

minimini
-
Posts
56 -
Joined
-
Last visited
Reputation Activity
-
 minimini reacted to Erebus and Terror in Medway Longboat 1742 by Chuck - FINISHED - 1/2" scale
Wow excellent! I’m looking forward to seeing how you create the pre-spiled planks! I’ve seen them in some Chinese and Russian kits and I can’t wait to see the method used to create them.
You are a kit/part building machine, Chuck. And with all your other work and leadership for the hobby too numerous to list...you are an inspiration, indeed!
-
minimini reacted to Chuck in Medway Longboat 1742 by Chuck - FINISHED - 1/2" scale
Thanks
The Queen Anne Barge kit uses pre spiled planks as well. Its not a big deal to make them. I basically spile and create the shape for the plank like I normally do on a scratch project. Once I am satisfied that my plank fits on my prototype I trace it and make a laser cut version. This laser cut version is then tested on the model. I will tweak it as needed and when I get it perfect, I glue it into position and move on to the next one.
It takes a while but the results are very good.
-
minimini reacted to Rustyj in Medway Longboat 1742 by Chuck - FINISHED - 1/2" scale
Hi Chuck.
Very nice start! The additions of the bracing blocks is a really great idea.
Anything to help with the alignment and stabilizing the assembly during fairing is a plus.
This is going to be a fun group build and I'm looking forward to it!
-
minimini reacted to Chuck in HMS Winchelsea 1764 by Stuntflyer (Mike) - FINISHED - 1/4" scale
Very nicely done.....almost time to start putting some skin on those bones!!!
-
minimini reacted to Stuntflyer in HMS Winchelsea 1764 by Stuntflyer (Mike) - FINISHED - 1/4" scale
Thank You, Maury and for all the "Likes"!
The quarter gallery framing and aft-most gun port turned out to be my week's project. The 5/64" X 1/4" strip along the top of the quarter deck bulkheads was made from basswood. I sanded the bulkhead tops to the correct angles for a smooth flow of the strip. Getting the symmetry from one side to the other took patience and repeated eyeballing. The framing of the quarter gallery required a bit of experimentation. There are a number of angles on each strip and no two strips are the same, except for the two gallery entrance strips. Rather than waste precious boxwood, I used basswood strips to find the correct angles. As an example, one strip had angles of 70° and 10° on one side, 6.5° and 5° on the other. A disc sander with multiple adjustments comes in handy. After completing the horizontal strips I made the two aft-most gun ports. Lastly, the quarter gallery entrance strips were added. The plan detail proved to be very useful for getting exact measurements.
All strips were inserted standing proud, allowing for shaping to the hull shape when fairing. I faired the work leaving a wee bit more for later on when I start work on the lower hull. I'm always trying to stay one step back until I'm sure of where I'm going.
Mike
-
minimini reacted to Chuck in Medway Longboat 1742 by Chuck - FINISHED - 1/2" scale
By the way....this is a big boat....16" longish. Is it too big? Should it be 3/8" scale instead. I cant do both. But this is the time to decide. If I get any further it will be too late and require too much redrafting.
Maybe not....I will see what the fellas say when they see it in person Tuesday night at my club meeting. And getting back to the discussion about me having way too much on my plate to do this project. Let me fill you in on the timeline so far. My club met last month in my shop and we discussed a group project. It was decided that the long boat was the best subject. I was super busy working on making parts to restock. But a week ago I started drafting this from the new contemporary draft I had on file. Over the last week I spent only about 12 -15 hours drafting this model electronically and laser cutting the parts. I also built several prototype attempts as I tweaked those designs and also arrived finally at the image you see in my last post. Actually I am a little further along actually. But all included the project has only taken me about 12-15 hours thus far with most of that time being at my computer drafting. Maybe I have about 2-3 hours of actual build time. Thats it. This will be a very quick build....hopefully, if nothing comes up to ruin it.
-
minimini reacted to Chuck in Medway Longboat 1742 by Chuck - FINISHED - 1/2" scale
Continuing along....
For those familiar with this design concept from my Queen Anne Barge kit, you will recognize the two-piece build board. I have however, tried to make some improvements with each new project based on watching others build them. In this case, I have added some slots for bracing blocks. Two for the transom and two for the bow/stem to stabilize them while planking. These pieces can be seen below. But do NOT glue them into the slots. These will need to be removed at some point in the build. It will be easier to remove the boat after planking without these in position. They are a press fit. If they are too snug....sand them a bit thinner because remember you will be removing them after a few planking strakes are completed. So make sure they are loose enough for that.
There are two types of frames on contemporary models like this and the barge. One piece frames and two piece frames. Th etwo piece frames have floors and top timbers. We will be doing the one piece frames first and there are 5 of them. Another tip I was given by an individual can be seen below. You can see thin strips of packaging tape along the inner cut line. I used heavy and sticky packaging tape. You can fold over the end to make a tab and place the tape so it spans across the seam. This will give it added (temporary) strength while fairing and planking. The tape is put on both sides. The tabs will make it easier to remove the tape before breaking the inside of each frame free when it comes time to do so.
Then once this is finished you must test the frames in their slots on the build board. They will be very snug by design initially. You dont want these loose and falling out of the build board. But you dont want them too tight either. You want to be able to easily remove them at any time. The best way to achieve the best fit is to sand the two tabs that fit into each slot just a little at a time until they are the perfect thickness. You will know when they are good because they will be firmly seated and yet be somewhat easy to remove. Be careful not to break the small tabs that hold the frame centers in the frames. No need to clean any laser char.
In addition, test the fit of the bottom of the frame so it fits the same in its notch on the keel. Not too tight and not too loose. The three single piece frames at the stern are shown below being test fit. and the two at the bow should be as well. Dont glue these into the build board. That would be a huge mistake.
With this completed, lets test the keel assembly on the build board atop the frames. Carefully place the keel assembly into the stern half of the build board first. This is a bit tricky if you havent done it before but once you do it a couple of times you figure out the little nuances. Slip the stern post between the two braces first as you carefully guide the keel onto each frame. Dont push to hard in each notch of the keel. You have have tested and filed those so they slide into each notch easily but dont fall out because they are too loose. NOTE the two small additional braces waiting to be installed next.
The two transom blocks in the slots can be moved forward or aft so you can get a good fit against the transom. Remember that they are not glued in. The slots for them are longer than needed so they can be adjusted to best advantage. But once in a good position, you can add the two smaller brace blocks. These can and should be glued onto the build board. Use a little glue and push them into position against the transom. But DONT glue them to the transom. Just glue them to the build board. These will stabilize the transom even more while planking. Also use the laser etched lines on the build board to help make sure the transom is straight and not askew. This method differs from the one I used on the barge kit but I think its an improvement. Time will tell.
Then repeat the test fitting of the keel in the bow half of the build board. Do it the same way except there are no additional stabilizing blocks. These two will do the job and keep the stem from wandering while you add the first few strakes up there.
How it all looks at this stage. You will be removing and testing the keel many times before its time to glue the keel in position for good. Now to do the two piece frames. I also want to point out to those interested....look at the laser char edges of the frames. You will see how they are not dark and black. Yellow Cedar is very forgiving thanks to the oil present. It doesnt effect the gluing either and I am using Titebond II for all my joints. The build board is just basswood and you can see how dark that gets when laser cutting. I find it very enjoyable to work in Cedar and removing the char is much easier in my opinion....as Cherry and Basswood burn like crazy.
-
minimini reacted to EdT in Young America 1853 by EdT - FINISHED - extreme clipper
Young America - extreme clipper 1853
Part 290 – Upper Mast Caps
Part 287 described making basic pieces for mast caps and parral yokes that had correctly sized holes for the upper mast sections bored on the milling machine. In the first picture one of those basic pieces has been mortised to fit its square masthead tenon – in this case on the foremast.
Cutting and trimming the square mortise with a piece of this length helps to visually align the cap on the ships centerline as the square mortise is finished. The spacing between the lower and upper mast sections was also carefully marked and cut to ensure the total mast assembly was straight. In the next picture the forward end of the cap has been cut to its round shape.
The circle template in the picture was used to mark the rounded ends, allowing the curves to be cut and sanded to the final shape. These curves could have been drawn with a compass before boring or mortising the holes, but this would require precise centering of the hole for boring in the rotary table and reliance on measured marking to correctly locate the square mortise in relation to the bore. Using the template to mark the non-critical shape of the ends was much easier and more efficient. The next picture shows the final cap shape.
The next picture shows the main topmast cap and topgallant mast fitted temporarily.
The next picture shows the fore topmast cap with its ironwork in a test fit.
The topgallant mast fid mortise has been sized in this picture but the diagonal rigging sheave above the lower square has not yet been drilled and cut. The next picture shows the model with the fore and main topgallant masts temporarily fitted.
The last picture shows the ironwork mounted on the main topmast cap.
The ironwork on both these caps includes the reinforcing band, four eyebolts for mast rigging tackles on the underside, an aft rigging eyebolt, and side eyebolts with shackles for the upper topsail yard standing lifts.
Ed
-
minimini reacted to Siggi52 in HMS Tiger 1747 by Siggi52 - 1:48 - 60 gun ship from NMM plans
Hello,
thank you Nils and all others for your likes. Today only a small update. The men installed the waterway and thereby the planking of the deck is ready. Now the paint and varnish can dry.
Next I think I must made the cheeks. The head has the tendency to bent to the left. It's now only a little, but nobody knows what will come in the future. There went something wrong when installing the head and I hope I will stop that with the cheeks installed.
-
minimini reacted to Siggi52 in HMS Tiger 1747 by Siggi52 - 1:48 - 60 gun ship from NMM plans
Hello and thank you all for your likes,
today I finished the planking of the gun deck and I made also the spirketting. I think that I need the next week for relaxing my fingertips and let here and there some new skin growing These riding pices are very hard and stable.
I build the deck without the margin plank, you would't see it later. The waterway I will install in the slit between the deck and the spirketting.
-
minimini reacted to Chuck in Medway Longboat 1742 by Chuck - FINISHED - 1/2" scale
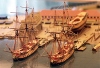
This new larger longboat model will be build just like the Queen Anne Barge. All parts whenever possible will be laser cut including the planking which will be pre-spiled. Below is the plan in progress as compared to the actual contemporary model.
Below are the initial parts that make up the keel assembly. There will be a more simplified version of the keel assembly and another that is lightly more chalenging. As is done on the contemporary model, lap joints will be used to connect the stem and stern post to the keel. The simplified version will just utilize a butt joint and laser cut scarph joint to attach the stem to the keel. I have started building the simplified version first shown on top of the photo below.
Before removing the laser cut parts from the sheet, they were sanded down with 220 grit sandpaper on both sides to remove the char. Its easier to do while they are still contained in the sheet.
Then the three main (5/32" thick) parts that comprise the stem, the keel and stern post were assembled. I used yellow glue to assemble them prior to sanding the char from the edges of each piece. In fact I purposely didnt remove it from the joints...they are laser cut fairly precise and fit together very well. Using tite-bond works great and the joint is very strong as long as you let it fully dry. Once dry I sanded the char from all of the edges and prepared to add the other (3/32" thick) cedar parts that make up the keel assembly.
These were treated the same way. I didnt remove any char from the edges util after they were glued into position. They are very delicate and it is safer and easier to do after they are glued into position. These thinner pieces were centered along the keel leaving 1/32" on each side to form a rabbet or "lip" for the external planking.
Next up I added the transom...it has a laser etched groove down the inside to help position it properly. It helps a lot but I was also very careful to also square up the transom properly in relation to the keel.
Thats it for now....I have one last part to add to this stem assembly before I start assembling the frames. I will post that very soon.
-
 minimini got a reaction from GrandpaPhil in HDMS Perlen 1804 by minimini - scale 1:30 - 46-gun Danish frigate
Michael
-
 minimini got a reaction from Jack12477 in HDMS Perlen 1804 by minimini - scale 1:30 - 46-gun Danish frigate
Michael
-
 minimini got a reaction from dvm27 in HDMS Perlen 1804 by minimini - scale 1:30 - 46-gun Danish frigate
Michael
-
 minimini got a reaction from tlevine in HDMS Perlen 1804 by minimini - scale 1:30 - 46-gun Danish frigate
Michael
-
 minimini got a reaction from granta in HDMS Perlen 1804 by minimini - scale 1:30 - 46-gun Danish frigate
Michael
-
 minimini got a reaction from mtaylor in HDMS Perlen 1804 by minimini - scale 1:30 - 46-gun Danish frigate
Michael
-
 minimini got a reaction from AnobiumPunctatum in HDMS Perlen 1804 by minimini - scale 1:30 - 46-gun Danish frigate
Michael
-
 minimini got a reaction from paulsutcliffe in HDMS Perlen 1804 by minimini - scale 1:30 - 46-gun Danish frigate
Michael
-
 minimini got a reaction from archjofo in HDMS Perlen 1804 by minimini - scale 1:30 - 46-gun Danish frigate
Hi All
just a little update , before i start the model i have decided to make a build table it is made of 18mm beech ply 700mm wide 2000mm long (sorry for the bad picture)
All the bulkheads ( 32 ) and the 9 pieces that make up the stem I post some picture in a few days. out of the 32 bulkheads I only mess up one
Michael
-
minimini got a reaction from GrandpaPhil in HDMS Perlen 1804 by minimini - scale 1:30 - 46-gun Danish frigate
Hi All
just a little update , before i start the model i have decided to make a build table it is made of 18mm beech ply 700mm wide 2000mm long (sorry for the bad picture)
All the bulkheads ( 32 ) and the 9 pieces that make up the stem I post some picture in a few days. out of the 32 bulkheads I only mess up one
Michael
-
minimini got a reaction from Jack12477 in HDMS Perlen 1804 by minimini - scale 1:30 - 46-gun Danish frigate
Hi All
just a little update , before i start the model i have decided to make a build table it is made of 18mm beech ply 700mm wide 2000mm long (sorry for the bad picture)
All the bulkheads ( 32 ) and the 9 pieces that make up the stem I post some picture in a few days. out of the 32 bulkheads I only mess up one
Michael
-
minimini reacted to mtaylor in Licorne 1755 by mtaylor - 3/16" scale - French Frigate - from Hahn plans - Version 2.0 - TERMINATED
Thanks for the "likes" and the comments.
Had to do a "back 10 and punt" on this boat. Still getting some oil canning and I'm not happy. Re-thinking things. I'll either add more ribs or go off in a different direction. It didn't look bad, just didn't look right to my eye. So, while thinking, I started looking over other bits and pieces and realized the DeathStar cuts just didn't look right also. <sigh>. Dove into the problem... Needed to re-calibrate things bigtime. When I replaced parts some time ago after the pump failure took out the tube and power supply, I replaced them with "upgraded" parts. Naturally, being Chinese, instructions were sparse so did some digging. Power supply needed some adjustment and then my cut sheets (speed and power) needed to be rerun. Also alignment was off due to moving the beast when working on it and cleaning the room. I'm going to have to redo all my cut specs for each species and wood thickness. Not hard work, just time consuming.
The several hours work, theresults are below. The upper is "before" and the lower is "after". Big difference to these tired old eyes. BTW, those are are 3" (about 75mm) wide.
I'm headed back to the ship's boats this week after more household duties have been performed. I like the look of the Master Korbel boats and what's available so I ordered the largest one in 1/72. Part of the learning curve.
-
minimini reacted to Siggi52 in HMS Tiger 1747 by Siggi52 - 1:48 - 60 gun ship from NMM plans
Hello,
for the internal works, I managed to get the old team from the Dragon again to work. And I think they did a good job.
With the hatchway to the bread room I have a problem. How was it made? All other hatchways have a rim, so that water would't run in, but not this one. See also the original plan. Was it closed with solid lid, or a grating?
At least the whole ship with its masts. In the foreground are laying the planks for the gun deck.
-
minimini got a reaction from archjofo in HDMS Perlen 1804 by minimini - scale 1:30 - 46-gun Danish frigate
just a couple of pictures more before bedtime,
Michael