


wefalck
-
Posts
6,651 -
Joined
-
Last visited
Content Type
Profiles
Forums
Gallery
Events
Everything posted by wefalck
-
 Thanks gentlemen for your as always encouraging comments! *************************************************************** Digression I wanted to use the die-filer I build some years ago from a broken jigsaw attachement (https://www.maritima-et-mechanika.org/tools/diefiler/diefiler.html) as a scroll-saw instead of the PROXXON. Here I can control the speed down to 0 and there is a clearance of only about 1 mm around the blade, which is important when working on the delicate parts of the bulkheads. I had contemplated down-holds for the workpieces, but never got around to make one and so far, it was not needed for my filing operations. However, it became quickly apparent that sawing would not be possible without, as the sawblade hooked on the upstroke taking the part with it and breaking the sawblade in the process. There are several designs of down-holds on commercial die-filers, but they require all a lot of machining. In the end I opted for a design similar to that of the PROXXON scroll-saw, but without the blade-guide, as I wanted to use it also with very fine machine-files. To this end I had to modify the overarm by drilling a hole for the stem and another tapped one perpendicular to it for the thumbscrew to set the down-hold. The down-hold itself resembles the foot of a sewing-machine and was milled from a piece of 5 mm x 10 mm aluminium bar. Downhold for the die-filer This scroll-saw now allows to make precise cuts on very delicate parts, though I definitely need to practice working with it. Digression No. 2 While the die-filer is an excellent tool for fine surface treatment, sometimes a router would be more convenient, particularly when working on concave surfaces. It can also be used with appropriate tooling for bevelling edges of irregular parts, which is possible on the die-filer but requires more complicated set-ups. Underside of the router table Stationary routers normally have the spindle under the table, but this is mainly a design convenience. I did not want to build a new machine, but utilise what I already have, namely the micro-mill built a few years ago (https://www.maritima-et-mechanika.org/tools/micromill/micromill.html). Set-up for free-hand shaping concave edges The design-specifications set out called for the use of common jewelers’ milling bits with 2.35 mm shaft or perhaps small carbide end-mills with 3 mm shaft. Thus, the largest ‘router bit’ diameter would be 3 mm. Guiding pin held in collet underneath router table I had a steel disc of 60 mm diameter and 10 mm thickness knocking about for many years, which should have become a face-plate for the watchmakers lathe, but since then I was able to acquire an original one. This disc now was reassigned to become the router table. This table should fit onto the spindle of the dividing head. The idea behind it was, that I then could use pins held in a collet inside as guiding pins, e.g. for bevelling irregularly shaped edges. Set-up for bevelling edges with the aid of a guiding pin The steel disc was turned flat on both sides, a 3 mm hole drilled and reamed (for appearance, rather than mechanical need) and bored out to a depth of 8 mm for a very light press-fit over the spindle end. Et voilà, we have router. Bevelling edges of irregular edges To be continued
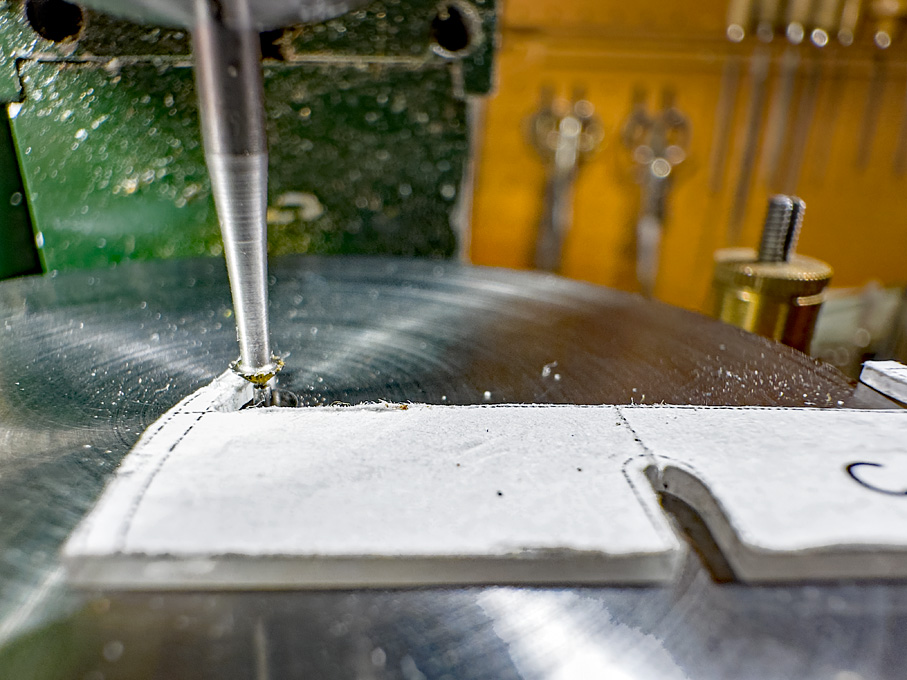
-
Zero Clearance for Table Saws
wefalck replied to DelF's topic in Modeling tools and Workshop Equipment
This is exactly what my plan would have been. Thanks for confirming it.- 12 replies
-
- 2
-

-
- Zero clearance
- table saw
- (and 1 more)
-
Zero Clearance for Table Saws
wefalck replied to DelF's topic in Modeling tools and Workshop Equipment
How did you make the slot for the sawblade, as on the KS230 one cannot raise or lower the blade?- 12 replies
-
- 2
-
-
- Zero clearance
- table saw
- (and 1 more)
-
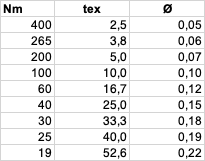
It seems that number on the spools is not tex, but Tkt (= ticket number) or Nm. Nm is the kind of the inverse of tex. Here is a useful converter for the different measures: https://texelle.com/en/count-converter/. Effectively the formula for converting Nm into tex is: tex = 1000 / Nm. However, normally the Nm is followed by an indication of the number of ply, how many individual threads there are in a sewing yarn, e.g. Nm 100/2 means that there are two threads of Nm 100 in the yarn, meaning that the weight per lengths and the thickness doubles. I have rearranged the above table (for one-ply threads): As Gütermann Sew-All is probably two-ply, e.g. Nm 100/2 has a diameter of roughly 2 x 0.1 mm = 0.2 mm, which now tallies with your measurements. I use the same method as you, putting say 20 windings of my shop-made rope around the shaft of a drill, measuring the total length of the windings with a vernier caliper and dividing the length by 20 to give the diameter.
-
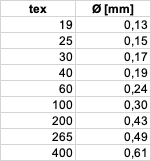
The 'diameter' of a thread or rope is difficult to define and measure, as it changes its shape and diameter under strain. That's why other measures were deviced, such as as how much is the weight (in grams) of 1,000 meters of thread, which is the defintion of 'tex'. Year ago I made myself a conversion formula for MS Excel based on the average density of polyester and the assumption that the thread forms a perfect cylinder, viz Ø [mm] = =SQRT(tex/(1,38*1000*100*PI()))*10*2. This formula then gives these rough diameters for Gütermann Mara:
-
Looking at the image, I more inclined to think that the there hinges/pintels under the overhang of the stern and underneath the wheelhouse, just inside the wall. This explains why the hole for the tiller in the rear wall can be so small. There would be minimal movement at this point.
- 732 replies
-
- 3
-

-
-
- Lula
- sternwheeler
- (and 1 more)
-
Somehow I imagined that the axes of the rudders would be just behind the forward edge of the rudder-post. However, if the axes were further forward and under the wheelhouse, there could be indeed a support of the tiller arm inside the wheelhouse. This makes perfect sense and the strain on the rudder post would not be torsion, but bending.
- 732 replies
-
- 4
-
-
-
- Lula
- sternwheeler
- (and 1 more)
-
Exactly, that seem to be somewhat iffy from an engineering point of view, when I looked at the image last night and I waited to see, whether someone would come up with real evidence. Are the tiller arms connected, as is done on modern catamarans?
- 732 replies
-
- 5
-
-
-
- Lula
- sternwheeler
- (and 1 more)
-
I concluded the same from looking at the image, but had the feeling that the rudder-post seemed to be too long to be unsupported by pintles. However Cathead's images show that it works. Looking forward to the building process.
- 732 replies
-
- 5
-
-
-
- Lula
- sternwheeler
- (and 1 more)
-
There have been no sails preserved from that period and all reconstructions are based on incisions on grave- or memorial stones. The interpretations vary considerably and different options have been tried out on replicas in order to understand what the most likely interpretation could be. I would check the publications coming out of Roskilde museum.
-
Years ago I made an interesting observation, when trying to saw out some bulkheads from 0.25 mm brass sheet: the saw tended to hook and distort the brass, but when I turned (counterintuitively) the blade upside-down it cut like butter ... don't remember the pitch, but it must have been in the order of 8/0. Some people also fasten the brass sheet to a piece of thin plywood to give the saw more meat.
-
Dafi (an myself) are not actually using the threads, but we make 'rope' from the threads. In this process you would tighten up the threads, which reduces the fluff a bit. Gütermann has a multitude of thread types in their production programme. My understanding is that Mara is relatively tightly wound and has comparatively little fluff. However, it may not be so readily available through retail shops. I have tried to buy it from physical haberdashery etc. shops in Germany, Switzerland and France, but couldn't find it. These shops have become very poor actually. You can buy it from on-line shops.
-
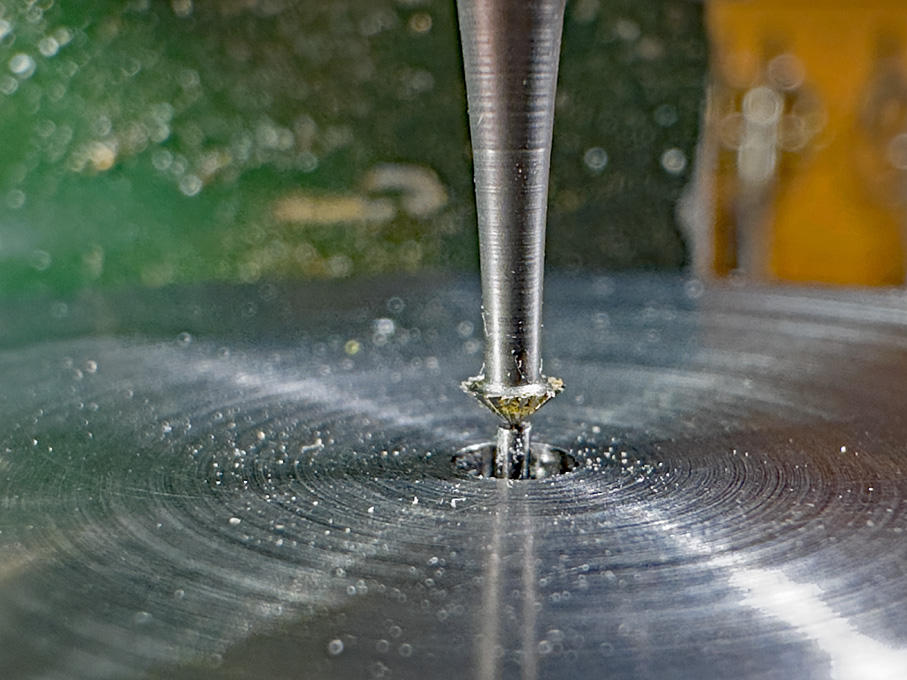
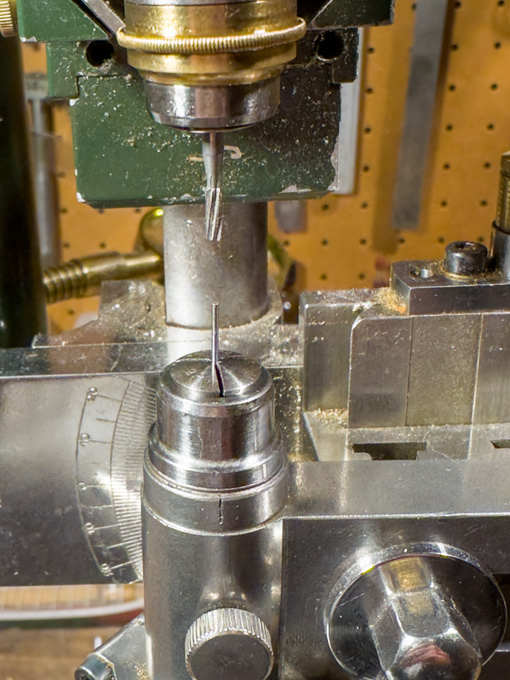
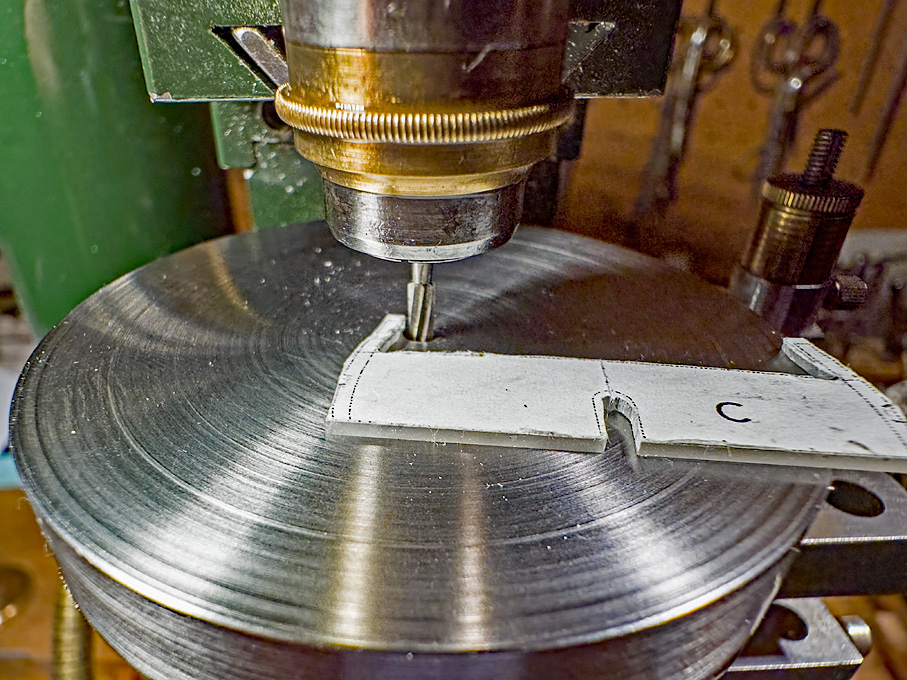
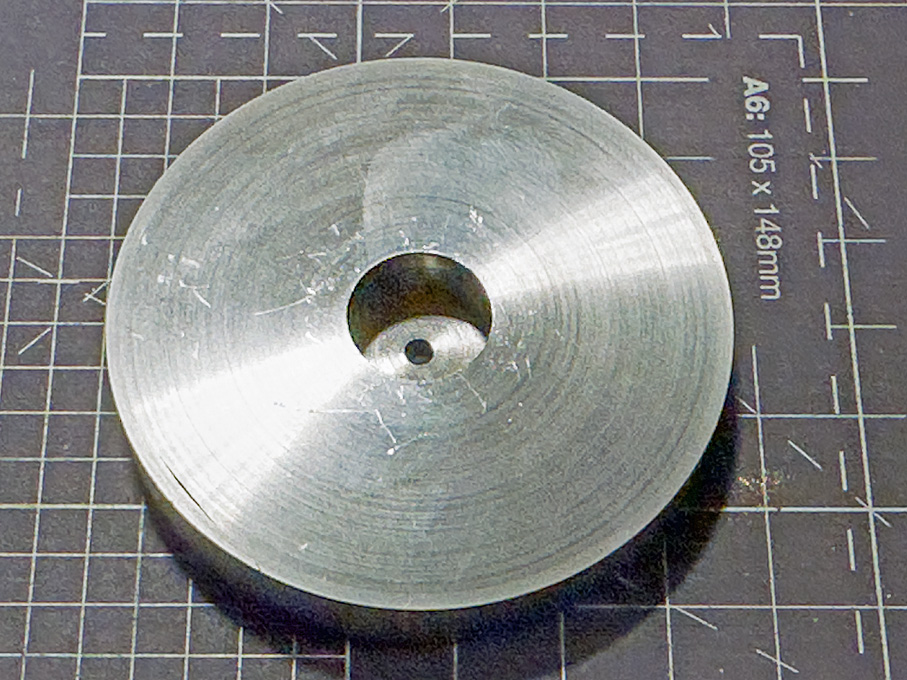
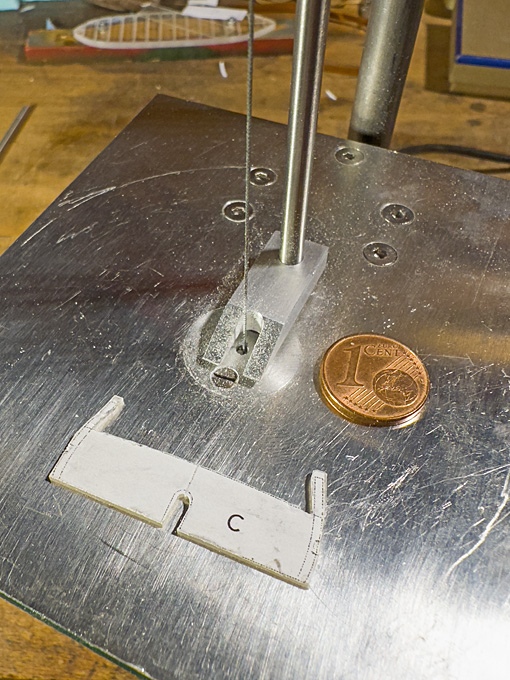
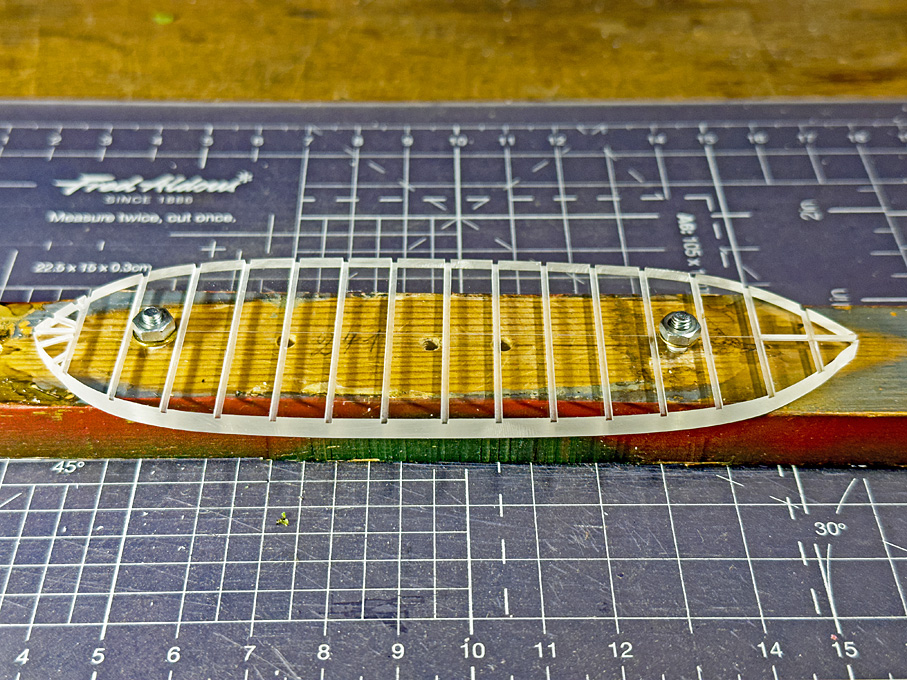
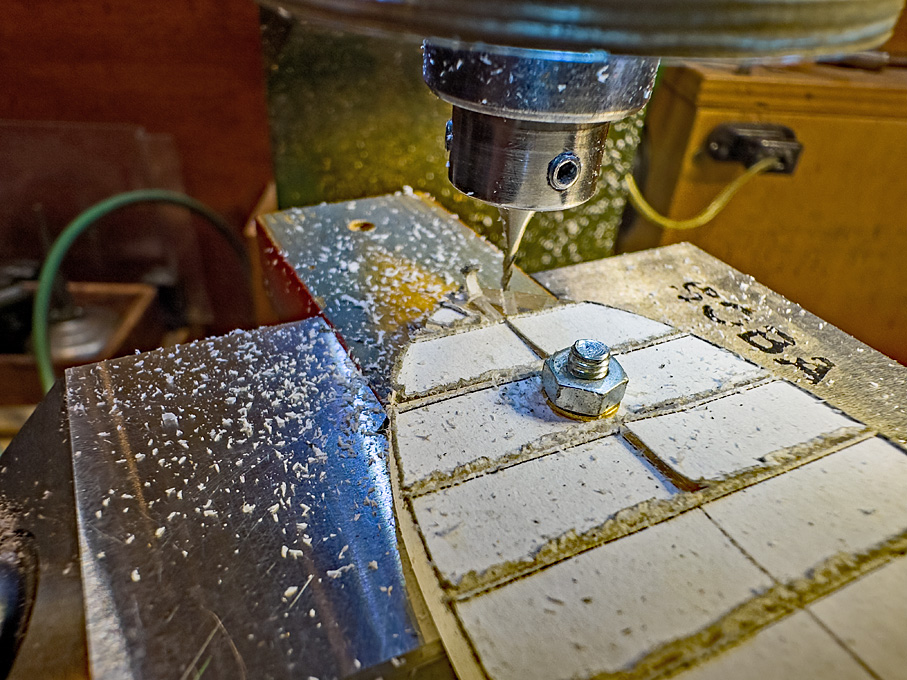
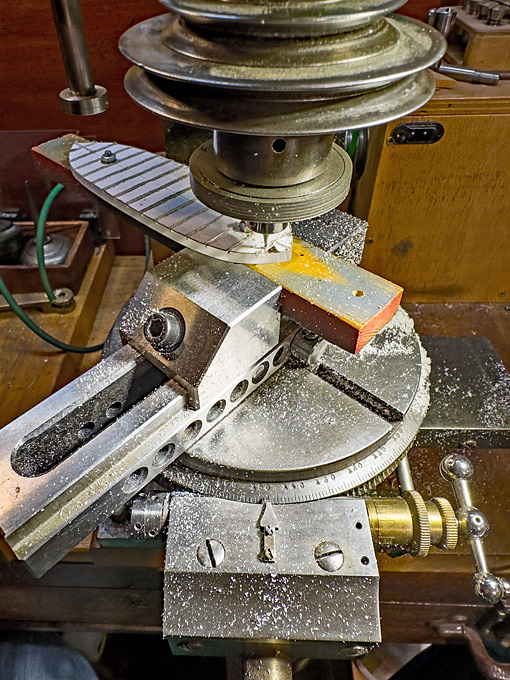
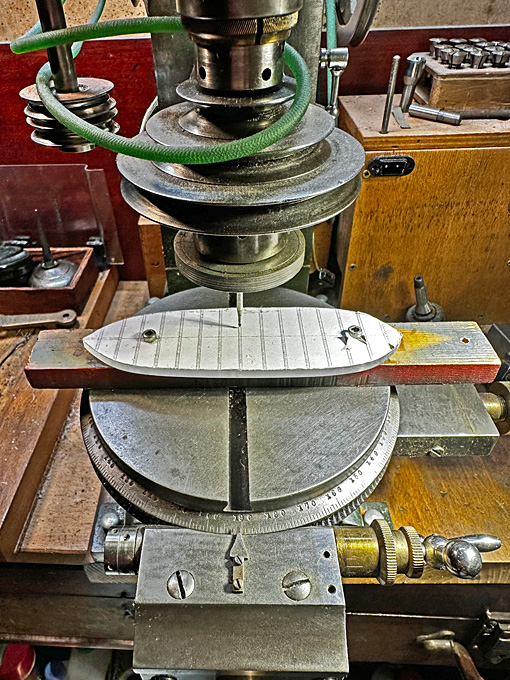
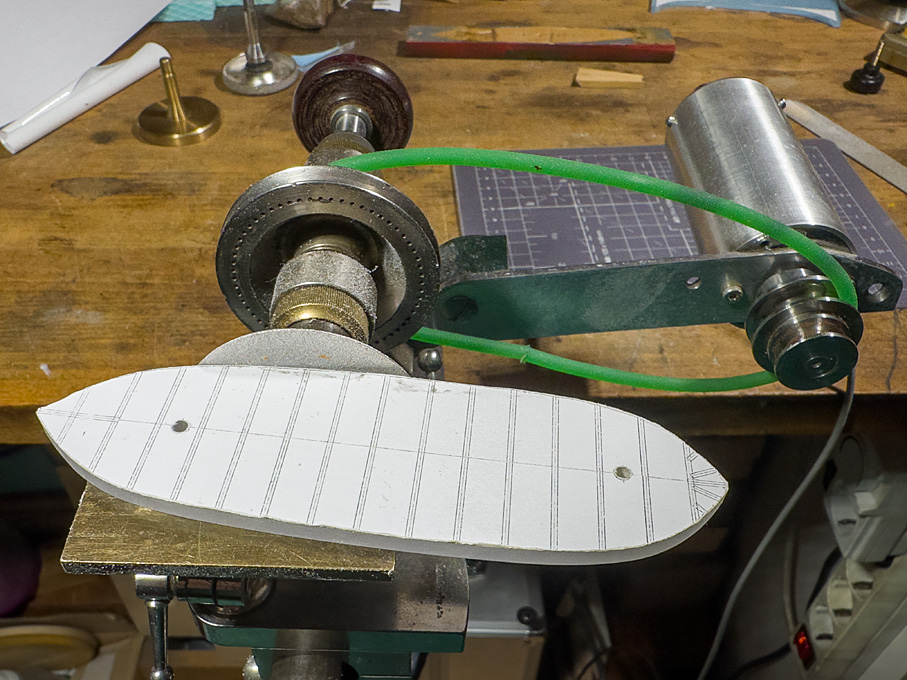
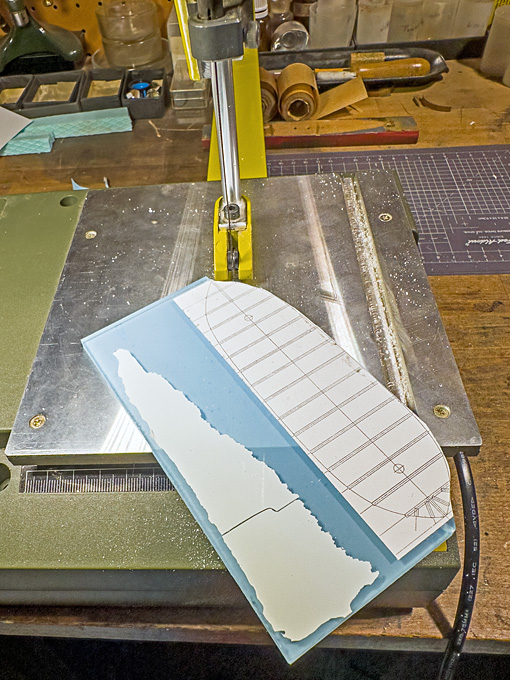
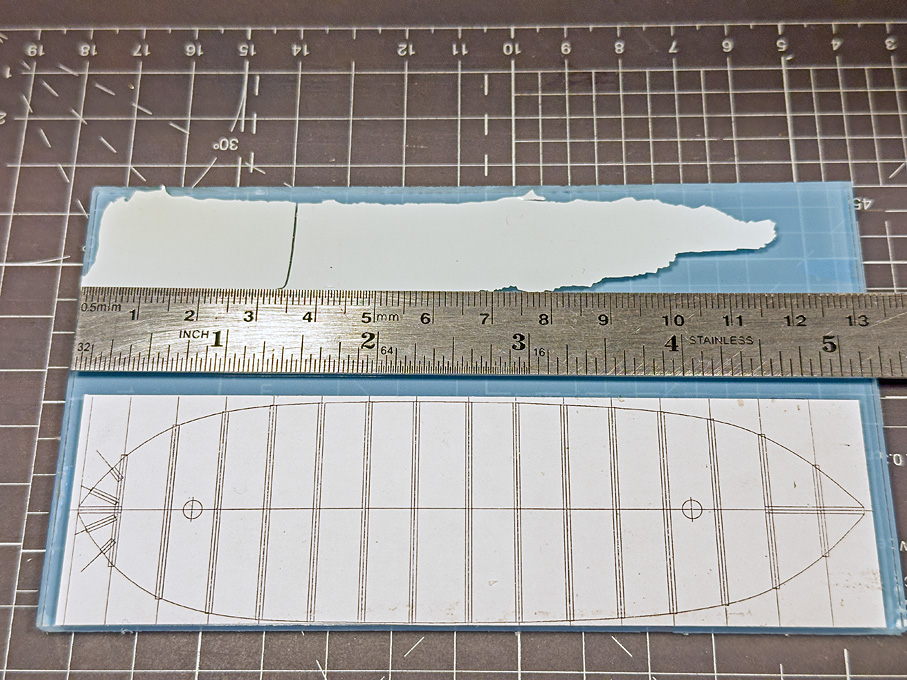
Started to make chips There was still some re-drawing and re-lofting to be done, as I realised that some parts of the planned back-bone did interfere with each other and cut-outs for the deckshouses etc. were missing. I then did a test-printout in order to detect any scale aberrations of my laser-printer. It turned out that the printouts were 0.5% too small, which was corrected by enlarging the drawing before printing accordingly. Then the printout was spot on with the desired dimensions. The base of the construction will be a piece of 4 mm thick acrylic glass. The printout was stuck to the acrylic with a glue-stick and then crucial intersections of lines and boreholes punch-marked. The centre-lines for the slots into which the bulkheads will were scored along the centre with a scalpel. This will help to align the base for milling. Layout for the backbone on 4 mm acrylic glass Cutting out the backbone on the small PROXXON scrollsaw The backbone was cut out with my PROXXON scrollsaw, but I am not terribly good at that, so I ended up quite far away from the line. However, the micro disc-sander that I build a few years ago from watchmakers lathe part came to good use here. Different diamond discs quickly and precisely removed the excess. Shaping the backbone with the micro disc-sander The backbone then was screwed down onto a batten that will allow to safely hold the model in a vice etc. during the building process. With the aid of this ‘building board’ the backbone was mounted in a vice on the rotary table of the lathe. It was checked that the backbone was perfectly perpendicular to the cutting spindle in all directions. This necessary in order ensure that the slots have an equal depth everywhere. The bottom of the slots will be the vertical datum for the alignment of the bulkheads. Finally the backbone was aligned to the axes of the milling machine. Set-up on the milling machine for milling the slots for the bulkheads All the slots, with the exception of those for the cant-frames were milled in the same set up, which ensures that the slots are parallel to each other and the slots for the stem- and sternpost are at a right angle to the bulkhead. Set-up on for milling the slots for the cant-frames For milling the slots for the can-frames the ‘building-board’ had to be moved so that centre, where the cant-frames would meet is roughly in the centre of the milling table. By turning the rotary table, the slots were aligned to the y-axis of the milling machine. Milling the slots for the cant-frames The back bone with the slots ready to take up the bulkheads After removing the paper template with warm water and some light deburring the backbone is now ready for the bulkheads. To be continued
-
If it is to be thinned with water, it is almost certainly some acrylic formulation. I like acrylics, but the penetration into wood decreases with its resin content. I would rather use something that is based on an organic solvent, which is not repelled by the wood resin.
-
Skoda 30.5 cm 1911 Cannon by RGL - - WIP3D - 1/35
wefalck replied to RGL's topic in Non-ship/categorised builds
Is this kit 3d-printed or cast resin? It's not clear from the discussion. Since the pandemic lots of masks should be around, they should be good enough for working with PU cast resin. I may have seen an original in the Military Museum in Bucharest some years ago. Another preserved original in the Vienna Military Museum was re-used in WW2 and destroyed during that war. The German Wikipedia has a long article and in the associated Wikimedia file there are dozens of pictures: https://de.wikipedia.org/wiki/30,5-cm-M.11-Mörser The 1/10 scale model in the museum in Vienna is actually painted green:
-
Perhaps it is a question of what Gütermann thread to use. I think the thread of choice (I believe Chuck used it originally for his ropes) is Gütermann Mara 120. Polyester normally has very long, basically endless, fibres and is smooth. So I am surprised that fibres should stick out. I actually never used Gütermann Mara myself, but rather rope made from fly-tying thread.
-
Zero Clearance for Table Saws
wefalck replied to DelF's topic in Modeling tools and Workshop Equipment
I think I'll try some self-adhesive aluminium tape (as used to cover the seams in dry-walling) on my PROXXON KS230.- 12 replies
-
- 4
-
-
- Zero clearance
- table saw
- (and 1 more)
-
One word: beautiful 👌🏻
-
Thanks for those tests! I would be inclined to believe that the polyester threads don't soak up the paint, it tries too fast and you push the semi-dry paint around with the brush. It's more work, but applying several thinner layers of more dilute paint may solve the problem. Today even museums seem to prefer polyester thread by Gütermann inter alia for their restoration work. So developing a method for such threads would be worthwhile. I am far away from this in my new project, but will probably go down that route.
-
Thank you very much for those insights into real wooden ship-building processes!
- 174 replies
-
- 7
-
-
- Vigilance
- Sailing Trawler
- (and 1 more)
-
That could be an interesting proposition to imitate these ramshackle (litterally) arrangements. It will have to be complemented by a worn appearance of the boat overall, to look credible and not just like a botched-up modelling job 😲 Externally stropped blocks would be a lot easier to make ...
- 312 replies
-
- 4
-
-
- Chile
- Latin America
- (and 6 more)
-
SMS Karlsruhe by Wreck1919 - 1/100
wefalck replied to Wreck1919's topic in - Build logs for subjects built 1901 - Present Day
Actually, the three chain would not be visible from that angle, the would be too low in the boat I think 😉 'Spannschraube' is normally translated as 'bottle-screw', because in its closed form it resembles a bottle. -
These would have situations and scenes in small-scale cargo shipping all around Europe (and probably the N-American continent too) well into the first years of the 20th century, when better roads and lorries replaced the boats. However, over here in Europe it was common to have a small coal-stove forward, which was used for cooking and heating. It is very easy to draw too much deck camber, I just had this experience myself and needed to correct the drawings for my new project. The camber also depends on how a boat is worked. Particularly when a lot of work is expected on the deck, less camber makes it easier to stand on deck. Also, when one expects to carry deck-loads, that is made easier with less camber. It's a trade-off between water-shedding capability and working convenience.
- 312 replies
-
- 5
-
-
- Chile
- Latin America
- (and 6 more)
-
Thresher & stable engine by RGL - FINISHED - Plus Model - 1/35
wefalck replied to RGL's topic in Non-ship/categorised builds
Nice ensemble! What's a 'drip' in this context? -
Zero Clearance for Table Saws
wefalck replied to DelF's topic in Modeling tools and Workshop Equipment
Never though of using a tape over the table as zero-clearance 'insert', that sounds like a clever idea. While creating a zero-clearance cover with a table saw on which the blade can be raised, this is not so straightforward for saws with fixed blade (such as small PROXXON). Have to think about a solution ... perhaps just a strip left and righ of the blade.- 12 replies
-
- 6
-
-
- Zero clearance
- table saw
- (and 1 more)
