DONATION DRIVE - SUPPORT MSW - DO YOUR PART TO KEEP THIS GREAT FORUM GOING! (91 donations so far out of 49,000 members - C'mon guys!)
×


Mike Y
-
Posts
1,557 -
Joined
-
Last visited
Content Type
Profiles
Forums
Gallery
Events
Everything posted by Mike Y
-
 These frames look so elegant! Very well done!
 -
Incredible build! Black walnut make it look very similar to the real one Looking into the early photos of the salvage - the camber is quite clear on the upper decks and a bit on the gun deck. I am sure you have seen that, but just in case - check out this old film with a lot of the archive salvage material: https://www.svtplay.se/video/jE4Bx6n/regalskeppet-vasa And a modern series where Fred Hocker goes through every deck, showing it in a good light and quality: https://www.youtube.com/watch?v=yknLUNgMqOI&list=PLkwCdpXl16oj7jXRD4UO0paHrMgTThoEv (the 5 video playlist)


-
TAIG Mini Lathe Table Saw Conversion?
Mike Y replied to DerekMc's topic in Modeling tools and Workshop Equipment
Does anyone have an update on that? Is the Byrnes reboot actually happening, or are these rumours just a wishful thinking?😊 -
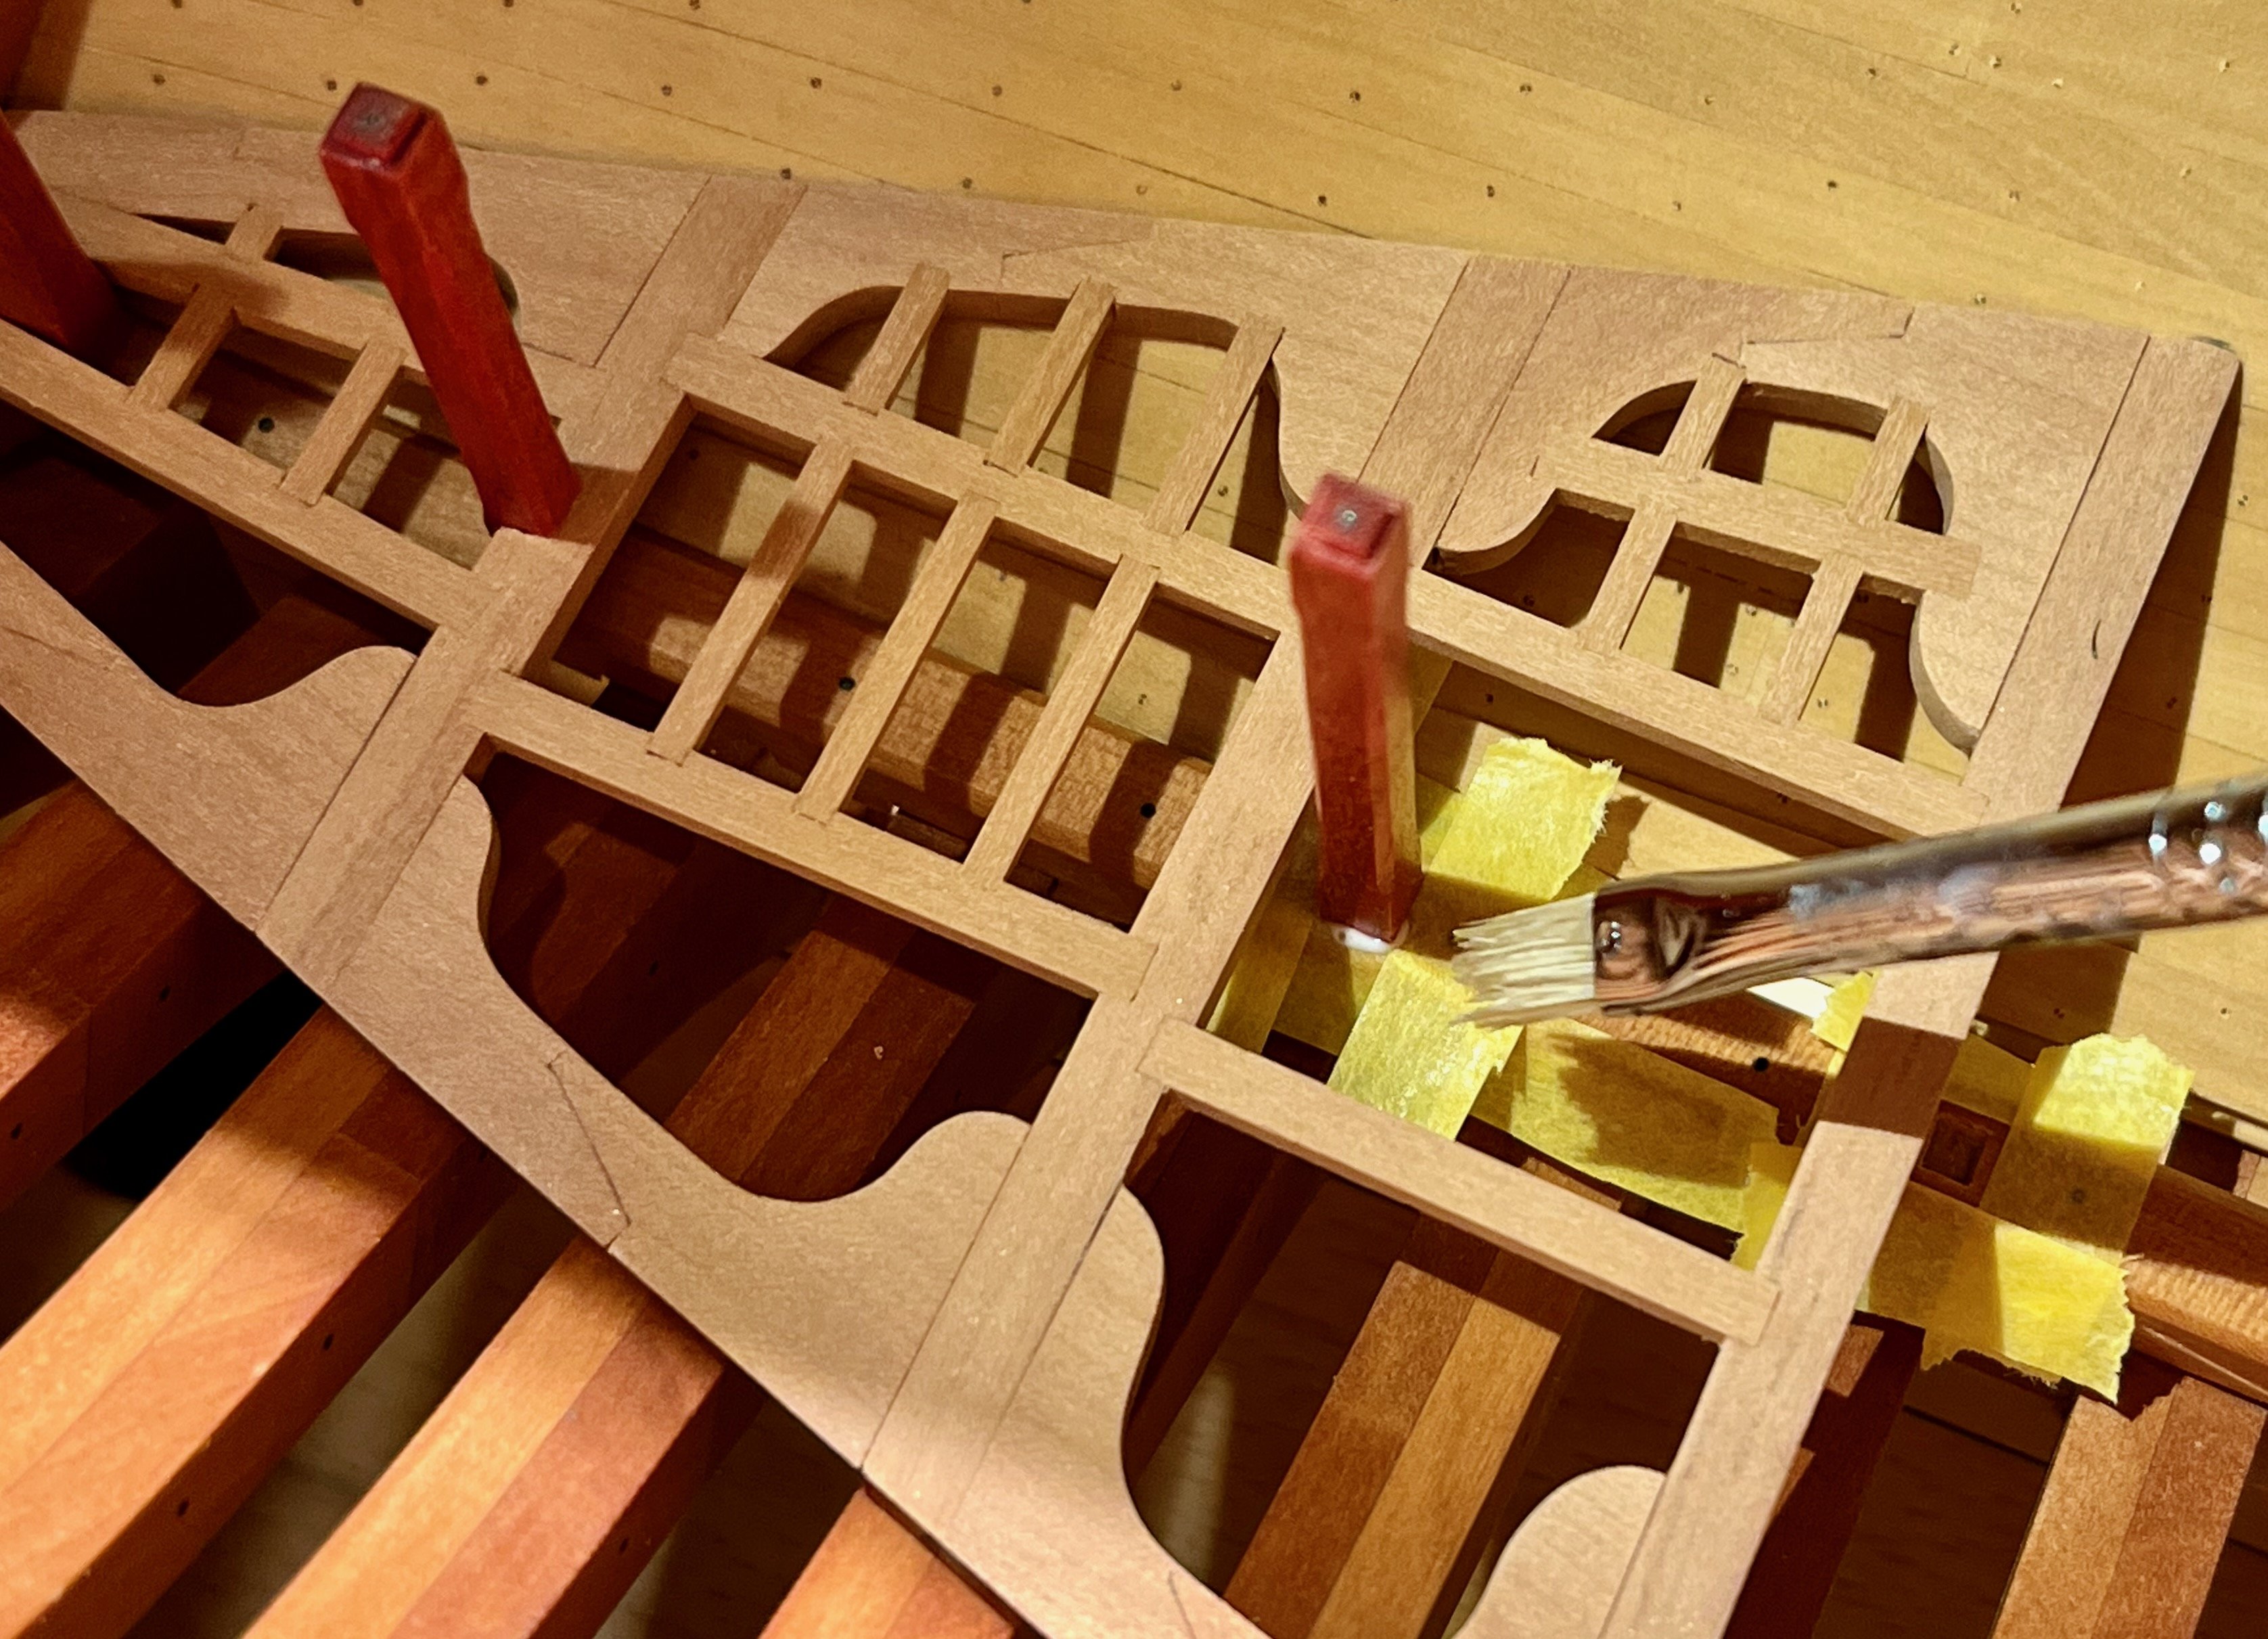
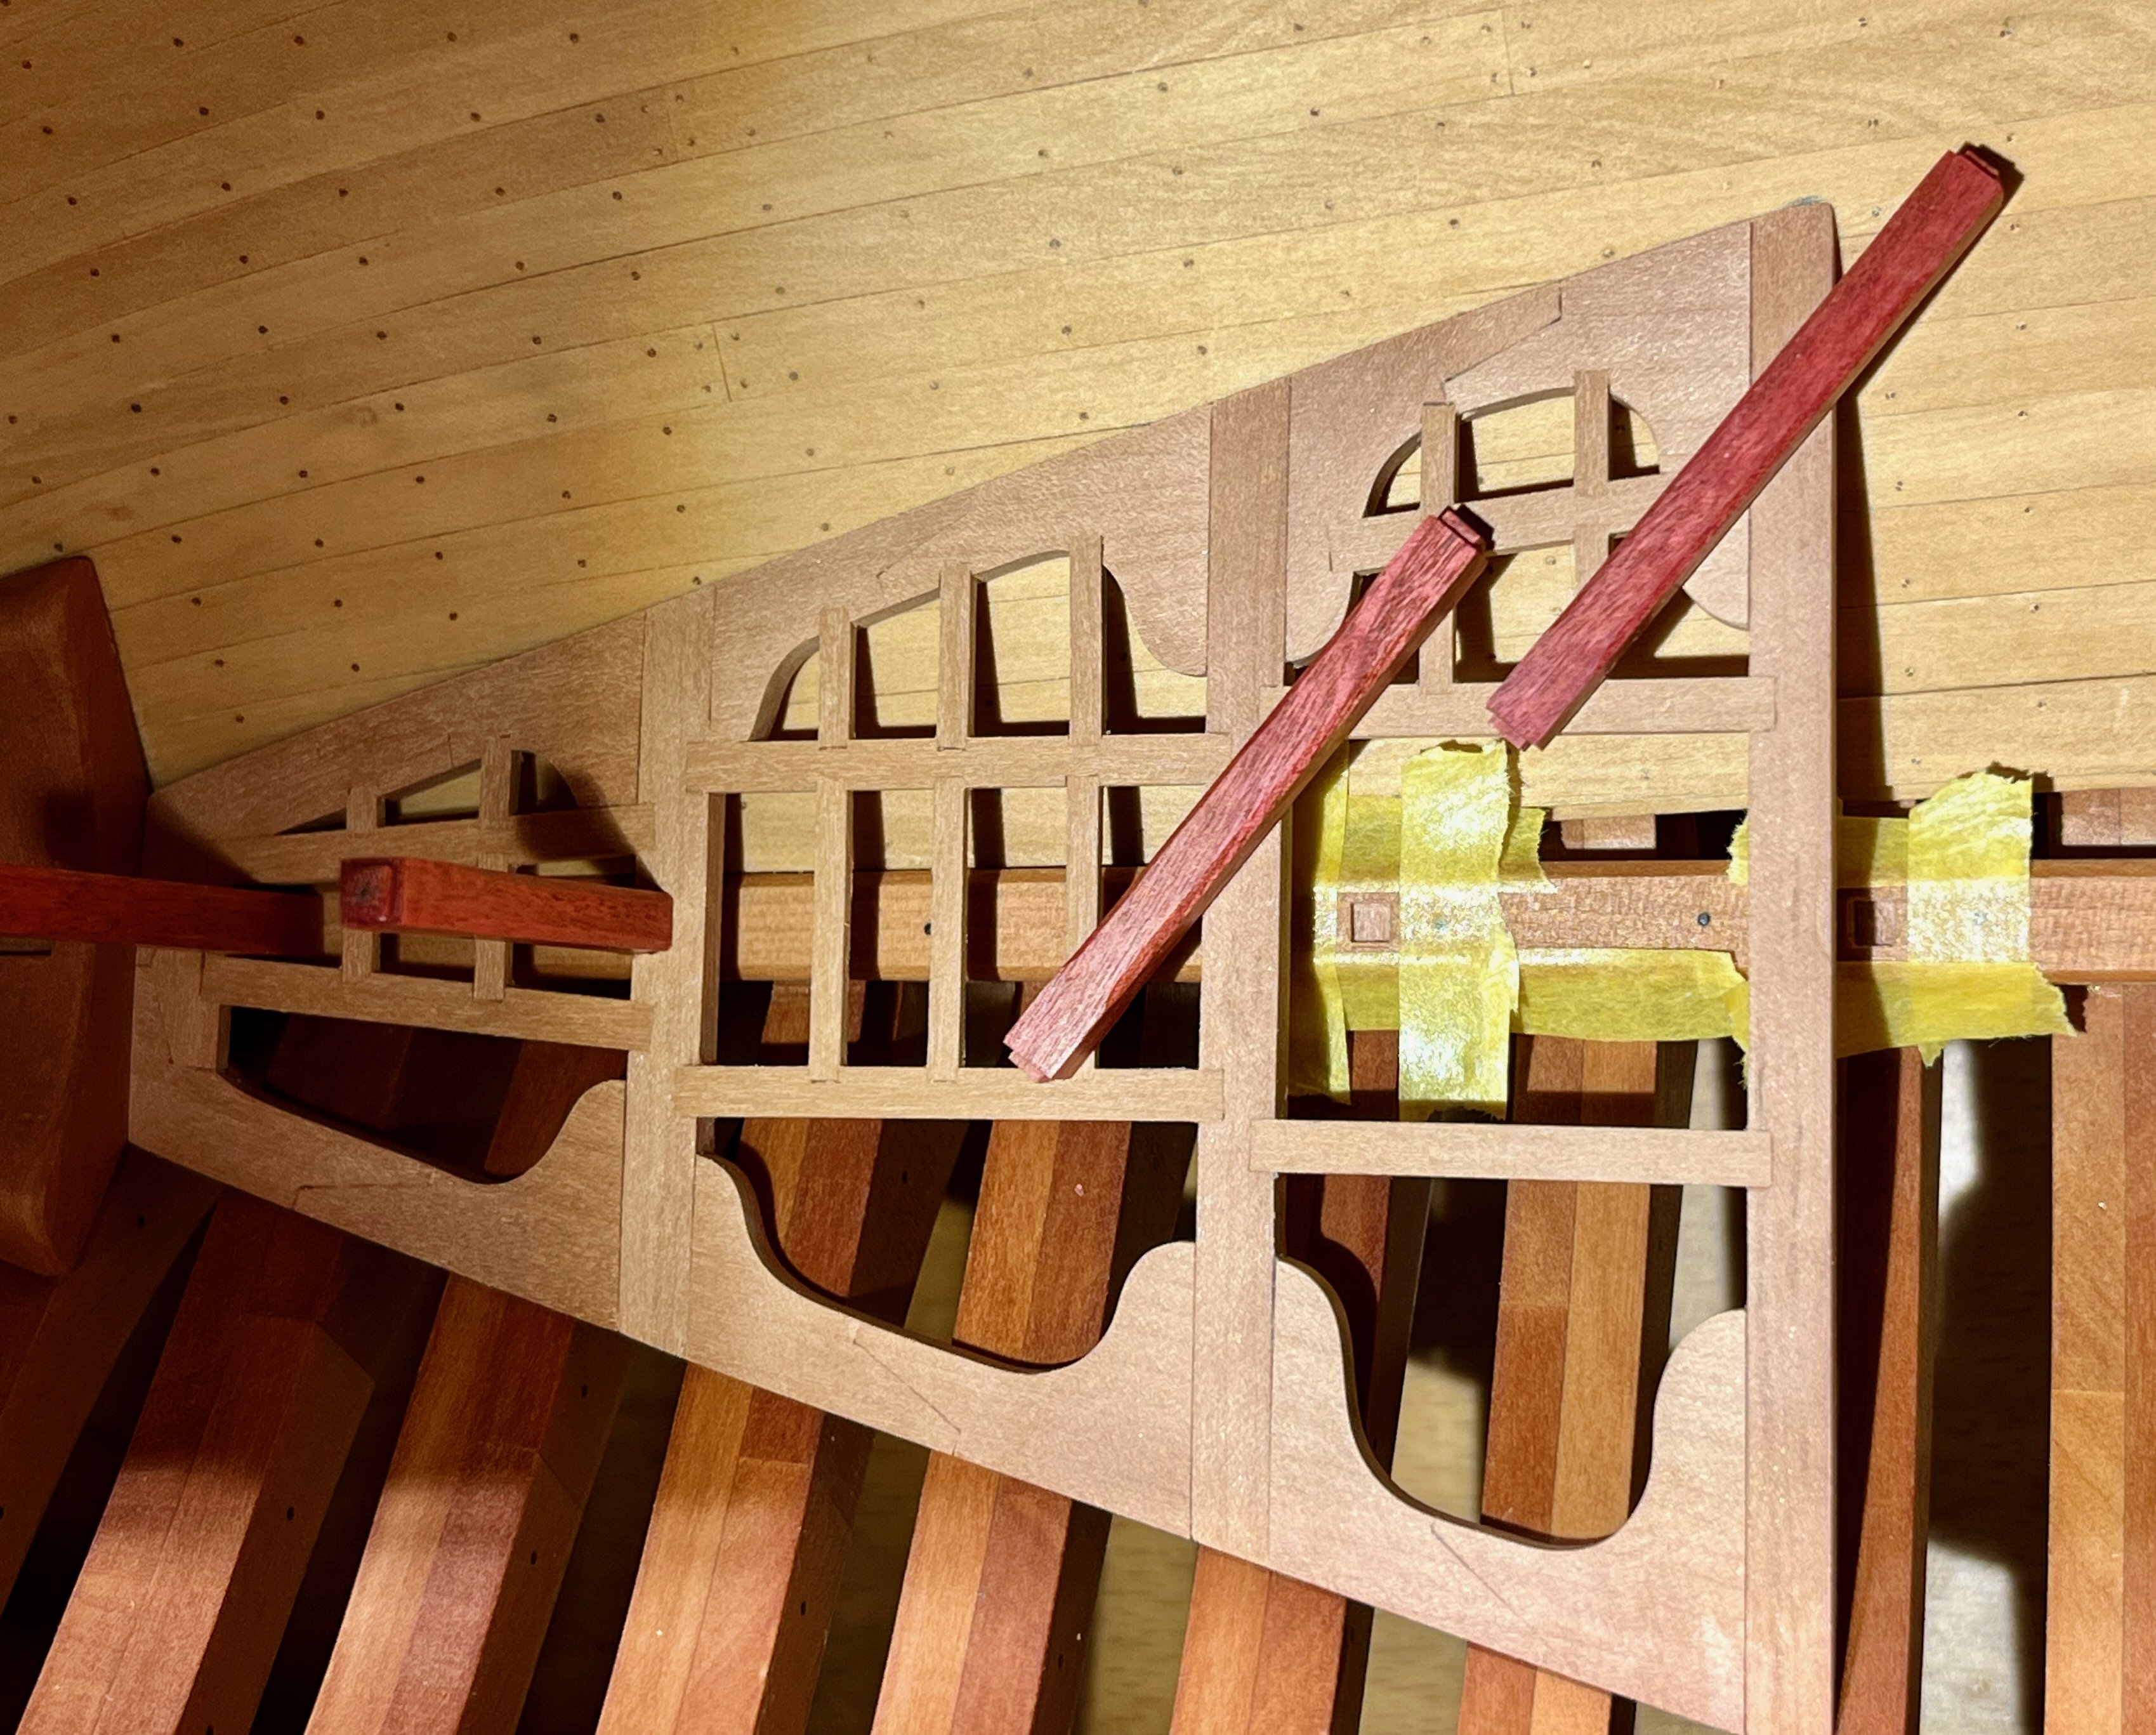
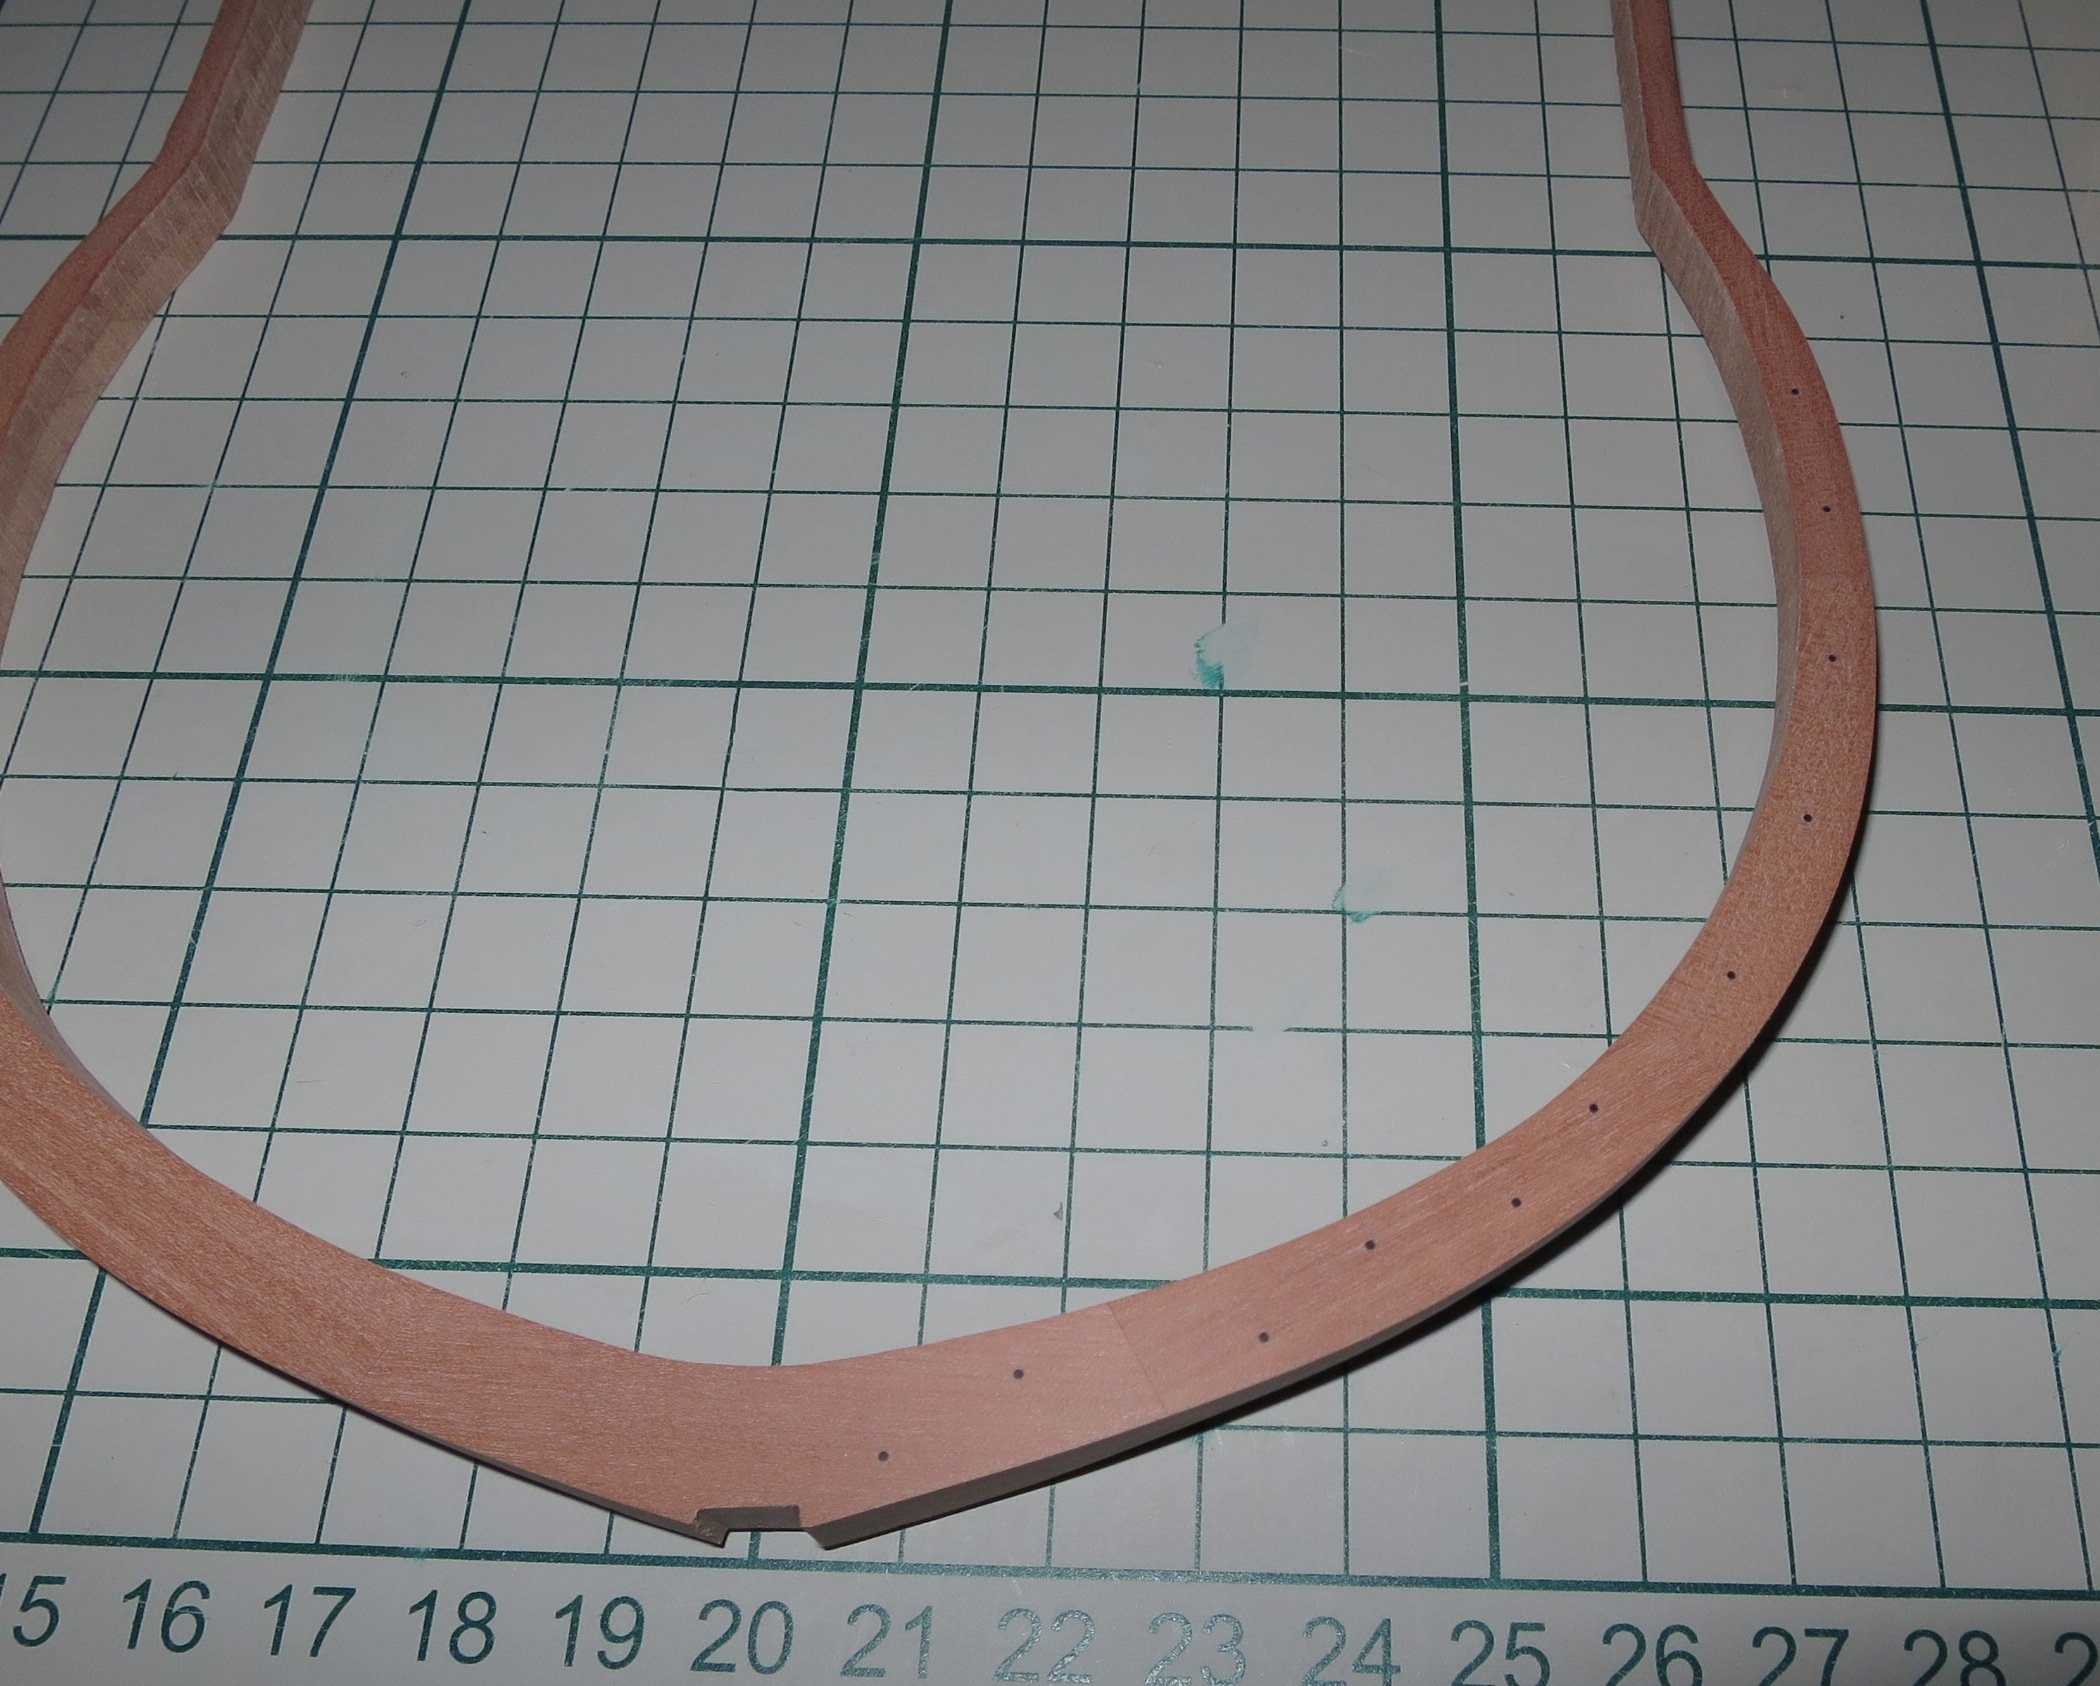
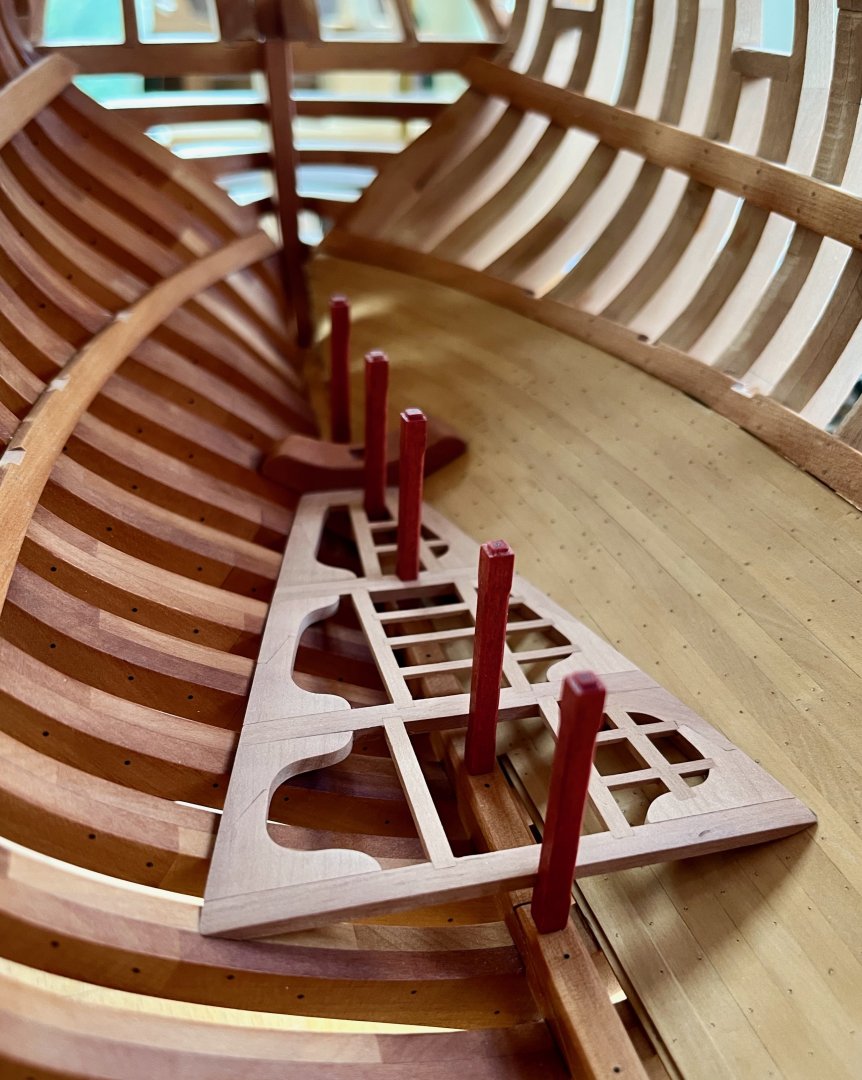
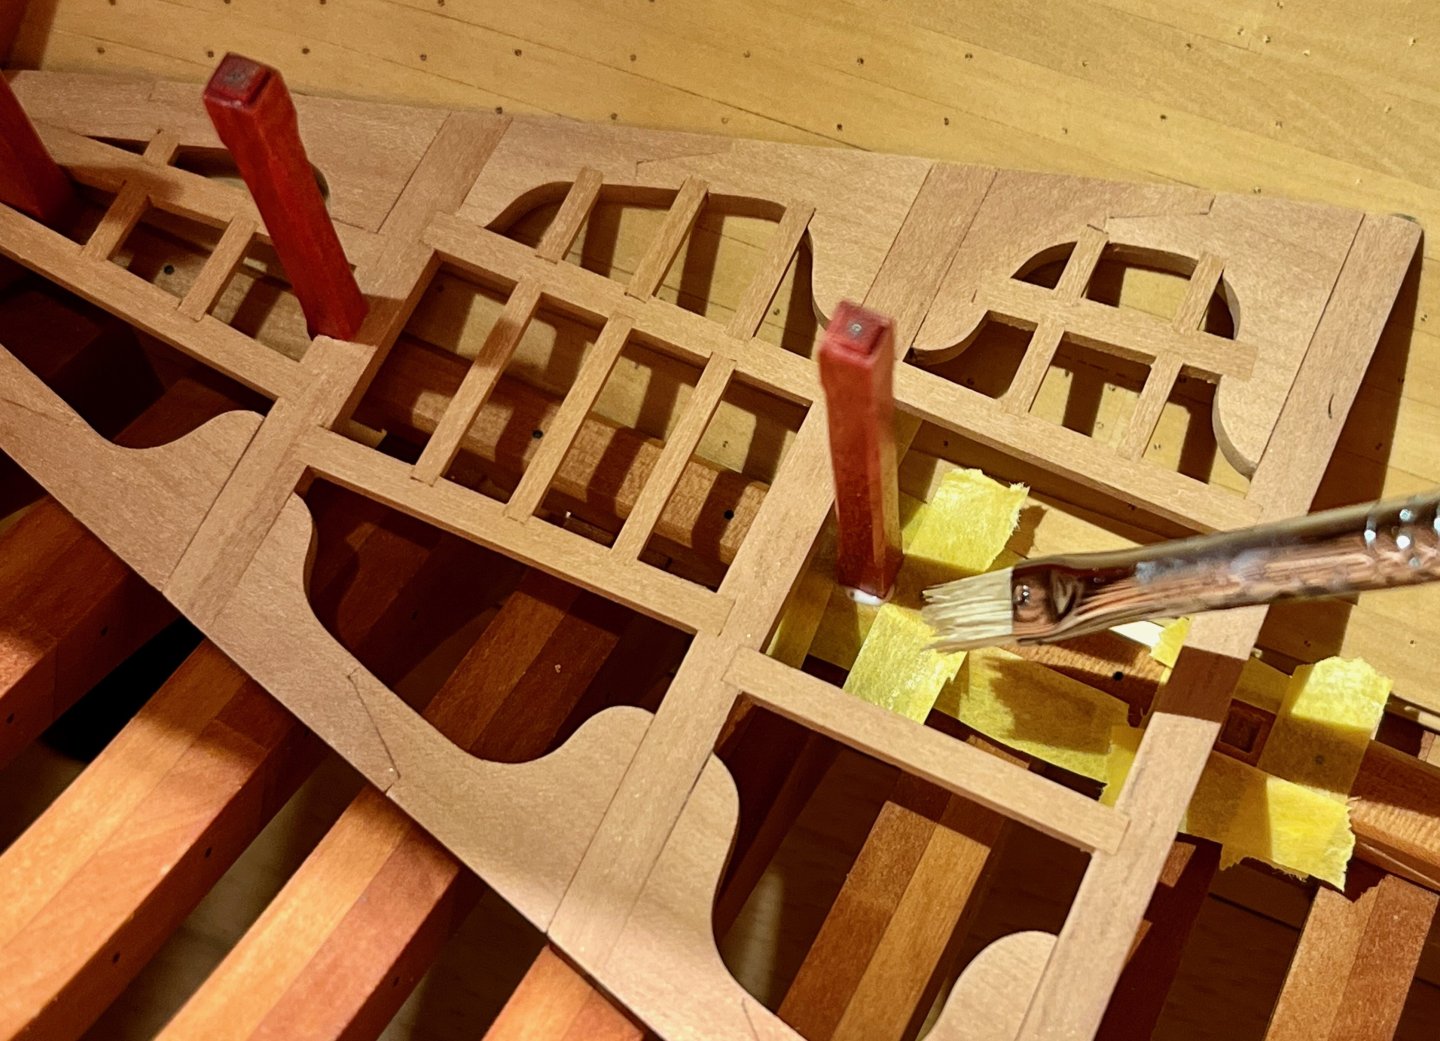
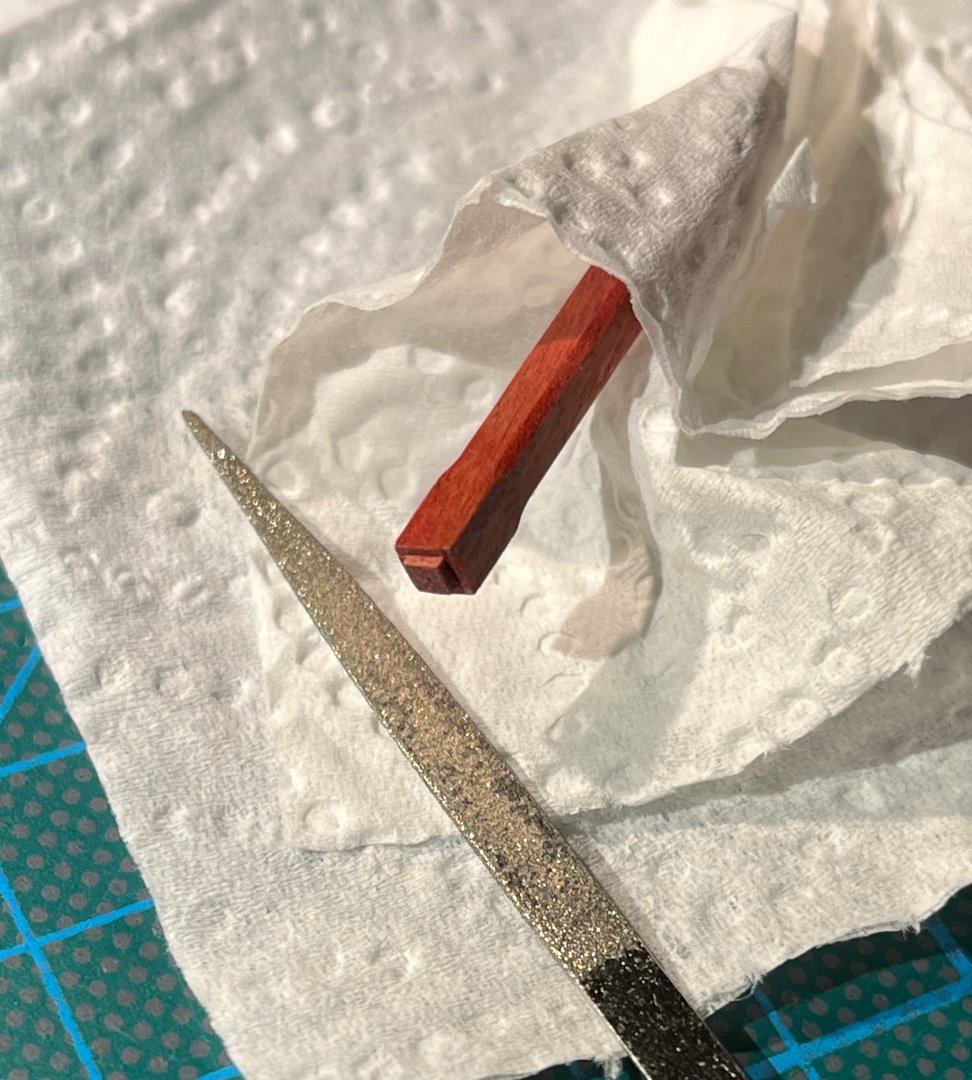
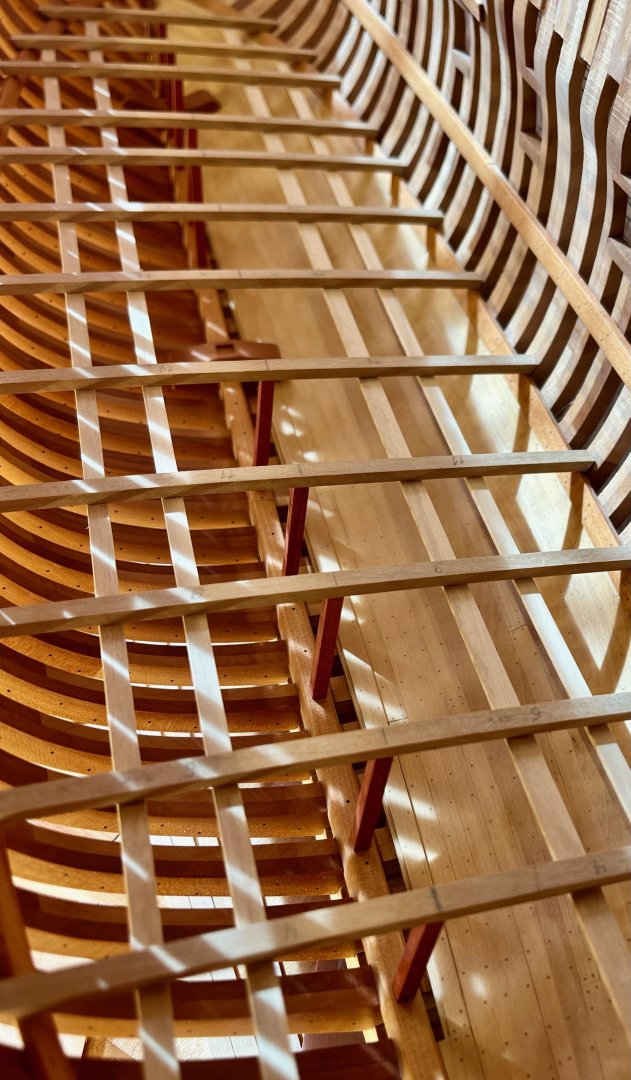
The interlocked pillar and the aft platform should be glued in simultaneously, a bit of a stressful glue-up. I scuffed up the glue contact spots with a curved riffler file, taking care not to leave finger marks all around. Now the whole platform-pillar-maststep assembly is permanently in place! Slightly crooked (was relying too much on pencil marks, lesson learned), but no one would know Almost forgot to record the installation process, but it is straightforward - scuff the tenon with a light touch of a diamond file, mask around the mortise to simplify the cleanup, brush off any squeeze-out with a damp stiff bristle brush. Then put the deck on to lock the pillar in its final position and leave it for a day to properly dry (I was installing two pillars at a time). Surprisingly that approach worked perfectly! Despite a tiny contact area, the mortise-and-tenon joints keep pillars tightly locked, they feel quite rigid if you try to wiggle them. And the deck pops in and out like a charm! It gets really locked in place by deck clamp notches and the pillars, only a light touch required to put it in place. Even a bad video speaks more than any words. It just pops into place, so satisfying! And here is the final result: Pink Ivory looks really cool while fresh and still pink Can recommend, a good contrast in both colour and texture, though a bit of a pain to work with. Here is the way it would be seen once all the decks are finished, doubt it would be easy to see pillars from the top.


- 968 replies
-
- 17
-

-

-
- hahn
- oliver cromwell
- (and 1 more)
-
Incredible! Hope you are planning to start a build log in this site? And can you tell a bit more about the internals, controlling all these sails, ballast and waterproofing? So many questions! 😁
-
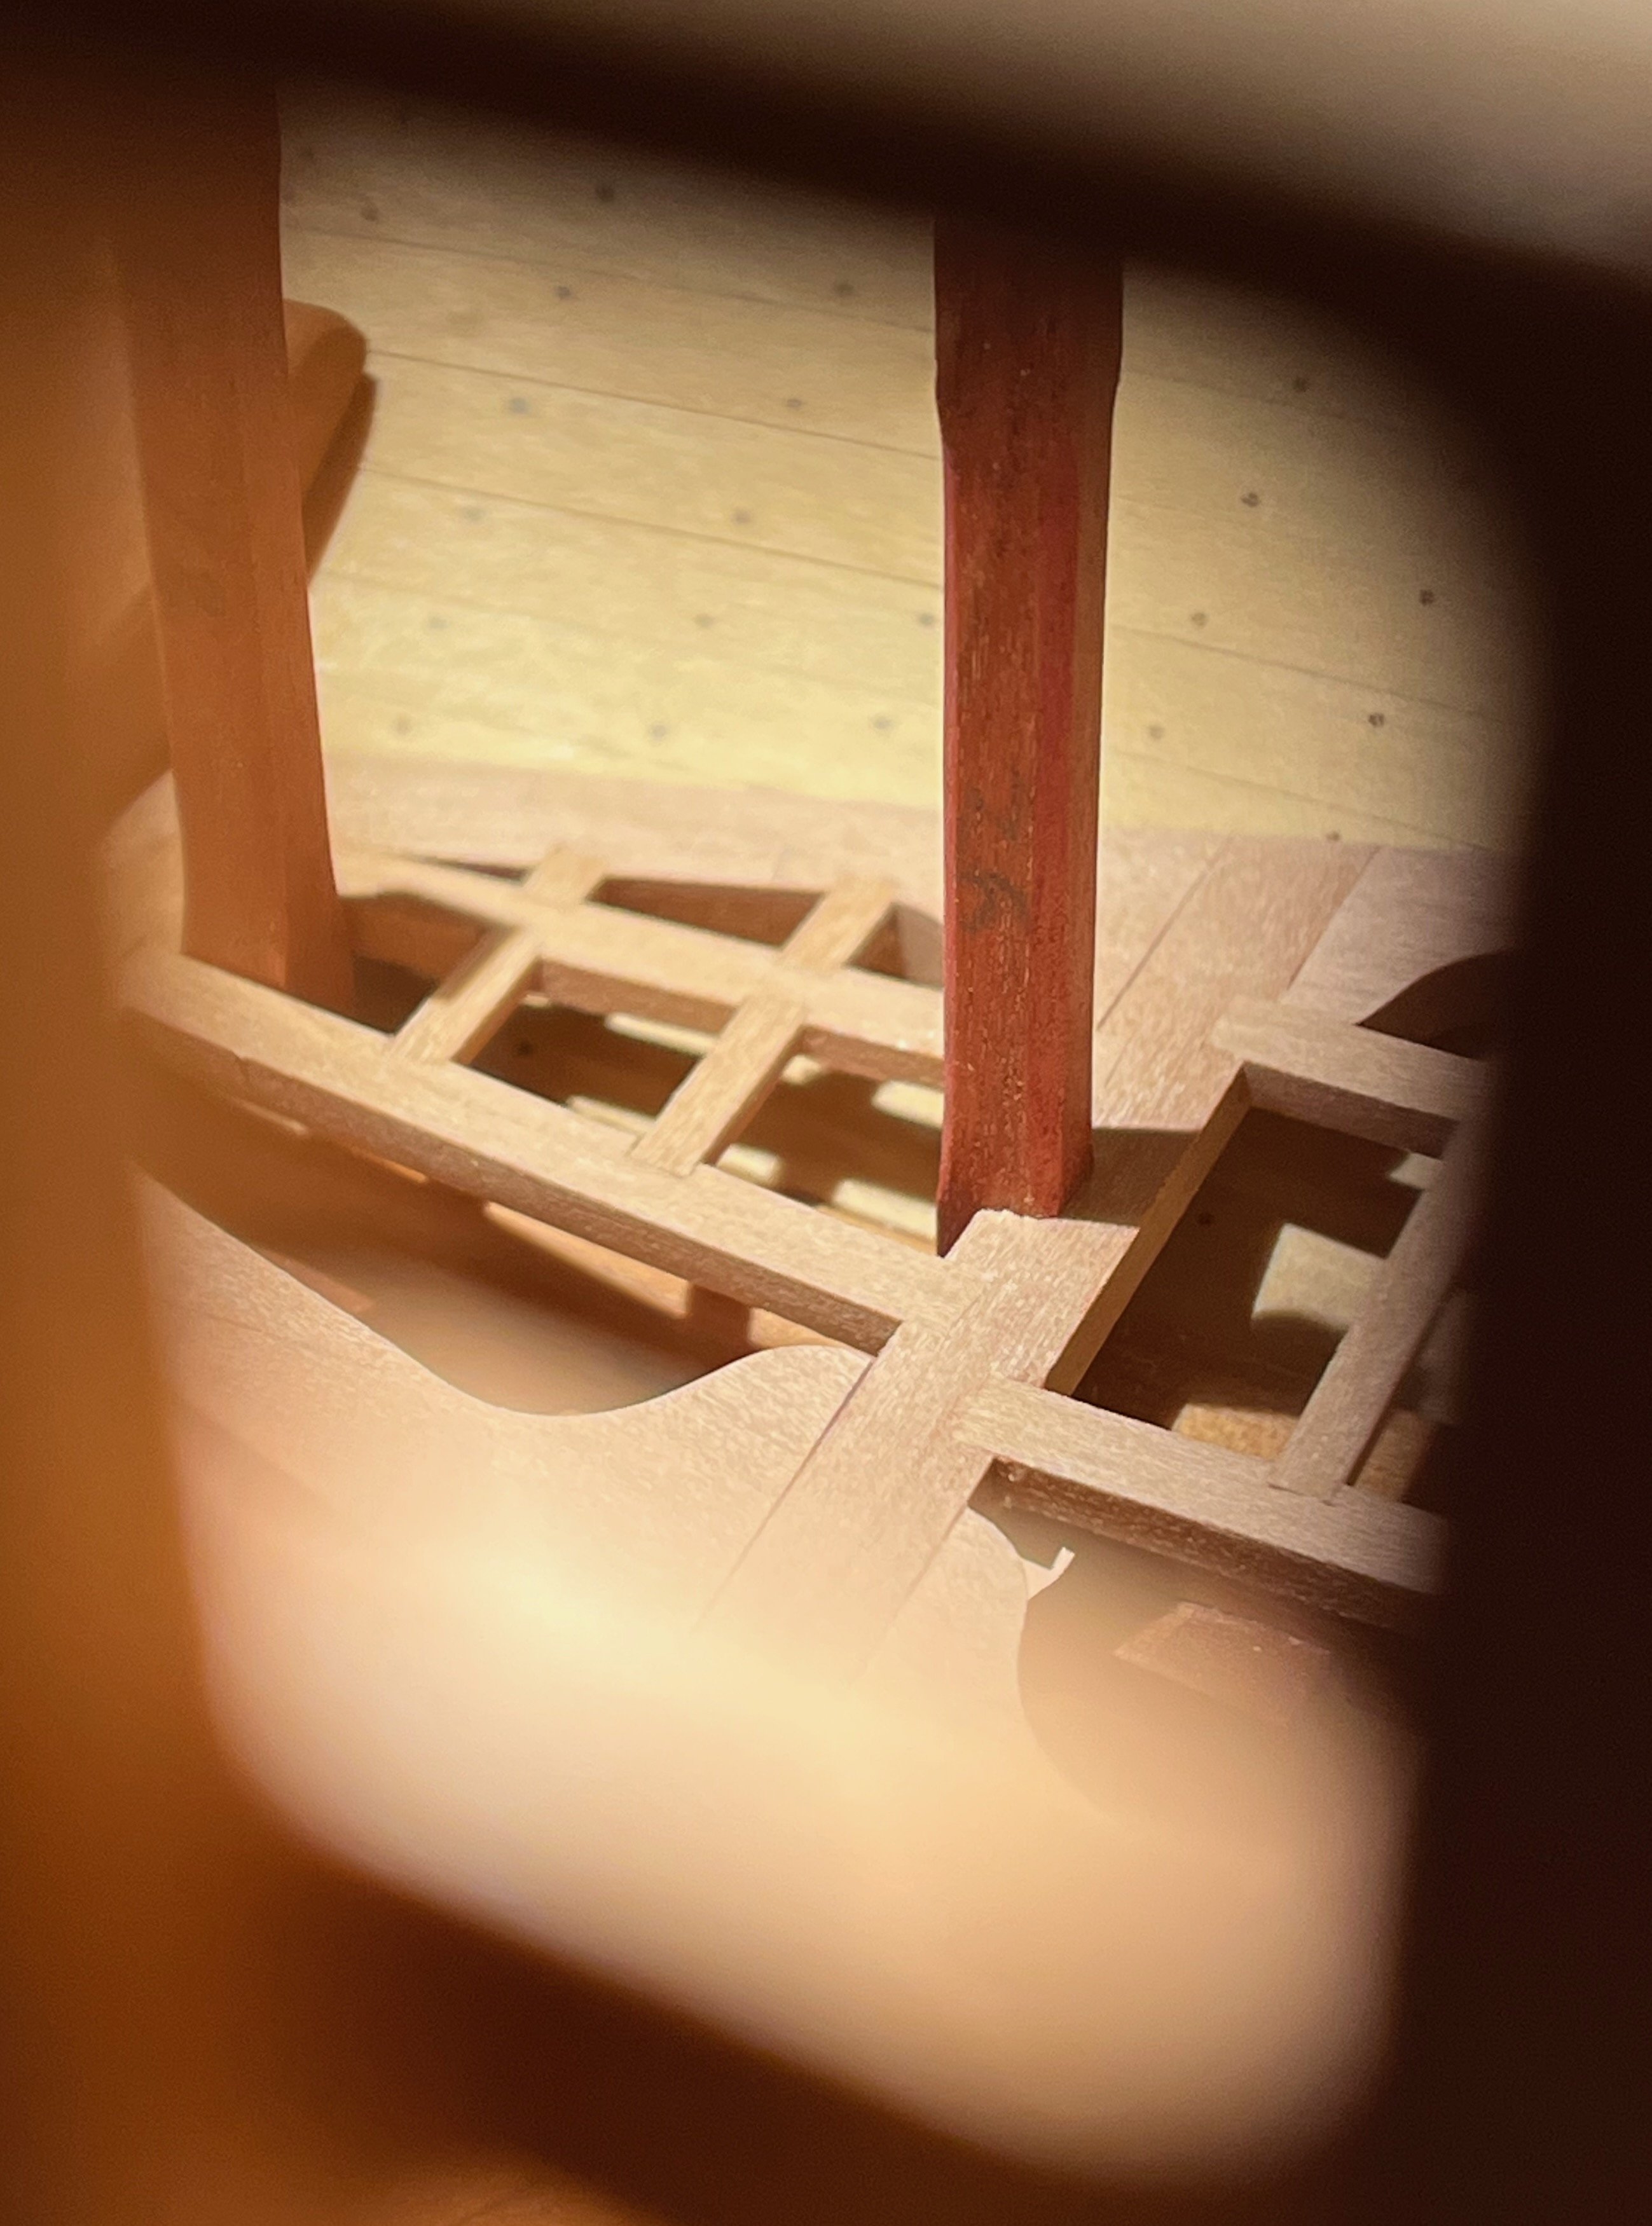
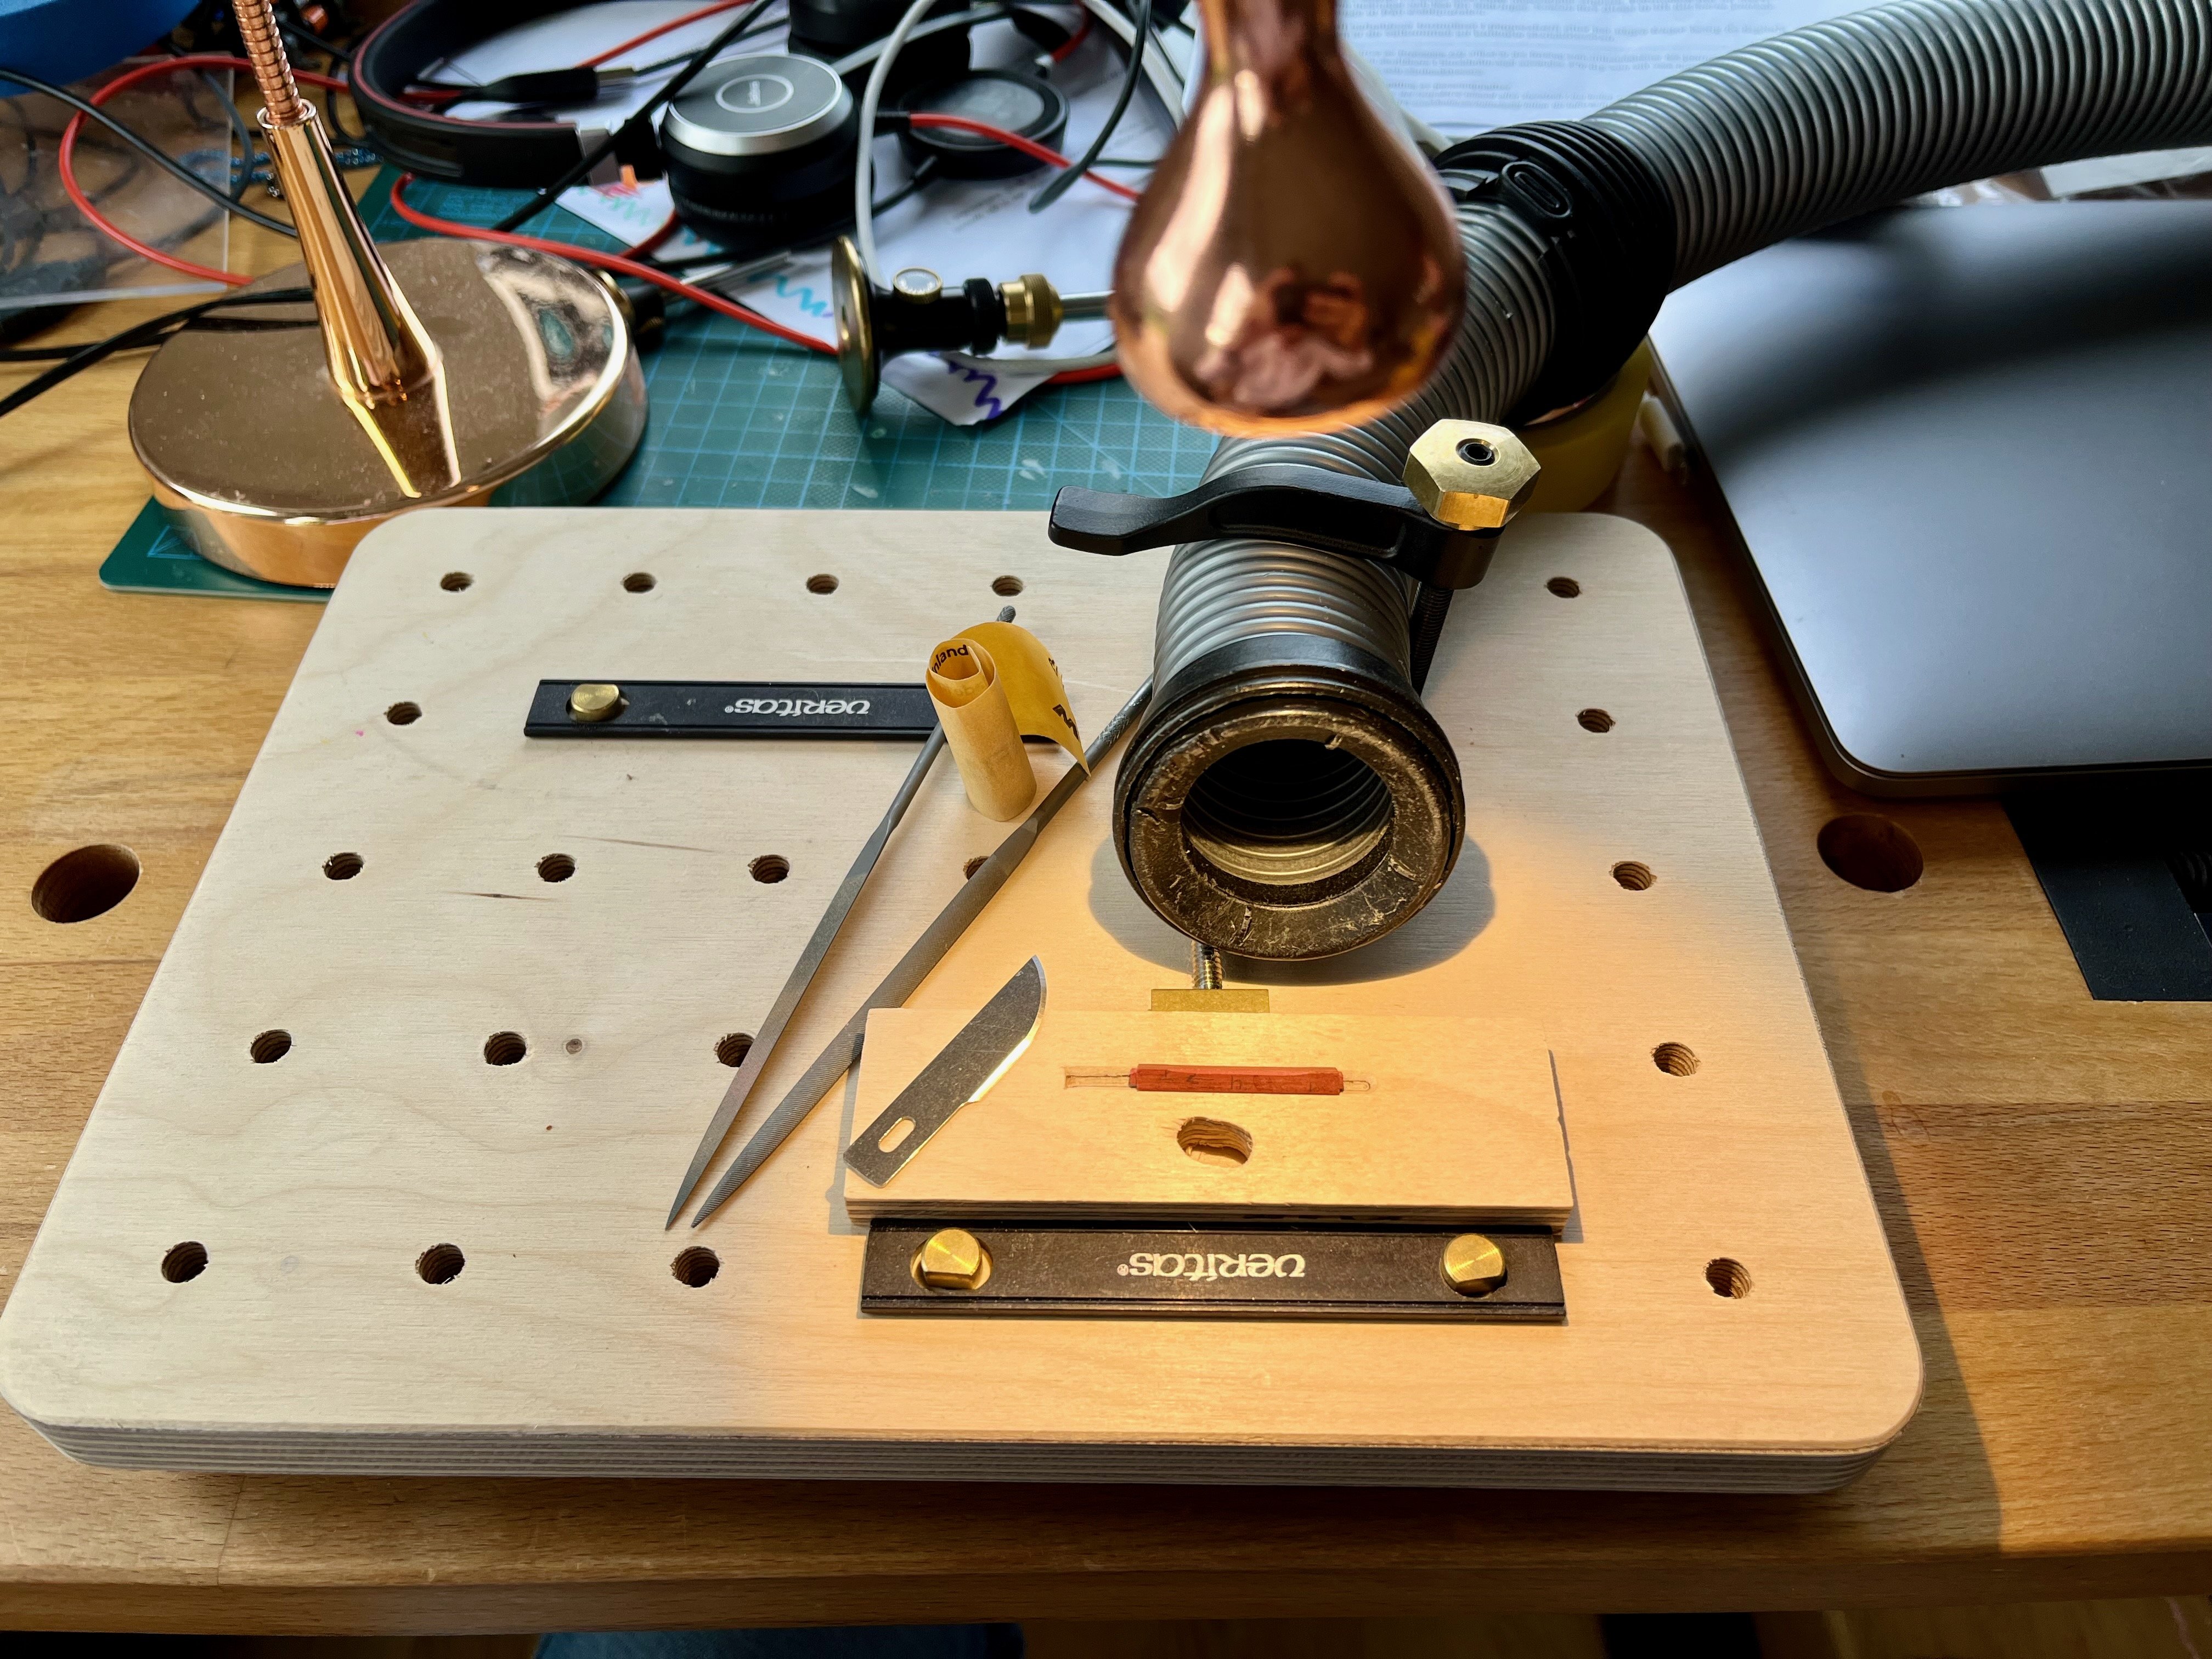
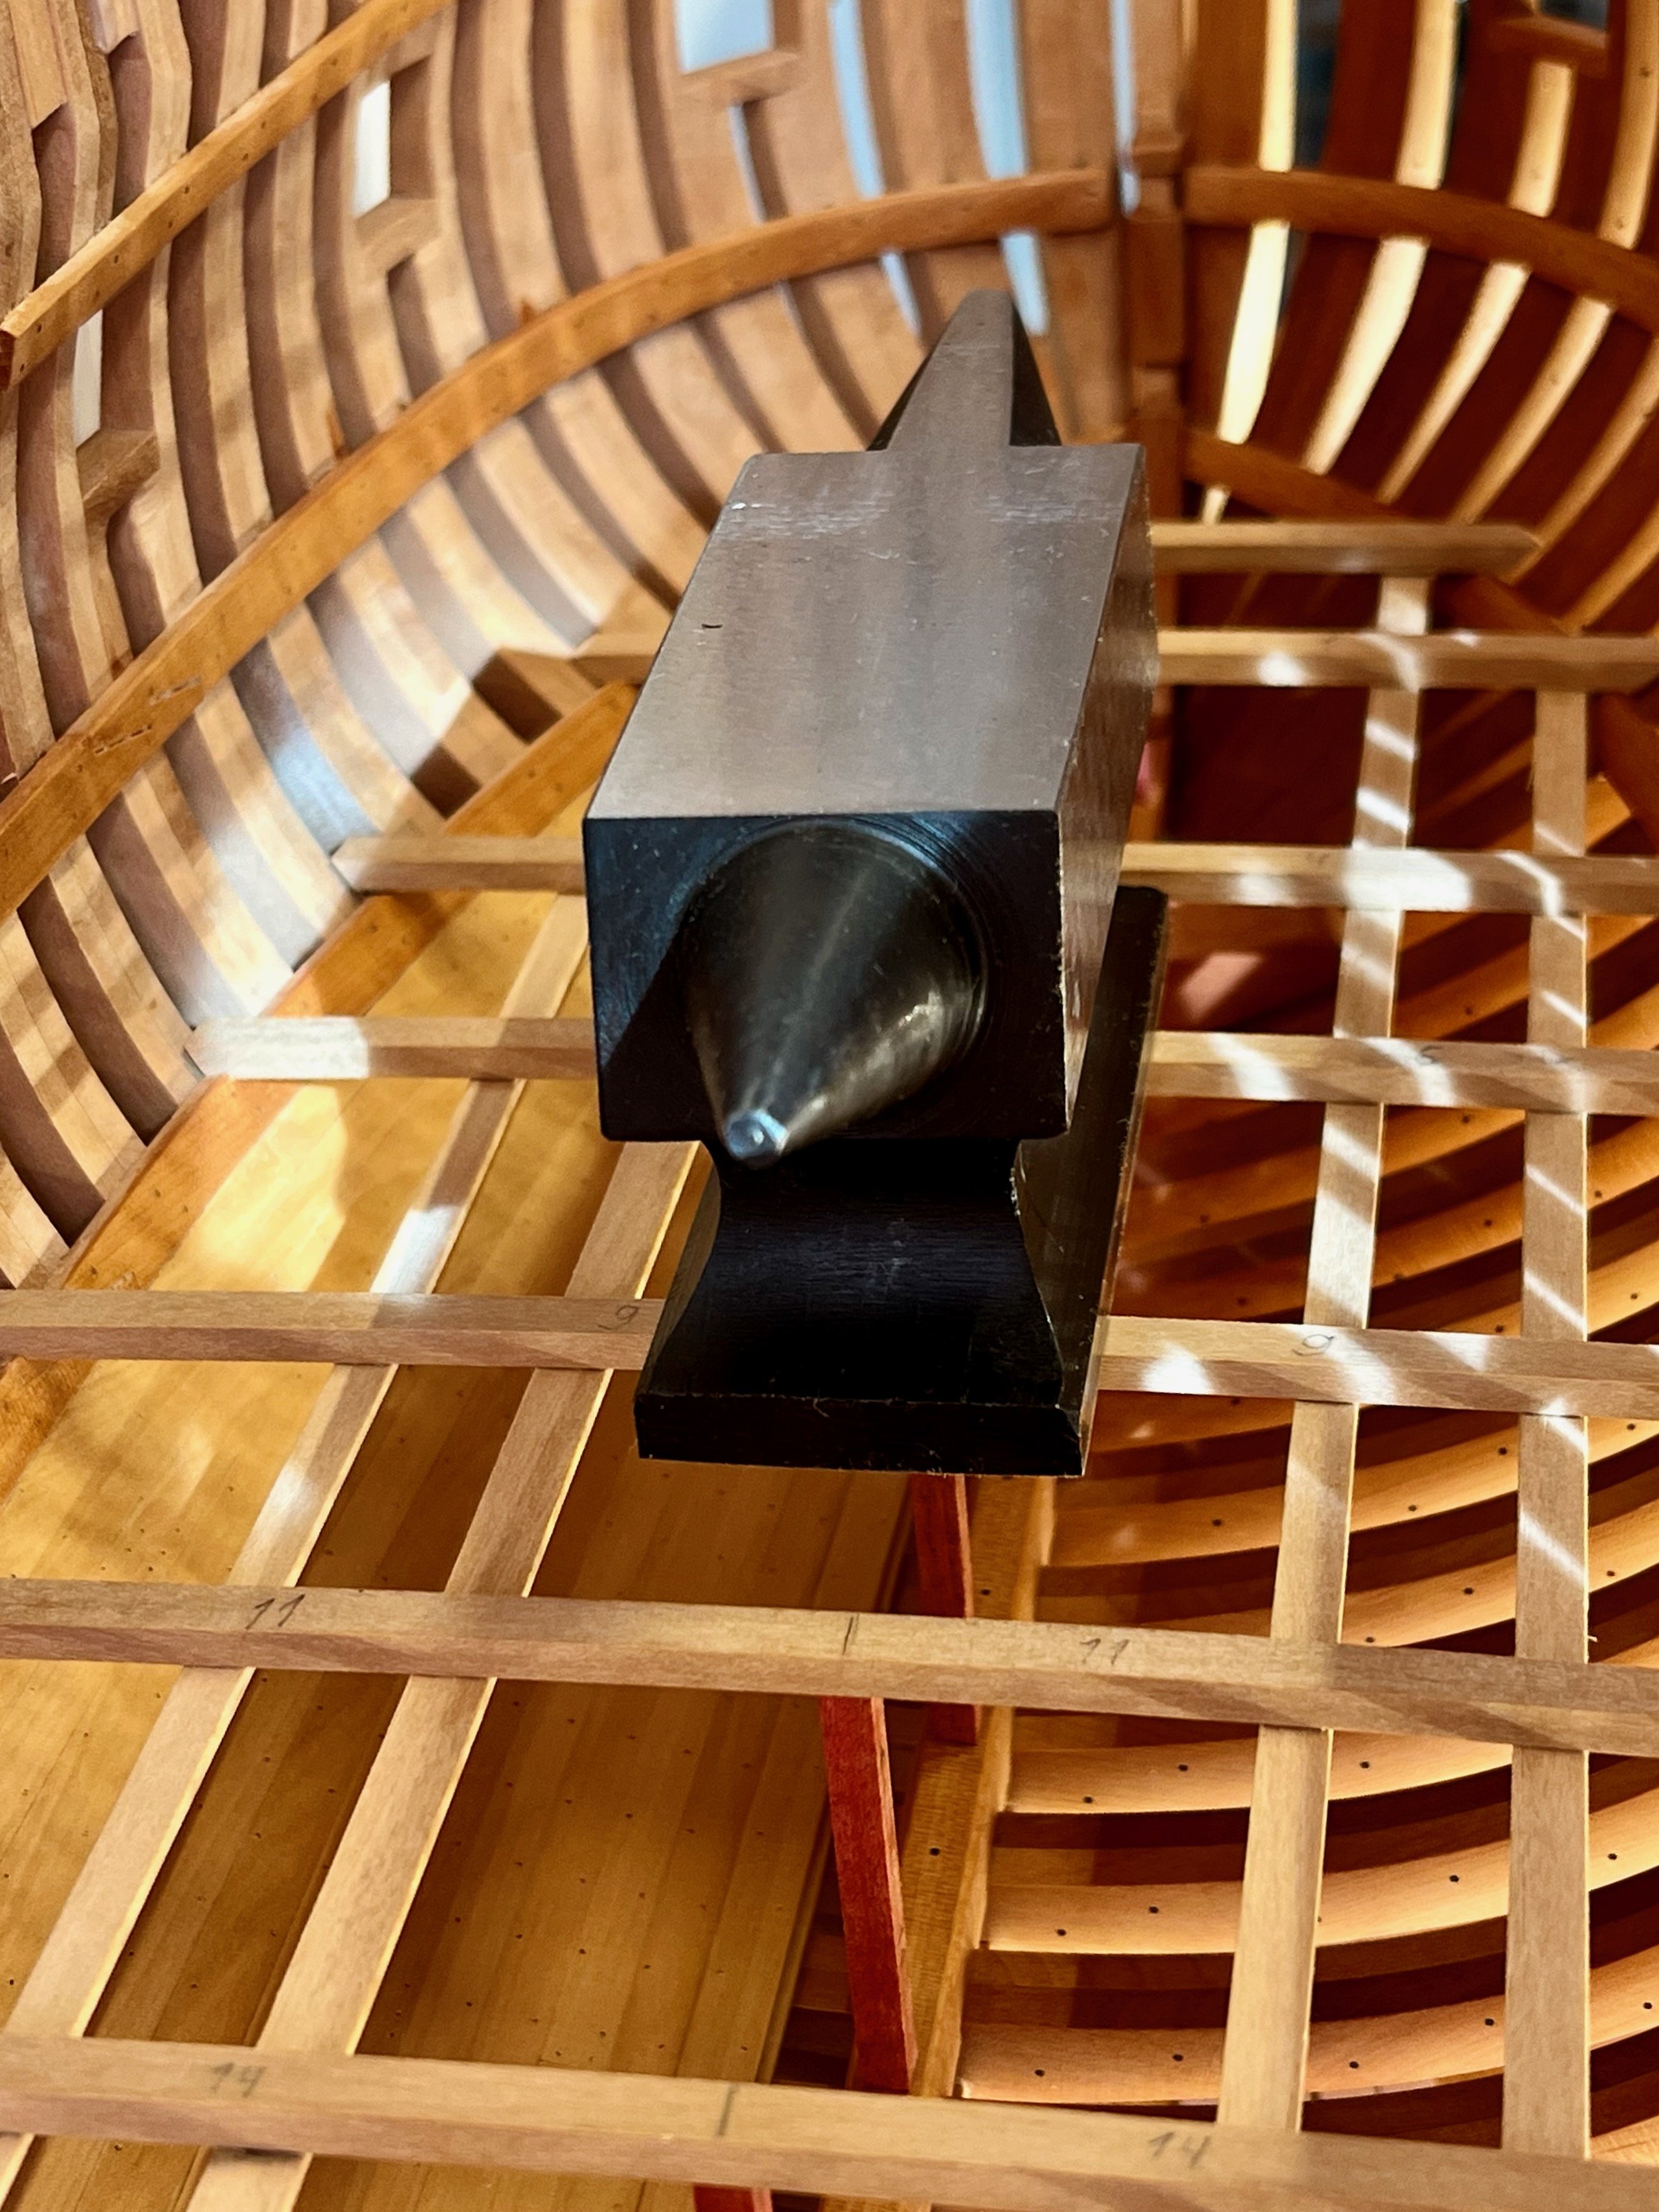
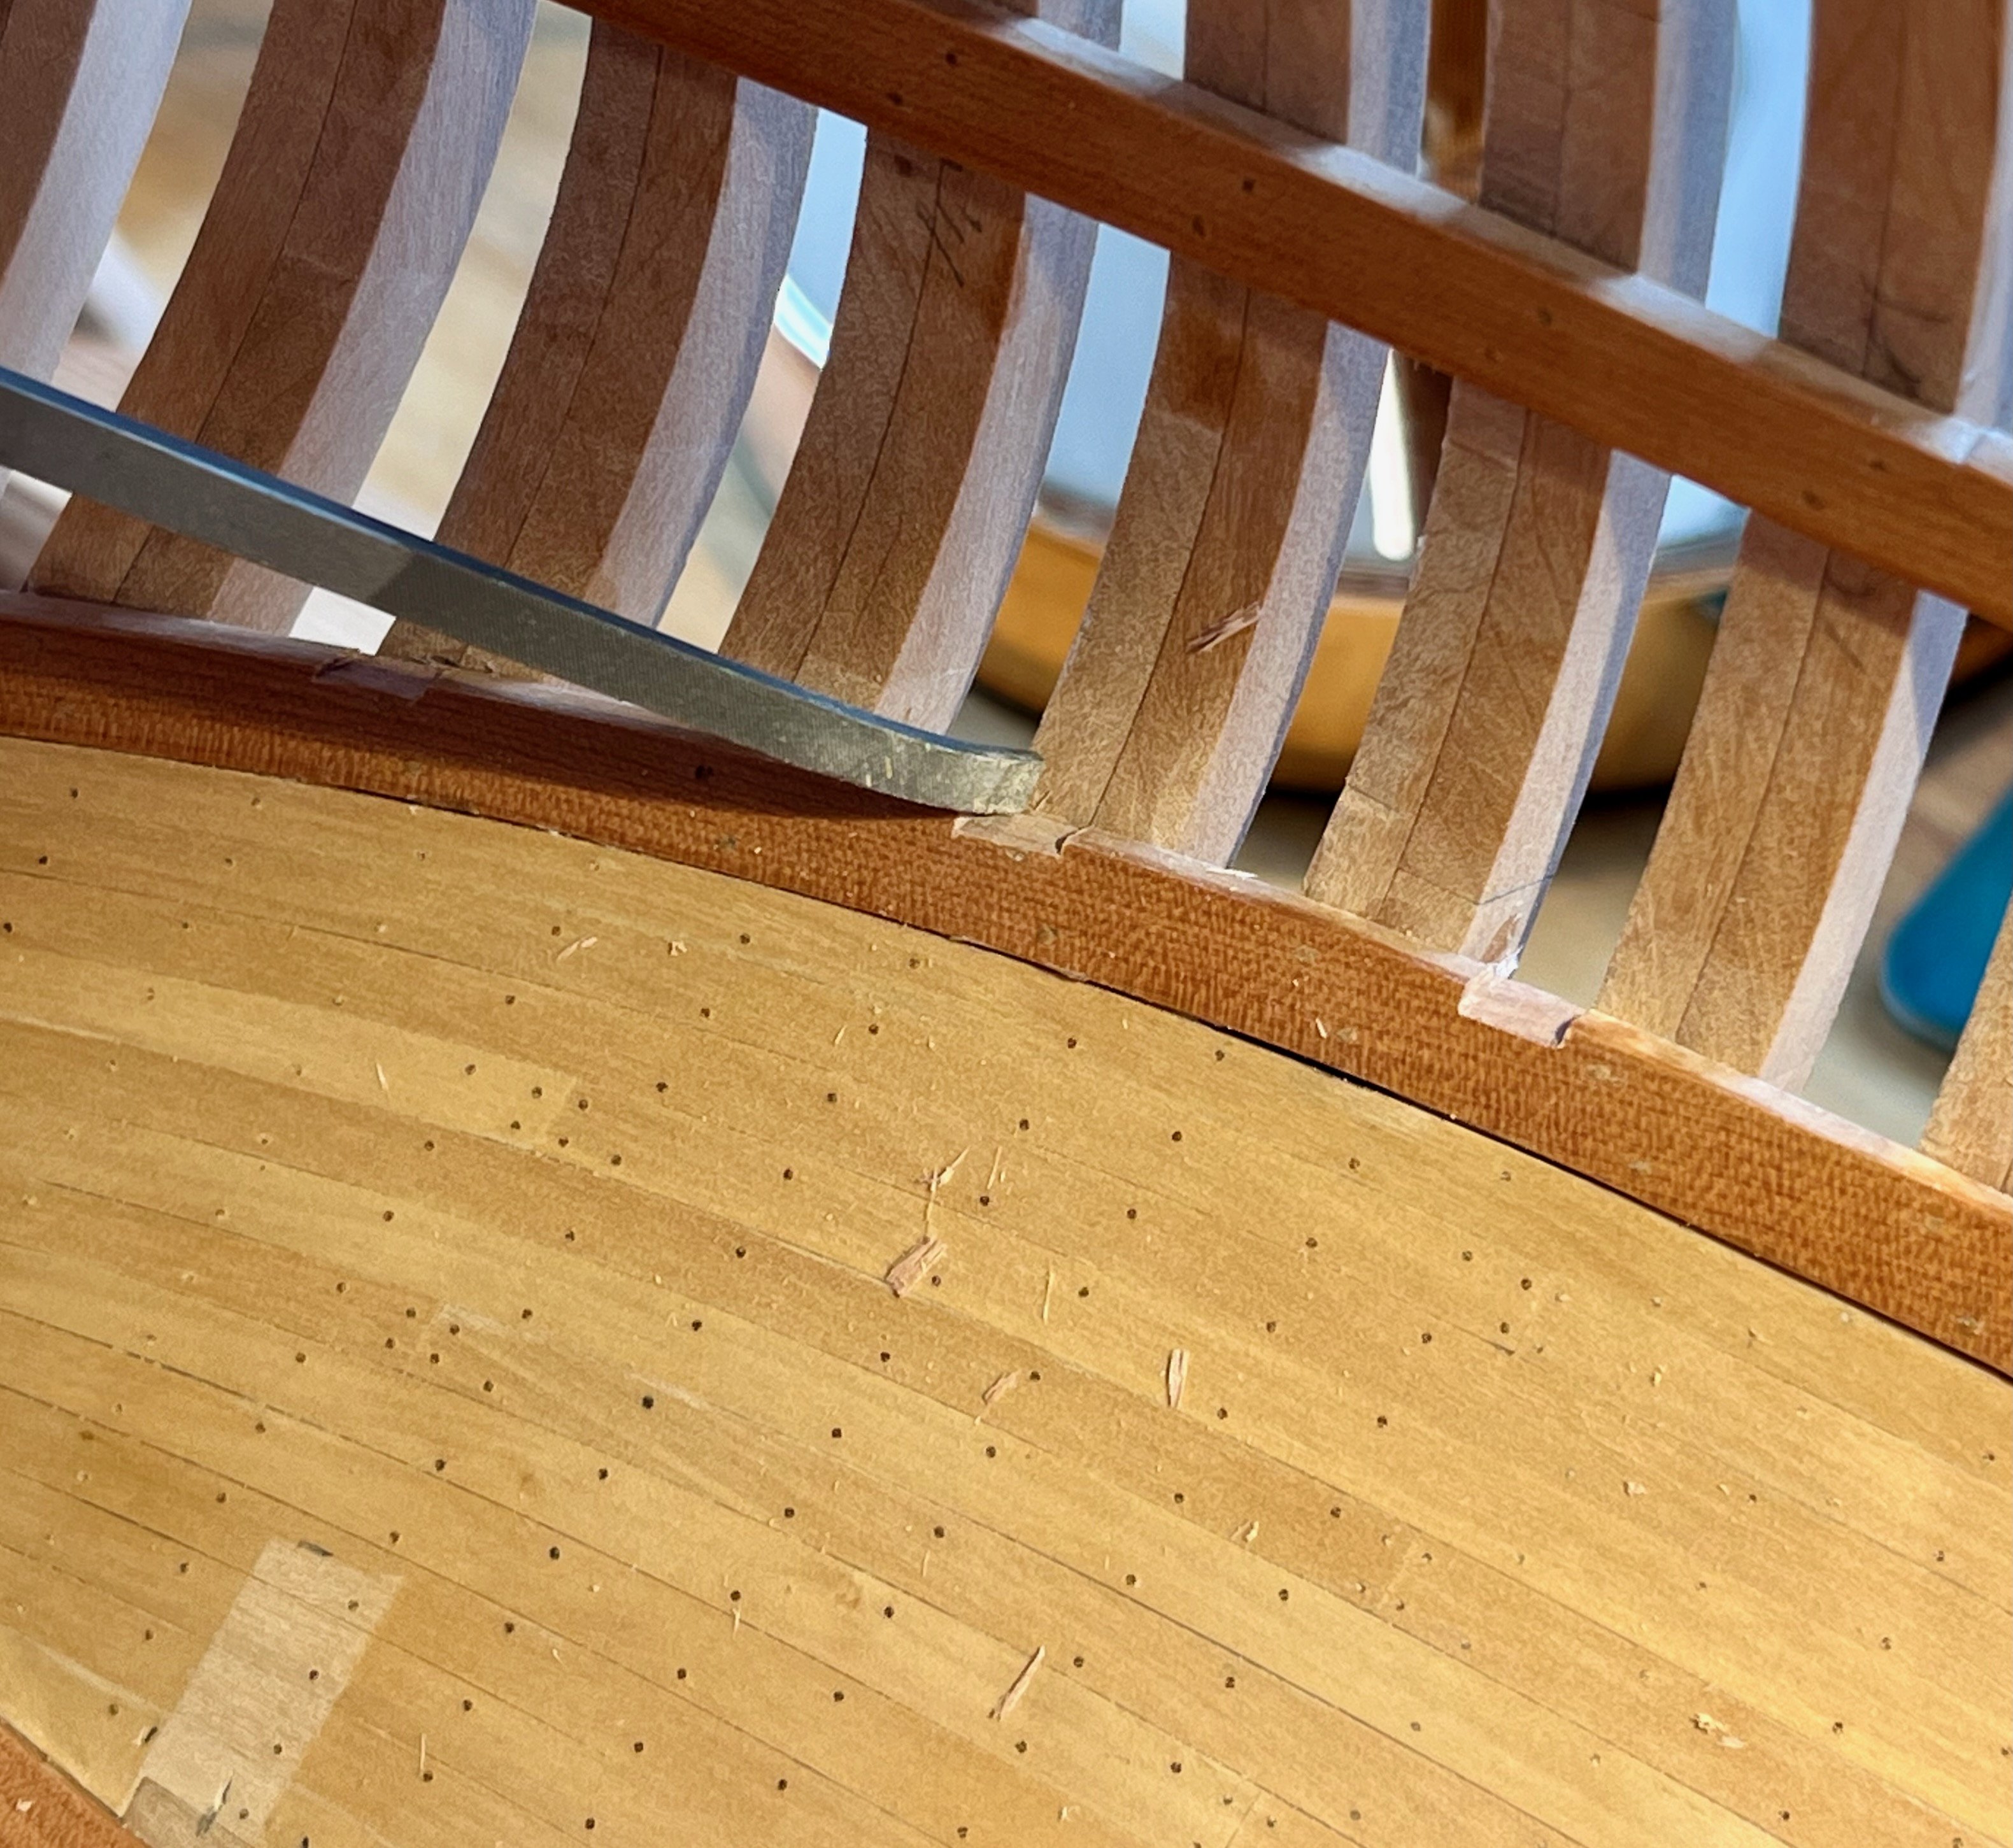
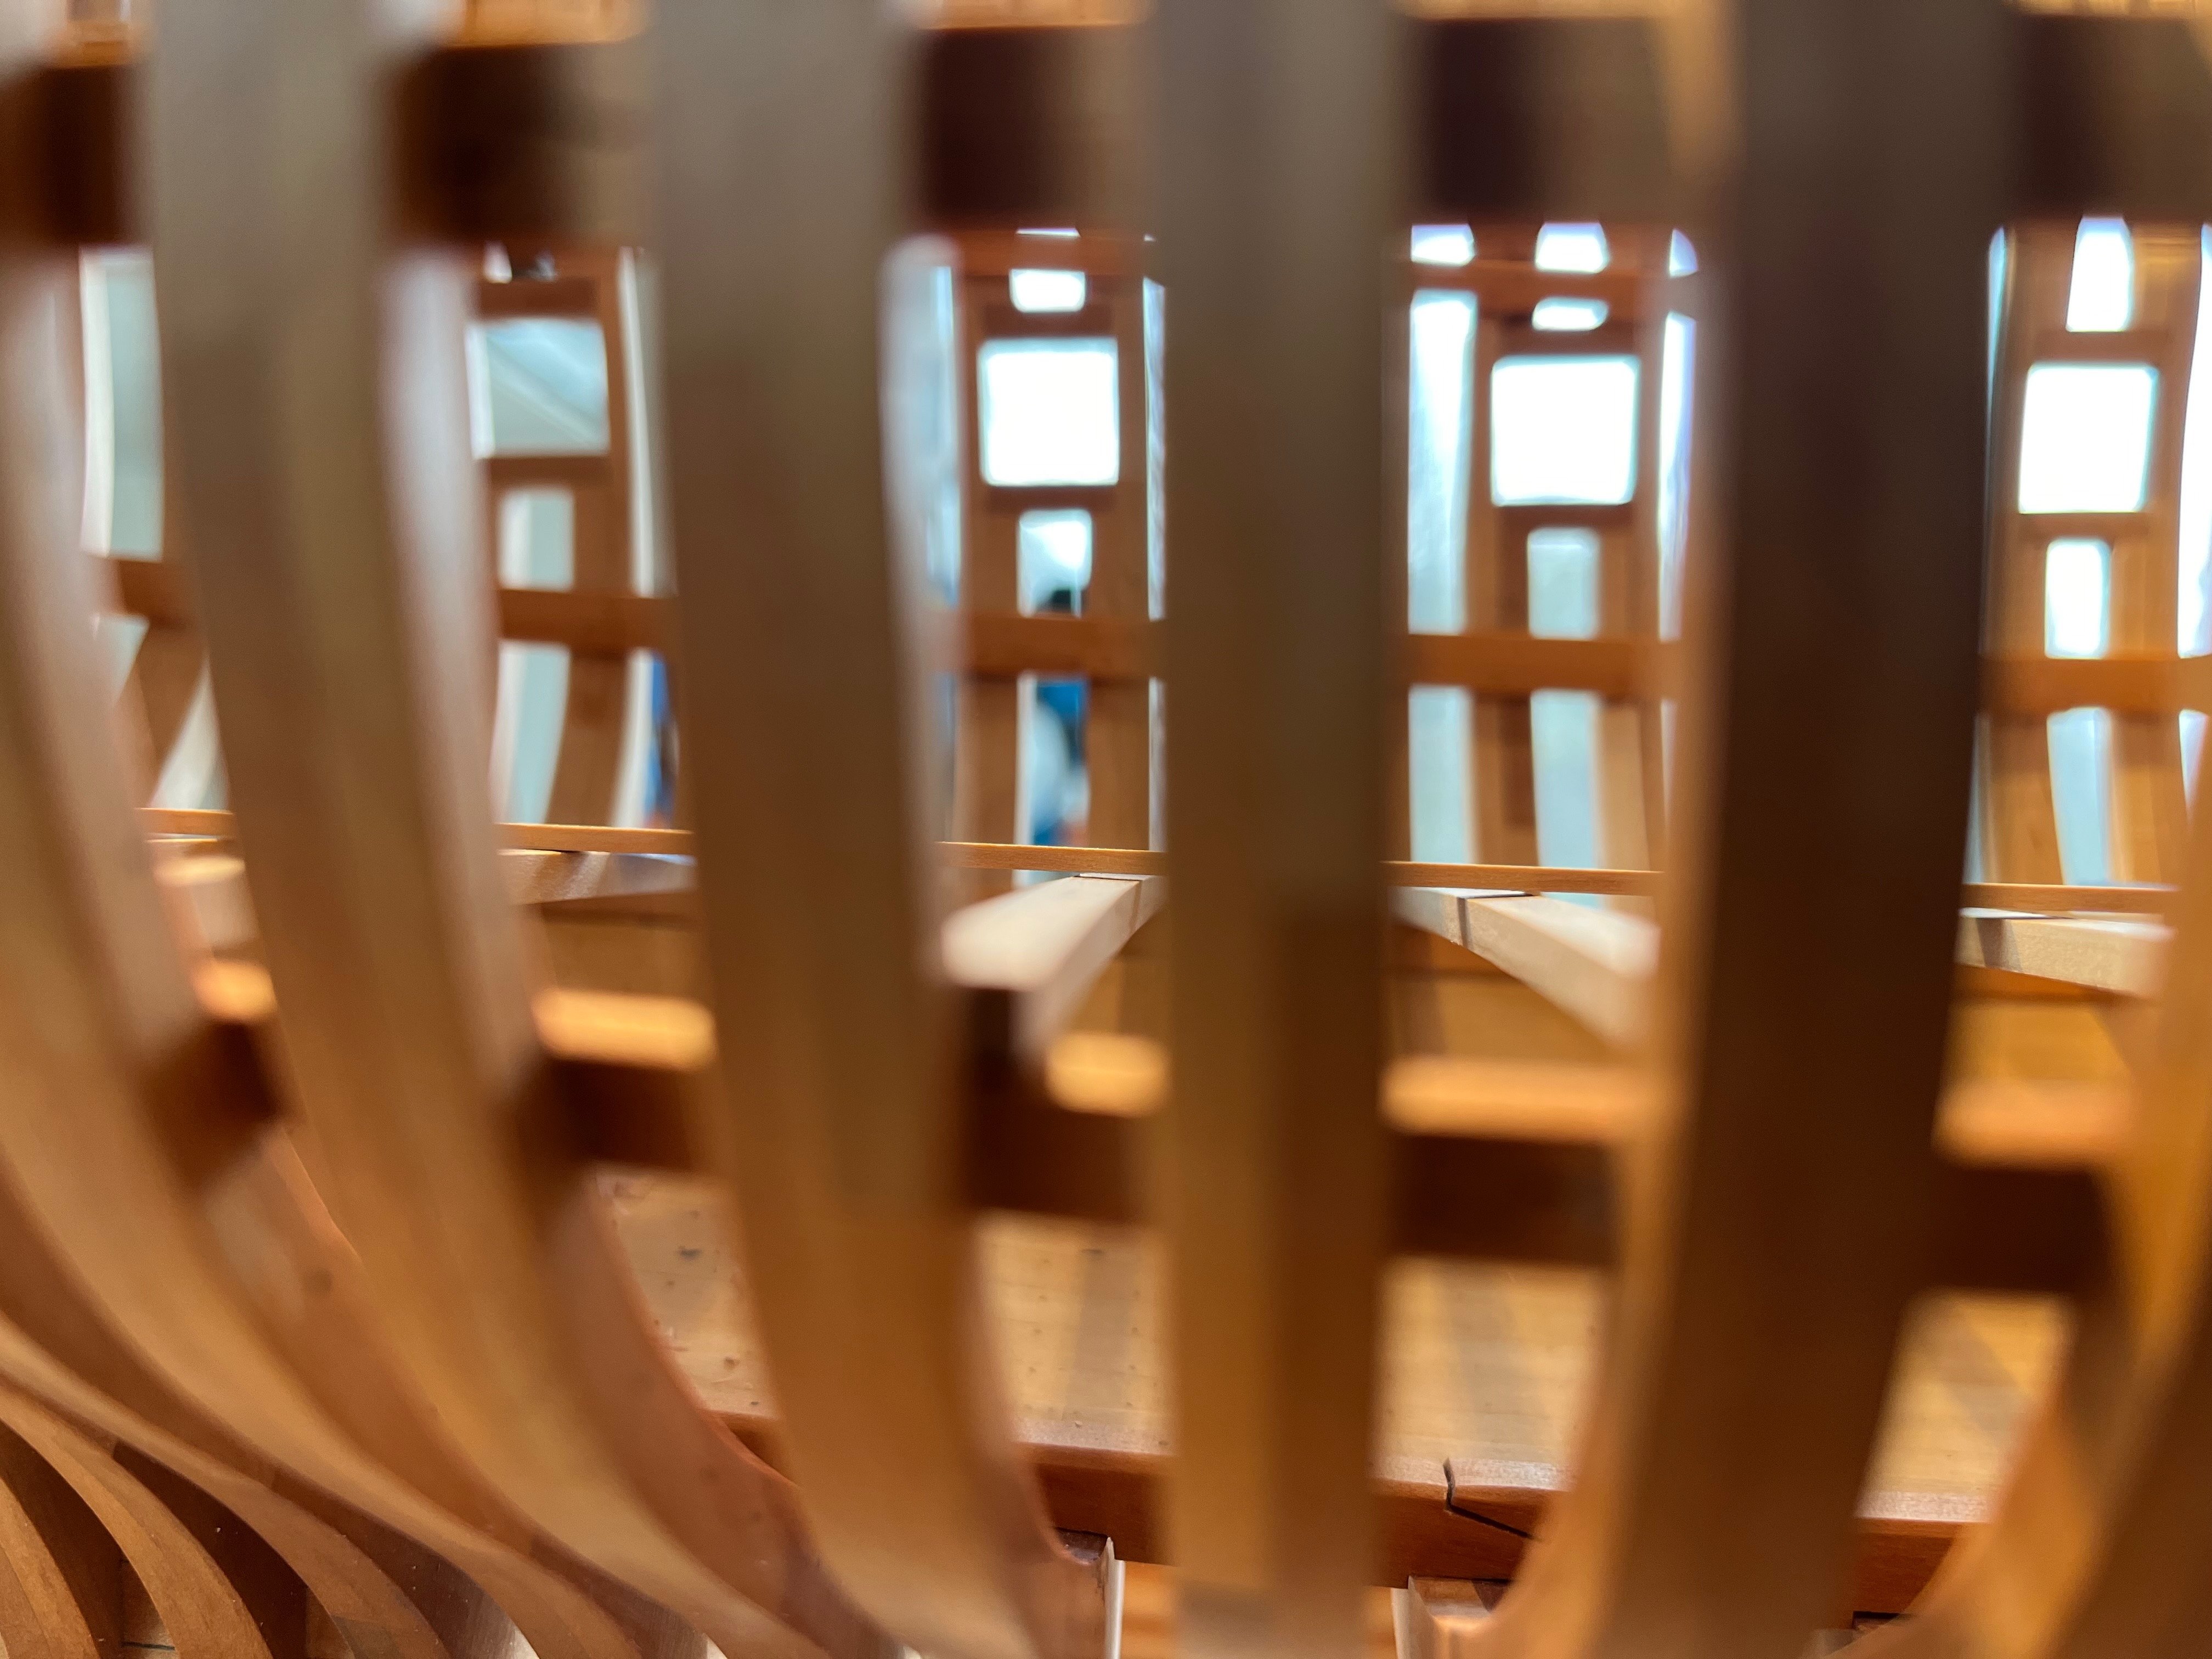
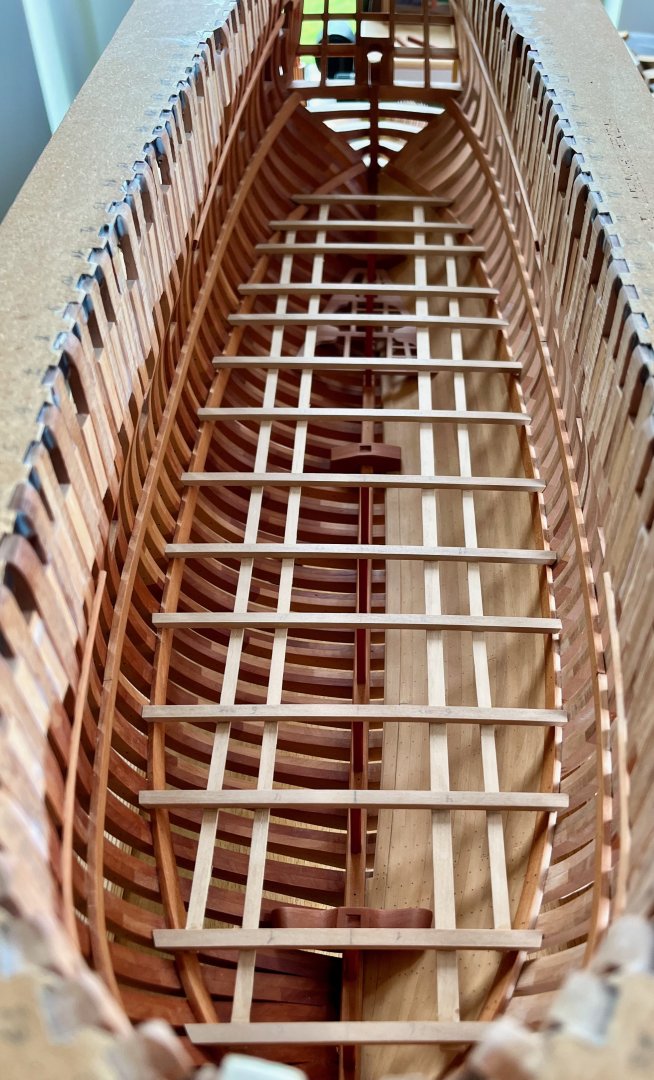
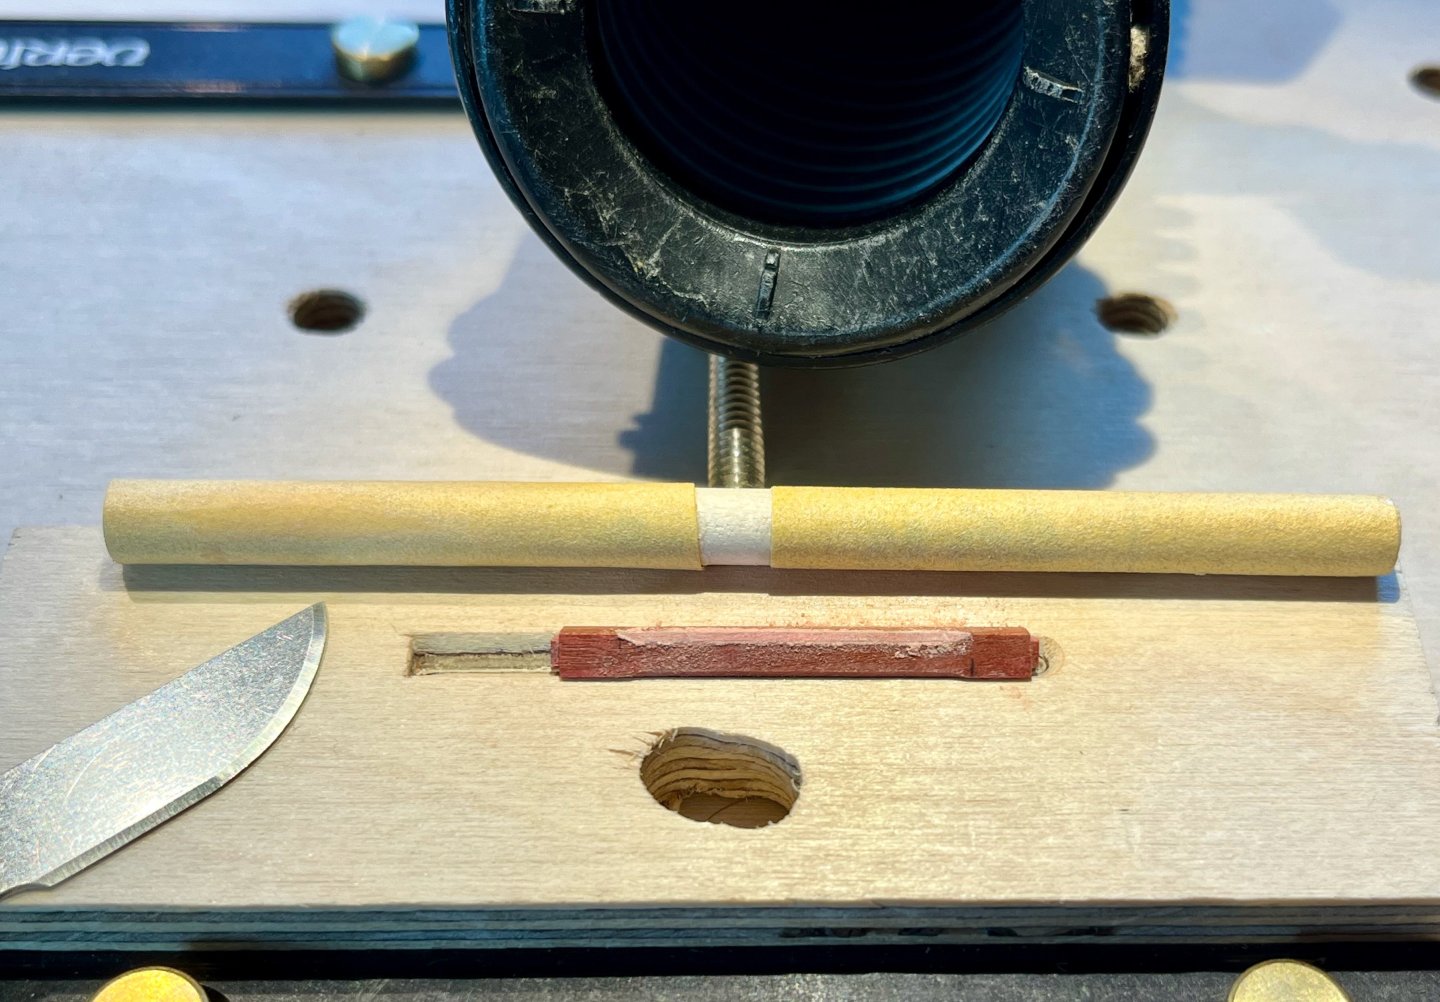
Time to make them pretty - starting with chamfers Here is my setup and an opportunity to play with the miniature Veritas worksurface. Being able to position the vacuum hose is the main feature The gentle air draft away from my face is catching all the fine dust. I started with a bit too many tools, but after a couple of pillars simplified it to a round dowel with 320 and 400 Mirka sandpaper, and a blade for a final scraping pass to flatten the edge. The dowel diameter also helps to ensure symmetrical shape of the chamfer end transition. Sanding dust highlights the shape of the edge, allowing to eyeball the chamfer shape. The result is quite straight even with magnification, so hopefully almost perfect to the naked eye. When it came time to install the pillars The Inspector have spotted a whoopsie - one pillar intersects the aft platform beam 🫣 That is to be expected when the Master Shipwright was working on his design in the late hours, and in my view even adds realism to the build - surely the quality standards of the average Revolutionary Era shipyard were far from perfect, especially in the "out of sight - out of mind" areas deep in the hold. "Good enough", said the shipwright and notched the pillar into the beam But if you take a peek through the gunport - you can still see his mistake clearly: I like how the hull is slowly filling with a spiderweb of timbers and framing! It is the next phase of "it looks like a ship" feeling I had when building frames, and now "hmm, it looks like an elaborate house for hamsters!" Pillars were finished on the lathe. Or maybe "in the lathe"? 🤓 Anyway, they were technically in the lathe while being finished, great way to hold them and avoid smearing oil all over (it is important to avoid contaminating the bottom tenon, it would be a tiny and critical glue interface) A surprisingly difficult problem is "how do I keep track of pillar numbers and orientations when the finish is applied?" There is no place for a pencil mark, and it is too easy to smear pencil from a tiny endgrain tenon. Tamiya masking tape is strong enough to hold it by the tenon edge, even though the contact surface is tiny. Here is the first batch hanging in the dark and drying As a backup I measured each beam with a micrometer and can later identify them by length, they are all unique assuming a precise enough measurement tool. The installation plan is questionable - to glue them into the keelson, but leave the top mortise dry and just pop the deck on and off. The top tenons are chamfered to locate the beam mortise easier. I hope that if installing one-two pillars at a time I will be able to achieve a glue joint than would hold the pillar angle precisely enough. Though the geometry and the glue joint dimensions are definitely not working in my favour... Stay tuned for the next chapter to find out if that plan would fail (or, rather - "how would fail, exactly?" )


- 968 replies
-
- 15
-
-
-
- hahn
- oliver cromwell
- (and 1 more)
-
The bench really ties the room together Very realistic and human-like! And a neat description of the dependency chain in the beginning of the post
-
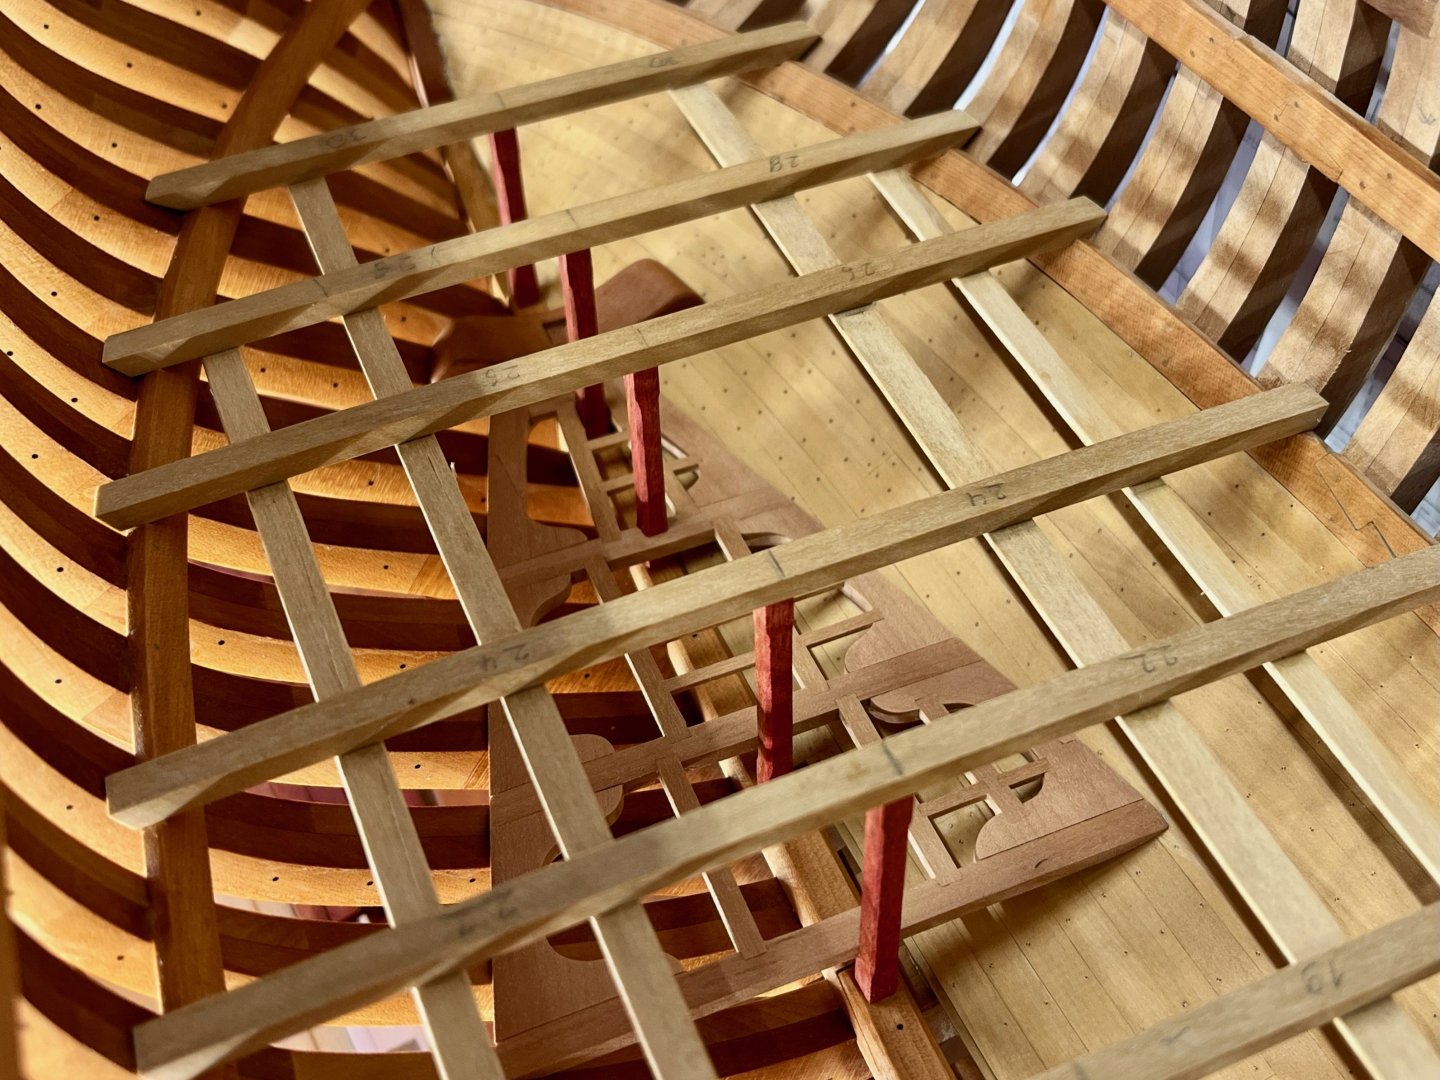
Pillar production continues. Tenons are milled on one side first and then hand trimmed in places where keelson is at an angle Marking up pillar locations on the keelson is a bit tricky. First I tried to make a plumb bob, but it's not easy on that scale, can't make it heavy enough to stretch the line consistently. So instead I use a carefully aligned gantry to find a vertical line along the side of the beam. A familiar jig has notches to offset the mortise from the side of the beam, and by flipping the gantry around I make sure it is symmetrical. As always, it gets tricky around the edges Now I can cut pillars to final length. Measuring with a caliper and then subtracting the beam thickness ended up unreliable where the keelson is angled, so I made that jig instead. A groove helps with keeping it straight and adds a bit of necessary friction. Once positioned in the mortises - gently press on the beam to compress it to fit. Measure it with a caliper and scribe a line on the pillar, easy Trimming each pillar to final size took a while. I did not dare to mill it directly to the line, so every pillar was slightly oversize (0.3-0.5mm), with hand chiseling and a lot of dry fits. Pink Ivory is very hard to trim with a chisel, takes a lot of force sometimes, and can split on you if you are not careful. Got a pretty deep finger cut when trimming these pillars, luckily avoided getting blood on the model But my chisel safety definitely improved afterwards! But it is a very satisfying feeling when finally the pillar sits just right - the beam is not rocking side to side, but also has zero vertical bend no matter how much weight you put on it. I was surprised how flexible the beams are, even if made of boxwood 4.2mm thick! The Admiralty ordered a load test to ensure the correct installation of such a critical element. Test passed with flying colours! 😎 Final result, all the beams are dry fit in their final positions and dimensions. Careful markup and fine tuning paid off - good alignment in both dimensions, no gaps, I am happy! Now I can take time making them pretty - add chamfers, sand and finish. It is a bit of a puzzle how to install them later on. I am planning on gluing them only to the keelson, even before the deck is installed. I hope that pillar tenons would poke right into the beam mortises with ease, I chamfered the edges to simplify it. Keeping them off the model for too long will be risky, I want to use them as height limits when gluing in the carlings that might affect the deck curvature. For now I am too scared to glue anything really, the pile of "completed, but not yet installed" parts just keeps growing


- 968 replies
-
- 19
-
-
- hahn
- oliver cromwell
- (and 1 more)
-
Thanks for the full description, Alan! Now it all makes sense, will try your method too!
-
Alan, I never had any splits with notches for the aft platform, but it was done in pear, maybe boxwood is more prone to it. But it was just me pushing too much I actually enjoy the process of cutting notches! Filing a chamfer sounds more error-prone in some sense, pieces sliding around in a glue instead of being firmly fixed in the notch. Meanwhile I started drafting the lower deck layout. Will build the deck in parallel with the shot locker and other items in the hold. Am I making some obvious mistake? Please ignore the "fore mast is too far forward", it is intentional and a part of the changes that were done by the British. The plans have not indicated any shift in the beam positions, so I am showing like it was done "cheap and easy" way, by just moving the mast two feet forward until it almost hits the next beam. The locations of hatches/gratings, masts and ladder opening are from the plan. Carling and beam arms locations are improvised based on the TFFM.

- 968 replies
-
- 4
-
-
- hahn
- oliver cromwell
- (and 1 more)
-
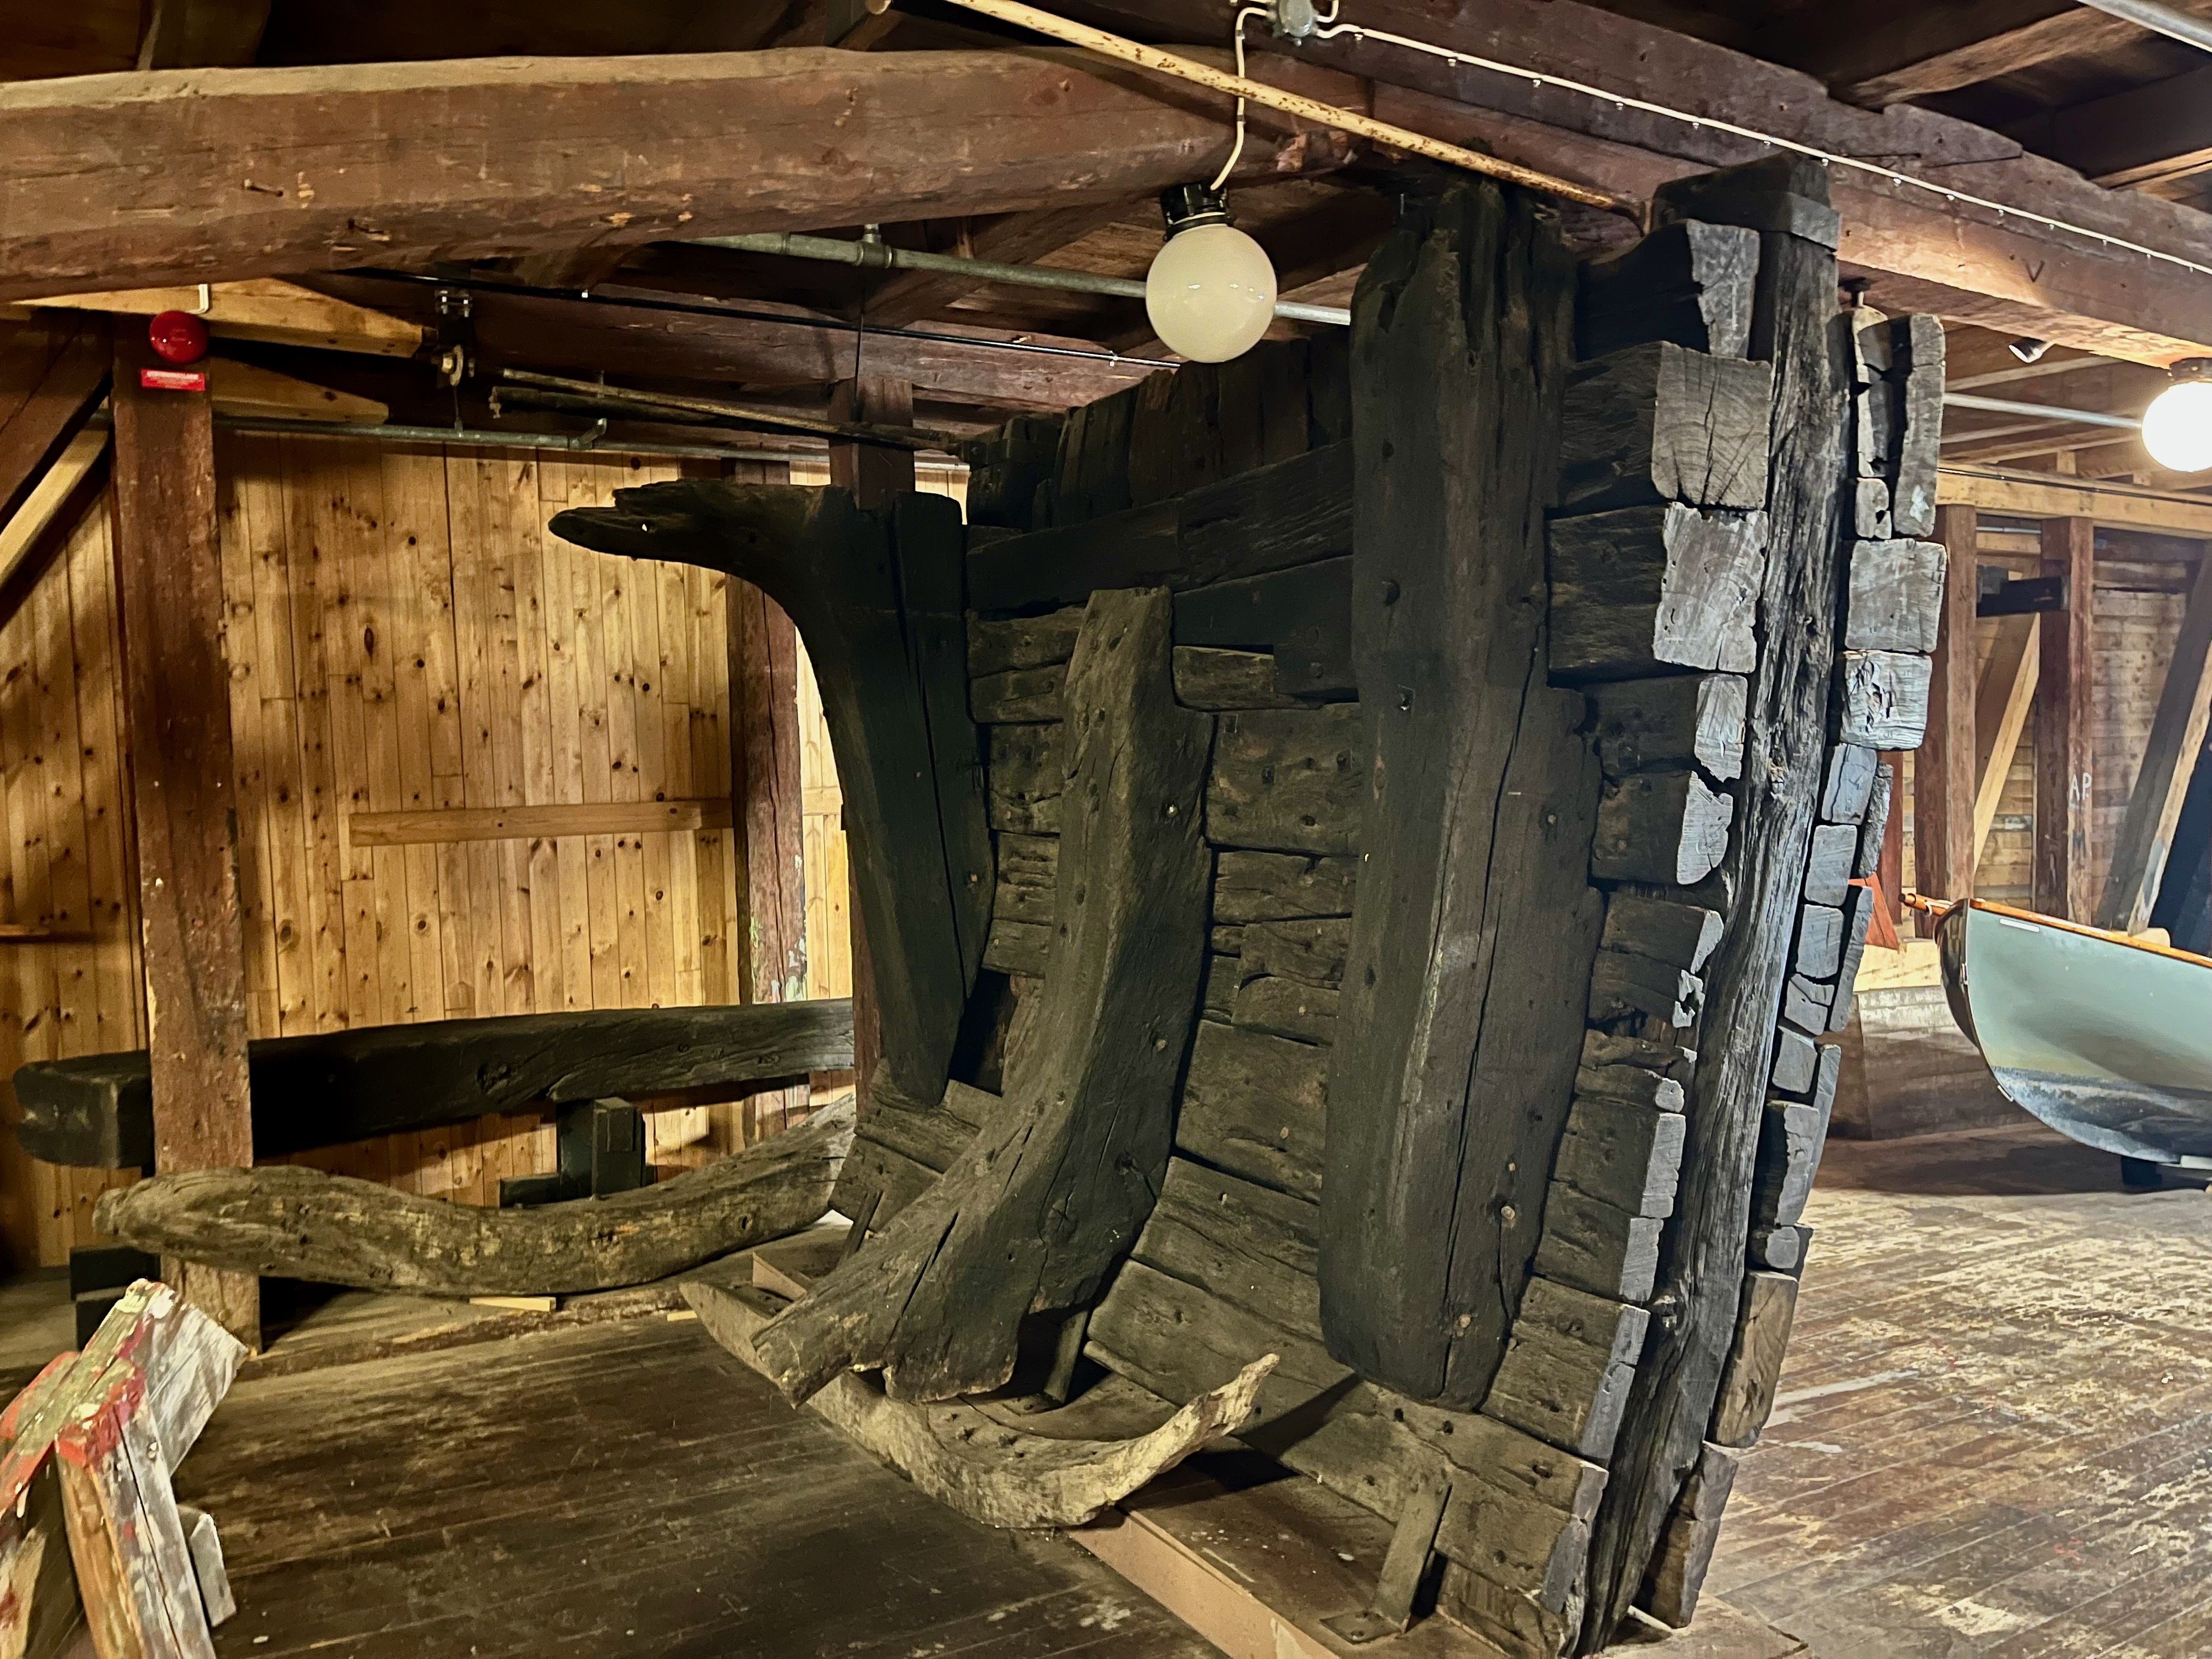
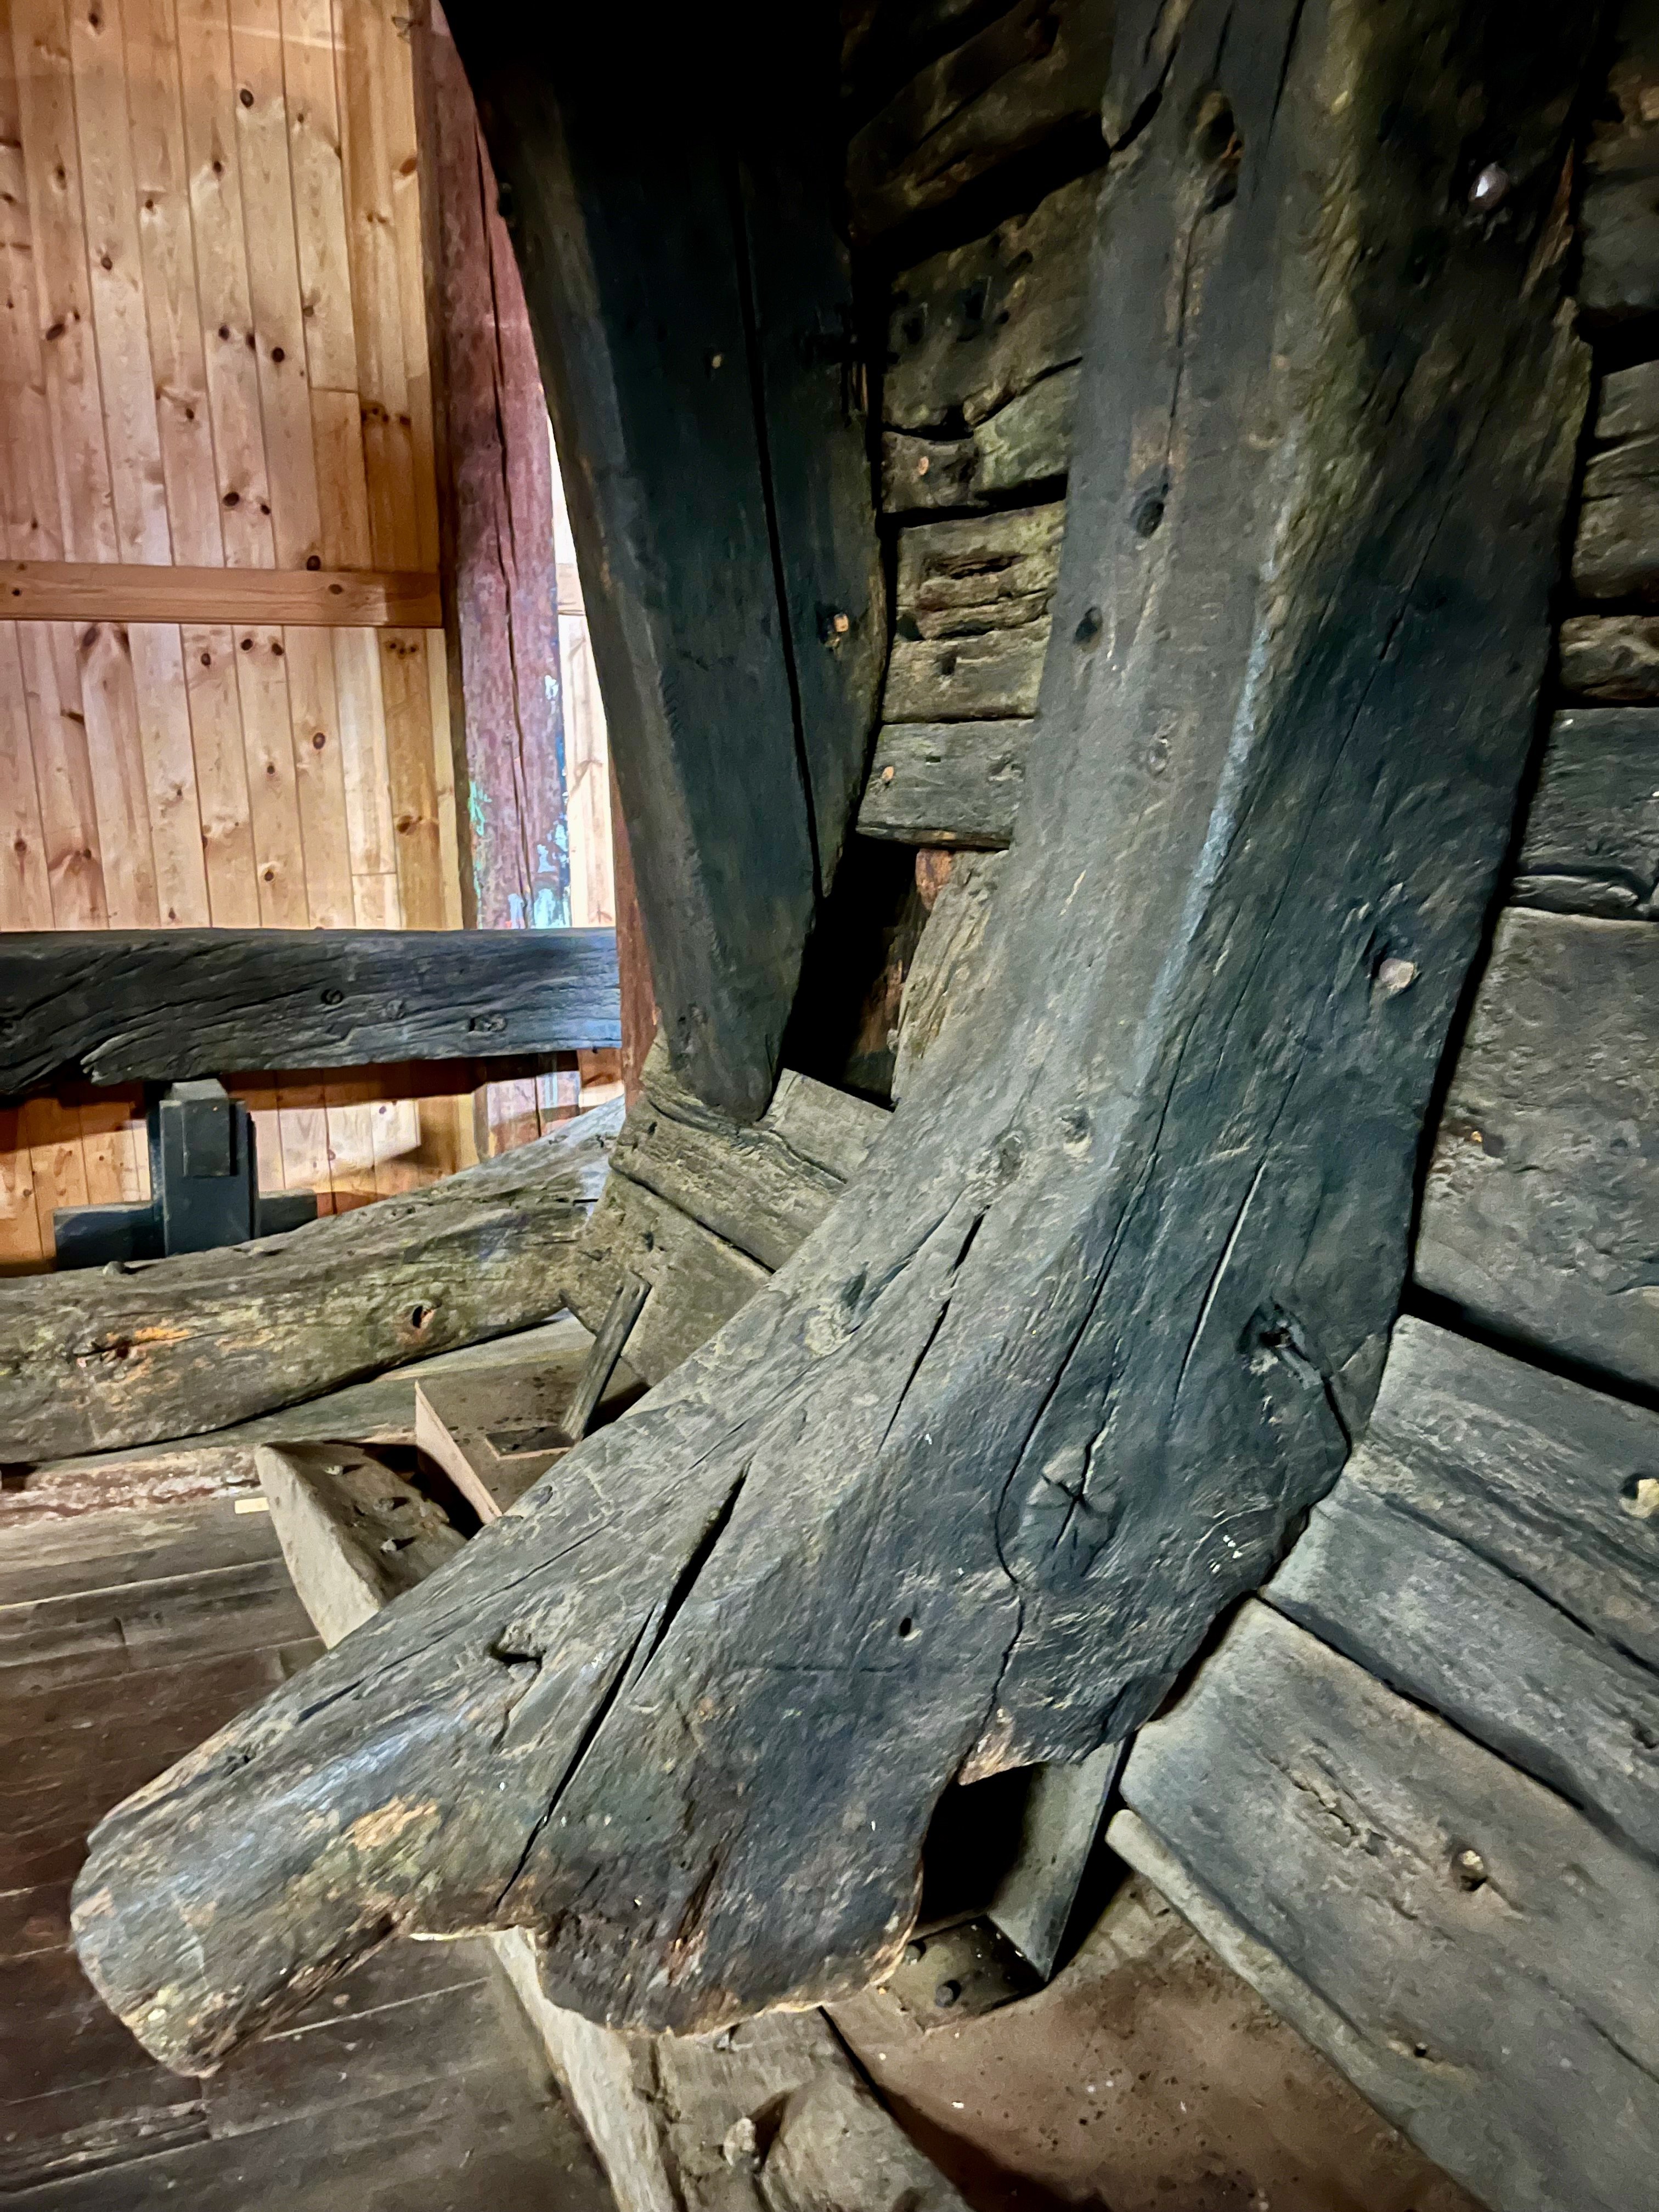
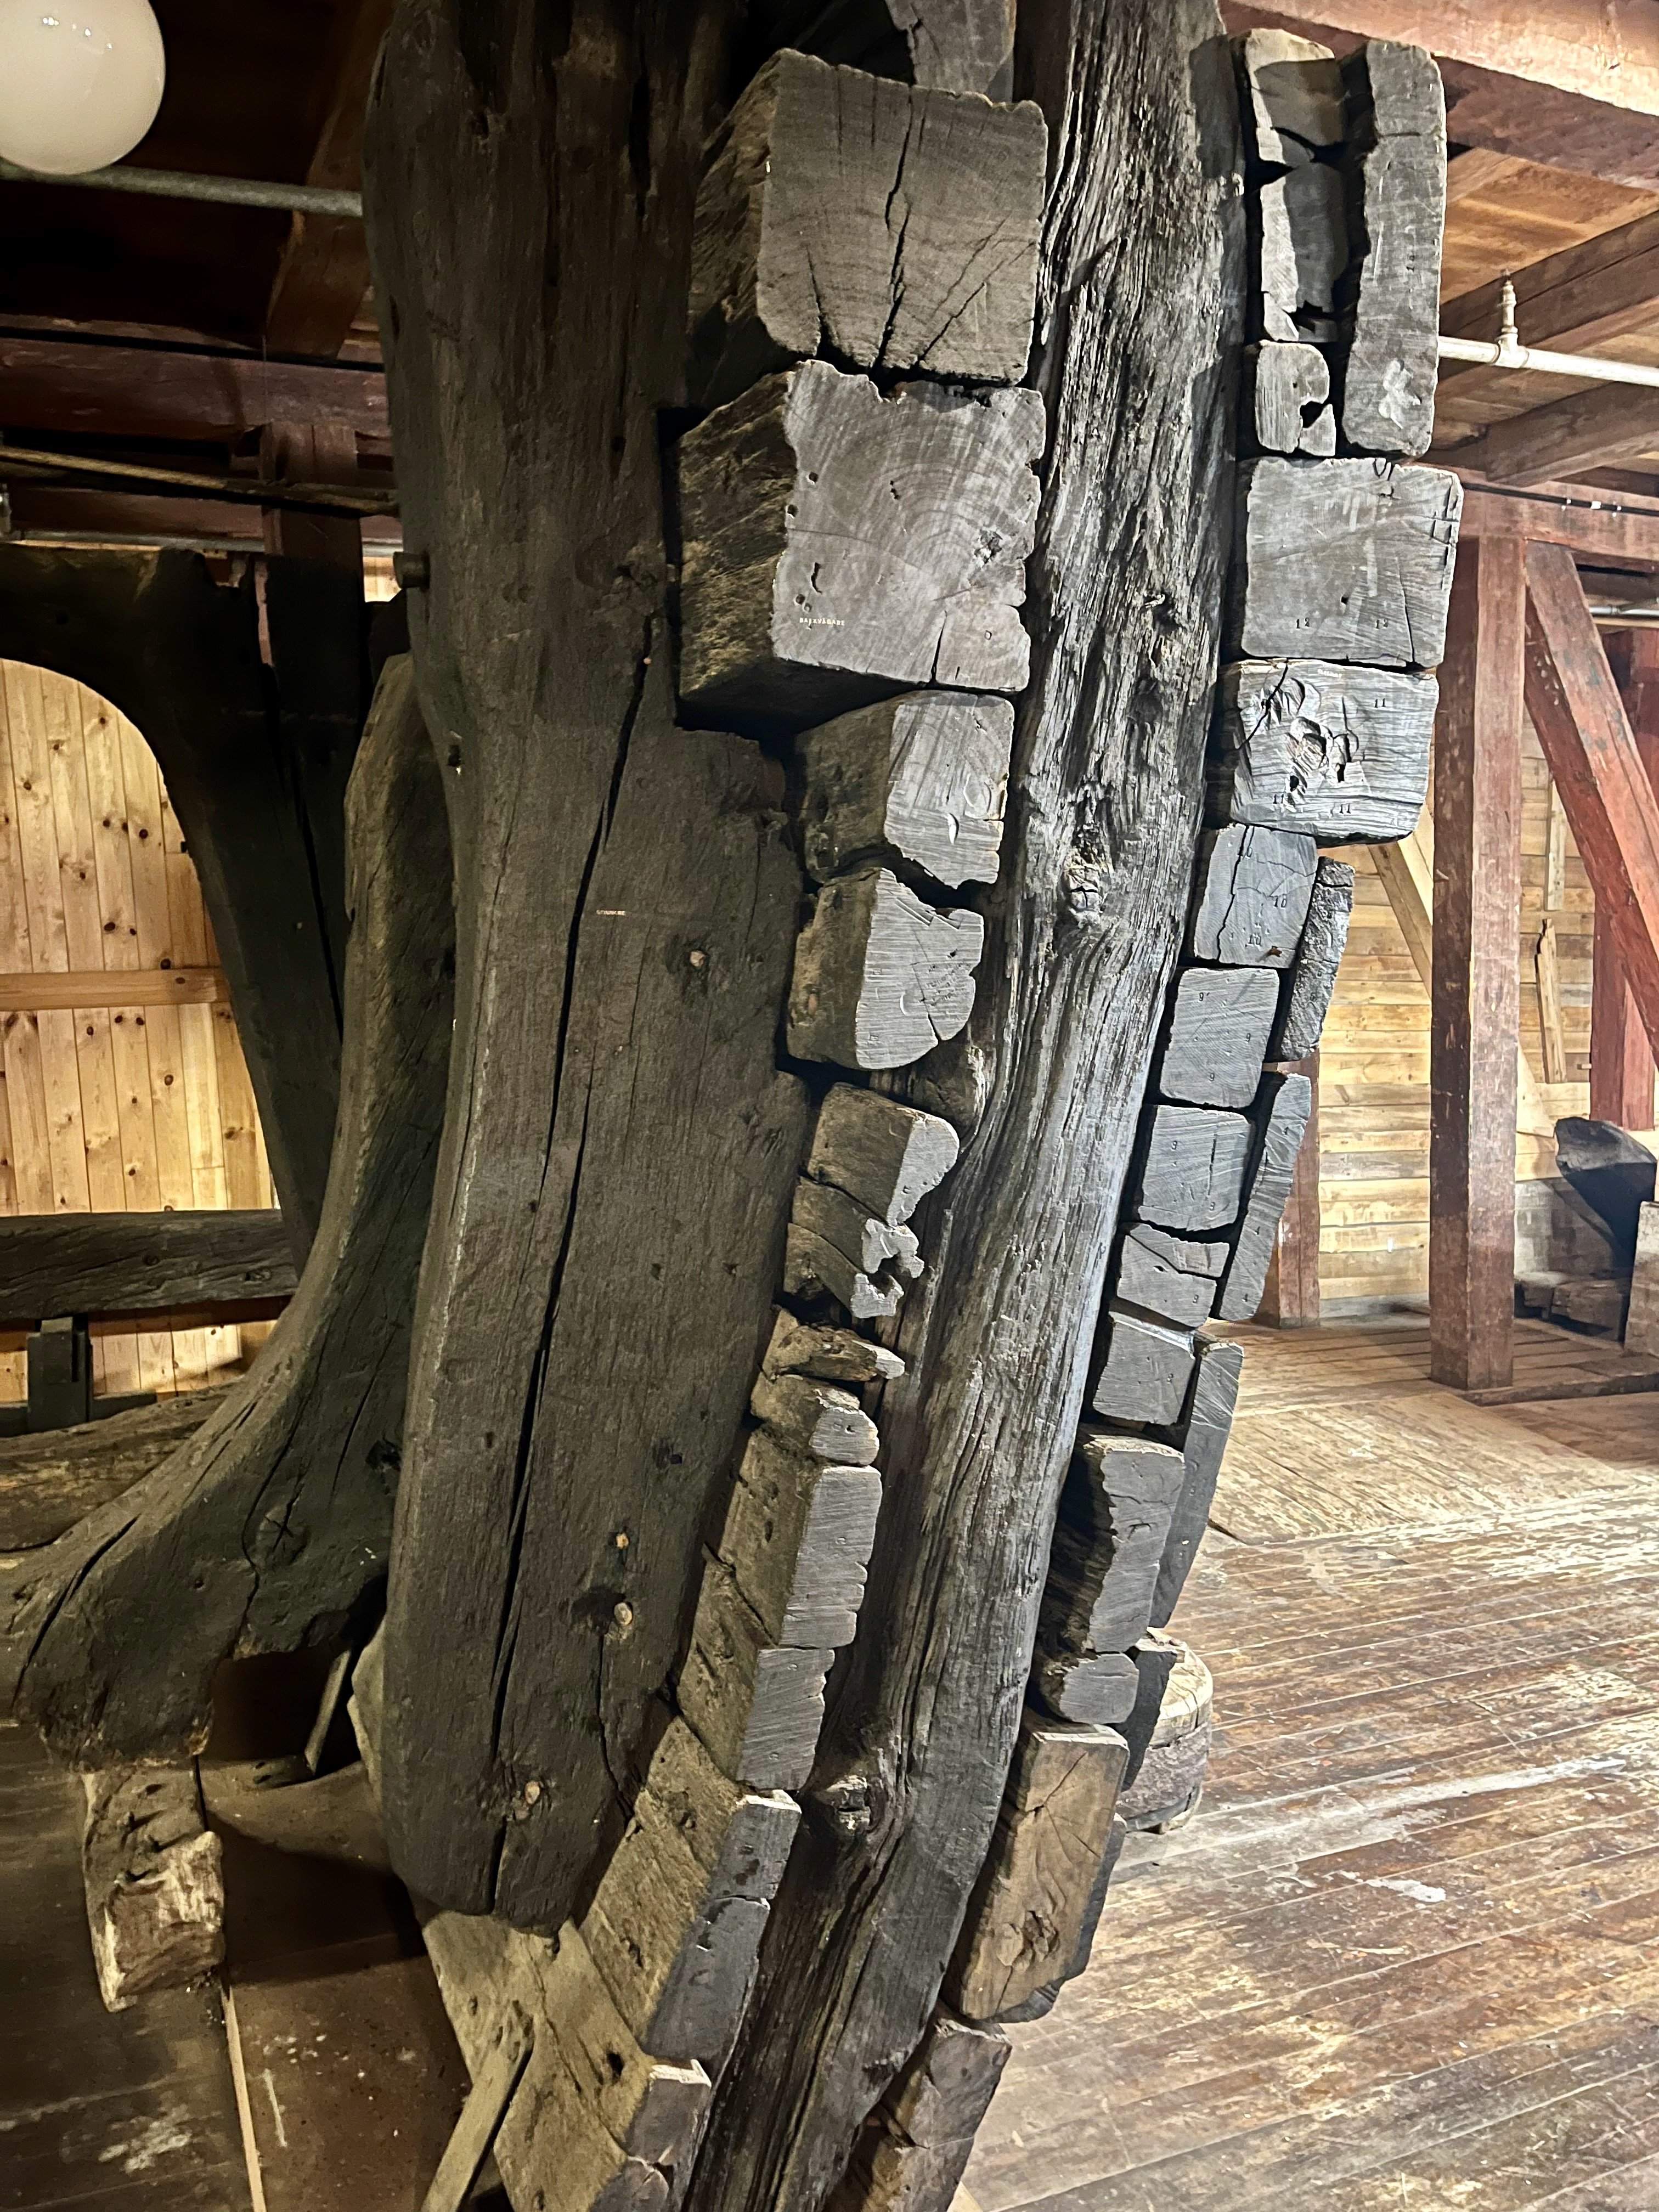
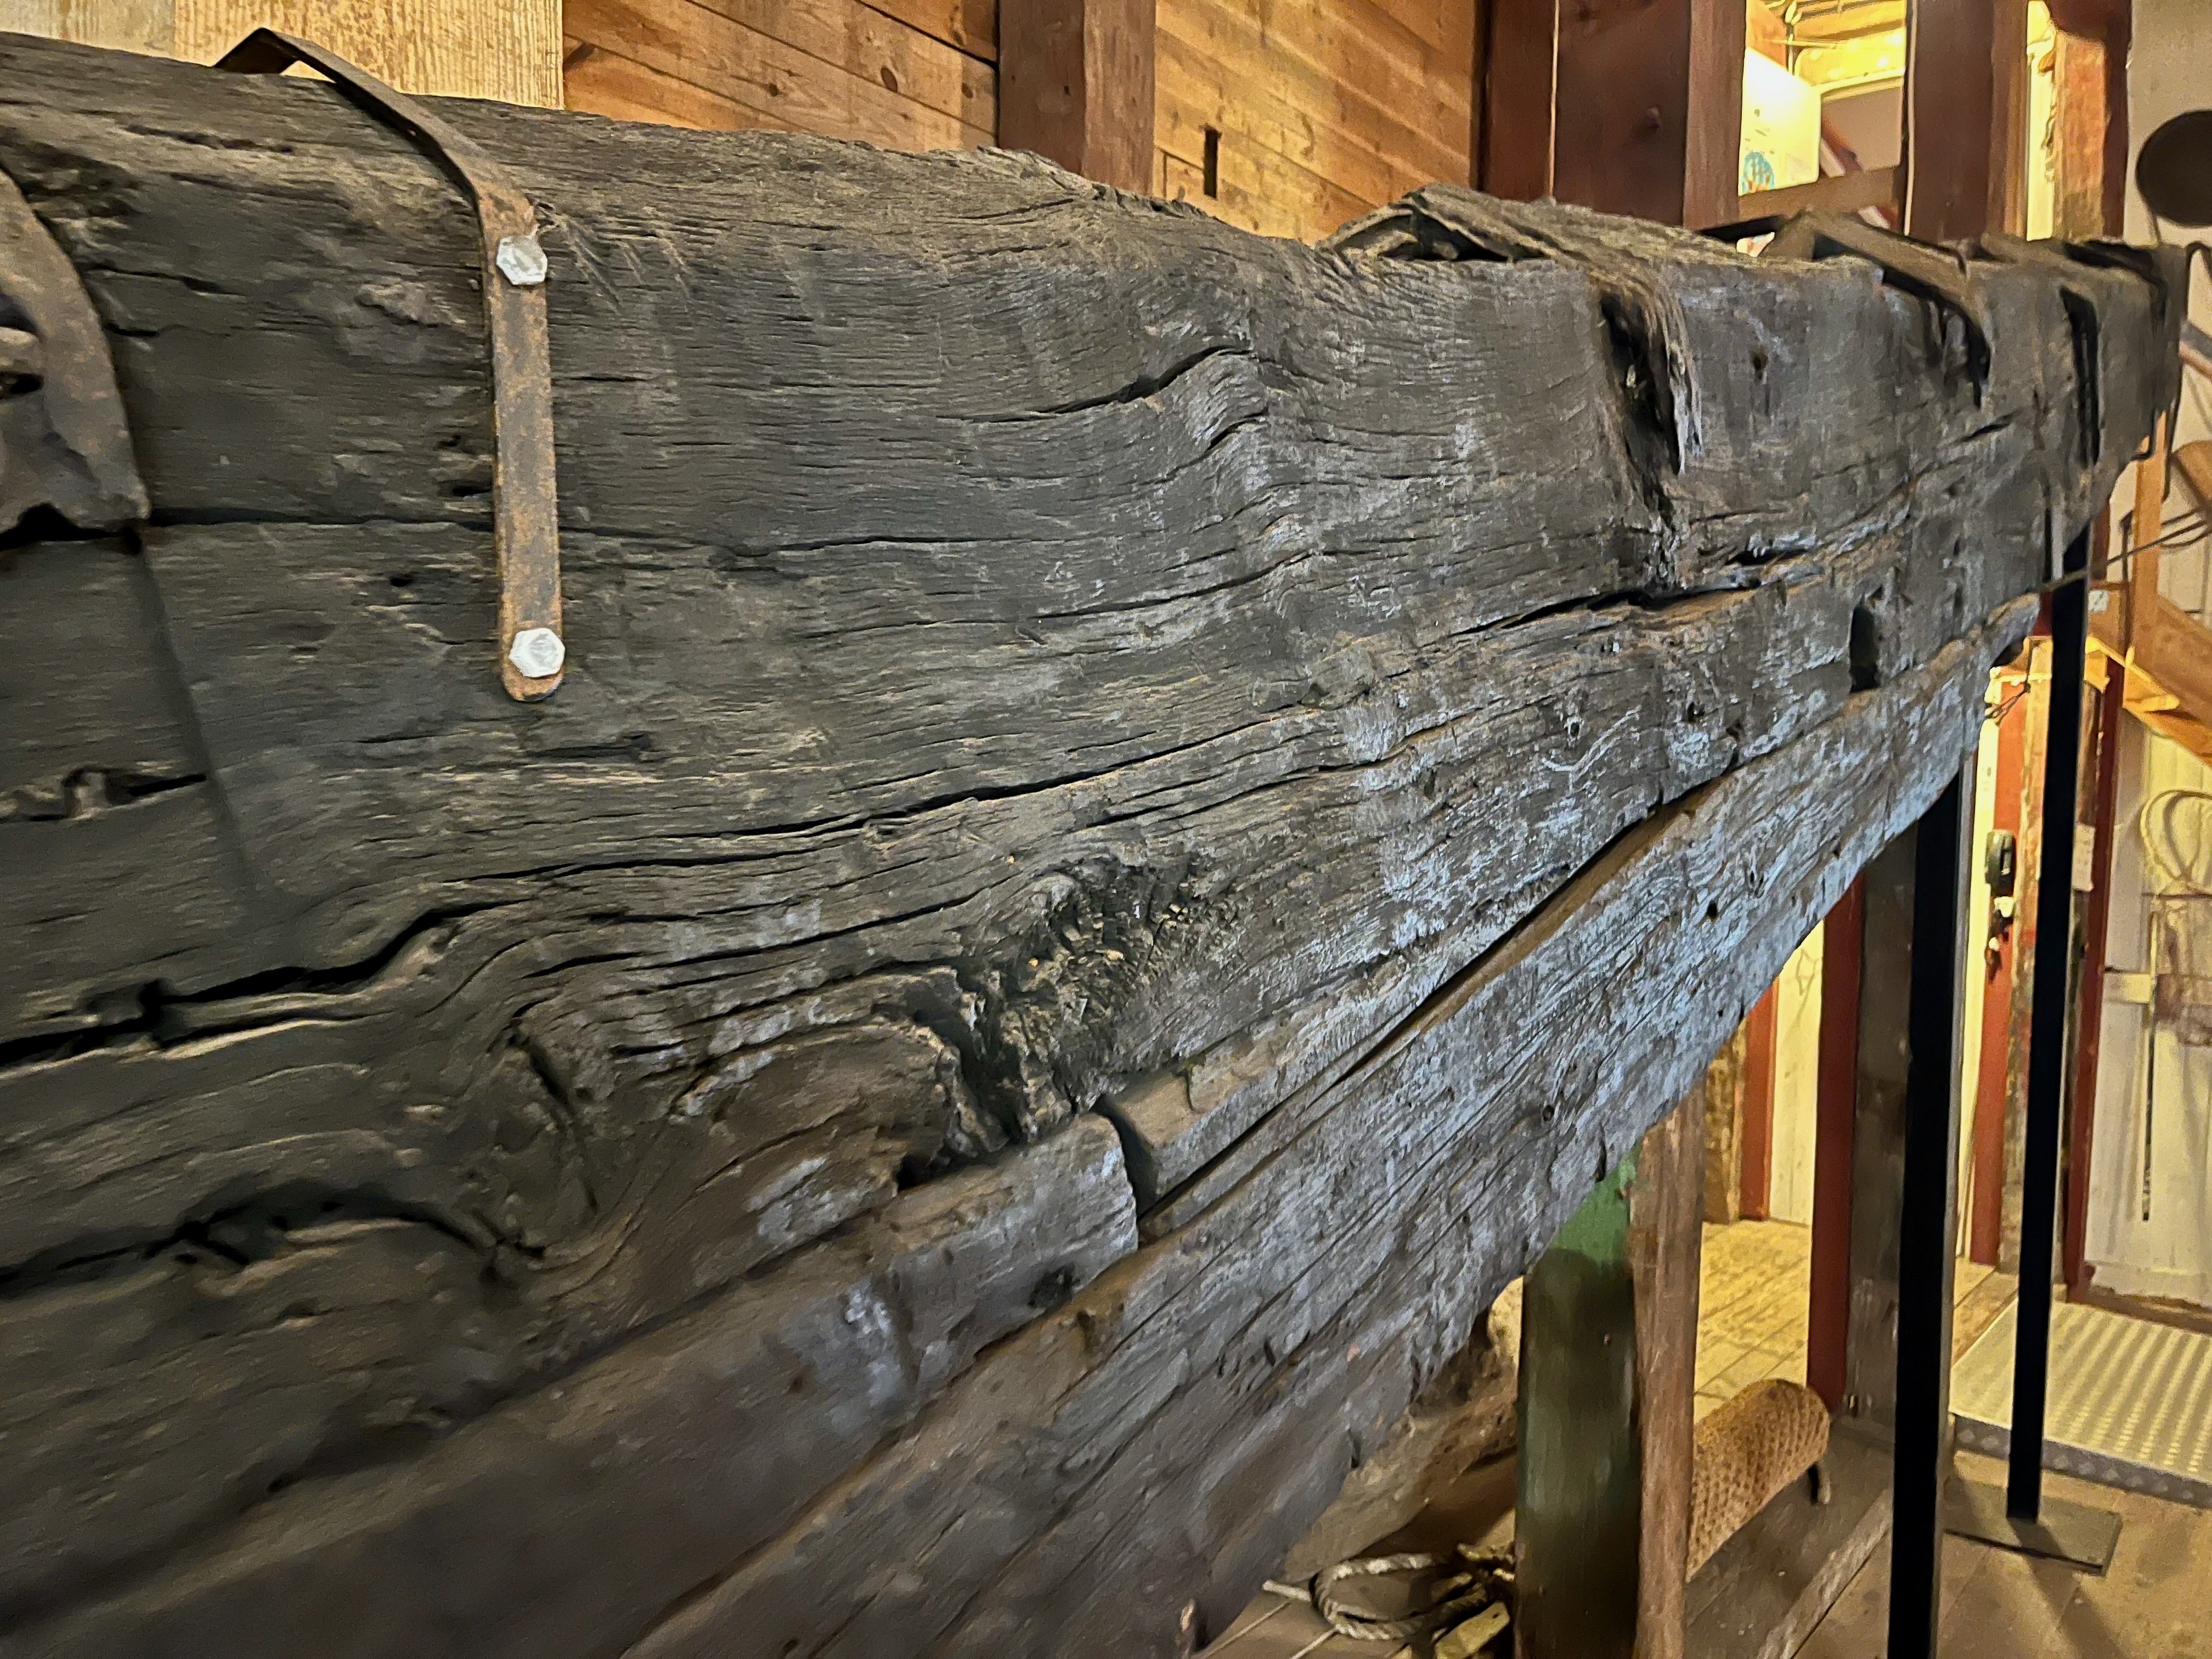
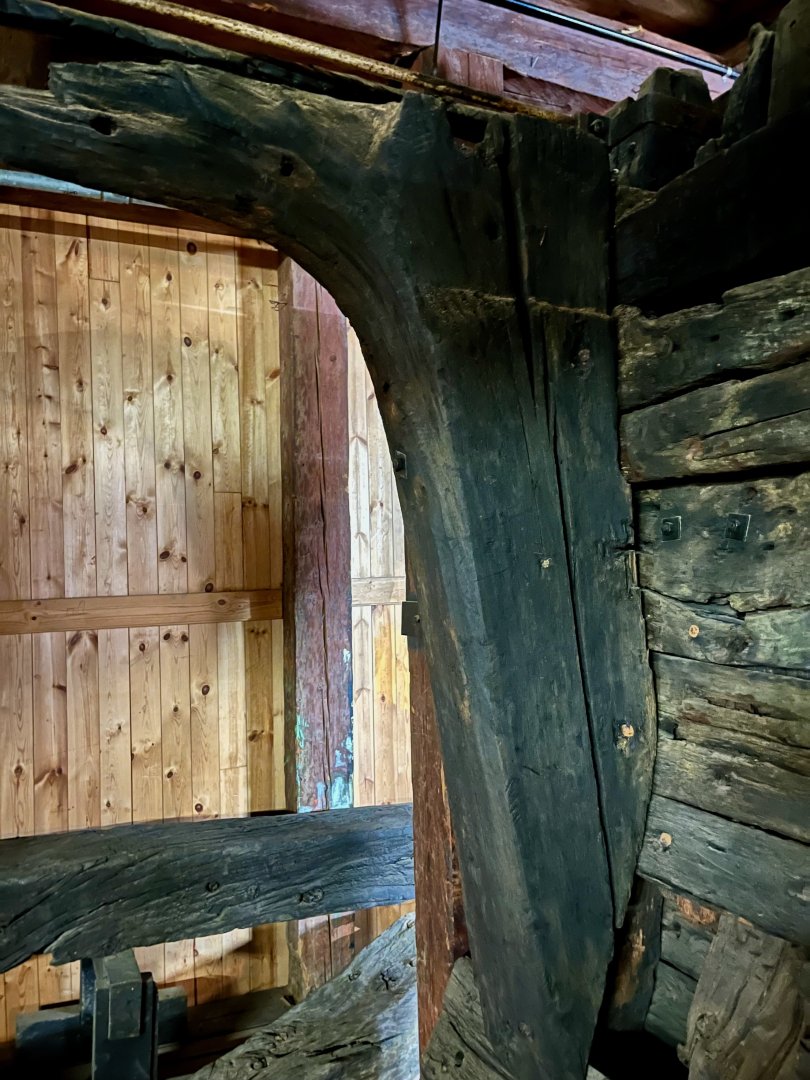
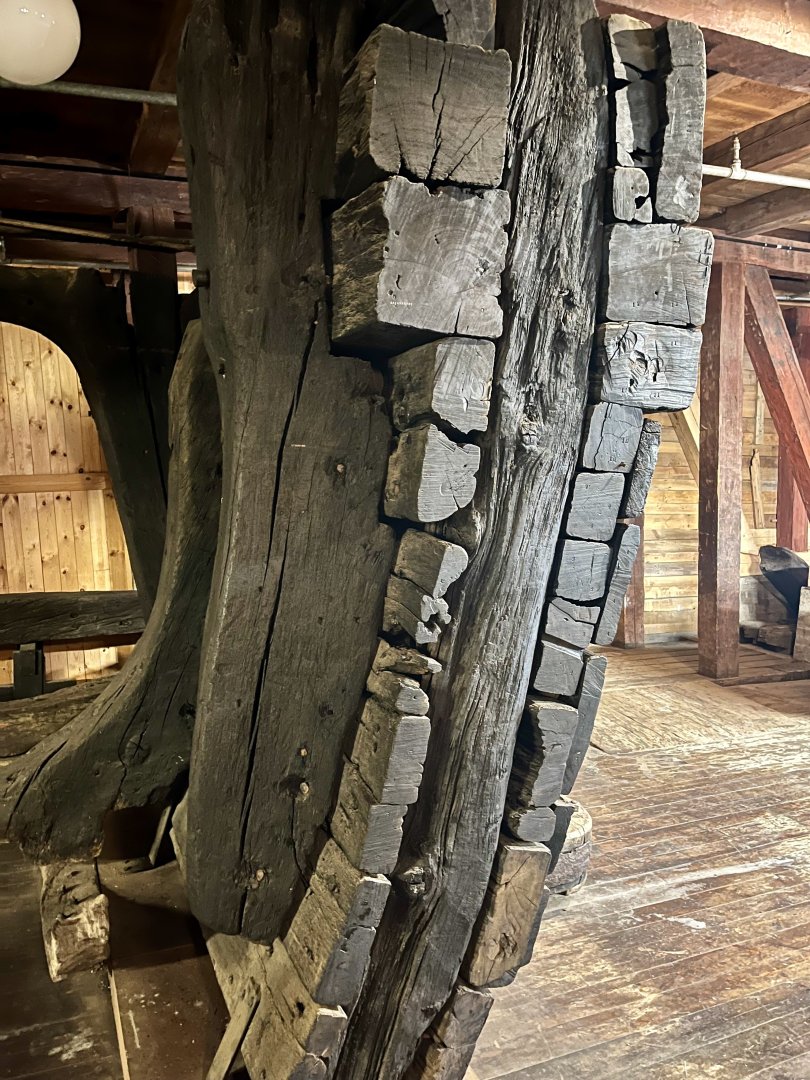
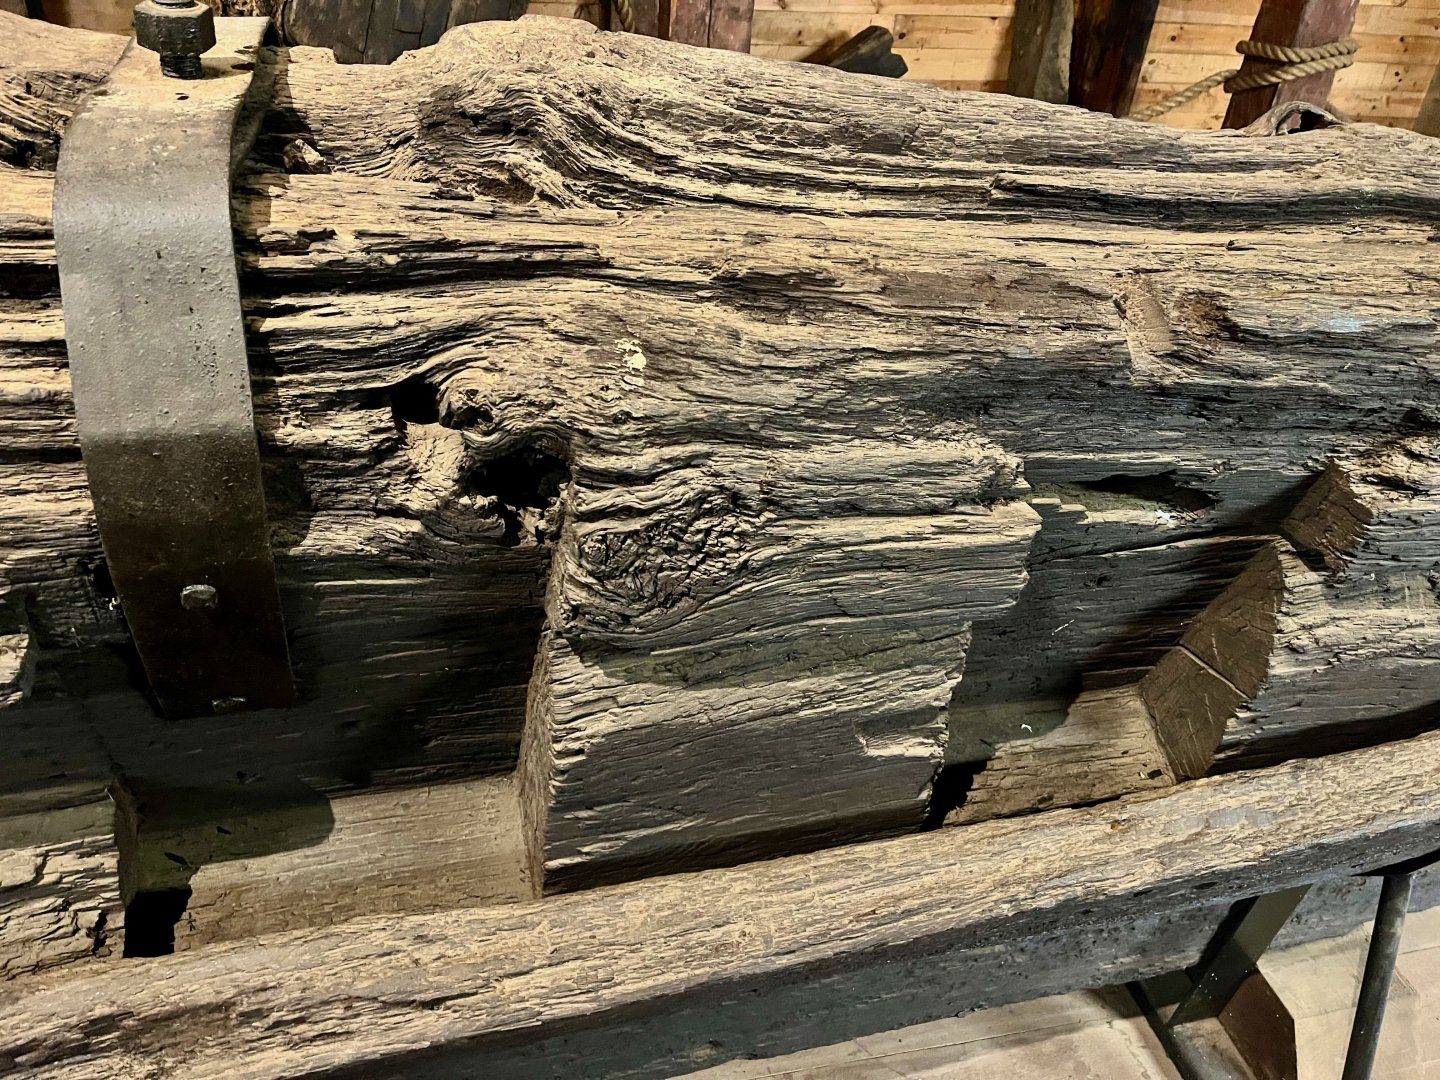
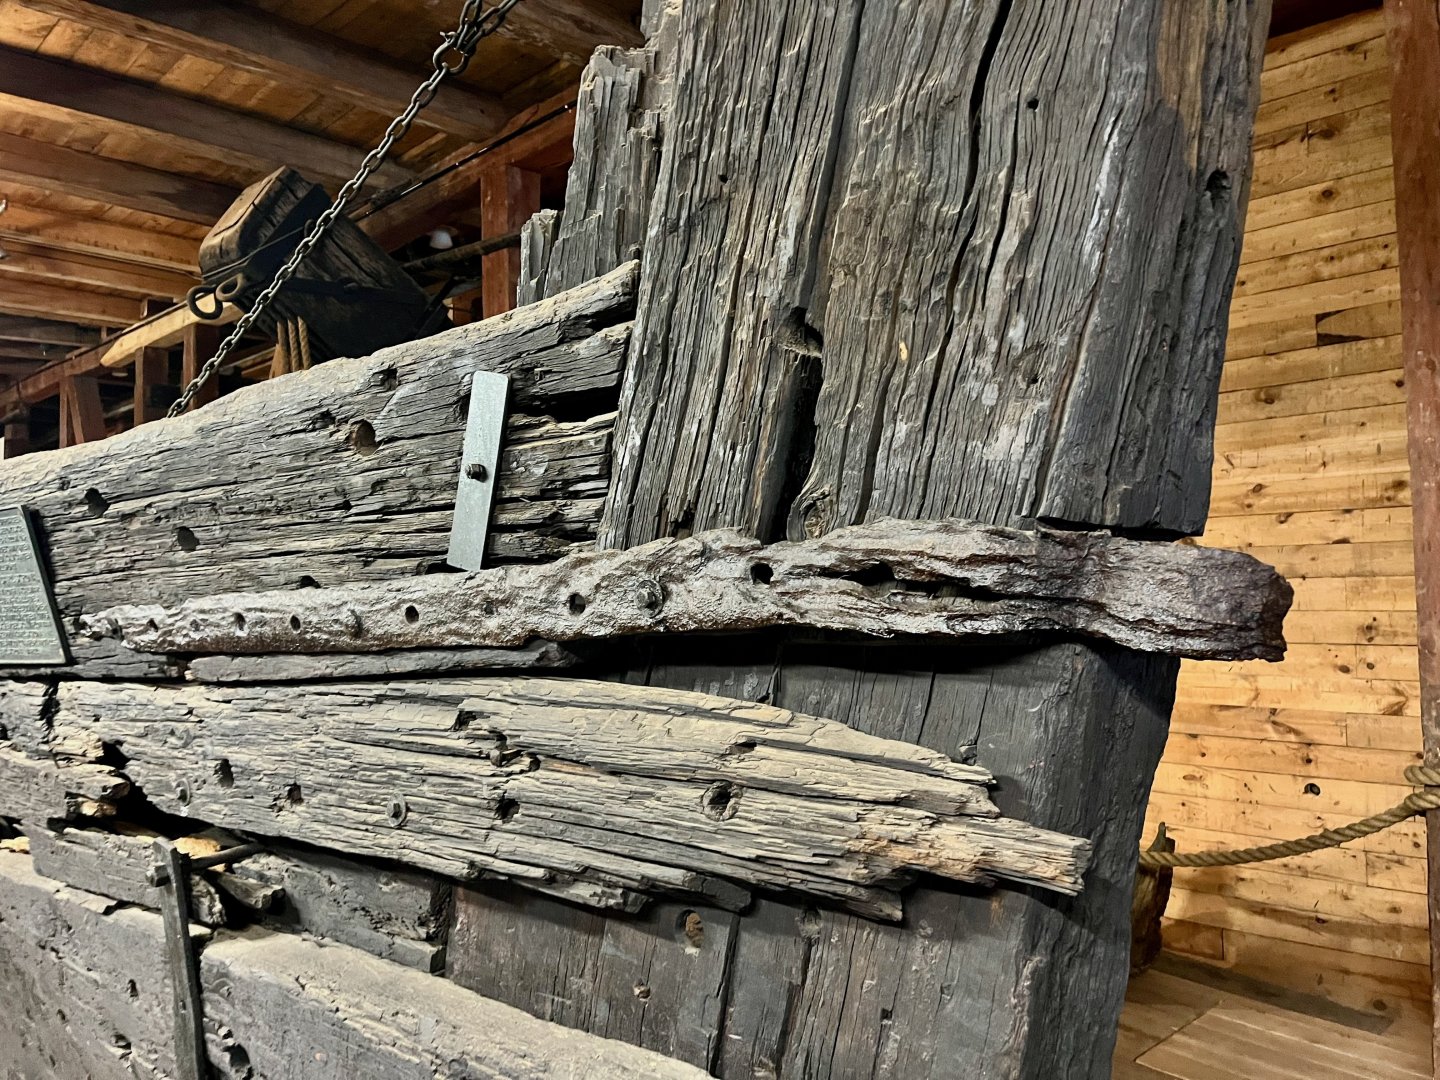
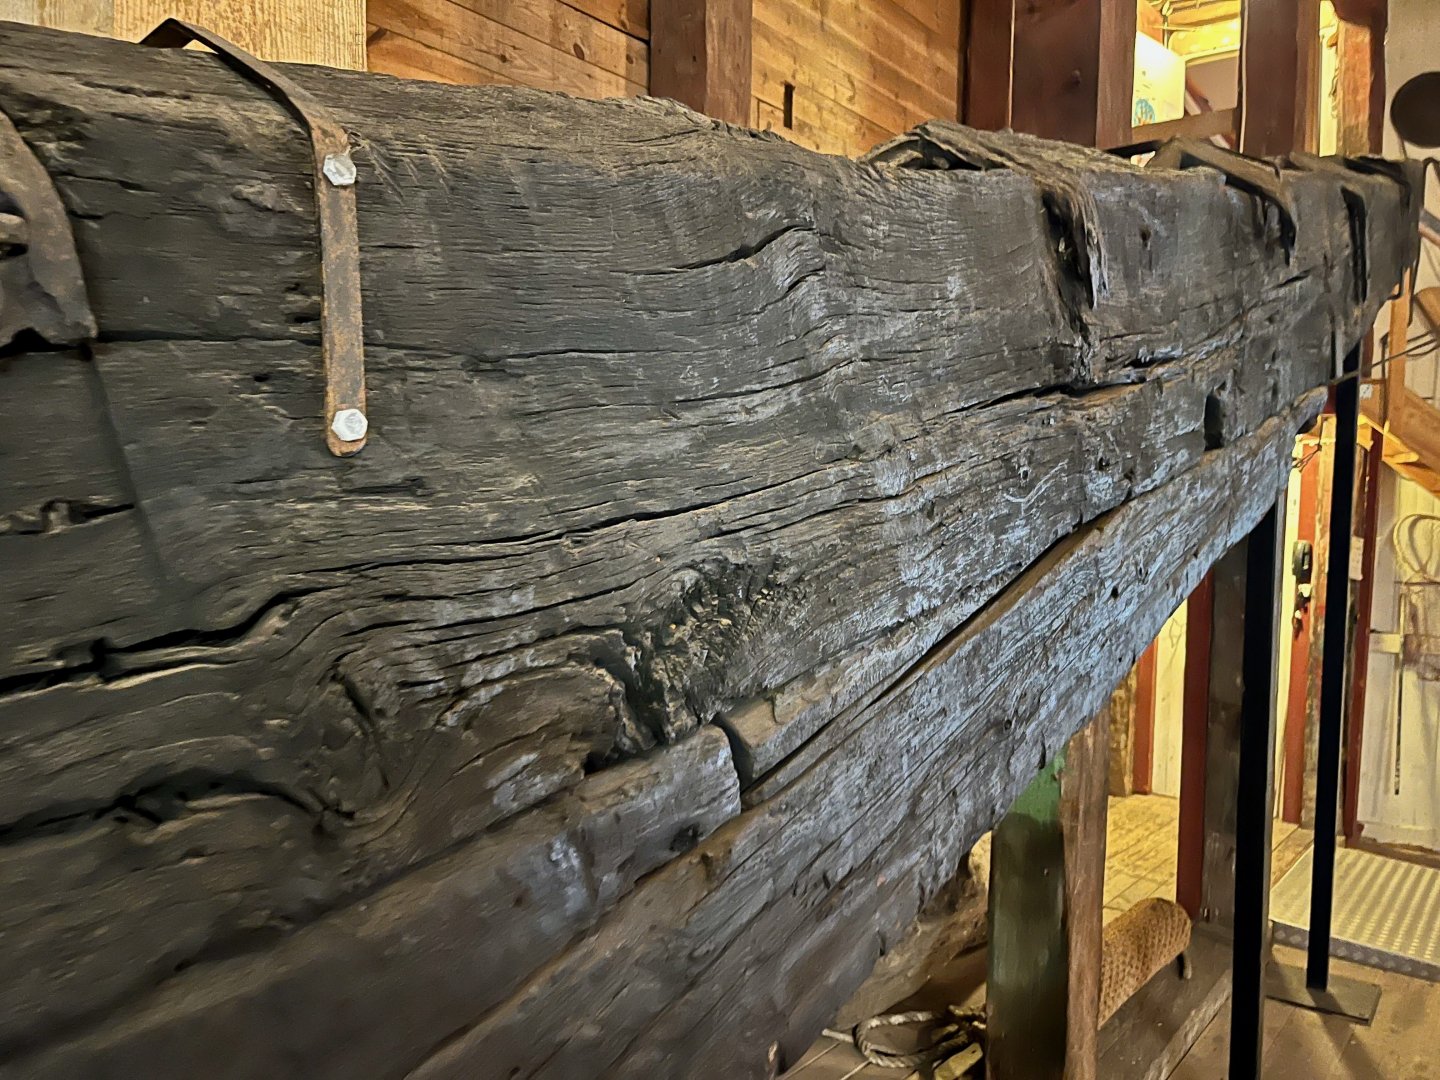
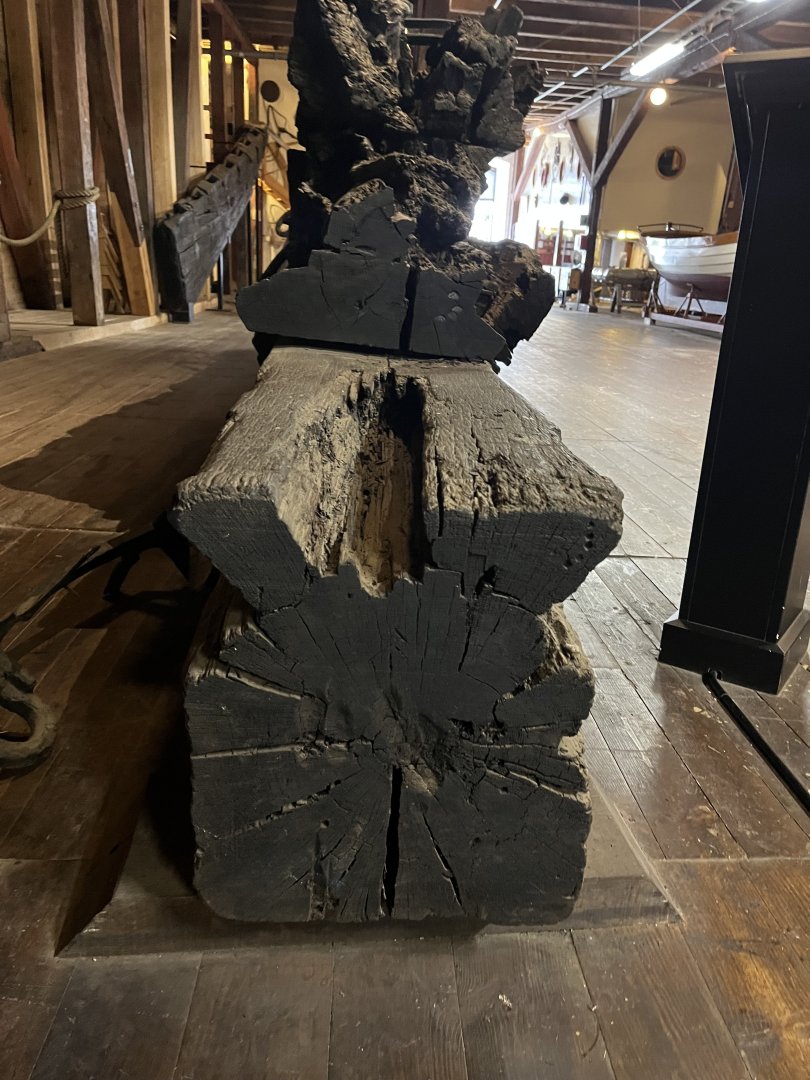
Speaking of wood imperfections - I was visiting the Naval Museum in Karlskrona (the naval base city in the South of Sweden). It had a fascinating bit of naval archeology on display - parts of the hull of an Age of Sail ships (1678 and 1717) excavated in the area. I did not realise how massive these timbers are in person! Impossible to convey on a photo, but these knees are a size of an adult human and likely heavier. The famous hull cross-section drawings look much more impressive when you can touch them... Speaking of the wood grain - note some knots and imperfections, as well as a non-ideal grain direction in the knee. Here is the deadwood - also far from the prime cut of a tree. That was the real life, a crude build reality rather than a work of art. Unfortunately knots and grain do not translate well in scale... And here is the rudder next to it: Sorry for the offtopic, just wanted to share. It's not often you get to see such structural pieces are on display, and not yet another salvaged cannon that museums like so much!


- 968 replies
-
- 19
-
-
-

-
- hahn
- oliver cromwell
- (and 1 more)
-
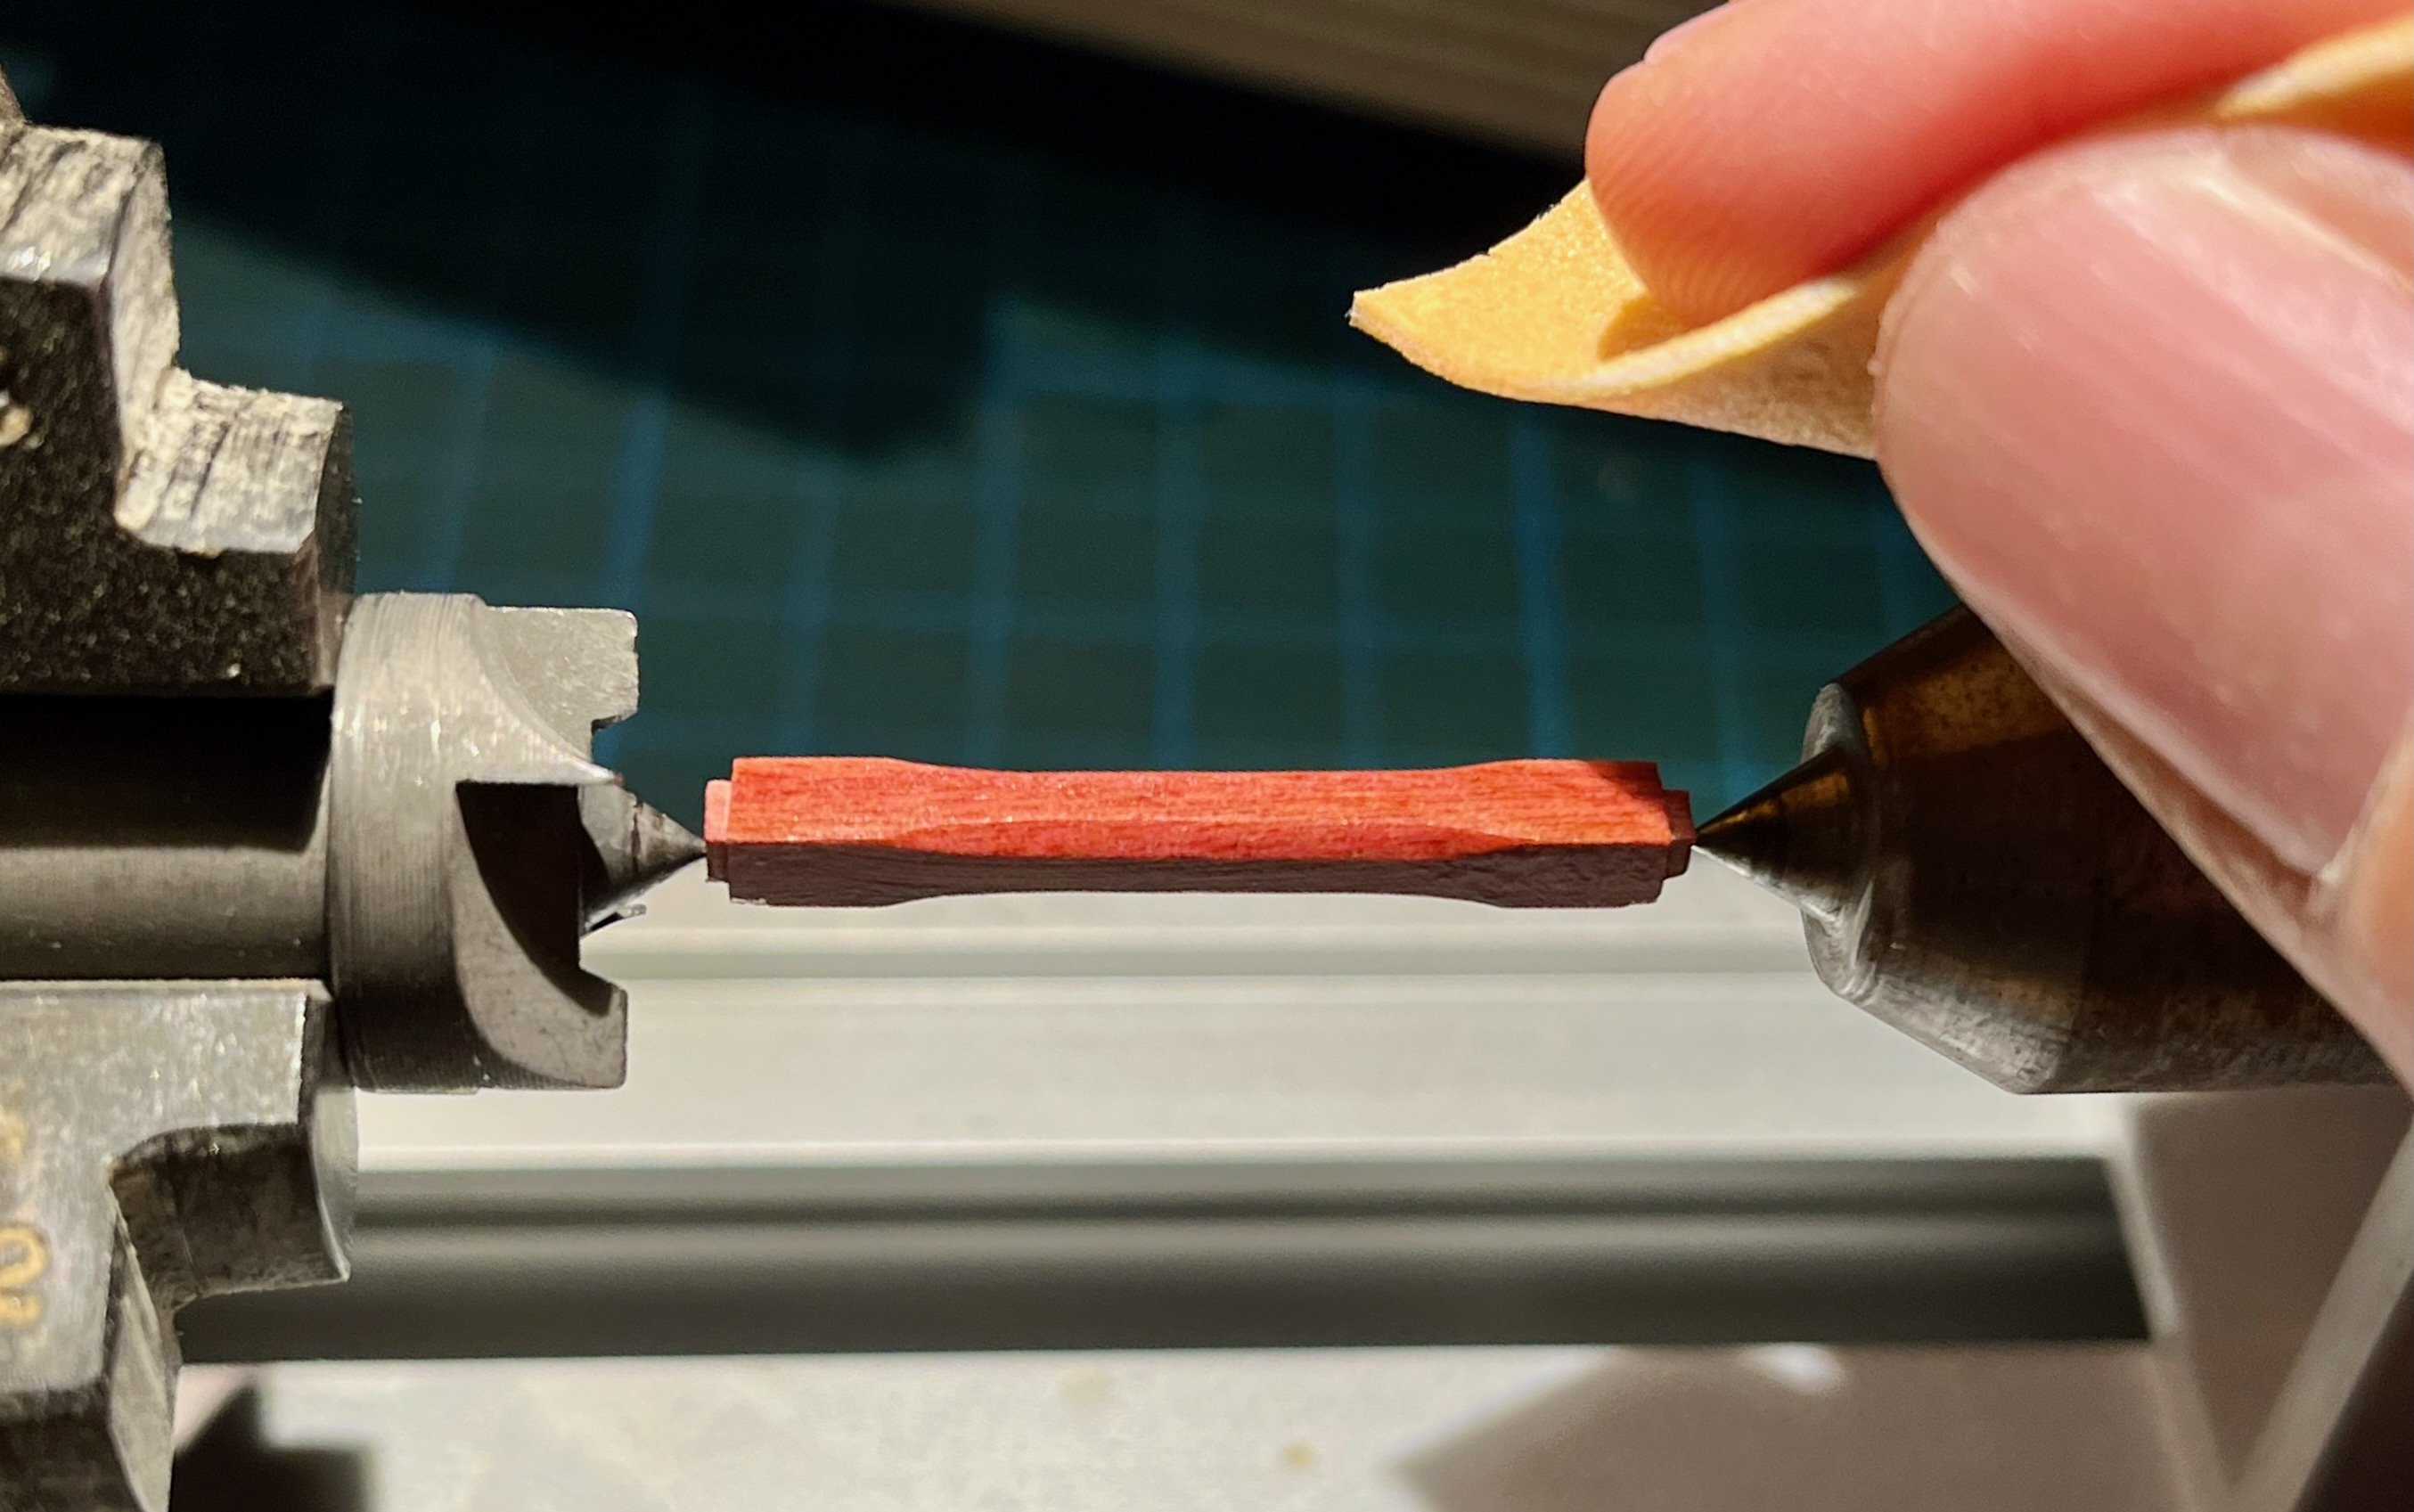
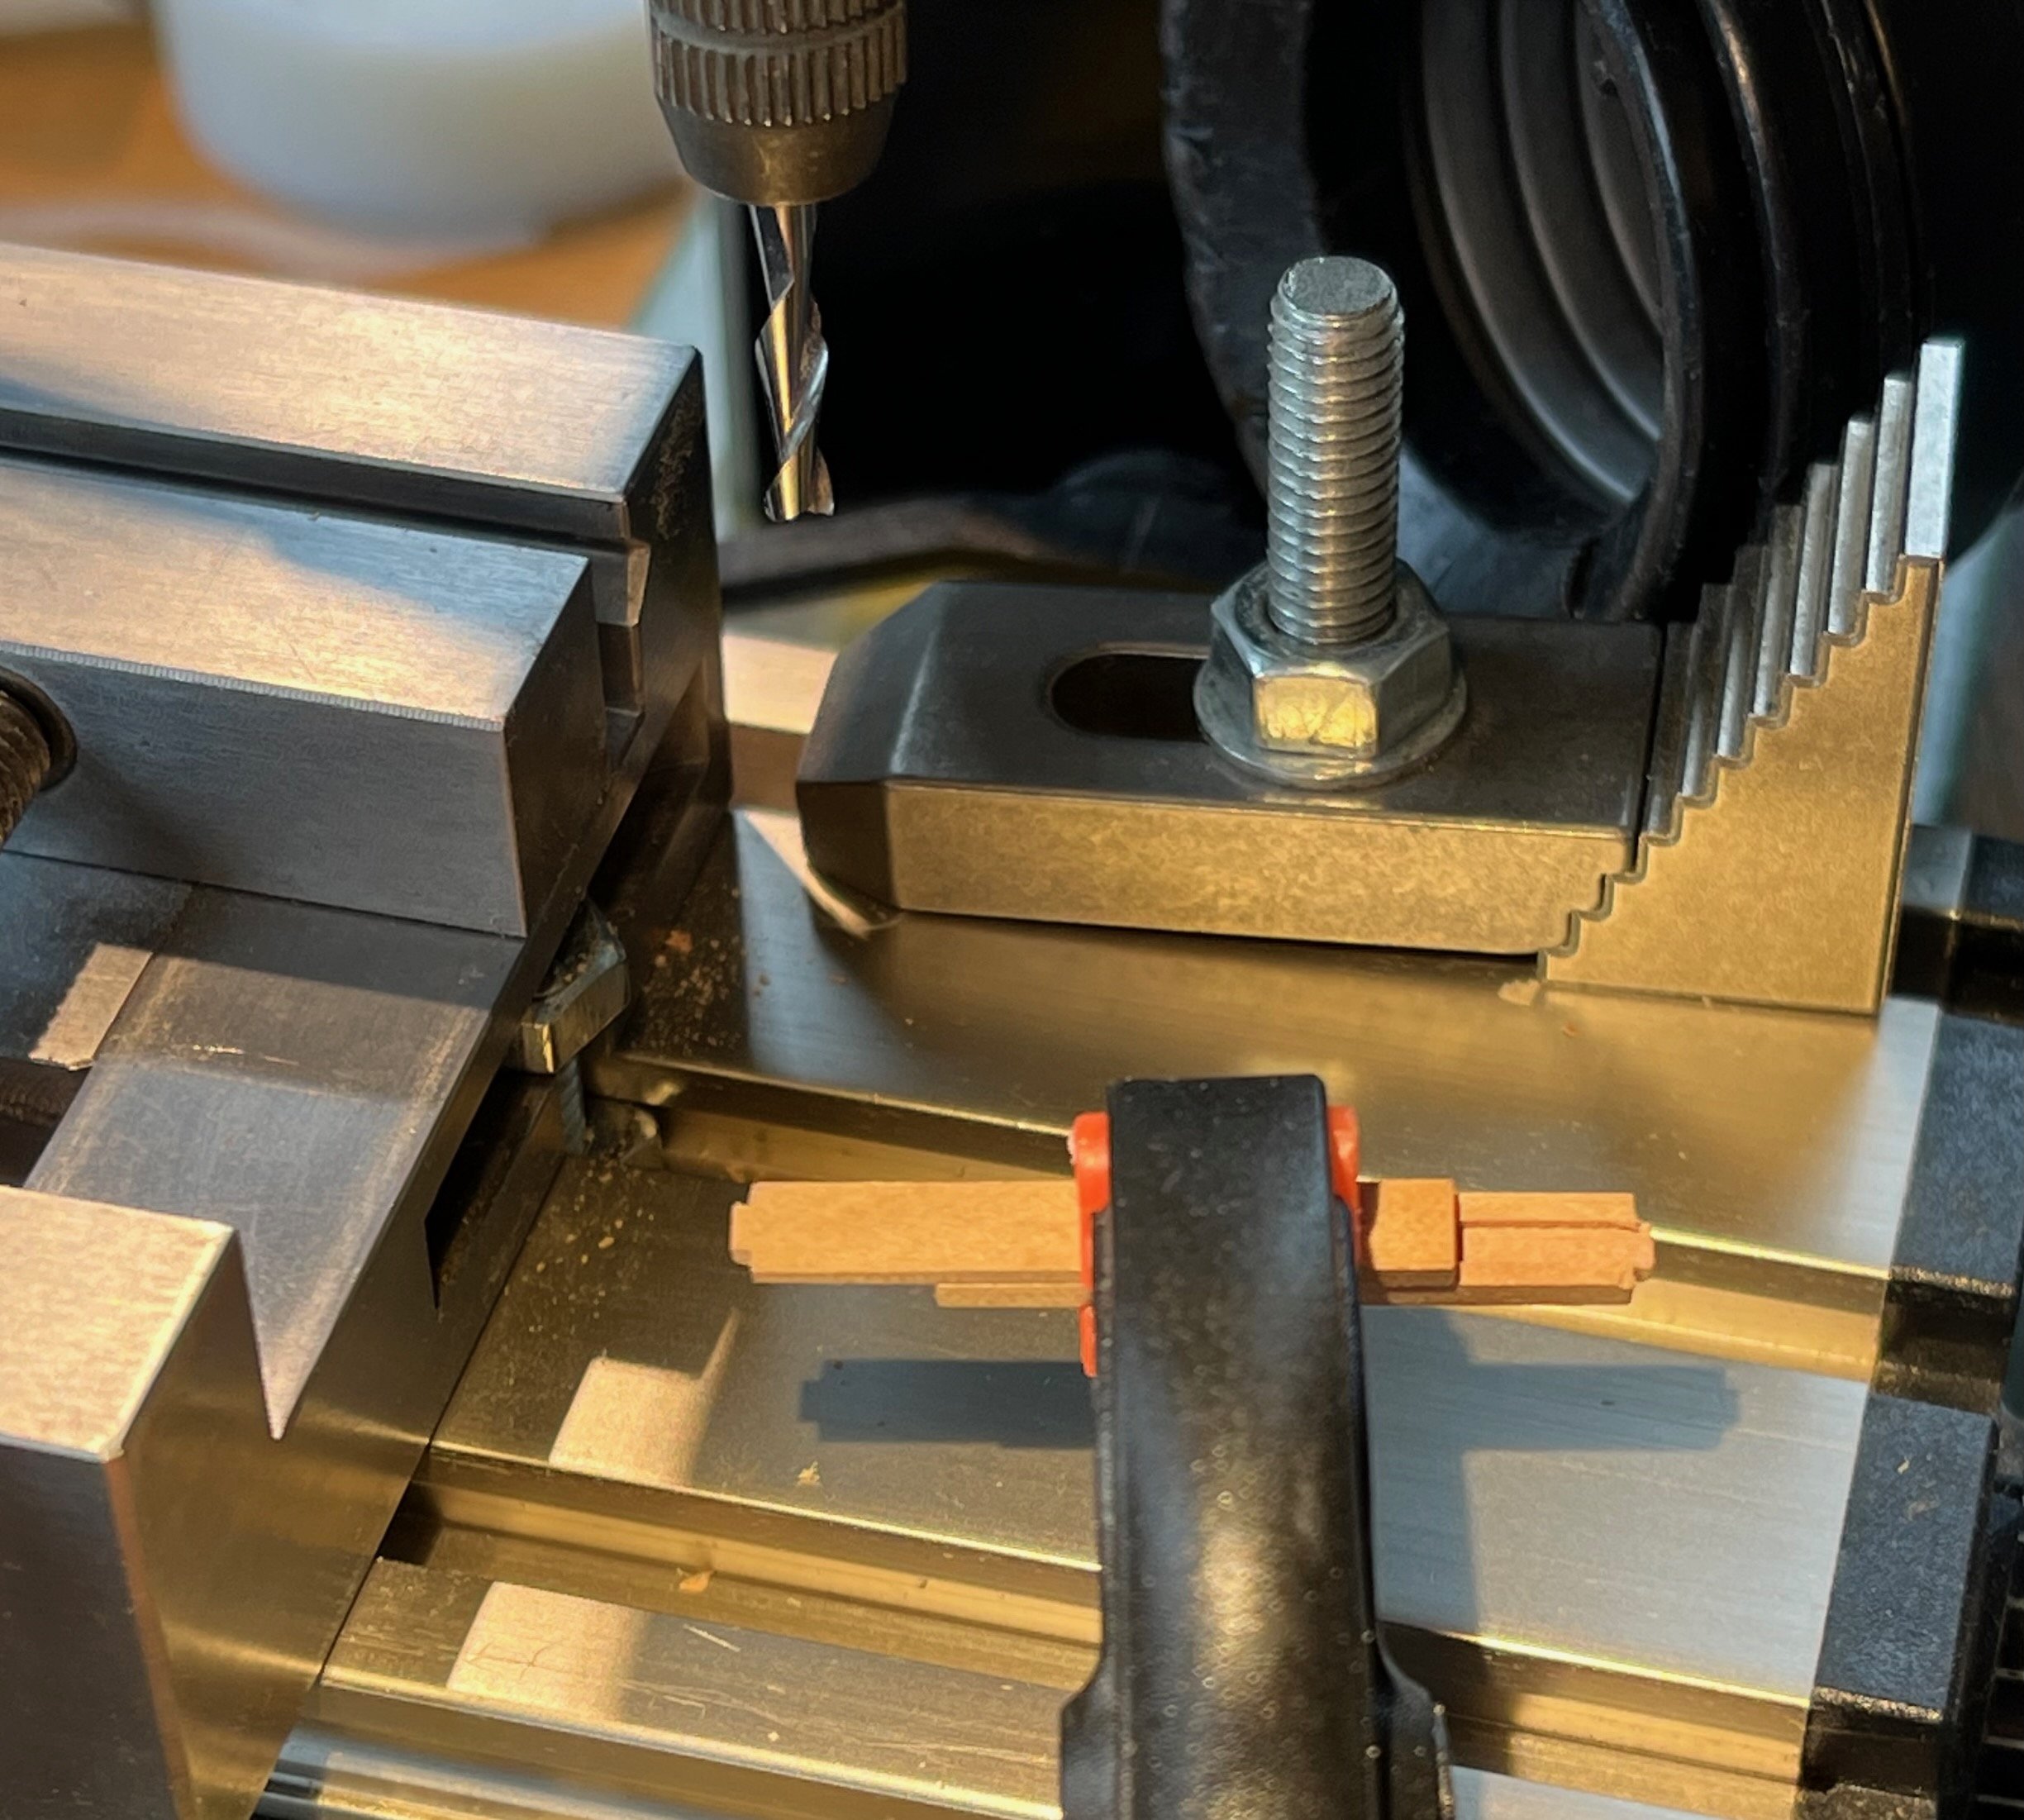
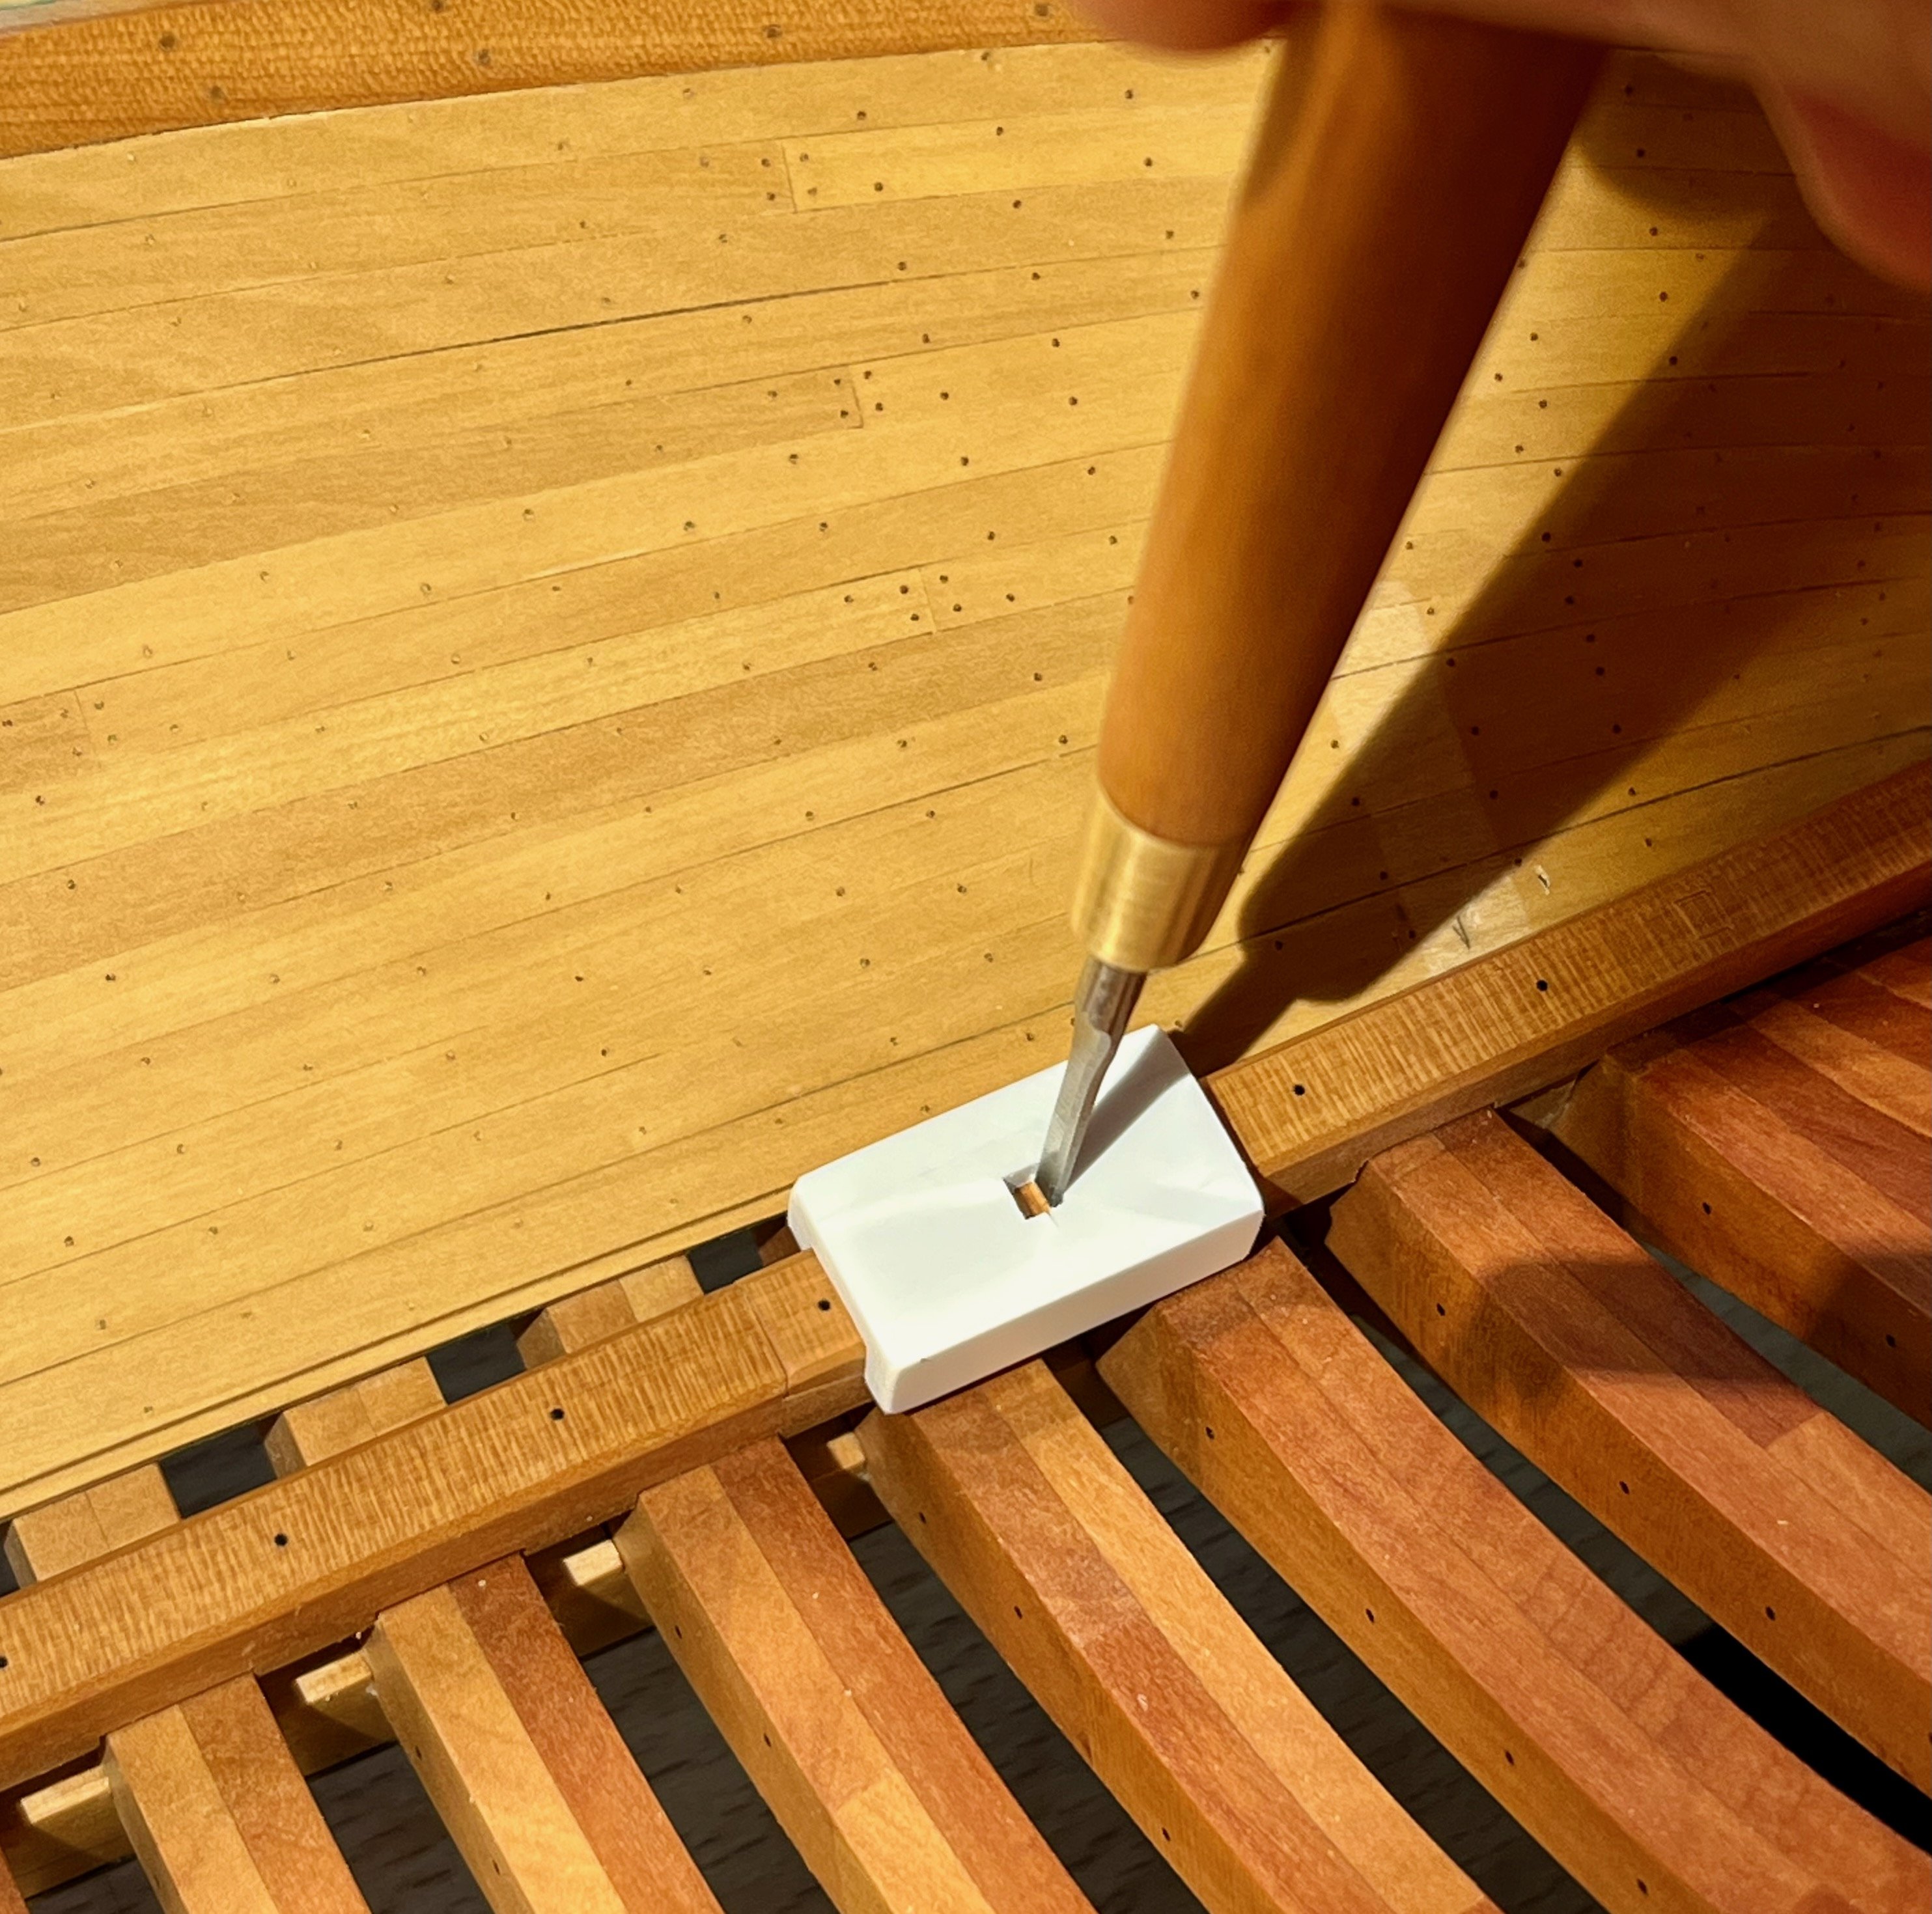
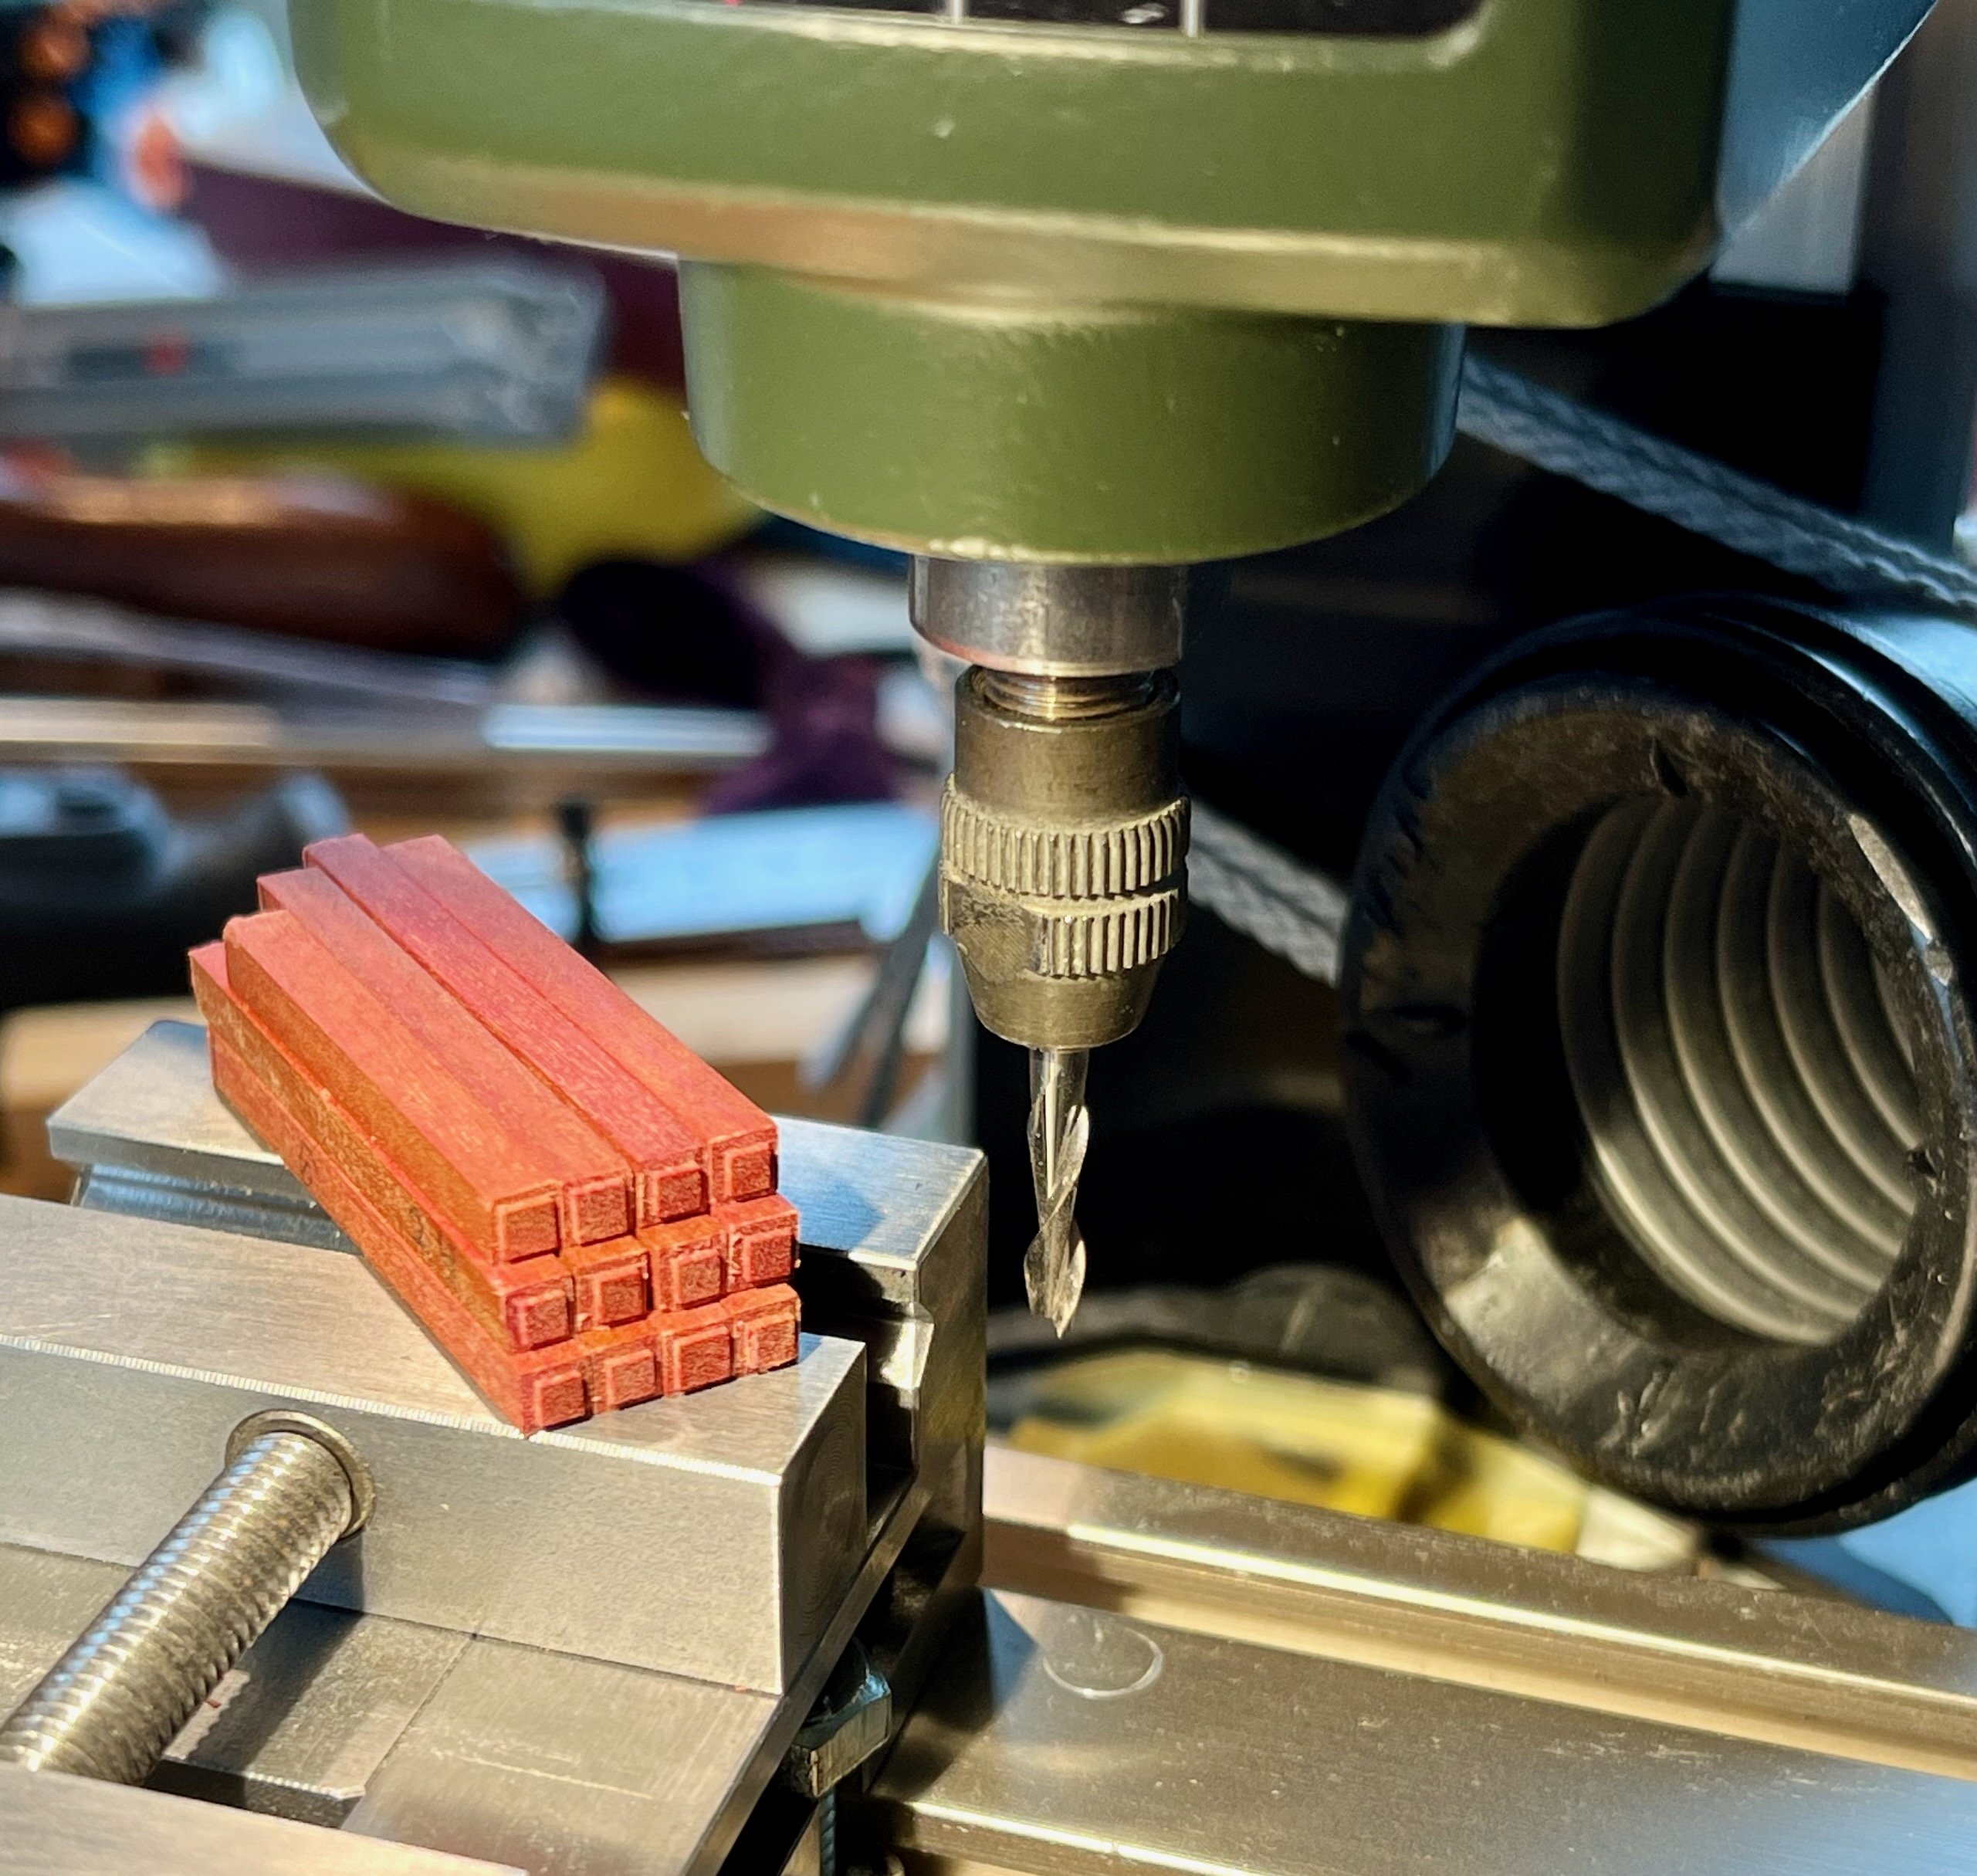
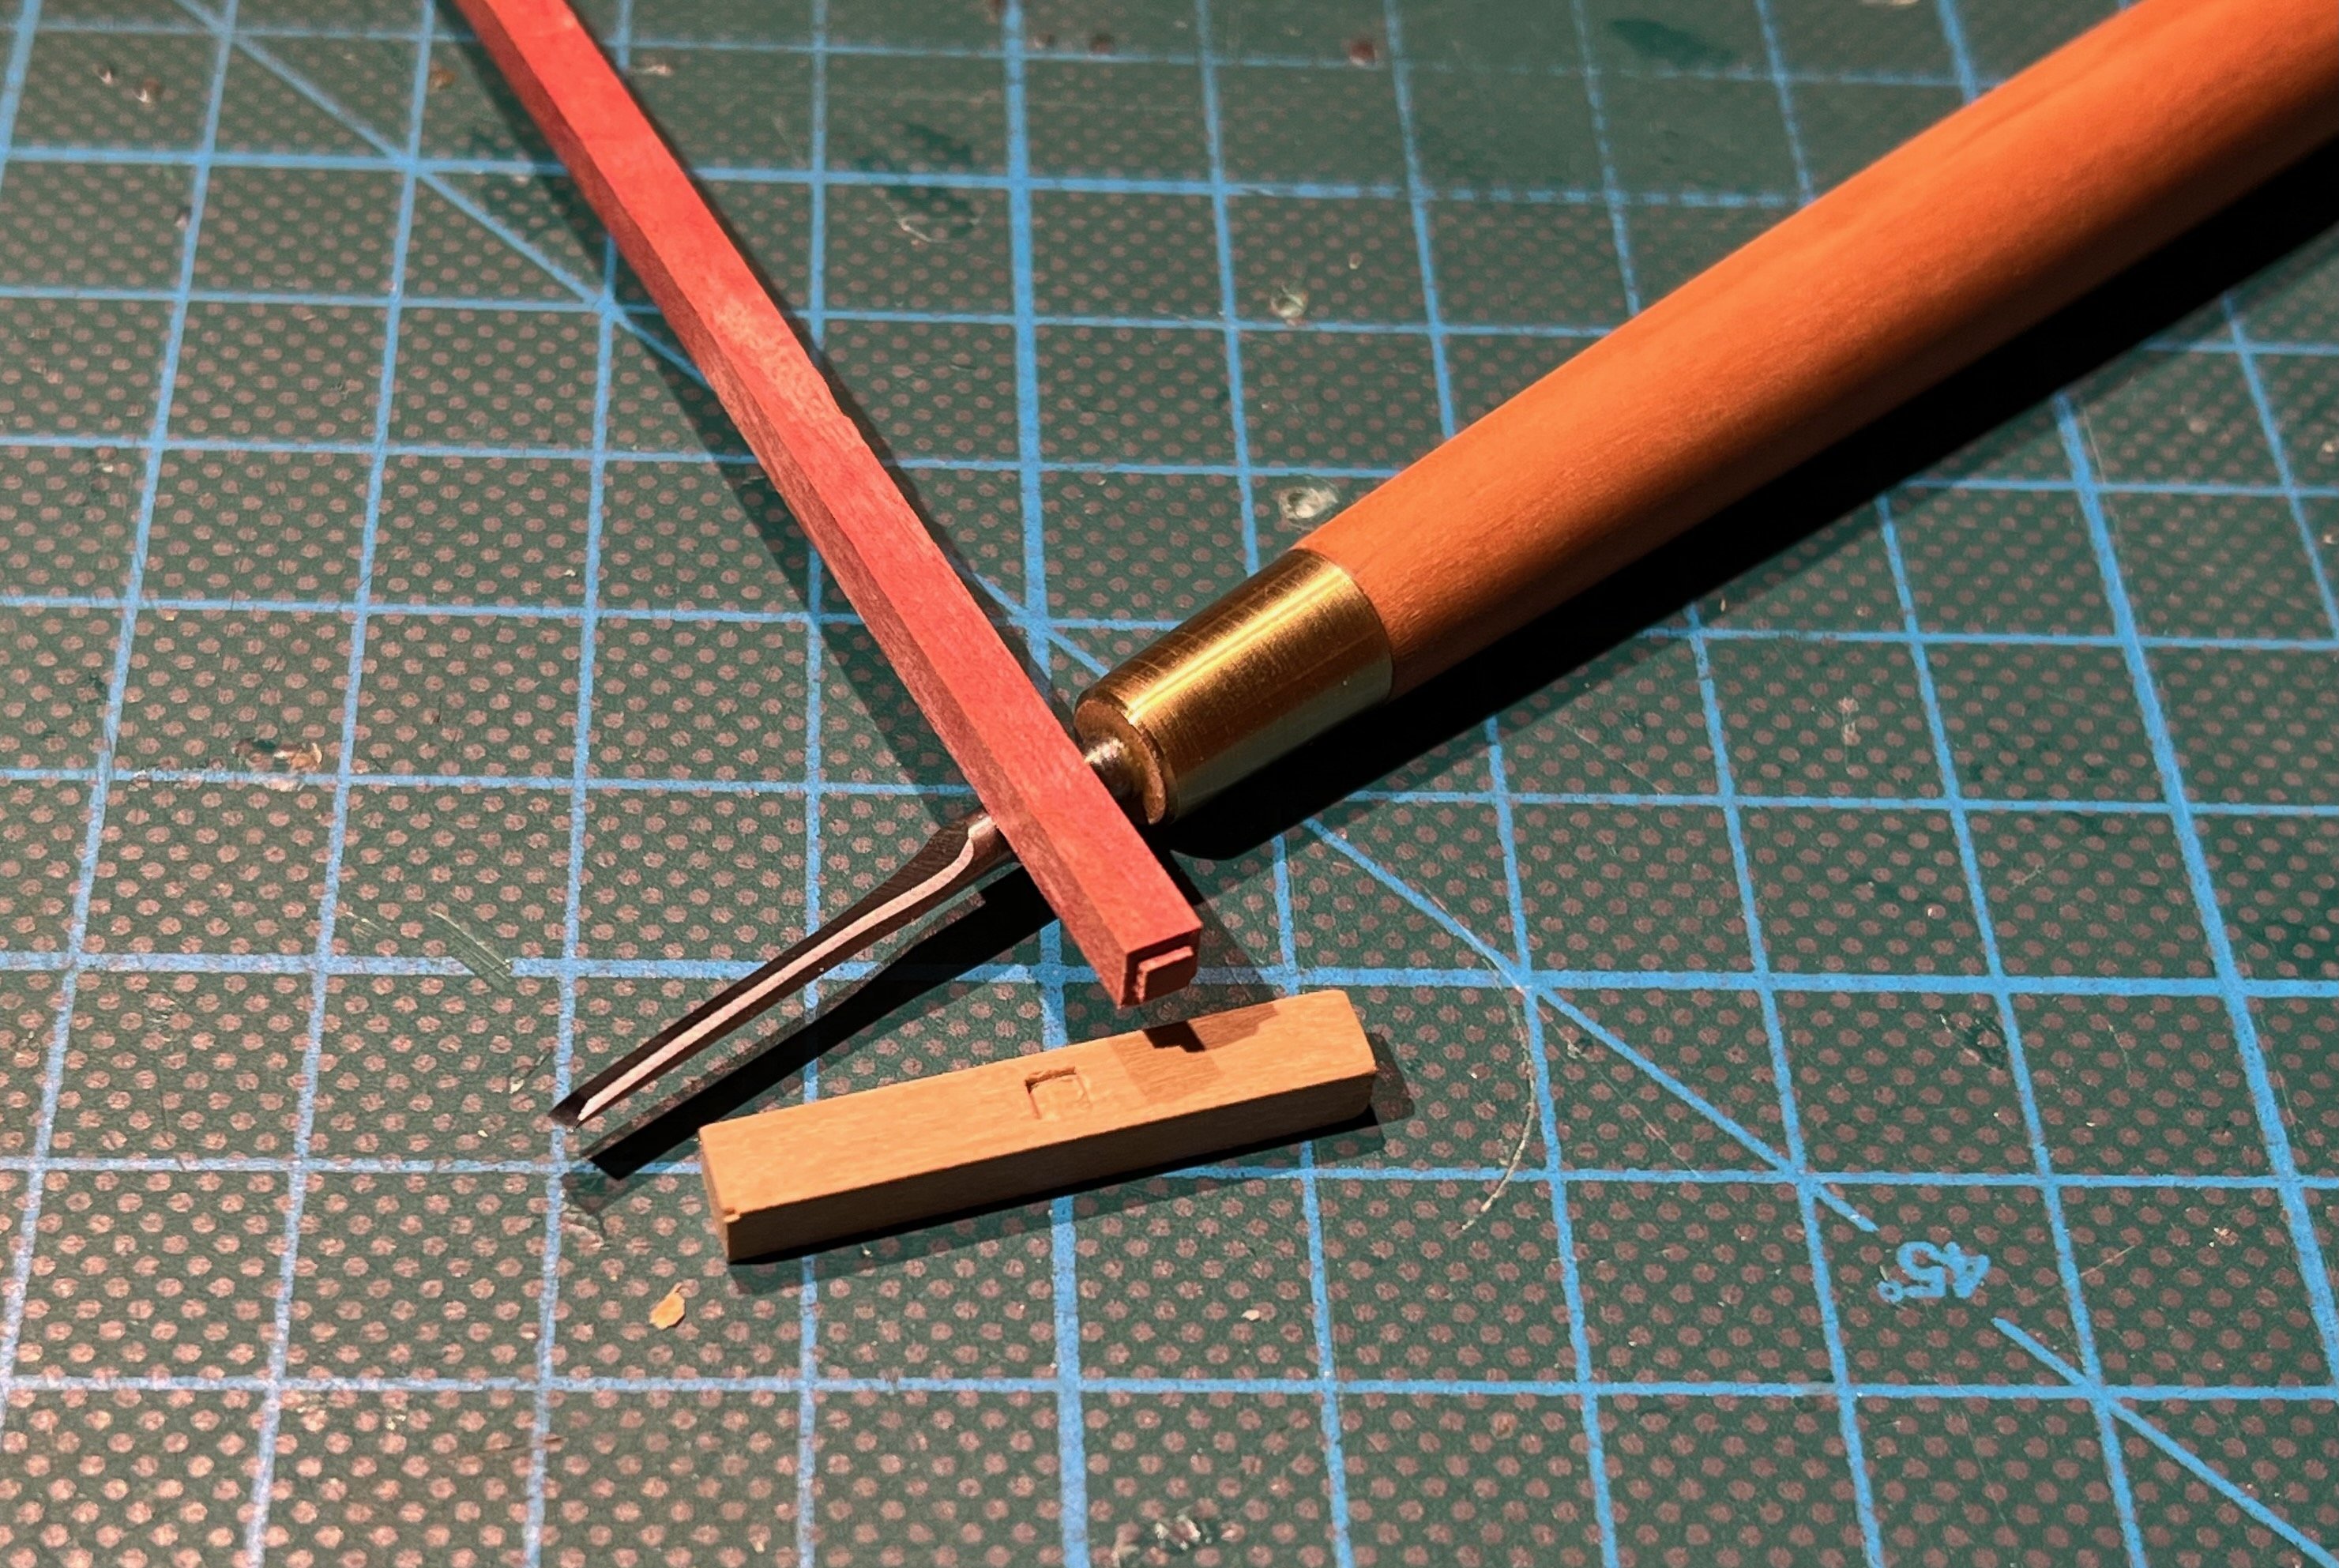
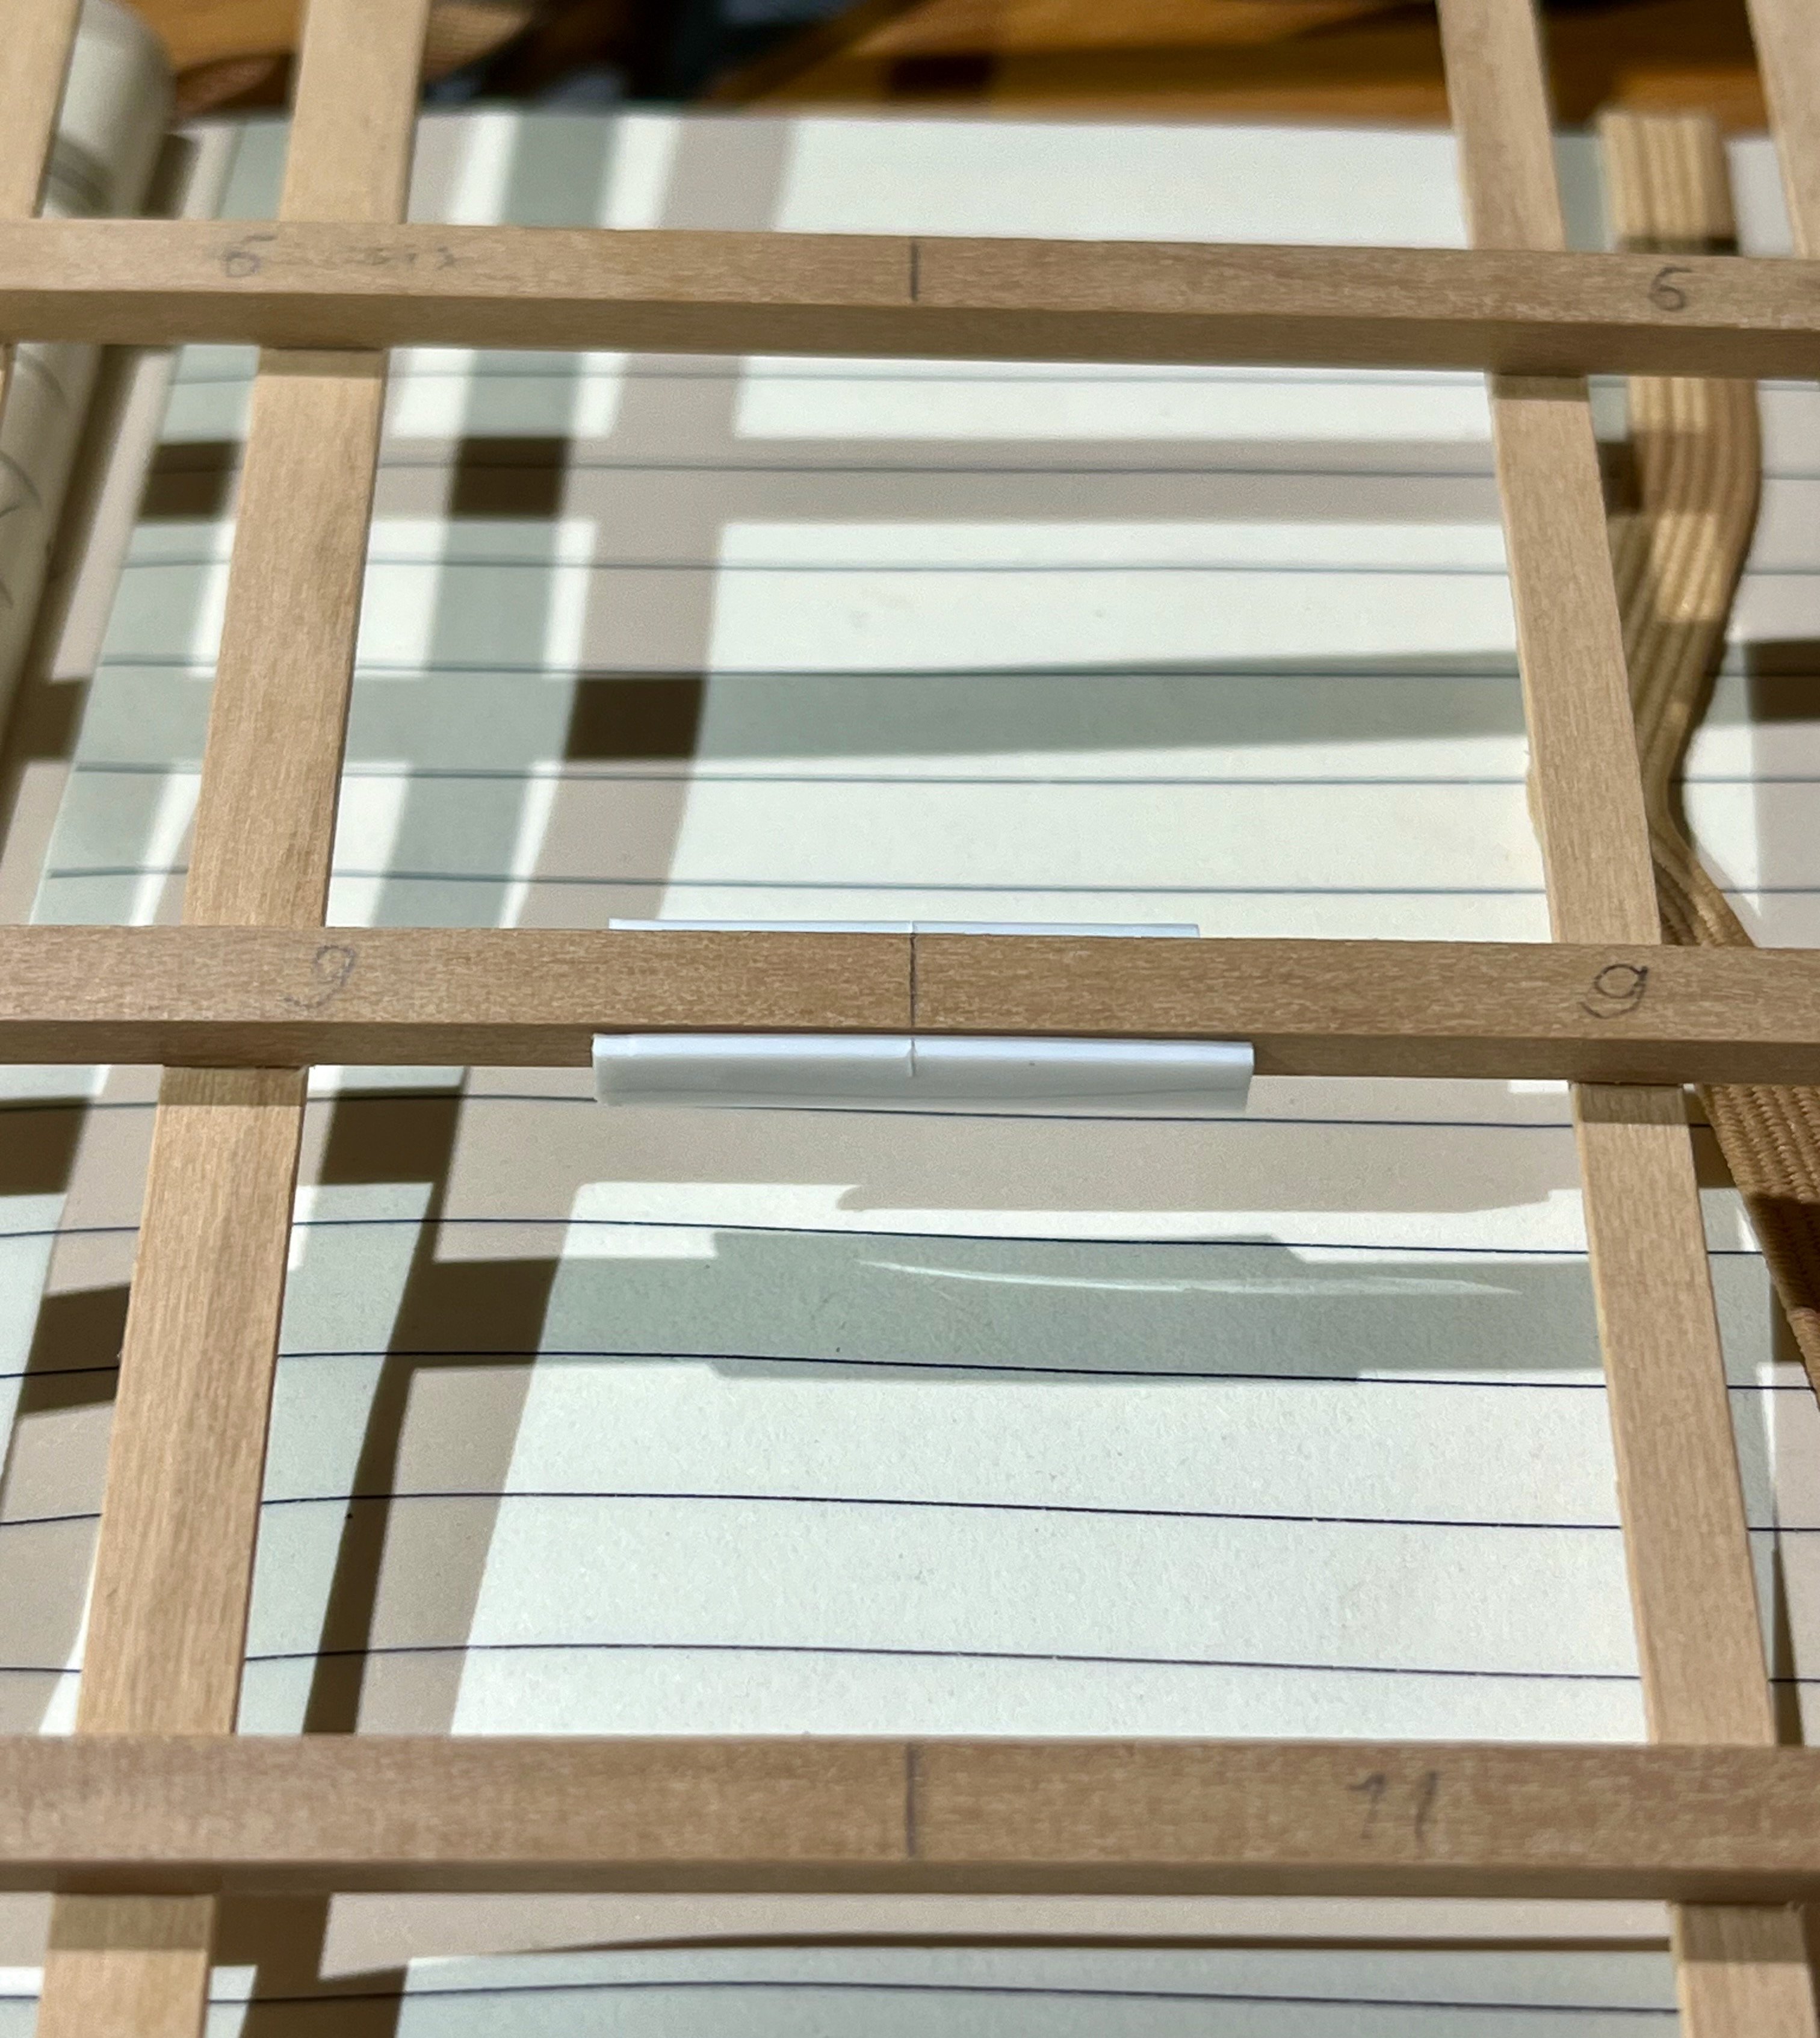
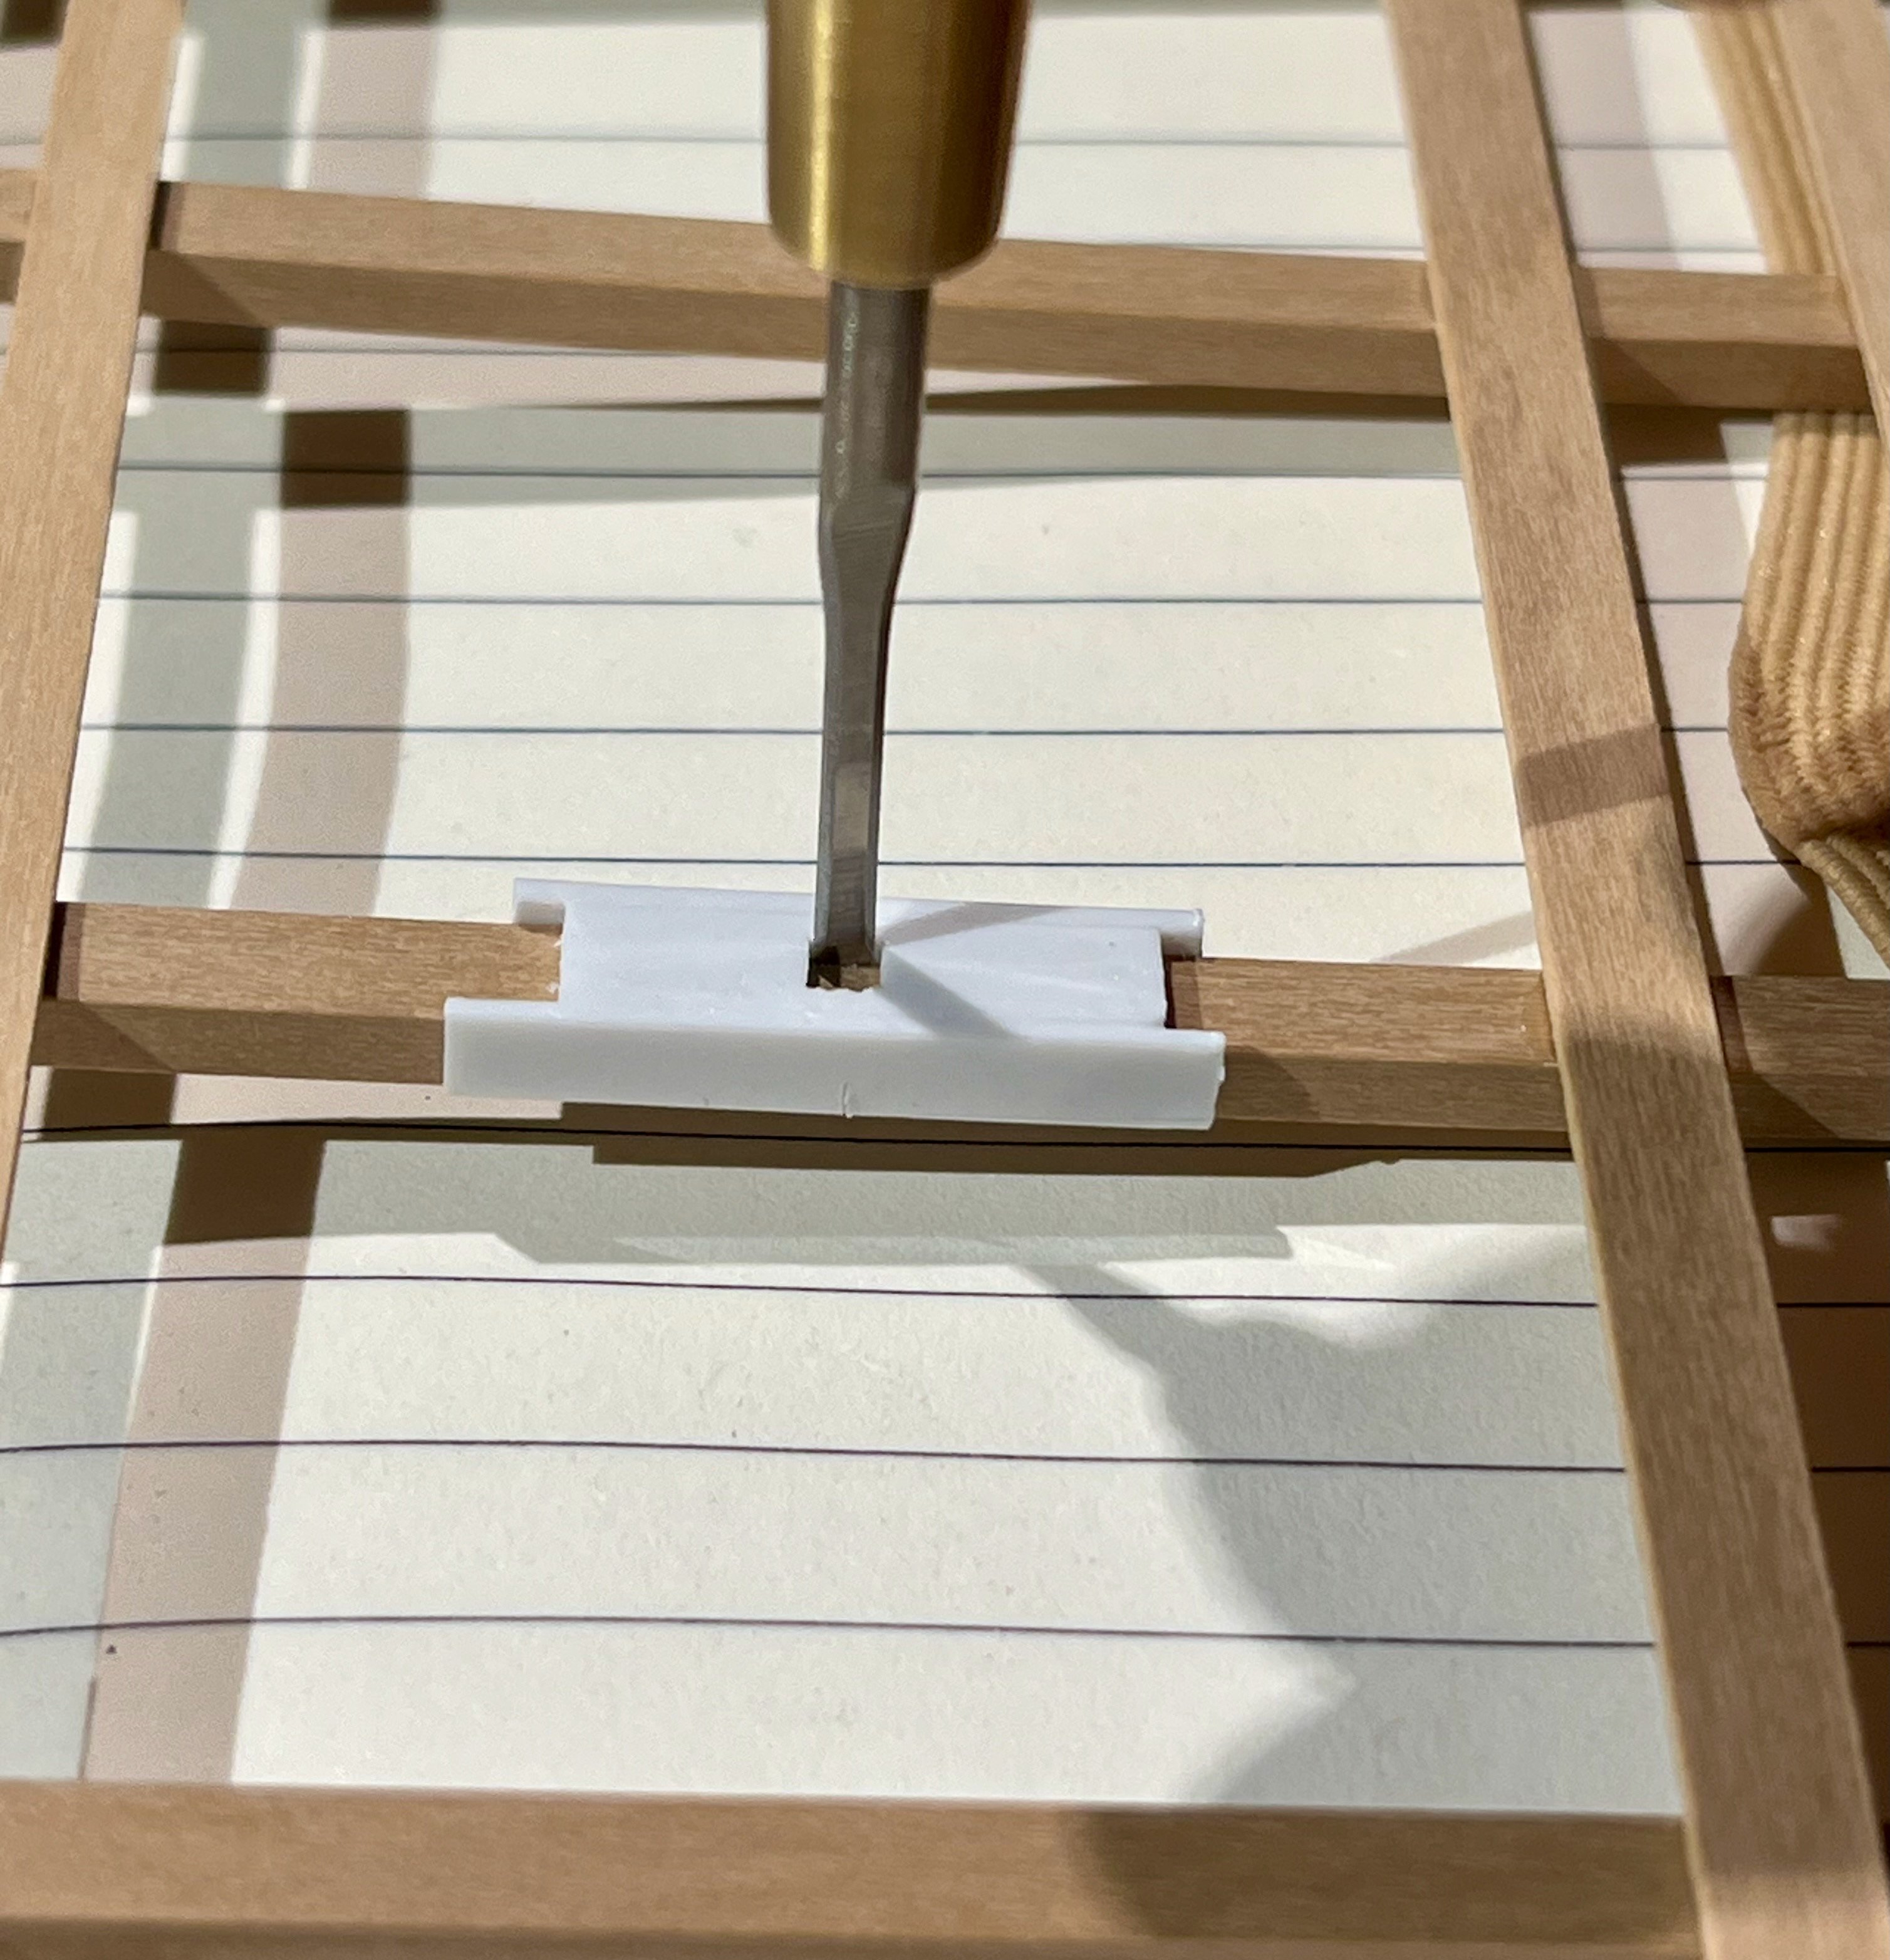
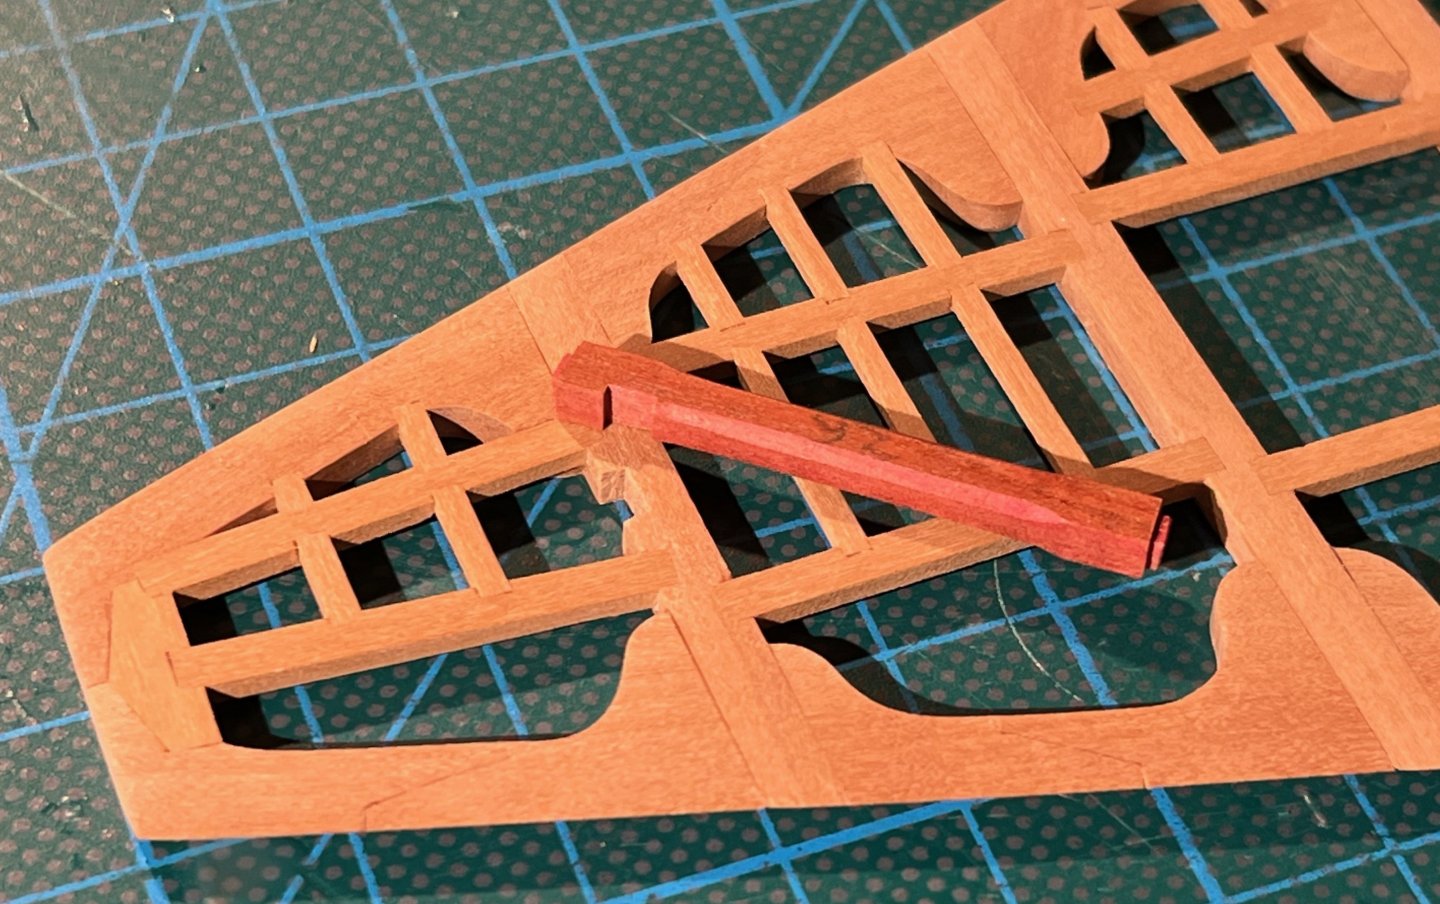
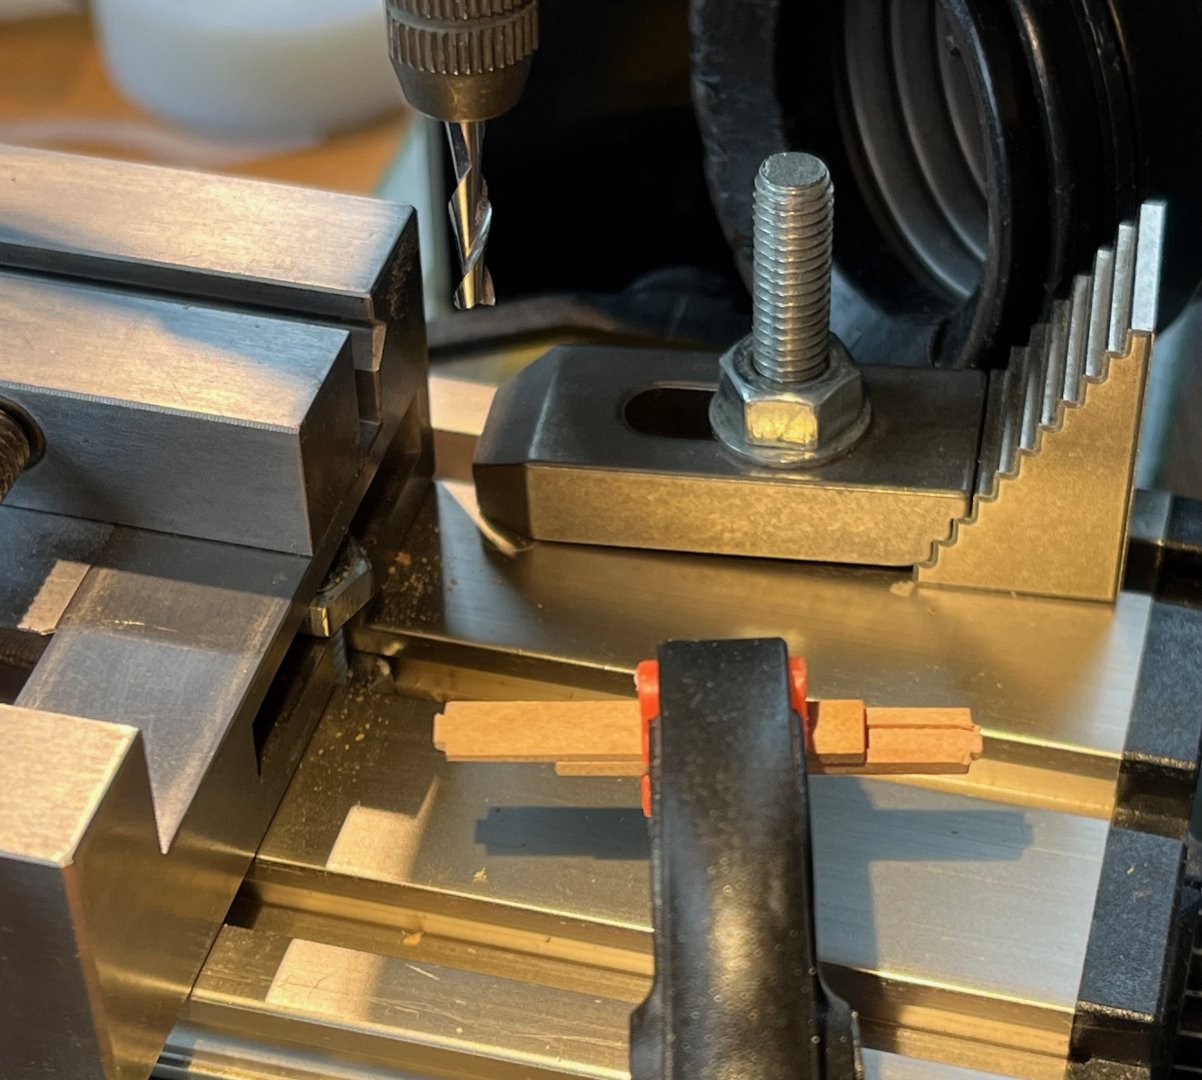
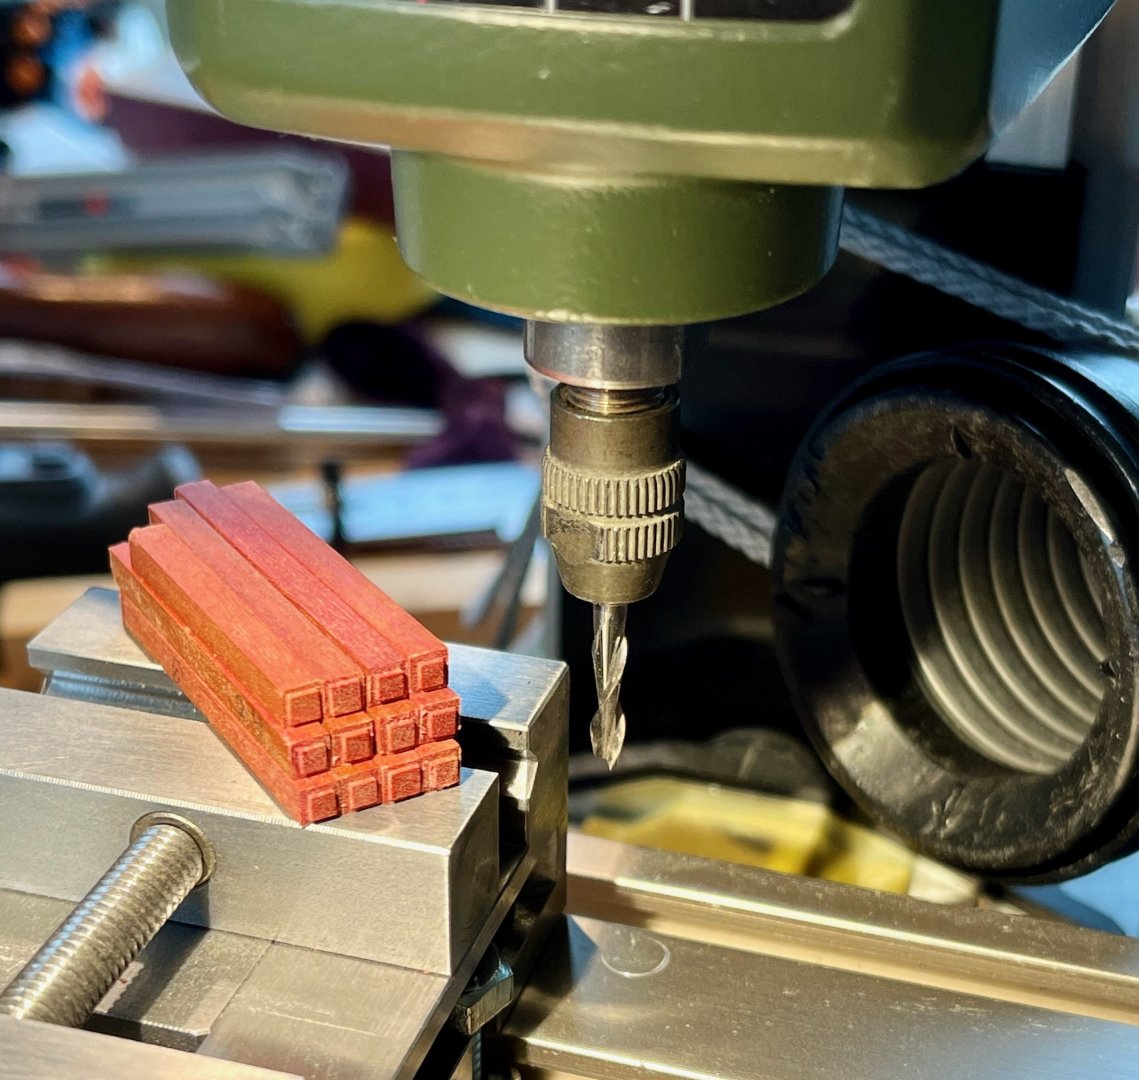
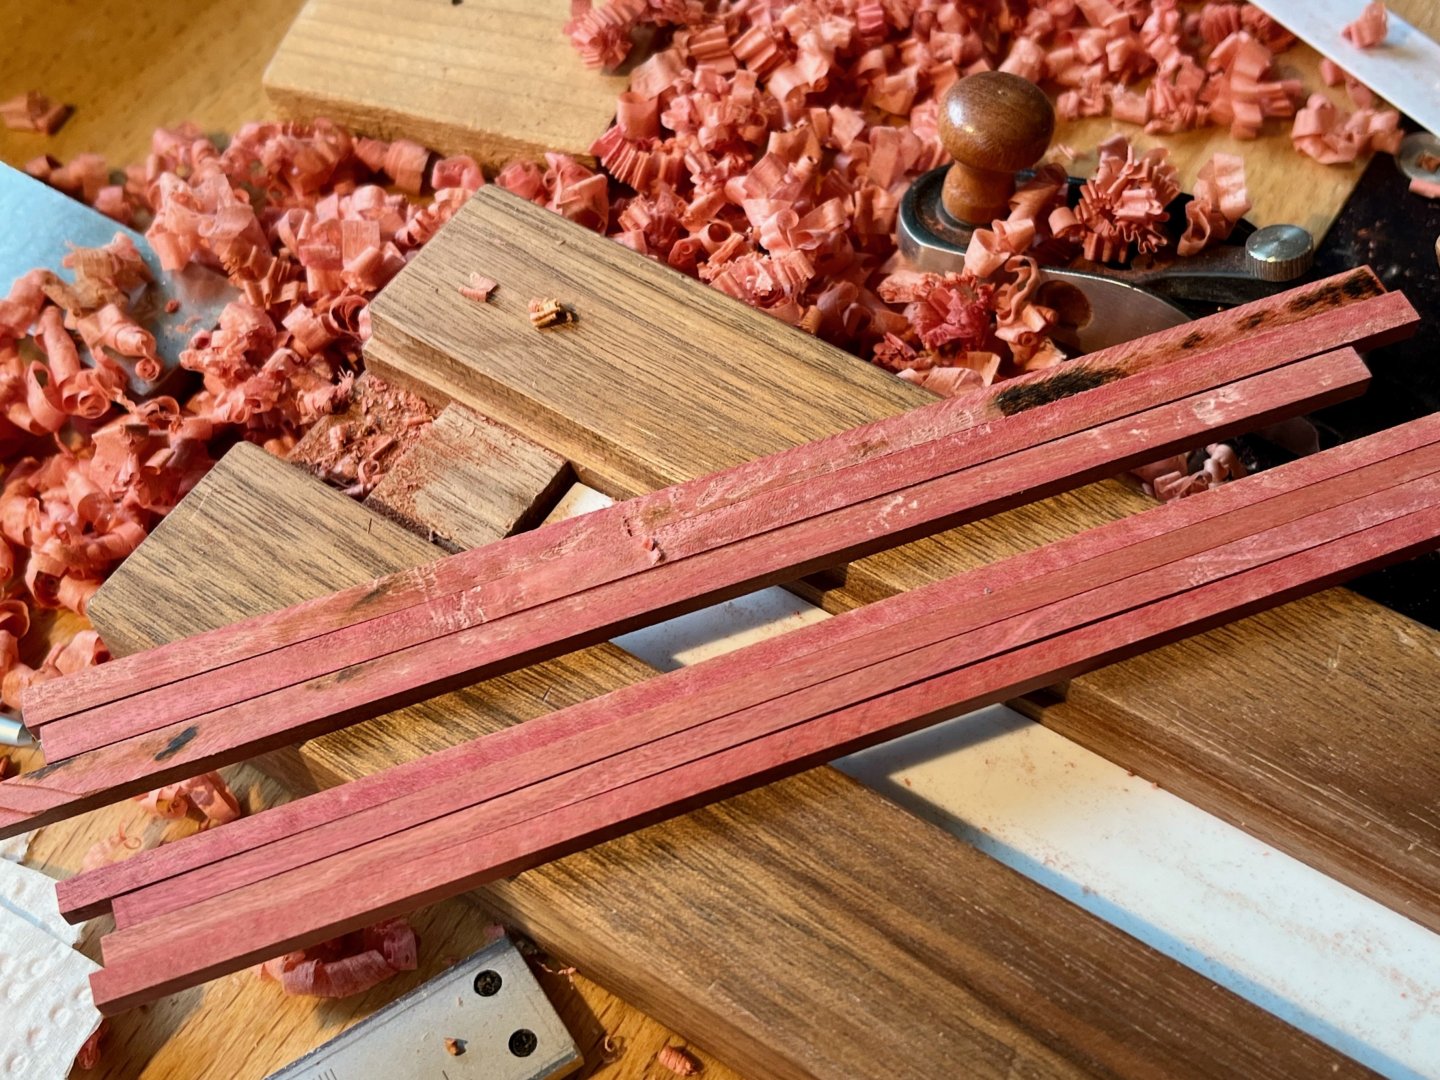
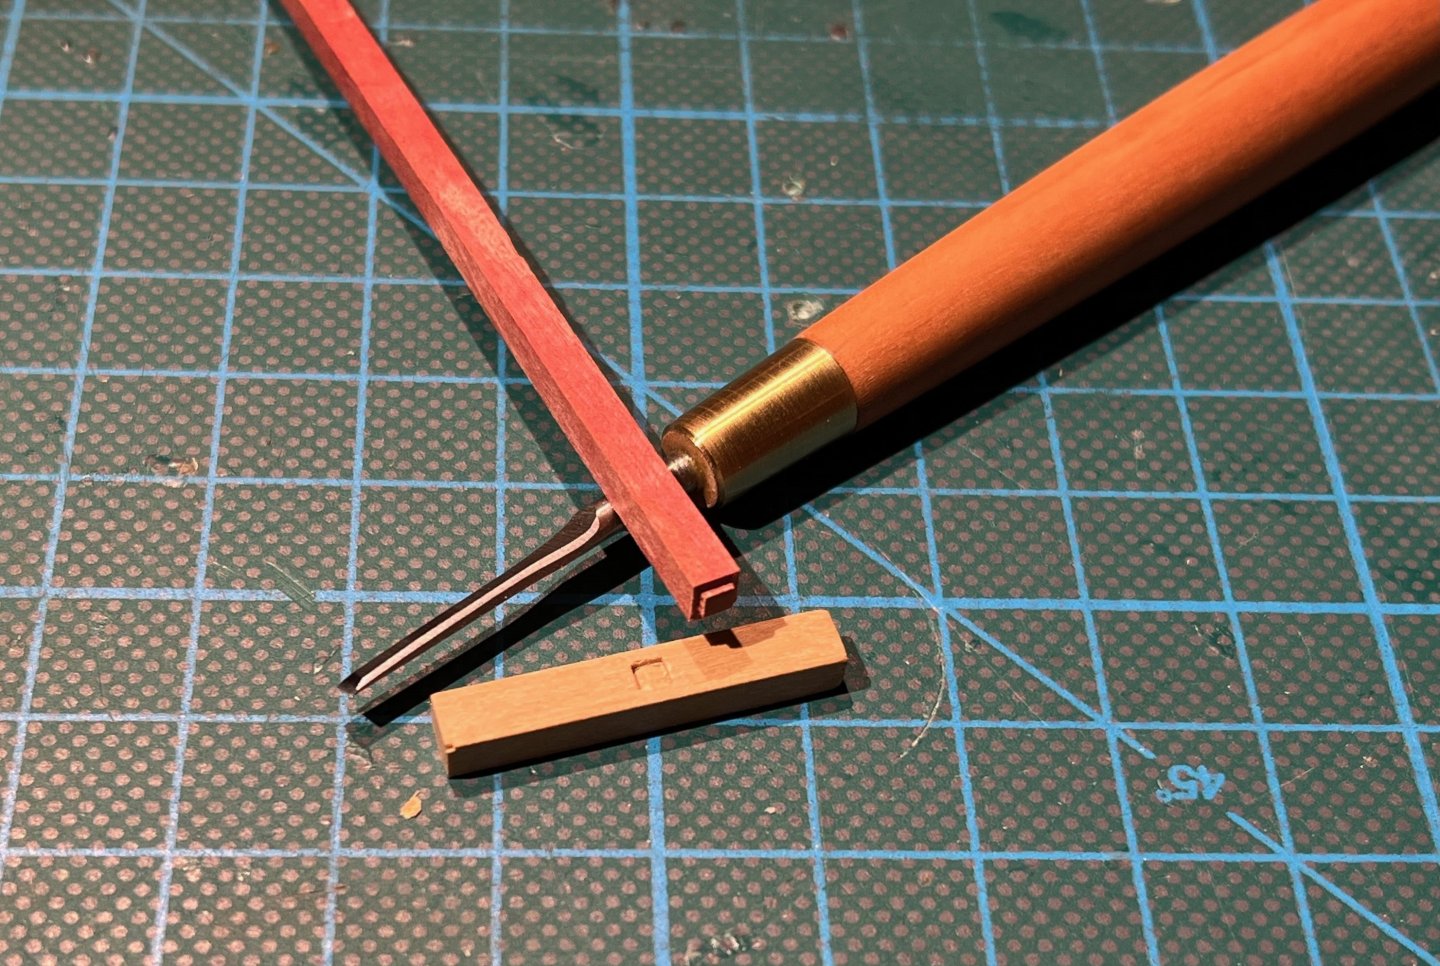
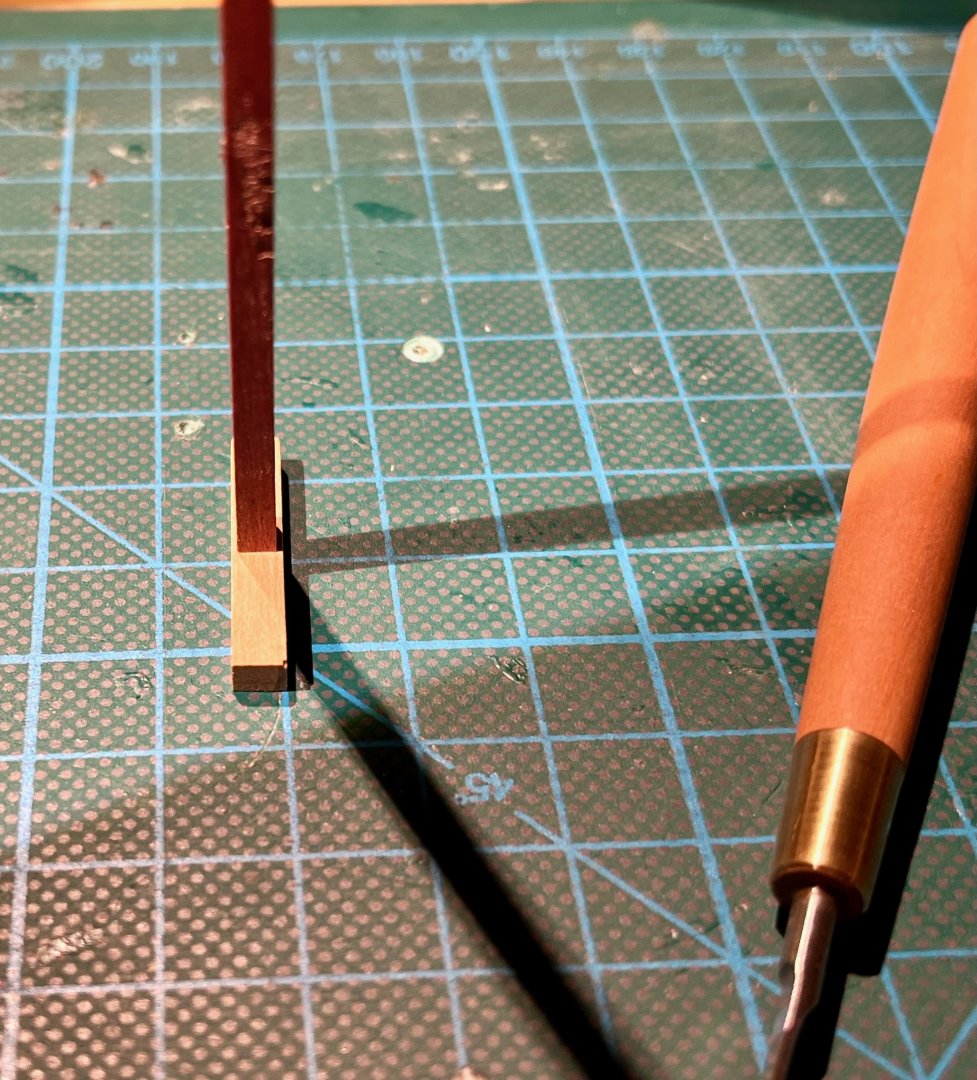
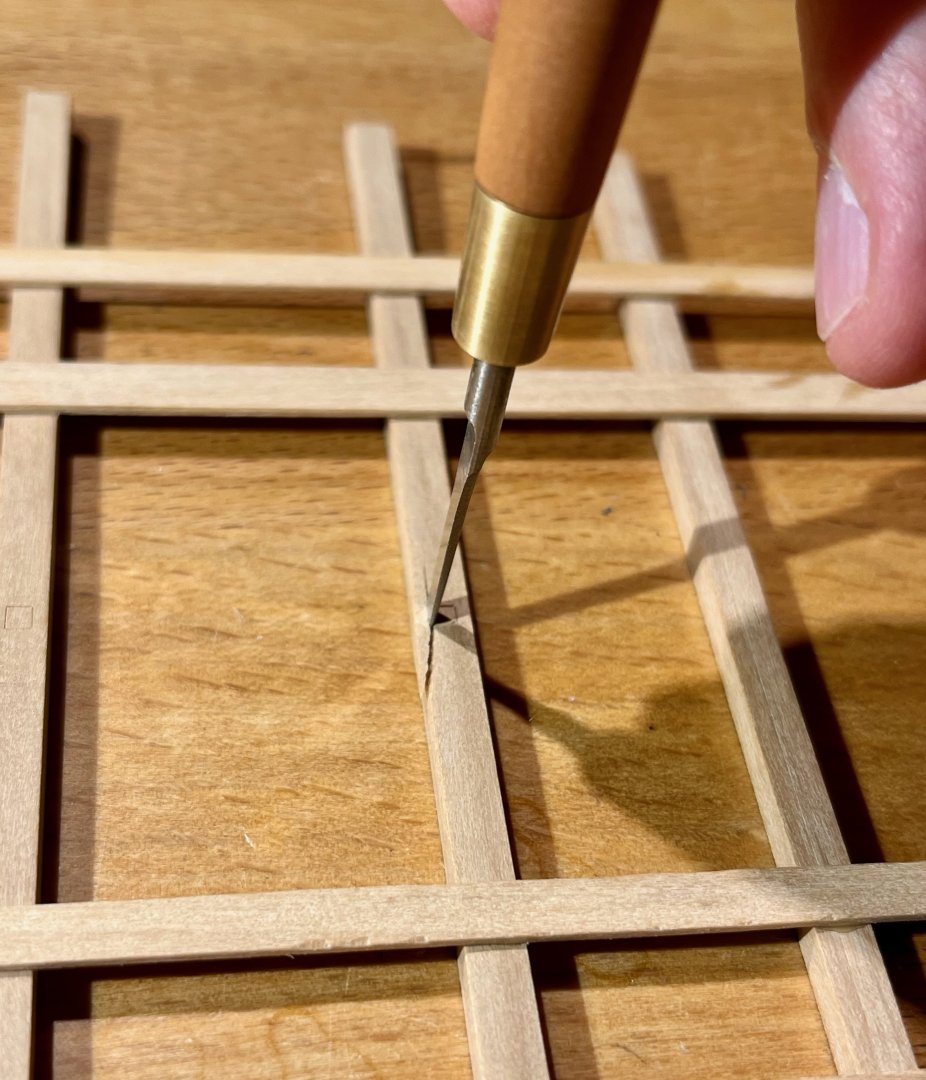
Now back to the pillars! Pink Ivory put my planing jig to the test. It is not easy to work with - burns when sawing, very prone to tearout, one must be very careful with the grain direction at all times. That made it unrealistic to plane multiple blanks in one go without messing up grain the direction. The other downside of that jig is the requirement to keep the plane straight, without rocking it side-to-side (this photo is exaggerated to illustrate the point). But in the absence of a proper thickness sander it gets the job done, cheap and silent I decided to cut real mortise and tenon joints into the pillars, mostly to help myself with the alignment. I doubt I can drill precise holes join them with a pin, and without some mechanical help to ensure alignment - gluing those together without making a crooked mess would be impossible. Mortise would allow for some adjustments in the very end - if I need to move the end of the pillar a tiny bit - I will just shave off one side of the tenon! And you can't imagine how satisfying the dry fit is, it is held nice and tight without any glue! It is hard to make such a tiny mortise deeper than 0.5mm though (due to the angle of the chisel), but it is enough to firmly register the beam in place. To help mark up the mortises I made a small styrene jig. It has a friction fit to the beam, a bit lower than the beam, and scored marks align with the centerline marked on top of the beam: On the underside a square opening is centered around these scored marks, and the chisel fits nicely in it. Not much pressure is required to mark it. But then I overestimated the strength of the beam, cracking it all the way through along the grain imperfection A clumsy builder can break even a boxwood beam! Luckily the crack is quite clean, so should be easy to glue back like it never happened.


- 968 replies
-
- 13
-
-
- hahn
- oliver cromwell
- (and 1 more)
-
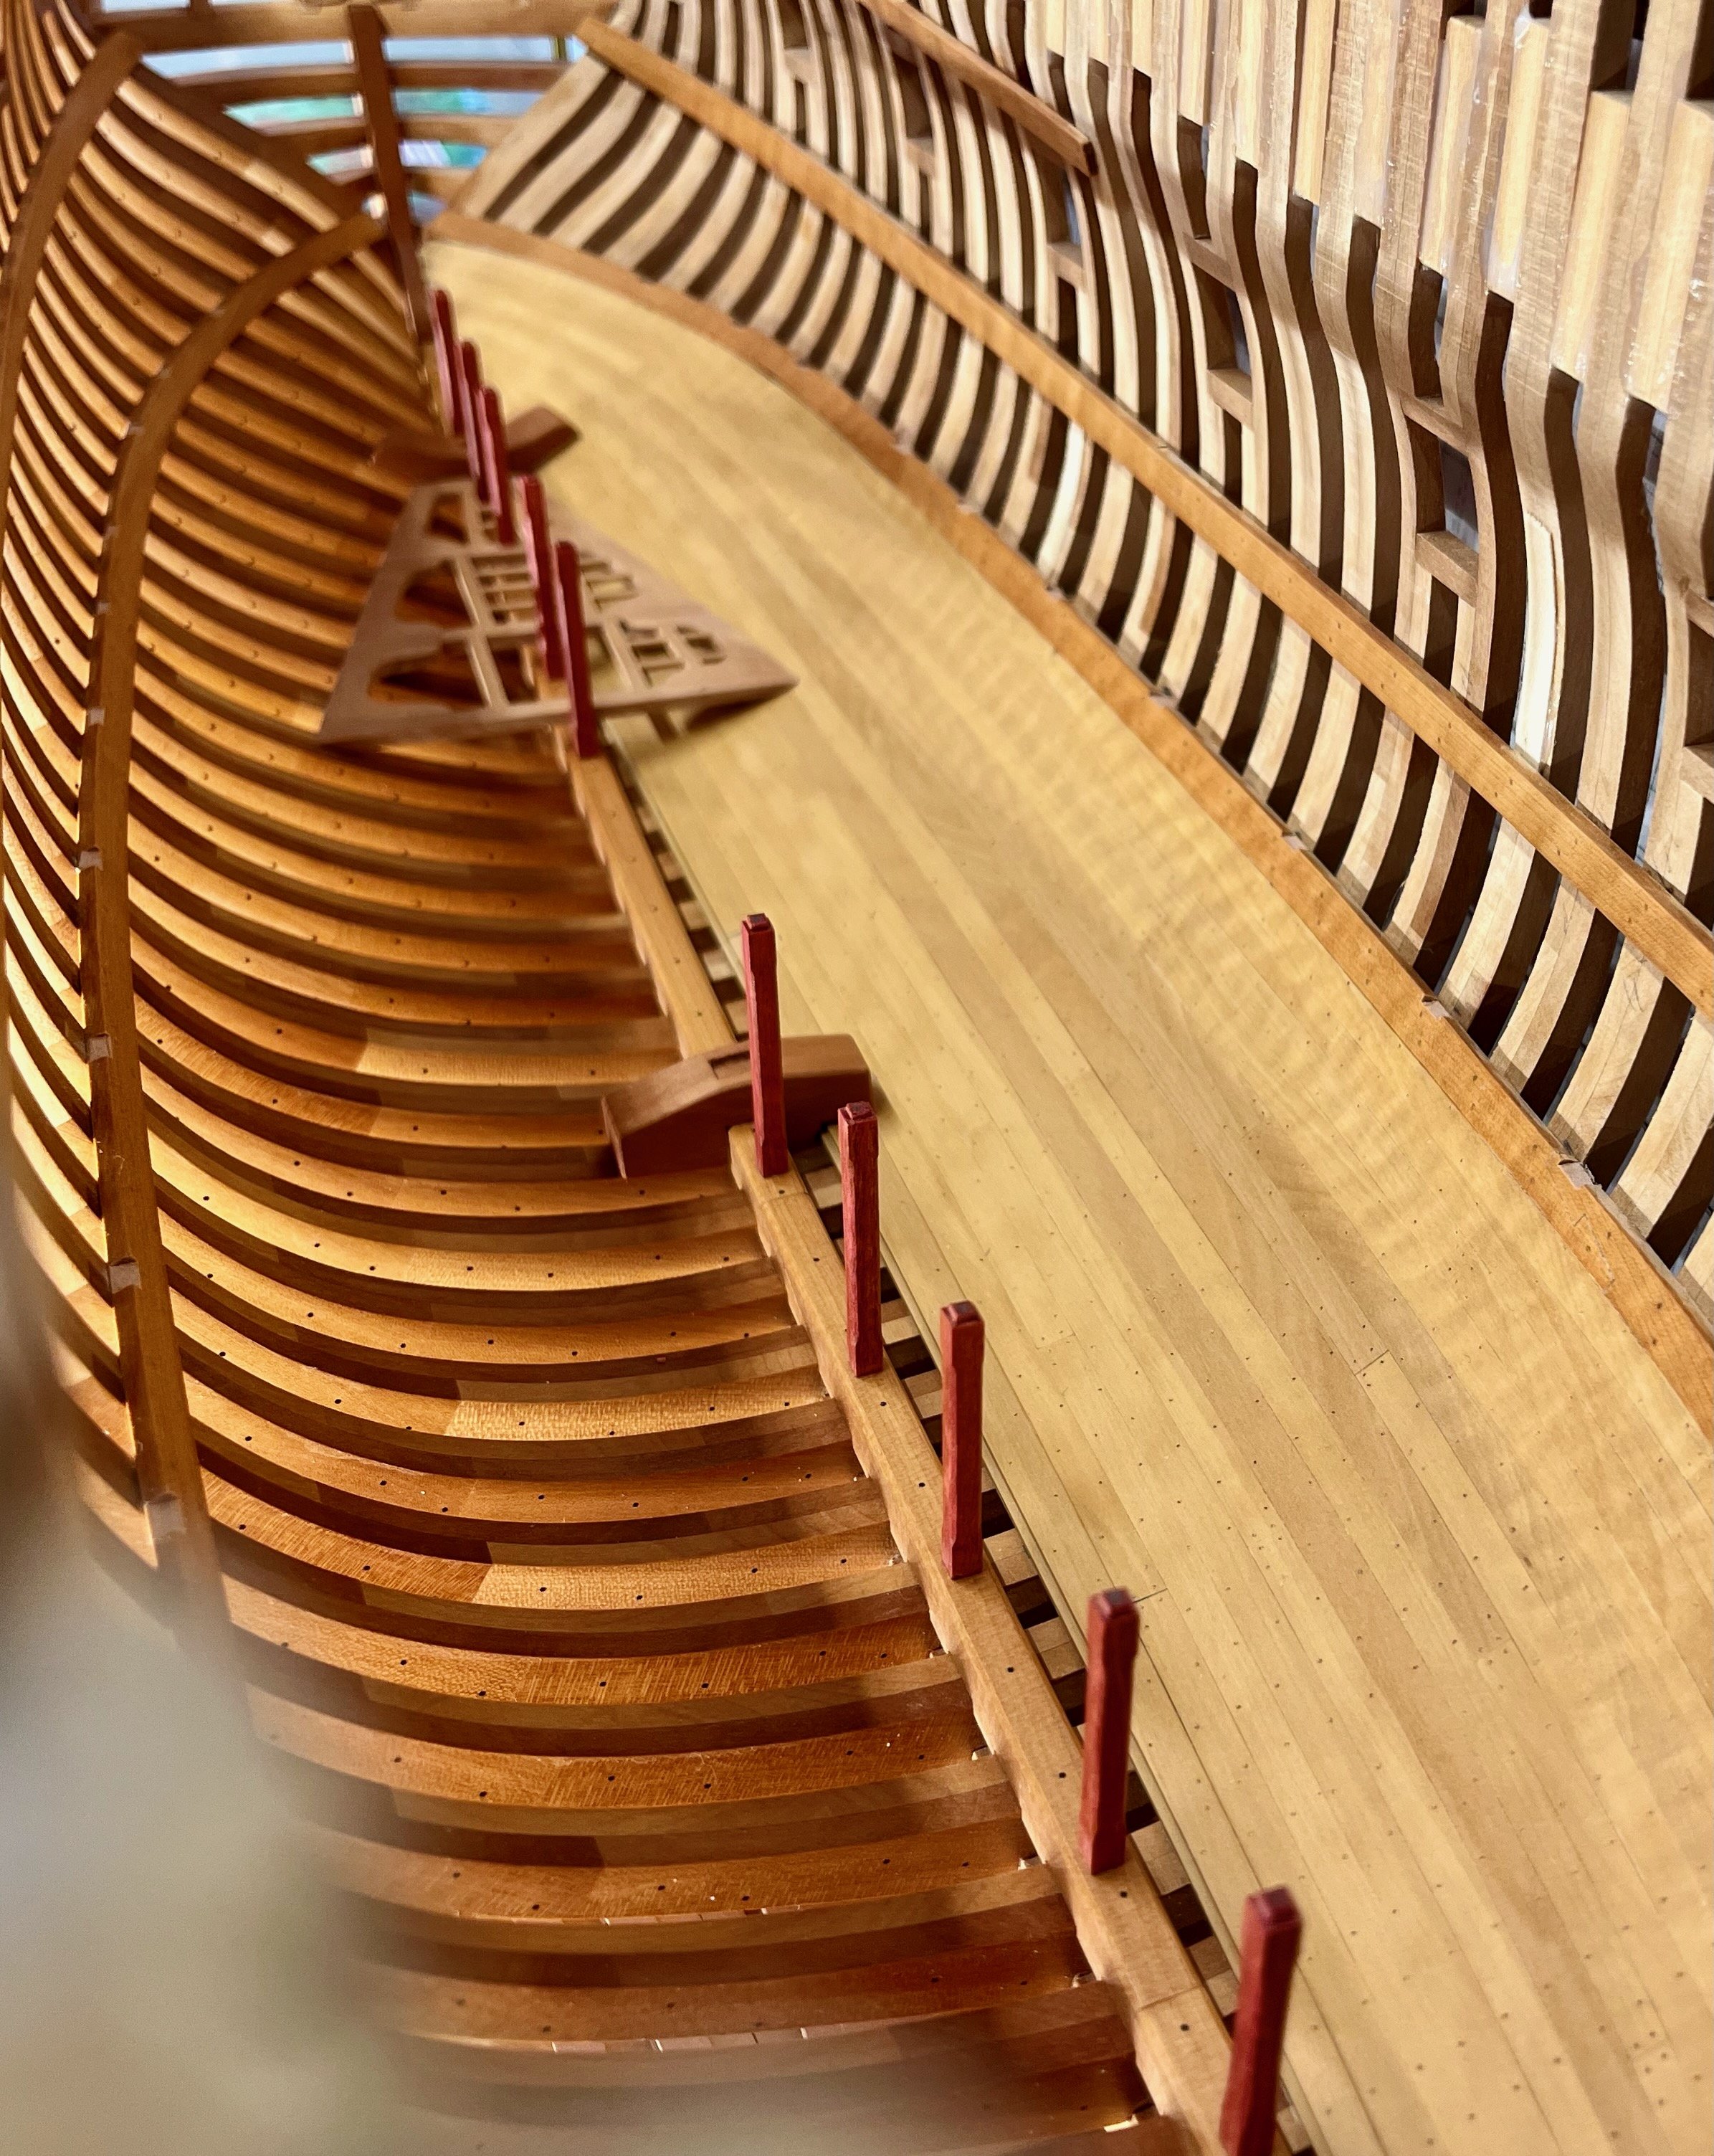
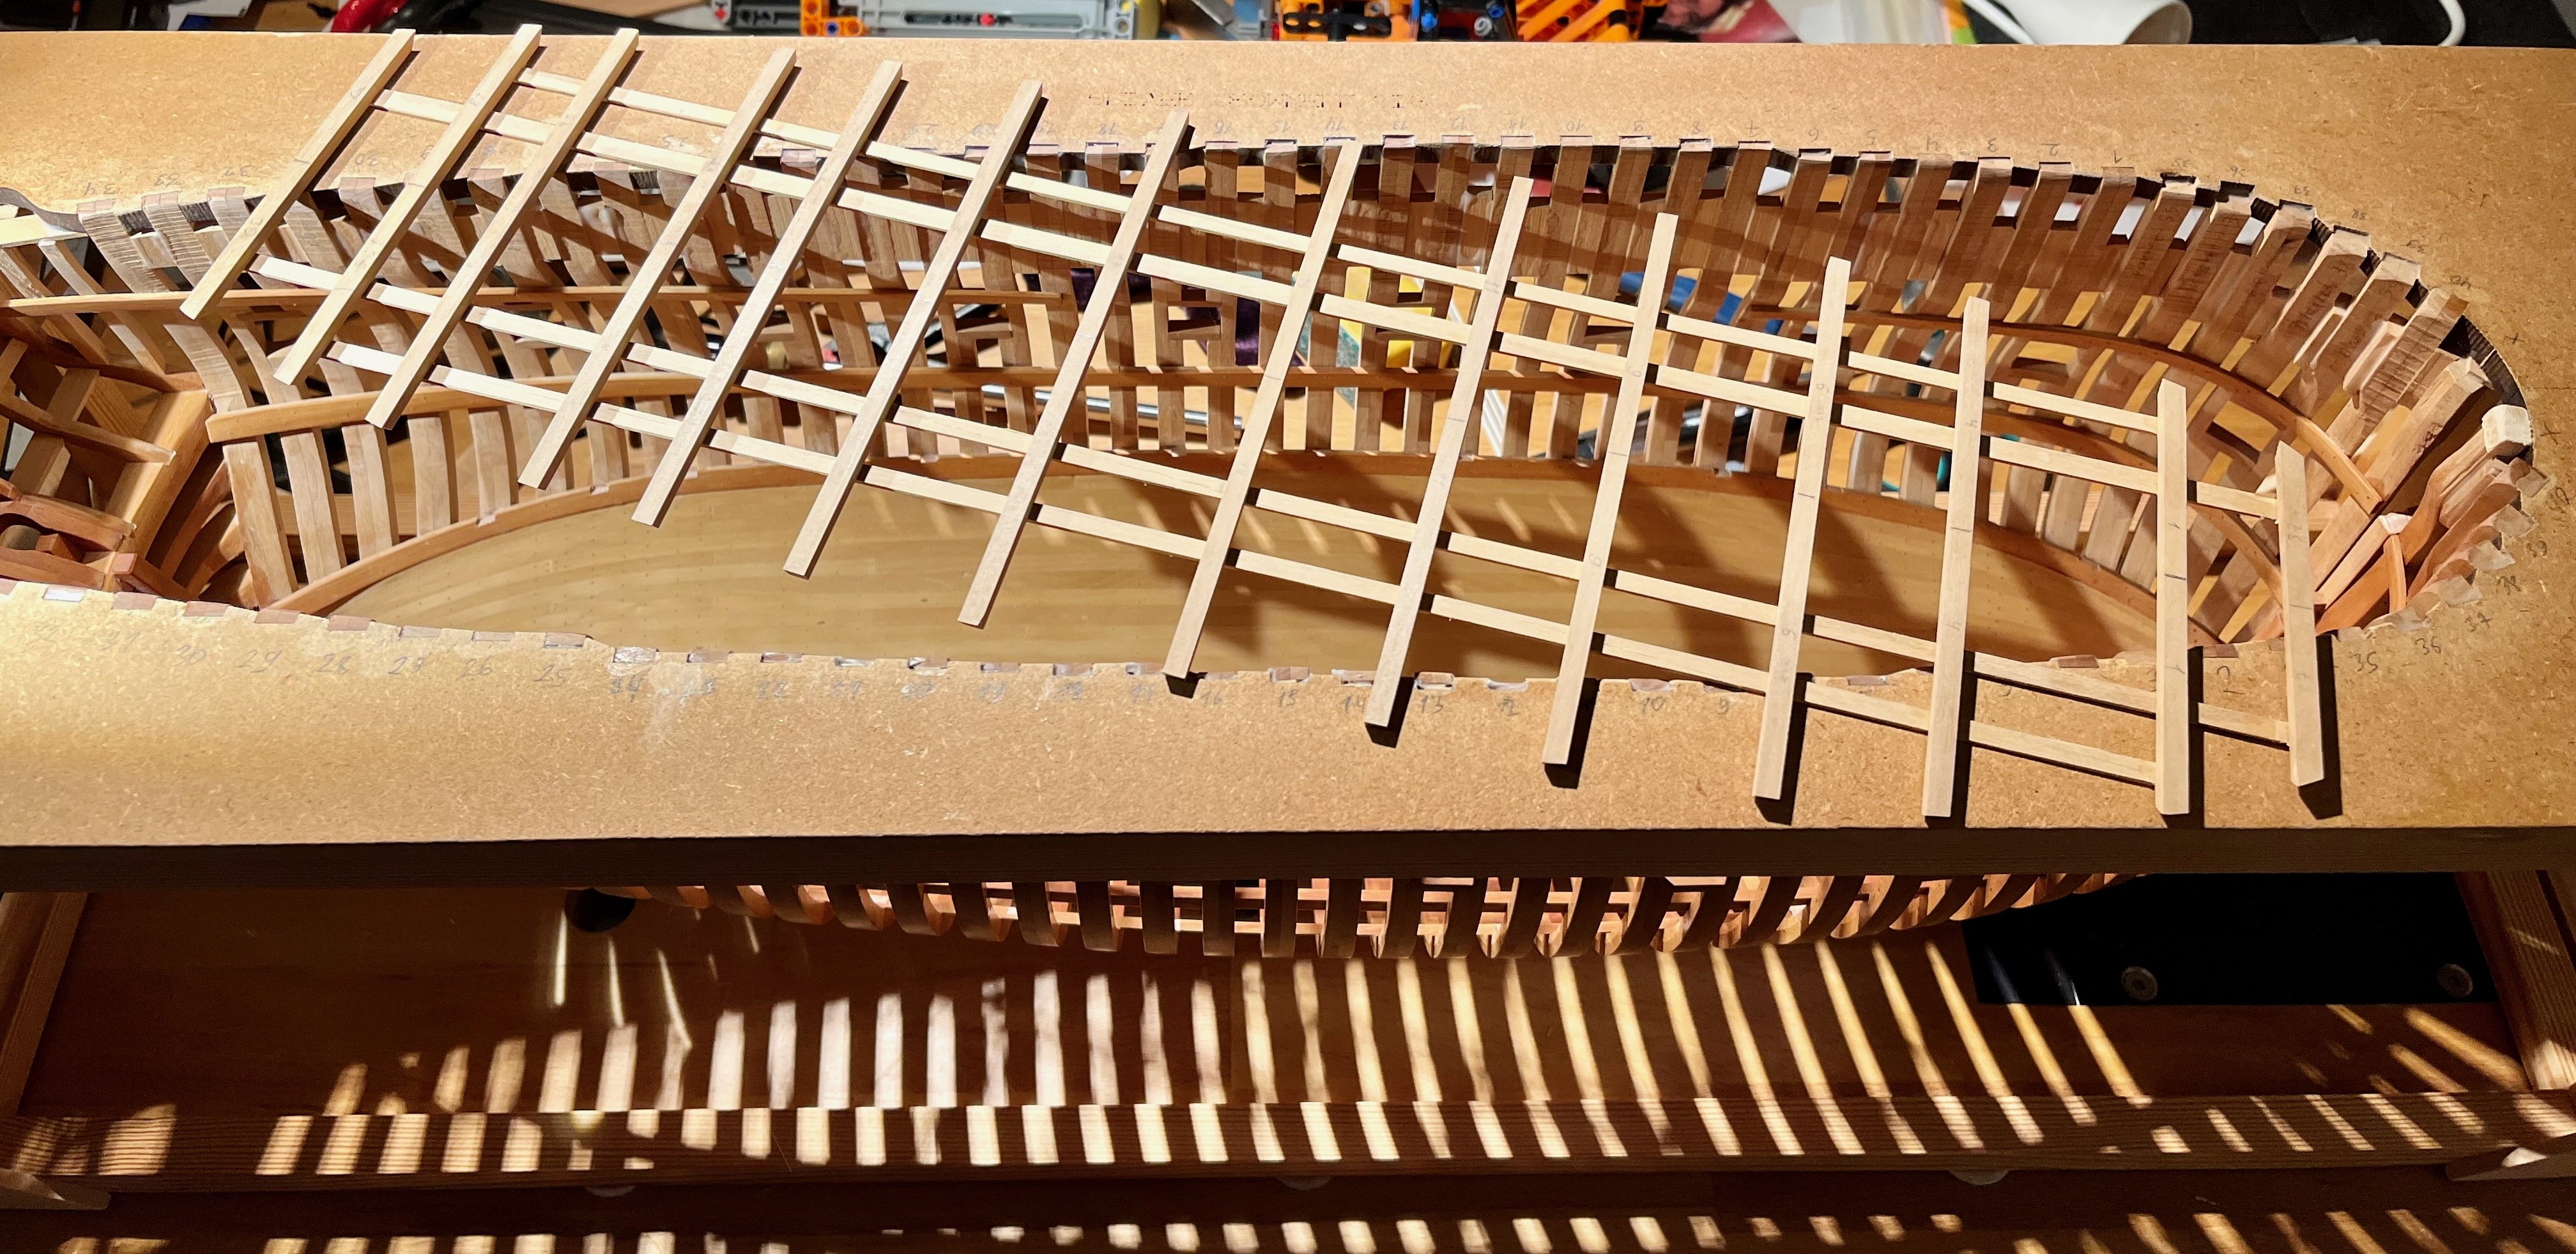
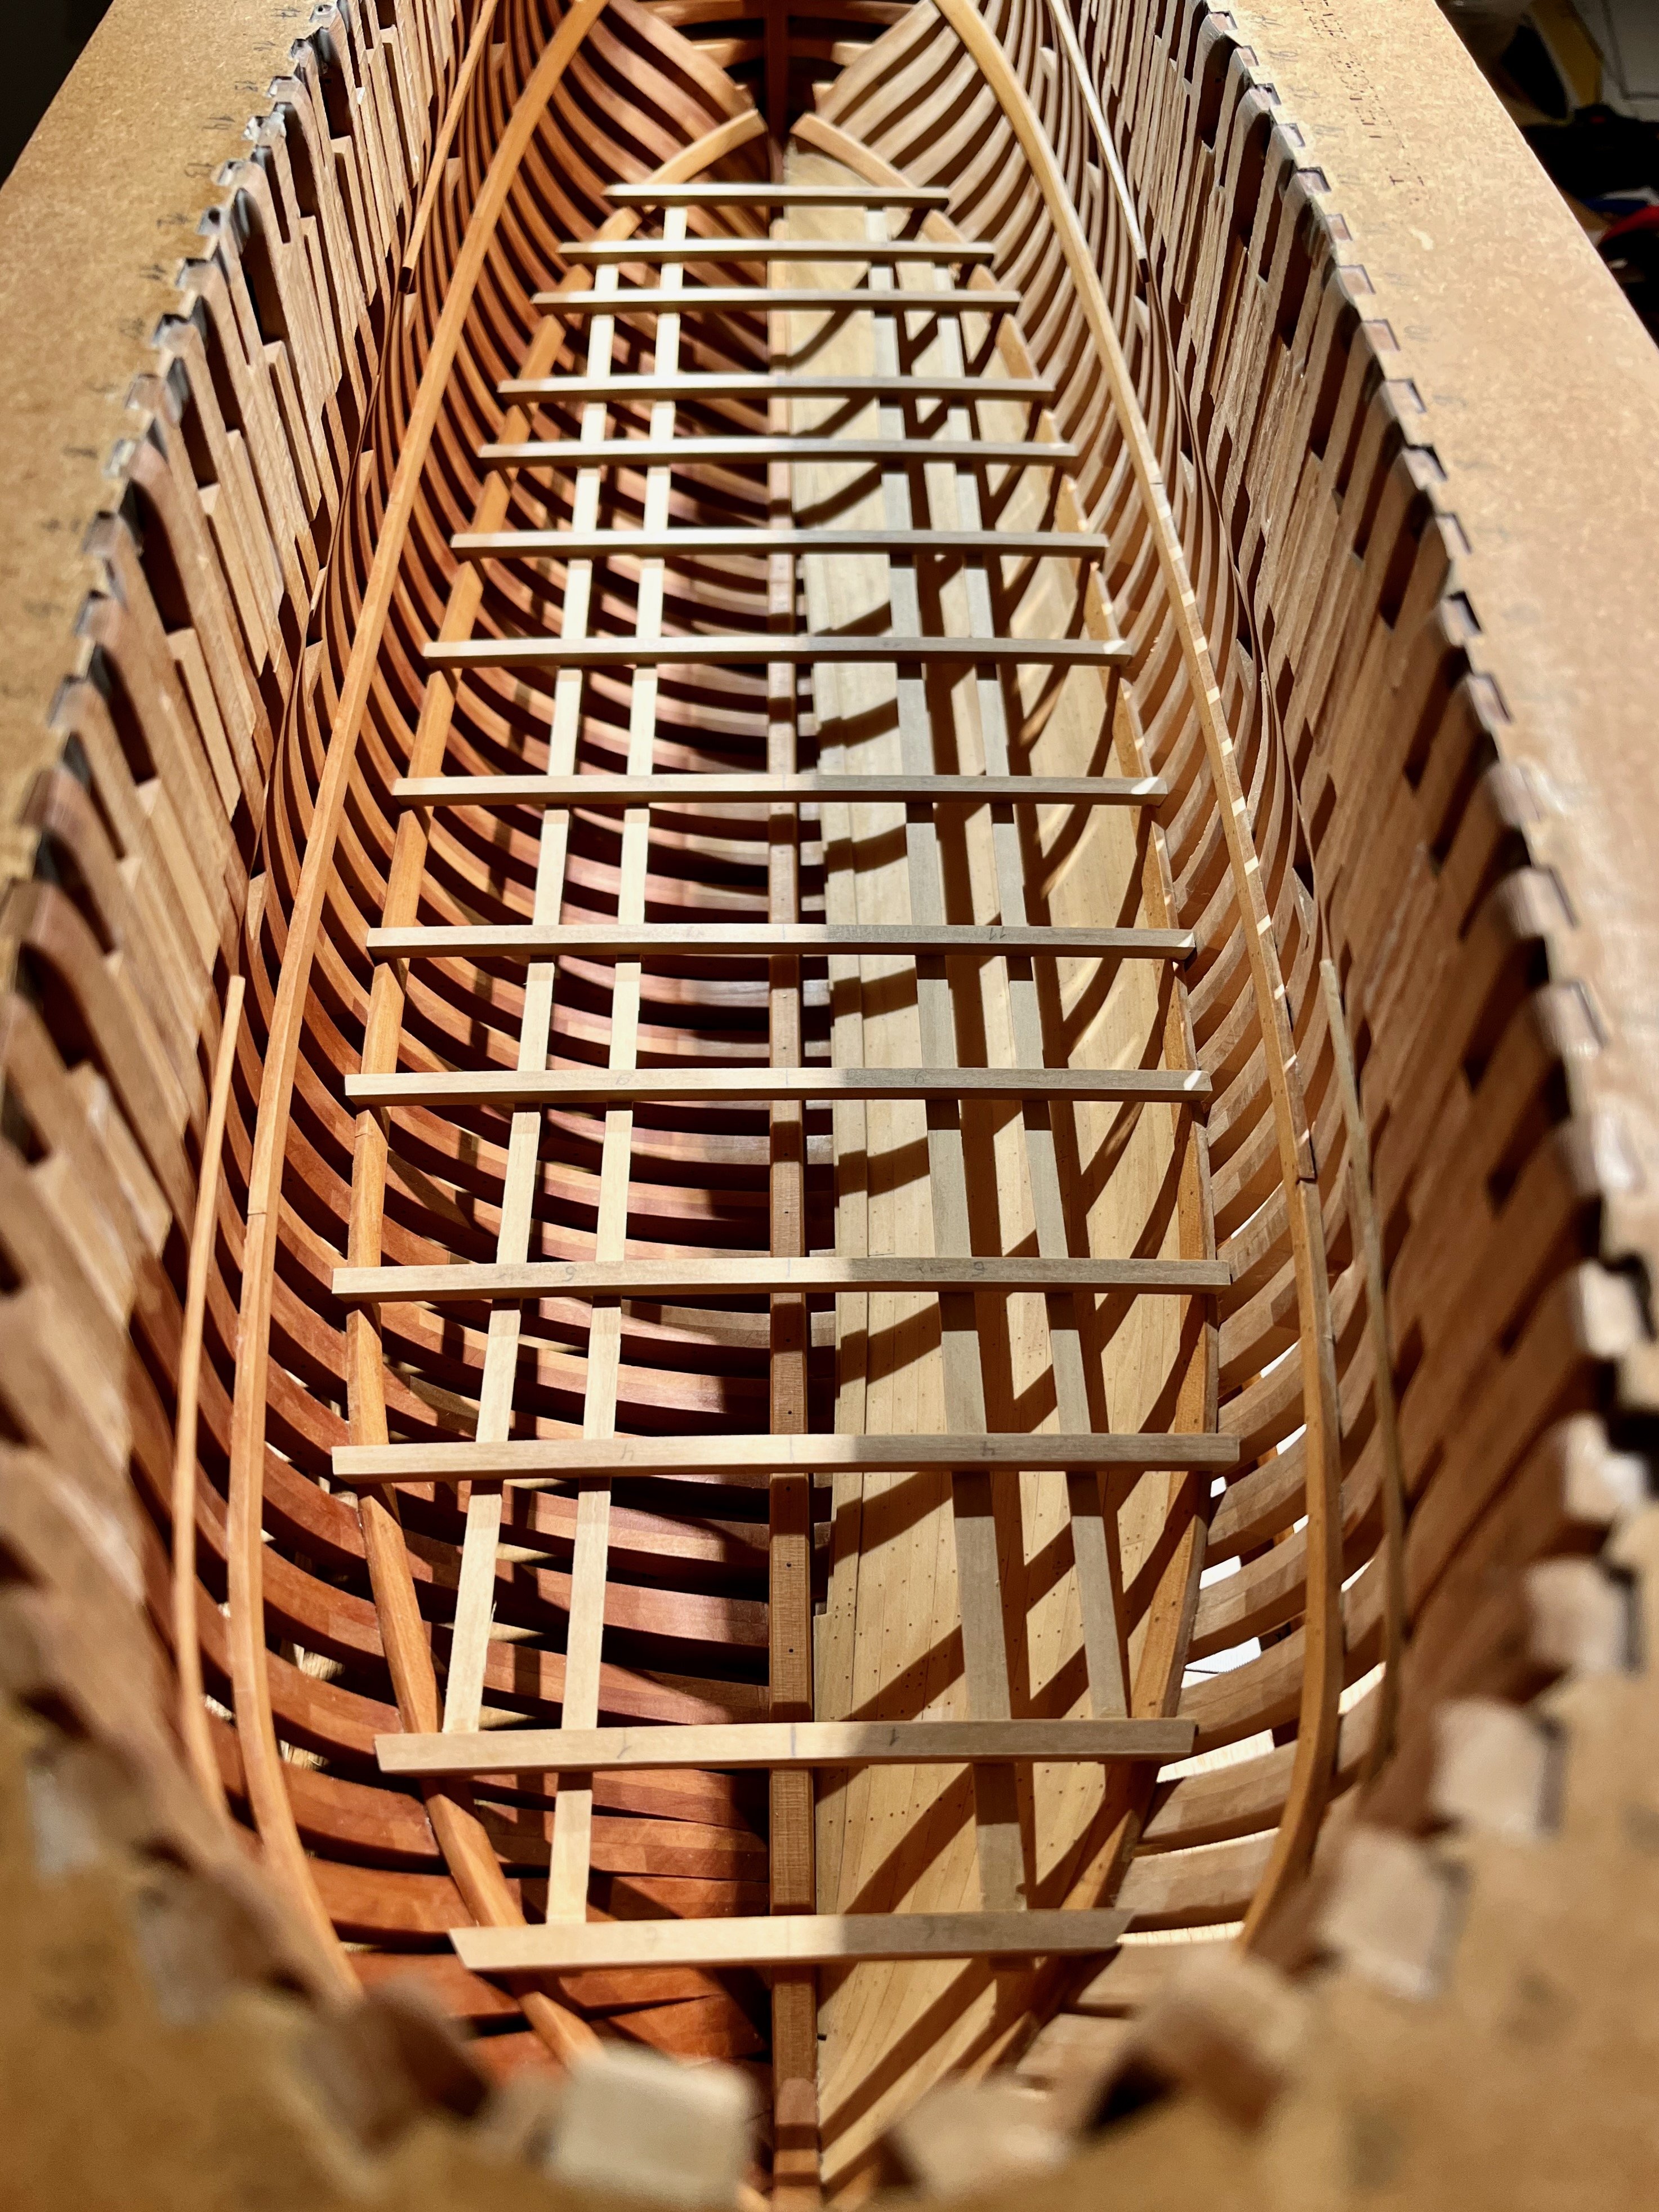
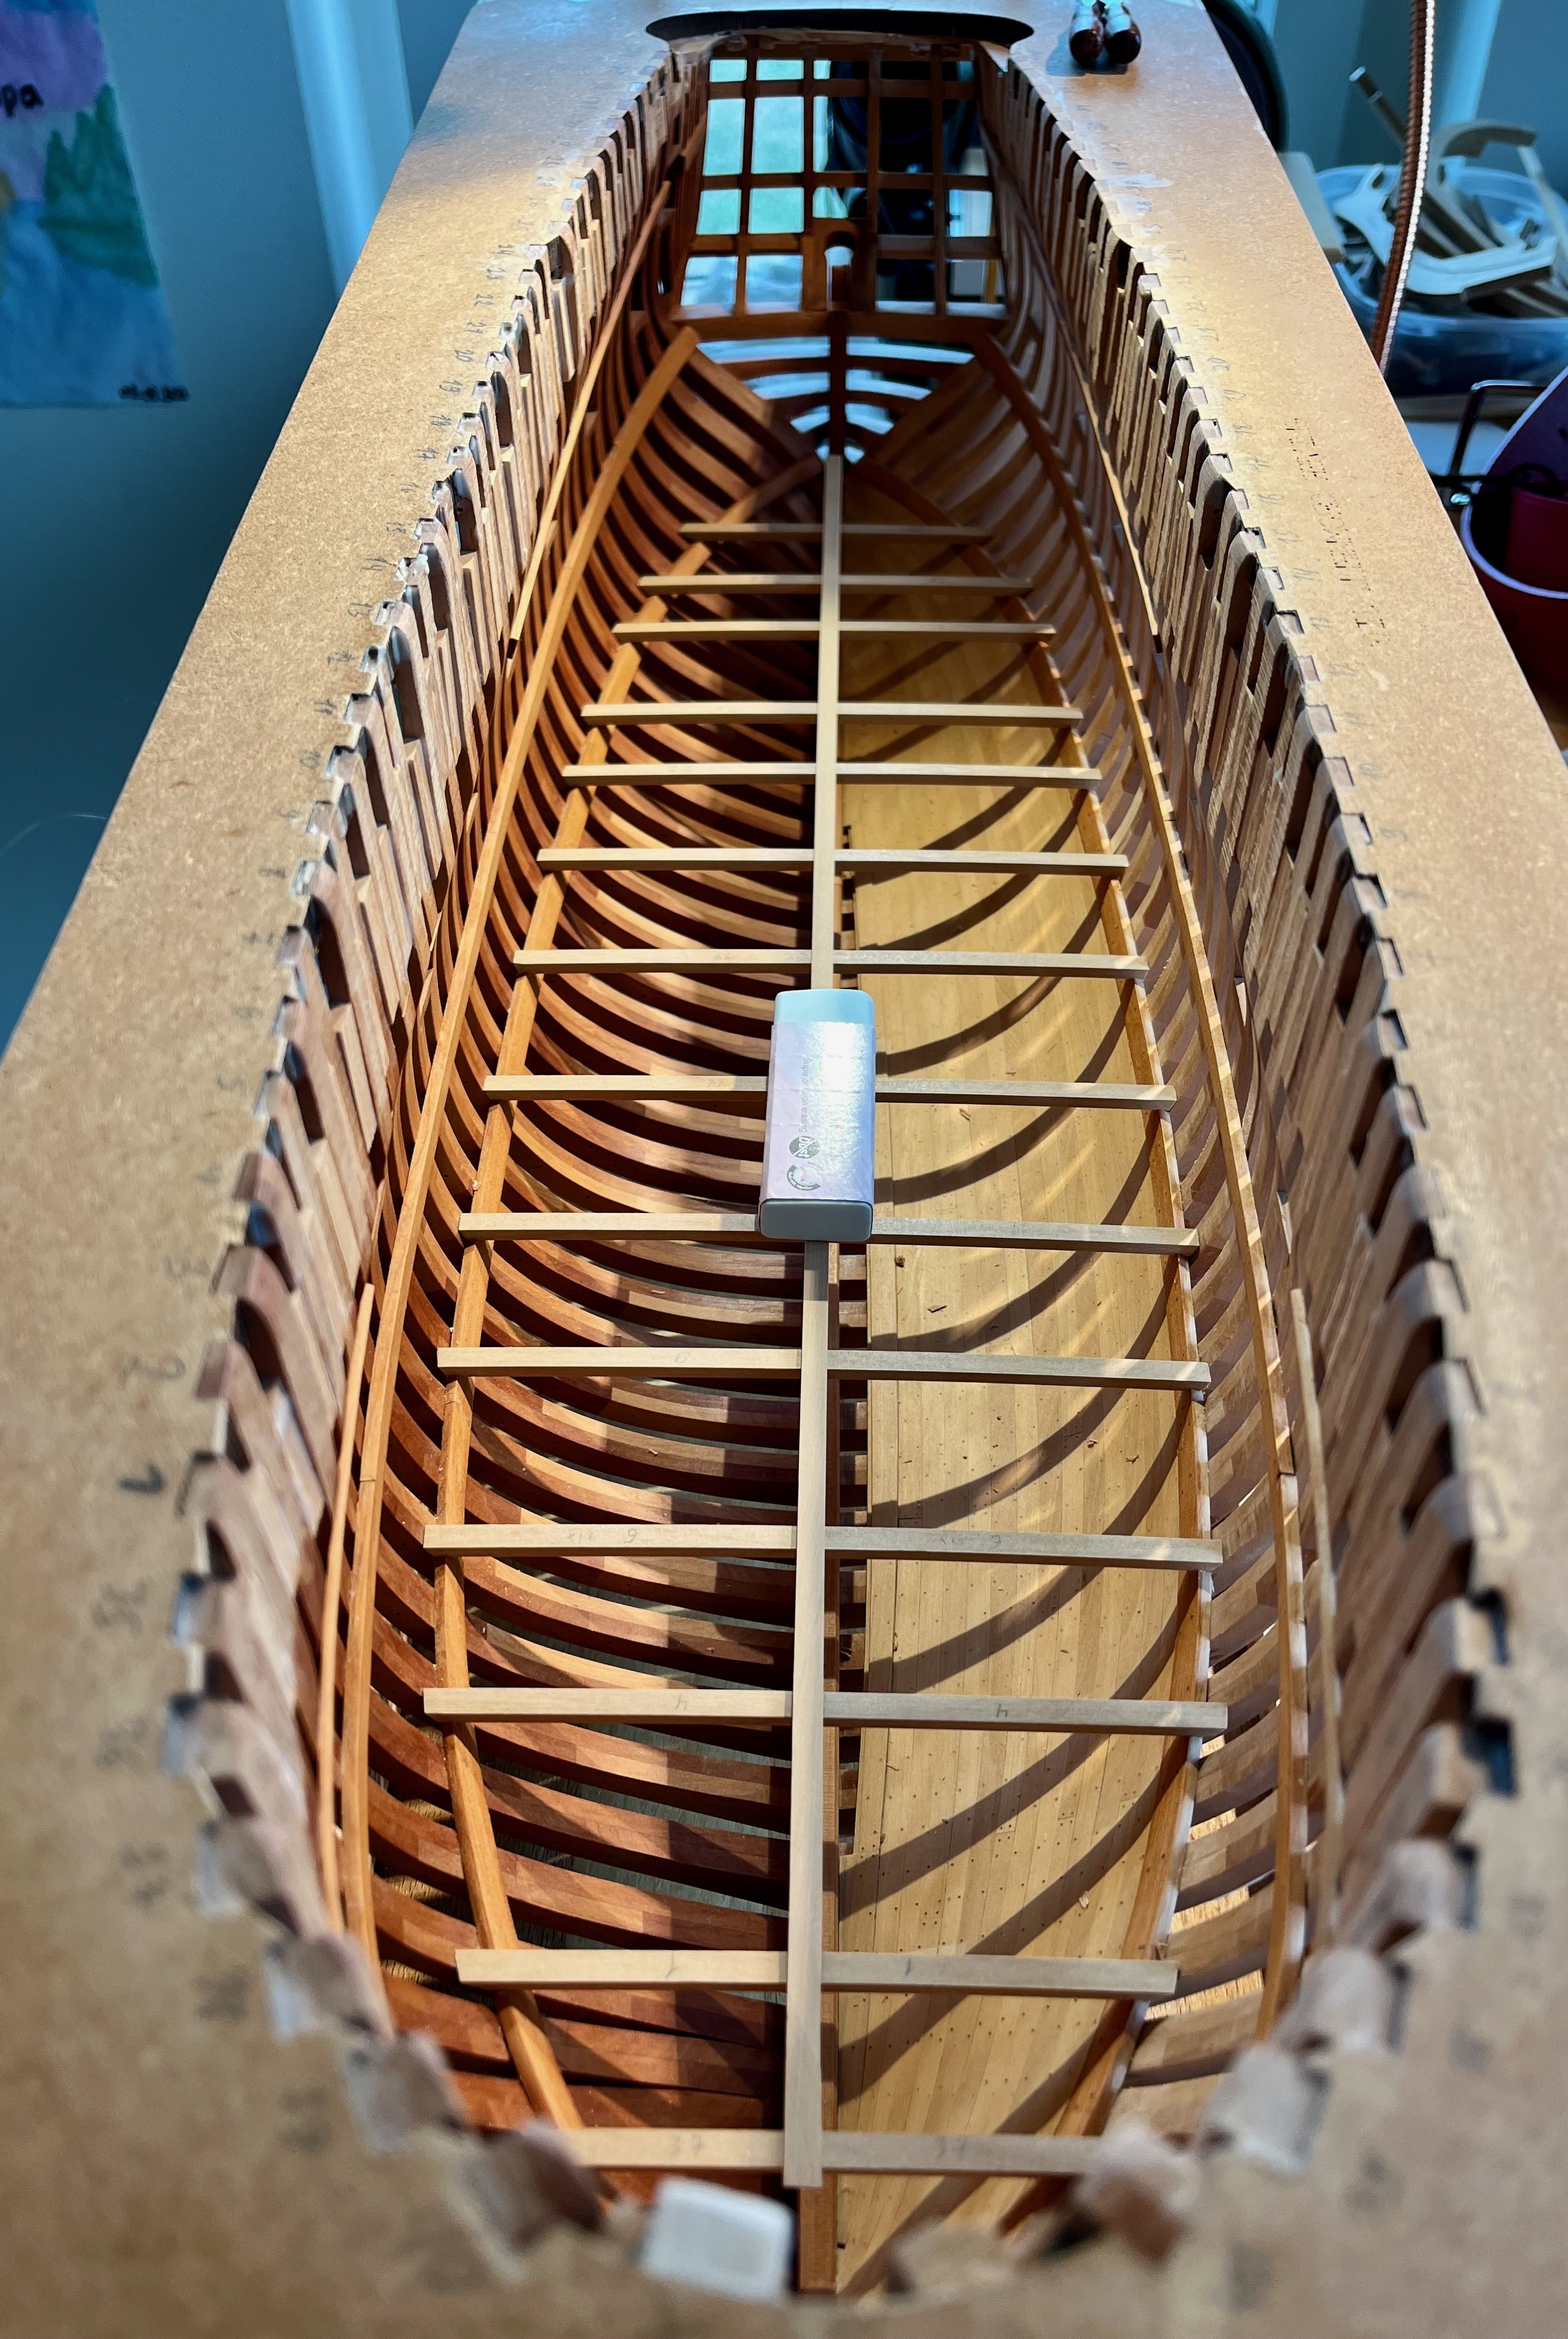
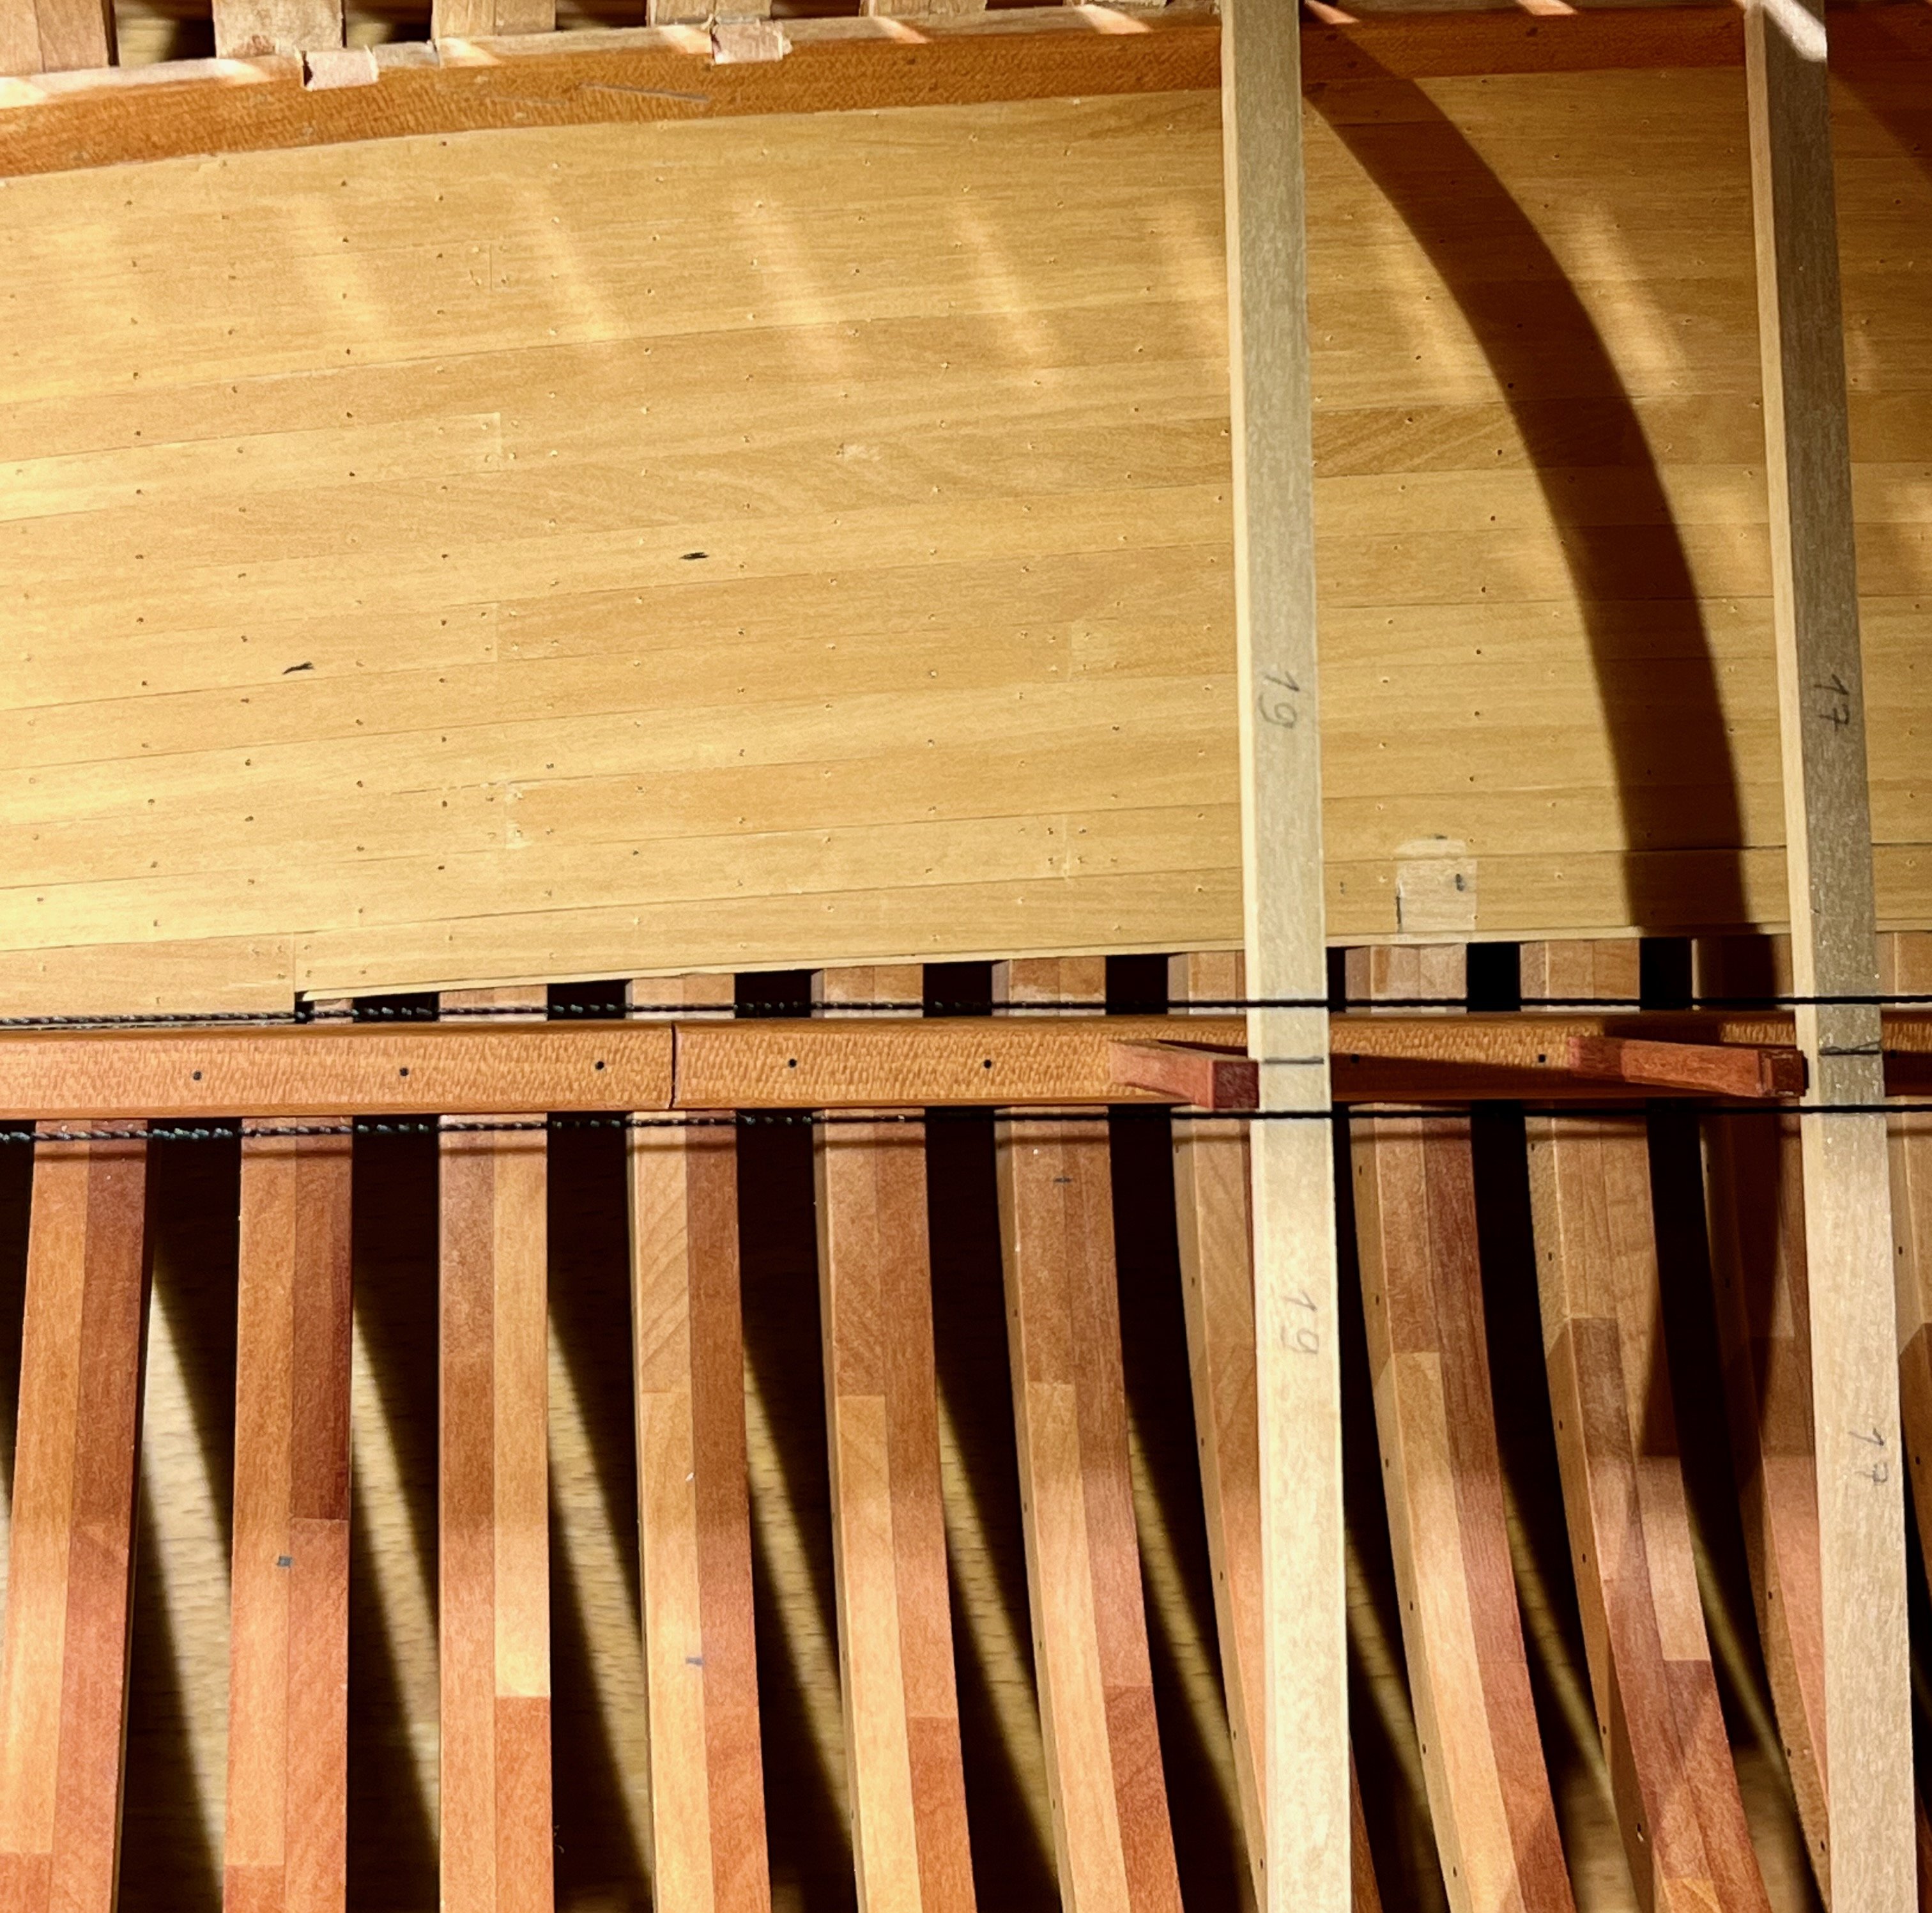
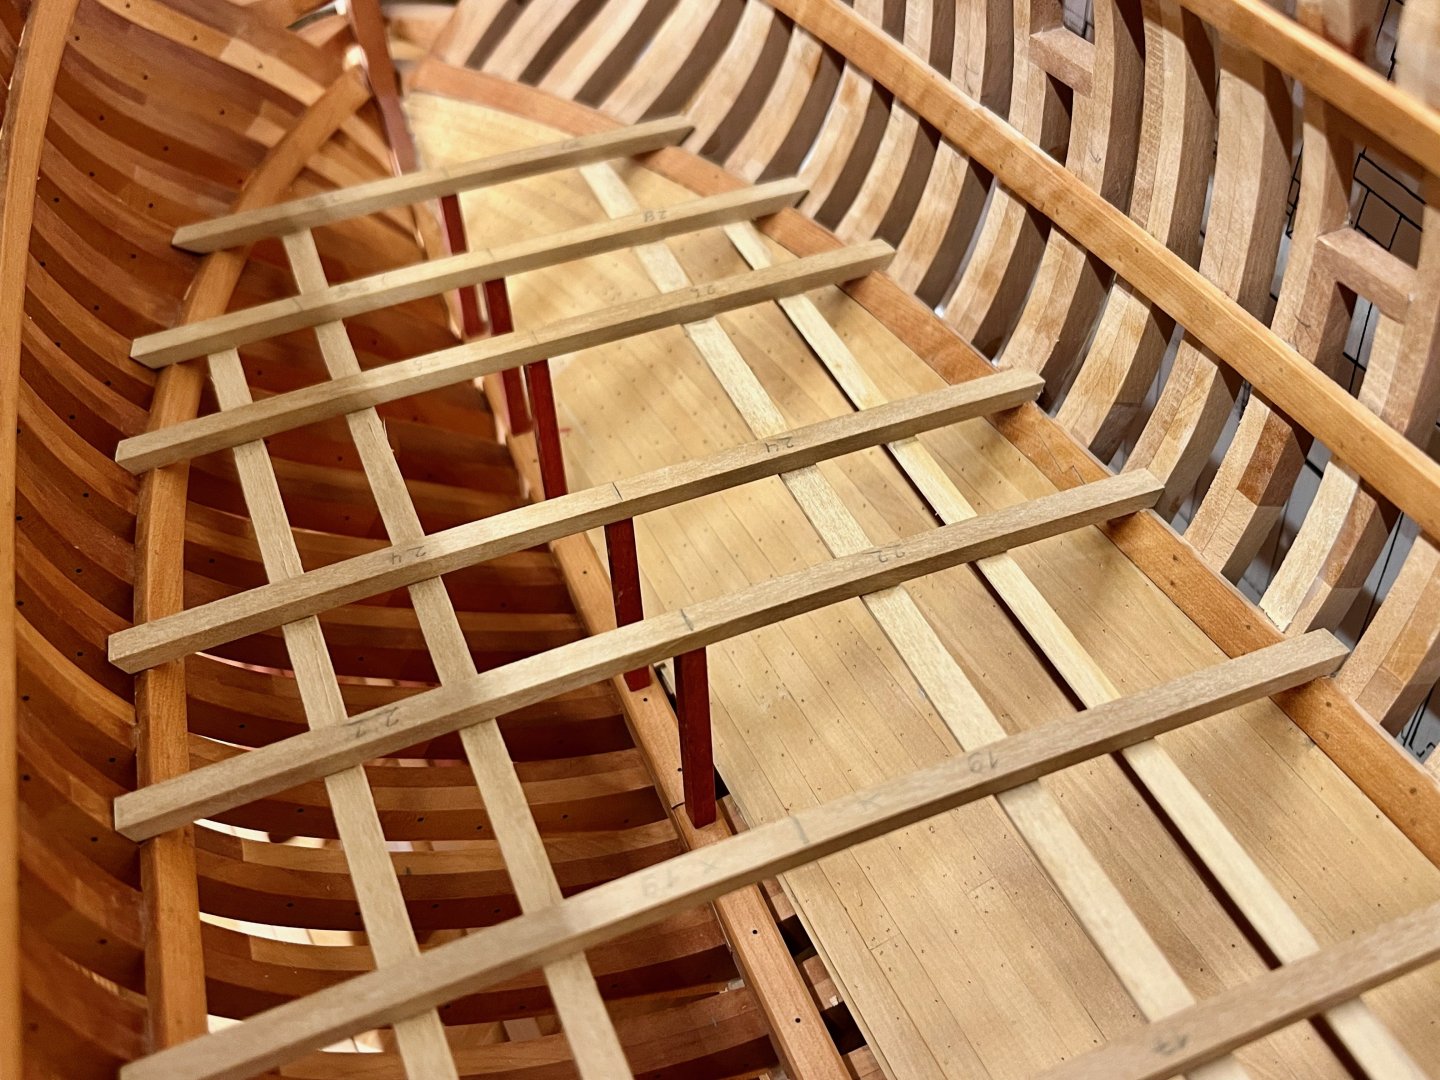
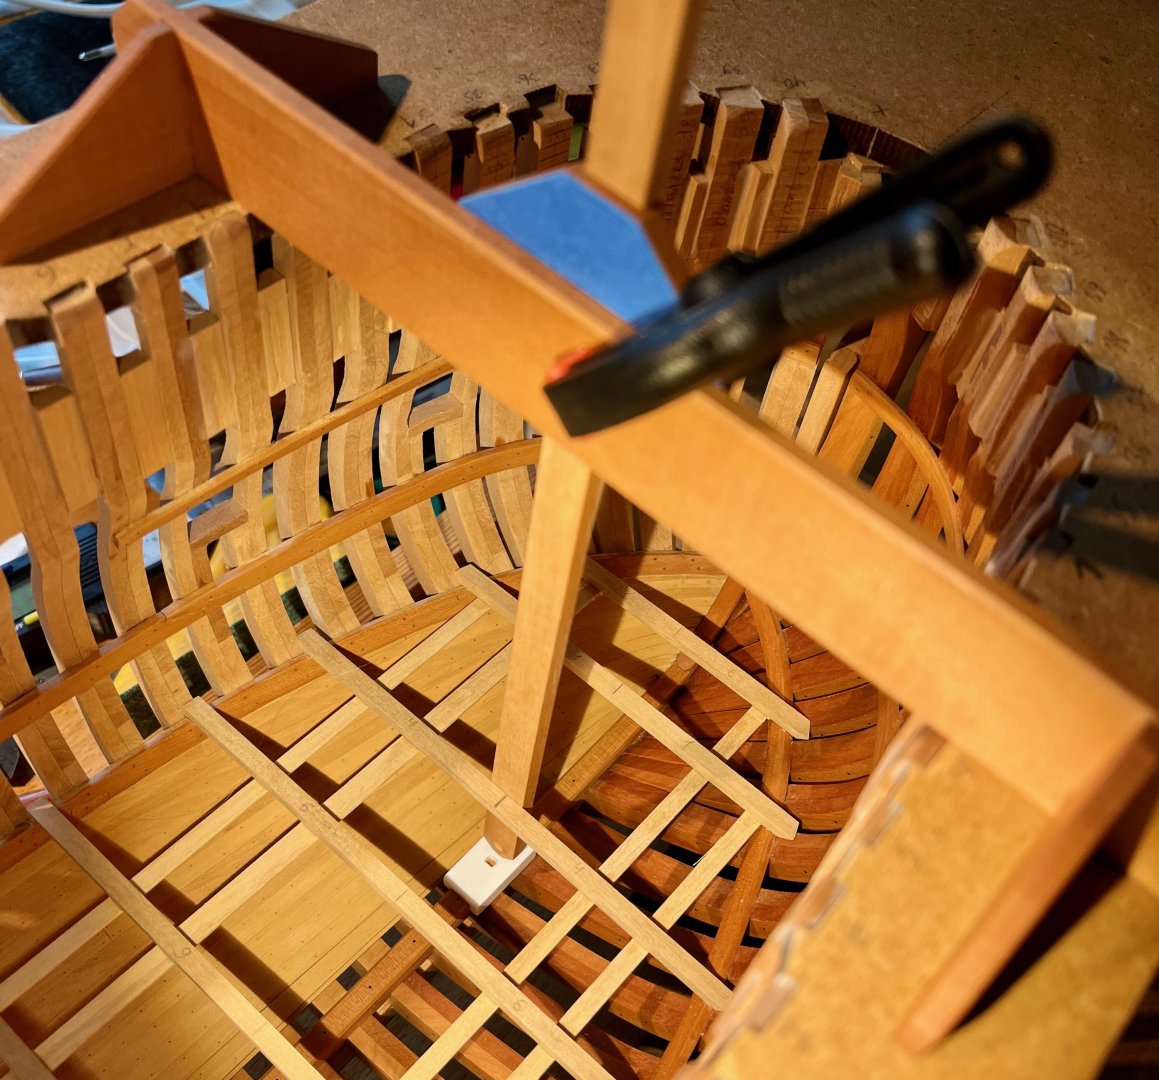
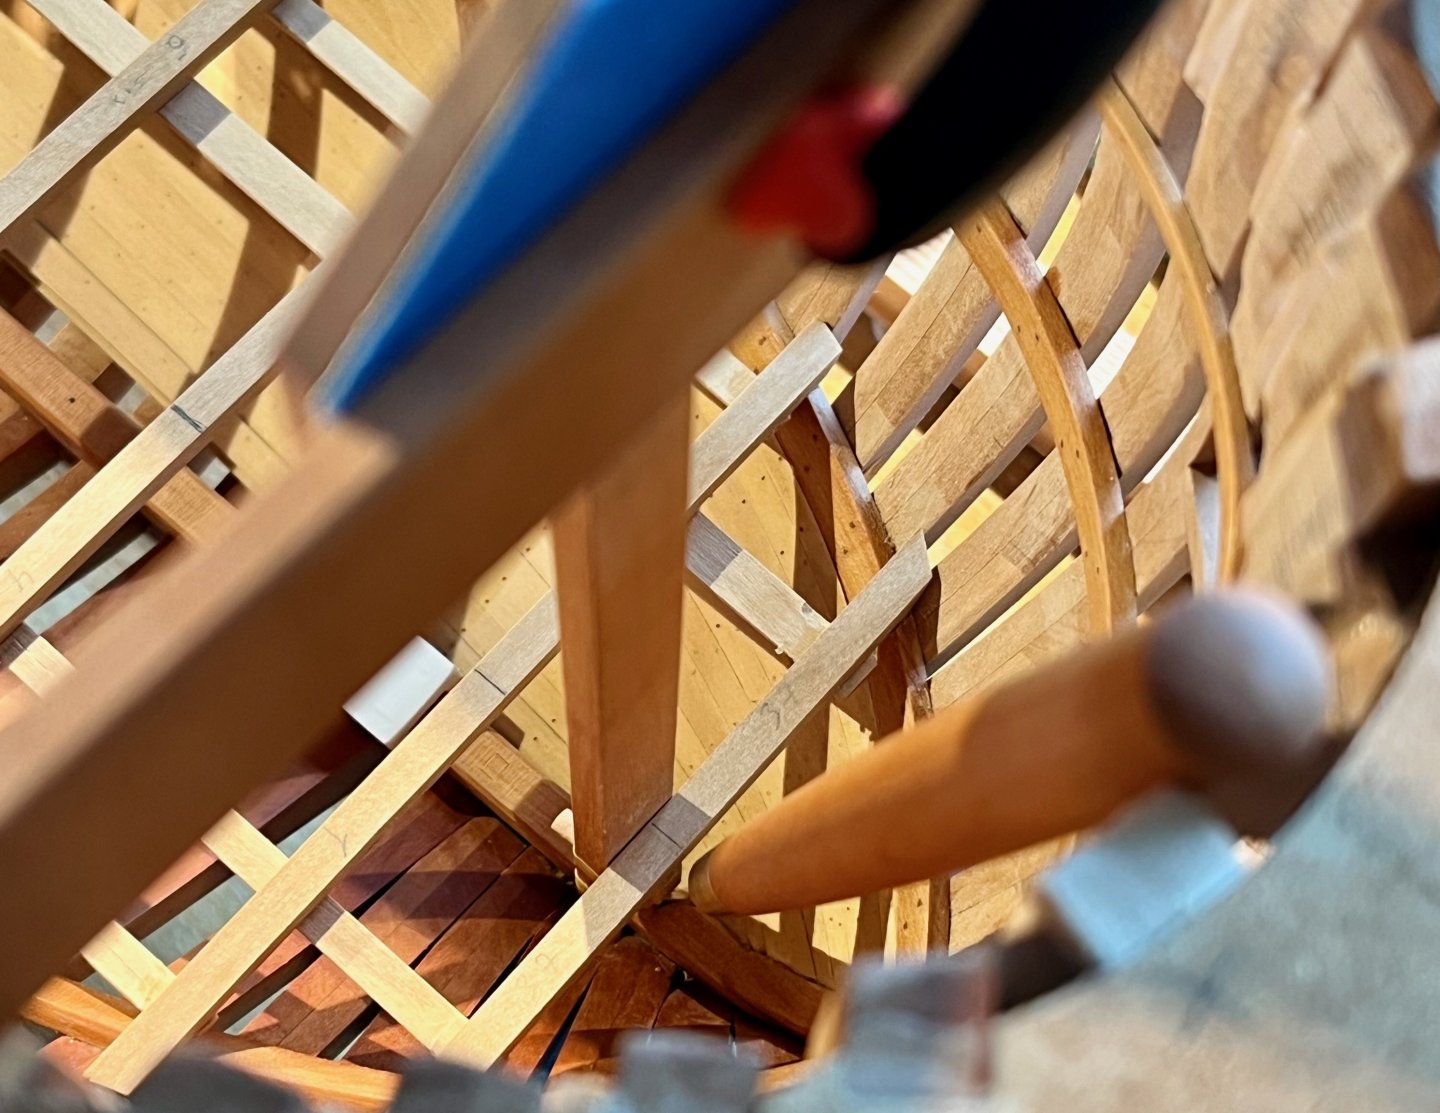
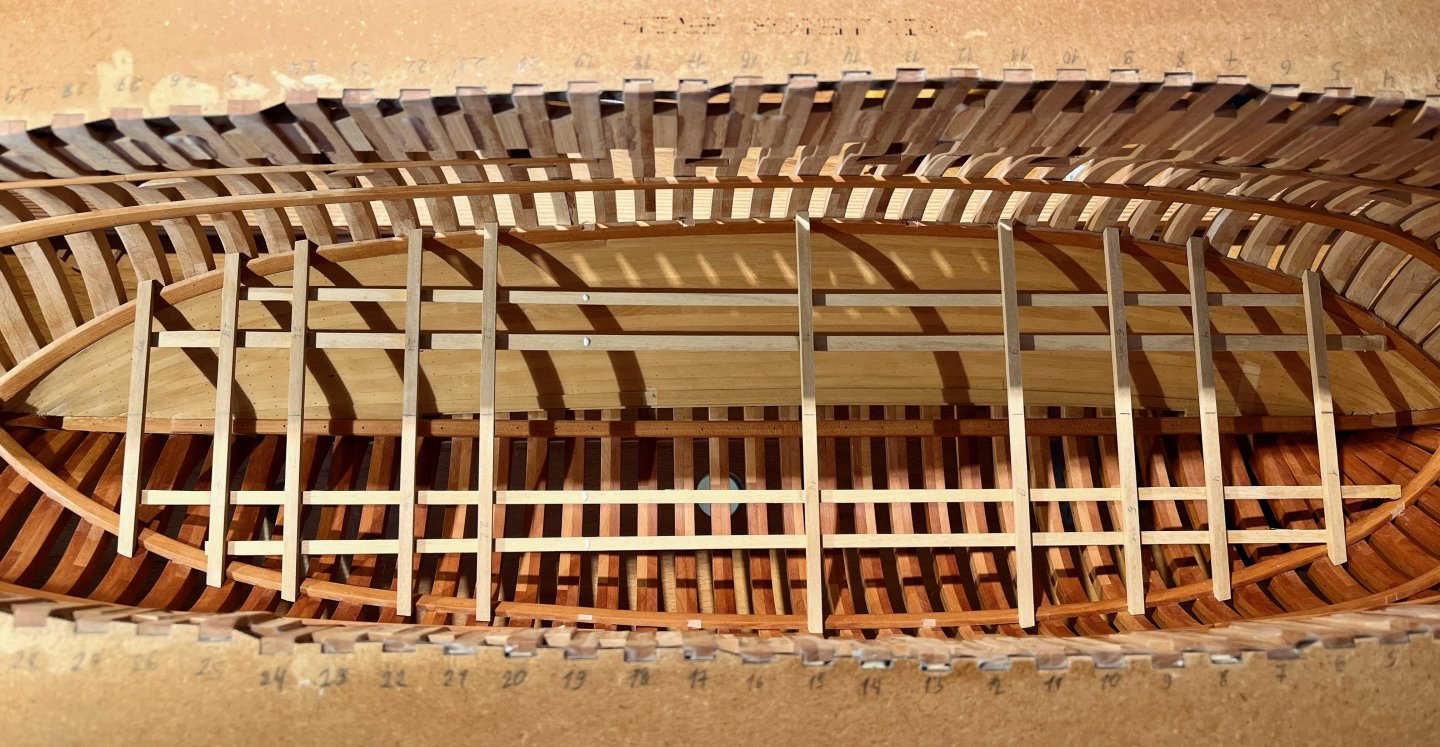
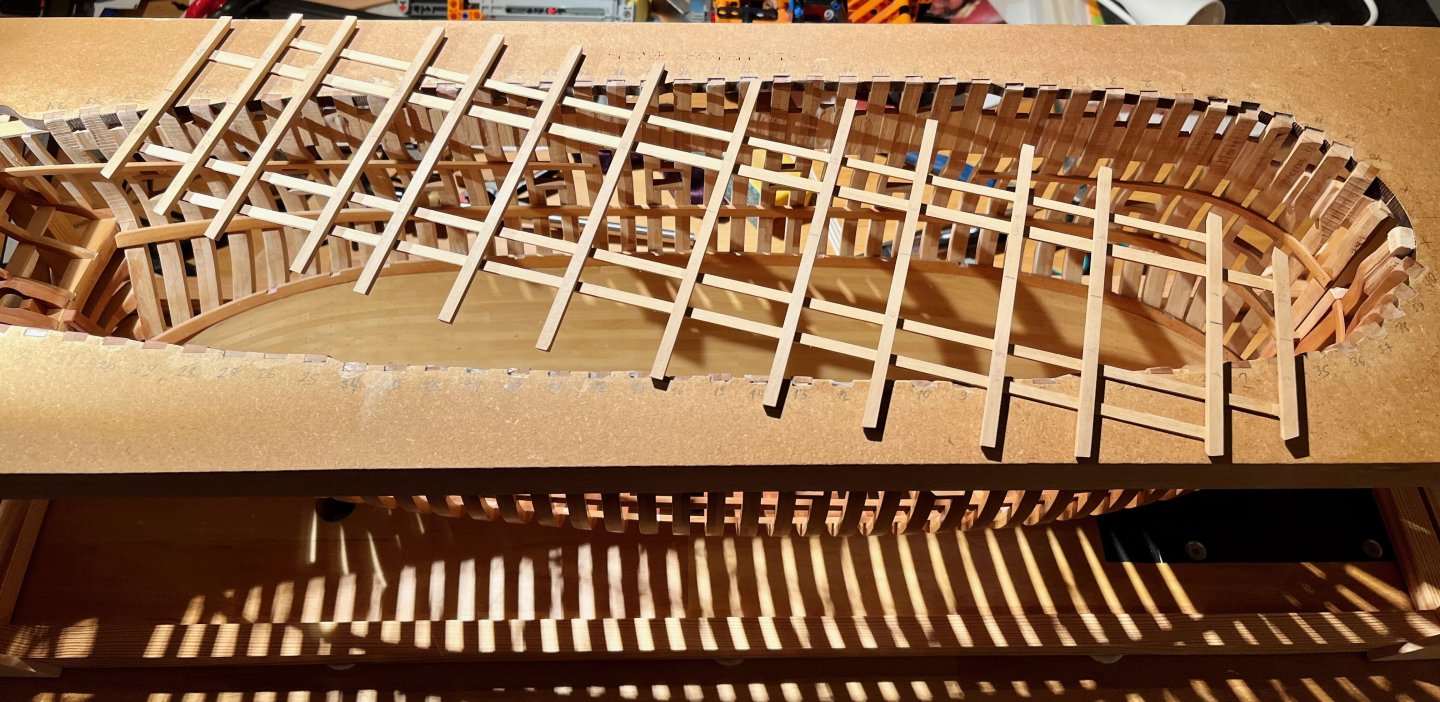
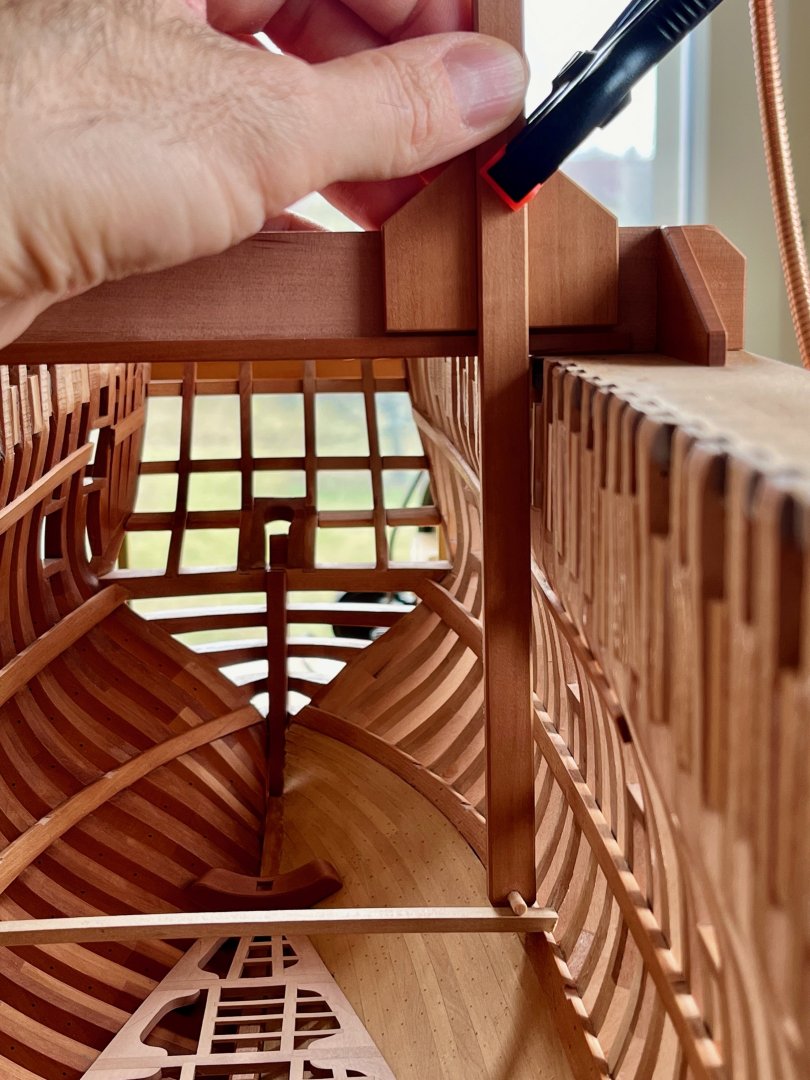
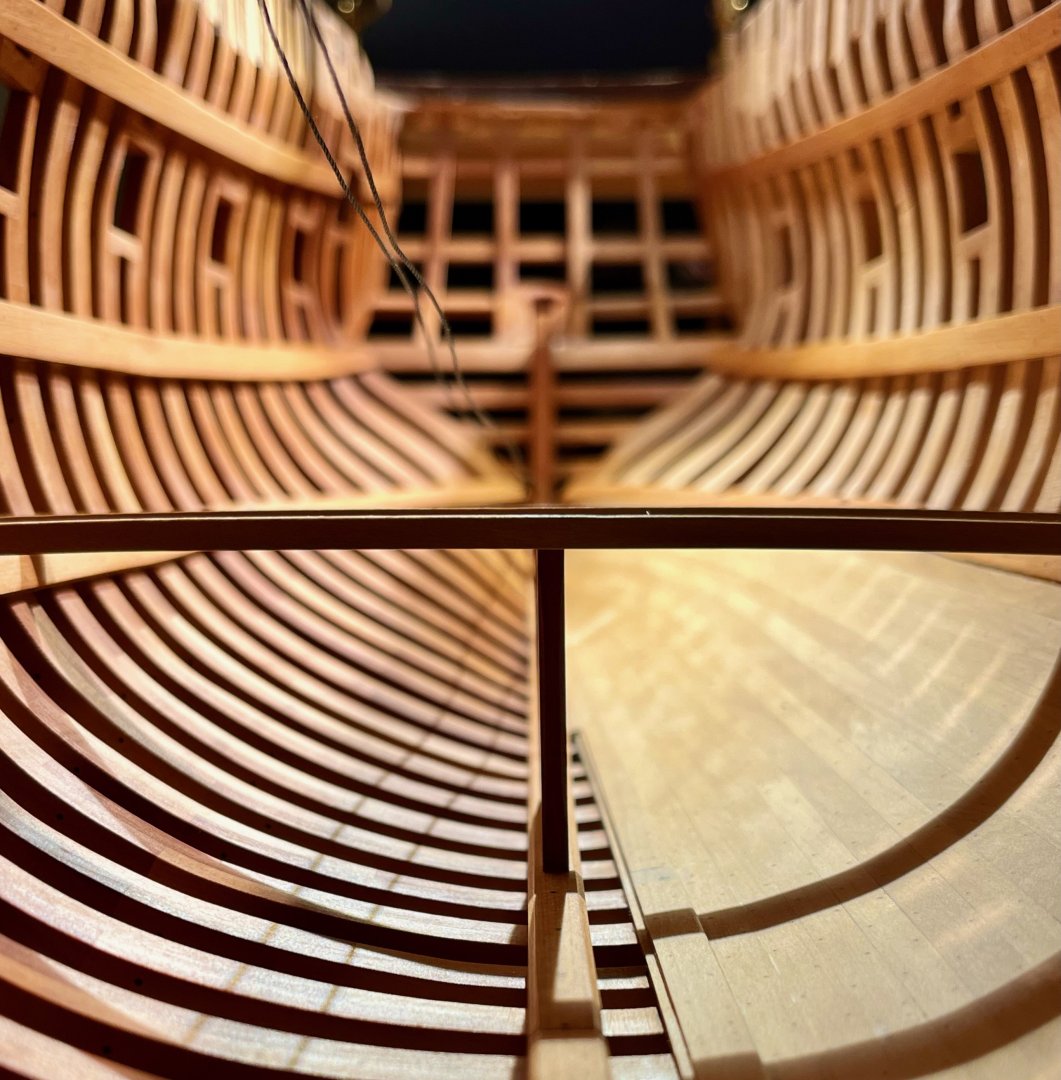
I was trying to imagine the process of marking up the deck inside the hull. Even with carefully prepared notches in the deck clamps it's not an easy work - the downside of Hahn's method is that working deep inside the hull always feels like a surgery, working through an narrow opening on top. So I decided to make my life easier and do it off the model instead Luckily that hull has a very modest tumblehome, so getting it in and out is geometrically possible. Beams are spot glued to boxwood strips and the entire deck would be assembled on them. Later strips would be removed using some alcohol or water. It would require a bit of a cleanup, but much easier overall. It fits perfectly into all notches, very satisfying! Now I can work with it The deck has a very gentle curve along the hull, so I will take care to glue carlings and ledges on the model to avoid loosing that curve.

- 968 replies
-
- 11
-
-
-
- hahn
- oliver cromwell
- (and 1 more)
-
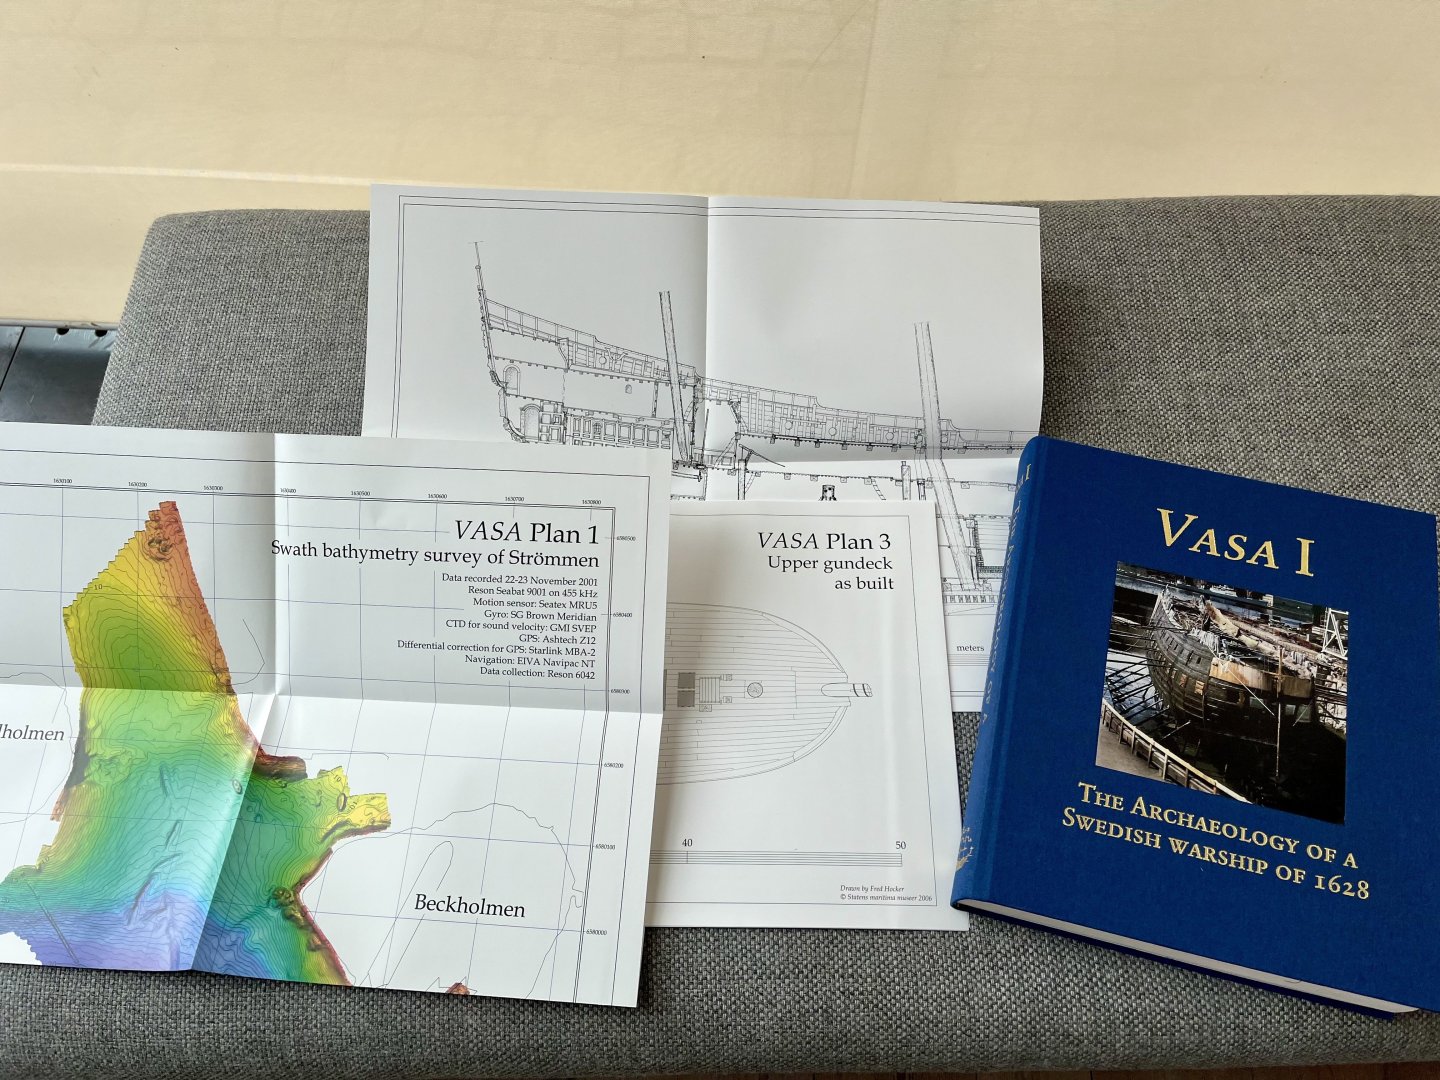
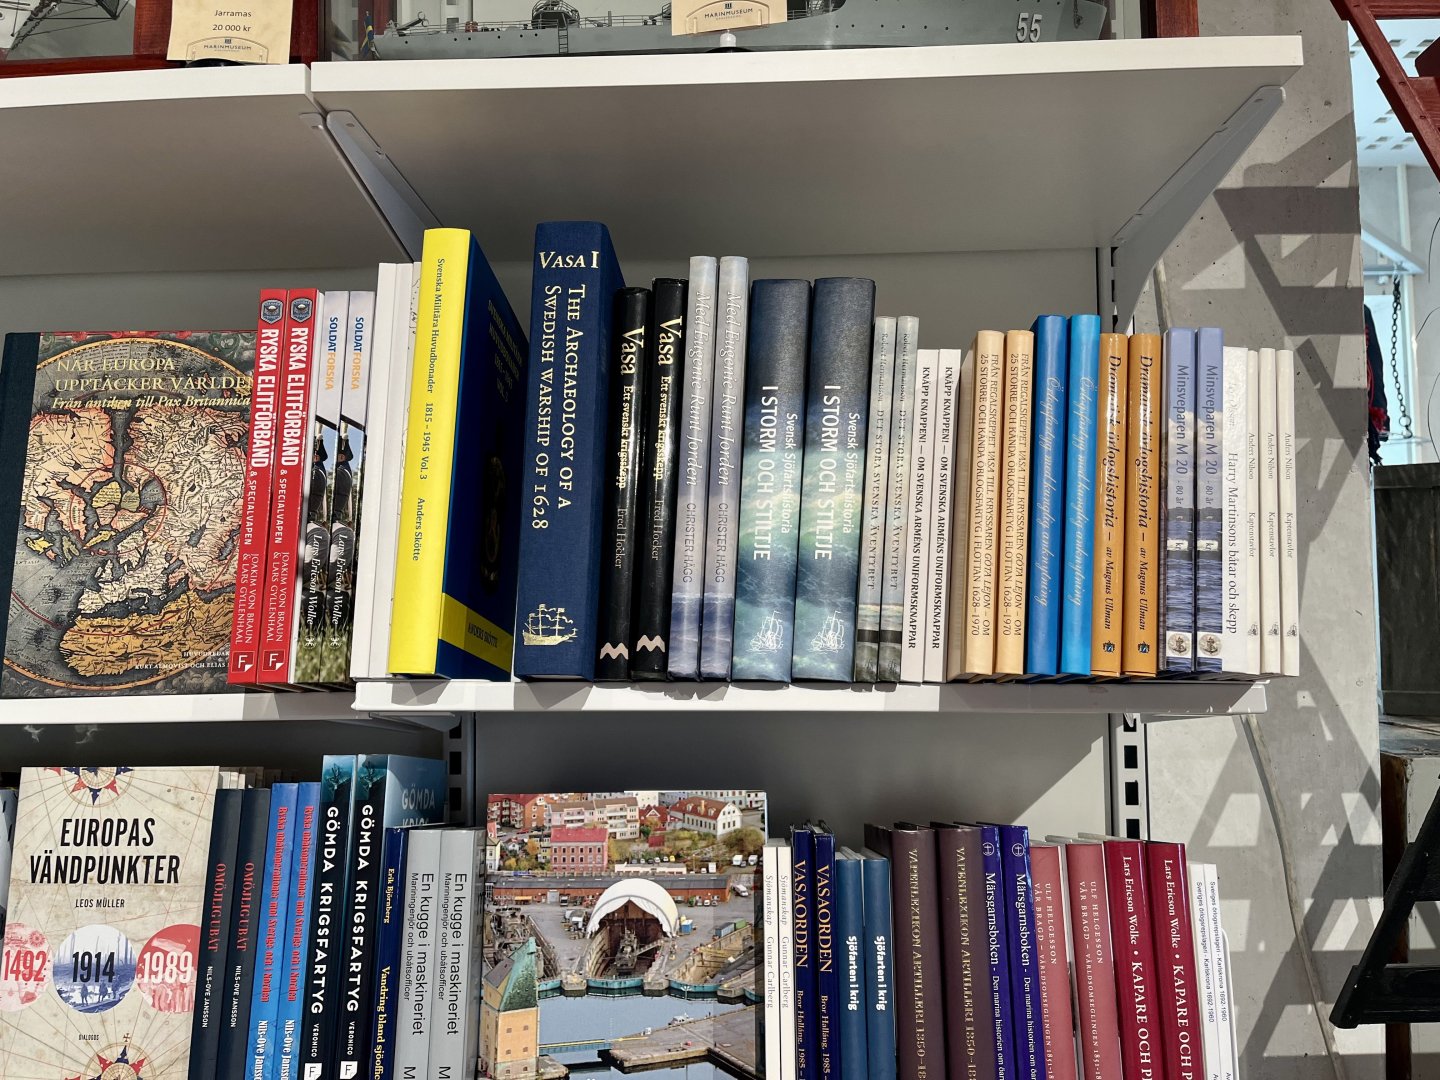
Unbelievable! I found Volume 1 in the wild, english version, not used, and it does not cost a fortune - but a list price of a mere $52! For comparison - the only second hand offer I found on Amazon is $1362 😳 It is on the shelf in the Marinmuseum (maritime museum) in Karlskrona. The treasure is there, among other books in the gift shop! I could not believe my eyes. On the official museum website it is listed as ”sold out”: https://www.smtm.se/om-myndigheten/forskning/publikationer/vasa-i And the shop personnel could not find the book in their computer, which made the transaction a bit complicated 😊 But you can try to contact the museum shop directly (their english is most likely very good) - you might persuade them to check the physical stock on the shelves, my picture might even help. There were at least two books there, I bought one, the other one remains, complete with plans and diagrams. If someone was hunting for it for years - do not miss the chance
-
ancre La Belle 1684 by Oliver1973 - 1/36
Mike Y replied to Oliver1973's topic in - Build logs for subjects built 1501 - 1750
Very neat trick! Sounds easier than soldering and bending it, and "wasting material" is a non-issue at this scale -
It is coming together very nicely! Looks like the preparation is paying off
-
Really like the organic shapes of the framing! It feels like the tree is growing around the mast step, hugging it with branches A bit too much decking obscuring it, the photos in post #135 are golden!
-
Great repair! Interesting gantry, could you please show more of that measurement probe mechanism on top?
-
Modelling ”career” definitely splits on ”before and after getting your first lifting table” 😊
-
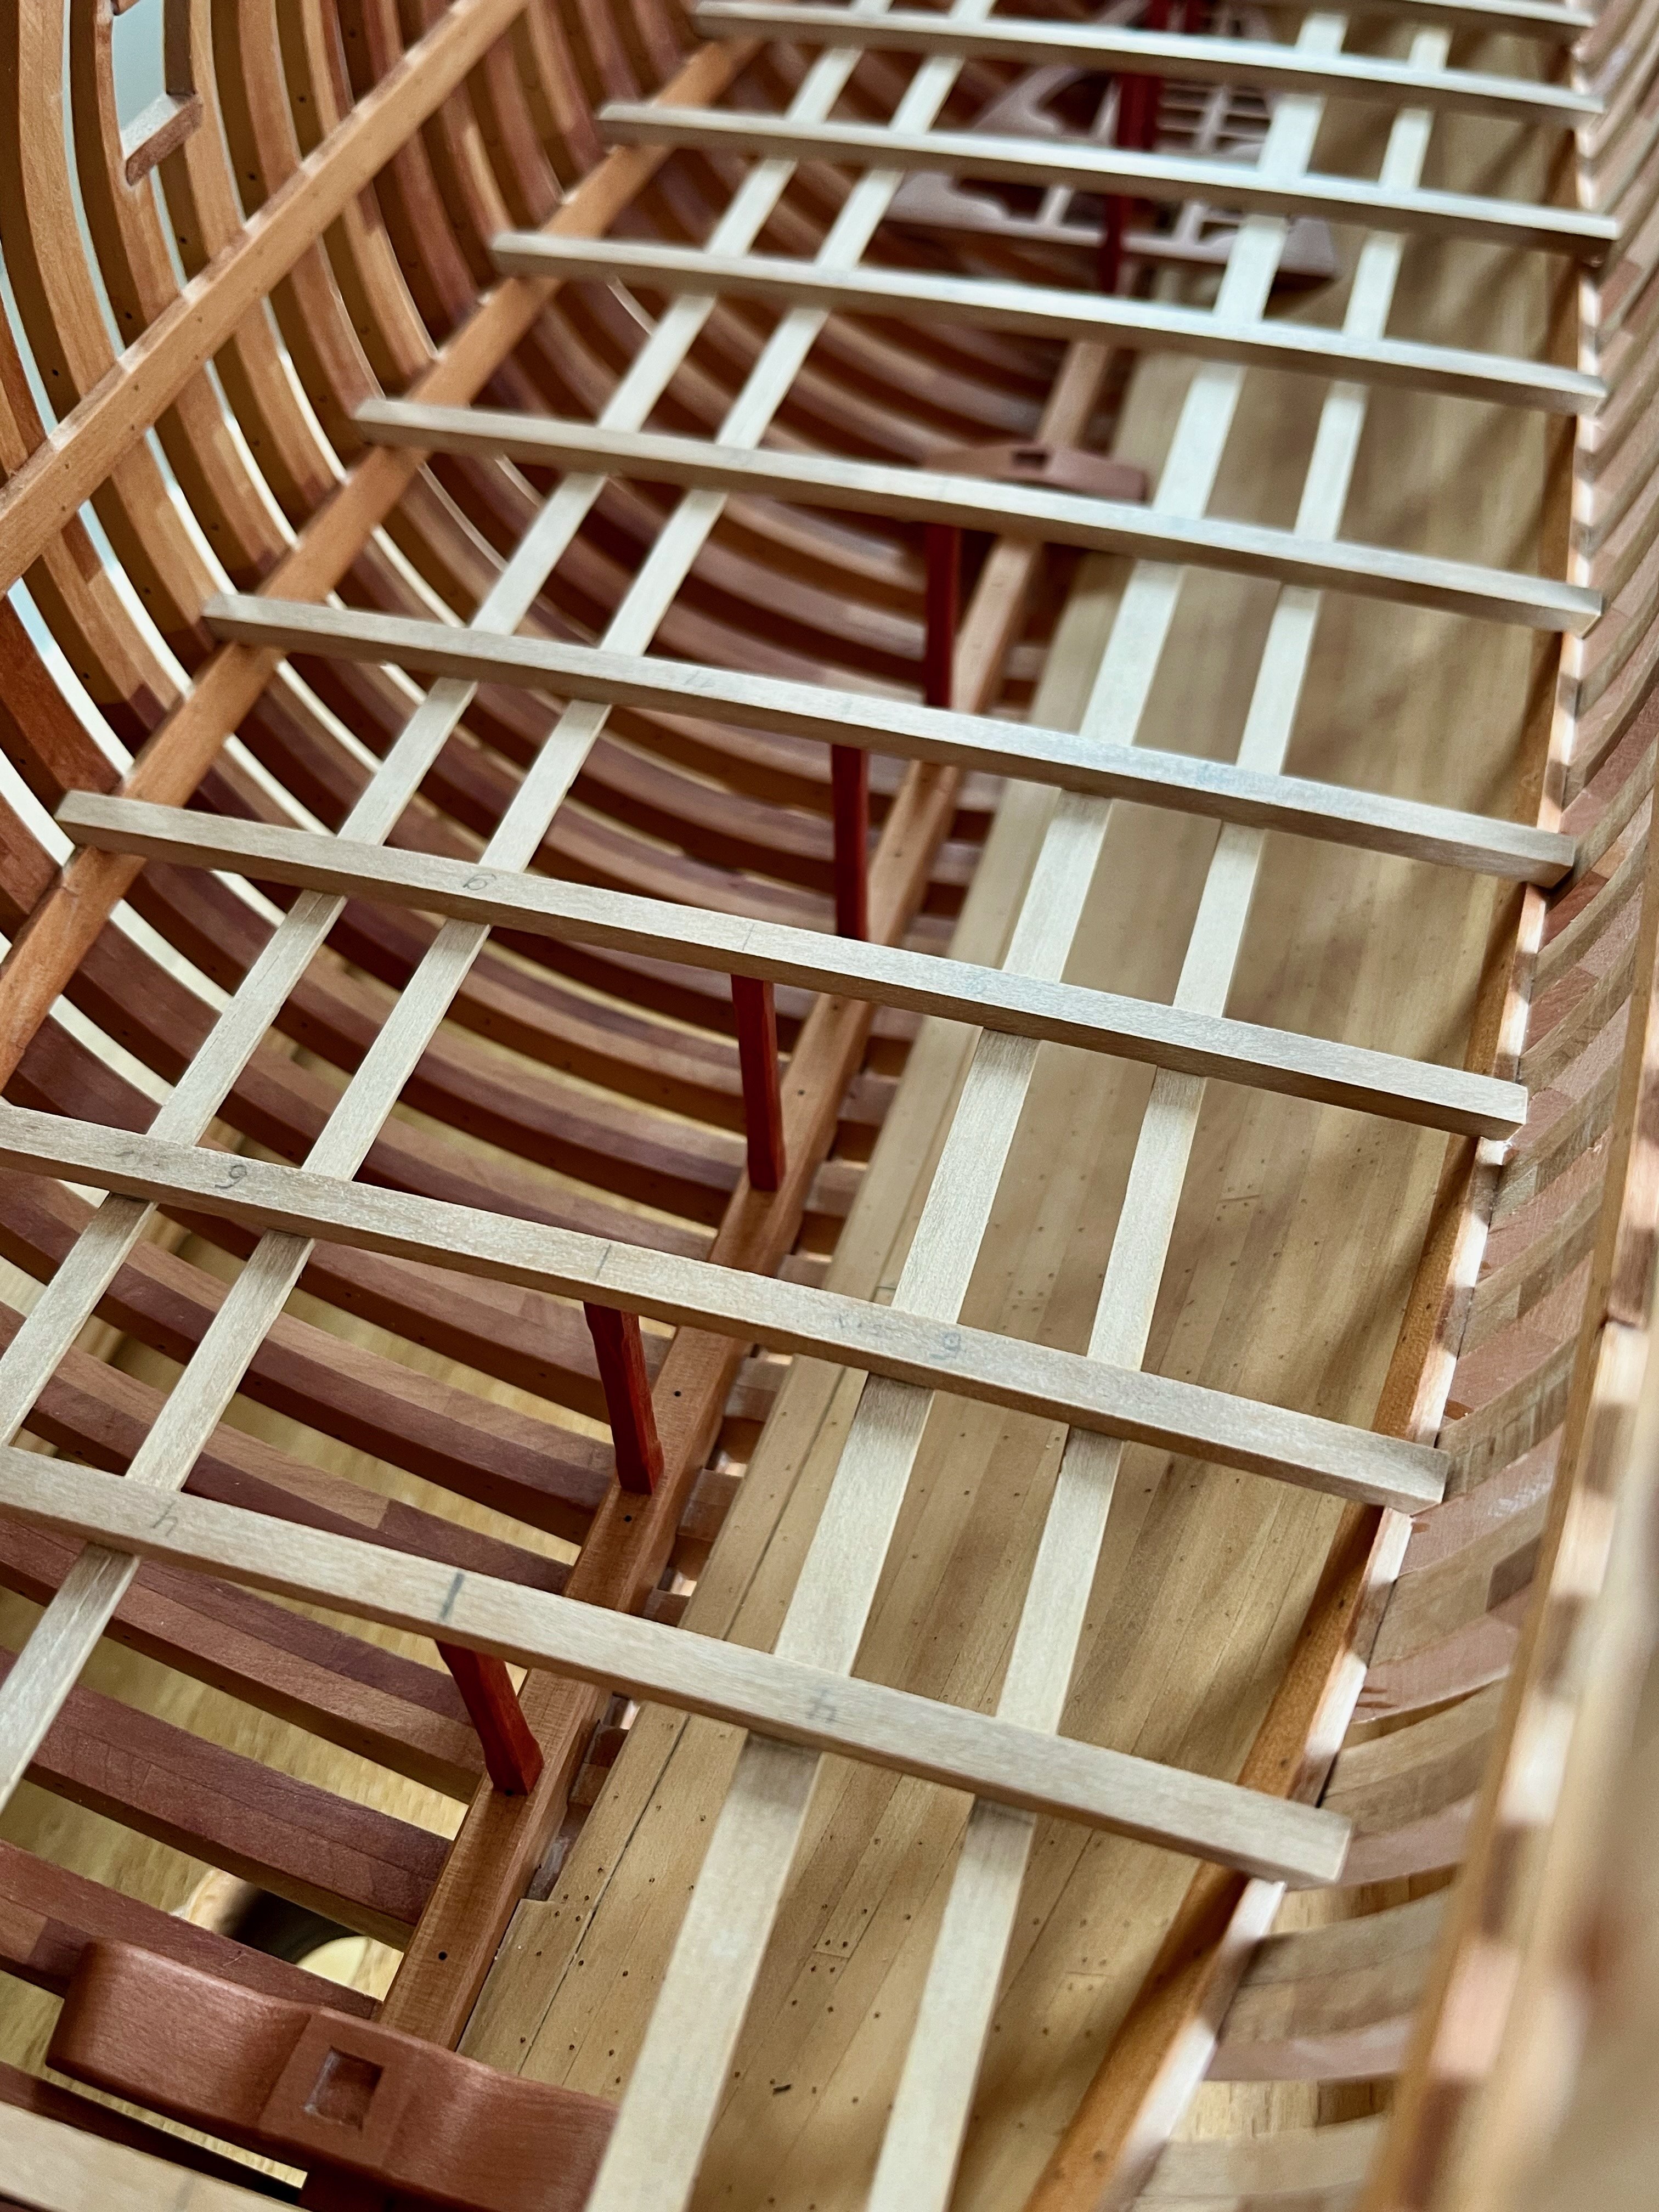
Next was the fitting the lower deck beams. Fairly straightforward and the alignment "jig" helped, though awkward to use (need to clamp its parts in a specific sequence, I dropped parts of the contraption into the hull many times, etc). Of course my deck clamps were not perfectly level to begin with, so some notches needed to be cut deeper than necessary to ensure a level deck. A curved Vallorbe file came in really handy to tune the depth of some notches! Once all beams were horizontal - the run of the deck was already quite fair, with only a minor adjustments to be done for a couple of beams. I was worried it would be a never ending process of alignment (fixing one dimension just to re-align the other), but it was not that bad. End result. Note the tiny gaps on the right side, I do not want beams to push into the frames on both ends to prevent any buckling or tilting due to the seasonal wood movement. The gap would be hidden by the inner planking on the right side, while allowing the hull to "breathe" a bit. My mind got carried away with plans for the deck structure, all the carlings and ledges, thinking how I would approach the construction. Marking up in situ? Making some paper template? Add temporary spacers to lift the deck in one "piece"? Use some rubber bands to firmly fix beams in position without drilling pin holes? Oh, right, that comes much later, I only did them to install pillars... I then remarked the true centerline using a string and placed these two test pillars under a beam. To my horror the beams standing on the keelson looked clearly off-center! The centerline string was already removed by that point, so I pulled two strings for a quick illustration. After careful checks the reason was found - the keelson is not perfectly level and is glued slightly tilted, resulting in a skewed pillar if you just place it on top. No big deal, can be easily compensated for. Luckily there is no issue with an off-center keelson or an incorrect hull shape. Always a bit scared of finding some critical mistake done 10 years ago... 🫣


- 968 replies
-
- 18
-
-
-
- hahn
- oliver cromwell
- (and 1 more)
-
I use a very thick black fishing monofilament for the bolts (designed to catch alligators and giant squids, I guess). No problems with any chemicals bleeding into the wood, etc. It is held inside the wood with CA glue and sands nicely to be flush.

-
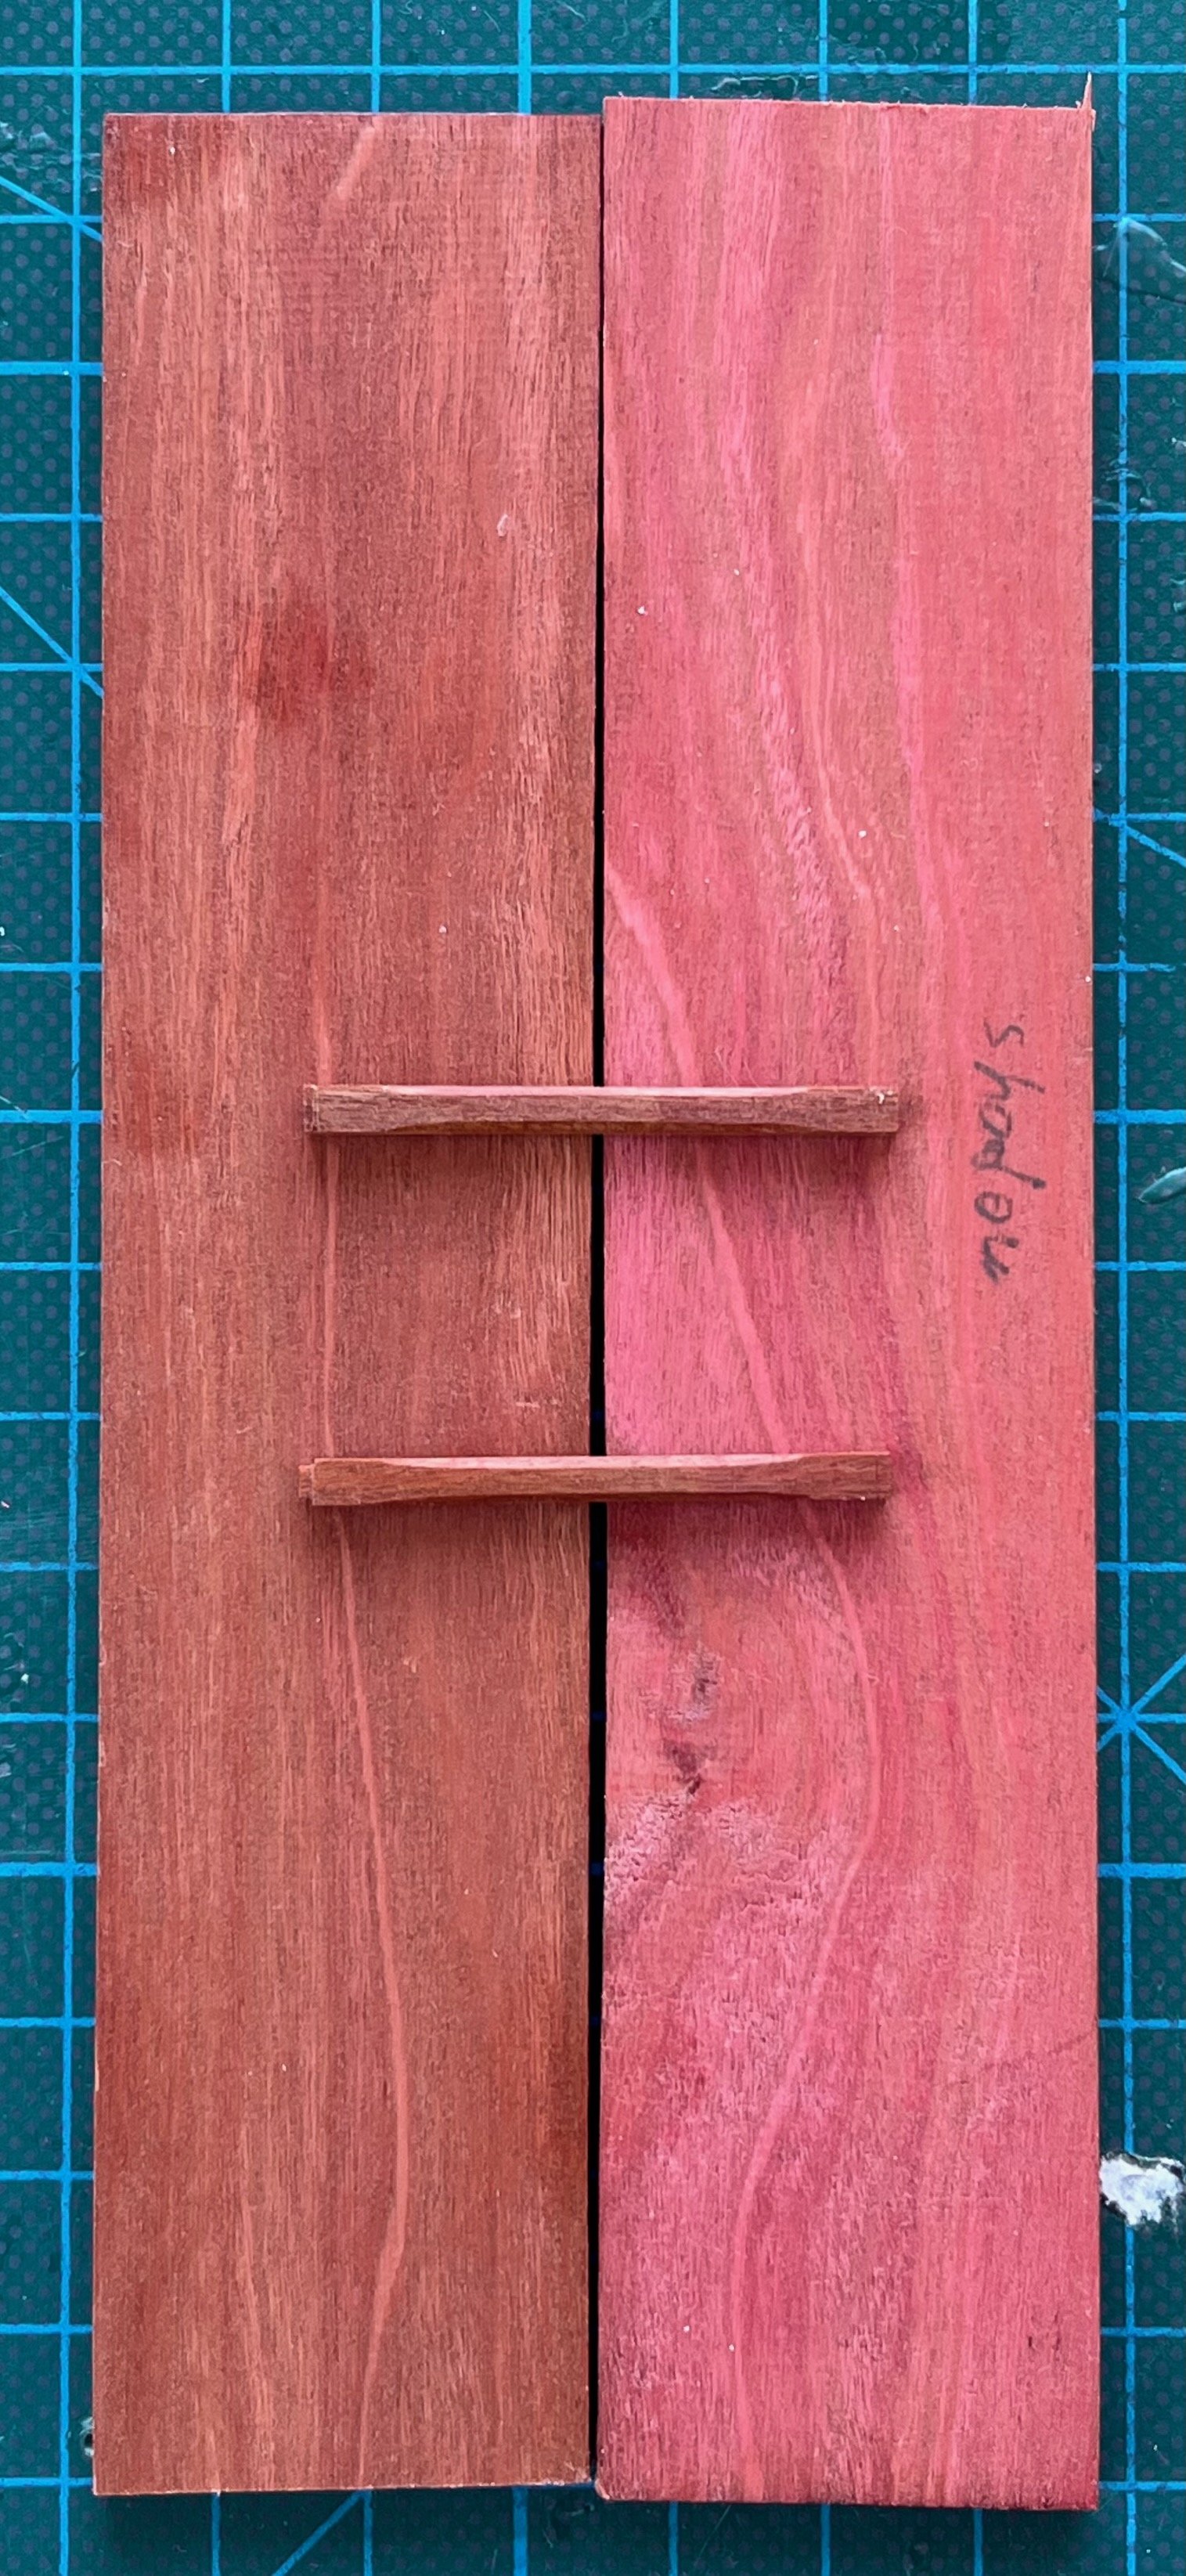
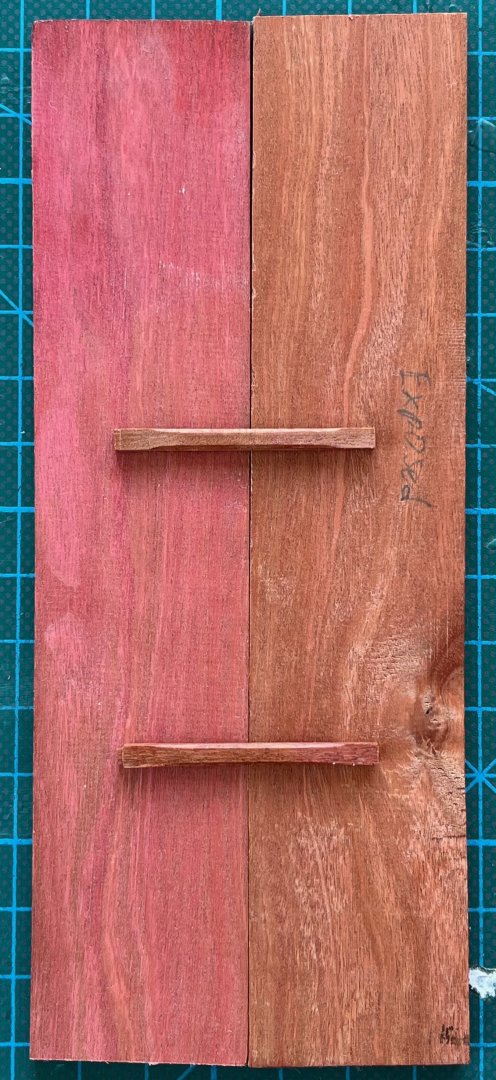
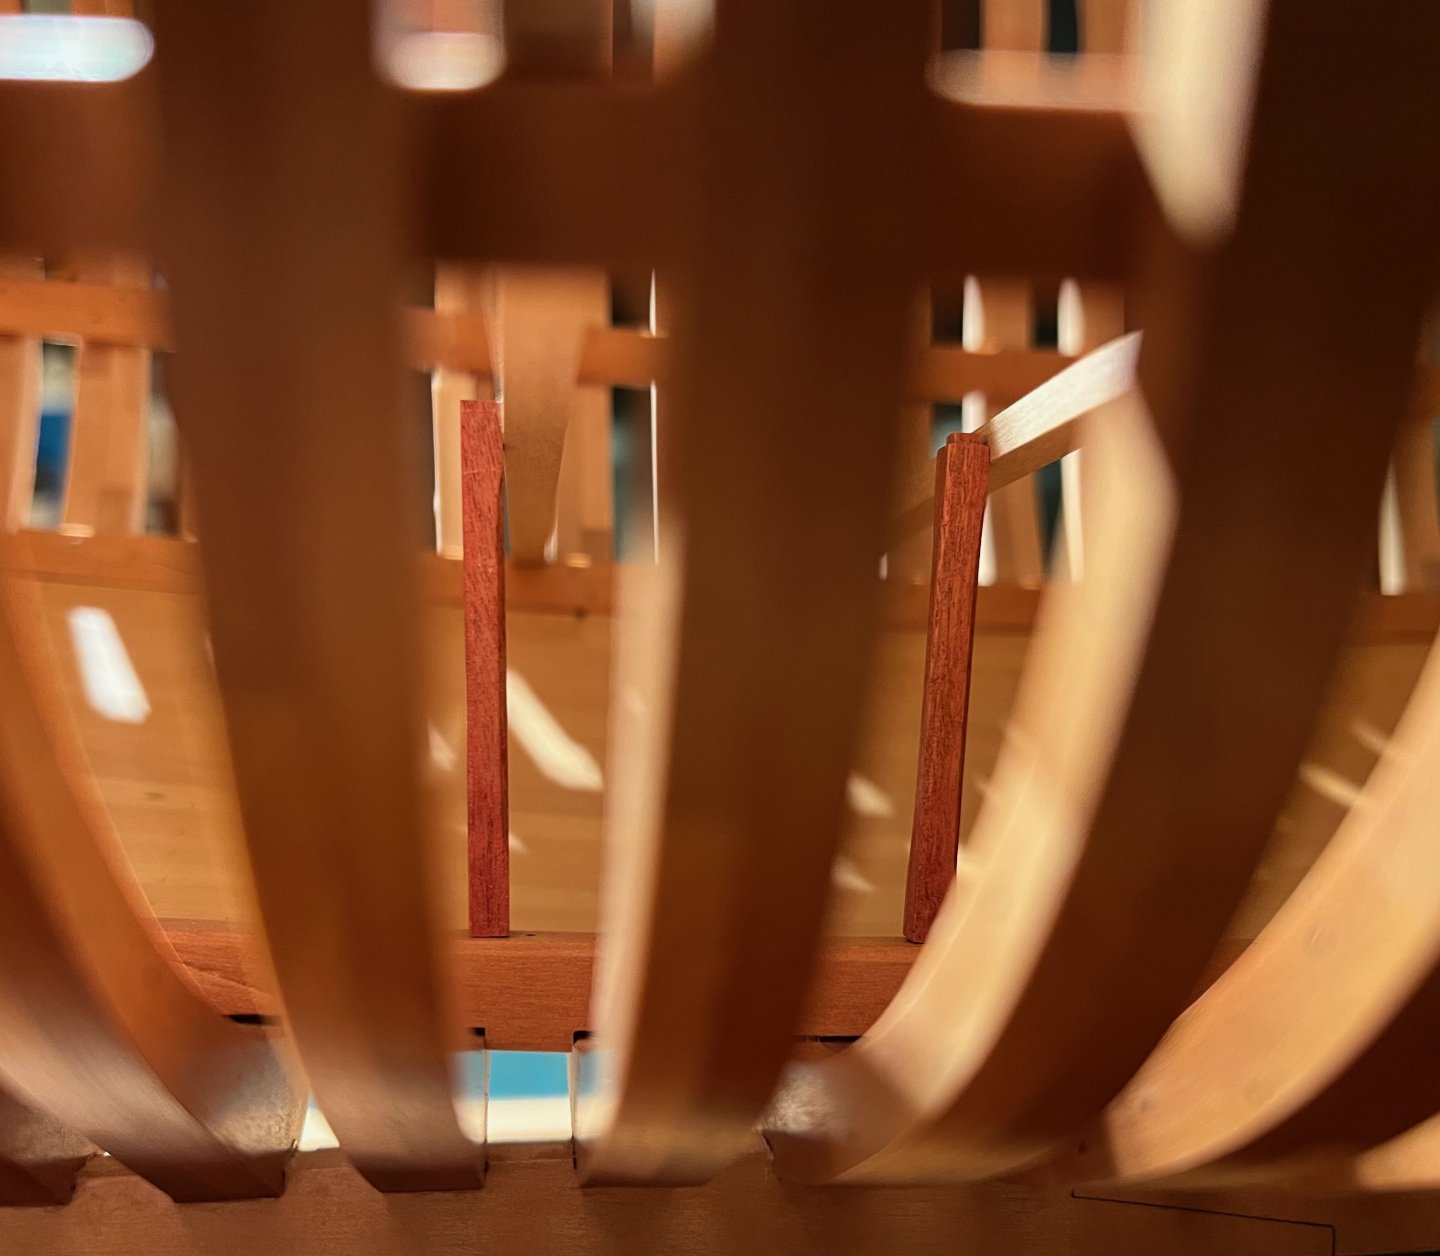
It's been 1.5 months of "aging" the Pink Ivory sample - the plank was laying on one specific side in a sunlight on my table, but not in an extreme way, sun hits it at an angle. As expected, it got darker, almost like a fresh vs aged red brick Coincidentally I bought that piece of Ivory because of the build log where brick oven was made out of pink ivory "bricks": https://modelshipworld.com/topic/11140-washington-galley-by-yamsterman-148-scale-pof/?do=findComment&comment=436782 To simplify the comparison I split it in half, the difference is clear (on the second photo both halves are flipped). No sanding to avoid damaging the "patina" layer, so sorry for some stains or fingerprints. Text says "shadow" and "exposed", but you can easily guess which one is which Both pillars were also in a direct sunlight, and looks like the one with Osmo finish aged tiny little bit less. Even when aged they look quite fine, and I think I'll go with it instead of a pear / box / ebony that are the usual candidates The texture is interesting - it has some grain, but not extreme like a walnut. It looks rougher when surrounded by the pear/box hull, but not too extreme or out of scale, even on close-up photos: (I know that this is not how pillars are attached to the beams, these are just test pieces freestanding on the keelson)

- 968 replies
-
- 12
-
-
- hahn
- oliver cromwell
- (and 1 more)
-
I love your building jig! Looks like a loom from some angles
-
Now that is "painting with wood" taken literally, well executed!