HOLIDAY DONATION DRIVE - SUPPORT MSW - DO YOUR PART TO KEEP THIS GREAT FORUM GOING! (Only 75 donations so far out of 49,000 members - C'mon guys!)
×


Mike Y
-
Posts
1,553 -
Joined
-
Last visited
Content Type
Profiles
Forums
Gallery
Events
Everything posted by Mike Y
-

HMS RESOLUTION 1667 by KarenM - 1:48
Mike Y replied to KarenM's topic in - Build logs for subjects built 1501 - 1750
Beautiful! Are you bevelling the edges of the planks before or after the installation? What is your technique for that? -
New Proxxon Eccentric Clamping Fixture
Mike Y replied to GGibson's topic in Modeling tools and Workshop Equipment
Super happy to see anything new from Proxxon, especially for their machine lineup! And the price seems very reasonable, though not yet widely available. -
I experimented with various pear and boxwood finishes and settled on these three depending on your needs. All three are easy to apply and are quite universal (would work for any shape of a part). 1) Tung Oil (pure one) if you want a deep, dark tone with a bit of sheen, making grain more visible. Beware - penetrates deep into the wood (a problem if you want to later glue another part to the finished part) and dries slowly. 2) Danish Oil as a middle ground 3) Osmo Polyx 3062 wax-oil mixture as a new go-to finish, looks lighter than the rest and super easy to apply. I did some finish tests in my build log, hopefully you would find them useful See here: https://modelshipworld.com/topic/7297-beavers-prize-1777-by-mike-y-148-pof-hahn-style/?do=findComment&comment=788496
-
Very interesting build and methods! A good crossover from other branches of modelling hobby world Small question - what kind of wires are you using for these LEDs? Looks like a coated copper wire? Any issues with insulation, what diameter would be sufficient for these SMD LEDs?
-
Taking shape!
-
Nautical archaeology internship programs
Mike Y replied to Ferrus Manus's topic in Nautical/Naval History
I would recommend to consult with Kroum Batcharov, he is a well known specialist in the field and also has a youtube channel about nautical archeology. He must have some good recommendations from the inside! https://www.youtube.com/@kroumbatchvarov-archaeologist -
Would not trust any joint angles when building a frame, weren't you gluing on top of a frame template (with a glass in between)? To make sure the pieces actually line up, especially on top of the frame?
-
Nicely done! Some battens (thin strips of wood) would help to highlight the high/low areas, since an eye can trick you...
-
A lovely time capsule! Can only imagine what it feels like to revamp your own project. Incredible build quality for a teenager, hats off to you sir!
-
Rigging in general is absolutely not my cup of tea, but your execution captured imagination! Now it’s not just a hodgepodge of strange words, but a coherent system. Your hand drawings are more illustrative than a lot of books do, and they do have a very charming style 😊 And the execution is impeccable as always!
-
Gantry style building board dimensions advice
Mike Y replied to davec's topic in Modeling tools and Workshop Equipment
Would strongly recommend to make a cardboard mockup - of your biggest midship frame (with keel included) and the gantry itself, with a mock height gauge. It is the best way to feel the dimensions and see if you would be able to transfer dimensions to the hull from your bluprints. Was too lazy to build a cardboard mockup when designing a display case, used CAD instead. Payed for it dearly, the proportions were a bit off and it ended up too big in real life. With the gantry / buildboard a cardboard mockup should be really easy to make! -
Fret saw versus power saw
Mike Y replied to Quimp Slattery's topic in Modeling tools and Workshop Equipment
I do scratch build in an apartment. Never had a big scroll saw, but a benchtop bandsaw (Proxxon MBS in my case) is not too bad. It has a bit of a high-pitched noise that does not travel too far (tested with neighbours), and I also put a rubber mat under all machines to reduce the noise distribution through vibration. You can buy these mats for washing machines and like. So unless your apartment walls are made out of paper (which might happen) - it should not be a thing preventing you from scratch building! Also the actual cut time is miniscule, you spend way more time preparing, marking up, gluing, sanding, etc, than the actual "cutting pieces from wood" time. Would be happy to help you with any other "tools in an apartment" problems, there are some photos in my build log that might help It is absolutely doable! And you don't need too much space, my modelling corner is 120cm wide. -
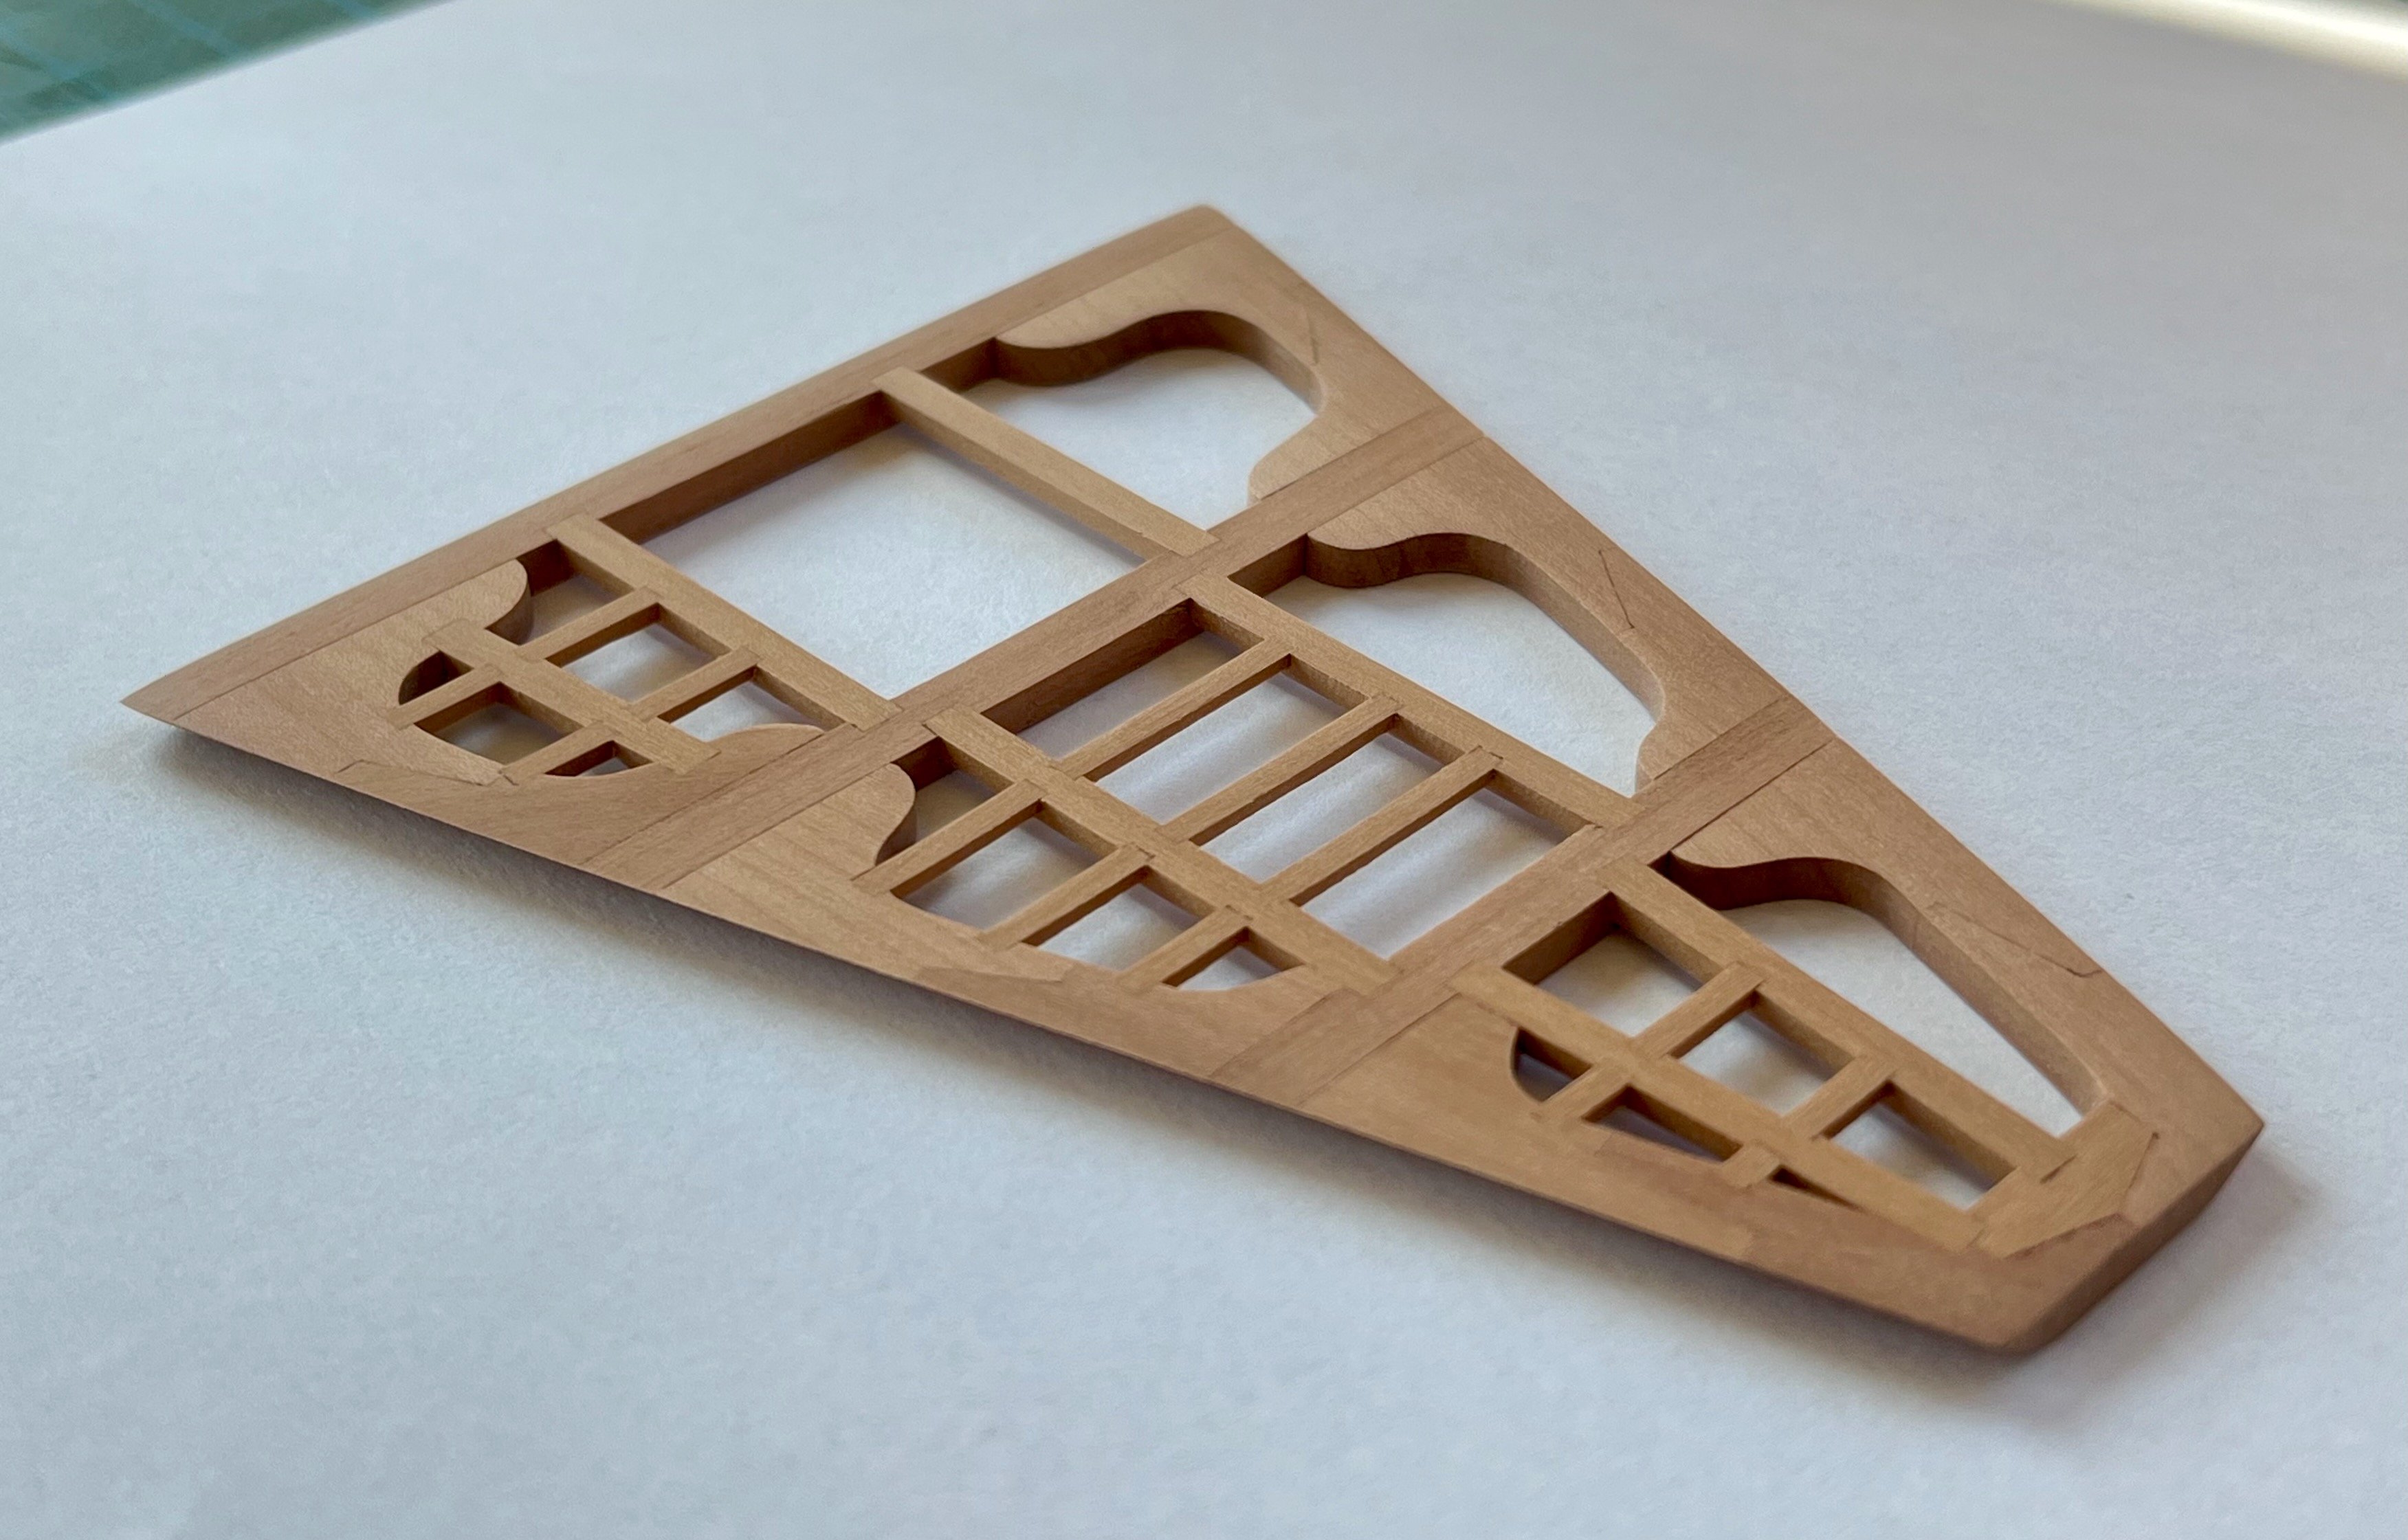
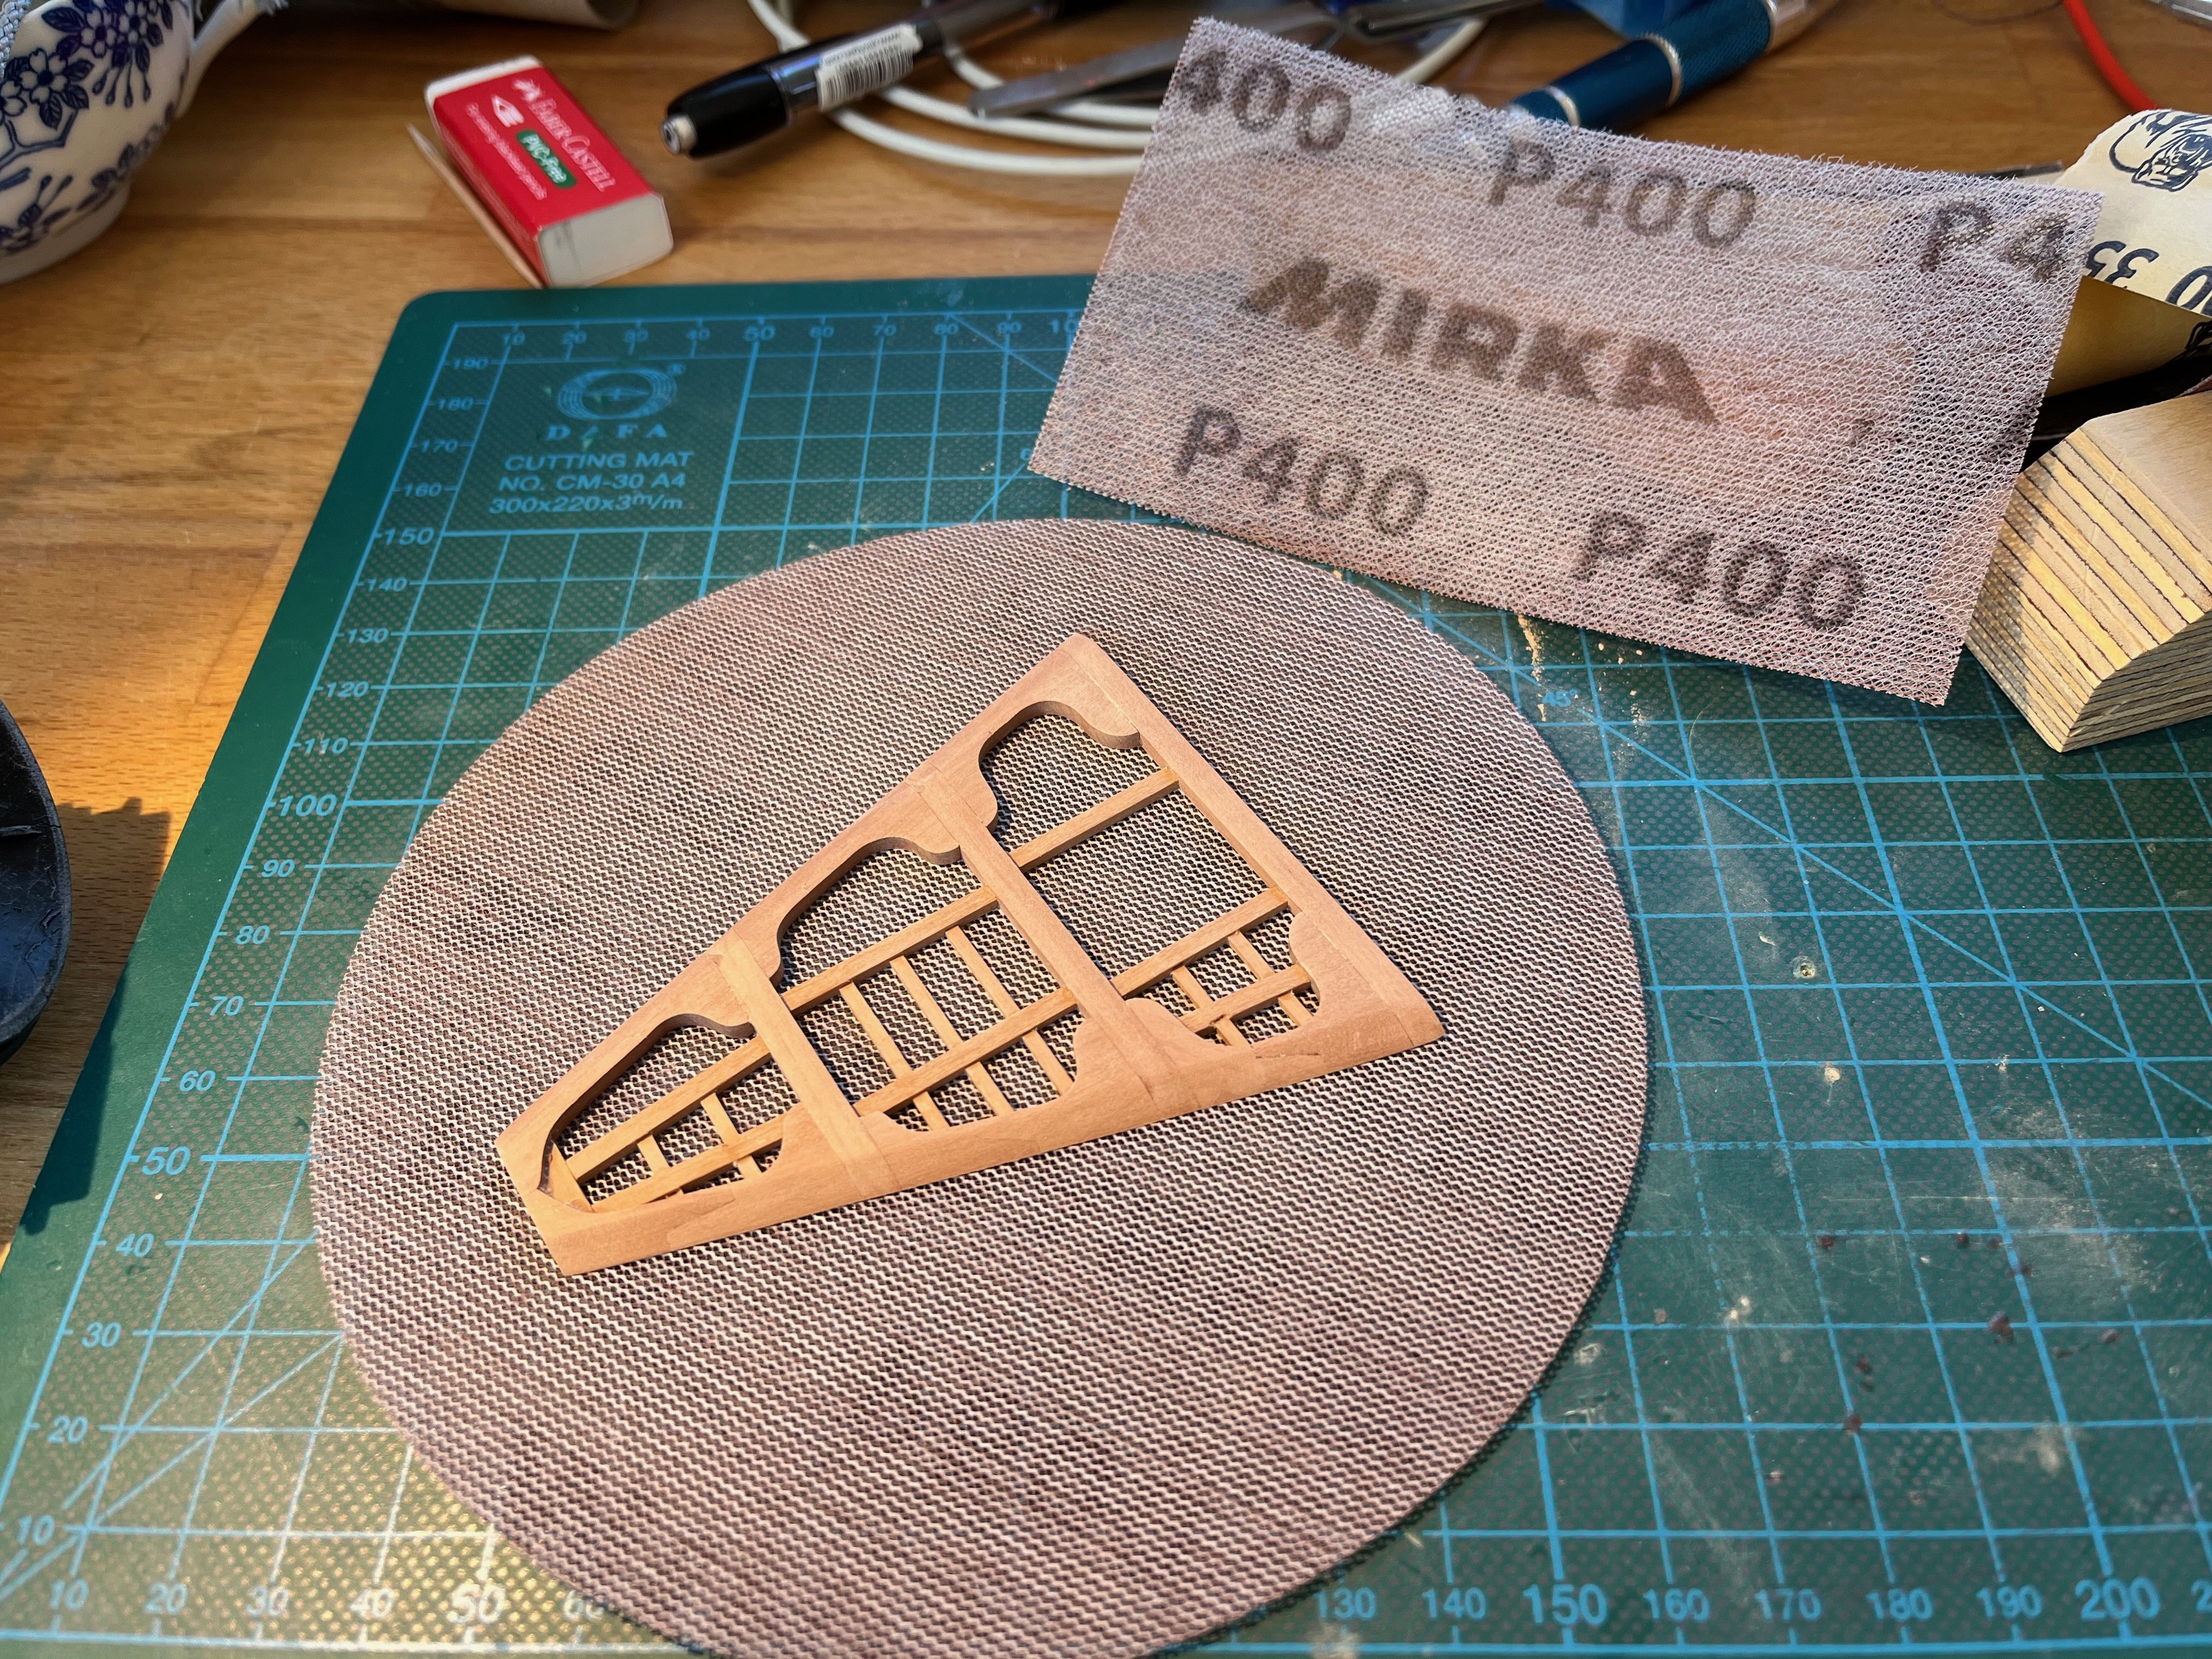
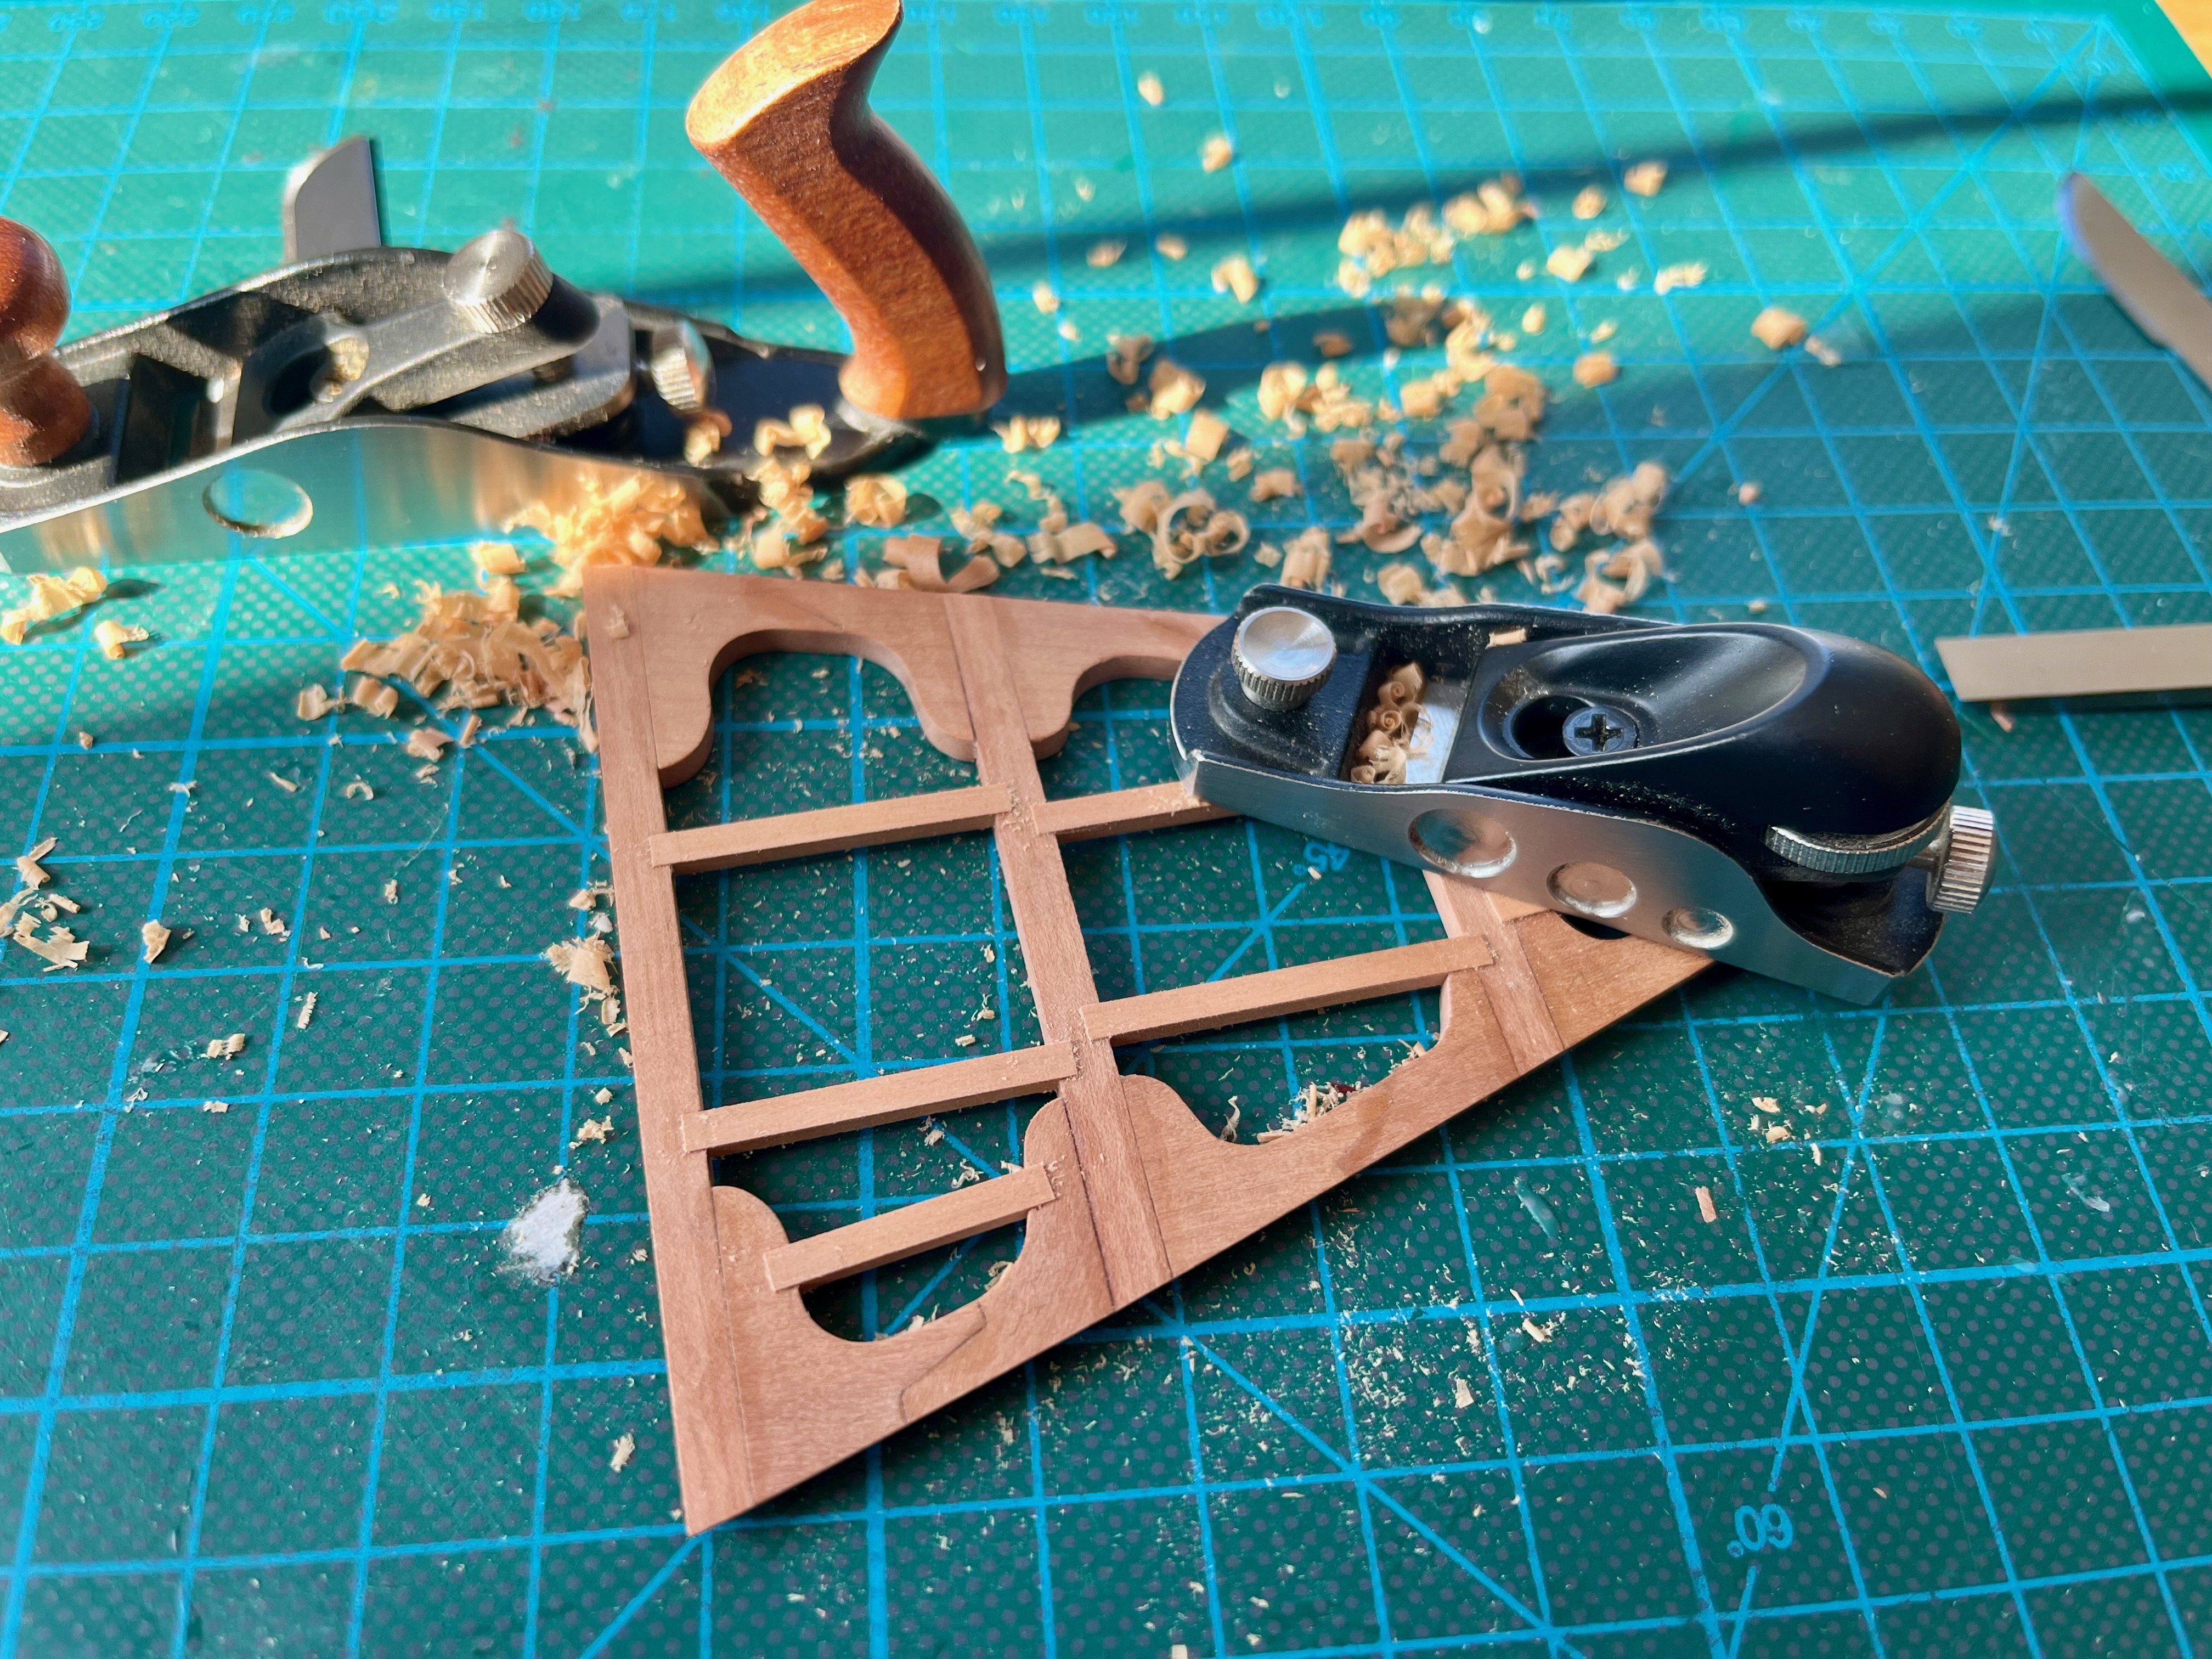
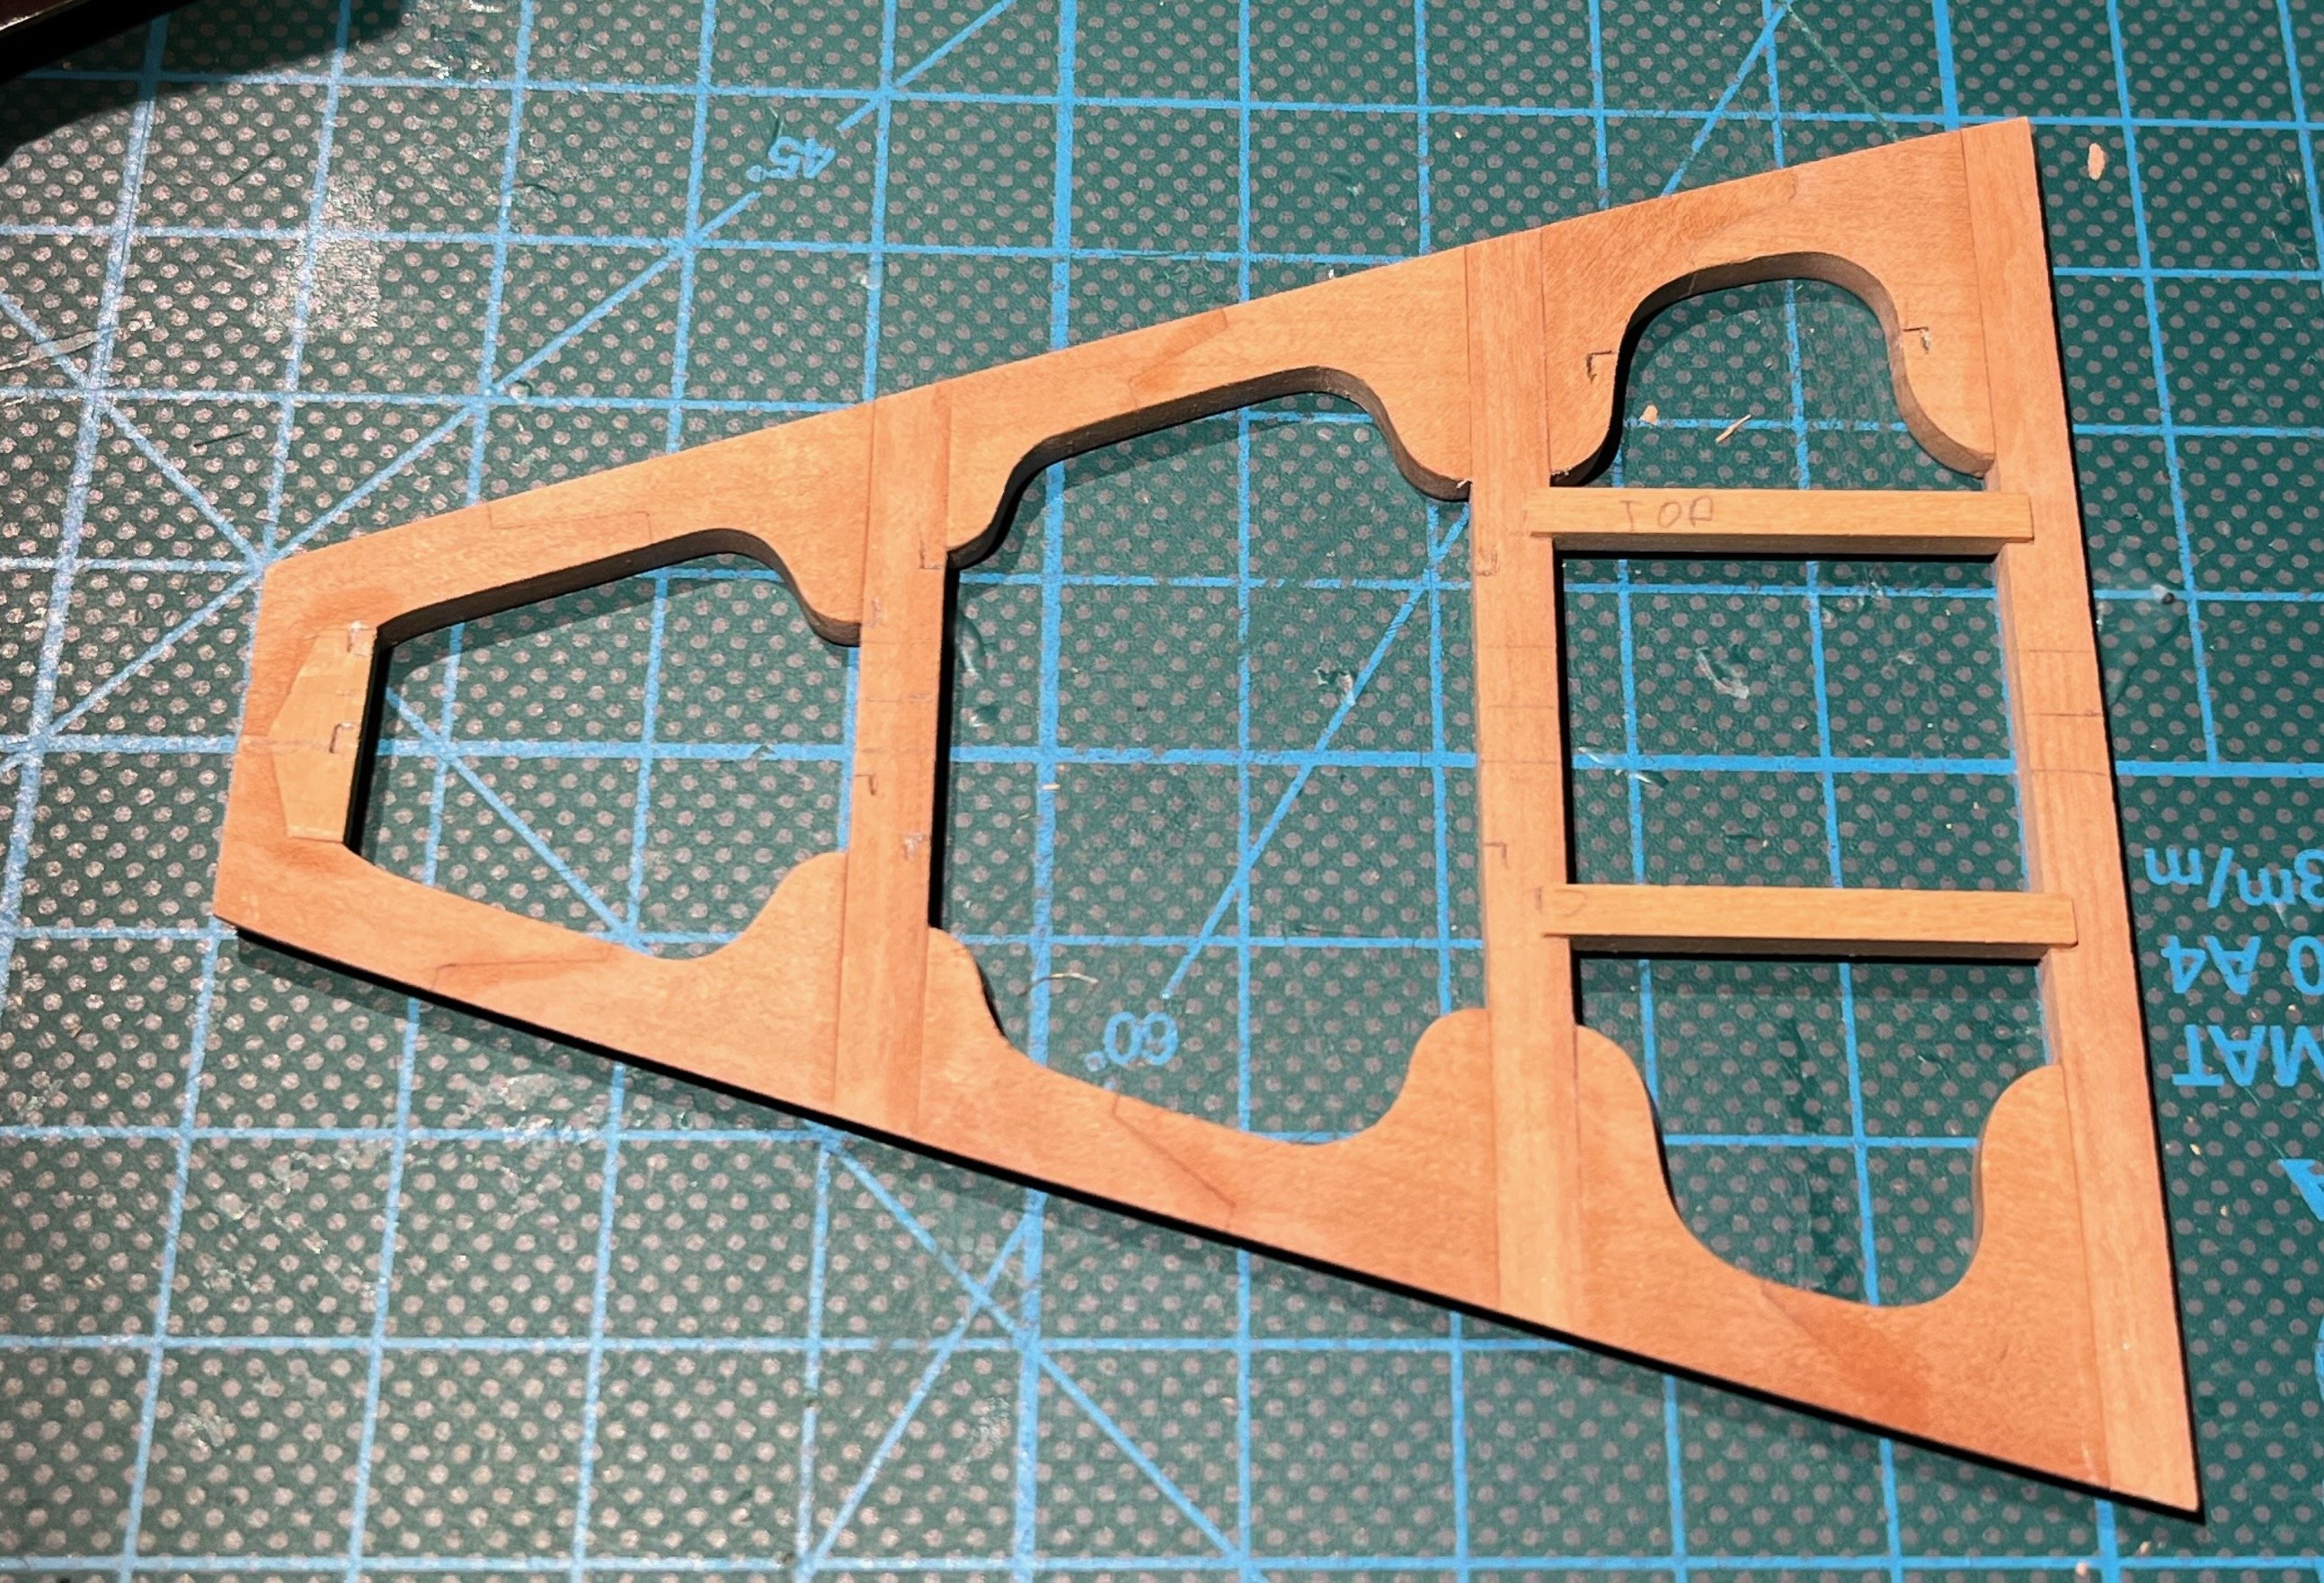
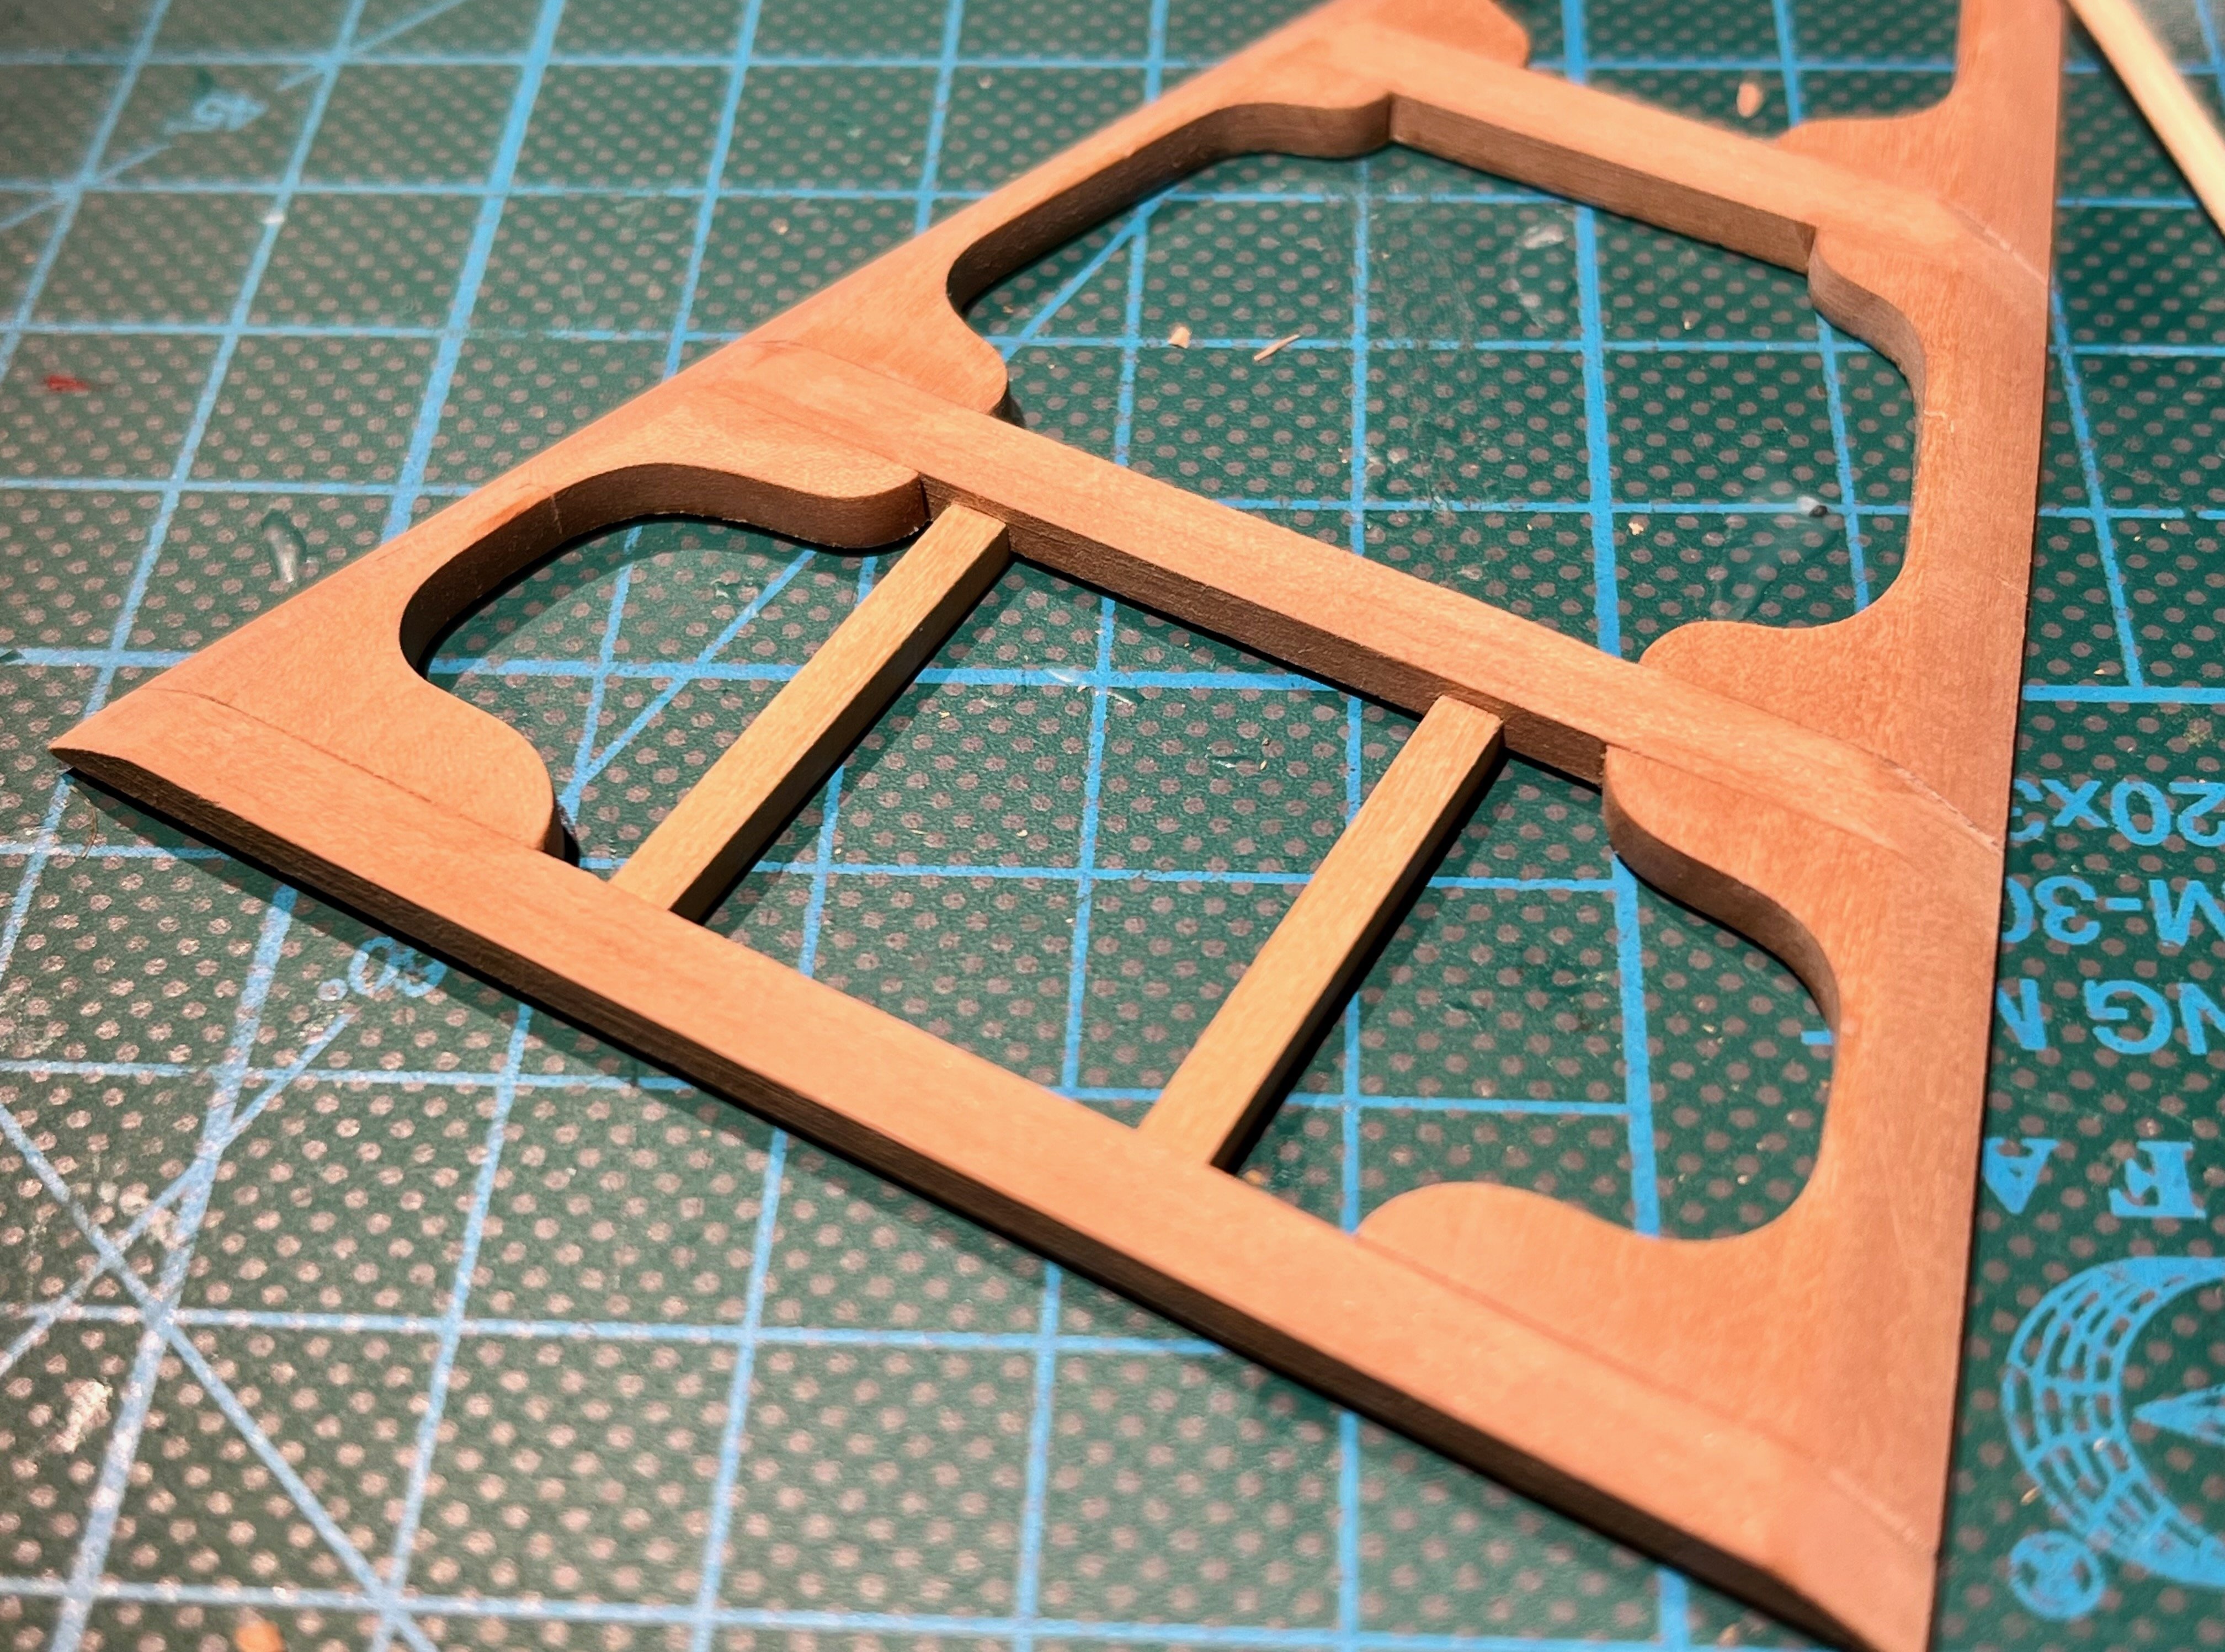
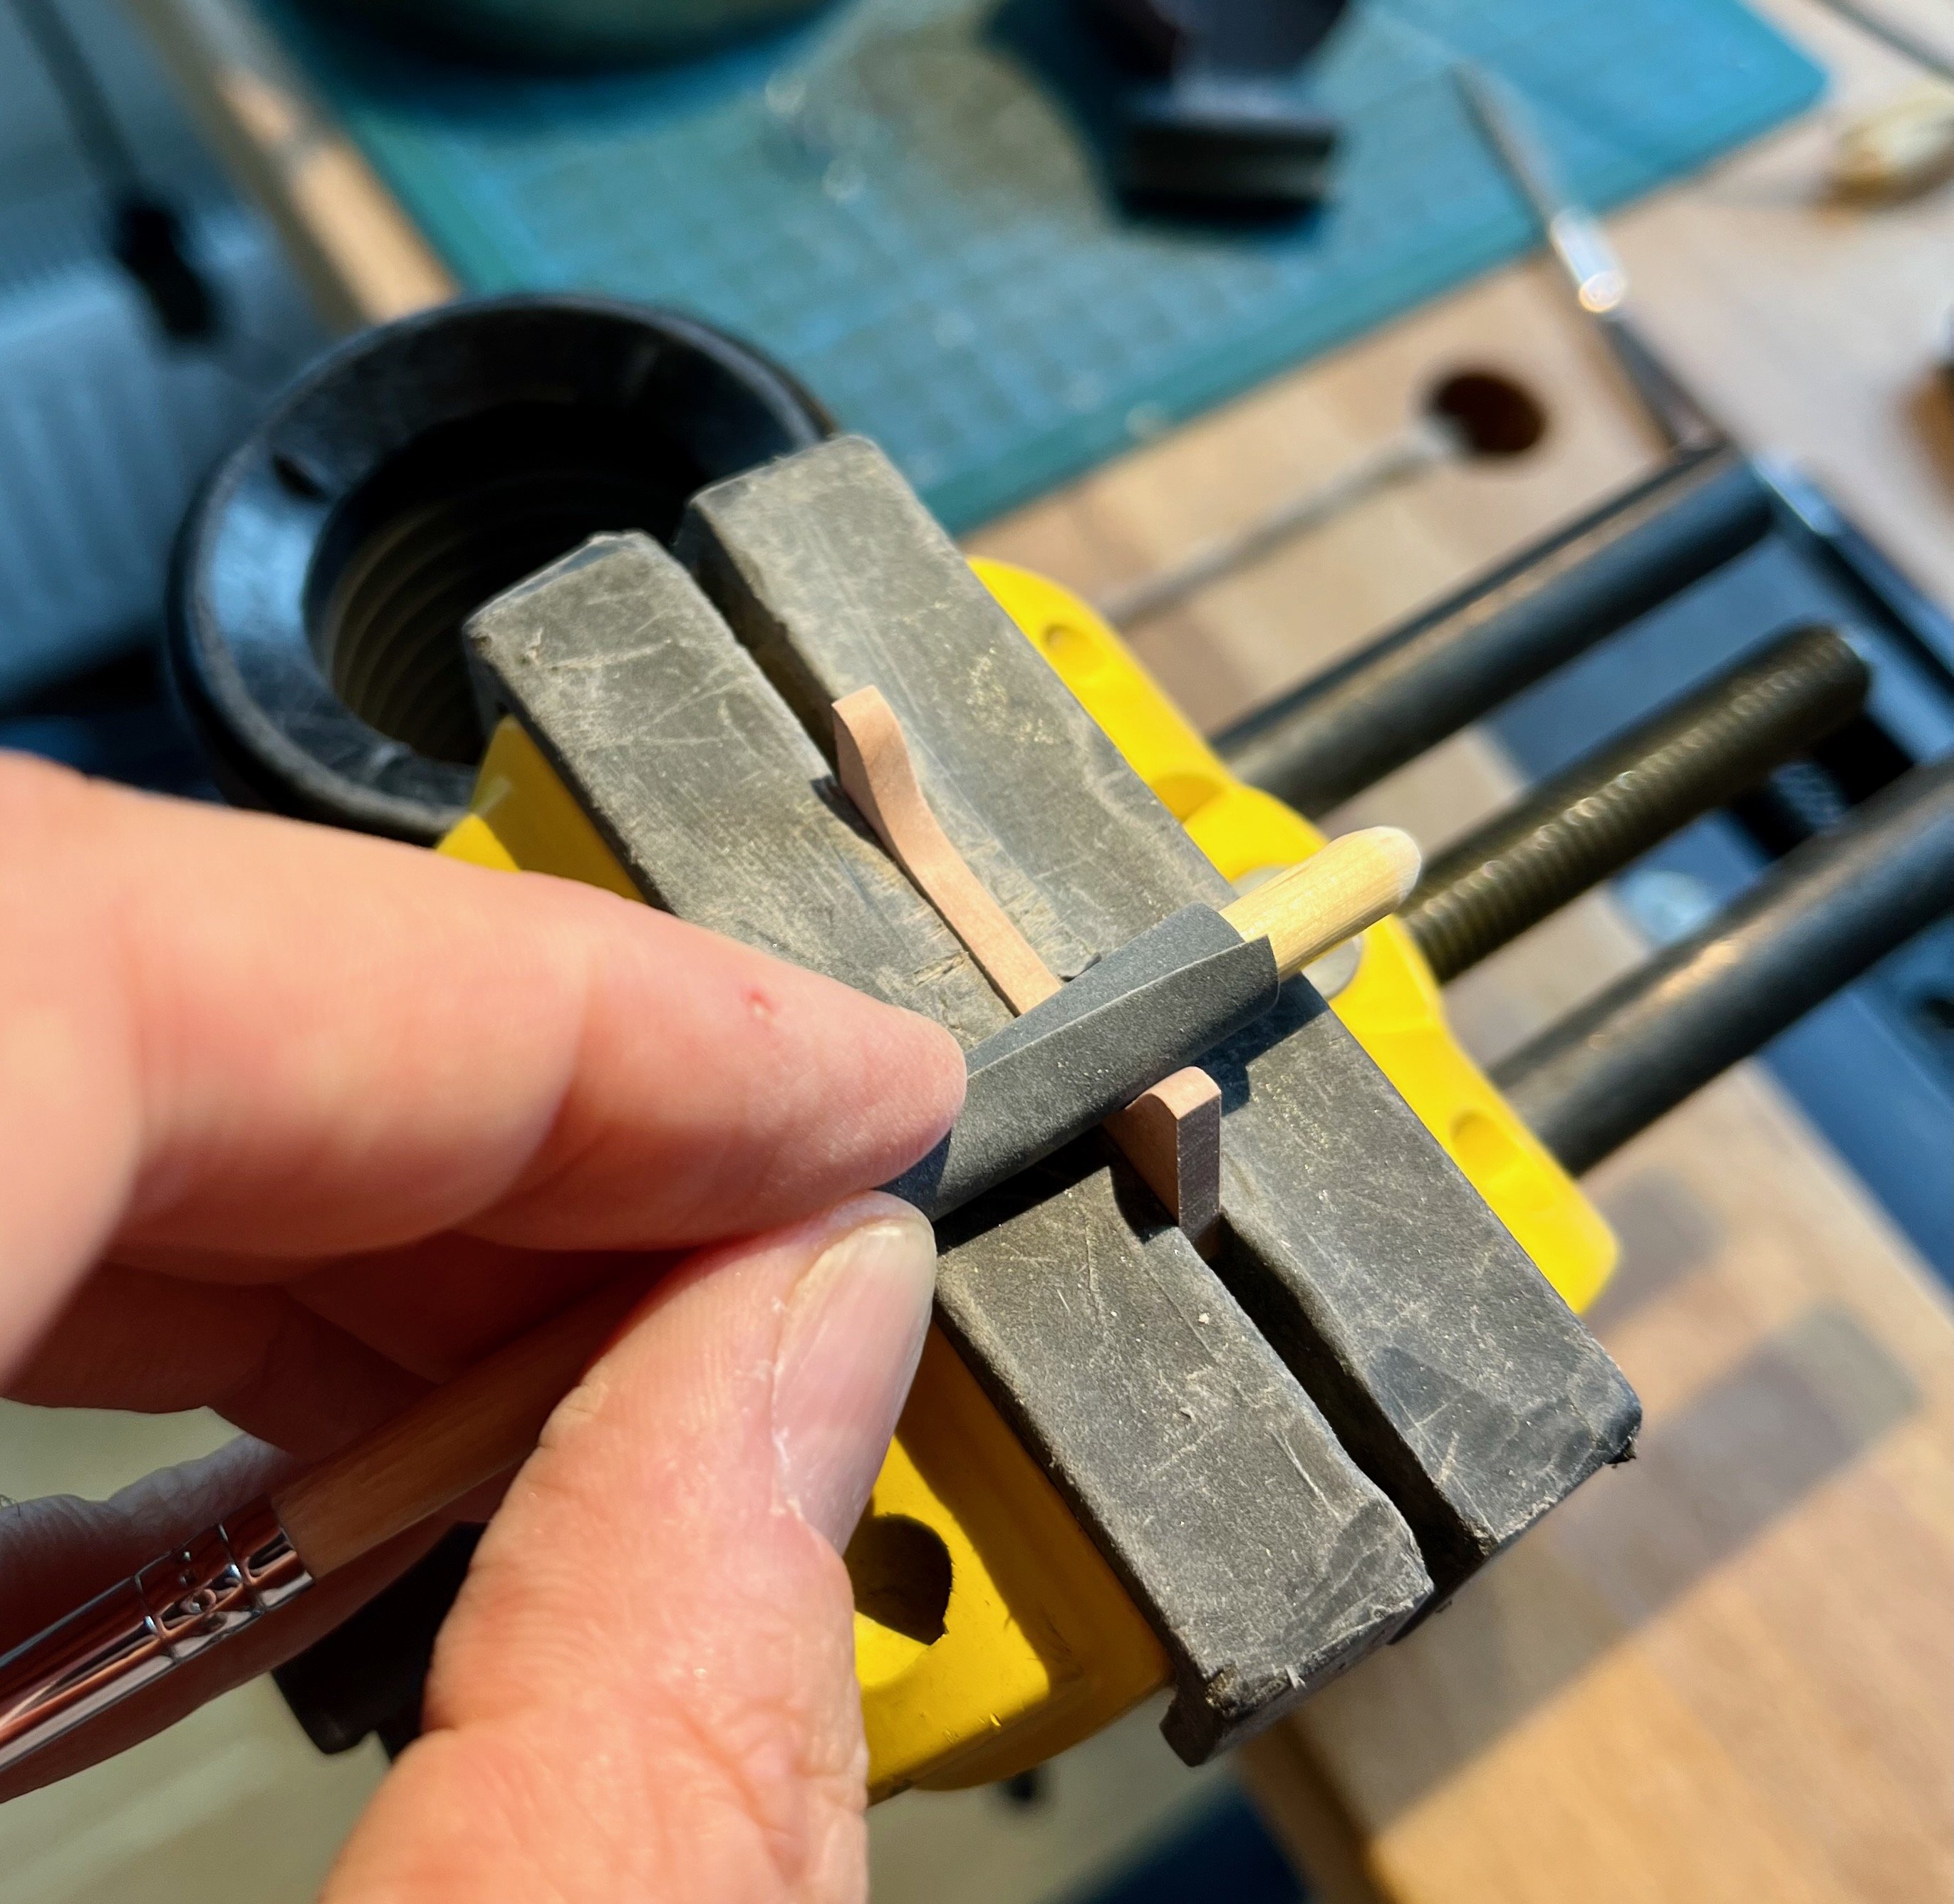
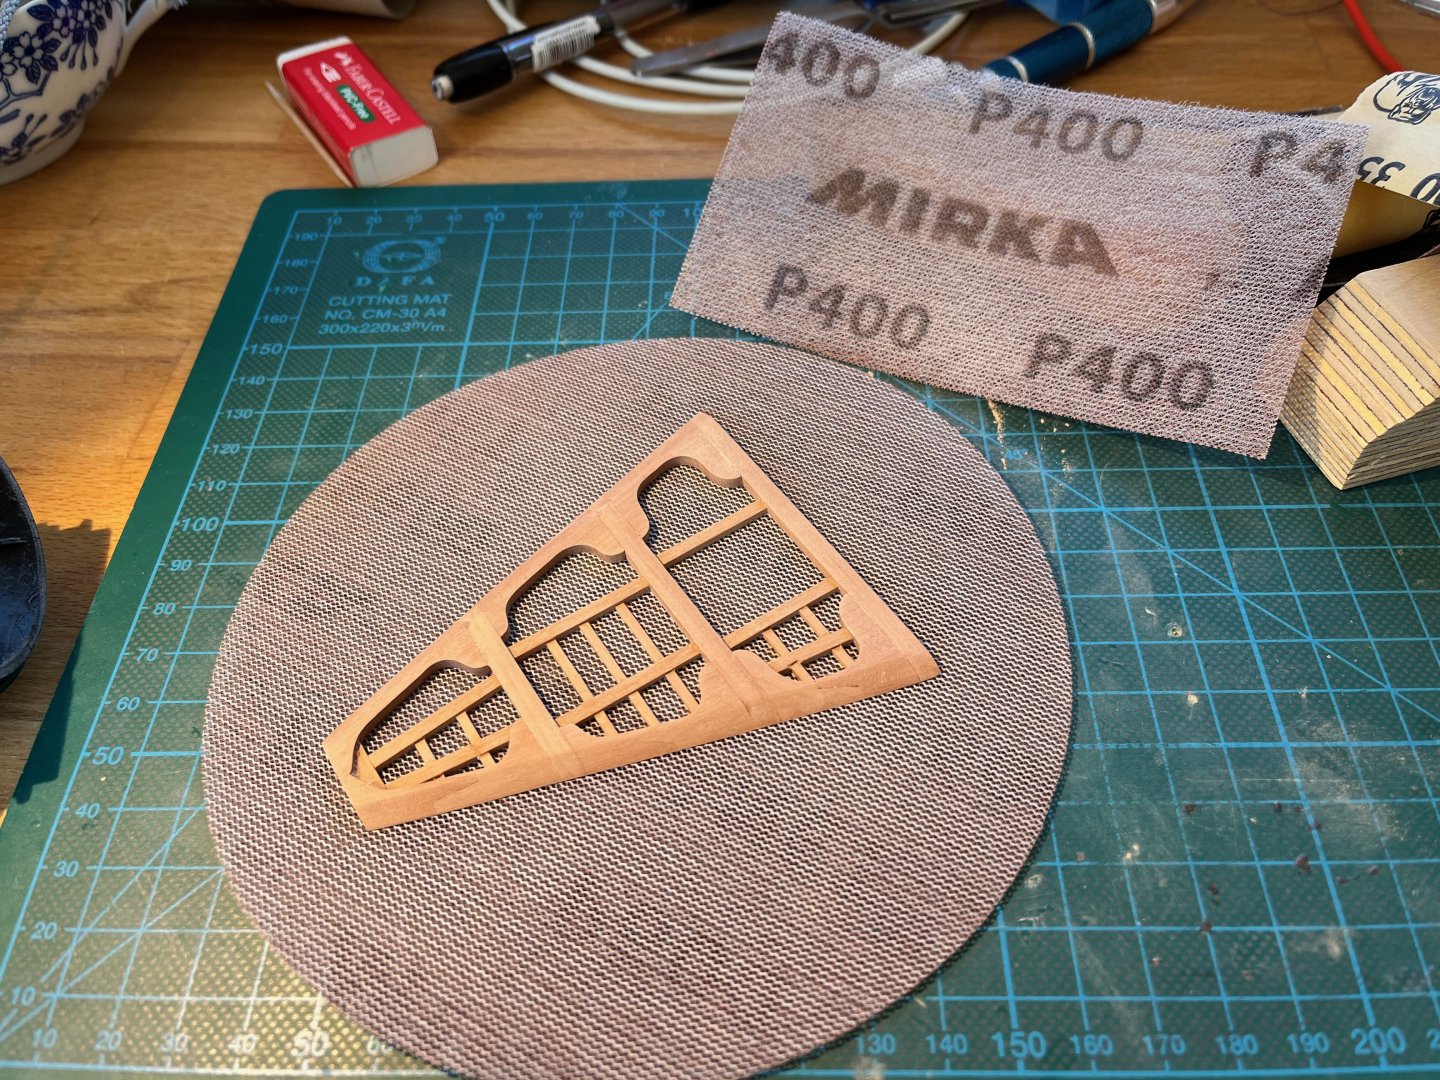
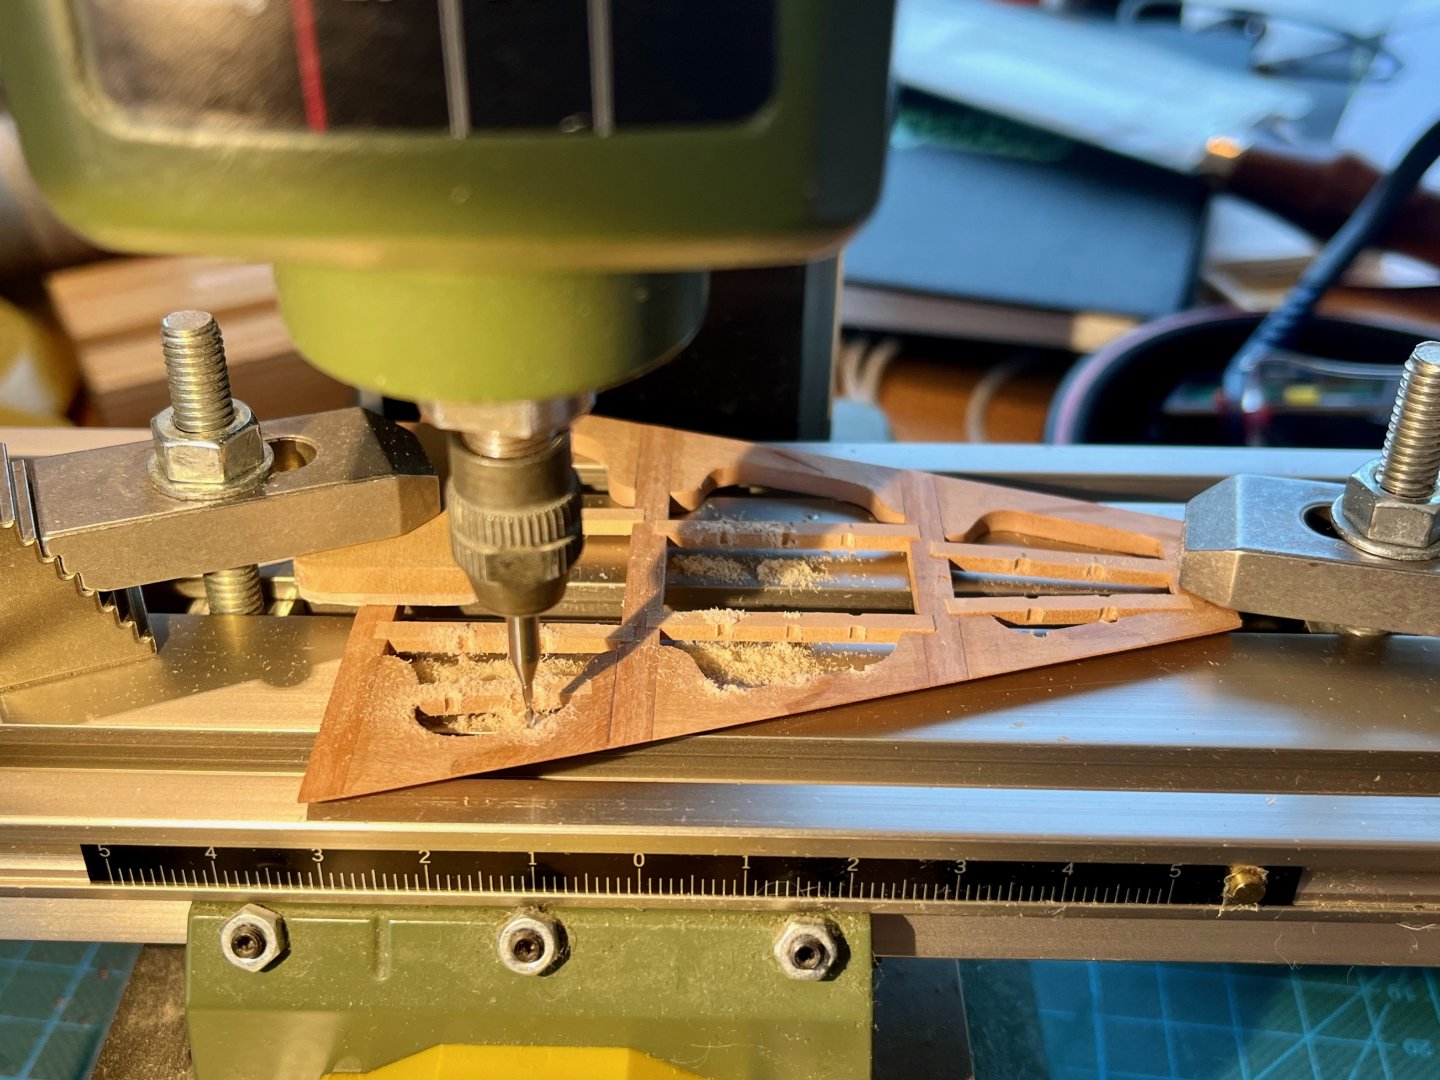
Few lessons learned: 1) Flattening the surface with a plane is quite tricky, since you bump into some cross piece with a risk of a chipping. Next time - make carlings the right height from the start (with just a tiny bit of margin for sanding) 2) Used mill to make notches for ledges - it is not worth it. The positioning is overly complicated, and the notches are quite shallow, so even a 1mm mill does not go deep enough, resulting in a semi-circular notch that is too narrow. In the end a manual markup and chiseling worked much better. The final step is my favourite - a little bit of sanding magic. This time I tried fine grits of mesh sanding pads - they are amazing! Before/after sanding. Isn't it awesome? There is a method to hide all imperfections like they were never there. Like a make-up for parts The whole asymmetrical layout idea is a bit questionable in the narrow area, but I still think it's the best option for asymmetrically planked model, and the offset would be much smaller once you leave the "bottom of the hold" part with a very steep planking angle. Looks like a render, isn't it? I tried to use a different kind of pear for carlings and ledges, but the contrast is too subtle, will try a more contrasting wood next time!


- 968 replies
-
- 28
-

-

-
- hahn
- oliver cromwell
- (and 1 more)
-
Byrnes Alternatives - Saw and Thickness Sander?
Mike Y replied to Jcredding's topic in Modeling tools and Workshop Equipment
Sidenote: what a pity that Proxxon pretty much stopped any development of new tools. The only tool they have released in the last 5 years is the Tungsten electrode sharpener attachment to their rotary tools, as well as some battery-powered versions of the classical rotaries. The "machine" part of their offering has not been updated for at least 6 years Just venting, sorry for the pointless comment -
Good call on redoing the frames! The first version was painting yourself into a corner with very little meat on the frames, would be very hard to fair (especially with the simulated bolts). And keep in mind that with Hahn method the alignment of top parts of the frames is also important. Looks so much better now, well done!
-
Hmm, yes, I thought the joke is obvious, sincere apologies if it was not... It is really incredibly clean and precise, a completely different level and something to strive for!
-
You are likely experimenting with us and some of these "photos" are actually 3D renders. The colour scheme is very similar to the Swan 3D model
-
Looking crisp! Steady progress, no drama.
-
Thanks John! I think I got the idea, will experiment Congrats on the anniversary!
-
Very nicely done! Can't believe it is your first POF and you started with the stern section, probably the most challenging part of the hull
- 99 replies
-
- 3
-
-
- ancre
- La Mahonesa
- (and 1 more)
-
When using it for strip thicknessing - how are you holding the strip? Especially to make sure it does not spin... Of course you can cut an oversized long strip, but it does not sound very efficient.. Trying to wrap my head around it before buying
-
Very neat! Beautiful parts, like the subtle wood colour contrast
-
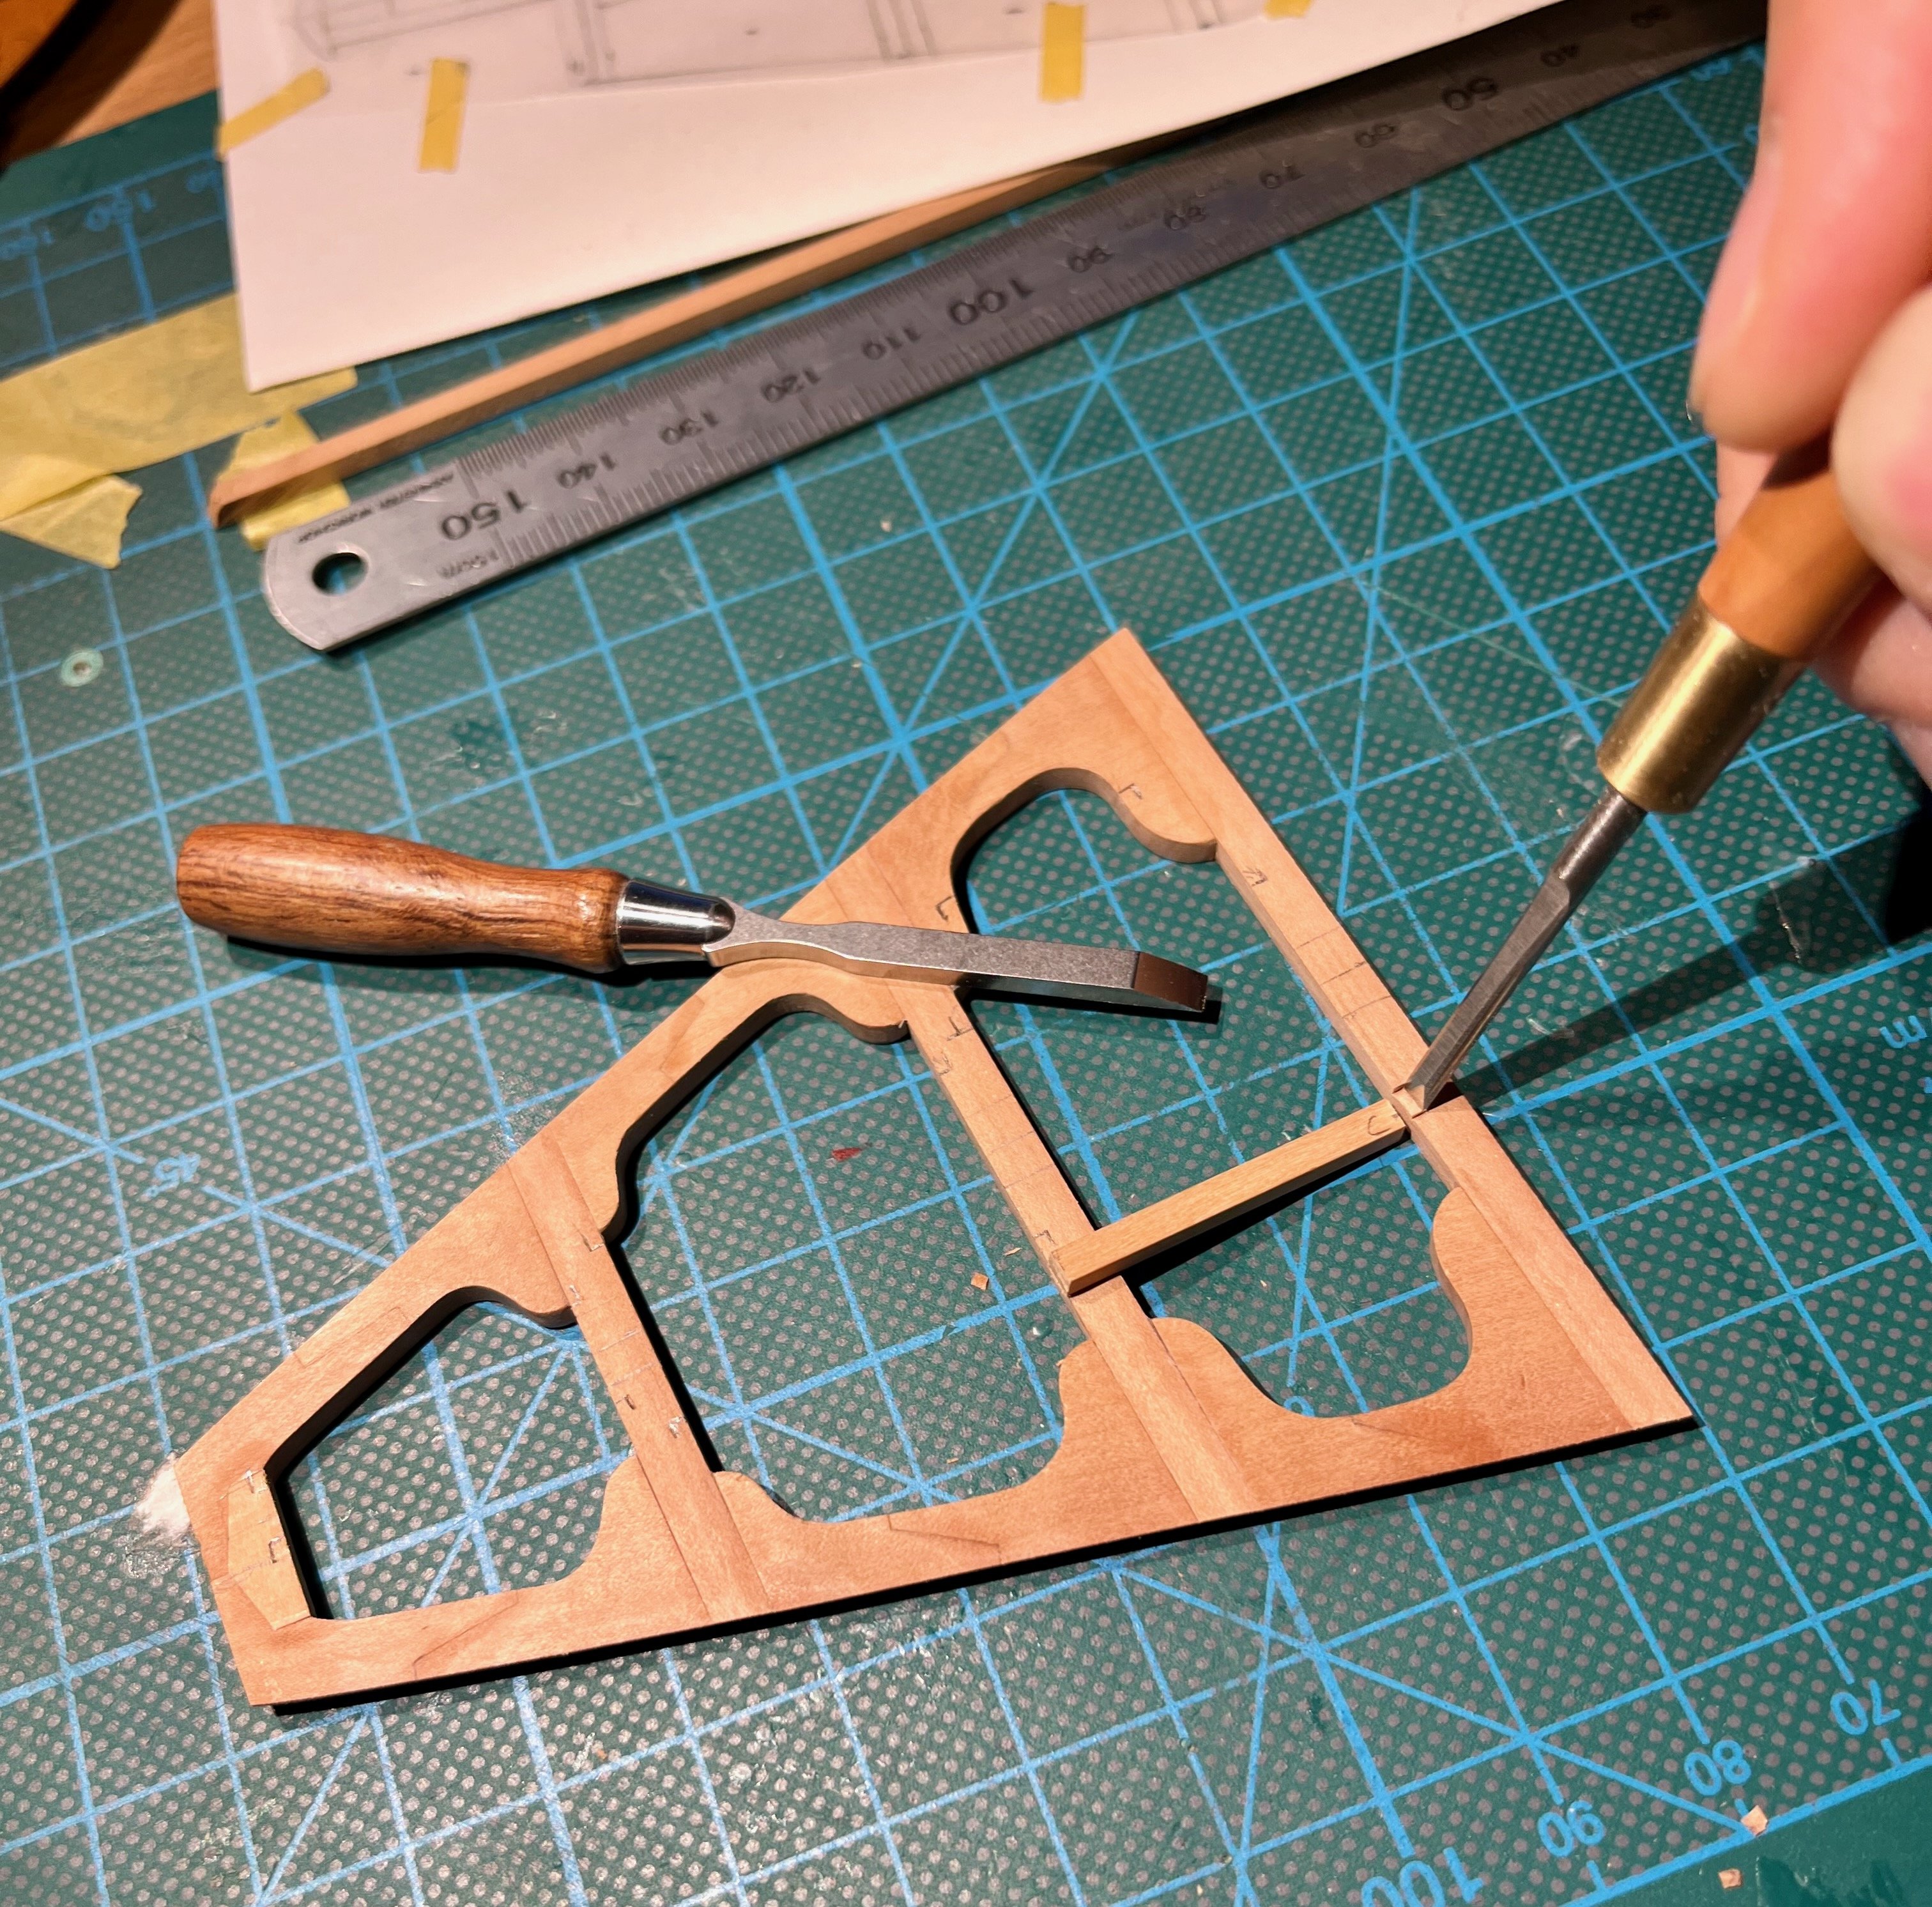
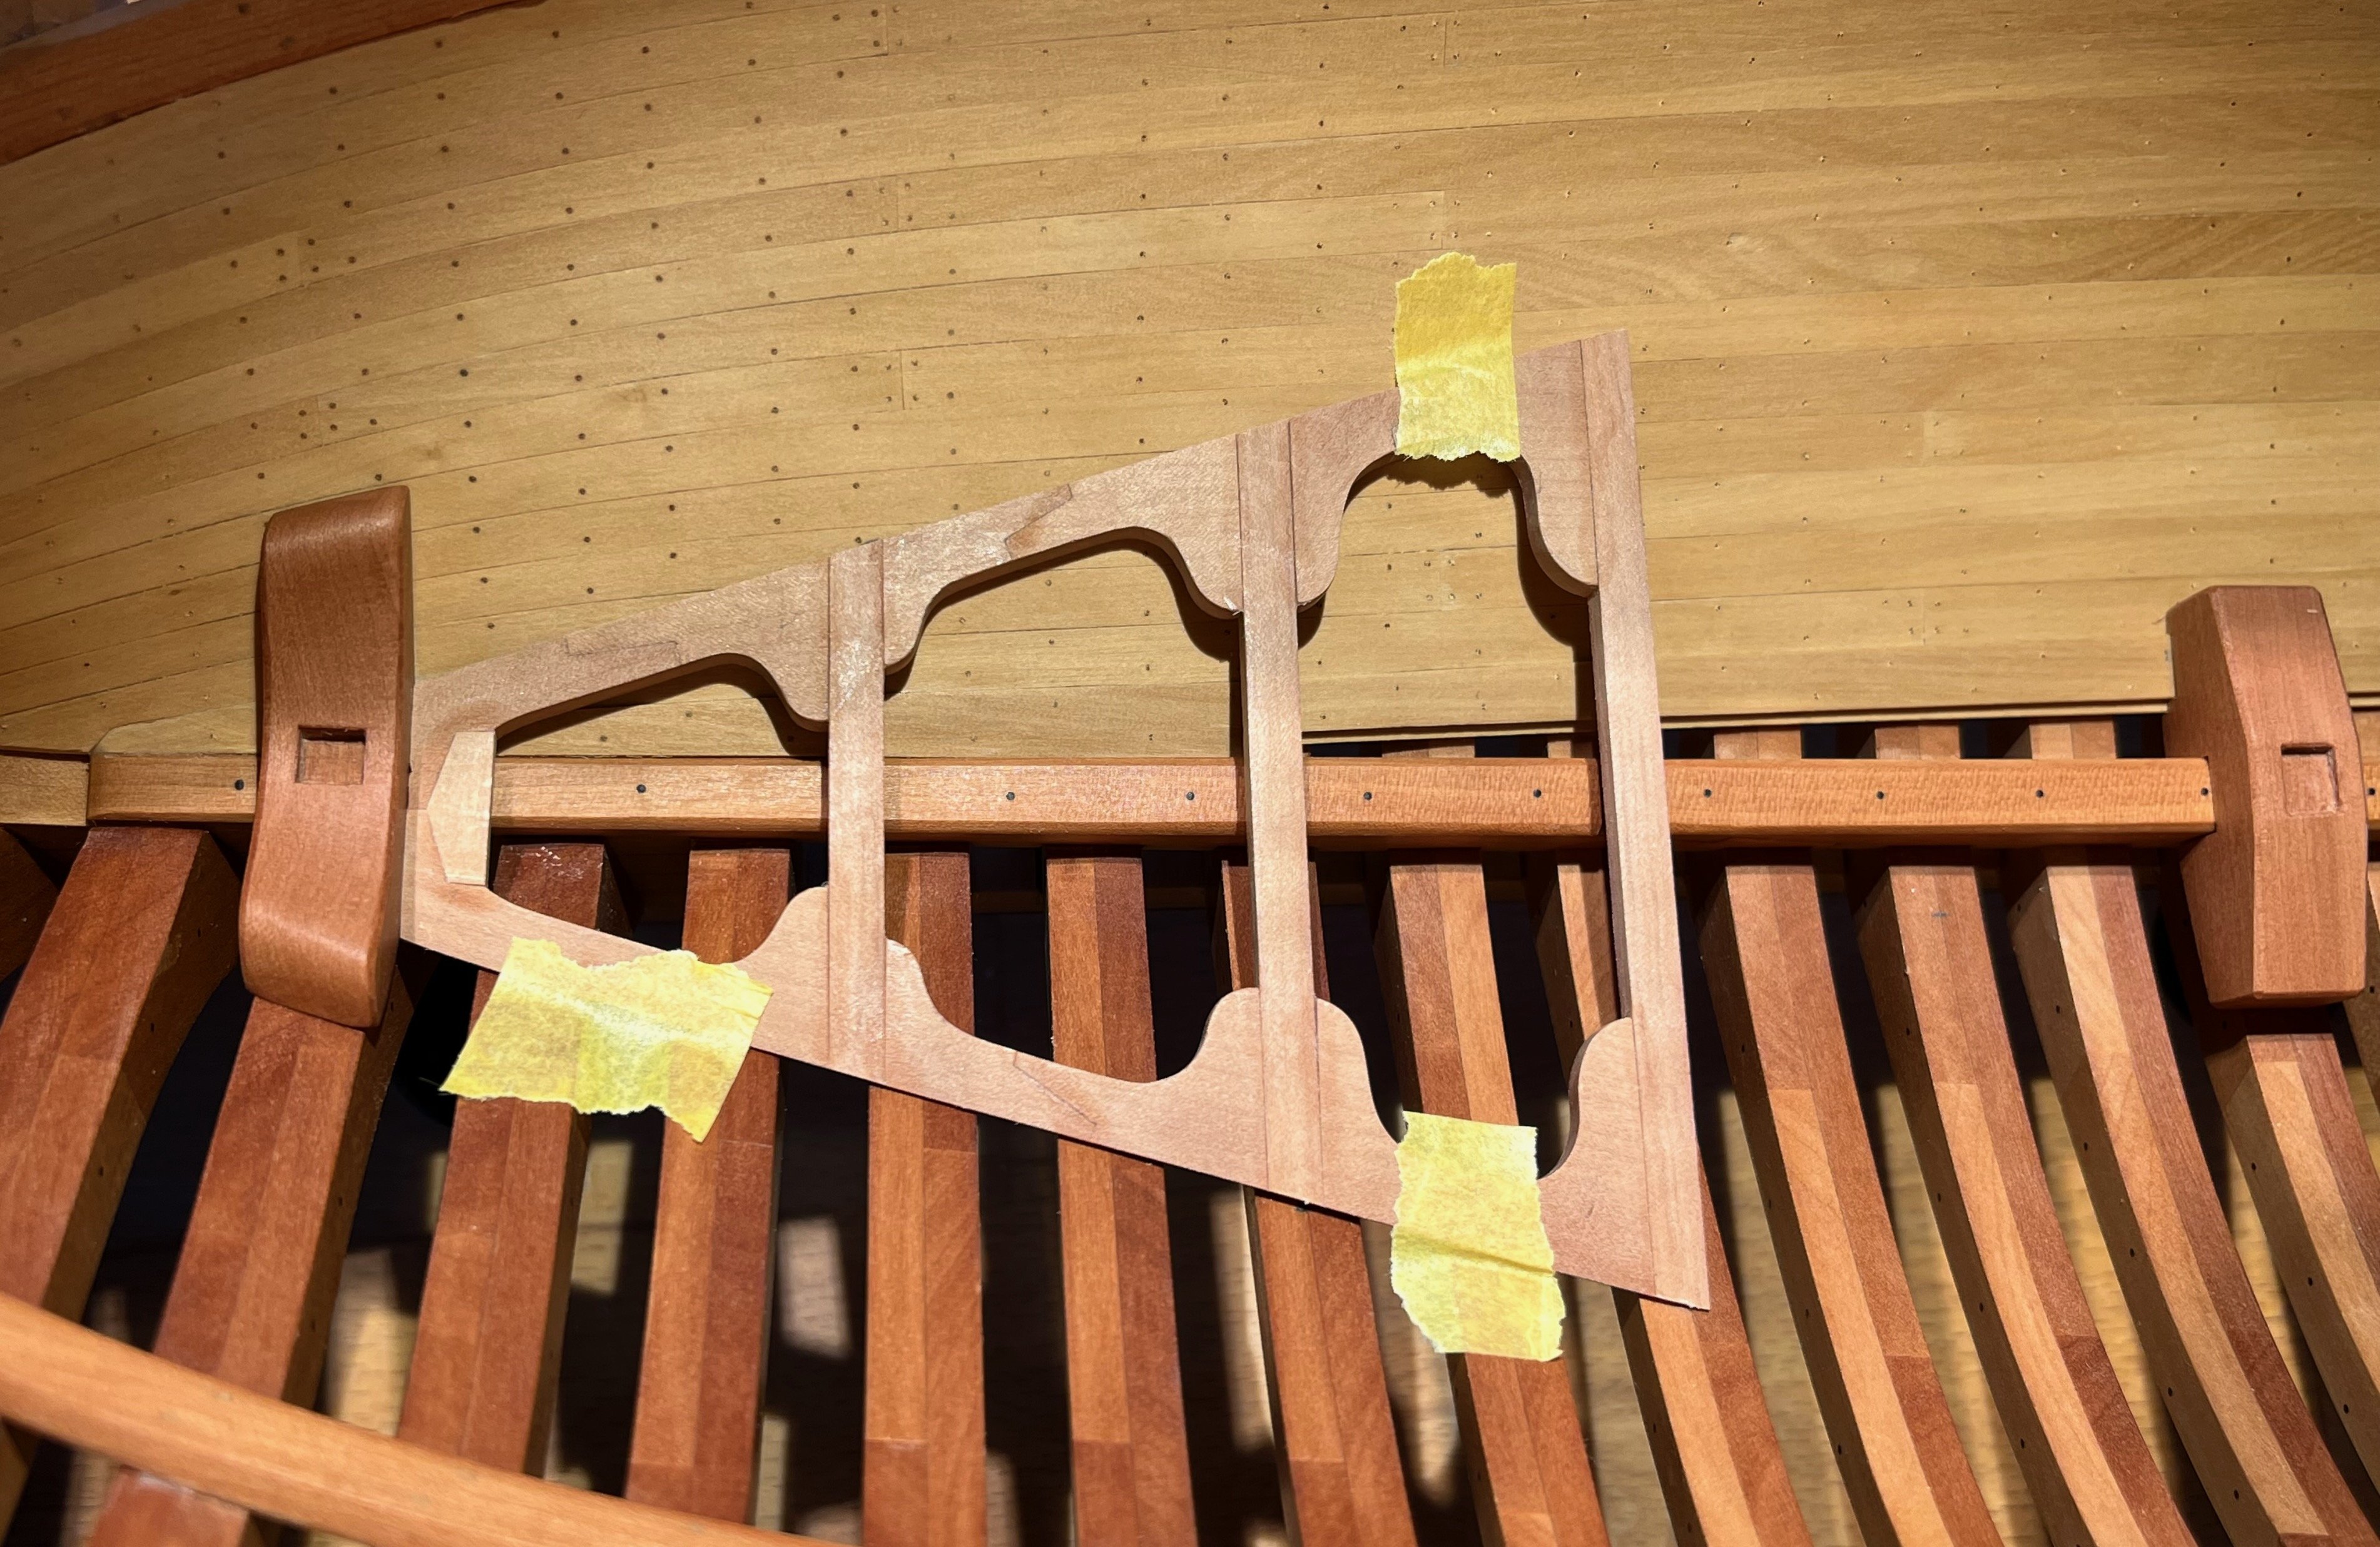
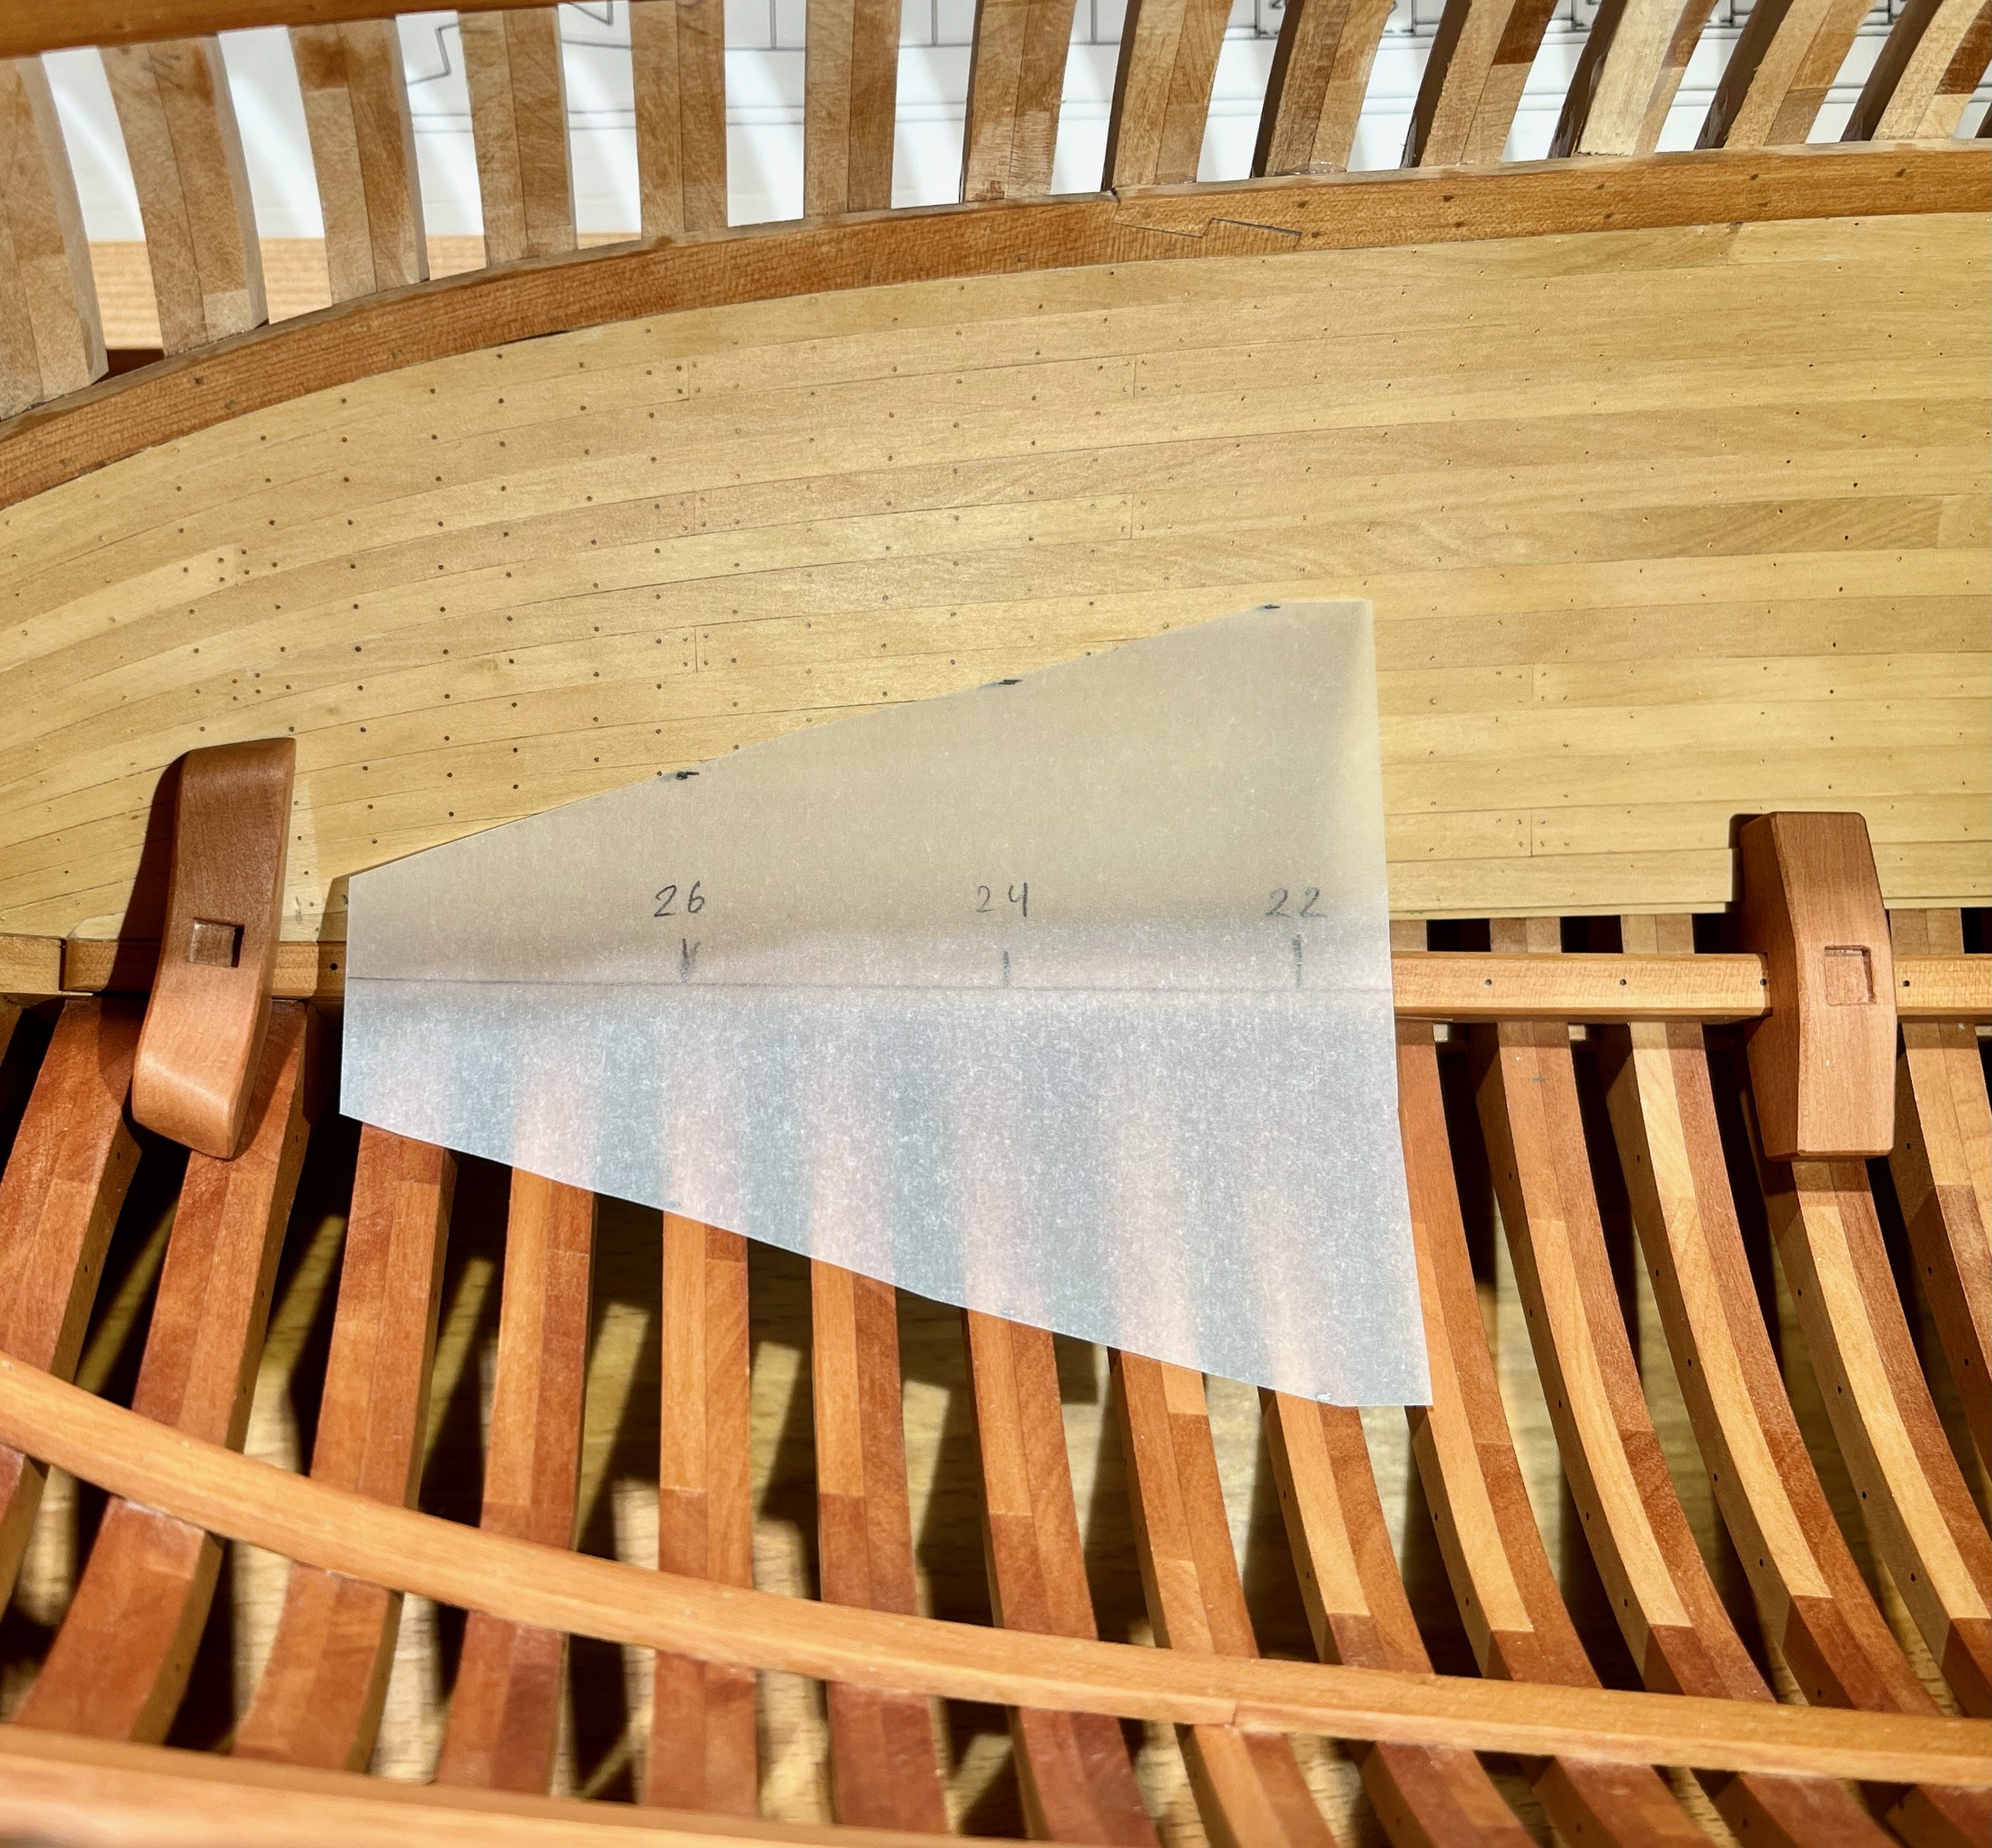
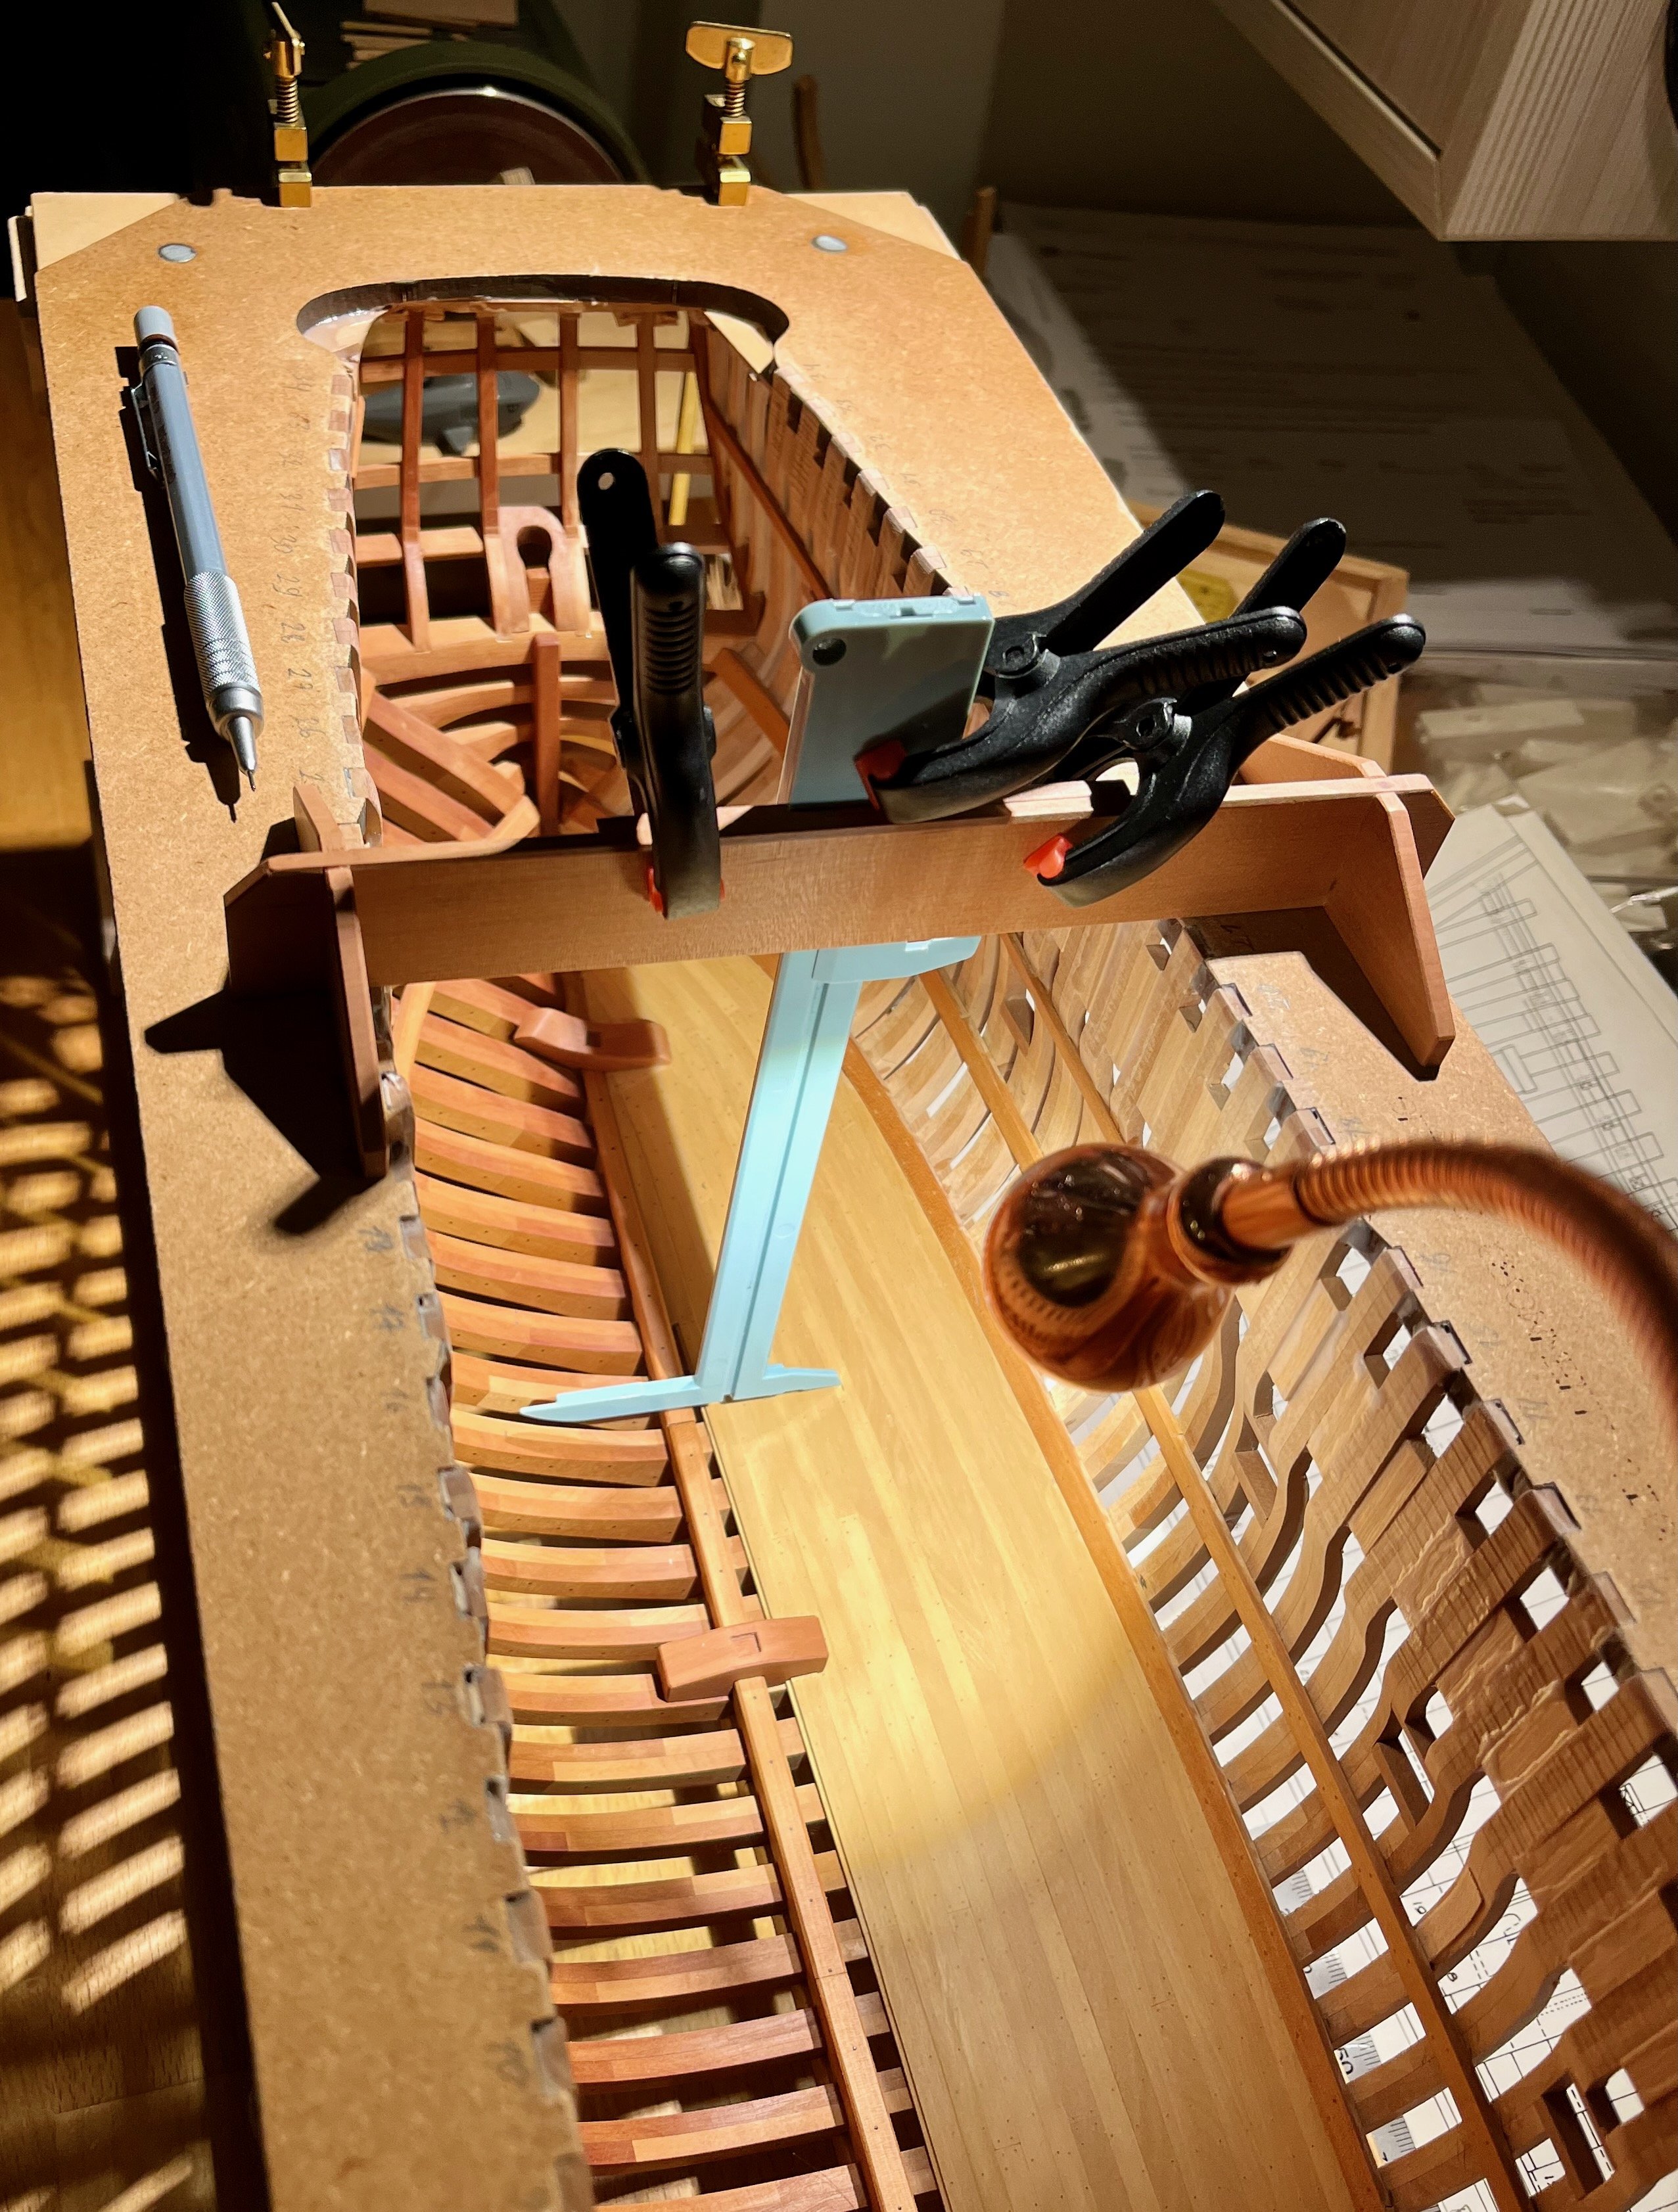
Next up was fitting the platform into the hull. Hahn jig makes a very nice stand for dust-free sanding and fitting, would come in handy When fitted into the hull - the platform looks quite off-center due to the one-sided planking. Carlings would be centered around the keel line, making them shifted from the platform center. Looks strange when taking a straight up photo, but it should be better once more layers are done, so it is viewed at an angle. I think it is a better alternative than adding spacers on the non-planked side or shaving off some meat from the knees on the planked side. The offset would get smaller the higher up you go, this platform is the deepest structure in the hold where the ceiling planking has a significant angle. Cutting notches for carlings was a blast! An incredible set of carving chisels came in handy, this is not even the smallest size! The smallest Veritas chisel for comparison. Incredible feeling when a piece perfectly fits into these notches when dry, nice and tight! Video 2024-07-29 22 01 07.mov


- 968 replies
-
- 17
-
-
-
- hahn
- oliver cromwell
- (and 1 more)
-
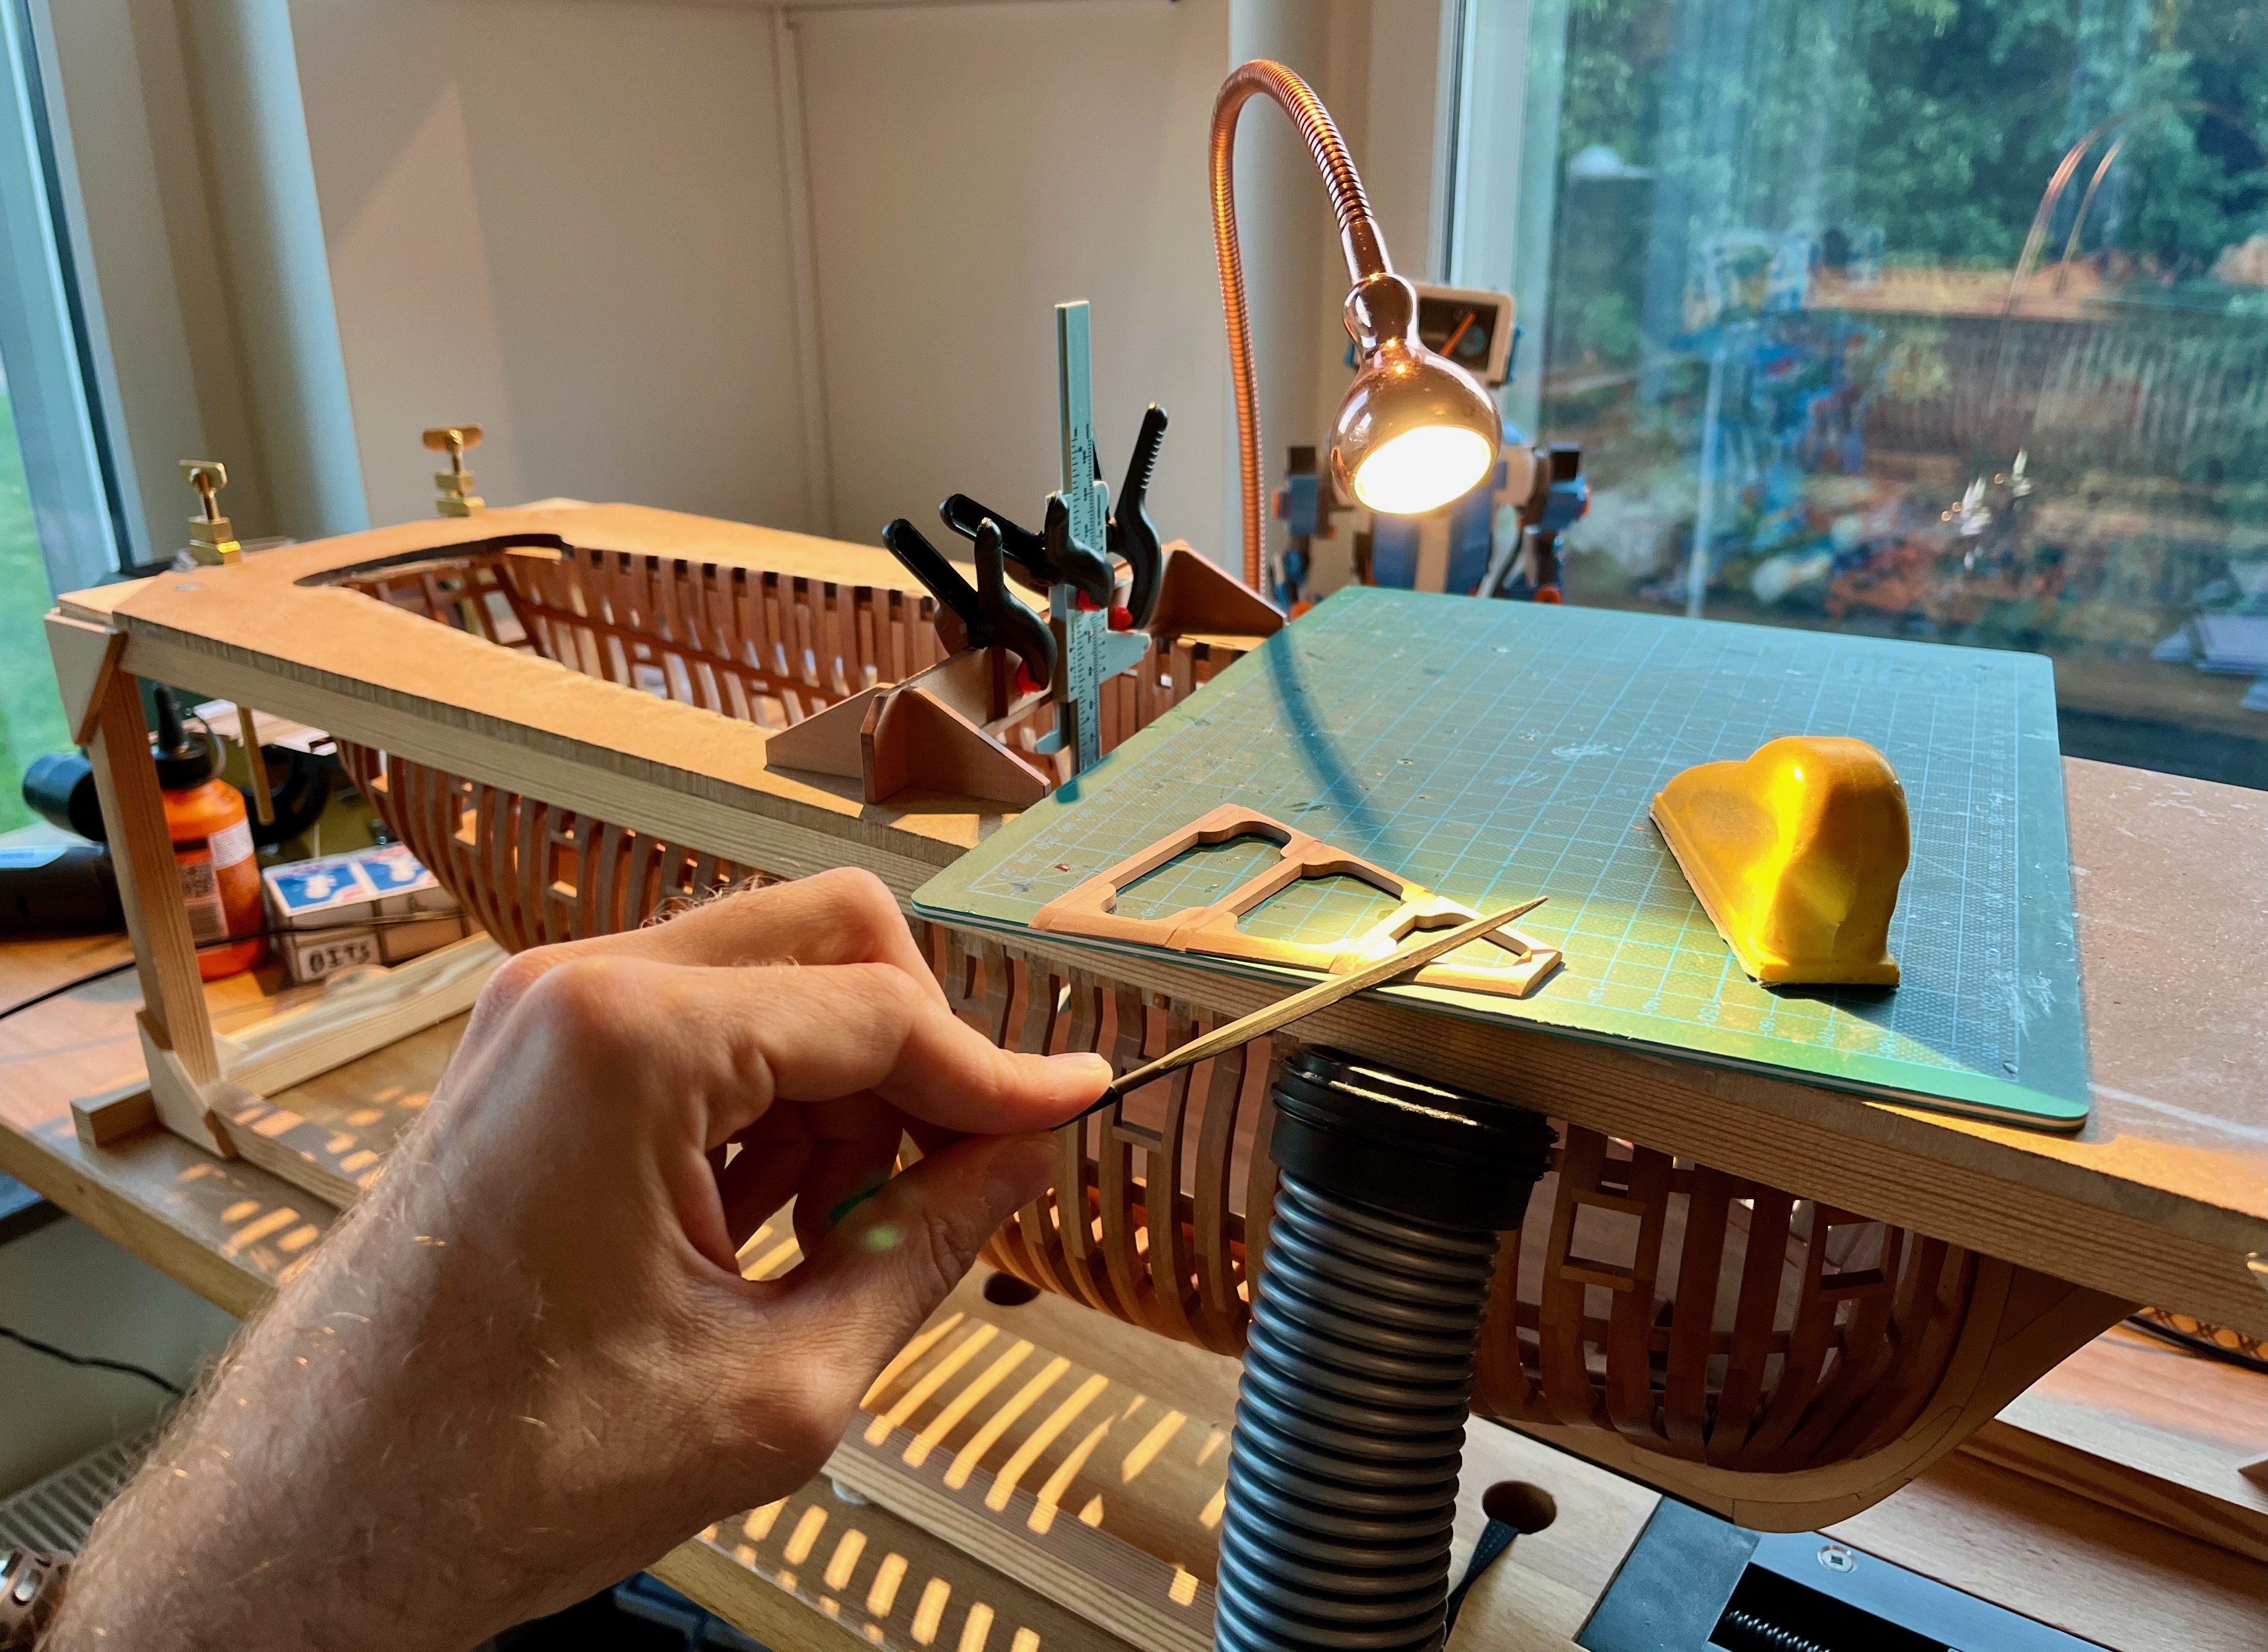
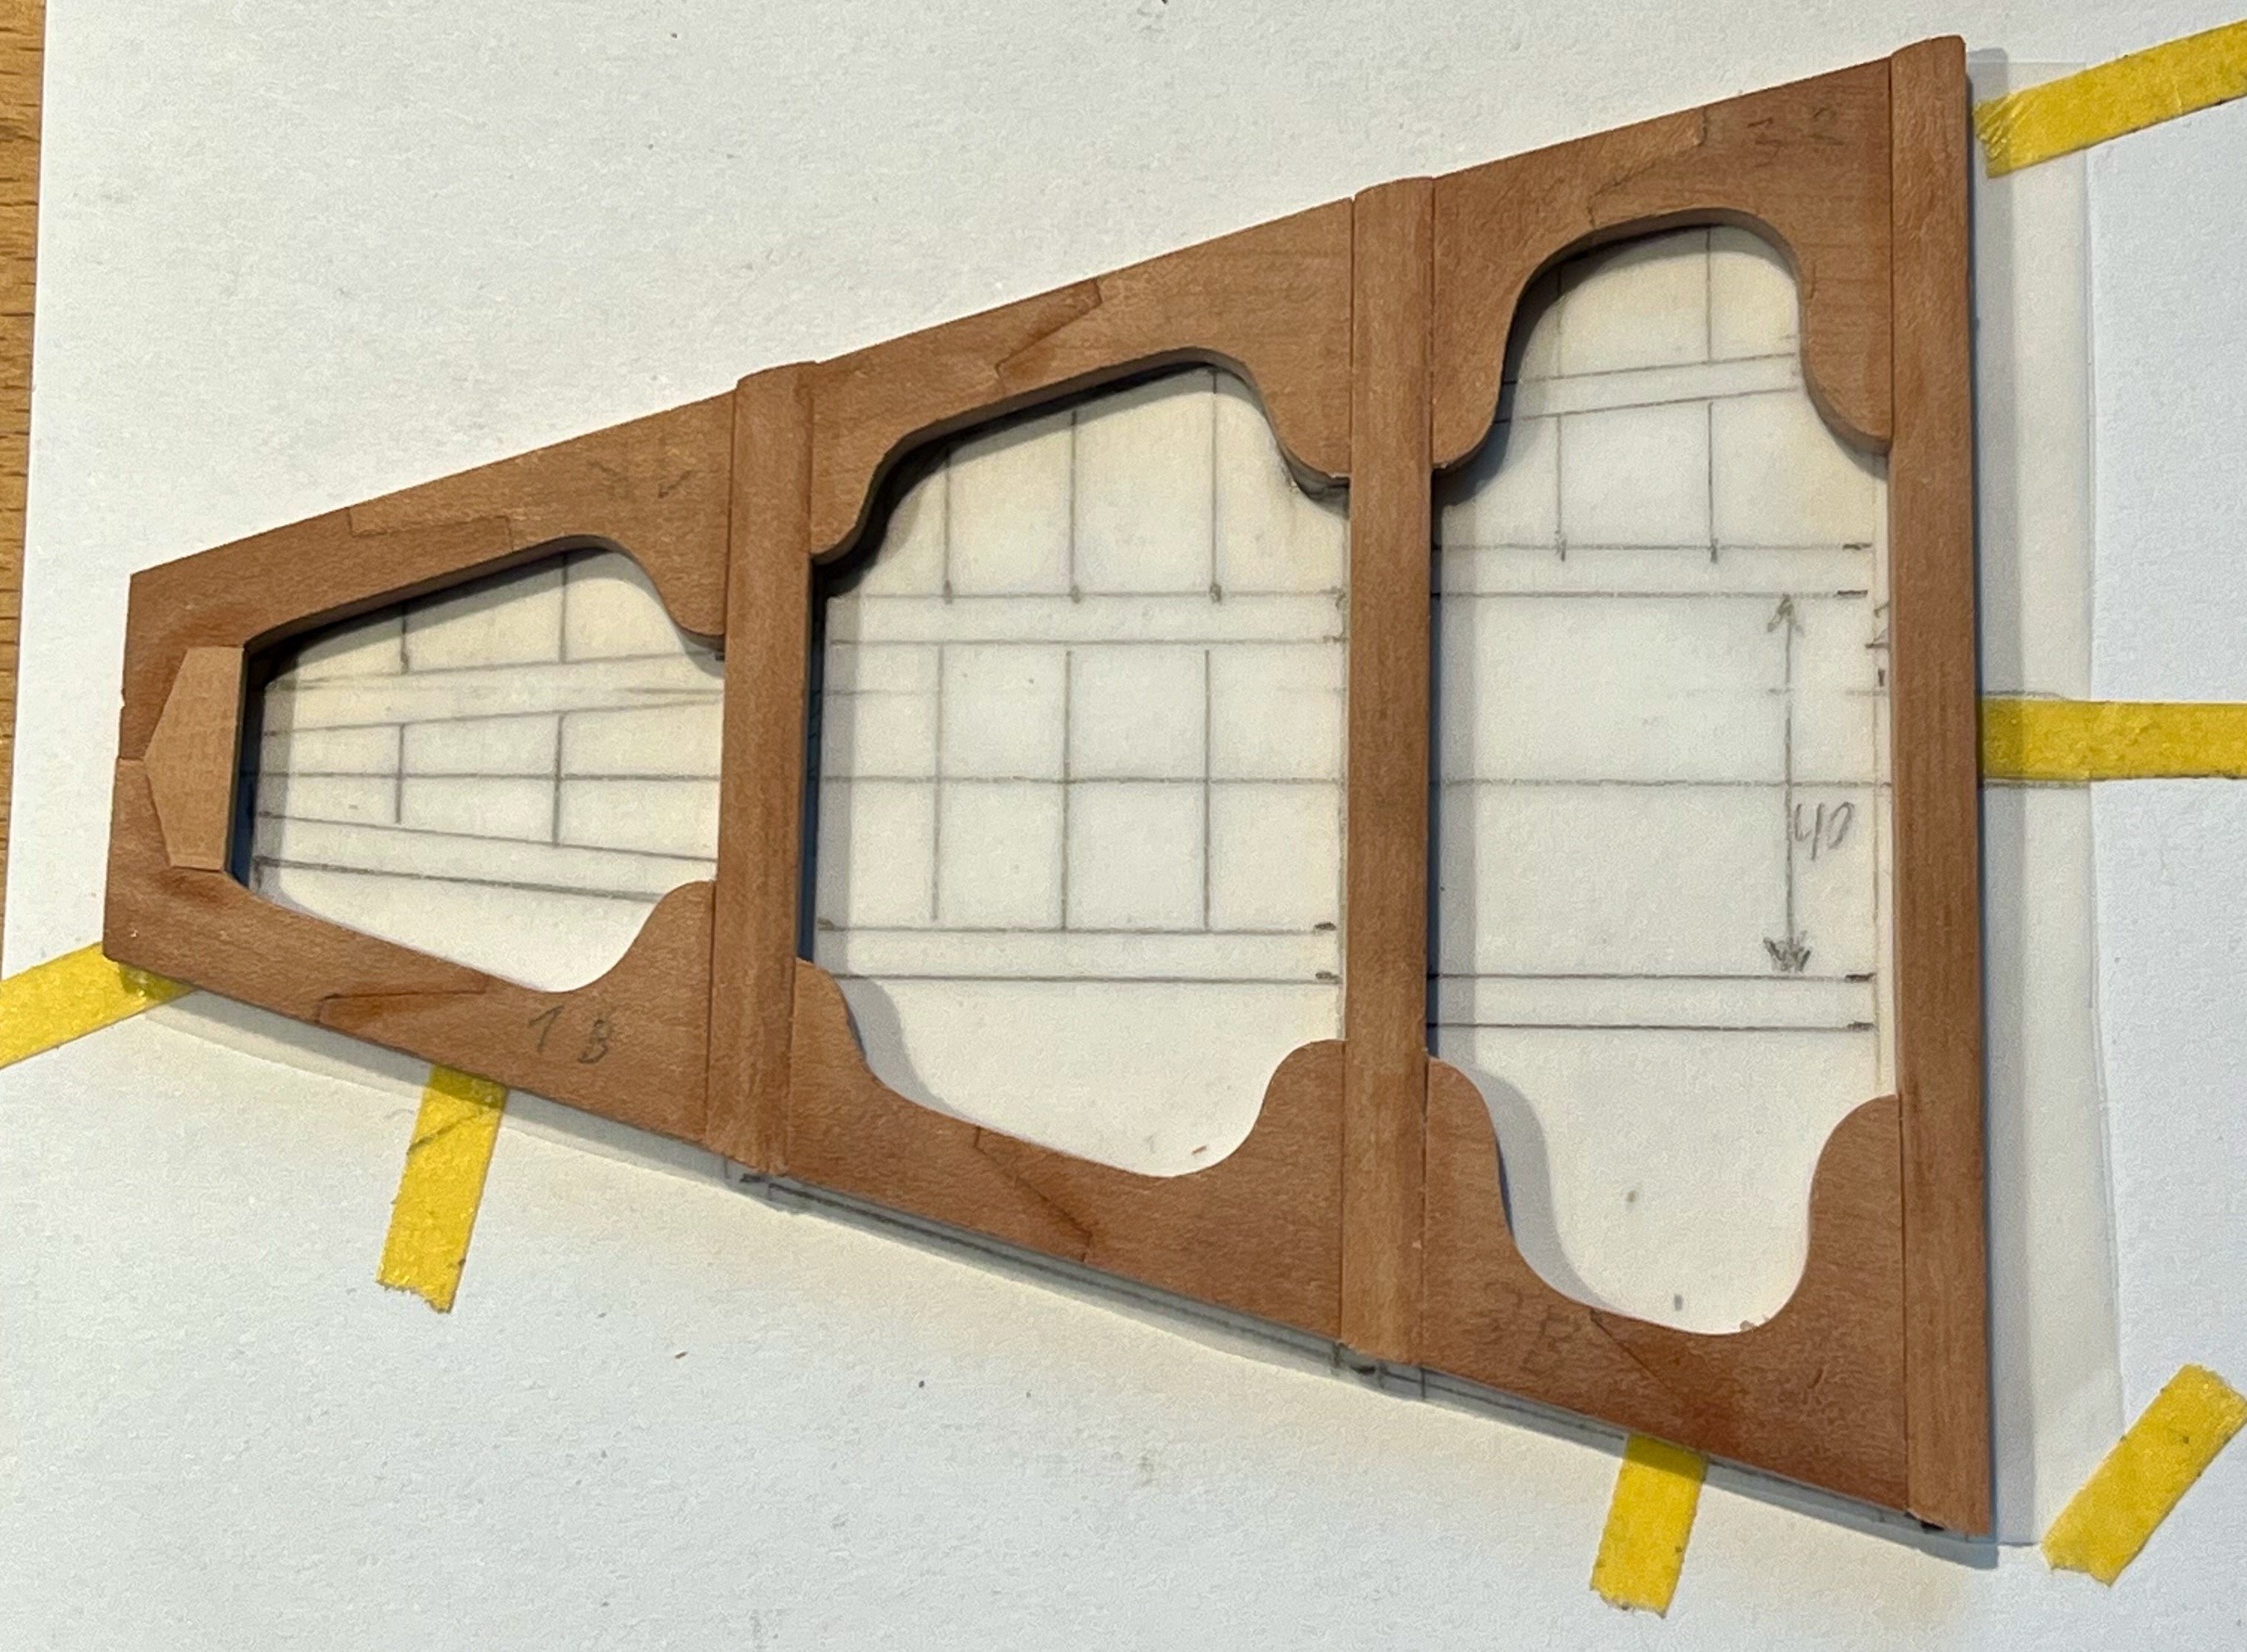
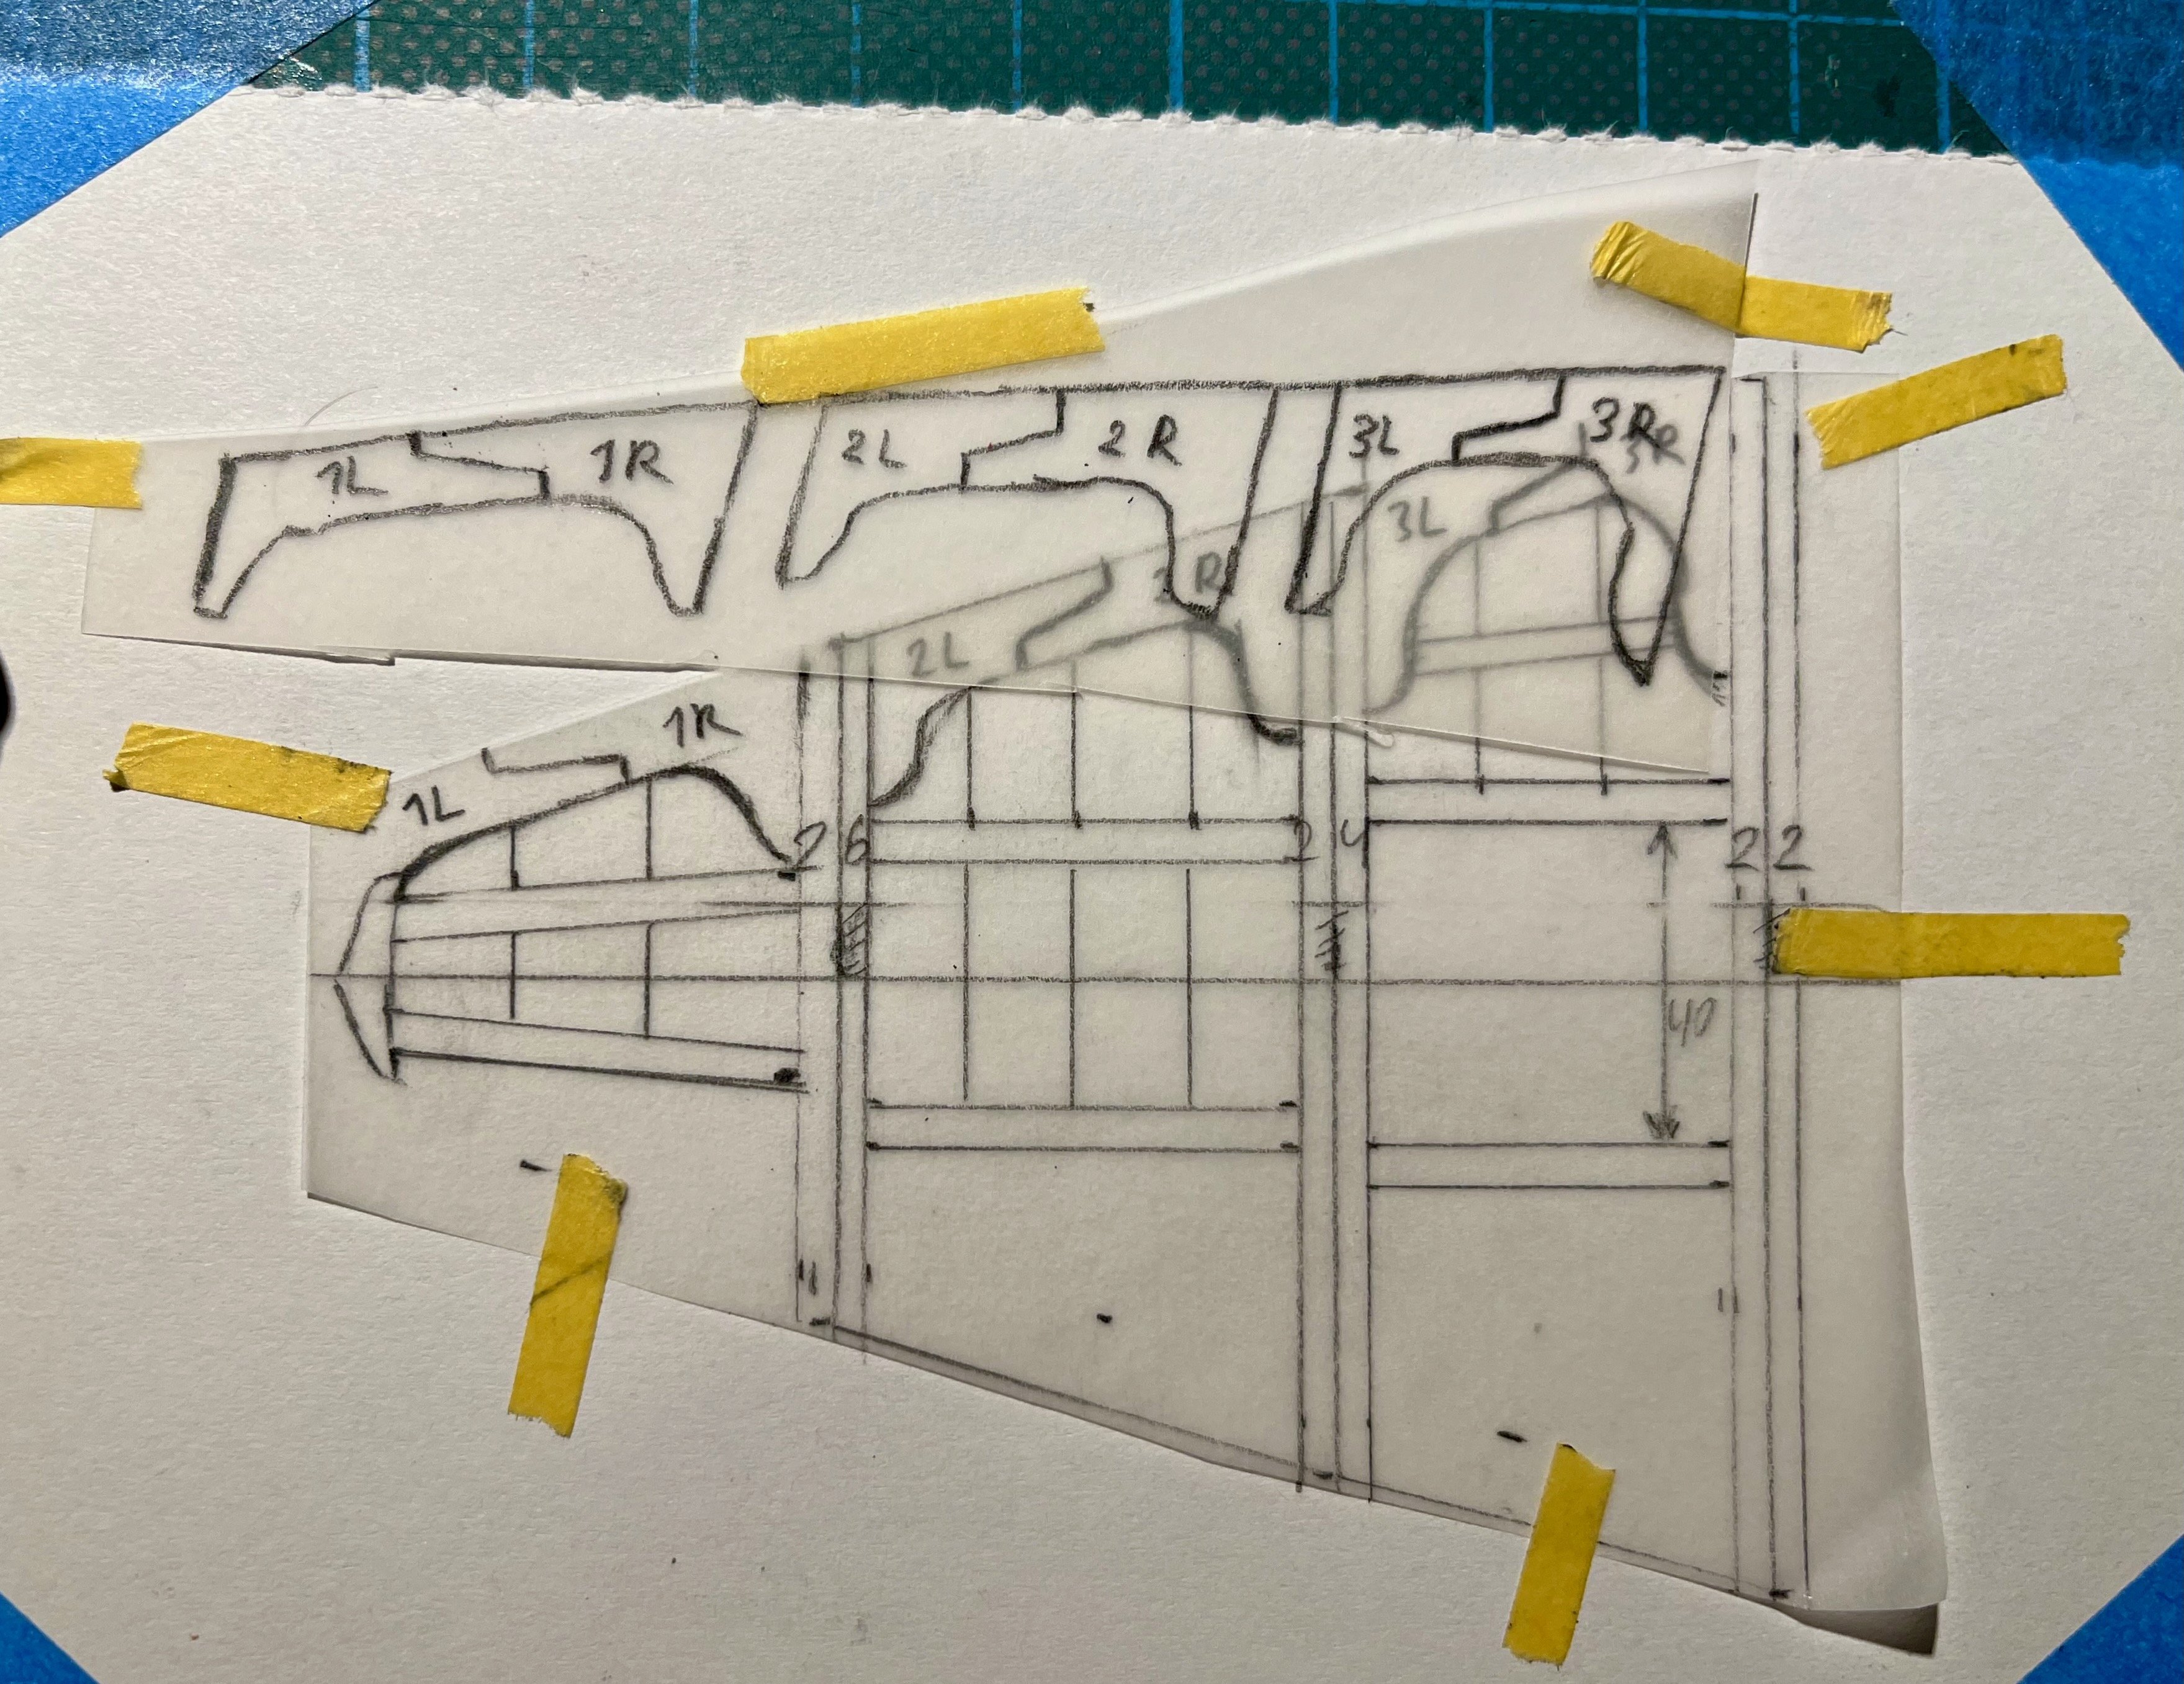
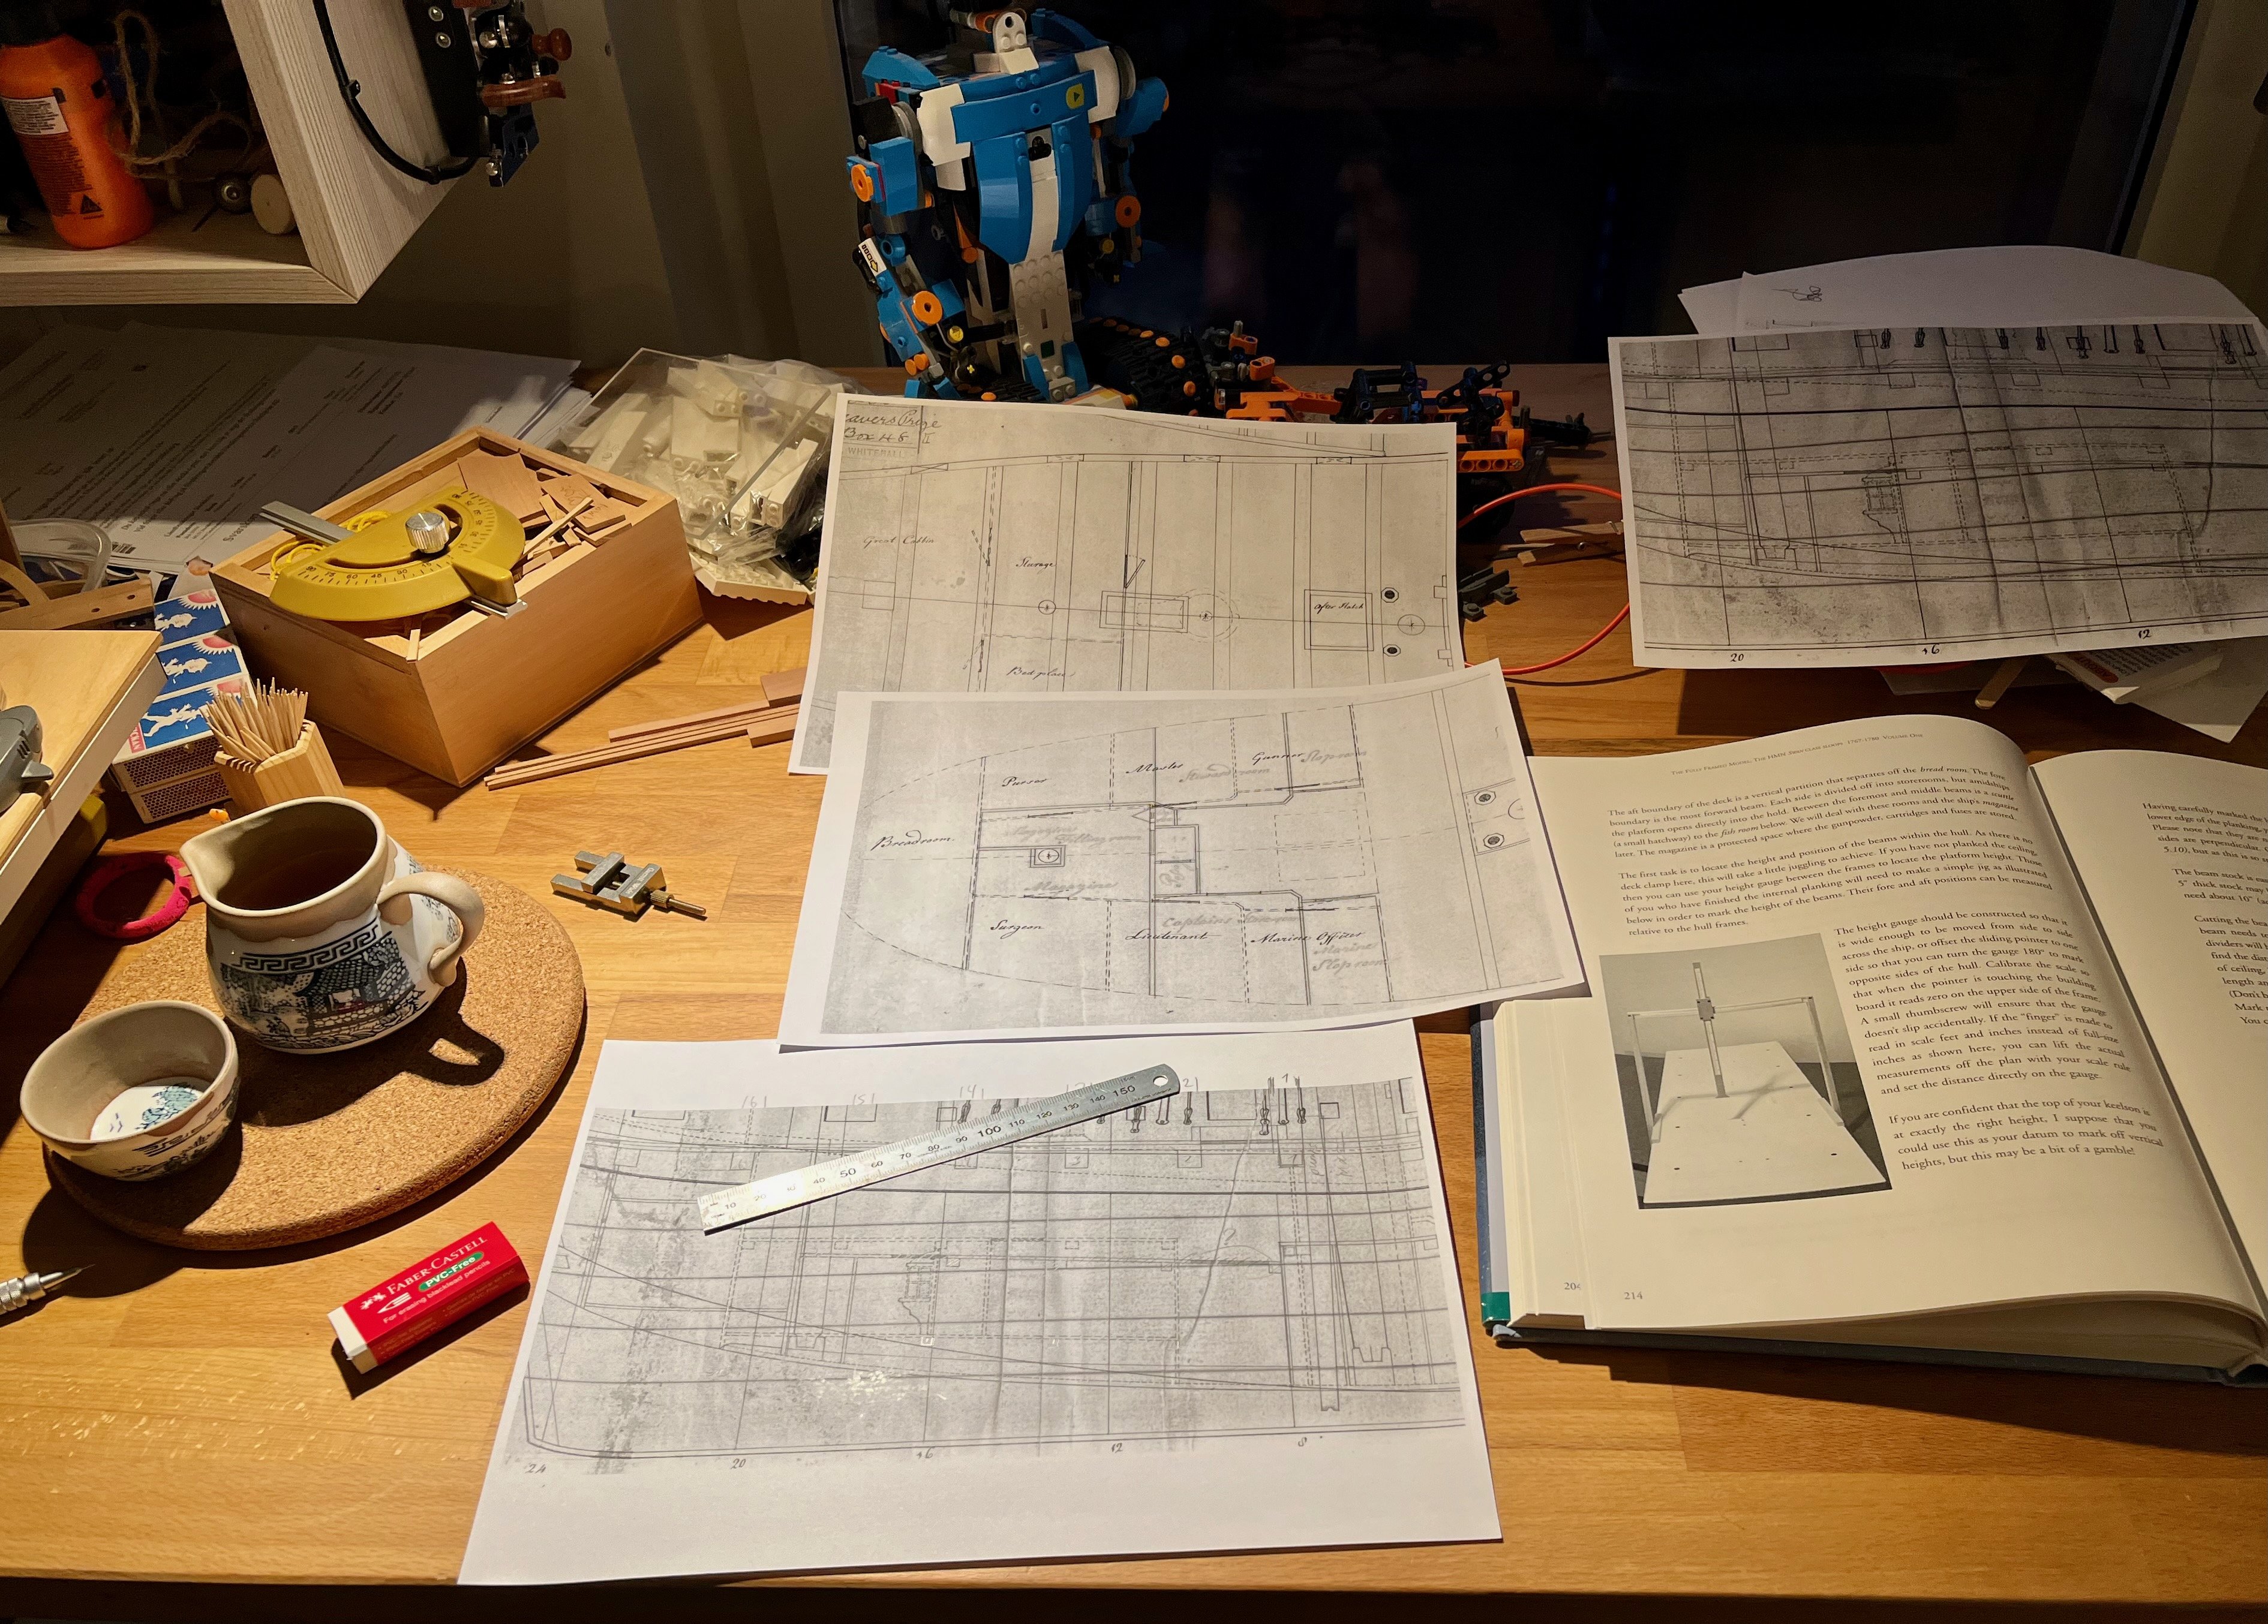
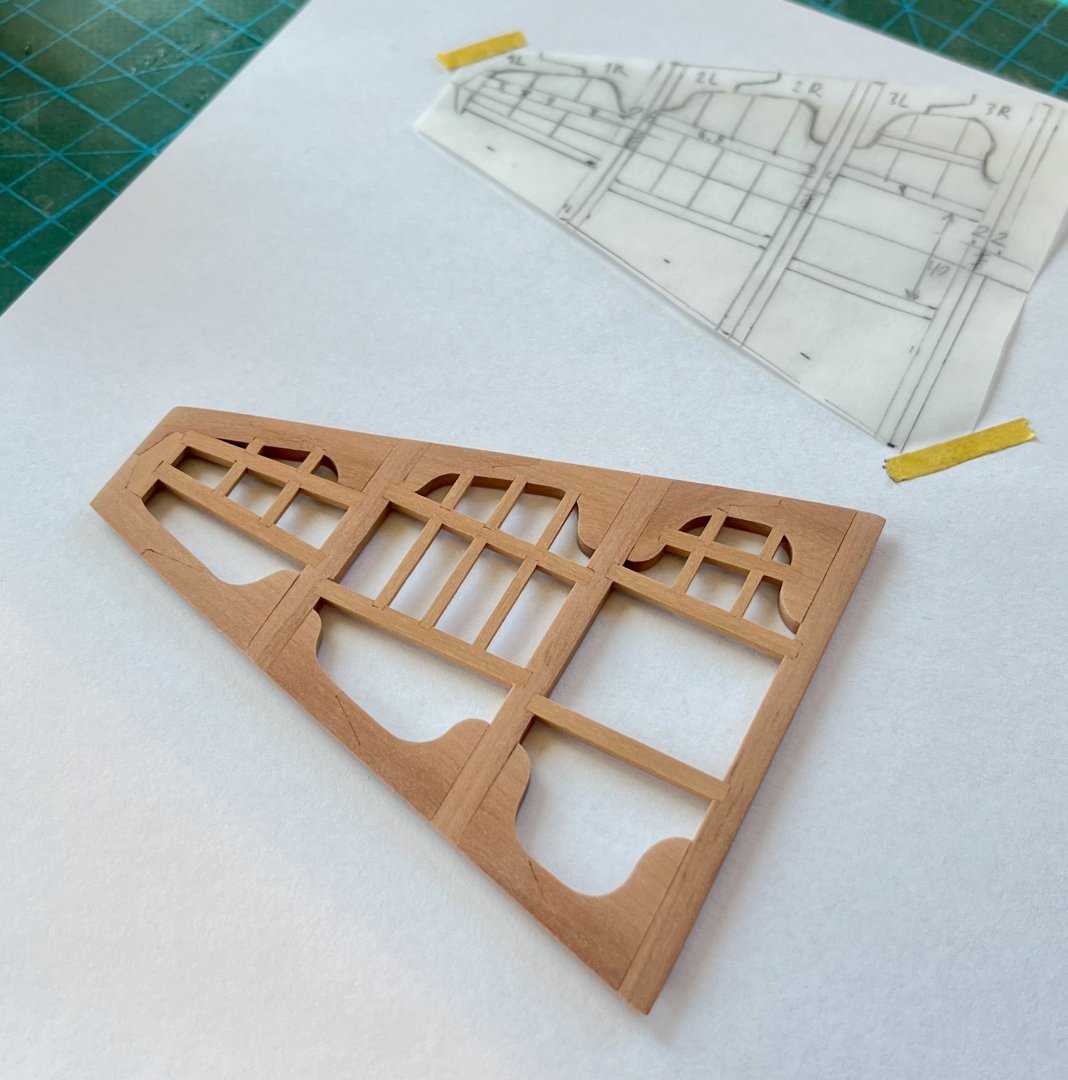
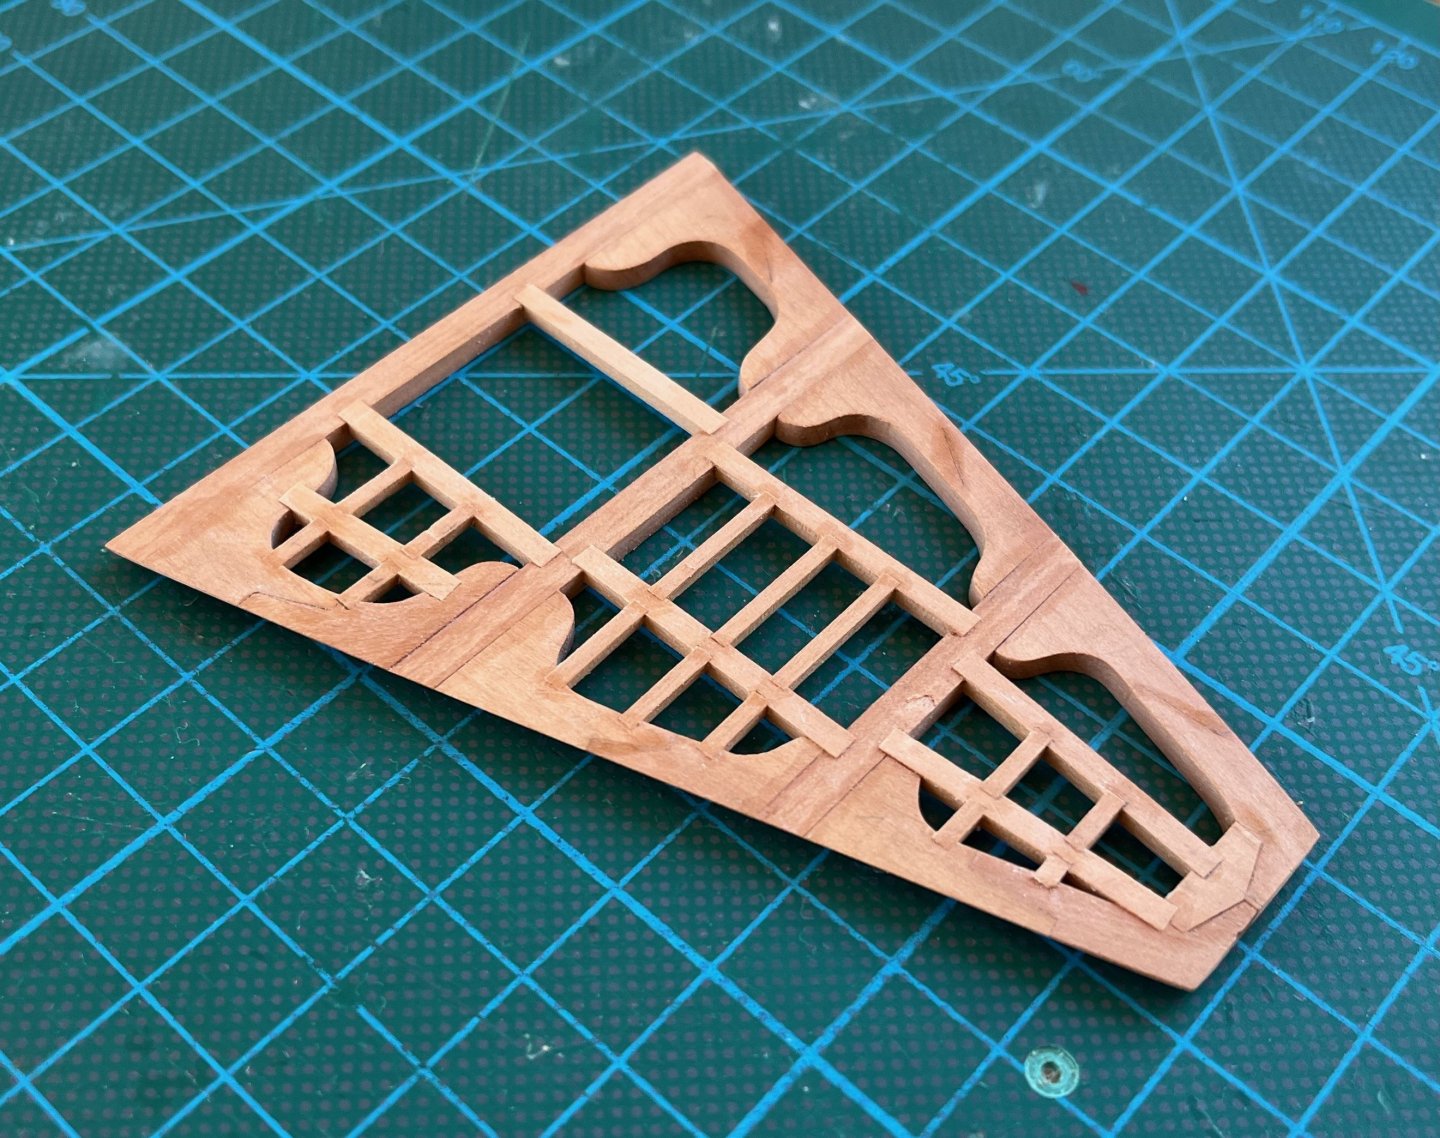
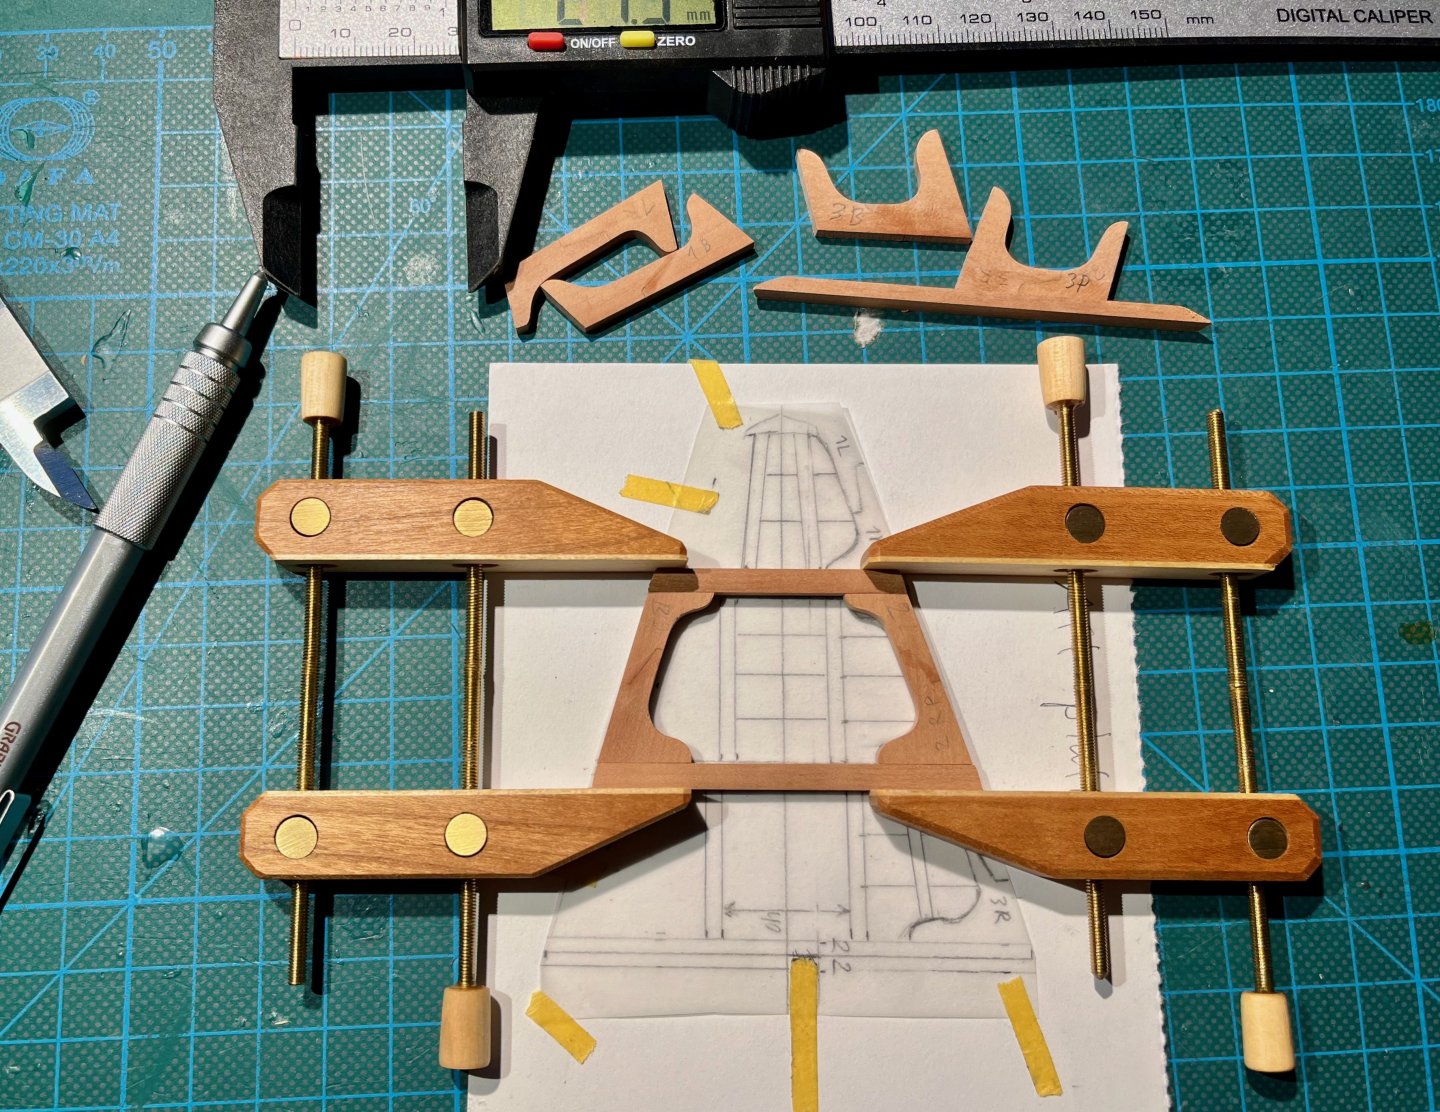
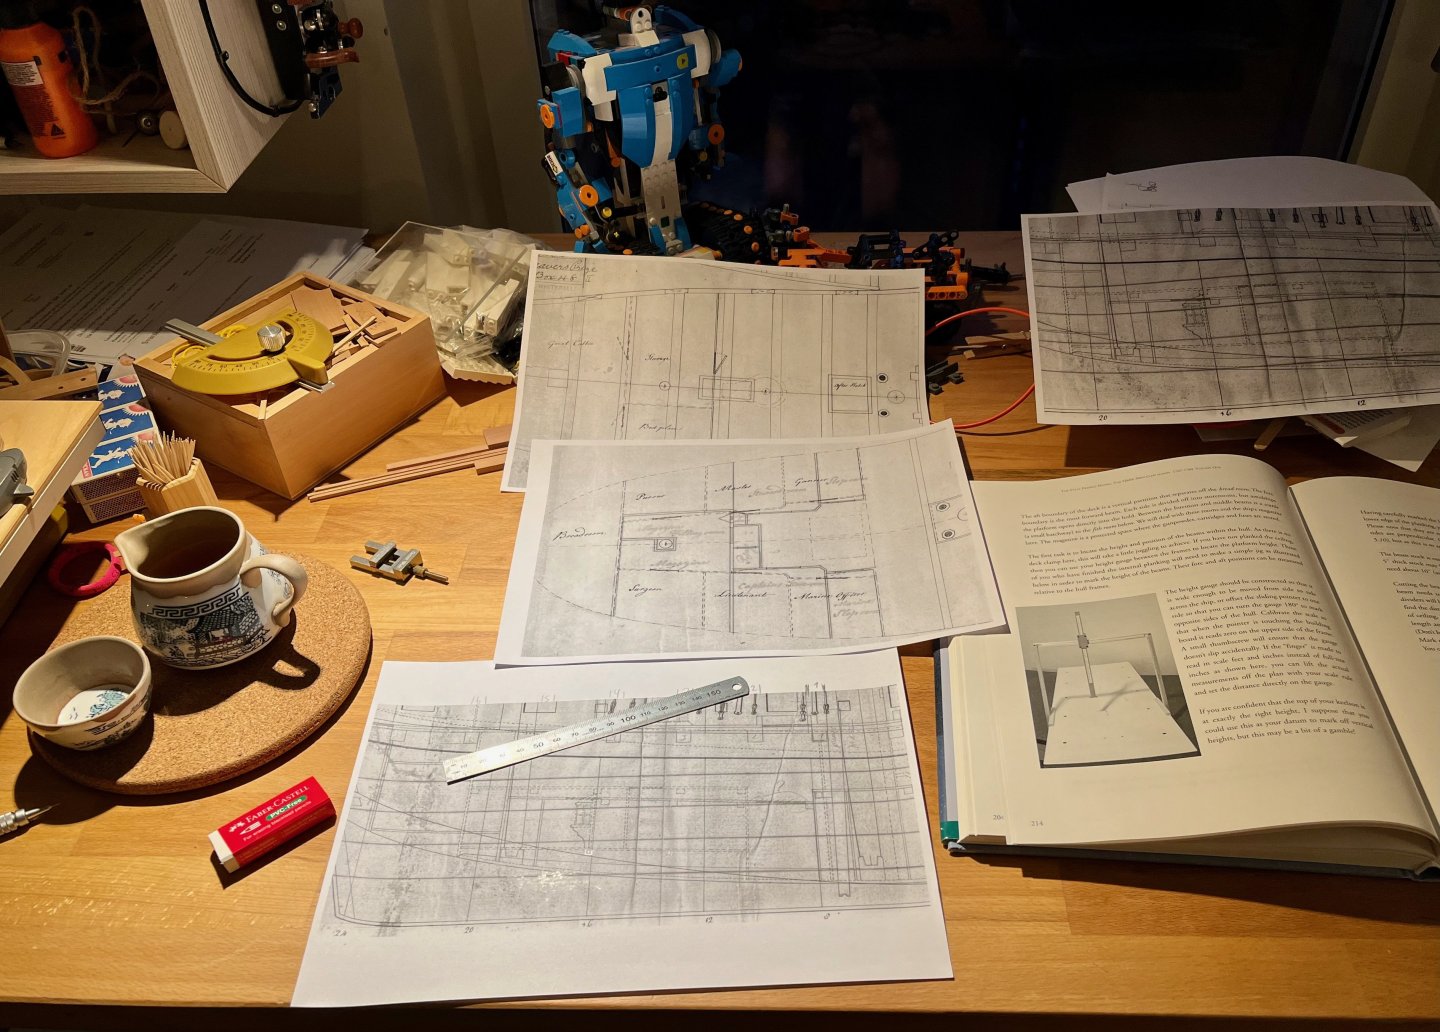
Was postponing the next big phase of the build - platforms & decks. It should be a very enjoyable part, one of the main reasons to start the fully framed model in a first place. But the learning curve is steep, primarily the planning part. Previously I relied on Hahn drawings to locate the parts, and the rest was rather repetitive. Now I need to sail uncharted waters - Hahn only provides locations of top deck beams and that's about it. So I relied on TFFM to understand the inner workings - these books are worth their weight in gold, I am immensely grateful to authors for simplifying a lot of research in an easy to understand form. And, of course, old Admiralty drawings from May 1778 done by George White. So I spent some evenings trying to wrap my head around and map the location and dimensions of the aft platform. Brain went into an overthinking mode and too many decisions should have been done too late in the evening. "What should I take as a reference point vertically? What about the horizontal reference? How to ensure a fair line? What method to pick to compensate for a lack of planking on one side? How to avoid a cumulative measurement error creep?" Finally the markup was done And a transparent template was born Transfer paper allows to copy the shape easily to cut off the wood patterns, but of course it leads to a creeping inaccuracy. Shaping 12 symmetrical parts that form 6 knees was not easy, but at least it did not require any thinking - just a pure relaxing process of small wood parts fabrication. Was missing a nano-sized flush trim router to make an exact mirror copy of each part Ideal usecase for CNC! Though where is the fun in that... Even forgot to take any pictures, the only one is the final edge polishing. The final assembly was tricky. I was planning to fine tune the knee angles, but trying to assemble a trapezoid when all its sides are sliding around is a very annoying process. If only I could somehow clamp all these pieces 🙄 Oh, wait, the past me thought about this and made some clamps. Six years ago. 😳 How very nice of me! Time to dust them off and use them first time for their intended purpose! They worked excellently, providing a gentle clamping force to get all pieces under control. Still took a while to fine tune the angles (adjusting one angle immediately affects the rest, what a mess). Here is the assembled platform, just need to fit it to the hull, add carlings and ledges and sand everything nice and smooth. Before adding ledges one is supposed to make sure they do not interfere with the lower deck pillars, but it's too much effort for now (requiting to mark the locations of all lower deck beams), creating a risk for another half-a-year modelling block. Will sort that out afterwards, moving the beams a little bit and even notching some ledges into the pillars. After all, the ship I am modelling is not famous for the build quality. The whole story around it smells "Friday night shift, shoddy engineering", so a few internal structural members overlapping each other are rather on brand Glad it would be hidden deep in the hold, a practice piece that still gets to be on the model Also I saw a number of build logs using pins to dry fit in place, but that implies drilling a tiny hole in the part. Do you just leave a hole there? Or plug the hole with glue and sawdust and do one more round of sanding before the final glue-up? Would be very happy to hear advices, suggestions and ideas to improve that process. I made it work, but surely it can be made easier and faster (and, frankly, more accurate).


- 968 replies
-
- 16
-
-
-
- hahn
- oliver cromwell
- (and 1 more)
-
If you are short on space - then yes, absolutely: https://www.proxxon.com/en/micromot/27110.php It is the smallest mill available in a reasonable price range (excluding aliexpress drill-mill junk combos), which is both good and bad. The working area is quite small, but enough for shipmodeling needs. It is hard to upgrade and attempts to machine anything harder than brass on that mill are rather questionable. But it is a great way to start and is fairly cheap in comparison. Make sure to get the "precision vice PM40", the cutters and basic workholding clamps should be already included. If you have a workshop - then your choice is much wider, there are a lot of medium sized "mini mills", but all of them are too big and heavy to be casually pulled up on your work table, they require a more permanent position in your shop. Proxxon, on the other hand, takes less space than some smoothie blenders in the kitchen
- 968 replies
-
- 2
-
-
- hahn
- oliver cromwell
- (and 1 more)