


SkerryAmp
-
Posts
809 -
Joined
-
Last visited
Content Type
Profiles
Forums
Gallery
Events
Posts posted by SkerryAmp
-
-
-
Love the big pic - colors!! Love the colors. Am tempted to seek out a ship (for the future now, not the immediate future) with some color to her. Looks really good!!!
Very nice work on this one as well Sjors - but then again, it is you: what else would I expect!!! wait.. where are the rat lines! (ducks and runs)
-Adam
-
-
Ooooh sails!! Very nice, very nice indeed!!!
This will be great!!!
-Adam
-
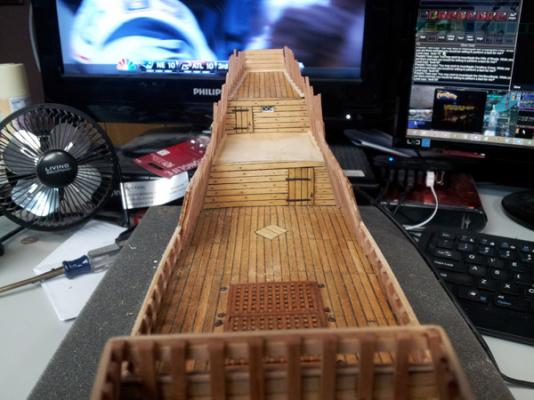
Hidey ho again folks!
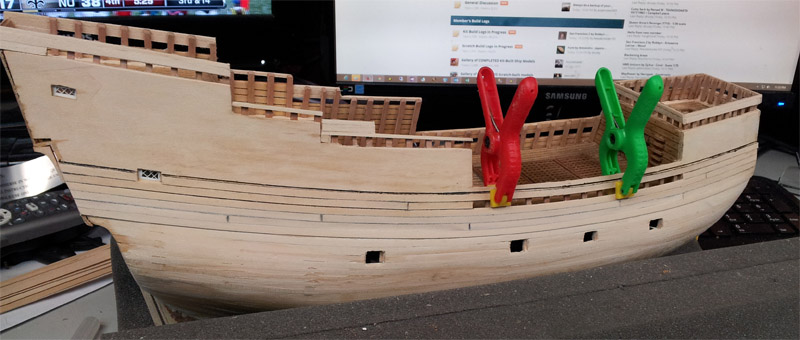
Got some more time on the bench today. The goal today was to at least get the one side planked, treenaild, stained and shaped. And that is where we are at!
Finished planking down to the lower wale. I decided to not plank the entire hull for two reasons. One, it is going to be painted white and two, conserve material (wood is expensive ya know
 ). Once I put the trim up which includes the wales it will all blend nicely together.
I did my best to keep consistent around the ship. Used the archive pen for the caulklines so they would match the transom and insner bulwarks, used Min Wax walnut putty to fill the tree nails (
 Hand is cramped from poking all those holes ) and then used a mix of 2.5ish to 1 Natural to Golden oak MinWax stain to wash over the entire side.
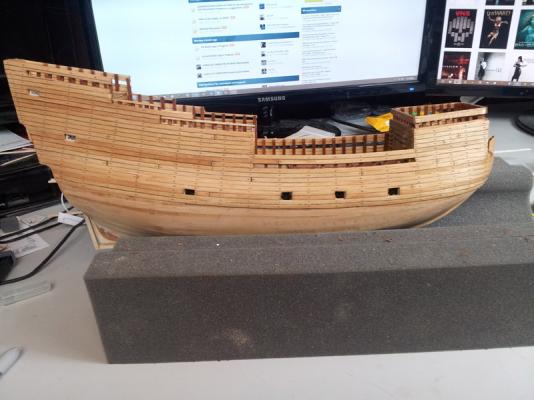
I also went through and stained all the stanchions with the same mix. The thought was, while they were pear if I used the same mix of stain it would tint without changing the color and blend the tone throughout and give it a nice two tone look. I think I pulled it off.

Now it is letting it dry a bit before moving onto the next few steps. I still have to clean up the gun ports, attach the lids (going to go closed, no cannons showing) then the wales and trim. Then I will move on to the other side!
Off to cook my wife my famous Chicken Kiev! Then will decide what to do next when I get back down here.... decisions decisions..!!
Until later friends - Do what you enjoy and enjoy what you do!!!
- lamarvalley, Dubz and Ferit
-
 3
3
-
Aftermarket wood - I may be a noobie but I love me some real lumber. I got some pear, holly and box a little time ago and ended up using it for all kinds of things - this that and the other; LOVE IT!!! (You are now hooked though, I gaurentee it)
I am trying to put together another order myself for upcoming ships in the closet.
It is so nice to work with!
-Adam
-
Thank you for the clove hitch picture Sjors! Scanned that over a few times and okay - the knot itself isn't so scary (did a couple on a stick here).... so when the time comes.....
.. I will be using you and others as inspiration. Fear knot  questions will be coming... (get it, knot instead of not... I crack myself up).
-Adam
-
Popeye sir (and others) a bit o praise and a dash of critic is how we get better =)
Never take it as anything but constructive assistance- I assure you

-Adam
-
-
-
If the paint is acrylic you can sometimes clean it up a bit with a q-tip and a little bit of alcohol and a light sand. If not - Sjors is the man! Dead on... and nice job!!!
-Adam
-
But still pressing forward and digging around. Something has to come up soon!

That's the spirit!!
 With that attitude - you are absolutely right; good to see you keeping positive - so much of it is just that.
Kudos!!
-Adam
-
Okee doke, caught back up.
While I stand by my statement that for a first go those ratlines didn't look bad - Is good to see the redo, they came out very well. Trust me, I can only imagine what mine are going to look like so am tryign to soak up as much as I can from you daredevils as I can!!!
Nice work Randy - loving it!!
-Adam
-
Sjors, looking really good my friend, really really good!
I am sure I am going to ask this of a few folks but HOW do you do the ratlines? I see so many of you guys have done them and I just can't wrap my head around how you get them so good looking. I know I will have to do the eventually, and just start to get a bit of anxiety thinking of it.
We need some of you guys to do a tutorial video or something on how you do that!!
Very nice sir, very very nice.
-Adam
-
Hi Adam, very nice work. As a young boy I've build the Revell Mayflower.
Thank you sir! I remember several of those plastic kits when I was younger as well. Never did the Mayflower but I do remember doing the Cutty Sark and Titanic!!
-Adam
-
your planking looks like it is flush with that upper bulwark {panel?)........are you going to be using .5mm planking, going up from there?
is there a wales strip to be covering this line? if so, that may help you with the bow problem. I see the non-conformity your talking about.......just round it off and cover it up...nothing to it

the brace problem doesn't look too bad either. follow the way your going, and as the brace begins to thicken, follow it and stay the same distance from the edge. create the same curvature as the brace.......this will blend the counter / transom line, and give you a nice rounded look. there is another curvature further down......be sure to follow the shape of the stern. I need to do the same thing with the Half moon........these ships have this distinctive stern shape.......the high back and rounded stern 'belly' really sets them apart from the others. is that second planking 1mm thick? I've always seen the second planking done with .5mm planking.........it's not a bad thing, but I would imagine that it would add thickness to gun ports, window casings, and eat up the overhang of the cap rails.
I've never used archive ink for the outer hull planking. I really like what it does to the inner bulkwarks........the idea you have in making it stand out in this aspect, is a very big plus.......adds more depth to the stanchions. blotch boo boos do happen though......try light sanding combined with the use of a pink eraser. it may take out most of it........if your staining it, this will also hide some of it.......just go a bit darker in this area........no hull is uniform in shading....you do have a bit of lee-way here.
it looks really nice so far.......just make sure that you are flush with the sterm wall / stern cap {transom / counter}, so the second planking will lay flat against at the edge {it will hide the mating gaps}. I'm sure that the wales are 1.8mm thick.......laying them over what you have now is going to make them stand out well. if the mating between the second planking and the bulwark {panel?} is flush, you may run into a problem here, in keeping with the wale protrusion. these will need to be cemented in place before you continue up the bulwarks. to plank with what your using would cause you to lose thickness with the wales.....they do sell blonde .5mm strip stock to thwart this from happening.
I do hope I'm wet behind the ears on the flush thing........but if this is the case, I hope something I mentioned helps you in some way
Always helpful my friend, always helpful!
The flushness is a trick of the camera - they are 1/32" planks so at that angle they look flush.
There are in fact two wales one lower (below the gunports) and one upper (just above the gunports) which will pop out from the rest of the planking. I think I will go with your idea for the curvature - I think that will be the best way to go (well the best way would be pop off the planks, recut and relay them... but uhm...yeah...... hehe.
Pink eraser, Never thought of that! Never thought of erasing on wood... heh. I think that may help take it down some. If I can get it to a grayish I think it will add some character so the pink eraser may just do that. Thank you!!
You are so on with the character, it is funny but looking at the pictures it never really "stood out" i gues, but working the transom make sit more appreciative of what is involved back there. My problem is sanding the ends to keep them smooth and a nice flowing run without sanding the already stained part on the transom itself ---
--- very stressful!!Thank you sir, great ideas and much less panicky now hehehe.
-Adam
-
You're making great progress Adam, she looks great!
Oh and.... welcome to the Jungle (this coming Sunday)....... Tom's getting kinda old and tired so don't feel bad when they leave town with a 4 - 1 record
(Okay... it is kind of hard to talk smack as a bengals fan but I feel duty bound) :mellow:
Thank you sir... and I TOTALLY understand the duty bound. Many people forget the patriots were not always like they have been the last decade or so. There were many, many, many, many years of being a fan but wearing a bag over my head during conversations LOL. Am sure it will be a good game though - the bengals aren't all that bad at all (could be worse, they could be the browns
)-Adam
-
Hey, you really won the Triple Crown these last 2 days. Great work on Mayflower, your Pats are right in there and work under control. GREAT.
You are also in luck. Our Broncos are 4-0................... but I aint a football fan!!!!
Don't know what to tell you on the ink. One of those things you have to just 'play with' until YOU are satisfied.
I did indeed!!! (Trying to not get too excited by it as there are still other things in the wings which are moving along but could very easily grab all my time if not careful so ssssh. don't want to draw to much attention!)
And it is okay not being a FB fan - but yes, Broncs are 4-0; I actually hope to see a brady/manning playoff game; those are lots of fun.
I think I am going to just sand out the planking and see where it lays. I doubt I will get it all out but it will add character!! =)
-Adam
-
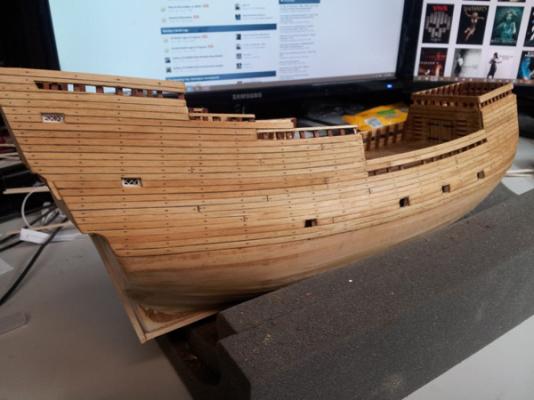
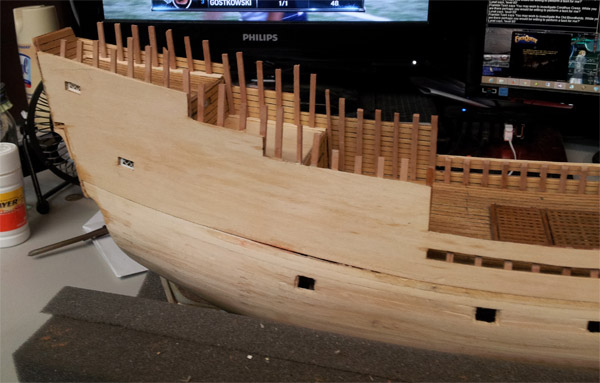
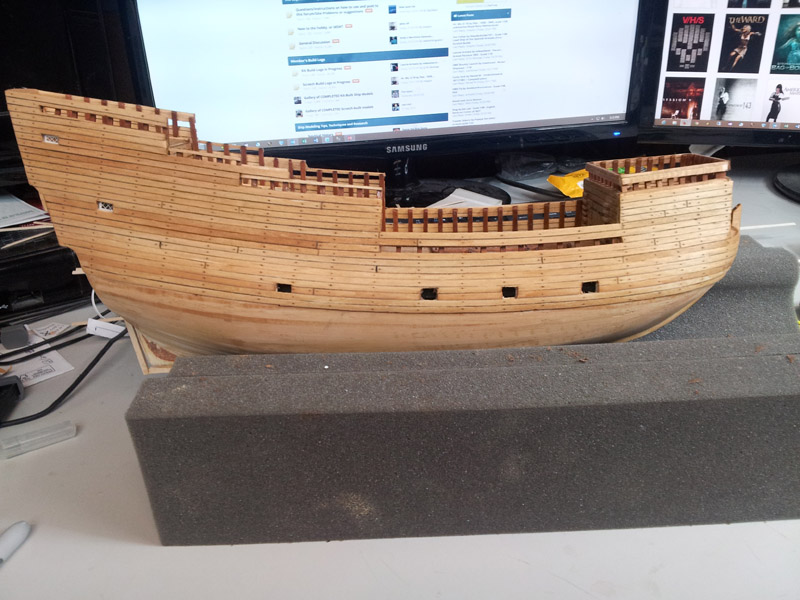
Well, spent some more time at the work bench tonight.
PLANKING has begun!

Basically started off by sanding down the hull as much as possible to remove any bumps, glue blotches etc etc. really any imperfections that could cause a bump in the strips. Once taht was done, laid down the initial wale plank and then started moving up from there!
Really surprised how well it is going down so far. I only have 3 trouble spots so far which I am not QUITE sure how to handle.
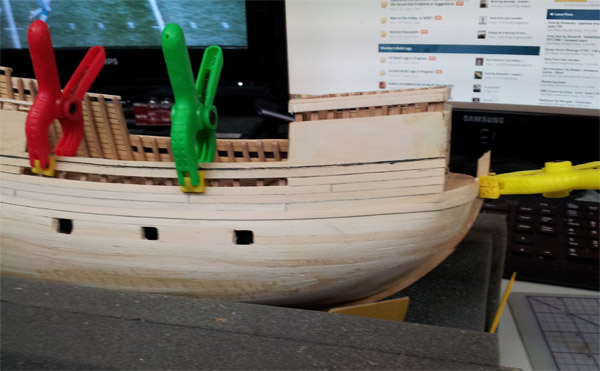
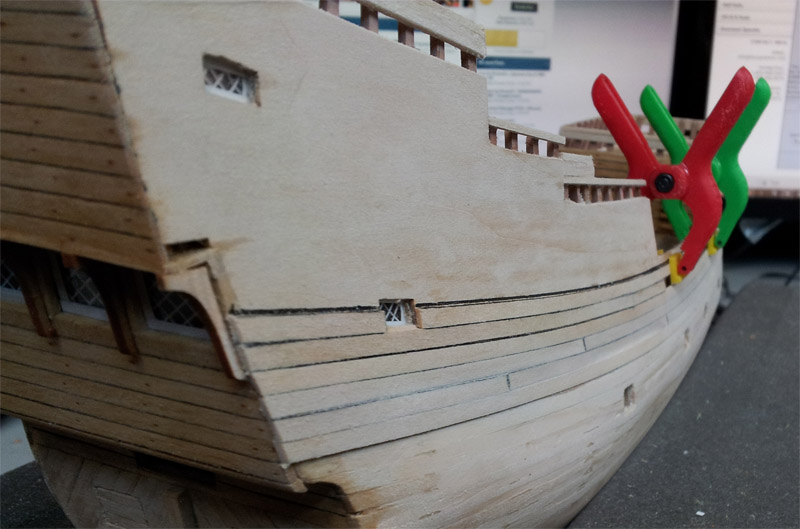
- At the bow there is a bit of a ridge in the bend. I am hoping I can lightly sand it round - but will see.
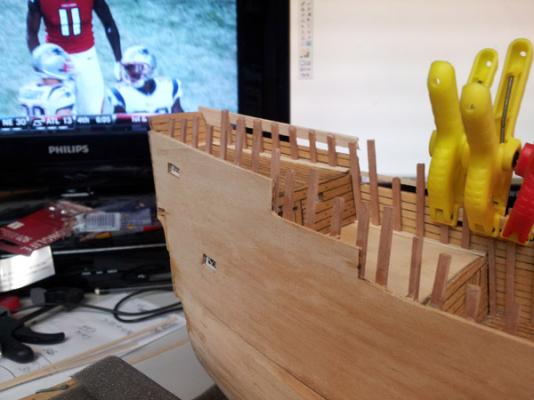
- The second, Not sure what I was thinking but I didn't bring the planks back far enough to blend with the braces on the stern. After looking at the pics and comparing them they are supposed to run up and along the braces... but alas mine do not. Only two so far, the others will so I may be able to take small peices of lumber and just glue them on.
- And finally, I used a little alcohol to clean some errant glue off the planks and it smeared the archive ink
 . Am debating on whether to Bleach it a bit to bring it back to pale tan/white. OR leave it and let it add character to the overall finish.
I hope =(
But, shall figure it out. By all means, any suggestions are very much appreciated!
So far only 6 rows of planks are laid. Tomorrow I plan to finish up at least the one side and then move to the others. Ideall having the initial second planking done by the end of the week and use the weekend to put up the trim etc.

As always, thanks for stopping in!
Enjoy!!
-Adam
- trippwj, Ferit, DCIronfist and 3 others
-
6
-
Hehe, nah.. not to crazy .... I remain quite reserved for the first 3/4 of the season. I start to get excited as it closes in on playoff time =) However, you do bring up a good point. I may want to consider mayflower protection plans just in case.
Thank you for the thumbs up my friend, appreciate that. The stanchions do add a dimension to it that wasn't there. One of those steps that seems to move it along and transition it.
-Adam
-
Good Evening!
Well, been a good night. Got some work done on the Mayflower, Patriots won and are 4 - 0, and managed to wrap up a major PITA project for work. Good night, good night indeed.
As promised - some meat!! (well, not real meat - leaving that to the others with their lobsters, venison, and whatever else is getting tossed on the barbeque!
This meat is more May flower.
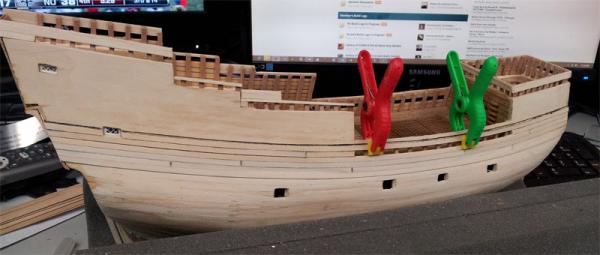
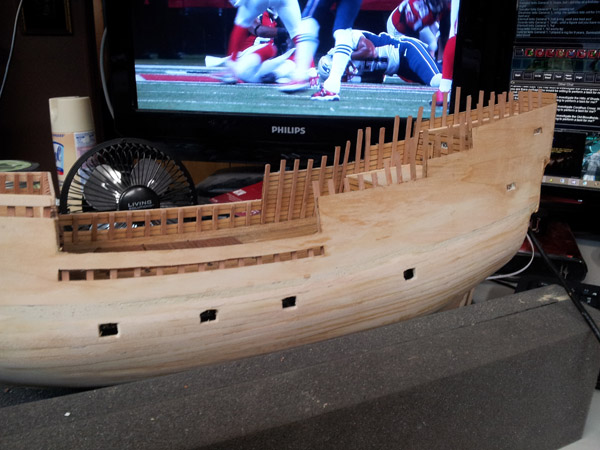
When we last left our hero - it was stanchions. Stanchions, stanchions and more stanchions. Very repetitive stuff, but did change the look of the ship quite a bit.
First, the stanchions all in place. It was very straight forward. Just a great reliance on spacers =) I have a couple of little booboo's, without any idea how to overcome them so most likely they will be disguised somehow. They are not major booboo's but just a little annoying.

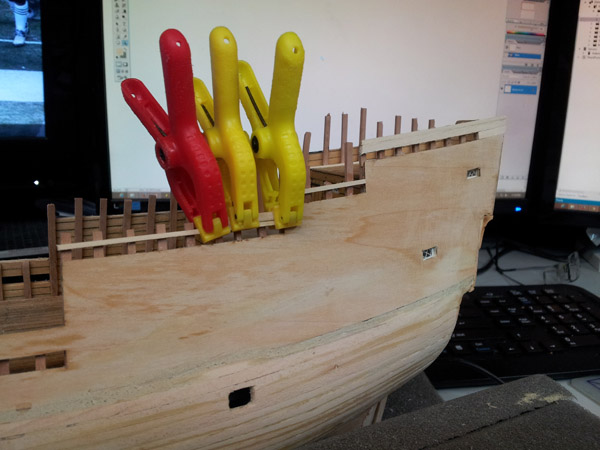
Once those all dried and were relatively stable it was time to start attaching the railings. Again, spacers - spacers everywhere!!. Dropped a spacer, installed a railing and clamped! Waited until the glue was set but not dry and removed the spacer (very carefully).

And now - we have a Mayflower with some nifty railings in place!

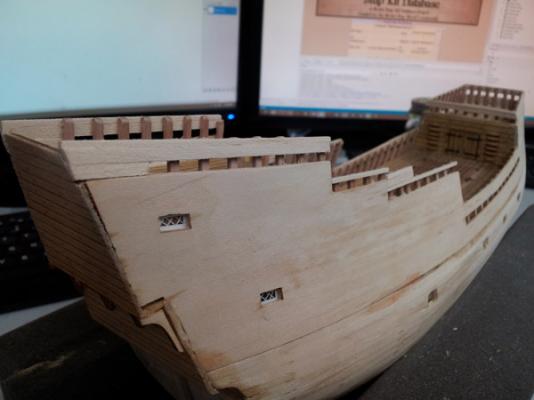
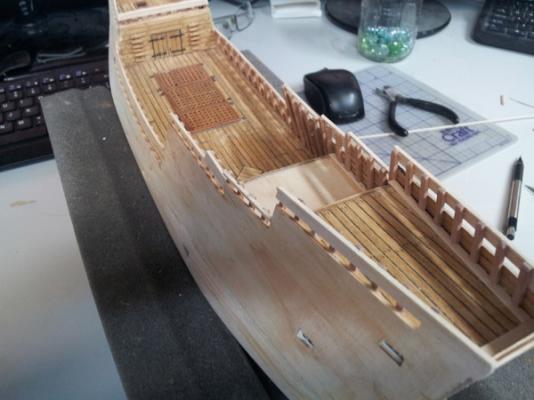
As you can see, they are a bit rough. That is where we leave them for the night. Once the glue has had time to dry overnight I will be going at them with the filler and sandpaper to get them cleaned up and ready for the second planking.
Ahh, feels very good to be back at the bench. Wonderful way to watch the game!!
As always, thank you much for stopping by and Enjoy!!!
-Adam
- Sjors, popeye the sailor, trippwj and 1 other
-
4
-
-
Coming along nicely David!!!
-Adam
-
Really nice job, the pics are fantastic and really show the work involved with all that string!
A proud piece for sure!!
-Adam


Half Moon by popeye the sailor - Billing Boats - 1:40 scale kit
in - Kit build logs for subjects built from 1501 - 1750
Posted
OOooh, now that is a nice rich stain color. Like it!! You said that was billings? I havn't found too many stains that I really like the colors always seem to light or too dark; but never thought to try some of the hobby stains out there. That there color - SUCCESS!!!
-Adam