Jump to content

popeye the sailor

Members
  • Posts

    15,993
  • Joined

  • Last visited

Everything posted by popeye the sailor

  1. I inherited a Tamiya U.S.S. New Jersey a few years ago from Lou. the owner passed away.........I would really like to continue where he left off, but it's still in my closet {one day Lou, I will get to it} from one model junkie to another.......I know your pain
  2. you prompted me to try searching again........I even looked on Scalemates {I joined a few weeks ago}. the Hasegawa 1:450 Missouri, I'm not too worried about.......I can source a paint guide from other kits. the Nichimo 1:50 Shokaku is the one I'm most concerned about......basically for a paint guide, since I'm not sure with the INJ colors. I've had these since last Christmas.......or the one before that.......a bit of a blur
  3. good job Lou I checked to see if they had instructions for the two I have........, but they don't. guess I'm still on the hunt
  4. thanks all for the kind comments and the likes I glanced at the pantry calendar, and for the month of may, it showcases the 1948 Tucker Torpedo.....or commonly known as the Tucker 48. it was such a cool car, that it caused me to look and see if there was a model kit on it. alas.........there are plenty of die cast models out there, and if what I saw was an actual kit, the price tag is around $200.00! the Tucker 48 was just a flash in the pan....not too many were produced. Matchbox put out a replica of the car and there are places that sell preassembled die cast cars. it was a thought.............puffffffffffff*
  5. that looks very nice.........spraying is the only way to get a smooth coat
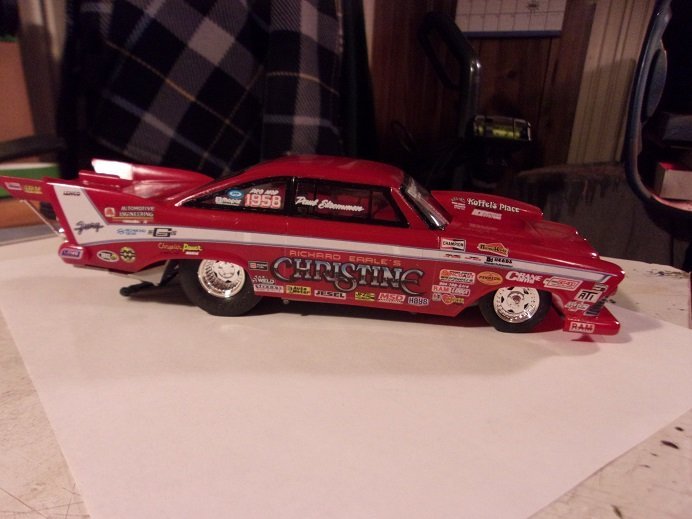
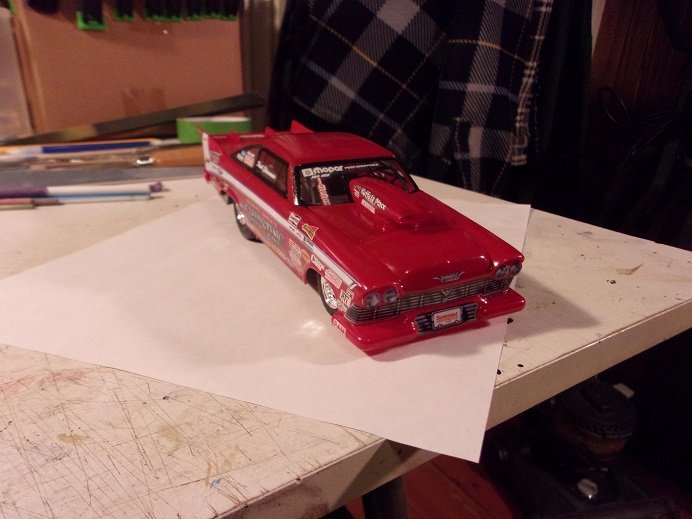
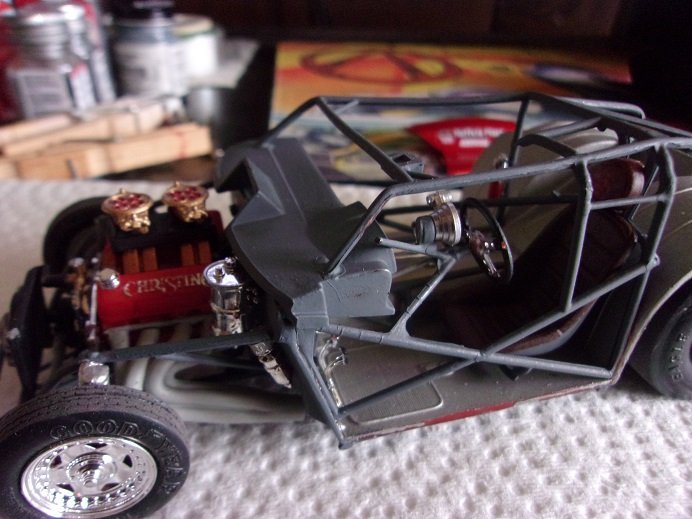
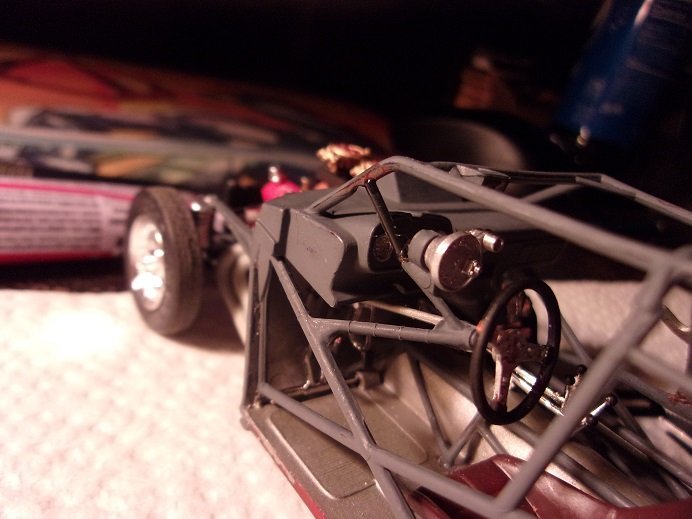
  6. I've found that with some of the newer emerging companies.........Round 2 is a good example. in some cases, they forgot to remove the original mold stamps, but their method is ink stamping. it is hard to remove with thinners and such.....I've found the best way is sanding it off, if there is a threat of it showing through the paint. it's not to bad if it's a 'molded' stamp, since it's the same color as the plastic. it's not that uncommon either, to find the date stamp from another company, like Aurora, Pyro, etc. take the 1:72 scale Stuka I built a while ago.........this model was produced, using the same molds, by at least four other companies. there are many kits out there that have issues that your experiencing.....dry fitting {no matter how hap-hazard} usually helps in fitting everything together. as I build, I try and see what can be done as a sub assembly, especially if it is to be the same color. a lot of times one may have to jump around in the instructions, in order to head off problems. I decided to follow the instructions when I built the Christine model. when I got to putting the body on the chassis, I found that how they wanted me to assemble the firewall {and the fact that the inner fender wells are molded to the body} made the process difficult to do. I have another kit of the same model { same kit but different subject}......I might experiment and build it the way I really would have done it. no log though 'cuz I already built a similar model
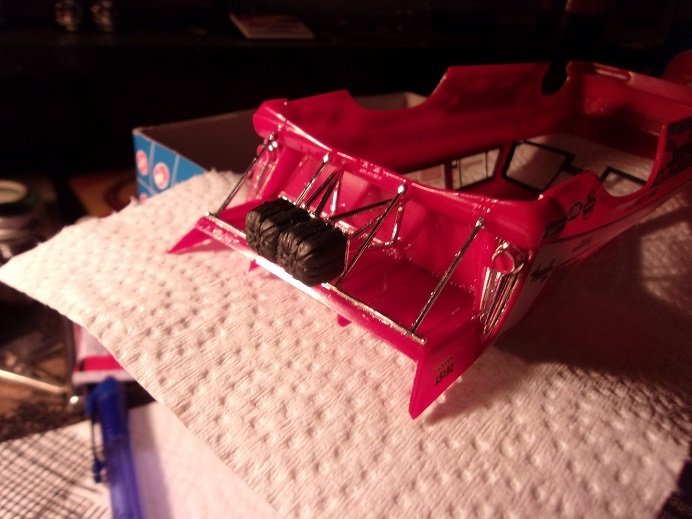
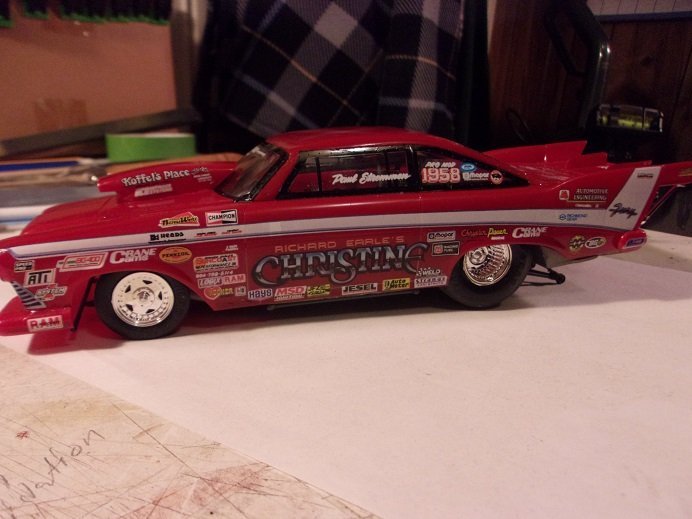
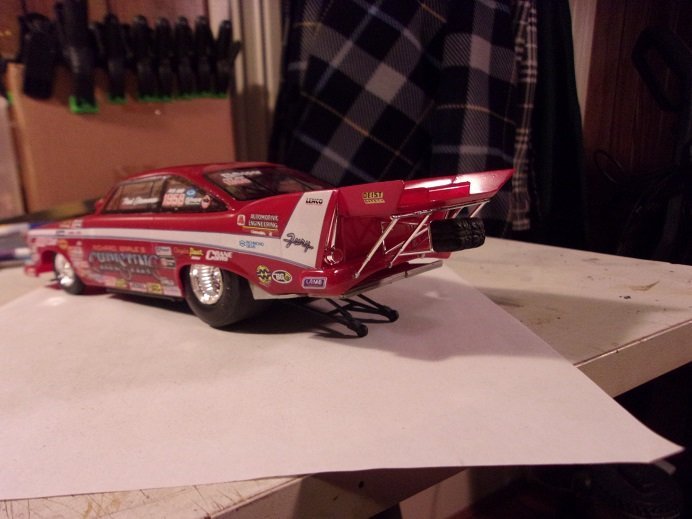
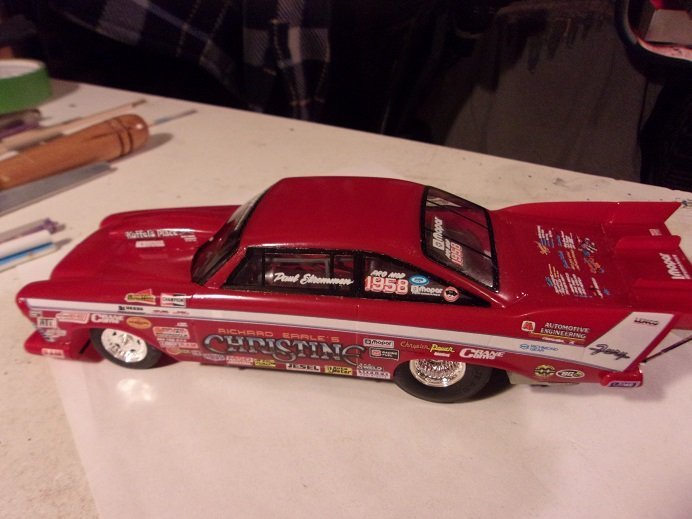
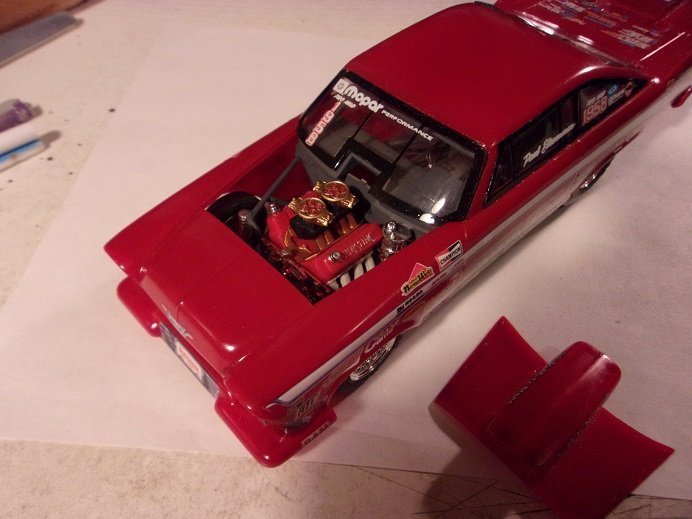
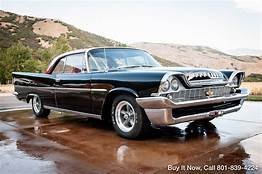
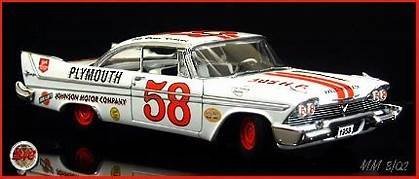
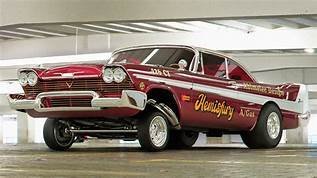
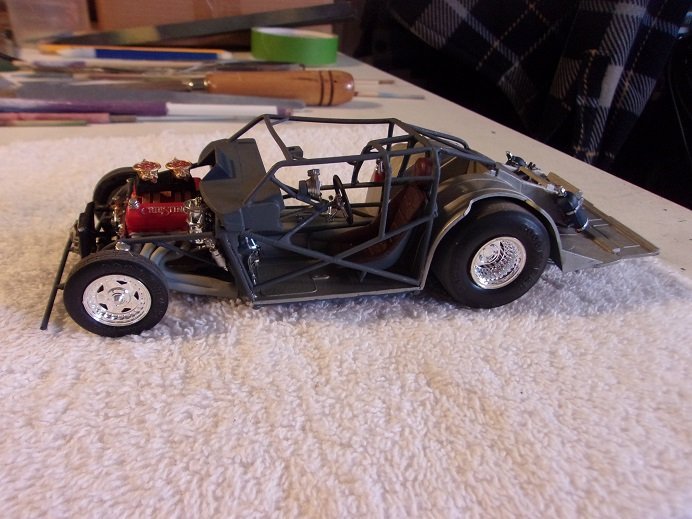
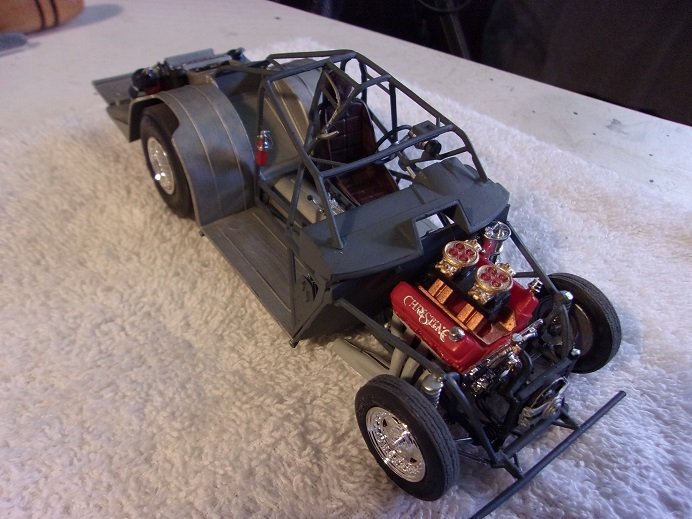
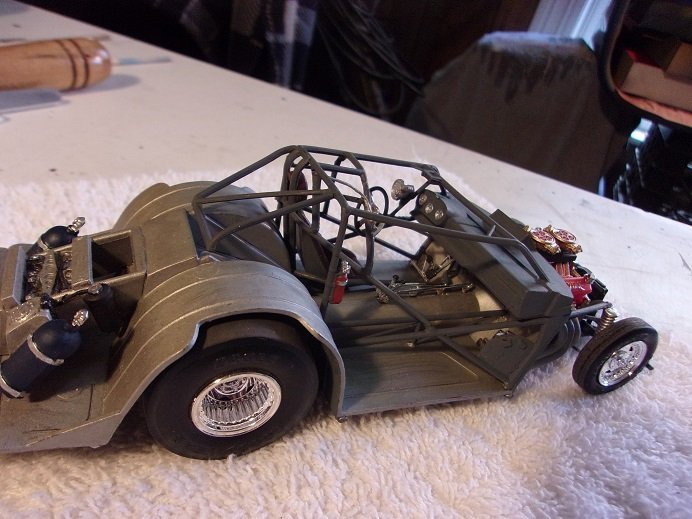
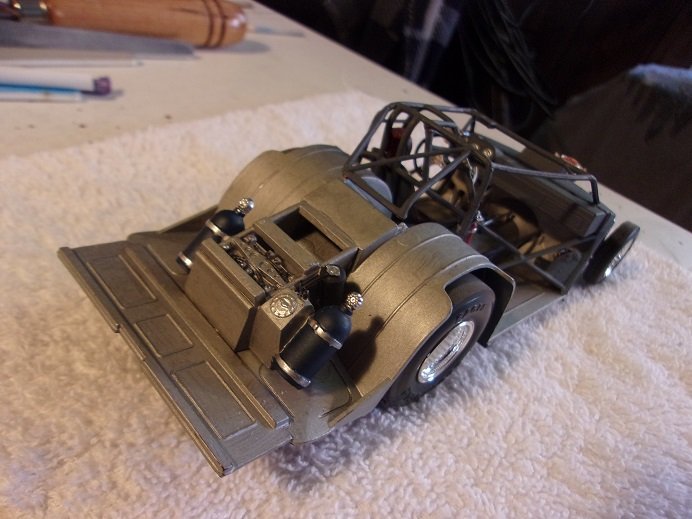
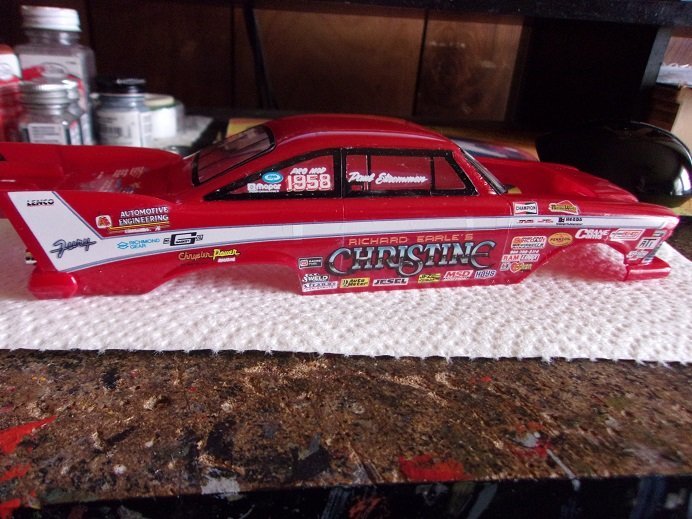
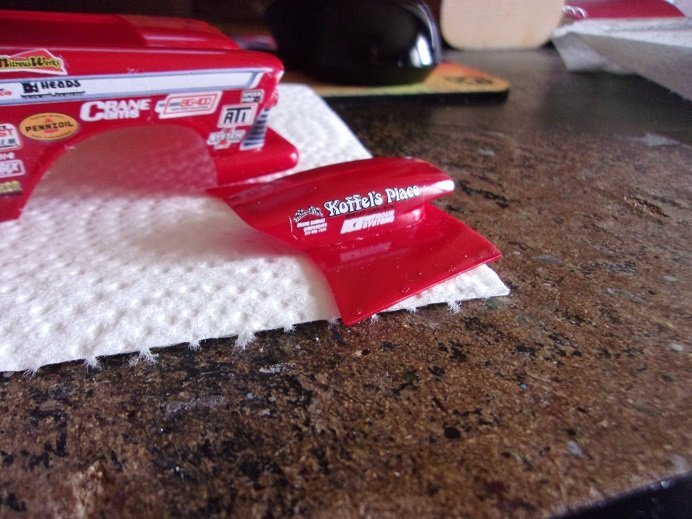
  7. I'll tickle your memory a bit more Mark.....I'm across the finish line. I knew the roll cage would have troublesome areas, but the rest of the build went very well. even the decal issues didn't take away from it. I should have expected the cracking to happen, since the decals were dated '93. but piecing them together went well....the biggest concern was the arching decal that went along the sides. going from back to front was the best way to work it.......line it up to the contour of the fin, and the arch went as it should I probably should have given it a second coat of paint too, but it still came out with a nice shine. the Chute bracket and the spoiler braces weren't hard to do...we took off for the afternoon........we did early shopping. thanks for all the kind comments guys.......I really appreciate it when dry, there was a couple minor touch ups. since I had to do a lot of handling after the glass was in place, I was concerned that the window maker/cement wouldn't hold and they might come loose. I was surprised with how sturdy it was. I basically only used it to fill in small windows and canopies........I guess I'll be using it a lot more from now on the body just slides onto the chassis......it easily lifts off to display the chassis. makes me wonder why the hood isn't molded to the body........but I believe it's an alternative way to display it. so here is the model in it's entirety not too shabby from a used kit........had to fix a couple of things, but the rabbit came out of the hat at just the right time we might go to Hobby Lobby one day soon........I'm going to see if they carry the cases for model cars. it would be quite fitting for these two. I'm still up in the air about what to do with the other '58 I have. I've seen pictures of it in many colors......some I really like. since I got it in my head to do some mods to the body and such. I could go with a custom look. it would be the easiest....the whole look depends on a set of mags does anyone see the resemblance to the batmobile? I could go stock car.......one thing I do lack is bucket seats though. a lot of hometown dirt trackers didn't ditch the creature comforts. a class that ran at Barberville Fla. was called 'Thunder cars'.........women entered cars too! not too terribly tough either.......all one needs is a roll bar. ...or I could go all out and do a gasser or a top fuel I would have to see what I have in the spare parts box. I did a little visual research with the Chrysler 300. the wheel base is longer, as with the Belvedere/fury. we shall see.........
  8. very nice paint work Dan..........it's blended nicely. super job thus far
  9. this looks really cool Mike! I saw one of these kits.........almost pulled the trigger on it. I may change my mind! very well done!
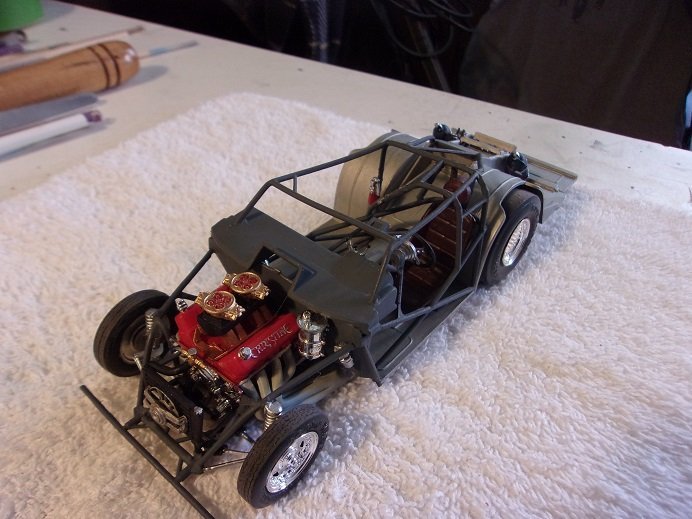
  10. all was dry, so the touch ups can be done. I'm still mess'in with the body, adding the chute assembly and the spoiler braces. here are the pictures of the chassis to start the gallery off I think it came out better than the Jukebox
  11. well.........getting near the end.. ....just gotta get the rest of the decals and rear parts on the body, and finish the roll cage on the chassis. the right side decals were a little worse........the long arching decal broke into more pieces, making it much worse. I got it though and managed to get the rest of the decals on. this isn't all the decals.........then the hood there are three areas left on the roll cage........the brace for the steering wheel, the back part, and the left side of the driver's compartment. the steering brace is too short, so it was cut off and a section added in. the left side of the driver's compartment was added.......and the back part of the cage was cut and repositioned everything is drying at the moment
  12. there are also mold date stamps somewhere on the model.......usually on the underside {an indiscriminant place} on the parts. that also gives you an idea of when the model was produced and molds were tooled. I've used Scalemates a lot.
  13. think of this as a multi media kit.............it would be a challenging model to build
  14. glad to hear that you were able to save the dio.........would be a shame indeed!
  15. thanks gents the week end is coming.......three days of fun and frolic! I added the decal that was where the crease was......started out well, but then broke into three pieces. I managed to save it though. the sheet didn't show any micro cracking. the cracks didn't show up until the paper relaxed, after a minute or so of being wet. we'll see what happens when I get back to it. I have received both of the kits I ordered...the ones I mentioned in the Christine log. they are both similar to the Christine kit, molded in grey/tan plastic { a very odd color}. the Chrysler 300 is a very detailed model.......the engine detail is especially nice.
  16. in the previous session, an alligator clip was attached to the front part of the driver's cage. I had glued it and used the clamp to keep it in place. the rear part was a lot more out of whack.......I broke the bar to put it into alignment, and glued it, after the front part had set long enough. that was left to set overnight and in the following morning, painted. the rest of the touch ups were also done. there are two more parts of the rool cage to be done.......the back section needs to be cut and relocated, and one last section needs to be added. the steering wheel also needs to be added, and that will finish the chassis assembly. the body still needs to have the spoiler braces added, and the chute assembly added. but I decided to do some of the decal work. these are the original decals, dated 1993. decals have come a long way since the early days. they were thicker, and utilized a pasty form of adhesive. todays decals are much thinner......changes in the printing and the types of adhesives they use. older decals usually have excess clear film that encircles the image, which can be trimmed off, for a more subtle fit in tight places. I was a little concerned with the decal sheet.......one was the small crease going through one of the decal images, but mostly, it appears that the sheet had been subjected to humidity. I started with the front grille decals.......if these were in tough shape, then I would need to locate another decal sheet. I did do some trimming here and there on these decals.......they went on without much trouble. next was the long molding graphics that run along the left side........not so good here. the decal broke in about four pieces........I had to add it in sections. the fellow that glued on the front and rear fascia didn't clean up the flash and mold lines....the rear 'fin' part of the decal couldn't slide under the bumper, so I trimmed it where it mated. this also caused the decal not to sit properly where it was supposed to, so the decal is slightly forward of where it was to locate. it still fit reasonably well, and I was able to mate the sections without any major gaps.........it did add to the guesswork of how it arched along the body. I'm happy with how it came out all these images are part of the decal........think if they were all separate. it would likely amount to two decal sheets.......and a lot more work! the second part of the side graphics is another mass of images........the car's name being the central image. the adhesive for these decals turns into a cloudy paste when wet......after the decal is set in place, a damp paper towel lightly washes away the residual adhesive. I will have to do it again when the decals are dry. luckily, the decal positioned as well as it did, with the initial decal being forward like it is. that little white decal in the upper left, almost got covered over. it can also be seen where I had to lap the front section of the molding decal over the other part to make it fit. I hope to be able to copy the positioning on the other side. I may try and fix the overlap. I also had to watch out for curling, where the decal narrowed, or protruded in odd ways. a pin was used to pull it back out from under itself. one of the decals was added to the trunk deck. ....and I added some to the windows. I will add more when these dry. finger's crossed when I continue..... more soon!
  17. thanks Kevin..........the other day I got to see the box art for the Monogram kit. same kit, different box
  18. thanks Alan........this is a new production of an older kit. it's all in the molds Round 2 acquired quite a few of the old AMT molds, and they are slowly bringing them back into production. I'll know more when I examine the kit that is currently in transit, which I should see tomorrow if the notification is true. I will know more then thanks for look'in in....appreciate it!
  19. good to see you back...........looking very nice
  20. that's what I plan to do with the 57..........I think I will source some nails with the same axle diameter. the head will do well for the cap........and cut them long enough to fit the hole in the rim. I was at first thinking plastic, but the thought of breakage would be more possible. the major bad {sad} points with these 1:16 scale kits, is that so much of the detail is molded........like the starter, door handles, windshield wipers........etc.....etc......etc. there are so many older 1:25 scale kits that have all these detail points....and more. today's kits are so much more detailed....I know I shouldn't be surprised. I guess it's because that back in the day, I wasn't so detail minded as I am now. to revisit some of the kits I built as a youngster, really makes me think about what I 'settled for' back then, and the possibilities seen in these kits as they come before me. I was at the point of chopping and modifying kits, scratch building stuff when I stopped modeling for that stretch of time.........and when I picked it back up again, I was a bit surprised that I remembered some of it. when I purchased my Second Cutty Sark {Revell 1:96 kit}, it was my start up............and what led me to wooden ship kits. scratch building came back to me when I built the Nordkap........that model was so much fun! ------>I'll be right back<------ people! I just came in from picking up two large pieces of cardboard out of the middle of the street...........folks just driving over them, not slowing down or anything! most of the time now, our garbage pick ups are automated.......there are no guys on the truck anymore. one would think that by now, everyone would know this, and not leave loose things out at their pick up sites......but no! I took 'em and cut them up to fit in my recycling container ***what a novel idea***.....glad I'm the only one who thought of it!
  21. looking very good OC..........your getting the hang of it I'm going to need to get into it as well.........watching what you do with great interest
  22. thanks gents looking at images on line, I've seen this model in many colors........some look really nice. I've even seen where folks did theirs in one of the many stages during the movie.........the burnt 'crispy' Christine looks interesting. pictures of junk yard.......smashed up cars can be seen too........some even did this to their models to replicate what that group of guys did in the garage {wrinkled fenders and such}. some had the white roof.......some didn't...........some even did a two tone version, which I think would be hard on this car seeing that the chrome along the sides doesn't go the entire length of the car. the two tone line would stick out like a sore thumb. AMT also put out a series of 1:16 scale models, in which I currently have two of them........the 1957 Chevy Bel Air convertible, and the 1957 Ford Thunderbird hardtop/convertible. I've done a little tinkering with them {not to the point of actually building them}, and it gave me an a closer inspection of the kits themselves. they have their share of missed opportunities in the detail department, which is a bit sad, but the 57 has one flaw that I can't ignore. that would be the fact that the metal axle passes right through the oil pan.......it is shaped to allow it. being in the engine mode, I built both engines for these models, and I filled the oil pan in on the Bel Air. I suspect that the 55 Chevy Nomad and the 55 Chevy Bel Air kits are the same way too. the Thunderbird is not {I'm happy to say}. there are videos on you tube as well. I have an idea to remedy the issue.......I'll flesh it out when I get to build it as I mentioned in the beginning of the log, the history of AMT is an interesting one. in 1983, ERTL bought AMT and was renamed AMT/ERTL. the company continued to release the original AMT line up, as well as some that were introduced by ERTL, which was making a name for their farm and construction toys and models. I was doing some surfing the other day, looking for the Christine kit molded in white. I found that there were quite a few out there....and I probably could have pulled the trigger on one of them, but I was still enamored with the pro modified. of course, finding one complete and at a more down to earth cost, is a bit harder to come by. giving up for the time being, I settled back working on the pro mod. the admiral was curious with what I was doing.....I told her what I found.........and that sparked her to do a search on her own. she misunderstood me though, because she later showed me a kit of the 58 Belvedere, produced by AMT/ERTL. I was unaware that these kits existed........I never saw them in my searches. she sent the link to my computer, telling me I could get it now..........any conniving husband could have blamed misinformation and ordered another Pro mod .........but I wasn't going to look a gift horse in the mouth, so I went to order the one she picked out. reading the description, I saw that it was an open kit, and the completeness wasn't guaranteed. I looked around and found one that was said to be a complete kit, and it was a few bucks cheaper while I was buying the kit, another one caught my eye.........and for around $20.00! WTH! did I go through a worm hole and end up back in the 50's? hideous........isn't she?!?!?! I did mention experiments......didn't I? ....and what is it with red? from what I saw, both kits are molded in white....the 300 is sort of a cream color {I think}. both kits seem to share the same molds as well {type-wise, I mean to say}. I'm working on a game plan for these two...........more on them when I get there thanks for look'in in.......it's not a bad kit, but it does have some nail biter moments. there are some mold lines that show up on the body, but they clean up fairly well. after all.......these are older molds
  23. hey there folks.......work continues on this one. as mentioned earlier, the roll cage parts have some warp to them. they need to be cemented together slowly........gotta let the glue dry before moving on to the next section. to start off this session, the passenger side of the main cage needs to be added. the instrument panel was also added at this point as well. the computer is added to the inner side of that plate at the front floorboard, before the section was cemented in place {that's the little chrome thing you can barely see. the fuel oxidizer assembly is also cemented in place. now that the windows have all been rimmed with the flat black, they will be added to the body. this time, I used the window maker..........it does a super nice job, but the windshield turned out to be a bit of a nightmare. I started to add to the rear......starting with the tail lights. I still harbor this strange desire to paint the bumpers....if I do, I'll use flat steel to paint them {this is still up in the air}. on the chassis, the head rest was added just above the seat. next is the top part of the roll cage.....which was initially cemented to the bars above the seat to start it off. the wrap around bar {for the seat assembly} has already been cemented to the passenger section. there is a small section that will be added to complete the driver compartment of the roll cage. the section doesn't line up on the rear deck either........appears to fall short of it's target too. I'll have to figure out something for that, even if it means cutting the connection points and repairing the cage afterwards. the driver side of the compartment part of the cage has two bars that needs to be cemented next, but they are also out of alignment and will need to be adjusted to fit. the warpage can be seen in this picture {I have since straightened out that one bar that appears bent}. the two bars that rest on the dash also needs to be positioned and held in place to be cemented. yup......this will be a slow assembly.........I went through the same process with the Jukebox Ford. once I can get the roll cage completely together, I can touch up all the glue points........hopefully it will look better, and not like it was cobbled together by a four year old I'm liking this color combination better than when I did the Juke box. continuing with the body, the chute bracket was fitted after being cemented together, and set up in it's locator holes to dry. there are support bars that go to the spoiler, but they will be added once this has dried....or I get to that point, after heightening my frustration levels with the roll cage. later, after the right side support bar was cemented to the top section and has since dried, and the dash connections were also cemented in place. I turned to the driver's side front cage bar........this one had the better possibility of joining without much fuss. as I do this, it does set the others up in better positions toward being in alignment........some just fall short and they will need to be dealt with in a more aggressive manner.........I'll get the saw blade out so this is where I am so far. I hope to have more for you soon........
  24. reminds me of the Cheech & Chong skit "Cheech & Chong at the drive in" of course, you gotta remember to let them out once you get through the gate I would think it's a pretty spacious trunk, but this kit doesn't even have hinges for the hood........let alone sport a trunk that opens. if there's one thing about models, they have a habit of making one thing of what should have been done, after the model is finished I decided to leave the side windows out......but I do wish I had thought of putting in the rear side portions......the glass could have been split into two sections very easily. I mentioned earlier that Christine had a white roof..........it slipped my mine painting the body. I'm debating if I could pull off doing the roof, but the silver trim might get damaged if I do........then there's the thought of the red ghosting through. it's a thought....... Christine is finished..........here are some pictures I promised......... I like the grilles........wonder why I don't do this more often........ in the second picture, you might notice the gap where the hood meets the grille........this is an additional problem with the kit. the radiator is too tall.......it juts just above the radiator bulkhead......the radiator cap raises it a bit more. the radiator locates on top of that cross frame........anyone who wants to build this model should cut the bottom off the radiator.......roughly 1/32nd or so, just enough to drop it down below the bulkhead line. there is not a lot of room in the engine area......... it does make me wonder if the original AMT kit assembles like this. it is a kit worthy of some experimentation. thanks for look'in in........always fun shar'in the ride with friends
×
×
  • Create New...