


paul ron
-
Posts
292 -
Joined
-
Last visited
Content Type
Profiles
Forums
Gallery
Events
Everything posted by paul ron
-
take a gear from a clock, mount it on a stick... pounce wheel.
-
Work area pictures only
paul ron replied to Johnny Mike's topic in Modeling tools and Workshop Equipment

-
that'll work. in case you need to store overnight... at least you'll have a pair left. 🤭
-
to store the pad while working, put some alcohol in an ash tray n sit the pad there between coats. to store the pad long term, a relish jar is the way to go.... short wide mouth easy to pick up the pad.
-
Looking for ideas for work area
paul ron replied to Desertanimal's topic in Modeling tools and Workshop Equipment
find a door in the dumpster or get one at home depot for $60. you just need to build a base or just put it on a pair of horses. i like solid core doors over hollow ones, but either will do just fine. -
Dremel 4 inch table saw 588-2
paul ron replied to lynne's topic in Modeling tools and Workshop Equipment
hopefully someone here has this saw and can measure the pullies for you? you can get them in hardware stores or machine shops. contact dremel. btw amazon is world wide too. -
Dremel 4 inch table saw 588-2
paul ron replied to lynne's topic in Modeling tools and Workshop Equipment
-
Dremel 4 inch table saw 588-2
paul ron replied to lynne's topic in Modeling tools and Workshop Equipment
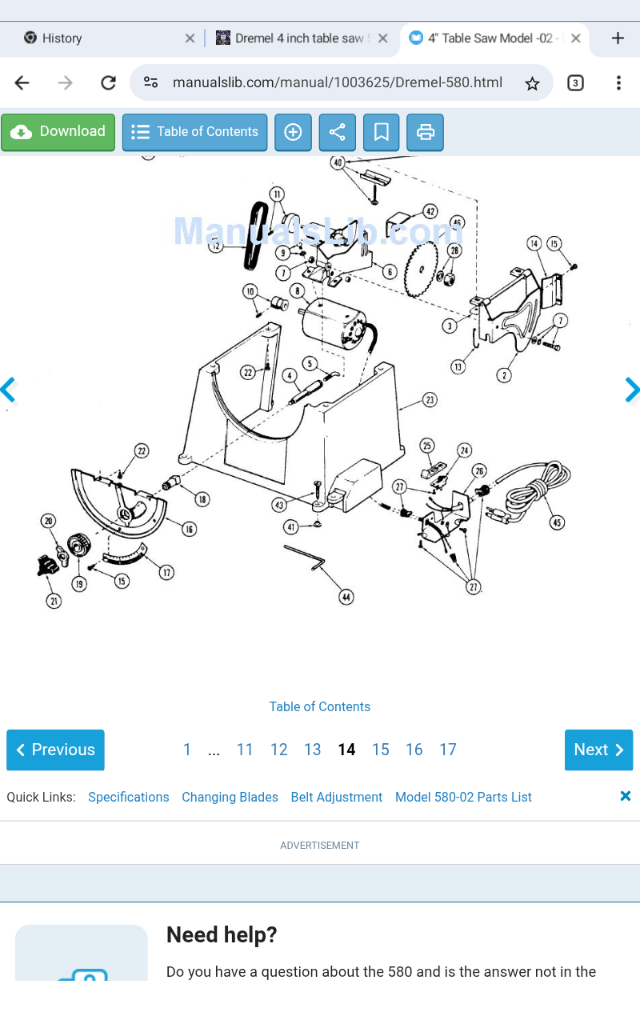
i took a screenshot of the parts list i the manual... https://www.manualslib.com/manual/1003625/Dremel-580.html?page=15#google_vignette seems there are 2 pullies available. perhaps a call or email to dremel to get the part? https://www.dremel.com/us/en/service-and-support/customer-support-services another way to go is try to figure out the size of the pully by measuring the belt slack. you may also put a multi pully so you can slip the belt for a different speed. btw the blade speed in the specs is about 9000rpm. the motor runs at 10,000rpm.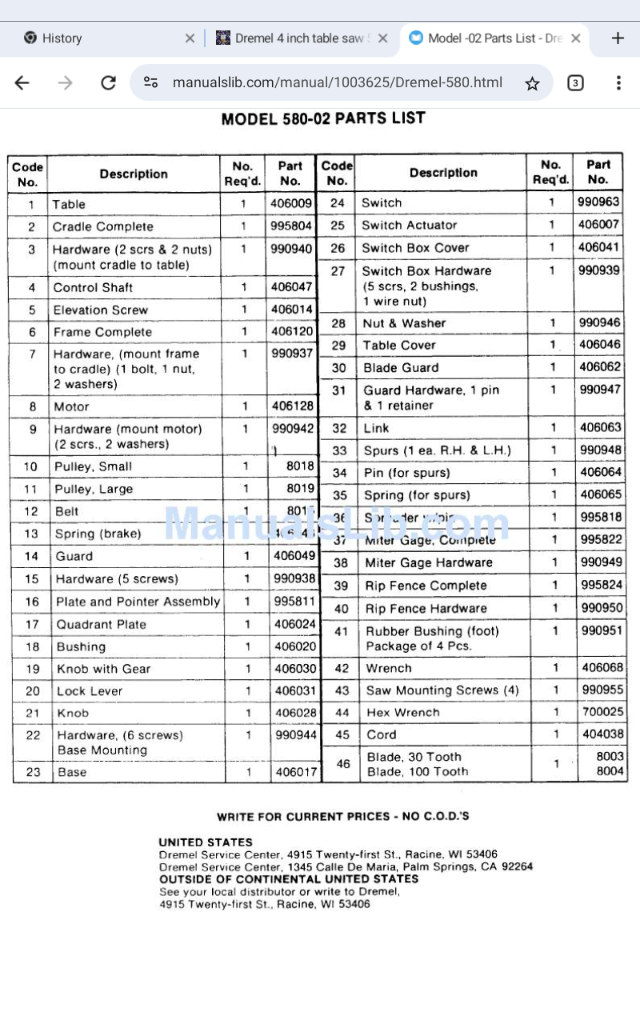
-
Taig Lathe Motor Mount
paul ron replied to kgstakes's topic in Modeling tools and Workshop Equipment
im not familiar with these small lathes. i do have experiance on metal lathes, comercial machines, and wood lathes. are you working metal? an oil drip pan under the lathe and an oil feeder may be worth looking into. do you intend to do threading? there are special toolings and accessories needed for that. perhaps asking others here for literature and check out you tube videos to see how to properly and safely use your tools. videos... https://duckduckgo.com/?q=taig+desktop+metal+lathe best thing to do is use it, follow instructions, get plenty of practice. -
Taig Lathe Motor Mount
paul ron replied to kgstakes's topic in Modeling tools and Workshop Equipment
its not unusual to diy mount a tool's motor using a hinge. the weight of the motor should be enough to tension the tool to the drive belt... if not, you can use bungies or other additional methods to tension the mount. there is no additional stresses to worry about as long as its all aligned properly. -
just stain whatever wood you are using to look like redish mahogony.
-
i leave my strips in the toilet tank for a couple hours. they come out like wet noodles and bend very easily... in fact i can get smaller radiuses than pictured above. whatever floats ur boat...
-
Decals for draft markings
paul ron replied to g8rfan's topic in Painting, finishing and weathering products and techniques
the rub ons are hard to find in typesets or sizes let alone color. ive had pretty good results with the water slide. the paper is semi transparent so i trace the lettering off the plans using pen n ink. it would be great to find the rub ons we need. im all for the easy way out whenever i can. i hope everyone posts their sources here? -
Gold solder for brass
paul ron replied to Richard Braithwaite's topic in Metal Work, Soldering and Metal Fittings
a pen torch would be more than adaquate for such a small piece. but it seems by the conversation here, color is more important than heat. yes, silver solder would be fine, but some of the color matching sugestions are like killing mosquetos with a hammer. at the scale and size of the piece, the weld would appear insignificant. an eopxy fix would be more than sufficient but it's just too simple a solution. -
Gold solder for brass
paul ron replied to Richard Braithwaite's topic in Metal Work, Soldering and Metal Fittings
you do realize there are brass low temp brazing rods available? https://www.amazon.com/GEOYLE-Brass-Brazing-Rods/dp/B0C7P15LC9?th=1 -
Decals for draft markings
paul ron replied to g8rfan's topic in Painting, finishing and weathering products and techniques
do you have a link to where you got your rub on letters? -
Decals for draft markings
paul ron replied to g8rfan's topic in Painting, finishing and weathering products and techniques
oh u need white. that creates a different problem. ive made waterslide decals using my caligraphy pens n inks, i needed gold type. i coated the decals with clear satin acrilic spray before soaking in water to preserve the ink from running. perhaps try doing this using white acrilic paint on the print side of the paper? -
Decals for draft markings
paul ron replied to g8rfan's topic in Painting, finishing and weathering products and techniques
have you considered using water slide decal paper than you can print your own via an ink jet or laser printer? https://www.amazon.com/water-slide-decals/s?k=water+slide+decals -
Grommets for 1930 Pond Yacht Sails
paul ron replied to Kimberly's topic in Masting, rigging and sails
https://www.amazon.com/Diameter-Eyelet-Colors-Clothes-Making/dp/B0CM3R4NWQ/ref=sr_1_17?dib=eyJ2IjoiMSJ9.uutbGviZ3Xg8GlX5As_CaaMToYaSzKqOIPuhhggJLDjg9G79SaGl9sJ1dN4eZZNz6EIfcEJIXNXD-usPMCurDioiJM8Agj9AMnfTTAg9Lqa5CIaF_ea4M1drf53_RabEFkAb-K8t5K0IedsY7vCfd6qjNXV-S7LCElSadUaNr61CCGN_y9heNeX9KRqs1ocARl_aCAl-77SIYJt1h-SWPmv1Oz5VF7EIdfvxafbEickO3YcPttbNEQ5EE4ROWHgE2xTM2B6Fb8azHqTV7Rmf5Nhkf5x7OYnclaEFRYCTFWE.SWjrxCHUlZgjnbPKh1VjBFmdzzvuq69NAF6GubOeCUg&dib_tag=se&keywords=small%2Beyelets&qid=1750424228&sr=8-17&th=1 -
a simple amazon search found this.... https://www.amazon.com/small-eyelets/s?k=small+eyelets are these small enough? https://www.amazon.com/Diameter-Eyelet-Colors-Clothes-Making/dp/B0CM3R4NWQ/ref=sr_1_17?dib=eyJ2IjoiMSJ9.uutbGviZ3Xg8GlX5As_CaaMToYaSzKqOIPuhhggJLDjg9G79SaGl9sJ1dN4eZZNz6EIfcEJIXNXD-usPMCurDioiJM8Agj9AMnfTTAg9Lqa5CIaF_ea4M1drf53_RabEFkAb-K8t5K0IedsY7vCfd6qjNXV-S7LCElSadUaNr61CCGN_y9heNeX9KRqs1ocARl_aCAl-77SIYJt1h-SWPmv1Oz5VF7EIdfvxafbEickO3YcPttbNEQ5EE4ROWHgE2xTM2B6Fb8azHqTV7Rmf5Nhkf5x7OYnclaEFRYCTFWE.SWjrxCHUlZgjnbPKh1VjBFmdzzvuq69NAF6GubOeCUg&dib_tag=se&keywords=small%2Beyelets&qid=1750424228&sr=8-17&th=1 https://www.amazon.com/GORGECRAFT-Quicklet-Grommets-Backing-Eyelets/dp/B0D2MGBT6T/ref=sr_1_10?dib=eyJ2IjoiMSJ9.uutbGviZ3Xg8GlX5As_CaaMToYaSzKqOIPuhhggJLDjg9G79SaGl9sJ1dN4eZZNz6EIfcEJIXNXD-usPMCurDioiJM8Agj9AMnfTTAg9Lqa5CIaF_ea4M1drf53_RabEFkAb-K8t5K0IedsY7vCfd6qjNXV-S7LCElSadUaNr61CCGN_y9heNeX9KRqs1ocARl_aCAl-77SIYJt1h-SWPmv1Oz5VF7EIdfvxafbEickO3YcPttbNEQ5EE4ROWHgE2xTM2B6Fb8azHqTV7Rmf5Nhkf5x7OYnclaEFRYCTFWE.SWjrxCHUlZgjnbPKh1VjBFmdzzvuq69NAF6GubOeCUg&dib_tag=se&keywords=small%2Beyelets&qid=1750424228&sr=8-10&th=1 https://www.amazon.com/Grommets-Eyelets-Backing-Grommet-Project/dp/B0DC6F3FXS/ref=sr_1_7?dib=eyJ2IjoiMSJ9.uutbGviZ3Xg8GlX5As_CaaMToYaSzKqOIPuhhggJLDjg9G79SaGl9sJ1dN4eZZNz6EIfcEJIXNXD-usPMCurDioiJM8Agj9AMnfTTAg9Lqa5CIaF_ea4M1drf53_RabEFkAb-K8t5K0IedsY7vCfd6qjNXV-S7LCElSadUaNr61CCGN_y9heNeX9KRqs1ocARl_aCAl-77SIYJt1h-SWPmv1Oz5VF7EIdfvxafbEickO3YcPttbNEQ5EE4ROWHgE2xTM2B6Fb8azHqTV7Rmf5Nhkf5x7OYnclaEFRYCTFWE.SWjrxCHUlZgjnbPKh1VjBFmdzzvuq69NAF6GubOeCUg&dib_tag=se&keywords=small+eyelets&qid=1750424228&sr=8-7
-
Gold solder for brass
paul ron replied to Richard Braithwaite's topic in Metal Work, Soldering and Metal Fittings
how about brazing brass using brass rods? for brazing small parts, you dont need a torch. i use a mini butane torch. the brass rod comes in all gages, even wire form. flux is important. here is a nice article how to braze... https://weldingproperty.com/how-to-braze-brass/ -
i love zona razor saws and bought each one, even the one that has a few replaceable blades in the kit... that key hole blade is amazing! tpi depends on what you're cutting.
-
Bulwark Posts
paul ron replied to Jackie's topic in Building, Framing, Planking and plating a ships hull and deck
when you fabricated the posts, why werent they all made the same size or follow the plans more accurately? the dremel may be the best answer to take them down. but after making them all even with the shortest ones, will they then all be too short? how about removing them and redo it correctly? it wouldnt be too hard to take m off if sanding is knocking them off. -
https://www.amazon.com/led-filament/s?k=led+filament you owe me one!


