


BLACK VIKING
-
Posts
476 -
Joined
-
Last visited
Reputation Activity
-

 BLACK VIKING reacted to 72Nova in Vasa By 72Nova - FINISHED - Airfix - PLASTIC
With the deck modifications nearing completion I needed to figure out how to deal with the main halliard fall as this would require to be rigged prior to fitting the deck, this is what I've come with in my mock up, obviously I still need to fab up a rams head for the final but I think it'll work just fine.
Michael D.
-
BLACK VIKING reacted to Cort in Orca by Cort - scale 1:1 - as seen in Jaws - screen accurate recreation of the interior cabin only
And of course, the kidde extinguisher
-
BLACK VIKING reacted to bartley in Stagecoach 1848 by John Bartley - FINISHED - Artesania Latina - 1/10
The Luggage Rack (completed)
This has taken me a while to complete due to several distractions (including my tax!)
So, the cover for the luggage rack (which actually obscures most the good work done earlier)
Forming the cover starts with cutting a piece of black Nappa approximately 155 X 120 mm
Staps are then attached to these with 5 mm nails
Finally some strengthening bars are added
The buckles were made from 0.5 mm brass wire and then a small piece od f Nappa folded over these so that they could be glued to the back of the straps
This final cover was then folded over the frame constructed in the previous step
A few bits and pieces such as the blinds became detached during the construction of the luggage raxk so once they are repaired I can proceed with the roof rack
John
-
BLACK VIKING reacted to 72Nova in Vasa By 72Nova - FINISHED - Airfix - PLASTIC
I'd have to agree with you on that Ian, they are really crisp, and the fitment is really good as well even in the dry fit stage.
I cut open the deck just aft the fore bitts to create the access to the lower deck, and did some modifications to the fore bitts, although barely visible I did create 4 sheaves. The Knighthead will be tough though, trying to cut in 4 sheaves and make it look to scale could be too difficult at this scale, but we shall see!
Michael D.
-
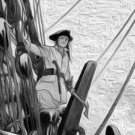
BLACK VIKING reacted to Vegaskip in Ship paintings
Flying operations from a QE class BB at Scapa Flow. Seaplane Carrier Ben my Chree about to secure to a buoy
w/c 16" x 11"
-
-
BLACK VIKING reacted to Old Collingwood in T Rex 36in (90cm) long Skeleton - Finished
Evening all, start of the washes stage - first the Dark one will be followed by a Brown one.
OC.
-
BLACK VIKING reacted to CDW in Bristol F.2B WW1 Fighter by CDW - FINISHED - Eduard - 1:48 Scale
Flying will be less of a chore with a prop.
-
BLACK VIKING reacted to AJohnson in Sea Harrier FRS1 by AJohnson - FINISHED - Airfix - 1:72
Evening all, thought I better post something up as I've been a bit quiet on this one for a while. Not done too much as I've been away, but what I have done has involved a fair bit of glue and multiple applications of filler! - this is not the best fitting kit! 🤔 not to mention a fair few sink marks.
Anyway a couple of pictures of how it looks at the moment, hopefully a nicer looking set to appear later, after a few more session of sanding down, filling, repeat!
-
BLACK VIKING reacted to realworkingsailor in Vickers Wellington Mk 1a/c by Realworkingsailor - FINISHED - Airfix - 1/72
Thanks everyone for the kind comments and "likes"!
More forward progress has been made, and some larger assembly has begun. It's starting to look like something!. I first finished picking out the aluminium frames in the fuselage half, and the interior is now being installed.
Looking at the aft end of the bomb bay, I'm pretty sure the large silver "can" is the airborne seat of ease (to use the local parlance). There's a flare chute that goes on the other half of the fuselage, which leaves only one other real possibility. I can't help but wonder, given its location over the bomb bay, that some crews didn't feel the urge to add a little something special to their deliveries. Something I've never seen spoken of.
Just forward of the bulkhead was a cot/stretcher. Airfix must have chosen to model this in the stowed position, as any contemporary photo's show it laying flat, ready for use. Just above the stretcher is another small piece of PE, a device I am wracking my brains trying to figure out. I have found only one photo online showing that particular object, and it seems to be simply a board with a vinyl/leather bolster draped from it (the black crescent shaped object).
Finally, just aft the bulkhead with the open door, are some oxygen bottles.
Moving along, the first position forward of the bulkhead is the navigator's station. Not much there, just what I am assuming are flight information readouts (heading, altitude, airspeed) above the window, along with a nice plotting table and chair. The seatbelts for this station were very easy to figure out! I am thinking about trying to find an aerial chart online that I could print out and stick on the table.
One more view of the work to date, for good measure. There are a couple more components yet to be added to this side of the fuselage, before shifting my attention to the other side, (a lot more PE on the other side) and getting things closed up.
Andy
-
 BLACK VIKING reacted to CDW in Bristol F.2B WW1 Fighter by CDW - FINISHED - Eduard - 1:48 Scale
This was our little buddy that passed away, Jasper.
-
BLACK VIKING reacted to CDW in Bristol F.2B WW1 Fighter by CDW - FINISHED - Eduard - 1:48 Scale
Rigging between the top and bottom wings is attached. Now to reattach all the parts I broke off while doing the rigging.
I didn’t say anything about it at the time, but one of our little dogs passed away three weeks ago after suffering with diabetes the past seven years. It finally got the best of him, but he lived thirteen good years and was loved by all, particularly our youngest daughter. Today we bought another little buddy to bring home. His name is Topaz. He will be eight weeks old on November 20 when we bring him home. Our daughter is thrilled.
-
BLACK VIKING reacted to CDW in Bristol F.2B WW1 Fighter by CDW - FINISHED - Eduard - 1:48 Scale
I used my vast storehouse of vile language while attaching the top and bottom wings. Fiddly doesn’t begin to describe the nature of it, though I do believe there is a certain benefit from going through the ordeal. Patience and endurance maybe?
-
BLACK VIKING reacted to Rking in HMS Terror by Rking - OcCre - 1:75
Hello everyone!
I thought I'd take the plunge and start a build log for my Terror model.
This is my first model ship project. I've had a bit of experience modelling before, but only ever in plastic kits here and there over the years, and so far it's been great.....if slightly frustrating at times! (no doubt you can all relate)
Unfortunately I've had to start this log part way through the build as I only recently discovered this site - in hindsight I wish I'd taken far more photos than I have!
Quite early on I found myself scratching my head with a lot of questions and, after a bit of scrambling in the dark, came across this site which has so far been invaluable. Looking through some of the build logs on here its amazing what you can learn, be it from a novice or a more experienced builder.
Although I am quite familiar with the story of the Franklin expedition and the two ships involved, building this model has given a really unique sense of perspective and a totally new angle with which to approach the story from which has been great!
Hopefully you enjoy having a look at my efforts so far. I'd say the model is definitely an 'homage' to the true design of the ship, I've taken a few liberties here and there, some for purely aesthetic preferences (I can hear some of you screaming out in horror haha) and others to cover little sins and mishaps along the way.
Even so if there's anything you can see which you think I could do better in future then please say! I'll certainly be having a lot of questions for people along the way! haha
.........and apologies for the naff photo's, if its one thing I'm most definitely not it's a photographer!
Cheers!
-
BLACK VIKING reacted to DocRob in F4U-1A Corsair by DocRob - FINISHED - Tamiya - 1/32
With the Covid and it's side effects more or less gone, it's time to get back on track and do some sports. Boy was I missing that. I'm still a bit weak, but today I thrashed my powerless bones into the Atlantic and had a good swim. A bit uncomforting were the Barracudas in huge quantity and different sizes. I don't mind the small ones, but don't like the cold stare of the larger ones.
Back to the Corsair. There will not be too many updates until something interesting happens. I have to admit, building and painting of the inner and outer sections of the wings bore me a bit. I have to take care to not make mistakes, where there are so many options considering flaps up or down, wings folded or not,...
@Egilman luckily pointed out, that the wings of a Corsair only fold simultaneously, so gone was the one wing up option. The wings will not be folded, as my plane is land based.
I finished all the assemblies for the wheel wells and inner wing parts, after painting tons of parts.
...and glued the wing roots and fuselage bottom to the rest of the fuselage. I think only Tamiya can produce so many strangely shaped parts to fit and lock into place with a tiny little snap.
On my last Tamiya build, I used Microscale's Micro Mask for the exhausts and it took hours to peel that off, horrible stuff. This time, I inserted a small piece of Kabuki tape to the inside of the fuselage to cover the exhaust opening. This can be pulled off with tweezers after painting.
The wheel wells itself are very beautiful rendered oob.
Cheers Rob
@Egilman
-
BLACK VIKING reacted to dziadek4444 in Soleil Royal by dziadek4444 - FINISHED - DeAgostini (Poland) - 1:70
Koniec !!!
Ponad trzy lata budowałem prawie równocześnie dwie wersje tego samego modelu Soleil Royal (DeAgostini - Poland).
Różnią się głównie kolorystyką. Dodatkowo wersja "czarna" została wzbogacona o sztaksle międzymasztowe. Obydwa modele prezentują się bardzo ładnie i praktycznie dodatkowe żagle sprawiają, że ogląda się je jak dwa inne żaglowce.
-
 BLACK VIKING got a reaction from flying_dutchman2 in The Flying Dutchman by BLACK VIKING - first scratch build
Sorry for the late response as I've had one heck of a year as I lost my mum last year and we have moved back to Kent to be near No1 son .
I have attached some pictures for you to look at to show what I have been up to.
Thanks again for the comments and likes .
Martyn
-
-
BLACK VIKING reacted to Vegaskip in Ship paintings
Ship Grace Harwar and Steamer Miltiades
w/c 16" X 11"
-
BLACK VIKING reacted to gjdale in The Shipyard at Foss' Landing (Diorama) by gjdale (Grant) - FINISHED - SierraWest - Scale 1:87 (HO)
Thank you so much EG, Glen, Mark and OC - you are too kind. Thanks also to all of the likes as well.
Wall Construction – Wall Details (Right Wall)
Details for the Right Wall commence with the large awning for the Loading Dock. A laser cut card piece forms the substrate, which is painted on the underside and has tarpaper applied to the topside. The preparation for this is the same as previously described. There are four support struts, again in laser cut card, which are also painted and the two outer supports also have siding and trim applied. I got a bit carried away with the process and forgot to take many in-progress pictures. Here is the back of the almost completed awning.
And a shot to show the siding and trim applied to the end pieces.
The top of the awning then has the streaking effect applied as previously described.
The awning is then attached to the wall using the cleverly designed location markers. An elbow vent is also provided as a metal casting. This was prepared and blackened as previously described and glued in place with some epoxy coloured with a little black paint. The paint/glue is dulled with a little grey chalk and some dull cote once the glue is dry to take off some of the shine. Here is the completed (for now) wall.
The next step will be to join the walls together and add the roof, before adding the two remaining dormers that were prepared earlier.
-
BLACK VIKING reacted to Egilman in T Rex 36in (90cm) long Skeleton - Finished
No biggie brother... the admiral wanted to see it assembled so I threw it together... No glue, I'll get back to it when time allows and do a better job of it...
So she is sitting on top of the cabinet looking all intimidating... {chuckle} and yes it is large....
Yours is looking very nice brother and the velociraptor will be a nice comparison piece...
EG
-
BLACK VIKING reacted to Old Collingwood in T Rex 36in (90cm) long Skeleton - Finished
Evening all, I got some good progress done today - firstly I turned the skeleton over with the base, then I found some small screws, I then drilled some pilot holes up through the inverted toe impressions - and screwed underneath into his toes, this secured him down nicely as he is quite heavy.
So here are some pics of him assembled (minus needing the head and tail end gluing they are just push fitted for now).
OC.
-
BLACK VIKING reacted to md1400cs in The Flying Dutchman by BLACK VIKING - first scratch build
Martyn,
Sorry to read re: your mom. Sadly we all go through that (;-(((.
I've always admired the work that you've done with this project. Stay well.
Regards,
-
 BLACK VIKING got a reaction from Yann Kermeur in The Flying Dutchman by BLACK VIKING - first scratch build
Sorry for the late response as I've had one heck of a year as I lost my mum last year and we have moved back to Kent to be near No1 son .
I have attached some pictures for you to look at to show what I have been up to.
Thanks again for the comments and likes .
Martyn
-
BLACK VIKING got a reaction from flying_dutchman2 in The Flying Dutchman by BLACK VIKING - first scratch build
Hi all sorry I haven't posted for a while but life has certainly got in the way. But anyway back to the build.
The guns have been fitted on the gundeck and the sides.
I have made some lanterns and some weird sticky up things on the stern and fitted some wooden teeth things on the beakhead.
Next job making the main mast .
Stay safe all.
Martyn