


mitchel
-
Posts
49 -
Joined
-
Last visited
Content Type
Profiles
Forums
Gallery
Events
Posts posted by mitchel
-
-
10 hours ago, allanyed said:
Not a tutorial, but Doris' build log of the Royal Katherine here at MSW may be of help to you.
https://modelshipworld.com/topic/15981-hms-royal-katherine-1664-by-doris-155-card/#comment-497721
Thanks for the link Alan.
-
2 hours ago, allanyed said:
See you again in 2025 Mitchel 😁 Just kidding, I really do hope you find the time to get into the build and share photos with us. STAY OUT OF THE SHOPS, (unless they have tools and models and fun stuff. 🤪)
Cheers
Allan
Hi Alan. Yeah, I'll take that on the chin. I just need to find tutorials about how to actually work with paper and cardboard so as to give me a chance to do a decent job of it. Things like how to iron out humps and fill in hollows.
-
So, at long, long, long, last.....life has given me the time to pick up the model. I have come to the realisation that interruptions hamper my efforts big time. My daughter has a baby....grandparent duties come first. I am in my shed...the missus wants to go to the shops. I, therefore, go to the shops and don't return to my shed. I pick up the model and bend the cardboard out of shape.....I look on the internet for a solution...and end up watching a movie. I go over the plans with a beer...and realise what a task I have ahead of me...so I have the beer instead.
No excuses here.....just telling it like it is.
But after so many false starts I am ON IT!
Making a period ship model has been a wish I have had all my life. I made ALL the Airfix/ Revell ones. I vividly recall doing the WASA and SOTS and wondering why there was a crowsnest on the bowsprit.
I have the monograph from Ancre of Le Gros Ventre. A wood model that I hope to build one day.
I guess what I am trying to say here is that I have had many a false dawn with this model, but I believe I am finally ready to give it another go.
- GrandpaPhil and mtaylor
-
 2
2
-
I saw a video on YT where a guy used wood veneer to overlay onto the paper on the ships hull. He felt that the cardboard in the kit was 'too perfect' to give a realistic effect. I was thinking of doing the same. Has anyone used veneer rolls? The type that you iron on? Can it be sanded down? Glued with PVA/Superglue?
-
Hello everyone. A lot has happened over the years. I was made redundant (4 times) and I put the build away in the wardrobe where it has stayed since. I have 2 more grandkids now and I will retire New Year 2024. I now have a shed where I can work instead of the dining table. The ship is still exactly as I posted. So sorry for letting you all down over the time but I will make amends.
- mtaylor and GrandpaPhil
-
2
-
Have I hell. Gotta be honest though, I haven't pushed myself to get back to it either. Thant's gonna change.
-
Absolutely stunning work. Completely gobsmacked.
- aviaamator, BETAQDAVE, EJ_L and 1 other
-
4
-
Hello everyone
My, doesn't time fly!
My grandson is 2 now and my daughter is moving out soon. Things should get back to normal in a few weeks. Over the months I have tried working on the kitchen worktops and in the bedroom but for me it just doesn't work. I even put the ship back on the table, but the little fella is always inquisitive and I end up putting the ship away again.
With a bit of luck I should be back soon.
-
-
-
Dafi, thanks for this truly inspirational build. Love what you are doing with the figures..each telling a story.
You are MSG's own Olivier Bello ..............http://www.arsenal-modelist.com/index.php?page=shipimg&ship=boullongne∂=cℑ=c1
-
-
Hi Guys
Clare...so sorry for not replying to you. I got my kit from the Polish site Shipyard. The frames were all pre-cut. Each frame piece is laser cut and has small tabs that when cut frees the frame from the cardboard.
John...thank you for the information.
On a general note, I haven't given up on my ship, but my working table became a nursery for my daughters new baby boy. He is 1 now. My how time flies! My table used to have new born baby stuff piled on it, now it has 1 year old baby stuff on it instead.
-
Hi Clare
I began my build after the new year last January. I soon found out that some of the cardboard formers were very fragile.
You can see my poor efforts in my signature.
I put the ship away because my daughter gave me a new grandson and my working table became a nursery. But things have steadied down now and I am getting the 'itch' again.
Nice to see your build coming along. Looking good.
-
Have you tried Alibaba?
Be sure to tick the boxes Gold Supplier and Onsite Check. You can also state the minimum quantities you need. Unfortunately it doesn't give you a price guide.
-
Mitchel - this thread is about finishes not shows.
Sorry I asked. I will be sure to post in the right thread next time.
-
I assume you are referring to Mr Shevelev,the ageing on his 74 looks the business.Incidentally his 74 took a silver at Haydock Park IMBS in the UK this summer(second only to another Russian entry)
Kind Regards
Nigel
I live near Haydock and I forgot about this show. Such a pity. I know you posted the date earlier in the year here.
Do you know of any pictures that were taken?
-
-
Guy, thank you for the link.
Ed, a thorough explanation well explained. Interestingly enough I typed in 'liver of sulfer' in youtube and in the video a lady uses it in gel form. She says it stays stable longer. The video is quite educational.
-
Hi guys
I posted this question earlier but it didn't show up on the forum, so if this post is posted twice please accept my apologies..
Anyway, here's my post...
This is a beginners question but one that has always intrigued me. How do you blacken copper when the parts are already on the model?
Ed you showed us the copper bolts going through the frames and then said you used liver of sulphate to blacken them. I have seen this blackening done on lots of other items too like the strapping around blocks. How come the wood doesn't discolour?
This is probably a daft question but I just had to ask.
I looked at youtube but didn't see a video on it.
-
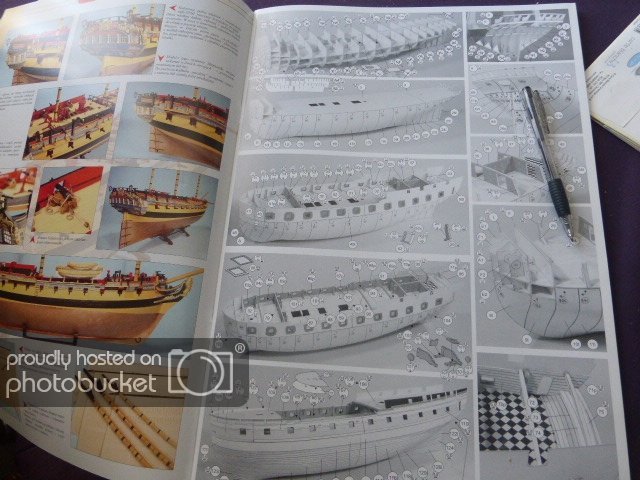
Here is a look of the inside of the instructions book. The book is a mixture of building instructions and the actual cardboard for the build. I am also crossing out the letters/numbers of the pieces I have used as I go along so that I don't miss anything. If the letter isn't crossed out then I assume that I haven't used it.

- consitution, GrandpaPhil, druxey and 3 others
-
6
-
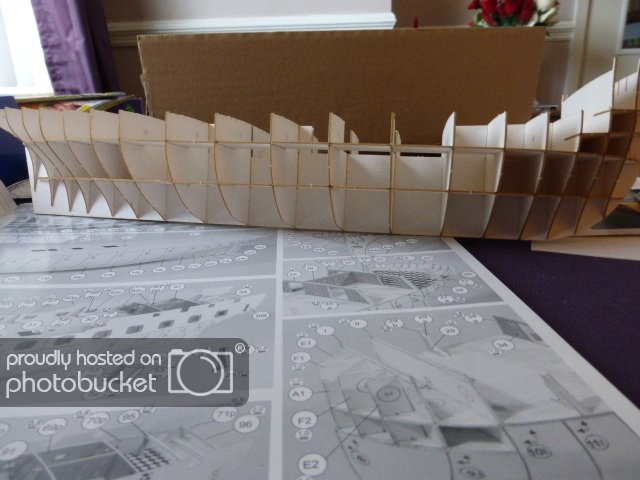
I thought the bulkead formers were a bit weak so I added pieces of paper to the bulkhead/horizontal formers. Not the neatest job I have ever done...
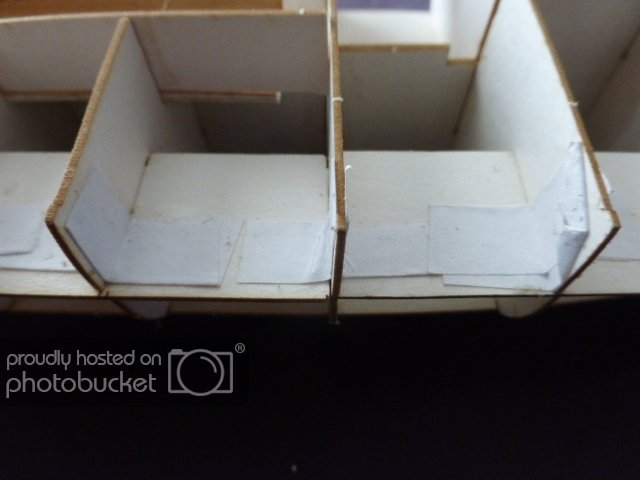
The transom formers are incredibly weak and just touching them breaks them easily..I will need to make a scratch version of the one I snapped and build the hull at the stern first to minimize any more breaks. The rest of the hull is quite sturdy..

- coxswain, clloyd and GrandpaPhil
-
3
-
Hi again.
I have opened a build log so you can follow me there.
-
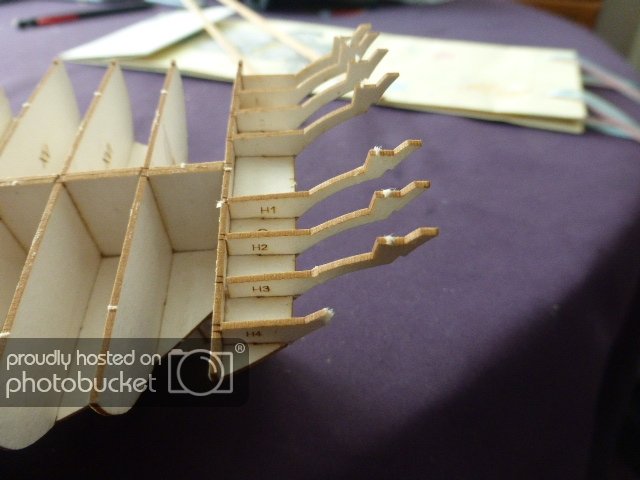
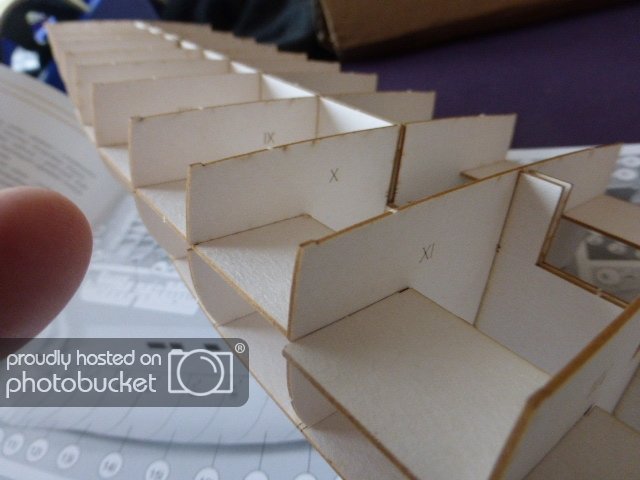
Here are a few more photos. I am only dry fitting before I use any glue. You can see the numbering of the bulkheads here..
I turned the model upside down to help make a snug fit of horizontal formers and damaged the upper tips of the fo'csle..
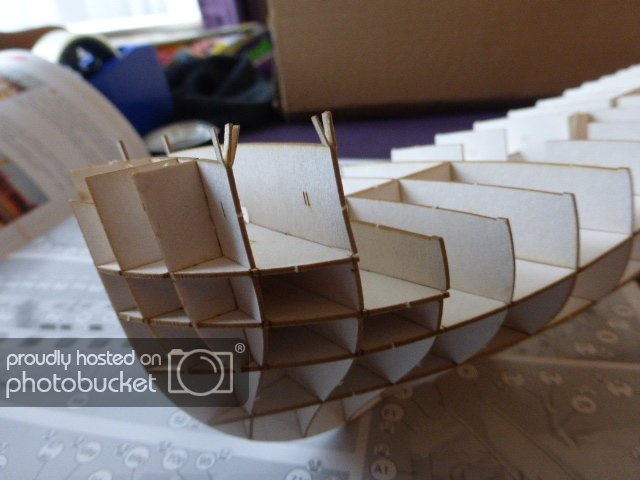
The bulkhead formers make a snug fit but I need to re-inforce the hull I think. Any suggestions? I am thinking of glueing vertical strips either side of the bulkeads and giving the whole structure a 'wash' with watered down glue.
And finally, a photo of the whole ship so far..
- GrandpaPhil, druxey and coxswain
-
3
 So cool!!


HMS Enterprize 1774 by mitchel - Shipyard - 1:96 - CARD - 28 Gun Frigate
in - Kit build logs for subjects built from 1751 - 1800
Posted · Edited by mitchel
revision
I see what you mean. You get a thin paper layer to place on the frames and then a thicker paper layer to go over that. I don't like the way the deck looks. It looks too perfect and the planks are not realistic in my view. The treenails? on the planking are round circles and don't look right. I have some thin wood strips of veneer and I also have a roll of beech-looking paper. I'm thinking of laying this over the 'perfect' decking.