

puckotred
-
Posts
430 -
Joined
-
Last visited
Reputation Activity
-

 puckotred got a reaction from Duanelaker in Hobby CNC
Hi folks
Bought me a 3018 cnc/laser kit some weeks ago. just to have something to play around with...
Then I vacuumed up the masts feet of my Royal Caroline, and made new ones with the laser module.
Then this morning I discovered that you had to make the anchor bits (and some other stuff) from some plywood squares...
So I did the Toolpaths in Fushion 360 and tried the cnc:
Only problem was that I had the feed rate too high so the first 1mm bit broke but lowering the feedrate 50% fixed that...
the machine:
Old MacBook Air to operate it:
It's now my favorite toy.
-
 puckotred got a reaction from thibaultron in Hobby CNC
Hi folks
Bought me a 3018 cnc/laser kit some weeks ago. just to have something to play around with...
Then I vacuumed up the masts feet of my Royal Caroline, and made new ones with the laser module.
Then this morning I discovered that you had to make the anchor bits (and some other stuff) from some plywood squares...
So I did the Toolpaths in Fushion 360 and tried the cnc:
Only problem was that I had the feed rate too high so the first 1mm bit broke but lowering the feedrate 50% fixed that...
the machine:
Old MacBook Air to operate it:
It's now my favorite toy.
-
 puckotred got a reaction from Canute in Hobby CNC
Hi folks
Bought me a 3018 cnc/laser kit some weeks ago. just to have something to play around with...
Then I vacuumed up the masts feet of my Royal Caroline, and made new ones with the laser module.
Then this morning I discovered that you had to make the anchor bits (and some other stuff) from some plywood squares...
So I did the Toolpaths in Fushion 360 and tried the cnc:
Only problem was that I had the feed rate too high so the first 1mm bit broke but lowering the feedrate 50% fixed that...
the machine:
Old MacBook Air to operate it:
It's now my favorite toy.
-
 puckotred got a reaction from Moab in Hobby CNC
Hi folks
Bought me a 3018 cnc/laser kit some weeks ago. just to have something to play around with...
Then I vacuumed up the masts feet of my Royal Caroline, and made new ones with the laser module.
Then this morning I discovered that you had to make the anchor bits (and some other stuff) from some plywood squares...
So I did the Toolpaths in Fushion 360 and tried the cnc:
Only problem was that I had the feed rate too high so the first 1mm bit broke but lowering the feedrate 50% fixed that...
the machine:
Old MacBook Air to operate it:
It's now my favorite toy.
-
 puckotred got a reaction from mtaylor in Hobby CNC
Hi folks
Bought me a 3018 cnc/laser kit some weeks ago. just to have something to play around with...
Then I vacuumed up the masts feet of my Royal Caroline, and made new ones with the laser module.
Then this morning I discovered that you had to make the anchor bits (and some other stuff) from some plywood squares...
So I did the Toolpaths in Fushion 360 and tried the cnc:
Only problem was that I had the feed rate too high so the first 1mm bit broke but lowering the feedrate 50% fixed that...
the machine:
Old MacBook Air to operate it:
It's now my favorite toy.
-
 puckotred got a reaction from Ryland Craze in Hobby CNC
Hi folks
Bought me a 3018 cnc/laser kit some weeks ago. just to have something to play around with...
Then I vacuumed up the masts feet of my Royal Caroline, and made new ones with the laser module.
Then this morning I discovered that you had to make the anchor bits (and some other stuff) from some plywood squares...
So I did the Toolpaths in Fushion 360 and tried the cnc:
Only problem was that I had the feed rate too high so the first 1mm bit broke but lowering the feedrate 50% fixed that...
the machine:
Old MacBook Air to operate it:
It's now my favorite toy.
-
 puckotred got a reaction from Gregory in Hobby CNC
Hi folks
Bought me a 3018 cnc/laser kit some weeks ago. just to have something to play around with...
Then I vacuumed up the masts feet of my Royal Caroline, and made new ones with the laser module.
Then this morning I discovered that you had to make the anchor bits (and some other stuff) from some plywood squares...
So I did the Toolpaths in Fushion 360 and tried the cnc:
Only problem was that I had the feed rate too high so the first 1mm bit broke but lowering the feedrate 50% fixed that...
the machine:
Old MacBook Air to operate it:
It's now my favorite toy.
-
 puckotred got a reaction from JeffT in Hobby CNC
Hi folks
Bought me a 3018 cnc/laser kit some weeks ago. just to have something to play around with...
Then I vacuumed up the masts feet of my Royal Caroline, and made new ones with the laser module.
Then this morning I discovered that you had to make the anchor bits (and some other stuff) from some plywood squares...
So I did the Toolpaths in Fushion 360 and tried the cnc:
Only problem was that I had the feed rate too high so the first 1mm bit broke but lowering the feedrate 50% fixed that...
the machine:
Old MacBook Air to operate it:
It's now my favorite toy.
-
 puckotred reacted to SIDEWAYS SAM in Nuestra Senora Del Pilar by Sideways Sam - OcCre - 1:45
Thanks for visiting.
Quarter gallery floors parts 93, 94 and 95 fitted.
Precut parts provided not even close but at least the plywood didn't split.
Will fit the windows and blend into the stern piece before deciding on the
upper floor treatment.
Regards,
Sam.
Sam
-
puckotred reacted to Salty Dog in Royal Caroline by Salty Dog - Panart - 1:47
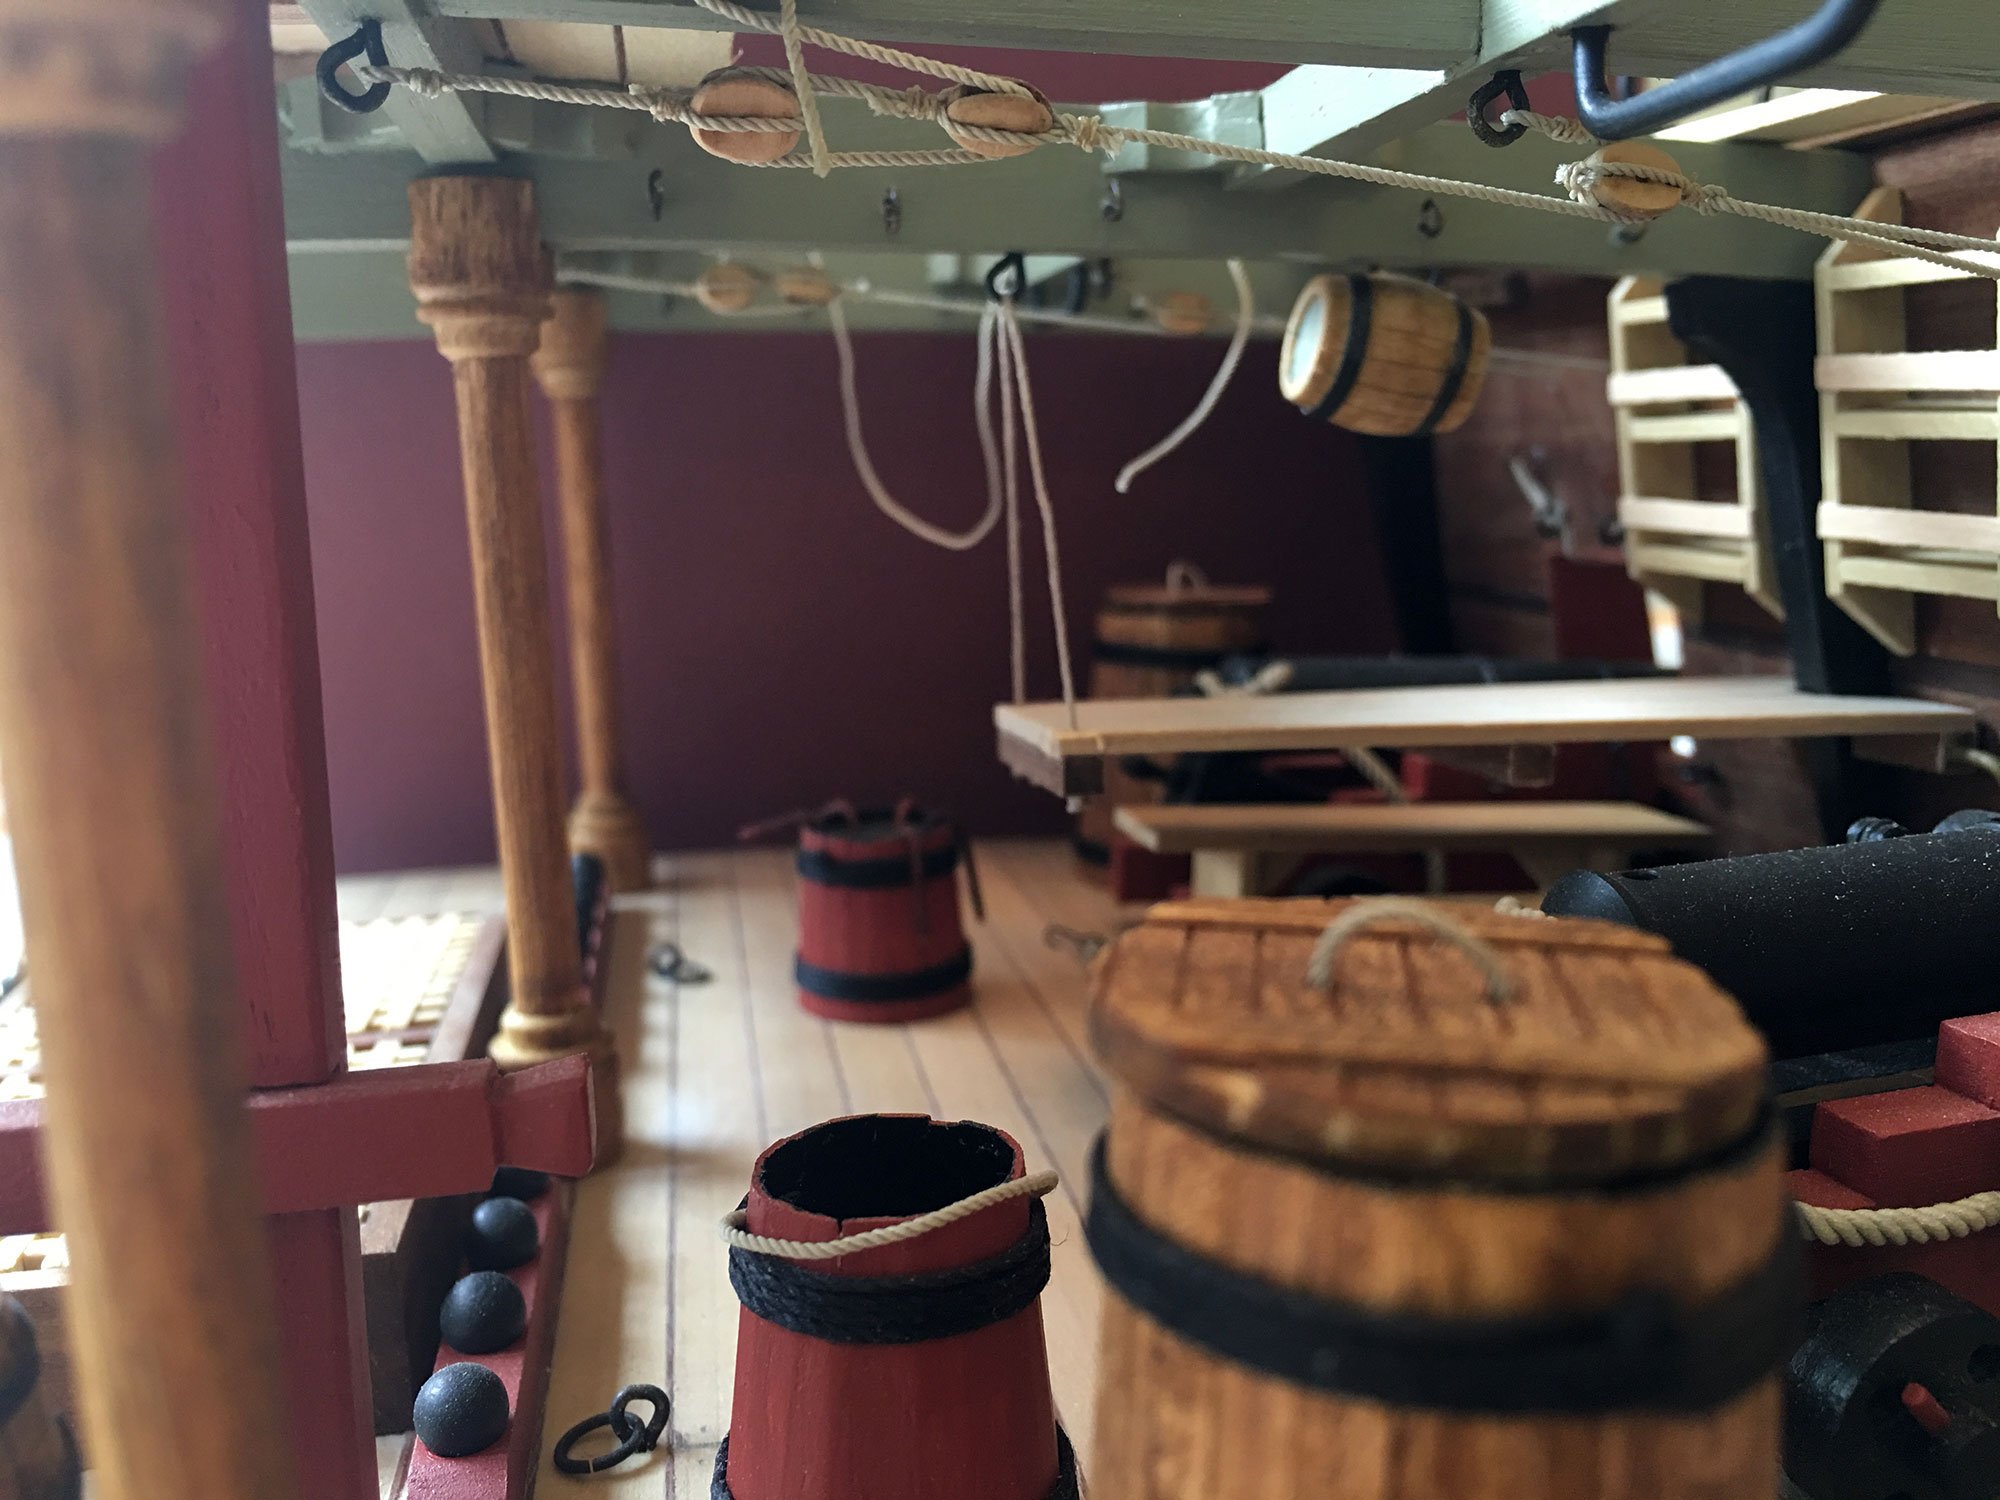
Quick update:
I worked on the grates and installed them:
I also worked on the stove pipe. I didn't want to make one that looked like the real thing because frankly, I think it's ugly.
I also added detail to the doors near the spiral stairs. Made the small window with card and used the same Mylar I used on the gallery for the glass.
I did all the fife rails:
And I did the boat cradle:
That's it for now. Getting close to the masts and rigging. Just in time since I ordered a ropewalk which I am dying to try.
Bye for now.
-
puckotred reacted to Salty Dog in Royal Caroline by Salty Dog - Panart - 1:47
Hello again,
Just a quick update. I added the mast feet and the rings around them. I placed all the bits and started preparing the canon installation. I added some of the ropes, as well as some of the tackle against the bulwarks. I also decided to order some of those photo etched hooks for the canons. Turns out the kit doesn't even include instructions to properly installing them and only want you to glue the canons on the deck. I made all the hooks and rings by hand. Can't do anything anymore with the canons until I get those hooks.
Thanks for visiting!
-
puckotred reacted to Salty Dog in Royal Caroline by Salty Dog - Panart - 1:47
Hi everyone,
I posted a few pictures and started a poll a few weeks ago regarding getting back into building. I have several kits in different stages and was just bouncing around without getting anything finished. I decided to go with the Royal Caroline because it had significant work done and because I love that ship.
I have been encouraged to start a build log by a couple of people so here it is. I was hesitant to make a log because when I started taking pictures, it was already in progress as you will see with the first pictures. I will add more pics as I progress.
The best part of all, is that I am back building and it feels good. Hopefully I will stick with it and complete this beautiful kit.
Thanks to those that are interested.
The first 4 pictures are from the current state when I picked it back up. I hadn't even installed the wales and nothing had been added to the deck. None of the bow brass work had been installed. I did mess around with installing drapes, and though it's very hard to see, I tried adding some "stained glass" to some of the windows.
I have always used the wood strips that come with kits to do the deck planking. This time I bought some Midwest architectural grade basswood and it worked out very well. It's precisely cut and after adding some oil, it really came alive and made the "caulking" very nice and visible and most of all nice and even. Caulking done with a pencil.
Here I started adding stuff to the deck, such as the capstan and the winding staircases.
And then I added the channels and deadeyes as well as the small steps on the side of the hull. The scupper holes too.
Here is where I added all of the brass work to the bow. This was no fun at all. Those brass "rails" had to be bent to shape from some very hard brass. I had to modify a pair of needle nose pliers in order to keep a firm grip on the brass. I hated the process.
And finally the gallery. This was also a real pain due to the brass parts. For the windows, I decided to go with mylar. I had never used it but I didn't want to cut out the areas behind the windows just to look at a dark empty hole through some acetate. My daughter didn't like the mylar at all, but my wife loved it. I like it too. I also placed the lanterns, but only for this pic. I will remove them temporarily so they don't get damaged during all the handling. I'll be posting more pics as I progress.
-
puckotred reacted to Barbossa in French Frigate by Barbossa - 1/64 - POB based on La Vénus (ANCRE) - semi-scratch
forgot about the last one
-
puckotred reacted to Barbossa in French Frigate by Barbossa - 1/64 - POB based on La Vénus (ANCRE) - semi-scratch
continuation
-
puckotred reacted to Barbossa in French Frigate by Barbossa - 1/64 - POB based on La Vénus (ANCRE) - semi-scratch
About time for an update, progress is slower compared to kit building ( those were the days...)
First of all I'd sincerely wish to thank all members who replied to my topic "3D drawings 18pdr at 1/64 scale", posted last Februari 11. Among those generous offers, one in particular caught my attention as it exempted me from the necessary drawingwork as well as the production of the guns itself. The final acquisition was the result of old fashion interchange. I can assure, guns are state of the art.
Aside from modelingmatters I find it very pleasing to chat with a fellow- MSW-member regarding other subjects and life in general. We agreed about the life-necessity of chocolate . For the interested in 3D expertise: please contact "puckotred".
Regarding the painting :
- overall : AV RAL 7021, Black Grey 70.862.
- edges and reinforcement rings were covered with AV 70.863 Gun Metal.
Although the pics may not show, the effect is very pleasing to the eye.
A modest attempt to scratchbuild the ship's stove is also included in this post ( + continuation )
-
puckotred reacted to SIDEWAYS SAM in Nuestra Senora Del Pilar by Sideways Sam - OcCre - 1:45
Capping rails fixed. Occre supplied several lengths of 2 x 12 mm sapele for these.
Probably the only pieces in this kit that were straight and true when they needed to be
slightly curved on plan. In the end I replaced the waist rails with 2mm thick flat sheet
I had in stock so lots of the sapele left. Won't waste it, quality material.
Looked at the photo's and instruction book twice. Stared at the wall for inspiration
and then went on Mark Tiedens log to se how he did it.
Gave it a try and it actually worked. This build is travelling further and further from
the real thing. Not authentic but as close as I can get.
Looking ahead the next problems will probably be the pinrails and belaying pins.
Time to finish the hull planking.
Regards,
Sam.
-
-
puckotred reacted to SIDEWAYS SAM in Nuestra Senora Del Pilar by Sideways Sam - OcCre - 1:45
Upper poop deck fitted.
Stem bulkhead planked and doors fitted, lead foil as roofing to roundhouses.
Catheads for photo only. Will be attached later.
Regards,
Sam.
-
puckotred reacted to MESSIS in Royal Caroline by Messis - FINISHED - Panart - 1/48
Lifeboat... mmm I did enjoyed it.
-
puckotred reacted to SIDEWAYS SAM in Nuestra Senora Del Pilar by Sideways Sam - OcCre - 1:45
First hull planking fixed, filled, whitewashed and marked up ready for second planking.
This is a big fat boat and planking took for ever.
Waterline marked but feels too high. Needs dropping 12mm.
Will have to do more research before I settle on this location.
The supplied plans are no use at all, the side elevations differ significantly.
Bulkheads 9 and 11 were too low over middle third.
Didn't spot this until after planking. This was both sides and took a fair bit of filling.
Sam.
-
puckotred reacted to SIDEWAYS SAM in Nuestra Senora Del Pilar by Sideways Sam - OcCre - 1:45
Hi and, thanks for the likes.
After a careful examination of Mark Tiedens build log I have been trying to sort out the stern.
The parts provided in my kit don't match the instruction book and the plans (lol) are no help at all.
In addition the stern side cheeks mark 29 are approx 4mm too long and protrude below
the stern piece. They lock into place so can't really be fixed incorrectly. I have corrected these.
I have decided on the following approach ---
The stern piece is attached and is not moving.
The second planking will be extended to meet the stern piece at the higher verandah and a door
for access into the high level cabins provided in the sides.
I may have to scratch build the side windows. Will visit this after second planking is fixed.
Next - the top moulding piece mark 70 goes down both sides of the hull and across the bowsprit deck
above the two access doors. Instructions say "use a small triangular file to form a groove down the centre
of 2 x 5mm sapele strips. Then sand to form the B shaped moulding. Not happening.
Will fabricate using 2x5 strip with 1x1 strips both sides. Artisania Latina make a set of micro planes
which would be ideal for profiling mouldings but don't offer them for sale in Great Britain.
Last problem -- The top moulding across the bowsprit deck clashes with the two door openings in the bulkhead.
After a close examination of the instructions it appears that the doorways have been cut 5 to 6mm too high.
This one is easy to correct.
Obviously the photo's were taken during building of the prototype and the laser cut sheets produced afterwards.
This has been a challenging build from day 1 and I have to say I am enjoying every minute of it.
It is not just a case of - nail part A to part 58 and stick it in a display case.
Neither is it a kit for the absolute beginner. It is building into a sturdy good looking model.
Will admit I am spending as much time staring at it and thinking about the next stage as I am building it.
This is a very absorbing kit and a cheap hobby.
Regards,
Sam.
-
puckotred reacted to Bedford in Royal Caroline by Bedford - Panart - 1/48
Thanks Mark, she was built in 1749 for King George II.
That puts her 15 years ahead of Endeavour and while the replica Endeavour is clearly not the original it is regarded as one of the most accurate replicas around so I'm using my knowledge of her to guide my thinking on this build, same country, same era, same navy and basically the same size so there are bound to be many similarities and that thinking has helped me understand and in many cases change what the drawings and instructions say to do
-
puckotred reacted to Bedford in Royal Caroline by Bedford - Panart - 1/48
A little bit more progress
-
puckotred reacted to MESSIS in Royal Caroline by Messis - FINISHED - Panart - 1/48
Improoving cannon rigging scale
-
puckotred reacted to MESSIS in Royal Caroline by Messis - FINISHED - Panart - 1/48
Tiller and ruder inplace