HOLIDAY DONATION DRIVE - SUPPORT MSW - DO YOUR PART TO KEEP THIS GREAT FORUM GOING! (89 donations so far out of 49,000 members - C'mon guys!)
×


Bedford
-
Posts
1,297 -
Joined
-
Last visited
Content Type
Profiles
Forums
Gallery
Events
Everything posted by Bedford
-
 No progress pics but I am having to do something I have never had to do before. The planks are 900mm long and I am having to join them to reach from stem to stern. That's not a bad thing as it turns out because it is getting warm here and the hull is so long that by the time I have applied glue to all the ribs and the edge of the plank then attach the plank clamping all the way by the time I get a bit over half way along the glue is skinning over.
 -
Jerry I have been reading your build logs today and there are some good ideas there, too late for me to go down that path now though so I will continue and see how it goes. Yambo I have been wondering about the need for glass, the hull will be pretty strong, The planks are 1.5 mm thick and there is a ton of strength in the keel so I might just go with a good coat of resin or two. I am not looing forward to working with glass, it is a bugger. When you talk about "thickened" is that the way you buy it or is there an additive.
-
What do you seal them with? Augie, 5 min epoxy would not give me long enough to apply it all the way along the edge of a 1 metre plank and to all the frames and fit the plank, making sure it is properly seated and clamped all the way along. I am planning to fibregalss the exterior and epoxy coat the interior pending better ideas. Steve
-
mmm don't handle ca either from memory.............. I have thought of using ca along the plank joints rather than running a bead of glue along them and clamping them together. I would glue the planks to the frame with the normal stuff then just run a line of ca along the join but I don't trust ca for such a big project that will be put to sea as it were.
-
See, I knew I wouldn't need to post pics..... I just wish there was a glue that would stay wet for 20 minutes then when pressed between two surfaces would dry in 5 seconds. The waiting for glue to dry so clamps can be removed before attaching the next piece is a real drag.
-
Thanks, I have seen that one before, ages ago. He cheats and turns the whole mast but she looks good under sail. I am pleased you posted it because I had forgotten about it and the keel and rudder size are helpful. It also appears that he has a false deck which is interesting. Anyway a little bit of progress, the first plank is on, there won't be a lot of pics of the planking because, well, we've all been there done that.
-
Just a little tangential thinking but she actually looks quite good as is and were I the type to display bare boned models it would actually look quite good. You can see all the lines etc and the masts finish her off well. Don't worry though, I don't do bare boned models.
-
I was thinking of making an extended keel out of mild steel that would just attach under the keel and run its length but on reading other builds I decided to go with a detachable sailing keel and have been giving a lot of thought as to how to mount it before planking. Still not sure how I want to make the keel but I have worked out how I can mount any keel I make so planking will commence soon. The keel will be deep to get the ballast well below the hull and as has been said I can fiddle with it until it is right. I do wish she had a deeper draft because that would mean more ballast but I think I can overcome that if needed by adding a false polystyrene bottom with the keel thus giving her a deeper sailing draft but only if it becomes necessary. Always thinking ahead, the joy of scratch building something you know very little about. That's why I do it though, to think and learn.
-
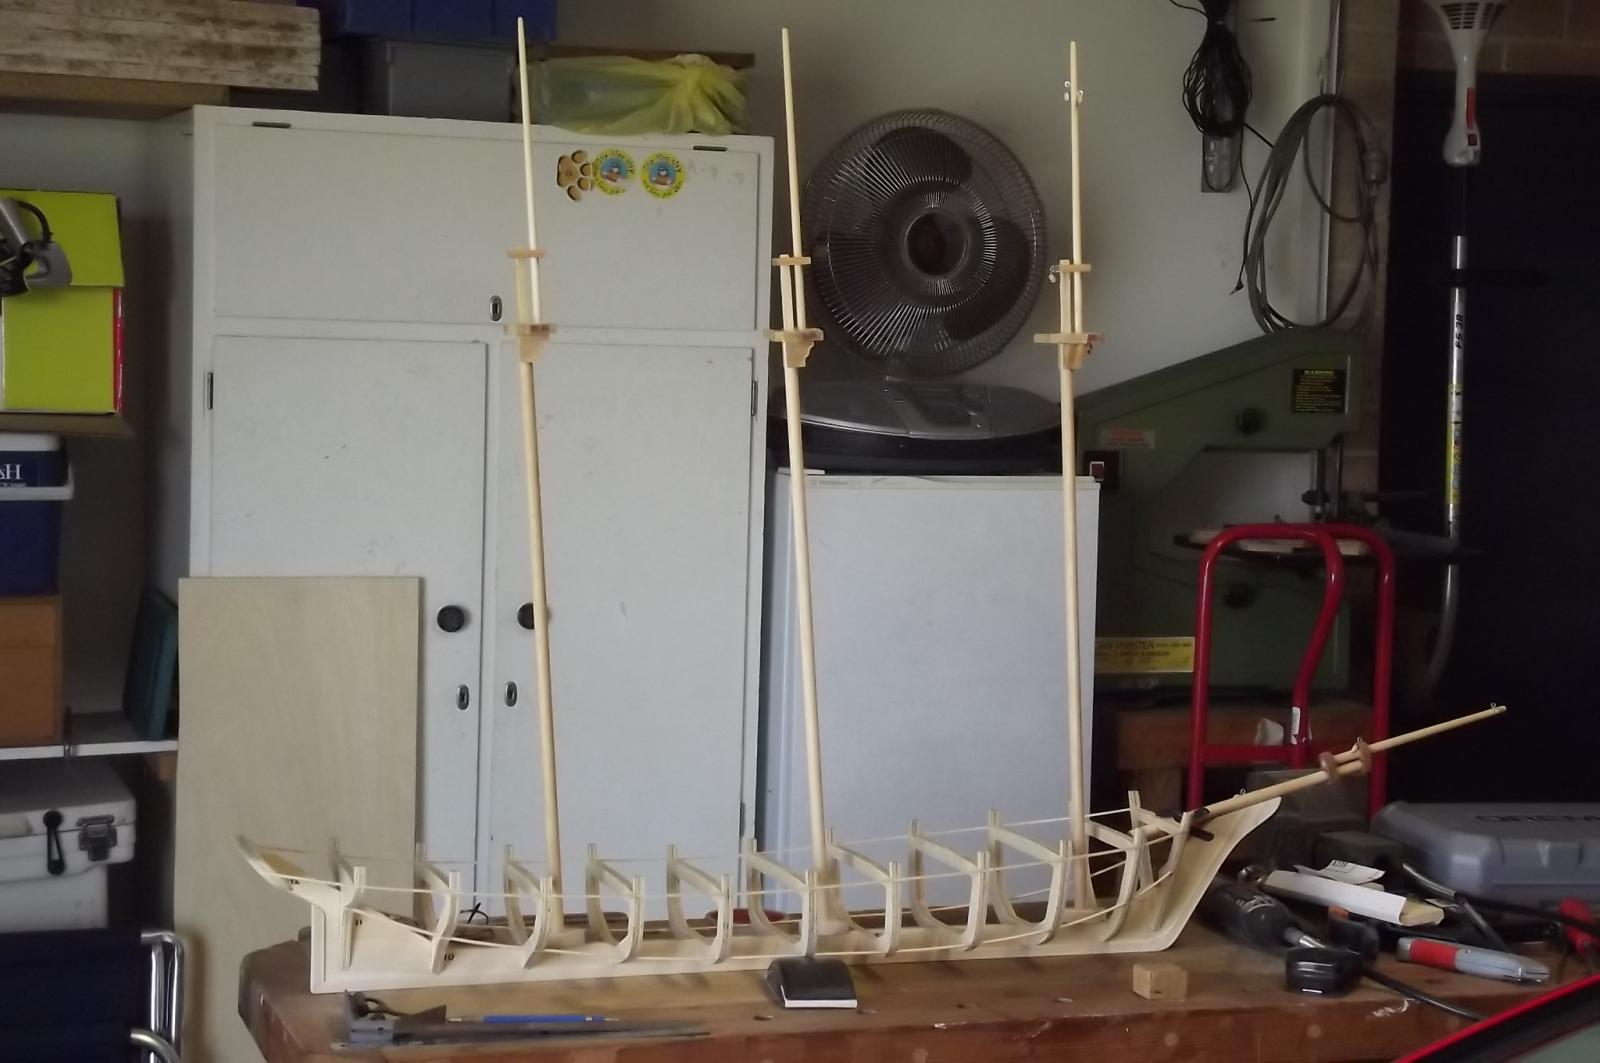
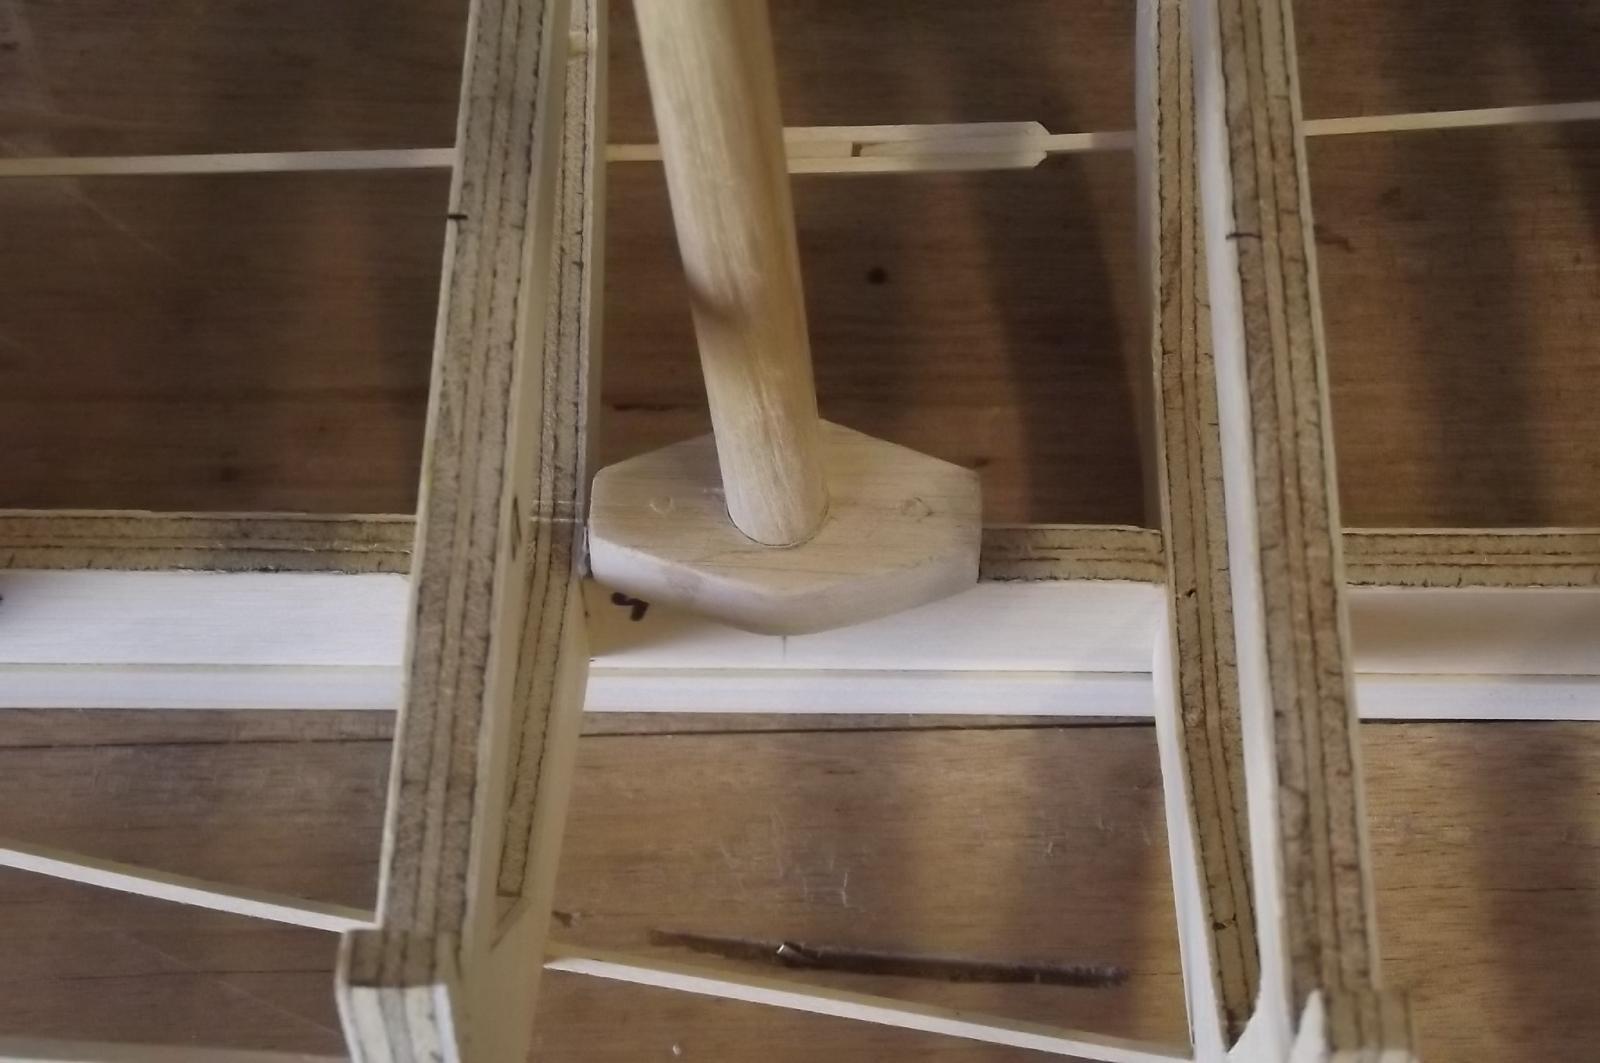
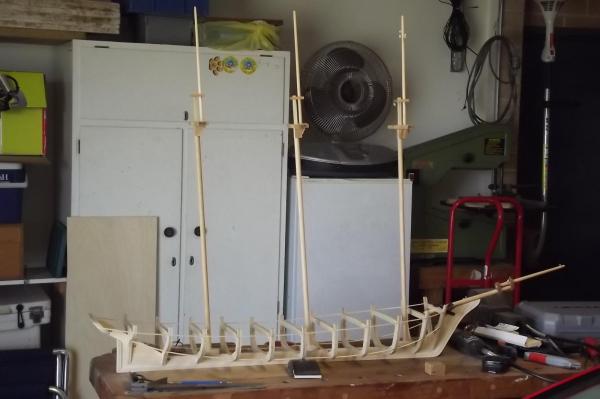
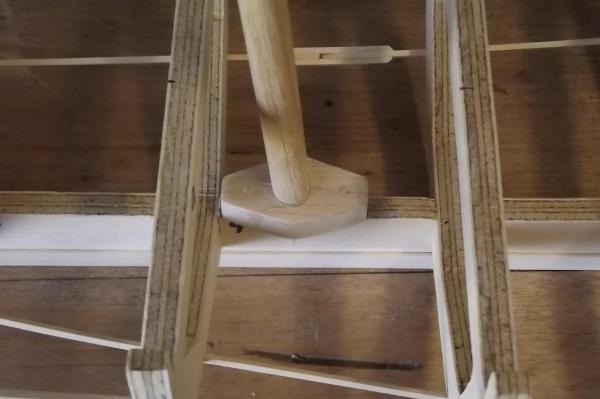
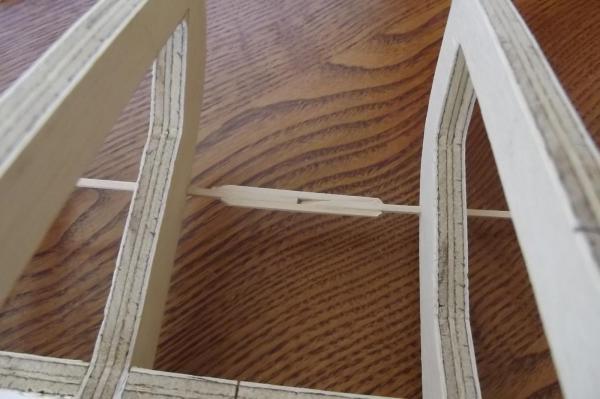
As promised, some interesting pics The masts and bowsprit seats are installed so I set her up to see what she looks like and the first impression......................BIG! The proportions seem right so I am very happy with it. This is how I seated the masts. The seats are drilled through at 86 degrees then glued and dowelled to the keel. In hindsight I should have milled a rebate in the bottom of them so they straddled the keel but it was late and I didn't think of it. They will be hidden anyway so function is all that matters.

-
Bob, I will welcome any input you have that might help me get this right. As I said before I like working things out myself but if you can see something going the wrong way please speak up. The only sailing experience I have is aboard the James Craig recently so I really am winging it with this but it's what I like, learn as you go. I already have doubts as to the depth of the hull, being a coastal vessel she has a shallow draft. I was going to get the plans enlarged 300% horizontally and 350% vertically to give me a deeper draft but I decided to stay true to plan. A deeper draft would have meant more freeboard so a dryer deck and more weight in the sailing keel so less likely hood of being knocked down under sail. I may add a plank or two to the sides to make her a bit taller but I think she will be ok. Looking at the water line and trying to imagine how much water she will displace I think there will be a good few kilos to play with. As a side note my Schooner for Port Jackson weighs in at 370 grams complete and the frame alone for this schooner weighs 900 grams. Steve
-
Popeye I have a long 6mm drill bit so I should be able to handle the ribs where ever the tubes need to run. I may need to make some infill blocks to fill areas that might be hard to drill because of angles and proximity to edges but between the drill bit and the dremel I shouldn't have too much trouble. There might be an interesting pic later today......
-
Yeah, good words those, it was astern too, that is the mizzen mast section. Working on simple mast seats now but I have to stop because there is grass to be mown.
-
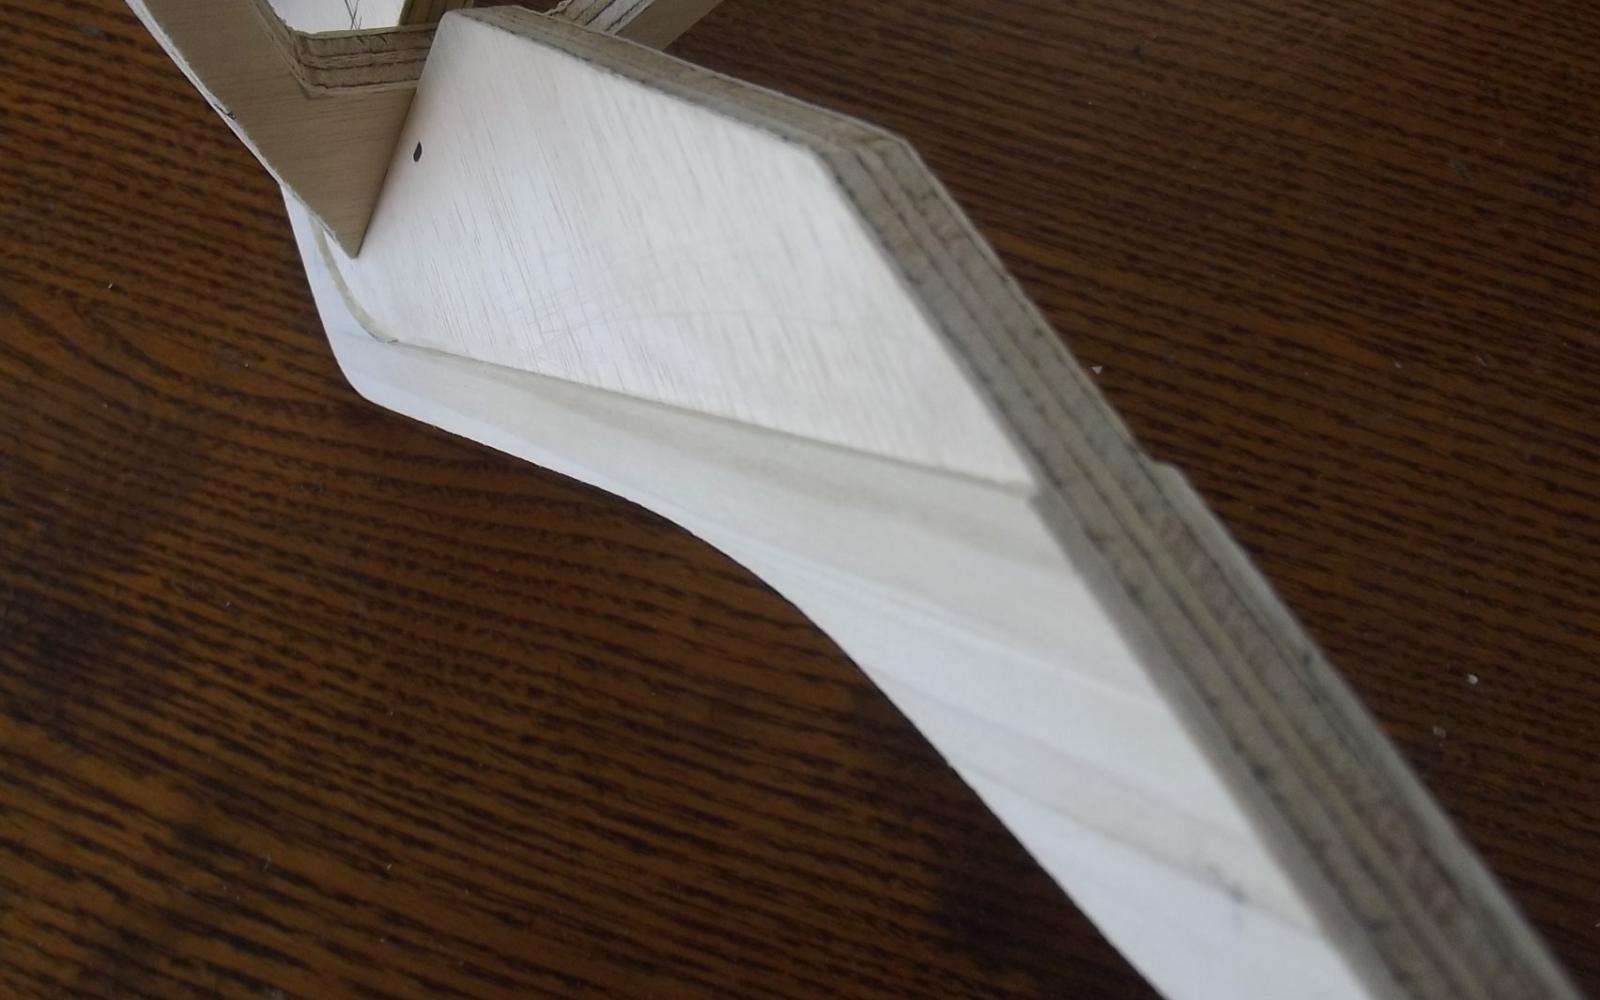
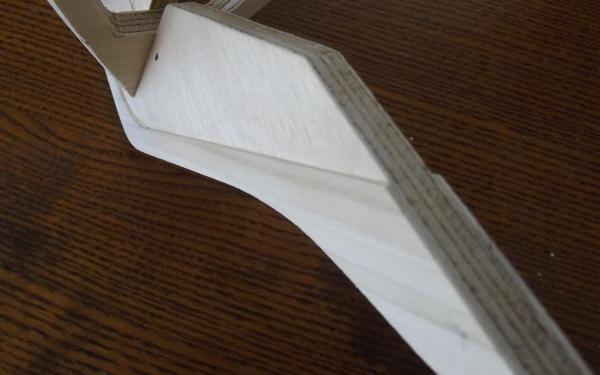
Be vewy vewy quiet, we are hunting wabets ! I have finally done the rabets by planking the outside of the keel. This brings the keel thickness to 13mm which the plan calls for but there will also be a thin layer of fibreglass over it. I have been agonising over where to mount the prop shafts etc but have decided that while it is unplanked I won't be able to see where they need to go and will focus too much on how they will sit with the ribs so I have decided to plank first and then see exactly where they need to go and then deal with the ribs. I do need to build mast seats and sailing keel mounts before planking though. This is the result of a mishap while swinging it around to work on the other side. The stringer hit a small vice and broke. Note to self, LOOK FIRST.


-
Ah so you are saying that I was right in the first place? I hate when I second guess myself.
-
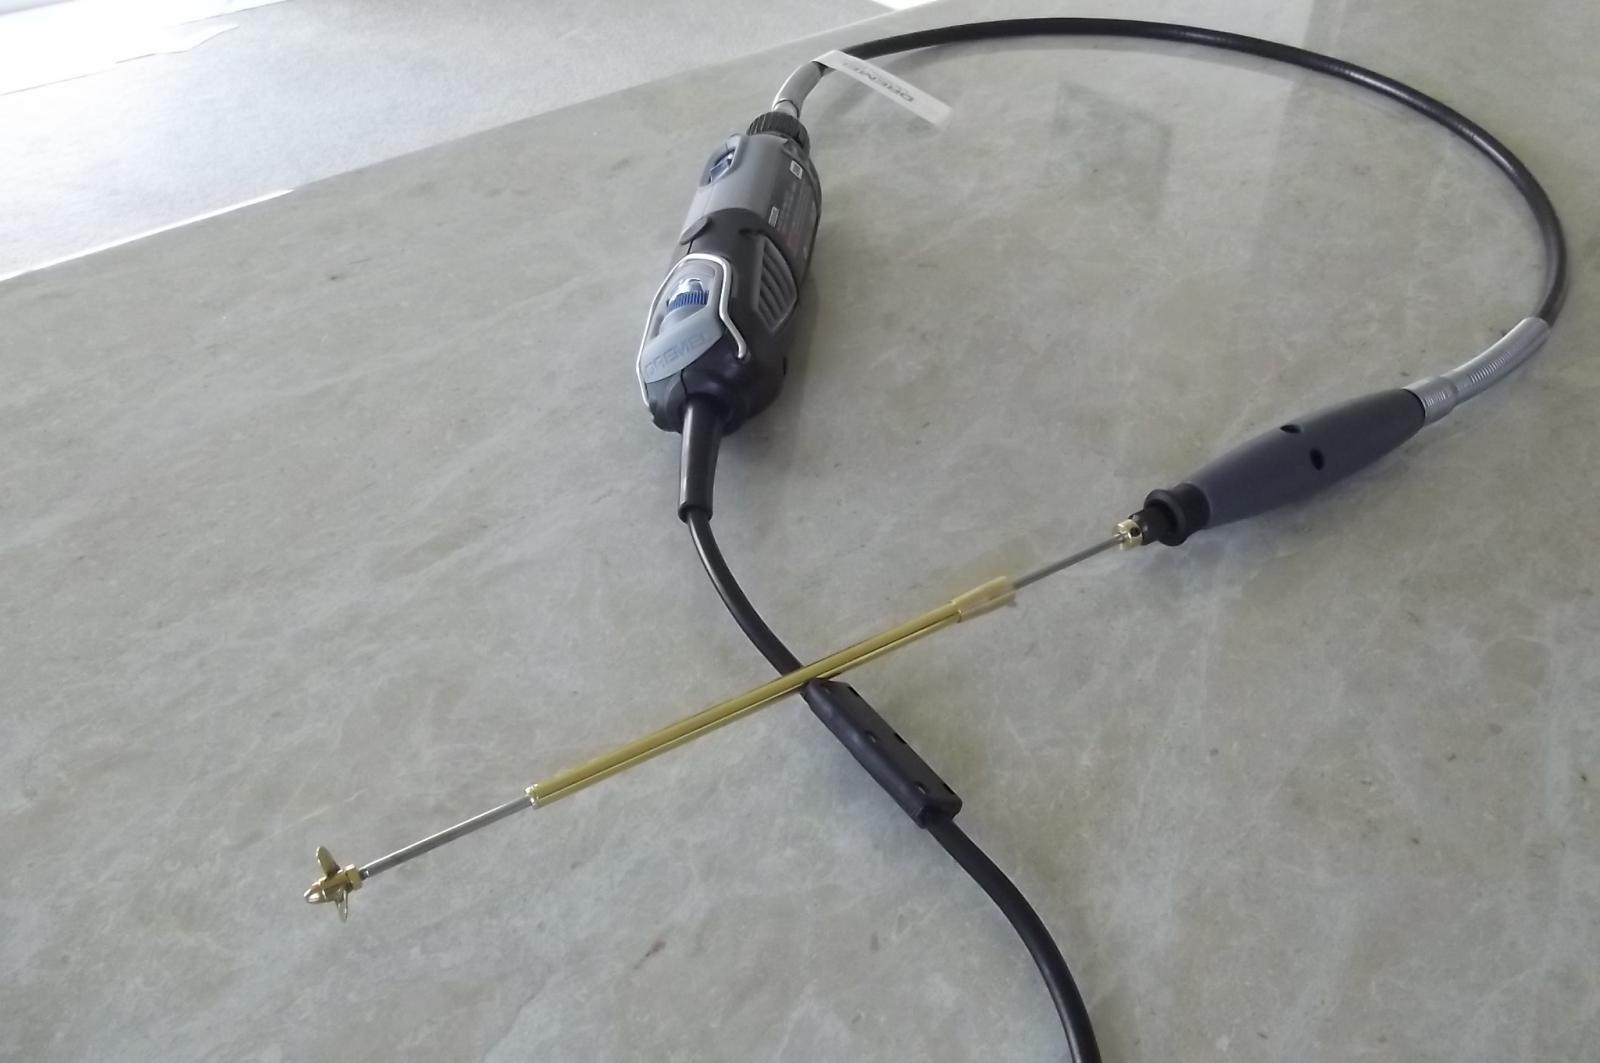
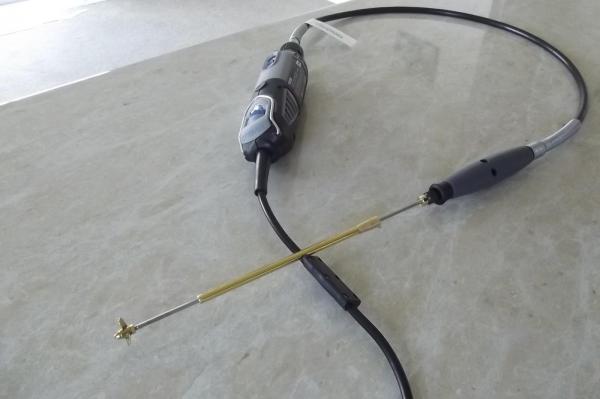
Love that link, thanks. If I am not mistaken they are under power for at least some of the clip so I am glad I decided to put power in mine. I had a slight mishap with one of the prop shafts today, I was running it in the sink with the dremmel and forgot it was on a high speed, when I turned it on I didn't have hold of the shaft very well and now I have a bent prop shaft. Only a little but enough to cause vibration so I will order another one when I order my new anchors.
-
Thanks Yambo ! Simple, effective. Brilliant ! Steve
-
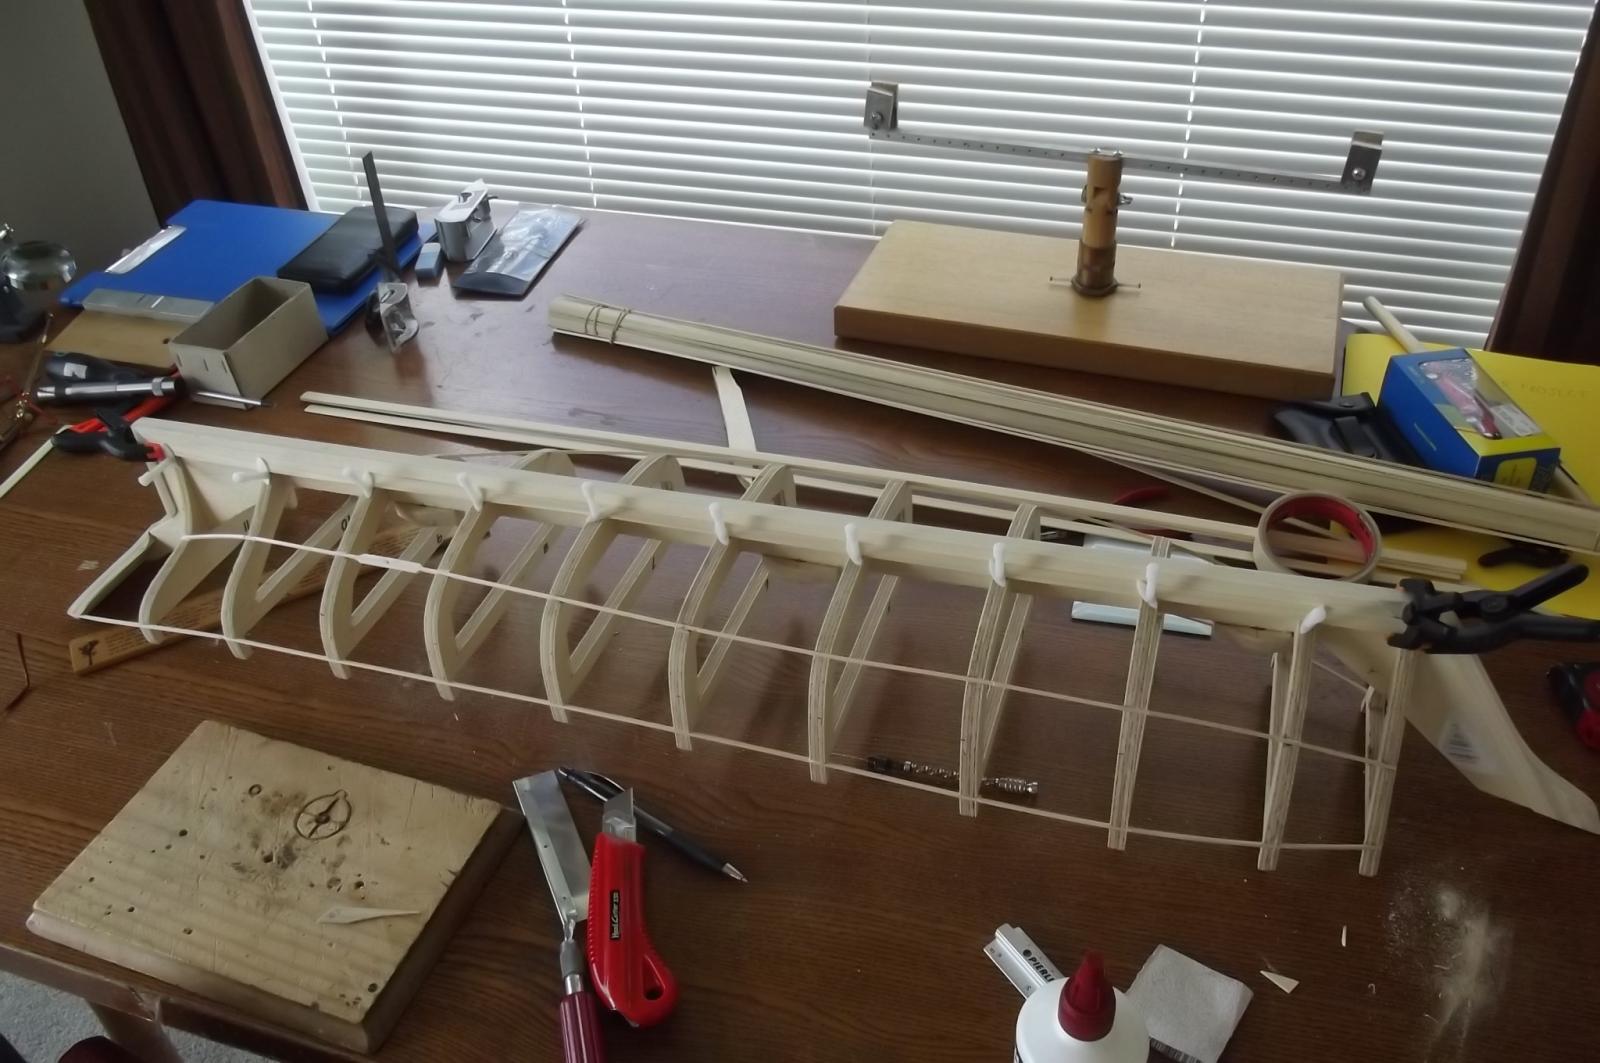
Some progress, not a lot to look at though. First, I hooked up my dremel to the prop shaft to see how much water she will push. At about 5000 rpm there was not a lot of thrust but at 15 it was like a speed boat. I am thinking that my reduction gearbox motors are going to be way too slow so I will try removing the gearboxes or something once I have the hull sealed and can float her. Upper and lower stringers fitted and veneer to outside edge of keel attached. Next step is to add the veneers to the sides of the keel to create the rabbet.


-
There should be a list of all the timbers in the instructions somewhere, you have to determine which timber is which by measurements and descriptions in that list.
-
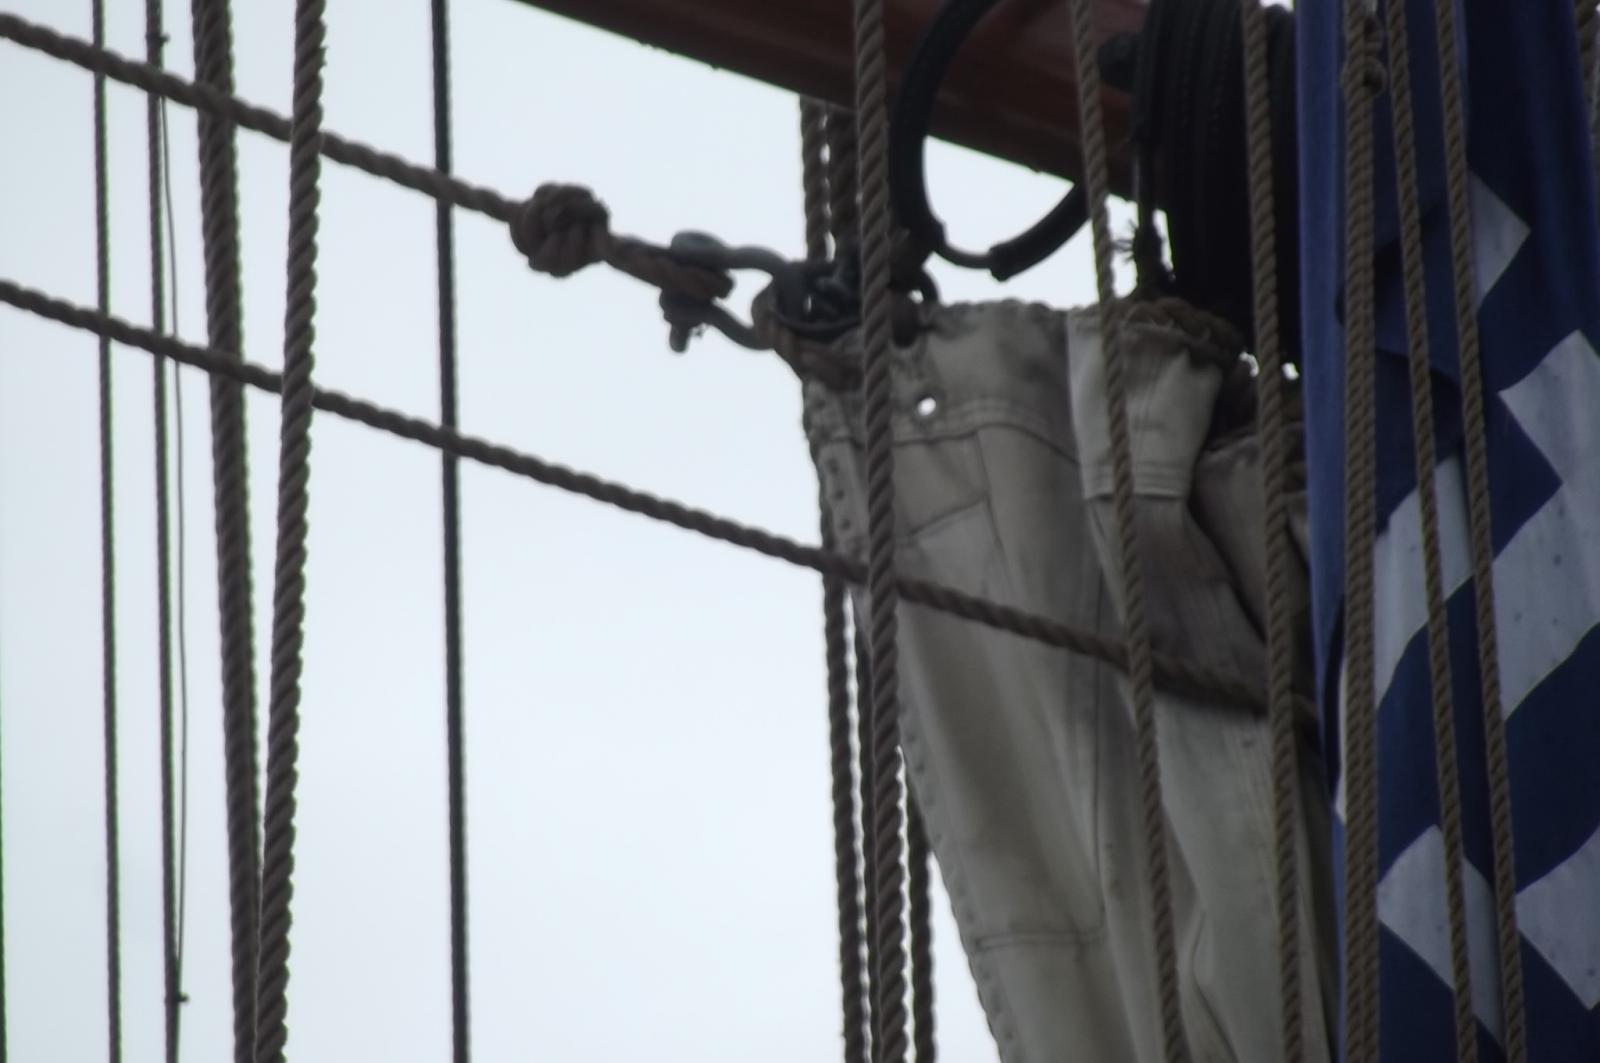
I have had my voyage and made my way home. It was a great experience and my inner thighs are still sore from trying to walk on the surging deck! Lessons have been learned inspite of the fact that the mizzen sails were not used at all. I now know that I need smaller anchors and the correct style is readily available, that's good news. I learned how to tie things off in a later style especially the shroud lanyards. I also learned the lay of the running rigging, ie which ropes go where. I guess you could say I learned the ropes as it were. However I also learned that I have to re-think how I was plannning to operate the sails. The topsails and stay sails on the model will stay as I had planned because it is reasonably correct given practical considerations. The main sails however need a 90 degree rethink, literally. I was planing on lowering the jibs and sails as I have seen on tv and in pictures over the years, this had it's own set of problems I was going to have to overcome. The mizzen sail on the James Craig is retracted like a curtain, ie the jib stays at its set height and the sail is drawn in towards the mast rather than down towards the boom. This should solve a lot of the problems that I saw coming however I have to recalculate the rope movements etc. Must get onto that. This shows the top corner of the sail in the retracted position and how it is drawn out. This shows one of the lines that are attached to the sail horizontally and the pulley it runs through to draw the sail in to the mast.


-
Yeah Robbyn I thought of that and I found one and put it where I wouldn't forget it.............and went without it I did get a fair bit of stuff to use and because I understand it I remember it. A little side point. They were talking about the names of the sails as you go up the mast. No-one knew what the one above the t'gallant is called, except for me, "Royal" It is too late at night for me to post the pics but I will soon I promise. Steve
-
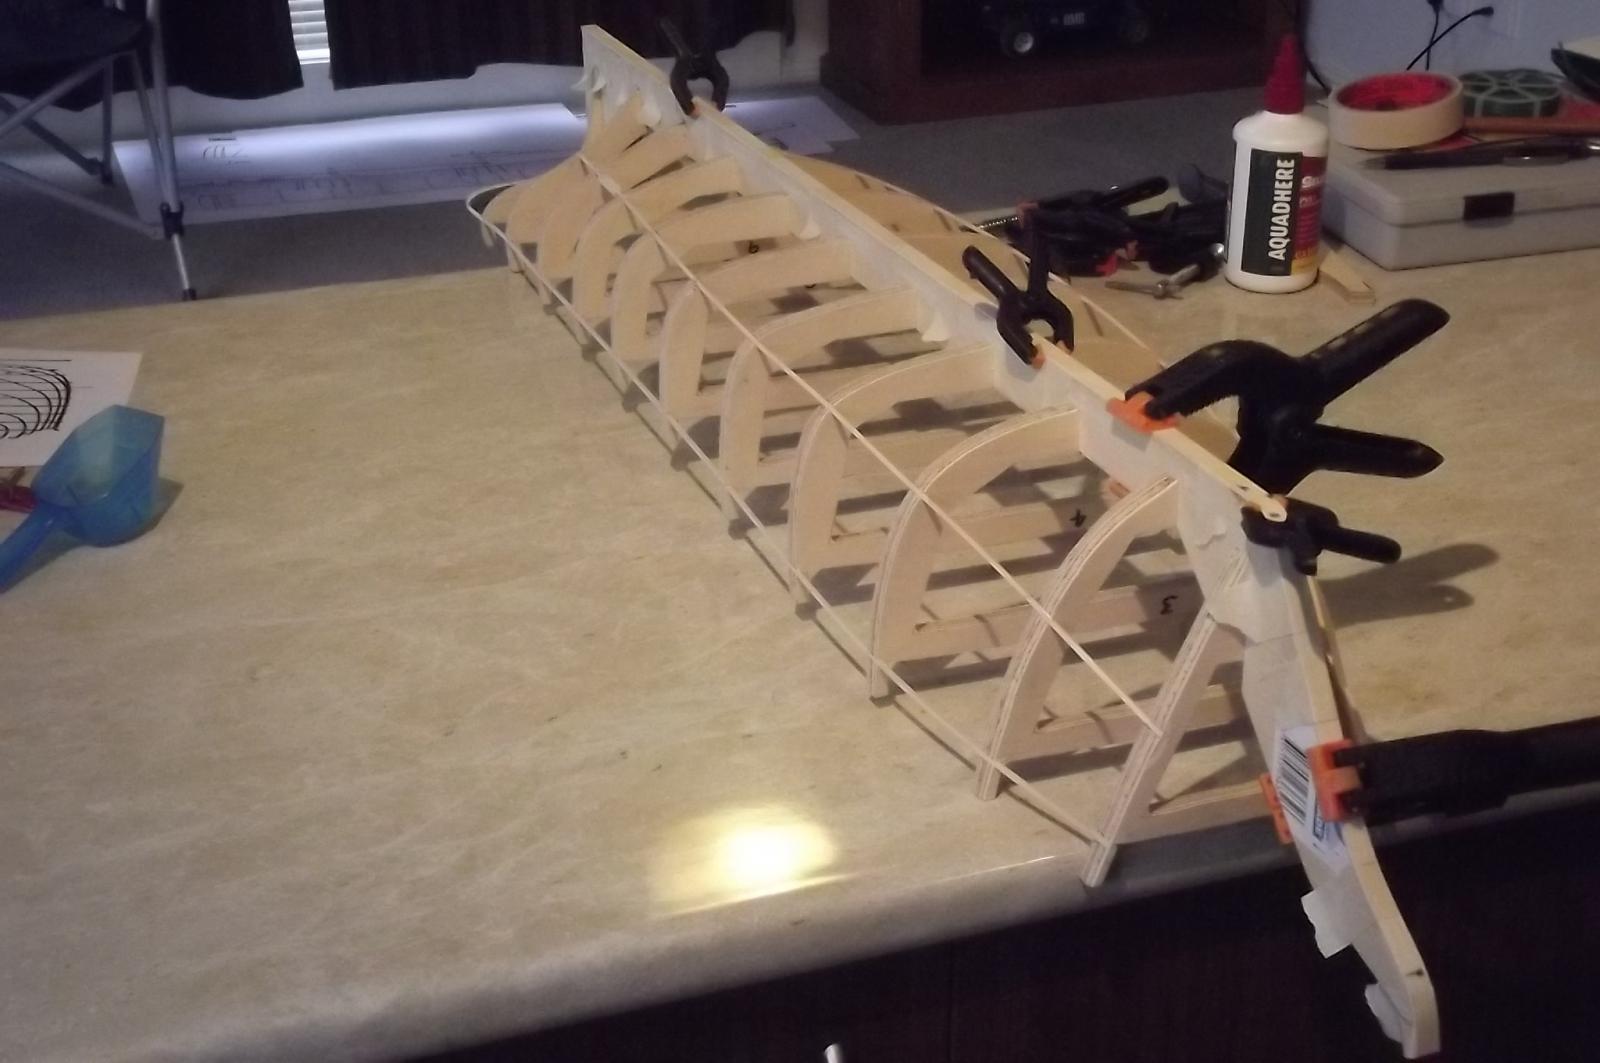
The next step is to fit stringers along each side, one low and one for the deck to sit on. They will stiffen her up quite well I think. I am in Sydney, staying at Darling Harbour so I just have a walk to the James Craig in the morning and I went and had a look at her tonight. She is uplit through the masts and rigging and looks beautiful. Sorry, no camera. I paced her out and she is about 55 - 56 metres along the deck and my schooner is about the same in scale. I had a feeling they were the same size ships. This means tomorrows voyage should be very helpfull from what size the anchors are to the size of the shrouds, dead eyes and everything. I wish I had a note pad to take with me. Steve
-
Steady on girl, I'm human and do have other things to do There is so much thought going into every step because I have to be sure I do everything I need to before continuing, ie I have to work out where and how the prop shafts and sailing keel will mount before I do any planking. These ribs are 10mm thick too so fairing them is going to take quite a bit of effort and time. Besides, this weekend I am getting away from 1:54 scale and taking on 1:1 I am going to Sydney to sail on the "James Craig" She is a Barque so fore and main are square rigged and the mizzen is gaff rigged, I will be paying particular attention to how they employ the mizzen sails so I can learn how to sail this when it is finished. That's not the only reason for going though Here is a link to pics I have posted of the James Craig, check again after the weekend, there should be a few more interesting ones http://modelshipworld.com/index.php?/topic/4078-james-craig-sydney-australia/#entry115816
-
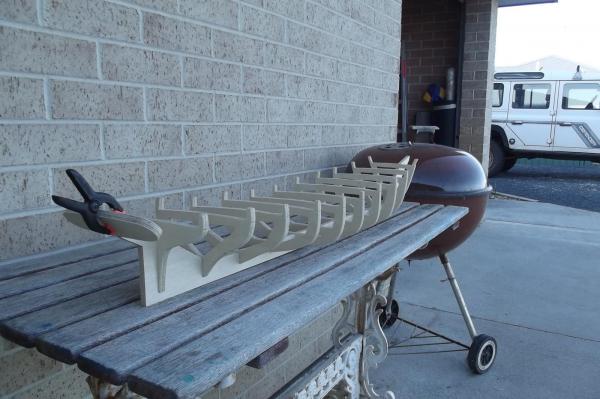
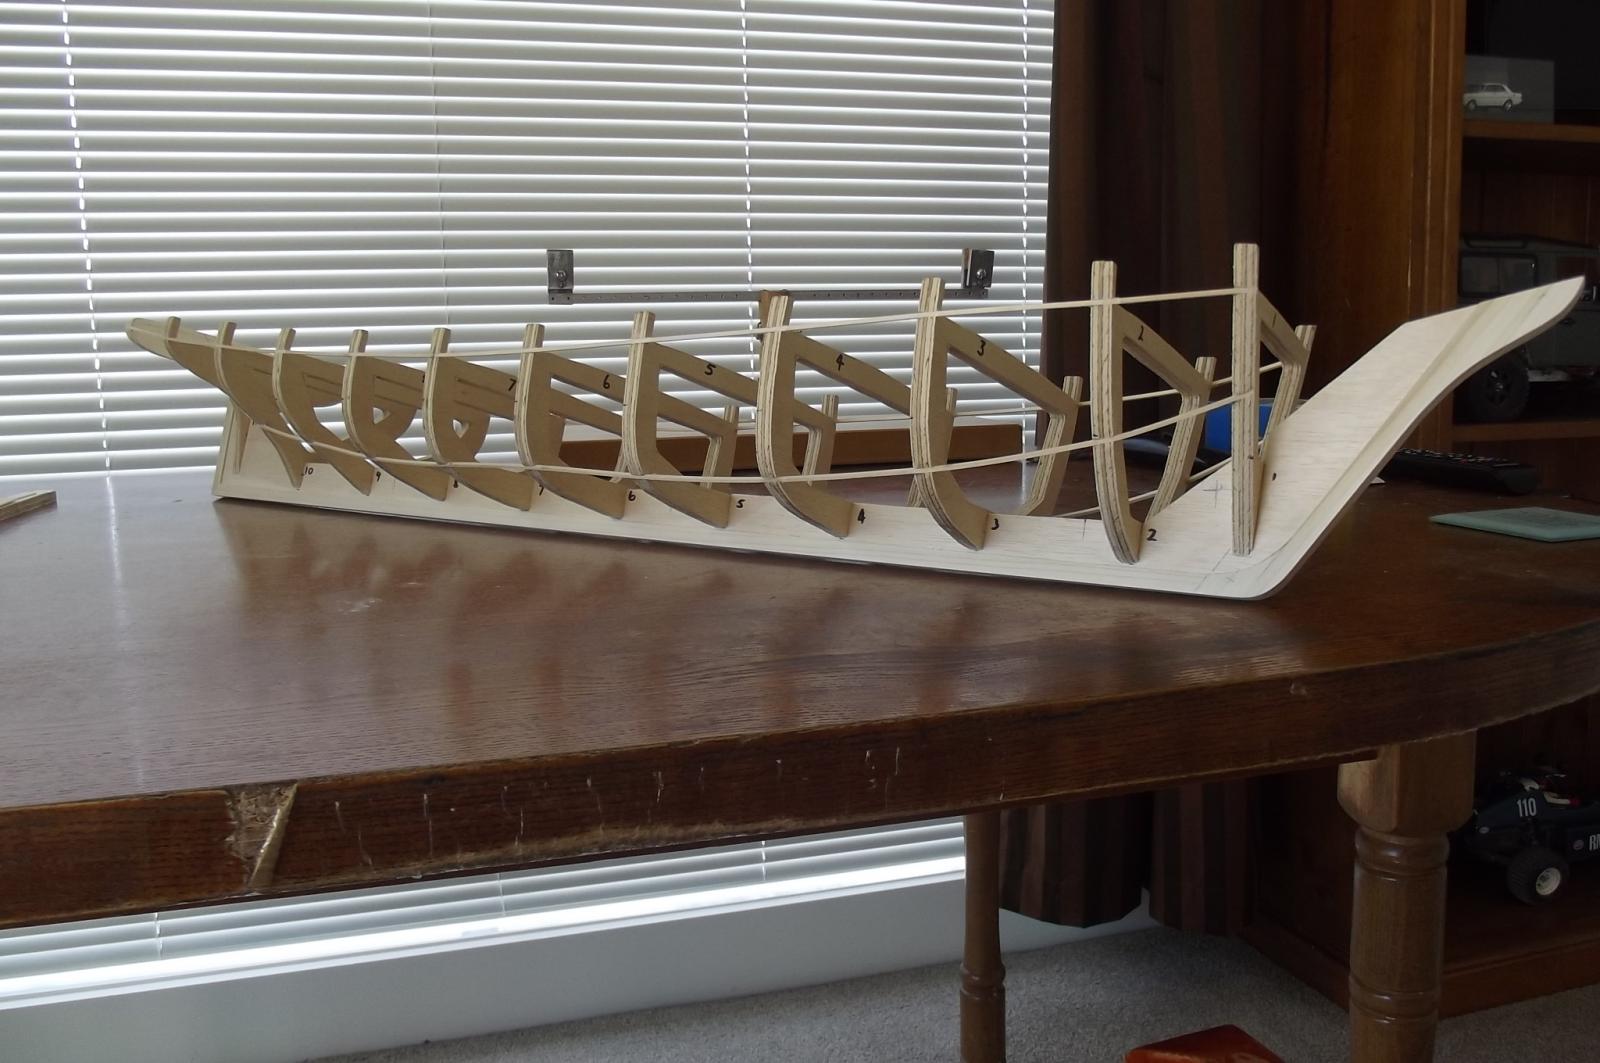
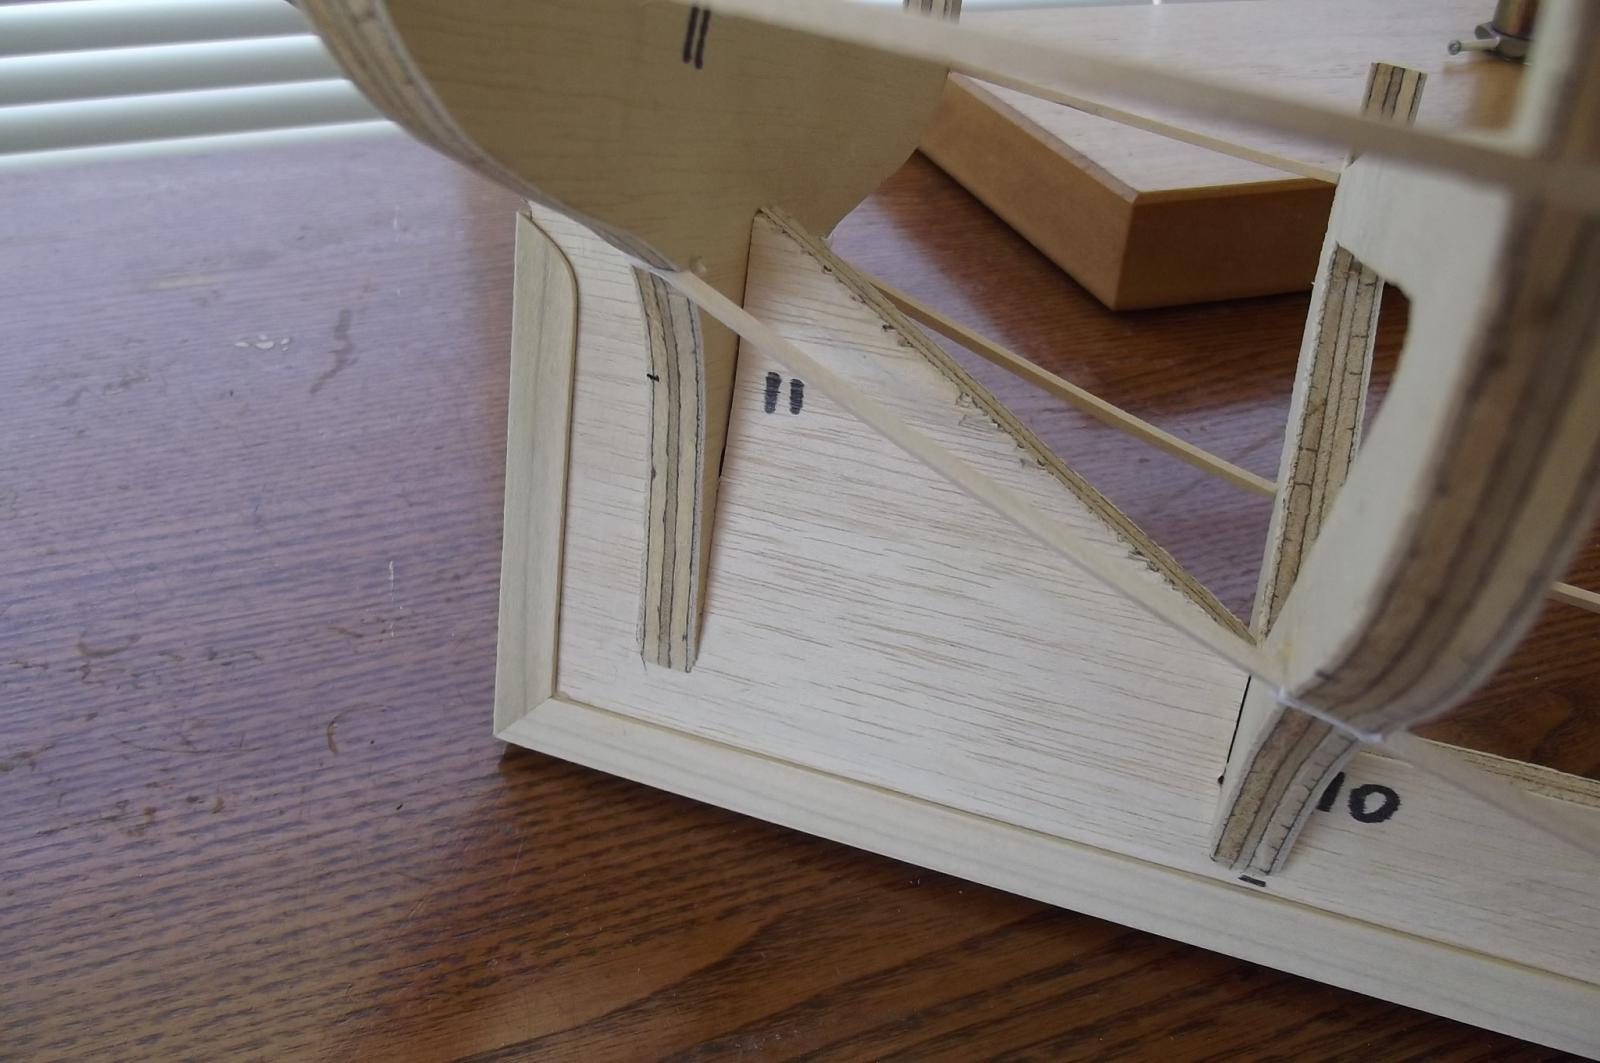
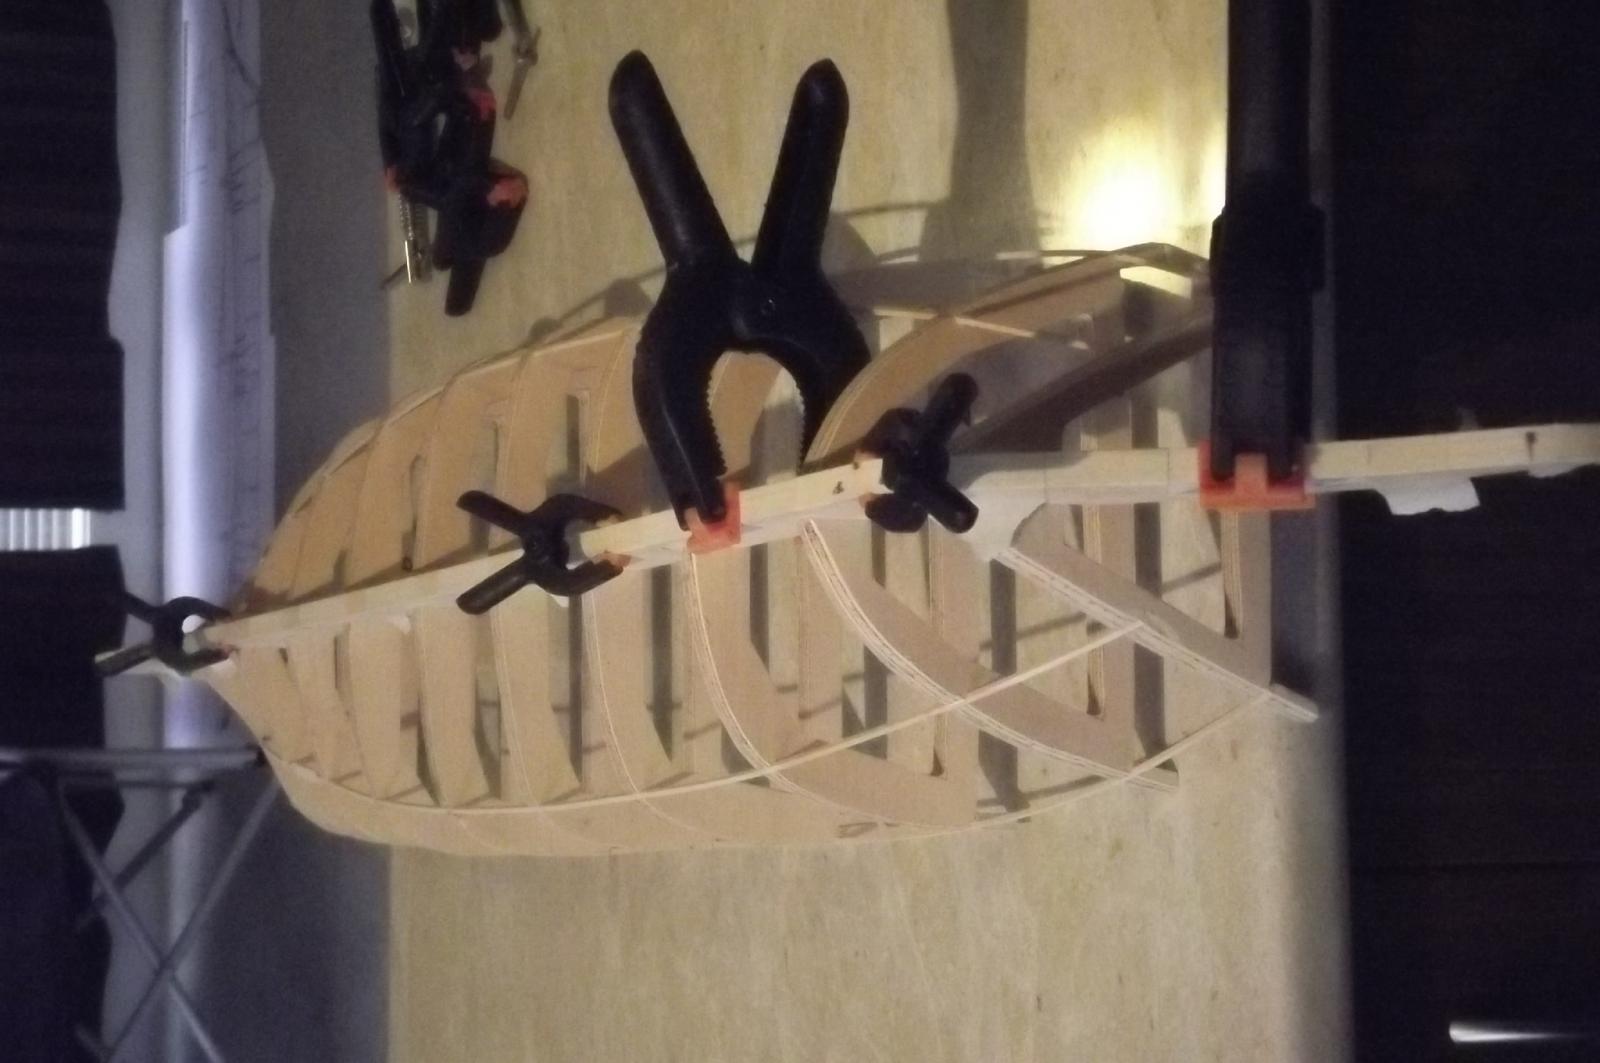
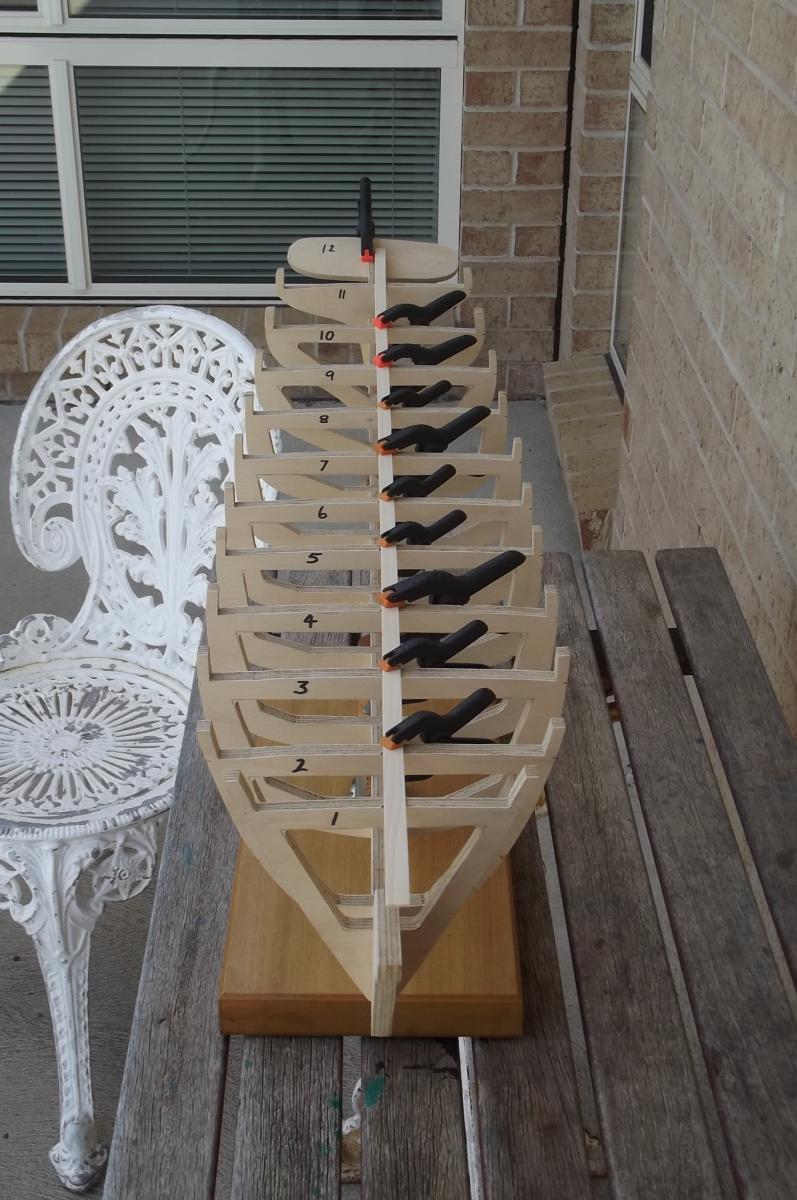
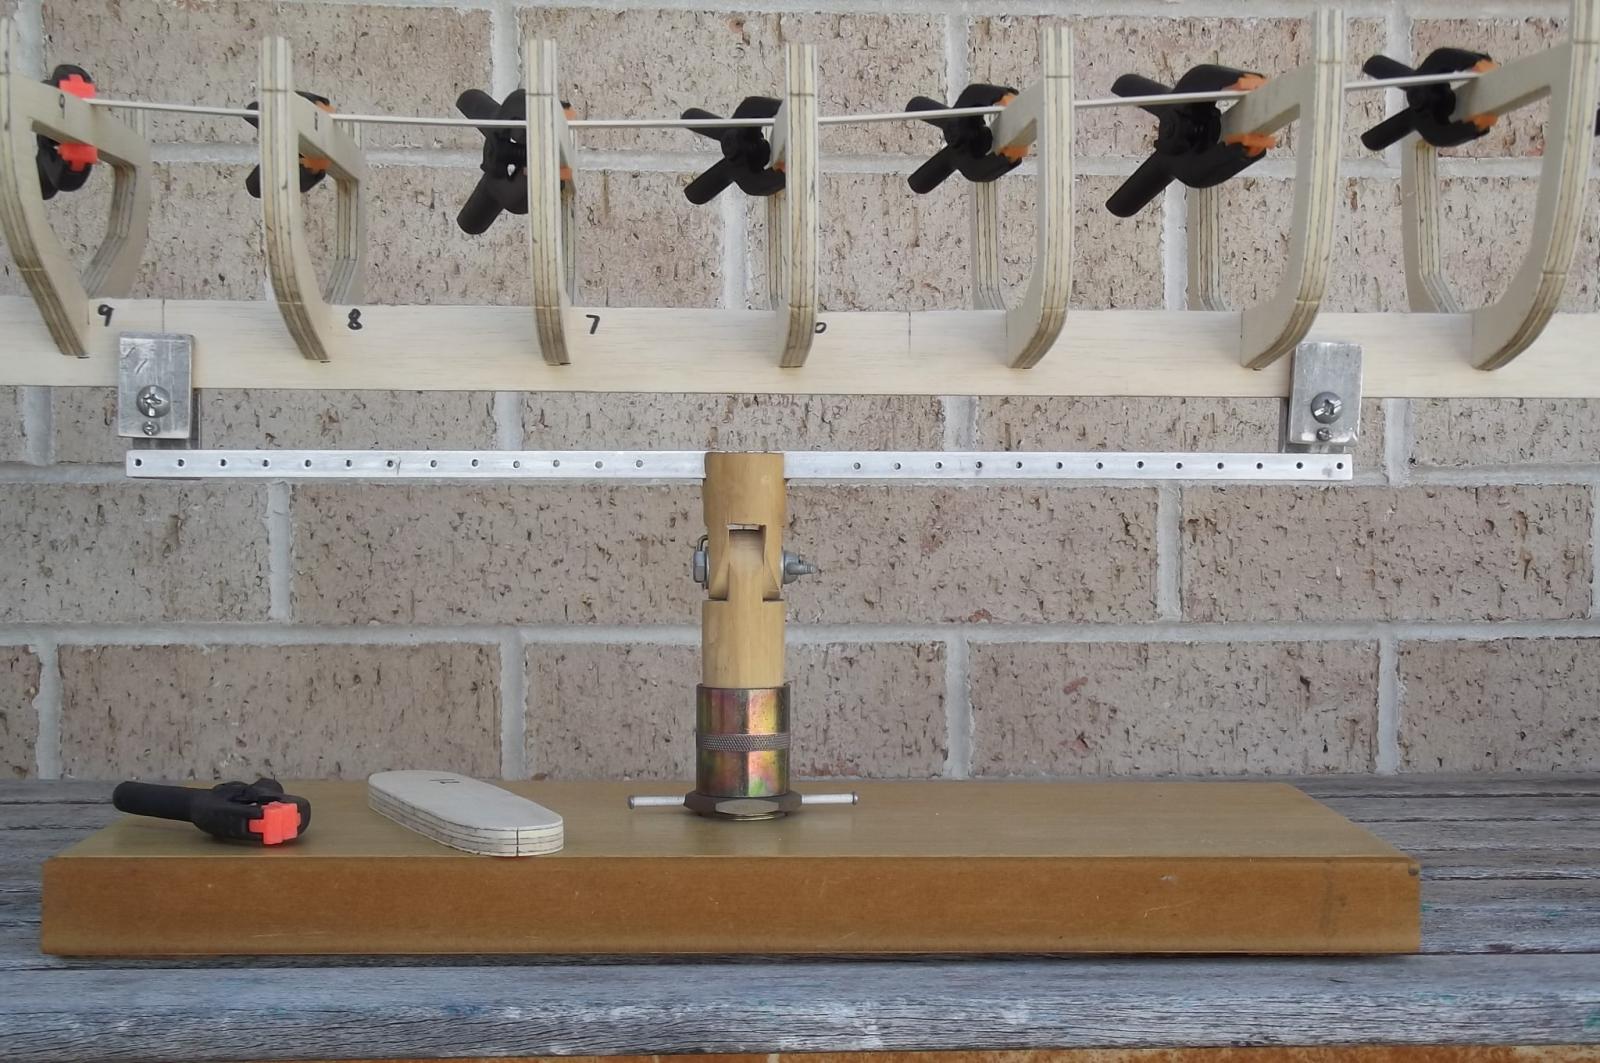
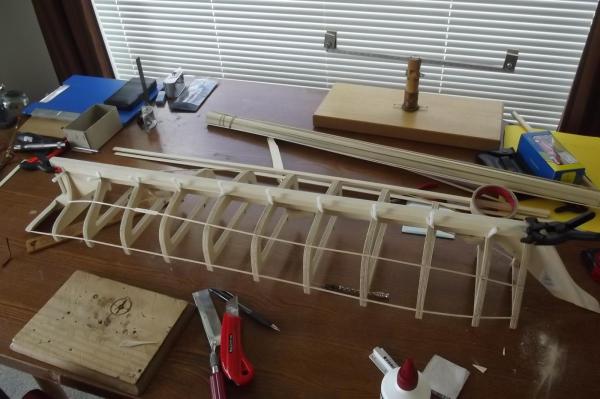
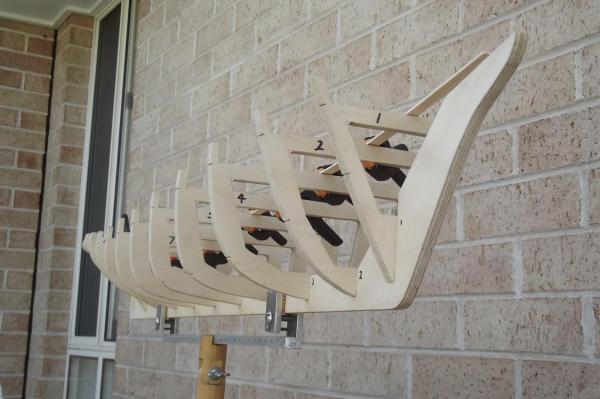
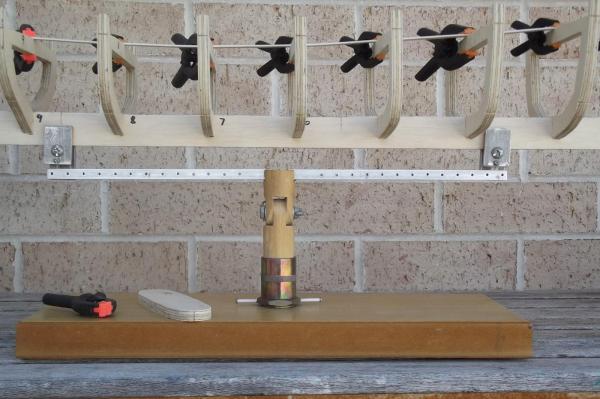
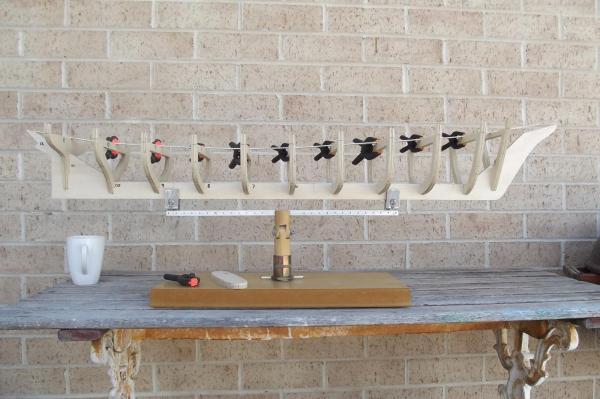
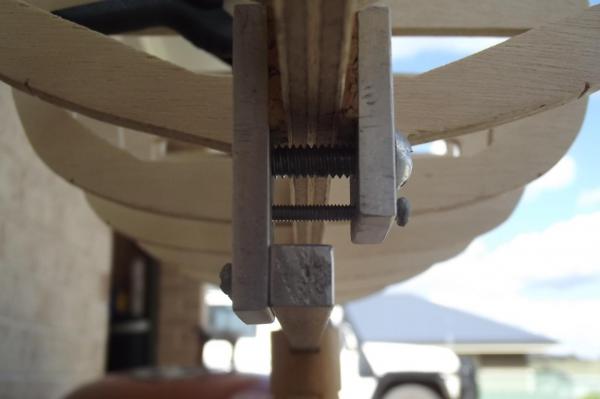
Not much to see after hours and hours working on it but I have now got all the ribs seated properly and by marking the centre line on the deck section of the ribs and laying a plank along the deck I am able to make sure all the ribs are vertical, centred and the line of the deck flows properly. This is my home made building stand. It was never intended for ships of this size. It should suffice !! Only problem is the clamping screws and stop screws which keep the jaws vertical are only 25mm long which is normally more than enough but they are just long enought to hold the bare keel but I am going to create a rabbet by attaching 1.5mm planks onto the keel, this will make it 13mm wide so it's off the the hardware store AGAIN !!

-
You got me ! It is a great time of year to sit outside with a nice cold drink and a handful of sandpaper and frame parts. Popeye, I am going for strong because I am from the old school of thinking where it is better to over engineer than under. Steve
-
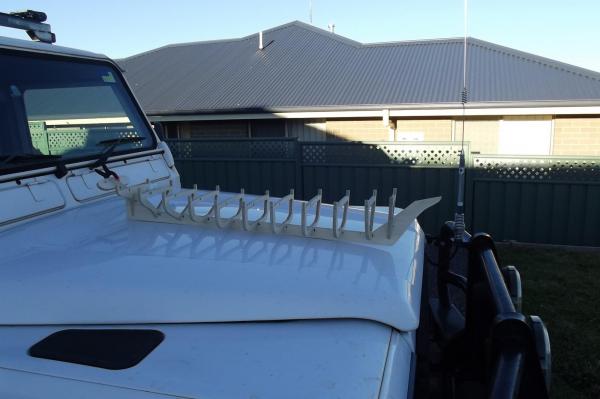
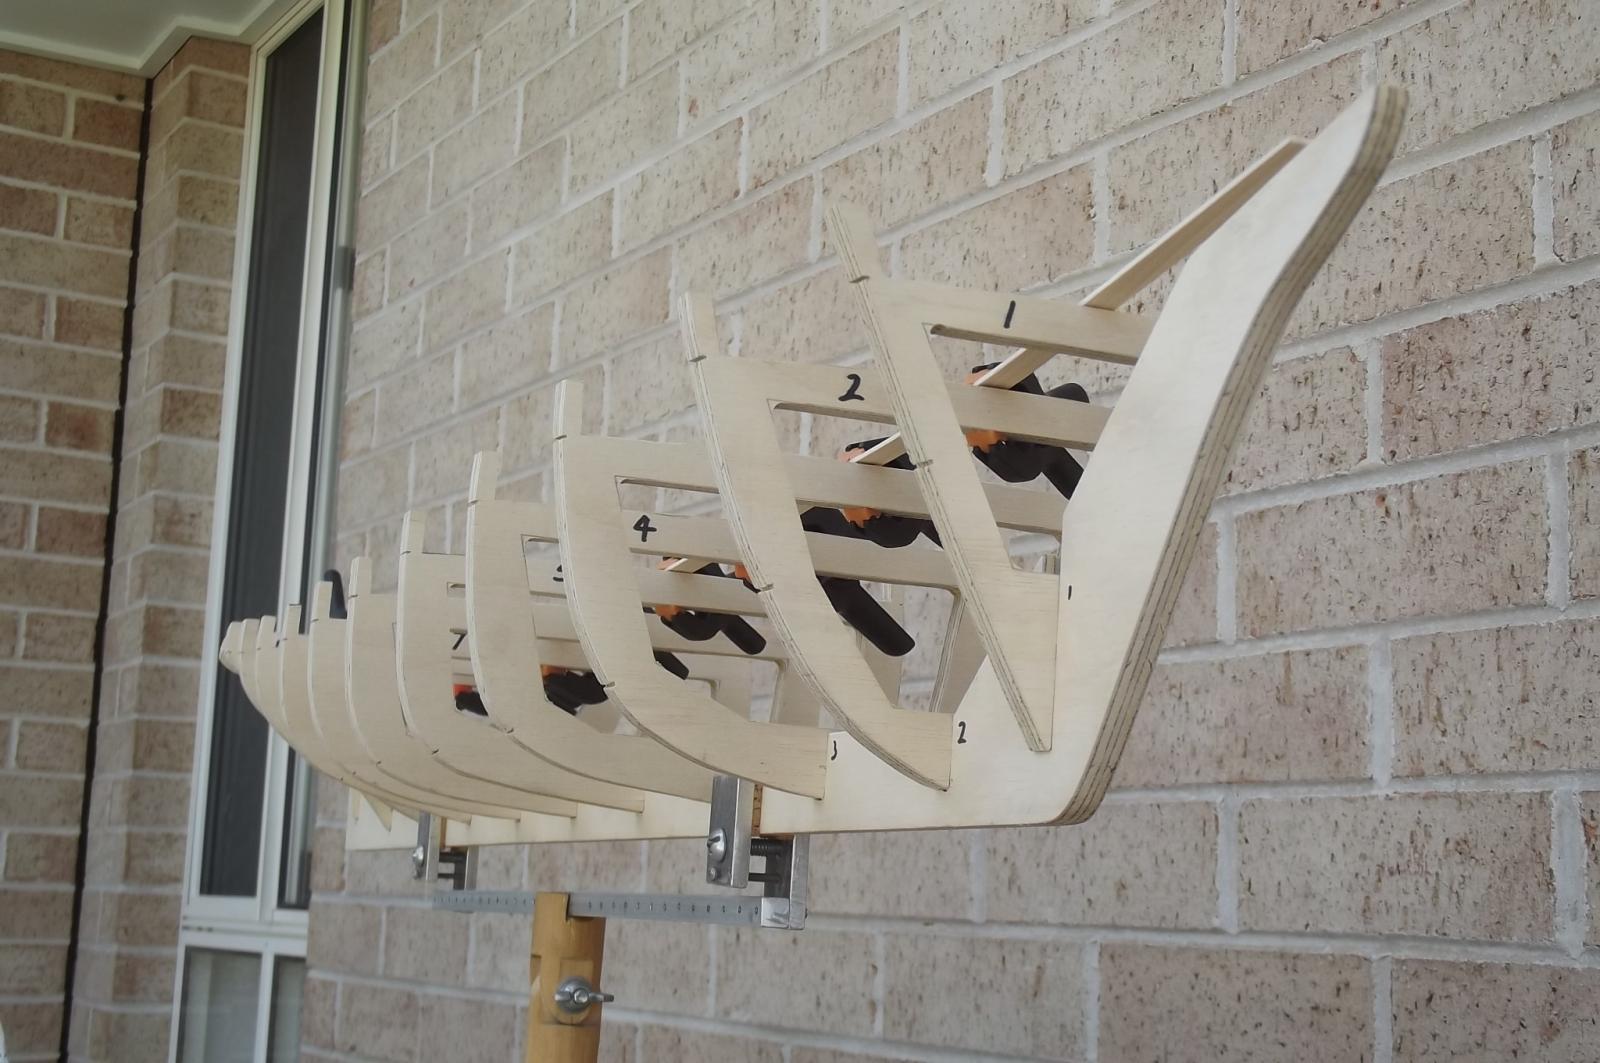
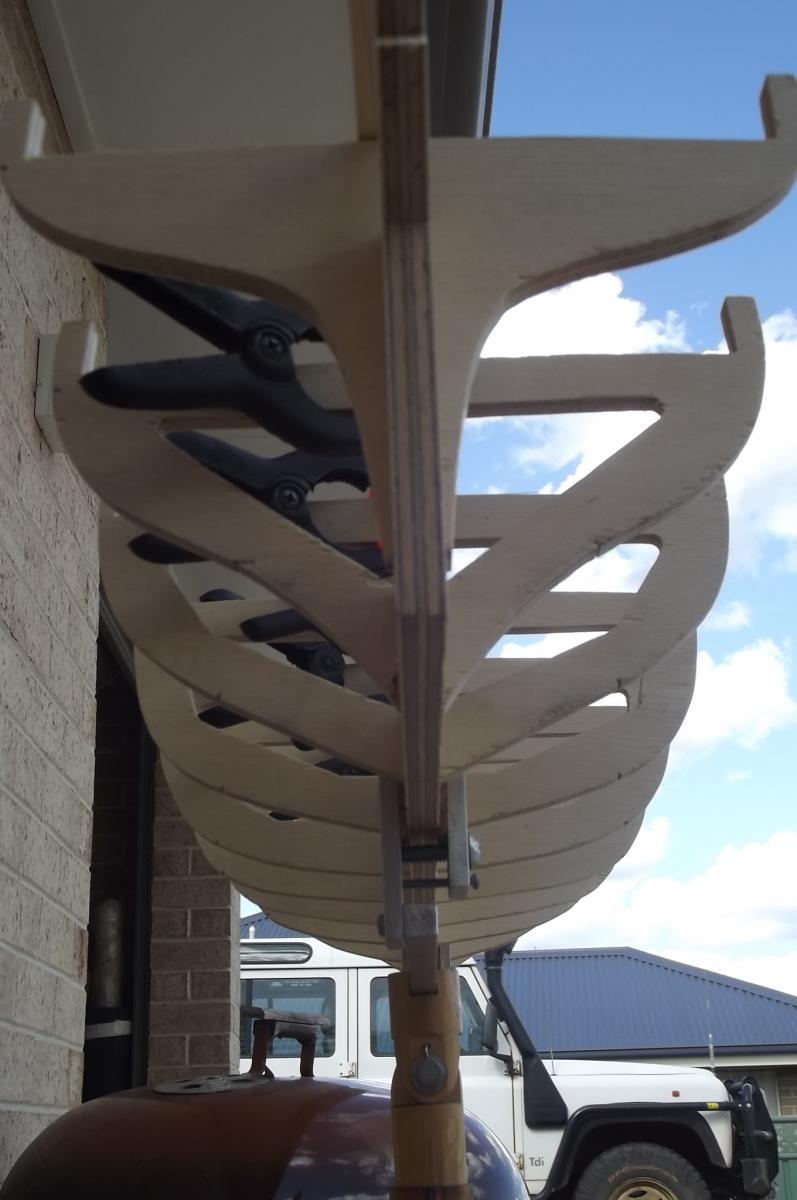
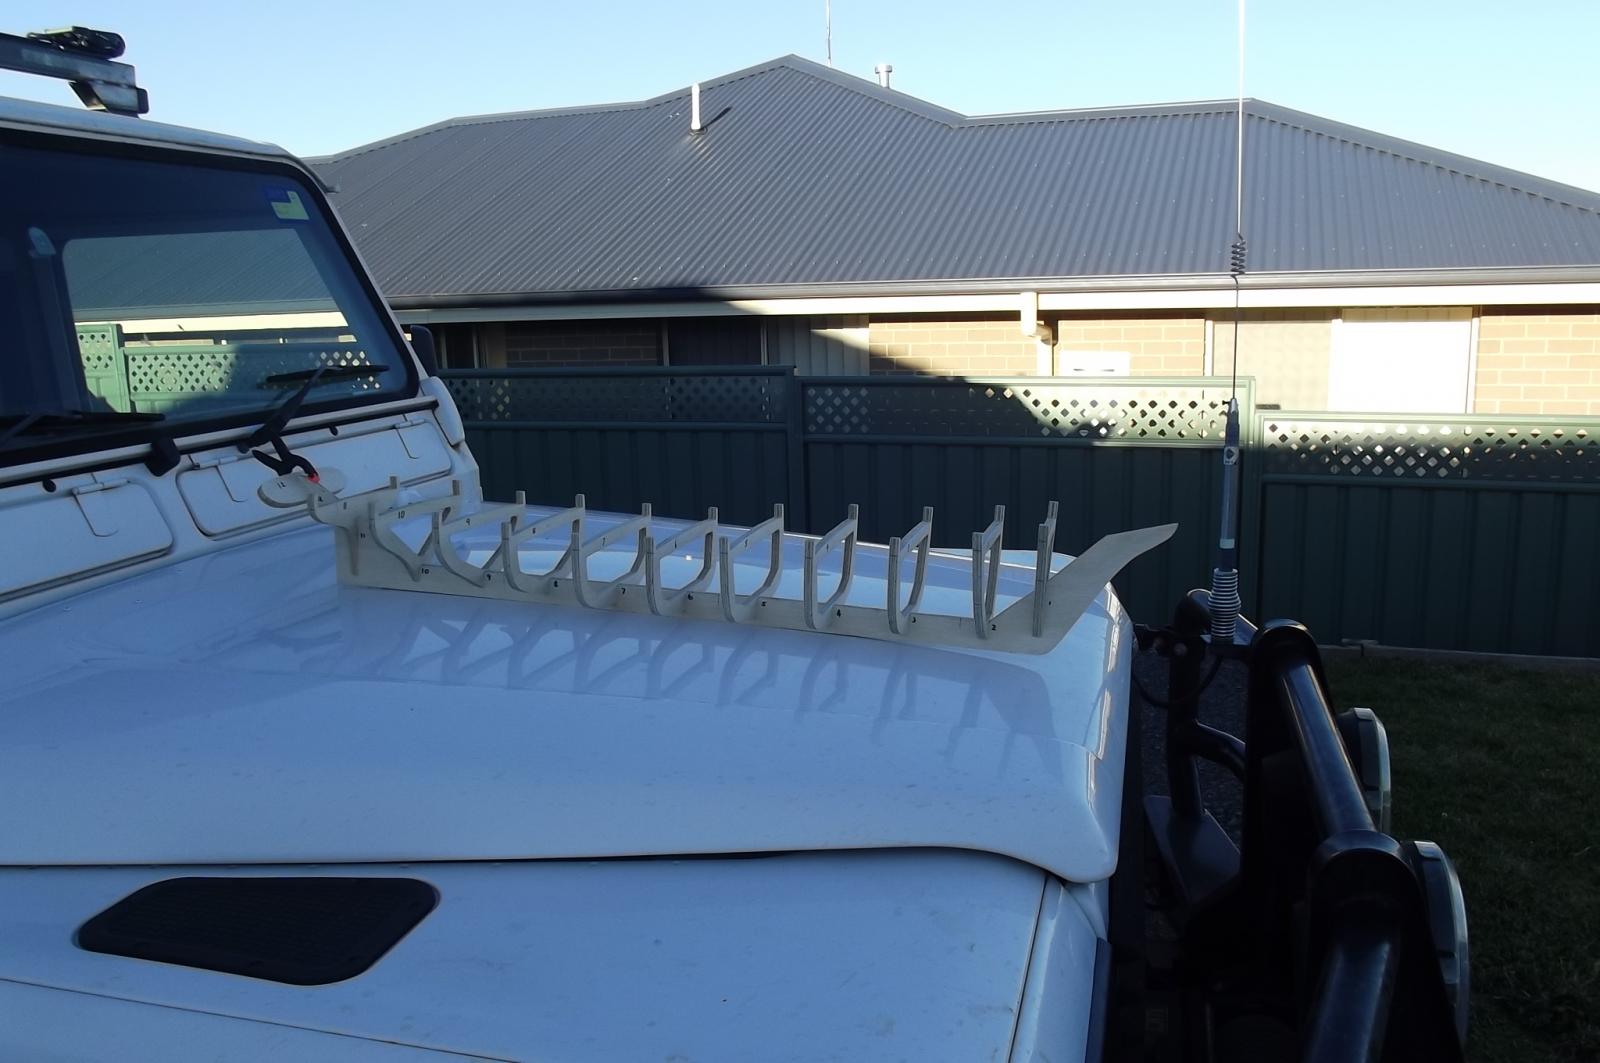
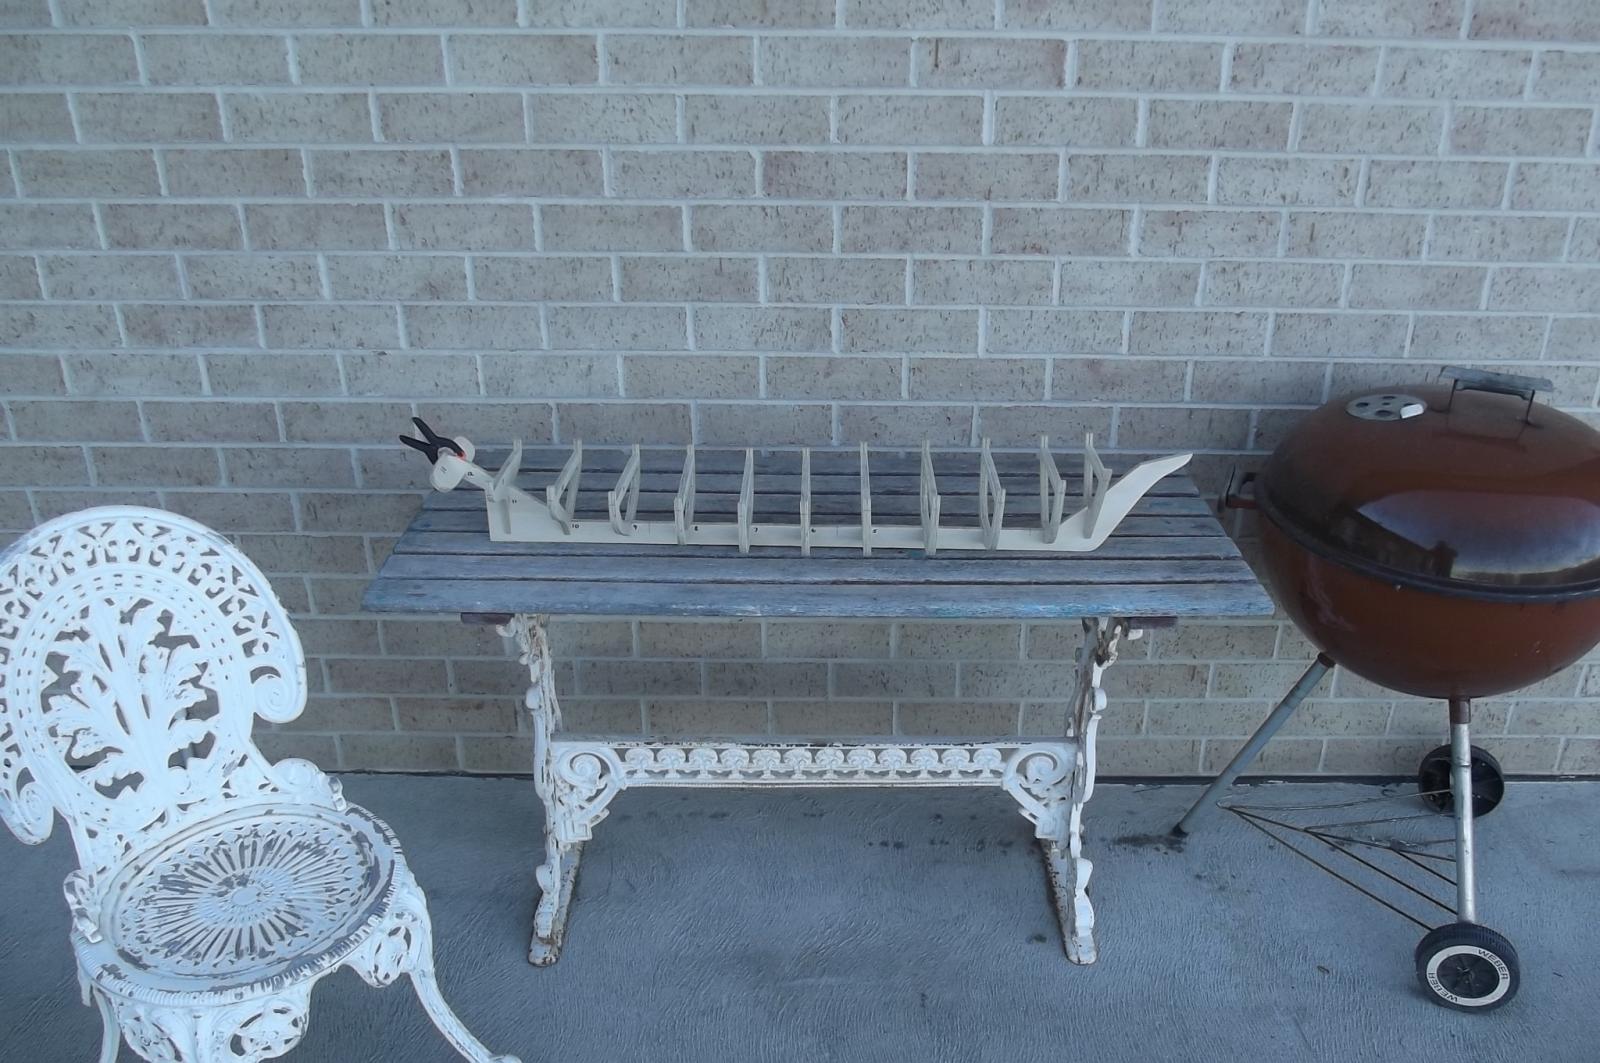
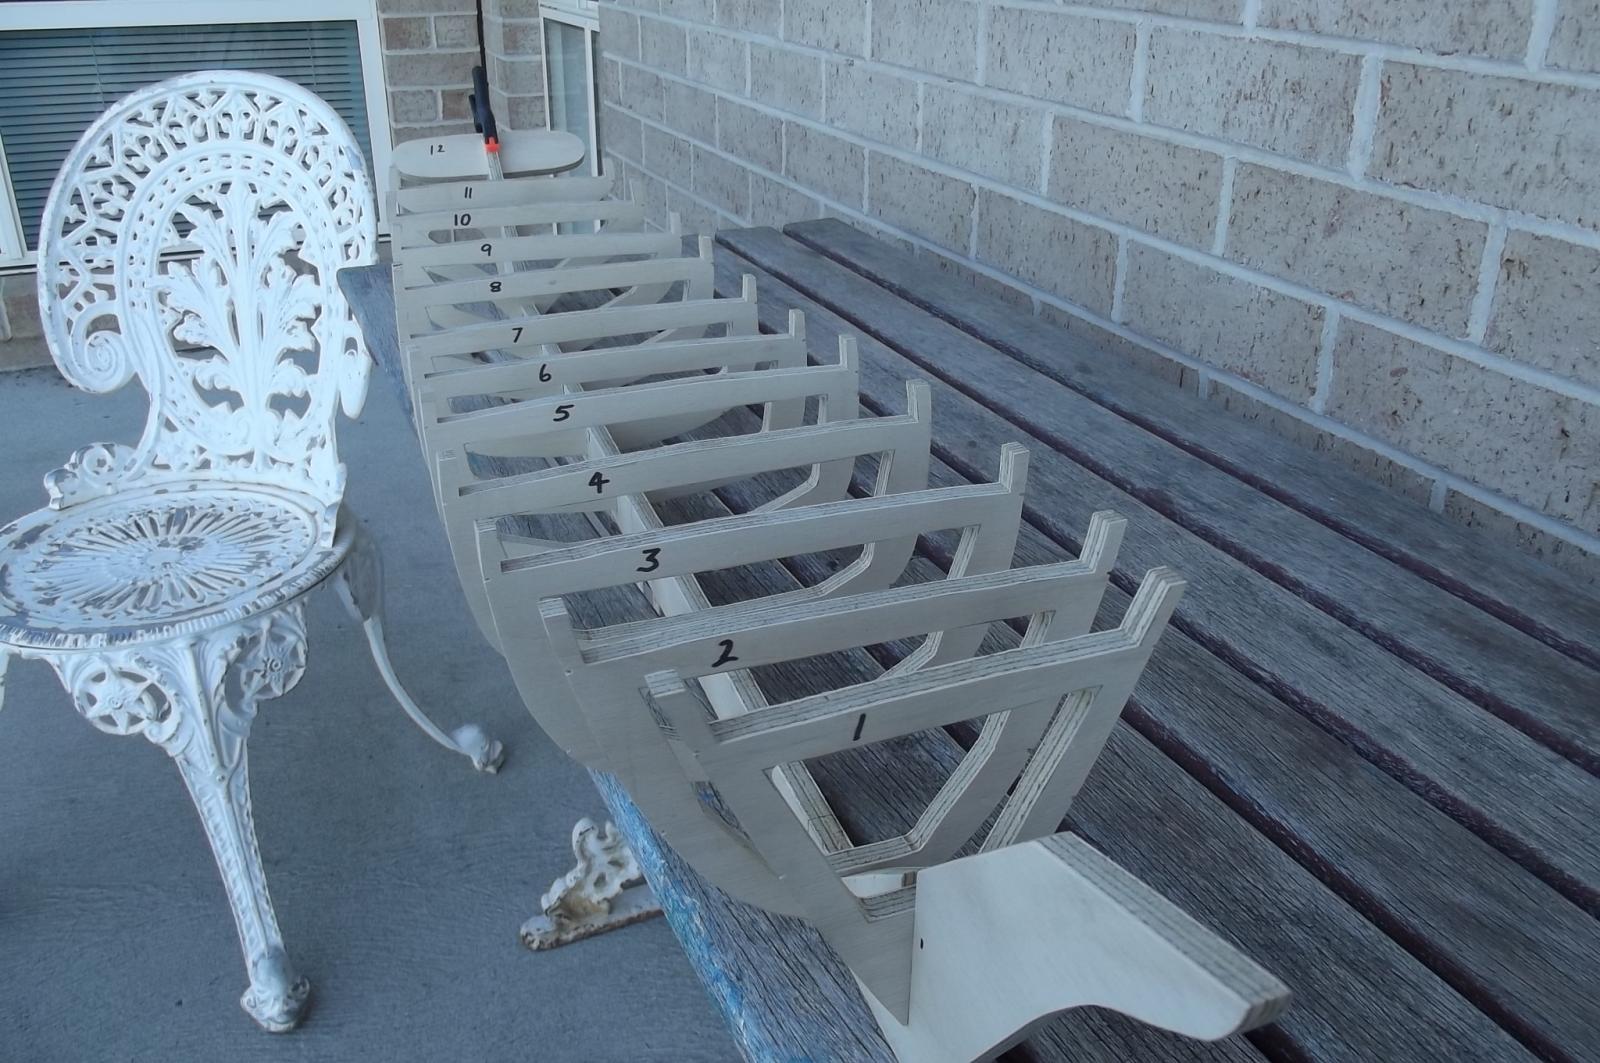
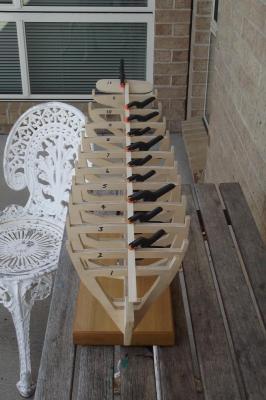
PROGRESS !! After two days of cutting, sanding and filing......................... I took this pic on the bonnet of my Land Rover to give a good idea of size The ribs are not completely set yet, there is still a little fine tuning to be done to get them into exactly the right position but I thought it worthy of a few pics and a post.