HOLIDAY DONATION DRIVE - SUPPORT MSW - DO YOUR PART TO KEEP THIS GREAT FORUM GOING! (89 donations so far out of 49,000 members - C'mon guys!)
×


Bahamas Diver
-
Posts
141 -
Joined
-
Last visited
Content Type
Profiles
Forums
Gallery
Events
Everything posted by Bahamas Diver
-
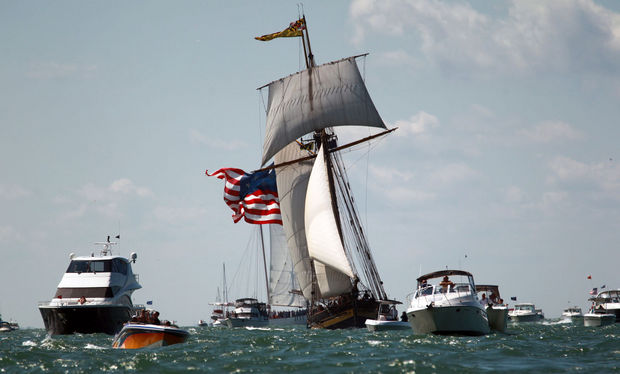
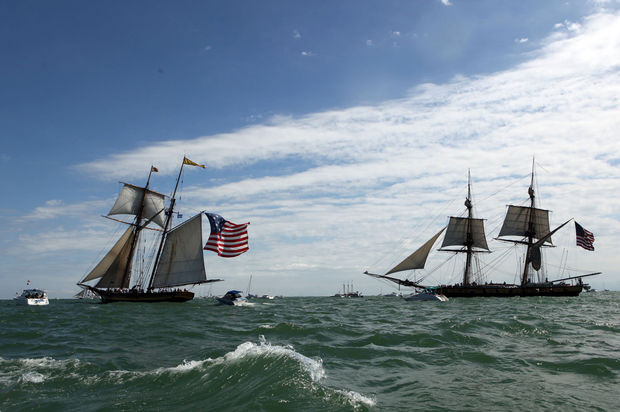
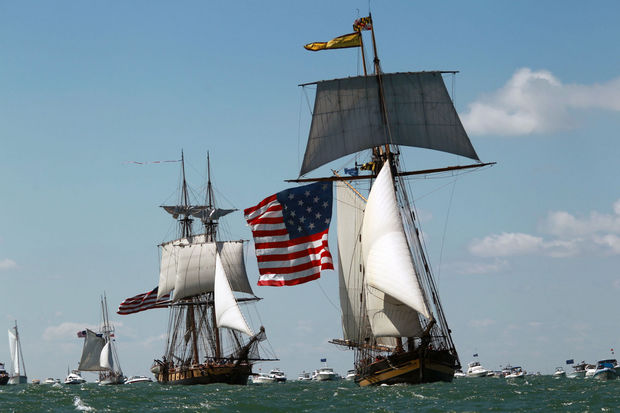
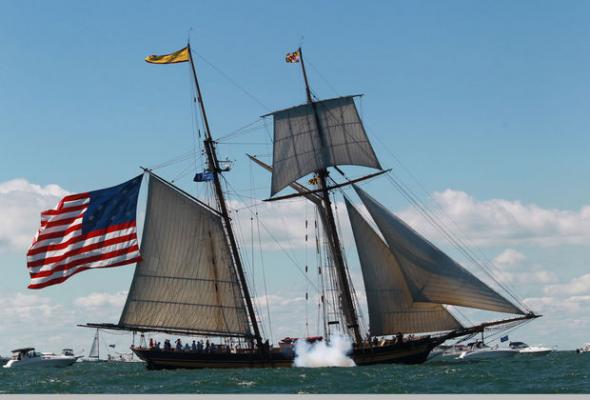
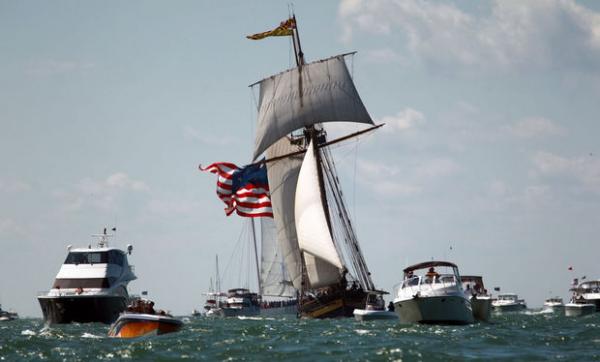
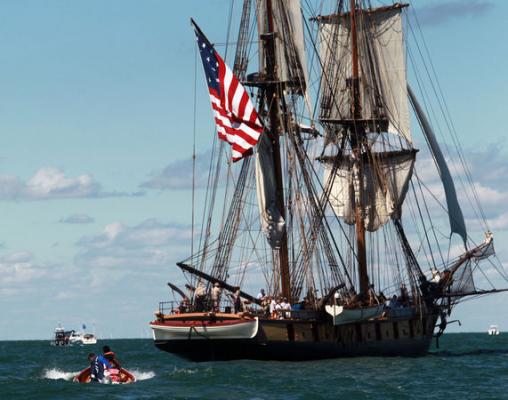
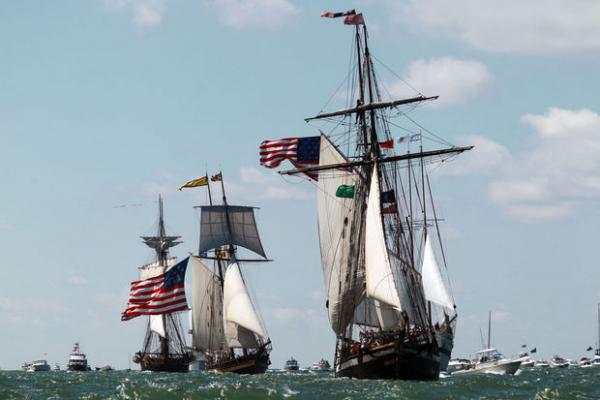
Over the Labor Day holiday weekend I had the pleasure of working my (you-know-whats off) on the Brig Niagara for the Bi-centennial re-enactment of the Battle of Lake Erie. It was a wonderful experience and I was able to be part of the gunning crew for the 32 pound carronades. Attached are some pictures of the re-enactment. Sadly there were so many pleasure boats out and so close to the tall ships that we were limited in the number of volleys we could send. Here are some pictures of the event.


-
Mark, Sorry I have been away for a bit and didn't see your question. I am not sure how you have come up with the block count for the gun tackle. The plans show 4 single blocks for the gun tackle. I used 2 singles and 2 double blocks (based on figure 16-16 in Ship Modeling from Stem to Stern). The plans show the tackle line being attached to the strop on the inward block then to the gunnel block and back to the inward block (the carronade slide). In practice on the Niagara today, to haul the carronade in we take the block off of the gunnel eye bolt make a twist and hook it to the ring bolt on the deck. To haul the gun in, we reverse the process. Anyhow to my count you need 80 blocks all together. By the plans 80 singles....the way I rigged them 40 singles and 40 doubles. I did not make train tackles for the long guns as there was not enough room on the deck (and it looked to crowded) and they were not necessary for the carronades. There are enough blocks for this and I think also for all the rigging. If not, Model expo will send you more. (they are very good). Hope this helps.
-
How to sew sails on your wifes sewing machine
Bahamas Diver replied to Mirabell61's topic in Masting, rigging and sails
Nils, The sails look great!!! I am a month or so away from needing to decide on how to display sails and will try your method. Thank you for the iformation. -
Your description is exactly how I would do it. I think you are putting them together just fine. I don't know why you are destroying the dead eyes unless you are squeezing them too hard while holding the dead eye with pliers.
-
I might be blind but I don't see the problem. How were you destroying the dead eyes?
-
Ken Larry, I would not bother drilling holes for cleats/ eyebolts etc. before painting. The paint will fill in the holes and you will at best waste your time. Larry, do you plan to fram the insides of the gun ports?
-
I agree. Ship Shape means everything neatly in its place...NOT everything being perfect.
-
Ken and Rich. Just a thought. I am now doing some rigging and am finding that there is a huge need for more rings to act as thimbles for rigging. (look at the details on plans 5, 6 and 7. In any case, I would make the rings from wire for the guns and save the kit tings for the thimbles (if I were to do it again). Just something to think about.
-
Geoff...I agree about the ratlines too. I use my compass (dividers) too and since the knot used is a clove hitch, they are easily adjustable on the shrouds before glueing in place.
-
BTW Roger, one of the best books I've found for rigging is The Young Office'rs Sheet Anchor. It is for rigging of English ships but I use it all the time. It is less than $13.00 from amazon.
-
I know this is going to go against everything I have read and what everyone says but I want to discuss the use of a jig for alignment of the shroud's dead eyes. I do not use any type of jig for adjusting the height of the dead eyes for the shrouds. There are 2 reason for this. 1st i use my compass (not a directional compass) and simply make sure the single hole (the bottom from the chain plates and the topmost from the shroud) and make sure they are pretty close to the proper length. All of the lanyard are laced and then temporarily tied off. Then I use the lanyards to adjust the mast so that it is properly adjusted (side to side). If the dead eyes are slightly off I wouldn't worry because (2nd reason) on a real ship the lanyards were adjusted from time to time to adjust the alignment of the mast. So it might be that the dead eyes were not perfectly parallel to each other. Sooooo.... now I am prepared to hear the arguments that are contrary to my reasoning .
-
Marsalv..I agree with Jon. The pumps are exceptional.
-
Larry, For what ever it is worth, I had the same problem on my Niagara. You can use some filler planks to fill in the gaps. Since you, me and bgarden had the same issue, I am wondering if it is not a common problem with the kit. In any case (and as you said) it is an easy fix. In the mean time your capstan looks great. One thing...from the 2nd picture of it, it looks as if the tip of the capstan is not square to the support ribs. It may just be the angle of the picture, but if not now is the time to fix it as it will show up when you add it to the deck.
-
Larry...the other trick I learned about CA is that if you put a drop on a piece of wax paper it will not dry for several hours. For small work I took the head off of a pin and inserted it into a small piece of dowel (as a handle). You can then use the tip of the pin to apply the CA where you want it. I have made a single drop of CA last a very long time LOL.
-
For the PVA in a syringe...when you are finished push a small drop out to the tip of the needle and let it dry. this acts as a cap. When it is time to use it again simply pick of the hardened drop and the glue inside the syringe will be as fresh as new.
-
I don't really know anything about lathes but for an additional $250 Harbor Freight has a 7 x 10 precision wood and metal mini lathe. Seems a better deal than the Proxxon tool. Just a thought.
-
I hadn't thought of using white glue but it makes good sense! I will try it at the next oppurtunity.
-
HAPPY BIRTHDAY Ken
-
Nice job on the capstan. I like the star painted in the middle...nice touch. BTW you can buy syringes at any drugstore such as CVS at the pharmacy. They are between $0.25 and $0.35 per. I get 5 mm but I forget the gauge. I will look and see if I have any unopened ones that label the needle gauge. You can use a triangular file to cut off the sharp needle part so that the syringe is safe and easier to use.
-
Thank you Hamilton. That is very kind of you to say.
-
Larry, Rather than using paper, I use manila folder. It is a bit thicker and so looks more like metal (once colored by a Sharpie). With the manila folder stock you can use CA glue...but judiciously.This is what I used for the metal ring. I also used a cut down syring to put drops of CA glue on the ring to simulate the bolt heads. The dry CA glue can also be blackend with a Sharpie
-
Thanks Ken and Larry. It is nice to be back here again and contributing to my favorite forum.
-
ancre Le Fleuron 1729 by rekon54 - 1:24
Bahamas Diver replied to rekon54's topic in - Build logs for subjects built 1501 - 1750
Rekon54...I'm in awe of your work. It is wonderful to see. Maybe some day I will come close to your quality. WOW -
Thank you for the kind comments Steve. It has been months since I have worked on my wonderful Niagara but I am now back at it. The first issue is to remember exactly where I left off in February. I think I have no figured this out and am setting things up to continue. I should have some more news in the next few days and maybe some pics a few days later. In any case it is good to be back at it and to be part of MSW again.