DONATION DRIVE - SUPPORT MSW - DO YOUR PART TO KEEP THIS GREAT FORUM GOING!
×


Jean-Pierre
-
Posts
268 -
Joined
-
Last visited
Content Type
Profiles
Forums
Gallery
Events
Everything posted by Jean-Pierre
-
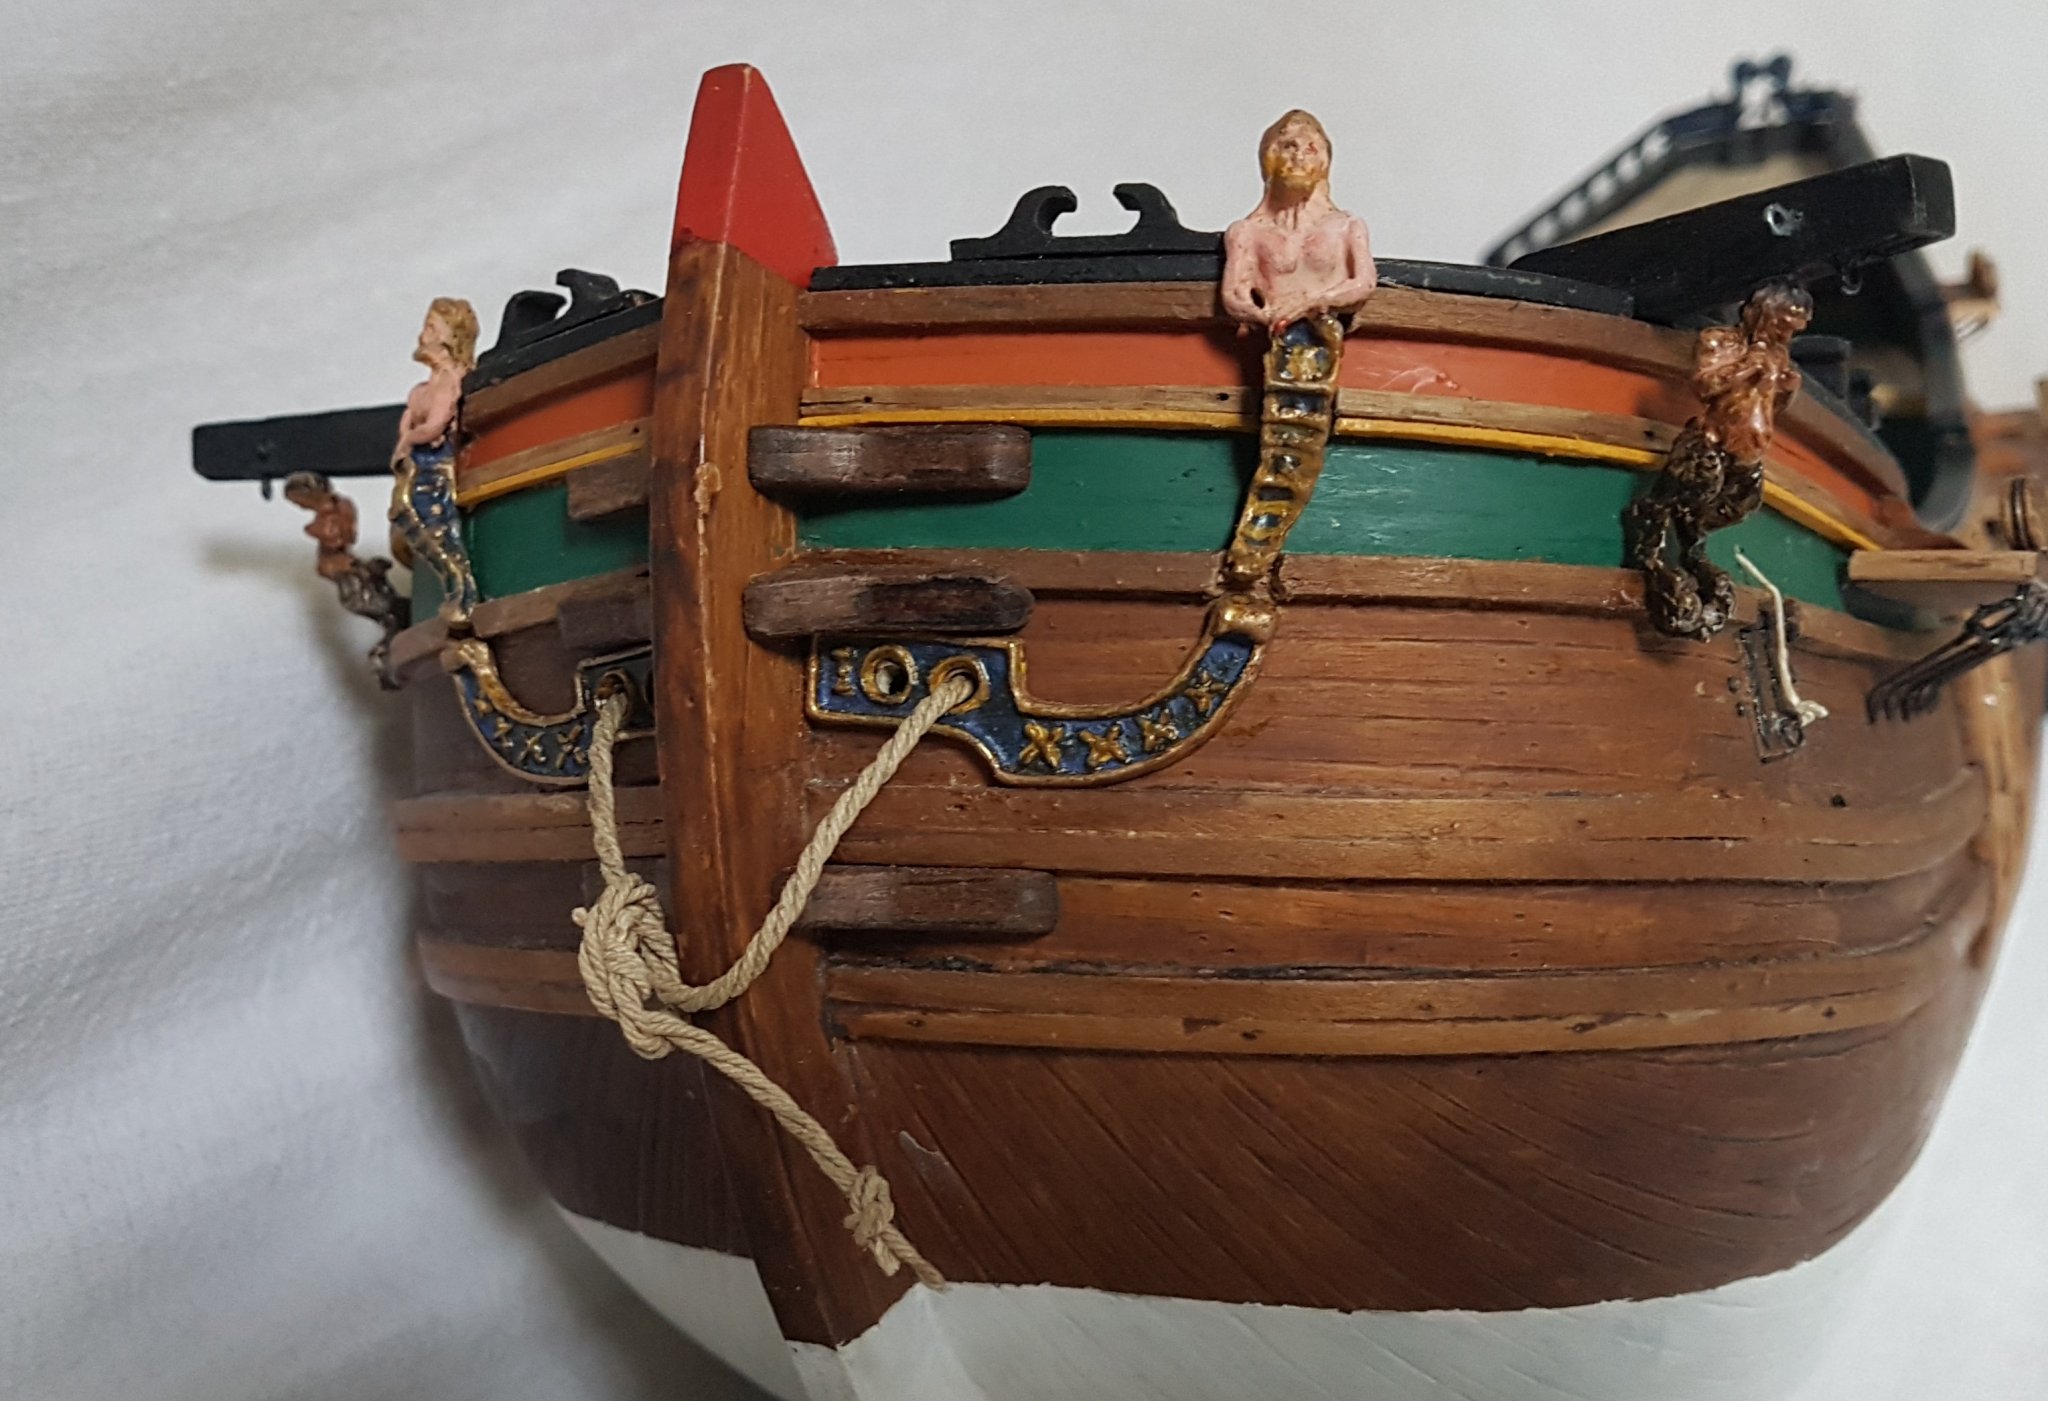
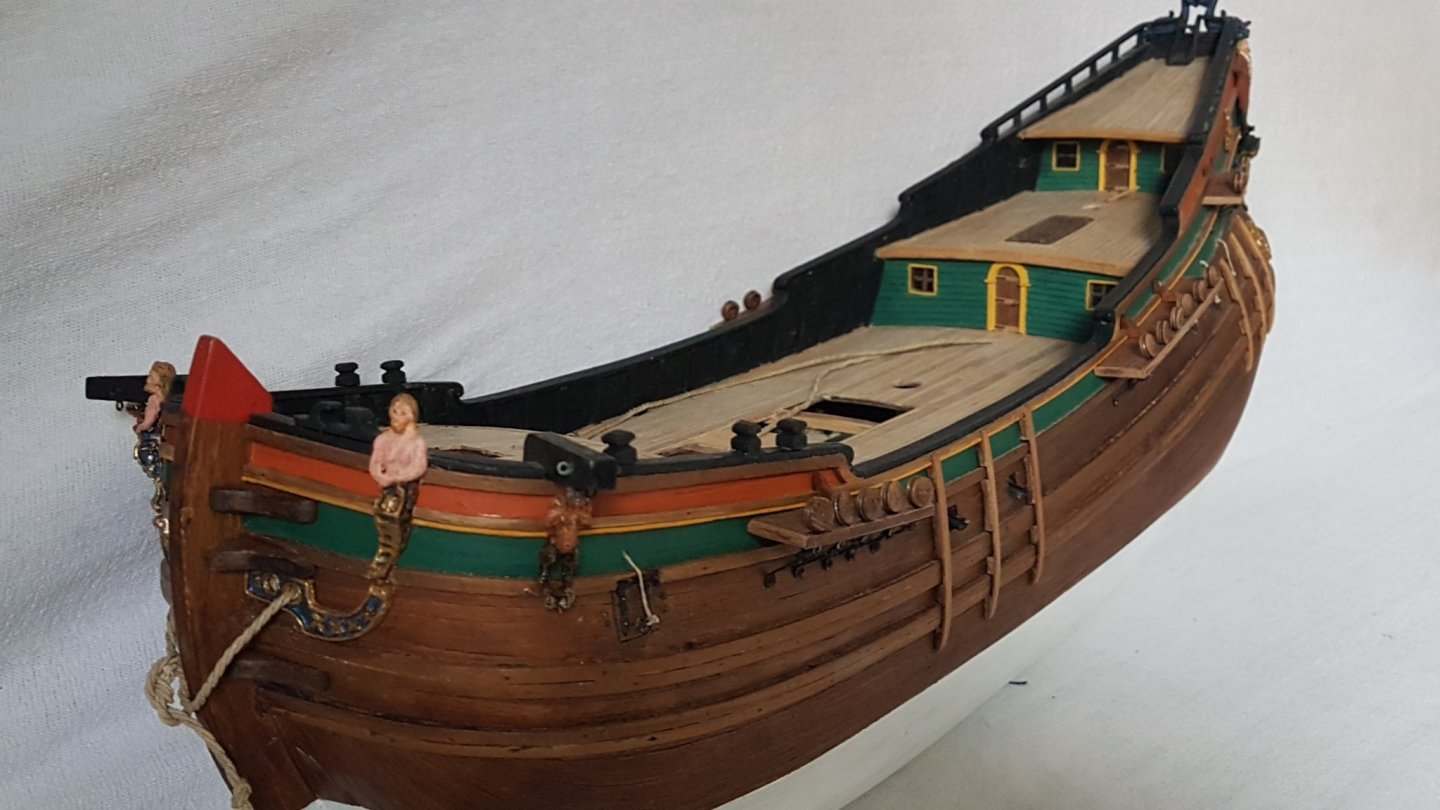
First I am a native French speaker. But I happen to be lucky and know Dutch quite well, and certainly better than most Franch speaking persons. I also have worked in the Netherlands, and in Flanders, and have a fair understanding of a number of dialects I was suspected that Poolsterre could have been the word in those days. I used to have some east Flemish friends, whom I managed to understand (at the cost of some headaches!) and yes, they still use the old word sterre. Alas, as you may see, I already put the tiny name plate, on which I wrote POOL STER / Hoorn. I may try and be bold enough to change that. In the meantime, the last 2 letters ER have been accidentally blurred ( Could have been a night raid by the Great Dutch Grammar Wizard? ). We'll see and thanks for the research anyway. So here are are some pictures of the ship I took yesterday with my cell phone. I did not care to have a pristine finish of the waterline, like on real ships of the time. I also added the anchor cables, which I made in the most rustic way by rolling 3 right twined cables from right to the left. I wanted to have a right twined cable, like it was in those days, at least for the thicker cables. I only had them (right twined in too small thicknesses.

-
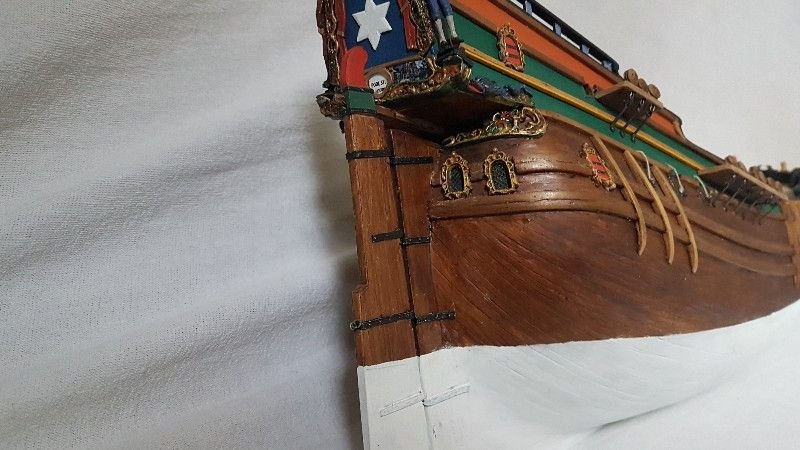
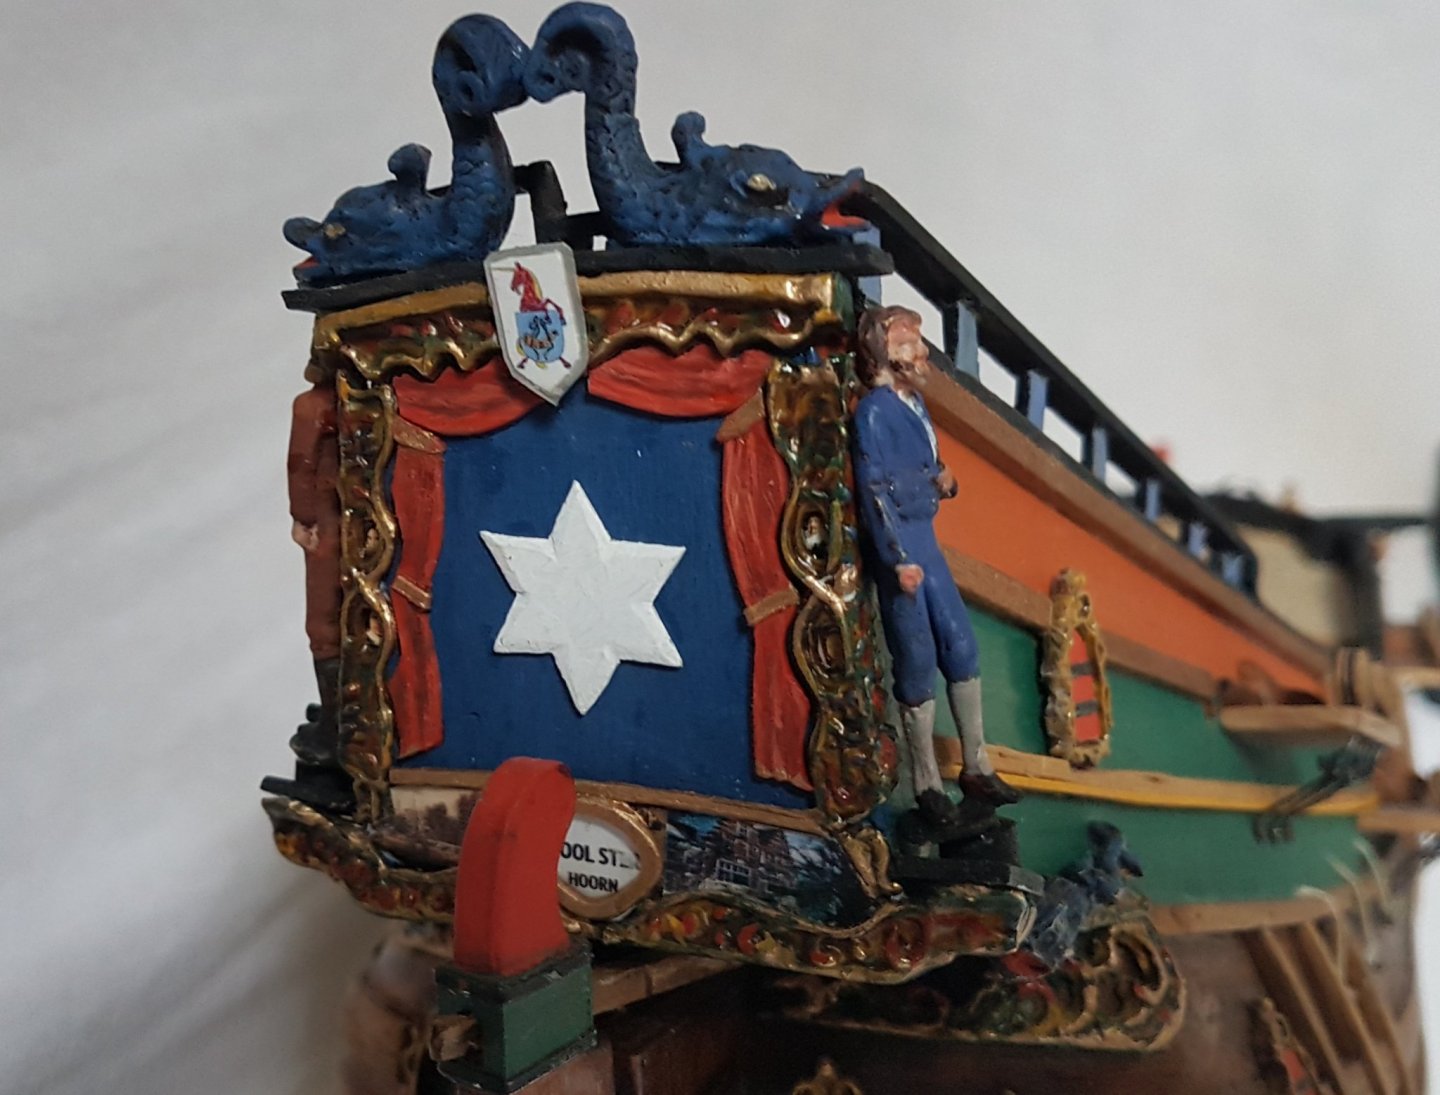
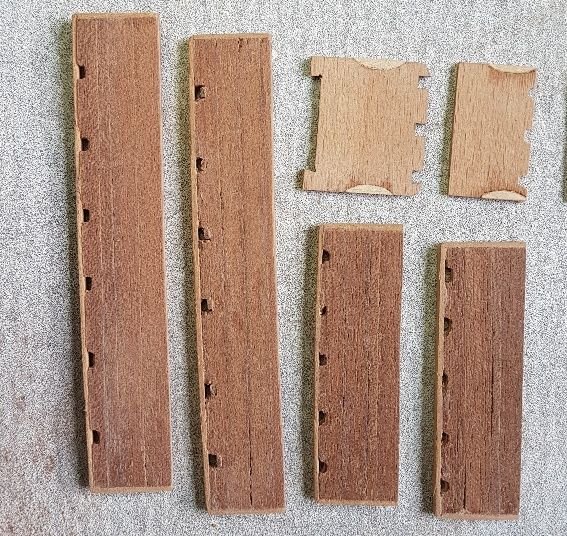
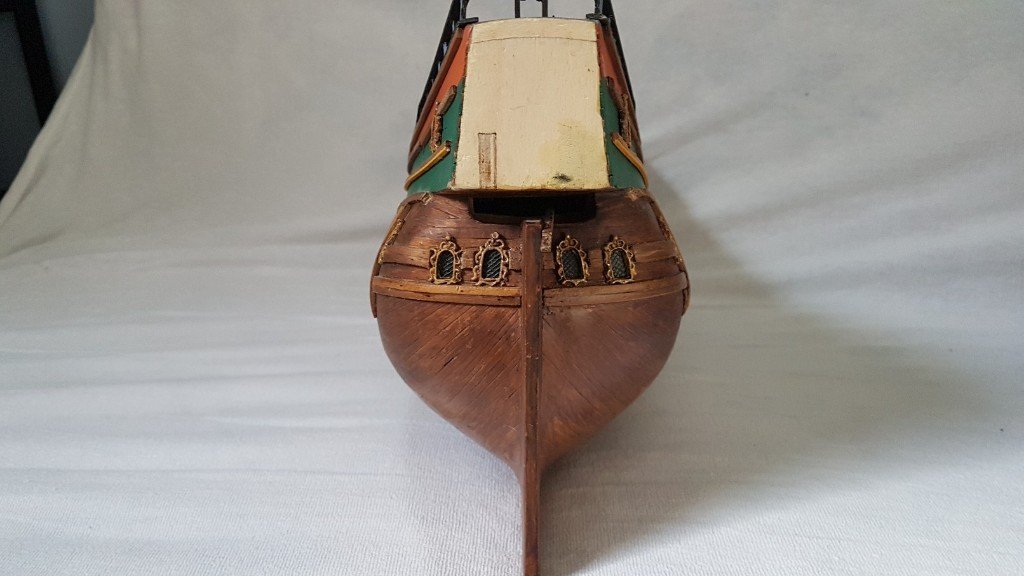
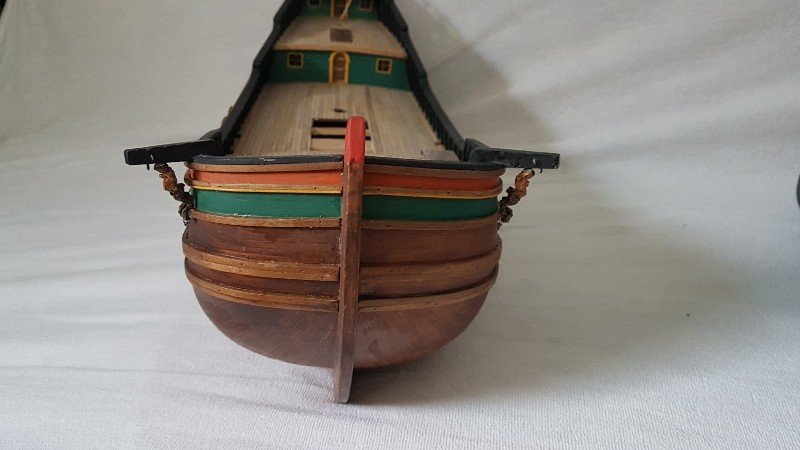
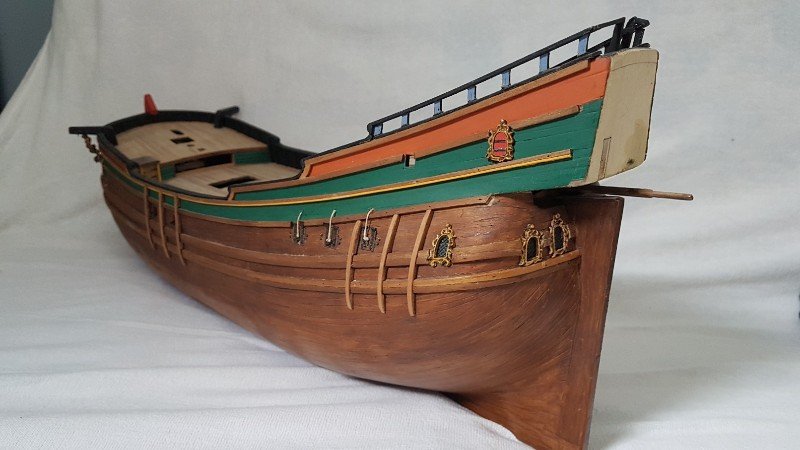
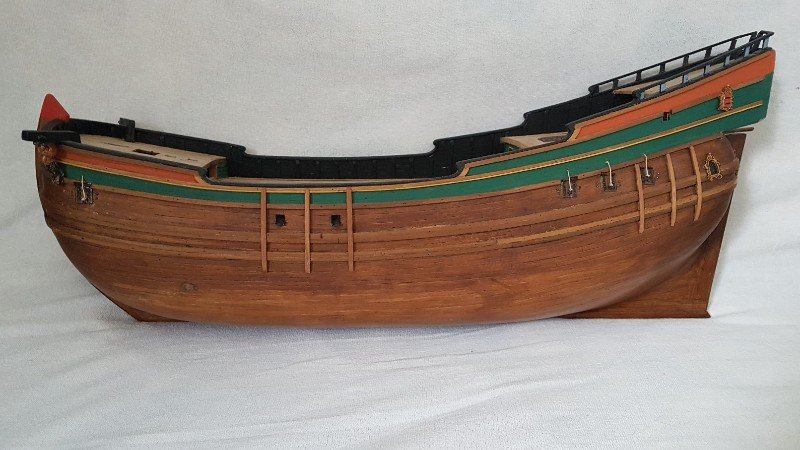
... and some more. Next (stupid??) thing will be to attach the rudder. The kit includes material for 3 hinges (as on the original model in Rotterdam). Yet I am inclined to think that there usually were 5 (or even 6) of them). Then on my self made rudder (I did not like the shape and the profile) of the kit rudder) I reduced the cutouts for the hinges, which I had made way too large). The hinges themselves were made of some copper strips onto which I glued a layer of aluminium tape with embossed fake nails. The pins I glued to the hinges, having failed to solder them😚. I fear this will be a weak point of the model, but let's cross our fingers. Then came the time to paint the lower hull. I did not find a "clean" way to achieve the blurred waterline like on the paintings, but I managed rather easily to reproduced the soft slope for and aft of it. The result is a sparkling white lower hull which, if I have the guts, I will tone down at a later stage. Then came the fun part of this kit (and of any other period ship): the decoration. Now please bear in mind that this is a kit that dates , at least, from the early 1970's. when a close ressemblance to the original was less important than details that would impress a newbie. This explains the never seen before hinges on panels and gun ports, and also the strange stairs that run over the rear decks. These are spectacular enough, but are better forgotten I am afraid. Also the decoration of the kit is really rude, probably due to multiple re-use of the molds. Main figure on the rear is what looks like Adam and Eve walking hand in hand. A Dutch builder of this model had considered to name his model "the Paradise" but he wisely changed that as life on such a ship in Arctic waters would have been anything but heavenly. I decided first to reduce the width of the rear pannel a little to make it more "flute like". I also decided to make a simplified version of the star seen on the Rotterdam model (which I copied from a Jewish star found on the net) and cut out of plasticard. I also made a small name plate with of course, the name I had chosen, and the Dutch city of Hoorn. Some of the place left over I filled with a couple of landscape paintings of Hoorn in the 17th century, while the oval holes on the sides of the star have been turned into portraits of the owners (copied from portraits by Jacob Cats!) About the "gold" seen on the decorations in the kit: I am pretty sure that no gold leaf was used on these ship, so I painted everything over in realistic colours. As this was too drab to my taste, I could not resist to make some highlights, with some gold enamel. At last, I made the guildings at the bow, also painted in "natural" colours, with just a bit of gold showing. Oh, let us not forget that i also made the chains. The plates in the kit are way too large. I reduced them to a width of 15mm and that is still a bit too large (12mm would be enough and ideal to cover with 3 x 4mm planks). The kit material for the chains had to be discarded. I used soft iron thread instead . Here you see how the plates were reduced in width and the cutouts on their sides filled in
-
Maybe I found the trick to have some pictures edited. So here is the model out of the mothballs.
-
Although this ship looked promising, I for some reason gave up this build 7 years ago. In the meantime, we moved from our house outside Brussels (where we had lived for 45 years) to a flat in the city, where place is obviously more restricted. That was a big issue not only for my built models (a painful selection had to be made), and also for the various tools and materials that had to be packed and stowed where room was available. What happened up to now? Well, I must say that the level of craftmanship among the community of modellers has considerably increased, and I am amazed to see what you people now produce, and the level and quality of finishing they achieve. Congratulations to all of you. Now my Dutch Whaler has recently be taken out of the mothballs. One has to find things to keep busy in this confined environment. The ship, as she had been stowed away, is a little more advanced than the last pics above. I now know that the expensive satin colored varnish I had bought at one of the local diy stores was **** (too glossy, and low tack masking tape would rip it off even after a few days drying time) Also, I found that the gloss was unsuitable for a working ship like this. I brushed a layer of thoroughly mixed flat varnish from the same maker: no use. I finally used one of my last bottles of Humbrol enamel based flat varnish, after a wash of much diluted flat black. Looked finally good enough. That was just before the mothball hibernation. Alas, in my former life, I had a helpful program called ACDsee which allowed for easy resizing of pictures, but in my new life, my Mac Book ,with standard programs does not offer that possibility, and the pics I took on my Galaxy S7 on the lowest resolution still are over 2 Mb and are not uploadable here. Sorry, but I'll first have to find a solution to this!
-
Although this ship looked promising, I for some reason gave up this build 7 years ago. In the meantime, we moved from our house outside Brussels (where we had lived for 45 years) to a flat in the city, where place is obviously more restricted. That was a big issue not only for my built models (a painful selection had to be made), and also for the various tools and materials that had to be packed and stowed where room was available. What happened up to now? Well, I must say that the level of craftmanship among the community of modellers has considerably increased, and I am amazed to see what you people now produce, and the level and quality of finishing they achieve. Congratulations to all of you. Now my Dutch Whaler has recently be taken out of the mothballs. One has to find things to keep busy in this confined environment. The ship, as she had been stowed away, is a little more advanced than the last pics above. I now know that the expensive satin colored varnish I had bought at one of the local diy stores was **** (too glossy, and low tack masking tape would rip it off even after a few days drying time) Also, I found that the gloss was unsuitable for a working ship like this. I brushed a layer of thoroughly mixed flat varnish from the same maker: no use. I finally used one of my last bottles of Humbrol enamel based flat varnish, after a wash of much diluted flat black. Looked finally good enough. That was just before the mothball hibernation.
-
Doris, your sculpting talent is so impressive that you could help some manufacturers with sculptures (or their moulds) for their ship offerings. I am thinking for instance at Kolderstock Models from Holland, who provide some excellent and well known models of Dutch ships from the 17th century, but which are a little let down by their sculptures. Once again, their kits are great, but with the "Doris touch" they would be real wonders. OK, just an idea...
- 1,035 replies
-
- 4
-

-
- royal katherine
- ship of the line
- (and 1 more)
-
2 little ideas if I may. I use to improve the look of the blocks simply by simulating the sheaves with a black pencil: easy and very effective. Secondly, you may wish to check the rake of the mainmast. It looks like its 3 parts do not run completely parallel. This can be partly rectified by adjusting the tension of the rigging, but on the long term... ?? Btw, the overall look of your ship is terrific! Congratulation!
- 786 replies
-
- 1
-
-
- Royal Louis
- Finished
- (and 1 more)
-
Does Anyone Still Work at Caldercraft?
Jean-Pierre replied to ringleheim's topic in Wood ship model kits
Anyway, let's hope they 'll be back soon. I also know that their "main" activity is the radio controlled plastic hull ships, a field where they definitely were market leaders. But there again, there isn't much new to be seen. -
Does Anyone Still Work at Caldercraft?
Jean-Pierre replied to ringleheim's topic in Wood ship model kits
I'm afraid you are right. I suspect that they brought out a little too many models in a short period of time, some of which, although beautifully made, were rather uninteresting. It's a pity that HMS Surprise did not make it to the shelves, and now I suppose it's too late. A 74 gun ship would still be selling well though. I think there might be some financial issues and that's too bad. They also ran an inquiry if I remember well, to know if their wood should be replaced with some better quality... and this may have induced some doubts about the quality of their current wood. Anyw -
Congratulations. This is a very nice build indeed. A President to be looked at with respect!
-
What a splendid model! Congratulations to Master Corabel for an excellent kit, and to you for the excellent miniature you made out of it.
-
Scott, let me wish you ...and your models, a successful move, and a safe settling for your marine treasures .
-
Excellent result!! And I guess you enjoyed this build. Hope the next project will come soon, as this build was a pleasure to follow.
-
Your dad's question is typical and mostly is the friendliest a non-initiated can do! tThe underlying question is rather "how can you spend so much time on such a futile project... but there usually also is some respect in the question. Coming from your own dad, maybe the best answer would be: "dad, you know pretty well where I got the patience from..." Well done, and now: back to work! JP
-
There is one point to consider about the sails, I think: the "high" rig that you prefer will also be very cumbersome and require a huge glass case. I would personally go for the 2nd type which is also very beautiful in my opinion and need a considerably less high case.
- 174 replies
-
- 1
-
-
- gaeta falcata
- marisstella
- (and 1 more)
-
I should add to my former post that I do use partial length planks... to save on wood strips. This has had the advantage that I have never run out of hull planking wood so far. But I have taken care to have the butt joints only where the planks are full width.
-
Is there a true POF kit in the market?
Jean-Pierre replied to Ulises Victoria's topic in Wood ship model kits
Why not upgrading an existing model: I mean the model Shipways Flying Fish, a beautiful ship, and a potentially beautiful model, but rarely finished! (Probably because the kit is not quite up to modern standards) -
I agree with this, of course, but why making it extra difficult by cutting the planks, while scoring them would give a safer butt joint and will look exactly the same?
-
I love this model, and the way you are building it is outstanding. I am sure, once finished, you will have a superb rendering of an excellent kit. By the way, there is a little point I think you definitely could and should improve, and that is the position of the figurehead, which sticks out a little too much. Have a google at other Berlin models. Get on with the fine job. JP
-
Where can I get TINY letters for my ship?
Jean-Pierre replied to Brenticus's topic in Plastic model kits
My experience as a clumsy ship builder is that small size letters are very, very difficult to align properly. Furthermore, small letters seem to be only available in sans serif characters, like Helvetica, while the letters used on period ship were mostly of the serif type (Times...). I personally used my computer and printed the required words on photo paper and protected the deskjet print with a few layers of matte varnish. Two small difficulties here are: first conceal the paper edges; second: reproduce the right hull colour as a background on your print. JP -
About your Diana: did you post your build log under this name? (I used to collect all pics available, but do not have this name!)
-
A drink or two? I tried this while planking my last deck. But then for some reason, the quality of my planking decreased progressively....
- 653 replies
-
- 4
-
-
- trabakul
- marisstella
- (and 1 more)
-
What a beautiful build! What a beautiful ship. Your model proves once again that there is no necessity of a bunch of guns to make a spectacular model. I look forward to the rest of your build. Thanks for sharing. Happy modelling JP
- 653 replies
-
- 7
-
-
- trabakul
- marisstella
- (and 1 more)
-
Nice and unusual choice of model. This ship surely looks quite detailed and will be impressive. About the cannons, I had the same problem when I built the plastic Soleil Royal, and I had to close a few gunlids because their cannon had gone adrift. In this case I would certainly wrap a thin blackened metal thread around the gun, pass the ends through the bottom of the carriage, through the deck and fix it underneath. Could easily be made invisible. Otherwise, you could put the guns on their carriage only when rigging is completed. Oh, just a little detail: the name Roter Löwe is German, so I suppose the ship is from one of the German states, and not Dutch (from the Netherlands) I look forward to your progress: happy modelling. JP