

Omega1234
-
Posts
6,057 -
Joined
-
Last visited
Reputation Activity
-

 Omega1234 got a reaction from BANYAN in Splendid by Omega1234 - Scale 1:500 - Mega Yacht
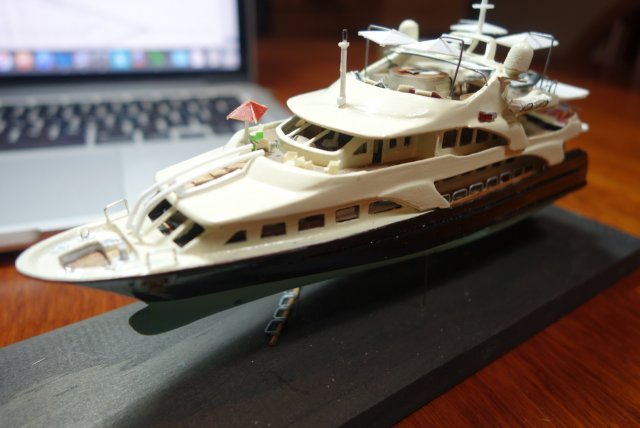
HI folks
Allow me to introduce you to my latest miniature mega-yacht model, “Splendid” (1:500). Splendid is based upon an actual mega-yacht named Nirvana https://www.yachtcharterfleet.com/luxury-charter-yacht-25086/nirvana-layout.htm and as is customary with all of my models, I will attempt to include as much internal detail as I can; with all of the decks made removable in order to view the interior.
The following photos show that the general layout of the superstructure has been mocked up in order to give me an idea of how everything will fit together. It’s all still very rough and there’s lots of work to go.
I hope that you can continue to join me on Splendid’s construction journey.
Thanks
Patrick
-
 Omega1234 reacted to steamschooner in Splendid by Omega1234 - Scale 1:500 - Mega Yacht
I'll be watching this one too! I do not know where you find them Patrick.
-
Omega1234 reacted to mtaylor in Splendid by Omega1234 - Scale 1:500 - Mega Yacht
Count me in for seat near the front, Patrick.
-
 Omega1234 got a reaction from KeithAug in Splendid by Omega1234 - Scale 1:500 - Mega Yacht
HI folks
Allow me to introduce you to my latest miniature mega-yacht model, “Splendid” (1:500). Splendid is based upon an actual mega-yacht named Nirvana https://www.yachtcharterfleet.com/luxury-charter-yacht-25086/nirvana-layout.htm and as is customary with all of my models, I will attempt to include as much internal detail as I can; with all of the decks made removable in order to view the interior.
The following photos show that the general layout of the superstructure has been mocked up in order to give me an idea of how everything will fit together. It’s all still very rough and there’s lots of work to go.
I hope that you can continue to join me on Splendid’s construction journey.
Thanks
Patrick
-
 Omega1234 got a reaction from mtaylor in Splendid by Omega1234 - Scale 1:500 - Mega Yacht
Thanks Casi!!
-
 Omega1234 got a reaction from yvesvidal in Splendid by Omega1234 - Scale 1:500 - Mega Yacht
HI folks
Allow me to introduce you to my latest miniature mega-yacht model, “Splendid” (1:500). Splendid is based upon an actual mega-yacht named Nirvana https://www.yachtcharterfleet.com/luxury-charter-yacht-25086/nirvana-layout.htm and as is customary with all of my models, I will attempt to include as much internal detail as I can; with all of the decks made removable in order to view the interior.
The following photos show that the general layout of the superstructure has been mocked up in order to give me an idea of how everything will fit together. It’s all still very rough and there’s lots of work to go.
I hope that you can continue to join me on Splendid’s construction journey.
Thanks
Patrick
-
Omega1234 reacted to Casi in Splendid by Omega1234 - Scale 1:500 - Mega Yacht
The great luxury the yacht !
-
Omega1234 got a reaction from mtaylor in Shohei Maru by Josh44 - FINISHED - 1/450 scale - BOTTLE
Hi Josh
Lovely job and a great gift for your father!
Cheers
Patrick
-
Omega1234 reacted to josh44 in Shohei Maru by Josh44 - FINISHED - 1/450 scale - BOTTLE
Part III: Launch, Repairs, and Finish
She folds nicely - a good start!
Even better!
The Stern was too wide for the bottle neck, so I had to grind it down a bit.
No snaps or cracks - music to my ears.
Secured by CA onto the 2 posts drilled up from the bottle bottom.
The next part - the fixing and finishing of the yards and rigging - is the where I experience the highs and lows of these projects.
Inevitably, and despite my sometimes careful planning, there are major repairs. Some of these repairs ar a result from the folding, and some from the insertion: I always fix from stern to stem, so some damage is foreward from my attempt to fix aft in the bottle.
Below, in red the major damage came from folding and squeezing into the bottle. Three sails, the main-lower , fore-lower , and for-upper topsails, all came off during insertion. This was probably because the knots I made in the fishing line were too small, and got pulled through the holes I drilled in the yards.
I think I simply glued these yards to the masts. The more elegeant option of rethreading inside the bottle with hartmanns clamps was proving too time consuming and unnecessary.
Here the mizzen is up, and the main mast is set and glued, but the bowsprit has inadvertantly been torn from the hull during the repairs.
Because many of the rigging lines passed through the bowsprit, I had to get it reaffixed before I completed the Foremast.
Many hours later, all is completed.
I decided not to take pictures of the model in various states of repair and frustration.
A proper custom base. My new thing is laying felt down tohave its color picked up and reflected, as if it were the ocean.
I kept the whiskey label on the bottom of the bottle. I might choose to remove it to improve the optics of the feaux-cean.
The Jibs look better from this - the windward - side.
Can't wait to give it to Dad! He will Love it!
Thanks for reading!
-
 Omega1234 got a reaction from FriedClams in 21' Fisherman's Launch by vaddoc - Scale 1:10 - Plans from Howard Chapelle's "Boatbuilding"
Hi Vaddoc
Just catching up. Geez...for crying out loud!!! How the hell you’re able to build these technically accurate, beautifully constructed models woven together with a touch of magic and oodles of skill, is nothing short of amazing. And...this model is no exception, as witnessed by the perfect planking and framing.
Nice job!
Cheers
Patrick
-
 Omega1234 got a reaction from BobG in 21' Fisherman's Launch by vaddoc - Scale 1:10 - Plans from Howard Chapelle's "Boatbuilding"
Hi Vaddoc
Just catching up. Geez...for crying out loud!!! How the hell you’re able to build these technically accurate, beautifully constructed models woven together with a touch of magic and oodles of skill, is nothing short of amazing. And...this model is no exception, as witnessed by the perfect planking and framing.
Nice job!
Cheers
Patrick
-
 Omega1234 got a reaction from Landlubber Mike in 21' Fisherman's Launch by vaddoc - Scale 1:10 - Plans from Howard Chapelle's "Boatbuilding"
Hi Vaddoc
Just catching up. Geez...for crying out loud!!! How the hell you’re able to build these technically accurate, beautifully constructed models woven together with a touch of magic and oodles of skill, is nothing short of amazing. And...this model is no exception, as witnessed by the perfect planking and framing.
Nice job!
Cheers
Patrick
-
Omega1234 reacted to vaddoc in 21' Fisherman's Launch by vaddoc - Scale 1:10 - Plans from Howard Chapelle's "Boatbuilding"
But Hakan, haven't you noticed, I only chose the best angles to get pictures! 🙂 Many thanks.
Thanks Gary. Now this boat would be ideal to try weathering for the first time wouldn't you agree? And I know just the log to follow. Something to think about...
Thanks to all for your likes!
Time for an update on the boat. But before that, just to mention I did put a few batens on the Yawl. Oh dear...it will be a difficult planking job with lots of steaming!
Also, I think I should reveal my secret on planking. I have 2 little elves helping me!
So, I started work on plank No 8. At this point, the planks on both sides are almost identical, this is a good sign. These are the patterns from both sides clamped together.
The previous planks were actually the most curved, the planks now are becoming straighter. I am happy with the initial planning.
And these are the two No 8 planks one on top of the other-almost identical.
So then I moved on to No 9. Again, the spilling is not unreasonable.
However, this is a tricky plank to fit. There is much less of a twist so it is easier to make the pattern but this plank goes on the most curved part of the hull. The planks will not sit unless their edge is pretty bevelled but also their underside hollowed. I am ashamed to admit I found easier to just chisel the frames flat! The next photo shows how thick the planks are.
Both planks went in quite easily. Two of the aft frames are very wrong and need shimming and a few others had the wrong bevel. It is pretty easy to tell actually, the planks at 2 mm are very thick and immediately show the problem areas.
A few pictures of the planking so far. They are taken from quite far due to the size of the boat.
And on to the next. I have been reusing pieces of the previous cardboard templates and with the plank twist getting less, the process is speeding up. The planks though are getting pretty long, I guess this one is around 65 cm long
Regards
Vaddoc
-
Omega1234 reacted to vaddoc in 21' Fisherman's Launch by vaddoc - Scale 1:10 - Plans from Howard Chapelle's "Boatbuilding"
I thought I d just post a few more pictures. Half way through the outer planking!
-
Omega1234 reacted to Bill Brown in 1930 26' Chris-Craft Tri-Cockpit Runabout by Bill Brown
Well its been more than a month since my last update but I have been busy on the project. I continue to work from stern to bow with planking and structural details.
In the photo above I have completed the interior cockpit planking and have started on the aft engine storage compartment. This area is one of the key differences between the 24 and 26 footer.
My attention then turned to the engine deck area. The boat is designed with two hatches that open in the center. I will create the hinges and handles at a later time.
After finishing the engine hatch planking. I then moved to the forward cockpit area where I proceeded to plank the interior bulkheads in a similar manner to the aft cockpit.
Having completed the interior planking in the forward cockpit I then tackled the dash.
Finally with the dash in place I was now able to focus on the bow deck which would prove to be the most challenging to date. The bow has a beam to beam camber as well as a slope from dash to bow.
In the photo below I tried to simulate the curvature of the bow as best I could with the limited plan information I have. This required some filler wood and Bondo. I ended up having to do this twice as I was not happy the way iteration 1 turned out at all.
The picture below shows the deck as it stands right now. This is iteration 2. The boat has a square access hatch located in the middle of the deck that will need to get added at a later time. I am also not happy with the interior cockpit planking as I should have added more frames to the back side. The planking I am working with is only 1/32" thick so not a lot of room for error. And error I do have. So the next step will be to replace the interior planking only after I beef up the frame support. Ugh.
Its definitely a 2 step forward 1 step back kind of project so far. Oh well it is what is.
Once I get the interior planking sorted out my attention will turn to final sanding and finishing of the hull and deck.
The boat will get bottom paint. Flat black below the waterline. It will also receive a decorative white stripe just above the waterline.
I plan to finish the rest of the wood with a red mahogany stain topped with several coats of gloss poly, sanding in-between coats. One thing I have to decide is if I stain the narrow deck planks with a lighter stain. I have seen this on some real-life full scale restorations and its sharp. I am just not sure that would represent the Miss Seaside that I am attempting to model. All I have is a black and white photograph and there does not appear to be a tone difference between the top side and deck planks.
Once the finish is applied my attention will turn to the interior (seats, cushions, gauges) and exterior/interior metal trim details. Until then, be well.
Bill
-
Omega1234 reacted to Bill Brown in 1930 26' Chris-Craft Tri-Cockpit Runabout by Bill Brown
It's been about a month since my last post and I have made some more progress on the Chris that I would like to share. When I last left off I had just finished planking the hull below the Chine. I am still not sure whether I will leave this part of the hull bottom natural (mahogany stain and poly) or apply a bottom paint (black or green). It will get a white accent strip added just above the water line either way.
My attention now turned to planking the sides between the Sheer and Chine. As with the bottom of the hull, I will be using 1/32" thick cherry planks. From full size project boats listed on the internet, I was able to determine the number of planks between the Sheer and Chine to be 6. This allowed me to create tick strips for each hull station and mark the plank widths at each location. I made templates for each plank and then used my Burns Saw and Dremel Belt Sander to create the individual planks. These were affixed to the poplar base using PVA glue. For clamps I used a combination of bar clamps, rubber bands, and push pins.
Its a slow process but also a straight forward one. I used this same process to plank the stern having determined the plank number from another full size project boat for sale on the internet. Eventually I was able to complete all the hull planks with the cherry veneer.
My attention now turned to the deck where I will work from stern to bow. These boats had beautiful decking using a combination of mahogany planks and lighter caulking. I will continue with the cherry for the deck planks and use a poly styrene (0.01x0.03") strip in-between the planks. I was able to determine from actual boat pictures, the number of deck planks across the stern. Knowing this allowed me to determine the deck plank widths, in my case 0.15". A wider center plank is added first to the stern deck and then working from the center out to the sides I added the planks and styrene strips.
This is about as far as I got this month. Next time hopefully I can show the aft cockpit being worked on as well as decking the engine deck. This deck area flares up as it flows to the stern and also has 2 doors for engine access. This will be more challenging then the stern. Until then, hope everyone is staying safe and healthy!
Bill
-
Omega1234 reacted to Bill Brown in 1930 26' Chris-Craft Tri-Cockpit Runabout by Bill Brown
I got some great help from a fellow club member and a great friend. In his shop he has some very nice tools including a beautiful scroll saw and an oscillating spindle sander that made cutting out the qty 8, 1/2" lifts straight forward.
Along with cutting out the waterlines for all 8 pieces, care needs to be taken to mark all 13 stations on each lift as well as the centerline for the full beam boards. These will be used to align the lifts for gluing.
Below is a picture of the 8 lifts stacked:
She is already starting to look like a boat!
Once all the lifts are cut and sanded to the waterline marks, its time to glue them all together. I used PVA glue and glued the lifts one at a time. This proved to be challenging as its tough to keep everything in exact alignment while clamping the lifts together.
Here is a photo of the lifts all glued together with some rough shaping already accomplished.
For someone who just finished building the POB model of the HMS Cheerful, the toolset for this project is a little different.
The best tool to start the shaping process is the chisel. Here are the set I used:
Make sure they are sharp. I can't emphasize this enough! We had an excellent tech session at one of our club meetings demonstrating the proper way to sharpen a chisel using a whet stone. Thank you Eric!
You are going to create a lot of poplar wood chips.
Once you have the macro shaping complete its time to switch to the rasp and then the sanders. Again this is still at the macro level of material removal.
Unlike my last project, here are some of the tools used for this process:
Care must be taken in using tools like these as a lot of material can be removed in a short period of time. Sometimes more material than you want ; ) I did invest in a pint of Bondo Wood Filler. The entire hull will be planked over with Cherry Veneer so I am not concerned if I have a filled hole here or there. The important thing is that the hull flows smoothly according to the plans.
Prior to doing this it is extremely important to mark both the Sheer and the Chine at all stations. You also want to use your station profiles frequently as you get close to the desired contours of the hull. You will have to repeatedly mark the stations during this process as the sanding operation will remove your previous lines.
Here is the hull with macro material removal complete. Each station fits the profiles well at this stage but it still needs a lot of fine tuning before I can say it is ready to be planked.
So I will leave it here for now. Next steps are to perform the finer sanding and shaping to make sure there are no high or low spots and the lines flow evenly.
Its amazing to me how fast you can get a reasonable hull by using the lift method. Until next time be well...
Bill
-
Omega1234 reacted to neilm in Orca by neilm - FINISHED - from the movie Jaws
Quint’s fighting chair. Fishing rod to do. 😊
-
Omega1234 reacted to neilm in Orca by neilm - FINISHED - from the movie Jaws
Most of the rigging now done. Super pleased. Winch and lager. ☺️😃😃😃
-
-
Omega1234 reacted to Wintergreen in Orca by neilm - FINISHED - from the movie Jaws
Man! That is just excellent!
I really like your detailing and that rusty chimney looks any part as real as the true piece.
Keep it up!
-
Omega1234 reacted to neilm in Orca by neilm - FINISHED - from the movie Jaws
The interior as good as done. Few more details on the rest.😊
-
-
Omega1234 reacted to neilm in Orca by neilm - FINISHED - from the movie Jaws
Searchlight, ladder soldered and some internal fitting out. All WIP.
-
Omega1234 reacted to neilm in Orca by neilm - FINISHED - from the movie Jaws
So fragile as well, cutting them off the trays.