HOLIDAY DONATION DRIVE - SUPPORT MSW - DO YOUR PART TO KEEP THIS GREAT FORUM GOING! (Only 24 donations so far out of 49,000 members - C'mon guys!)
×


bear
-
Posts
362 -
Joined
-
Last visited
Content Type
Profiles
Forums
Gallery
Events
Everything posted by bear
-
Ahoy Chuck It's like a lifetime ago-40 some years ago when I started out learning how to file and polish form die's at work. It just takes lots of just doing. You will get a feel for it just like in your planking skills.And develope your own ways and steps and final finishing mediums. It's easier with steel because you have material that has no grain to deal with. You might try scraping with very small knife blades. Just like you make your moldings ,but in shaped areas and corners. I use small dental scrapers for my plastic models and they work great on wood. It just is that the photos show up everything your eyes do not see. Keith
-
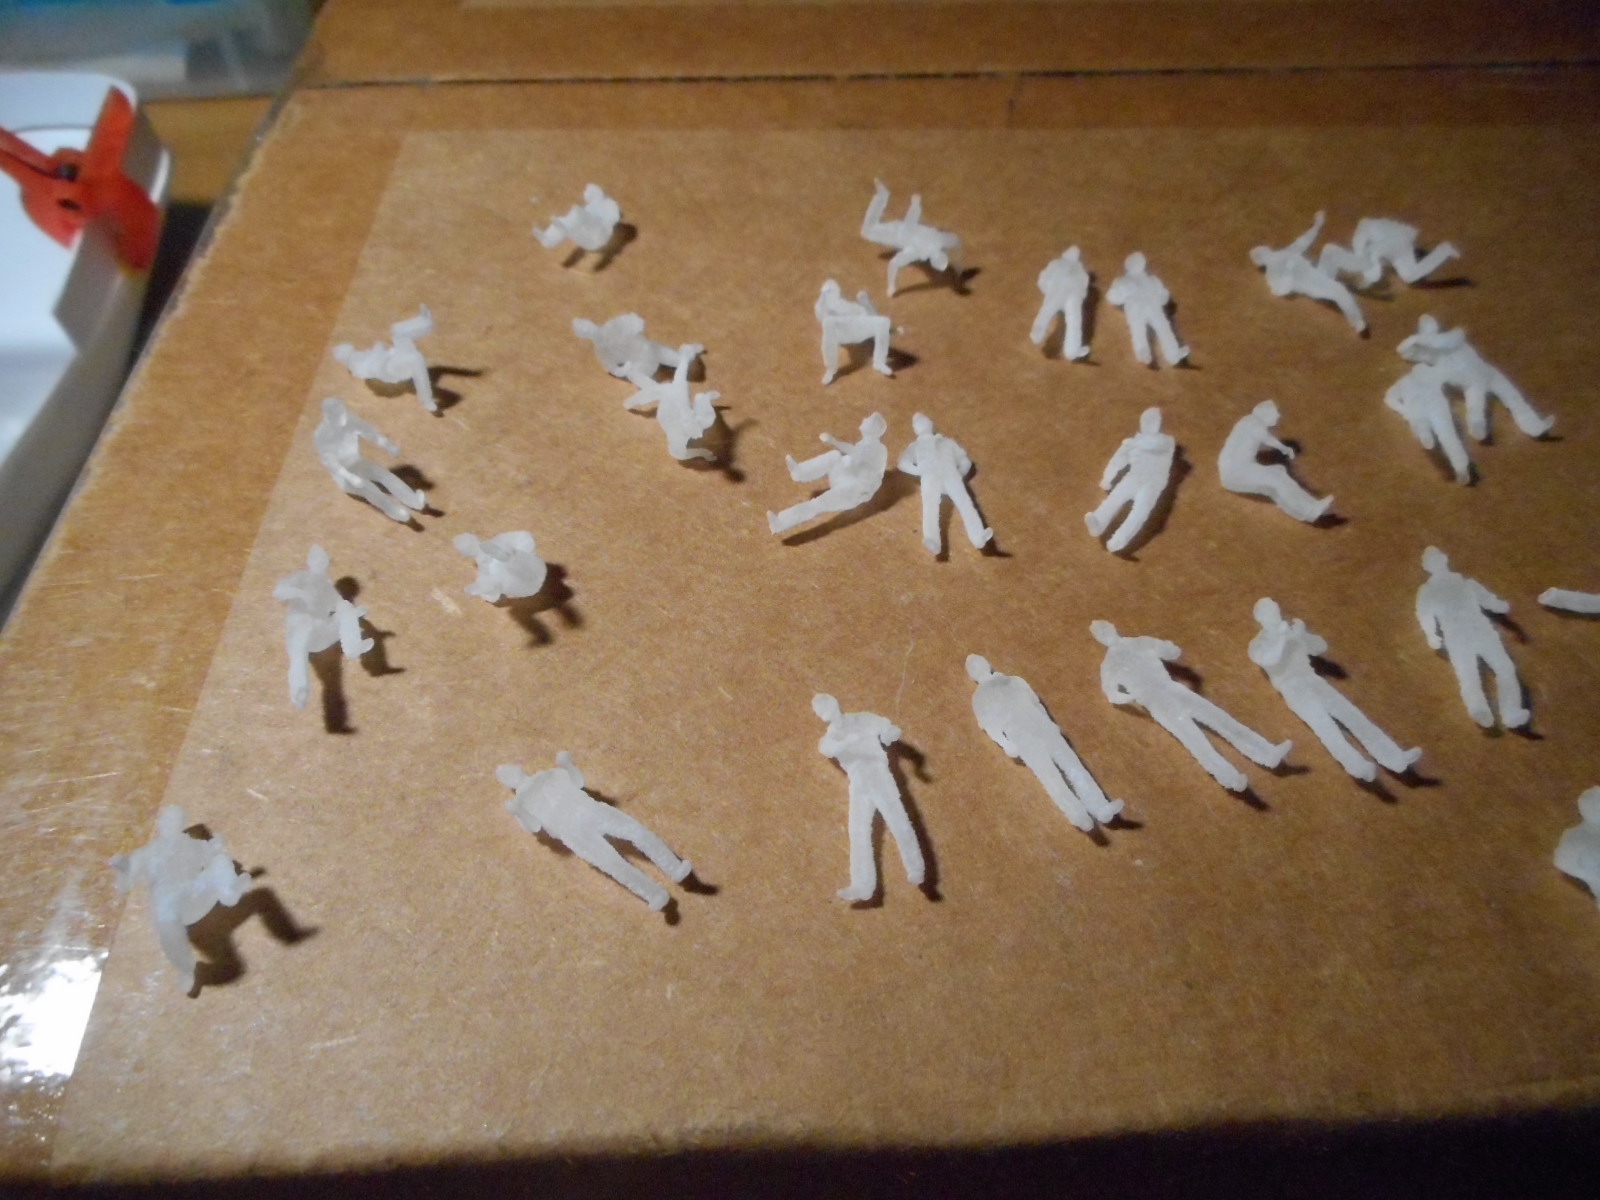
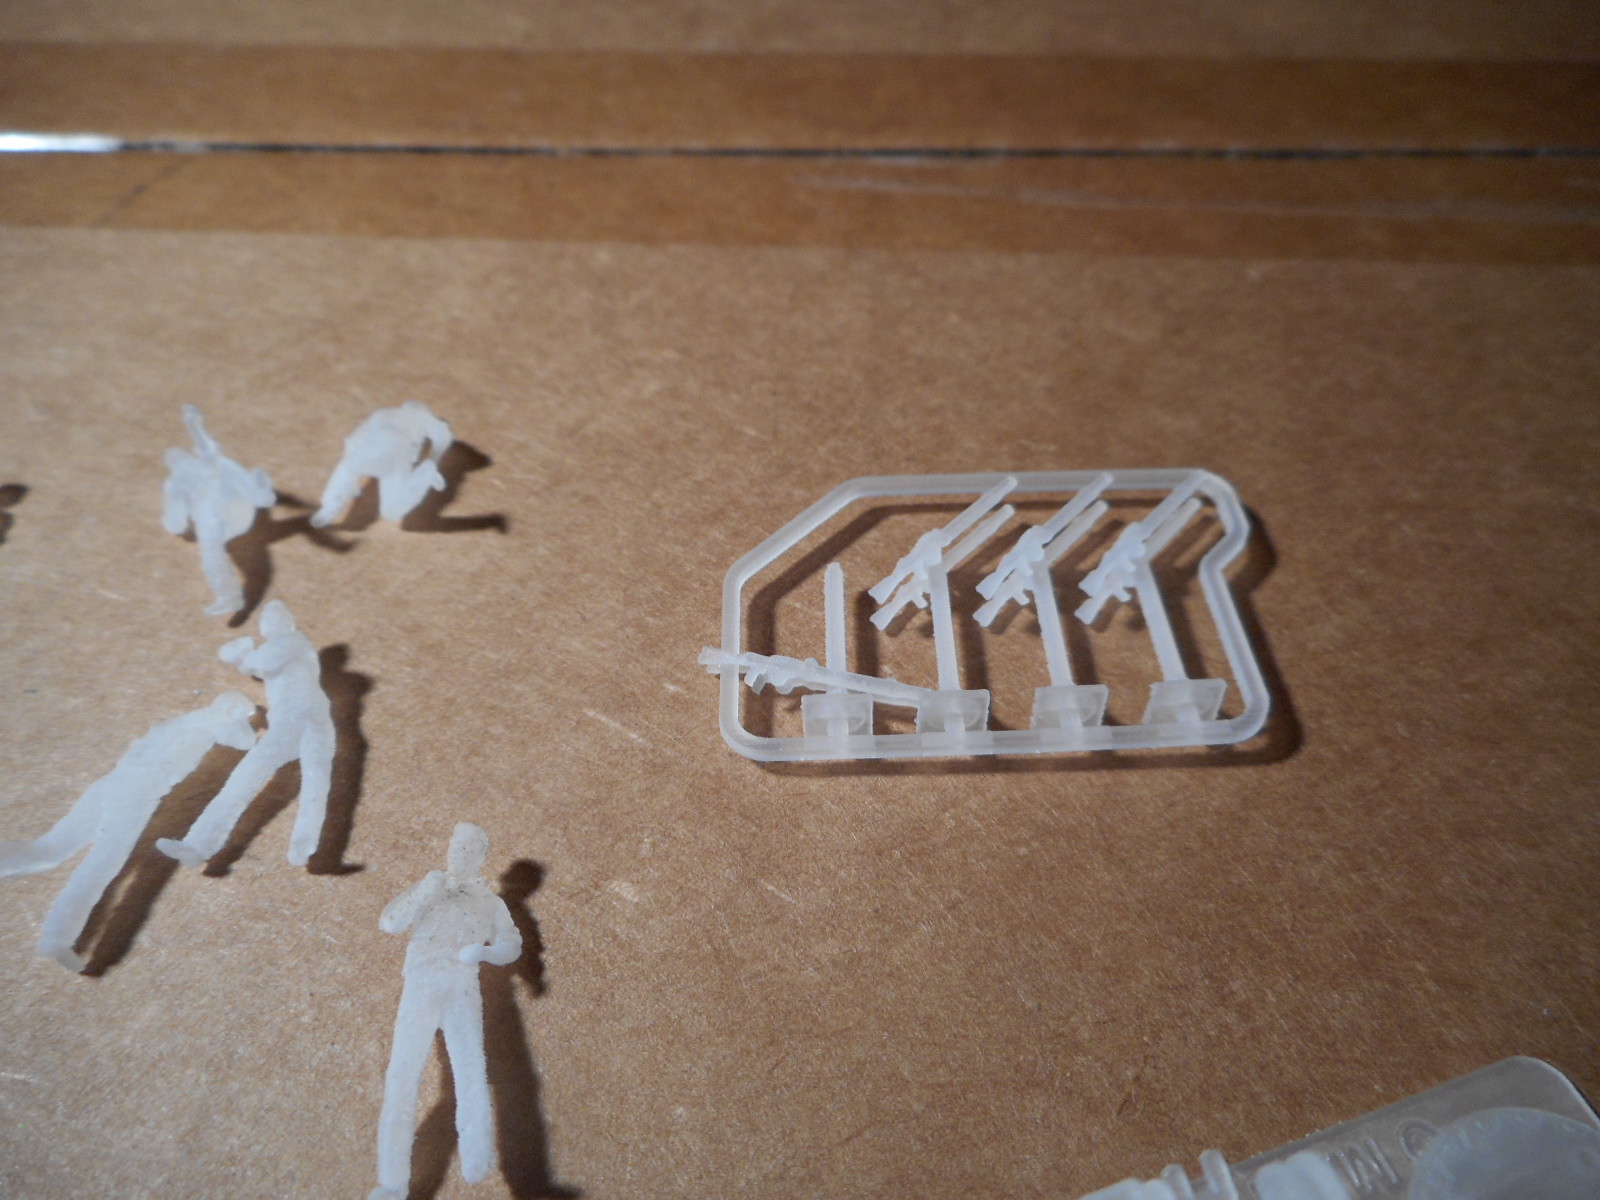
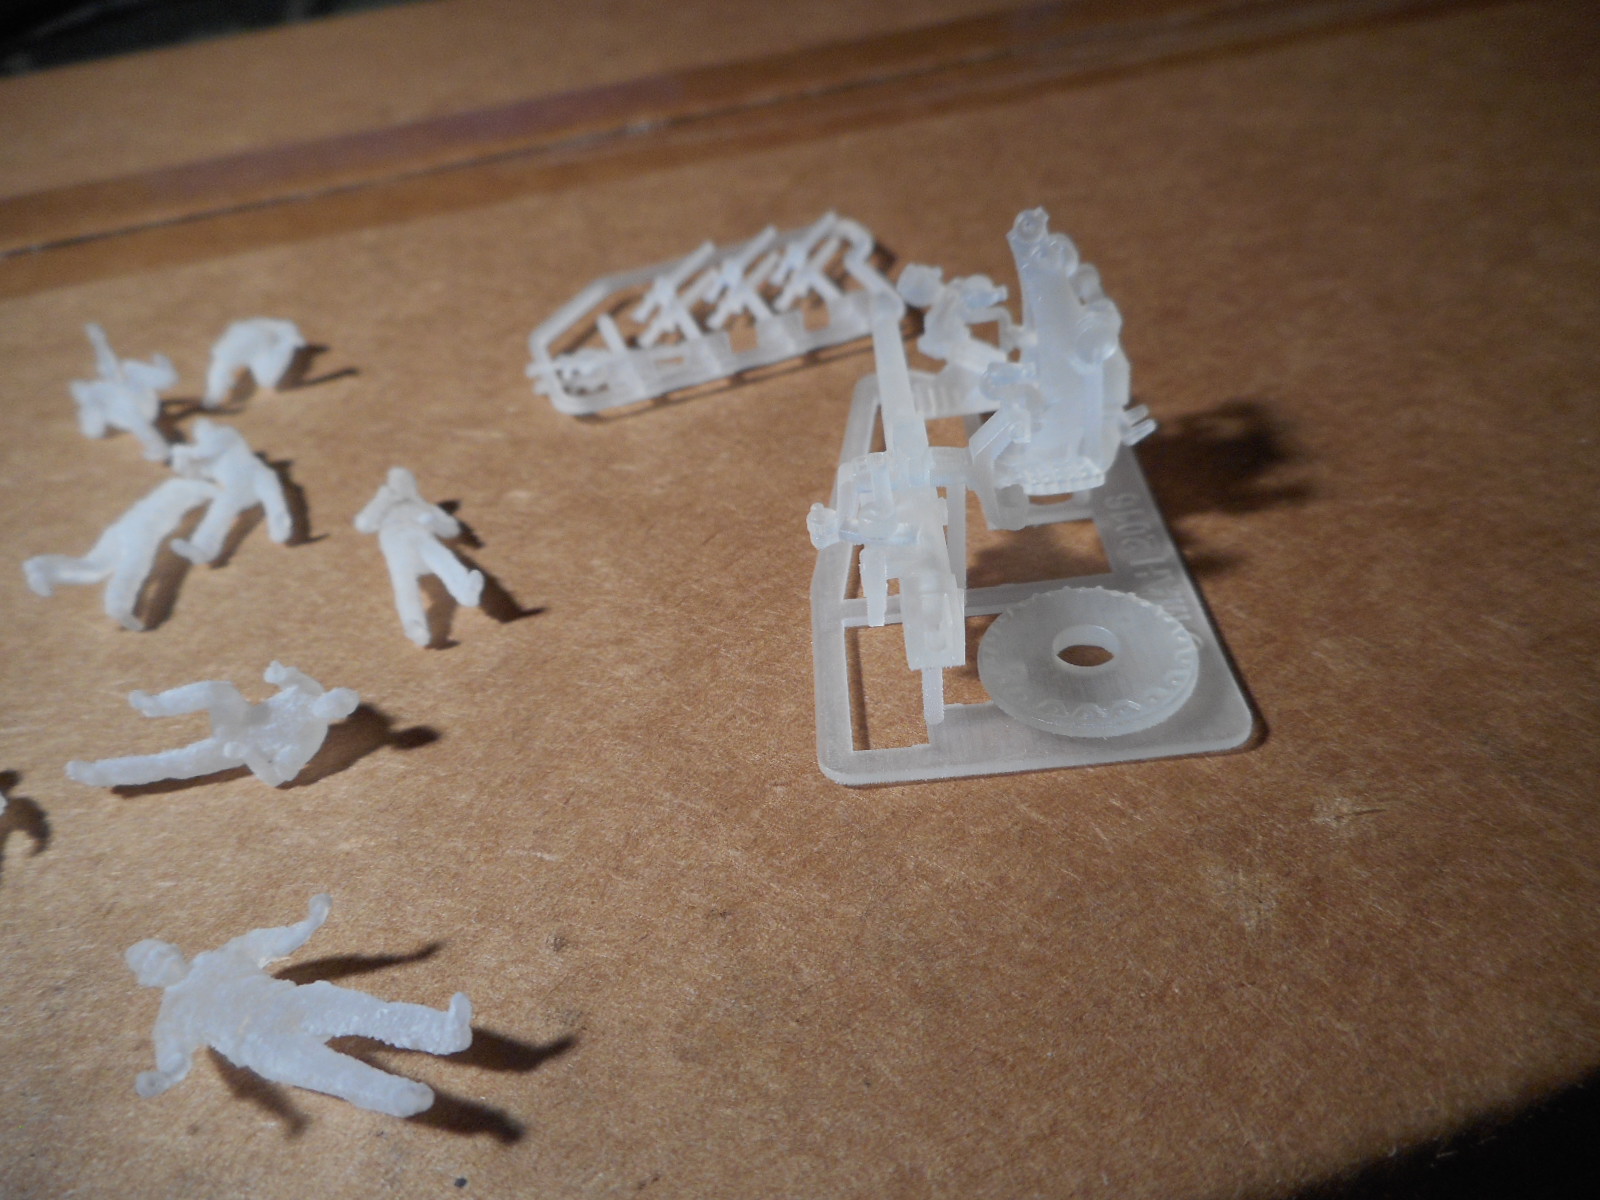
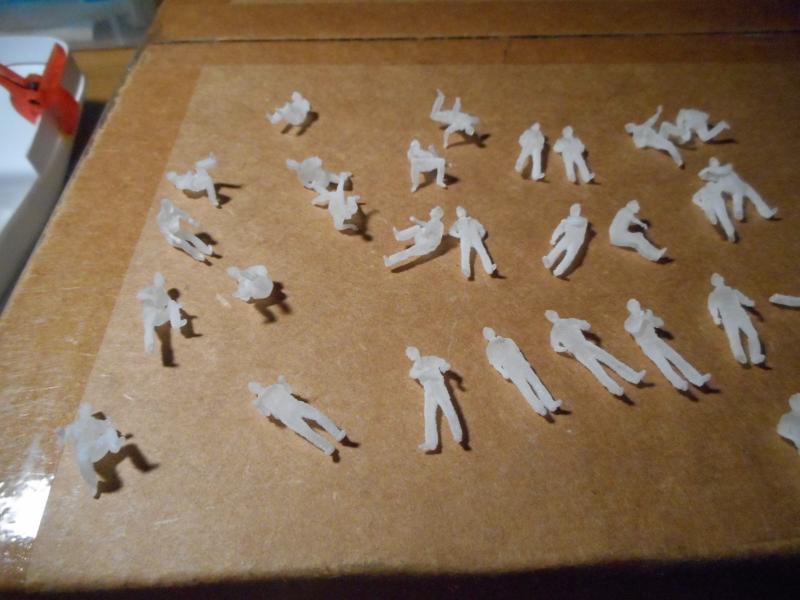
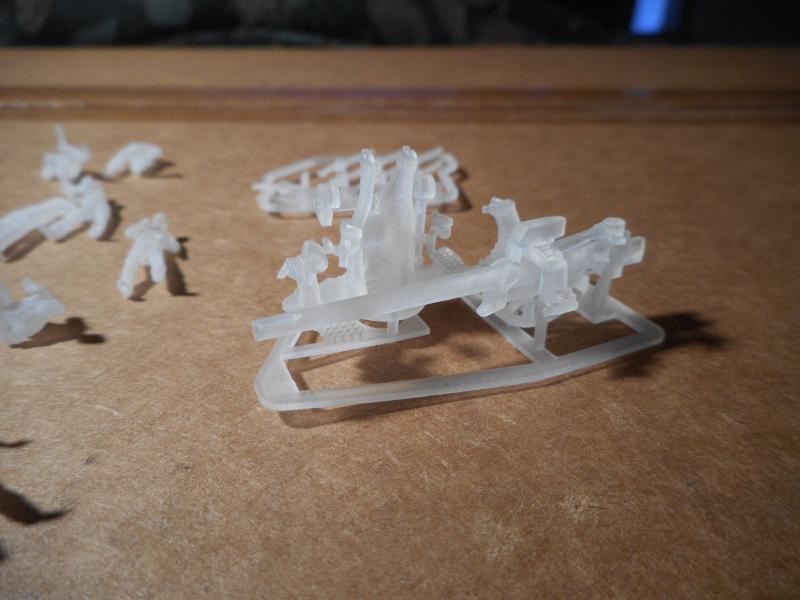
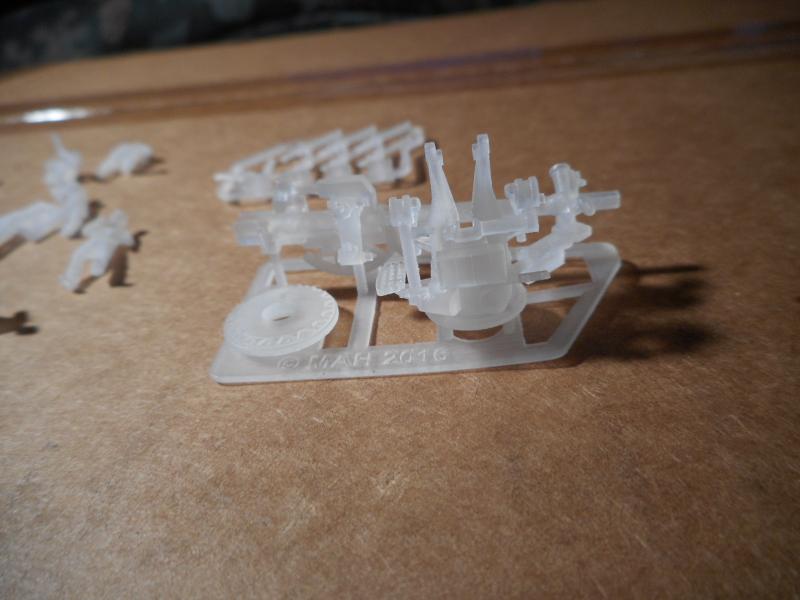
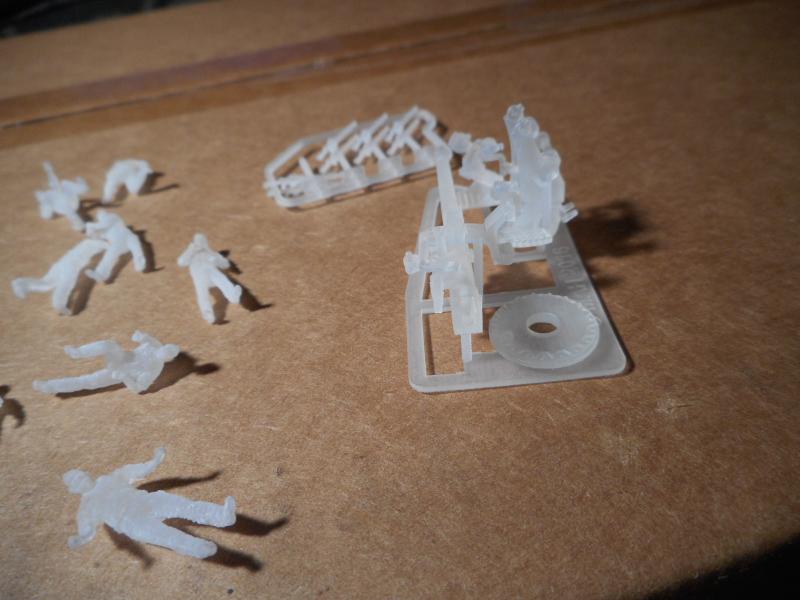
Ahoy Mates Just received some 3D printed parts for a scratch build I will be making of my Dads ship he served on in 1942-43 in Greenland. The Albatross Class Minesweeper AM72 USS Bluebird in 1/96 scale. I purchased USN navy figures,Lewis air cooled macine guns and a 3"50cal Dual Purpose single Gun mounT. I have read some ways of cleaning and painting 3D printed parts but want to know if any body here has experience with these type of parts. And whats the best way to paint them,and which paint to use. Here's what they look like. It's hard to see the fine details of the figures since they are in frosted white color. Keith

- 1 reply
-
- 2
-

-
Ahoy Steven Well,Pickels and I were unable to comp-lete the ship for the show. Just too much work to be done and little time,so I just said forget it for this year. Right now I am remaking some of the last couple weeks rigging work that I had hurried thru. Now I can take my time and not build for a show,but for me. There's nothing worse than building for a show deadline,and I will never do it again. My last builds that ended up in a show and entered had been finished long before the show,and during the build I did not have a contest in mind. It's better to take the time it takes to do your best work. Keith .
-
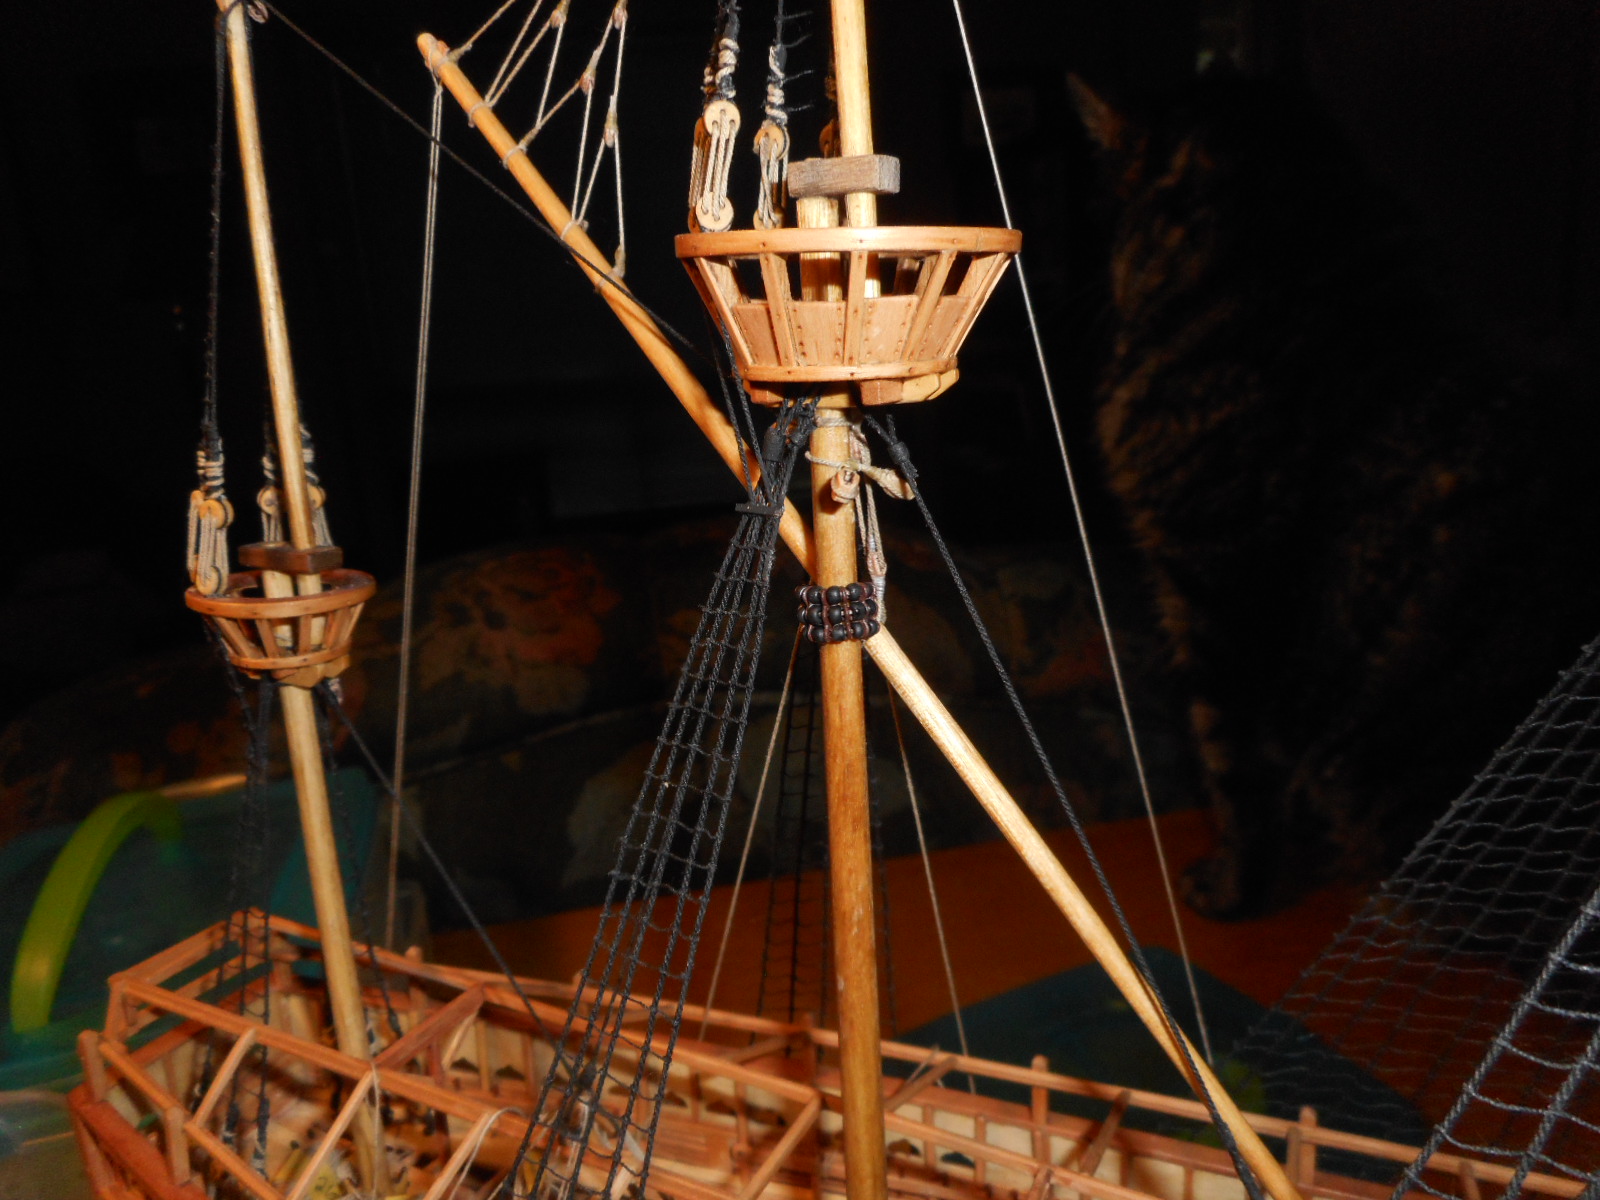
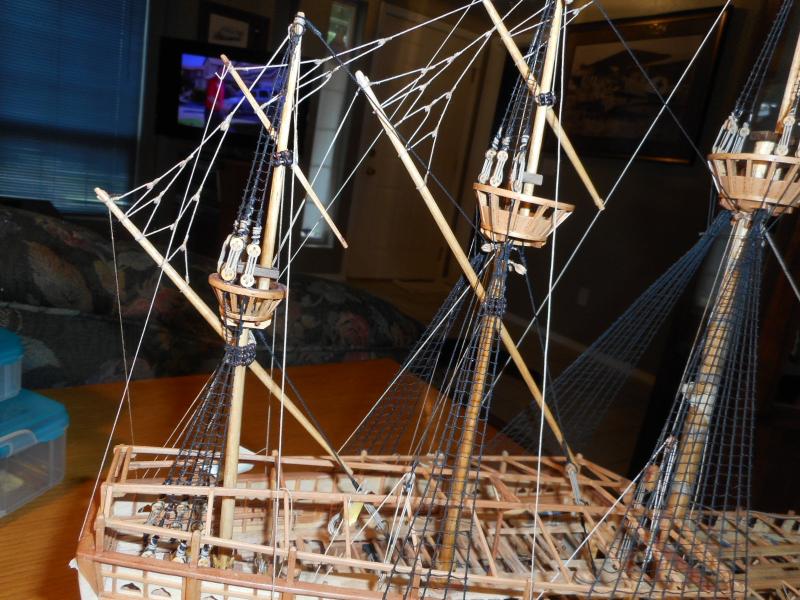
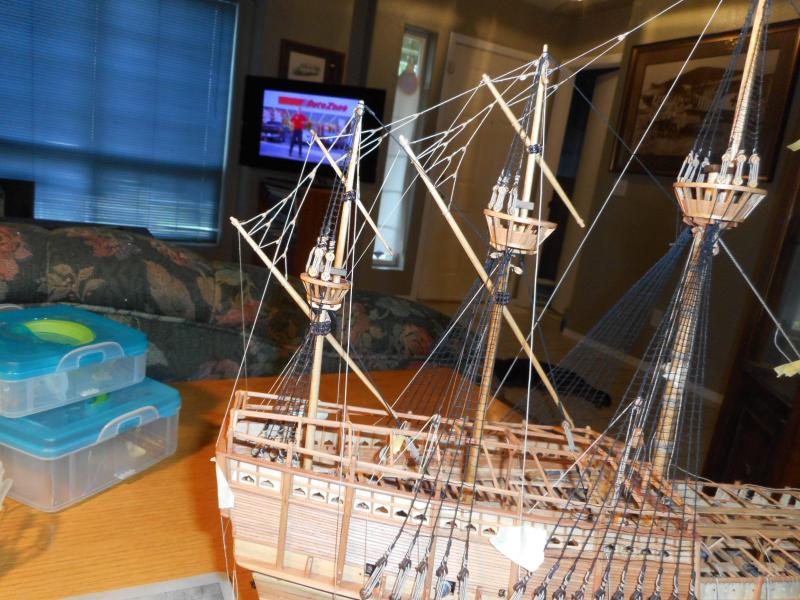
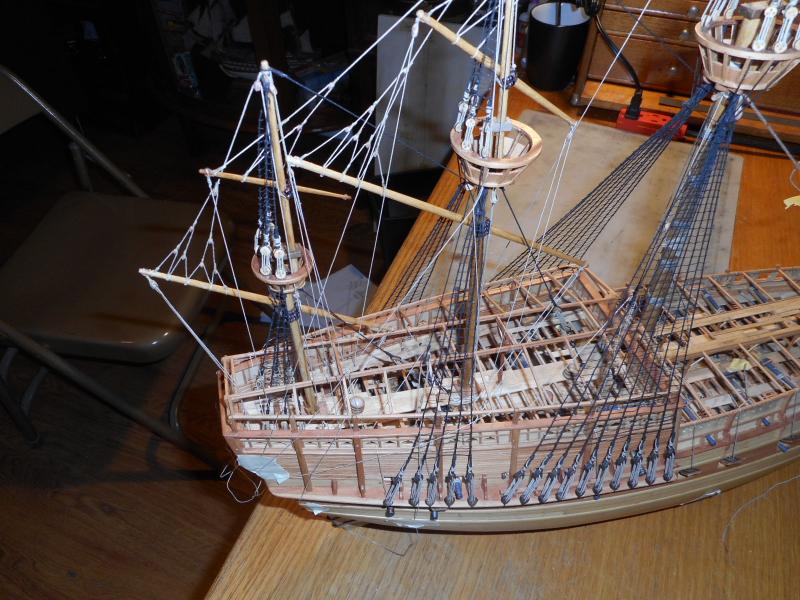
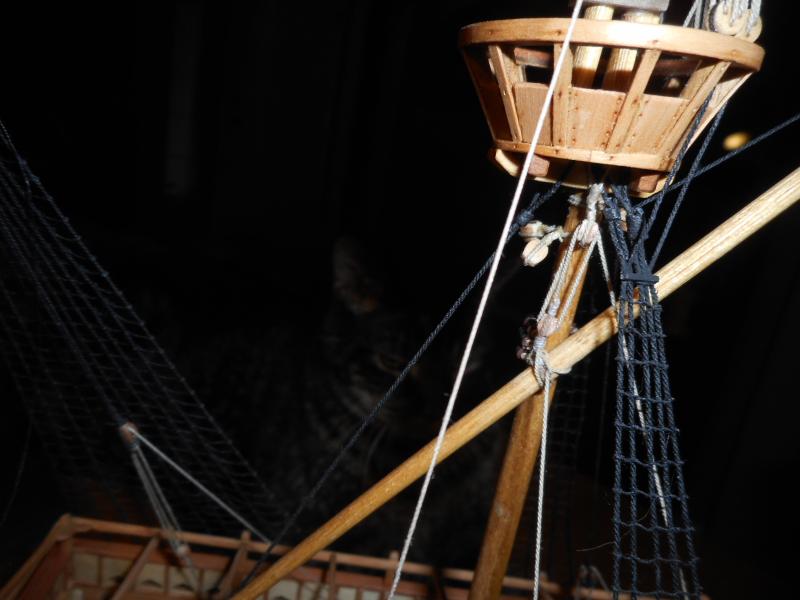
Ahoy Mates Thanks for the help and here's what I worked on over the last two days and nights on the Lateen yards on the Mary Rose. Keith
-
Ahoy Duff and Brian Thanks for your replies. I have to finish the rigging by Friday because the Mary Rose is being entered in our Annual Contest. Now I can finish up this part of the ship. If there is contrasting information please post it. Thanks Keith
-
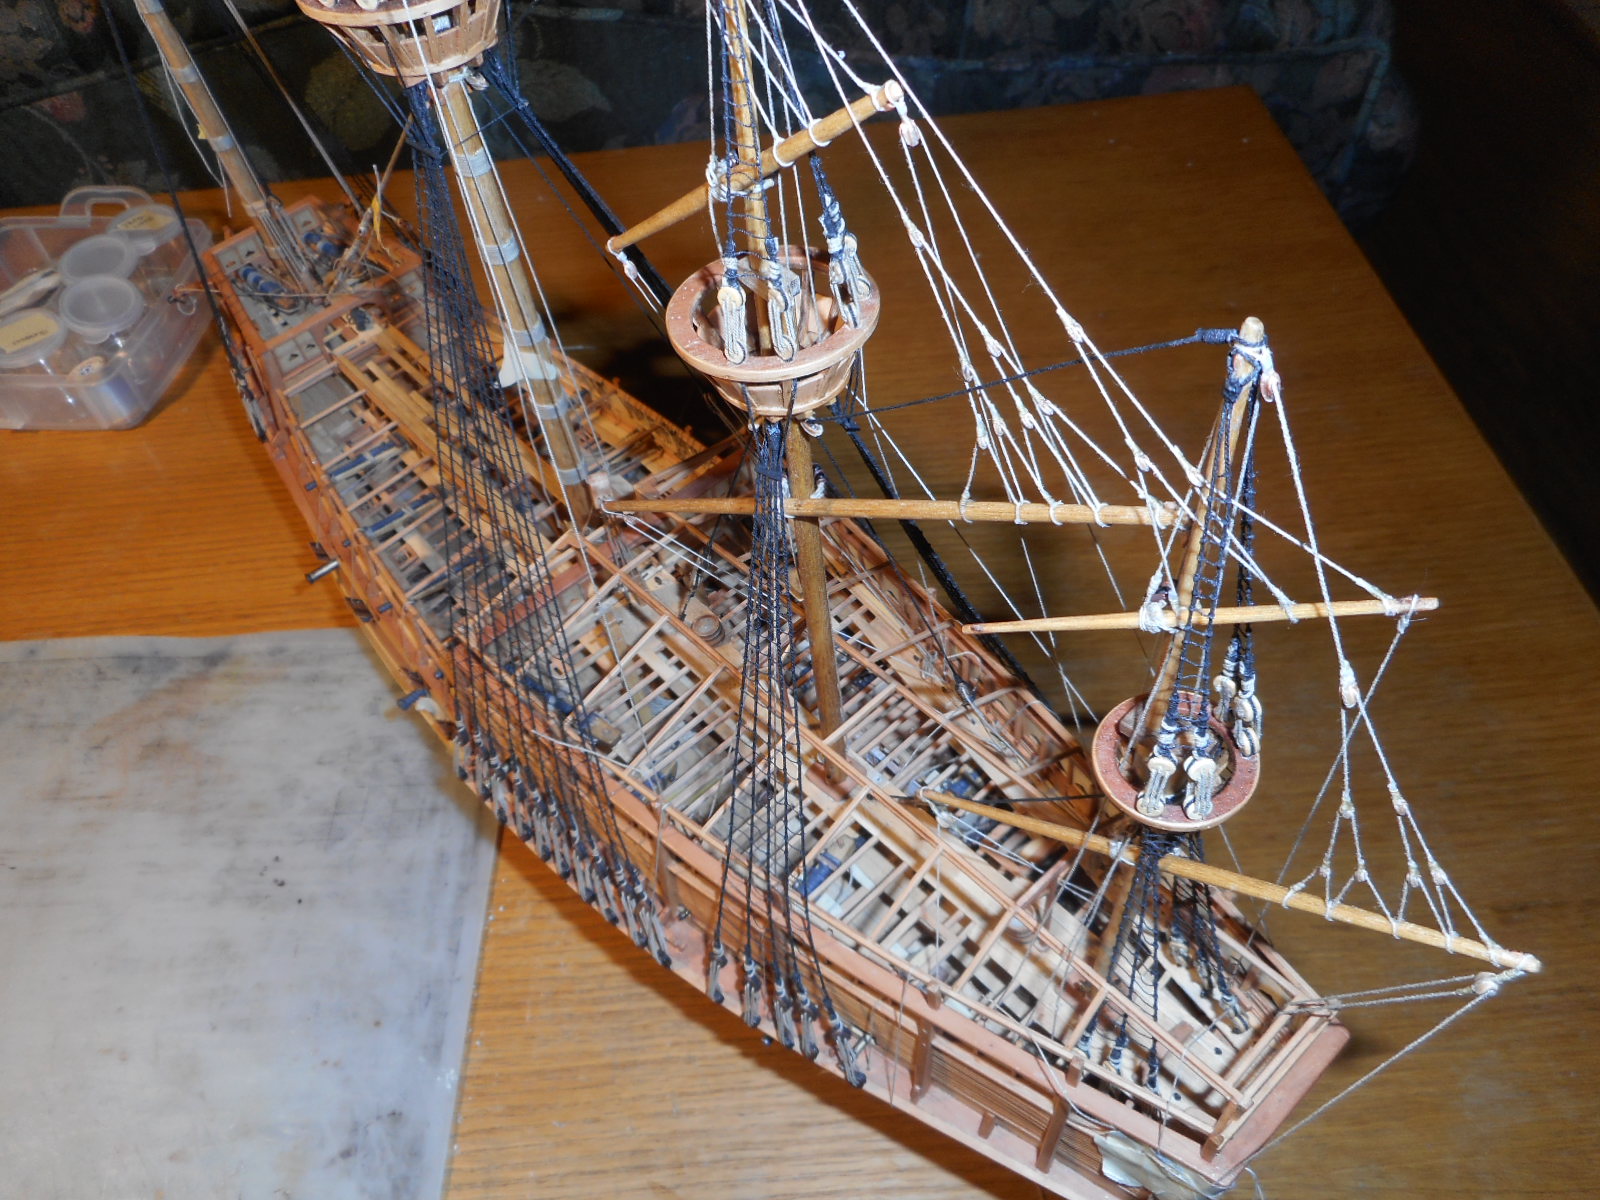
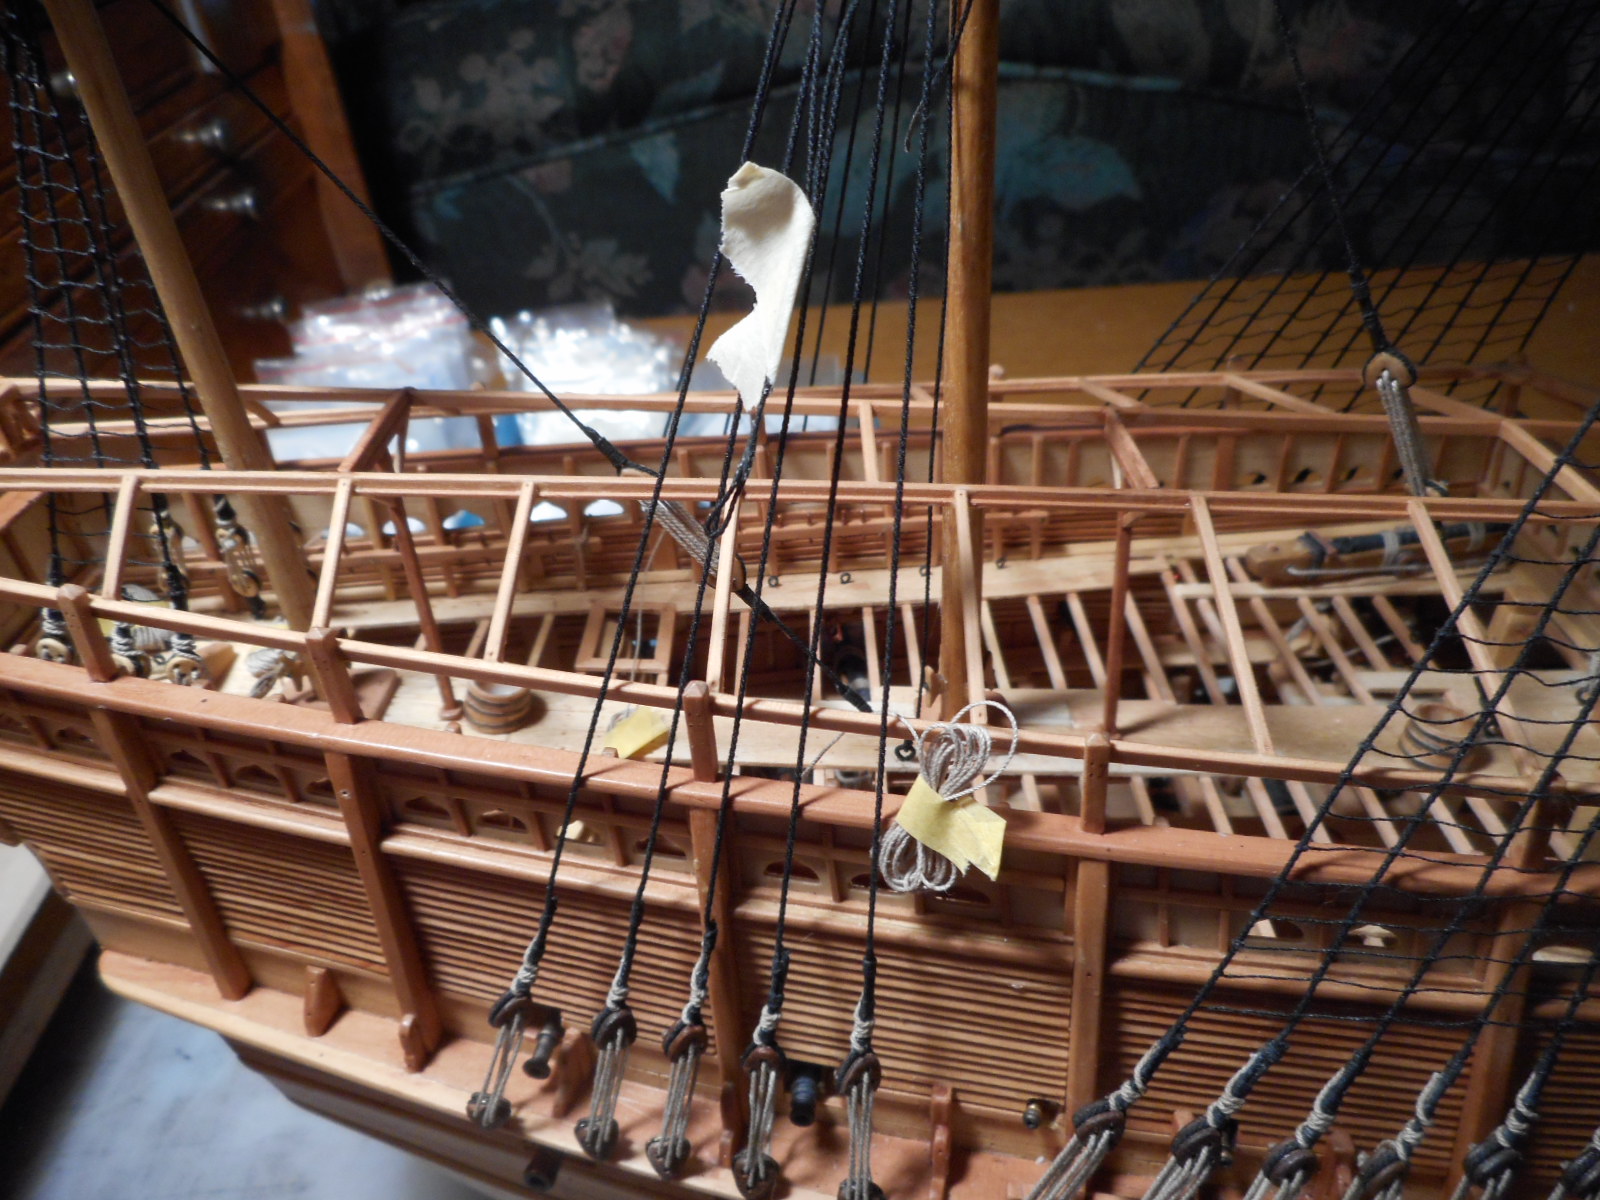
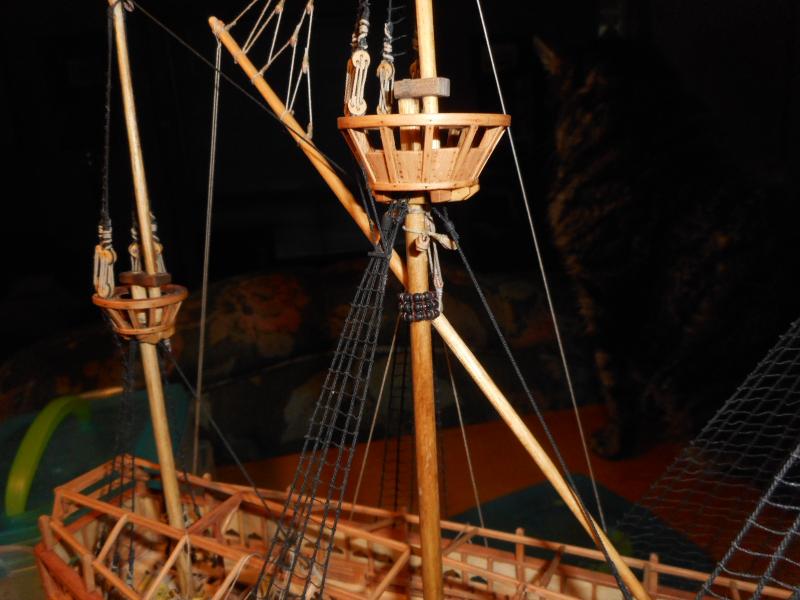
Ahoy Mates Setting my lateen yards for my Mary Rose for the Mizzen and Bonadventure mast's.Being that I have never rigged a lateen yard I want to know if they are set inside of the shrouds,which limits the angle to which they can be set from just fore and aft, or should they be set at an angle outside of the shrouds? Have looked thru my reference books ,and they do not show exactly where they should be. Here's photos of how I have just set them on the masts now on the Mary Rose. The Jotika kit finished model photos show them inside the shrouds like I have set them now. They are just set there,nothing is lashed down,I want to find out before I start to set the lines on the cleats and pin rails. I have not routed the lines to the correct belaying points either. Thanks ahead of time for your help. And is there a reference book or site that shows clearly how they shoud be set-the lateen yards . Thanks Keith
-
Ahoy Mates A lot of my toolmaker tools are now being used in my shipyard.Diamond files,radius gauges,scribers,height gauges,dial calipers,angle protractors,dept gauges,toolmakers square,squares,pin vises,toolmakers vices,Bridgeport Milling machine,12" lathe,surface grinder,unimat lathe,transfer punches,shim punches and die. People asked me when I retired if I was going to sell off my tools. Hell no I said,I still have models to build. I am lucky that they were purchased over the last 48 years now,and I would hate to have to start over and buy some of them now. Just my Starrett Toolmakers Square cost's over $350.00 now! And I use it all the time on my ships. I also have all of my Fathers Toolmaker tools to use. He taught me the trade and we worked together for 18 years before he retired. He then did wood carving making figures and then chip carving before he passed 6 years ago. I use quite a few of his tools in my model building. Plus his wood carving tools. I just wish he was still around to do his excellent sharpening of them. Using all these tools in model making gives me the feeling that I am still working on die's,except they are 99% wood now. I use all the skills that I learned in toolmaking in my model making now. And have always loved doing both since I grew up with my dad teaching me how to build models and later how to build and design die's. Keith
-
Ahoy Mate I have their 1/72 German Torpedo Boat resin kit,they are expensive by they are very detailed and the only ones being made. I like the half hull type for space requirements. I remember that one member of our modeling club made up a submarine diorama that had the ocean surface with what he stated as a 1/35 scale Typhoon Class Russian at periscope depth. He had a base that was only 4" X 8" with the ocean surface made out of resin with the periscope sticking up 3" ! The rest was underwater! Or under the base he would say with a smile. I just wish they had other types of submarines. I do have a 1/72 resin kit first type Holland submarine kit that was made a decade or more ago by Bluewater Navy. Keith
-
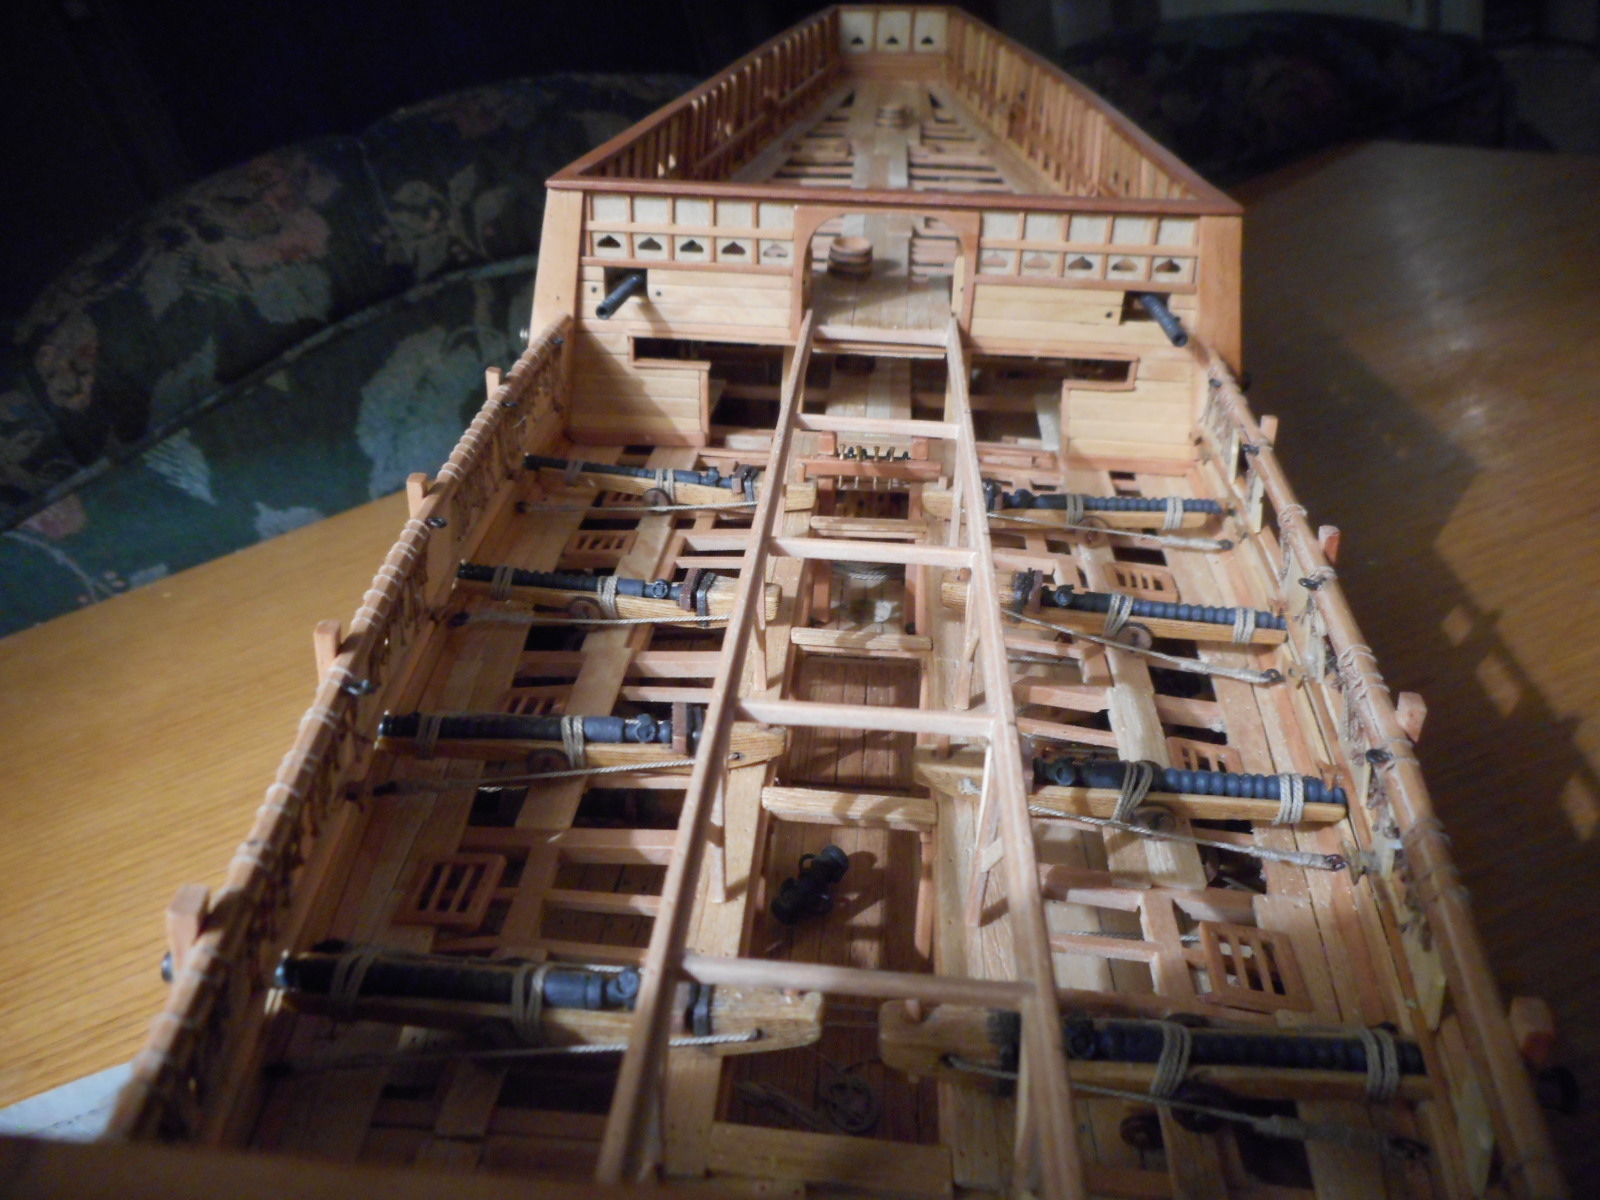
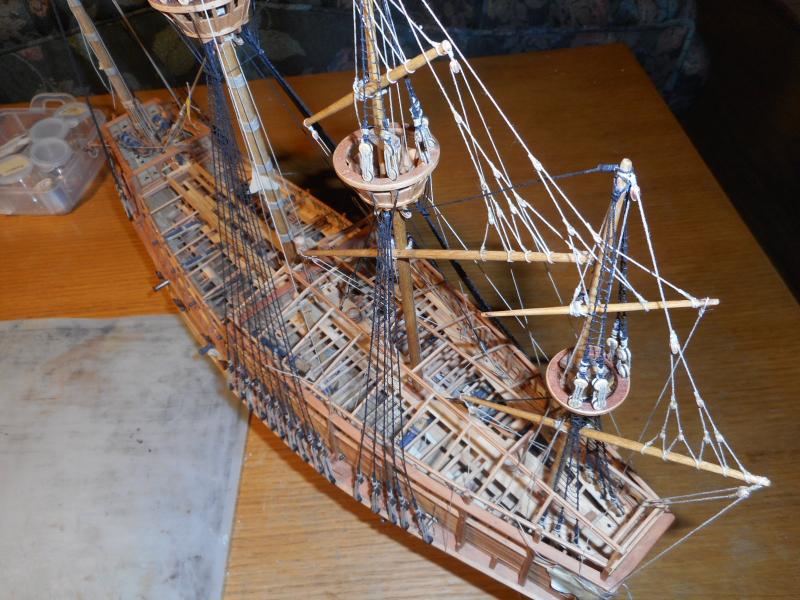
Ahoy Mates Here's whatbasswood for the deck planks,boxwood for the hull planks and swiss pear for the gun port line planking and the lap planking on the upper hull looks like on a Mary Rose build in 1/80 looks like. I have done it in admiralty style to show down thru the decks to the main gun deck. I have the main deck cross beams in boxwood and the smaller beams in swiss pear. The finishes are a Minwax oak for stain and Testors Dulcote to seal all the surfaces. Keith


-
Ahoy Mates I have been working on my Mary Rose now for about 3 years now,and will complete it in the next 3 weeks. I have a show to enter it in as a deadline. But there have been times when I was fed up with the build. That's when I would find a small sub build for the Mary Rose that was different from what I had been working on to break the negative feelings that had built up from the stress of building. You do two things,work on something different and make up and complete a new addition to the big build. And just look at it as a new small kit. I often use rigging and yards as subjects for these little "kits" > There's lots of yards to make and plenty of blocks to seize . Keith
-
Ahoy NO ON THE BABY WIPES!!!!! They contain oils that would only damage your model. Try to find a museum with a qualified conservator and get second opinions before doing ANYTHING to your model. Take your time in finding out what to do. And first do an area that's not clearly visable,so that you can try out the cleaning process on a very small area,and then let it age for a while to see if there are any adverse aftereffects to what you have done in cleaning. Take your time in researching out the information and those who can help you. Make sure they are documented people in cleaning artifacts. Just remember that you want to do it the correct way the first time,and not to end up with something that's worse than what the condition is now. I just wish I had this task to do now that I am retired. Keith
-
Ahoy Newbie Boy ,now you want to start out on two of the biggest models that there are? WRONG,do not go there. For your first build these are not even in the same universe that you are in now. I would recomend the Model Shipways Gunboat Philadelphia 1/24 kit to start out with,and here's why: First,the odds of you completing it are better than even,while the Surprise and Constitution completion odds are NONE! Second_ It's a simple flat bottomed shaped hull with a bow and stern shape that you will be able to make and learn from. Third- It's a large scale that will allow you plenty of room to work on the rigging but still have lots of things to learn and be succesfull at. That is VERY IMPORTANT for your first build. Learning and success without being so simple as to be boring,which this kit is not. Fourth -Great kit and instructions and plans and not too expensive. And most important-You will have fun building it because it will challenge you without defeating you! Look up our building groups blog at www.woodenshipclass.blogspot.com and see back in time how our group built our Gunboats. You have to crawl before you walk,and this kit will take you along in a very rewarding journey in starting out in ship model building. Do not by the first ship kit you like before you have the learned skills to finish it. I would say that maybe 99-95 % of all first wooden ship kits purchased NEVER GET FINISHED,and end up in disapontment and the fate of the closet top self until they are either sold at a garage sail or thrown out years later. Keith
-
Ahoy Mates Regarding wooden ship model contest's,who holds them and what are their rules? As far as IPMS shows they used to be limited to only plastic models or some high percentage of plastic used in the model. The latest rules are stated as "material that is appropriate " which does not exempt wooden ship models. Our local IPMS club changed their name from Oregon Historical Modelers Society to Oregon Modelers Society since their are now more car builders and other types of modelers in the club. And I know that there are standards established for museums models. Keith
-
Ahoy Use whatever works best for you. Most of the time whatever you use other than wood to start out with gets painted 99% of the time anyway,and who cares what's under the paint. And I have used wood, brass plastic and steel for wooden parts that I ended up painting to look like wood in the end. And the result was that if I did not tell what it was made of,all thought it was WOOD! In our building group our founder and owner of the hobby shop could not stand that I was using evergreen plastic for parts on my wooden ships instead of brass. We argued about it,I said that since it was painted black ,that if I had not told him otherwise,he would have assumed that it was made out of brass and either painted or blackened. After about 3 years and beating him in contest's for those years,he finally is quite about the subject. It's your shipyard. Keith
-
Ahoy Mates Just wanted to know what types of glues you use when rigging in black rope other than CA that will not "silver" when dried? I have tried diluted PVA glues with a range of results. From being unseen when dry to being white-"silvered" air under the glue when it's dry. I use Titebond for my Tan Syren rope with no problems,but the black is different for some reason unknown to me. Where the tan will take to the Titebond with little effort,the black doesn't want to hold onto the glue and dry the same as the tan. What do you use,and how do you use it? And what should I be doing different for the black rope that is not the same as for the tan and light rope? Thanks Keith
-
Ahoy Mates When knotting ratlines,at what small scale do you just use an overhand knot in place of a clove hitch? This question just came up in our group meeting yesterday. Would it be like smaller scales than 1/72? That's getting so small that it would be hard to see the difference. If you have elves doing your building with tiny hands this question doesn't have to be asked. We are asking for the normal builder,not an OCD one who would do it down to 1/200 scale or smaller. Thanks Keith
-
Ahoy Mates To start with I am a now retired tool and diemaker who has been using mills of all types for the last 50+ years. What advice I would give all about milling is that,since you are not having to do it for a job with time being a large factor- Take your time milling. Small cuts do two things: 1- it saves wear on your cutters which are costly to replace and 2 nd it reduces any deflection of either the cutting tool and reduces the over cutting of the mill cutter in your work piece. The small milling machines are not built to handle deep cuts by the milling cutters. In size a standard Bridgeport milling machine handles cutters up to 1" dia. but even then they have a hard time with full cutter depth cutting. If you kept the same size and capibility ratio of milling machine to cutter,the small mills would have only a cutter of 1/4" dia. with a cutting flute depth of only 1/8". So take it easy. And if you are burning wood,either your speed is too high,feed too fast clogging up the flutes of the cutters,or you have a cutter that doesn't have enough room for the chips created by you cutting speed and feed. Mini mills EQUAL MINI CHIPS!!! Keith
- 146 replies
-
- 12
-
-
Ahoy Mates If you have more than 3 mast's and different level decks,how do you line them up,so that they are in line,and straight up and down? Do you have a method that you use? Keith
- 1 reply
-
- 1
-
-
God Bless you Chuck! You know how to make my day. I am looking forward to building this kit after I finish up my Mary Rose. It will be great to be able to purchase the resin castings and then be able to carve and learn also. This barge will fit in nice next to my Gunboat Philadelphia that's also in 1/24th scale. And my first build to use all of your rope and blocks in it's building. Keith
- 269 replies
-
- 2
-
-
- Queen Anne Barge
- Syren Ship Model Company
- (and 1 more)
-
Chuck As for the laser cut parts for the carvings,will there be extra's included for those who have mistakes when shaping them? Or will you offer to sell set's of the laser cut parts that need to be carved? I know that I would want at least an extra set so that I can use one to learn how to work the shapes out,and another for the finished model. Please put me on a list for this kit. Happy Customer from Troutdale,Oregon Keith
- 269 replies
-
- 3
-
-
- Queen Anne Barge
- Syren Ship Model Company
- (and 1 more)
-
Wow,eye candy for the ship model builder and a level of craftsmanship that few attain. I can do this same level of work,but only in my dreams. I sometimes hate it when I wake up and realize that it was only a dream. It's like when I would see my dog Vincent sleeping and dreaming while he was laying on his side and his legs were moving like he was running after a chipmunk,And then when he would wake up,his look on his face was ,crap I did not catch that damn chipmunk,it was only in my dream! Still hoping someday that it will not be only a dream. Great work Mick. Keith
- 504 replies
-
- 3
-
-
- washington
- galley
- (and 1 more)
-
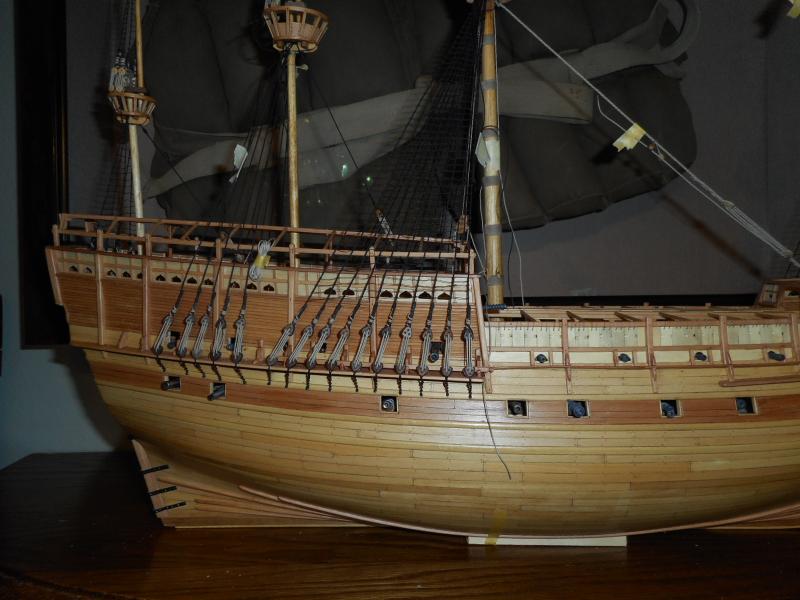
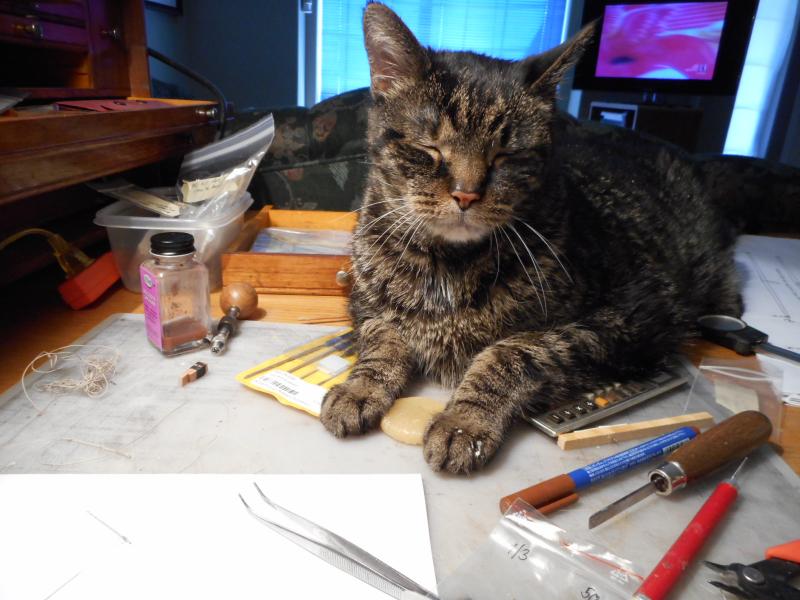
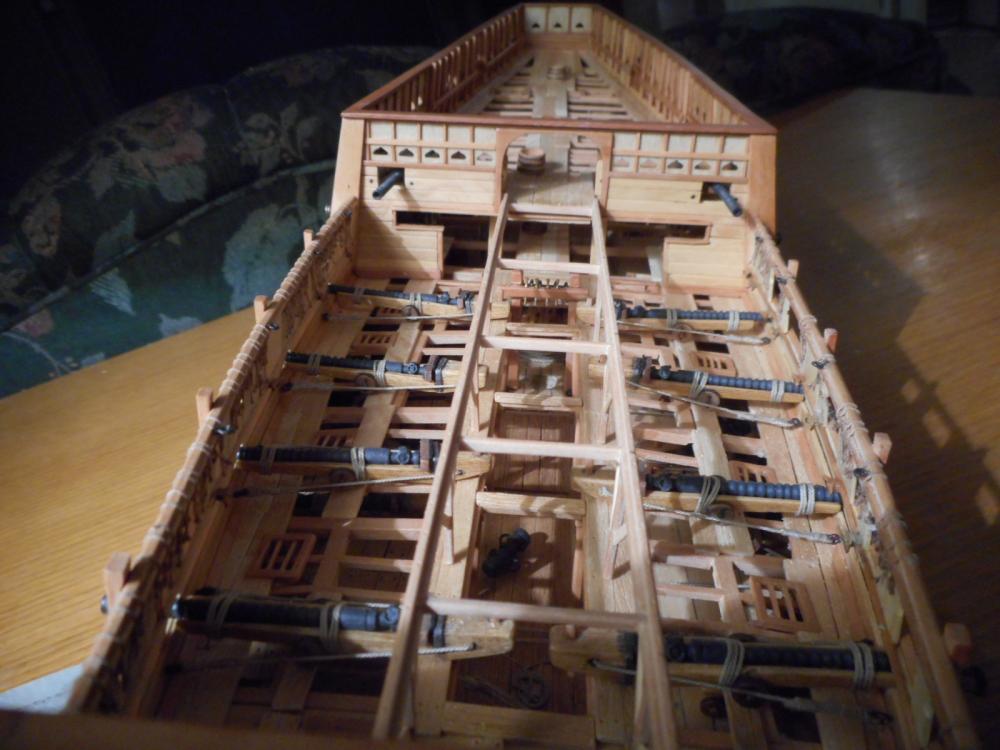
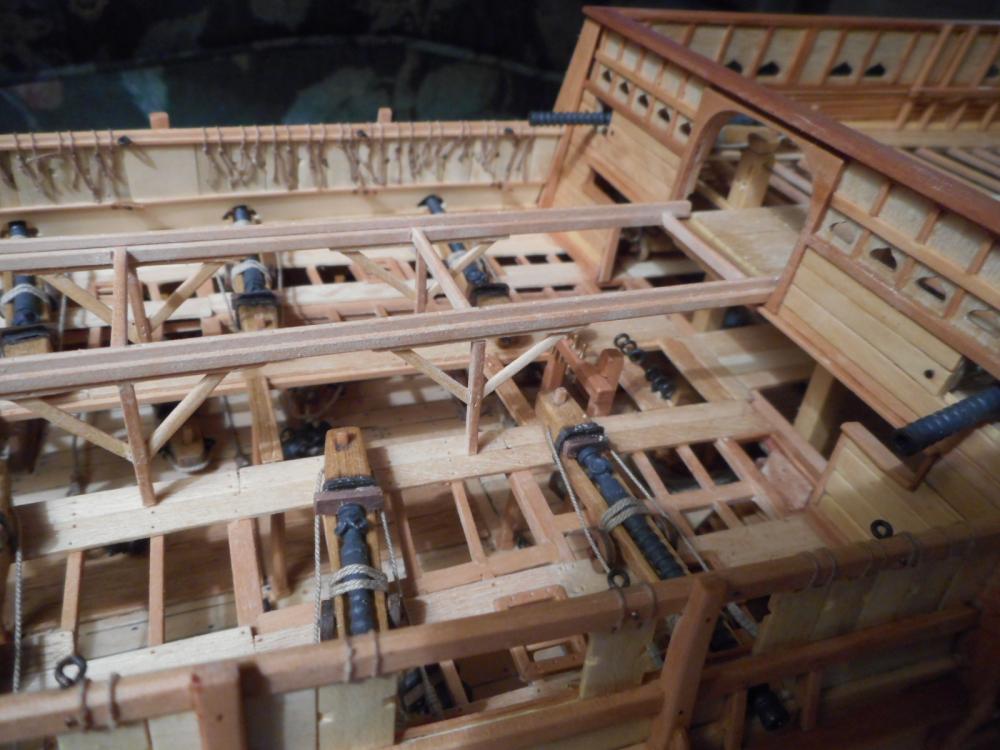
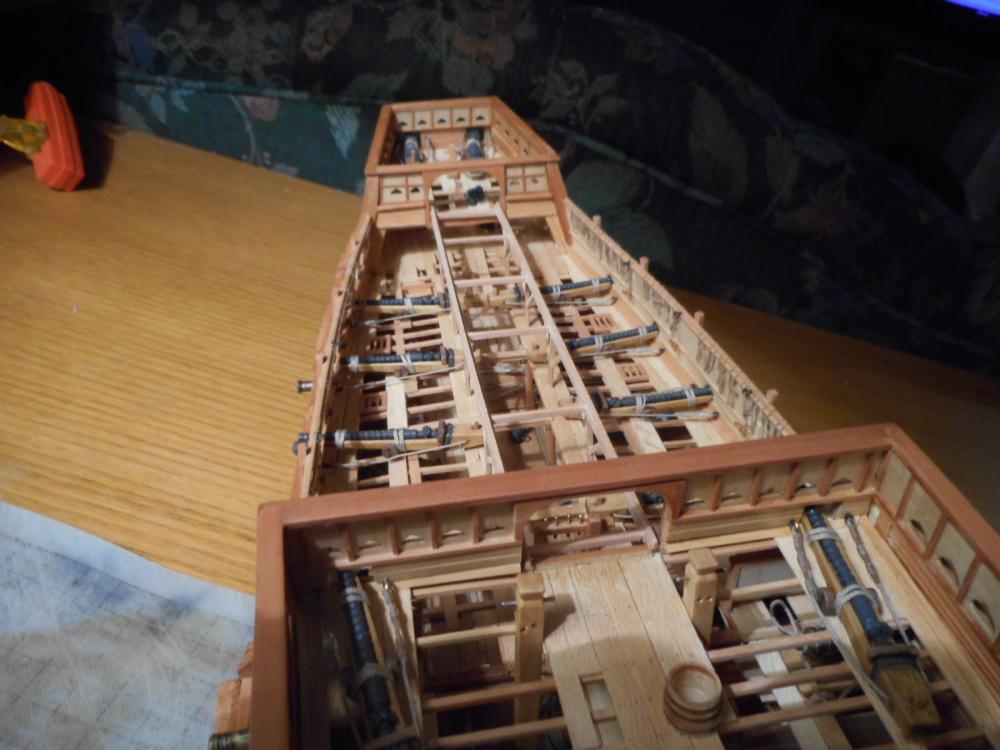
Ahoy Mate This is what I have been working on a Mary Rose 1545 showing all the structure down to the main gun deck admiralty style. All scratch built using basswood for the deck planking-what is there that is,and boxwood and swiss pear for the planking and deck beams. I use the basswood because I can then add the wood grain to it by engraving the grain with the point of a xacto blade easily. The boxwood is best for the long beams because it's stronger than the swiss pear. I used the swiss pear for the cross beams for a color difference so that you can see that there are different parts in the structure and where they join. On the hull it's boxwood except for the band that the main gun ports are in,that's swiss pear. The boxwood and swiss pear are hard so that they hold their edges and do not get dented. And you can file slots without having to deal with burrs like on softer basswood. Keith

- 15 replies
-
- 10
-
-
Ahoy Mates A couple other things you might do: sand the sides of the eyebolt end that gets glued in. I roughens up the surface and also removes any oil or oxidation that would lessen the holding power of the glue that you use. If the eyebolt is going to have tension on it straight in line to the hole it's in,file some notches into the sides of the end that goes into the hole 90 deg. These will fill in with glue and hold the eyebolt in even better than just the glue around the straight sides of the eyebolt end. I have not had an eyebolt come out of a deck after notching the ends for the glue. Do not have a hole too tight to the eyebolt size,you need some space for the glue to form a film around the eyebolt sides. Keith
-
From what I have seen there doesn't seem to be much of a wooden ship kit collectors market for vintage kit's other than those of around the 30's-50's era kit's.And some limited production kits like LSS kit's from the 90's. The market is very limited and now is depressed due to old collectors like me selling off their collections or the kits being sold off in estate sales due to old collectors of my age not living long enough to sell off the kit's themselves . Their is just not the interest of the younger generations in these hobbies. Same is true in Brass Age Car's. Our fathers collected them because they grew up driving in them and driving them,now that hey are almost gone their prices have fallen,just see some of the car auctions ,not enough bidders wanting them now days. I just wish I had sold my kit collection off twenty years ago when prices were at their peak for plastic kits,and as for the wooden ship kits'I was not collecting any back then. Keith
-
Hi Pat Thanks for the input. I am working in 1/80 scale on the Mary Rose 1545. I will try out the different ways before working on the model. Keith