HOLIDAY DONATION DRIVE - SUPPORT MSW - DO YOUR PART TO KEEP THIS GREAT FORUM GOING! (Only 27 donations so far out of 49,000 members - C'mon guys!)
×


bear
-
Posts
362 -
Joined
-
Last visited
Content Type
Profiles
Forums
Gallery
Events
Everything posted by bear
-
Come on,why should you re-invent the wheel. As Chuck said so well,I do not enjoy having to sand to thickness strips or sheets to just start building. In this day and age,why go backwards in model building? This was to celibrate the ability of our latest vendor's ability to supply us with product that is as good as it gets and at a price and time frame that until now was not to be had. It was not to revel in the sanding dust of having to rework what you have just bought to make it useable. I hope that we do not revert to being the old man who yells at kidds getting near his perfect lawn or for here-looking down on those who do not become lumberjacks and lumbermills doing the who process of being a model ship building lumber yard. As a tool and diemaker I always used great suppliers for punches,screws,dowels,die sets,springs and all the other items that go into a die. I could have made all of the above from stock material,and have done so when I was in a time pinch,but it would have just been a waste of time and my skills doing the things that could be done by others who would do it better and cheaper than me. I wanted to use my time for what I did best in making tooling and die's. Most of us have limited time for our hobby,and I for one do not want to spend it just getting the raw material ready to start building. It is the same in any hobby that has a good supply industry behind it. Our's is still not to the level as other areas of model making with suppliers in resin cast detail parts and PE detail parts. Chuck and Rick are now sources of laser cut parts and short kits,along with brass cannon barrels along with others expanding their product lines. If you want to go back 90 years and do it all by yourself-good for you and have a lot of time to do it. But do not look down on those who chose to enjoy and support those who make and sell the items that now make building a more enjoyable task to those who do not "scratch build" to the extreme definition you use. Thia is my last posting on this subject. Time to move on,just like what I said above to what I do best-BUILDING MODELS. Keith
-
Ahoy Mates Just recieved a shipment from Jason at Crown Timberyard today of Holly for the decks on my Cheerful amd mediator builds. This is the first Holly that Ihave ever seen,and I like the light color with the grey pattern grain thru the wood. Fast shipment across the country,just 4 days total from New Jersey to Oregon. The only bad thing about this Holly is that it will be some time before I will be able to use it on my two builds.If someeone thinks that being retiered is a time with lots of spare time,they are wrong. Keith
-
I have three orders from Jason Crown Timberyard and they are all of the same quality-Excellent. In my experenece as a tool and diemaker who had to deal with close tolerance work-+- .0002- that's 2 tenth's of one thousanth of an inch,this wood produced to these numbers is way beyond the building level of 99 percent of the model builders. To be completly honest-and no offence to those out there, but-I do not think that the 99% would know a .001 difference in wood thickness in building even if it bit them in their ***. There's not a lot of toolmakers who even can work in the +-.001 tolerence range. With model building it's more of the visual area that shows up differences,not the dimentions of the wood used. And then it's the feel of the finger tip over seams,which can detect differences in hight of only .0005 to .001 of planks next to each other. But that is out of the visual range unless you look at it with a light sourse at an angle to the surface that you are checking out. That's what you see in car body shop's and car makers plants where they are inspecting the body panels and paint for uneven surfaces and other defects. As Chuck said it's great to have a Vendor where you can get wood to this level of milling. It's easier to build with consistant wood no mater what your building level is. The real test is when you have to work with wood that is all over the map in sizes,even tho it's sold as the same standard size. That is when the boys are seperated from the men in building. Just as planking is the great leveler in skill level in wooden ship model building. I look at Chuck' planking and building and just hope that I can sometime in the future just get near his level of building. Keith
-
Ahoy Mates Thats getting to a tolerance that is only seen in ground steel stock.As far as ship model building what do you think of the tolerances shown above? As a tool and die maker it's nice to see this kind of consistancy in the wood sizes. I always use my dial calipers in my building of models. Using them to measure to make sure that the frames-bulkheads are on center to the keel and level to the deck. I use them since it is just how I worked on die's and tooling. What is the expectations of the ship modelers here on this site when it comes to wood sizes? Please let me know just how close you want the dimentional wood,and do you carry that into your building practices in wooden ship model building? Keith
-
oy Mates I have been using boxwood for planking my last ship and was looking at Swiss Pear for a change in look for my next Planking. The ship is the 1/80 scale Mary Rose kit by Caldercraft. The planks will be either 1/32 or 1/16" thick by 5/32" wide. It would be the 1/32" thick if I double plank the hull or 1/16" thick if I single plank the hull. I am leaning torward the single plank with using 1/16" thick planks. I have done both single and double planking and have come to the same conclution as Chuck ,why do the same thing two times. But if the 1/16" thick swiss pear is harder to bend in this thickness ,I might have to do a double planking after all. My question for those who have used boxwood and Swiss pear for planking is: Is the Swiss Pear much different than the boxwood in planking? Is the Swiss pear harder to bend than the boxwood in either direction? or are they pretty much the same for the 1/16" thickness? Thanks Keith
-
MDF for laser-cutting new frames
bear replied to rshousha's topic in CAD and 3D Modelling/Drafting Plans with Software
Hi Rick My answer on MDF is NO WAY. Plywood is still the way to go. Reason for this level of answer is that we have enough things to worry about health wise,and starting to use a KNOWN Cancer Causing substance in our hobby for no reason other than it would be just a couple dollars cheaper for the manufacturing of a kit is INSANE. And do you see Amati passing on the lower costs-NO. I am surpised that the UE would alow MDF to be used for a hobby product. With the MDF sanding dust also being a health hazzard,even if the chemicals are in "safe ranges" we do not need another possible increase in our health hazzard load as modelers. Being 62 it might not be a long term risk,but who knows how long any of us will live,and have this added exposure. I wish that I had not been exposed to asbestos where I worked back in the 1970's in our heat treating area,and also all of the acetone that I used to clean of Dyekem blueing off of die sections. And the paint thinners and paint in model making thru the years. But now I am smarter as we all must be,and we now know what we can keep out of our lungs and eyes that can realy hurt us. This is a material that doesn't have to be used,and should not be used. Now I will get off my soap box and leave it for the next builder. Plkease Rick do not go to the health dark side of kit manufaturing for just saving a small amount of dollars. Keith -
Hi Chuck I am glade to see that you are using laserboard instead of PE. It's easy to work with,glue and it holds paint. And after they are painted who's to know what they are made of. You must feel realy great about the laser cutter you now have and how you to creat new product to sell as you are building this ship and that you have the means to cut them. Keith
- 1,051 replies
-
- 2
-

-
- cheerful
- Syren Ship Model Company
- (and 1 more)
-
Hi Chuck No,you are not crazy for drilling all those holes in the Cheerful,you are just an exalted "Holely Man Builder". As a tool and diemaker one of the first jobs I had as an apprentice was working on die's that punched holes into peg board. They would punch 3 rows of either 3/16" or 1/4" dia. holes on 1 " centers 48" or 72" wide for the hardboard sheets that you buy for your garage to hang tools on. Each die had 102 1-1/4" dia. springs ,that I had to drill the holes for into the dieset 2-1/5" deep. So I have been drilling thousands of holes thru the 44 years that I was a diemaker plus now as a model maker. But now they are quite a bit smaller in diameter. I just sit down and listen to the TV or a CD and get into the land of drilling holes and seeing how close of a perfect pattern that I can make,and just how many holes without breaking a drill bit. On my Royal Caroilne I have drilled over 8,000 holes now of .016 dia. without breaking a drill. And thats drilling into boxwood that has been coated with Testors Dullcote. Not a reacord for me,but just another week in model building. From a fellow "Holely Man" retired Toolmaker Keith from sunny Troutdale,Oregon-going to be 72 today here.
- 1,051 replies
-
- 5
-
-
- cheerful
- Syren Ship Model Company
- (and 1 more)
-
Hi Chuck When will you add these little jewells to the parts for sale on the Cheerful? Just finished the treenailing on my Royal Caroline this weekend. I also have all of the Cheerful parts cut out and sitting in a drawer with all of the other parts for it in my Syren tool box just waiting for me to start on this build. Keith
-
Ahoy Mates Other than wood,what do you use for treenailing? How do you use it? And where do you get your supply of it? I have used brass,plastic and nylon. For brass either I cut it before putting into drilled holes,or snip it off after. Using either CA or Titebond for glue. And pretty much the same for plastic. Has anyone used fishing monoflilament line? I see where it comes in various diameters and colors. And I have used Titebond and Elmers glue for filling treenail noles. Have colored the glue with acrylic paint mixed in to simulate wood and tar colors. Whats have you come up with for this labor intensive work? Keith
-
Hi Even better would be 1/8" dia. piano wire. It will not bend like tube will. I have used it inside king posts and other ribs and frames that need the strenght. I have just drilled a hole that it will go into and glue it in place. Works great on basswood frames and bulkheads that have thin tops that are in the area that has planking that puts preasure on them. And supports them before the planking is glued to them,when you can just touch them and they will break off. Use a sharpe drill and drill the hole into the solid section at least 3 x the wire dia. or even more if possible. Keith
-
Ahoy Mates Have a problem that I want to avoid the next time I plank. In the glue thats between the planks in the seams when using Titebond,open up when I sand and scrape the hull to shape. They then show up as white,when the sanding and scraping particals get into them. I qiute using CA because I am mildly alergic to it now,so I use Titebond. What should I do to avoid these? and how can I deal with them if I do get them ? Thanks for the help. Keith
-
Mary Rose 1545 by tarbrush - Scale 1:72
bear replied to tarbrush's topic in - Build logs for subjects built 1501 - 1750
Hi John What plans are you using for your build and interior details? I have been building the Jotika 1/80 Mary Rose kit and having Rick laser cut me a 1/48 enlarged version. I have all of the Mary Roses trust books and other books for my builds. I would like to get a set of plans that you are using. Maybe they have details that my library that I have now on the Mary Rose desn't have. Sent me a PM on getting the plans. Your frames and progress looks great. I am working on my Panart 1/47 Royal Caroline until Rick gets me the decks for my 1/48 laser cut short kit that he has been working on and cutting for me. I also am working on the 1/80 Caldercraft Mary Rose kit. Keith -
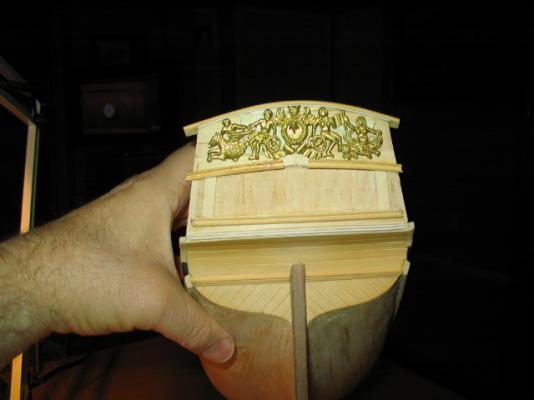
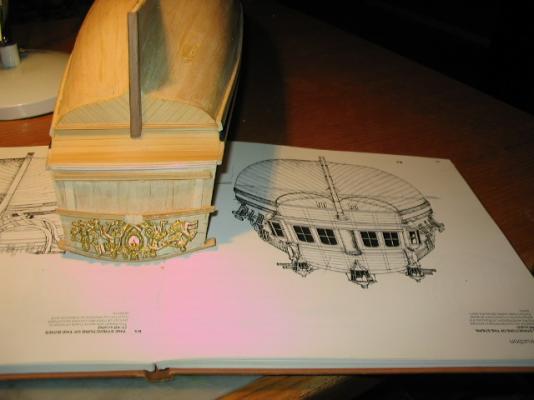
Hi Chuck Since I have seen your moldings for over the past year,it was time for me to try some. Here's a photo of my moldings on the 1/47 Rouyal Caroline that I am building now. Looking forward to building the Cheerful. Keith
- 1,051 replies
-
- 9
-
-
- cheerful
- Syren Ship Model Company
- (and 1 more)
-
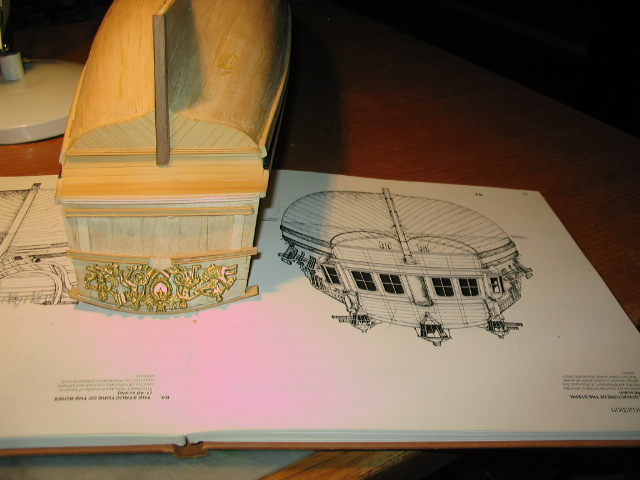
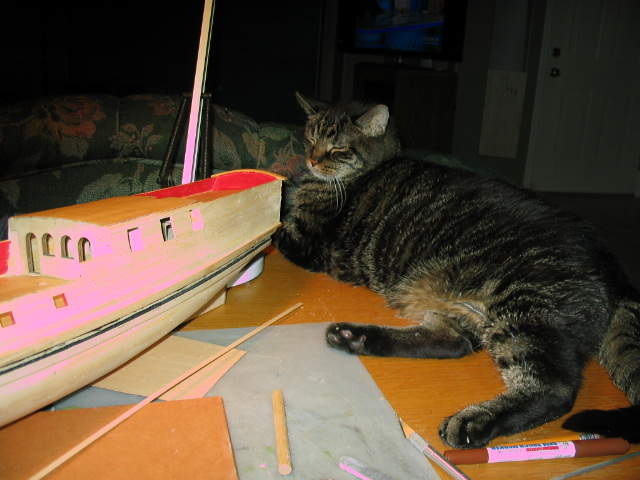
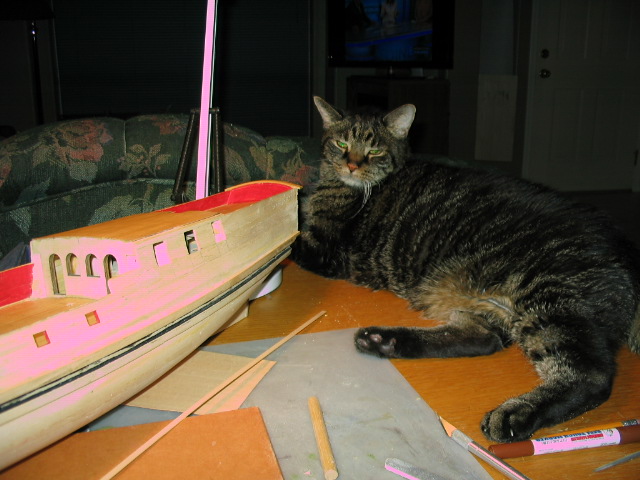
Ahoy I will have to try the Sculpey myself. Here's what I was able to do for the stern moldings today. Tonight I will make the niche in the center of the windows and start on the windows. The moldings were made out of boxwood and evergreen strip material. And a photo of my shipyard supervisor, Sweet Pickels ,he loves just watching the work and the heat from the lamp. Keith


-
Ahoy Mates I use a couple of dividers from a parts box as glue boards. They are made out of polyproeleen9sorry about spelling) nothing sticks to this plastic. Either PVA or CA. After the glue dries, I just flex the divider and the glue comes right off. I have about 3 that I use i n tag team manner. Keith
-
Ahoy Mates Just finished another bottle 8 oz. bottle of Titebond today. Over the past year I have used up a total of 16 oz of Titeband and one 1 oz each of med. and thick CA glue bottles. I am not using CA for anything other than where I have to. Over the last year I have become sensative to its fumes. Just slows down the building, but now I do not have to pry the fingers away from a plank or two. I have found that I am building better by not having to be in a hurry to just hold it down,now I have to plan my clamping more and doing a better job at it. With CA I have found looking back at what I had done,that I was just depending on holding it in place by my hand instead of clamping,which when it did not harden fast,caused problems with it moving out of place. And using excelerator did not always work out well. I did have a fresh bottle of CA,but do not know its real age. From what I have read latly CA over time has some real problems,in hardening to a brittle point and causing thread to break from also being brittle. What has been your luck or lack of on CA,and how much do you use of these glues? And how about you finger sticking stories? Keith
-
I used Minwax Golden Oak and Natural stains to finish my hull. On the basswood that I used and wood grained with the teeth of saw blades and xacto knife blade points to engrave the wood grain patterns ,I used the Natural stain first to keep the Golden Oak from being too dark of color. It would seal part of the wood,so that there was less of the dark stain that would go into the basswood. Keith
- 259 replies
-
- 1
-
-
- Gunboat
- Philadelphia
- (and 1 more)
-
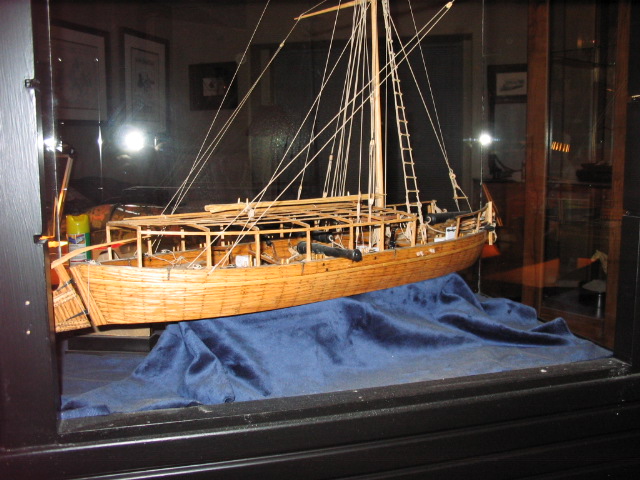
Hi Chuck Here's what my Philadelphia looks like. I planked it with 1/32 oak veneer as the real one was made out of oak. I used .025 square evergreen plastic strip for the nails. I drilled .020 dia. holes then squared them up with a square steel punch. Then I colored the white plastic srtip with a black felt pen on the outside. Then inserted the strip into each hole with Titbond glue on them. Cut them off about .020 above the plank surface. Then I sanded them down until they were about .015 above the surface. after that I painted the ends with a Gundam Paint pen dark grey. I also stained the planks to show the staining that iron nails would have done to the oak planks. Over 2500 total of these guys inside and outside of the hull.

- 259 replies
-
- 2
-
-
- Gunboat
- Philadelphia
- (and 1 more)
-
Hi Chuck No problem here with having to make the keel. Just looking ahead to what I will have to do. Keith
- 1,051 replies
-
- 1
-
-
- cheerful
- Syren Ship Model Company
- (and 1 more)
-
Hi Chuck Will the of bulheads for the Cheerful also include the keel? Thanks Keith
- 1,051 replies
-
- 1
-
-
- cheerful
- Syren Ship Model Company
- (and 1 more)
-
Hi Chuck Just a coule of questions. When drilling the hole,how deep do you drill the hole? When using the awl,how far do you push it in the hole? Is it just to make sure the hole is round after sanding? And if it is just for rounding out the hole,could you just use the same size drill and just use it in reverse to round out the hole befor using the pencil lead? Thanks Keith
- 1,051 replies
-
- 1
-
-
- cheerful
- Syren Ship Model Company
- (and 1 more)
-
Hi Chuck Thanks for the full lesson on what to do. Keith
- 1,051 replies
-
- 1
-
-
- cheerful
- Syren Ship Model Company
- (and 1 more)
-
Hi Chuck After drilling the #78 hole,what do you fill it with? What are your steps and what do you use? Thanks Keith
-
Ahoy Mates Looking ahead to when I have to paint the decorations on my Panart Royal Caroline build with a Gold Leaf paint color. Will be panting whatever Gold Leaf paint that will be chosen from the recomendtions from all of you. I will try out several paints recomended on sample parts. I would also like to know what you do to add depth and high lights to the Gold leaf in dry brushing or washes for the inside corners and outsdie edges. I will be painting over wood,plastic nd cast brass parts. Thanks for your help. Keith