

mij
-
Posts
224 -
Joined
-
Last visited
Reputation Activity
-

 mij got a reaction from Archi in Xebec by mij - FINISHED - 1:60 scale
The bulkheads have all been fitted.
-
 mij got a reaction from Auvergne in Xebec by mij - FINISHED - 1:60 scale
The bulkheads have all been fitted.
-
 mij got a reaction from avsjerome2003 in HMS Sussex by mij - Scale 1:48
My workshop is my garage, and with the UK winter ( a lot warmer than some of you guys )I`m finding the wood glue is not setting( I do have some heating in there ), so I`m having some time out on HMS Sussex until the summer.
I shall scratch build a P.O.B model half the size of HMS Sussex in the conservatory were it`s a lot warmer and the glue will set.
mij
-
 mij got a reaction from egkb in HMS Sussex by mij - Scale 1:48
My workshop is my garage, and with the UK winter ( a lot warmer than some of you guys )I`m finding the wood glue is not setting( I do have some heating in there ), so I`m having some time out on HMS Sussex until the summer.
I shall scratch build a P.O.B model half the size of HMS Sussex in the conservatory were it`s a lot warmer and the glue will set.
mij
-
mij got a reaction from Archi in HMS Sussex by mij - Scale 1:48
Cherry ready for the bandsaw
The cherry cut and ready to be milled.
It was worth the time and effort.
Tulip on the left and Cherry on the right
Start of the new build in cherry.
In the back ground is the one made from tulip.
-
 mij reacted to tlevine in HMS Atalanta 1775 by tlevine - FINISHED - 1:48 scale - from TFFM plans
The last two pictures show the knees installed.
-
mij reacted to dafi in Chain plates
That is when I realized that the used Krick-deadeyes were drilled too unevenly for my taste ... As I did not want to discard my painfully soldered parts and get better deadeyes, I startet closing the holes with toothpicks and filed them even.
Just then I realized that because of the size and curved surface the planned drilling templates did not work :-(
At least I know by now why they those bastards are drilled the way that they are ...
OK, good old solid handwork, putting each part into the vise and mark the central line for the two middle holes ...
... and with patience, a template and a good eye drill the preliminary holes with 0,5 mm, set the third hole with a fresh eye ...
... and finish the drilling with 0,8 mm.
I usually drill small holes by hand with the drill fixed on a round material as it gives far more control as any machine! .
Now came the tricky part of straightening everything up, worked best upon a cutterblade, even the smallest loops :-)
And finally I had a complete set of deadeyes and preventer plates for the main-mast channel on my adhesive tape. :-)
Hourray
... and finally came the montage :-)
First à la nature ...
... then with a little bit of colour ...
... and it looks like it was all simple! ;-)
Liebe Grüße, Daniel
-
mij got a reaction from Archi in HMS Sussex by mij - Scale 1:48
Hi Dan
The bandsaw is an old 3 wheel INCA, with a blade length of 104", which is capable of cutting 4" oak, for the milling I use a Proxxon DH 40 Planer Ticknesser (Ref: 27040).
The milling does take long time, but as you can see from the cherry, it was worth it.
mij
-
-
mij reacted to Modeler12 in A video about making metal hooks and . . . . .
I have made a short video about making various parts out of metal wire. Some of the topics I included seem to be of interest right now, but I also included some hints, how to blacken metals and a few others.
I show what I typically do and don't want to give the impression that it is the best or only way, of course. In fact, I welcome suggestions and your input about how to . . . .
After all, that is what this forum is all about.
-
mij reacted to AntonyUK in HMS Victory by AntonyUK - FINISHED - Scale 1:36 - cross-section
Hello Shipmates.
Another update on the Lower gundeck.
Basic assembly done just the Deck carlings to machine and fit into place.
No Gluing done at this stage.. Just good old tight joints.
Sides being treenailed.
And the other side.
View from the underside of the deck.
View from the Top side.
Close up of a joint.
No Glue or pins in this yet .
Thanks for looking in.
Regards Antony.
-
mij reacted to garyshipwright in HMS Montague 1779 by garyshipwright - 74-gun Alfred-class
Hi Remco. Thank you very much sir. Am glad you like the cannons sir and seems that your statement is just a little modest but I do thank you. Here are some more photo's of the gun deck with a few more details. Am not sure if I will leave the curve planking which is due to the curve of were the back of the cannon truck's land. May just plank one side for cannon's and leave the other side alone. Reason is that I just don't want to cover all of the detail up and am sort of stuck on the do I want to or not decision. :mellow: Gary
-
mij reacted to dvm27 in Speedwell 1752 by dvm27 (Greg Herbert) - FINISHED - Ketch Rigged Sloop
Thanks for all your comments!
Remco - There's no need to fix Fiebing's dye. It covers and penetrates beautifully and buffs to a nice finish. As a matter of fact, they recommend applying it to wet leather.
Learner - I adapted my stove from Lavery's Arming and Fitting... It depicts an iron firehearth contemporary to Speedwell. Brodie stoves appeared decades later, c.1780. Here are a couple photos of the strove during construction. All brass parts were constructed over shaped plugs of holly and glued with J&B Weldbond. This creates a very strong bond and fills the joints which can then be sanded. The finish is automotive gray primer followed by automotive black.
Mark - trunnels are drilled and applied after the wales are in place. They are easily touched up using the dye on a q-tip. Kind of a wasted exercise though as they become invisible.
Speedwell is a nice little project at 1:48. She'll fit easily on my one remaining shelf.
-
mij reacted to sudomekh in How should a carved figurehead be finished?
This is my fantasy! In fact, I do not know what the figure was at ARIEL
carved wood hornbeam
-
mij reacted to newbuilder101 in How should a carved figurehead be finished?
I have found some wonderful information on carving figureheads, which woods to use etc. but I haven't managed to find anything on what type of finish to use.
I hand carved this figurehead from a small block of basswood and now I'm not sure how to proceed with the finishing. On the kit models of the San Felipe, the manufacturer provides a brass cast figurehead. Does this then mean that the originals were gilded wood, or brass, or is this just artistic license on behalf of the kit companies?
I'm torn as to whether I should just seal it with a satin poly, use a very light stain and then seal, or paint it with a gold paint and add accent colours for the flag portion on the "face"?
Any ideas, or suggestions greatly appreciated.
-
mij reacted to Gaetan Bordeleau in Le Fleuron by Gaetan Bordeleau - FINISHED - 1:24
Glued evrything except the 2 back ramps for further easy access
Planking over side structures
Box framing each side dry fitting
At this stage dry fitting is essemtial because I could not arrive and fix parts at the first throw; I have to think calmly and slowly progress with each part to his shape and position in relation with the rest. Slow process but interesting!
-
mij reacted to Ilhan Gokcay in Matthew 1497 by Ilhan Gokcay - FINISHED - Scale 1/50
Attached the last sail and the anchors and it's finished. Next I will take photos of the finished model.
For large and more detail photos see also: http://www.flickr.com/photos/ilhan_gokcay/sets http://www.flickr.com/photos/ilhan_gokcay/sets/72157626433922489 http://www.flickr.com/photos/ilhan_gokcay/sets/72157626433922489/page16
-
mij reacted to AlexBaranov in HMS Cumberland 1774 by AlexBaranov - FINISHED - 1:36
I graduated from the "furnish" Gondek, a little more effort and I can close it . Before closing, I will do the final photo.
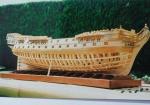
Mastered the three-dimensional shapes and almost finished decor stern. Finished completely underwater boards .
-
mij reacted to AntonyUK in HMS Victory by AntonyUK - FINISHED - Scale 1:36 - cross-section
Hello Shipmates.
Thanks Rusty and Bob for you comments.
Orlop is now complete and ready for final adjustments before fixing into place in the void.
Gratings and planks that adjoin the Headers are not glued as they will be cut to fit after fixing the deck.
View from top.
Another angle of the Deck.
A different angle.
View of the underside of the Orlop deck.
Another angle
From the other side.
That’s it for now. Will take a few photos when deck is fixed into place.
Regards Antony.
-
mij reacted to SJSoane in HMS Bellona 1760 by SJSoane - Scale 1:64 - English 74-gun - as designed
Hi everyone,
This weekend, I pushed along to finish the aft end of the gundeck (all but ledges). The first photo shows using a caul shaped to the fore and aft camber of the gundeck, which I used to level the beams as I glued them in place. Clamping the beams up to the caul ensured that they are all precisely level on the upper surface, where it counts.
I then worked on the carlings. I found an easy way to measure the angle of the end of each carling in a beam, with an angle gauge. i could then use the gauge to set the angle of the miter gauge on the sanding machine, for precise results, and flip it over to reverse the miter gauge and sand the symmetrically opposite carling in the same bay. Systematically working aft and from outboard to the center, I got them all done in a day. I still need to cut mortises for ledges in the carlings before they can be glued. I got progressively better at this as I worked along. The carling fair well fore and aft, with only one joint needing a slight adjustment from my original mortise cuts.
I also built the mizen mast core in anticipation of building the partners, and found an easy way to set the diameters at the 4 quarters, using a proportional divider set to two divisions. I set the long legs on the ruler for the total diameter at any point, and then used the short legs to mark off either side of the center line. It saved a lot of time.
I made the fore and aft standard fitting up against the wing transom and stern post. It took some fiddling to match angles and cut the slot for the wing transom. But very satisfying after all of these years to see that finishing up the aft deck. You can see on the starboard side of the aft gun deck, my first efforts at working out how a knee would finish up the deck at the rounded aft end. I have no drawings that show what this knee would look like but there has to be one to provide a landing for decking in the corner, before the decking can land on the deck transom. I can't believe that the decking would just land on the inner side of the aftmost frames with no support under it. Does anyone recall seeing a drawing of what happens here?
Best wishes,
Mark
-
 mij got a reaction from Jeronimo in HMS Sussex by mij - Scale 1:48
Hi Dan
The bandsaw is an old 3 wheel INCA, with a blade length of 104", which is capable of cutting 4" oak, for the milling I use a Proxxon DH 40 Planer Ticknesser (Ref: 27040).
The milling does take long time, but as you can see from the cherry, it was worth it.
mij
-
mij reacted to GTM in Choosing a miller
Hej Richard,
I’m a lucky man and own both setups (the MF70 & the BFW 40/E and the table setup as shown by MIJ)
So hereby my findings for both setups..
I started off with the MF70 and I’m very, very satisfied with this product
Pro.
-It comes with an compound table and the “head” also moves down & up via an spindle and it is good for accurate router tasks.
-It is also very good for small router bits and harder materials as the speed can varied between 5.000 - 20.000 rpm
-Collets and a three-jaw drill chuck can be used
-Is a small machine
Con.
-The “spindles” on the compound table (200x70mm) are small and therefore I use the spindle itself for accurate movements and not the handles
-It is a time consuming machine for drill tasks as the vertical movement only can be operated by an (small) spindle
-It can’t be used for “tilted” drill/router tasks
As for the other setup..
I was actually looking for an drill-press but instead my attention focused on this BFW 40/E setup (contains BFB 2000, KT 150 and BFW 40/E) ..
Con.
-The total setup is more expensive (but I must admit it is worth the extra money)
-Needs a separate power supply
-Less rpm’s than the MF70 (900-6.000 rpm)
-Only collets can be used
Pro.
-The compound table (200x200mm) can be bought separately/later, the spindles are more accurate, can move very fast and the handles are usable
-The head can be tilted, so angled tasks are no problem
-The setup is Multi-functional (via an lever the head can be switched into a “router/static” or “drill-press/lever” mode)
-The motor-unit (BFW 40/E) is very, very, very quiet…
-It can also handle “big” work pieces
-

-
 mij got a reaction from giampieroricci in L'Amarante 1749 by giampieroricci - FINISHED - 1:30 - French Corvette
Hi Gianpiero
Very nice model and great workmamship.
mij
-
mij reacted to giampieroricci in L'Amarante 1749 by giampieroricci - FINISHED - 1:30 - French Corvette
after removing the clamps here is the result
on the right side