
MORE HANDBOOKS ARE ON THEIR WAY! We will let you know when they get here.
×

woodrat
-
Posts
832 -
Joined
-
Last visited
Reputation Activity
-

 woodrat got a reaction from Vivian Galad in Venetian Carrack or Cocha by woodrat - FINISHED - 1/64
Yes. It survived well into last century as this photo of a dhow from 1972 attests.
This the mainyard ready to be swayed up
-
 woodrat reacted to Cathead in A method for making panelled sails using paper
Part III: Adding reef points
Reef points add a lot of visual interest to sails, and they're easy to add in the paper-sail method.
The reef bands were glued on in Part I. Where to place the reef points is something of an uncertain topic; I found references for a variety of options, including one point on each seam, one point within each panel, and two points within each panel. I chose to use the first approach. Because the paper layers were extra thick here, due to the seam and reef bands, I used a small drill bit to open up a hole rather than trying to drive a needle through.
For the reef points, I cut a series of rigging rope a bit longer than I needed. I wanted my reef points 2 scale feet long, so I cut the rope 5' long to allow for trimming, then used a deadeye/block threader to run each line through the sail. The threader creates a strong crimp in the line, so I tried to center each line in the threader before pulling it back through; the crimp then becomes a natural reference point holding the line in place where it passes through the sail.
When all the lines for a given band were threaded, I clamped a piece of wood across the sail 2 scale feet below the reef band as a reference marker. You can get the length right here in two ways: either trim each line to the right length relative to the crimp, or don't worry about the crimp and pull each one back through the sail until only 2' are left on the side you're working on. I then used a fine brush to gently apply a bit of glue to a line, then pressed it into place on the sail with its tip against the wood. You only have to hold the line in place for maybe 10-15 seconds for the glue to take hold, before moving on to the next one. I like to get glue from the tip to about 2/3 to the sail, not all the way to the sail. This means the line naturally bows out a bit where it comes out of the sail, giving it some 3D texture. Don't overdo the glue or you'll get weird stains on the paper. Also, don't worry about trying to get each line perfectly straight; they're going to want to curve this way and that, and buckle a bit, and that's exactly what you want because that really makes them look like loose lines dangling down. You want just enough glue to hold them relatively flat so they look like gravity is working. If you glue them too flat or perfect, they'll look glued on and artificial.
Once one side is done, it looks something like the image above. Then you just turn the sail over, clamp the wood at 2' again, trim the remaining lines to length, and glue them in the same way.
If there is more than one reef band, do the upper one first, since you're overall working on the lower side. Above, you see the same process being repeated for a lower line of reef points.
And here are the two completed lines of reef points. They have a nice randomness that looks like loosely dangling lines. Note that, once again, I slightly messed up this demonstration by not cutting the upper line of reef points quite evenly (they're too short on the left). It figures that my demonstration sail would be the sloppiest of any I've made so far, but I hope the idea comes across. And, as above, this sort of things fades away when the sail is placed in the full context of a rigged model.
I'm quite happy with this method. I've now made all six of the sails for my topsail schooner this way and feel that they have a strong visual interest and a realistic (if not perfectly accurate) appearance. Moreover, the method uses cheap material that's easy to work with, and requires no special skills other than some patience and care when handling glued paper. It's easy to test on random scraps first before trying a full sail, and it's easy to customize. For example, you could skip the panels and just use a full sheet of paper, or skip the boltropes, and still use the rest of the approach to have a nice sail that holds it shape and can even be shaped to hold a curve. I hope others find some or all of this interesting and useful as a different way to produce interesting sails for nautical models. Thanks for reading.
-
woodrat reacted to Cathead in A method for making panelled sails using paper
I've developed a method for making paneled sails from paper that works nicely to simulate the three-dimensional texture of a sail. It seems to offer a lot of visual interest, more so than a flat sail, and the procedure is pretty manageable. I like paper sails for several reasons: they hold their shape better than cloth sails (including a natural bellied curve), they have a nice texture (especially when colored by pastels), and there's no need for complicated or careful sewing. In this topic I'll walk through the method I worked out so far, starting with making the panels themselves. I haven't seen much else about paper sails on MSW, so hopefully this is of interest to some folks.
I first tried paper sails on my 18th century longboat build and was quite happy with the result. In that case, I just used a flat sheet of paper and drew on the seams and stitches. It worked, but was too flat. For my current build of a US Revenue Cutter, I decided to try making sails the prototypical way, assembling them from long panels of material joined at the edges. I first asked for guidance in another sail-making thread, which produced a lot of good ideas and guidance. This guide to sail-making from the Historic Naval Ships Association was a particularly useful suggestion, as it's chock full of detailed diagrams for the arrangement of panels and the overall design of sails for different craft. Following these guides, I made a few sails and was very pleased, so I finally put in the time to document each step of the process for the foresail of my revenue cutter. Here's what these sails look like on that model:
Cutting & Assembling Panels
I used bond paper, which is heavier and more textured than regular printer paper. This is commonly used for printing theses; my supply came from leftovers of Mrs. Cathead's graduate thesis. Beware of watermarks in bond paper; you don't want your sail advertising a paper company when you shine a light on it! As shown above, I mark a sheet of bond paper in scale 2' strips, then cut the strips on a small paper-cutter. Using a dedicated fine brush, I run a narrow strip of basic wood glue along the edge of each strip, then lay it out on the edge of a neighbor strip. A glue stick might work too, but I've been fine using this method. Repeating this process produces a nice 3D-textured shape from which you can cut the final sail pattern. Make sure you pay attention to the direction in which you lay out the strips; I did one of my sails backward (so that the seams ran counter to the other sails) and had to start over because it looked funny. Above, you can already see how the overlapped panels create more visual interest than a plain, smooth sail.
Next, I cut and attach any corner reinforcement panels. Then I cut thinner strips for the edging of the sails, and fold them in half. Then I brush glue along the inner surface of each one, and carefully fold it in place along the sail's edges. There are several ways to do this: you can brush 1/2 of the strip, glue it on, then brush on the other 1/2 and fold it over; or you can brush the whole inner surface at once. Although the former approach sounds better in theory, I've found that the moisture in the glue causes the paper to buckle, so that if you do the 1/2 approach, the strip bends out of true and is really hard to align on the sail's edge. If you glue the whole thing, it stays straight and is easier to handle. Incidentally, the same buckling-when-wet property works to your advantage in the sail overall; as the moisture dries between the panels, the sail inevitably takes on a bit of a curve, which nearly perfectly mimics the gently belly of a sail with wind in it. I also cut any reef-point strips and attach these.
Once the sail is fully assembled, I color it with artist's pastels. You can use your finger or a cotton swab to gently rub on color; the paper takes up the color wonderfully, and it really brings out the texture of the bond paper. The 3D nature of the assembly helps, too, as the pastel powder naturally collects a bit along seams and highlights the structural elements of the sail. You can use a mix of colors to get just the appearance you want. One important warning: don't rub too hard, and hold the sail flat. A downside of paper vs. cloth is that paper creases; if you rub too hard or otherwise force the paper to bend or kink, you'll never get that feature out again. Some folks may want to use some kind of fixative on the color, but I've never bothered; the bond paper holds pastel really well on its own. Just be careful about handling the sail with fingers coated in pastel; you don't want to leave a dark fingerprint smudge somewhere.
That's the first stage. You could stop here for a basic version, but I went ahead and added boltropes and reef points, which I'll cover in the next few posts.
-
 woodrat got a reaction from hexnut in Venetian Carrack or Cocha by woodrat - FINISHED - 1/64
Yes. It survived well into last century as this photo of a dhow from 1972 attests.
This the mainyard ready to be swayed up
-
 woodrat got a reaction from michael mott in Venetian Carrack or Cocha by woodrat - FINISHED - 1/64
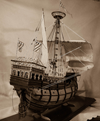
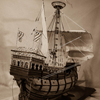
I do apologize for my tardiness in updating this log. I have been in the process of restructuring my professional committments and, consequently, have neglected the more enjoyable of my pursuits. I have, however, finally worked out the likely method that was used to laterally stabilize the mainmast. The shrouds are passed inboard, not as in later vessels outboard to chainplates. The pendants from the mainmasts ( more later) are secured by tackles. This is more in keeping with the iconography of the period in mediterranean vessels. It may well have been different in the northern european vessels as illustrated by the drawings by the flemish master WA, which show chainplates. Certainly it would have been vastly simpler for me to secure the pendants outboard but, in shipmodelling, it is sometimes better to aim for accuracy rather than facility. Nonetheless, I offer this as a solution which is consistent with the scanty evidence.
Dick
-
 woodrat got a reaction from kees de mol in Venetian Carrack or Cocha by woodrat - FINISHED - 1/64
The mainmast. This tapered mast is often undersized in carrack models. Contemporary illustrations show a very substantial mast made even thicker at the base by long wedges inserted vertically into the partners. Although, as discussed previously, the mainmast was usually a built mast with a central spindle and at least eight outer spars, I did not have the carpentry skills to reproduce this in miniature. Therefore I chose to fudge it just a little while maintaining the look and feel of a mediaeval built mast.
Many illustrations show the longitudinal lines along the mast that you would expect if the mast was built and not a single spar.
or
note the wooldings
I started with a tapered spar
Made a paper template
Made strips with the template so that I would end up with eight tapered strips
Glued the strips to pine strips
Stuck the pine strips to the mast with double sided tape
Vessels with built masts had quite a variable number of rope wooldings to reinforce the mast. However they did not use wooden hoops above and below the wooldings as was seen in later periods. It may be that the ropes were reinforced with nails to prevent the ropes slipping.
The completed mast
Cheers
Dick
-
 woodrat got a reaction from shipmodel in Venetian Carrack or Cocha by woodrat - FINISHED - 1/64
Yes. It survived well into last century as this photo of a dhow from 1972 attests.
This the mainyard ready to be swayed up
-
 woodrat got a reaction from firdajan in Venetian Carrack or Cocha by woodrat - FINISHED - 1/64
Yes. It survived well into last century as this photo of a dhow from 1972 attests.
This the mainyard ready to be swayed up
-
 woodrat got a reaction from Farbror Fartyg in Venetian Carrack or Cocha by woodrat - FINISHED - 1/64
Yes. It survived well into last century as this photo of a dhow from 1972 attests.
This the mainyard ready to be swayed up
-
 woodrat got a reaction from cog in Venetian Carrack or Cocha by woodrat - FINISHED - 1/64
Flat surfaces would be subject to shear forces and would need reinforcement with trenails , bolts or nails, all of which would weaken the wood and lead to splitting. the concave /convex joint reinforced with rope is strong and not rigid. Moreover iron hoops are difficult to make and apply and rope is readily available and cheap.
Dick
-
 woodrat got a reaction from Louie da fly in Venetian Carrack or Cocha by woodrat - FINISHED - 1/64
Yes. It survived well into last century as this photo of a dhow from 1972 attests.
This the mainyard ready to be swayed up
-
 woodrat got a reaction from druxey in Venetian Carrack or Cocha by woodrat - FINISHED - 1/64
Flat surfaces would be subject to shear forces and would need reinforcement with trenails , bolts or nails, all of which would weaken the wood and lead to splitting. the concave /convex joint reinforced with rope is strong and not rigid. Moreover iron hoops are difficult to make and apply and rope is readily available and cheap.
Dick
-
woodrat got a reaction from Louie da fly in Venetian Carrack or Cocha by woodrat - FINISHED - 1/64
Flat surfaces would be subject to shear forces and would need reinforcement with trenails , bolts or nails, all of which would weaken the wood and lead to splitting. the concave /convex joint reinforced with rope is strong and not rigid. Moreover iron hoops are difficult to make and apply and rope is readily available and cheap.
Dick
-
woodrat got a reaction from firdajan in Venetian Carrack or Cocha by woodrat - FINISHED - 1/64
The next step is the mainyard. In mediterranean vessels the mainyard was made of 2 spars bound together. The combined length is approximately the length of the keel and the two spard overlap by 50%. It is an error to apply 17th or 18th century preconceptions to these yards. They are very different and a lot longer than many Santa Maria models depict. Once again the paintings of Carpaccio come up as the best source. But even Carpaccio leaves things out, in this case the forestay.
The mainyard is held to the mast by parrels. The bigger the vessel, the more rows of parrels. In my case there will be four rows of parrels.
note that one spar has a concave cross section and the other convex
-
 woodrat got a reaction from mtaylor in Venetian Carrack or Cocha by woodrat - FINISHED - 1/64
Flat surfaces would be subject to shear forces and would need reinforcement with trenails , bolts or nails, all of which would weaken the wood and lead to splitting. the concave /convex joint reinforced with rope is strong and not rigid. Moreover iron hoops are difficult to make and apply and rope is readily available and cheap.
Dick
-
 woodrat got a reaction from usedtosail in Venetian Carrack or Cocha by woodrat - FINISHED - 1/64
this shows a closeup of the attachment of the shrouds to the mast by looping over pegs inserted in the mast. This may seem odd in that the usual arrangement we are used to is looping the shroud through crosstrees and AROUND the mast. I chose this method because the Trombetta drawing of the mast being set up shows the fighting top already in place BEFORE the shrouds were rigged. This method is also seen in some models close to this period.
Dick
-
woodrat got a reaction from shipmodel in Venetian Carrack or Cocha by woodrat - FINISHED - 1/64
I do apologize for my tardiness in updating this log. I have been in the process of restructuring my professional committments and, consequently, have neglected the more enjoyable of my pursuits. I have, however, finally worked out the likely method that was used to laterally stabilize the mainmast. The shrouds are passed inboard, not as in later vessels outboard to chainplates. The pendants from the mainmasts ( more later) are secured by tackles. This is more in keeping with the iconography of the period in mediterranean vessels. It may well have been different in the northern european vessels as illustrated by the drawings by the flemish master WA, which show chainplates. Certainly it would have been vastly simpler for me to secure the pendants outboard but, in shipmodelling, it is sometimes better to aim for accuracy rather than facility. Nonetheless, I offer this as a solution which is consistent with the scanty evidence.
Dick
-
 woodrat got a reaction from JesseLee in Venetian Carrack or Cocha by woodrat - FINISHED - 1/64
Flat surfaces would be subject to shear forces and would need reinforcement with trenails , bolts or nails, all of which would weaken the wood and lead to splitting. the concave /convex joint reinforced with rope is strong and not rigid. Moreover iron hoops are difficult to make and apply and rope is readily available and cheap.
Dick
-
 woodrat got a reaction from rybakov in Venetian Carrack or Cocha by woodrat - FINISHED - 1/64
Flat surfaces would be subject to shear forces and would need reinforcement with trenails , bolts or nails, all of which would weaken the wood and lead to splitting. the concave /convex joint reinforced with rope is strong and not rigid. Moreover iron hoops are difficult to make and apply and rope is readily available and cheap.
Dick
-
woodrat got a reaction from Farbror Fartyg in Venetian Carrack or Cocha by woodrat - FINISHED - 1/64
Flat surfaces would be subject to shear forces and would need reinforcement with trenails , bolts or nails, all of which would weaken the wood and lead to splitting. the concave /convex joint reinforced with rope is strong and not rigid. Moreover iron hoops are difficult to make and apply and rope is readily available and cheap.
Dick
-
woodrat got a reaction from Louie da fly in Venetian Carrack or Cocha by woodrat - FINISHED - 1/64
The next step is the mainyard. In mediterranean vessels the mainyard was made of 2 spars bound together. The combined length is approximately the length of the keel and the two spard overlap by 50%. It is an error to apply 17th or 18th century preconceptions to these yards. They are very different and a lot longer than many Santa Maria models depict. Once again the paintings of Carpaccio come up as the best source. But even Carpaccio leaves things out, in this case the forestay.
The mainyard is held to the mast by parrels. The bigger the vessel, the more rows of parrels. In my case there will be four rows of parrels.
note that one spar has a concave cross section and the other convex
-
 woodrat got a reaction from CaptainSteve in Venetian Carrack or Cocha by woodrat - FINISHED - 1/64
Flat surfaces would be subject to shear forces and would need reinforcement with trenails , bolts or nails, all of which would weaken the wood and lead to splitting. the concave /convex joint reinforced with rope is strong and not rigid. Moreover iron hoops are difficult to make and apply and rope is readily available and cheap.
Dick
-
woodrat got a reaction from Farbror Fartyg in Venetian Carrack or Cocha by woodrat - FINISHED - 1/64
The next step is the mainyard. In mediterranean vessels the mainyard was made of 2 spars bound together. The combined length is approximately the length of the keel and the two spard overlap by 50%. It is an error to apply 17th or 18th century preconceptions to these yards. They are very different and a lot longer than many Santa Maria models depict. Once again the paintings of Carpaccio come up as the best source. But even Carpaccio leaves things out, in this case the forestay.
The mainyard is held to the mast by parrels. The bigger the vessel, the more rows of parrels. In my case there will be four rows of parrels.
note that one spar has a concave cross section and the other convex
-
woodrat got a reaction from mtaylor in Venetian Carrack or Cocha by woodrat - FINISHED - 1/64
The next step is the mainyard. In mediterranean vessels the mainyard was made of 2 spars bound together. The combined length is approximately the length of the keel and the two spard overlap by 50%. It is an error to apply 17th or 18th century preconceptions to these yards. They are very different and a lot longer than many Santa Maria models depict. Once again the paintings of Carpaccio come up as the best source. But even Carpaccio leaves things out, in this case the forestay.
The mainyard is held to the mast by parrels. The bigger the vessel, the more rows of parrels. In my case there will be four rows of parrels.
note that one spar has a concave cross section and the other convex
-
woodrat got a reaction from JesseLee in Venetian Carrack or Cocha by woodrat - FINISHED - 1/64
The next step is the mainyard. In mediterranean vessels the mainyard was made of 2 spars bound together. The combined length is approximately the length of the keel and the two spard overlap by 50%. It is an error to apply 17th or 18th century preconceptions to these yards. They are very different and a lot longer than many Santa Maria models depict. Once again the paintings of Carpaccio come up as the best source. But even Carpaccio leaves things out, in this case the forestay.
The mainyard is held to the mast by parrels. The bigger the vessel, the more rows of parrels. In my case there will be four rows of parrels.
note that one spar has a concave cross section and the other convex