


Beef Wellington
-
Posts
2,249 -
Joined
-
Last visited
Content Type
Profiles
Forums
Gallery
Events
Everything posted by Beef Wellington
-
 I wish I was different!! I'm limited to maybe 1hr per evening, and that seems to be 45mins staring at things! Seriously, the coppering looks very nice, looks like you are getting very close to the end now.
 -
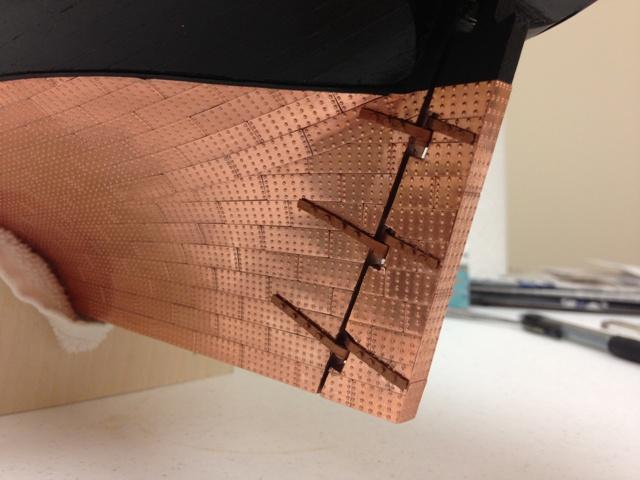
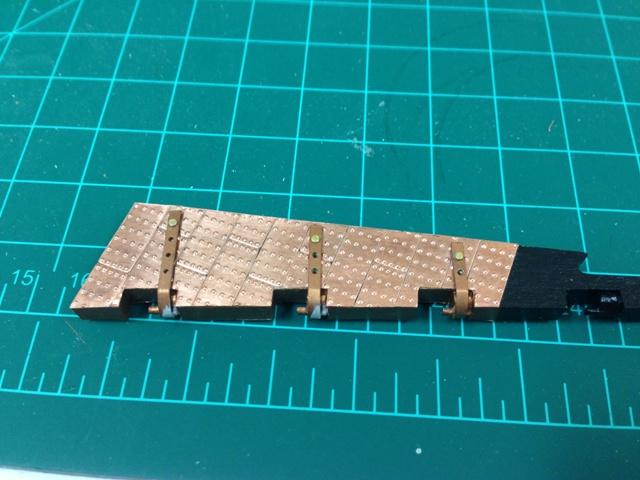
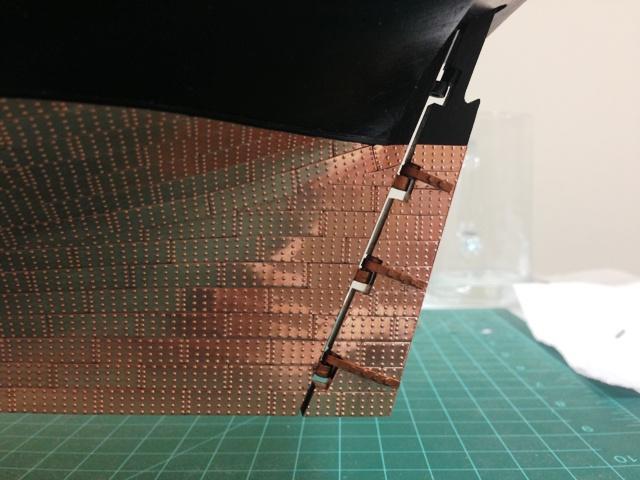
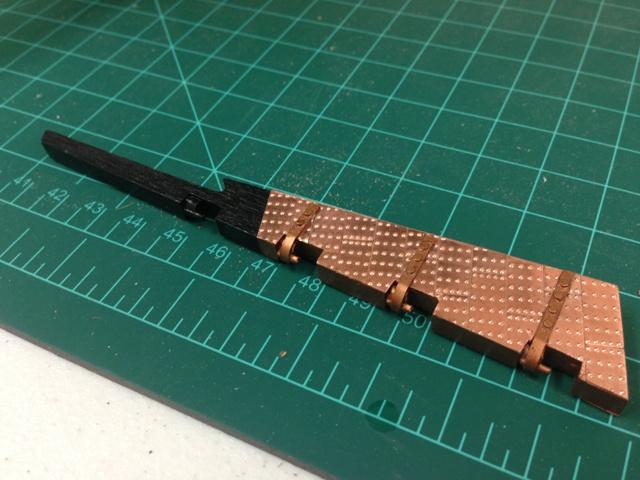
Would appreciate some opinions here from my fellow Snake builders. My worries about the fitting of the ladders have if anything have been amplified by a little iddling, I decided to mock up one of the sets of ladders to see how they would sit and possibly get in the way of the tiller rope. The instructions indicate to cut the boards to be 14mm, roughly 0.9m at 1:64 (roughly 3ft), the width of door. This doesn't seem unreasonable. However, looking at the plans the ladders are shown much smaller (varying 9-10mm), with the illusion that the ladders are much less of an obstacle both in the forward and aft areas which are really quite tight (the bits and guns for'ard, and the tiller rope and guns aft). This doesn't seem to be wholly unreasonable either scalewise (roughly 2ft or 0.6m). The question seems to be to follow the instructions strictly which will seem to require really careful planning, or alternatively follow the plans which may make things easier. Thoughts anyone? Real shame Normanh's excellent build log was lost!
-
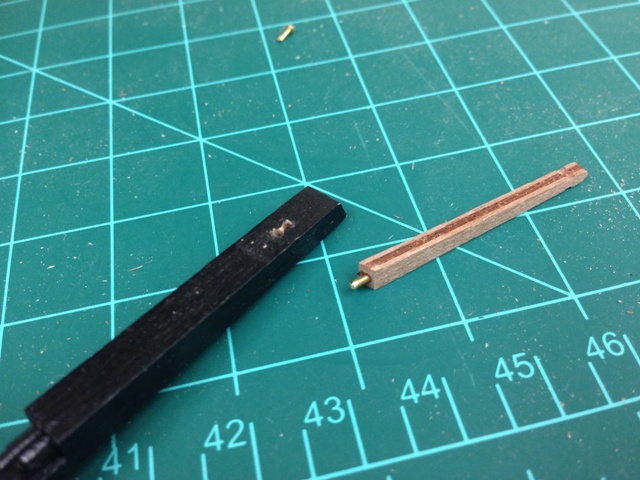
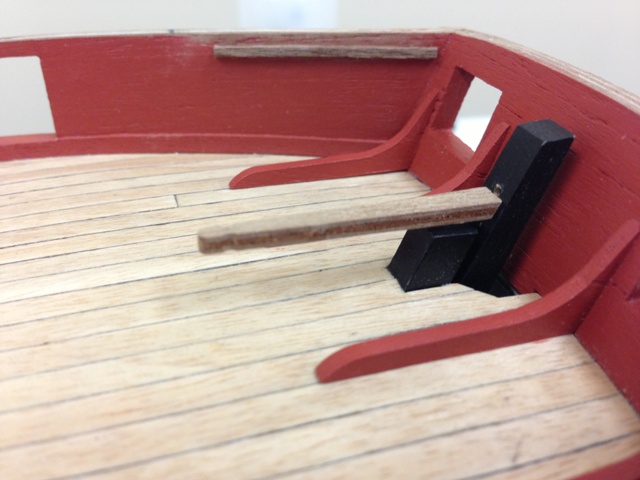
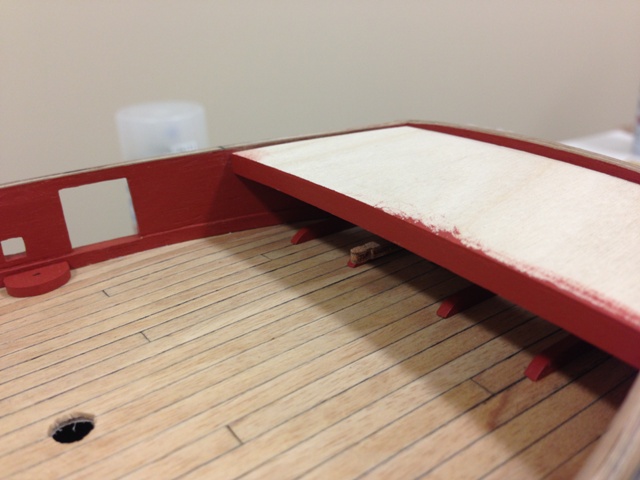
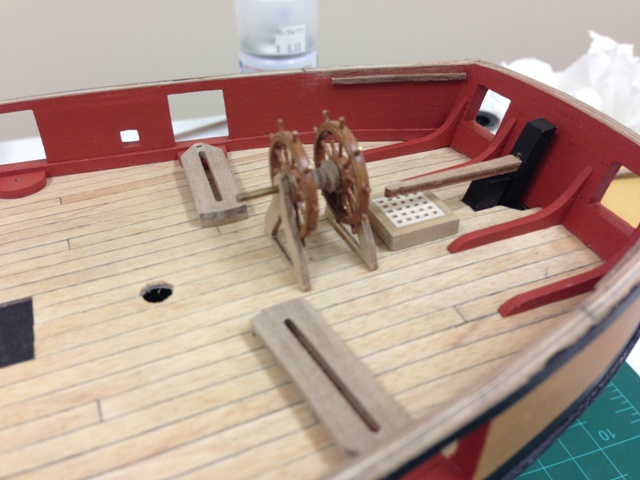
Small update, definitely getting a bit more comfortable working with some of the what I'm sure are basic skills to most! Started to tackle the tiller. 1 - found that the tiller arm is too long, and the plans seem to contradict each other from side to top elevation in determining the length. In the end I sort of averaged it, dry placed the wheel and adjusted for what I thought looked about right length. Side note, the more I work with the plans the more I keep reminding myself that they are more "guidelines" in a number of respects. After finding the right length, I shaped the end to the angel of the rudder and drilled a 1mm hole in the tiller arm and the rudder to accept some wire - this seemed a little more reliable (how you are supposed to work with the pre-cut square 'pin' I don't know). SPOILER ALERT - You'll see there are two holes in the rudder, the top is a mistake which I'll explain 2 - Dry fitted tiller arm. I'l probably round this off a bit before final fitting. 3 - Dryfitted the aft platform and found that the tiller arm was too high as the arm did not clear the support beam (again, despite using the plans as guidance) - simple to fix, but another example of where I'm learning its important to be 3 steps ahead. It would have been a real pain to correct this after it was all rigged 4 - Threw some of the other in progress deck fittings together, looks like its going to be rather crowded back there even without the aft platform, and ladders still need to go in. Need to assemble these and plan for where these will go prior to fitting the tiller rope otherwise it could cause problems later.
- 800 replies
-
- 1
-

-
- snake
- caldercraft
- (and 1 more)
-
Yes, I believe the bridle port would remain clear
-
I can't speak from experience as I'm about to start this as well. The two block next to the wheel I believe should allow the tiller rope to go from vertically downwards through 90degs so it is travels parallel, and close to deck height as it heads out to the first bulwark tackle blocks. I'm assuming we'll need to fit some eybolts to secure these. Interesting you bring up the fore platform. I'm waiting for some more tanganyika wood before I can proceed with that, but I have shaped the ply already. I was going to plank this once the ply is glued into place to cover any gaps. I'm debating though whether it may make sense to install the foremost gun first as it looks to be a bit restricted once the plat form is installed. (I am diverting from instructions and will be using Caldercraft 9lb'ers, which are can duplicate the 6lb'ers in size as provided in the Cruizer kits) in the first gun-ports as it seems these ships carried 16 carronades and 2 6lb'ers - presumably bow chasers.
-
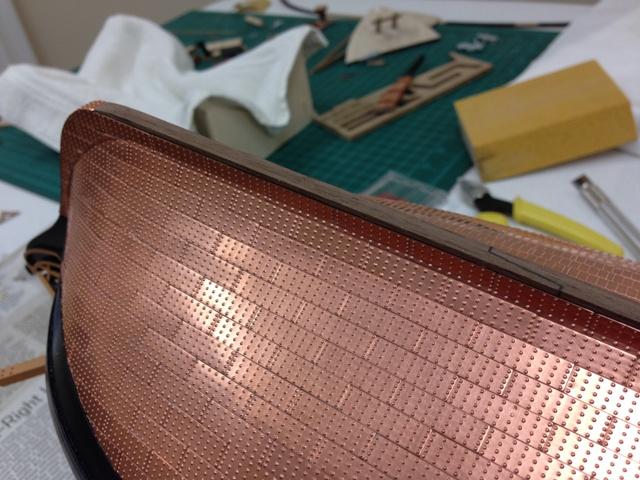
Same as Jim. I tried to keep the overlap to a minimum, and found that if you lay the plate in place and simply use a fine marker pen to draw the profile,a dn cutting with scissors, you can get a pretty good initial fit with little effort. Definitely second Jim's comments, use gentle strokes once the plate is glued as it doesn't take much to pop one off - minimizing the amount you need to remove in this way really helps. Once you are very close, you can even use fine sandpaper to get a smoother edge if necessary.
-
I think I'm rapidly approaching an 'ask lots of questions' phase, so please bear with me, first of many I suspect to come. I'm had thought about adding a false keel instead of coppering the keel bottom. Based on what I've read and seen in AOTS series, the false keel was installed to protect the keel from inevitable damage, was easily replaceable, and would have been attached on top of the coppered keel bottom. Pictures below show what I think this would have been like based on my research (I faked the scarf joints as they will not be very visible). Is this a reasonable representation?
- 800 replies
-
- 3
-
-
- snake
- caldercraft
- (and 1 more)
-
Agree with you, thats how I was thinking of tackling it as well as I think it may need to keep a bit of lateral strain in places to sit properly. Have you given any thought to the bulwark pinrails and whether you will fit before or after the capping rail? I'm also deliberating over the placement, on the plans they seem to be immediately below the capping rail, but it seems a little high, and looking at other ships it seems they are a little lower, maybe the same height as the foremast bits. I'm leaning toward lowering them which means it may make sense to do after installing the capping rail.
-
Thanks B.E. - that helps tremendously. Think I'll give it a go if I can find some chain, will need to go shopping...
-
Nice space, looking very tidy! I think the metal arc on the decks is a feature added much later when the size of the guns started to grow to make them easier to lay and prevent chewing up the decks. Haven't seen anything like this contemporaneous with the "Snake" period.
-
Andy, Sjors - thanks for stopping by and the kind words B.E - the instructions are very limited, I went to the Jotika site and found that its possible to download the instructions for some of the newer kits (http://www.jotika-ltd.com/Pages/1024768/Manuals_Front.htm). For comparison, the Pickle instructions run to 58 pages, the Snake instructions have only 6 1/2 !! After a quick scan through I would definitley recommend this as even though they are kit specific, they have some nice pictures and more detailed explanations of some of the common steps. I would like to install a chain, any advice on how to do this or pictures to show the spectacle plate and rudder hancing - can't find any info on these. What size chain would be appropriate?
-
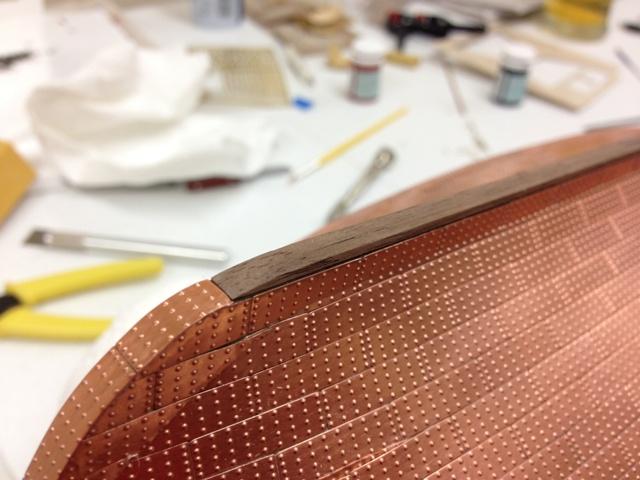
Well, the straps took a bit longer than I had hoped, but I'm having bit of a whisky and cigar moment... Broke 2 small drill bits in the process but pretty happy with the way they turned out. I found getting the placement right to be a bit of a challenge on the hull as the the shine on the copper, the curve of the hull and the lines of the copper plates all seem to conspire to make you a little cross eyed - and even when they are perpendicular to the sternpost, they don't look to be. I found the painting to be a chore yet again. The Admiralty metal primer acrylic I'm using gives good coverage, but the copper paint like all metals required many many thin coats to get a solid look. QUESTION - any advice on whether the rudder should be secured to the hull in some way, or is it OK just to leave it gravity like real life?
- 800 replies
-
- 1
-
-
- snake
- caldercraft
- (and 1 more)
-
Hi Carl, I agree it is a nice contrast. The copper paint is supposed to have actual copper in the paint, and according to Caldercraft the paint is supposed to tarnish just as copper would. Interesting to see how this plays out...
-
Glad you are back Alexey, I greatly enjoyed your previous log...will be following closely!
-
Stergios, I'm taking the same approach as Jim, just leaving it to tarnish naturally. You're making good progress, looking nice, especially the contrast with the wood and the black paint.
-
What is the best way to attach a block to an eyebolt in an 'authentic' way when a hook is not used. Seems like a basic question but can't find any good information anywhere. Any help would be appreciated.
-
Not sure on pricing, but the wheels are sold individually. However 15 quid seems a little steep. Don't think I paid that much.
-
Looks very nice already Ray, maybe I missed it, are you using maple for all the decking? It has a beautiful colour made only better by the sharp planking - curious whether you had any bleeding on the ends on the planks, I tried this approach and found even with an archival pen it bled into Tanganyika wood so ended up using a soft pencil. Did you seal the wood at all first? Either way, its a huge improvement - sorry for all the questions!
- 536 replies
-
- 1
-
-
- diana
- caldercraft
- (and 1 more)
-
Congrats Jim, looks great. I know what you mean about the sense of accomplishment!
-
Very nice Kevin, one day I hope to tackle her as well. Will be following closely!
- 1,319 replies
-
- 1
-
-
- caldercraft
- Victory
- (and 1 more)
-
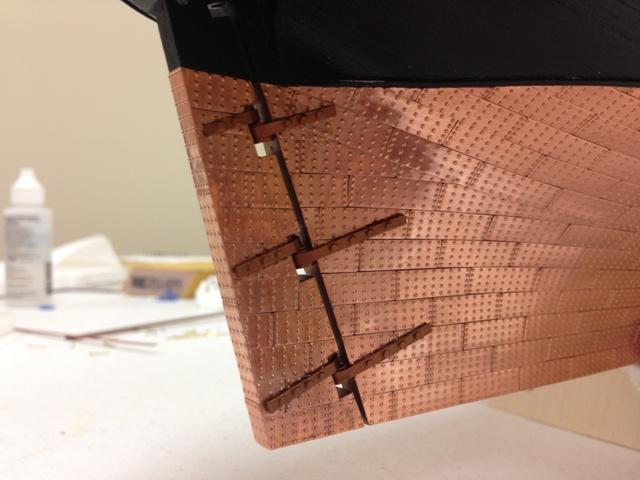
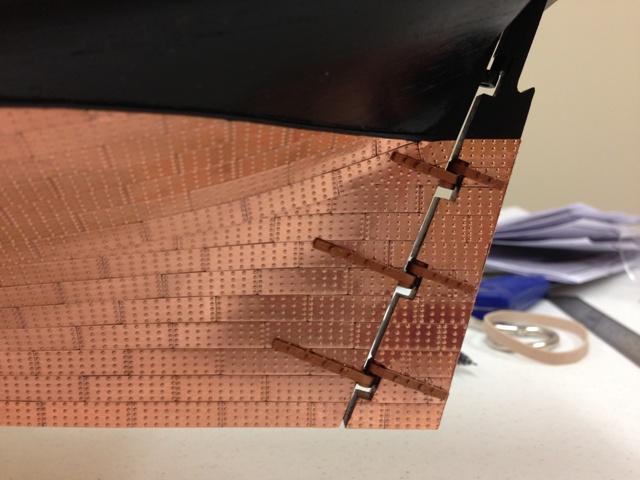
Started to tackle what is really the last task to be done before I can safely keep the old girl permanently on her keel and start getting the deck fitted out...installing the straps. The instructions are very light in this area and it took me quite a while to figure out a system. I only have one side of the rudder complete at this point, but started on the rudder as I thought it would be easier to handle and build skills before tackling the hull straps. I was concerned with the pins protruding too far as I assume that these would probably have been flush, but I'm not sure its possible to achieve that with the supplied materials. I was pretty pleased with the result, the pins don't seem to be any more noticeable than the nail heads on the plates. Heres how I tackled it...hopefully I haven't made any newbie gaffs: Prepainted the straps with metal primer and copper paint Marked the center point of the rear of the strap and pre-bent on a piece of 3mm dowel Spot glued the strap to the pintle only Once I'd ensured the strap was perpendicular to the forward edge of the rudder, drilled a small (0.6mm) hole in both of the end holes (found the smaller bits drilled through the copper more easily). This seemed to secure the strap sufficiently to be able to work on the rest Enlarged the hole to 0.8mm (If positioned correctly, the hole from opposite sides will meet) Enlarged the strap hole further to 1.0mm to allow the pin head to be countersunk to some degree Using the brass pins supplied (couldn't find any others I should use), I cut these down approximately half the thickness of the rudder, put thick CA glue on the bottom of the pin and inserted into the hole Repeated this step for all the other holes and painted. Of course, my small diameter bit broke so will need to find a replacement.

- 800 replies
-
- 1
-
-
- snake
- caldercraft
- (and 1 more)
-
Thanks for stopping by and the kind words Kevin, your Victory build is looking very nice indeed.
-
Wow, thanks for the fast reply gents, very interesting. Seems I have some options - I'm sorely tempted to have a go for the experience, but think I'll wait until I'm closer to that stage before committing as the I may be overwhelmed by the rest of the rigging. Thanks again!
-
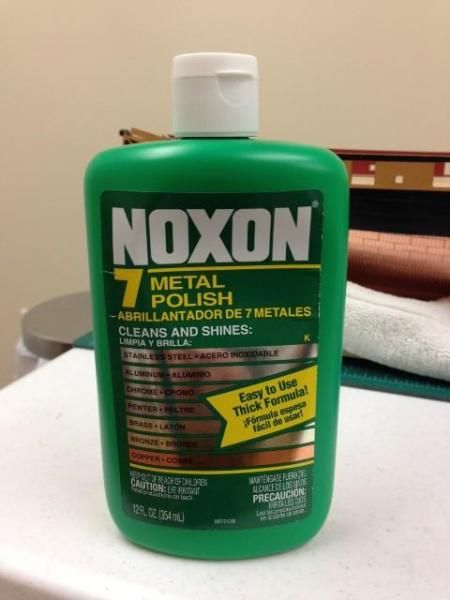
Stergios, here is the product I used on the copper. I've been proved a liar as it clearly states that it is a 'metal polish' on the bottle, but despite the promise to 'shine' it really didn't, which was good in my view. I just made sure to wipe down afterwards to ensure that no residue remained. I think the simplist thing for you to do is just to try what you have on a plate and see how it turns out before committing to the whole hull.
-
Agree Mort, gald I made the choice to go with Caldercraft as a first build, and even though the instructions are a little light (this being an older kit), the support and help from this site is invaluable. Its taken me about a year to get to this point, but it really doesn't feel it and I've never felt the urge to rush. As for the query on the gunports, interesting question! I would agree that these would certainly be wet ships, but whatever resources I've seen (paintings, NMM plans etc) there does not seem to be any indication that they had them. I wonder if there was some sort of temporary cover that captains would have installed?
