HOLIDAY DONATION DRIVE - SUPPORT MSW - DO YOUR PART TO KEEP THIS GREAT FORUM GOING! (Only 20 donations so far - C'mon guys!)
×


Beef Wellington
-
Posts
2,249 -
Joined
-
Last visited
Content Type
Profiles
Forums
Gallery
Events
Everything posted by Beef Wellington
-
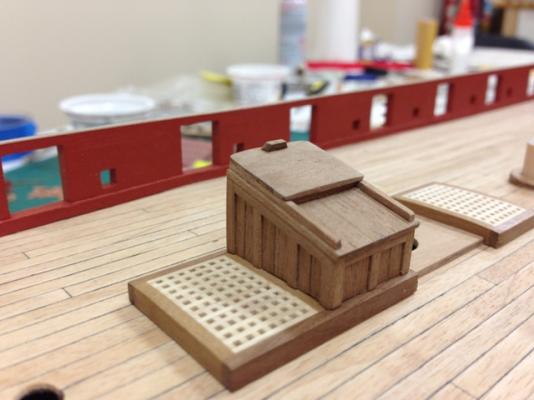
 Mort, Timmo, Hamilton, Robert - thanks fro checking in, definitely appreciate the encouragement! Edwin - you had me wistfully reminiscing - I lived in Seattle for 13yrs before moving to Connecticut so definitely appreciate the beautiful area you live in. And yes, a good Beef Wellington is hard to come by! BE - I think I cheated on the gratings, I glued the coamings to the grates when assembling which really helped keep them neat. Sjors - always welcome to look over the shoulder, I probably will use a matt finish on the compmanionway cover, there are some other wood fittings and would like it to "fit in" and not be the center of attention.
 -
She looks very impressive outside Kevin, looks like you had a rough sea knocking a few copper plates off, hope they're not lost!
-
An old toothbrush and water very easily gets rid of any cleaner left between tiles.
-
Nothing else, just the Noxon to clean. Worked well for me but I'm sure there are lots of similar products.
- 1,144 replies
-
- 1
-

-
- snake
- caldercraft
- (and 1 more)
-
Hi Stergios, nice to see an update, looking very nice. I smiled looking at your picture at all the copper plate cuts offs on your work mat, I'm still finding these on the floor! Yes, the plates will oxidize/tarnish over time. I think acid in skin oils speed up this process which was why I did a final clean to make finish consistent as fingerprints had become quite noticeable in places. I quite like the look of the tarnished metal as it lends a sense of age, but as always its down to personal preference.
-
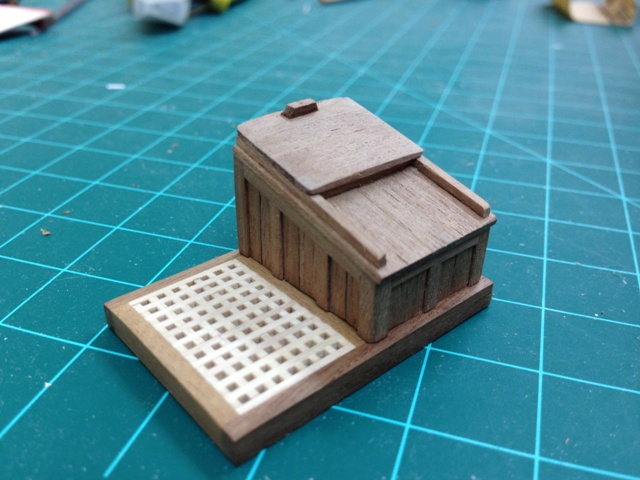
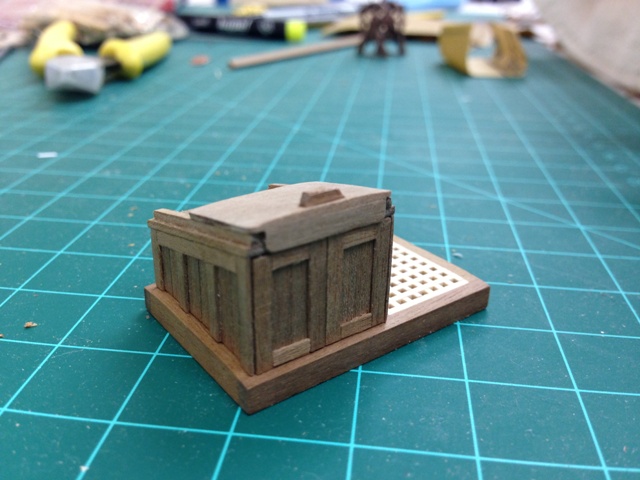
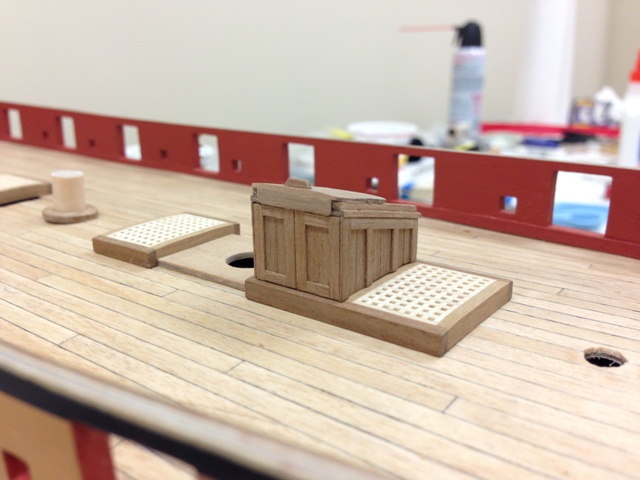
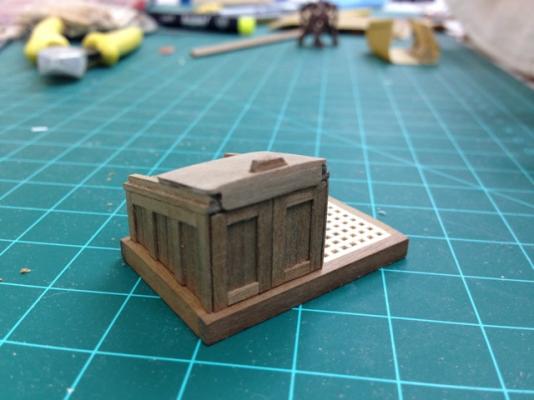
Have managed to get a few more drill bits in the mail (hopefull). Found the metric bits much harder to get hold of, but came across a useful calculator in the site download section that showed the respective #xx number, should work just fine. Spent quite a bit of time working on the companionway, I just couldn't get happy with the one supplied so after seeing Robert's (j21896) wonderful Mars build it definitely inspired me to give it a go to customize it a bit. I had to shorten the length from the plans to fit the modified deck grating plan I'm following, but otherwise kept the slope the same, but reduced the max height to be more in line with proportions shown on the HMS Gannet plans . I really struggled with making it look functional, especially the sliding top as I struggled to find any decent references. I'm going to give it a bit of a break before adding some 'doorknobs' and to see if I want any additional changes, but think I'm good with the way it is. Its far from perfect, but I like it a lot better than the kit stock walnut ply version, even though it did take an embarrassingly long time to pull together. Unfortunately I stuck with walnut (both because it was all I had and wanting to keep the wood consistent), which as most know (and I'm learning fast) is a bear to work with, the grain and the splitting make getting a good edge very challenging. If I ever get to another model, I will definitely replace the stock wood with something else right from the start.


- 800 replies
-
- 3
-
-
- snake
- caldercraft
- (and 1 more)
-
Mark, thanks for the tip.
-
Red Right Returning, history question
Beef Wellington replied to Modeler12's topic in Nautical/Naval History
This story sounds a little dubious as well, bombardment of civilian towns is a modern method of warfare not practiced then. The burning of Washington DC by the British was a direct reponse to the American burning of the York in Canada which was a considered to be against all commonly accepted methods of war at the time. The Royal Navy would be able to tell the difference between a shipyard and a town, and especially whether it was being hit or not by connon fire. -
Everythings looking great Jim, looks like you've cracked some of the tricky steps, I'm sure I'll be asking for advice when I get there. Are you planning to pin the bowsprit to the deck as well, or just secure under the bit? Seems this would want to be pretty secure but maybe the gammoning really helps there rather than just looking pretty... And congratulations, welcome to the gunroom and snotty-dom!
-
Red Right Returning, history question
Beef Wellington replied to Modeler12's topic in Nautical/Naval History
Andy's spot on. http://maritime.about.com/od/Rules_of_the_Road/a/Maritime-Traffic-Lanes.htm I think the pilots and masters in 1812 would have given their eye-teeth to have such modern conveniences as channel markers back then, which is more recent development as you point out Jay. -
Carl, maybe you could get into the supply business :-) BE, Chris, appreciate that, great ideas. I may just bite the financial bullet (this time!) and get some more chain (21 to the inch) and some drill bits so I can move on - definitely agree it would be nice to have plenty of spares on hand by buying in bulk.
-
Cruizer-class Brig-Sloops of the Royal Navy
Beef Wellington replied to molasses's topic in Nautical/Naval History
At the time the Admiralty was investigating the benefits of ship vs sloop rigged so ultimately victorious Cruiser/Snake design won in the original design competition. I suspect the term 'Cruizer' class simply stuck because the vast majority of the subsequently ordered ships were sloop rigged (as per Cruizer), although they did retain some of the Snake's features (e.g. fore and aft platforms). I've read consistently that the general opinion was that the ship rigged vessels were superior in sailing and fighting qualities (decreased impact of losing a mast in battle, which was a major factor in the results of some of the war of 1812 engagements as US 'sloops' tended to be ship rigged) but were offset by requiring increased manpower - which I suspect was the determining factor in adopting the sloop rig for the majority of the class. -
Yup, I'll try to blacken the metal and cut to length and try to attach to the bottom of the transom with eyebolts...need my drillbits
-
Not much of an update I'm afraid, more of a question. Finally received the chain I've been waiting for for the rudder. Its15 links per inch, which seems to be roughly just over 4" per link full scale. Maybe its just because its all shiny and new, but worried that its a little overscale (?), but I suspect I'll just try to make this work. I'll try to do a simple spectacle plate, maybe with painted card. Frustratingly, I'm still waiting for new drillbits, specifically a 0.8mm size for the ringbolts, ModelExpo who I got this from suddenly cancelled my order because of lack of availablility so will need to look elsewhere...

- 800 replies
-
- 1
-
-
- snake
- caldercraft
- (and 1 more)
-
Hey Jim, I encountered the same issue and had some photos near bottom of page 2 on my build log how mine ended up. The supplied pieces needed a lot of modification in any event, but I'm sure you made the right call to get the cathead beams at the right angle on the outside despite the effort it seems to have taken.
-
Norman - Looking forward to seeing this back up! Its a real shame that your other build logs were lost, they were great references.
-
Thanks Jim, thats helpful. Yours looks great so I'll probably use the .25mm, maybe it just looks a lot thinner in isolation.
-
Looking good Jim. Quick question, what thickness of line did you use for the tiller rope? The instructions seem to indicate.25mm but that seems rather light (1/2 inch real scale), 0.5mm looks to me better to scale with the block sizes recommended. Will be watching from the sidelines for a bit as my dockyard is short on some key supplies. I'm waiting for some new drillbits to be delivered to do the ringbolt holes, some chain for the rudder which I want to figure out before attaching permanently and tanganika wood for the decks!
-
I think you're making the right choice - but I fully recognize I'm not the one who will have to do it. That capping rail really enhances what already was looking very nice. It must be good to know that you'll have a capping rail that actually fits vs the kit supplied version.
-
Looking very nice Jim, you're setting a high standard to follow. Of course, the obligatory questions : 1) Did you buy extra rigging blocks for the carronades? 2) Any recomendations on making the hooks, seem very fiddly but look very good. 3) I was going to wait until I've got the capping rail on before installing guns as I suspect that this may require some 'rough' handling. Did you reject that approach? Looking forward to seeing more.
-
Thanks Mark, I think I'll definitely be taking your advice and will probably leave as is, its not going to be very visible. Good to know going forward if I ever get to a next build! Appreciate the info and you checking in.
-
Interesting Jim, I did the same, but decided to build with a 10mm board! Think it all boils down to personal preference, I felt the proportions looked a little bit more like the NMM model, its funny how 4mm can be such a big deal. I haven't fitted the fore and aft platforms yet (still (!) waiting for some Tanganyika wood) but it looks like the ladder is a little tall on the aft platform with the top step being slightly above the deck height. Do you have the same setup? I was thinking that it would make sense to reduce the height and remove the top board so its below platform deck level as per the picture. This would mean only 5 steps, vs 6 on the model, but they seem to look to be made up using thinner wood. Forward platform height seems just fine as is.
- 800 replies
-
- 1
-
-
- snake
- caldercraft
- (and 1 more)
-
BE, Jan, Norman, Wefalck - thanks for all the responses, some great ideas to think about!
-
Jeff - I managed to visit the Constitution a couple of weekends ago anf have a couple of pictures of the carronades/rigging if that would be helpful, let me know. Everything is looking great!
-
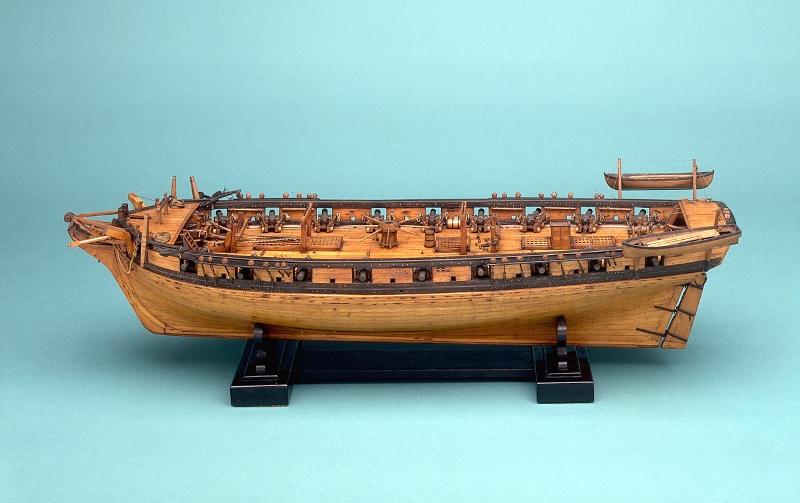
I've maybe been able to answer my own question. I remembered seeing these pictures some time ago on MSW 1.0, and have been able to track them down on the NMM website. (I hope its OK to re-post these). The model is a Cruizer class, but shows that the fore and aft platforms were not limited just to the Snake. 1) I'm estimating that the ladder board width should be no more than 10mm based on estimating with ladder width and total platform width and scaling. Equates to 0.64m or about 2.1 feet actual size. 2) Picture also confirms that the tiller rope definitely is an obstruction to the aft ladders and gun lines....care will be needed with placement. Same true with forplatform ladders and proximity to the guns. 3) Steering wheel is quite a bit smaller than the kit suggests, and in my humble opinion looks too small. Will stick with the Caldercraft ones

- 800 replies
-
- 1
-
-
- snake
- caldercraft
- (and 1 more)