-
Posts
2,249 -
Joined
-
Last visited
Content Type
Profiles
Forums
Gallery
Events
Everything posted by Beef Wellington
-
Dave (davyboy) - thansk for the kind comment and good tip, I need to do some thinking whether this want to tackle this (pun intended). I guess these would need to be really small diameter 1.5-2mm(?) Dave - picture definitely helps. Its strange, the kit supplied carrondes come with white metal wheels, I had thought about trying to use these to replace the wood but the sizes don't work - the kit carronde trunnions mount on the sill of the gunport, the aftermarket ones use a deck mounting block. Even though these represent the same thing its amazing how different the sizes are. The 32lb carronades are just bohemoths as well, they barely fit underneath the top of the gunport. I need to think about the extra work on the training tackles, I'm tempted to maybe fir the rings, but not the tackles as it may just leave the deck a bit too cluttered. Need to ponder some more... Ferit KUTLU - appreciate the kind words, I'm doing my best, you Berlin is very clean and precise, beautiful wood tone.
- 800 replies
-
- snake
- caldercraft
-
(and 1 more)
Tagged with:
-
Tim, can only add my voice to the chorus of approval. I especially like the idea of highlighting a 'building beverage of choice'
- 366 replies
-
- granado
- caldercraft
-
(and 1 more)
Tagged with:
-
Stergios - think you have a couple of options, taking the stain approach you suggest but you can only be the best judge of whether you are happy or not. Something to consider would be to paint it black which would also be a valid approach. I think ther blocks you reference are only available from the person who manufacturers them and not through retail stores, would love to see them if you decide to buy them. They look very nice, but they aren't cheap!
-
Stergios, 2mm blocks would probably be best, but no-one supplies double blocks in a 2mm size, 3mm is the smallest I could find. Also different manufacturers seem to measure their sizes differently. I stuck with Caldercraft for consistency. I bought a 'block sander' from Model Shipways, basically it acts like a rock tumbler and should take of the sharp edges, this also has the benefit of making the block look smaller. I'm still experimenting but will post a pic when I can.
-
Hi Stergios, yes, I think we're on our own on that, although there seem to be plenty of references. I ordered some extra blocks and copper ringbolts to allow them to be rigged more fully (3mm double and singles which seem to be that smallest doubles that can be found), Jim has some good pictures of the ones he has rigged. I'm still debating on how I want to approach this but hope to have some pics soon.
-

HMS Caroline: WWI battleship wins £1m lottery boost
Beef Wellington replied to Kevin's topic in Nautical/Naval History
I'm glad people are starting to have the foresight to try to save these historically significant ships, so many have been lost. I know the Unicorn Trust is also looking to secure lottery funding which I pray will be forthcoming, HMS Unicorn is also getting in a bit of a sad way and I hope people come to their senses before she gets beyond a point of no return. For those not familiar with the ship, she was placed into ordinary immediately after completion and has never had masts stepped, as such, she is arguably the most original of all the sailing ships in existence. -
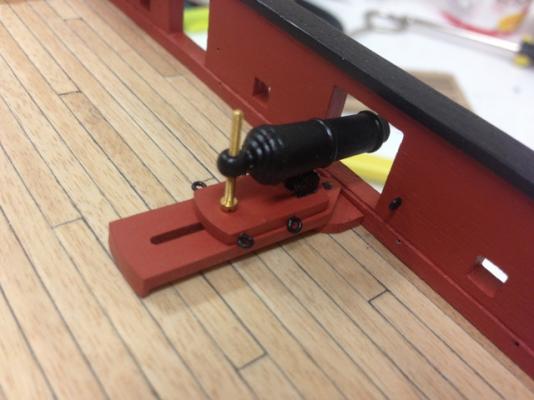
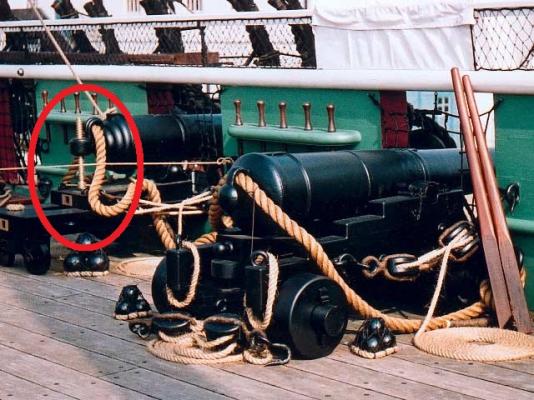
Not much progress unfortunately, but starting to seriously think about getting the 'great guns' started. Finally managed to (nearly) complete one of the carronades and am posting just so others can see what the aftermarket Caldercraft carronades look like. Despite my trial attempts and desire to blacken the carronades (could only get "Blacken-it"), I decided to paint them as I found it next to impossible to get a consistent tone with all the various metals needed to build up the carronades, some smaller parts would only go brown - I tried all the recommended chemical/physical cleaning methods together with varying dilution %'ages. In the end I just had to admit defeat this time round and will add this as a challenge for a future build. Only 15 more to go plus two cannons.... Couple of things that I'm a bit confused with: There aren't any wheels or training tackle attachments - I can't find any similar photos or drawings but I'm assuming CC did their research on this, would these have just been moved with handspikes? There is no breaching ring on the cascable - again this seems to be an omission (?). Will probably just wrap the breech rope around the neck unless there are any suggestions for adding these (I'd be more happy if there was justification for not having to add I've ordered the some additional 3mm double and single blocks and also bought a block sander from Model Shipways, it seems to do a nice job rounding off the square edges of the blocks and making them appear smaller as the large size of the 3mm blocks seems to be a common comment by others. I've also ordered some 0.1mm line and was going to consider using this for the line, but it may be too fine. Otherwise I'll probably go with the supplied 0.25mm line. Lastly, was going to solicit some opinions. The elevation screw in the picture I've left as bare brass (mainly as I was waiting until all were mounted before painting so I could get consistent elevation for the carronades), but then I came across this picture of a carronade on HMS Trincomalee which shows the same shiny elevation screw (circled in red). Got me thinking that it may be OK to leave them unpainted, although it could be a bit over the top so may just try to chemically blacken a touch to take the shine off.
- 800 replies
-
- snake
- caldercraft
-
(and 1 more)
Tagged with:
-
Carl - I'll think I'll put off the photo-etching of my own letters to a future build! I have enough going on with just the kit
- 800 replies
-
- snake
- caldercraft
-
(and 1 more)
Tagged with:
-
Hi Mobbsie, looking forward to seeing how your gunports turned out, I must say it the process sounds a bit harrowing!
- 1,279 replies
-
- agamemnon
- caldercraft
-
(and 1 more)
Tagged with:
-
Very nice Ray, she certainly has some nice lines and seems to be a big girl! If you ever have a moment, I'd love to see a picture with Diana next to your Pegasus to get a sense of the difference in size.
- 536 replies
-
- diana
- caldercraft
-
(and 1 more)
Tagged with:
-
Nice work on the guns Timmo. I think these are going to be the death of me on my Snake as there are 18 of them and I'm just trying to figure out the rigging aspects. Curious on your blackening method whether you tried diluting with hot water to see how that played out? I must confess I wanted to use the blackening approach but I just couldn't get a consistent finish with all the different metals involved in the carronades, yours are looking very nice and the rope work looks great. Which part of the cannon carriage did you 'pin'?
- 366 replies
-
- granado
- caldercraft
-
(and 1 more)
Tagged with:
-
Skippy, lovely build you have going there, especially like your use of the maple. I'd have to agree with BE on the copper plates, you look to be well short and I suspect that a call to Jotika would be in order, they may send to you for free. On my Snake I certainly had more than 15 mistakes and was still able to complete it just fine. A break from the coppering while waiting may not be a bad thing!
- 31 replies
-
- pickle
- caldercraft
-
(and 1 more)
Tagged with:
-
Jim, Smitty - thanks, I have your Pickle on my 'to read' list which I promise I'll get to soon. Definitely agree BE, unfortunately the Snake kit doesn't even come with the photo etch letters as an option which I've seen in some of the other builds, so its this or nothing it seems.
- 800 replies
-
- snake
- caldercraft
-
(and 1 more)
Tagged with:
-
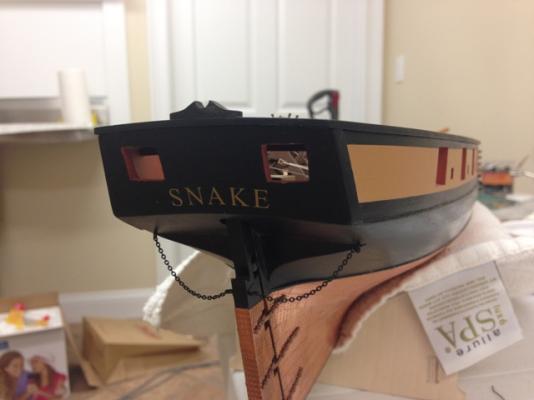
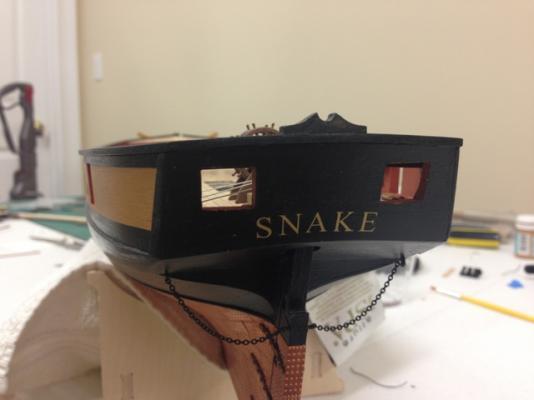
Had a naming ceremony! Credit for this goes to Blue Ensign whose excellent approach on his Pickle build I poached for applying the lettering, which are letraset 5mm gold Times New Roman dry rub transfers. Easy to apply, but alignment is a bit tricky - looks better in person for some reason. I tried to get the letters to follow the curve of the underside of the stern.
- 800 replies
-
- snake
- caldercraft
-
(and 1 more)
Tagged with:
-
Hi Stergios, just to confirm - yes, diluted PVA glue is the way to go. You can dry assemble the grates (which I found very fiddly) and then use a cheap brush to soak the dilute PVA glue in - seem to recall I used about a 50% dilution. When dry assembling I found that if you put the pieces on some tape, it helps hold things together until you can glue. Also be careful to ensure they are 90% corners, I needed to redo one or two as they had slipped, but I simply soaked in rubbing alcohol and then re-glued - very easy to fix once you know how.
-
The replacement wheels come individually in a pack so you would need 2, I hope I didn't suggest anywhere only one was needed, if so I apologize.
- 800 replies
-
- snake
- caldercraft
-
(and 1 more)
Tagged with:
-
Very nice. What kind of a butt shift did you use? And how about the treenails? :-)
- 1,319 replies
-
- caldercraft
- Victory
-
(and 1 more)
Tagged with:
-
Hi Len, looking forward to seeing more progress, I loved following your Bellerophon's progress before the great crash. Thanks for reposting.
- 122 replies
-
- bellerophon
- victory models
-
(and 1 more)
Tagged with:
-
Glad you like the pictures, its a lot easier to post pictures than make progress I think. I hope I'm not guilty of posting too many with too little progress
- 800 replies
-
- snake
- caldercraft
-
(and 1 more)
Tagged with:
-
Great pictures Sjors, Mirage looks very impressive...and your workspace is very nice too.
-

Cruizer-class Brig-Sloops of the Royal Navy
Beef Wellington replied to molasses's topic in Nautical/Naval History
You know, you may have a book in the works here
About us
Modelshipworld - Advancing Ship Modeling through Research
SSL Secured
Your security is important for us so this Website is SSL-Secured
NRG Mailing Address
Nautical Research Guild
237 South Lincoln Street
Westmont IL, 60559-1917
Model Ship World ® and the MSW logo are Registered Trademarks, and belong to the Nautical Research Guild (United States Patent and Trademark Office: No. 6,929,264 & No. 6,929,274, registered Dec. 20, 2022)
Helpful Links
About the NRG
If you enjoy building ship models that are historically accurate as well as beautiful, then The Nautical Research Guild (NRG) is just right for you.
The Guild is a non-profit educational organization whose mission is to “Advance Ship Modeling Through Research”. We provide support to our members in their efforts to raise the quality of their model ships.
The Nautical Research Guild has published our world-renowned quarterly magazine, The Nautical Research Journal, since 1955. The pages of the Journal are full of articles by accomplished ship modelers who show you how they create those exquisite details on their models, and by maritime historians who show you the correct details to build. The Journal is available in both print and digital editions. Go to the NRG web site (www.thenrg.org) to download a complimentary digital copy of the Journal. The NRG also publishes plan sets, books and compilations of back issues of the Journal and the former Ships in Scale and Model Ship Builder magazines.


