lambsbk
-
Posts
910 -
Joined
-
Last visited
Content Type
Profiles
Forums
Gallery
Events
Everything posted by lambsbk
-
Actually I have TWO kits. The second was purchased cheaply and I use it to experiment technique when needed. That is why I have extra eyebolts as well. The rigging line is from the original kit. I suspect it is all cotton but it looks better in my opinion (see page 1 of this log for pic). If you are looking for more line or to replace the lines Chuck Passaro (one of the originators of MSW) has a store which has excellent materials. I bought some anchor cable and blocks as well as tackle line from the store. You will see these showing up over the next few pages of this log. His store link is http://www.syrenshipmodelcompany.com/. I hope that info helps.
-
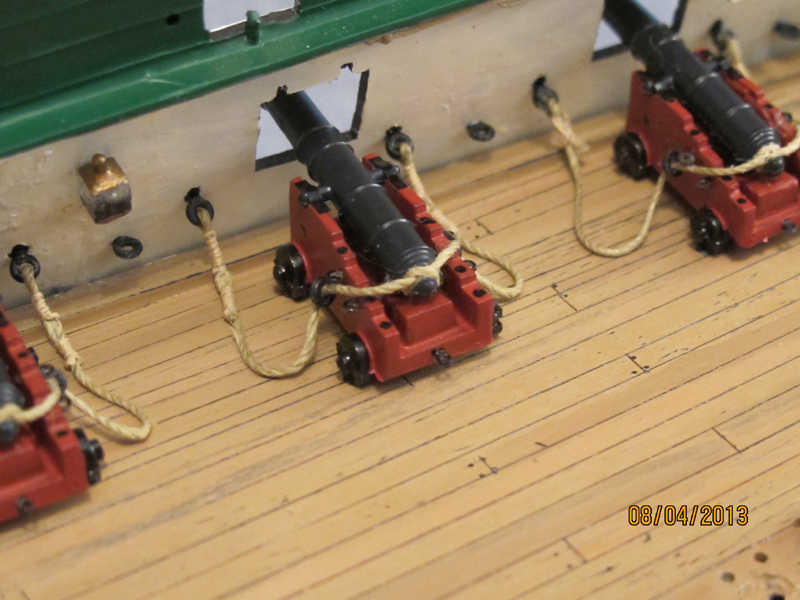
This is a slightly different angle showing the 'gravity' effect on the breeching line. Obviously a little touch up paint is needed here. Dave
- 601 replies
-
- 1
-

-
- constitution
- revell
- (and 1 more)
-
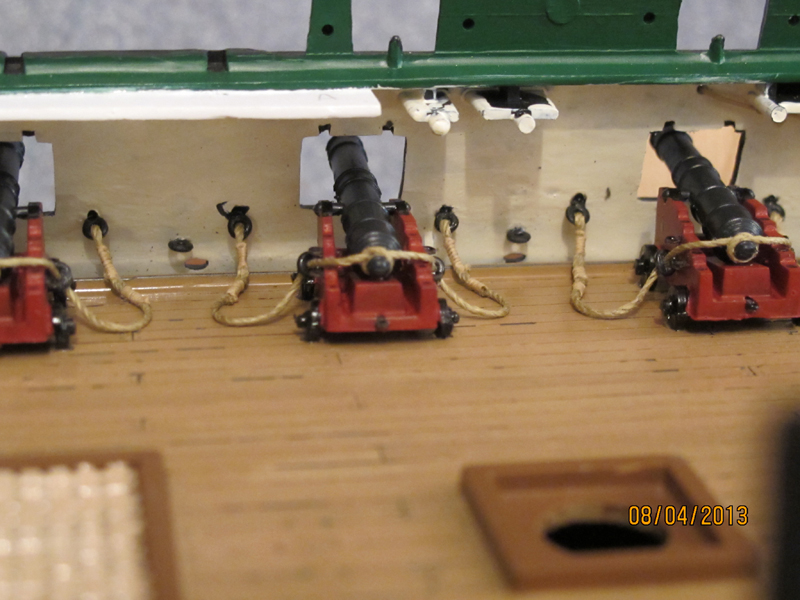
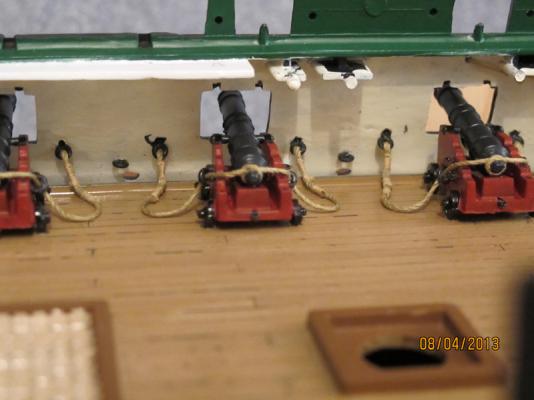
The first 9 guns are installed. They are getting easier as I go. I am much happier with the lashing I am currently using. The pic below shows both. The upper canon has the lashing tied in a proper but not very appealing knot. The bottom canon has the lashing which is not exactly ship shape but looks much neater. I am sticking with the second. The lantern looks good in this photo.

- 601 replies
-
- 1
-
-
- constitution
- revell
- (and 1 more)
-
Dan - Don't be frustrated by the windows. Take a few days to just think about it. Usually the cluttered thoughts clear away eventually leaving a workable solution. The head area looks good. Dave
-
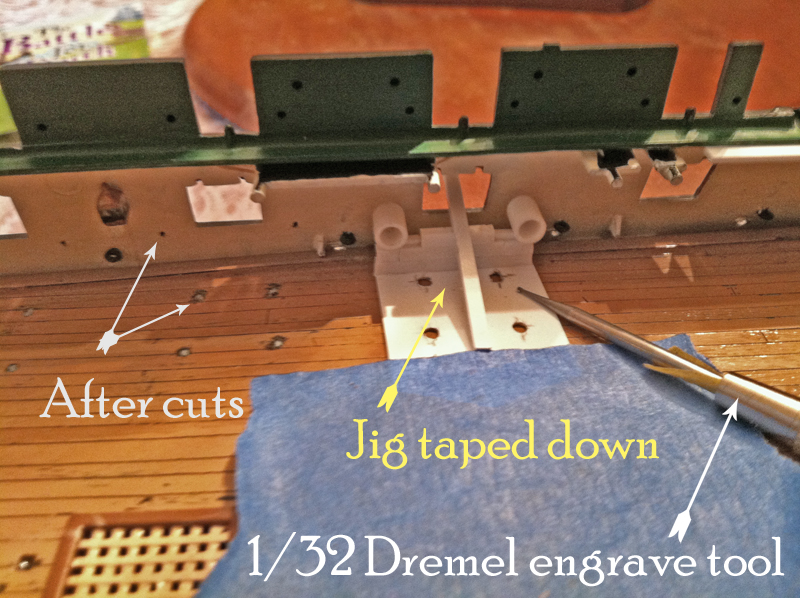
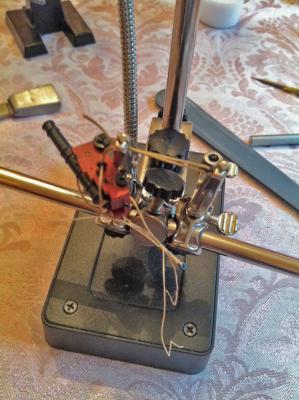
Thanks for the kudos Rick. I made it from a styrene sample pack: a couple of square rods stacked, a perpendicular for centering, tube for the ringbolt positions, and a flat thinner piece of styrene sheet for the canon carriage wheel positions. (I tried thick stuff but it was really hard to work with, the second was off dimensionally - this working jig is my 3rd!) I spent some time getting it right but that one being right means the canons will be as well. I did not use a Dremel motor - only the engraving tip (about $7). I simply mounted it in a jeweler's tool holder I found at Sears. It was the first tool I made for this build and I use it a lot for scraping tiny hard to reach areas. Youngtiger1 - welcome aboard. Go ahead and dive in - I think that is the hardest part. Don't rush the build progress. Most of us take on these projects knowing they will be years in the making. Let me know when you start a log and I will follow with you. Sharing ideas is how these builds have become (literally) works of art. Although I have many ideas for its completion, it is also a compilation of a lot of folks on this forum. Good luck.
-
Well. I had not thought of that. I will check with Caligor and see if they sell to the general public. Sorry. I should have thought that problem out before posting the pic and comment. I will find out Monday. Thanks Kim.
-
Thanks Dan. I just checked your build and you are right: I can't see the stock. I may not be able to do this however. The forward gun ports 1 and 2 will not be used on my build for gun positions. First (Evan confirmed what I already suspected) because the guns could not have been run in and out from these positions and second because the fiber optic lanterns will light up this deck and I want to use these ports to better view the guns in line. So I will have an almost deck level lit view of these guns. I am afraid I am going to have to rely on the wheel glue points to hold them down. The under carriages will be visible. The prototype gun seems to be holding pretty well so far so I am hoping this plan will continue to work. I appreciate the suggestion and I wish I could add the extra security of additional plastic surface area for gluing. Dave
-
The deck is being prepared for the canons. The jig is positioned and taped. Then the top guides are used to score the ring bolt position . I am using a 1/32" Dremel engraving bit held in a jewelers tool handle. Using the same tool the carriage wheel positions are then scored into the deck, which I hope will hold the canon securely when glued. My first Connie in the 70's had these come loose after the decks were closed in. Arghhh...

- 601 replies
-
- 1
-
-
- constitution
- revell
- (and 1 more)
-
Evan I wonder if you would chime in on this one as well. (since the 'shipyard' still may be under repair - very sorry to hear about that but glad there wasn't a major disaster) The forward ports (1 and 2) of the gun deck are for the positioning of 24 pounders. But after fitting the forward bitts, cable bitts, camboose, anchor chain and bow sprit I can not see how they could have run those gun positions in and out without some major repositioning. Did they man those positions? Even the train tackle would be tricky. What do you think? Dave
-
I really should let Evan comment on this as his research is excellent. The second link is from the 1927 refit plans and are available from the Constitution Museum in Boston.Notice the absence of the Orlop deck diagonals which were removed in 1927 and replaced at the most recent refit due to an increase in the hog of the ship by more than 12 inches. Some folks are modeling their build to match this 1927 refit. The first link, I believe, goes to a build that is also at the museum. There are several parts of this build which I don't think go back to 1812 (although I am no expert.) Nonetheless, it is an excellent model without equal. Do you have a reference to the pre-1927 plans. That would be a great resource. Thanks. Dave
-
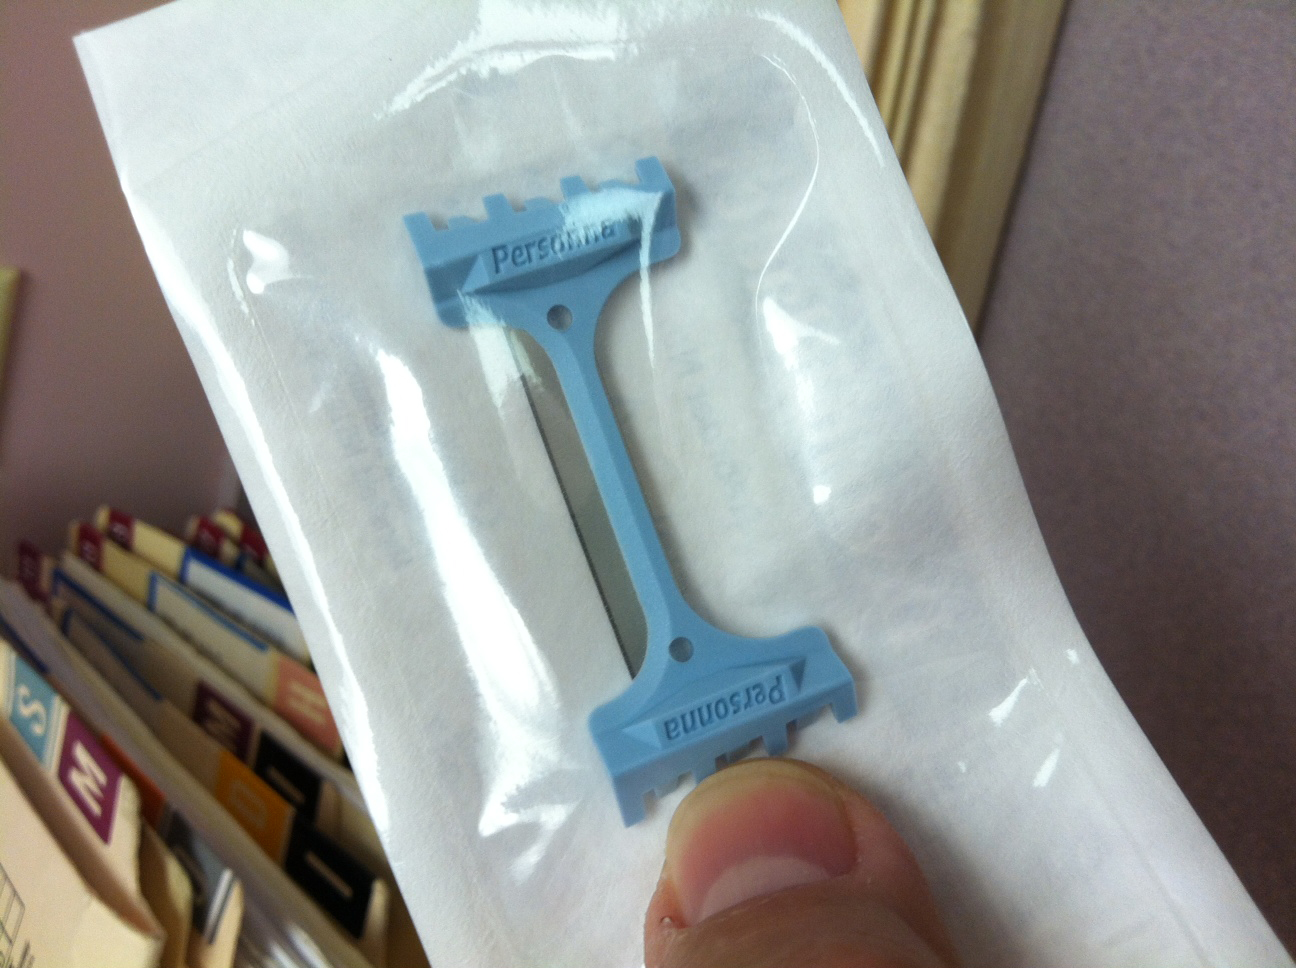
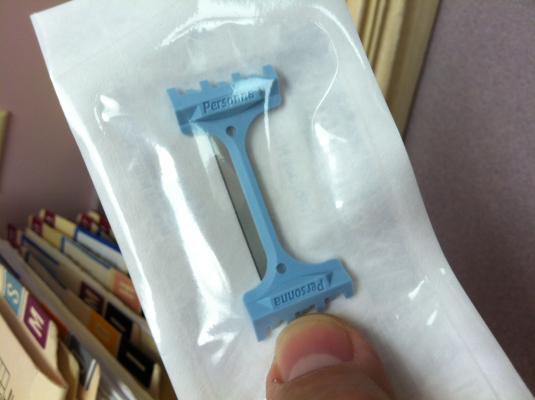
I don't know if anyone has used one of these before or not but they are excellent at cutting small delicate (lines) smoothly. They are dermablades which I use in the office for skin biopsy's but they make quick work of cleanly cutting rigged lines. Like a hot knife through butter - just touching the blade to the item cuts it. It is held by pinching it between thumb and forefinger and has a slight curve for stability. Just FYI.
- 601 replies
-
- 1
-
-
- constitution
- revell
- (and 1 more)
-
Canon Breeching: Round 2 I am getting the feel again for lashing and I found (like others) that dilute Elmers glue works very well at holding the lines together when complete. It keeps the breeching line straight and keeps a clean profile. Overall I like the look of these second canons much better than the first.

- 601 replies
-
- 1
-
-
- constitution
- revell
- (and 1 more)
-
...and thus page 98...
-
Yes Sjors, as someone wise once said "no matter where you go, there you are." And I suppose to add to that "and so is your Tom-Tom." :D
- 1,668 replies
-
- 1
-
-
- syren
- model shipways
- (and 1 more)
-
It is not the glass that gets you...it is the broken glass that does (although I don't actually know of anyone to whom that has happened). I suppose it could turn a fine ship into a battle weary one. Here in Charleston we sit on a fault line. I am planning to use plexi. Augie I don't think those Rockies move. I'll bet glass works out fine.
- 1,668 replies
-
- 2
-
-
- syren
- model shipways
- (and 1 more)
-
Whew... vacation bible school is over so back to build work I go. I think I will go ahead and finish the gun deck guns. they have been taunting me of late. From there I will work the mid deck working aftward on the pumps and capstan. The progress will be a little slow at first as I am not certain on my skills to strop the 2mm boxwood blocks I bought for the tackle (Russ - you are right - the Revell blocks just seem too big!) but if I am unable to strop the boxwood blocks and hook them I will fall back on these Revell blocks reluctantly. So I am diving in...hopefully not belly first!
-
It all looks VERY nice John. Congratulations.
-
That was your second build!? There may be HOPE for me after all! WOW. What a beautiful work of art. Congratulations Augie.
- 1,668 replies
-
- 1
-
-
- syren
- model shipways
- (and 1 more)
-
Absolutely beautiful Augie. Oh...and as for the frog...my preacher always says (during the monsoons of coastal South Carolina) that "it was raining so hard he saw two bullfrogs fightin' over an umbrella." I had no idea the saying was based on fact.
- 1,668 replies
-
- 1
-
-
- syren
- model shipways
- (and 1 more)
-
John: Let me know if you find any non-standard pedestals. I have been reluctant to buy any for that very reason. Dave
-
Thanks for the link John. I wish I could have gone a little farther south last month to visit her. Have a great trip. Dave
-
Wow. It really looks like it is in the plating shipyard! Superb effect. I am glad to see you taking your time with the build Rick. It is paying off. Congrats again on your family addition and welcome back. Dave
- 79 replies
-
- 1
-
-
- constitution
- revell
- (and 1 more)
-
Go for it guys. I can't post anything of the build anyway. My wife has vacation bible school this week and I am neck deep in helping her. Next week...back to the build. See you then.
-
It leaves a matte finish so I am hoping it will take paint well.
- 601 replies
-
- 1
-
-
- constitution
- revell
- (and 1 more)
-
Unfortunately it also contracts. Great care has to be taken to ensure this does not happen. Optical shops use hot sand to control temp. I wonder if that would not be a bad investment (maybe someone selling off their equipment).