vossiewulf
-
Posts
1,477 -
Joined
-
Last visited
Content Type
Profiles
Forums
Gallery
Events
Everything posted by vossiewulf
-
 A pin rail. Ok, thanks again, noted that I need to stop and figure that out when installing the pin rails comes up to bat.
- 714 replies
-
- 2
-

-
- lady nelson
- victory models
- (and 1 more)
-
Miniature Hand Tools
vossiewulf replied to Julie Mo's topic in Modeling tools and Workshop Equipment
If you can get yourself one of the many Veritas planes with a PM-V11 iron. I was skeptical of the claims of easier to sharpen than A2 steel with a much longer-lasting edge as that seemed pretty unlikely, but there it is. The edges not only get pretty sharp as you see above but they will stay that way for an absurdly long time, to the point I can feel my cave-man brain insisting ever louder that this is some kind of dangerous wizardry. -
Precision router base for Dremel 4000 etc.
vossiewulf replied to vossiewulf's topic in Modeling tools and Workshop Equipment
Great! Really shouldn't need too much other than a plate it could be screwed to with a 9/64" bur shaft hole and you have a very good mini router table, but I'm sure the members here can come up with something cool and unnecessarily complicated and precise. One of my favorite reads was of a guy who spent I don't even know how long, weeks of work at least, turning a standard good quality 7x12 mini-lathe into an insanely precise device over its entire operating range so he was pushing out past .0001" in accuracy for no other reason than he could. I love that guy, I laughed the whole time I read it. I can't quite be him, but I understand the mindset. -
Thanks Tony. I've never bought ship fittings but it seems a real crapshoot considering the fairly random number of sizes offered by any manufacturer vs what size they should be considering the plethora of ship scales from manufacturers. I did find these guys making bronze thimbles that look pretty realistic but I haven't figured out what size mine should be yet. I did figure out a way to make them, though, but the basic requirement is telescoping tube. If you can get tubes small enough you cut the thimble-sized one in half lengthwise, giving you a nice long c shape. Make a thimble-opening shape to wrap it around, and wrap it on that form with open side out, using the telescope-fitting rod to make the bend and prevent the c shape from collapsing. Thanks for the compliments Pat, I try Only a couple photos, as noted not feeling well and all I managed was gluing on the keel and sanding it down. And I only remembered to take a couple pics. As I mentioned, I already broke off the kit top piece, not good kit engineering; no matter which way you point the grain that piece is going to be very weak made out of one piece like they do. So I will make a replacement in three pieces and I have to take a look at the upper bulkhead planking strip fit before I decide what order I'm going to put them on. Here it has its pins added. Normally for something like this they'd be twice this long, but being at a 90 degree angle to each other meant they had to be very short to get them in the holes on the ship without snapping the stem. Because of my pins and the fitting work, as I hoped I could just CA on the pieces with no clamps, starting with the sternpost and then the keel itself. Only mild complication was the stem where I needed a little help to ensure straightness so I clamped a piece of brass on the keel that was nice and straight to give me a reference line when hand-clamping the stem. And there they are all glued on and ready for level sanding. And we could do the final profile also, here it's being checked against the little piece of balsa I was using as a template. For those less experienced making stuff, it generally makes more sense to make your template out of something harder than your work as you can clamp it in place then sand your work quickly down to that. But I knew I was very close already in this case so I made my template out of something quick, if I'd had card stock within reach I'd have used that. And now all level-sanded on both sides and profile done, time to attach deck. As for the little carbon fiber rod sticking out of the keel, the sun was in my eyes, the check is in the mail, the guy was already dead when I got there, I DIDN'T DO IT


- 714 replies
-
- 8
-
-
- lady nelson
- victory models
- (and 1 more)
-
Thanks, If you're wondering about anything let me know. I'm going to try to do everything in that chapter. And Rick, it arrived today and yes chapter 1 should be retitled The Advanced Rigging Manual for the Amati Lady Nelson". I know I can make all the wood bits with no problem, I've done super-detailing at way smaller scales, but I've never done rigging like this. On the other hand I sent several years as a youngster sailing Lasers and 420s and 505s for the Annapolis Yacht Club and more years doing fly tying, I'm hoping those two will help me along. As for those holes, having snapped that top bit off twice already because of the crappy grain direction I'd already decided that was a "shortcuts lead to long delays" decision and am going to replace one way or another. It can be made much stronger without too much difficulty by making it from multiple pieces as such I'll do whatever the Advanced Rigging Manual tells me to. For five identical holes in cocobolo I'll take it to the mini-mill and then bevel Are 1/64 thimbles available somewhere? I wouldn't mind buying those, otherwise it's doable on the mini-lathe but complicated, At least I can't think of an easy way to do it unless you have a micro metal-spinning rig and if you do I will bow in obeisance as you are a way bigger tool geek than even me.
- 714 replies
-
- 6
-
-
- lady nelson
- victory models
- (and 1 more)
-
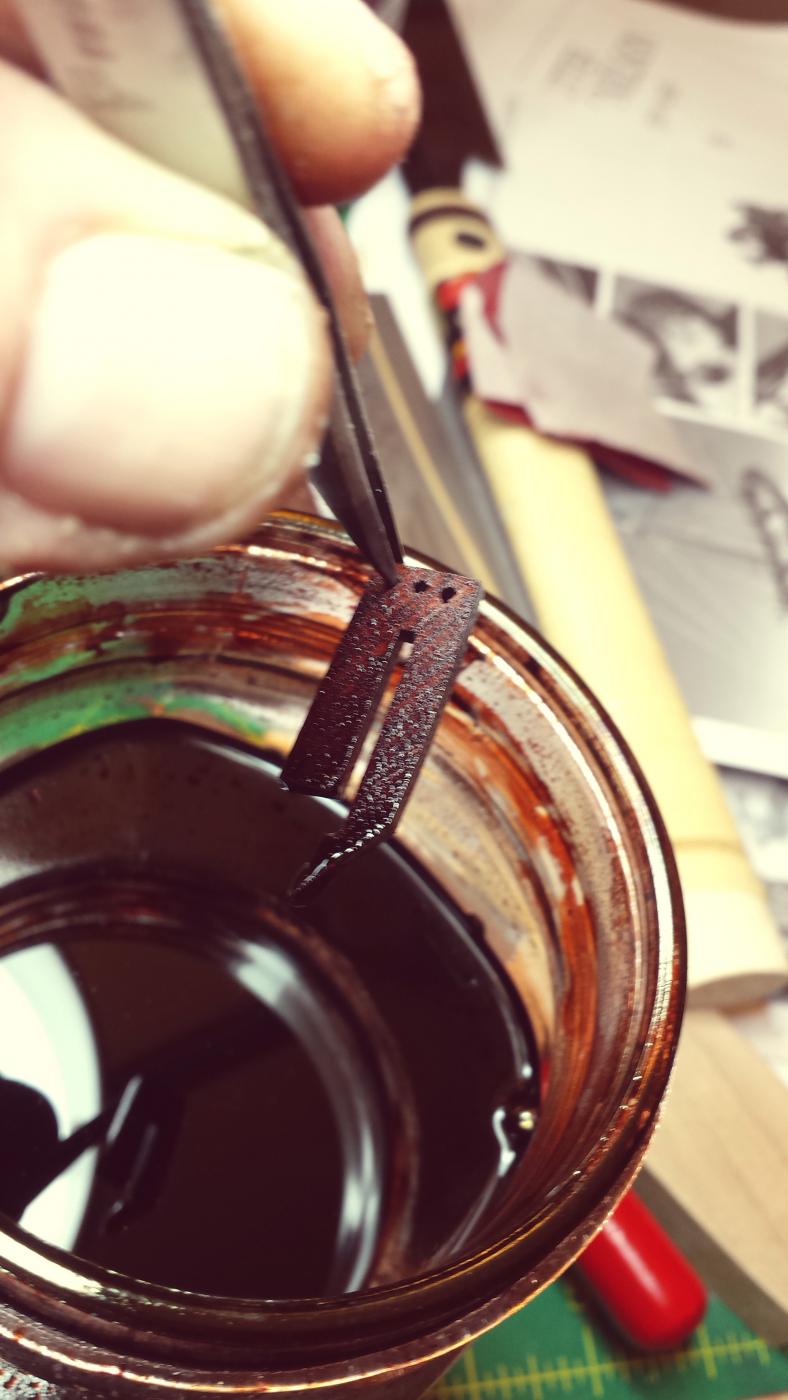
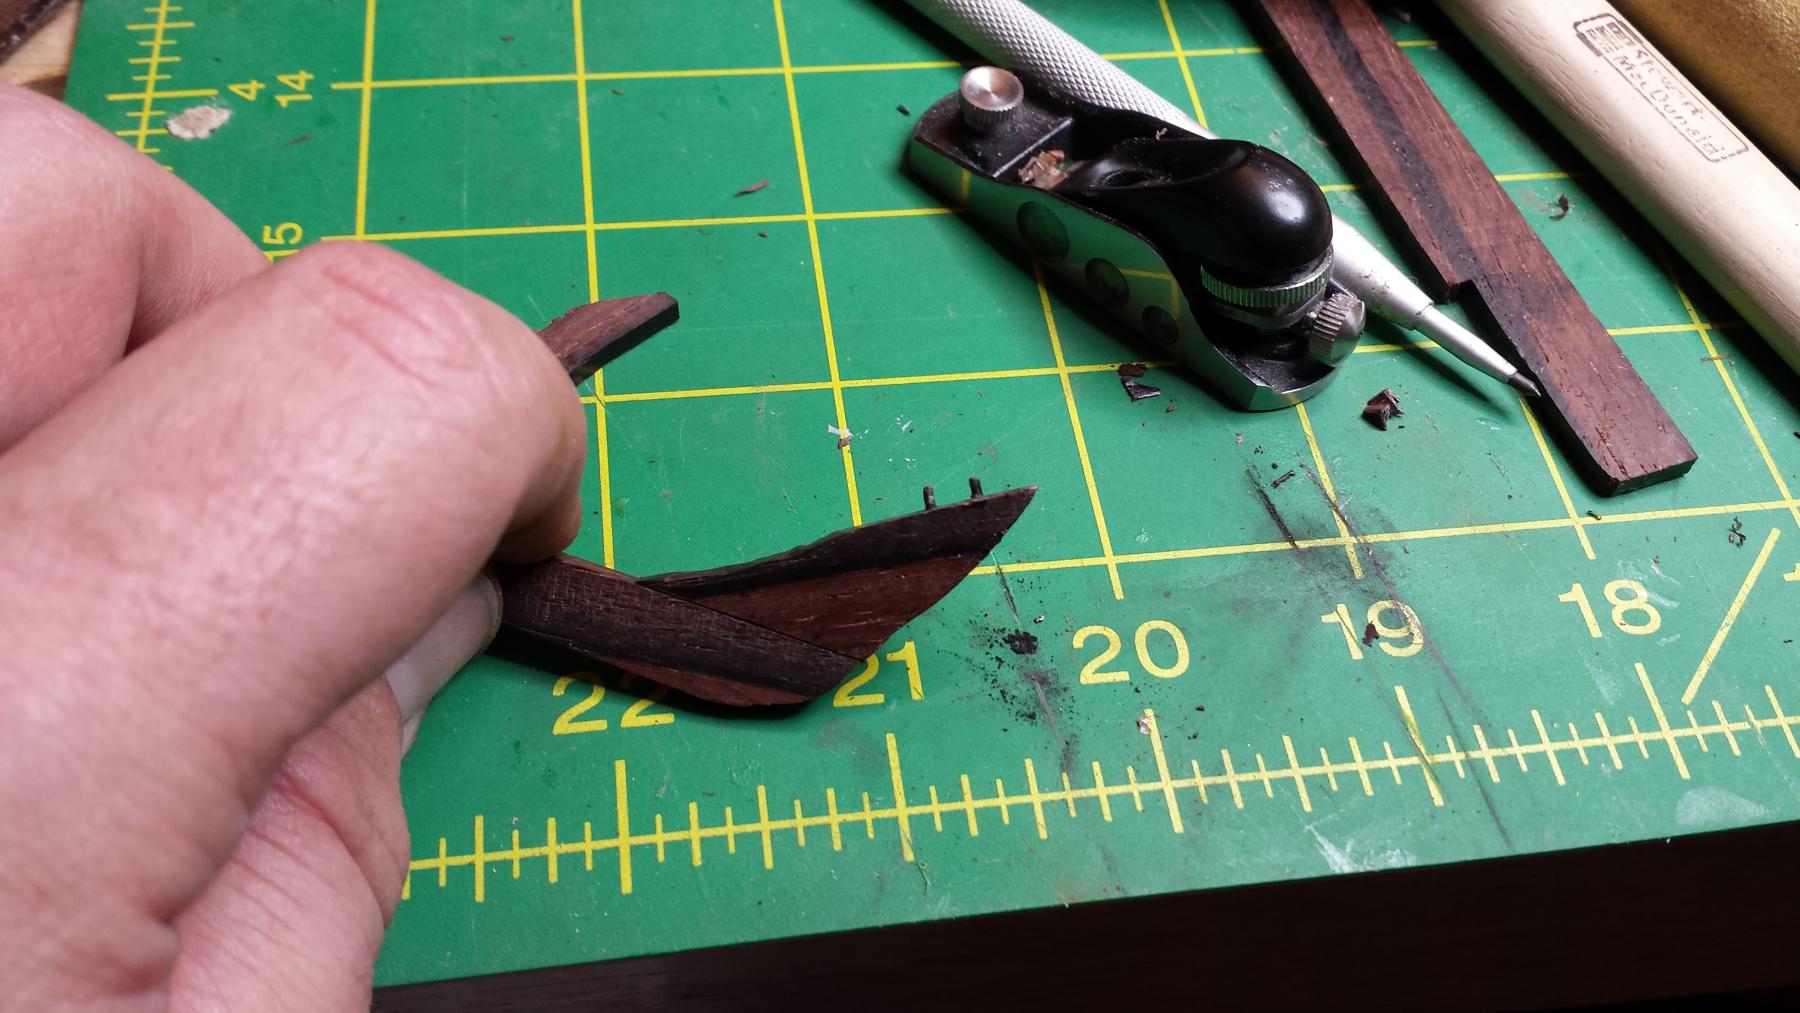
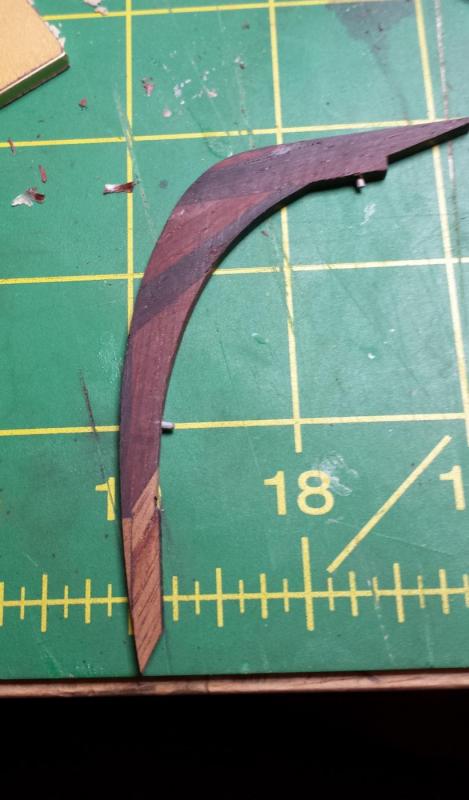
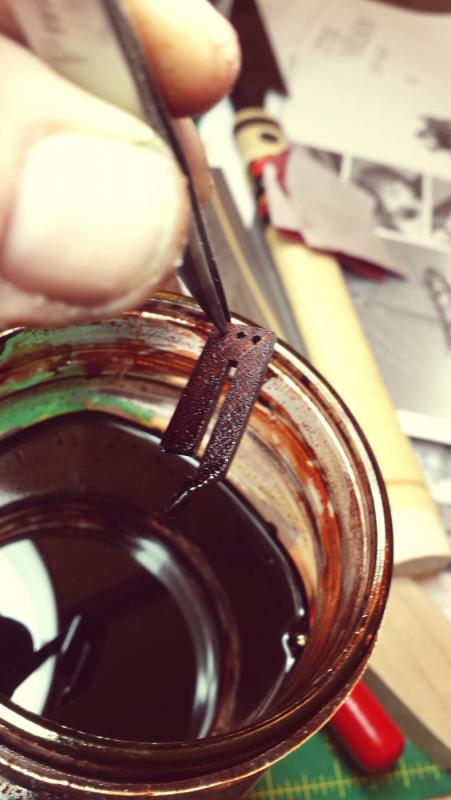
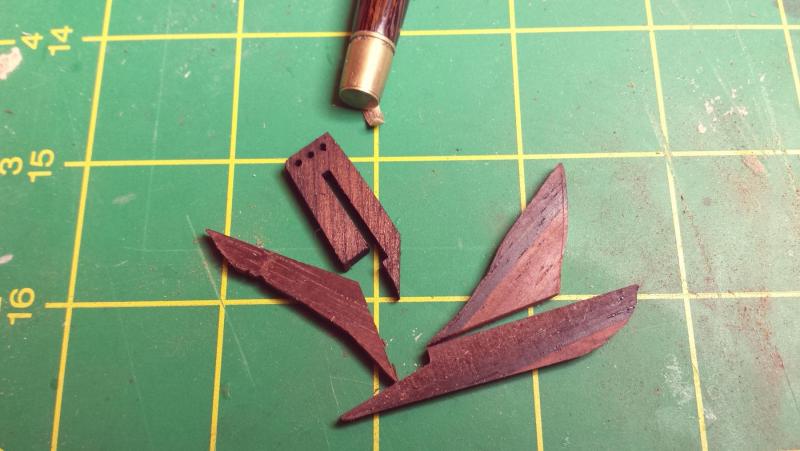
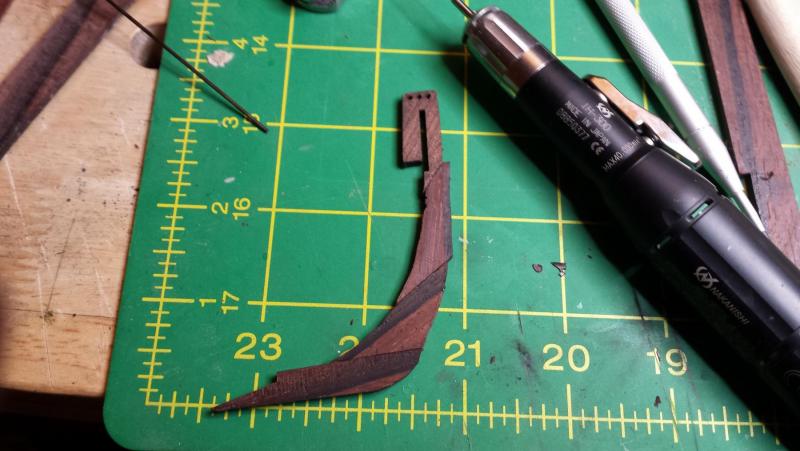
Am sick as the proverbial dog, although I managed to get the keel all made and fit before sick as dogness set in yesterday morning. Have slept most of the last 36. And thanks again Pat, I think this is the first time the images are going to be doing what I want them to do. As mentioned, keel and stem and rudder post, need to do the stem now before I can cut the scarf joint between it and the keel. I decided to make it out of four pieces, with the kit's original top piece being the fourth to save a bunch of machining time. I wasn't worried about the color differential in the woods, as you'll see below. Funny thing is all of this and the keel and rudder post are not going to be seen, as of now the only paint I intend to use is the white bottom. But long way until there, we'll see. But I've never made a stem and keel from scratch so wanted to do it anyway for practice and challenge. Which piece isn't cocobolo again? That's some red-brown alcohol-based aniline dye I keep mixed, along with a green-brown, between the two you can solve lots of color issues. It will come off in the subsequent machining but is easily added back at the end, we know the color will be good. Carbon fiber pins between all joints, note they are always orthogonal to the glue surface; drilling wood like cocobolo at an angle is a problem you don't want. All glued up with all joints pinned. Rough sanding outside. Now rough sanded inside and out and top and bottom, all looks good. Kit confirms we're still a bit big which is good. First test fit of stem to hull. Cue Bob Uecker with "JUUUUST a BIT outside..." In here is lots of slow careful work, mostly with good riffler files. The problem you always run into here is a surface getting rounded from sanding shaping so it's touching in center and neither edge is touching. So I use round riffler riffler files down the length of the joint so the joint is actually a slight concavity. This guarantees that if you're square, both gluelines will be good. This is the riffler file set I have, in cut 2. It seems really expensive until you use them, they can easily make very difficult materials like exotic hardwoods do what you want them to do. Looking a bit better now. Couple small gaps but the rabbet will be over this area, so it's a better joint than was really needed. That allowed me to mark out the joint between the keel and the stem, here we are test fitting, this looks good. They were done with very fine-toothed saws and knives and files and sandpaper on flat brass. Don't bring just your knife to an exotic wood joint fight. The keel had been rough ripped down, but now I tapered it in situ while dry fitted with its carbon fiber pins holding it in place, it reduces from about 2.75" at the stem joint to .212" at the rudder post. I used my long straight brass piece with PSA 120 sandpaper. Cocobolo mostly points and laughs at 220. And now stem and keel together, after another 15 min of fiddling the fit. The joint is good but not well-centered, the scarf is badly out of balance, something I will have to do better next time. And finally the rudder post that was ever so slightly easier to make being just some straight lines. Here it is dry fitted with pins holding it in place and this looks good too. So whenever I can stand up again I'll be gluing all that on, and should be able to CA all of it with no clamps. Right now back to sleep I think.


- 714 replies
-
- 9
-
-
- lady nelson
- victory models
- (and 1 more)
-
Congrats on the progress first on the health front and second on Le Licorne. The latter is looking as good as one could want.
-
I have those books, hadn't seen those drawings. I will go look. I'm going to buy a set of those tools from Mikhail, he says around February, and Minerva looks as good a figurehead as any for a first try. Plus I have all your photos to refer to
-
Miniature Hand Tools
vossiewulf replied to Julie Mo's topic in Modeling tools and Workshop Equipment
I too am a fanatic for sharpening, I have to be to do chip carving like I do. I also at this point primarily use Shapton glass stones, having experimented with everything under the sun, I find that Shapton stones remove metal faster, stay flatter longer than anything but diamond, and will probably last my lifetime. Anyone who hasn't tried one should, in my opinion they stand head and shoulders above all other hand sharpening stones. Also in my opinion stones above 10k aren't worth it, inexpensive strops of various types work as well or better. And you don't need the godawful expensive Shapton flattening stone, first you won't unflatten it meaningfully doing ship modeling work, and even if you did there are reasonably flat diamond stones out there for 1/10th that cost that will do just as well. But back to your question Bill, see the Veritas Ml.II honing guide I linked to above It's not intended for gouge curve radii but it will do an extremely good job of curved edges at widths from 1/8" with narrow blade attachment to 2 7/8", it's very well made, and it is what I use to sharpen my $200-$300 Veritas bevel up smoothing and jack planes as well as everything else it's appropriate for, in all cases leaves an edge I couldn't conceivably improve on. And as I mentioned above, no one should every sharpen a straight plane iron purely straight, have to feather in a smooth curve to .001 to .003" or so relief at the corners depending on width of iron to prevent those nasty straight lines from the corners of purely-straight plane irons. So I only use the straight roller on the Veritas honing guide to establish the basic bevel, and until that needs to be redone again I will sharpen with the cam roller, spending the most time the first time around to establish the curve I want. You can try to do that by hand, I used to, it doesn't work very well. In short have to pry my honing guide out of cold dead hands. Here is a surface straight off my smoothing plane, three full-width passes right to left. You're going to need an extremely good straightedge to detect any deviation from pure flat, and there is no abrasive that could improve this surface. And this is wenge, extremely hard wood. Here are the shavings it's taking doing that. And here's the jack plane doing the same thing to a piece of rock maple but that is way easier than wenge. Just about every shaving is almost full width and feathering out on the edge, exactly as desired. And to back once again to the main point , the Veritas guide will do just as good a job on the double-concave iron in Julie's plane.
- 100 replies
-
- 13
-
-
Where did the drawings come from Alexander, is that a 3d model or just sketches from different angles? And of course the carving is completely beautiful.
-
That's because the rest of us also bought from Cornwall. Oops!
- 33 replies
-
- 1
-
-
- lady nelson
- victory models
- (and 1 more)
-
Miniature Hand Tools
vossiewulf replied to Julie Mo's topic in Modeling tools and Workshop Equipment
For simple rounded sole planes with a much larger radius than typical gouge radii, I use the Veritas Mk.II Honing Guide with the camber roller. In fact I also use the cambered roller on the straight blades as well, just not as aggressively, so their edges feather out. -
At this point I have to ask who ISN'T building Lady Nelson.
- 33 replies
-
- 1
-
-
- lady nelson
- victory models
- (and 1 more)
-
Well first I found that >I< was using large thumbnail links from Imgur so that was part of the problem, I've edited and now that last post is at least showing the 1000px versions. I found no options controlling max image size. I will try submitting a large image again, but if it still doesn't work I found you can set a link on an image, so in worst case I can set links on all the small images to 4k versions on Imgur.
- 714 replies
-
- 2
-
-
- lady nelson
- victory models
- (and 1 more)
-
Hey Pat, thanks for the kind words and the suggestions on the images. I'm not using attachments, just the insert image button because you can't interlace text and attachments at least as far as I know. Let me see if I can find the options that control the max image size.
- 714 replies
-
- 2
-
-
- lady nelson
- victory models
- (and 1 more)
-
Again, how does one link to larger versions of images here? I can't figure it out, and these small 700px or so images are not very good at showing detail.
- 714 replies
-
- 2
-
-
- lady nelson
- victory models
- (and 1 more)
-
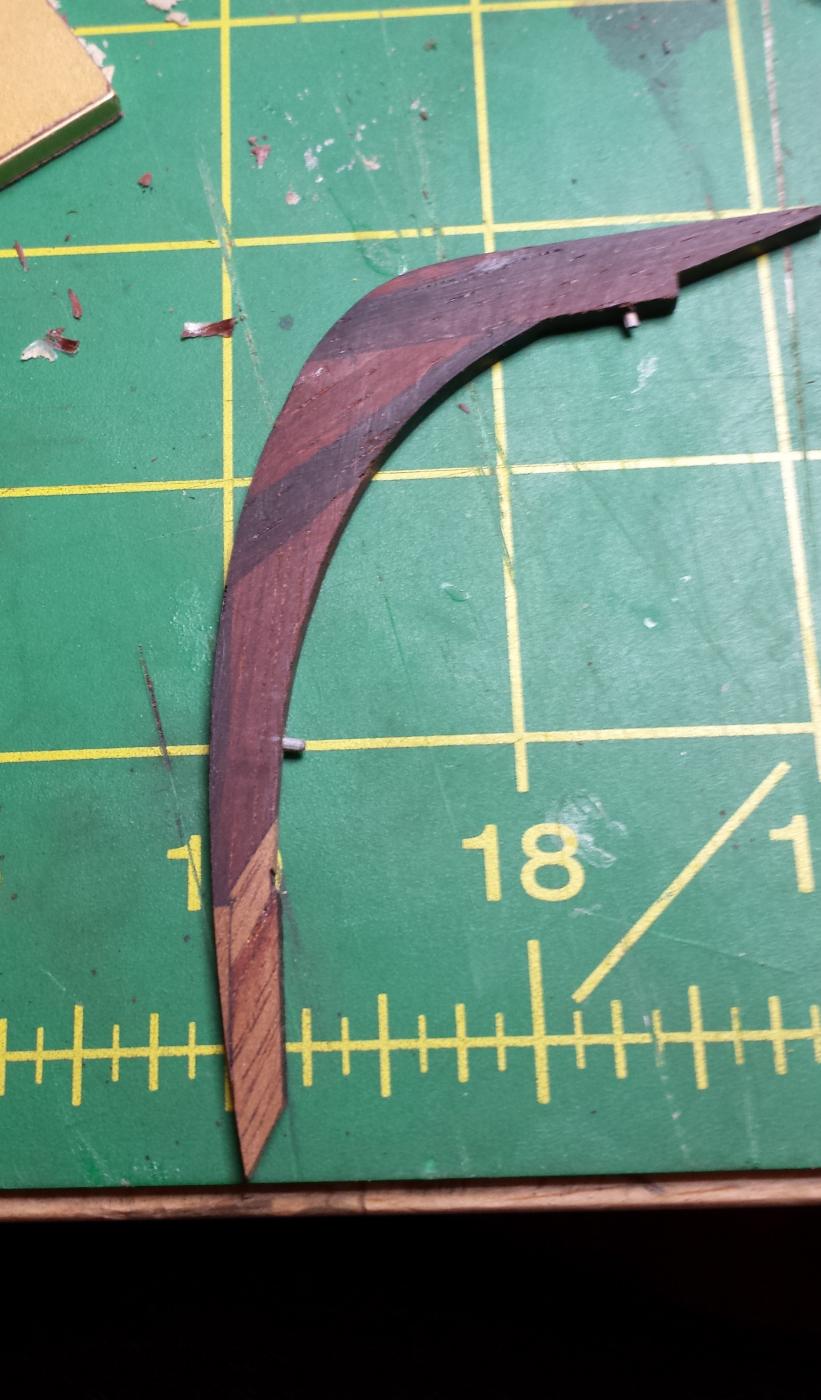
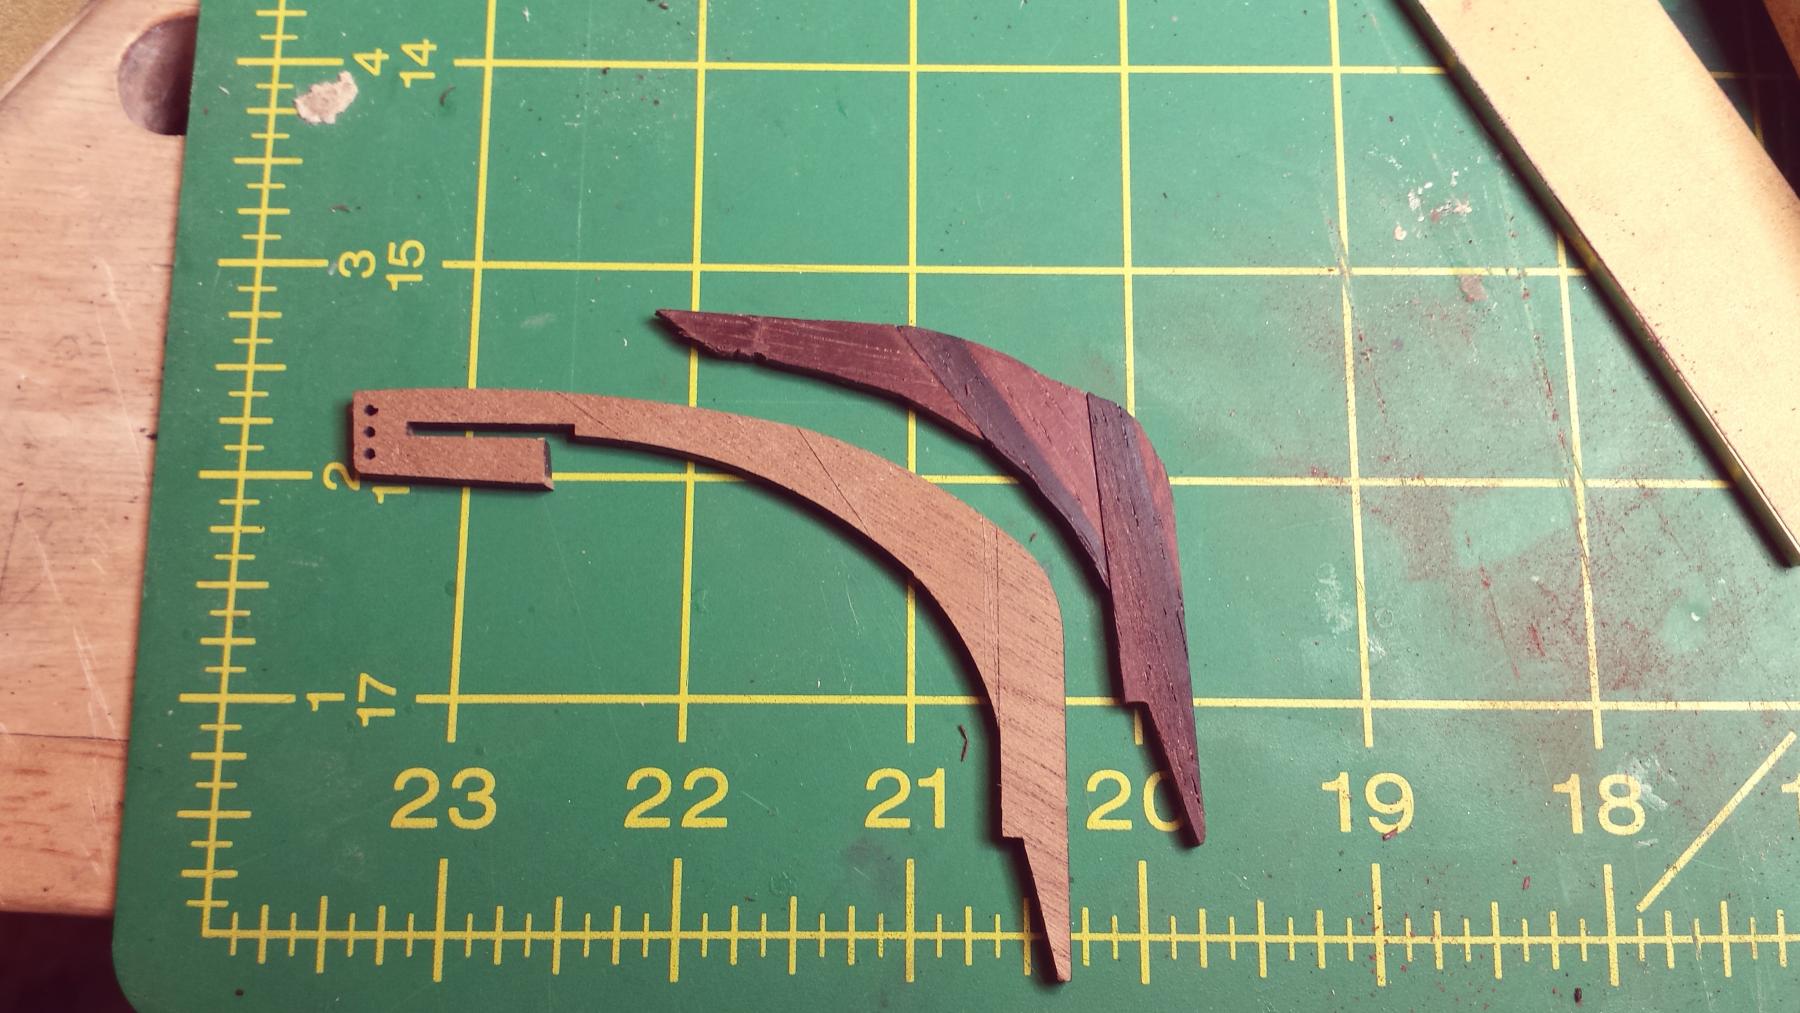
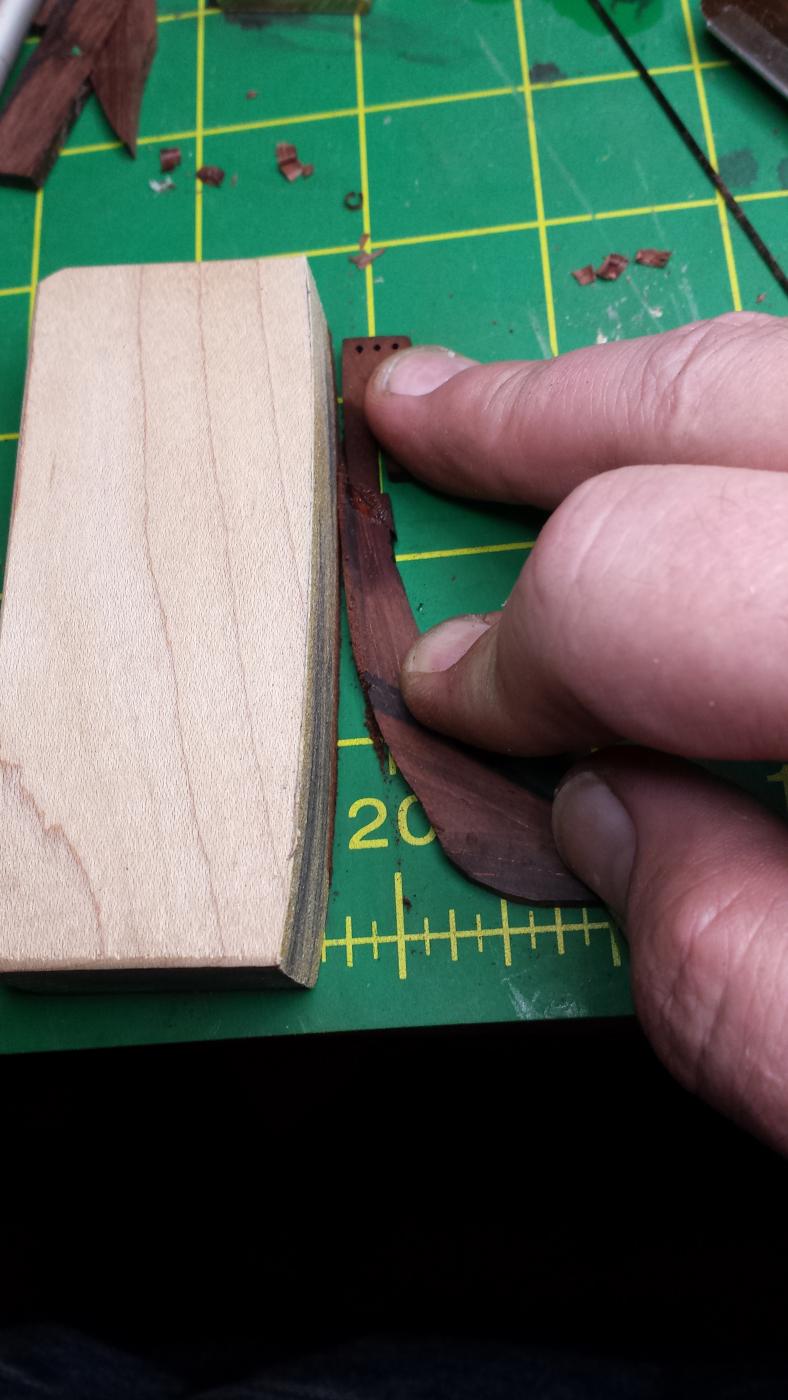
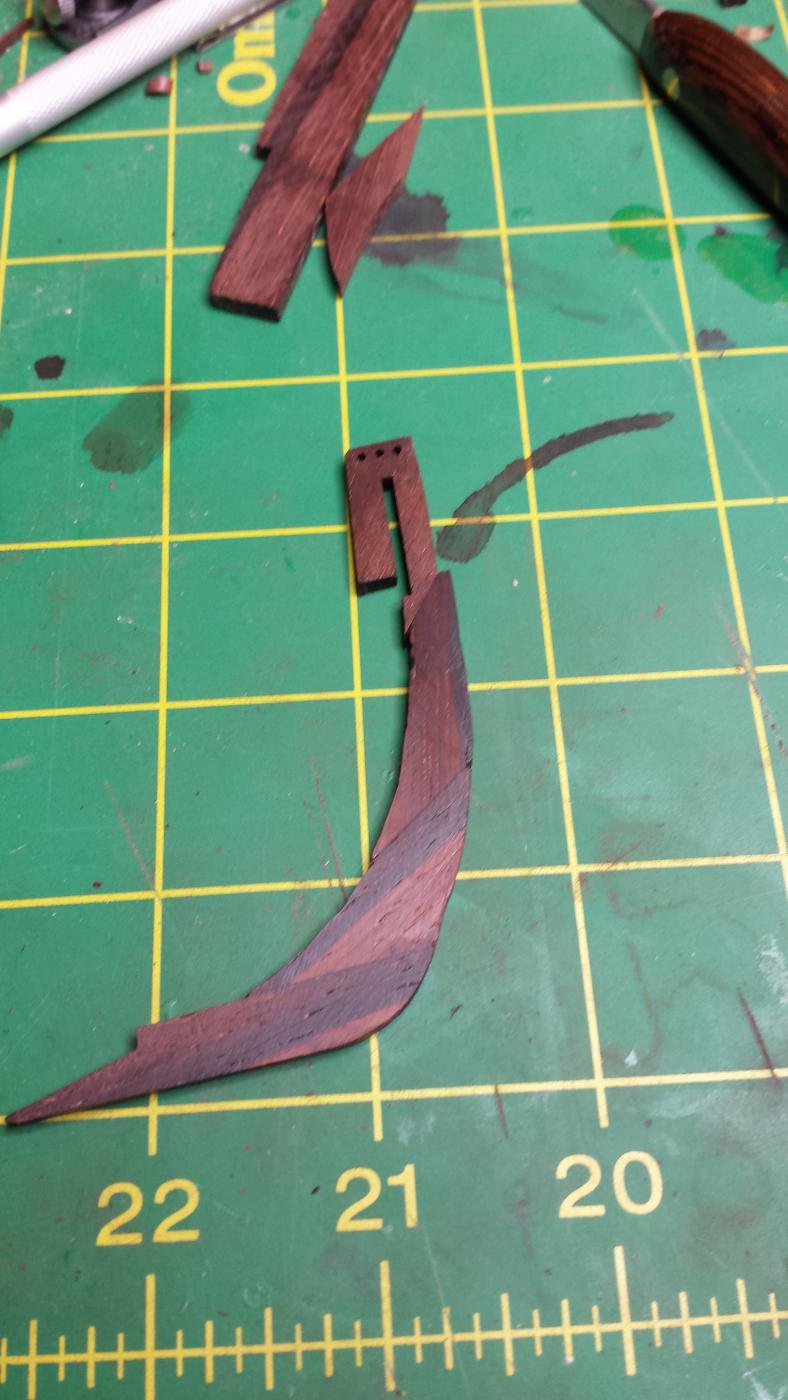
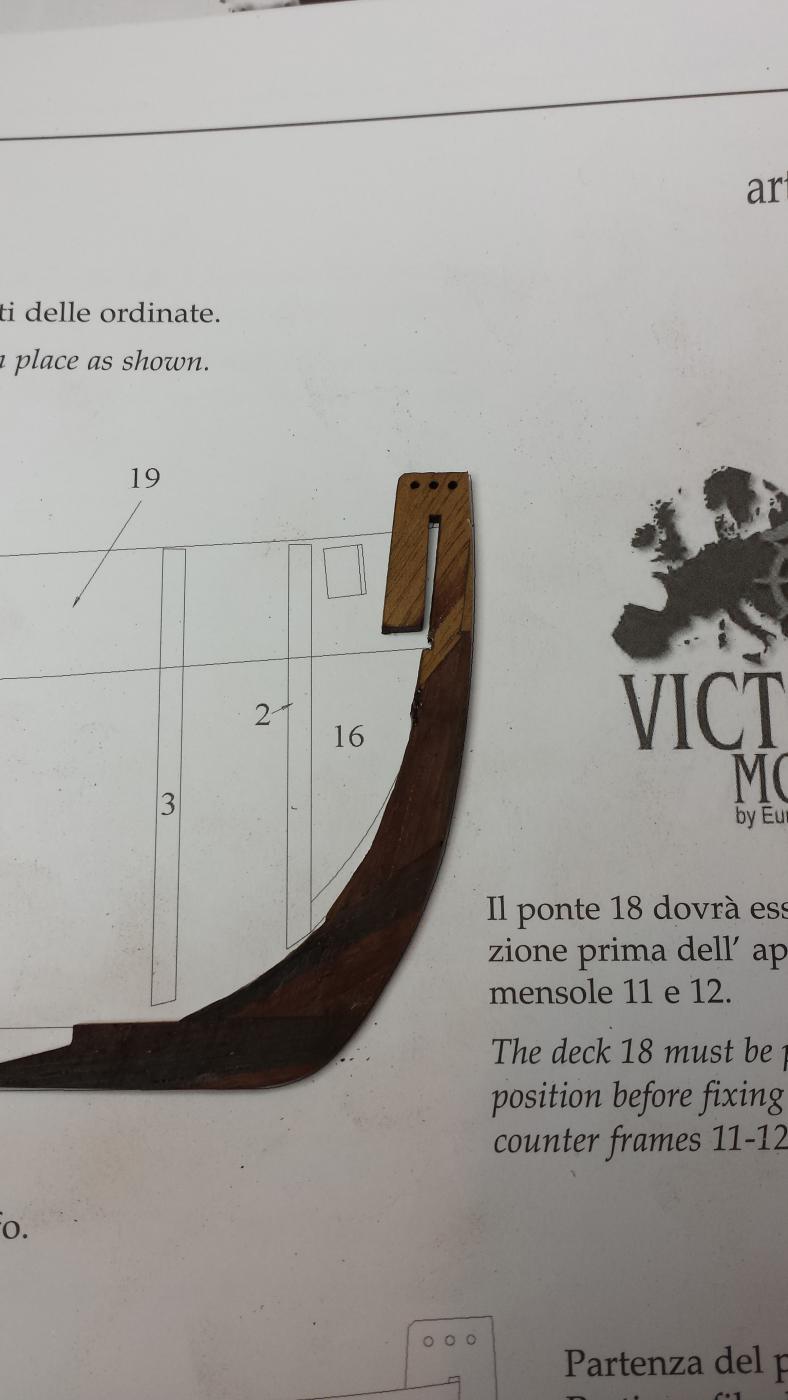
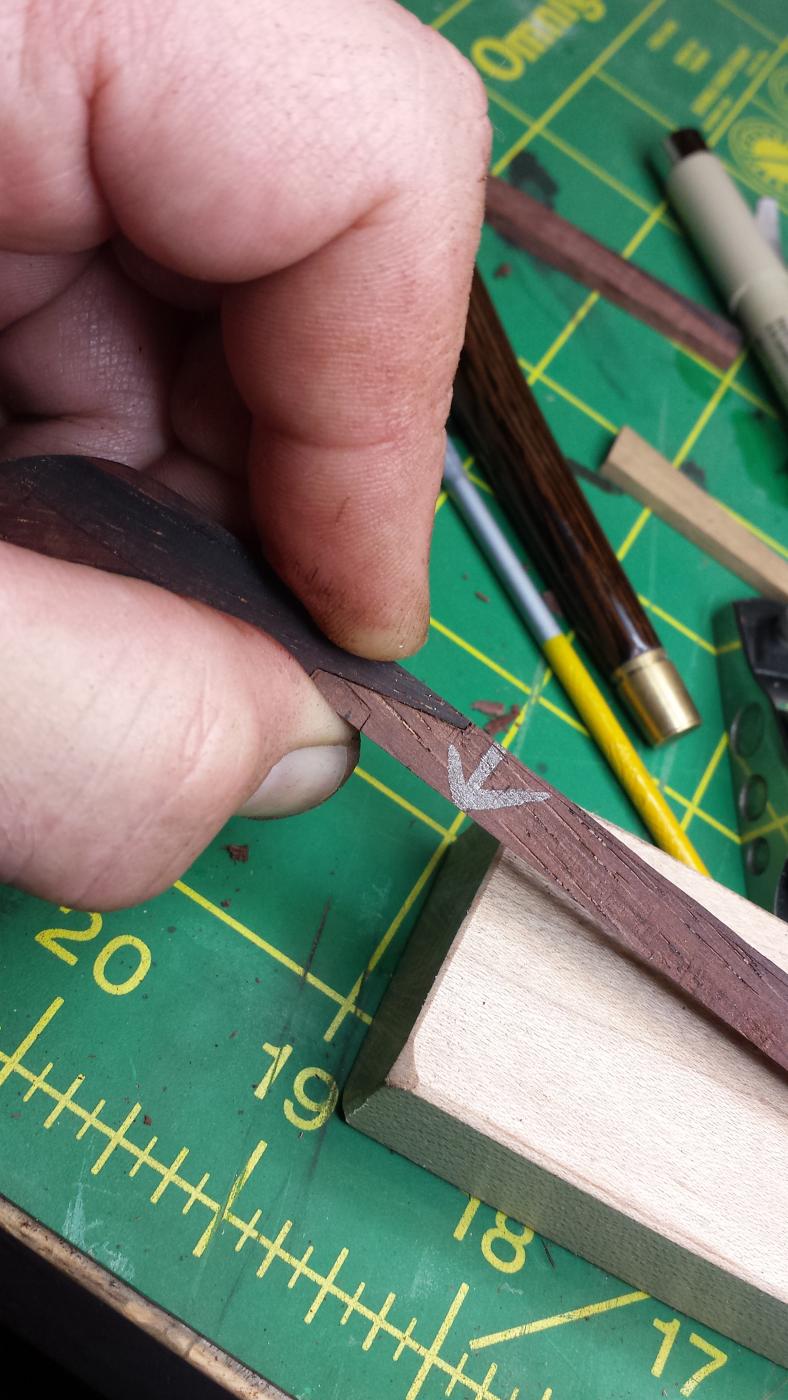
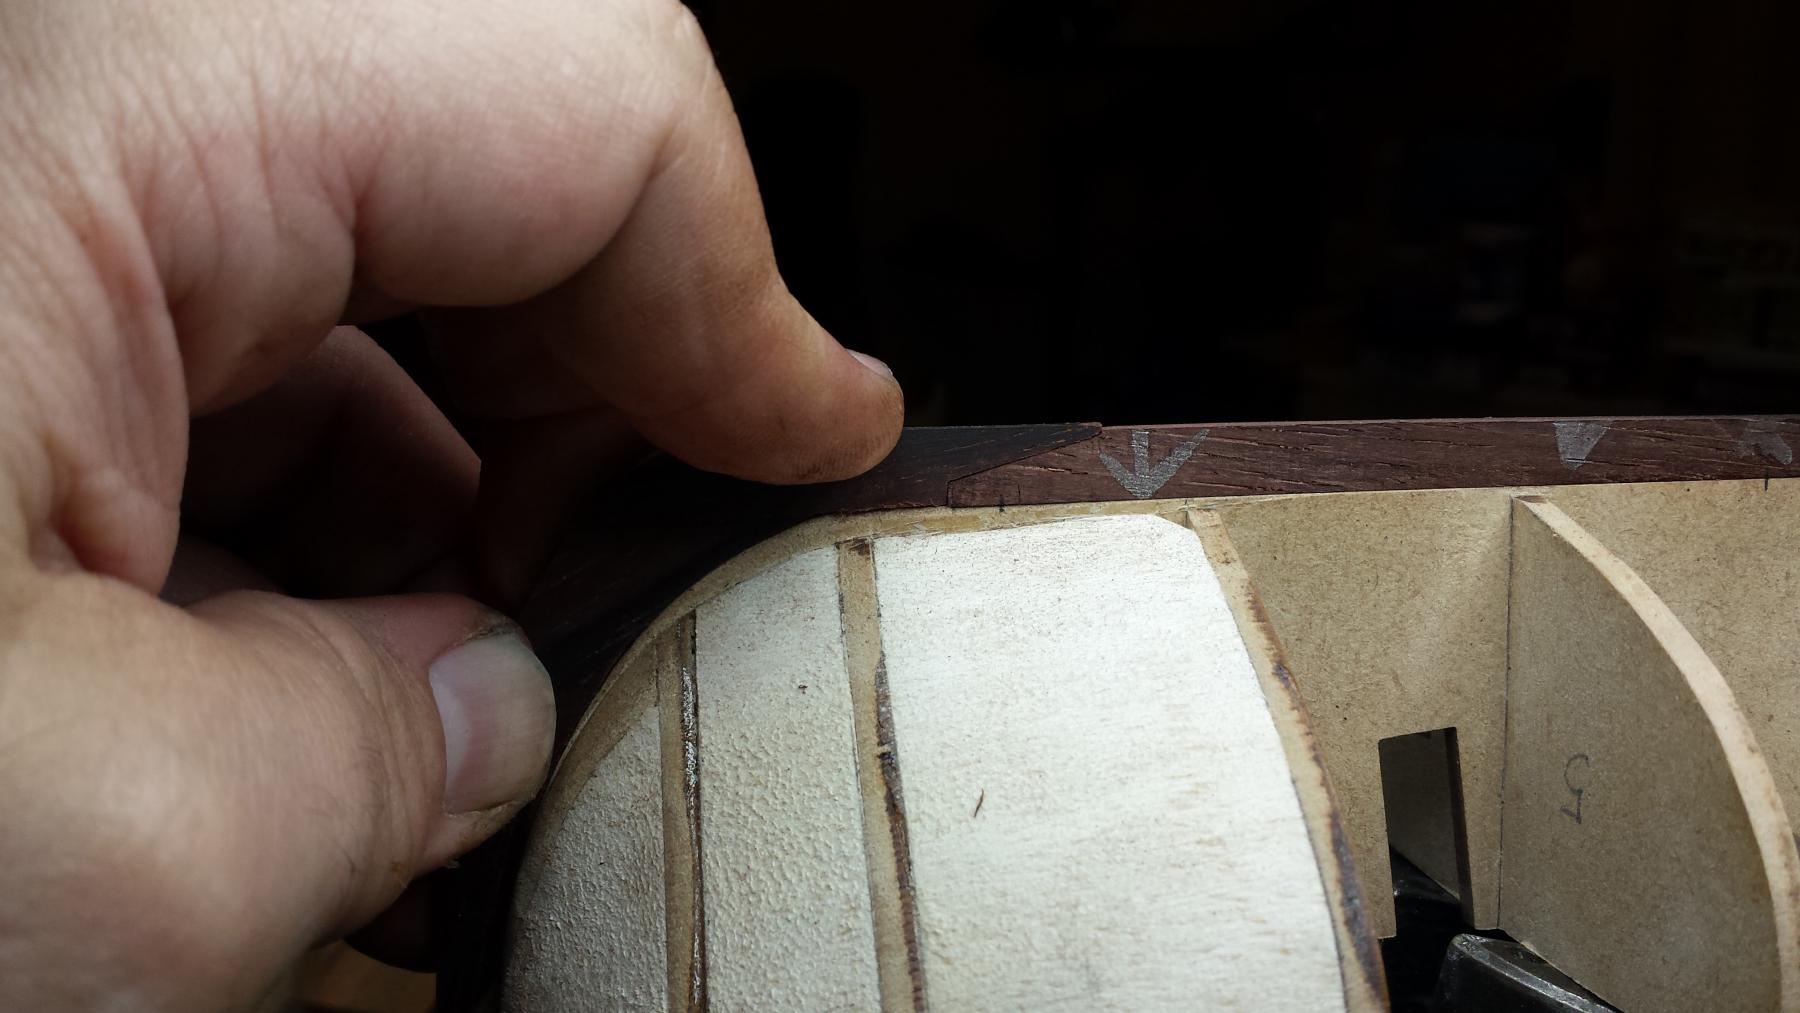
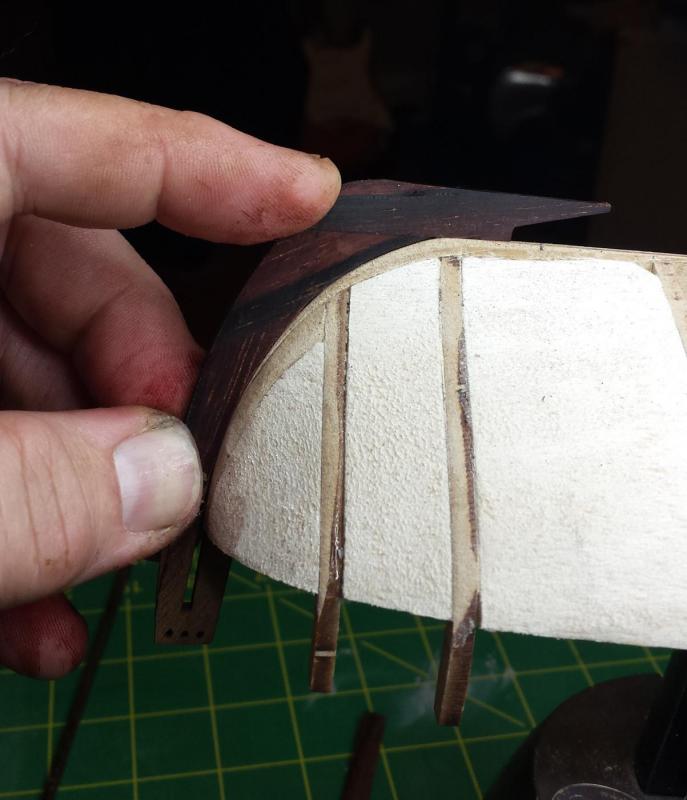
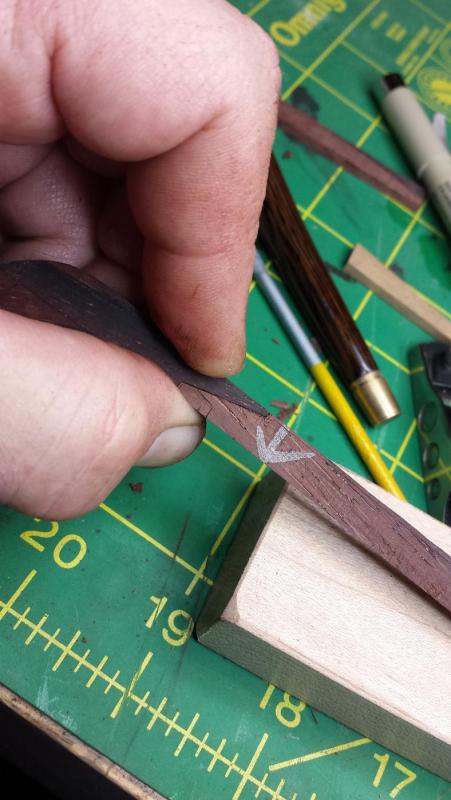
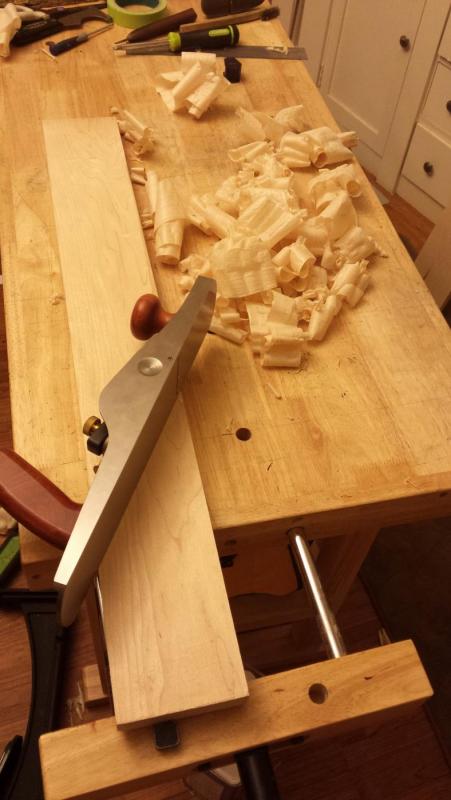
Instructions want to first have the keel/stem/sternpost added and then deck and then the last stern hull bulkhead, so I've left the hull in the "almost sanded fully down" state, and fully sanded the deck side so it's ready for the false deck to be added. First I made a sanding block out of maple with a radius somewhat less than the radius of the deck sheer so I could sand the deck lengthwise without fear of flattening the sheer. And used it to fully clean up the deck along with knives and planes. Then it was time to start making the cocobolo replacements for the keel/stem/sternpost, so I first ripped that 2x2 turning blank, making a .550" x 2" piece that I could then take to my little table saw. Checking the existing keel shows .124" thickness. So I ripped my .550" x 2" x 12" piece into strips that were .550" x .150". Then I took those to my Mk. I Thickness Planer, you see it's a pretty high tech machine consisting of a Veritas low-angle smoothing plane with PM-V11 iron, a 1/8" thick piece of scrap, and two cam clamps. It's more physical effort of course, but I'd be surprised if a Byrnes thickness sander was faster than this method for anything less than a whole pile of planking stock. And this method leaves a far superior finish, absolutely perfectly glass smooth, even if you wanted to improve that surface, you couldn't. Here's the replacement keel. And it doesn't vary more than .001" over its length, not bad for three total passes on each side. I like sturdy, so I decided I'd put some .040" carbon fiber rod reinforcement to the keel glue joint. For this kind of thing I just use my rotary tool with nice twist drills from Otto Frei on 3/32" shanks, they drill wood like it isn't there. I can drill reasonably orthogonal holes in surfaces freehand looking at a 45 degree angle, and that's what I did here since we can ream it out if there's a problem, but there wasn't in this case. Still for real precision holes I use a pin vise and constantly flip between two 90 degree views to ensure perfect alignment. Sometimes I use my mill, but most often done by hand by one of these two methods. Here are the keel and sternpost/stem pieces, arrows point to marking knife cuts showing shape of stem and sternpost pieces. With the keel piece, I just flipped it up on its side and planed a perfectly straight and smooth and square edge with the smoothing plane. First I drilled holes in the kit false keel and made the carbon fiber pieces. Red arrows pointing to those, since they're hard to see. Then drilled holes in my cocobolo keel, and here it is mounted on the kit false keel with no glue. So I think we're good here, and I will rip it down to final height now. However before I did that I also planed about a .005" sweep in the glue joint of my new keel, so when it goes down on the carbon fiber pieces the two ends hit first. So when I go to glue it I can use CA and just press down in the middle for 30 seconds and the whole length should have a good glue line. That's where I knocked off. Next up is cutting out the stern post and stem pieces, gluing the latter together, and then then gluing them along with the keel onto the boat.
- 714 replies
-
- 9
-
-
- lady nelson
- victory models
- (and 1 more)
-
I'm aware of that, but I have a set of plans that say Lady Nelson, I'm not going to call it "generic cutter from the 1800s". Thanks for the pointer to the book, I didn't realize this rig qualifies as fore and aft rig, when I saw that book some time back I decided I didn't need it for now. And I'm still confused between brig and brigantine, I know the description but Wiki's diagram doesn't make much sense. It says the Brig has two square rigged masts and the Brigantine has one square rigged and one hybrid. Don't see how that's the case when both have spankers, just one a bit bigger than the other. Brig Brigantine Edit: I'm aware the cutter isn't either, but its one mast is one or the other of those two's mizzen masts, I'm trying to figure out which one and why.
- 714 replies
-
- 2
-
-
- lady nelson
- victory models
- (and 1 more)
-
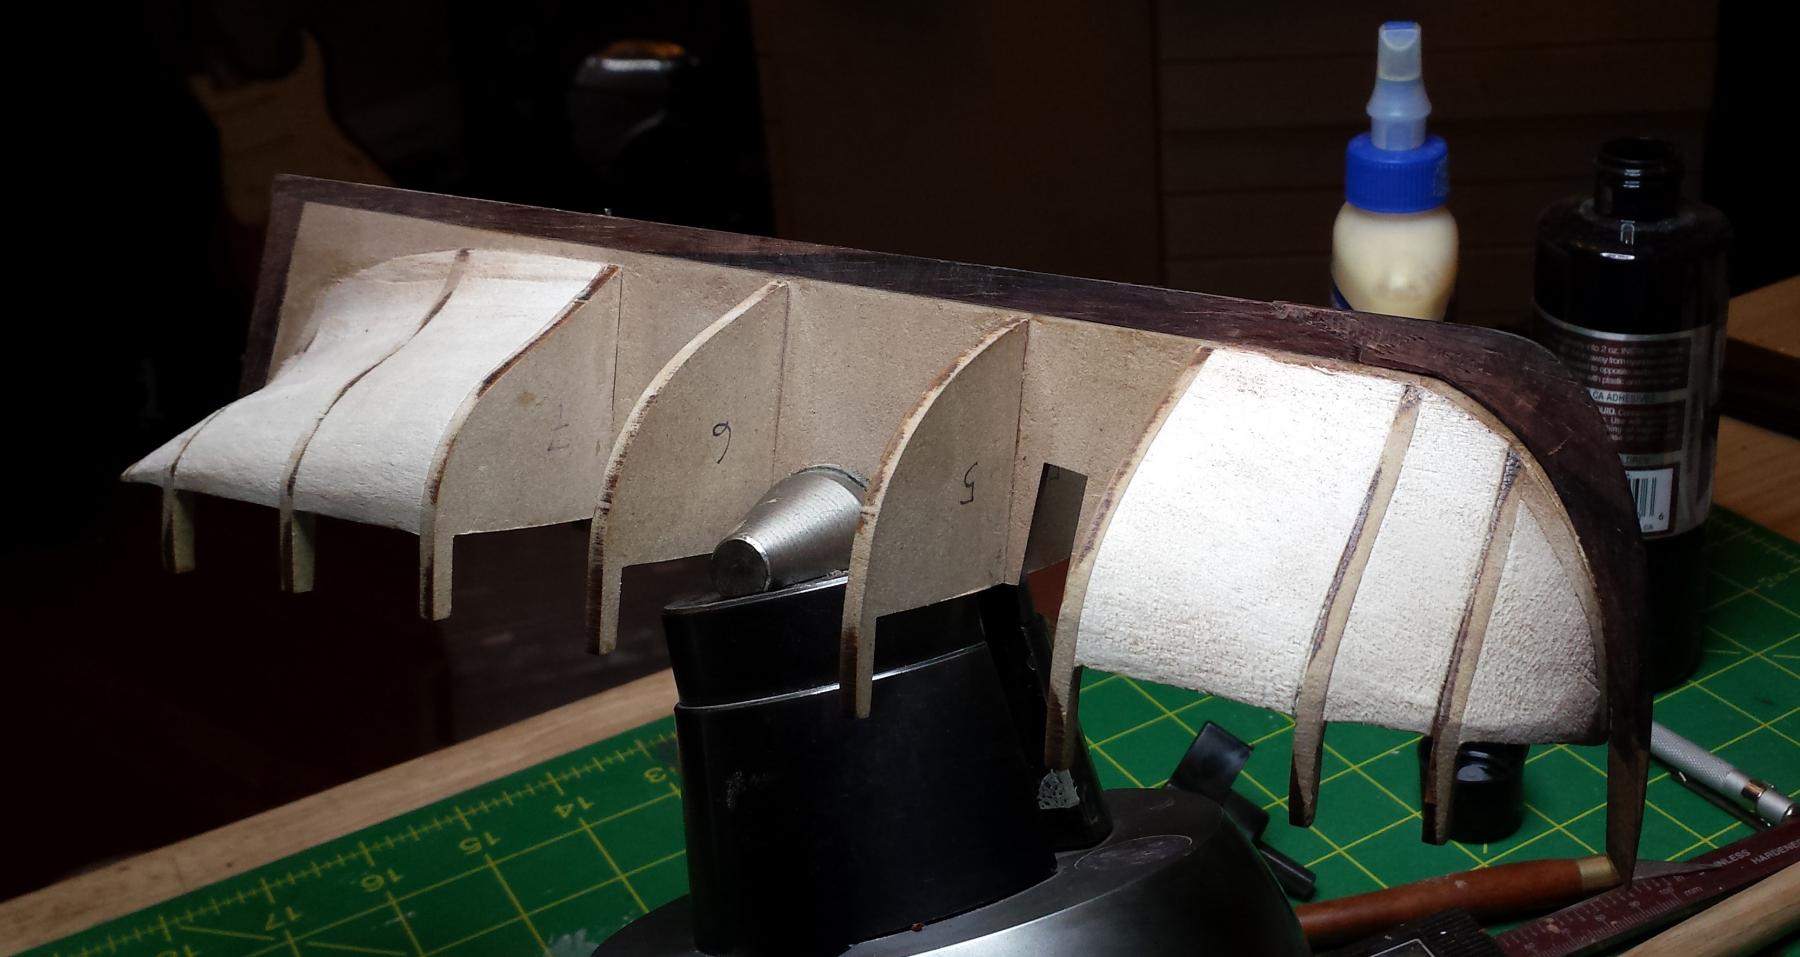
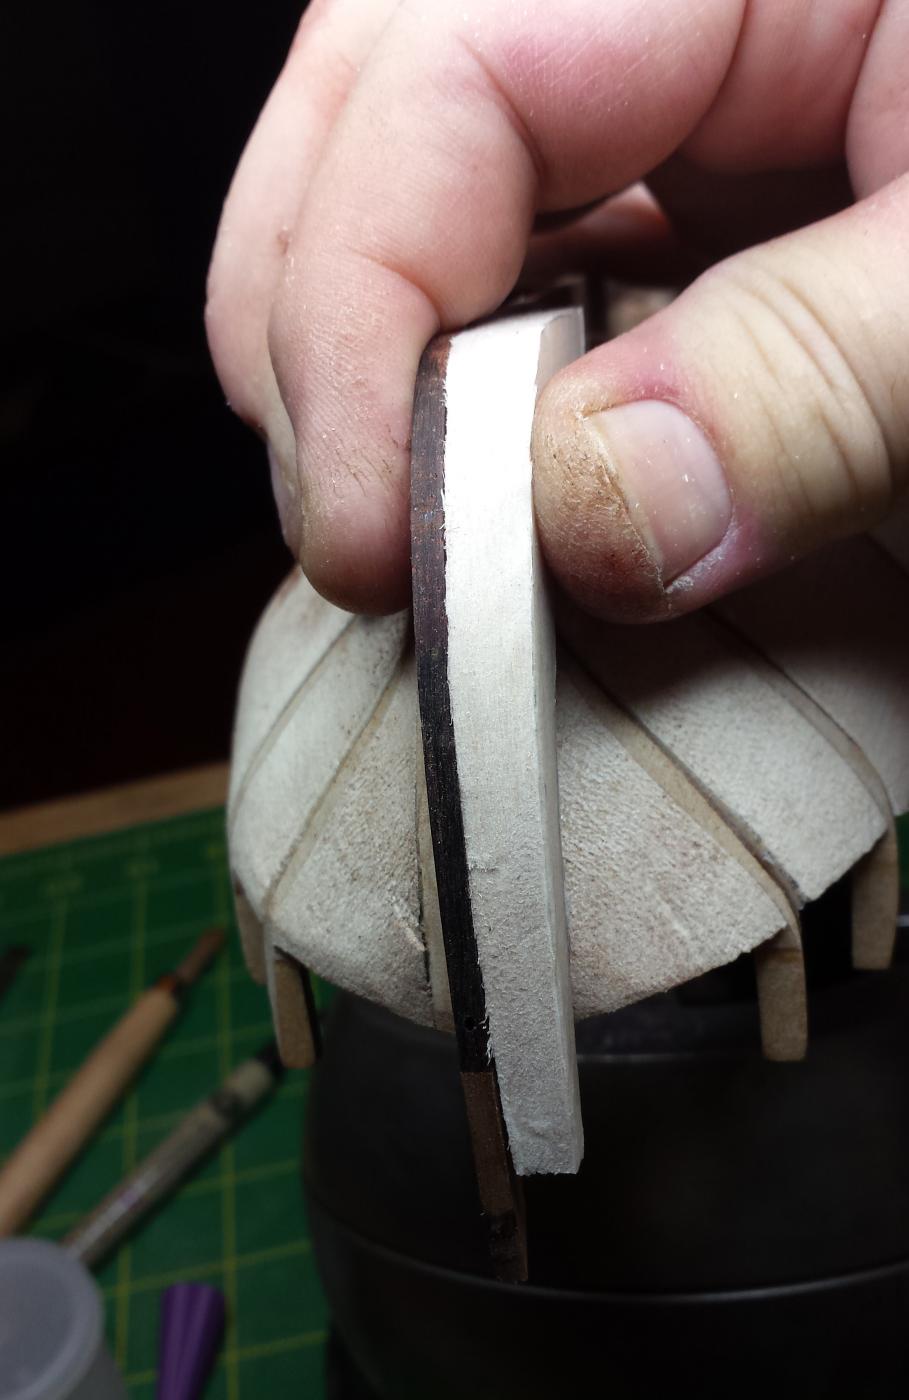
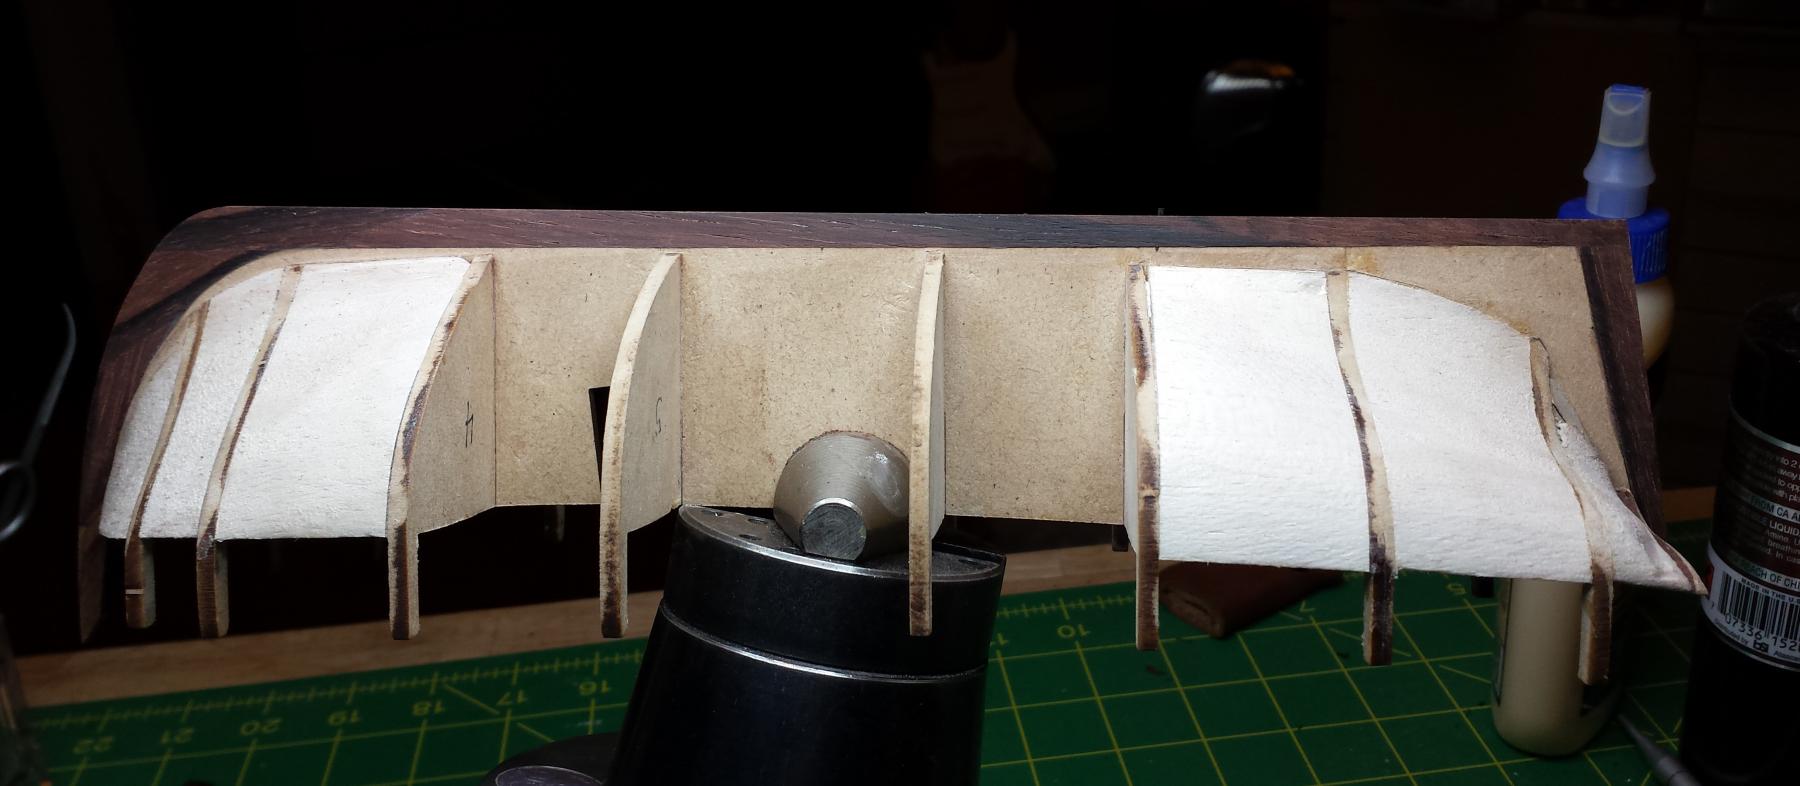
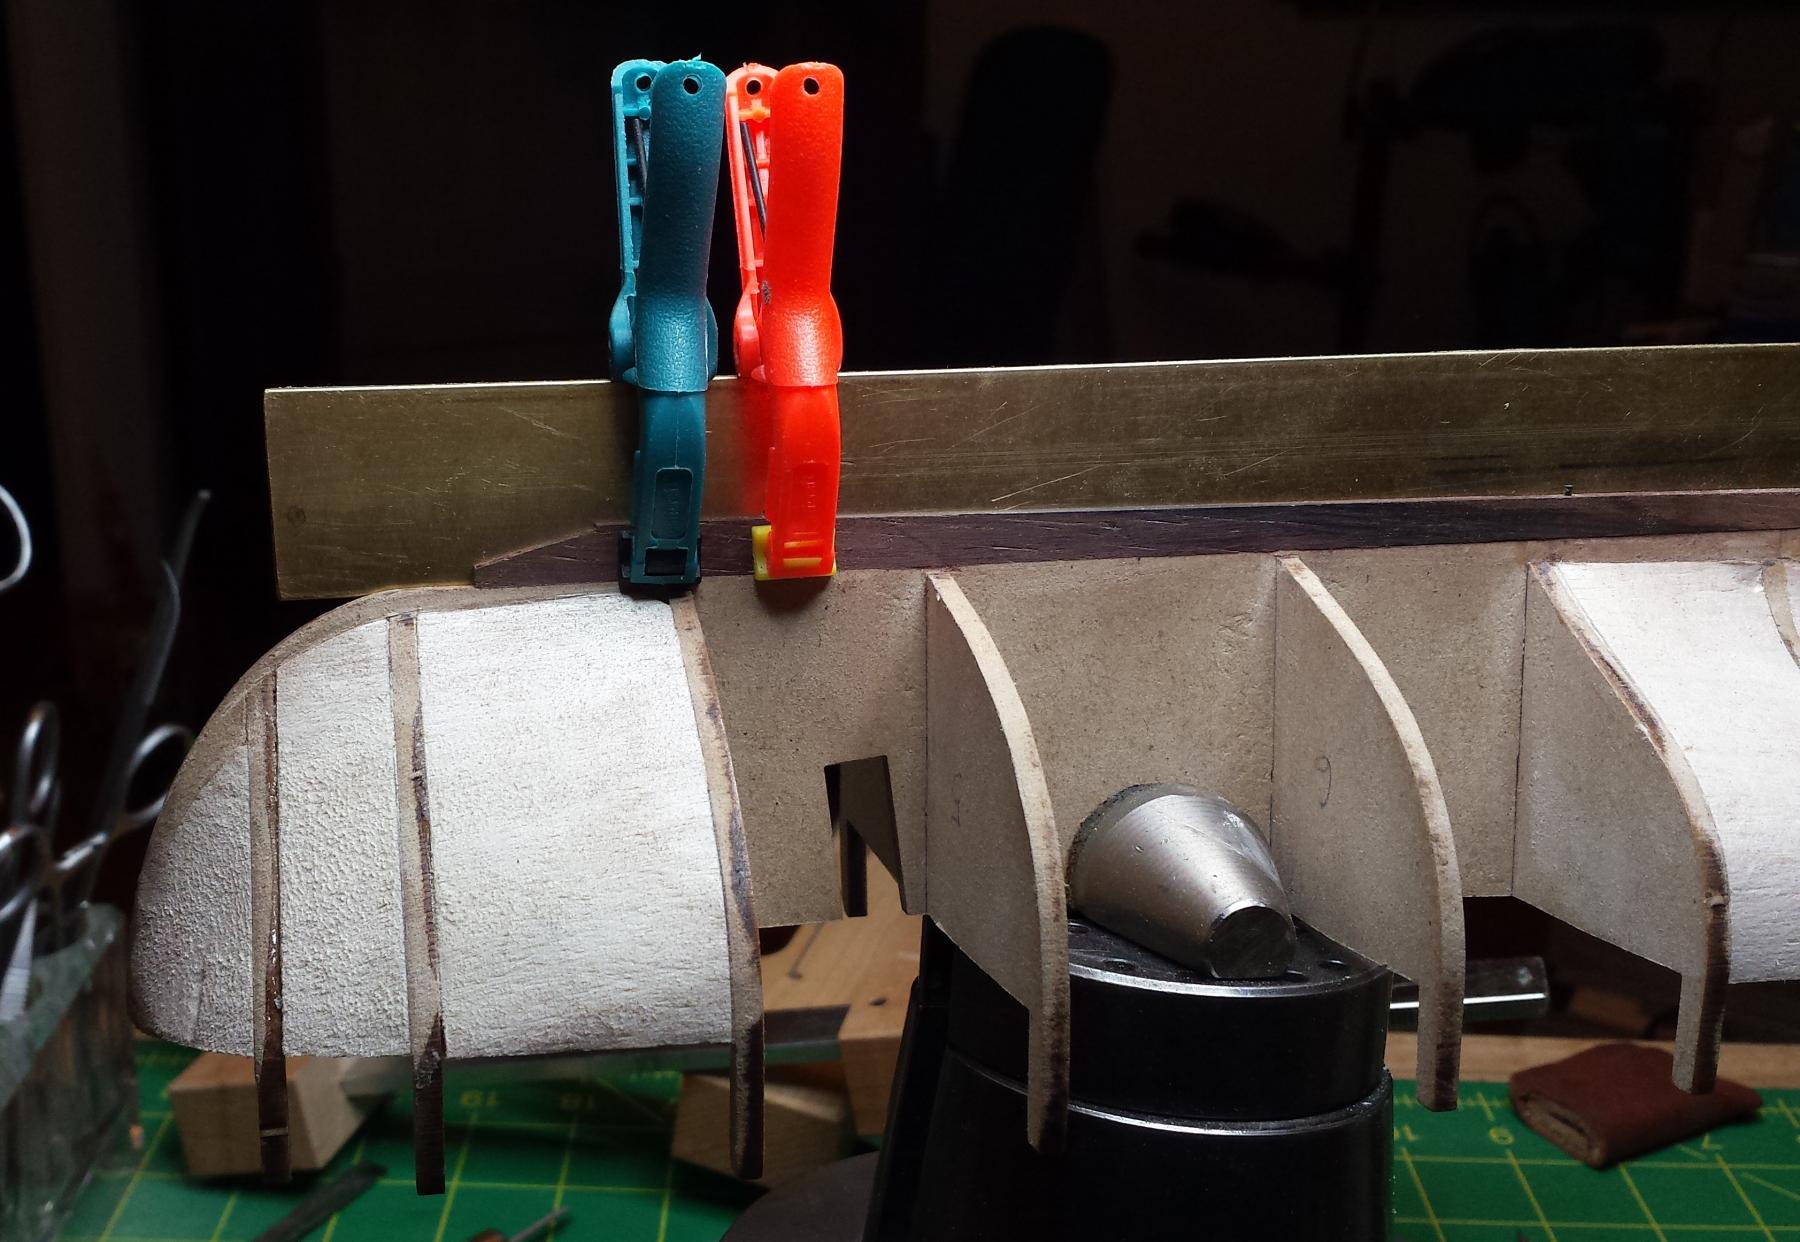
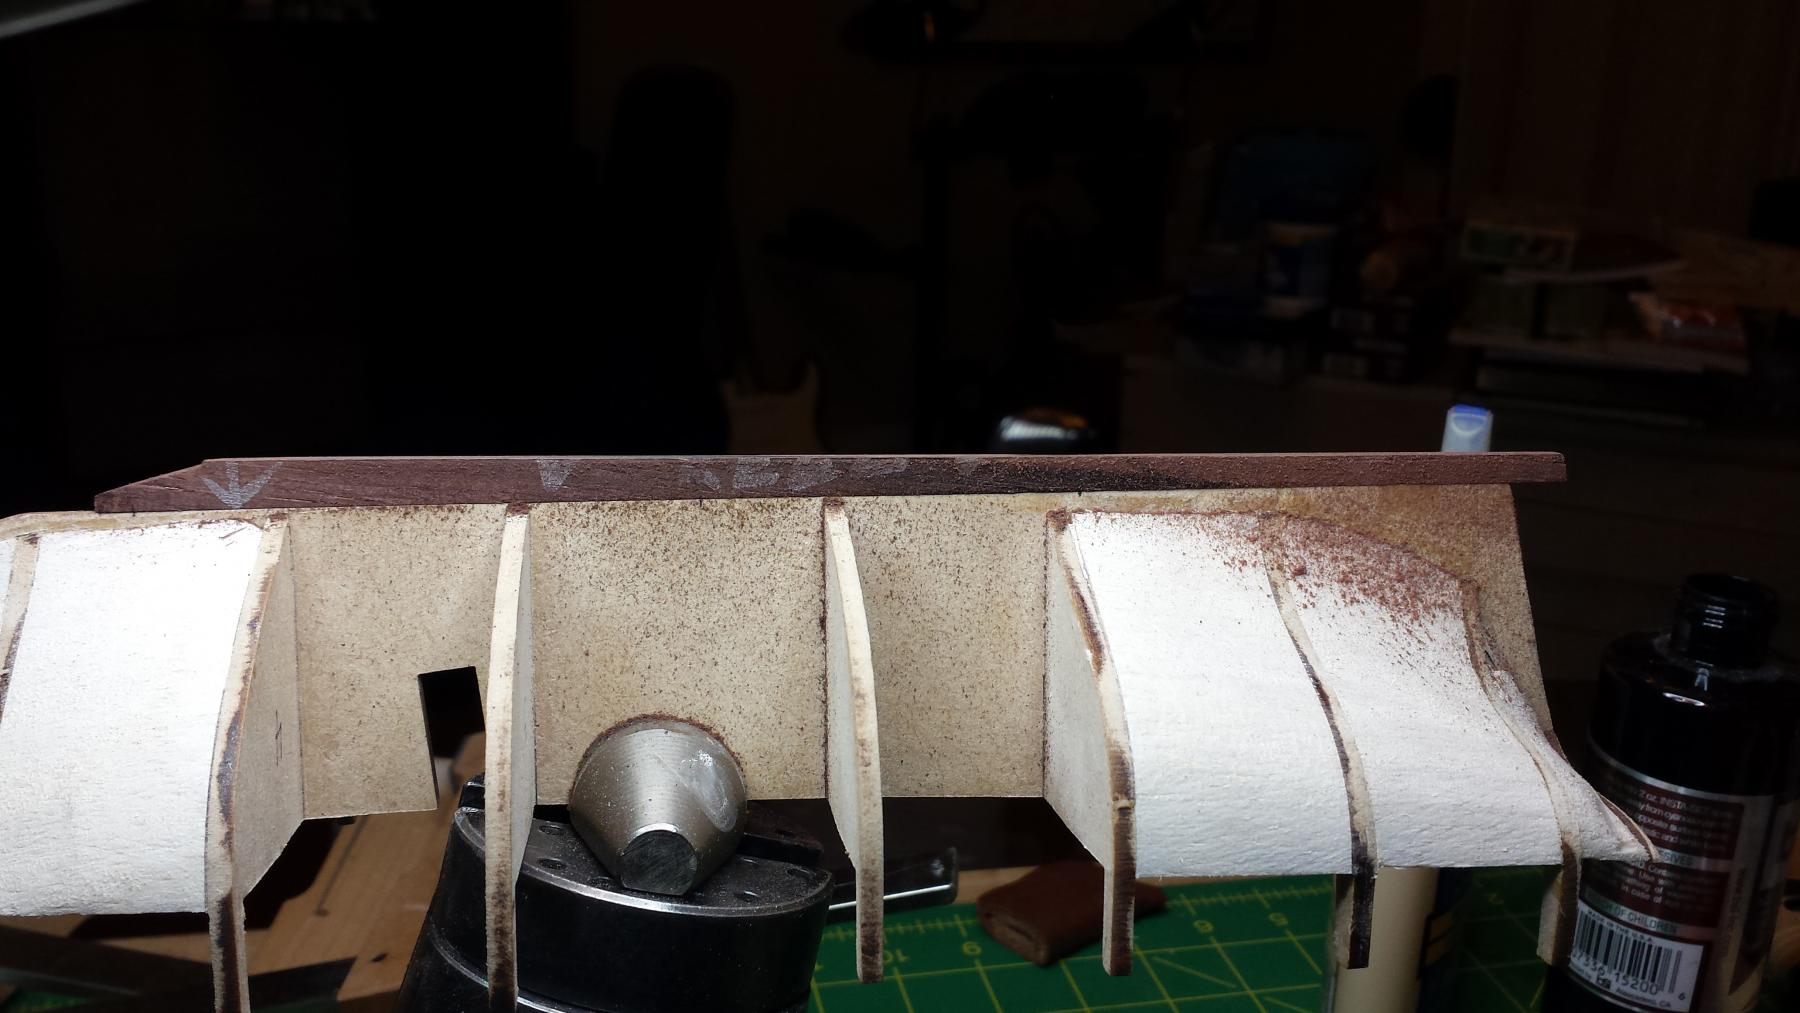
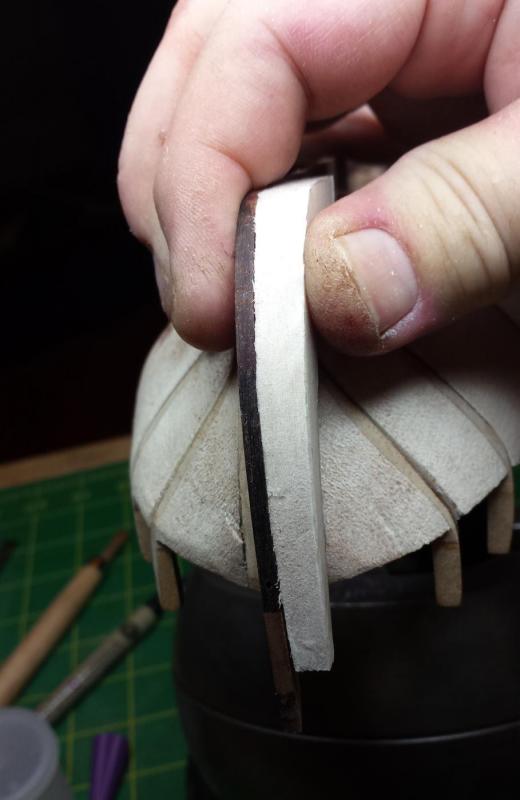
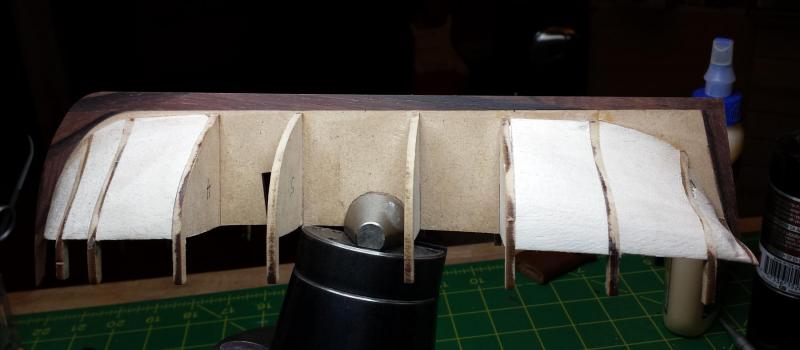
Weird, I was posting 1000 x whatever it was pixels images and they weren't getting resized, if I post a 4k image it gets resized to 680px or something, I guess the breakpoint is above 1000. Ah hell these are still 600 or so px when you click on the thumbnail, what is the purpose of having the thumbnail function then? Ok I go back to 1000px next time unless someone can tell me how to get bigger ones to be shown when someone clicks on a thumbnail. Anyway, in spirit of a documented build log, more photos. Here filling in balsa in first three bulkhead gaps on bow and stern. Excalibur saw, rough cutout. Quickly rough-shaped with knife and gouge. And glued in place. I was using CA until one grabbed and refused to move, leaving it slightly out of position. Reminded myself CA is not always necessary and did the rest with yellow glue. Once all blocks were in place, both ends got another quick go-over with the gouge prior to sanding. The deck sides of the blocks were knocked down to .5mm above deck with a chisel plane so I could get into the stanchion corners. He was made intentionally somewhat dull as balsa can be cut with a butter knife along the grain and doing so made it easier to prevent him from nose-diving into the wood, which every chisel plane tries to do. This is more or less the same as doing it with a paring chisel, but I think I have more control with the plane, and both were down to the very minimal sanding required point quickly and easily. And sanding began but had to call it a night at this point. Sanding is being done with a flat plywood piece and a 9" long segment of 1" diameter aluminum rod, both covered in PSA 120. Next time around I will start with 80 for speed's sake, this time being cautious to figure out how to get to the final shape without taking too much anywhere.
- 714 replies
-
- 6
-
-
- lady nelson
- victory models
- (and 1 more)
-
Speaking of shooting boards for tapering and beveling planking strakes (no really I did mention it up there!), I'm considering using a method I employed for something similar a couple years ago - taking my LN scraper plane, flipping it upside down, clamping to benchtop, then do my tapering and beveling freehand and Mk.I Eyeball. When I did it before, I found it much easier to control than I thought it would be, so going to run some tests using scrap stock. If that doesn't work as planned, I think I'll just make a traditional shooting board and use that to do the taper. I'd then do the bevel freehand with one of my small scraper planes.
- 714 replies
-
- 3
-
-
- lady nelson
- victory models
- (and 1 more)
-
Question for the knowledgeable crowd, since I'm doing no paint I should do the stem correctly in multiple pieces scarfed together. Where can I find the correct layout for this class, or at least some RN cutter from the period? I don't see this joinery detail in the period plan elevations, and it's not in the kit drawings. Also looking for rigging detail in James Lee's Masting and Rigging book - is the one mast of this cutter essentially exactly the same as a ship-rig's mizzen mast? Only discussion I see in the entire book seems to assume a three-masted ship rig.
- 714 replies
-
- 3
-
-
- lady nelson
- victory models
- (and 1 more)
-
Miniature Hand Tools
vossiewulf replied to Julie Mo's topic in Modeling tools and Workshop Equipment
I have the flat version of this plane and agree it's excellent, but then again it's Lie-Nielson and everything they make is extremely good. However as Julie says, not sure of the use for models, if so it would only be on the very large ships and even then you're going to want super-straight grain that's oriented the same way on every plank, otherwise bad things will happen. If you want to go bigger than the Lee Valley micro planes, I'd recommend the small scraper plane from Veritas, sharpened well it can still remove material pretty quickly but it's a scraper plane, so no tearout. I think it should have a heavier iron than it does but it still works reasonably well.