vossiewulf
-
Posts
1,477 -
Joined
-
Last visited
Content Type
Profiles
Forums
Gallery
Events
Everything posted by vossiewulf
-
 If they're not available I have no issue making something like that for myself. I was more thinking it's a niche market that someone with a laser could make a little money in Create required files for top 10-15 kits, offer for sale, run them off on demand.
 -
Thanks Pat and Rick. I'm not anywhere close to throwing hands in air, I expected these kinds of things and were I to rip off everything planked so far and start over again it would be massively better as I've already run into the major things having to do with laying it out and tapering and beveling. It's exactly what I was hoping would happen, to see and figure out solutions to these things before we get to the final planking. I think you're both right that I started the tapering too far back, and now that I've seen this I know that if you have a more vertical stem, the more likely the taper isn't going to be straight and you need to start a little forward at least. But I'm going to take the time to draw it out in Photoshop or Illustrator, I bet it's actually a noticeable curve and for best results I'd have to largely skip using my plane and focus on using abrasives to get that curve correct. As for beveling, sounds like Pat says 100% bevel on the lower edge of the plank you're gluing on, and Rick says bevel the upper edge The one thing I don't hear is trying to do both sides, but I think what Pat is saying make for easier adjutment/fitting.
- 714 replies
-
- 5
-

-
- lady nelson
- victory models
- (and 1 more)
-
Great idea Mark. One I was thinking of after watching everyone spend time using filler blocks to fill in overlarge gaps between bulkheads for planking was whether someone with a laser rig and reasonable CAD skills could create filler kits for popular retail kits. For example you could do two tweened bulkheads that get added between each kit bulkhead, at that point no gap would be big enough to cause a problem. Or simpler, but less elegant, would be bread and butter pieces that you stack and then slide in between bulkheads that are cut to fit specific bulkhead locations. I think those would be quite doable and I at least would pay some money for something like that to cut out an annoying step by using laser-cut pieces that would solve the problem not just for the bow and stern but provide pieces for midships as well, I would use them.
-
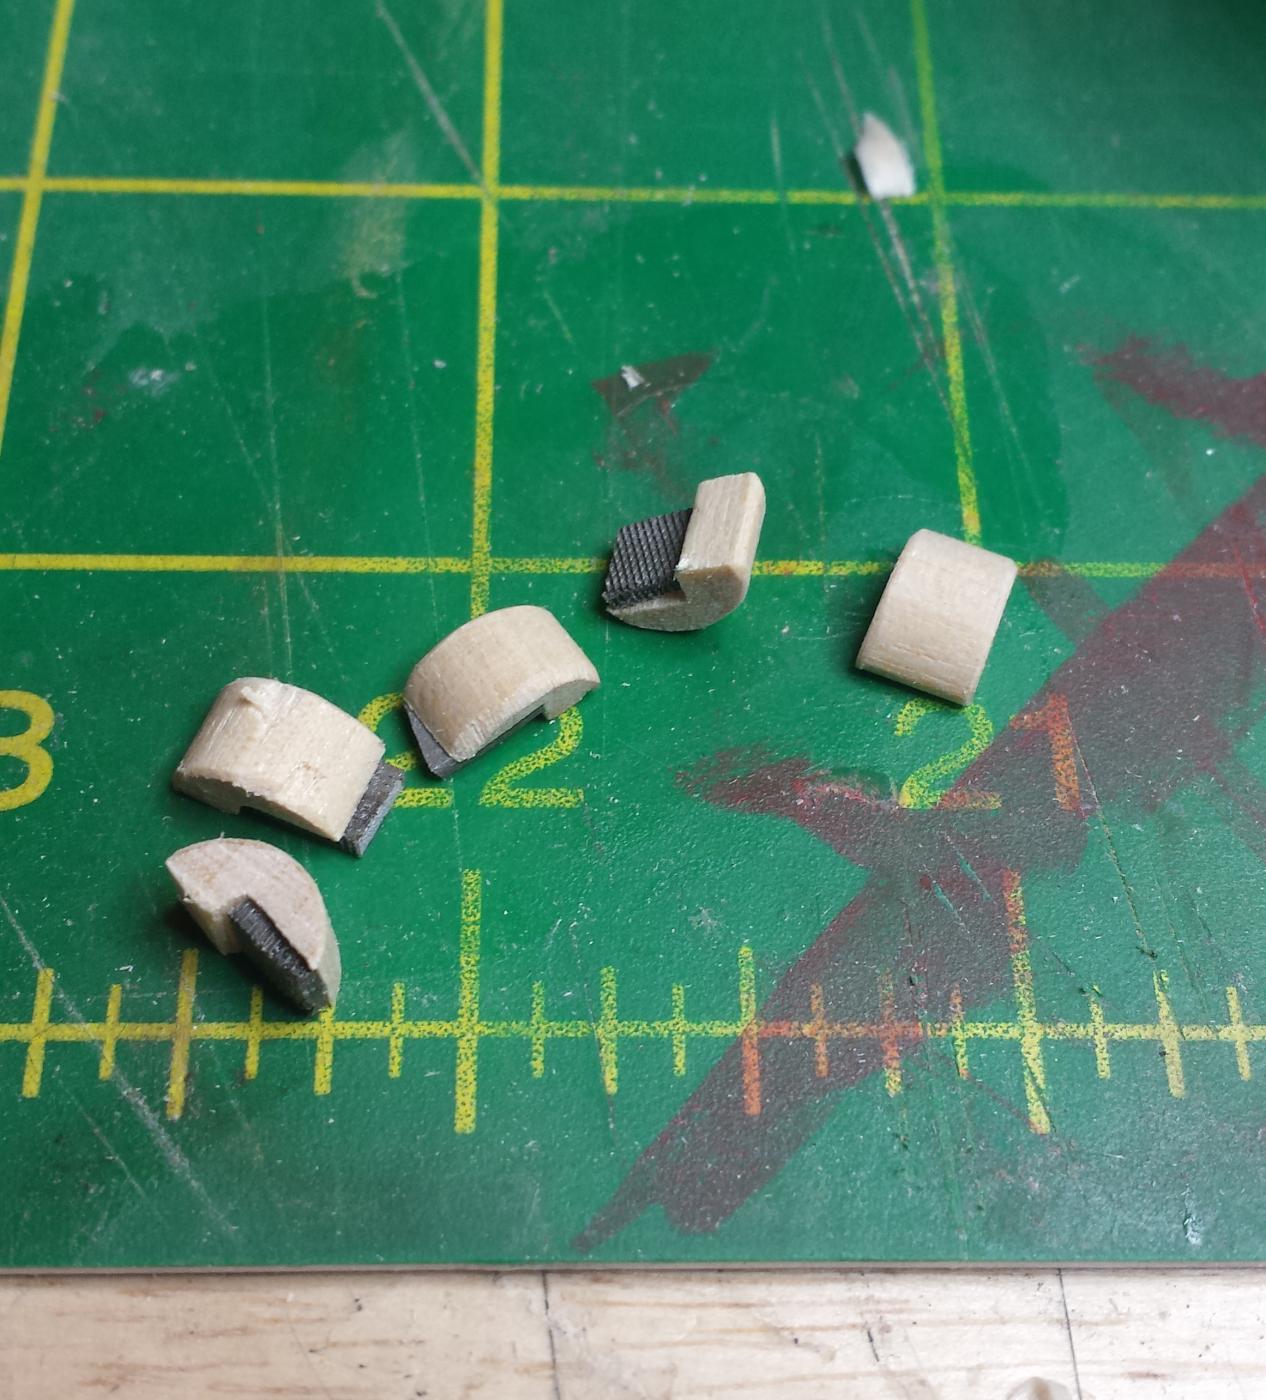
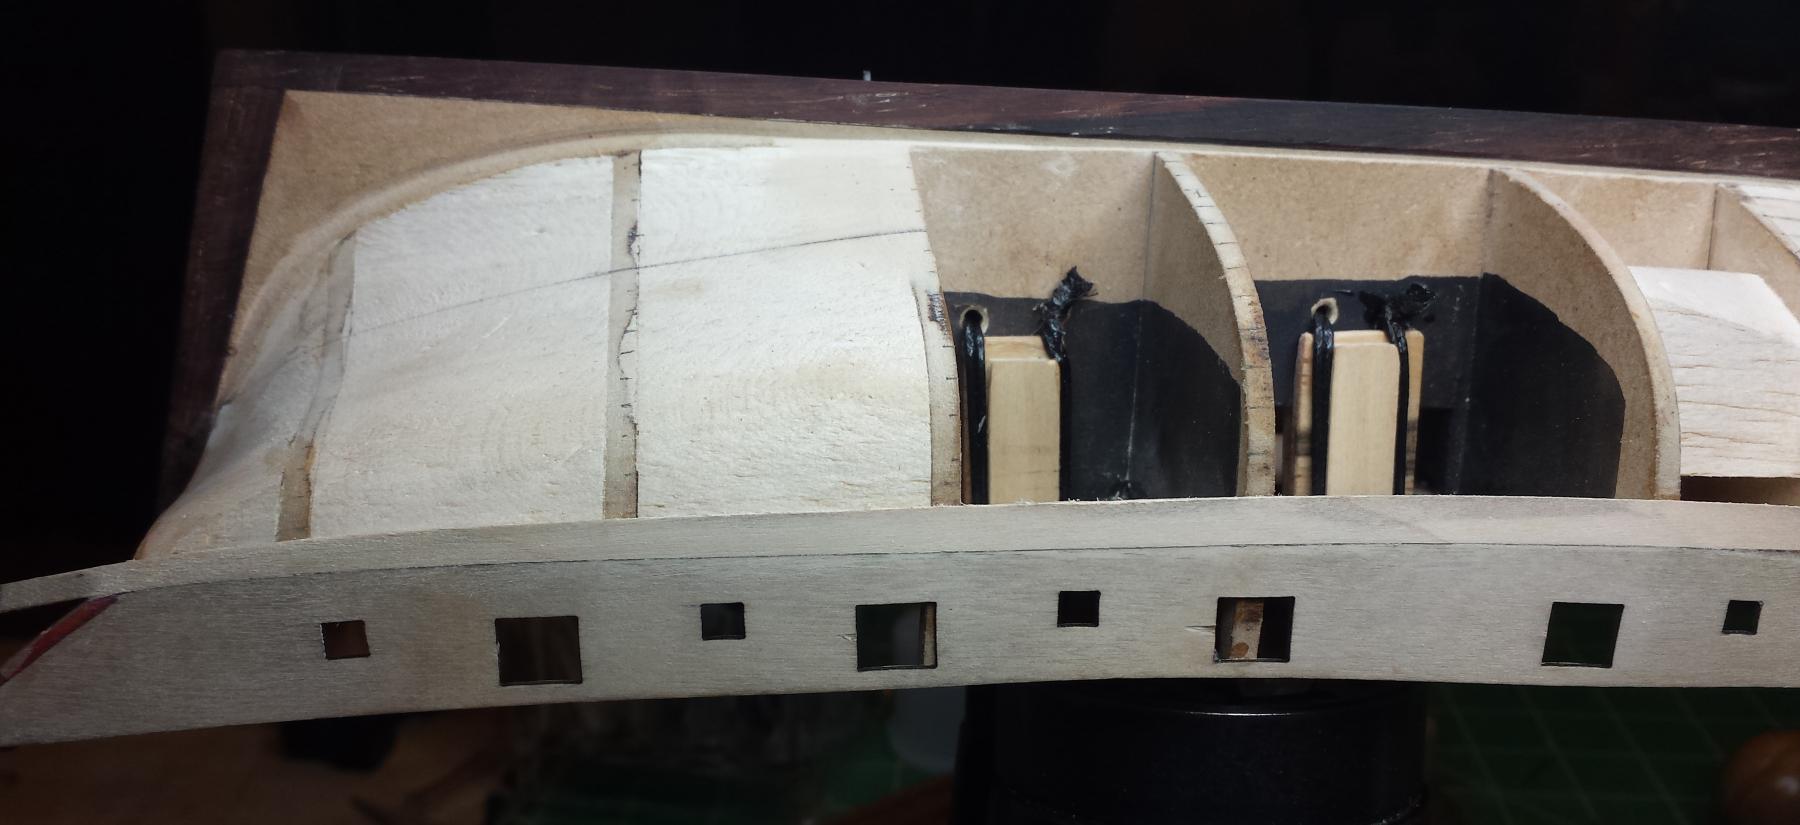
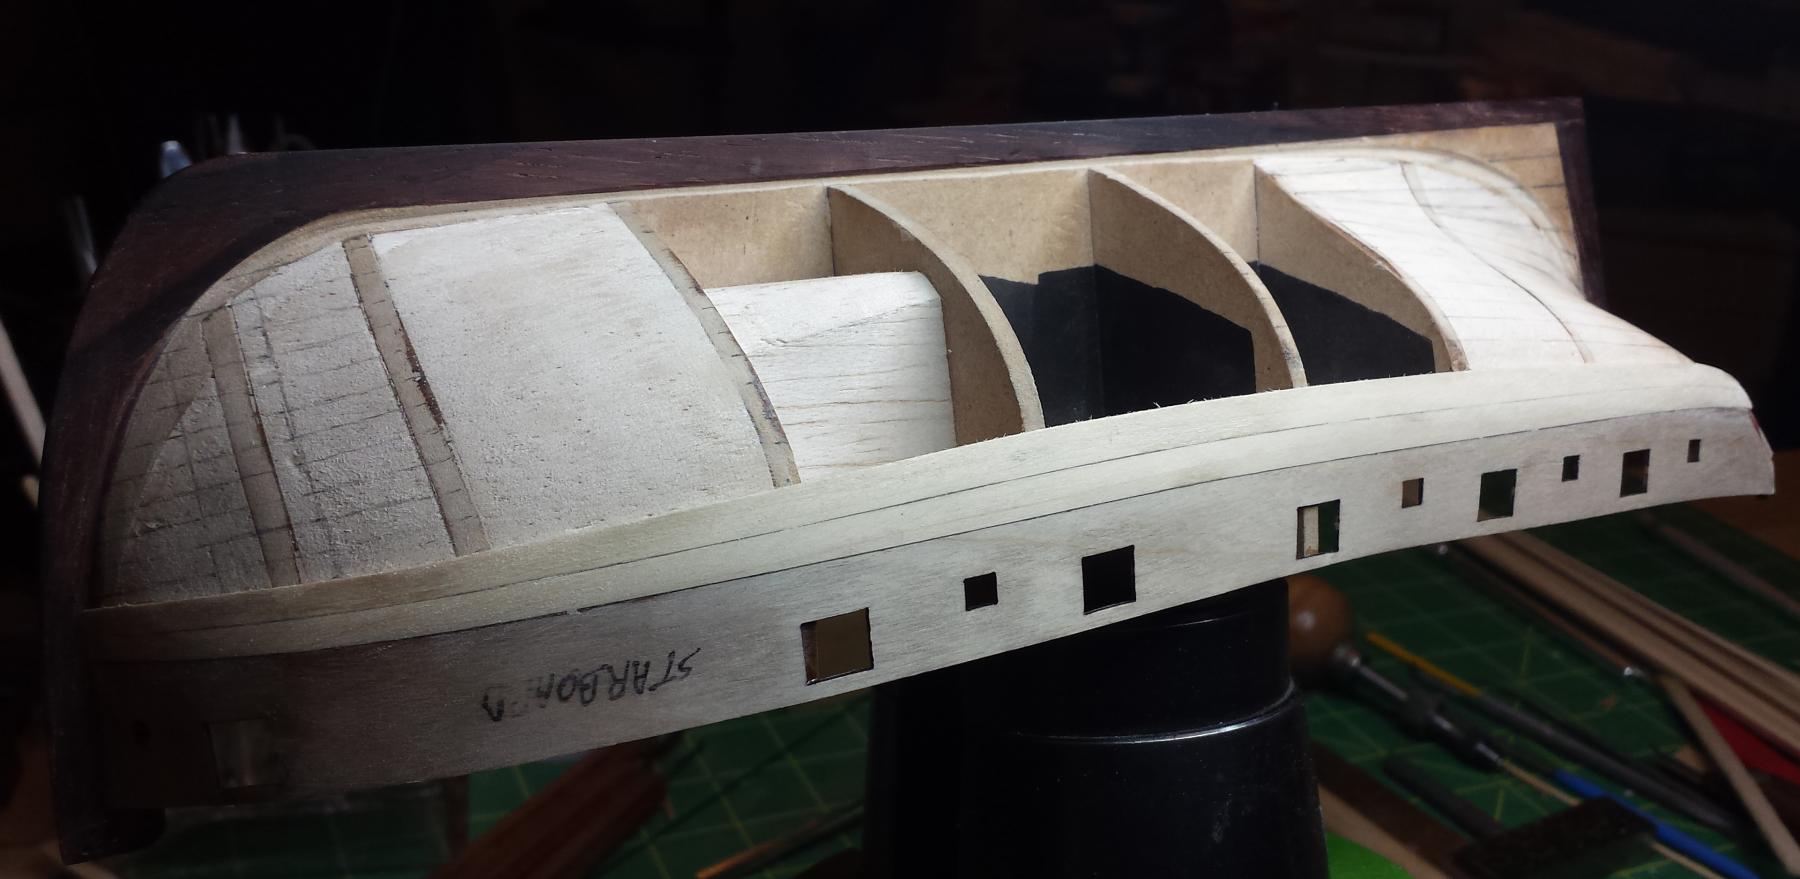
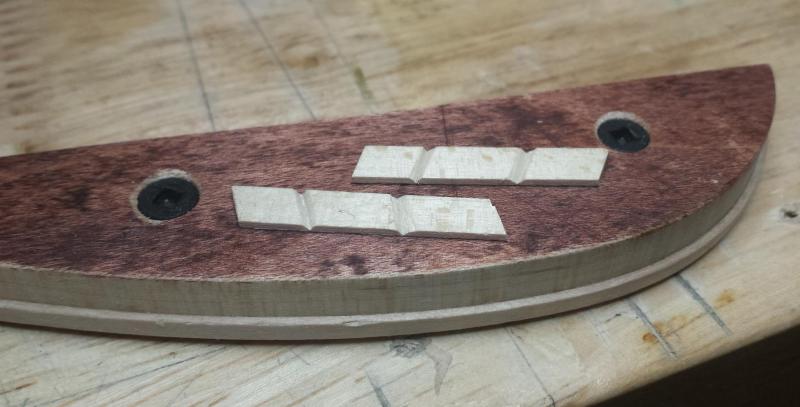
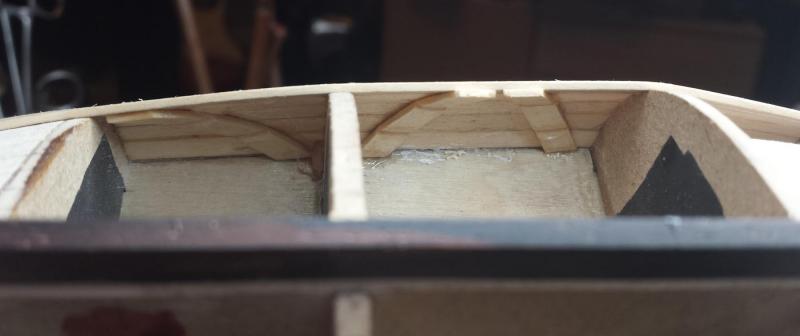
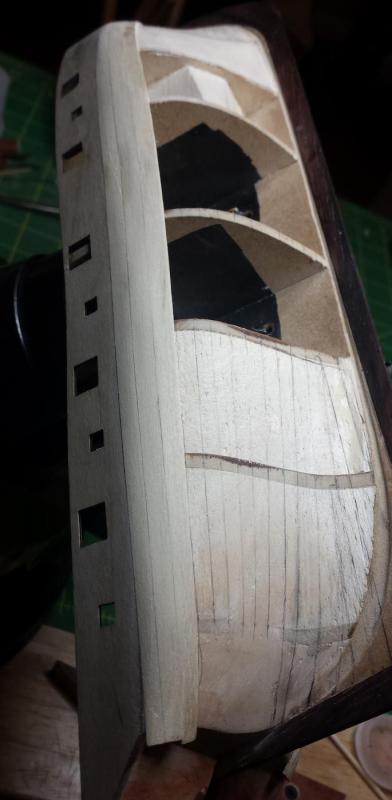
Another one for new folks, if you don't fill the bulkhead spaces in with blocks, the long midships first planking section in particular will flex, making it trickier than it should be to sand to the smooth curves you want for the second planking. Answer is Sepping's angled bracing for Lady Nelson: Take some scrap inner planking strips and cut one or two grooves into them like this. Put glue on the side without the grooves, position, then press down making them fold at the grooves so they follow the inner curve well enough for a good glue joint. Once that's done, fill the grooves with super glue and set with accelerator, end result is a strong and rigid support following the curve of the planking. And it makes those sections much more rigid so they won't flex during sanding. I did this after 6 planks, you could do it after 7 (halfway). I'm considering filling in the remaining areas to be planked with some basswood.
- 714 replies
-
- 5
-
-
- lady nelson
- victory models
- (and 1 more)
-
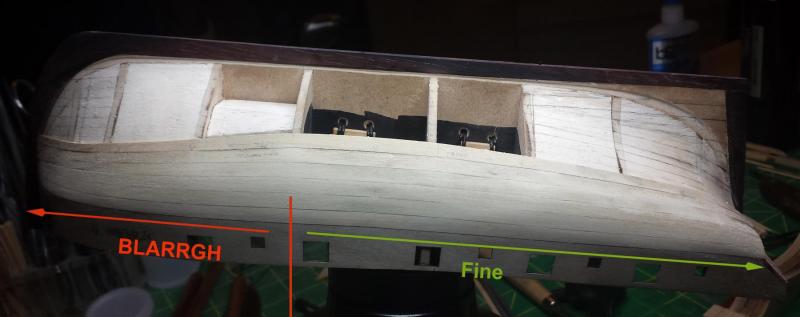
Popeye, you're correct I'm spending more time on this than is necessary, and for my second and third and fourth ship I won't be spending this time. But remember this is my first ship, and very shortly I will need to do the outer planking which does require as close to perfect joinery as I can do. I could just race through this section and then try to produce that high quality joinery, but that would seem to be wishful thinking. So instead I am trying to learn how to get the fit I want on the outer planks by practicing on the inner planking layer. Somewhere above I said it better by saying I now have 28 inner planks with which to learn quality planking before I have to do it for real. So this is a first-model workflow not to be repeated on later models. And it's working, I mentioned above each plank that's going on is fitting better with less effort, and I'm figuring out which steps are really important to get that fit and which aren't, and I'm running into the problems I would face on the outer planking beforehand so I hopefully don't face them at a time where it will be orders of magnitude more difficult to fix. And I have a new set of questions and another problem that I need to ask about, now that I'm halfway through the inner planking. First question has to do with beveling plank edges - I watched Chuck's videos and he seems to not do any beveling of the edges he's not gluing, and does all of the required beveling to make the next plank fit correctly on that next plank. I'm wondering if that is the standard method or whether people try to do it more as it was really done, with the edge of each plank being perpendicular to the tangent of the bulkhead/frame at that point, meaning that you split the required bevel between the two planks so each gets some instead of Chuck's method where only one is beveled and that bevel needs to be more extreme. The former method makes more sense to me but requires a beveling step on all edges instead of just half of them. And now the next problem - When it came to the required bow and stern taper, after laying it out it looked very close to a straight shot in both cases, so I've been tapering from the last full-sized midship bulkhead in each direction down to the correct bow and stern plank sizes (midships is 3/16", bow is .108" and stern .140" for the first 10 planks). However I now think that was wrong and the taper on the bow needed to be done in steps, or most accurately it should be a slight curve from midships to final bow width. At least that's my explanation for what I'm seeing now, which is that the midships and bow dimensions are right but the interim widths are slightly too narrow, And was we've added up those small width misses we now have a significant one. Since this is inner planking I can use whatever means I want to fix that in this case, the concern is how to avoid it with the final planking. So am I correct here in what is happening? And if so, what's the best way to do a curving taper like that?
- 714 replies
-
- 5
-
-
- lady nelson
- victory models
- (and 1 more)
-
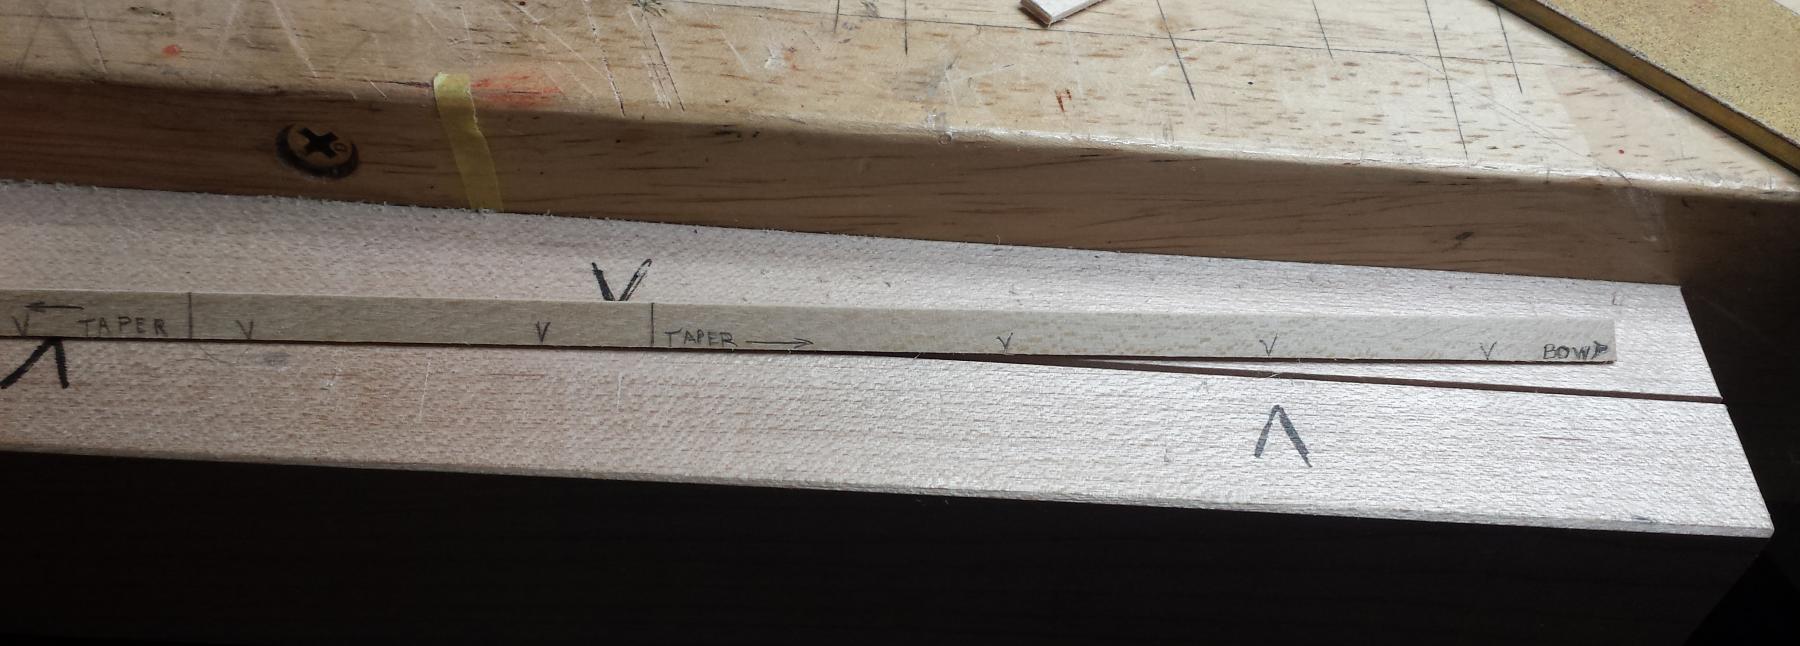
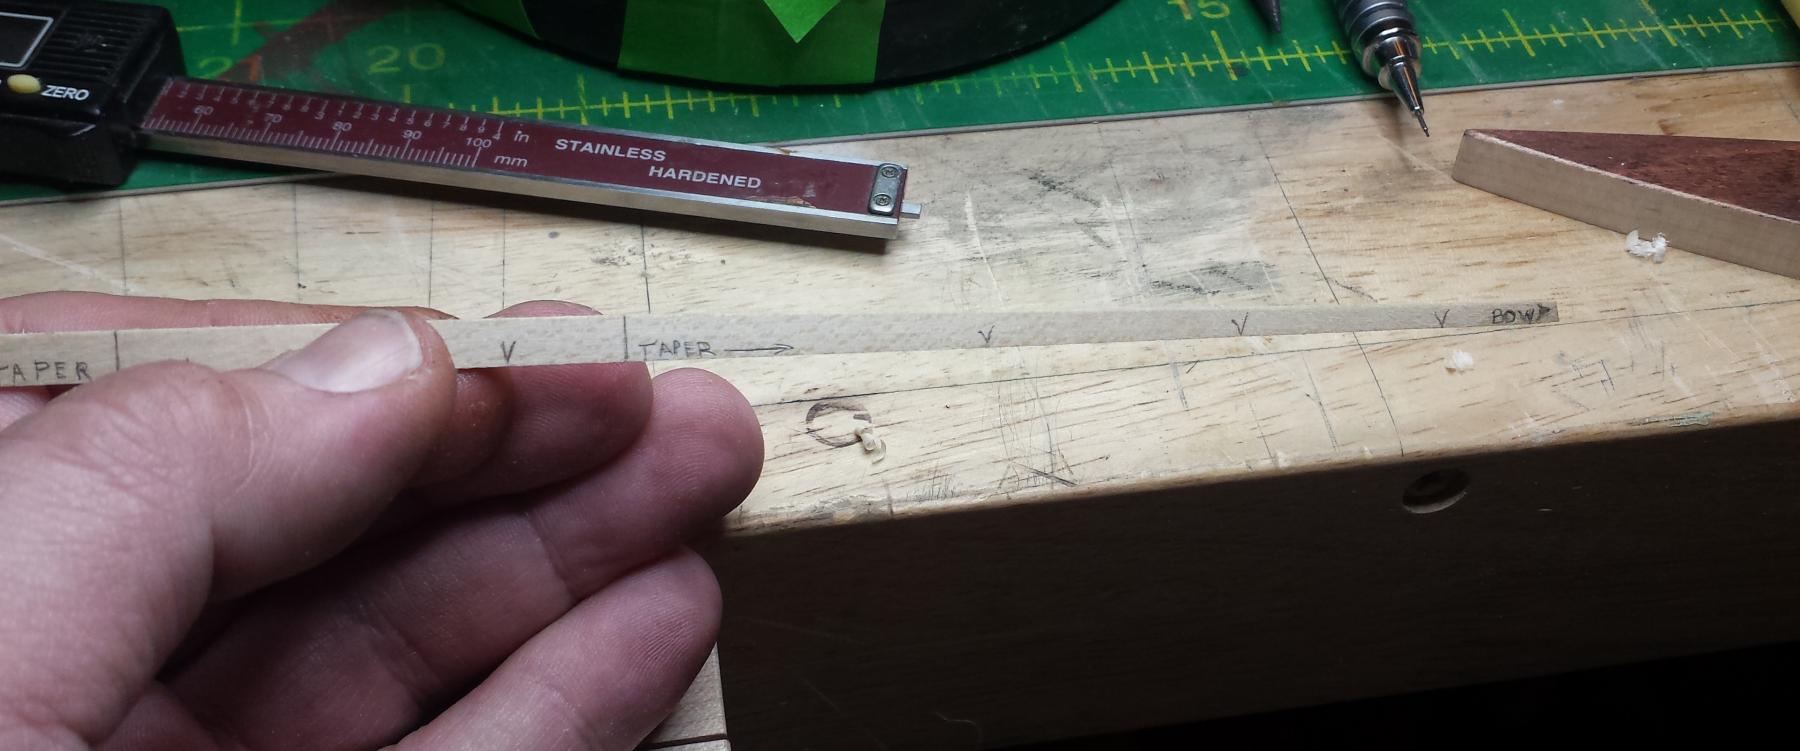
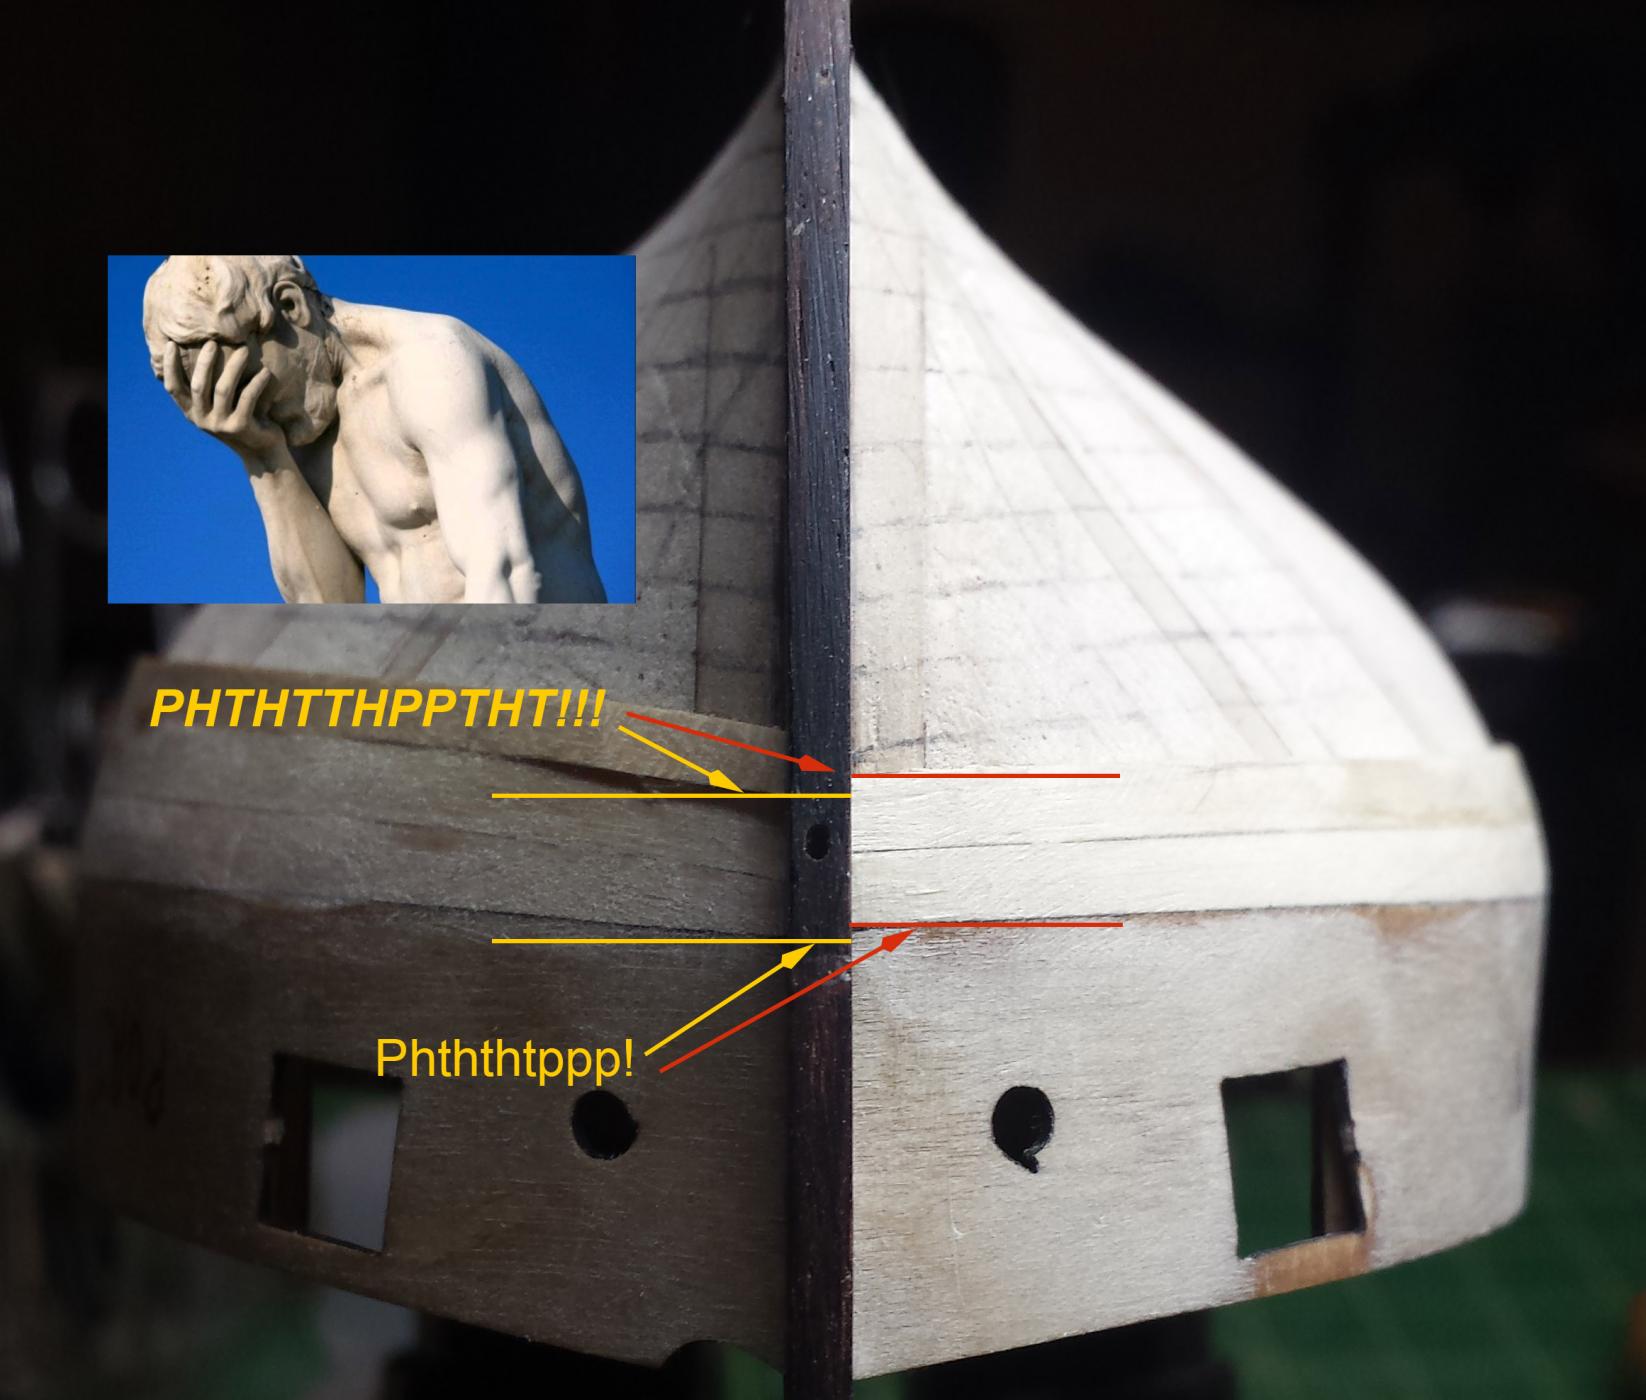
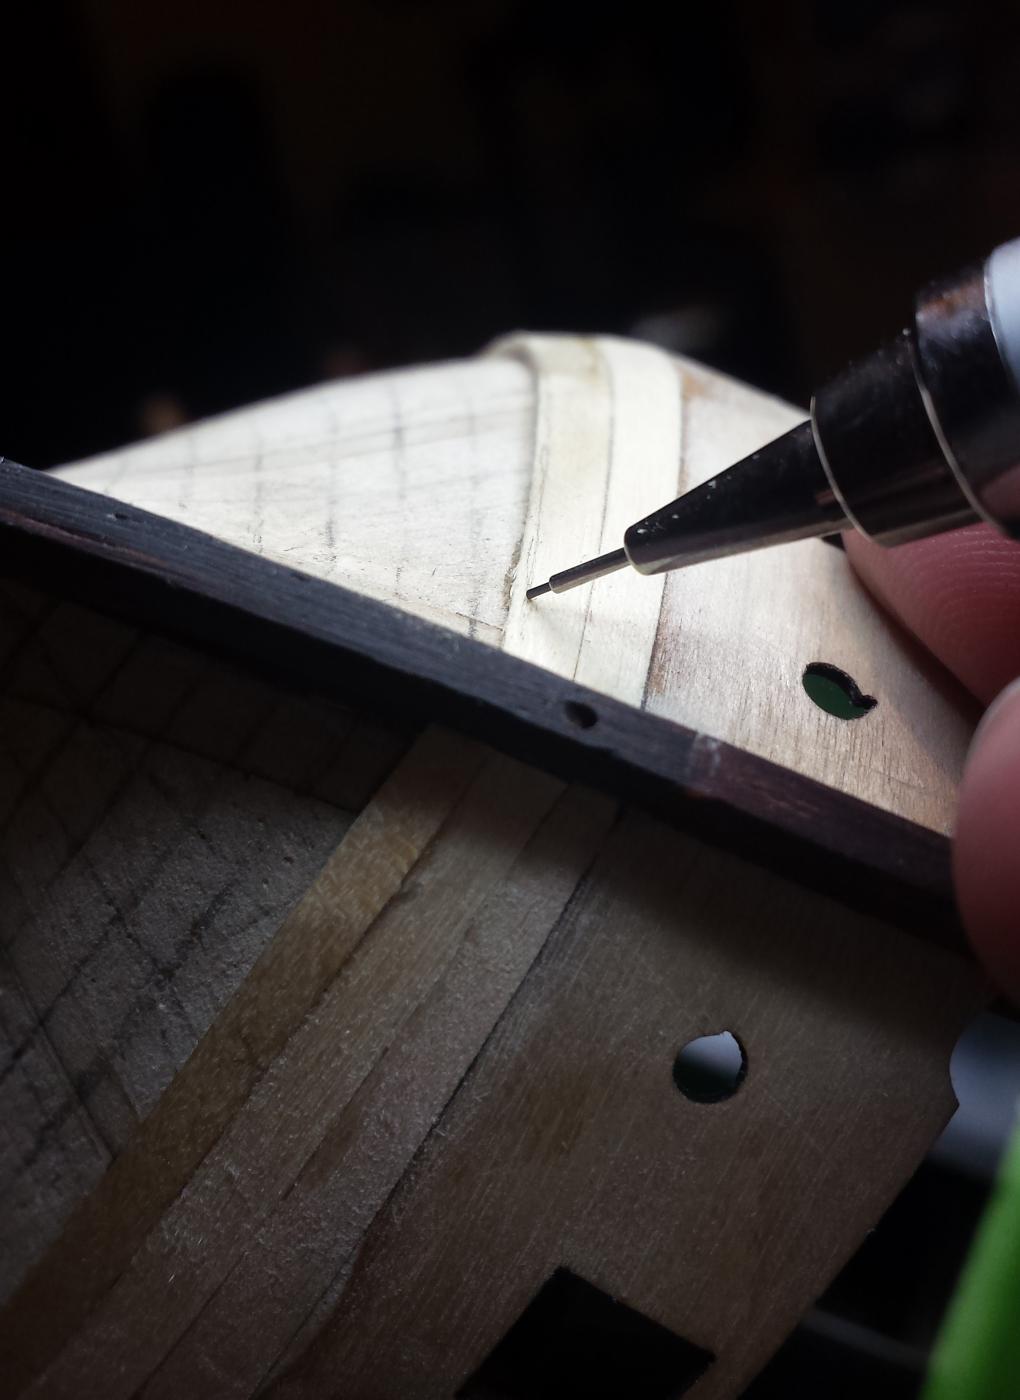
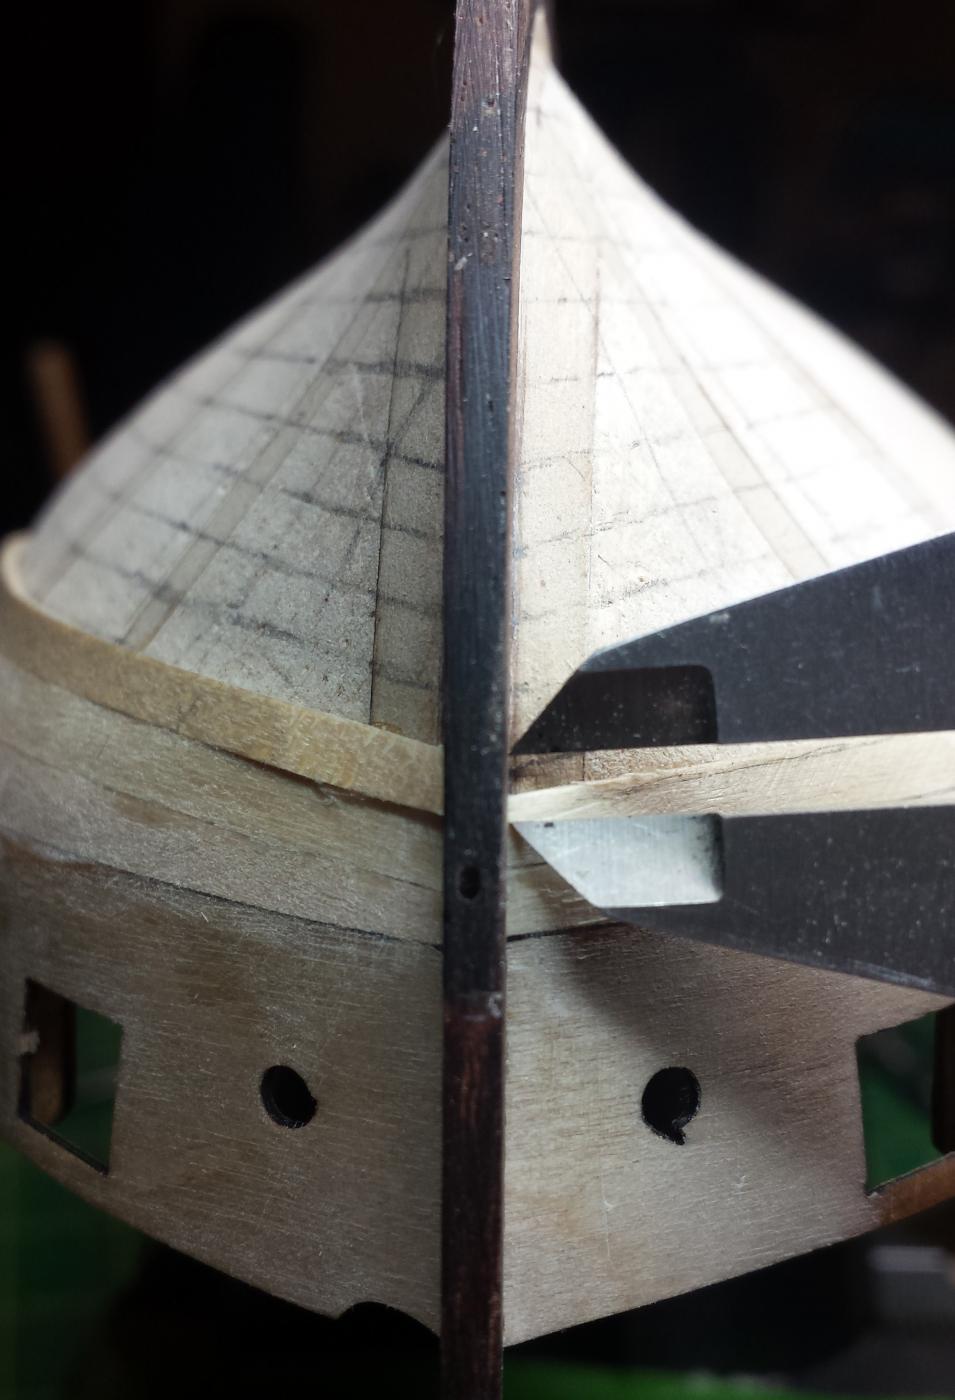
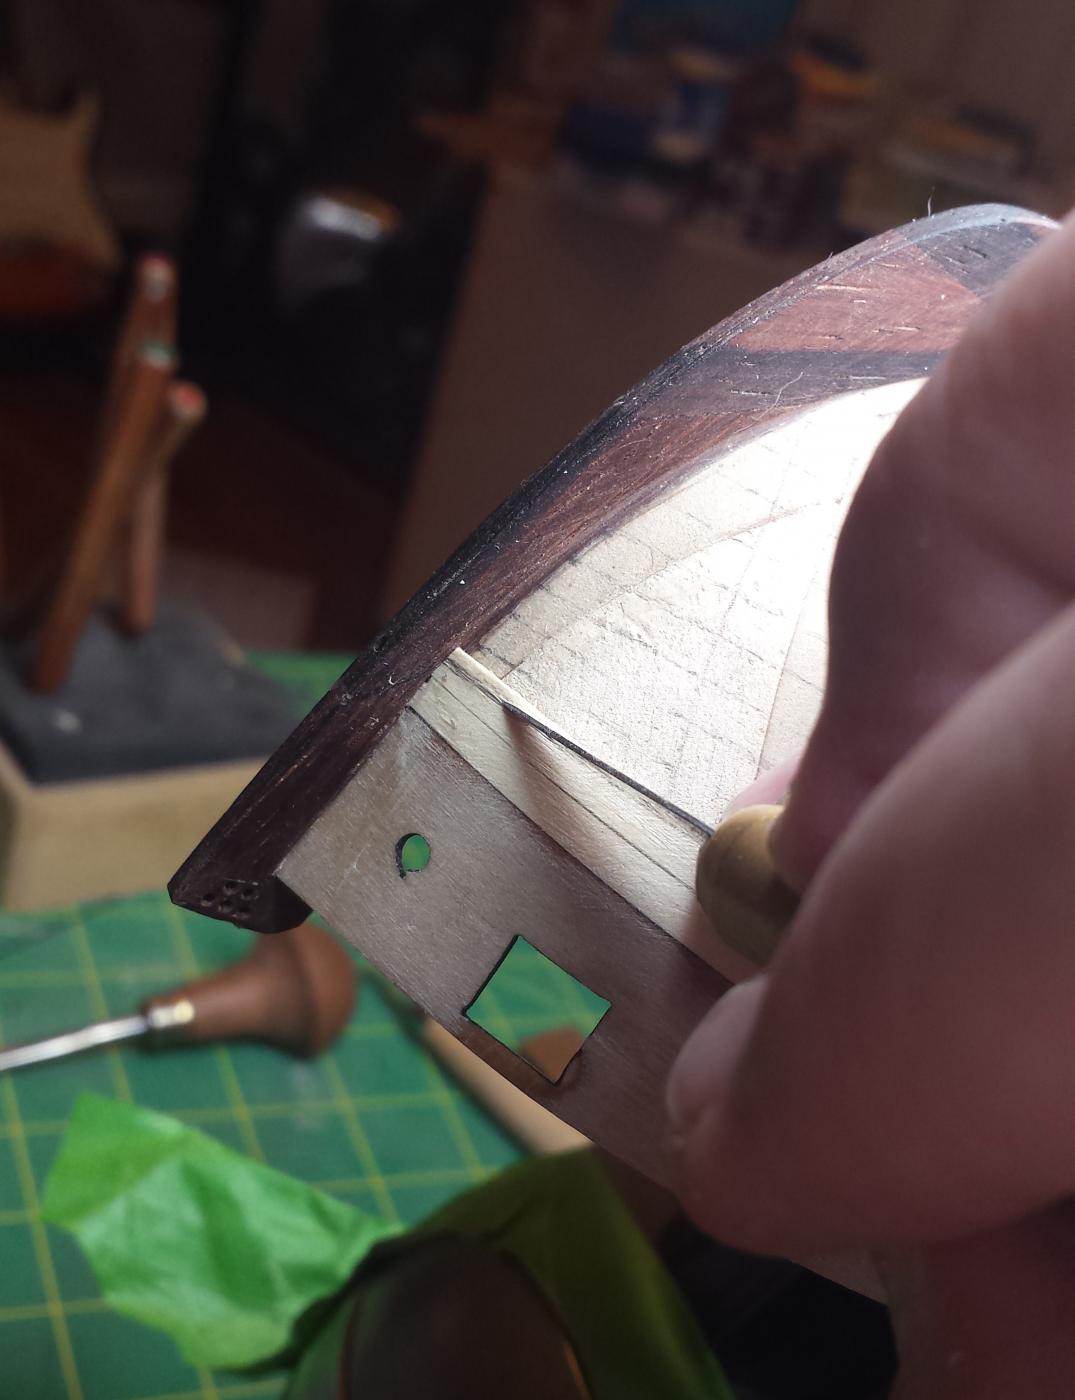
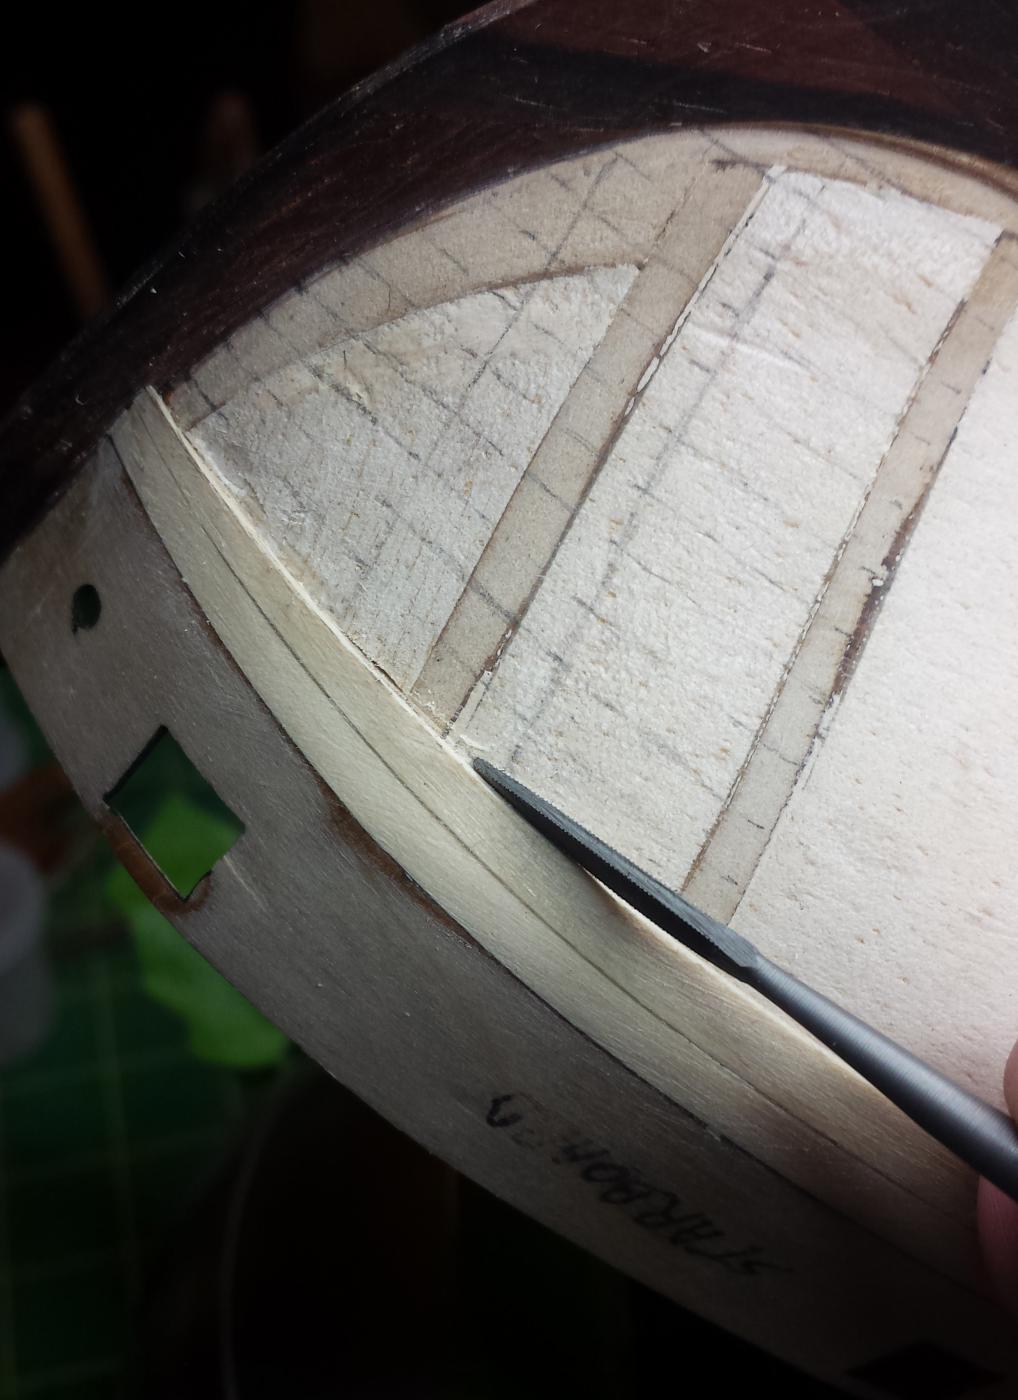
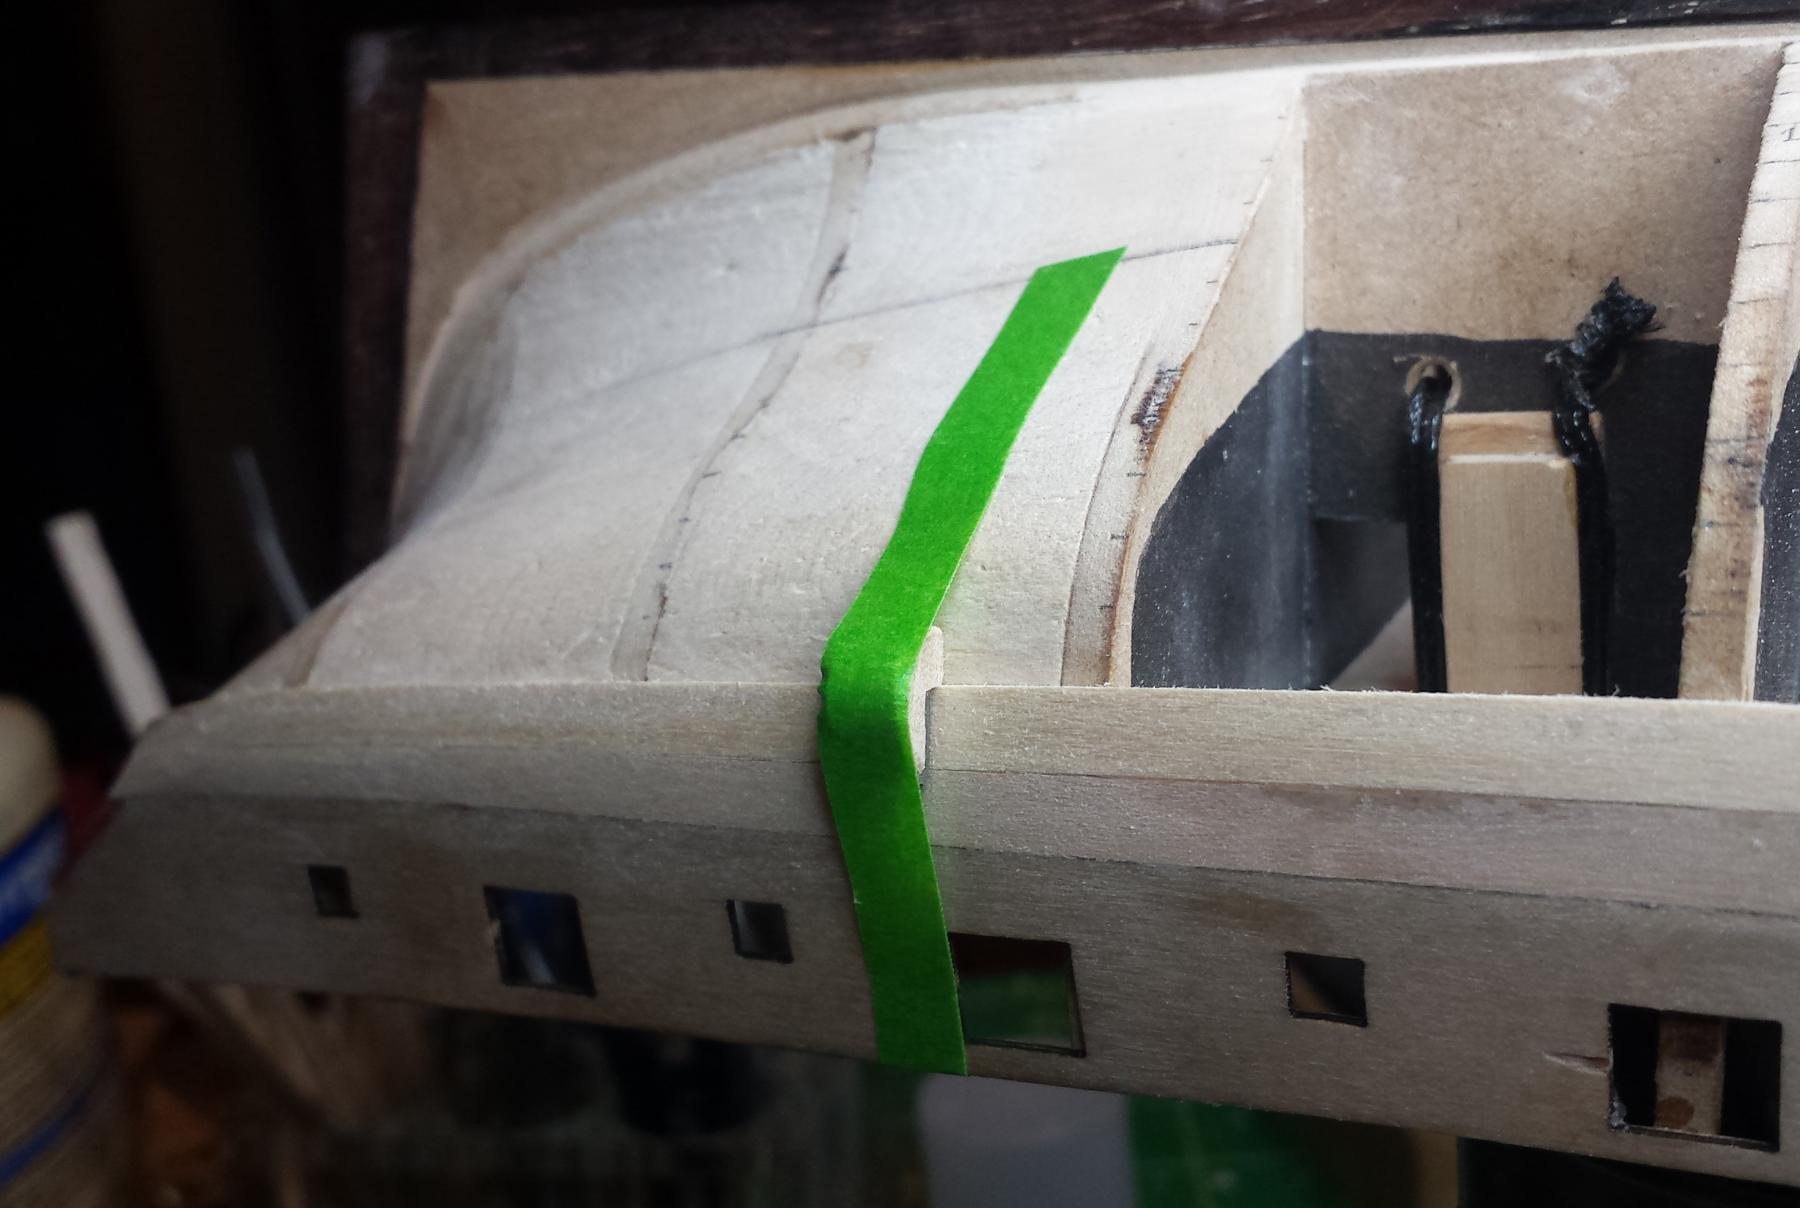
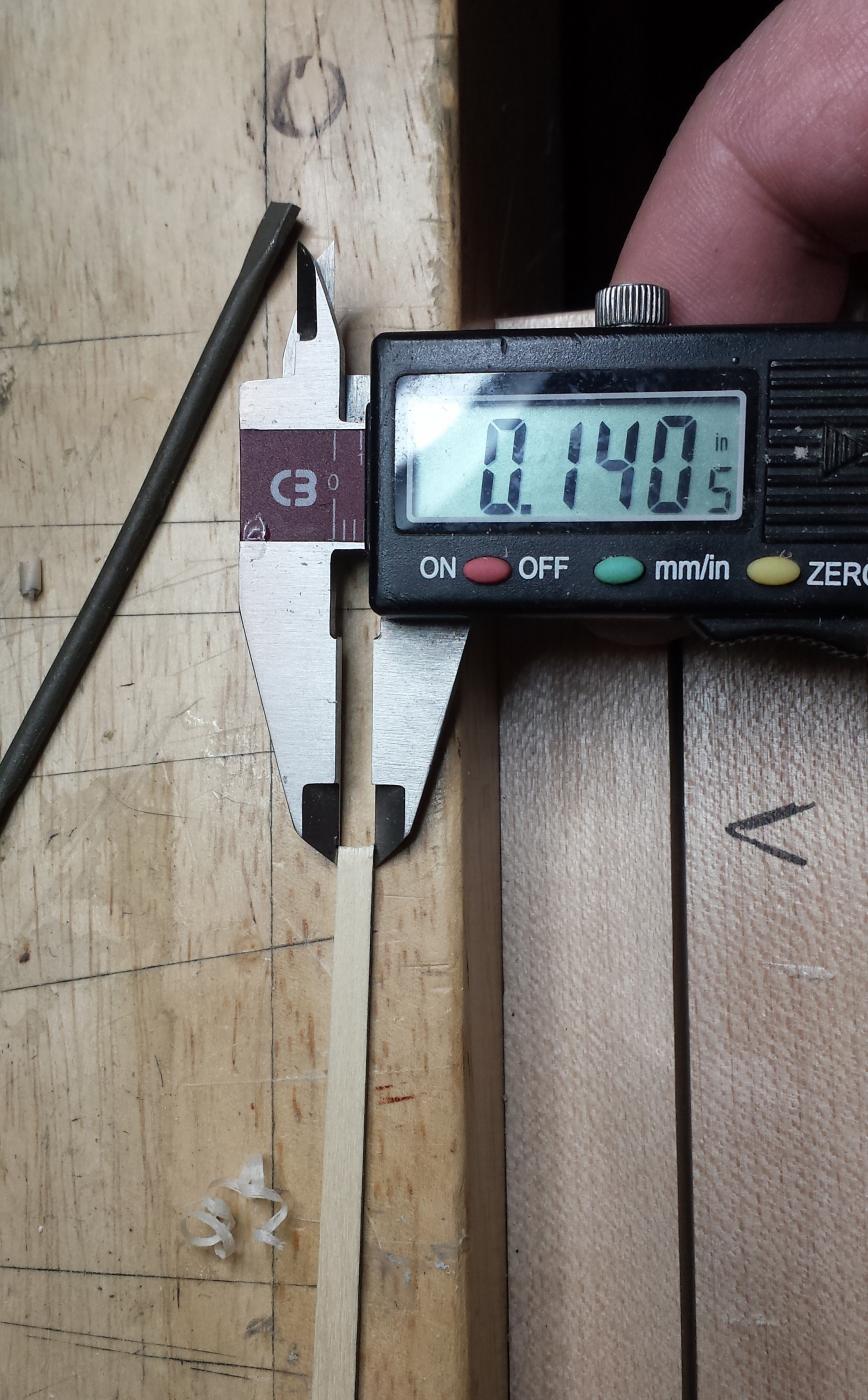
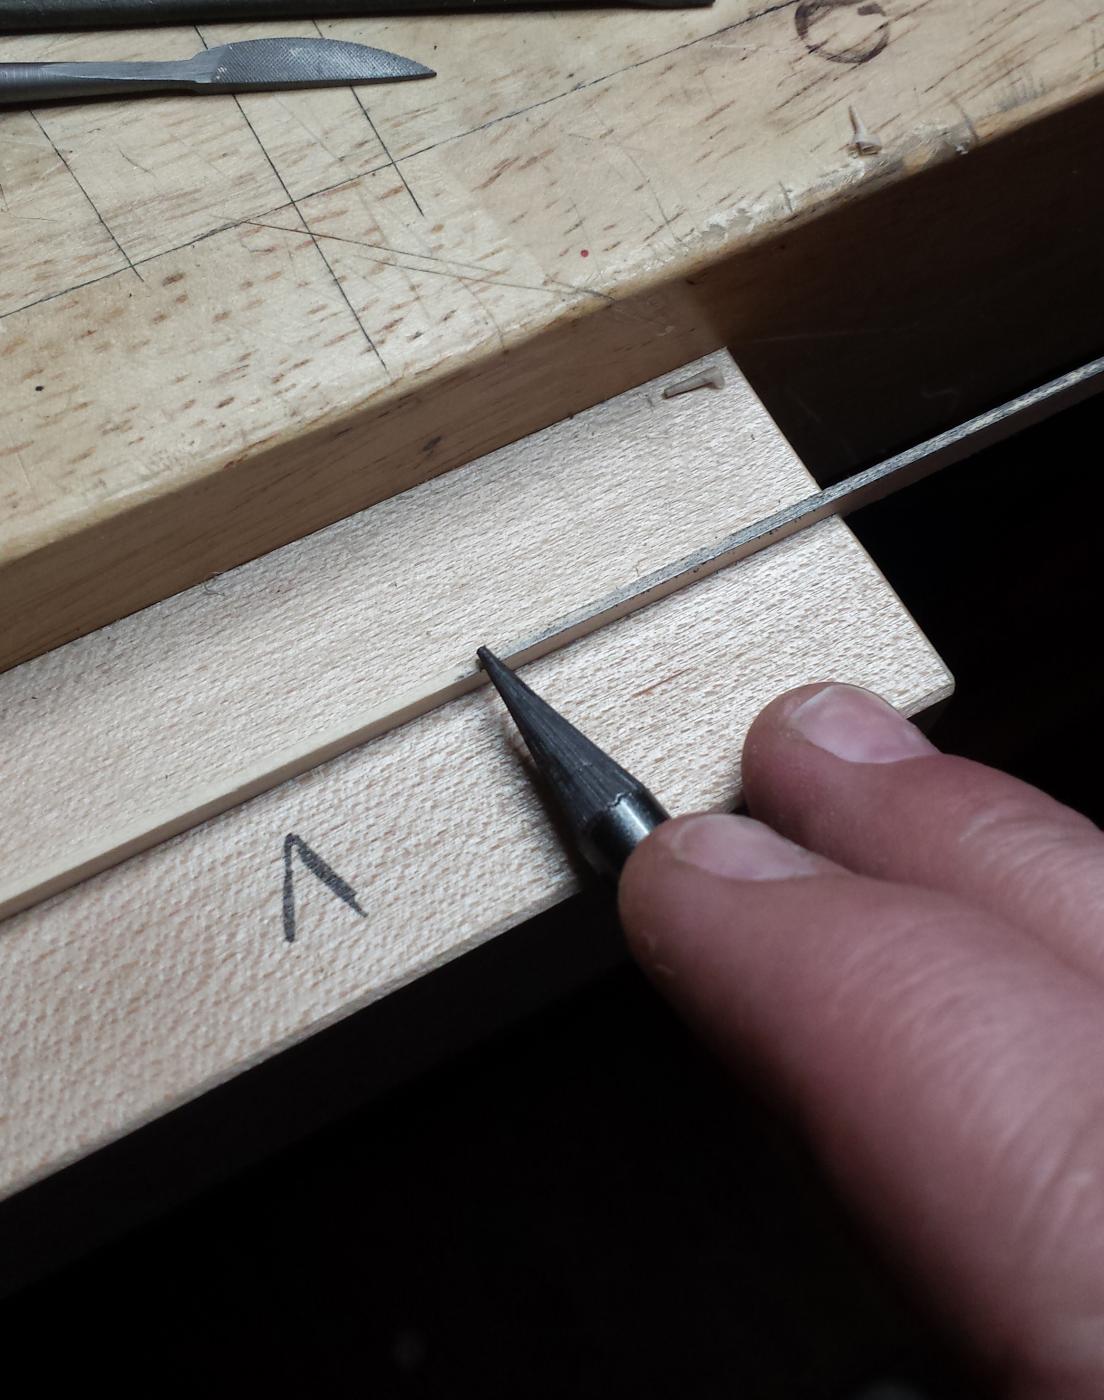
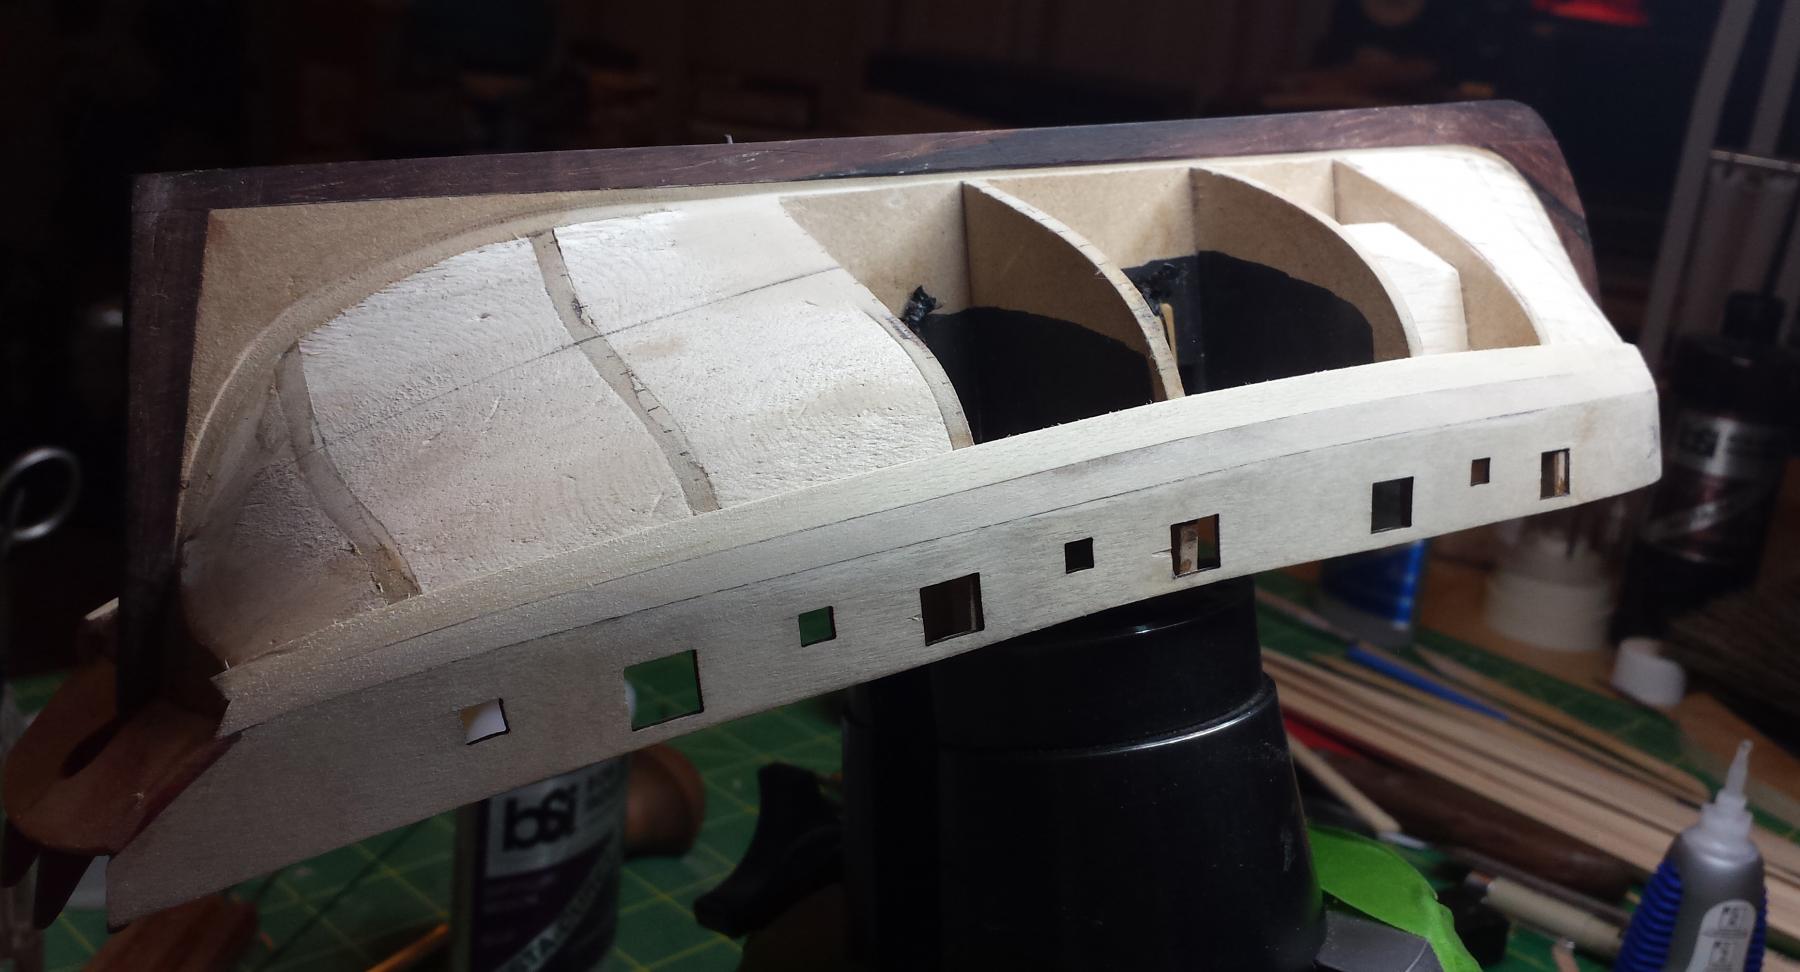
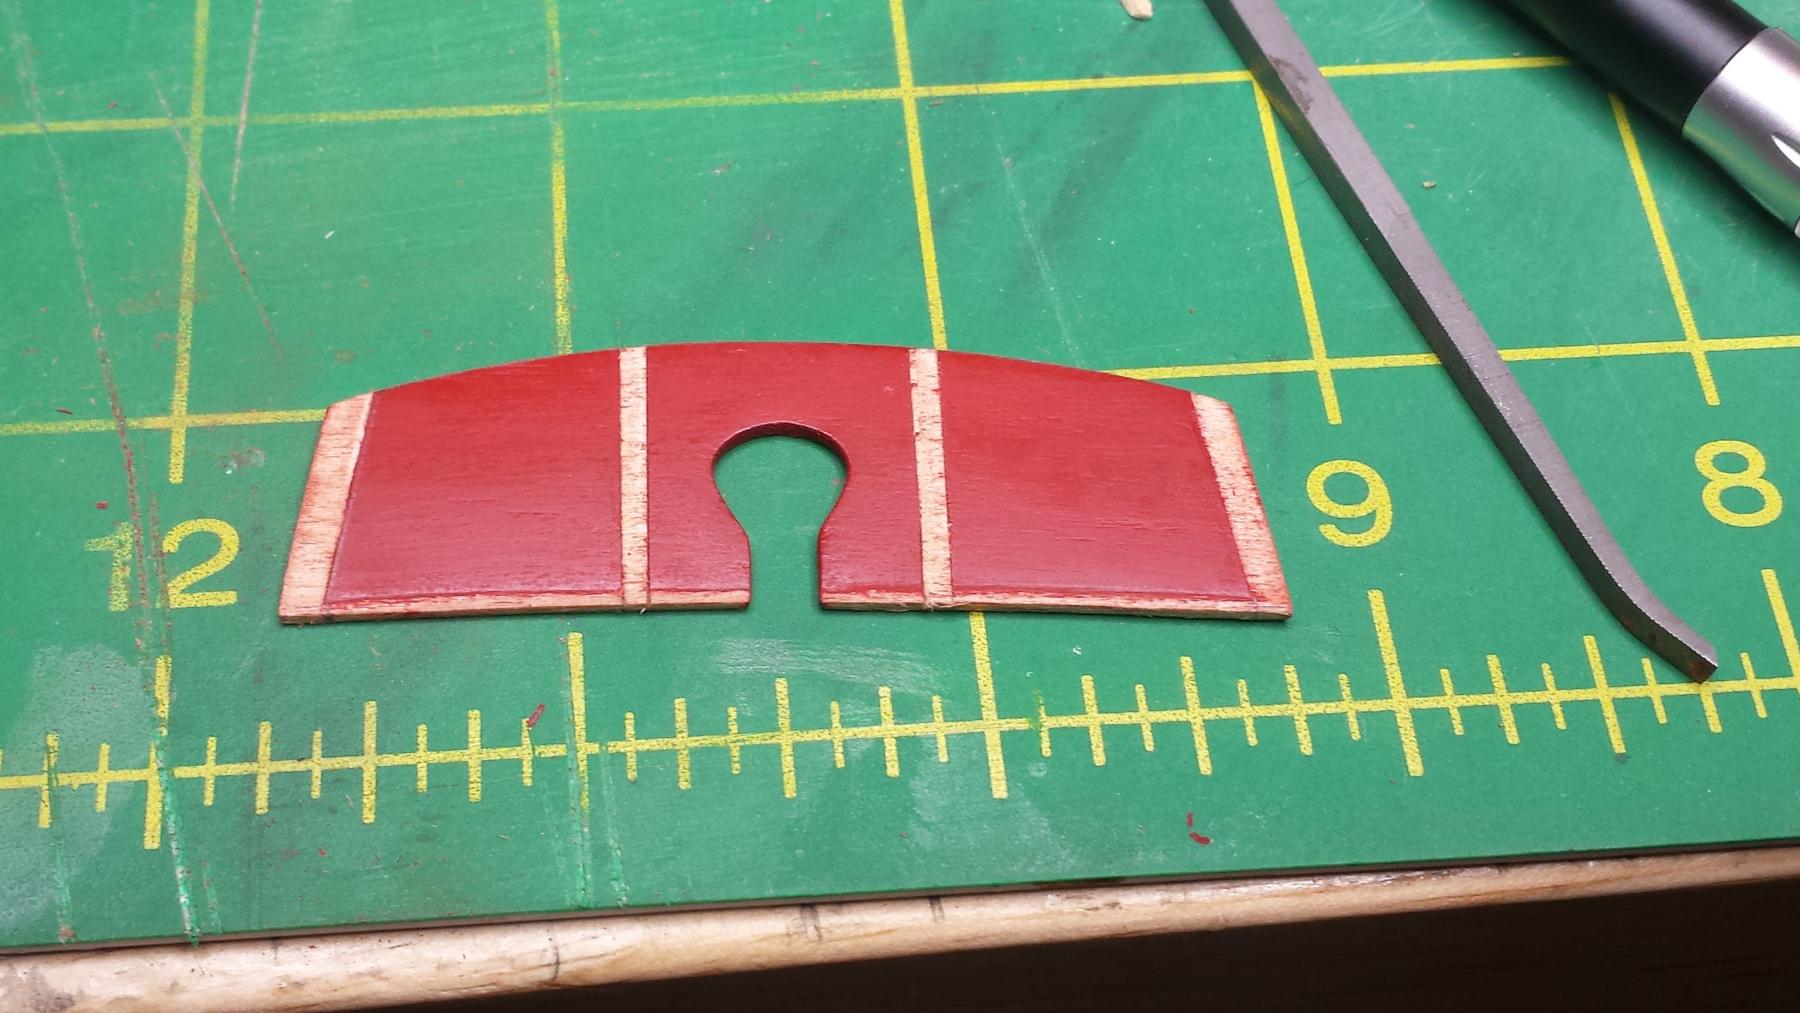
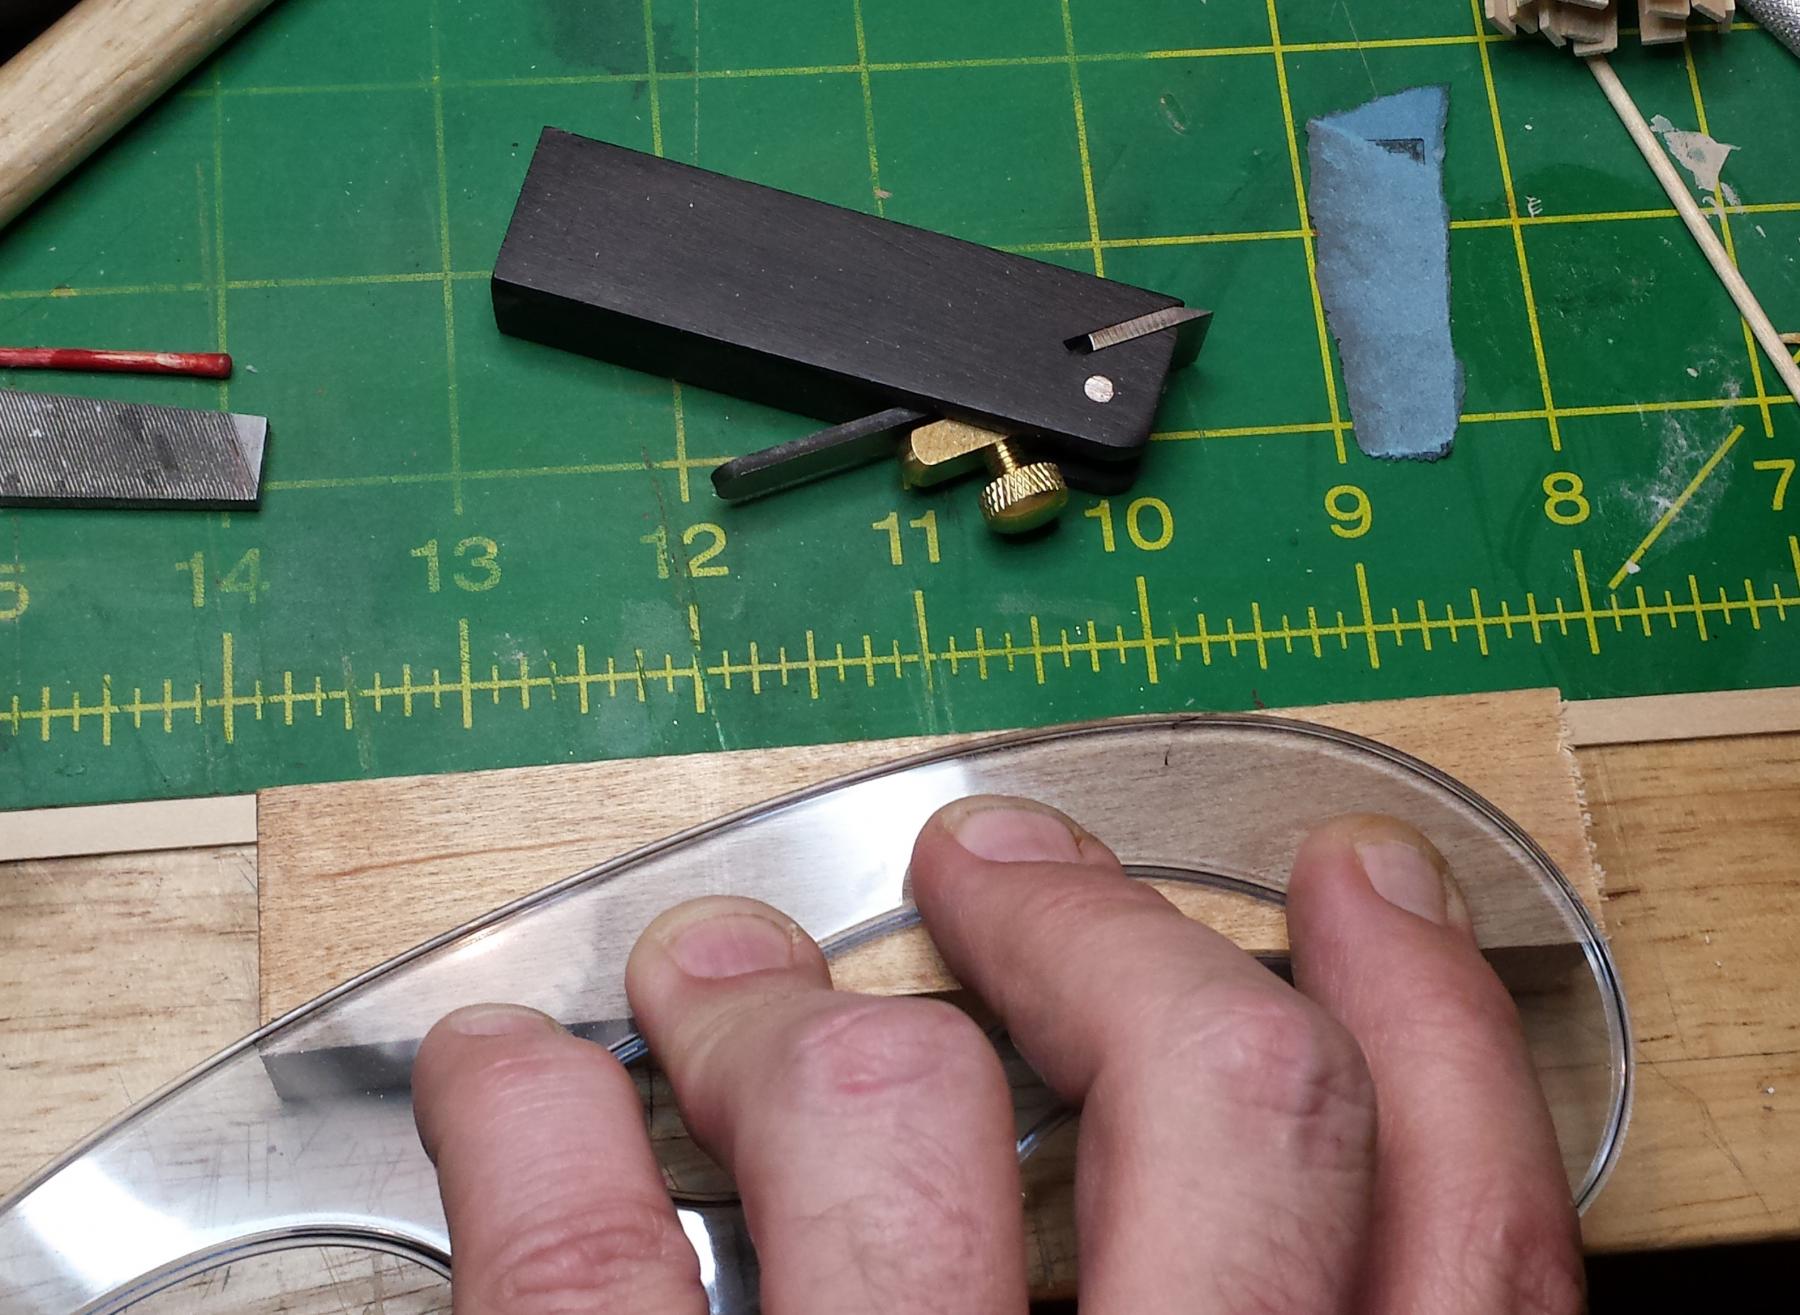
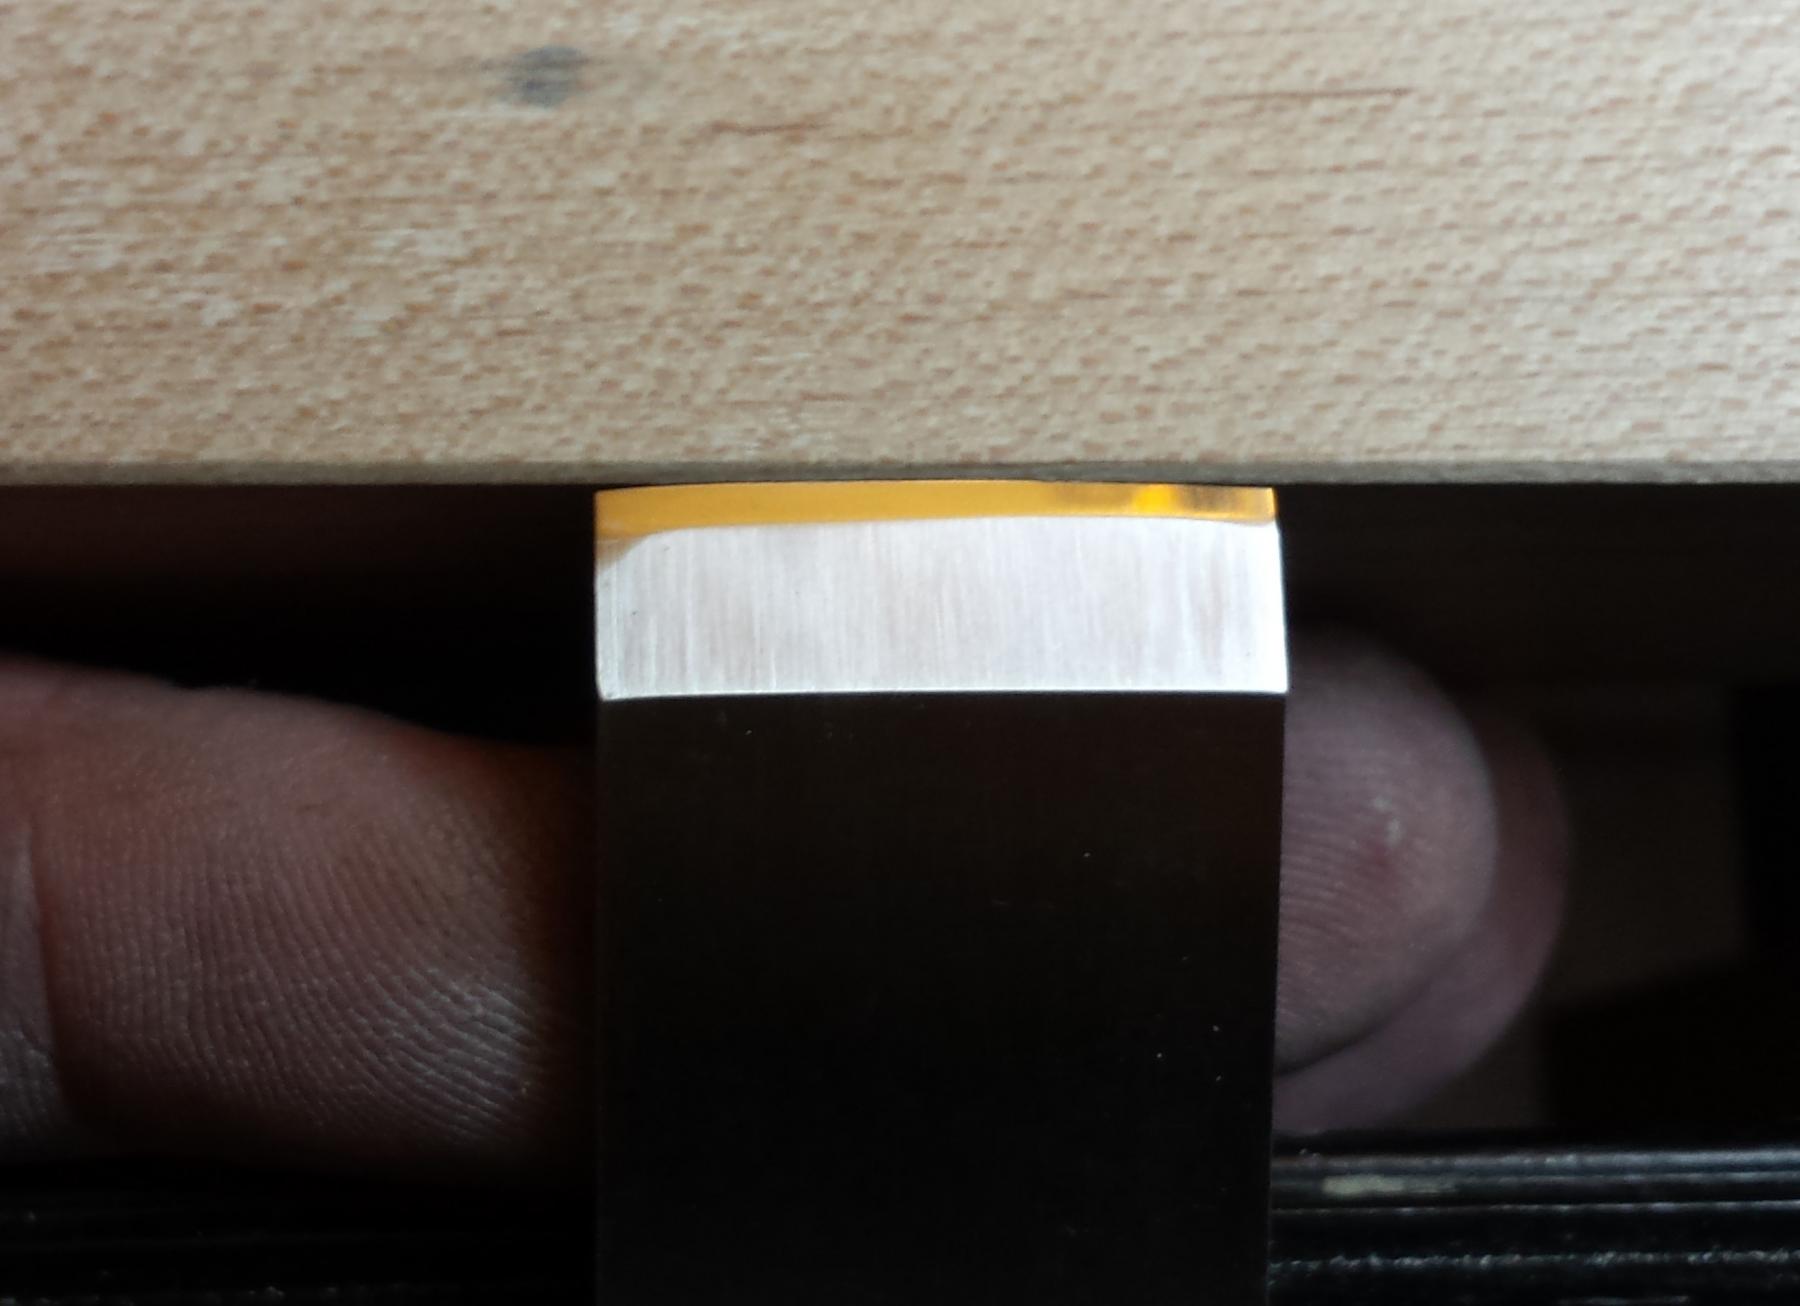
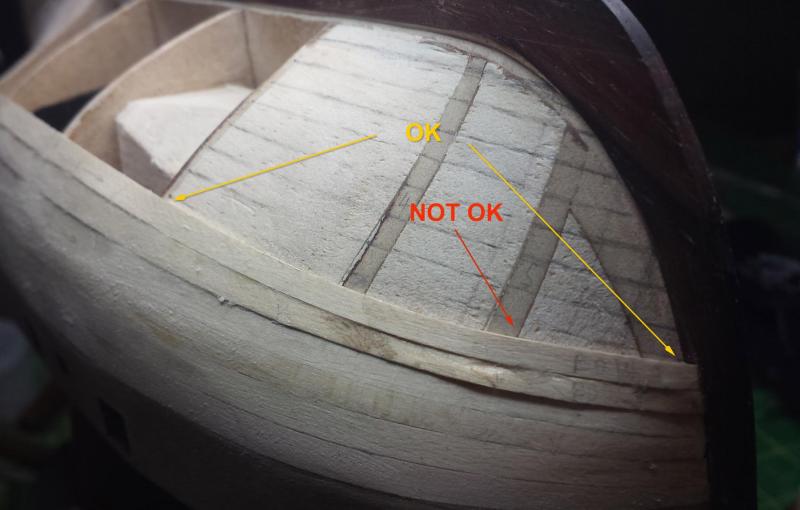
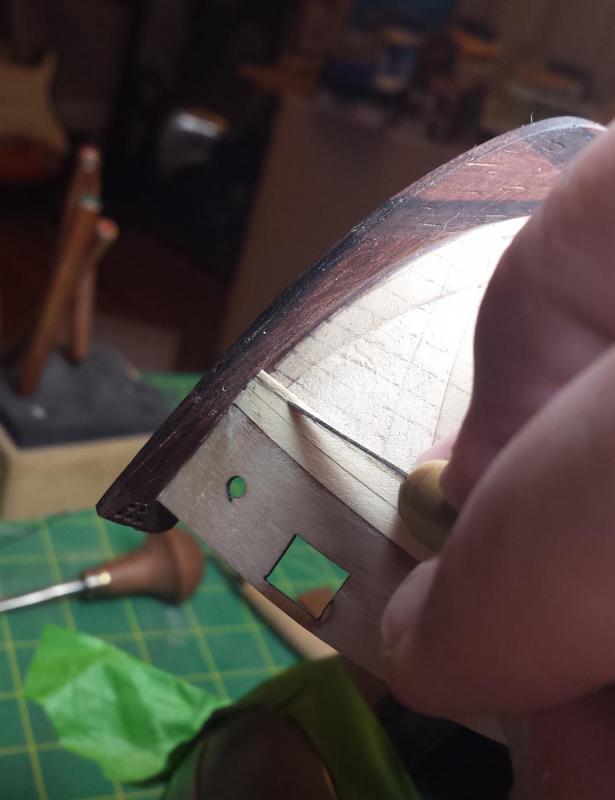
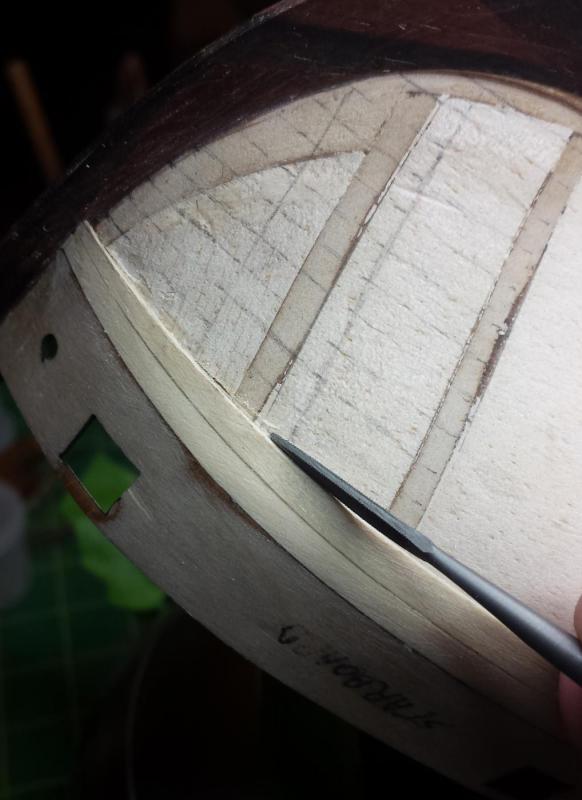
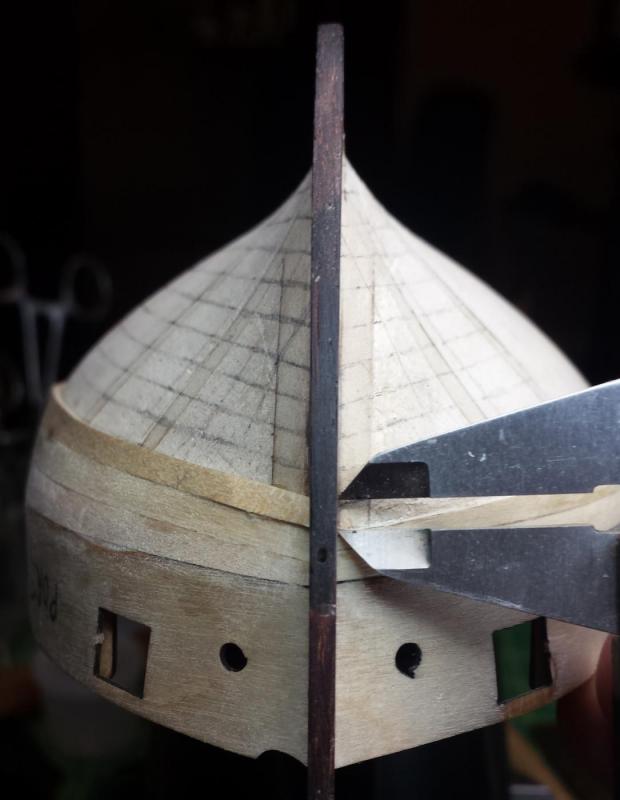
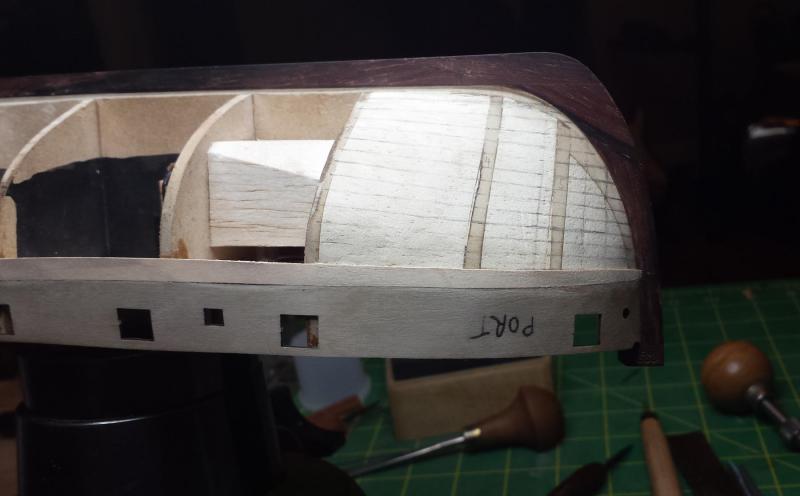
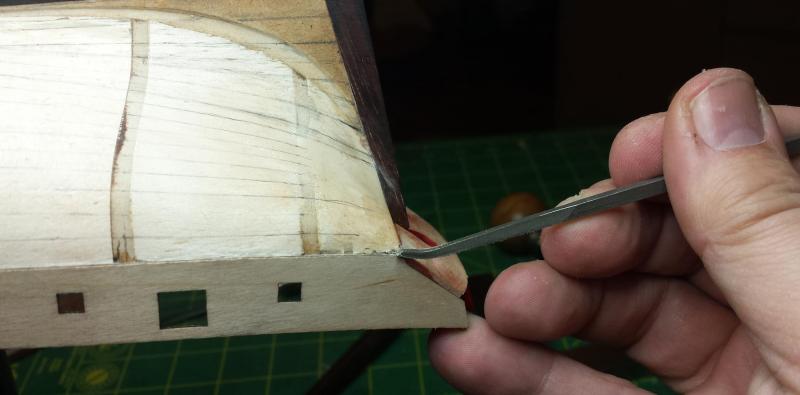
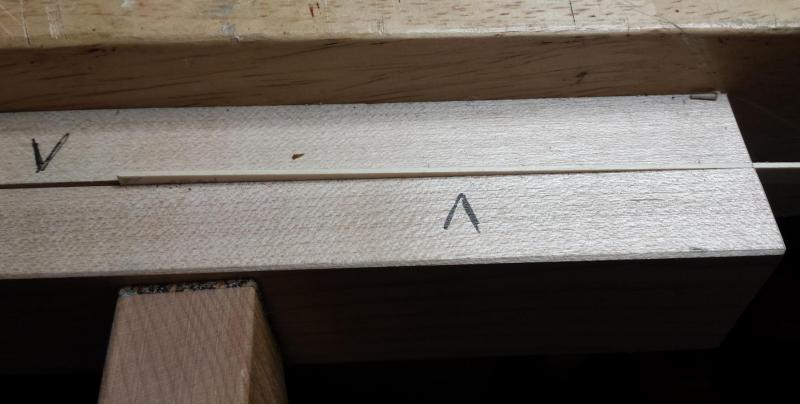
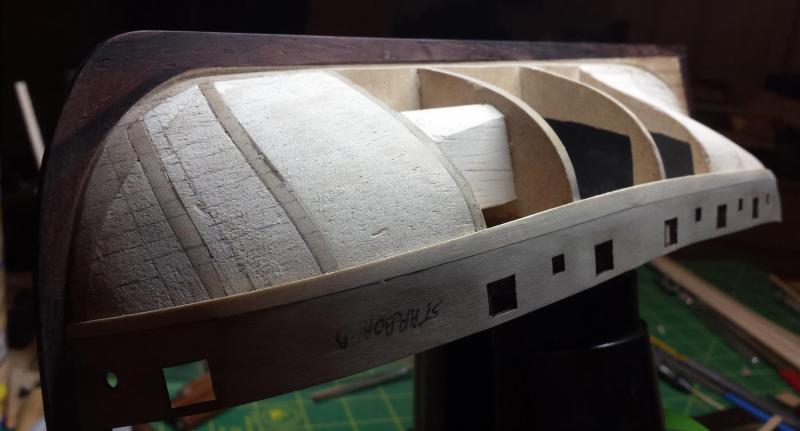
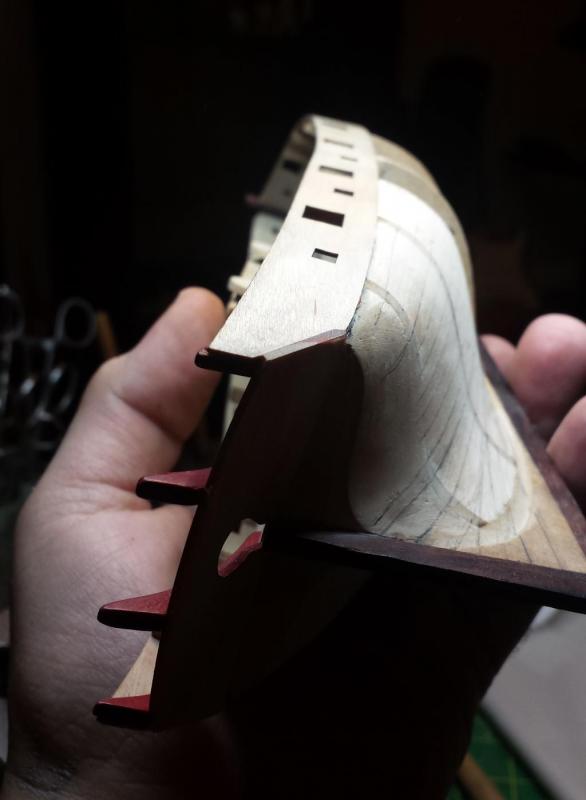
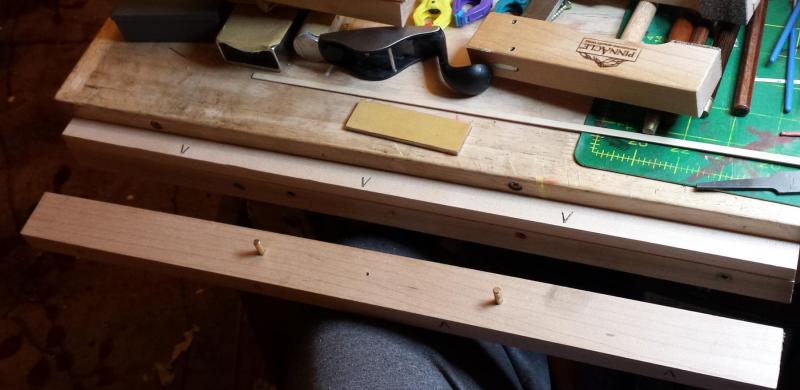
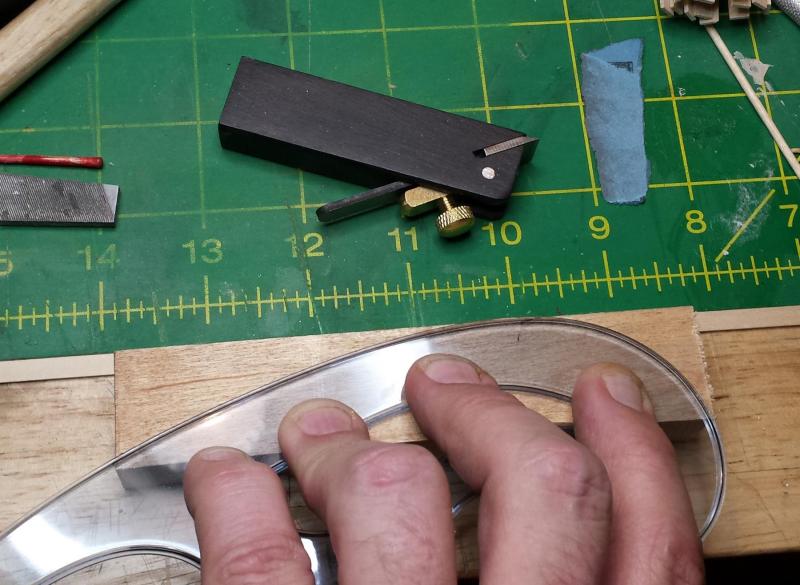
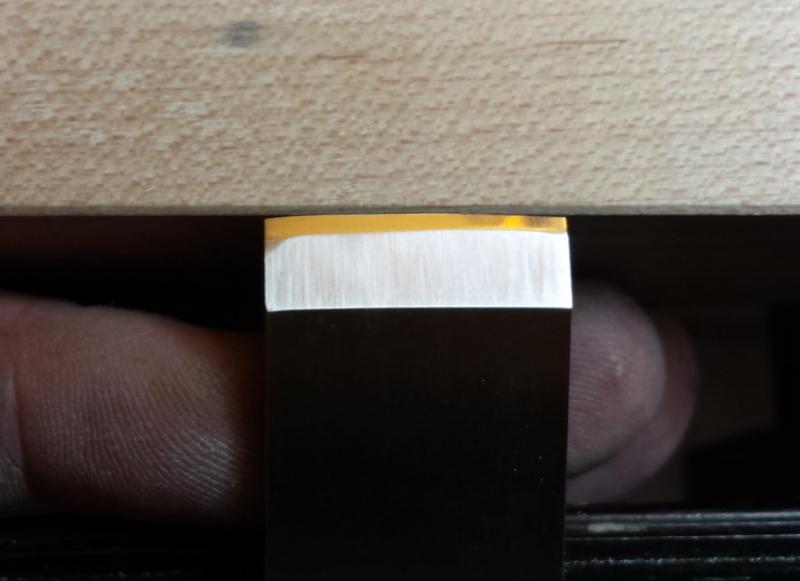
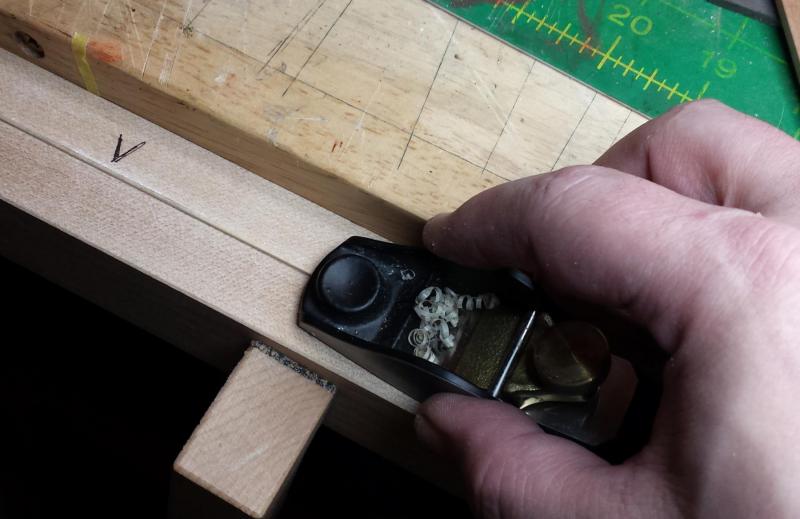
Going to show a few more pics below of a problem I had to fix last night, another example of something I missed due to my noobishness and simply not knowing where all the minefields are. Also, don't think I am imagining that anyone commenting on this thread is learning anything from what I'm doing, I'm showing what I'm doing so 1) you folks can say OMG DONT DO THAT if you see me heading down a bad path, plus 2) Rick has saddled me with the responsibility of creating the greatest build log/practicum ever for new people building LN, one so perfect that 100 years from now modelers will still be saying "man, THAT was a good practicum," earning themselves odd looks from the floating cyborg barista at their local Starbucks zero-G bar. First a couple pics for new people showing how I'm marking my planks, showing bow and stern ends, which side is the current glue line, and where the tapers begin. In my shooting board we line the start of taper mark on the top edge of the plank flush with the shooting board surface, and the other end is positioned so we remove everything down to the taper mark. Before and after bow taper. And I'm using this Modified Passaro Bender for the vertical bends, wet plank, bend it more than is needed, clamp in place, hit it with heat (hair dryer or plank bender) and then let it cool. So, with each plank I'm figuring out the geometry of the joining surfaces better, and each glue line is better than the last. And there I was feeling all fat and happy about that and congratulating myself when start dry-fitting the third plank on the port side. The bulkhead strips were registered on their top edges in the stem slot, I never considered the possibility they'd have different heights. And of course they did. And it looks like the first couple planks just exacerbated it. If this were the second planking, I'd probably tear off the port planks and start over. And if I decided I couldn't do that, I'd be doing calculations to split the amount to be removed off the remaining planks to minimize the noticeability of the fix. However, since this is the first planking I'm going to take it all out in one shot. Caliper set to .108", the height of the bow end of the planks. We can see how much we have to take off that plank on the right Mark the removal line. Start removal with xacto. Then riffler files to straighten and bevel correctly for new glue joint. Check, looks like that's correct. For inexplicable reasons didn't take a photo of the fix spot after putting on the third plank, I'll post one later But we do see that the glue lines are getting better with each one, Unless something else interesting happens, otherwise I'm going to be head down finishing the first planking run, will post more pics when we get there


- 714 replies
-
- 8
-
-
- lady nelson
- victory models
- (and 1 more)
-
Thanks Grant. Yes, sandpaper will work also but it's also more likely to slip and leave cross-grain scratches; I picked the rough-cut file as it should bite just a little with lines going with the grain. But if you don't want to kill innocent riffler files, sandpaper is the best choice. That said, please note the file I used was a hobby store $1 file, not one of my $10 G/V rifflers.
- 714 replies
-
- 4
-
-
- lady nelson
- victory models
- (and 1 more)
-
Nice progress Popeye, and I agree with philo426 that the deck camber looks perfect.
- 453 replies
-
- 6
-
-
- thermopylae
- sergal
- (and 1 more)
-
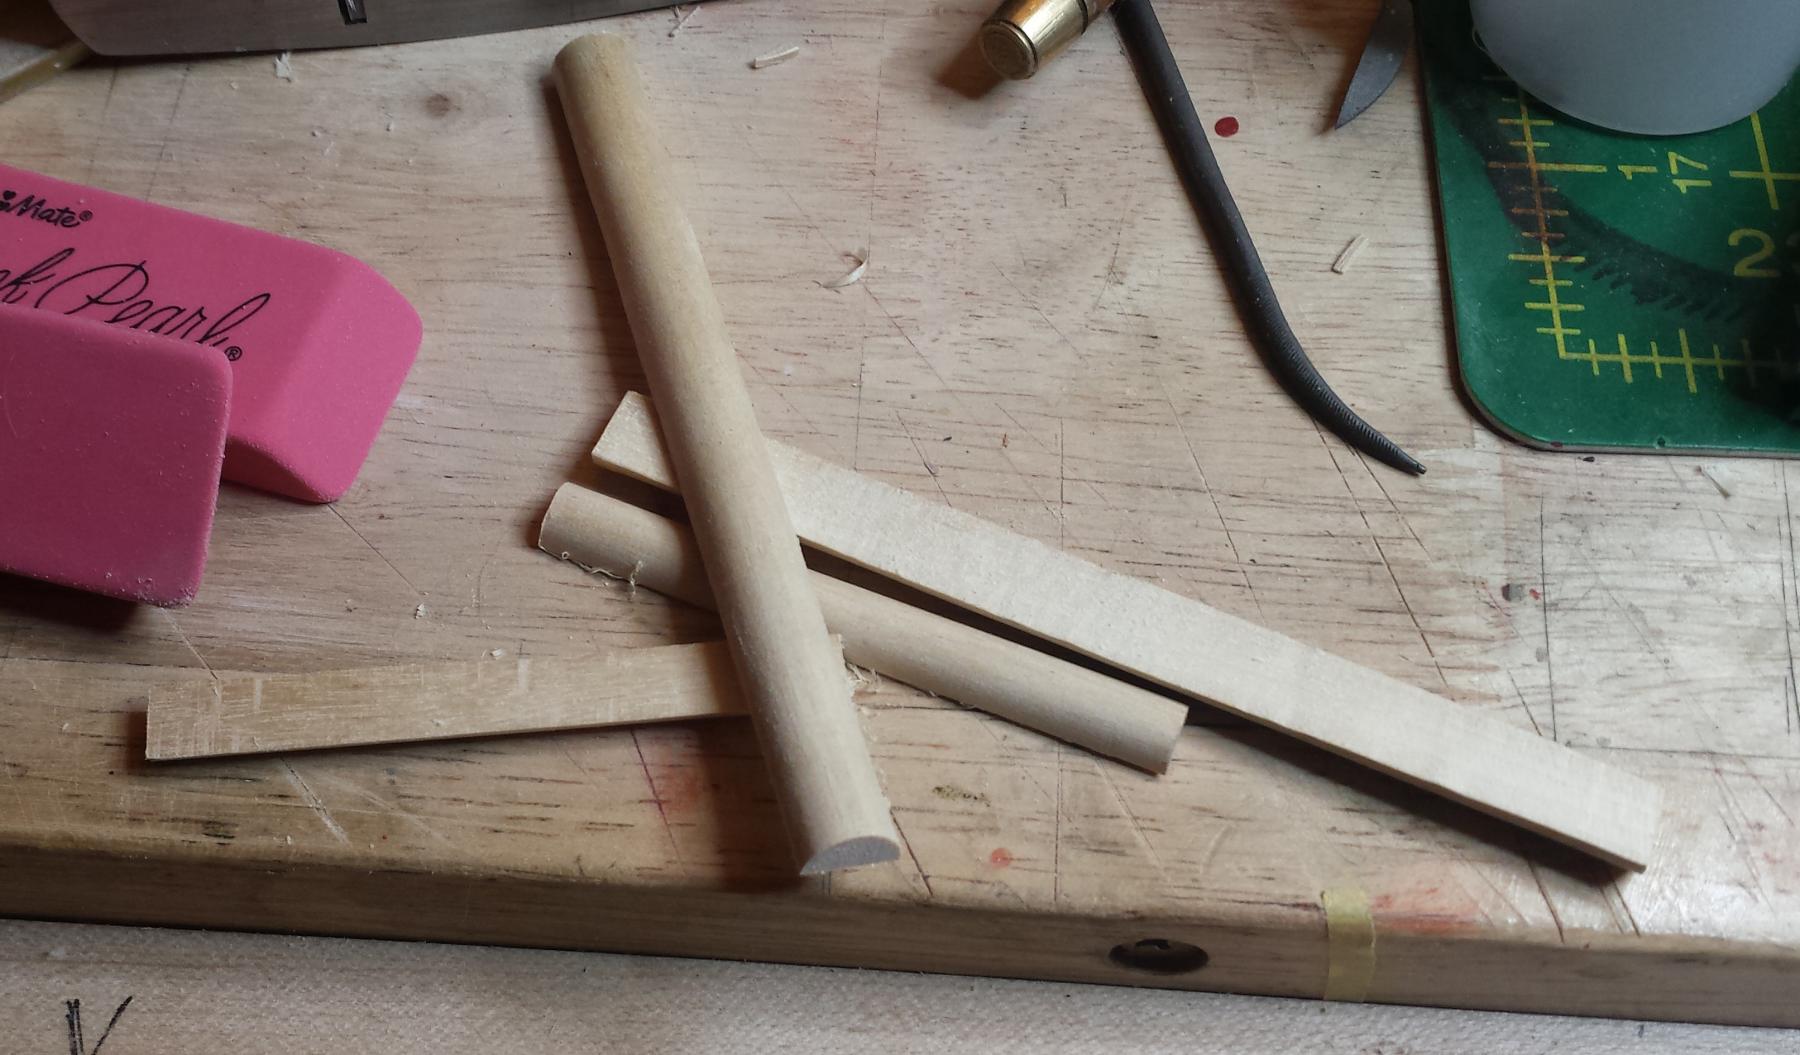
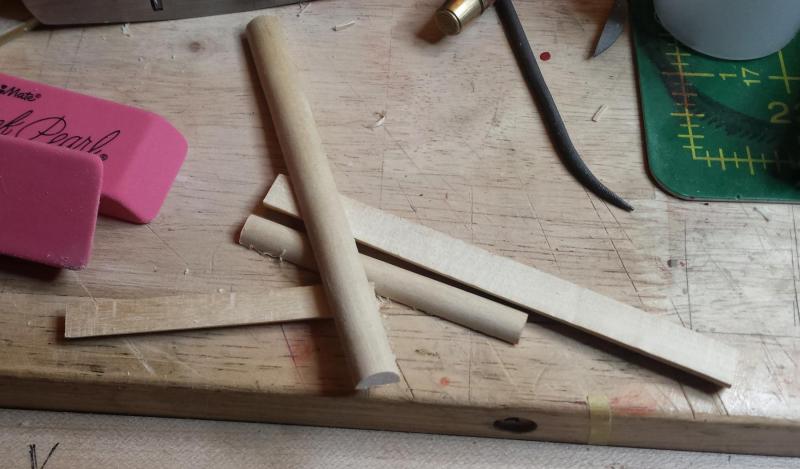
So here is my clamping idea, the Mk.I Advanced Filamper. Yes, all of my tools are born advanced. Naturally. When I improve them they become Uber. And yes they are named whatever damned fool thing pops into my head, it's tradition. So I grabbed a couple sizes of dowels and scroll-sawed them down the middle lengthwise. Rabbet with miniature rabbeter. Then glued all the file pieces to the rabbeted dowel and then sliced them apart into individual Advanced Filampers. And they work fine as long as tape holds. This one isn't pulled tight but I was able to exert goodly amount of force when I did pull them tight. Of course a better idea in general is rubber bands, but the geometry of the tape makes it easier to generate more force in the desired direction.


- 714 replies
-
- 5
-
-
- lady nelson
- victory models
- (and 1 more)
-
To a modeler, the whole world is his tool. Wait that didn't work. To a modeler, the whole world is just a bunch of tools. Crap that's even worse. The world is a tool and the tools of the world make... the modeler.... CUT! I'll come in again.
- 714 replies
-
- 4
-
-
- lady nelson
- victory models
- (and 1 more)
-
The answer is yes, yes they do Three types of large rubber bands and two types of erasers- the traditional pink ones and some modern white polymer ones, will be here by 7PM. This is where there's an advantage to living in the Bay Area. Also Rick I have lego blocks, going to grab a pile of those too.
- 714 replies
-
- 3
-
-
- lady nelson
- victory models
- (and 1 more)
-
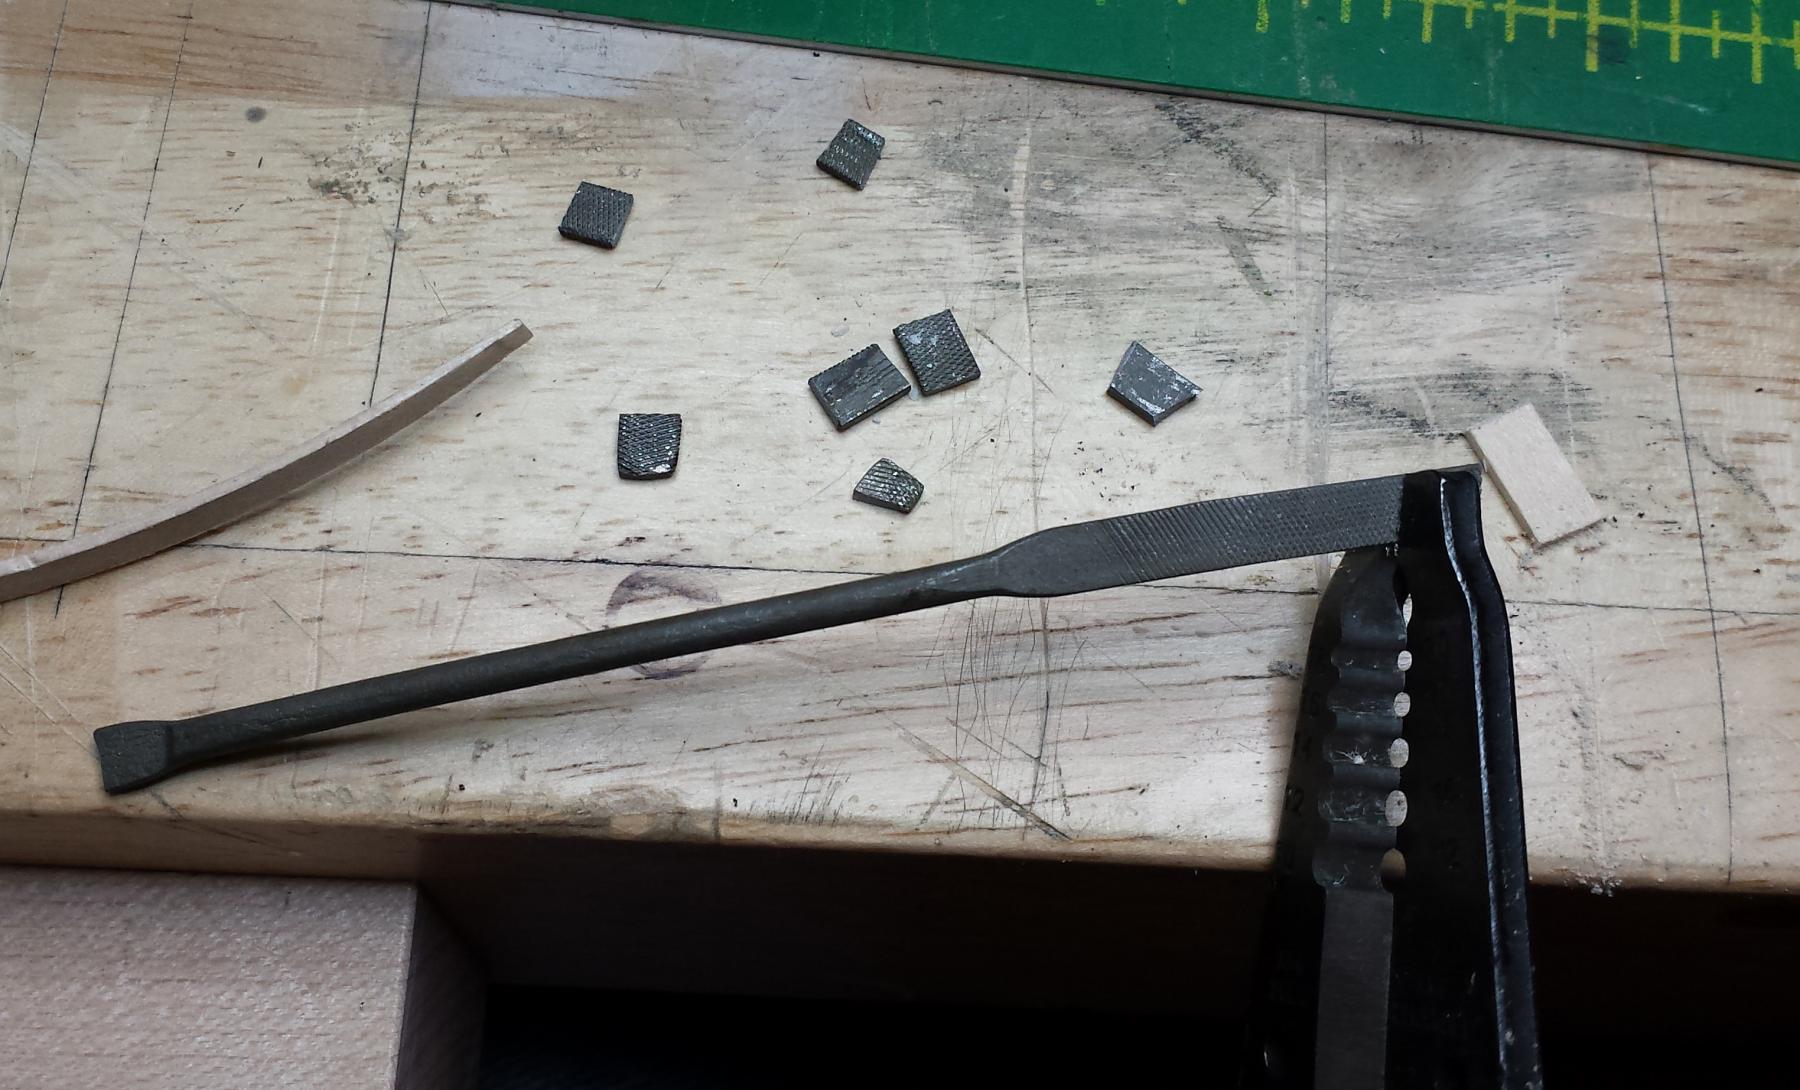
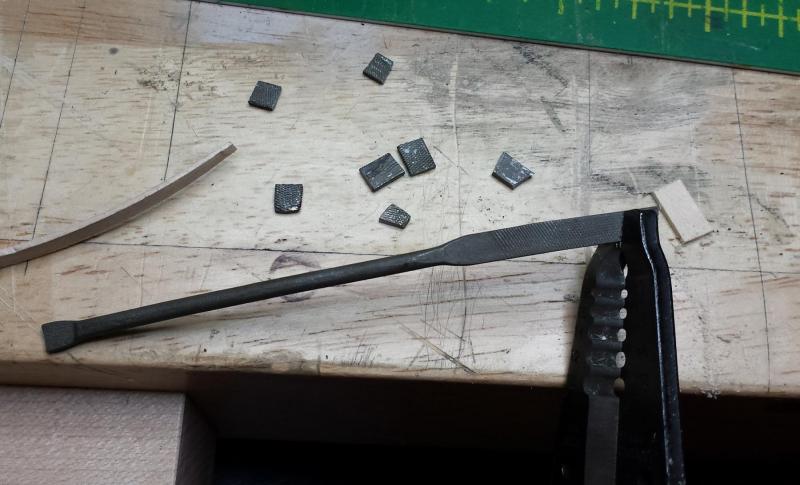
Thanks guys, good ideas! Much appreciated I especially like Ian's idea of eraser blocks. The idea I had that I'm also going to try is this: This is an old cheap riffler file in cut 0 or so, pretty coarse, and snapped it into little pieces. I'm going to glue them on the bottom of small blocks. I tested, and they will grab a plank face quite firmly without leaving bad marks. I think Ian's idea is better but I think this should work also and since I already murdered the file I might as well follow through and see. Anyway, off to see if Amazon Prime Now with two hour delivery has erasers and big rubber bands. I love Prime Now, last time I went to our Bellevue office (just outside Seattle) to visit my team there I forgot my mouse, and I had Prime Now deliver me a new one in two hours to my hotel room.
- 714 replies
-
- 5
-
-
- lady nelson
- victory models
- (and 1 more)
-
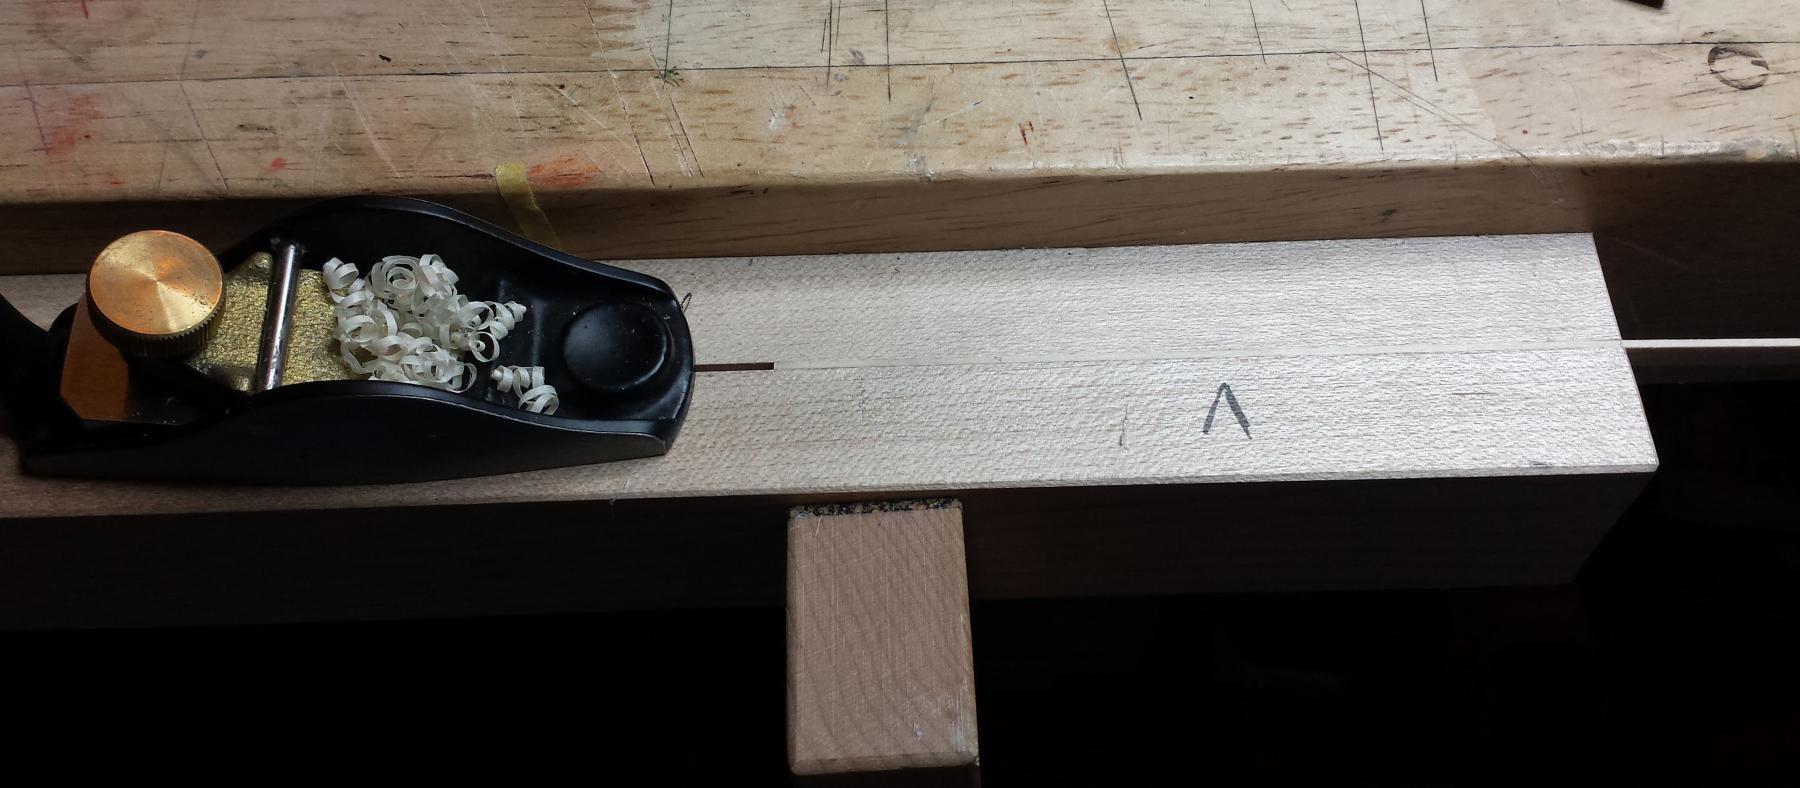
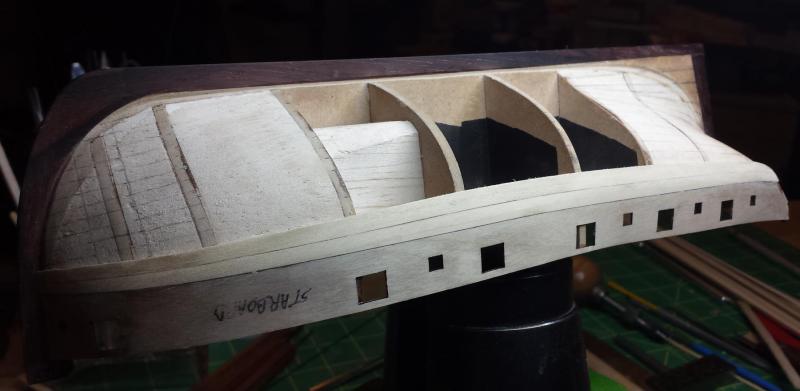
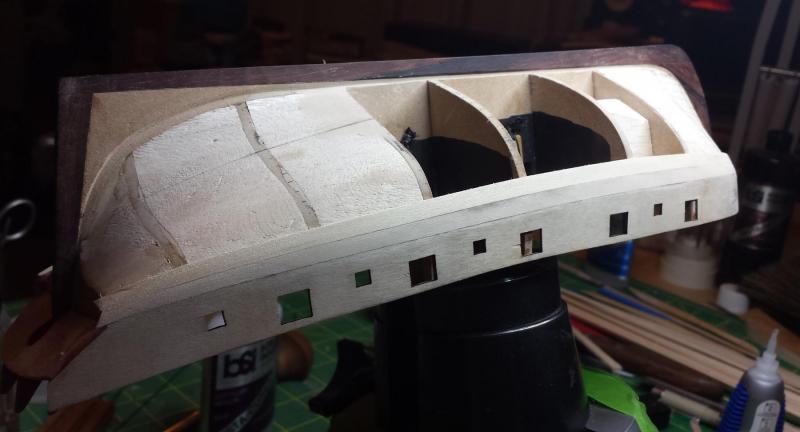
Finally got to sit down last night and start putting on planks. Although it's going fine I'm still thrashing around with the process, but it will get considerably quicker from here; fitting the planks isn't taking me very long. The only issue is that I haven't found an acceptable way to clamp yet, so I gave up for the moment and am just using CA glue and hand clamping, applying glue in three sections as I work down the plank. Technically that would work for the outer planking too but I'd prefer not to be planking with expensive boxwood using the one chance to get it right CA method. I tried various pins and those plank clamps - part of the problem is this ship is so small, the plank clamps would work reasonably well on a bigger ship. I'm going to stop about halfway through the first planking and work on that problem again until I have something workable, I very much want to use the inner planking to try out whatever I'm going to use on the final planking, would rather not be trying something for the first time there. Rick, the boxwood planking is a very different size from the inner planking, being about .6mm x 4mm, considerably thinner and narrower than the kit planks. So more planks needed but should be much easier to do. So anyway, planking. I wasn't taking pictures with the first one, just get to see results. * This is basic workflow as of now. Start with ensuring joint surface on ship is clean and ready using the trusty rifflers. Mark the required tapers on each end, for these planks it's .108" on the bow and .140" on the stern, and then position them in turn on the shooting board and plane the taper, this step literally takes about 30 seconds. Besides fast, it's also quite accurate. Then use a solid graphite pencil on the edge to be beveled, makes it much easier to see them and know whether you're done. I probably shouldn't be doing this since I won't use this method on the final planks as it's possible the pencil would show in some places (like deck caulking). First plank starboard side. Trimming down adding more planks. Repeat, got two planks on each side before calling it a night, not bad considering I spent half the night trying to figure out how I was doing the next step. With everything worked out except clamping, hopefully can make quicker progress. Starboard and port.


- 714 replies
-
- 5
-
-
- lady nelson
- victory models
- (and 1 more)
-
Between Alexander and Gaetan and his Le Fleuron, I need a new superlative dictionary. I'm running out Looks amazing as usual Alexander!
-
Tom if you don't mind me asking, how do you use the 1-2-3 blocks in ship building? And the latest looks great too.
- 1,354 replies
-
- 1
-
-
- constitution
- model shipways
- (and 1 more)
-
I understand that now, but it's not a skill or interest shared by many ship modelers, so I wasn't expecting sophisticated camera work - I've spent 12.3 gillion hours in Photoshop but even I am only doing the most basic cropping and adjustment when I post pictures here. Well except for de-aging paintings, I like taking historic paintings that are hopelessly yellow and dark and dirty and restoring them to what they looked like when the painter put his brushes down. Speaking of the camera work, that was pretty cool, if someone asked me what wood that was as the closest color match is lignum vitae but anyone who built your ship out of that wood would be officially crazy, hence my confusion. Did I mention your ship is amazing again? If not I will repeat that It really is a no-kidding, being absolutely serious and as critical as I can get, a phenomenal piece of woodworking in general and the quality of the work makes a long-term placement in a major museum entirely justified. As I said in my earlier response, you have every right to feel extremely proud of what you've accomplished here. If I were you I'd have a very hard time not spending entire days just looking at it and grinning. So... next is Soleil Royale at 1:12? Fully sailing with operating cannons, so you can truck it to a lake on weekends and sink anything that challenges your ownership of said lake?
- 728 replies
-
- 2
-
-
- le fleuron
- 64 gun
- (and 1 more)
-
Precision router base for Dremel 4000 etc.
vossiewulf replied to vossiewulf's topic in Modeling tools and Workshop Equipment
I only adjust it inverted, usually with the dremel in a vise so I have both hands, and lubed the main posts, and I really don't have much difficulty getting it to do what I want. I tried adjusting it while on its base with the weight of the dremel on it, but found that it was wracking more than I wanted. Try adjusting it as I do, see if that works better for you. -
Thanks Rick, I'm sure you guys are at the GET ON WITH IT ALREADY phase, but with planking I'm doing every bit of prep I can think of, it's the only way to figure out which steps are really important and which aren't. Whatever my process ends up being, it will definitely be simpler and more streamlined than this extremely careful preparation.
- 714 replies
-
- 2
-
-
- lady nelson
- victory models
- (and 1 more)
-
Miniature Hand Tools
vossiewulf replied to Julie Mo's topic in Modeling tools and Workshop Equipment
Above somewhere I was talking about the need to slightly curve the edges of straight plane irons to feather the edges of the cuts and avoid those nasty hard lines made by sharp plane iron corners. I was sharpening my little Lie-Nielsen squirrel-tail plane, the flat-bottomed one that matches Julie's convex one, and remembered to take a pic to demonstrate. Some people try to make it a smooth curve all the way across, this is senseless to me as no matter what you do that will leave a scalloped surface. Instead I leave as much of the iron as possible straight, and then only smoothly relieve the corners, because unlike the continuous-curve iron, mine leaves a perfectly flat surface. As to how flat, go look at the piece of wenge I planed, pic on page 3 of this thread. Since this iron is only 1" wide it doesn't have as much of a flat in the center, but you can still see what I mean. By the way, I'm with Ron Hock and don't do secondary bevels despite what it looks like here. Somehow the last time I sharpened this it was more like 23.5 degrees instead of the desired 25 degrees, so I'm fixing that, another couple of sharpenings and it will be all one bevel again. And this was sharpened 1000-4000-8000 Shapton stones and finally on a strop. The dark spots on the right part of the cutting edge that look kind of like flaws aren't, they're reflections of things on my bench above, The best way to do this curved edge is with the Mk.II Veritas Honing Guide with the curved barrel-shaped roller that is designed to do exactly this process. It's technically feasible to do it by hand, but it certainly ain't easy. -
Doris, another good one to start with is the one I'm working on, the Lady Nelson RN cutter from Victory models. It couldn't get more ahistoric in that no cutter of that name existed, but it's also extremely historic in that it accurately represents the RN cutter designs of ~1800 and they were extremely important as a class and the sailing Ferraris of their day. It has only one mast which simplifies the masting and rigging task even further than Syren, but the rigging that is required is exactly what you'd do with more complex ships - standing rigging, shrouds and ratlines and deadeyes, braces and lifts and halliards, so you'll practice what your next project will require. Here's the thing - I'm very familiar with woodworking and carving but even so ship modeling is a big leap requiring lots of tools you probably don't have and learning very tricky skills like bending wood and getting two pieces of wood that are curving in multiple axes to fit together perfectly - this is planking, It makes much, much more sense to have a very simple first project during which you'll be buying things you need and learning how to use them and no matter how good you are naturally with making things, you won't be real good at some of the tasks the first time. You'll also be figuring out processes and workflows that fit the way you like to work/the tools you have (there are many ways to build a ship model), and then you'll be making jigs and things that will help in future projects. In short, the learning curve is steep and there is a tooling up/basic learning phase you need to go through and both to make that process go smoothly and so you don't have hundreds of dollars at stake, it makes the best sense to do it while working on a smaller and relatively inexpensive kit. I came very close to doing the English Longboat from Model Shipways for the first project, and although I'm doing fine with Lady Nelson I can still make an argument for that being the better choice. So anyway, this is one of those start slow, finish fast things. Start with easy, small project and go slow and learn the options for every step and experiment with different ways to skin various cats, and you'll still make reasonable progress because the kit is small and simple. And then you'll have an order of magnitude more confidence when you start Syren, which to me is an excellent second build and I have that kit sitting in a closet for when I finish Lady Nelson. And also sitting in the closet under Syren is the MS Constitution So basically I'm on the same path as you, but I think I might be working on Old Ironsides before you are if you start with Syren Link below takes you to my Lady Nelson build log if you want to see how I'm doing. Since I am apparently psychologically incapable of building something out of the box, the extra complication I am adding is replacing the kit wood with better woods, and I'm going to try to do more realistic rigging, mostly because I have 30 pages of a book showing exactly what it should be for an 1800 RN cutter in perfect detail. You can still do a few things like that on your first build if you must as long as you know your own skills well and are sure you can handle them.
-
^ What he said. That's an exceptional piece of work Gaetan, and you have every right to be very proud of it. I hope you find a home for it where many can enjoy seeing it. I was about to ask, the previous image with the wood showing as green-brown didn't look much like the cherry wood I'm familiar with My favorite thing about cherry is just giving it a clear finish and leaving it to do its own color change, it turns such a wonderful shade of light brown over time.
- 728 replies
-
- 4
-
-
- le fleuron
- 64 gun
- (and 1 more)
-
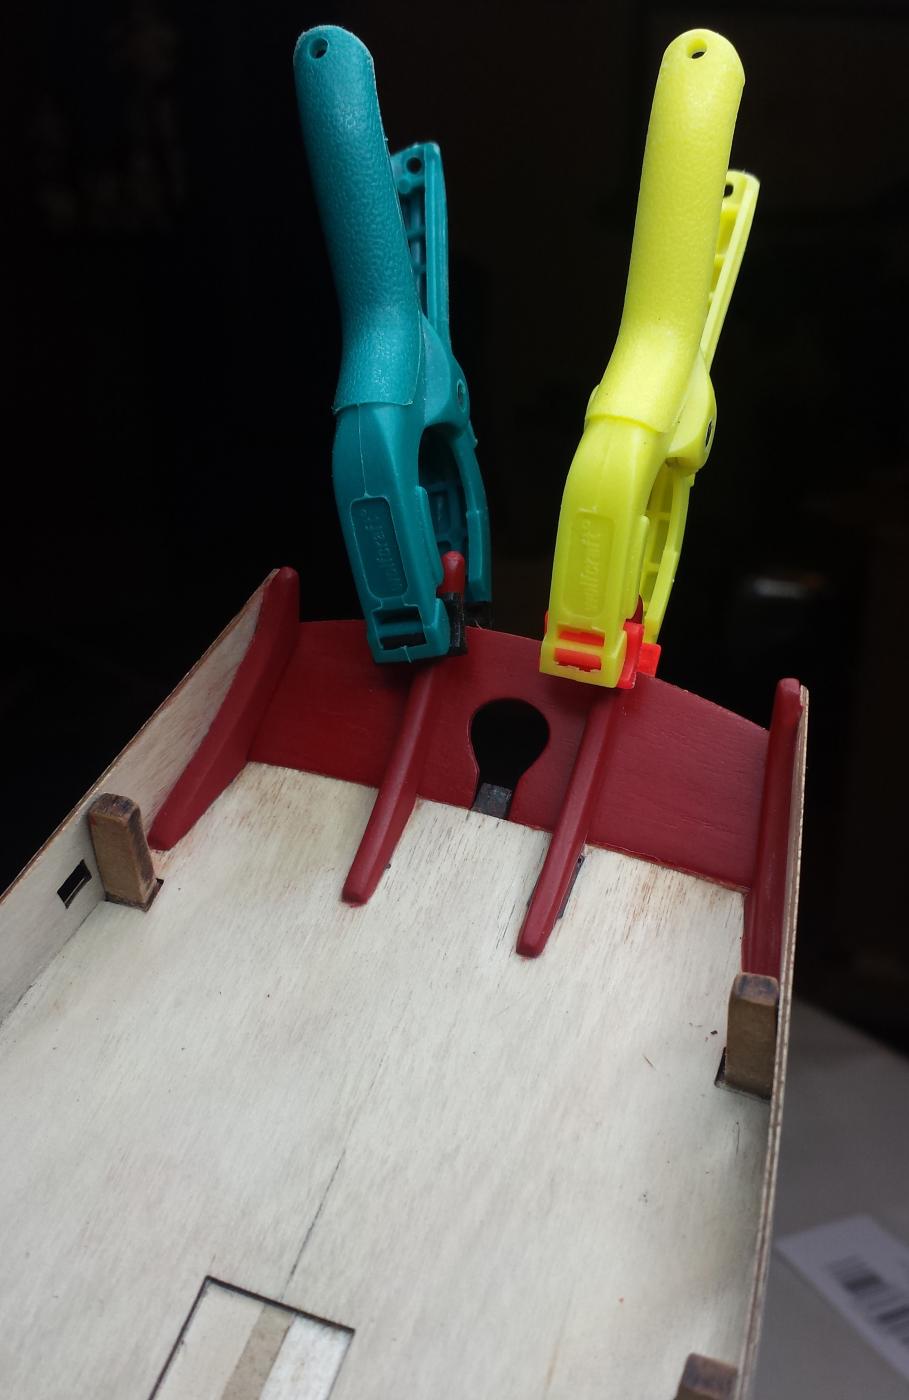
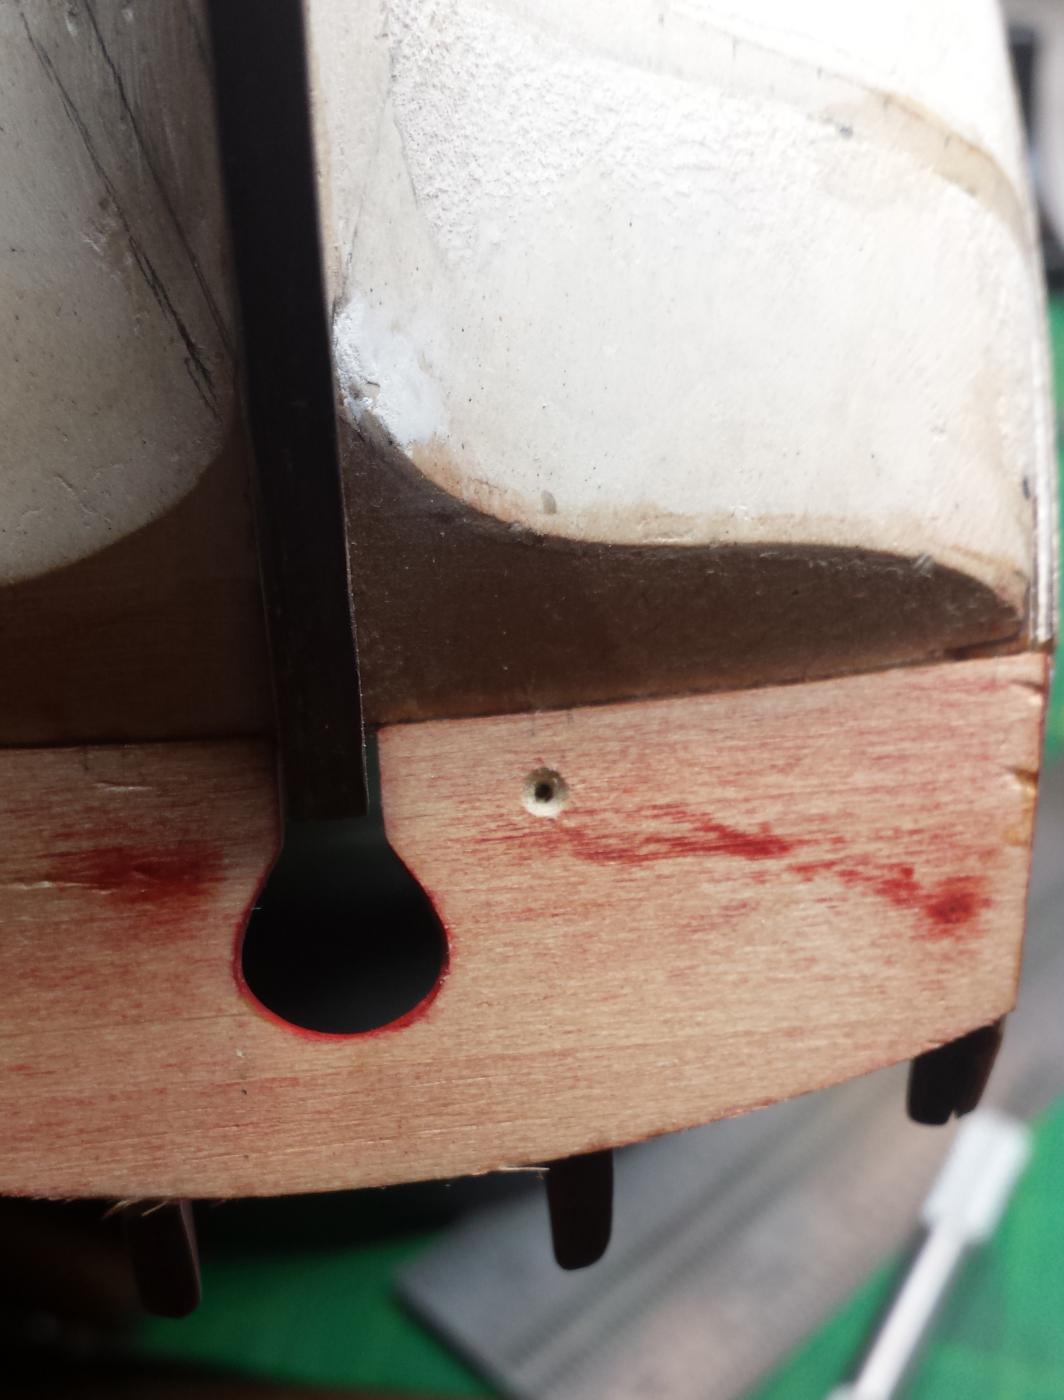
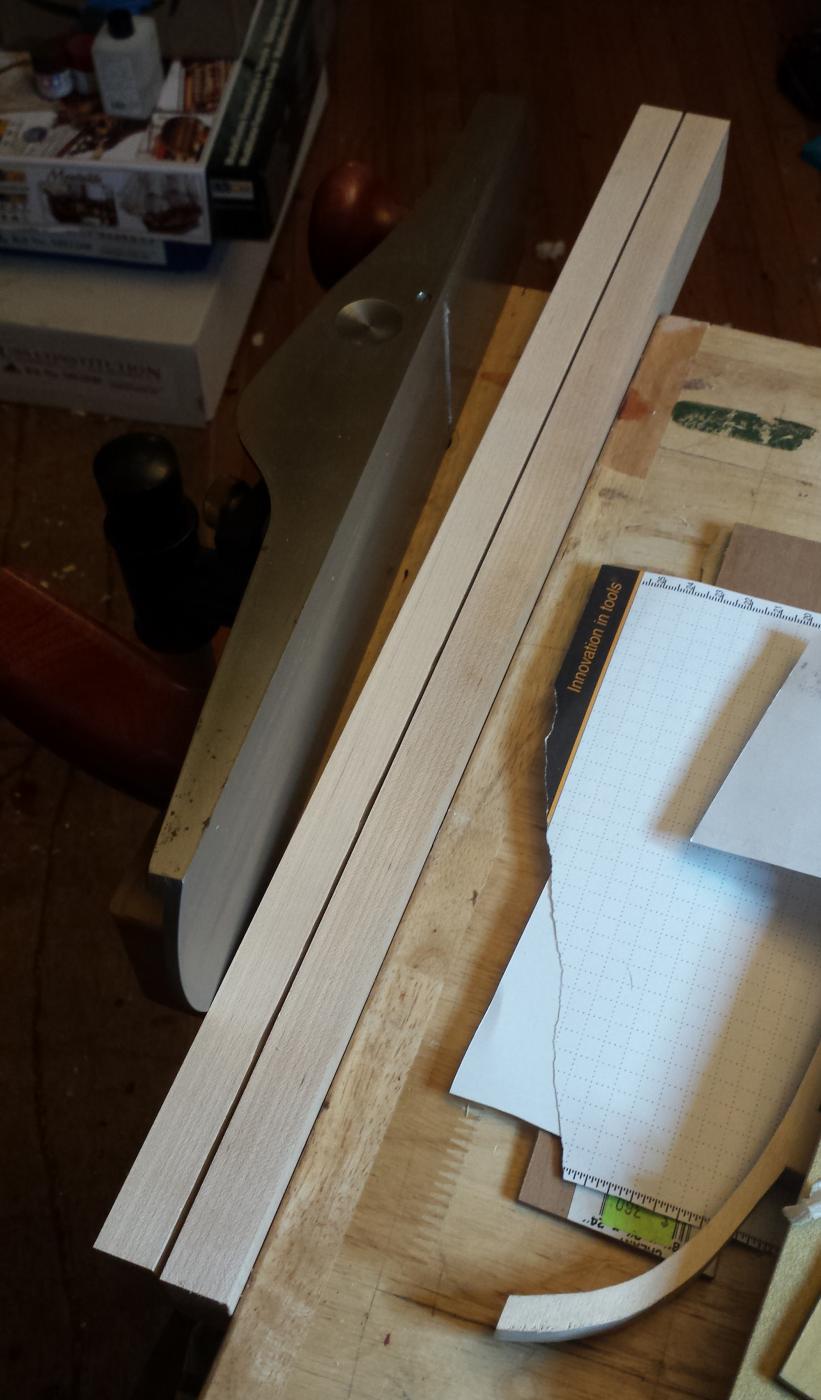
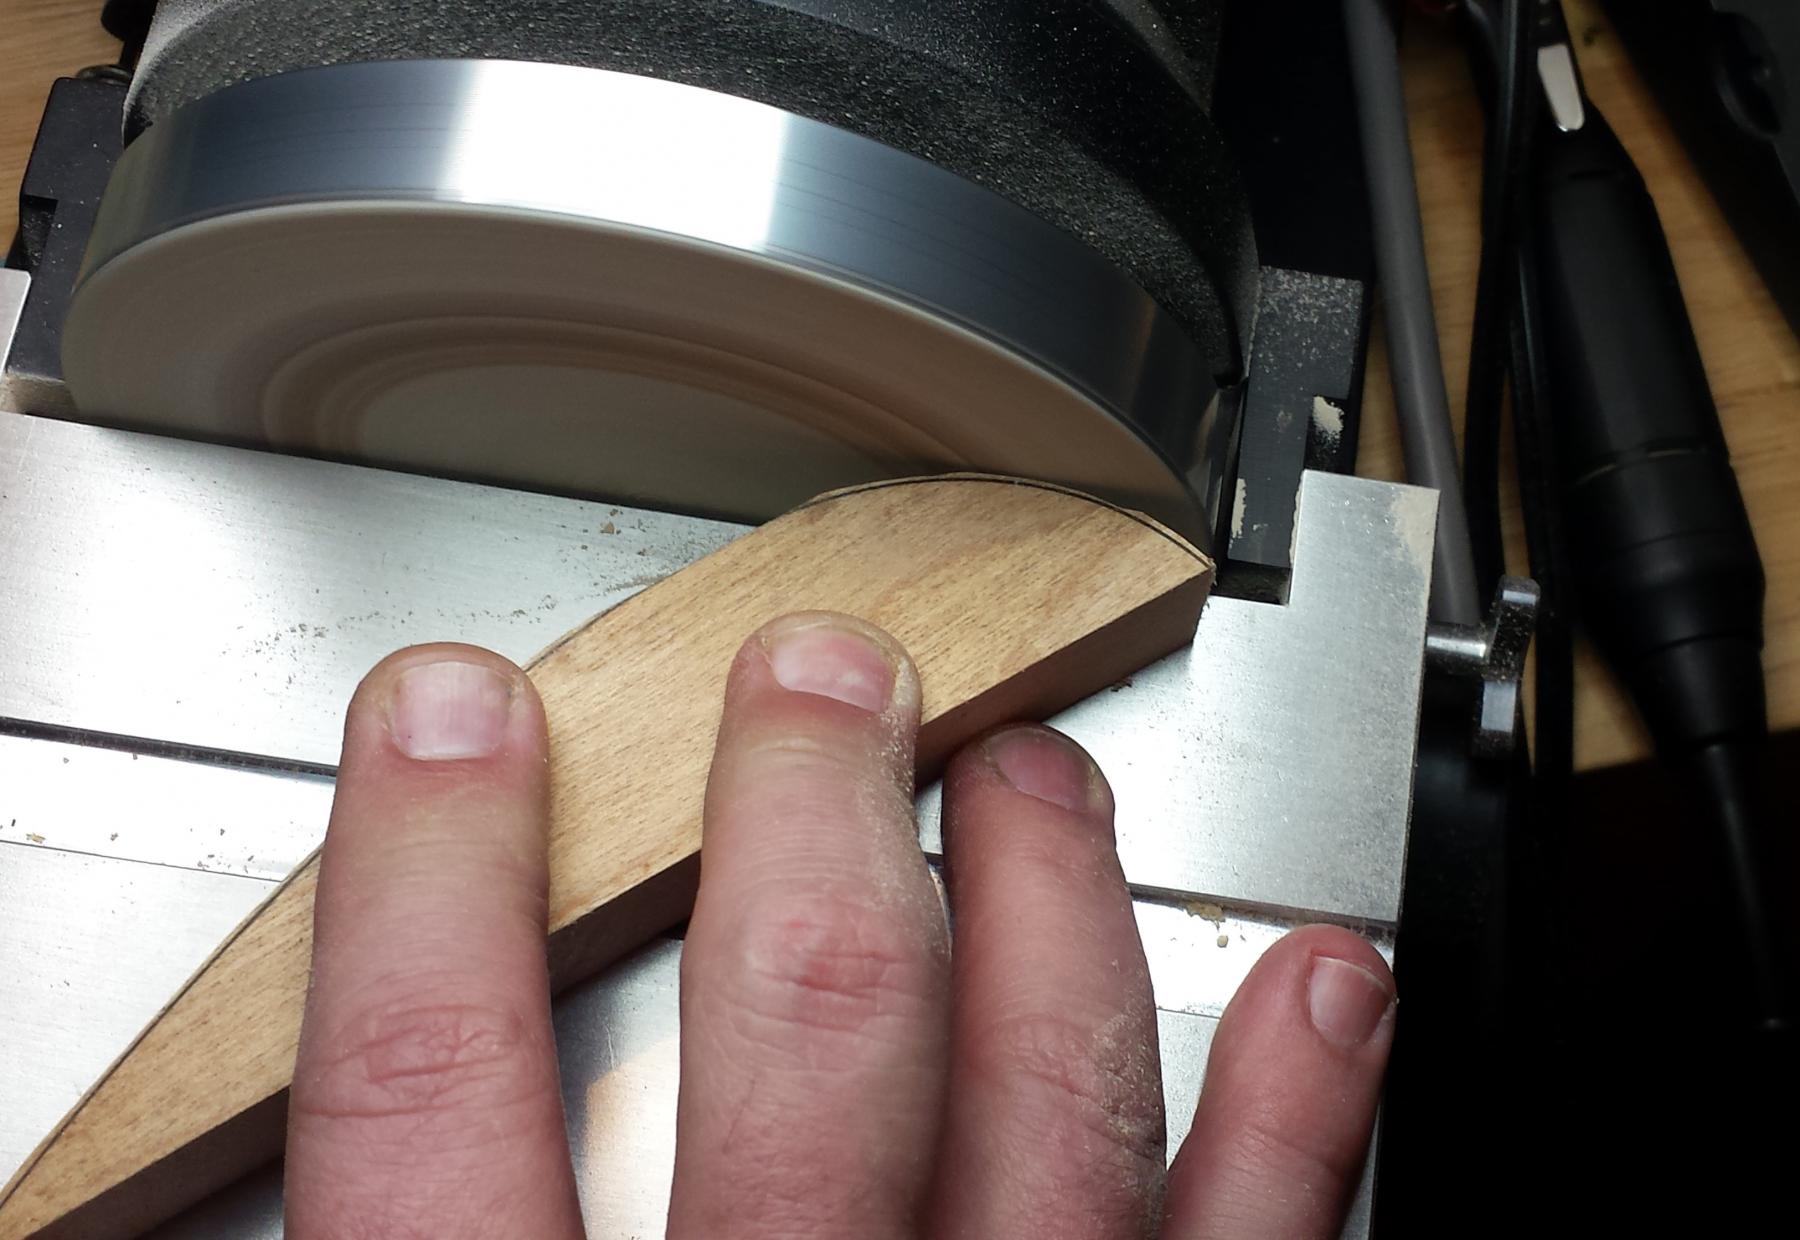
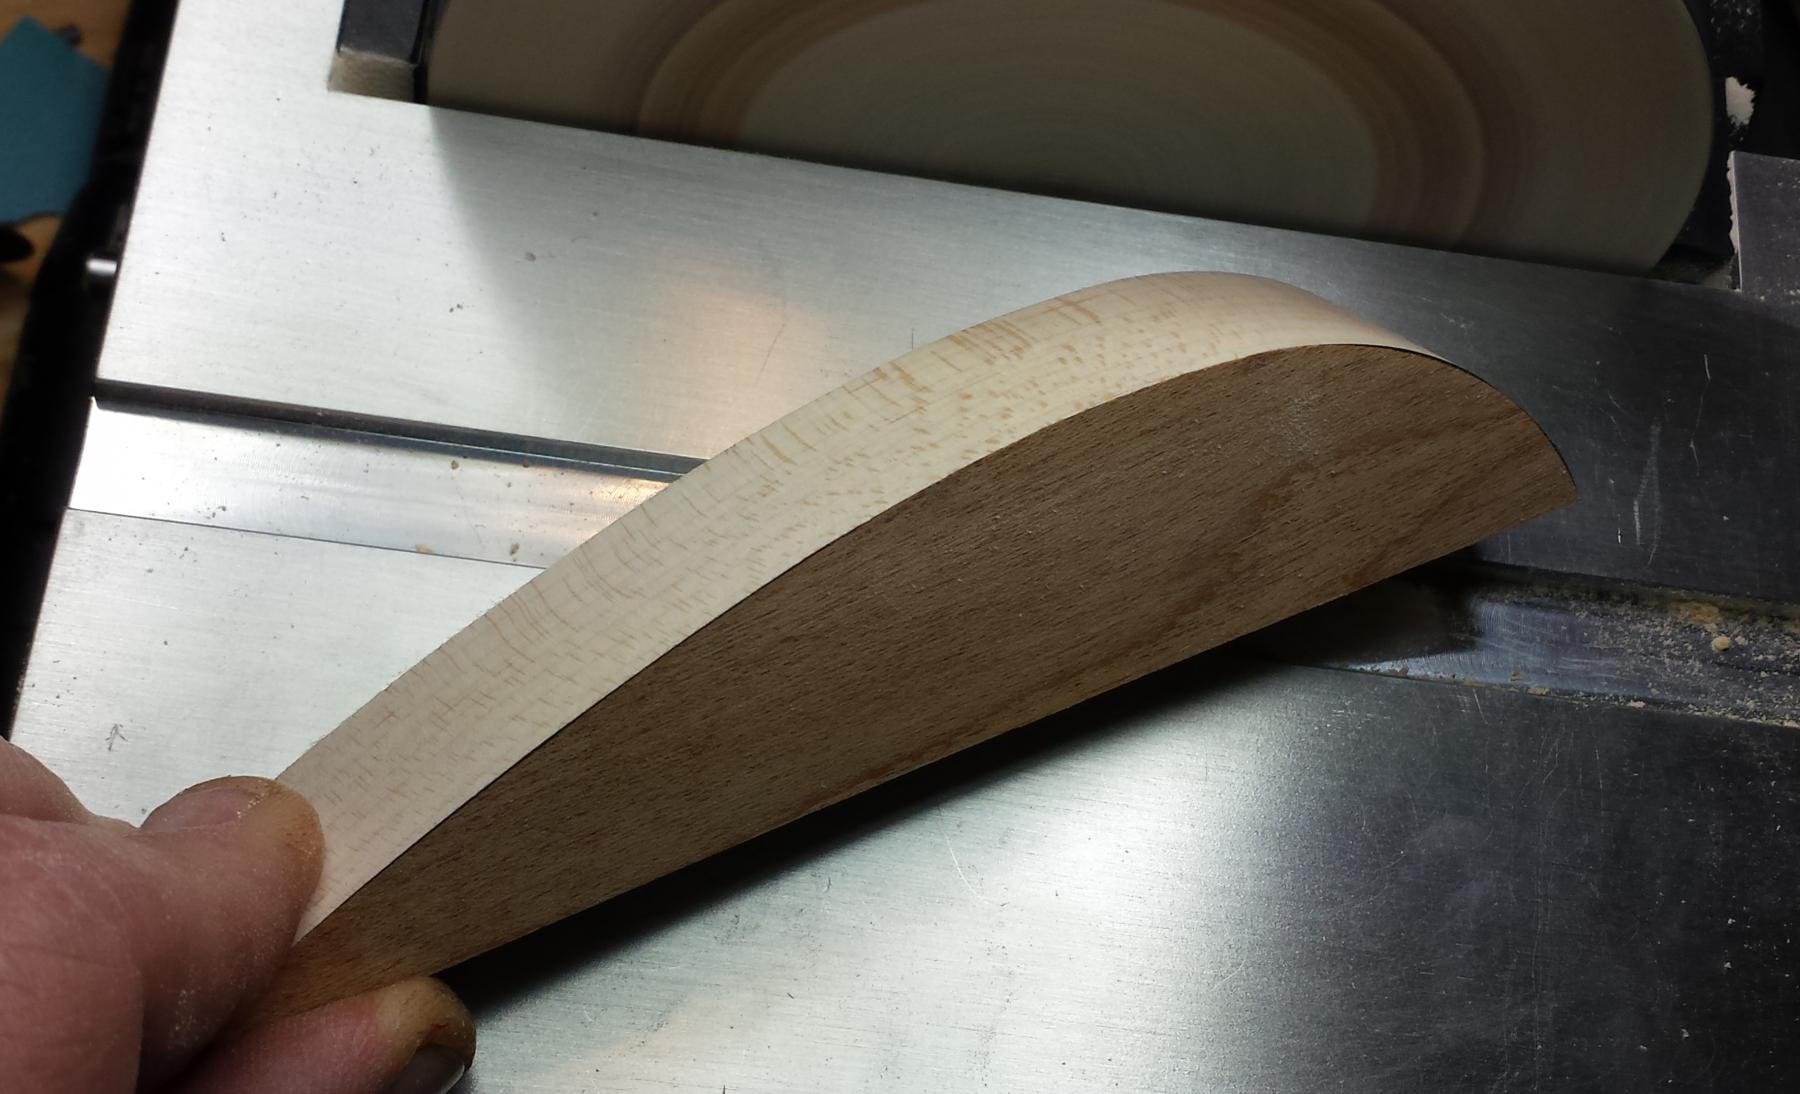
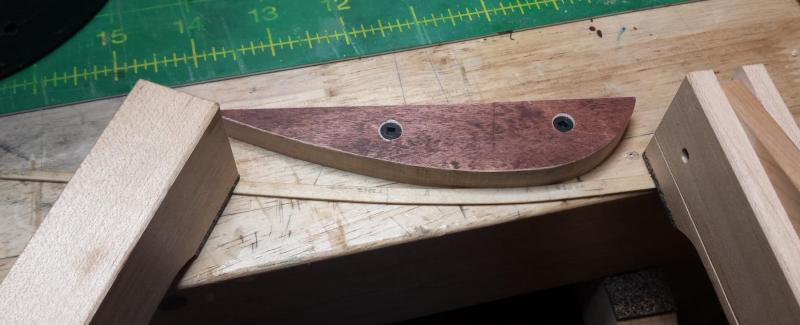
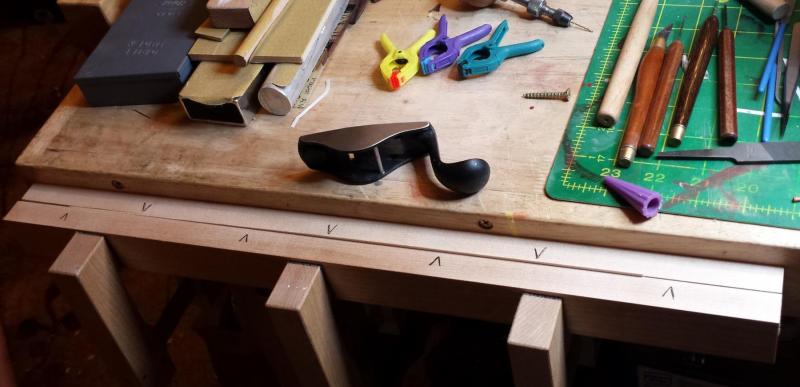
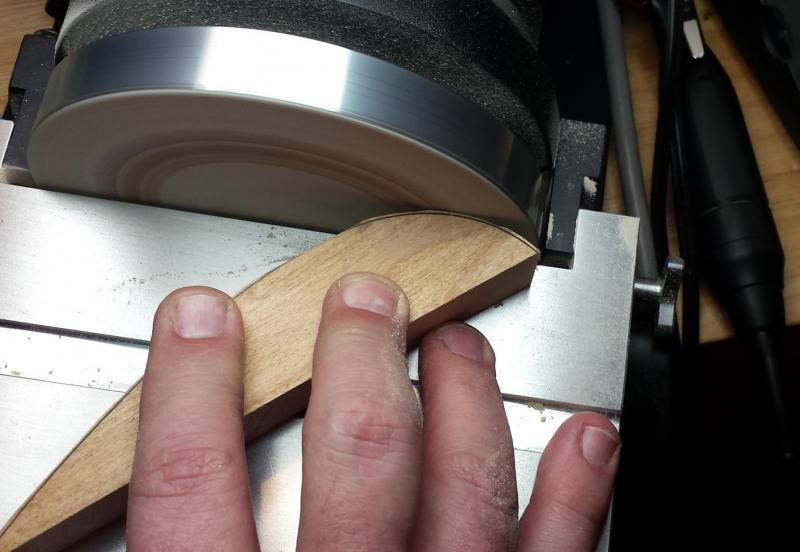
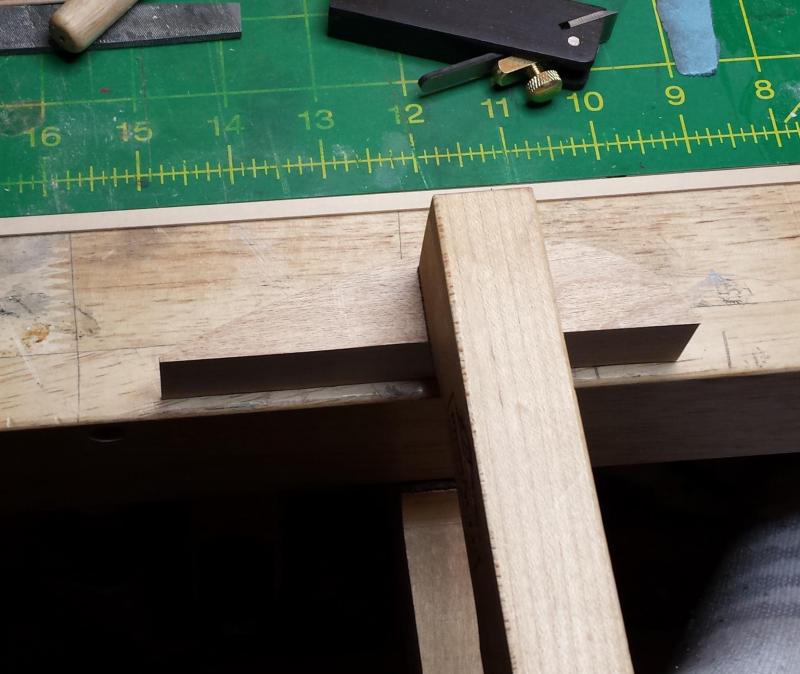
So anyway, have managed to do lots more work, still without putting on a plank, But it's mostly one-time setup time as I make myself stuff that will work for future projects as well. In this case a shooting board for tapering planks and something just a tad more sophisticated than Chuck's end of a clamp on the edge of the bench. First was putting on the stern fascia and putting the nightmare hopefully behind us, starting with removing the paint from the glue areas of the fascia piece. And glue it on. First step was yellow glue on the back of the center fashion pieces because it had to sit there for a minute, and then CA along the bottom line of the fascia. Here the sides haven't been glued. Sides were then glued but then I noticed a poor glue line at the bottom of one of the center fashion pieces so I drilled a hole in the back (it's getting planked over) and beveled the edge and worked some CA glue in from behind and hand clamped it into position. Yet another way to fix a problem joint. Then flushed the sides. I decided that I wanted a shooting board for tapering the planks and a little male bending jig like Chuck uses to go along with the female one that comes with the plank bender. Lots of steps in here getting 1" x 1 1/2" rock maple ready. I then cut two pieces about 28" long, and added telescoping brass tube/rod registration pins, one side drilled for a glued-in tube, other for a fitting rod. Once that was done I could true the shooting edge, I have just done that here with my jack plane. Then more drilling and screwing and countersinking and things to get it mounted where I wanted it. This shows how it works, you can see the registration pins that keep the pieces perfectly even. Next the male bending jig thing. French curve to draw the curve I want. Of you mean I need to use my Byrnes disc sander now? Oh no twist my arm. This pic is also an advertisement for the Excalibur 16 scroll saw, I'm not aware of too many that can easily work through 1" rock male. It's an advertisement for this disc sander that it chewed easily through rock maple and making this entire curve smooth and what I wanted was quite easy. Clamped to desktop, ready to go. Then was just need to sharpen the LN squirrel-handled plane and test. I think these modeling loins are about as girded as they get.


- 714 replies
-
- 6
-
-
- lady nelson
- victory models
- (and 1 more)
-
Before I became a Silicon Valley geek, spent most of my life in NC, so it has to be a pig. Slow cooked for 18 hours using one of a few good hardwoods for smoke, with just a little apple cider vinegar injection. Served with Worcestershire sauce and oniony cornbread deep-fried hushpuppies with enough butter to kill a moose. None of that heatheny vinegar-red sauce those heatheny heathens west in Lexington eat, or the even worse mustard sauce the complete freaks out east eat. And we won't even mention cow.
- 714 replies
-
- 3
-
-
- lady nelson
- victory models
- (and 1 more)
-
I once was on the trapeze of a Hobbie 18 doing about 18kts on one hull in a beam reach in a 25-30kt wind when I got my weight just a tad too far forward and the one hull in the water pitchpoled. I hadn't worn my sailing gloves but I still grabbed for the side stay as I went flying forward, and held on while I slid most of the way up the side stay, but at least it stopped me from trying to do a human maypole on the mast. However you can assume the result of totally removing a thin stripe of skin on your palm felt every bit as spiffy as you might imagine. That is absolutely what made me think about what would happen when a boomsprit as long as the ship buried itself in the face of a wave. And it's also always interesting to see what history has preserved and what hasn't been, obviously we have phenomenally detailed information about many aspects of this subject but apparently one of them isn't the sailing and sail handling of a Royal Navy cutter. Even though there were lots of them, they were highly engineered specialists designed for speed, and performed an important naval role pretty well.
-
Thanks Frankie but I'm not sure I understand why taking the boom in was required to set shorter sail, I'm wondering why the smaller sail couldn't be bent to wherever they wanted on the length of the boom. If it's not fair weather it's assumed we also have running seas, was it because the long boom would also start burying itself in waves if seas are high?