vossiewulf
-
Posts
1,477 -
Joined
-
Last visited
Content Type
Profiles
Forums
Gallery
Events
Everything posted by vossiewulf
-

Red Paint or Red Ochre
vossiewulf replied to davyboy's topic in Painting, finishing and weathering products and techniques
Same thing exists in pretty much every modeling field, in WWI aviation there are death struggles over the "real" color of British PC10 and PC12 brown/khaki that was painted overall on all British aircraft. And it's basically impossible, first because different batches drifted some, and then it also rapidly faded due to exposure to sun and rain. So really, the color it was painted with can't be determined with total exactness, and then it faded once applied such that literally every single day that aircraft was a slightly different color than it was yesterday. I fully understand those issues and am not looking for a single color but a range- I know the hue range of PC10, and also its saturation range. And names of colors don't help at all here, you have to generate numbers - I'm talking I know the colors in a Hue/Saturation/Lightness (HSL) model typically used in Photoshop. If I had to guess, the red gunport sill/bulkhead color, if they were using their "real" red vs red ochre, would probably be an HSL range (on a 0-255 scale with zero being pure red) of H:3-8, S: 90-120, L: 180-200. Does that sound correct to you Frankie? -
More tools - Luthier, jeweler, fly-tying
vossiewulf replied to vossiewulf's topic in Modeling tools and Workshop Equipment
Thanks Welfack for the GV links. For the broader goup, all of my needle/riffler files are either Grobet or Gardon-Vallorbe. I can't recommend them enough, all I can say is the performance differential between these and hobby store versions easily justifies the cost, and they'll become tools that someone is going to have to pry from your cold dead hands if they want them. -
Hmm would have to see that as I'm not sure why that would take a steadier hand than what was required for what I just did, at least the rotary tool part, and also am thinking there should be a way to make a fence for a rotary tool with a router base to follow. Anyway, thanks for continuing to look in Rick, all the advice and help is appreciated.
- 714 replies
-
- 2
-

-
- lady nelson
- victory models
- (and 1 more)
-
To be a little less terse, I suggest starting with raw sienna and white, and have a mild red and a mild yellow like Naples yellow on hand to tweak the color. According to what I've seen, it should be very slightly redder than the pure tan you'll get from raw sienna. The yellow is on hand just in case you go too red but can still save it with a little yellow.
-
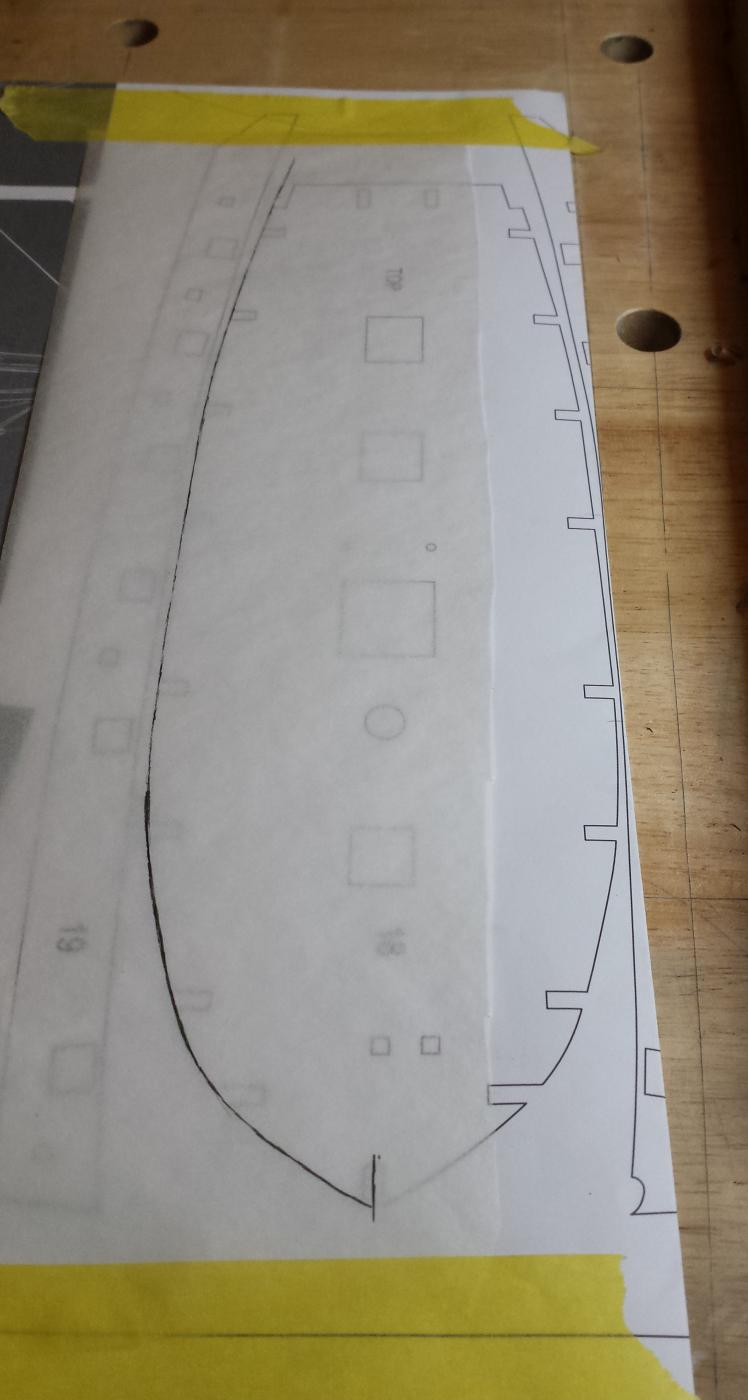
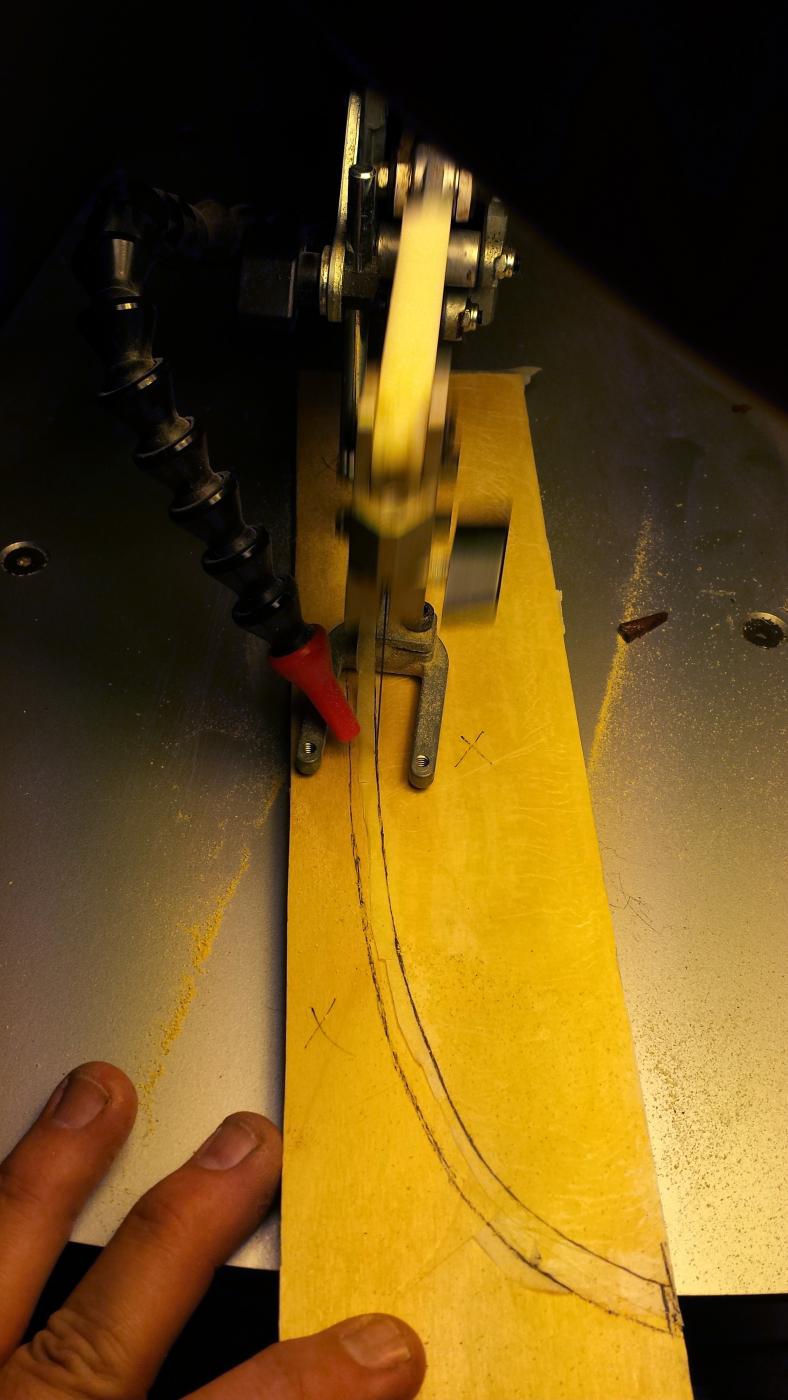
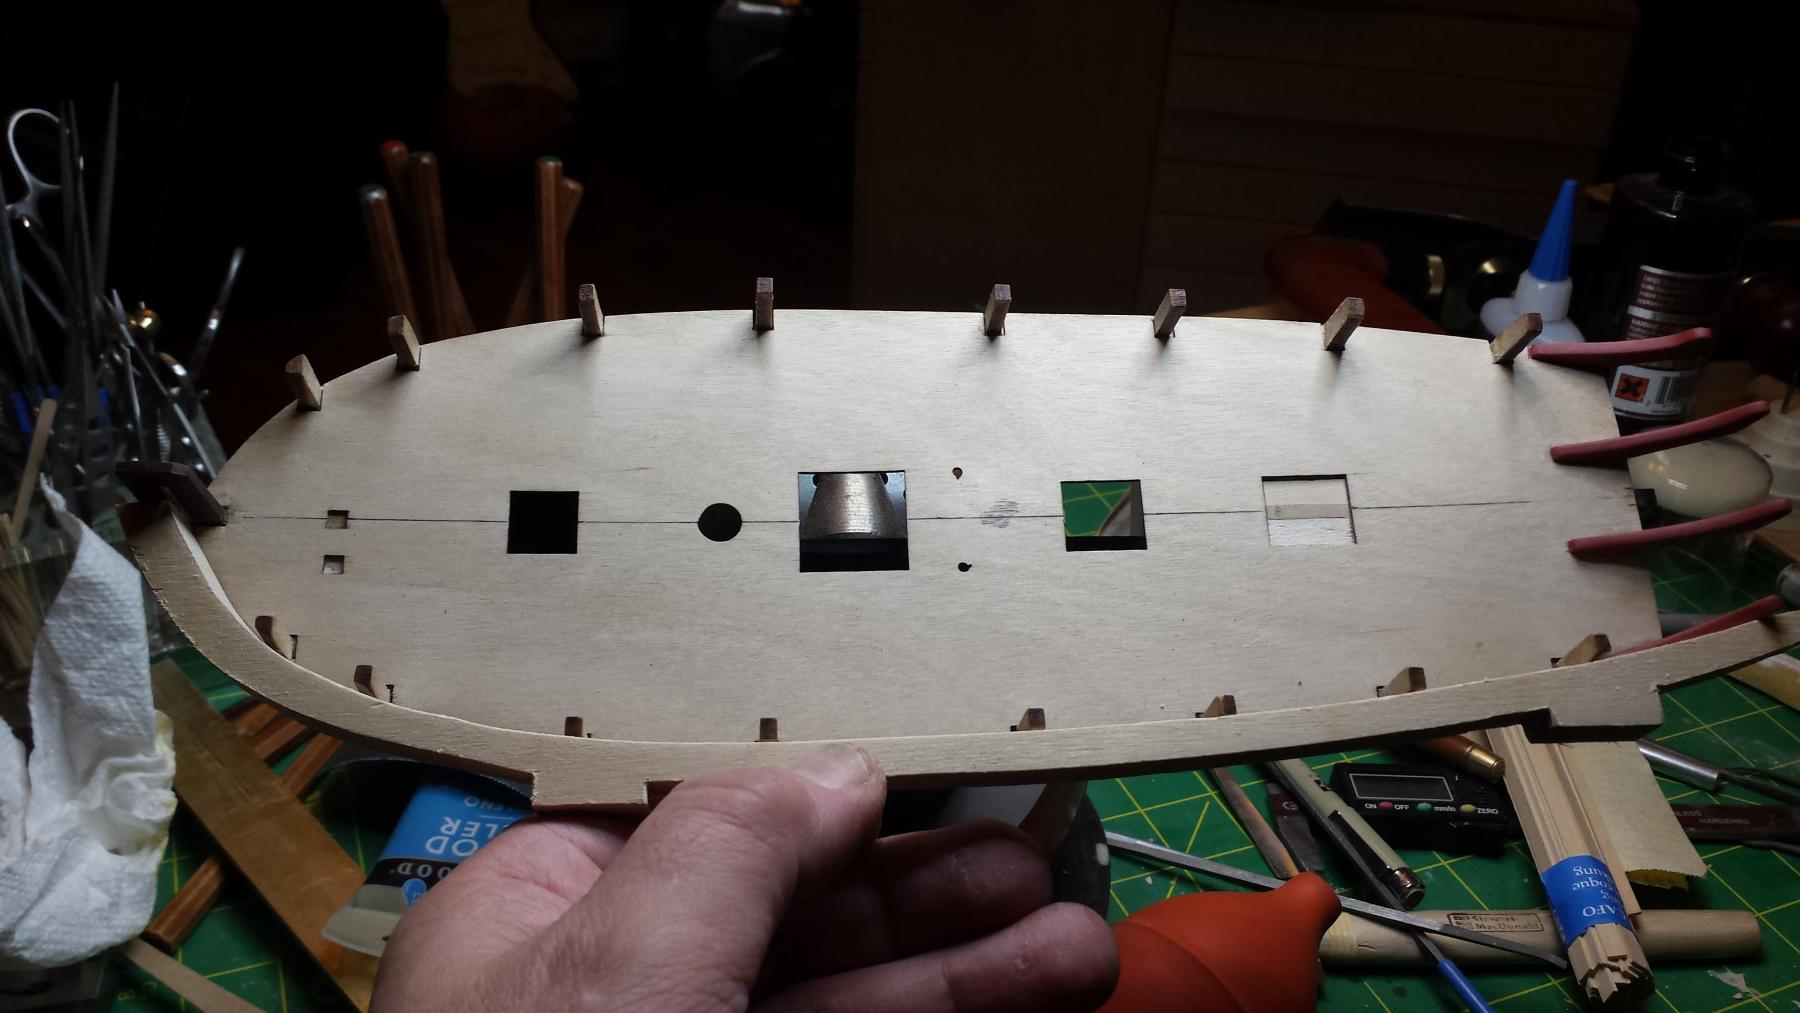
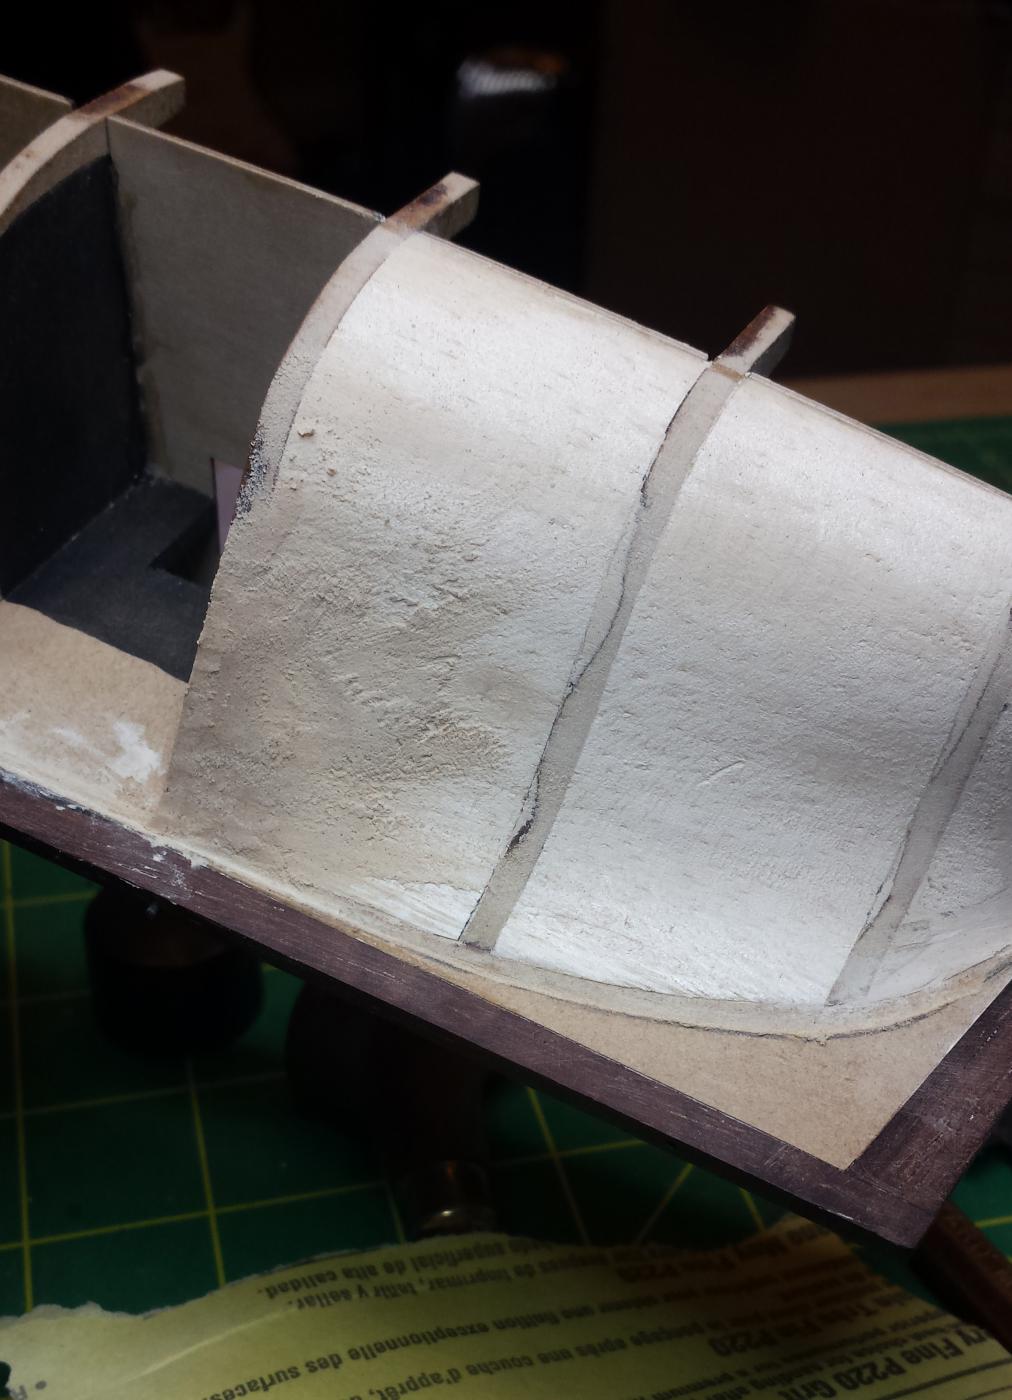
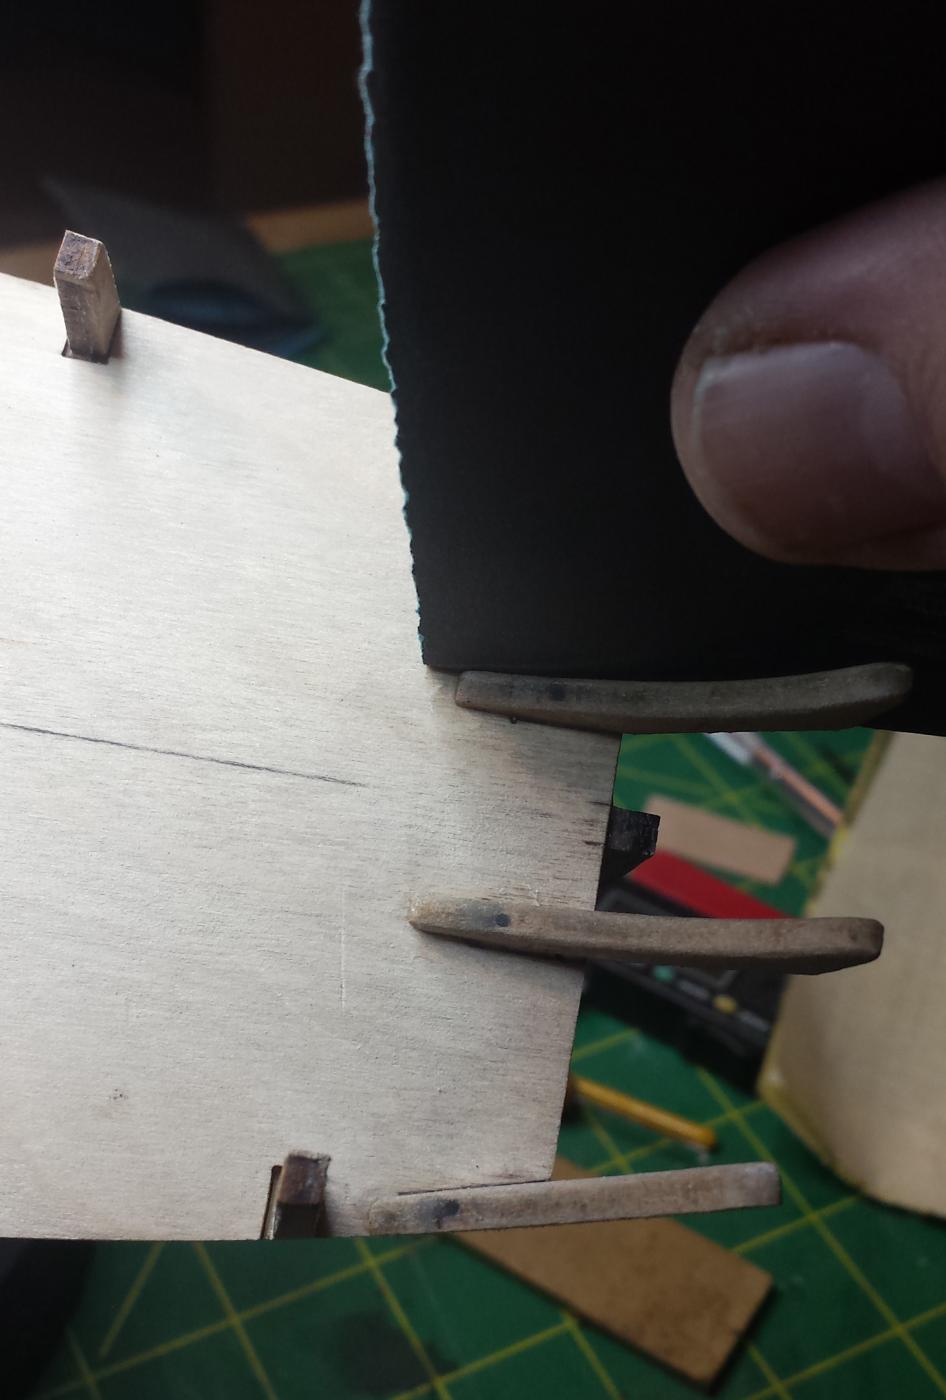
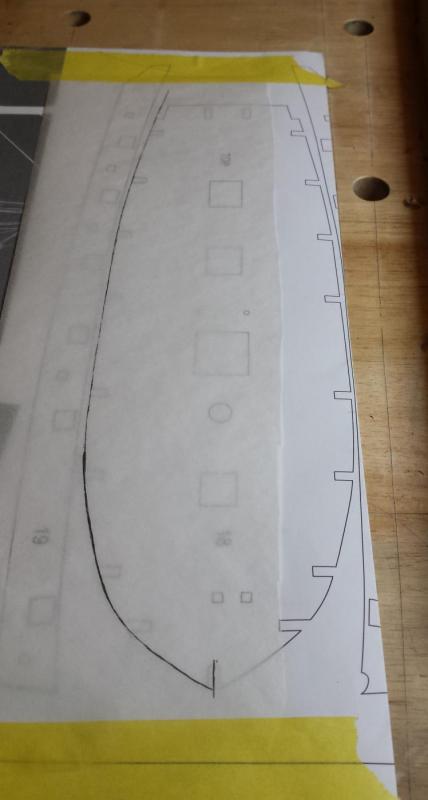
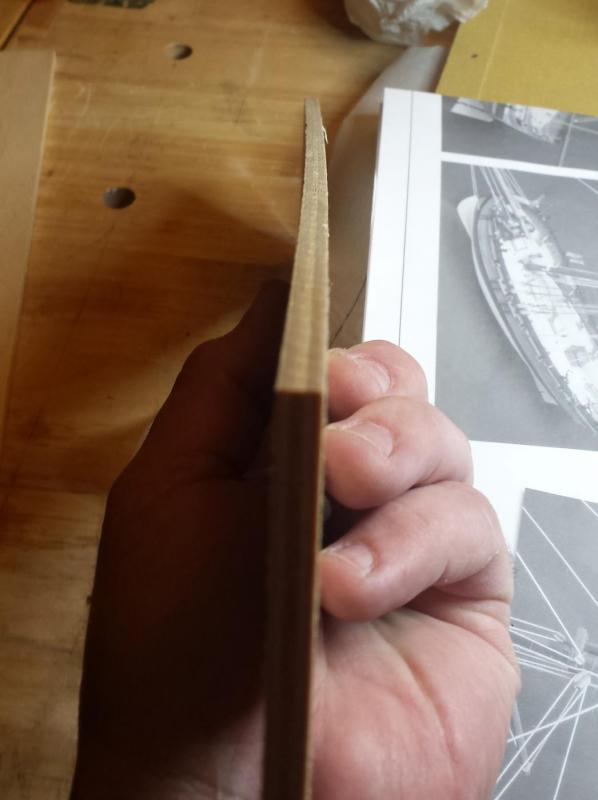
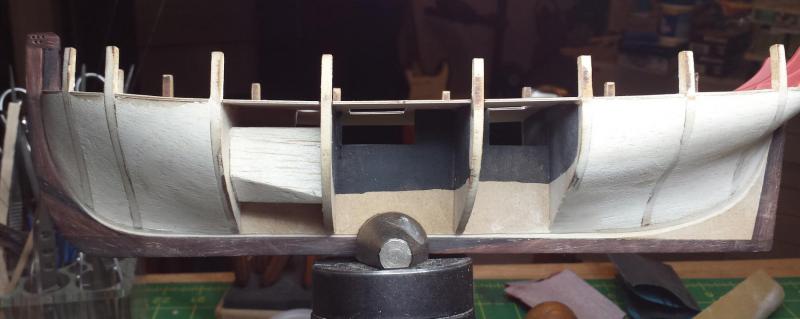
Thanks again Rick, that's what I'll do then. And yes inner stern faces and bulwarks will be painted, one of the few places I'm sure I'm going to paint. You saw I already painted the fashion pieces with red ochre from Admiralty and come to think of it I need to stop and address that first, since that seems just too orange and would blend in too much with the overall mostly browns this thing is going to be. I want the red to be a point of contrast so I need to mix a red I can live with and repaint the fashion pieces that color. But it will be somewhere between red ochre and the eye-blinding pure Admiraly Ensign Red. So first this evening I finished the rabbet on the port side, I did a bit better this time and I worked it a bit longer in practice for doing the final planking rabbets that need to be dead on. I'm good with this, although I look forward to doing a ship where the keel is correctly left off until after planking as cutting those rabbets will be trivial in comparison to this little bit of micro-surgery. Following your suggestion I soaked the bullwark strips in warm water for about an hour and then test-fitted, no pics as have to move quickly bending drying wood. I found there was a problem I should have anticipated, it wants to bend too much at the gunports where there is much less wood and not enough where there aren't gunports. So I was going to need to clamp both ways, clamping in against the bulkhead stanchions and also clamp out the too-much bends at the gunports. So I decided to make a caul, that would let me do both. So I went and looked at my scrap plywood and couldn't find the 1/2" I wanted but found something better, a warped 1/4" piece. The warp would help it follow the deck sheer of this little ship, and I could just CA glue two pieces together to get my 1/2" piece. Traced the pattern. The yellow tape is Frog delicate surface masking tape that works great for taping things on plans, it holds quite well while coming off without doing any damage. And it still works well for masking, at least straight lines. Glued pattern trying to use glue only on the waste side, so theoretically the paper mostly just falls off after you're done cutting. I put in a couple of flats in case I needed heavier clamping. Slightly concave and that is perfect for a caul, just clamping the center will generate some clamping pressure across the whole strip. This is a final dress rehearsal dry fit. The caul worked well in that I could clamp it fully into the correct line. However, I found I had to move much more quickly than I like to when gluing something very important like this, and even though the top view line is perfect, I wasn't sure wheter it was aligned vertically exactly as I couldn't see the bottom line in some places. So instead of moving ahead with gluing this, I decided to leave it clamped like this overnight to dry and set to this shape. That should mean I can glue it without the caul and just use normal clamps and I won't need to move as quickly. So I know this method will work, but it's more complicated than I think it should be, so with the other one I'm going to try my plank bender. And that will be tomorrow, since I also had to do some other things and didn't have much time.


- 714 replies
-
- 5
-
-
- lady nelson
- victory models
- (and 1 more)
-
Rick is there any reason not to add the stern fascia after adding the upper bulkhead strips? As far as I can see just prevents you from letting deck planking run long and trim later, and I don't see that as a big issue since I plan to add waterways and to toggle in the deck planks. I hate the fashion pieces hanging out in space begging to be broken, adding the fascia would stabilize the inner ones until we add the counter after planking.
- 714 replies
-
- 2
-
-
- lady nelson
- victory models
- (and 1 more)
-
Thanks Pat. And Rick yes, good point, it could have been worse Hardly tragic anyway, will fix it this evening and hope to get the bulkhead strips installed at least.
- 714 replies
-
- 2
-
-
- lady nelson
- victory models
- (and 1 more)
-
Are they going to be painted? If so cut them off, make new square tops, drill matching holes on each side and glue with dowel or better yet carbon fiber rod Even if you're not painting should still be doable, get matching grain pieces and get a good nearly invisible glue joint, that is perfectly possible with just two square (angle not shape) ends to glue together. It will be made all the more invisible by the change in shape, we expect grain to change when the shape changes significantly.
- 1,354 replies
-
- 2
-
-
- constitution
- model shipways
- (and 1 more)
-
Too red. Needs to be moved toward yellow a bit, and too saturated. That's to match what is on the ship now, not what my opinion of the color is.
-
Red Paint or Red Ochre
vossiewulf replied to davyboy's topic in Painting, finishing and weathering products and techniques
Also whoever said bulkheads were white, as far as I know that only started to become common in the late Georgian navy, they finally realized that extra light in the lower decks was more important than tradition. Prior to that the standard was red and I think red remained common on top deck bulkheads. -
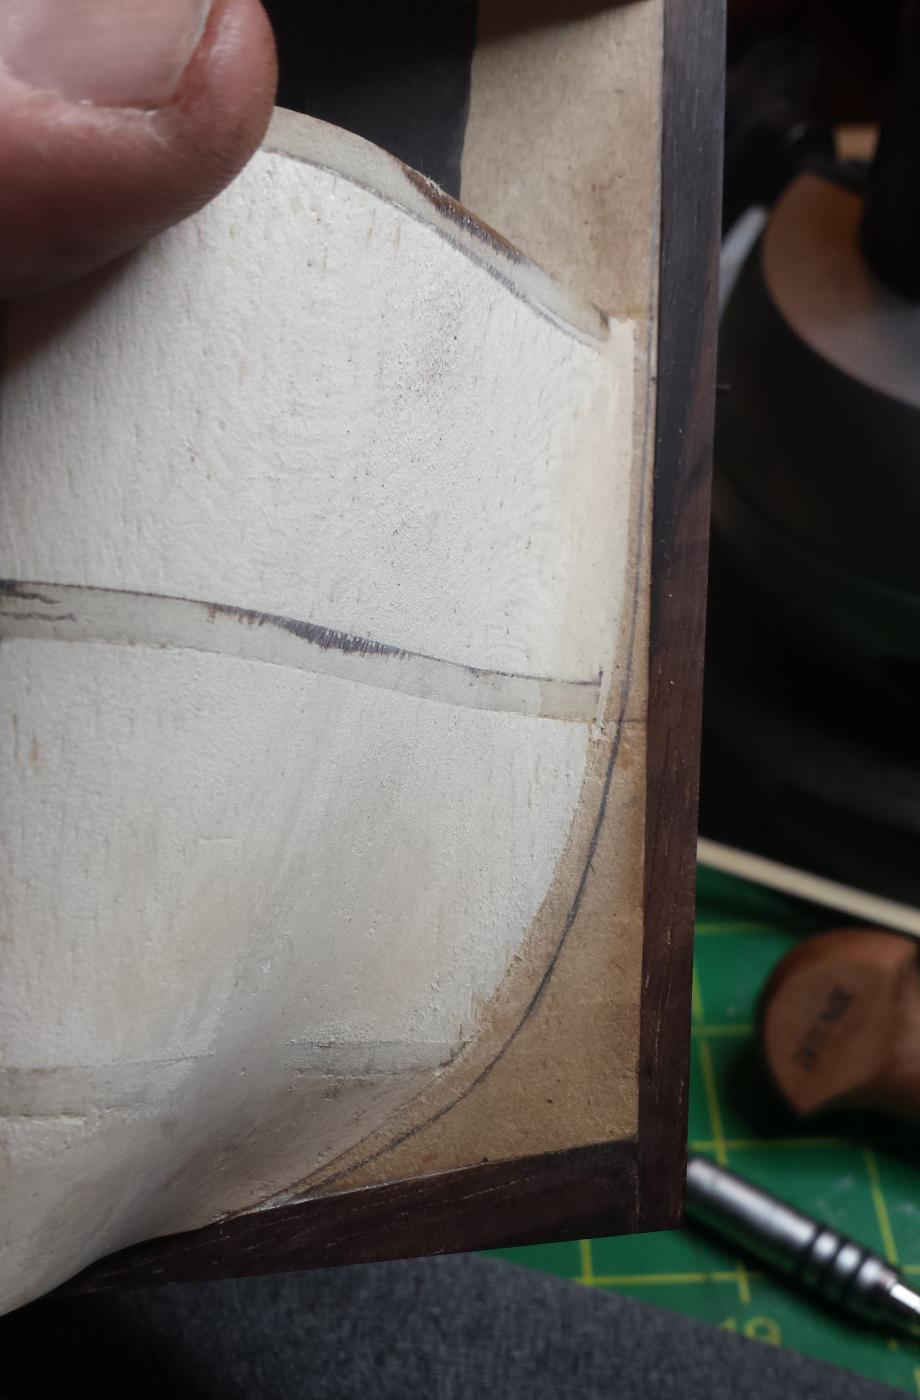
Being an optimist I'll assume the silence means the first rabbet looks ok. Got paged for a work crisis not long after I got home and had to get the team back online to deal with that, so I only had about an hour this evening. I marked out and was quickly moving through doing the other side when one of my checks noticed something odd, and lesson for the evening turned out to be that if you're going to use where each bulkhead bottoms out as a reference point you should check that this side matches the other side first. One of six wasn't symmetrical, it was almost 1/32" short. Was odd because I thought I had checked for symmetry repeatedly through the previous processes. So will have to be finished tomorrow.

- 714 replies
-
- 2
-
-
- lady nelson
- victory models
- (and 1 more)
-
The advanced model will have a small level in the front piece to keep yourself straight.
-
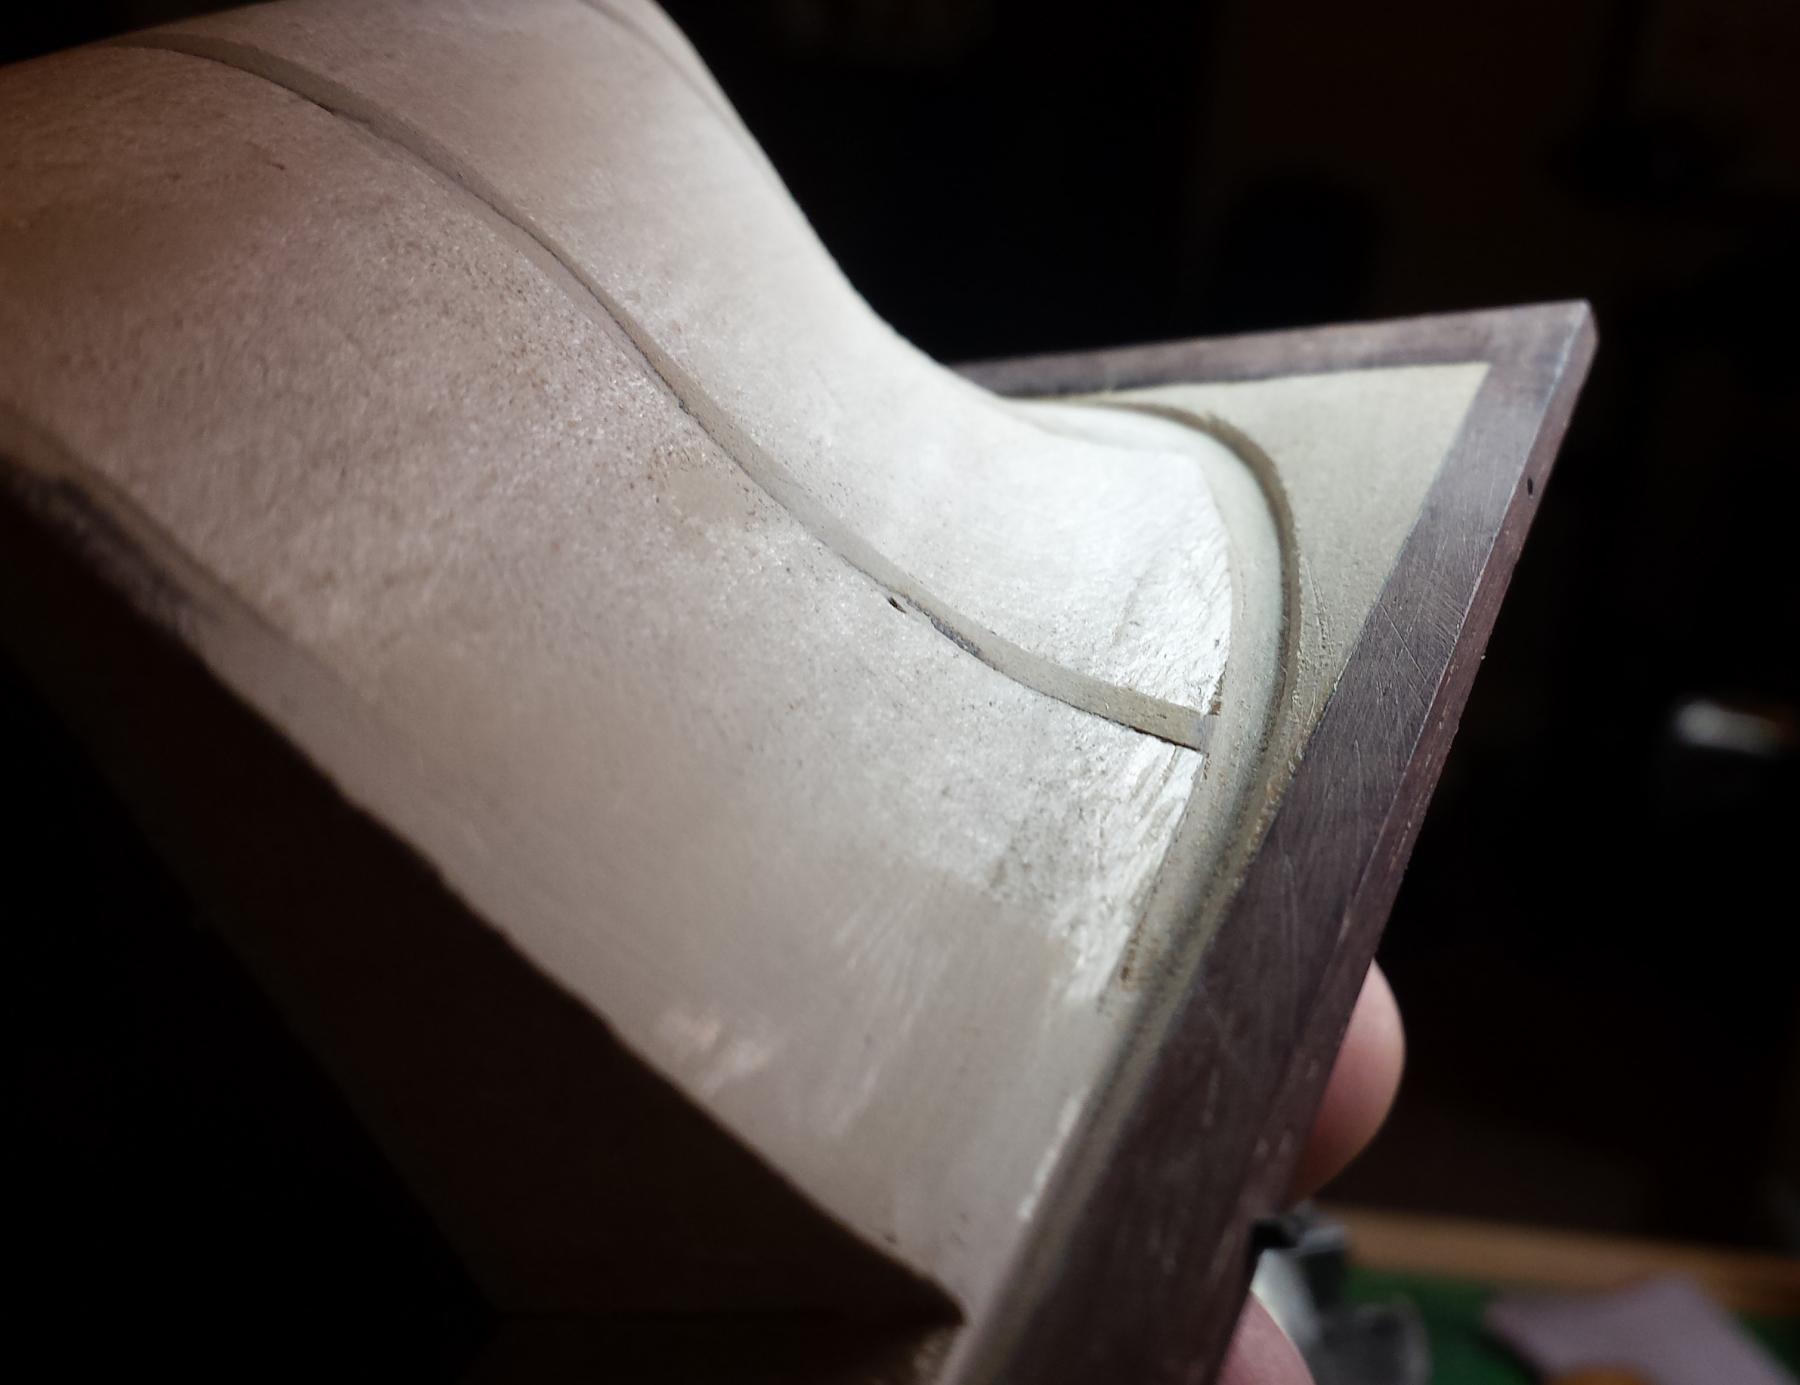
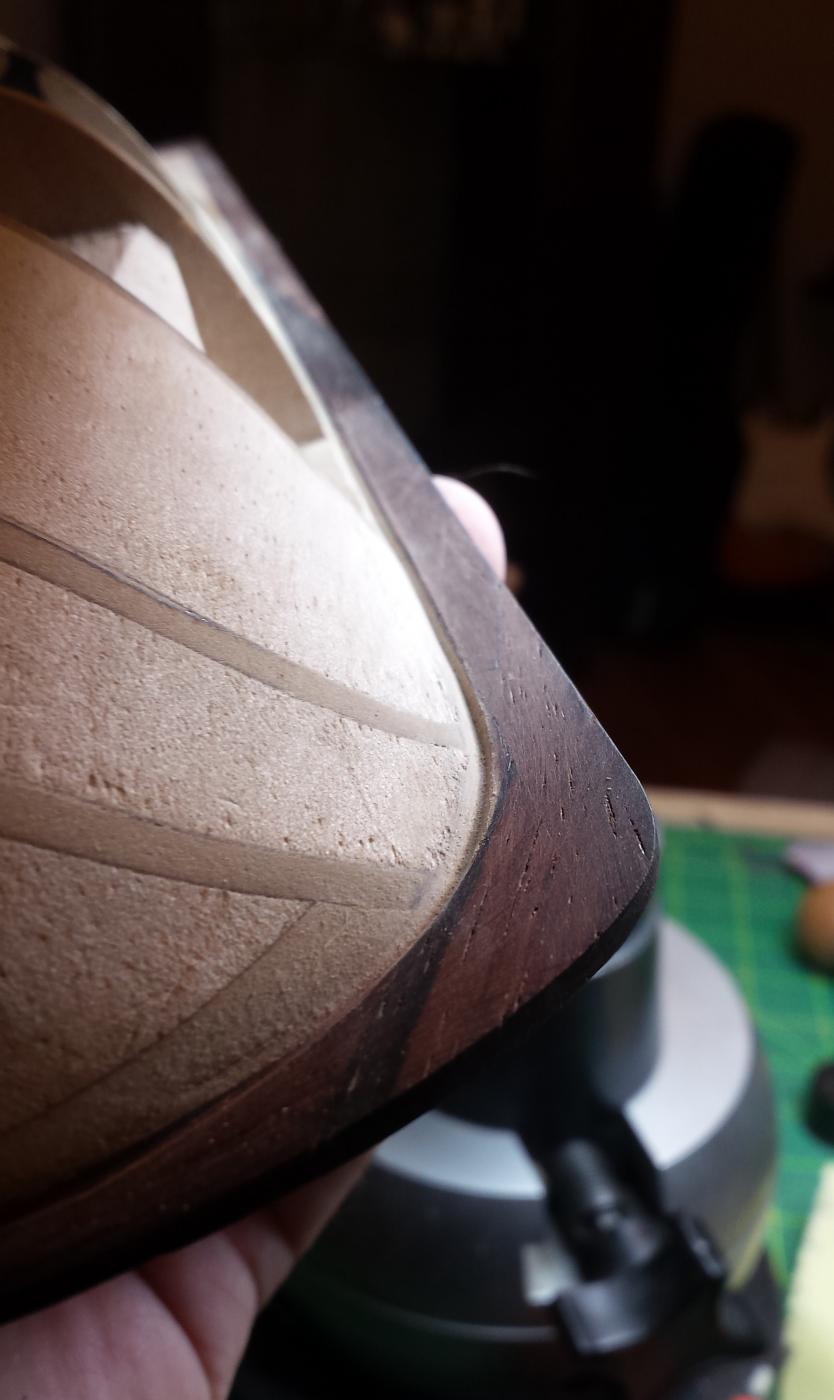
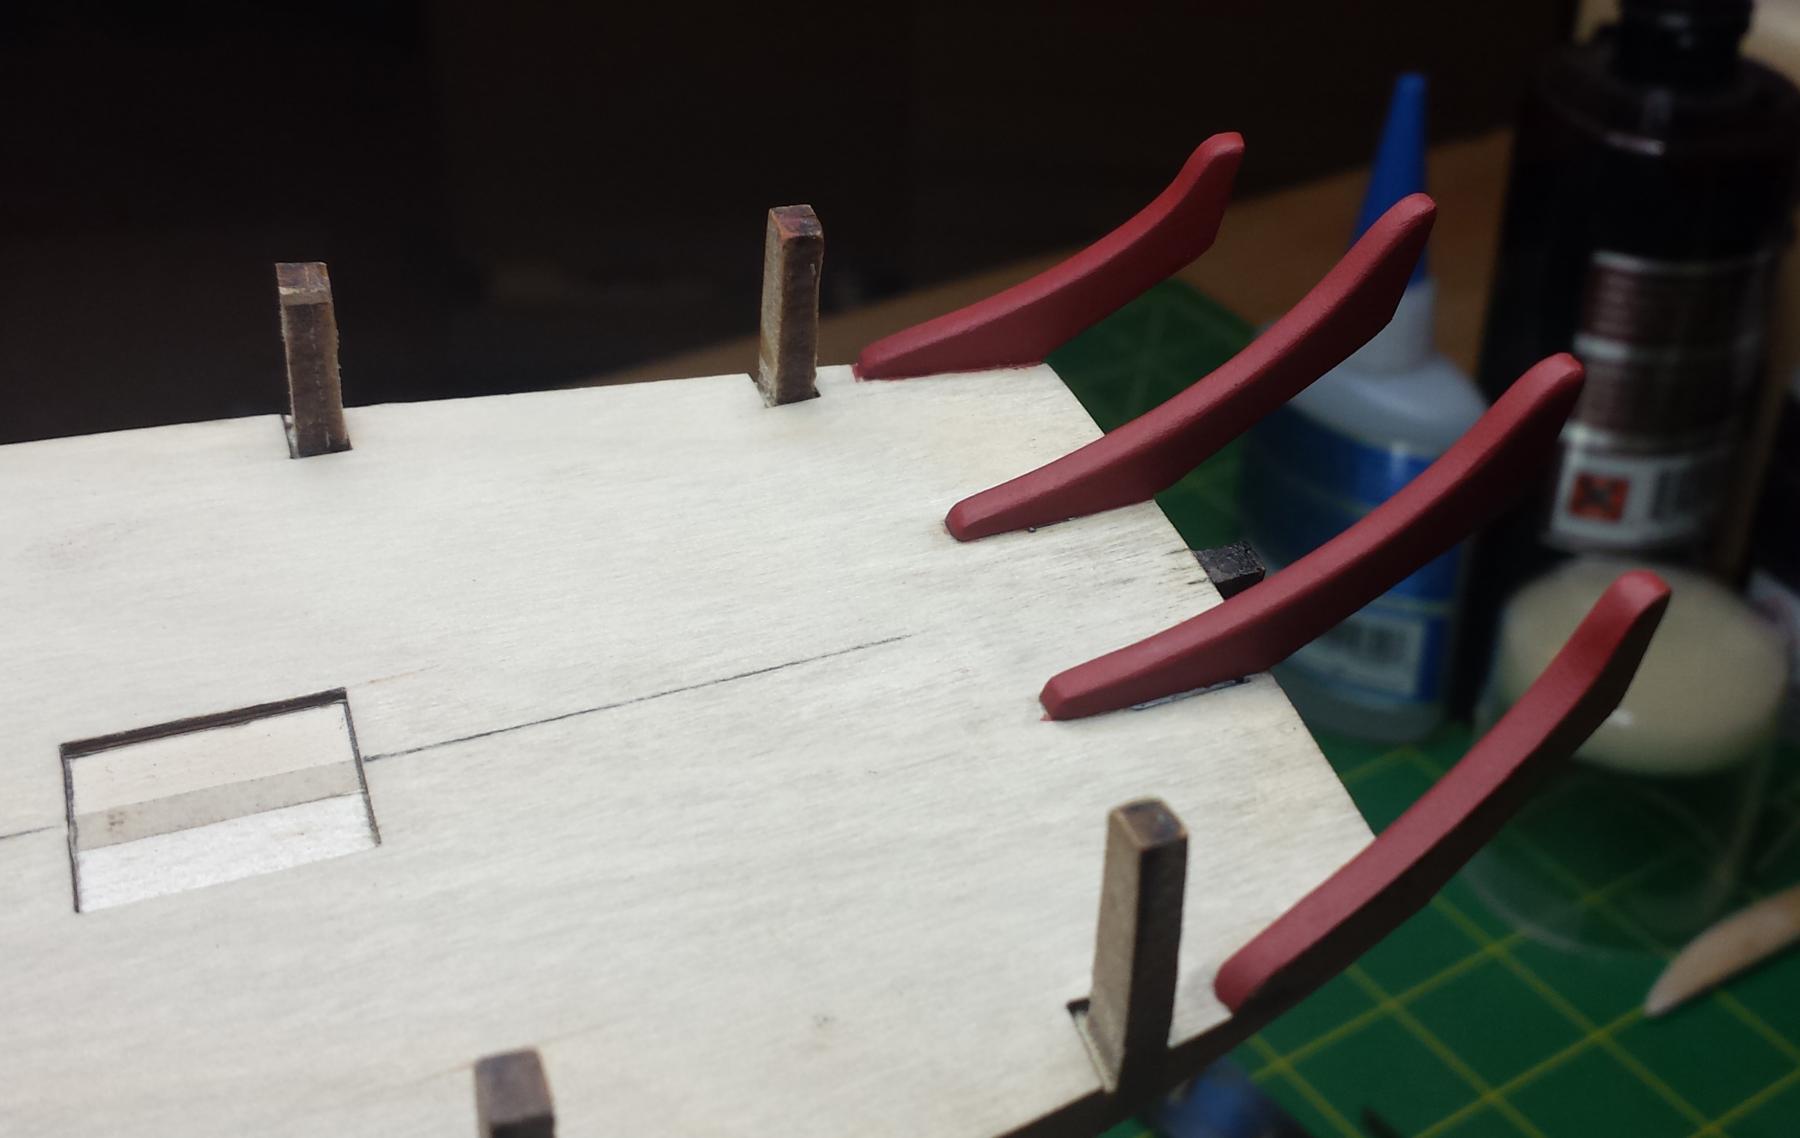
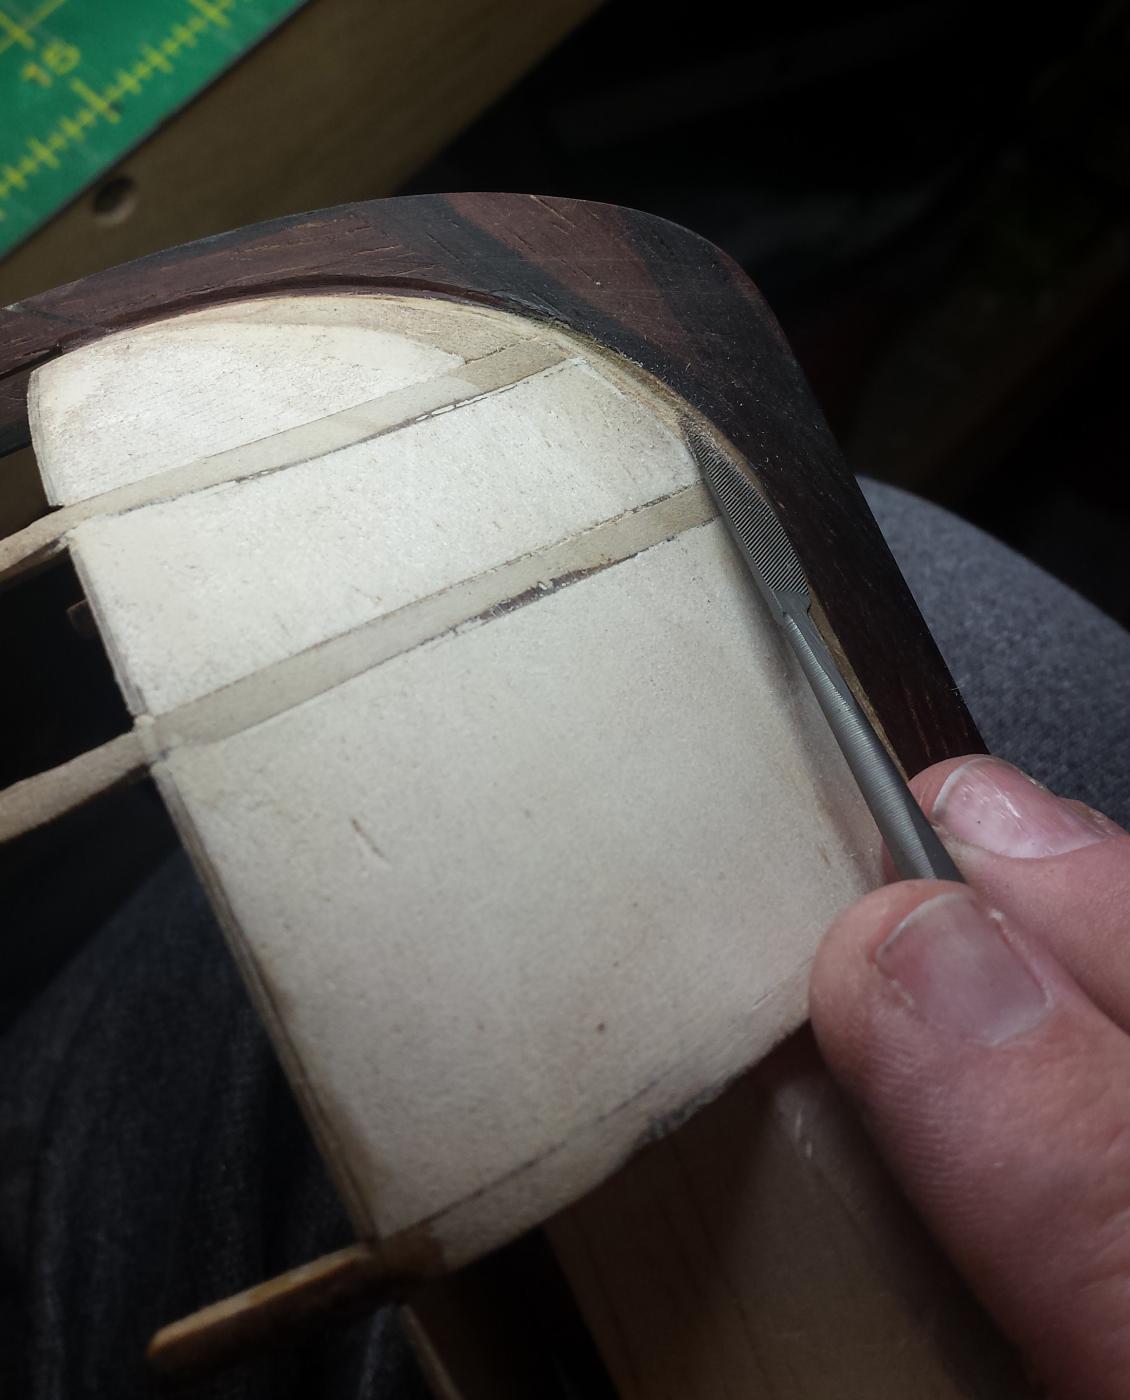
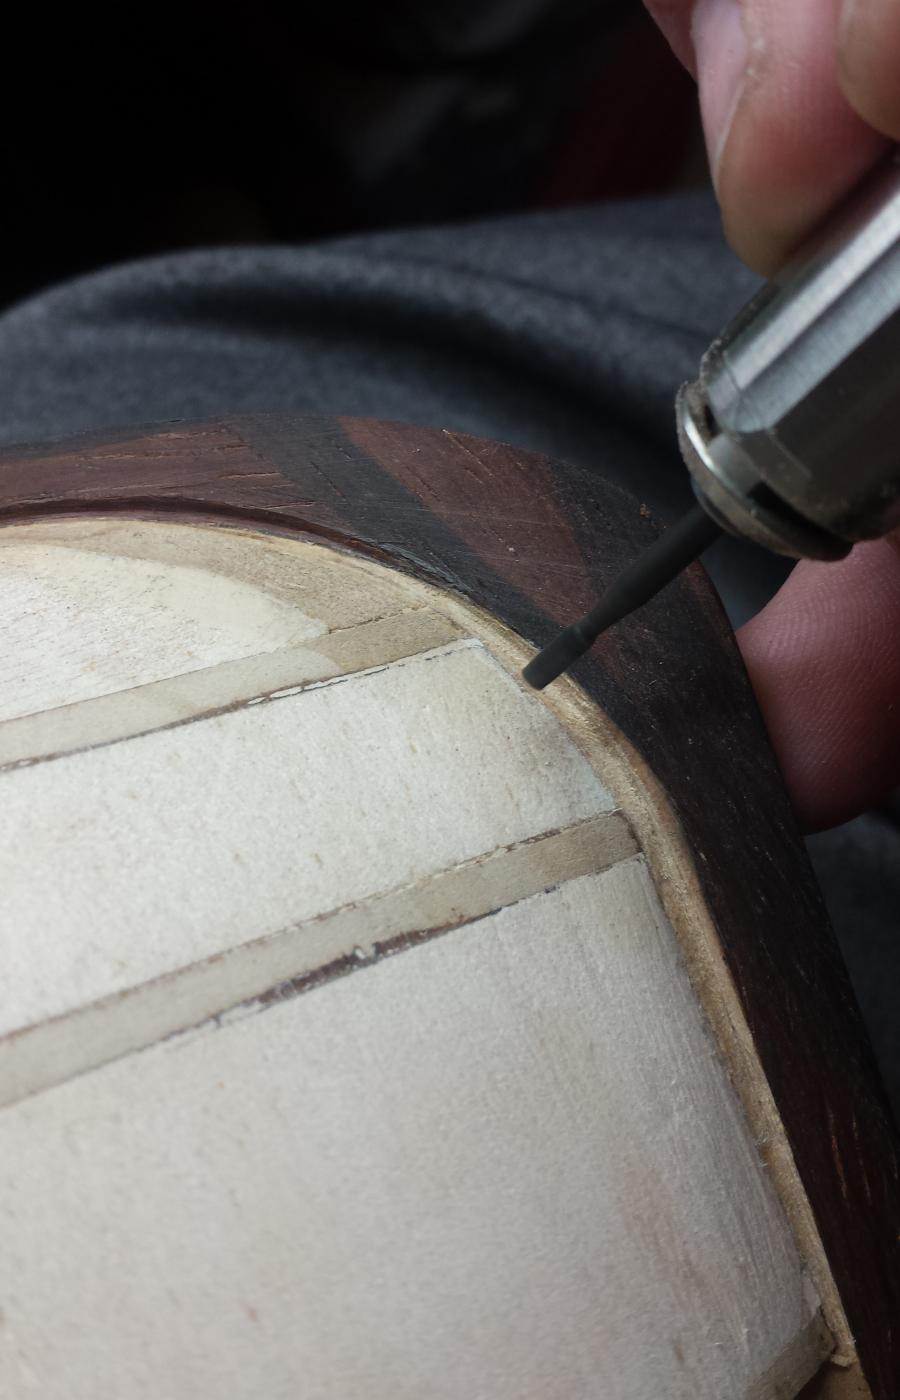
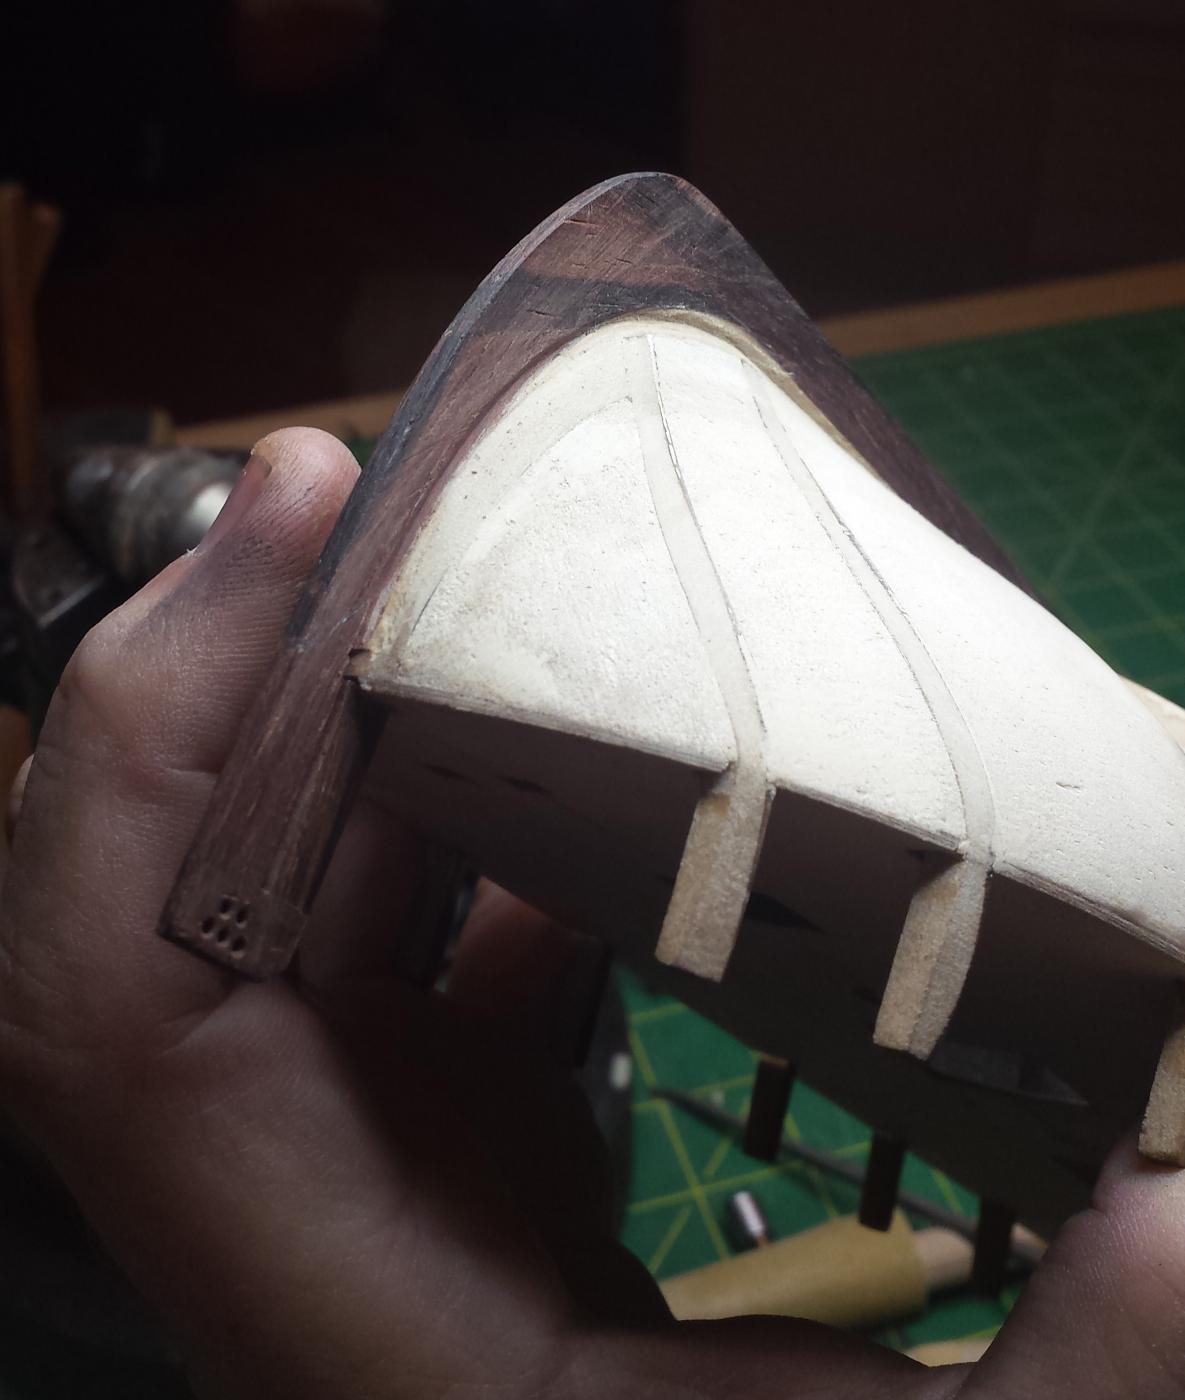
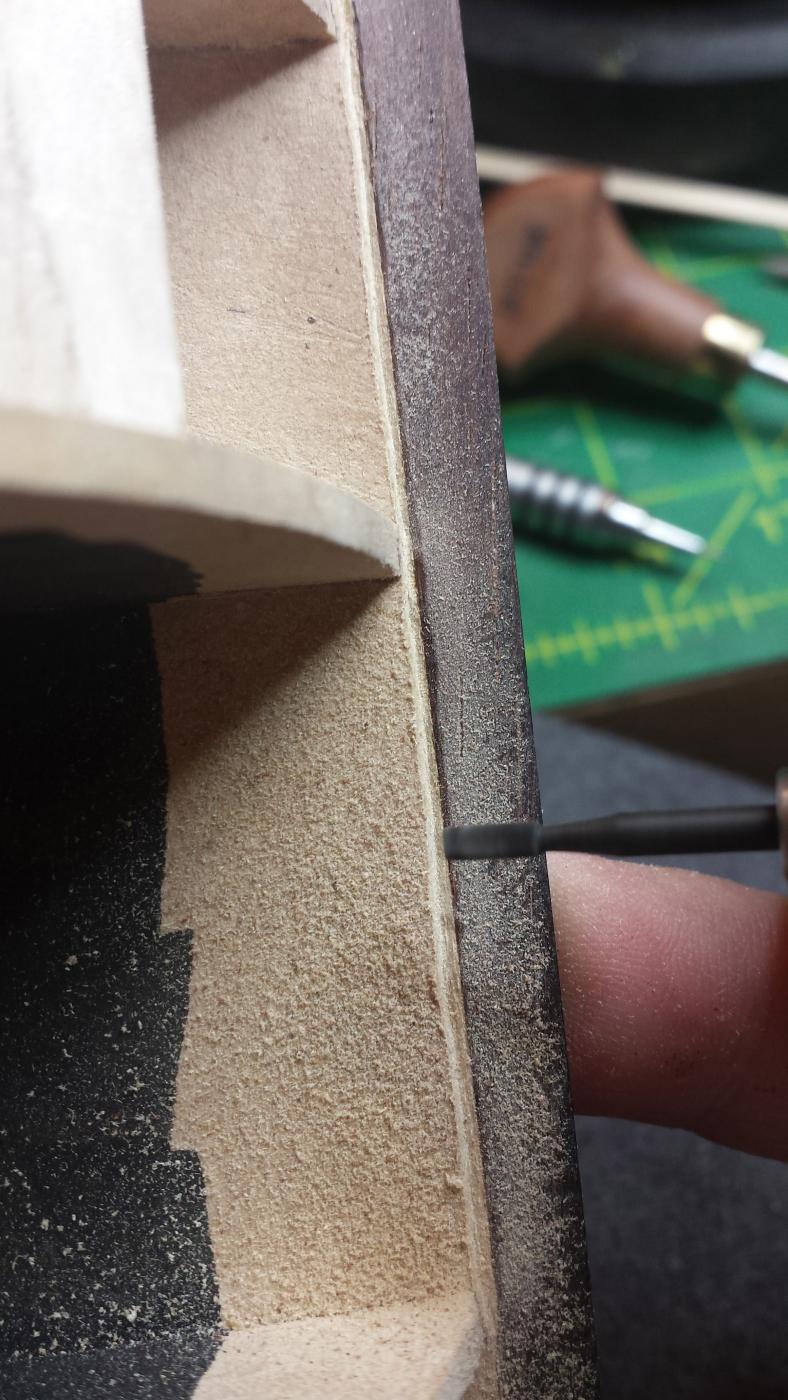
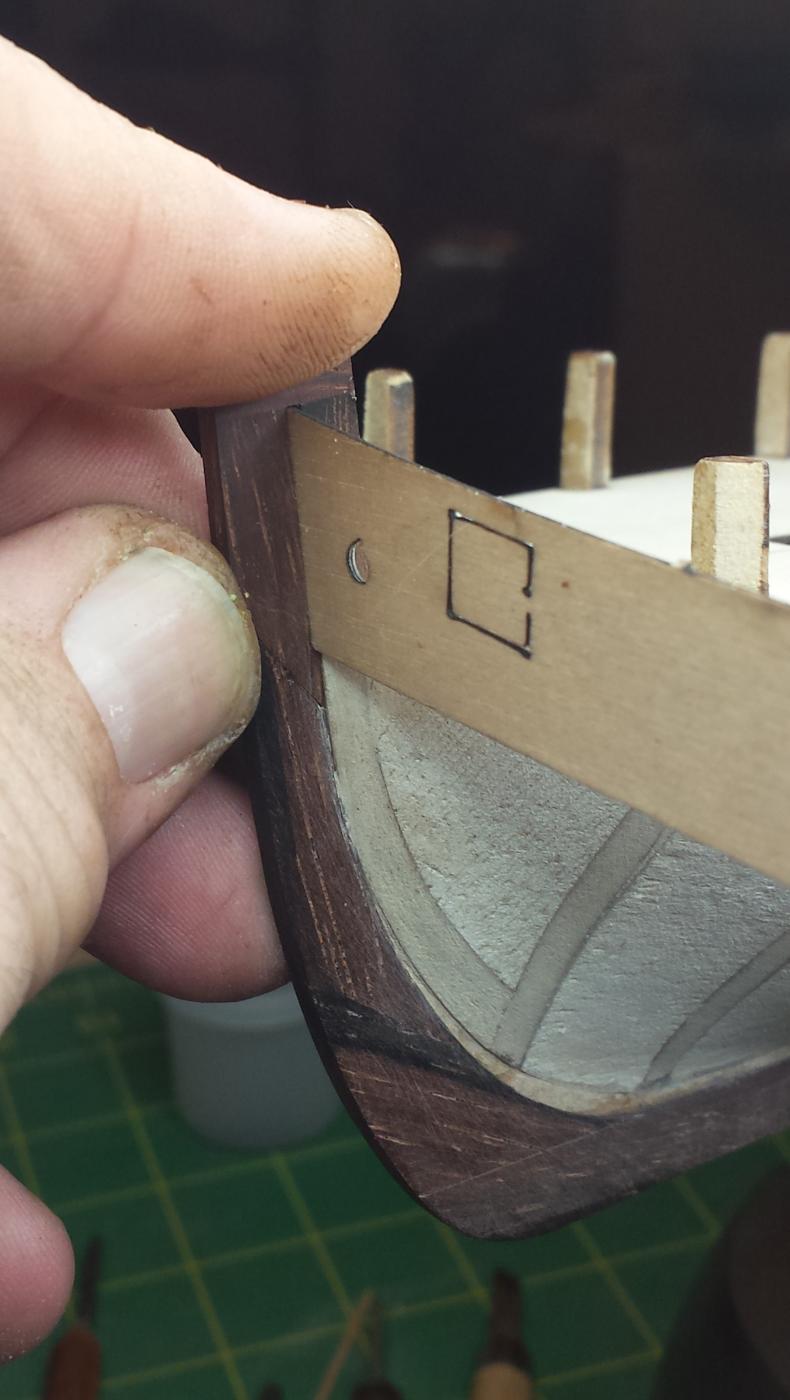
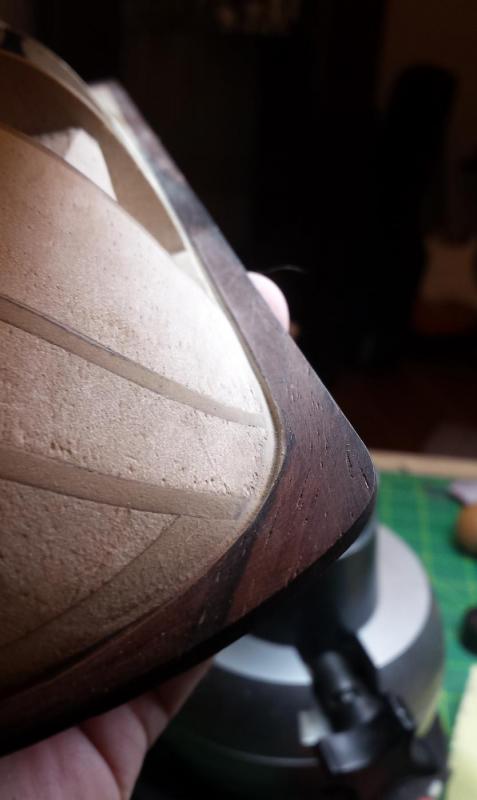
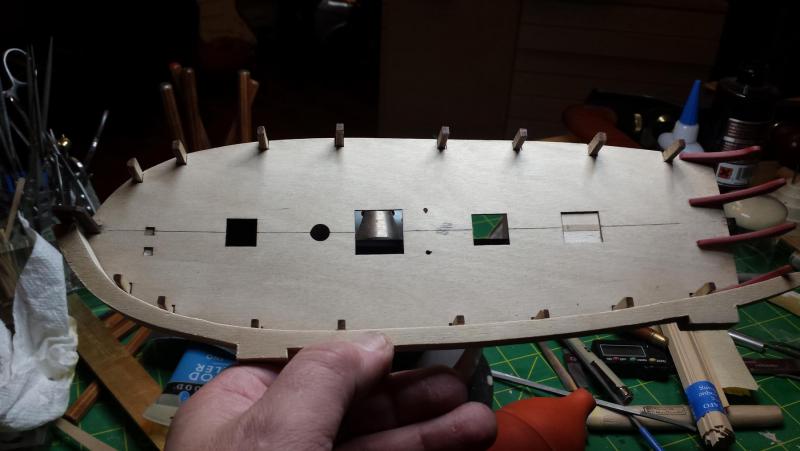
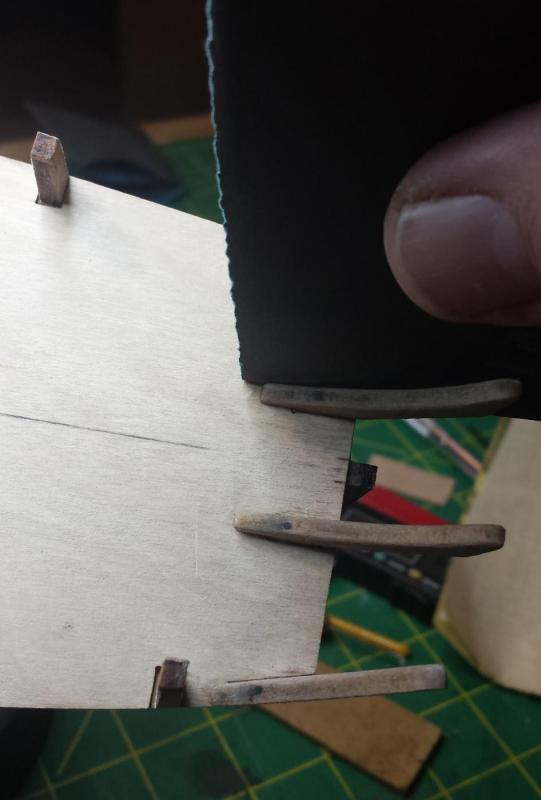
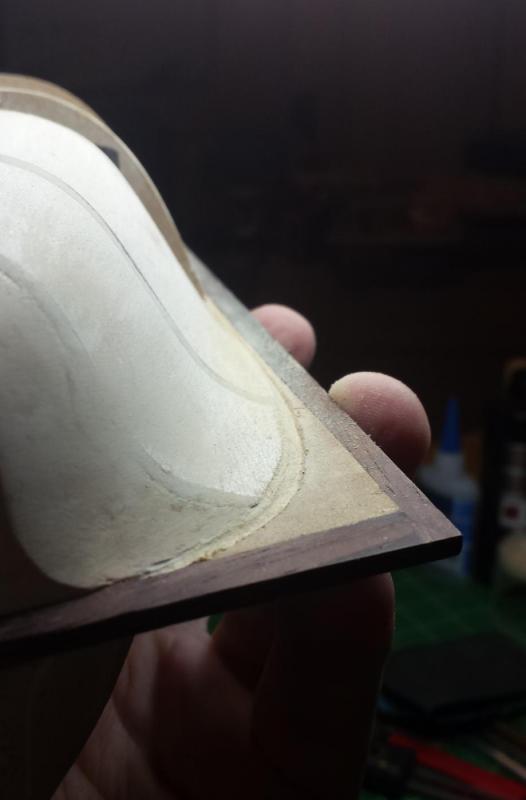
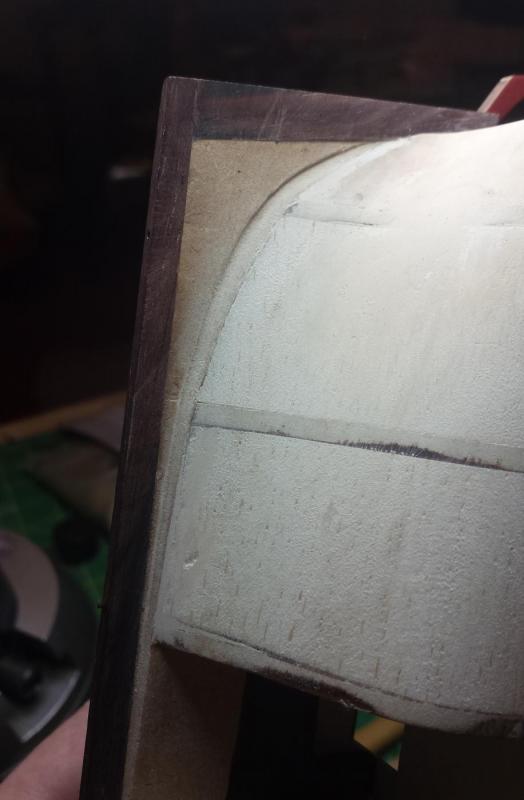
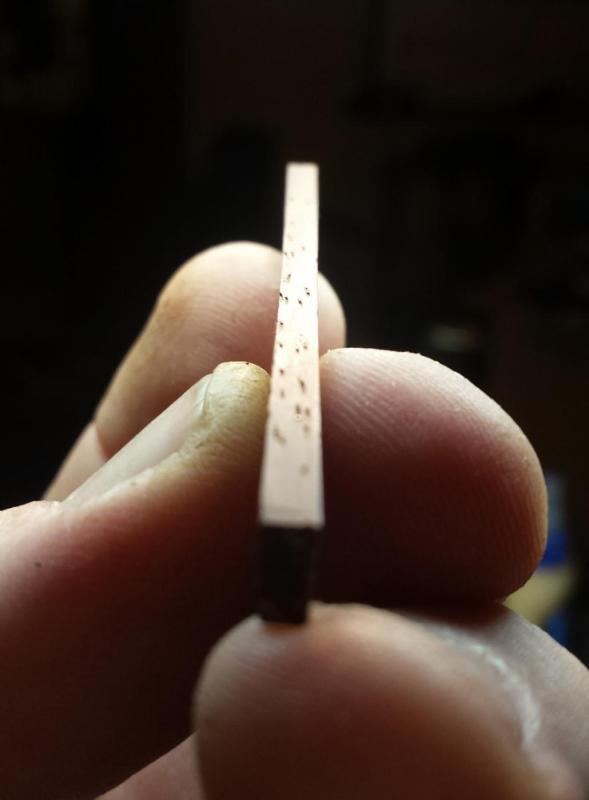
More the merrier But I've seen your build, the only ideas you're going to get from me are wood choices ;-) So anyway I got to cut a planking rabbet for the first time this evening, and I have one side done and will finish the other tomorrow. Will go much quicker tomorrow; since I'd never done this and as you folks have seen I'm a heavily armed modeler with eleventy zillion tools, I briefly tried a series of options before I settled on what was a very good solution (for me), However first, I've been looking at my Admiral Paints Ensign Red and thinking it's (on scale 0-255) hue is about 3, saturation is 255, value 255. In short about as absurdly bright as modern chemistry can make red paint and it simply is not conceivable to me that that's an accurate color. I posted a question about it over in the paints forum. will see what they say. In the meantime decided to try out their red ochre. Although it's probably too orange, it has a saturation and value much more in line with what I would expect from 18th century ship paints. It's the fashion pieces we're talking about now, I'm about to add the upper bulwark strips that glue to the outer fashion pieces, so from here they just get more inaccessible and I decided I wanted to paint them now. First I hit them with a couple coats of a clear flat sanding sealer and smoothed down all the MDF fuzz. Then gave it three thin coats of the Admiral red ochre. I just wish the hue was a less orange. Marking rabbet. Notice my stem piece glue line was really not good on this side, not sure how but at least it's straight. Very disappointed with that, may have to fix it. As noted tried a few tools briefly but closed in on this- a small square end mill in my Nakanishi turning at 40k RPM to rough out and just one riffler file to finish. I'm not sure I would try this with a Dremel, way too bulky and heavy with way more runout and vibration. Also this is a good quality and relatively new end mill, so there's almost no resistance from the wood allowing a very light touch. Only trick here is having the end mill be orthogonal to the end of the frame to cut the right angle and smoothly transition between those angles along the run. I did not come anywhere close to trying to cut it in one pass, this was very light touch slowly working down with lots of shallow passes, I find this rotary tool easy to control but it's a rotary tool which means you still can completely screw up your work in zero seconds flat so slow and careful is the watchword. This is what the stern looked like after the rotary tool work. And this particular riffler file is perfect for this application. I wish I could point you to the set I have but Otto Frei has changed the Gardon-Vallorbe riffler set they carry and the choices are a bit different. My set's made by GV and was about the same expense and I will growl at you if you get close to them. Still not perfectly straight but well within limits for first planking and I know I can make the second perfectly straight with just a bit more work. Remember the plan is separate rabbets for each planking layer due to thin keel and thick planking, that's why the rabbet at the stern ends well short of the rudder post.


- 714 replies
-
- 6
-
-
- lady nelson
- victory models
- (and 1 more)
-
More tools - Luthier, jeweler, fly-tying
vossiewulf replied to vossiewulf's topic in Modeling tools and Workshop Equipment
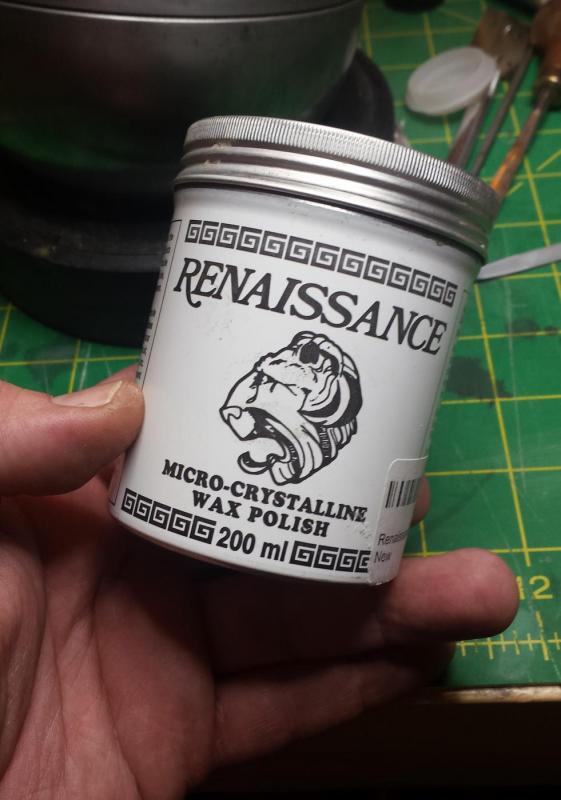
Another one, grab this wax, it's advertised as what the British Museum uses to protect its collection. I use it constantly as it's as easy to use as paste wax, but has no silicone like most paste waxes that can contaminate your woodworking area and ruin every finish you do for the rest of your life. I use it to protect steel, for plane bottoms and anything else that needs to be slippery, and both over finishes and as the sole finish. I've been totally happy with every application. Only downside is strong thinner smell, so you need ventilation if you're covering big areas. Renaissance Wax.- 86 replies
-
- 11
-
-
Red Paint or Red Ochre
vossiewulf replied to davyboy's topic in Painting, finishing and weathering products and techniques
We have a good discussion of what red ochre is and where it comes from, not so clear the OP's original question was answered clearly. I have a similar issue in that I have two Admiralty Paints, crimson and red ochre. Allegedly the crimson is right for RN gunport sills and inner bulwarks, but it is an insanely bright and saturated red to my eye. I find it hard to believe they could make that red at the time, and if they could, whether it wouldn't have faded almost immediately. I mean a modern paint manufacturer would hem and haw if you wanted to paint your house this color and have it remain color stable. So I am considering using the red ochre, this is going to be one of the few painted surfaces on the model, most of the rest is going to be stained/clear. In the end since I'm already violating correct color by not painting some of the surfaces, I'll use the color I want but like the OP I'm wondering what the color was that they really used and what it looked like 3 months after it was last painted. -
My question would be why, when you can have any color under the rainbow and have them be safe and stable long term by mixing alcohol-based aniline dyes? Best part is they're not pigment based, the color is molecular, so they don't occlude the underlying wood at all unless you go really dark If Gibson uses these every day to stain $4k Les Pauls in a thousand colors, it should be a good choice for ship modelers. I'm new to ships but not making things, example of the trust I put in them was a so-called luthier ruined the neck on my 1994 Strat by stripping the truss rod, so I made a replacement neck and had to match the 20 year old yellowed Fender clear. I also think they're very easy to use, best thing is to mix at 50% or 33% intended color so you can control better by putting a few coats on, and you also control color by how long you wait before wiping. With alcohol-based you can do coats about every two minutes since it dries immediately.

-
I just got a shipment from Chuck, I got one each of most of his rigging sizes and boxwood blocks and deadeyes in (I hope)the right sizes. I'll ask him.
- 714 replies
-
- 3
-
-
- lady nelson
- victory models
- (and 1 more)
-
I'm sorry I missed this yesterday, thanks for pointing to that. Considering the number of especially new people working on LN, we should put together a list of the oopses/WTFs?
- 714 replies
-
- 2
-
-
- lady nelson
- victory models
- (and 1 more)
-
BTW, why is that a boom and not a bowsprit, and why would they want to sometimes pull it partway in, which is the reason I've seen cited for it being mounted this way?
- 714 replies
-
- 2
-
-
- lady nelson
- victory models
- (and 1 more)
-
The thing about deadeyes is the circle is turned so we get side grain looking at that circle, and I've never tried to turn anything in that orientation, not sure how you keep the pieces from exploding all over in the process of working them down to your circle diameter. Especially as that sounded like haha! You're screwed now you need to make the dreaded 5 HOLE DEADEYE!
- 714 replies
-
- 2
-
-
- lady nelson
- victory models
- (and 1 more)
-
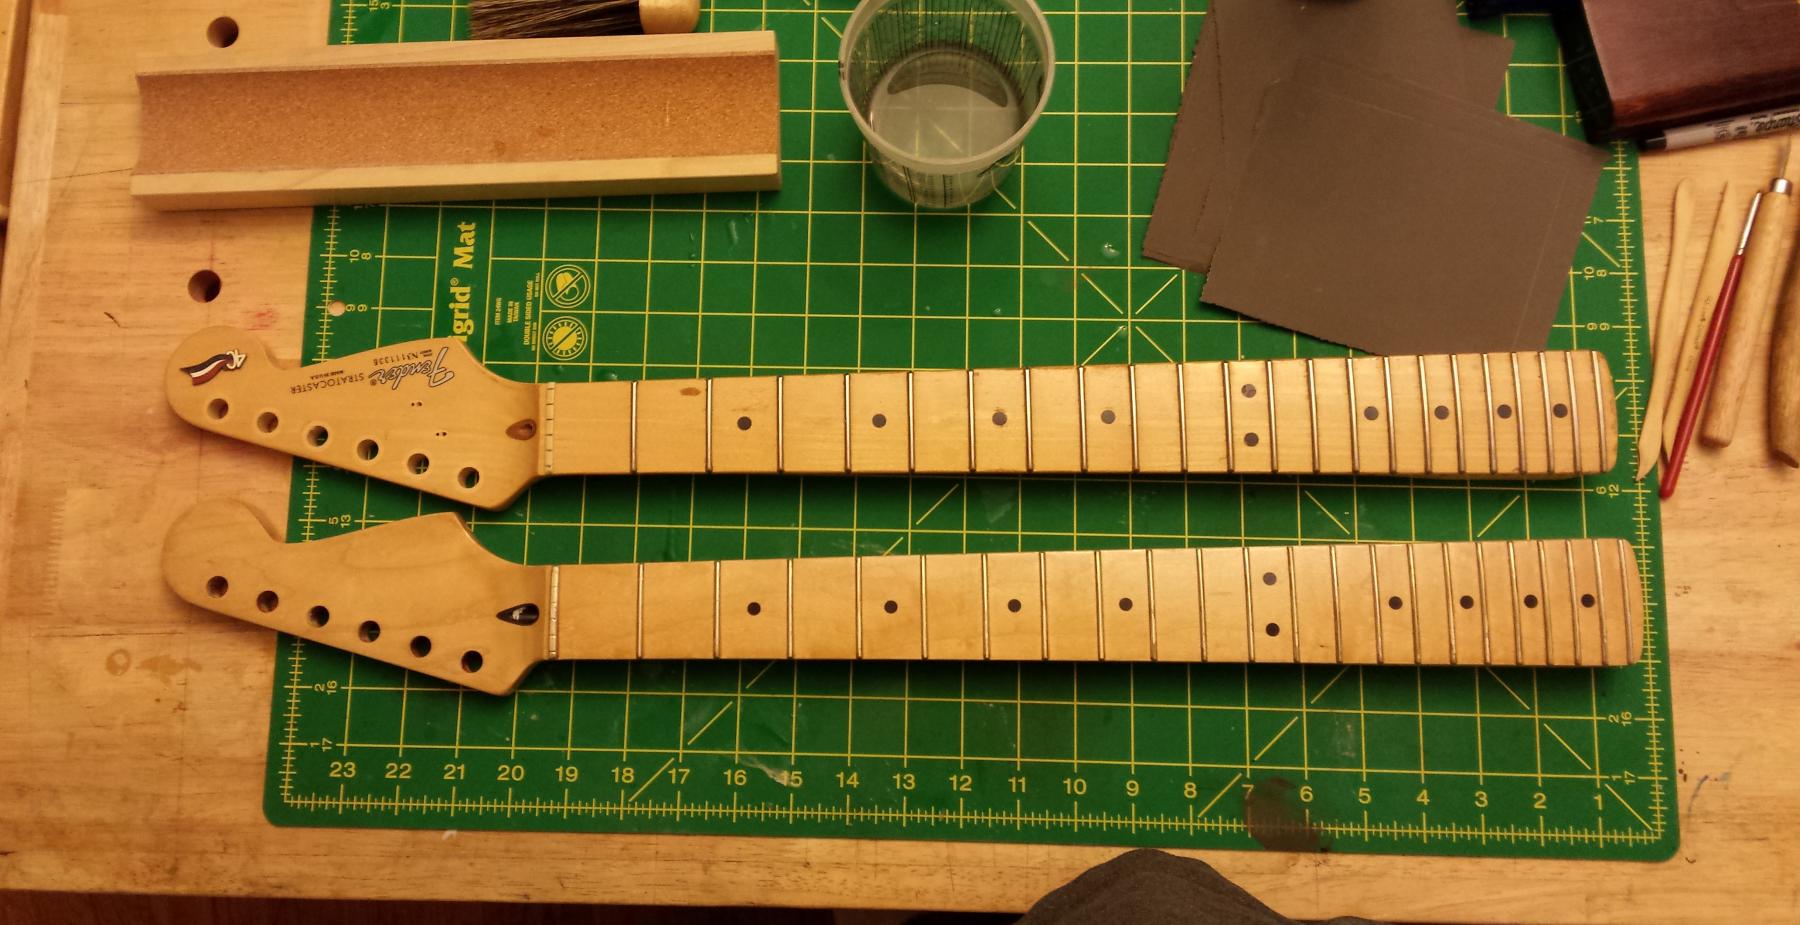
Tom, might want to try one of these (they even have one finer if this isn't fine enough) when doing the masts on the lathe. I haven't used them for specifically this purpose, but I have a different Iwasaki file and have used it very successfully for similar things. Unlike normal files, these teeth are milled with some kind of fly cutter in a circle the center point of which is maybe a foot beyond the handle of the file. So the teeth are also curved forward, and this file properly used will take shavings instead of dust and I'm guessing a fine or extra fine might leave a polished-looking surface much better than sandpaper unless you go out to like 2500 grit. Iwasaki 8" Extra Fine Side Float
- 1,354 replies
-
- 3
-
-
- constitution
- model shipways
- (and 1 more)
-
I'm not seeing anything one could complain about, looks very good.
- 453 replies
-
- 6
-
-
- thermopylae
- sergal
- (and 1 more)
-
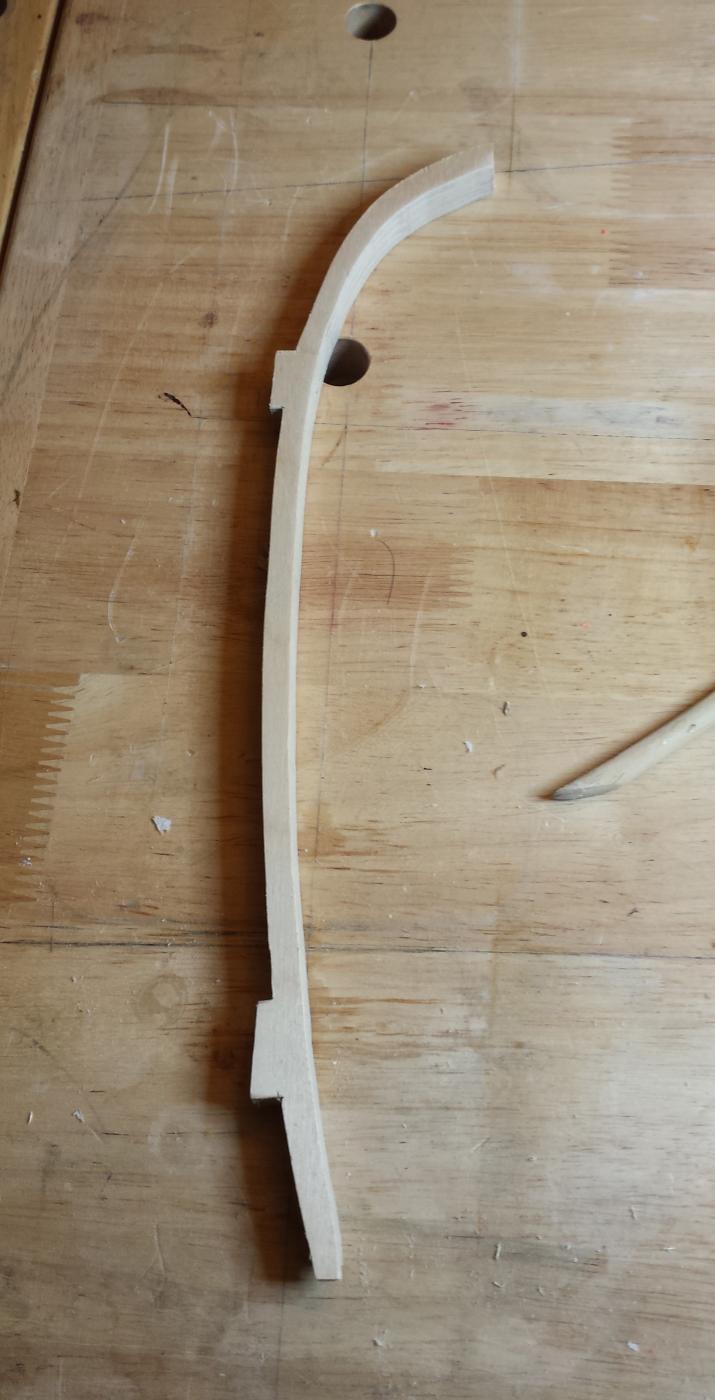
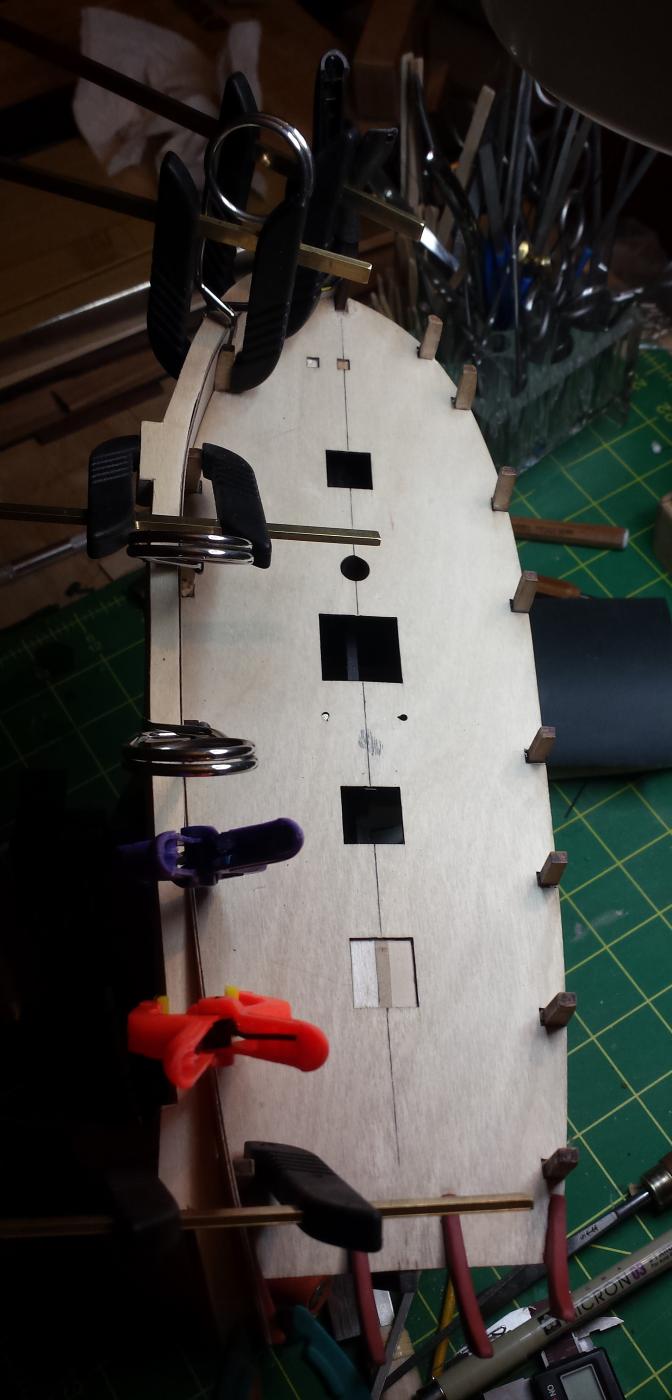
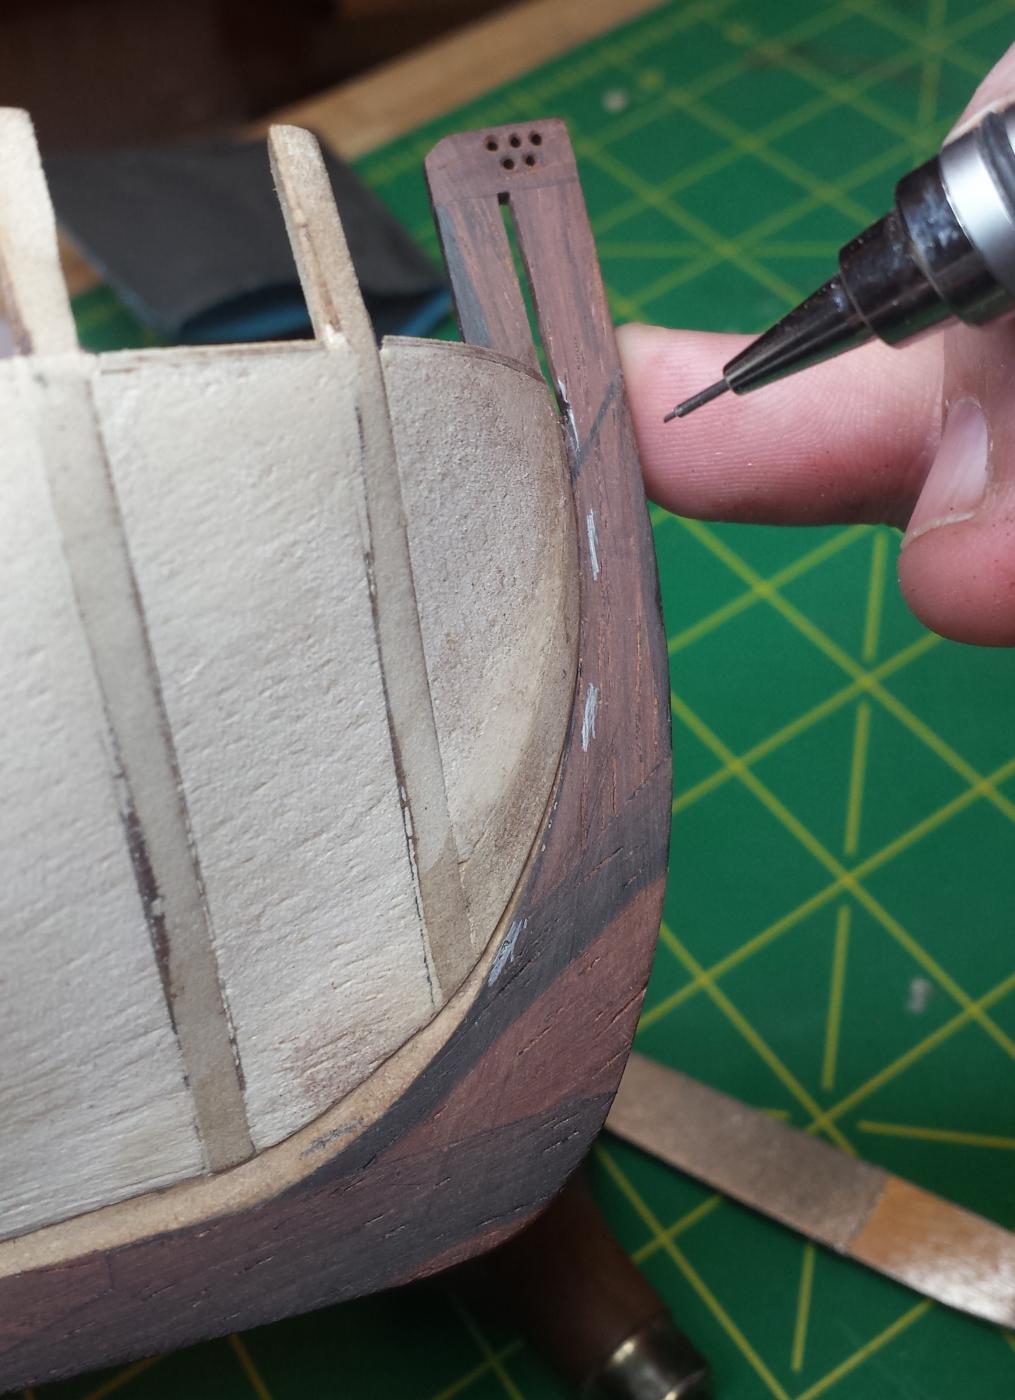
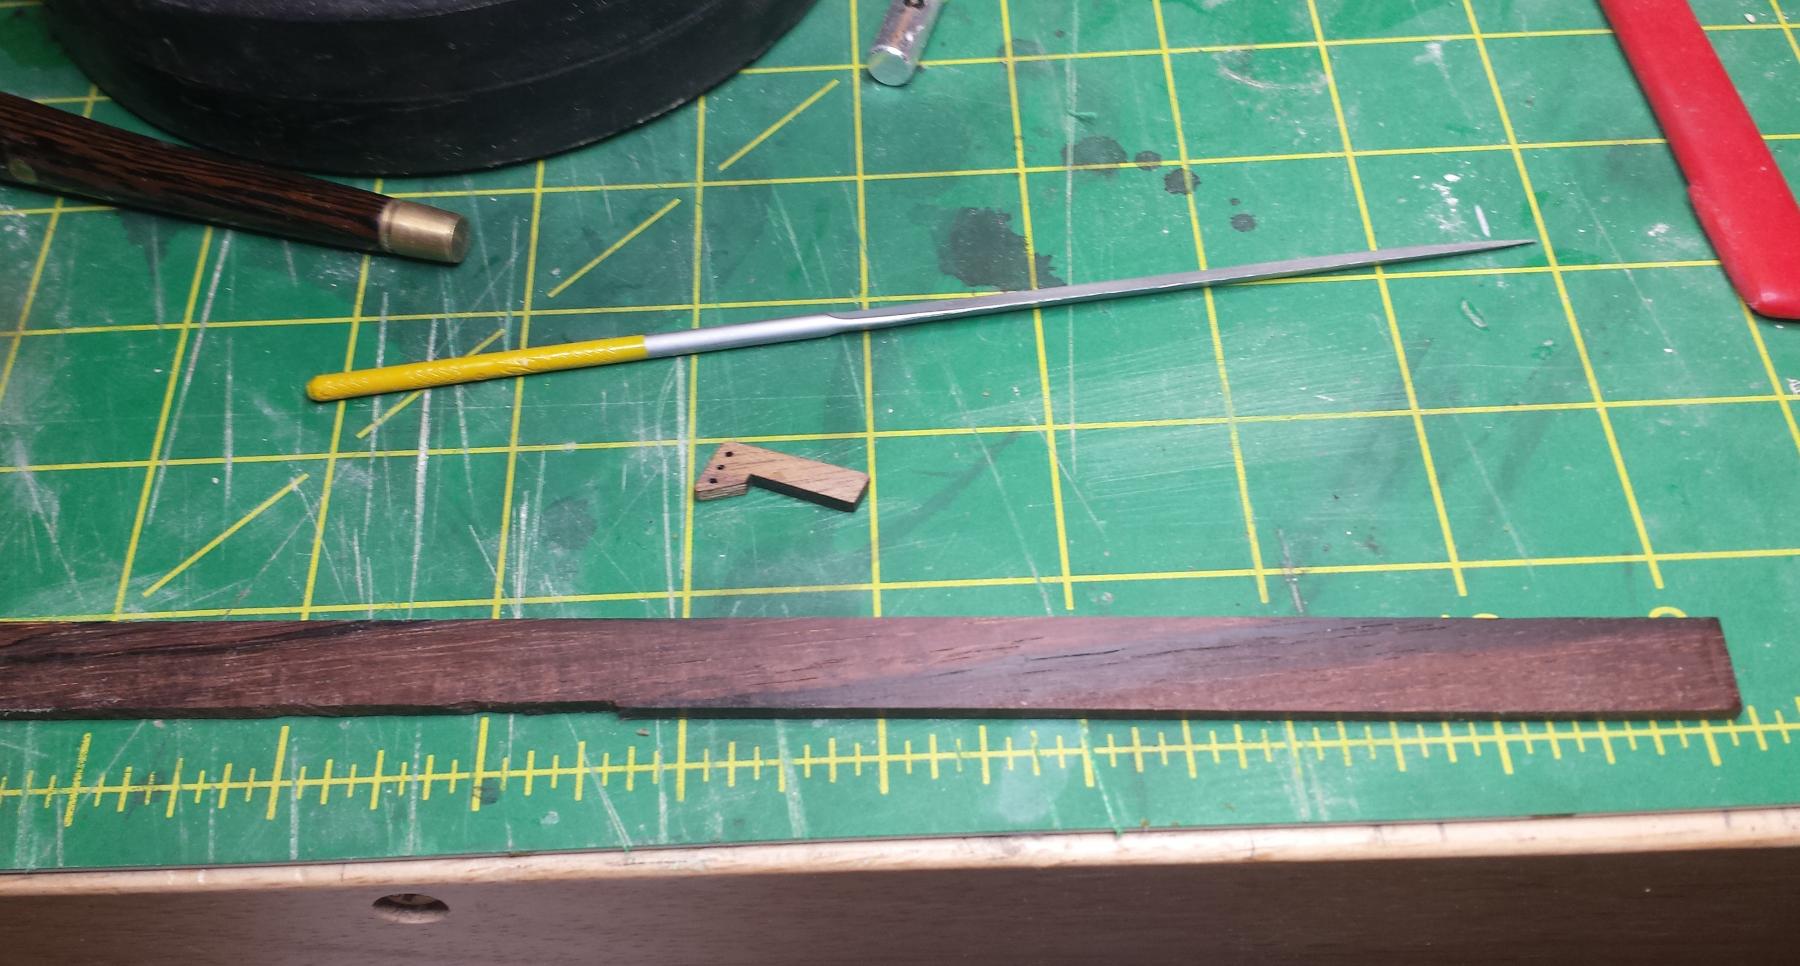
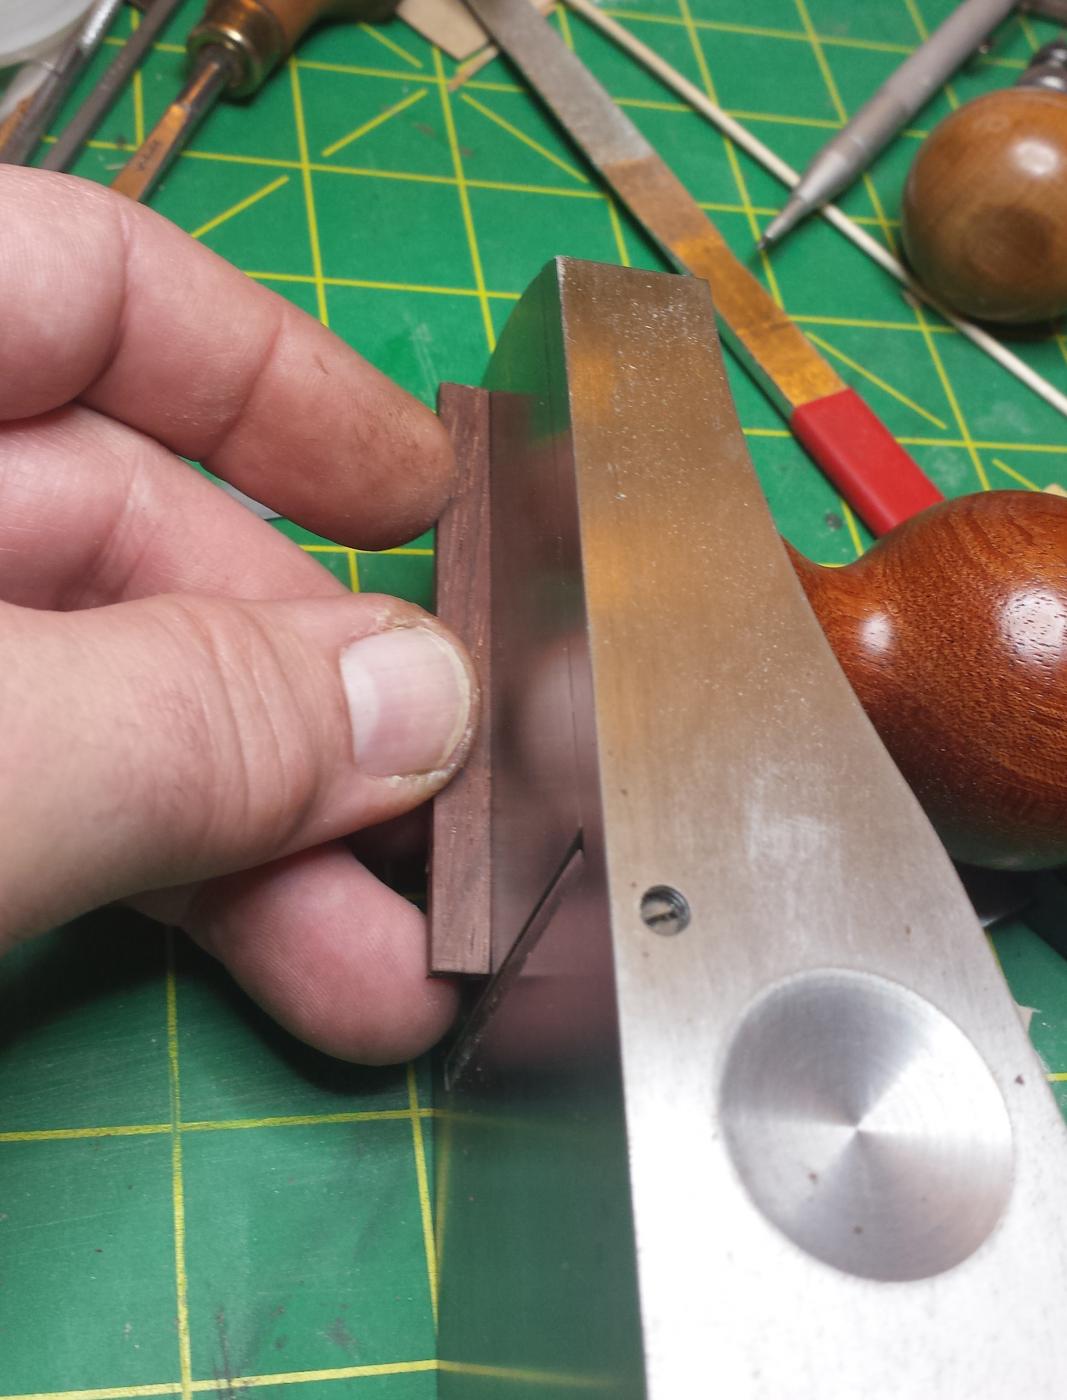
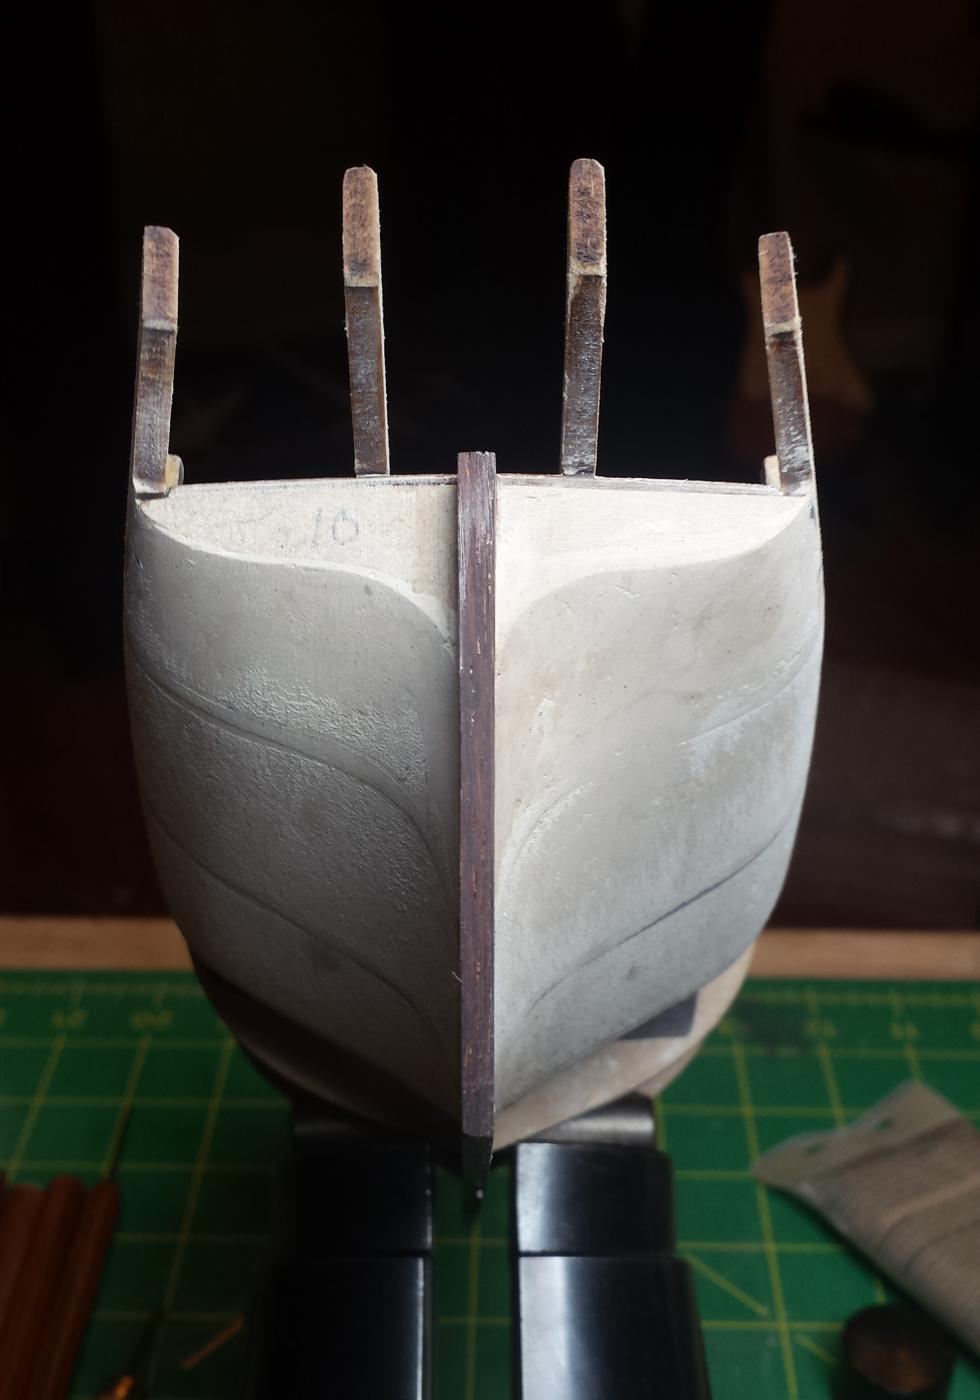
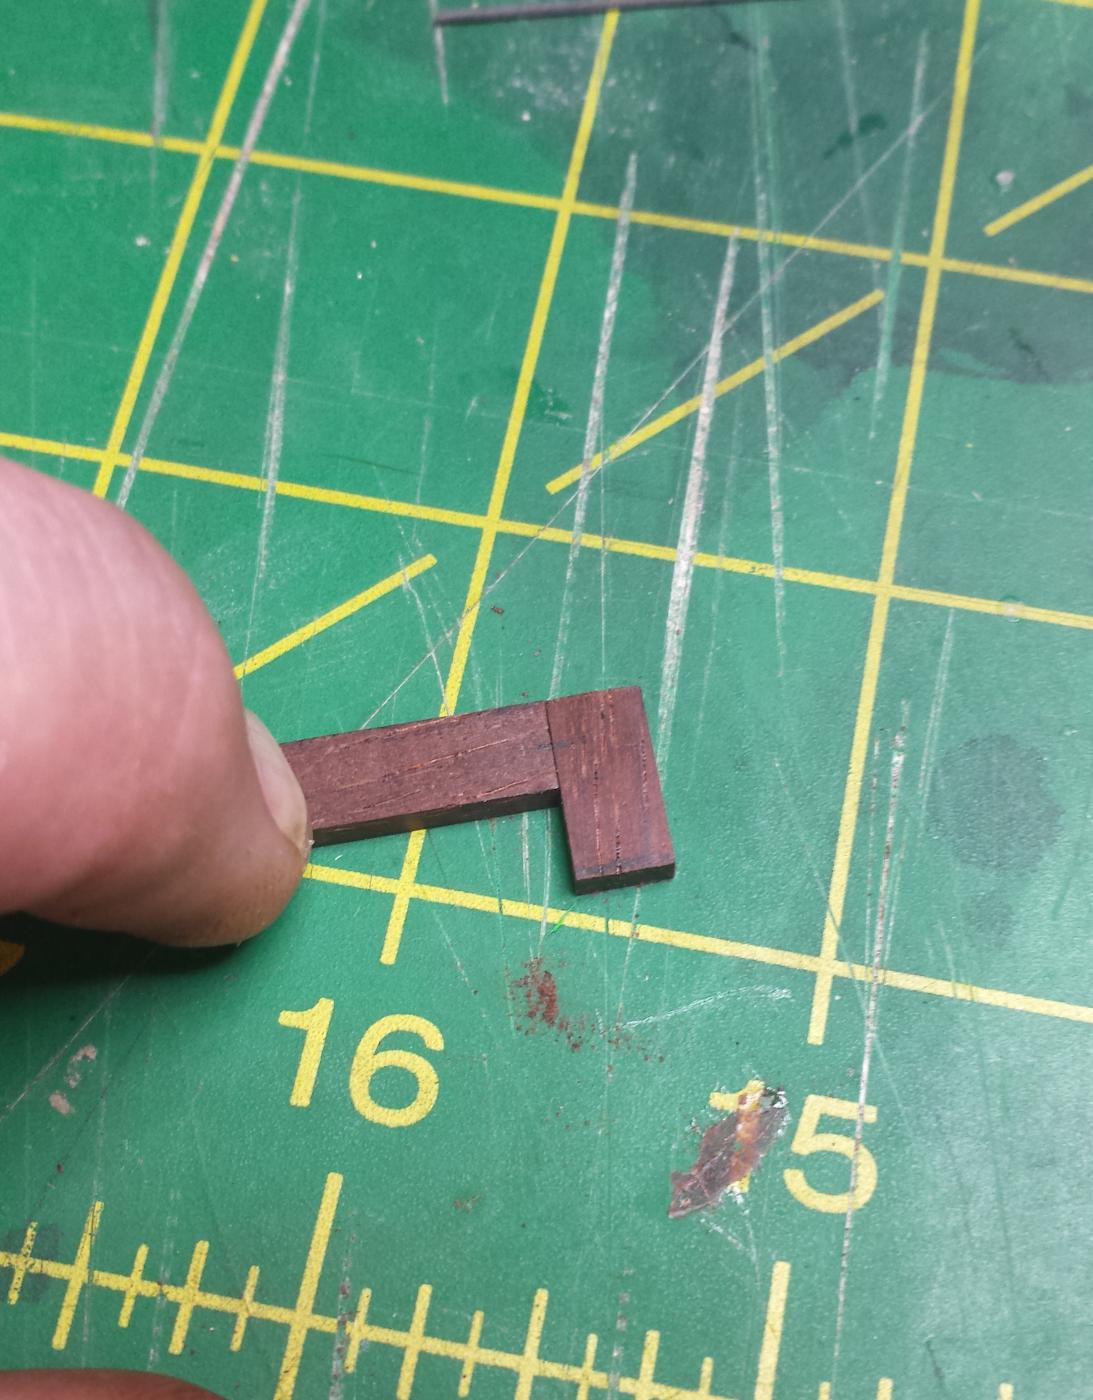
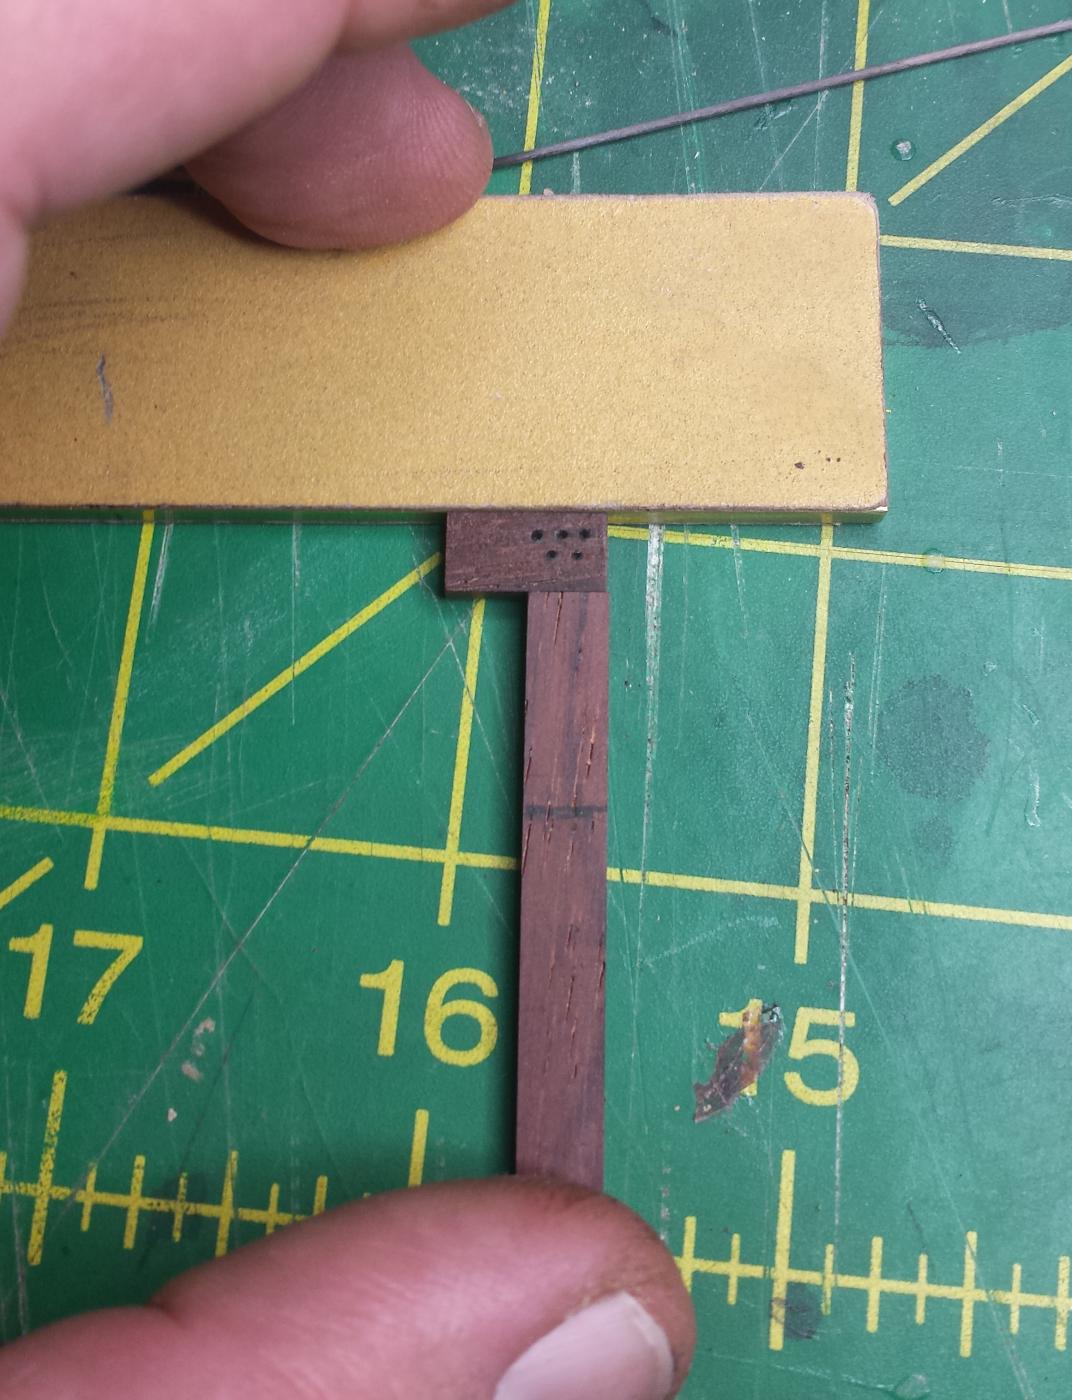
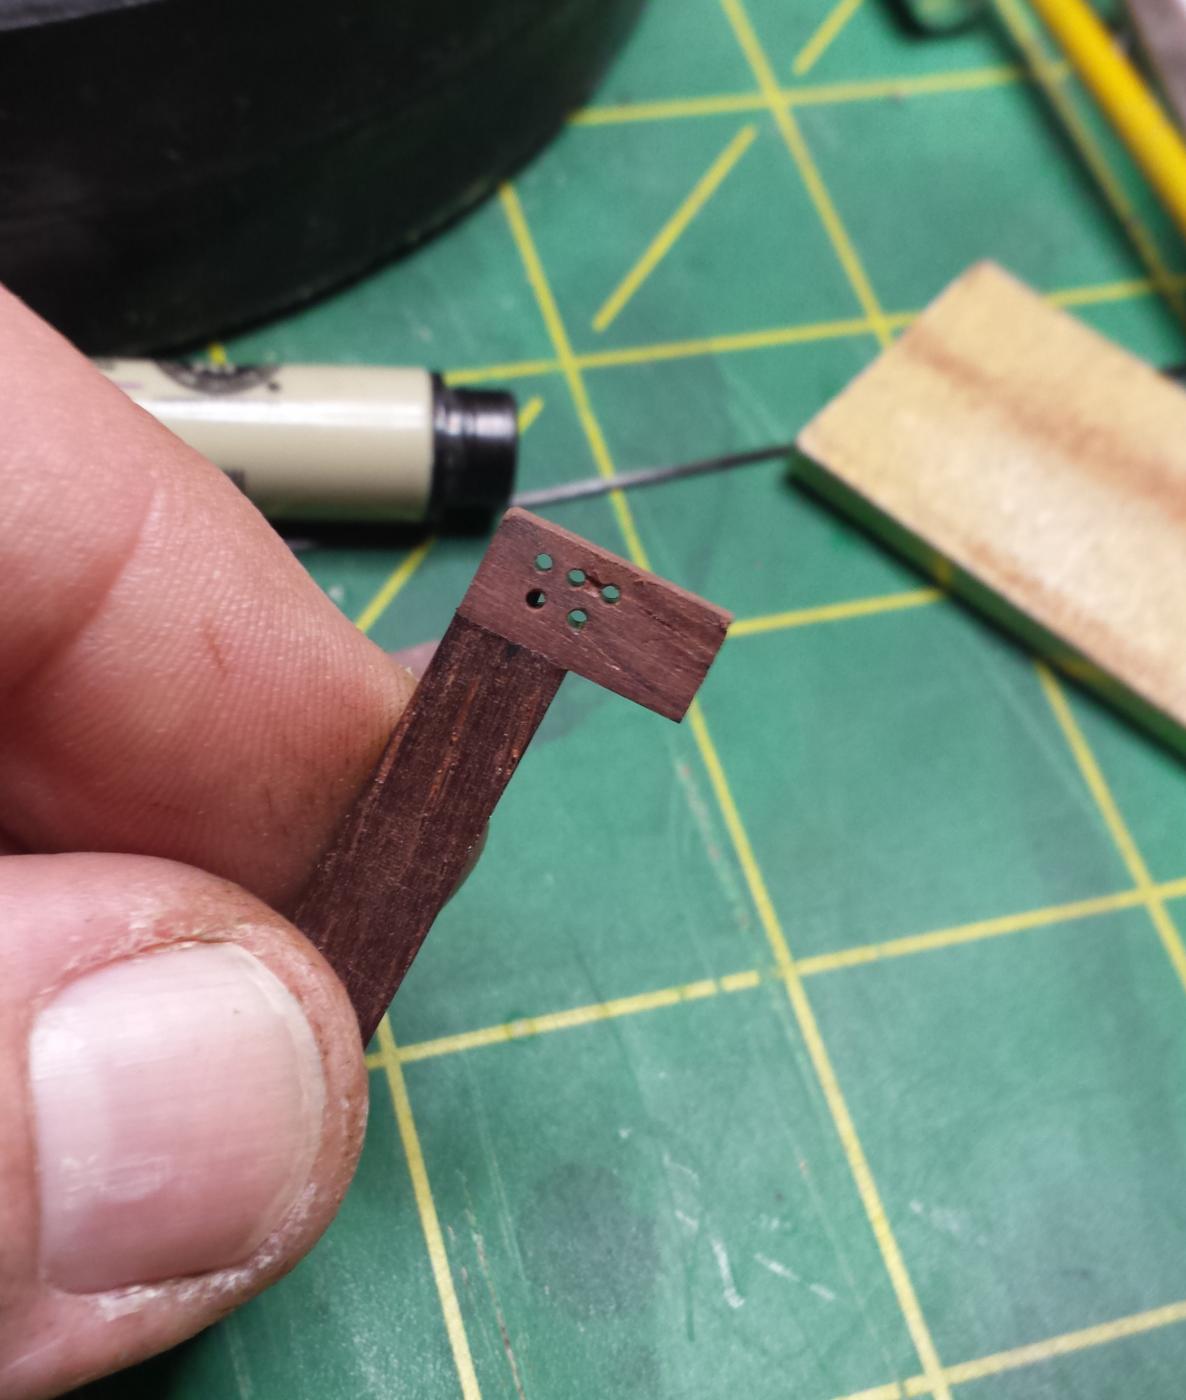
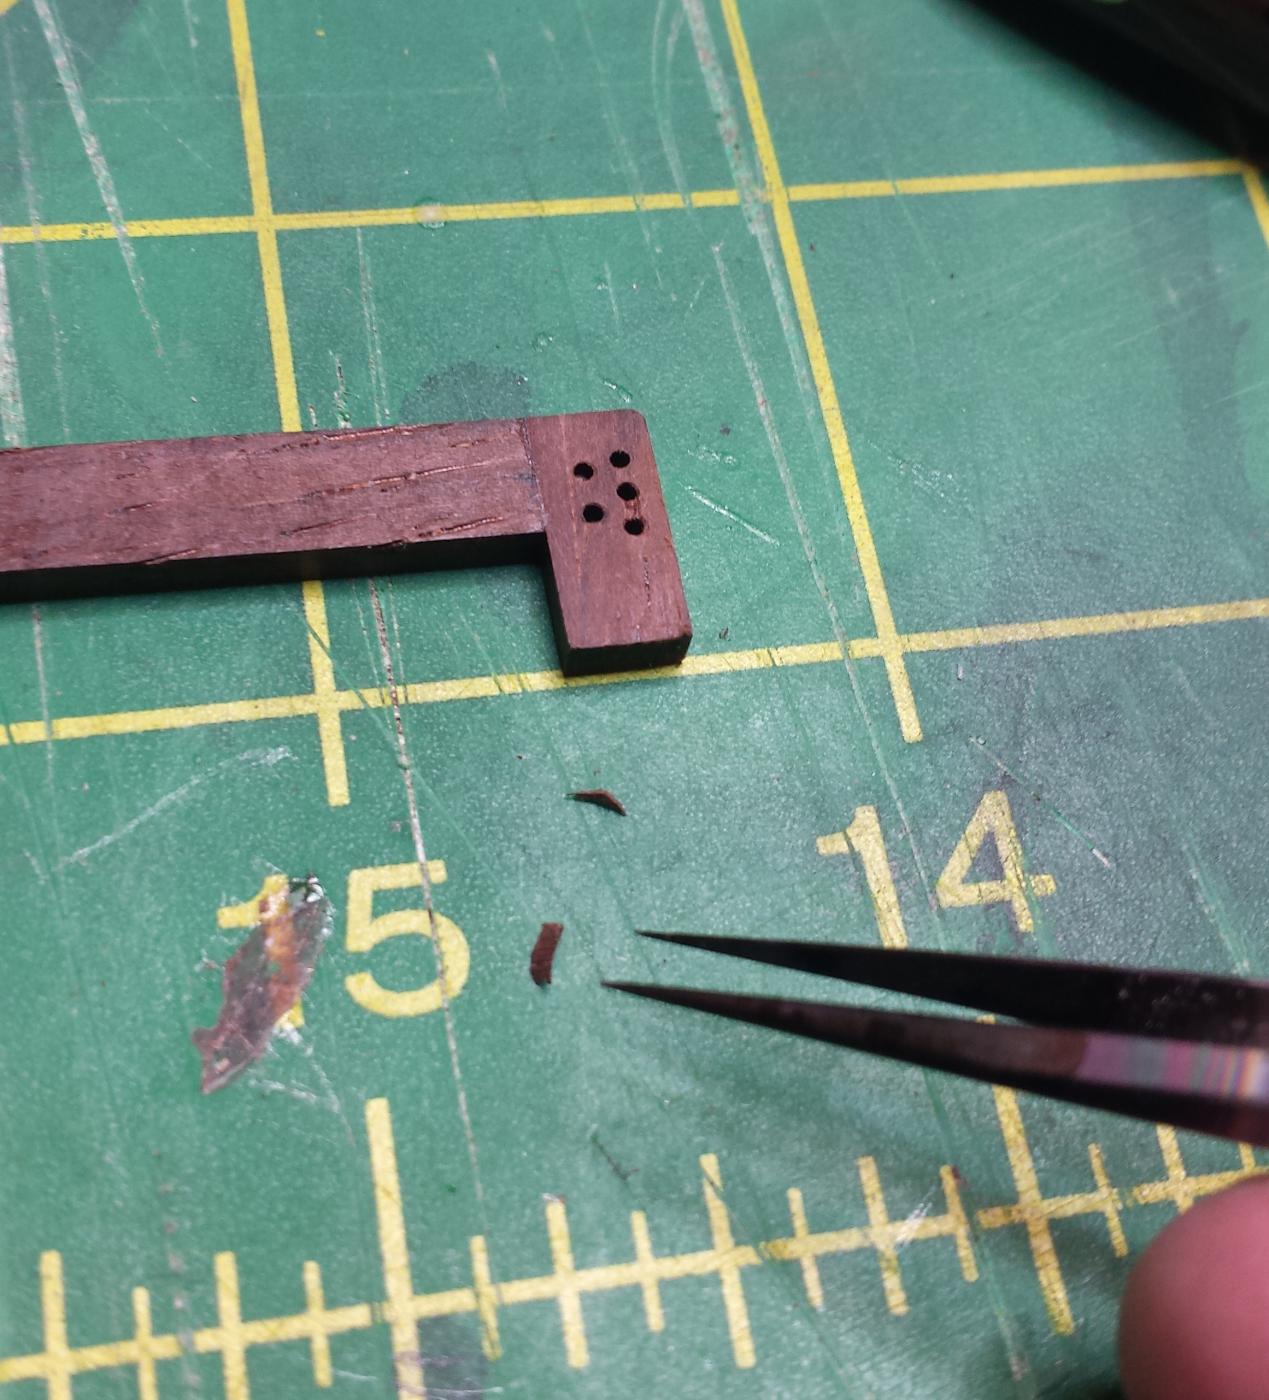
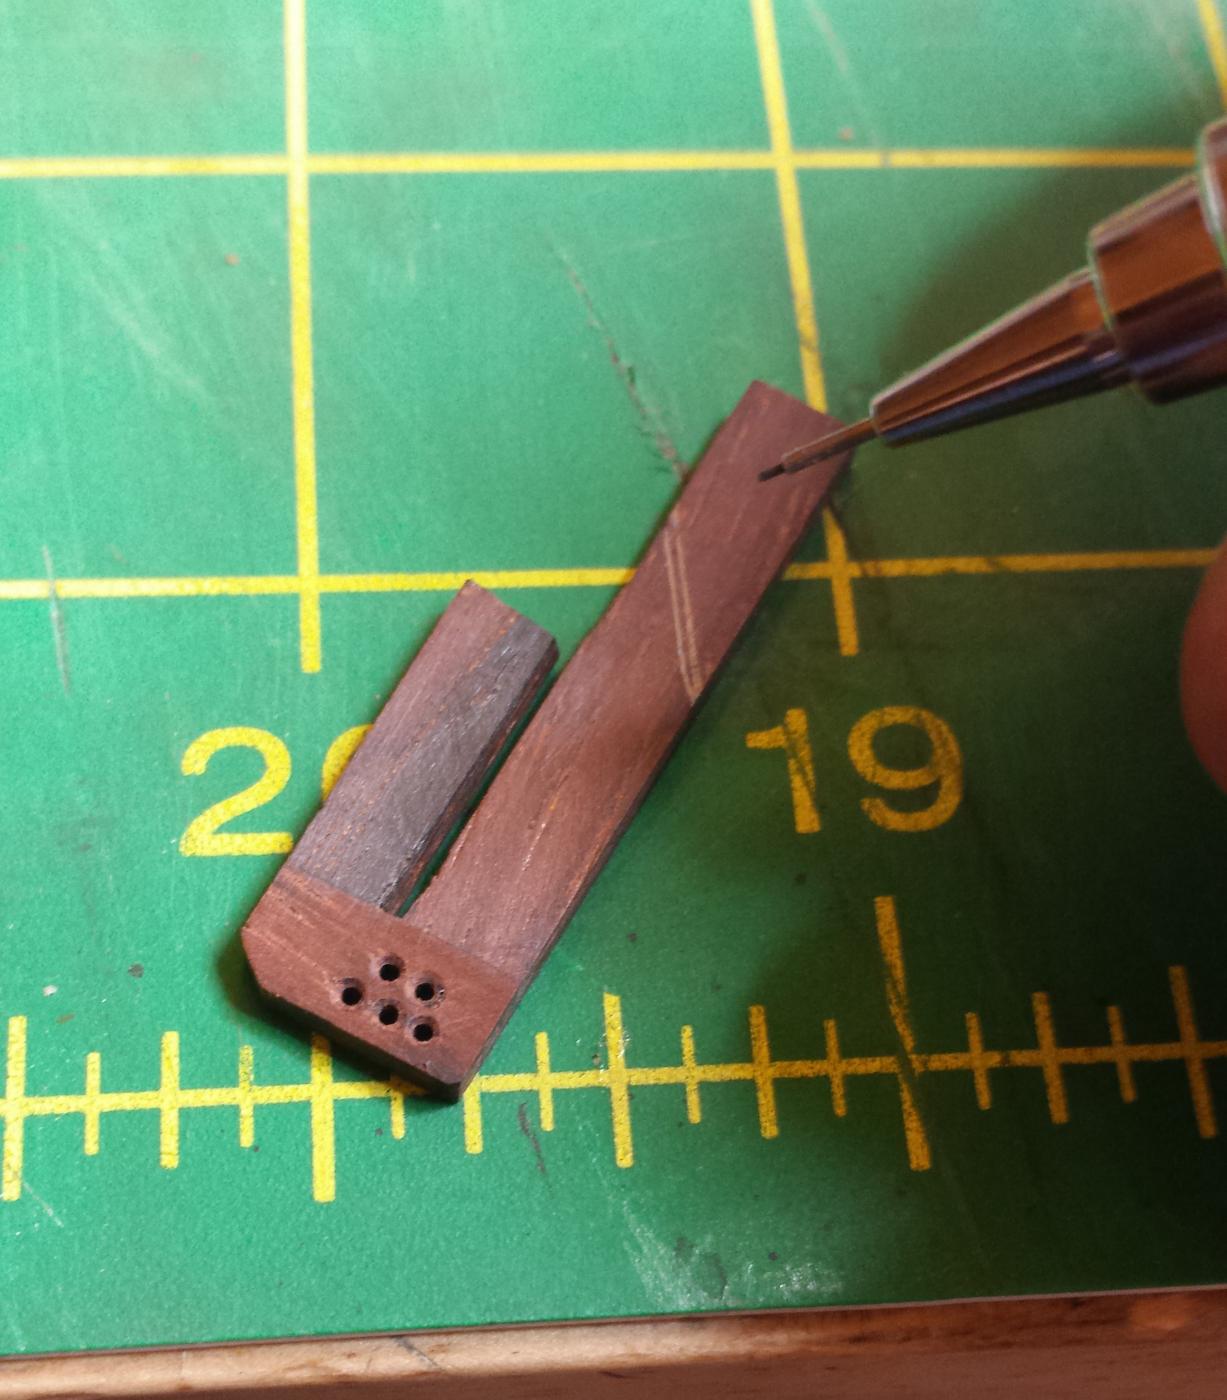
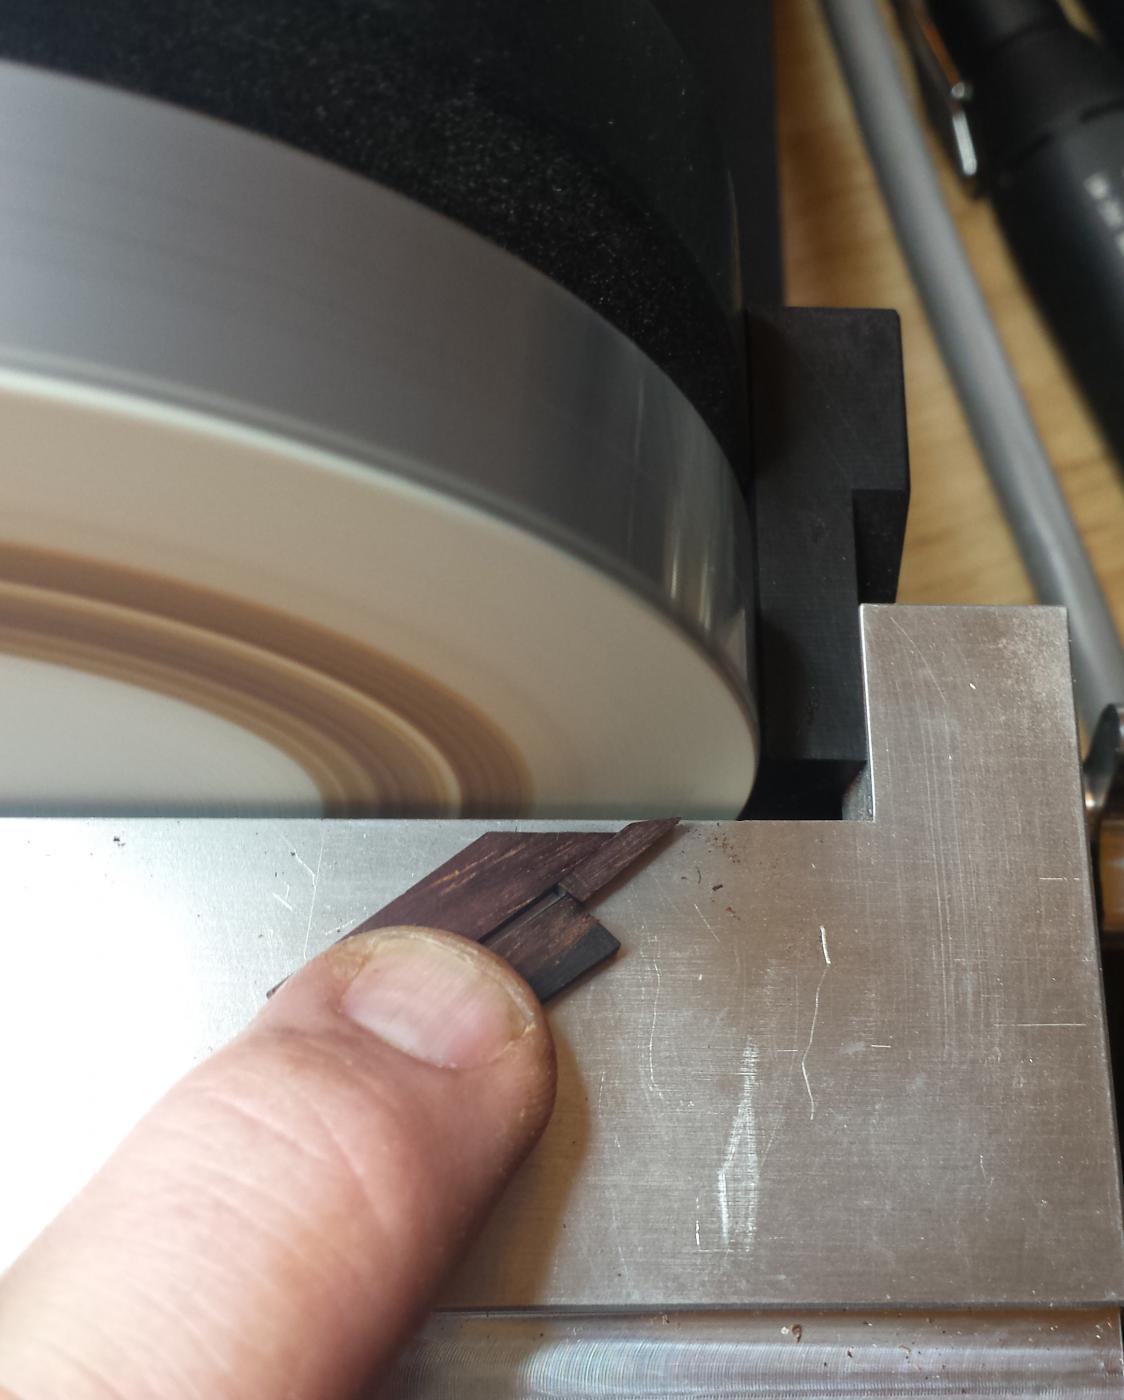
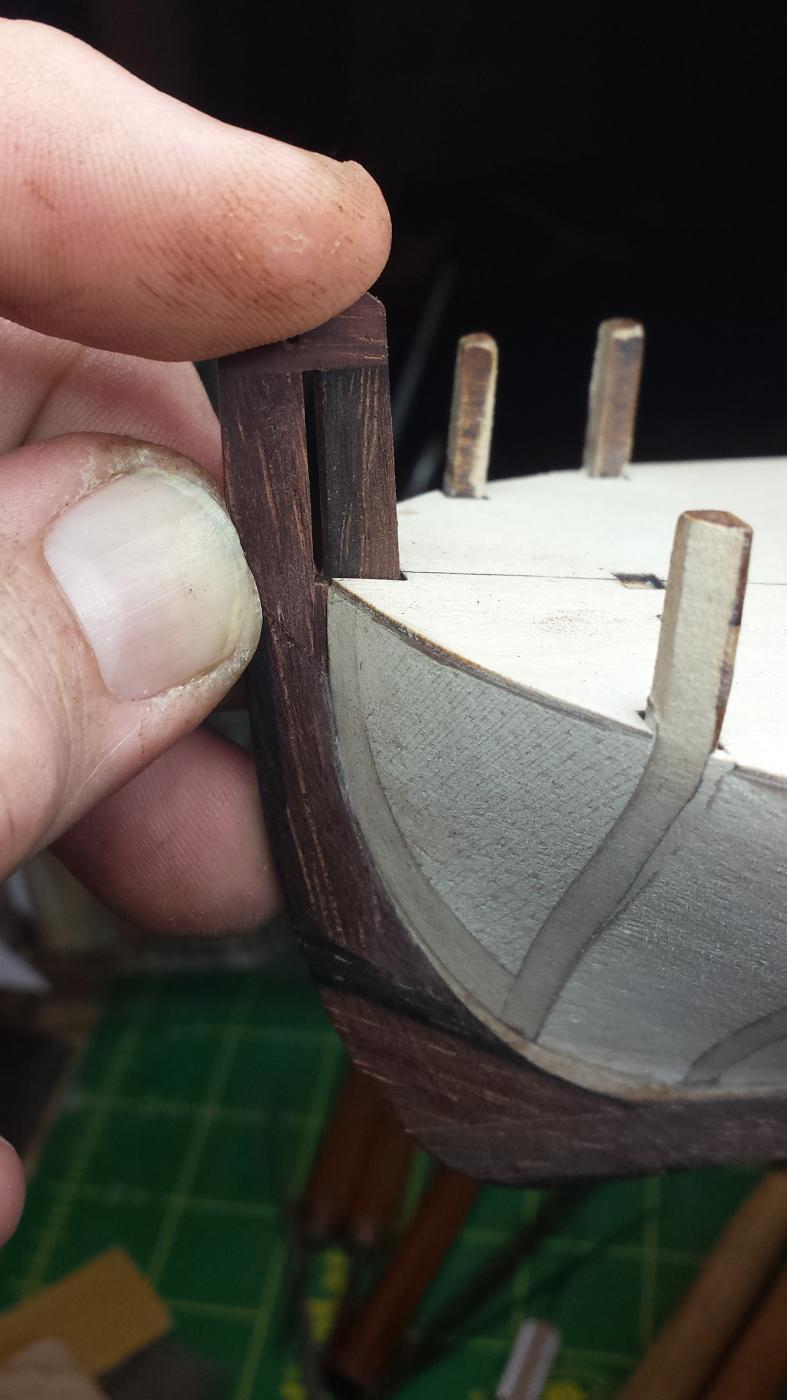
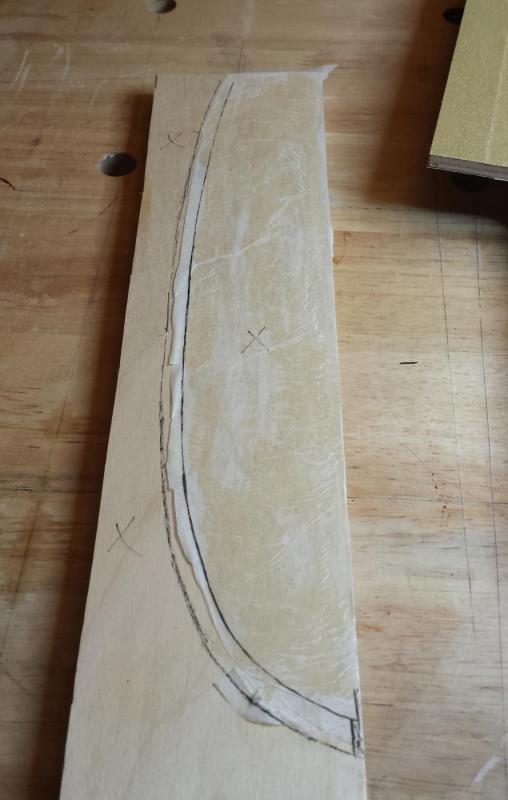
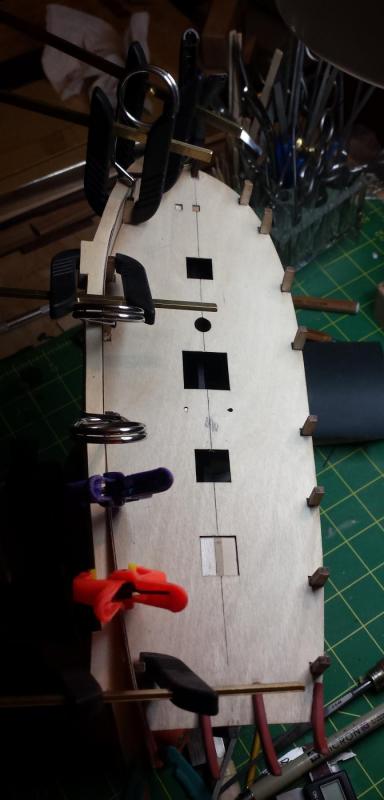
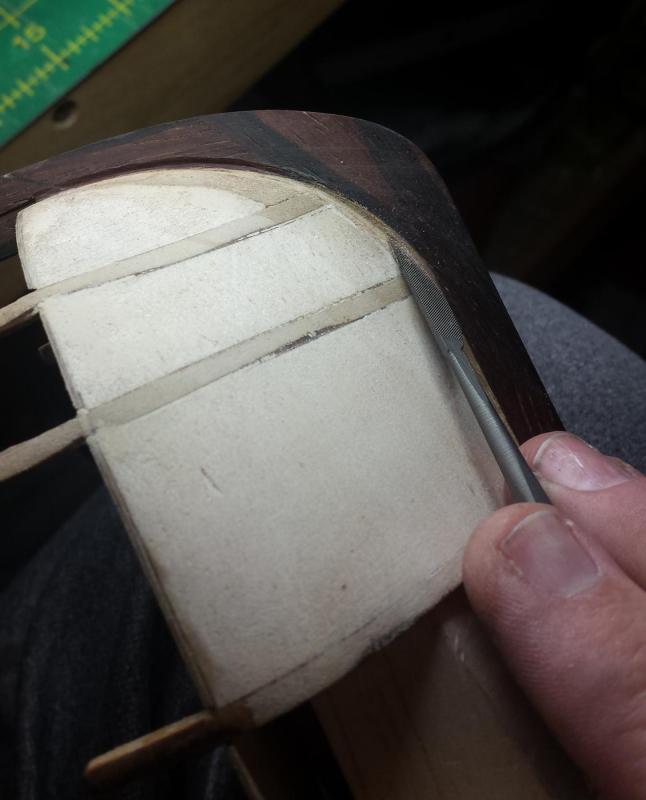
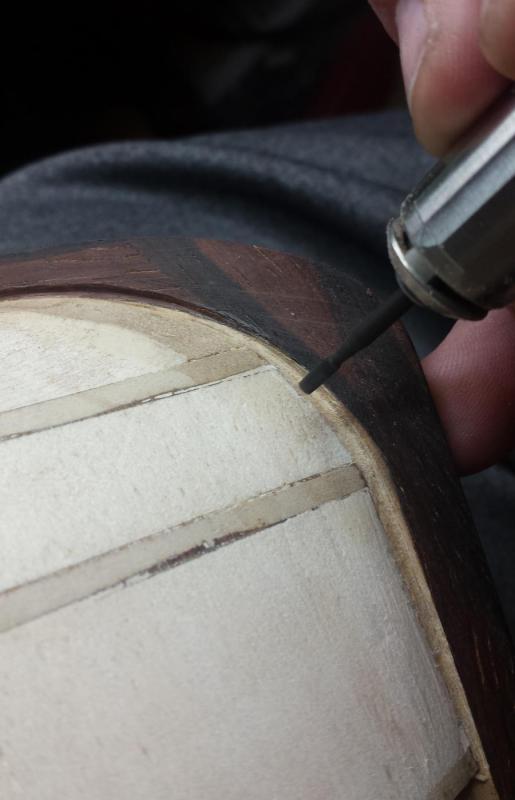
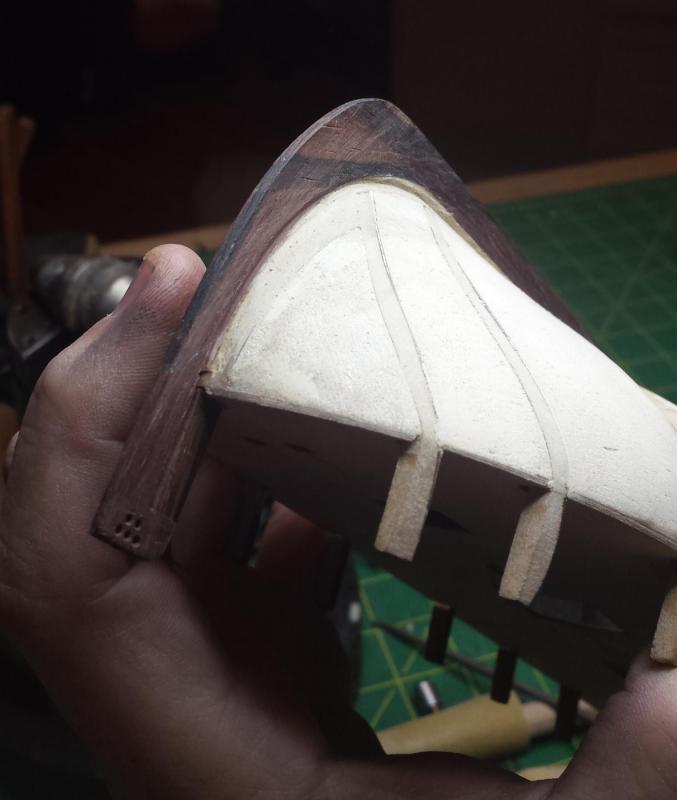
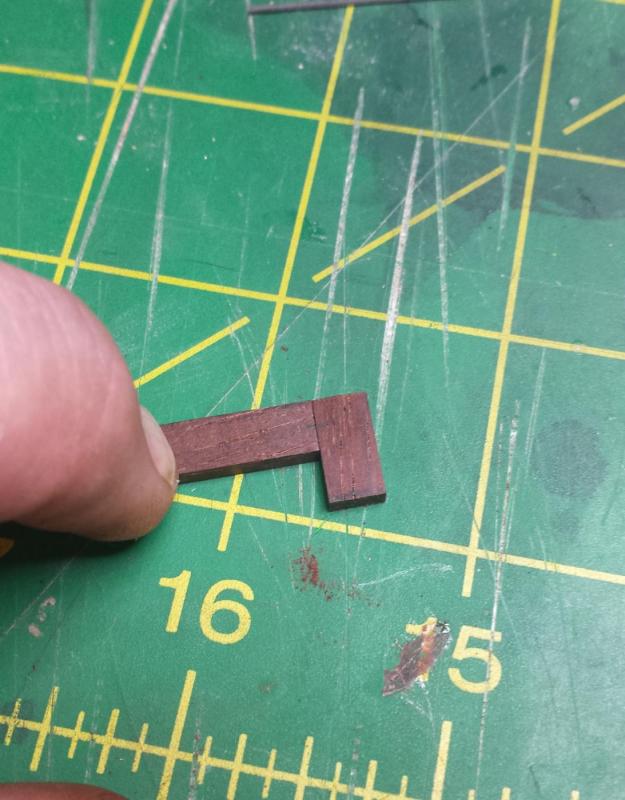
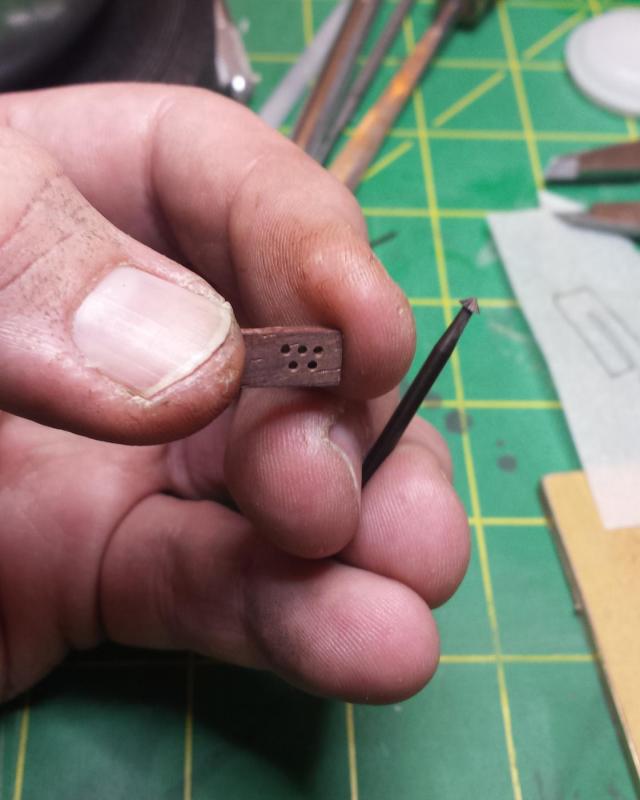
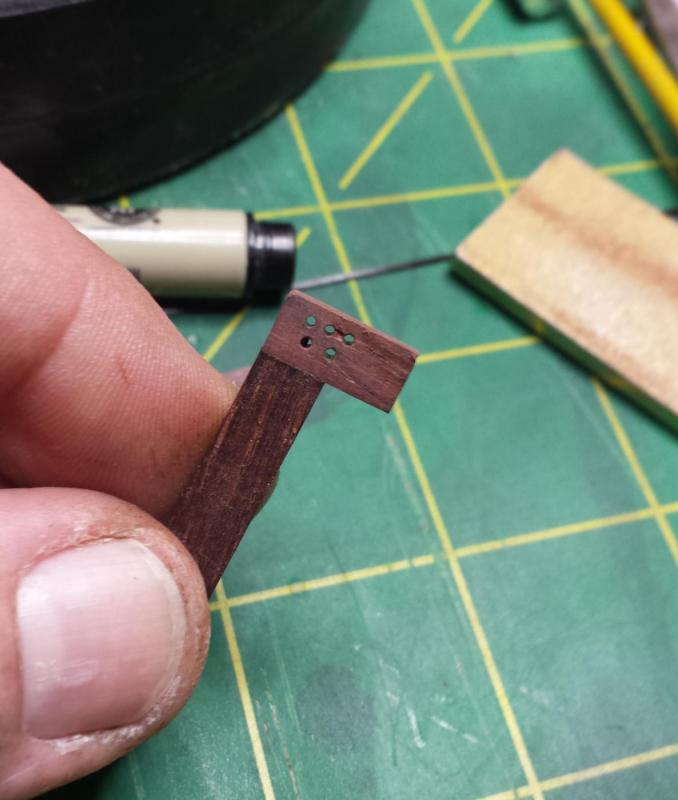
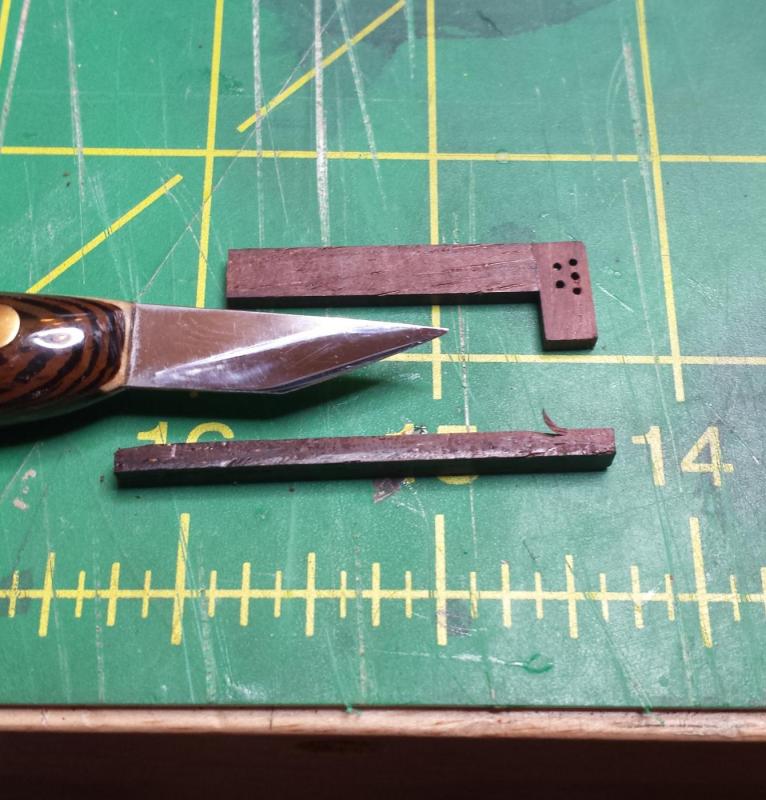
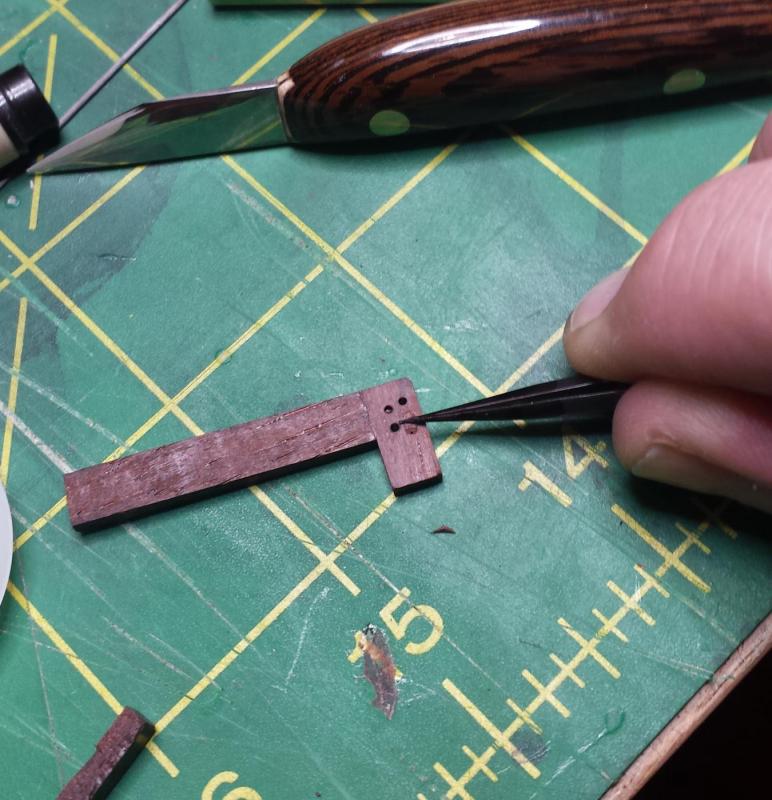
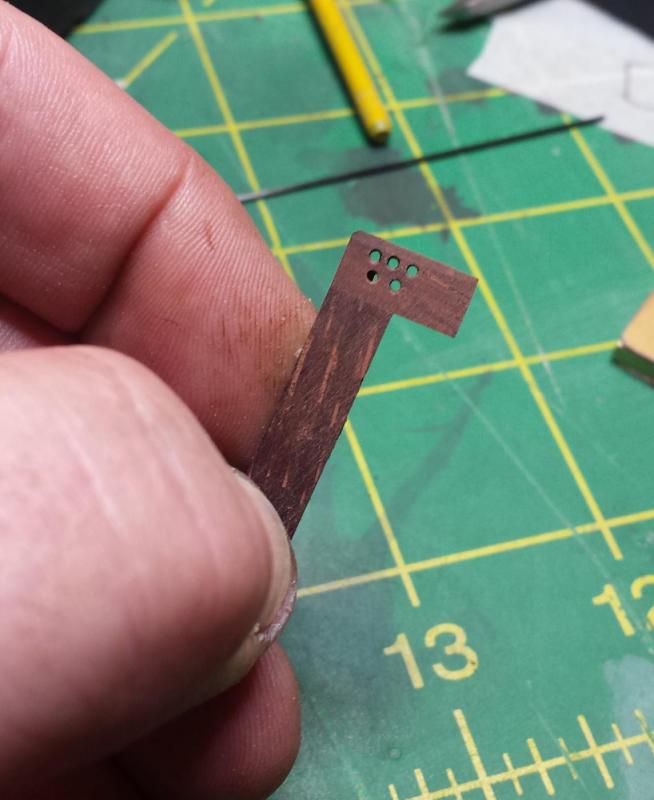
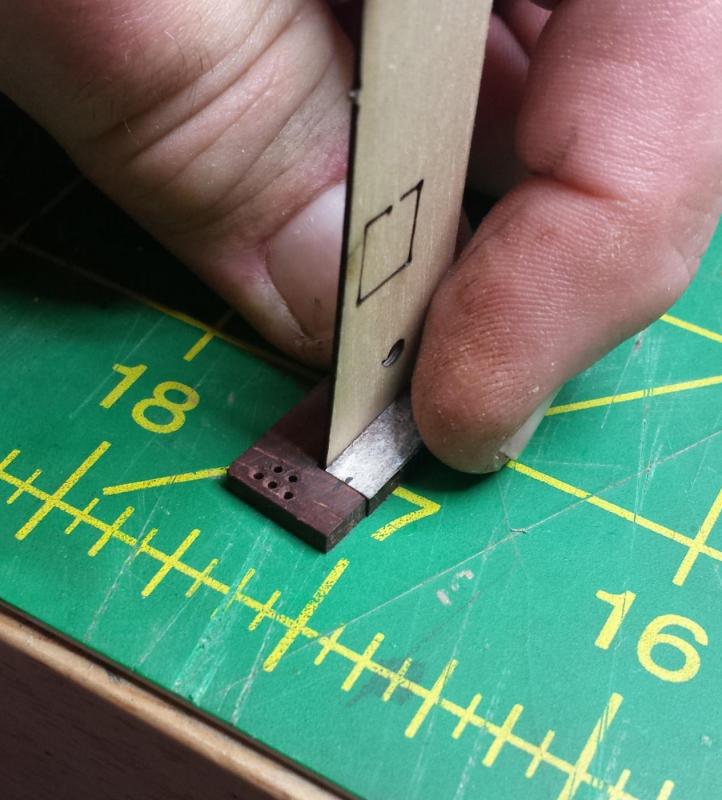
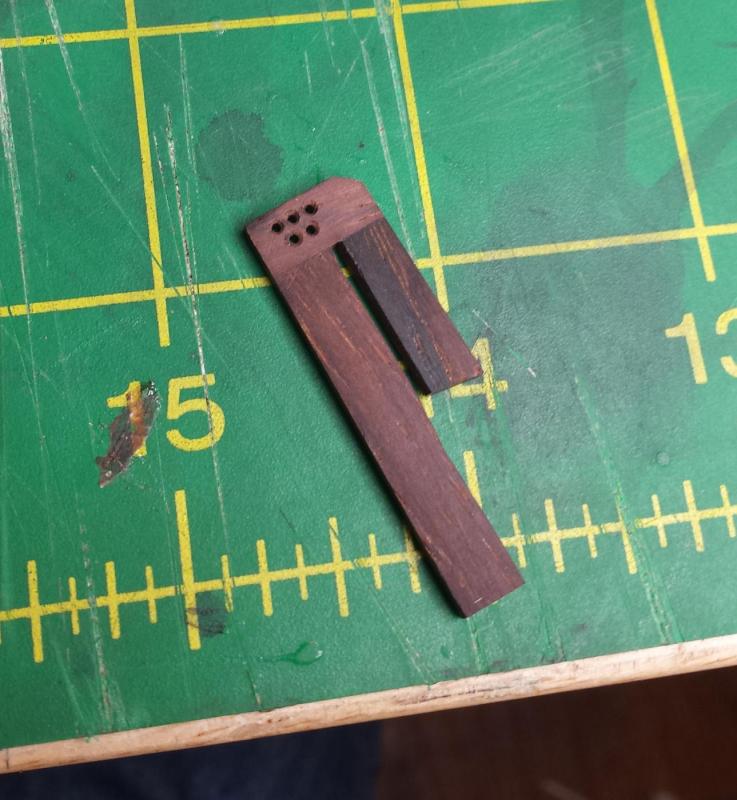
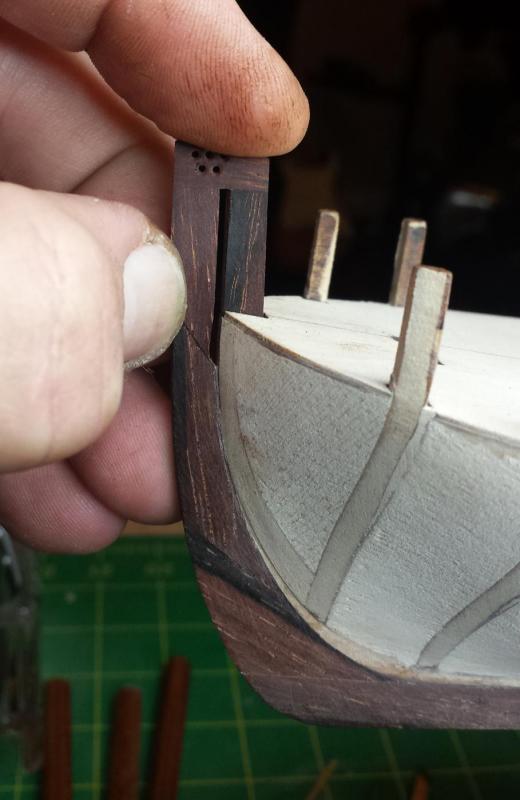
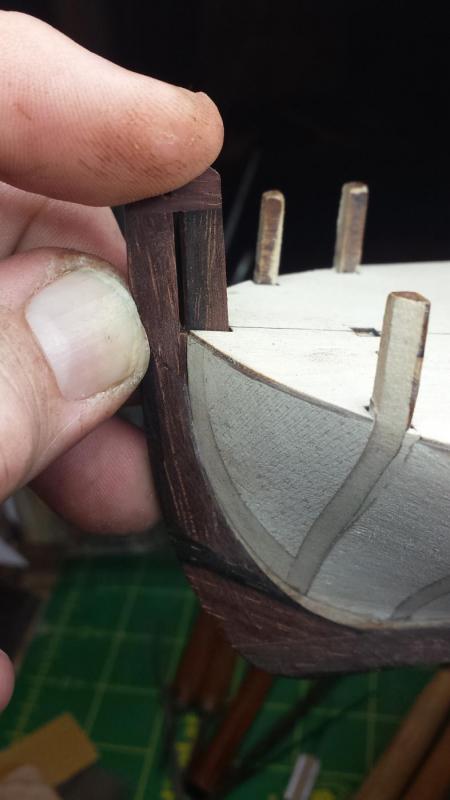
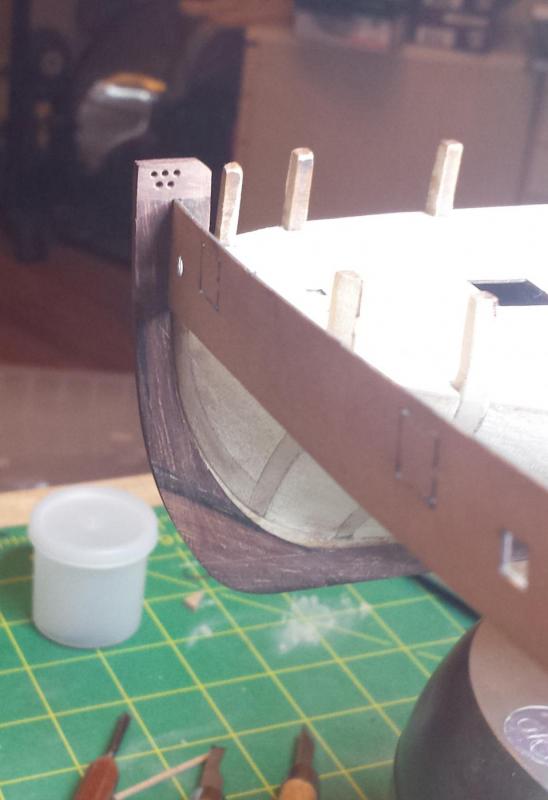
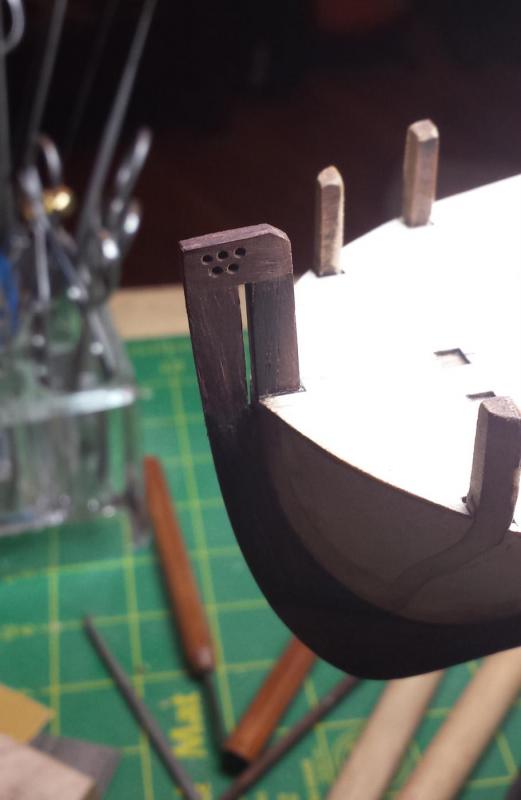
I figured out that it meant .6mm. No idea how, but I did. Anyway that stem piece took way longer than I thought it would, but it's done. And for some reason took lots of photos so you get to see every step. First I said in the previous update that I'd used lots of filler to get a reasonable shape at the stern, but forgot to show what I mean - as you see for me at least, the edges of that bulkhead were completely covered and as I said that bulkhead needs to be at least 1/8" talleer for it to be correctly faired where planks would touch the entire edge. And another miscellaneous thing, this stuff is great. Advertised as the product the British Museum uses to preserve its collection. I use it constantly. It's what I use on all my tools, both handles and to preserve the steel and for plane bottoms. I've also used it over wood finishes or as the only finish on wood and I always like the results. Unlike most paste waxes it has no silicone so you can use it in your wood shop without silicone contamination screwing up every finish you do for the rest of your life. Ok so the little walnut bit is what we need to replace along with another piece going where the mitre-looking edge is, so I grabbed one of the other cocobolo strips I planed down other day. I cut a piece from that strip long enough to make the all of the pieces I need. Here is another reason it's good to have sharp full-sized planes around, they make it trivial and quick to get a perfectly square and straight and clean edge. First two pieces, marked to get drilled for carbon fiber pins. Before I could glue them together though, had to drill the five holes (thanks for pointing that out Rick) holes for the deadeye connected to the forestay. I then took a 90 degree stone-setting bur and beveled the holes as I assume the real ones were, no way they'd run an important standing rigging element over a sharp corner. I just held the bur in my hands, it's a good quality jeweler's bur so it's sharp and just a little pressure and a few spins is enough. Now with 500% more holes. Glued. Unfortunately we have a problem, wood blew out between upper right two holes on this side. Which is annoying since it was drilled with another cocobolo piece backing it. Have to fix it, too obvious. Step 1 curl a little shaving up off another piece. Cut it off, grab our fine tweezers with the carbon coating that makes them very grippy. Use tweezers to place on glue and hold down. Sand down, all fixed. Here I've made the third piece and am test fitting it with the upper bulkhead strip that has to fit into this piece. You can see I have to trim the inside a bit, groove still not wide enough. Once that was fit, put my CF pins in and glued and cleaned up the third piece. Now we have to fit this to the ship and the stem ending that is at an angle, marking for the rough cut. We have a good fit. The big gap between it and hull is intentional, it was easier to make it this way and glue a piece on than trying to cut a big notch in a cocobolo piece. After I added the little extra piece I needed, I flushed it with the other piece on the disc sander. Fit looks good now. Test fit with bulkhead strip. And now glued and cleaned up.


- 714 replies
-
- 9
-
-
- lady nelson
- victory models
- (and 1 more)
-
I understand, same thing happens with Kiwi and Hoser history too, gets overrun by British history. Thanks for the confirmation on the plan. And yeah, another idea is to say screw these thicknesses and redo much thinner, .6mm would be about right. One wildcard is that I haven't received my crown timber order yet that includes boxwood outer planking so I don't know how thick it is.
- 714 replies
-
- 2
-
-
- lady nelson
- victory models
- (and 1 more)
-
Forgot to say thanks on the counter explanation, I'll plow ahead then. Also, wow the Amazon Silk browser does not play well with this site, the reply text box even on the full reply UI is one line long and three words wide. Using my tablet from the workshop.
- 714 replies
-
- 2
-
-
- lady nelson
- victory models
- (and 1 more)