HOLIDAY DONATION DRIVE - SUPPORT MSW - DO YOUR PART TO KEEP THIS GREAT FORUM GOING! (Only 20 donations so far - C'mon guys!)
×


Jond
-
Posts
856 -
Joined
-
Last visited
Content Type
Profiles
Forums
Gallery
Events
Everything posted by Jond
-
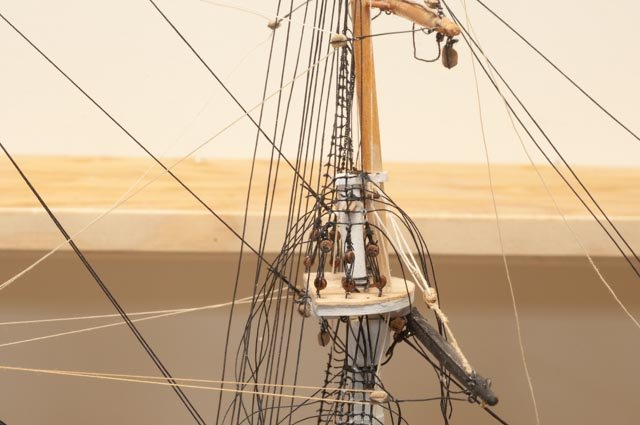
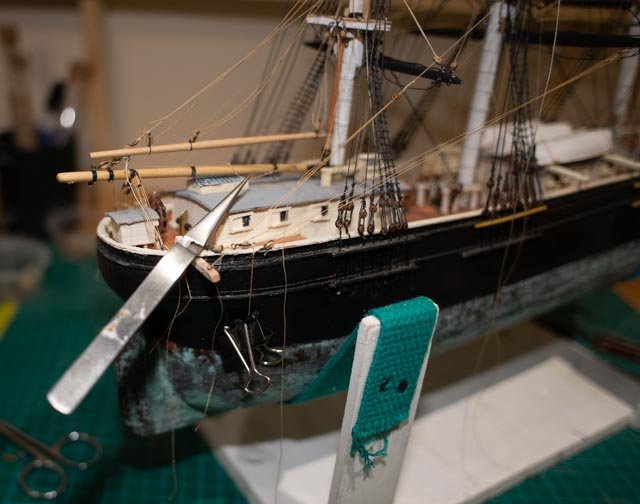
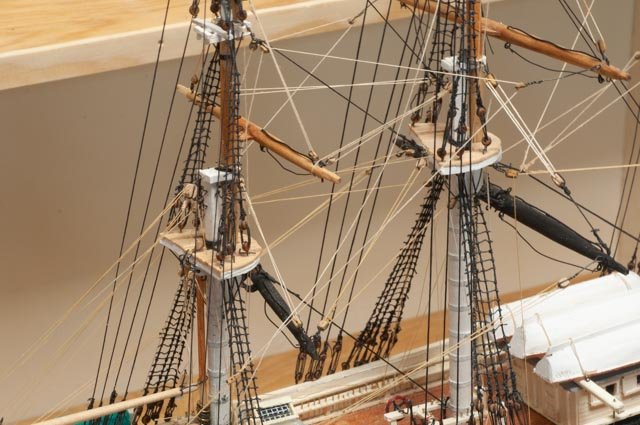
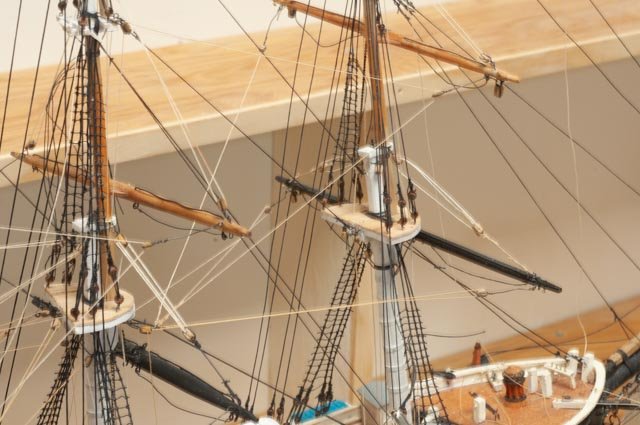
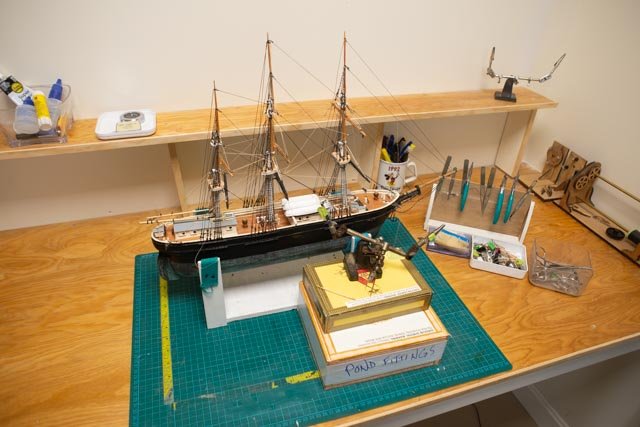
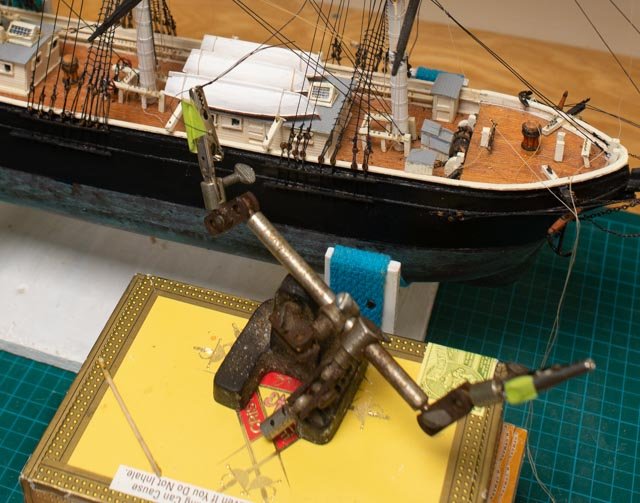
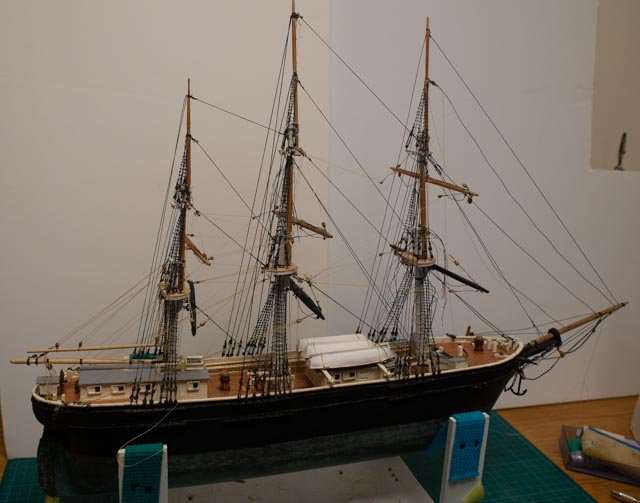
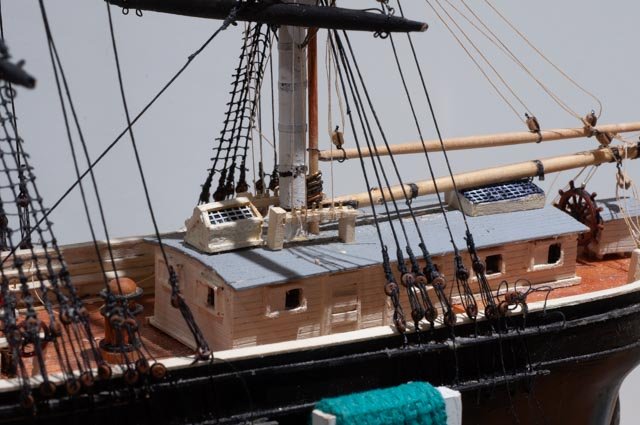
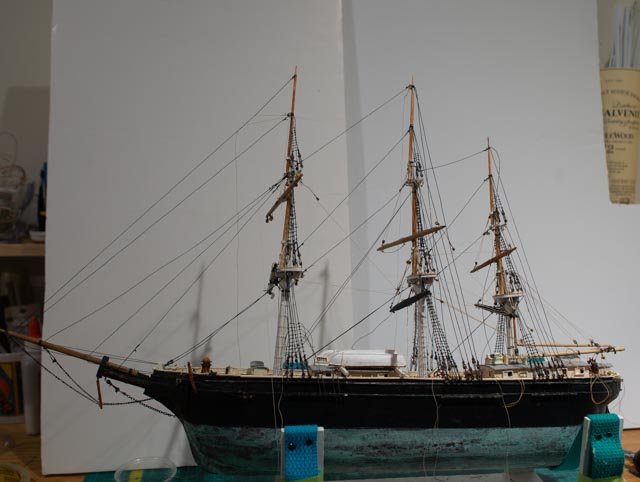
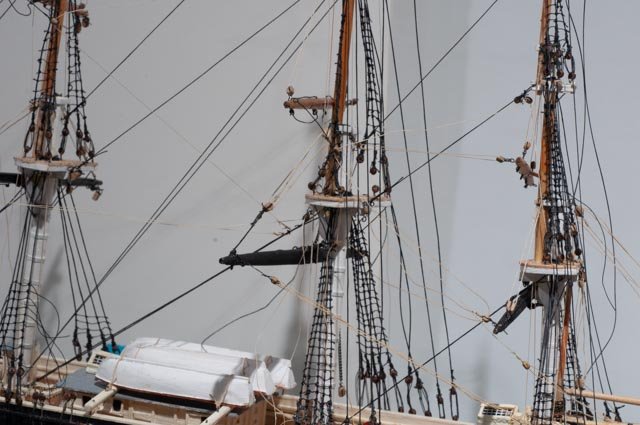
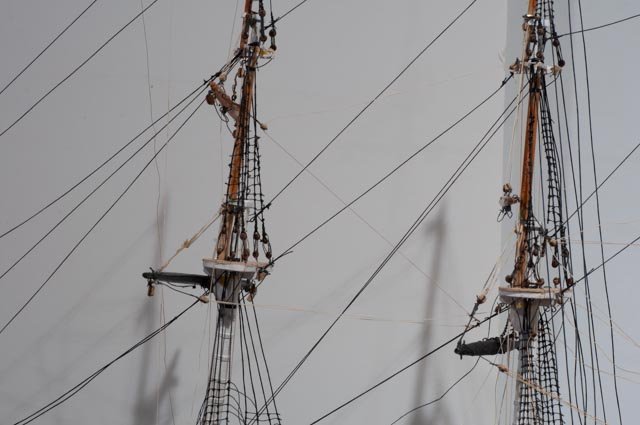
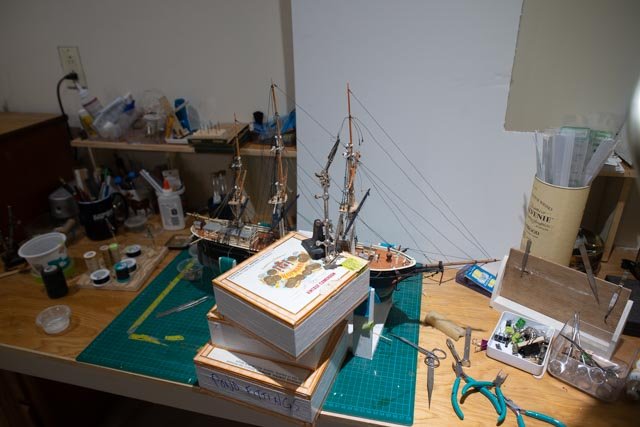
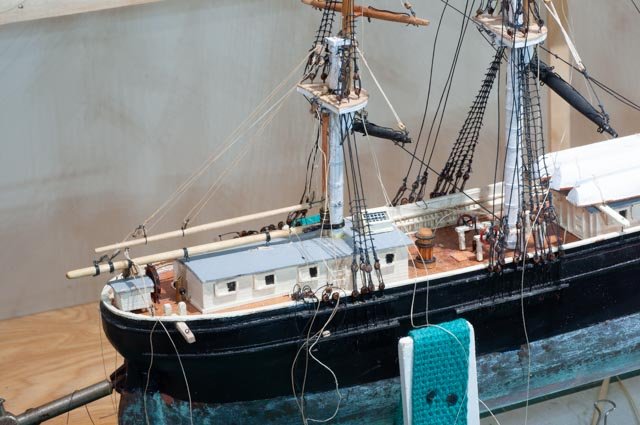
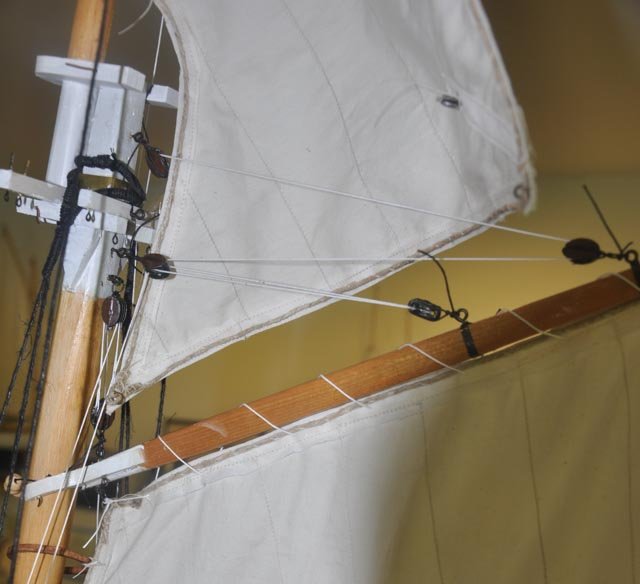
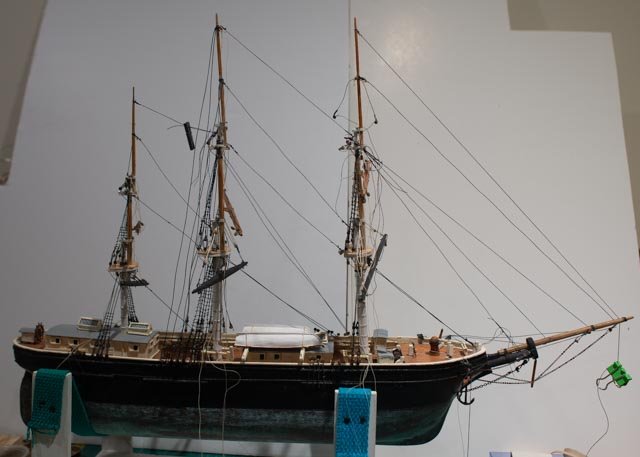
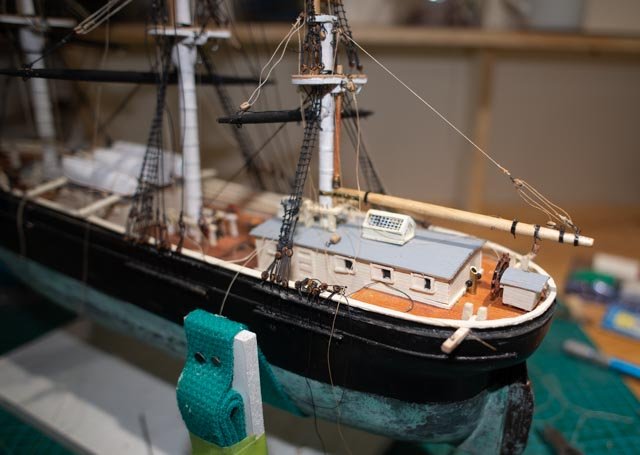
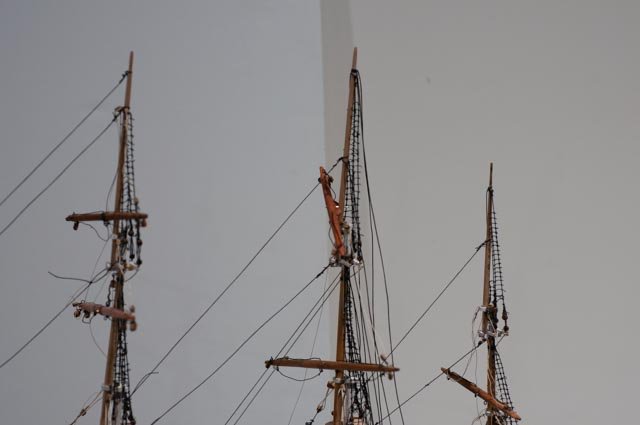
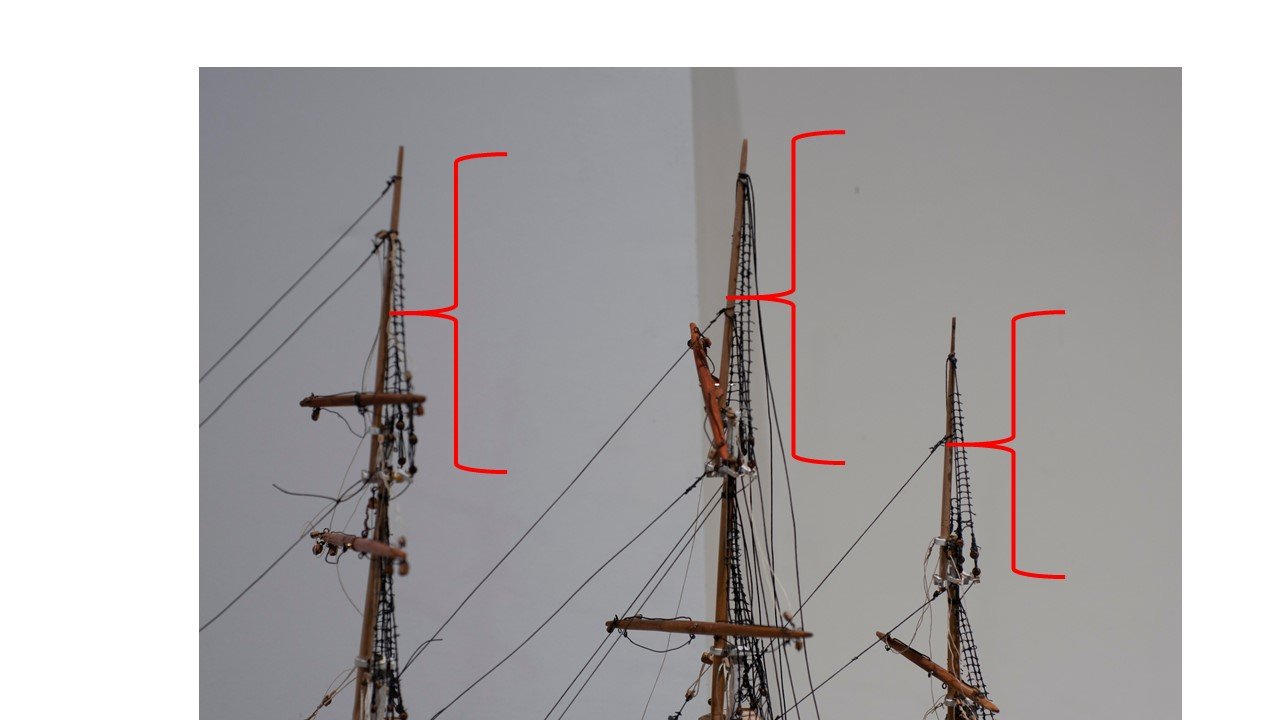
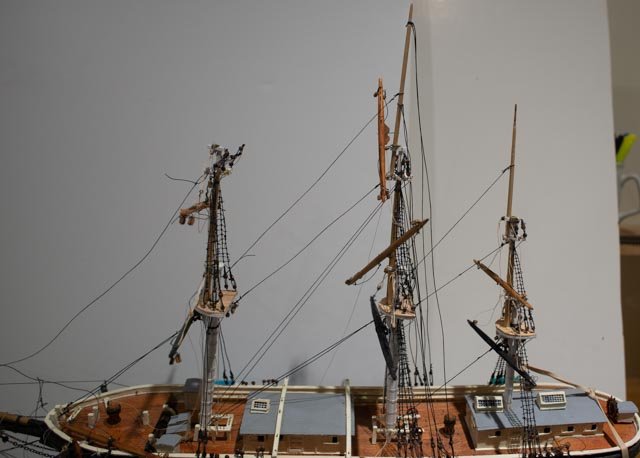
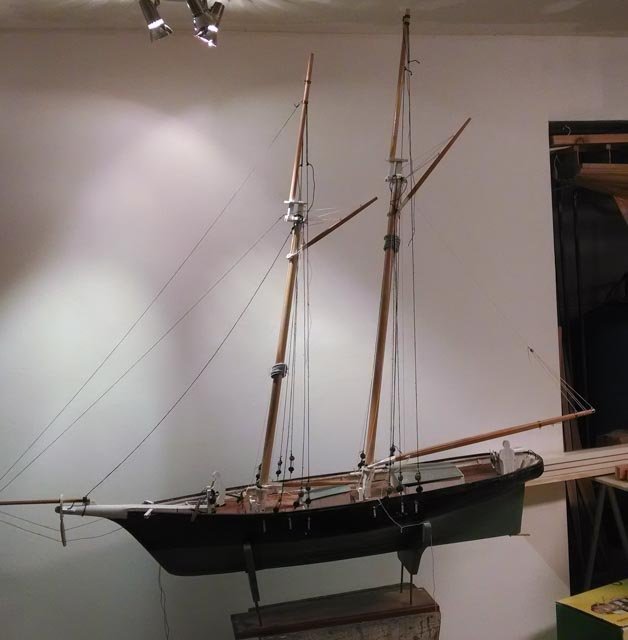
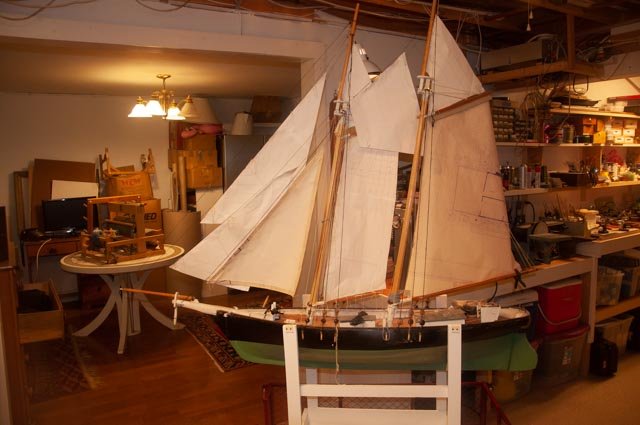
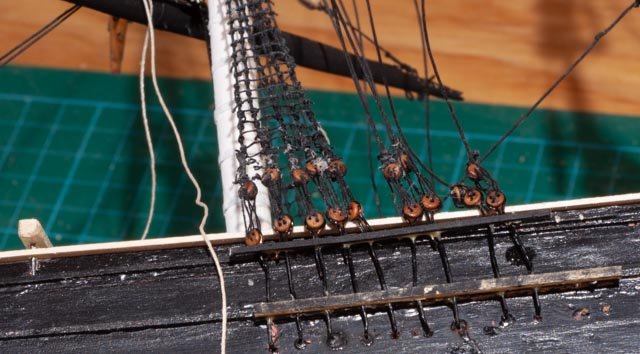
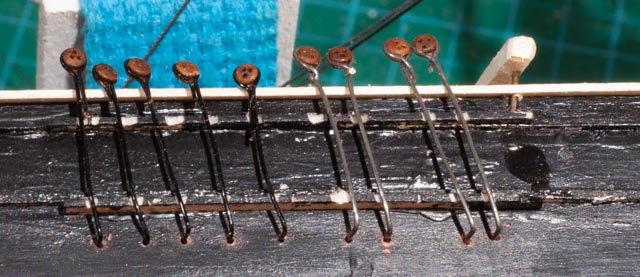
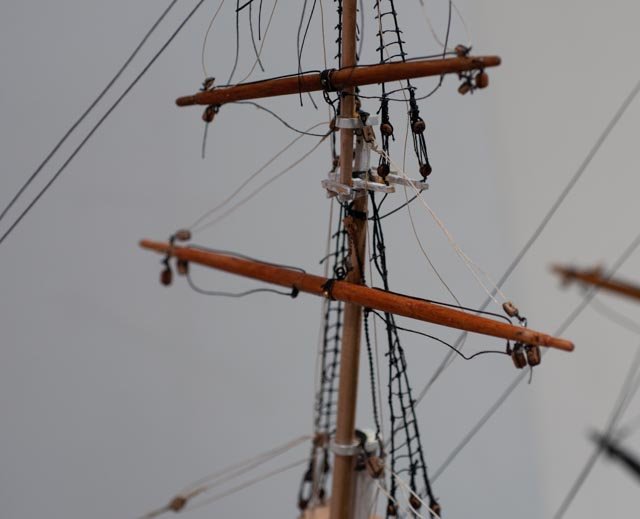
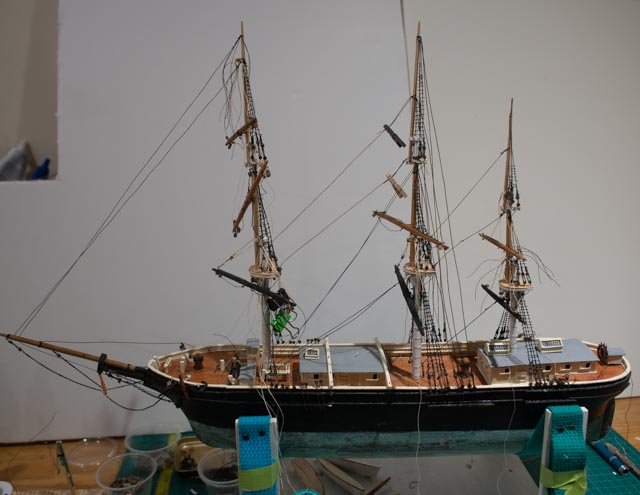
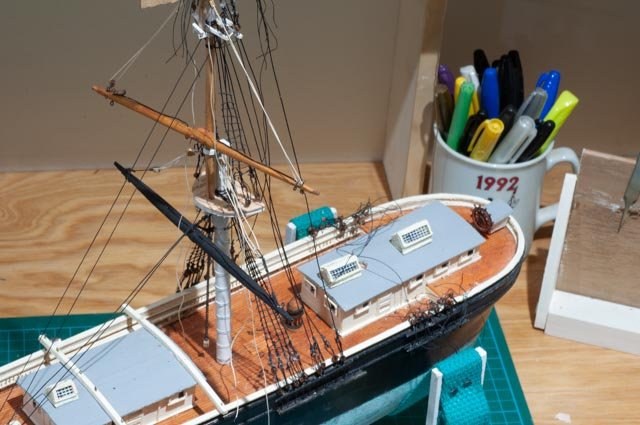
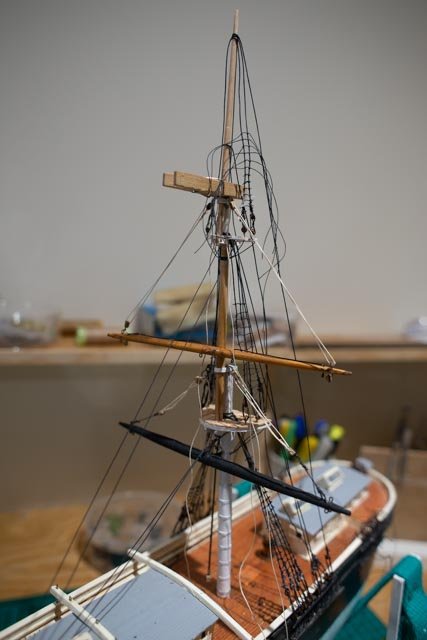
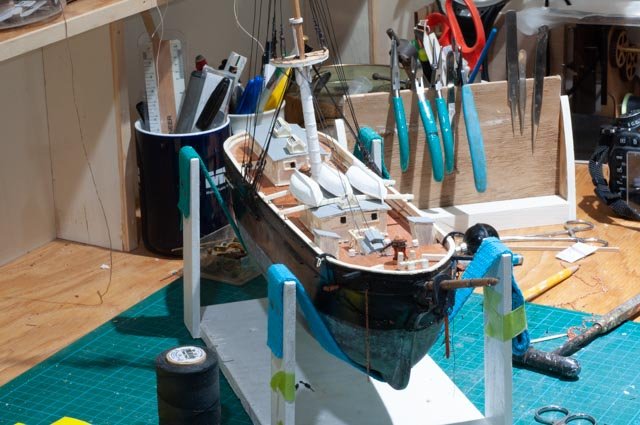
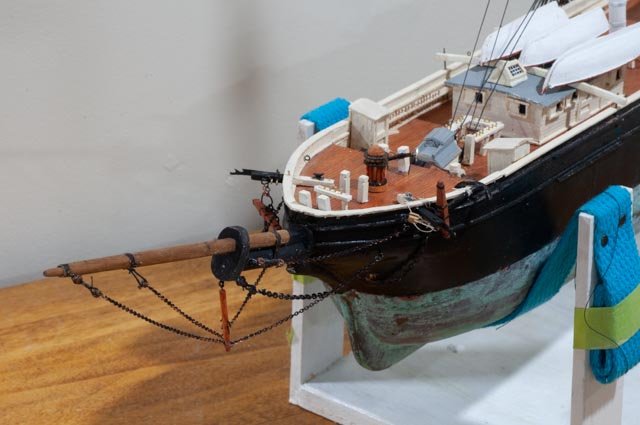
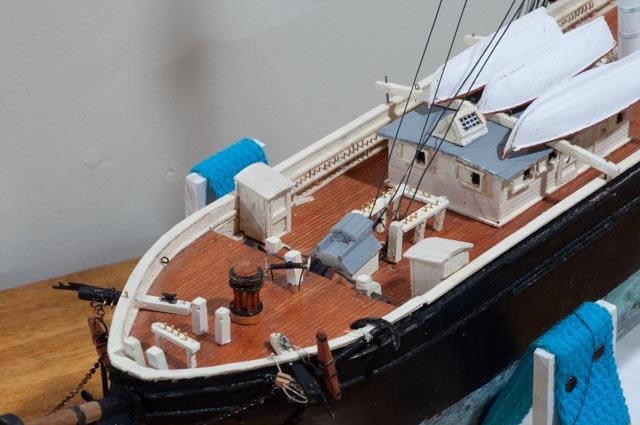
 post 30 Complete standing rigging and lower yards…..almost I learned years ago that finished is a very subjective word. I remember the 20 80 rule...we spend 20% of the time and effort to get 80% complete and then 80% of the effort to get to 100%. Following the curve of diminishing returns, we need sometimes to say enough. I write this post today to celebrate what I am calling a milestone. Finished standing rigging and lower yards Looking at the foretopmast ratlines in the last post, picture 204 I decided to take another step backwards. They were awful, so I cut them all out. I feel better about working in this small scale and it really was much easier to replace them than it was at the beginning when they were my first attempt. 206 here we see the fore topmast shrouds and ratlines are gone 207 here the port side shrouds and ratlines are all back and I and tying ratlines on the starboard side . it is a little tricky with all the running lines in place. 208 one of the things I learned at this small scale is to simply get the line around a pin and add a drop of glue with a clamp to hold it tight till the glue dries . then remove the clamp and using two tweezers tie the half hitches. 209 the main lower and top mast yard braces come back to the stern area. I like using the bumpkin as it makes sense to project those line outward. 210 here we see all the braces snugged up and made off for the main and mizzen 211 and here we have the foremast lower and fore topmast yard braces The milestone In honor of achieving this milestone, I cleaned up my rigging desk. I also have a new overhead LED 2x2 light that is wonderful to improve the lighting from the previous overhead LED flood light. I am also putting in a dropped ceiling that makes the whole area a lot nicer. 212 here my cigar boxes are out, and the alligator arms hold the last dead eye as it gets its splice 213 shortly after this photo, the white glue dried and I lashed it into the lower dead eye completing the standing rigging. 214 here we can see the tied off yard lifts on the foremast fife rail. The braces go to the outer pin rail. Next, I need to make up those little coils to lay over the pins 215 here we see lift lines for the main and mizzen braces on the side rails. the pump wheels look like they need a touch of paint 216 so here we are at this stage. There is obviously a punch list. There is always more to be done. There are a few more ratlines, clean up, the aft skylight etc. then I will advance to the topgallant yards and ultimately the royals All for now got to go sailing
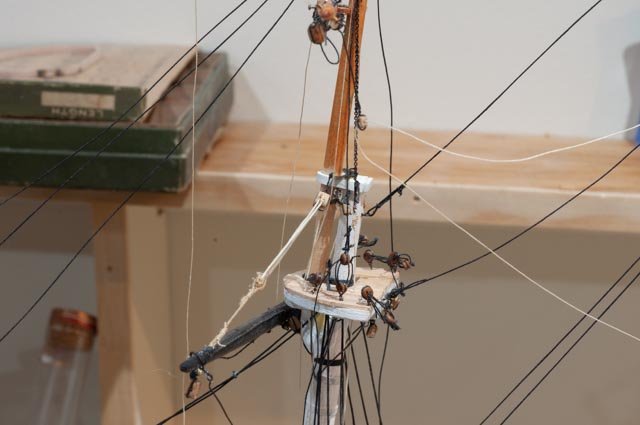

-
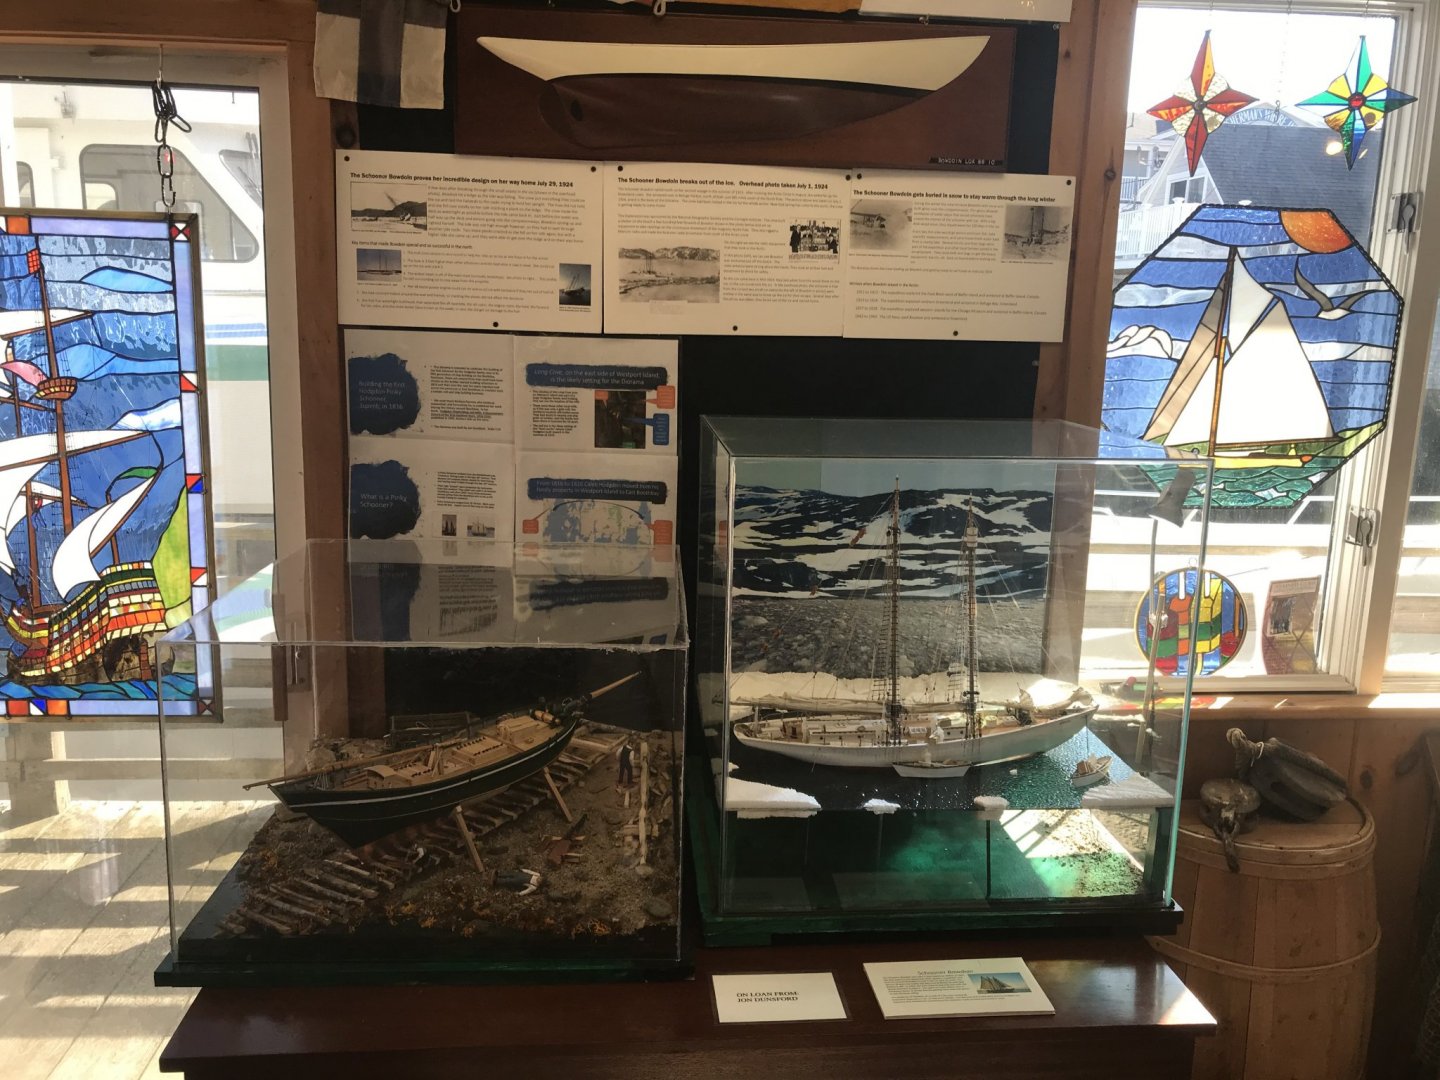
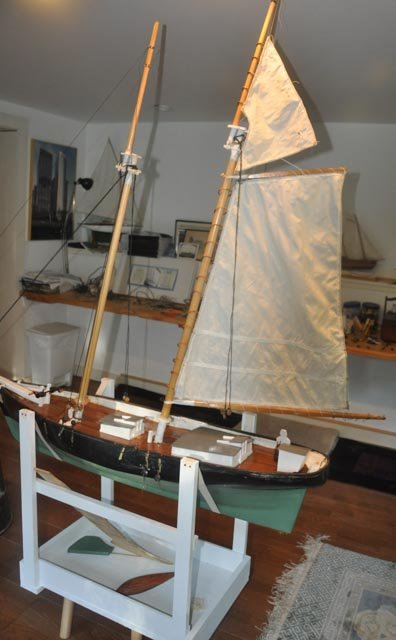
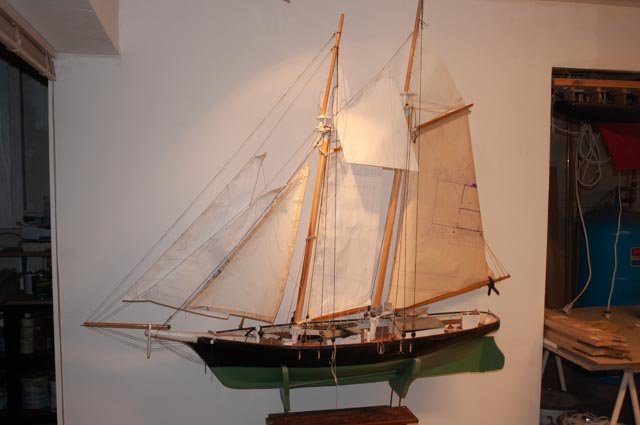
I just wanted to conclude this story with a picture in the Windjammer's Emporium museum store in Boothbay Harbor Maine . She is sitting beside last year's project of the 1924 Bowdoin diorama we built last year. come see them cheers
- 69 replies
-
- 4
-

-

-
- diorama
- Glad Tidings
- (and 2 more)
-
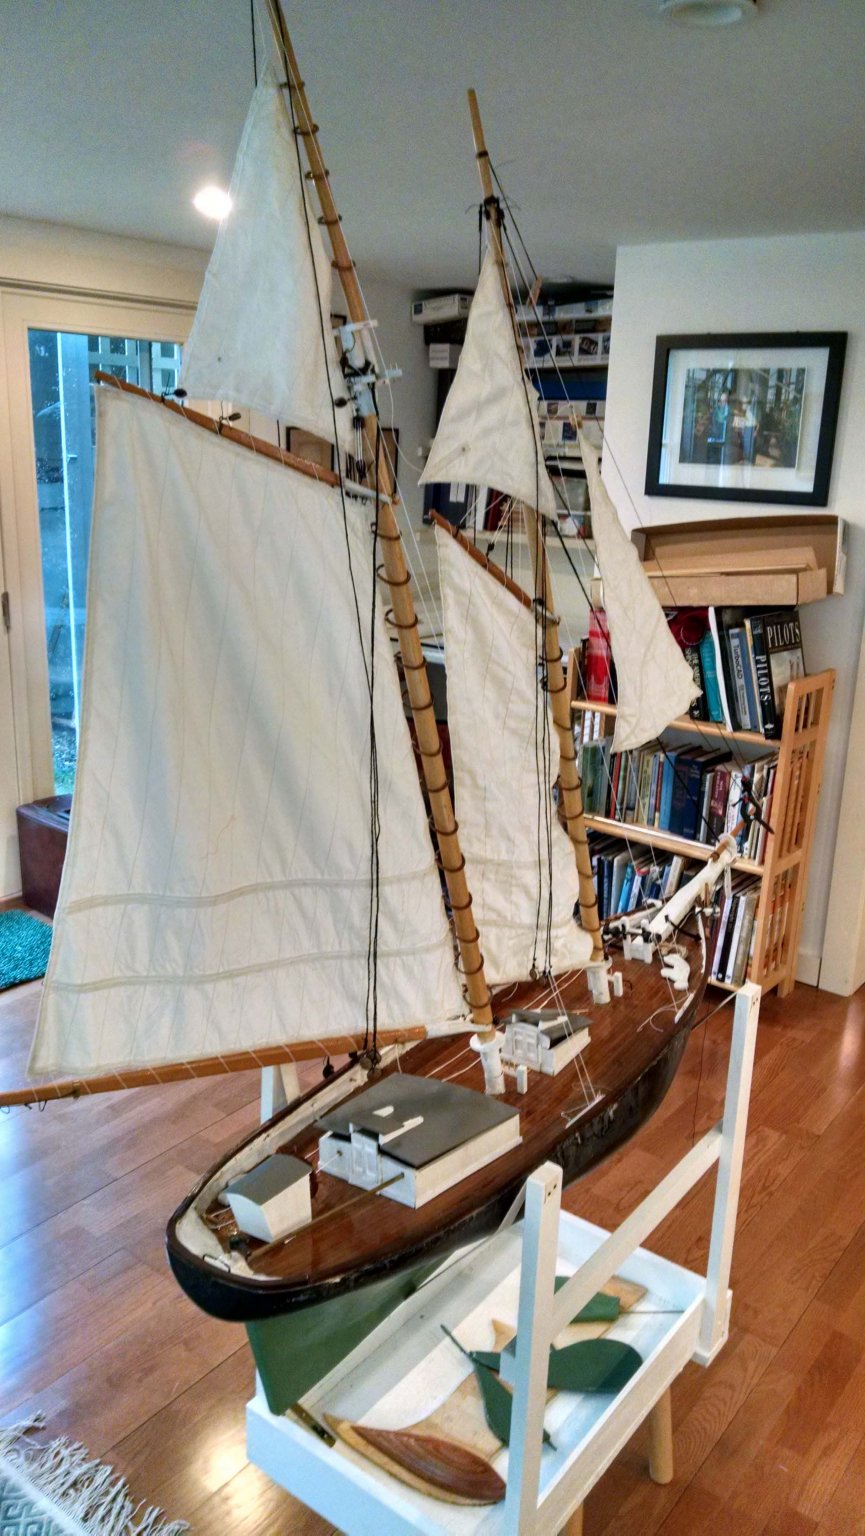
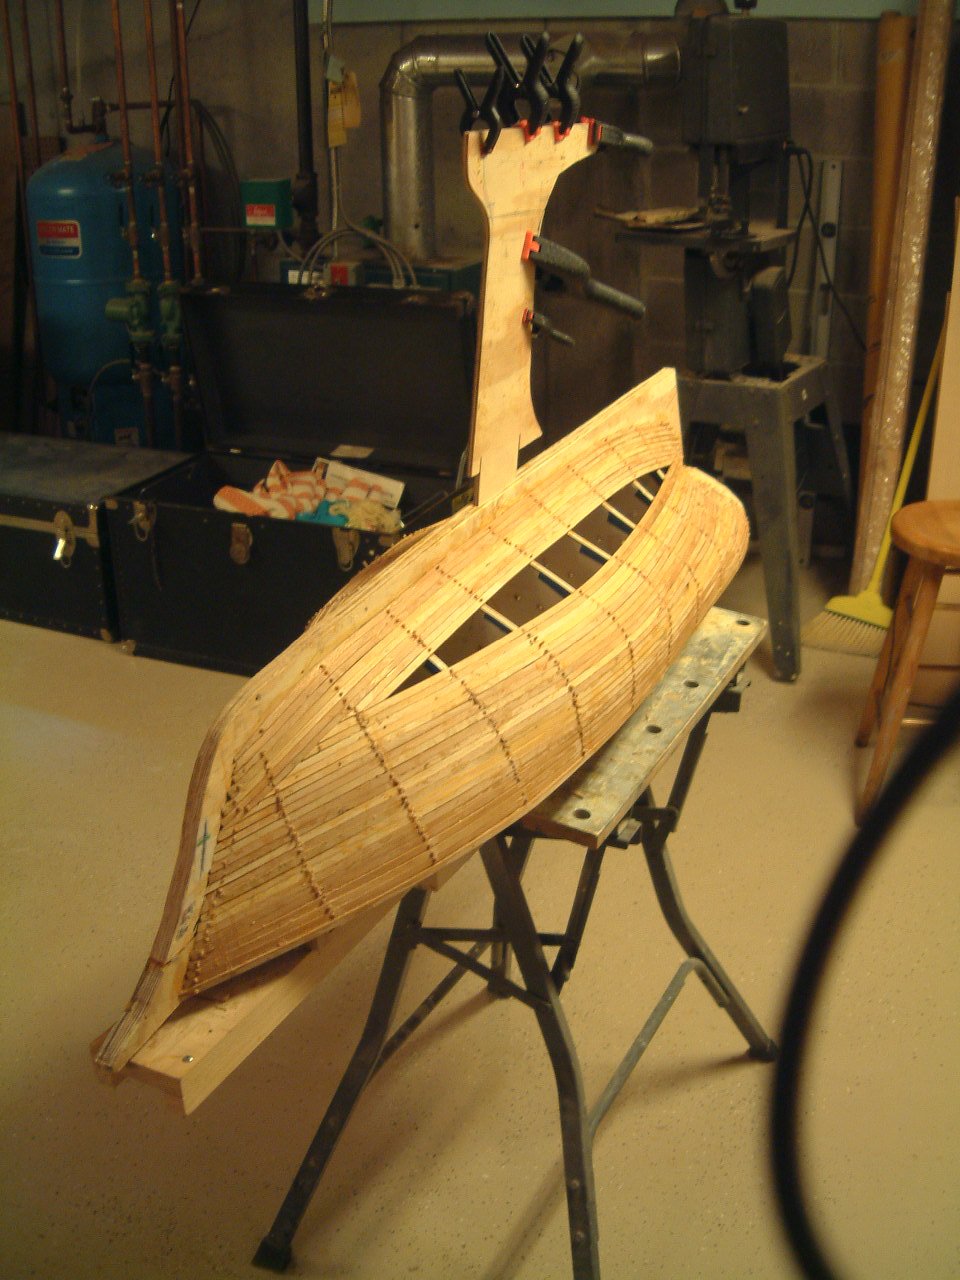
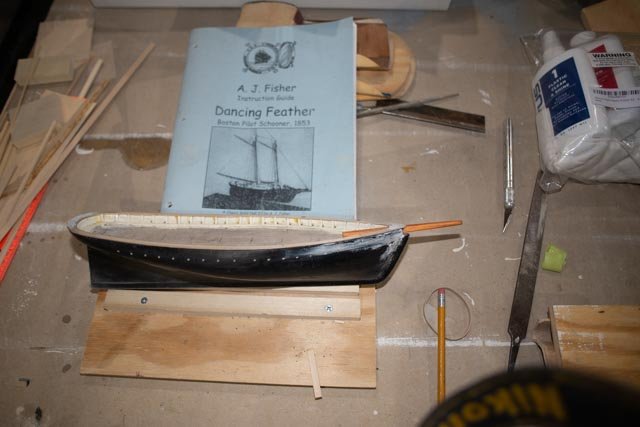
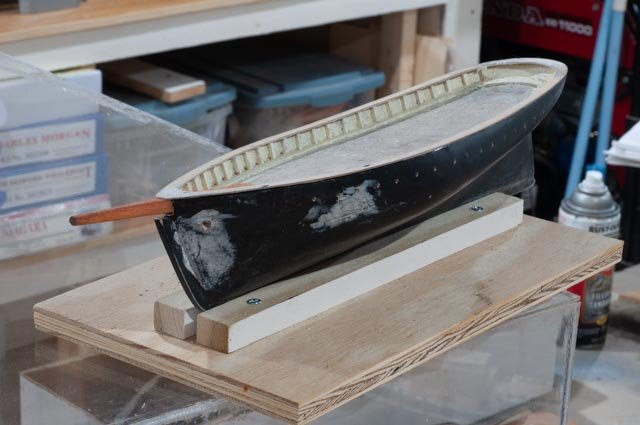
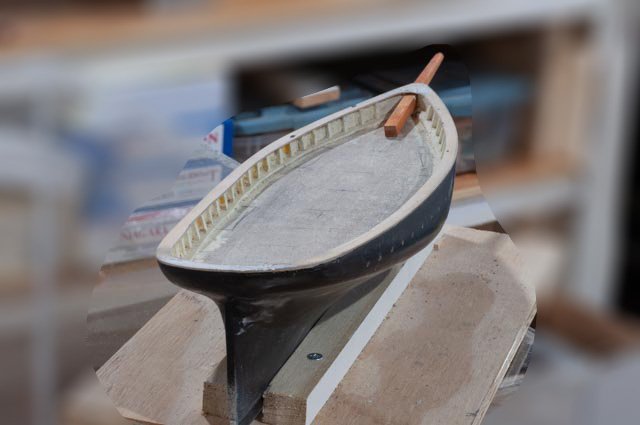
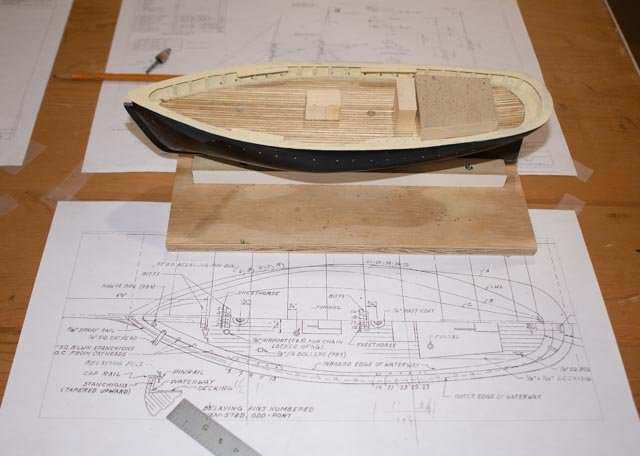
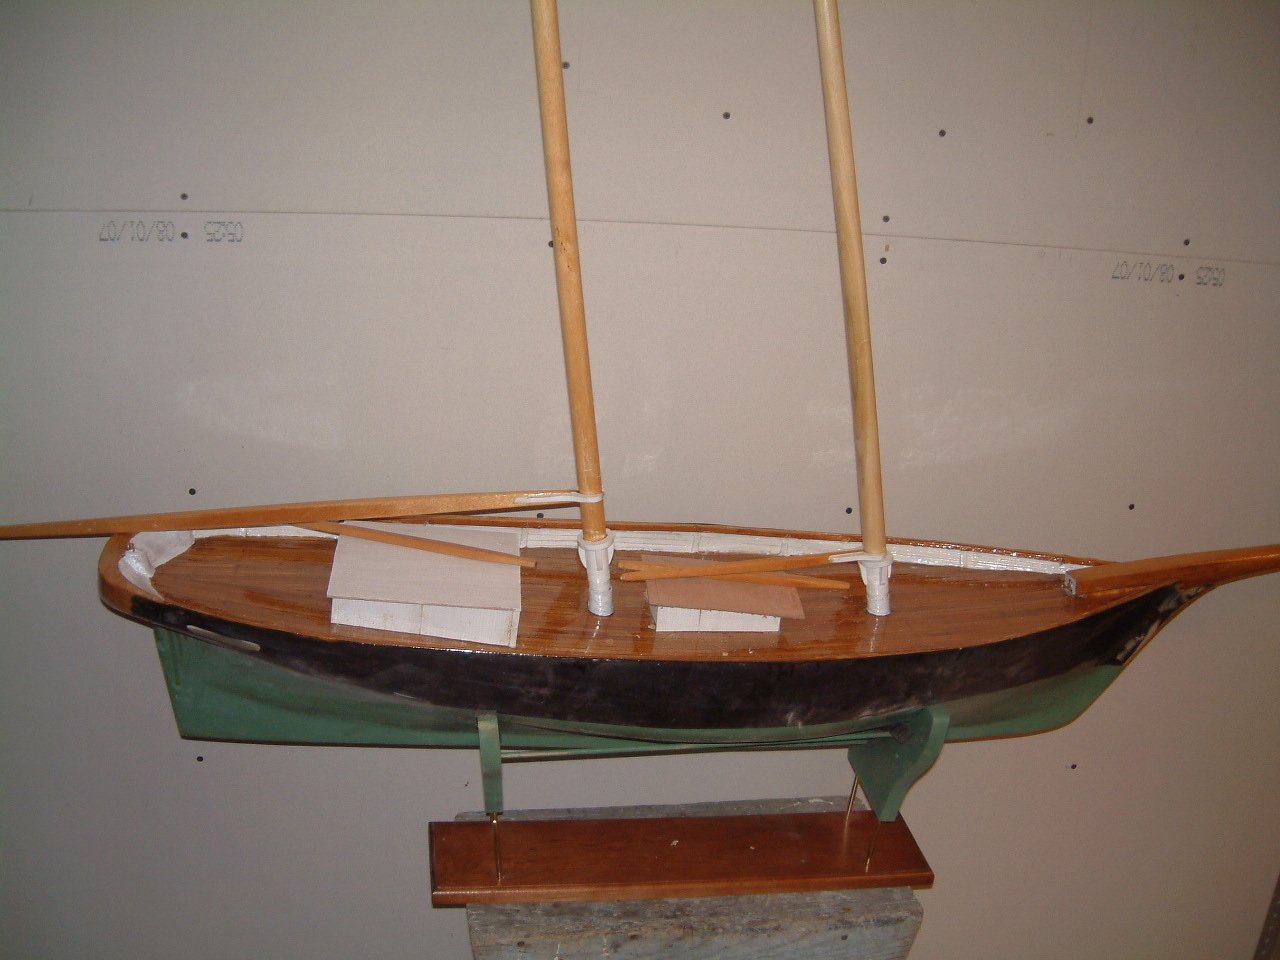
Post 7 Let’s start the study model….1:64 Before we cut down the rigging and make the big boy attempt a water venture, I thought it wise to do some research on how these schooners worked and work on a study model to accomplish that goal. Then or maybe if things change, I can take the study model and either leave it as it is or do some more work to honor the historical research. That means like my other builds, I do not know at this stage what will come of the effort. My planned time on this project is proportional to its current progress. That means I expect to do a few other projects at the same time. This project is one I mean to complete it just must accept I have other priorities. I hope to have this study model well progressed by the fall and then over next winter rework the larger version. So, let us get started on the study. As a note I will number the photos on the study starting at 201 so they sort in the files 201 here we have the hull. That is about all I plan to use from the kit other than their material that went to general supplies. 202 after cleaning up the hull, adding the keel and stems etc. I added a water way and stanchions. 203 as this is a study only, I am taking a few shortcuts. For the rail I took a 1/16” piece of scrap plywood and traced it out. I made offsets and cut it out. Since it will be painted, I am not worried about the edge. 204 for the deck I used up a bunch of bass wood planks. I then started to cutout blocks to shape for deck furniture I have to share this goof 205 working away I clad the two cabins and shaped the two masts ….then OH I can ‘t believe it 206 this view shows what happens when you don’t focus on what your doing. Yes I have redone the aft cabin since this revelation. Next up is copper bottom Jon

- 23 replies
-
- 7
-
-
- dancing feather
- pilot schooner
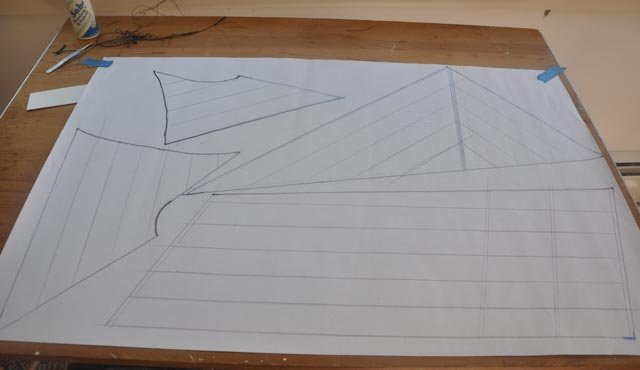
- (and 1 more)
-
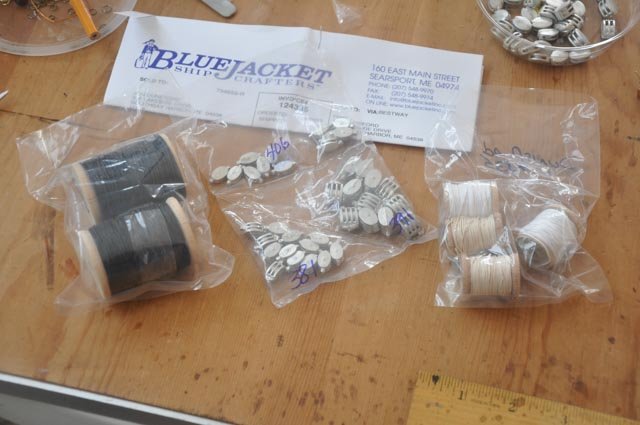
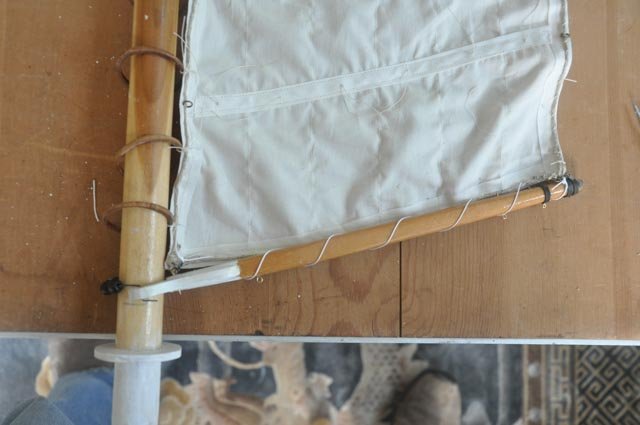
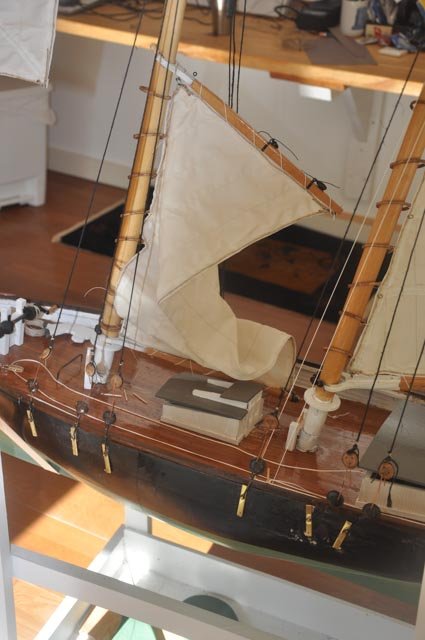
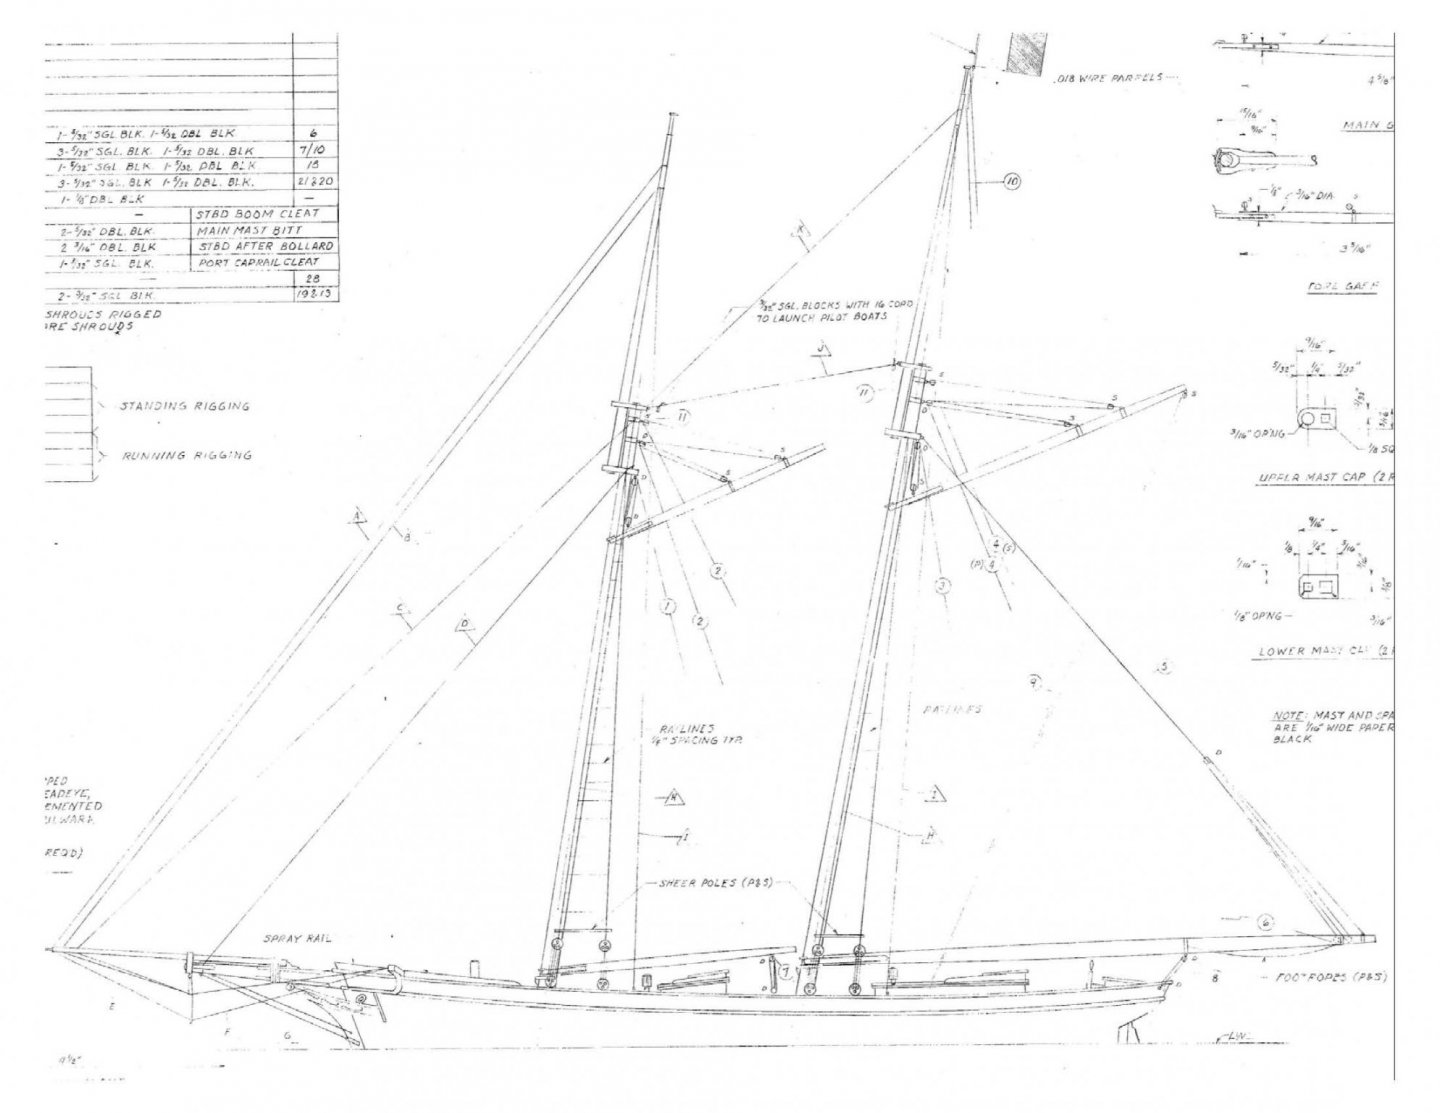
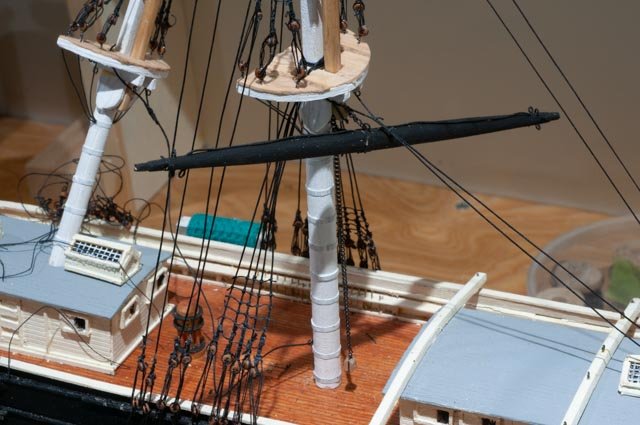
post 29 figuring out the rigging plan Although time is limited by summertime temptations, I am still plugging away at this project. As I have noted often, I consider it class work project and fortunately will not likely leave the shop when done. In the last few weeks, I have focused on building the bottom and center and getting all lower mast and top mast work done. At the same time, I need to complete the standing rigging, ratlines etc. I won’t point out each time it happens, but I am constantly finding loose shrouds that need to be rerun and other things that make me step back. Maybe that is normal, but I believe it is what happens when close to the edge of our skill. I am finding it easier to work with the tiny blocks and lines. Some basic methods have come to me by trial and error and I may even be able to get this one done Last time I showed the partial solution for the Spanker. I pick it up today and share the almost completion of that work as well as the top masts re rigging of shrouds and the introduction of the yard braces. My plan is to get everything done before I venture up to ad the to gallant and royal yards. Today is a partial milestone. Many lines are still loose as for two basic reasons. I am focusing on the port side. To tie done a brace the other side is loose, so I need to get all these in place and then turn the ship around. I can then start tying things done and making them snug. I am also doing the 10-15 ratlines per day . I know I need to cut out and redo the fore top mast as it is ugly, and I now find it easier at this scale to do. So here we go with the planning of what needs to be done to get done. 199 I made a cut down [ low profile] sky light to go under the gaff. If it works, I will give it some frames and then consider if I should change the other two to match 200 here I have compromised and rebuilt side only fife rails so I can tie down lines. The rings for the spanker are purposely a mix of metal rings just be a motley grouping. 201 I have added all the lines. The gaff vangs are critical to hold all in place. When I turn the model around, I can tie down the topping lift and peak halyards to raise the boom just off the skylight and make all the lines tight. All the shrouds had to be rerun as they were shredded in the spanker process. At least they are snug this time Looking at the overall rig, we must remember pictures 182-185 earlier as I had to take off the top work rigging that was all wrong. 202 here we see a few lose or missing shrouds yet but the essence shows we have it right this time. It is hard to see in the photo, but I have also figured out all of the yard braces that are needed to hold the yards in position 203 this shows the braces for the mizzen and main 204 shows the braces on the foremast. I find using the fine annealed steel wire so helpful at this scale. In larger scale we take black line and splice twice etc. here in a matter of a minute a lanyard is made with a block in it and ready to hang. 205 splicing dead eyes on top shrouds can be fun. Here I figured out a use for my old cigar boxes that keep left over parts in. So onward we plug jon

-
Keith we have had a glorious two weeks and much time was spent on the water. yesterday all fog and today so so . I am online catching up. The fresh air and typical family plus close friend boating make it a perfect relief in my mind. Sorry others are still restricted, but i must say being here in Maine at the end of a ten mile peninsula where there are no cases of Covid is a blessing. thanks as always for your encouragement. this build is a challenge cheers
-
There is not enough to write up a post yet, but i just want to log that I almost made it through the spanker saga. I tried a different low profile sky light and think I need to change all three to a lower profile. I have no way yet to tie off about twelve lines at the base of the mizzen mast. Maybe a new fife rail forward and sides with an open back. Now it is June and we are sailing in a real boat and doing other summer things. As I have time to peck away i still hope to get on with this first attempt of a ship. I think the general design corrections are in place for the spanner on a the extended cabin poop deck configuration. 198 this view is just to show the boom and gaff are made and in place and tied to all their lines. the sheets are a bit tight and i will adjust the boom up enough to squeeze a low profile skylight underneath. cheers
-
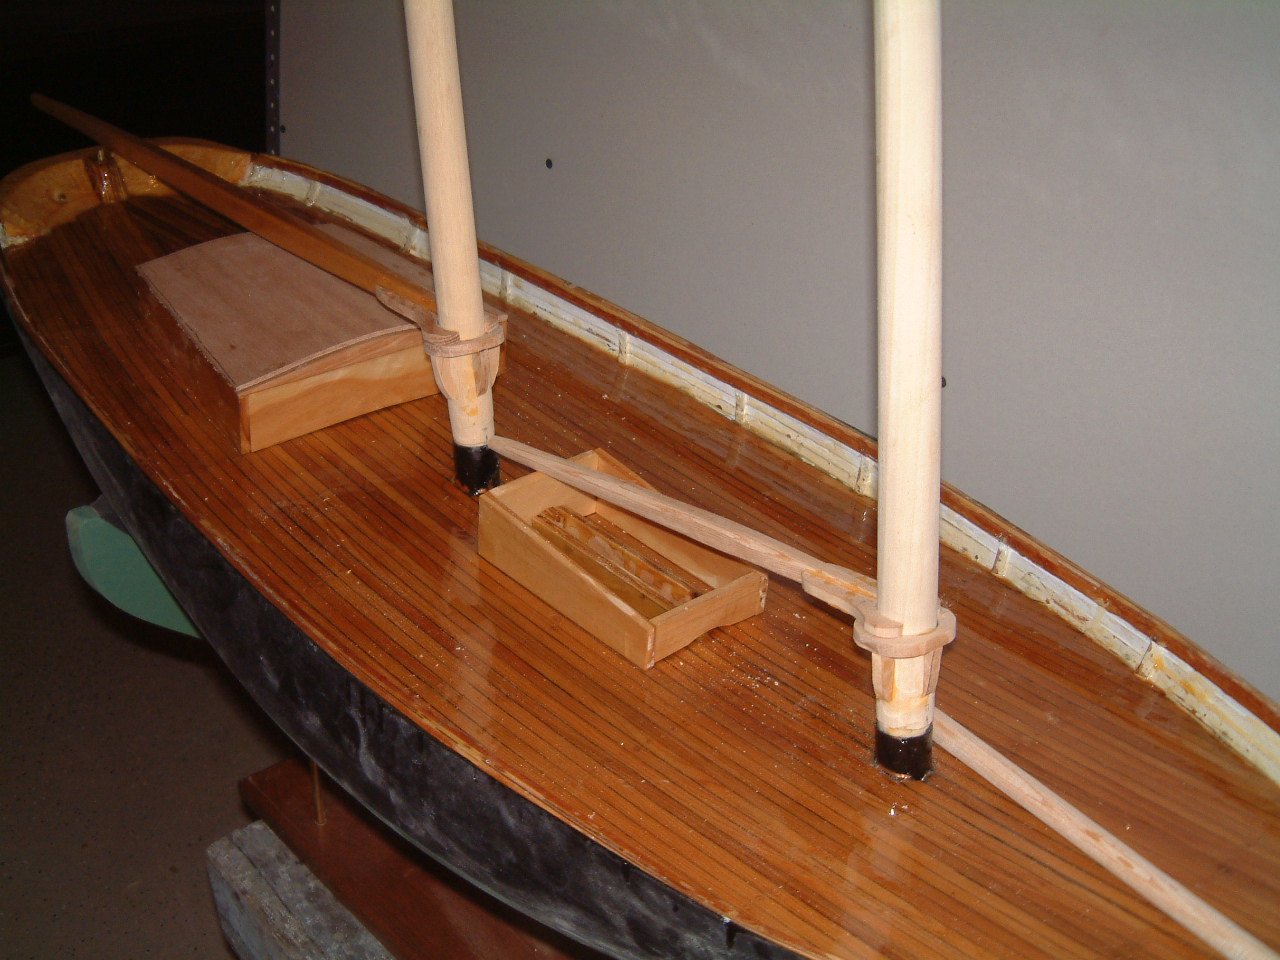
Post 6 Completed 2015 rigging exercise This posting completes the look back into the work done on the RC version of this build through 2015. Following the build, I went on the Bluenose Journey and built and sailed the BHOD sloops. As I went through each stage of those builds, I came to the conclusion that it will be a challenge to fit this schooner out for RC. We will talk about the specific issues later, as I try to figure out what to do to get her wet. Now back to the build 41 here we see the foot of the sails laced onto the boom and the birch plywood hoops. This is pretty normal although many RCs like to to use wire jack stays to hank the sails close to the boom. 42 looking down the deck we must figure how we will use a single servo to let out and pull in both the large main and the small fore sail. Also I is apparte3nt I need to solve how to control the rudder. The rudder shaft comes up on deck near the mainsail horce on the transom 43 I added scale figure cut outs and a helm for looks. This is my first home made wheel. I have learned a lot since then. 44 here we are preparing the foresail. Topsails and jibs are on the table too. 45 as on my other builds I frequent our local supplier Bluejacket for most of my loose fittings. Working in this large scale I like the metal fittings. 46 here the foresail is sewn onto the mast hoops 47 we see the value of the stronger fittings. This process is where I got into trying hemp craft line for bolt roping. It is ok at this scale but I had to redo it on the 1:24 scale bluenose as it was just too big 48 here goes the foresail 49 here is the attempt I made then to control the rudder. The brass square tube penetrates the housing to an elevated servo. Who knows, it might even work. the sail servo is set up too run lines on deck. that is not normally done but access below decks at this stage did not allow for a simple solutions to be hidden. 50 up on the foredeck, I made some anchors, trail boards and the windlass / winch. 51 here she is as she sat for several years in the middle of the sail loft in my old shop. She is still over there today as part of the “staging” one needs to do for the hopeful sale of my past home. Here is a summary of the long sage followed by a look forward I bought this plan and kit in 2001. I started the hull for the larger boat in the winter of 2005. I restarted the build in 2007, as covered in this catch up log. As of today, I could say I have 15 years into this project. That is nuts and why I have taken it off the shelf so to speak. My plans for this upcoming build are to peck away at the small 3/16-inch version with a focus on setting up the sails and rigging design before getting back tot he large version. Next winter, though I will get into a few other projects as well, I have intent that one project is to complete the sails and rigging, so next summer we might try to sail her. All for this catch up. Next will be a some progress on the rigging design model

- 23 replies
-
- 7
-
-
- dancing feather
- pilot schooner
- (and 1 more)
-
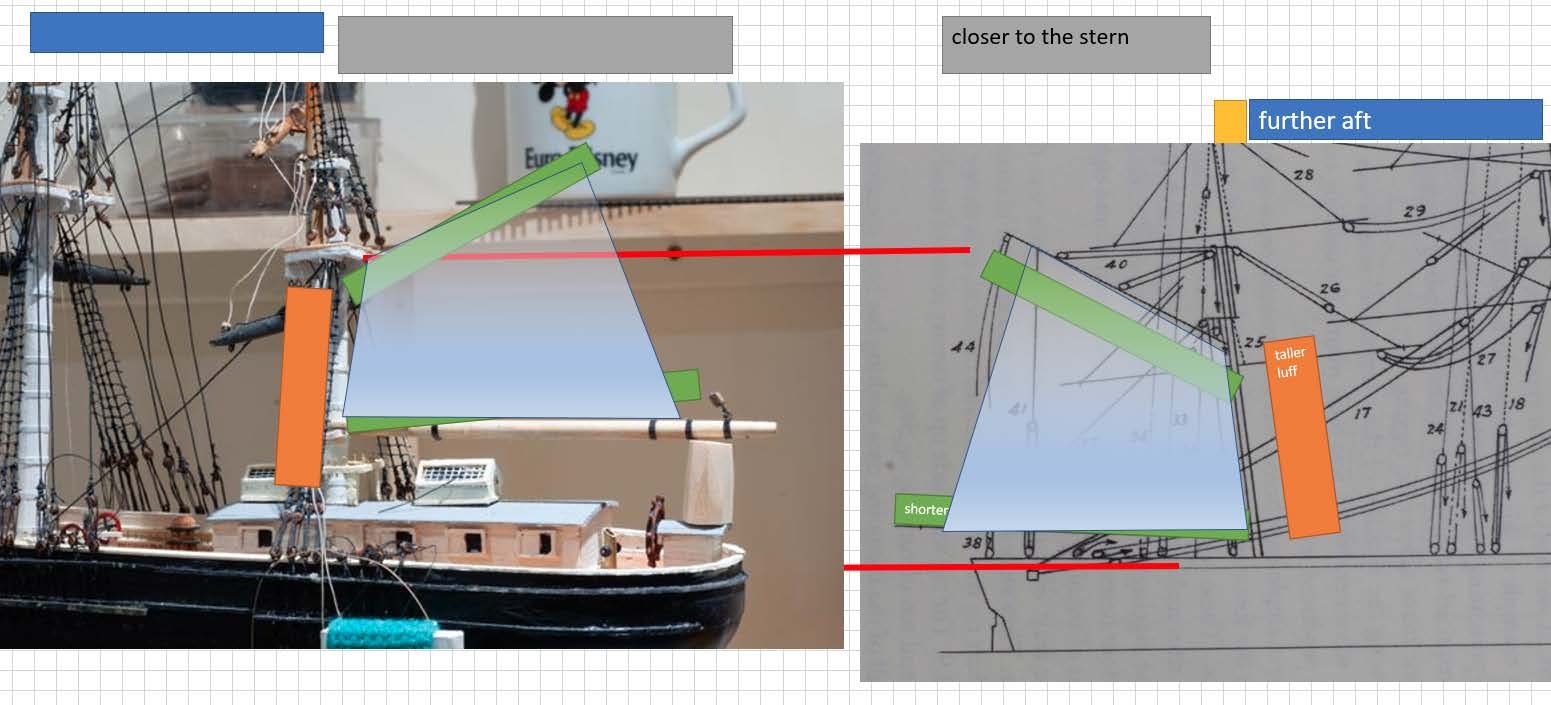
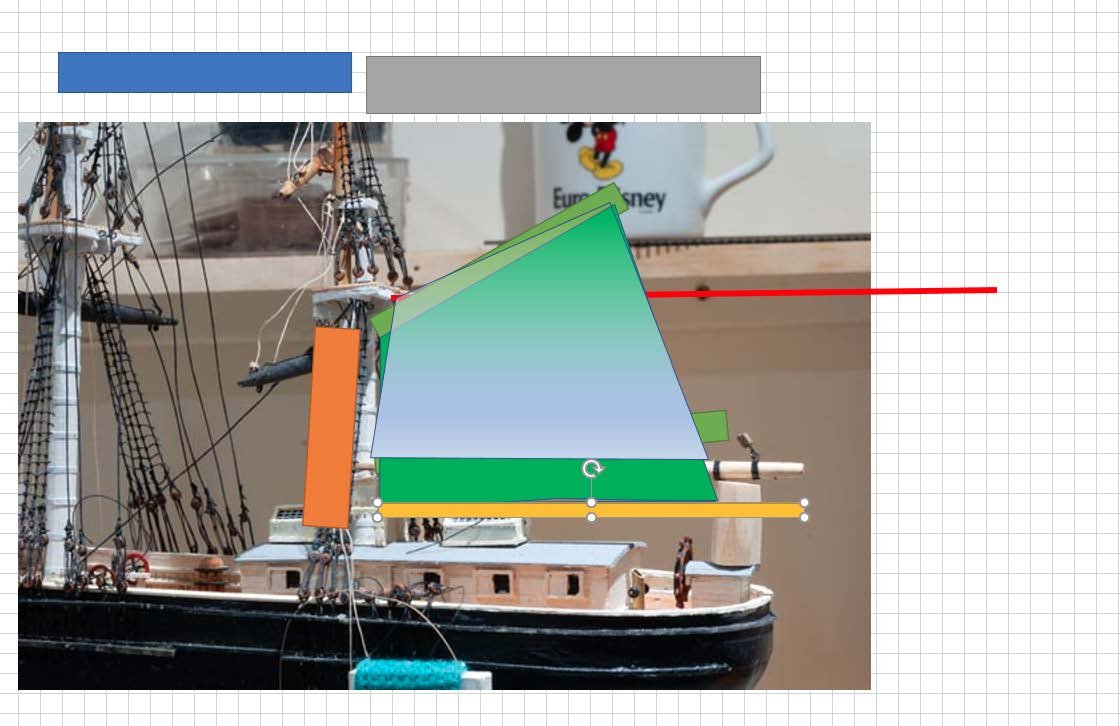
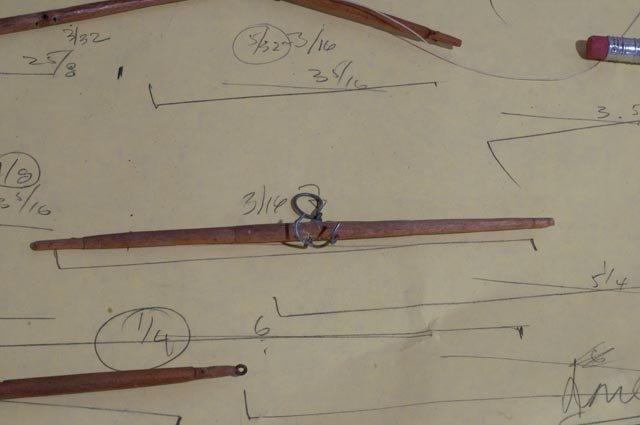
Post 28 Second attempt to figure out that spanker As usual we need to go back to the basics. We must also accept that what we have already built might just not be right. First up is to ask our expert Mr. Crothers how he rigged a typical ship 195 is just that, the running rigging for a typical ship. I have cropped enough to make a comparison with the picture 191 above 196 here I pasted the two photos side by side and scaled so they can be compared. A few observations The mizzen in the typical ship is further aft from the main mast. The distance from the mizzen to the stern is much less on the typical ship The potential luff on the typical ship is much taller, making what the eye says is a reasonable spanker sail. Aphrodite has, by Alna’s design, a cabin and sky light, and my interpreted fife rail forcing the boom way high. Something has to give. My current thought is to take off the boom [ already done] and remove or at least lower the sky lights and remove the fife rails. At this scale it will be very difficult to put cleats on the mast for the 8 lines and actually tie them off. I will have to have some liberty there. Perhaps eight eyes with simple hitches buried under coils of line. 197 this is my next direction. Reconfigure the boom and lower it as much as possible. Just a note... the port shrouds on the mizzen got shredded and broke, so I am going even further backwards. oh and the wheel fell off too. Cheers

-
Post 27 Getting organized. seeking a path to do the rigging and how to do a mizzen One of the joys of doing this build without complete plans is the need to regularly search and discover a plausible solution. Unfortunately, it has again happened after the first attempt. First up is look over the “mess” as I called it and figure out a sequence. Then stick to it. If I glue something or paint something I must not jump to another extraneous part and work out of sequence. That is one reason I started up the other build. As to the sequence I feel a little better about starting in the middle and working out and working from the deck up. The little example of what had to be done to get the pumps installed was a great learning tool. So off we go. Last time we took a hair cut and went back a few steps 186 here is a milestone. All fore and aft standing rigging is in place and there is a clear list of items missing on the port and starboard shrouds. I will now work from the deck up. 187 first up the boats are now going in and are lashed down 188 looking aft we have a definite problem. How are we going to tie down all those yard lifts and other lines? The extended poop deck and house remove deck area around the mizzen mast. 189 looking at the rigging diagram they agree we need fife rails. But again, we have a skylight in the way. These are not indicated on the plan. 190 so being creative I reduced the skylight [ love those band saws] and built up another fife rail. I am used to trimming down some maple and using the mill to drill straight holes. My new problem is the acrylic craft paints I use are drying out and get lumpy. Just another pain to deal with. A most important sight in this photo is where I followed the masting instructions of our friend Mr Crowthers and came out with a lovely spanker boom with yokes and a table for the mizzen mast. I felt I was back in schooner land where I am much more comfortable. Looking at it though I just cannot believe it to be right 191 I look at the proportions and cringe. A yoke on the gaff would be ridiculous. Also starting above the cabin, we are a few feet shorted in the luff. Would it really have been so long? 192 back to the books. Here we have an image of a more plausible solutions. There is no full explanation, but a small mast is set aft of the huge mizzen to take the small spanker sail 193 here I am with my interpretation. I have a band over mast band forming a goose neck for the spanker boom that simultaneously houses the “{?????} “small mast for the spanker. 194 so as this week ends, I had to make other decisions. The spanker sheet is intended to go to both port or starboard rails over the steering gear. The bitts I added to ho;d the bumkins will allow tying off the sheet. That means I kept the boom at the length given in the table for Alna our prototype. Looking at the shallow slope of the topping lift and then imagining the block of the gaff peak halyards this will be a strange looking sail. I need to do more study on this part of the build. perhaps I shorten the spanker boom and have the sheets on the end of the cabin roof. All for now

-
Keith thanks for you fortitude to continue to drop in. I must say that just because i have become more comfortable in the world of Schooners, that a ship build is the place to go. it is amazing how much more there is to learn about how all parts of a ship work and what they are called etc. The sequence too wow ..... this rebuild started as a throw away. A pigs ear was an over statement. if I get it back to a pigs ear that will still be a worthy journey for me cheers
-
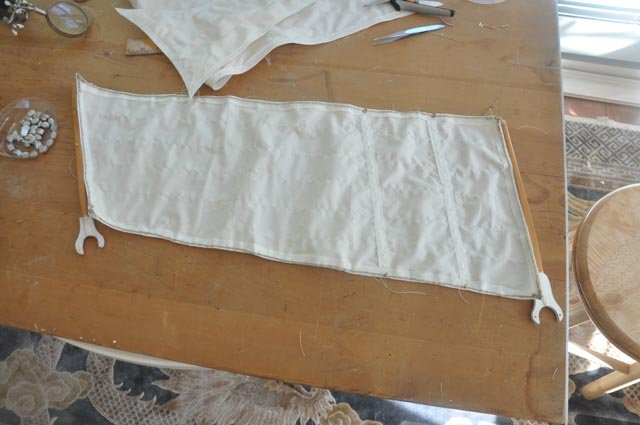
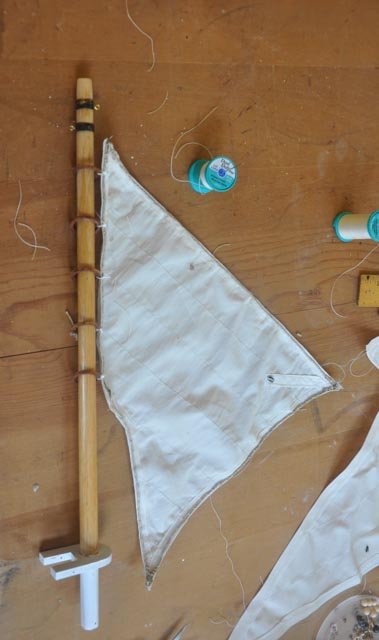
Post 5 Rebuilding rigging second time and starting sails In the fall of 2015, I spent some time re-rigging the schooner using much newly acquired skills. They are truly basic bit to me they were new. 31 to make strong hoops for sailing I took 1/64 plywood strips, soaked them to make them more pliable and bent them around a plastic electrical conduit that was the right size. After drying they are glued and wrapped again. Then sanding and varnishing and they look almost real. 32 I learned to cut out the big hole in plywood or bass sheets before sanding to the outside diameter of a ring. 33 here we see the Sitka spruce mast with the ring table for the boom yokes. The ring on the mast in the photo are the first generation of electric conduit cut in slices. The replacement wood rings are on the bench. 34 the first-generation mast head broke. Here again I drill the inside holes first and the cut and sand to shape the outside. I am obviously cheating as there is a slot and not a proper square hole. 35 here we are replacing the mast head. The crude attempt of seizing the shrouds looked good to me at the time, but now I need to think more about the right scale. 36 I needed to make up cabin and hatches for the deck housings. Here the hatch too big [ the pencil shows where it should be]and needed surgery. 37 here I am gluing up outer coverings. They must be removable Now to the sails I spent some time and consideration to reduce the sail area so the sailing of the scale model would be more realistic. From my reading there are many opinions out there, but a 15% reduction seemed to make sense 38 I laid out the sails on a template and the traced the marks to a plain muslin . 39 here is the first one made and sewn onto the loops 40 and here we set up the main and see the deck cabins More to come
- 23 replies
-
- 5
-
-
- dancing feather
- pilot schooner
- (and 1 more)
-
Keith i use the would skill loosely. i love it when i think I am rolling and then oops cheers
-
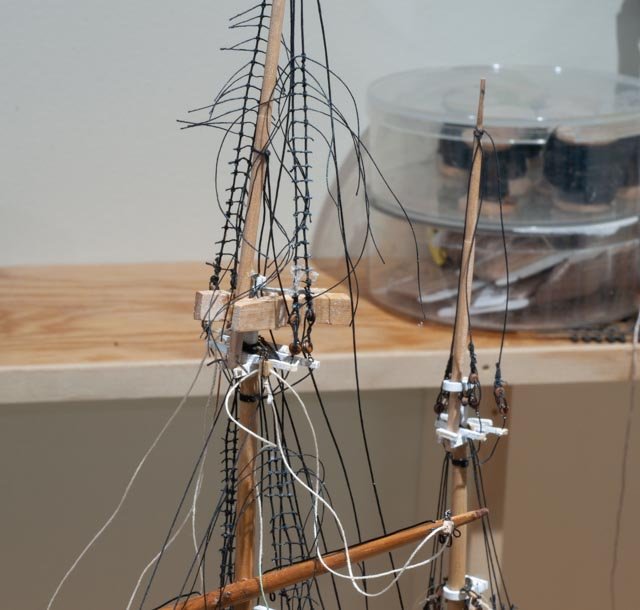
Post 26 Big oops again….top mast rigging One good thing about all the other activities that come into our lives this time of year is the time to reflect. Walking by the work bench I kept thinking something is wrong. I needed to take the time for a fresh look into the rigging plans and be sure I have the big picture right. Well I did not 181 look here without reading ahead and see if the obvious issues hit home. The issue is the relationship of the lay out of the top gallant and royal mast, or “pole” as they call it in the book. I went back through the tables and then realized what I did wrong. I then redid the clac’s to see how best to fix it. Over simplified, the main and fore “pole” was made up with 24 feet of top gallant, 16 feet of royal and the top post roughly 5 feet. That means the shoulder for the stays at the top of the topgallant are just over halfway up the pole 182 uses a simple method to point out the errors. Basically, the shoulder is correct on the main and mizzen and way off on the foremast. The compounding error was to carry the shrouds and ratlines above that line. As I understand it now the crew apparently did not climb up to the high position of the royal sails but must have lowered the royal yards using the lifts so the yard came down. How else could they have gotten there to furl the sail. Anyway, it is all wrong and I need to start that phase again. 183 Some good news though… I got the last fife rails and little pumps installed. More importantly I successfully tied off the first few lifts. 184 I also decided to add some glue to the base of the mizzen and pull it a bit aft. All the tension from added stays was pulling it forward. I normally do not glue masts. Perhaps at this small scale where the consistency of tension is less consistent, it would be a good idea 185 here we are having taken a haircut. The foretopgallant mast is being replaced and all the shrouds are gone. I hope to get it right next time Cheers
-
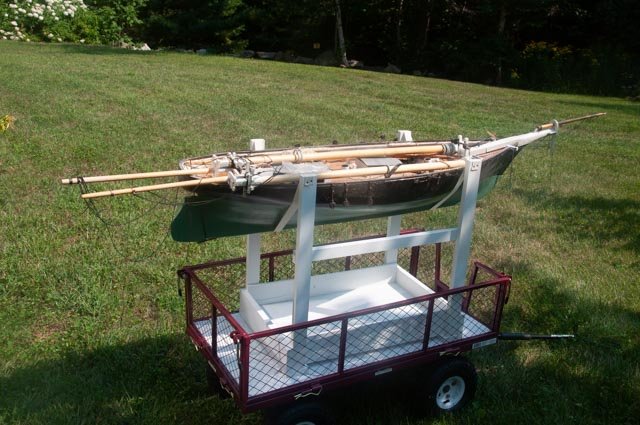
Post 4 2014-2015 first rigging of sails The pace of this build continued on a spotty basis. In the spring of 2014, I spent a little time as I got going after retirement to roughly rig the spars. It was not a great result, but I was cutting my teeth so to speak. First, I needed to decide what were the sails going to look like. I had two images to work with 22 this is a cropped view of the kit design giving intended dimensions. I knew I needed to reduce the size of sails to about 85% and simplify them a bit for RC 23 this image I took from the book on Pilot Schooners and is what I tried to make. Obviously, there would be too much sail but off I went thinking I could cut them down later 24 here we are at the entrance of the shop in the spring of 2014 with standing rigging 25 the view on deck shows the roughness of the work. The full focus was learning process and the results were not great Several months passed and I decided I needed to rough out paper patterns for the sails. 26 here we have the paper templates all cut out and this is how Dancing Feather sat for another several months as I worked on the BHOD racing sloops 27 part of the learning exercise was for a standard easy to use stand for RC sailing. This strapped box goes with us to the shore and carries loose parts below and is steady to support the fully sailed model outside 28 here we are on the new stand and as a few more months went by 29 now in the fall of 2015 it got to decision time. I removed everything as I knew it was no longer up to snuff. The little red wagon is to carry the schooner to the shore. Other photos showed Charles Notman in the same wagon. 30 next up was to finalize the design of the added rudder and keel for sailing. This built was to achieve 50 inches on deck as that is a class of schooners in the Vintage Model yacht group. I had visions of travelling south to Maryland and joining a regatta if I ever finished the build. The wood shaped bulb form is the 5-pound lead form from the same 50 inch Marblehead I built at wooden boat school. They would give me 10 Lb of lead to hopefully keep us upright. In late 2015, after having built both Charles Notman and BHOD racing sloops I realized the need to redo everything. Next up is the rebuilding of the rigging the first time Cheers


- 23 replies
-
- 6
-
-
- dancing feather
- pilot schooner
- (and 1 more)
-
Keith as the story unfolds it is like a confession of a lost soldier. I always have about three projects going and I am always reading about three different books at a time. Some get done in a reasonable time and some don't. If one drops in to my Bluenose log one will note I still have three sails to complete and I am committed to rebuild the mainsail. There was a pre covid 19 rumor that Bluenose II will visit here in honor of Maine's 200th birthday. If she comes here, I should drop everything and go back to that build.. My long answer is a clue by itself...i have no real time table. I hope they get done. However the long hiatus means I learn more and get better skills or tools. what was good enough in 2014 is rejected today/ so maybe i never get done. cheers
- 23 replies
-
- 3
-
-
- dancing feather
- pilot schooner
- (and 1 more)
-
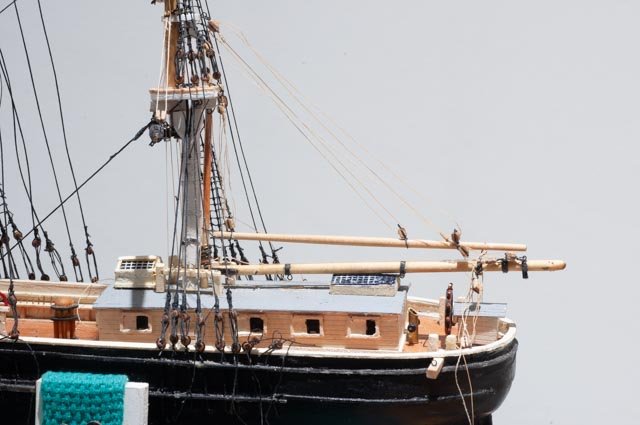
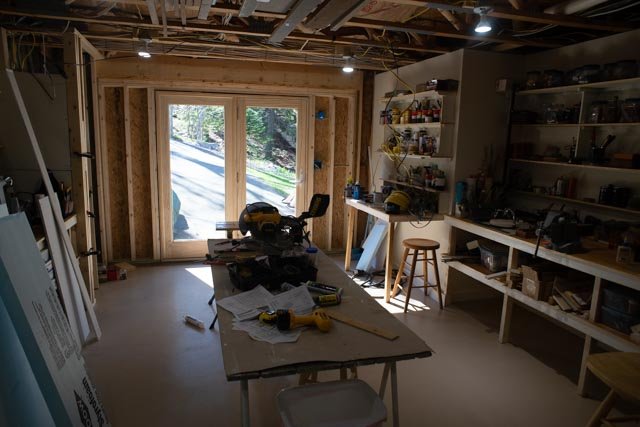
Post 25 Some more rigging….set the masts??? I remember in one of my earliest posts I was talking about trying to save this old hull and maybe the masts and see if we can turn it into a fun project. The first struggle was the shape of the hull, specifically the round stern. I got a response that asked why I was trying so hard to save this old log of a hull with a too round stern etc. Looking at some of the photos showing the dinged-up spruce log hull with me suffering to get dead eyes level, all I can do is chuckle. This ship will never make anyone’s mantle. Heck it may never leave the shop, but I have learned so much that I really look forward to a future build. I want to build some Brigs and I feel I will be ready. I might take it up a notch to 3/16 scale though. The current scale is becoming less daunting as I work through it and it might be better for a diorama where I have two boats …..Part 2 of my planned Pinky builds by example….next winter perhaps The three weeks have been terribly busy on other things, but I try each day to do something. The tiny little ratlines are finally easy, and I try to do 12 a day. First up is to log progress on the shop rebuild that started with he house move mid-way through this build. The end of the shop was a garage door, as I understand the first oner stored antique cars. 173 I finally got my new glass door in, so the daylight, especially in the morning is great. The dog loves the new exit to the side yard. Back to Aphrodite… First up we need to take a step back. When I glued the little brass yoke that holds the main topsail yard lifts, it dribbled and grabbed the topgallant mast. Top topgallant mast had slipped loosening the top shrouds, so I had to break it out and rebuild the connection. Murphy lives. I learned to wrap the upper mast with a styrene piece [ see earlier post] and glue it to the lower mast. This arrangement allows the mast to slip in and out and from the side looks just like a proper mast cap. To get a ¾ inch long piece of the right size styrene, the cupboard was empty. It cost more to ship than to buy. 174 while we wait a few days for a new mast cap, the top gallant mast remains temporarily clamped. You can see the daily progression of ratlines. 175 I wanted to install the fife rail and pumps around the main mast but needed to get the mizzen set, so the mizzen forestay could be installed first. 176 here is the result of my first attempt to getting the main mast set. The top mast shrouds are still loose waiting for the reset of the top gallant. I have been using soft annealed black coated copper wire gauge 24 from Joann’s to make the chain plates . they are quite flimsy. 177 I commented in the last post of my revelation to use annealed steel wire for this assembly. Here the top mast dead eyes are all done in steel and I am much happier with the result. These two photos are the reference I made above of needing to remember this is an old spruce board carved as a hull. There is no nice planking. 178 another item to go back on is to replace these large topsail yard lift lines that are too big. 179 here we are with smaller lift lines that actually feed through the little holes in the lower mast tops to get to be tied off below, once the shrouds plumb up the mast 180 well here we are. Everything is a mess and we are working in all areas. My next milestone is to get enough done to complete all deck connections. One example is I need to research to see where to attach the Foremast forestay. Also I need to figure how to attach a spanker boom before I get too much done on the mizzen. All for now cheers
-
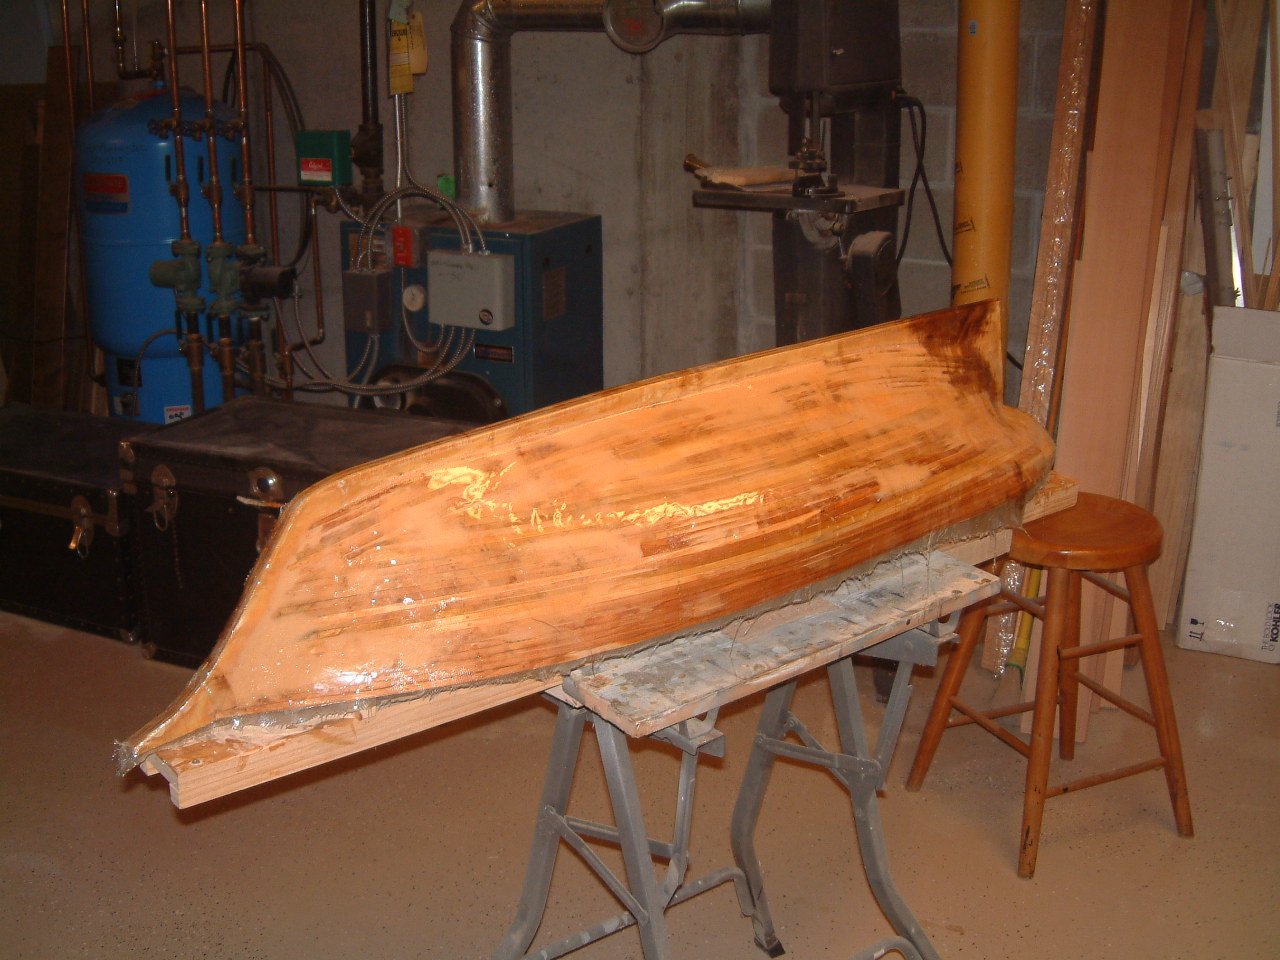
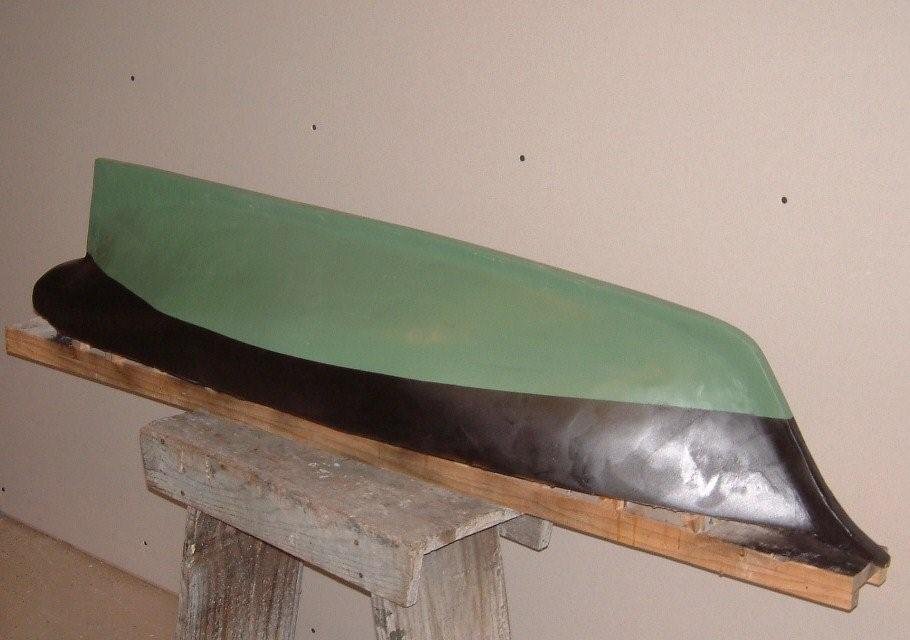
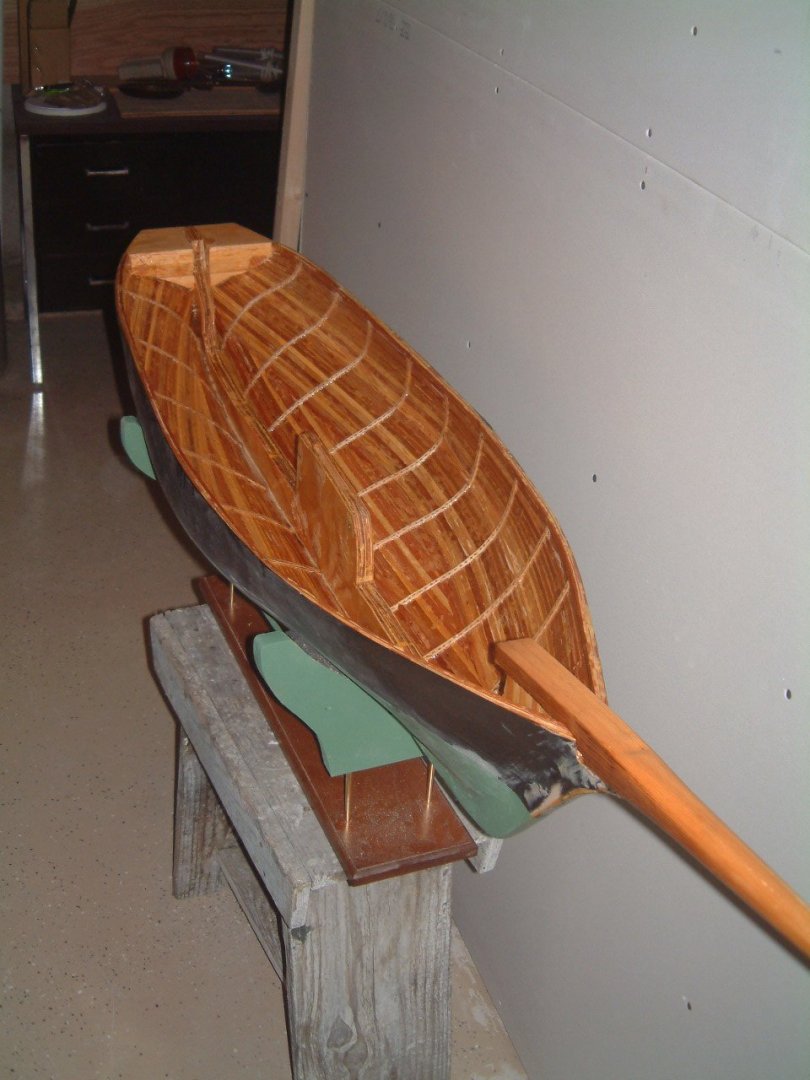
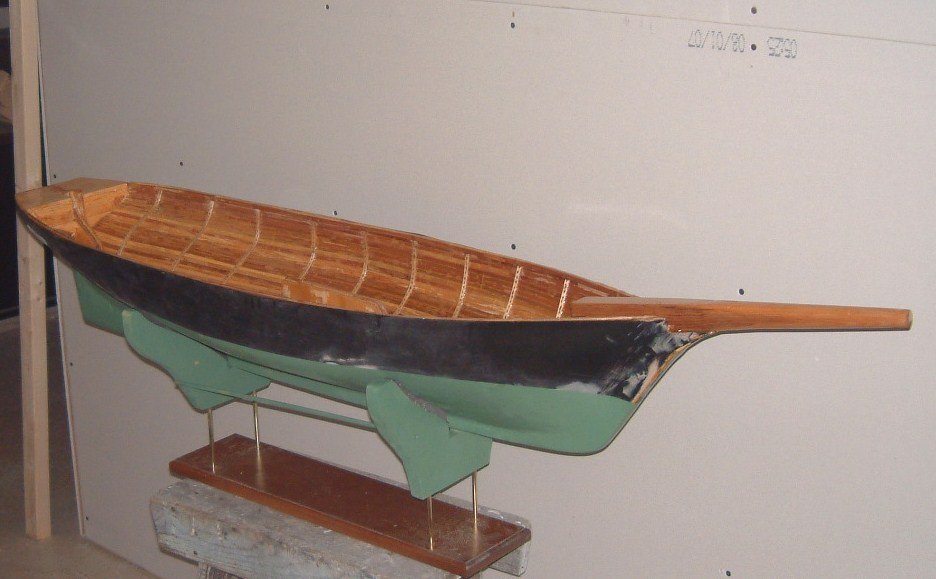
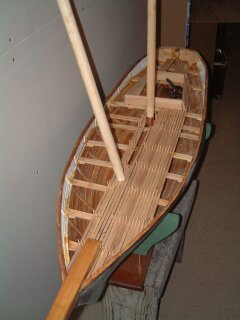
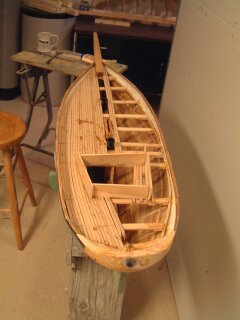
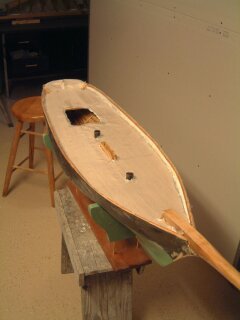
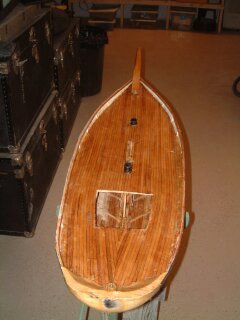
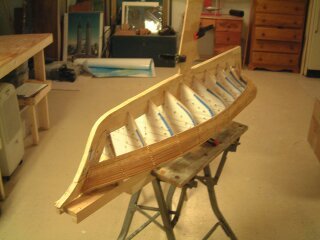
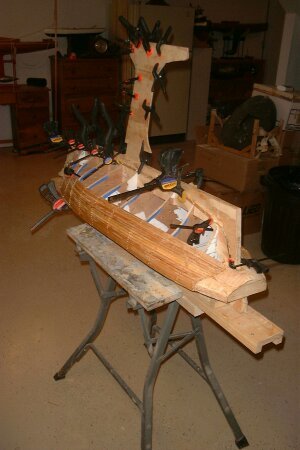
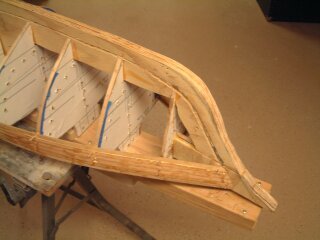
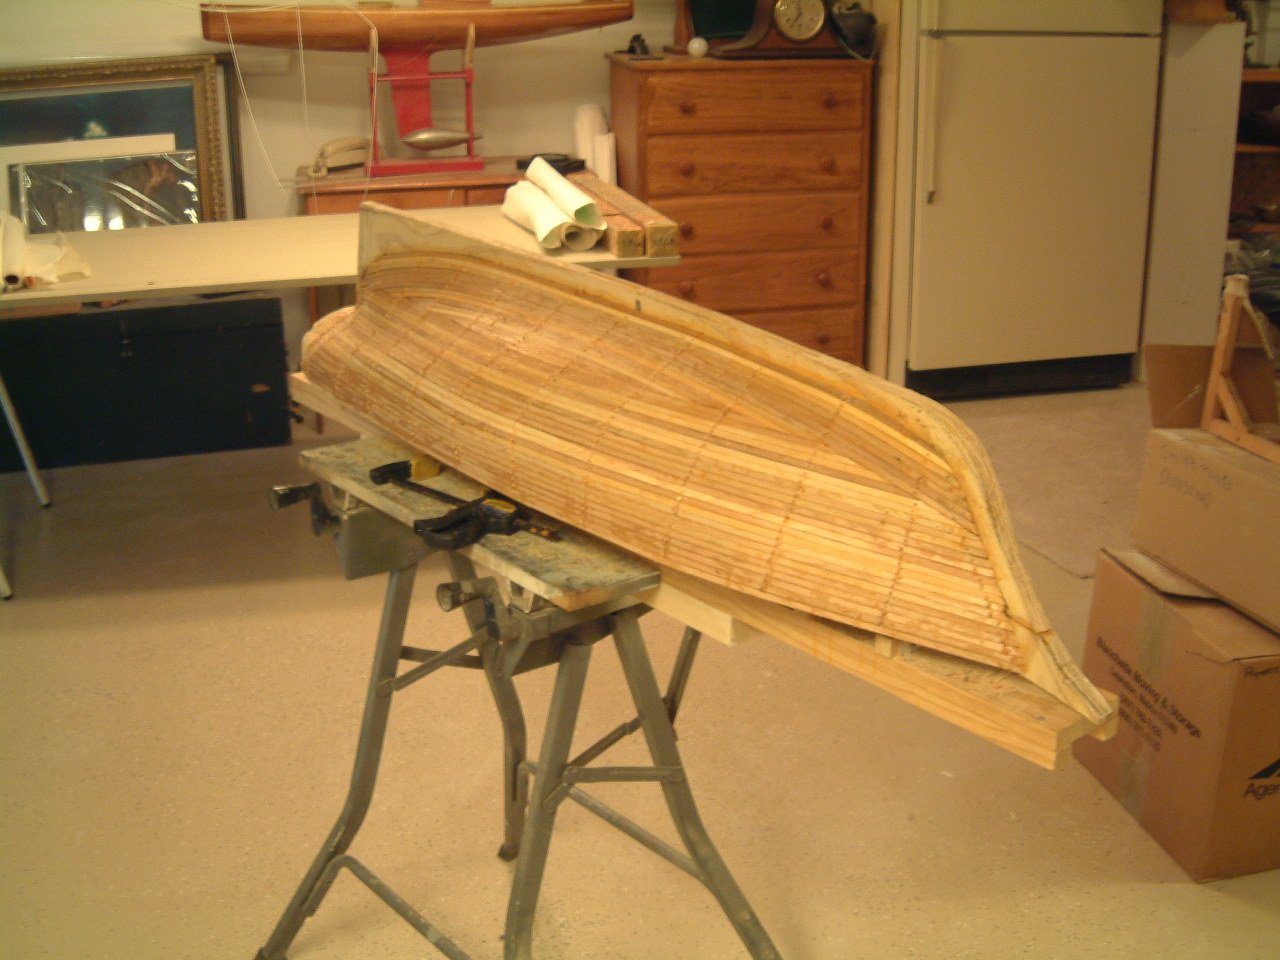
Post 3 build as of 2007 this post is a catch up on the work done in 2007. 11 starting off we see the complete hull planking with rough sanding done. In the background one can see the frame for what became my 1:24 Bluenose build. I built that frame and found myself a little over my head. I switched to this build using what I learned experience wise on the other frame, this one came together Ok and includes a slot for the dagger board. Bluenose will require some other means to bolt on a sailing keel. 12 here is a lesson learned. Someone suggested I use the water base filler for all the seams and things. What I learned is that the cured white plaster is harder than the cedar. It was the wrong material for modeling. 13 material did not mater in the end as here I have 4 oz glass with three coats of west system epoxy resin. The bottom as was shared in the literature was green. I chose this moss green as it represents patina on copper. It is not the darker green of Fitz Huge lane, 1850 painter of note. As this is the simple sailing version, I see, some thirteen years later, no reason to change this color. I will need to add the gold trim line, and the forward embellishment of the bow to some extent. 14 inside we clearly see the construction technique taught at Wooden Boat school. The little 1/32 plywood strip ribs stand out nicely against the rich color of the resin covered cedar. The dagger board truck will hopefully be watertight. There is no way to go back and to check. If it turns out to leak, I will need to permanently install either the full dagger board or a stub. Either would take away from the display aspects of the model. 15 here we see the error of way ways happening on screen. The bowsprit is clearly too big 16 now to start the deck. The cabin is the access for the RC stuff. 17 in the early days of my modeling there were several missed steps. Since this scale is quite large, I might have nibbed the planks. The deck house will sit on beams as it needs to be watertight. The visible deck house will sit over this inside “neck”, and be removable for access to RC gear. 18 Mast stubs are in and the oversized bowsprit is starring at us. 19 clear resin goes on the deck for water proof. simple varnish goes over for UV protection 20 The spars are roughed out. They are made of Sitka Spruce 21 and here is how we sat from 2007 until 2015 All for now
- 23 replies
-
- 8
-
-
- dancing feather
- pilot schooner
- (and 1 more)
-
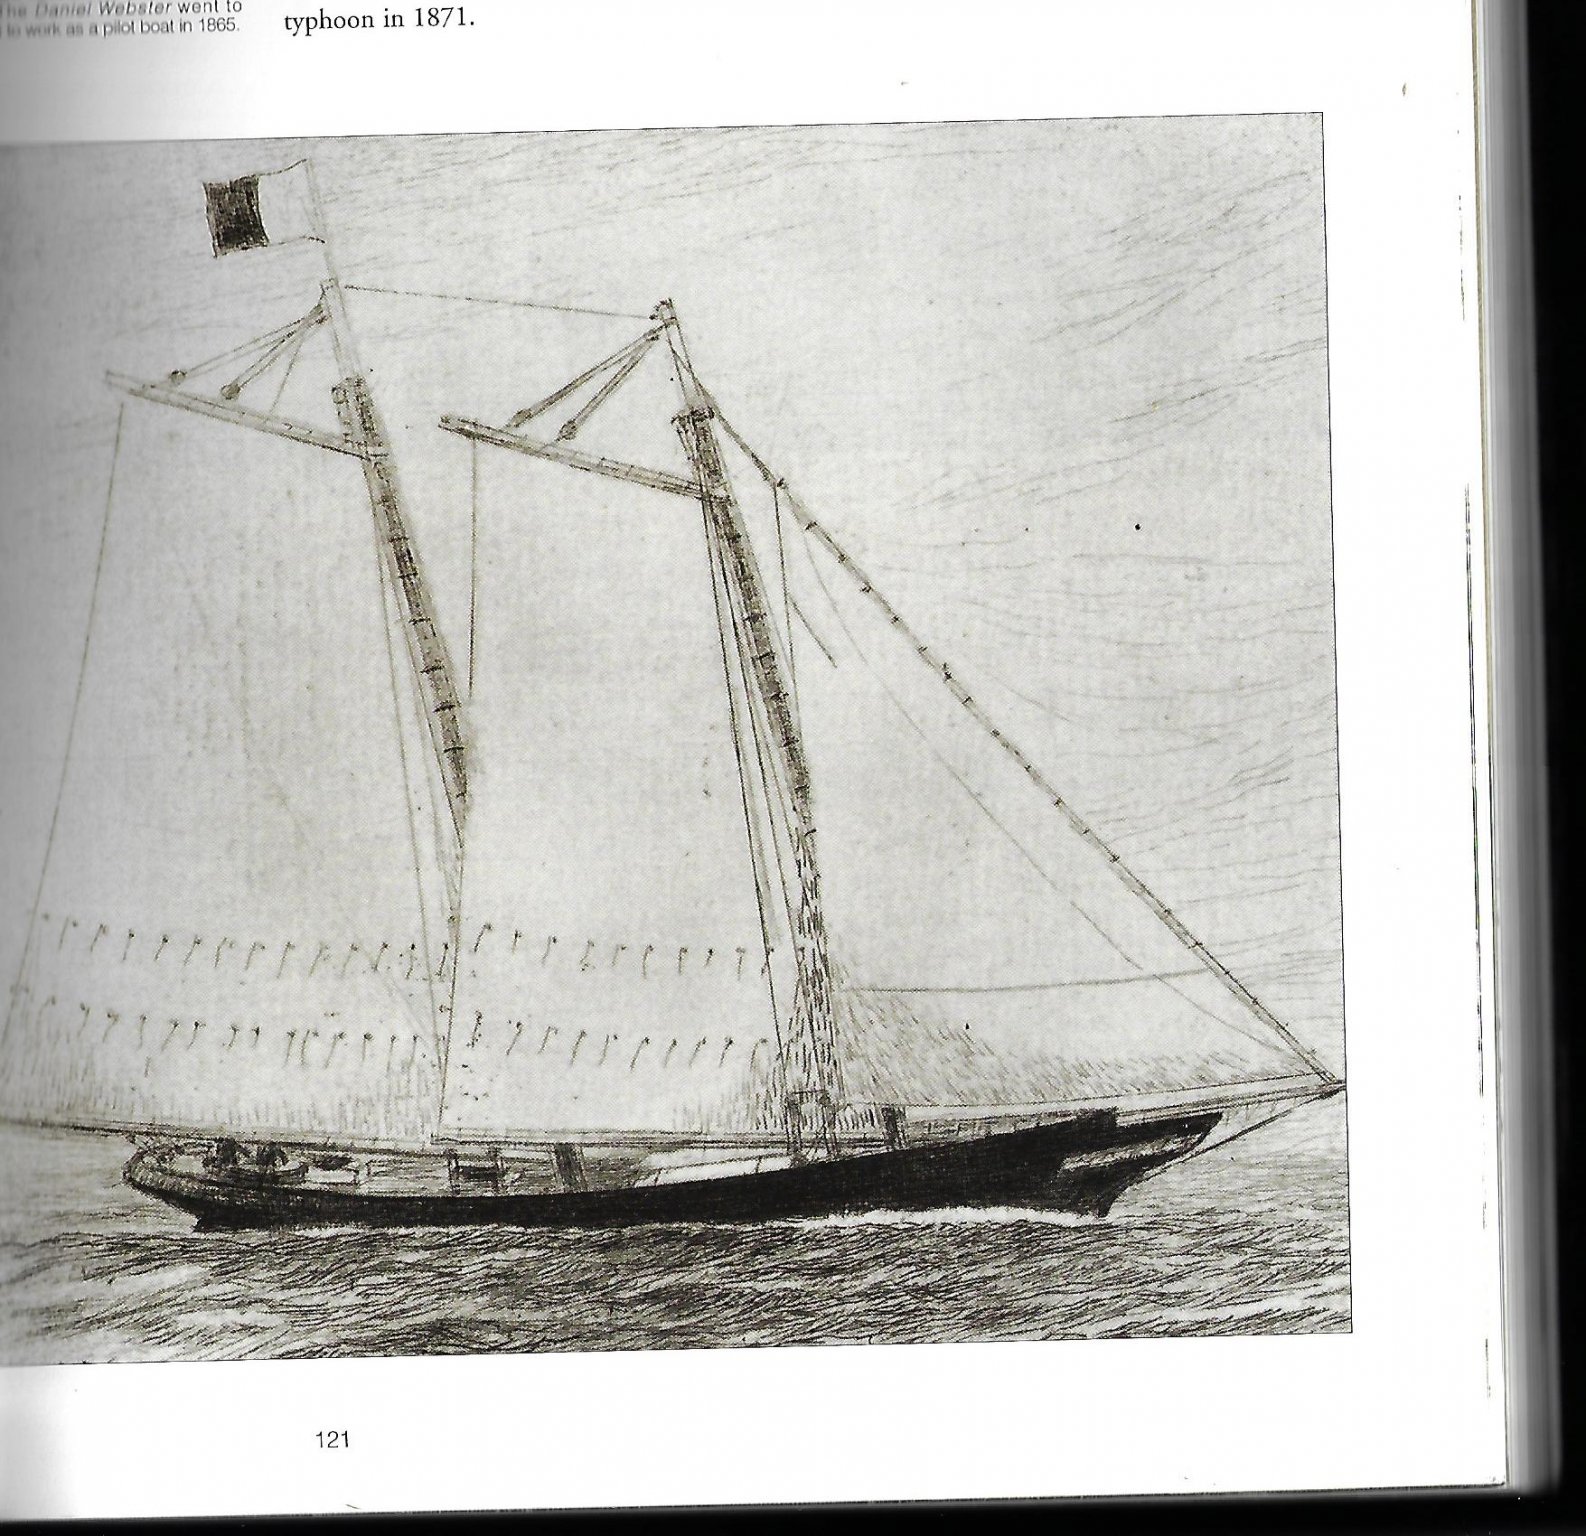
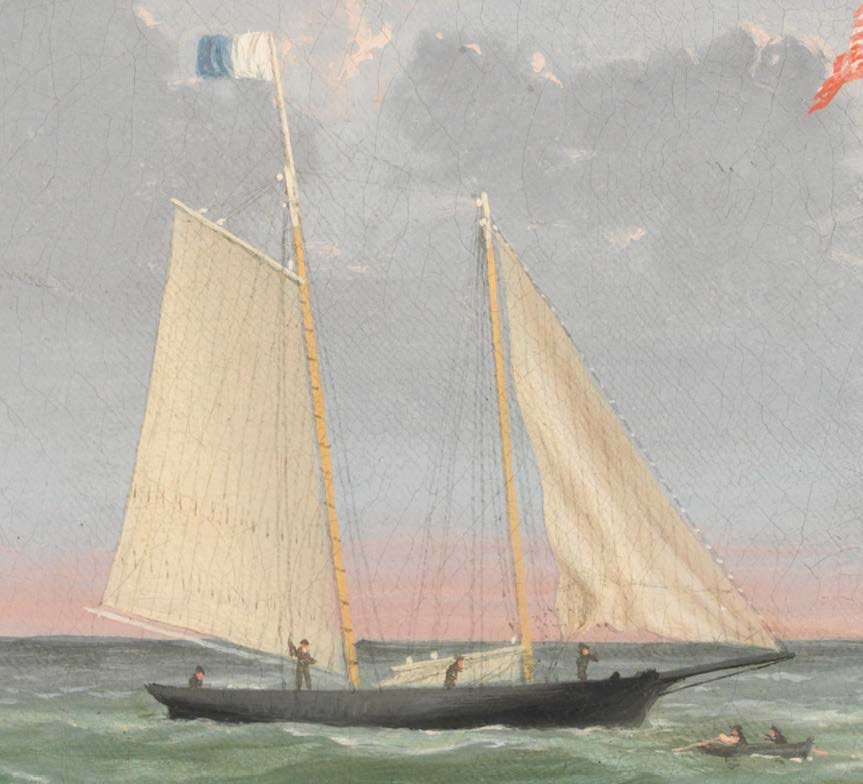
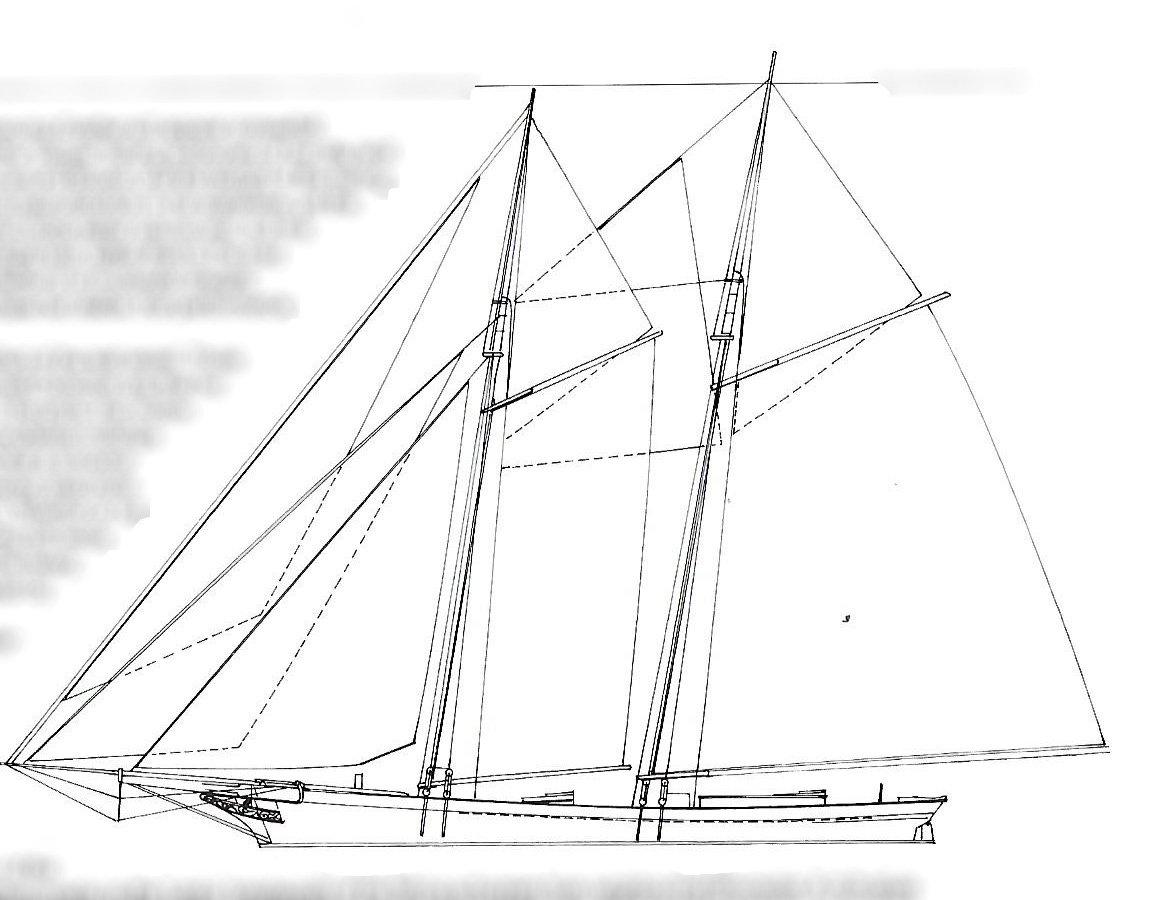
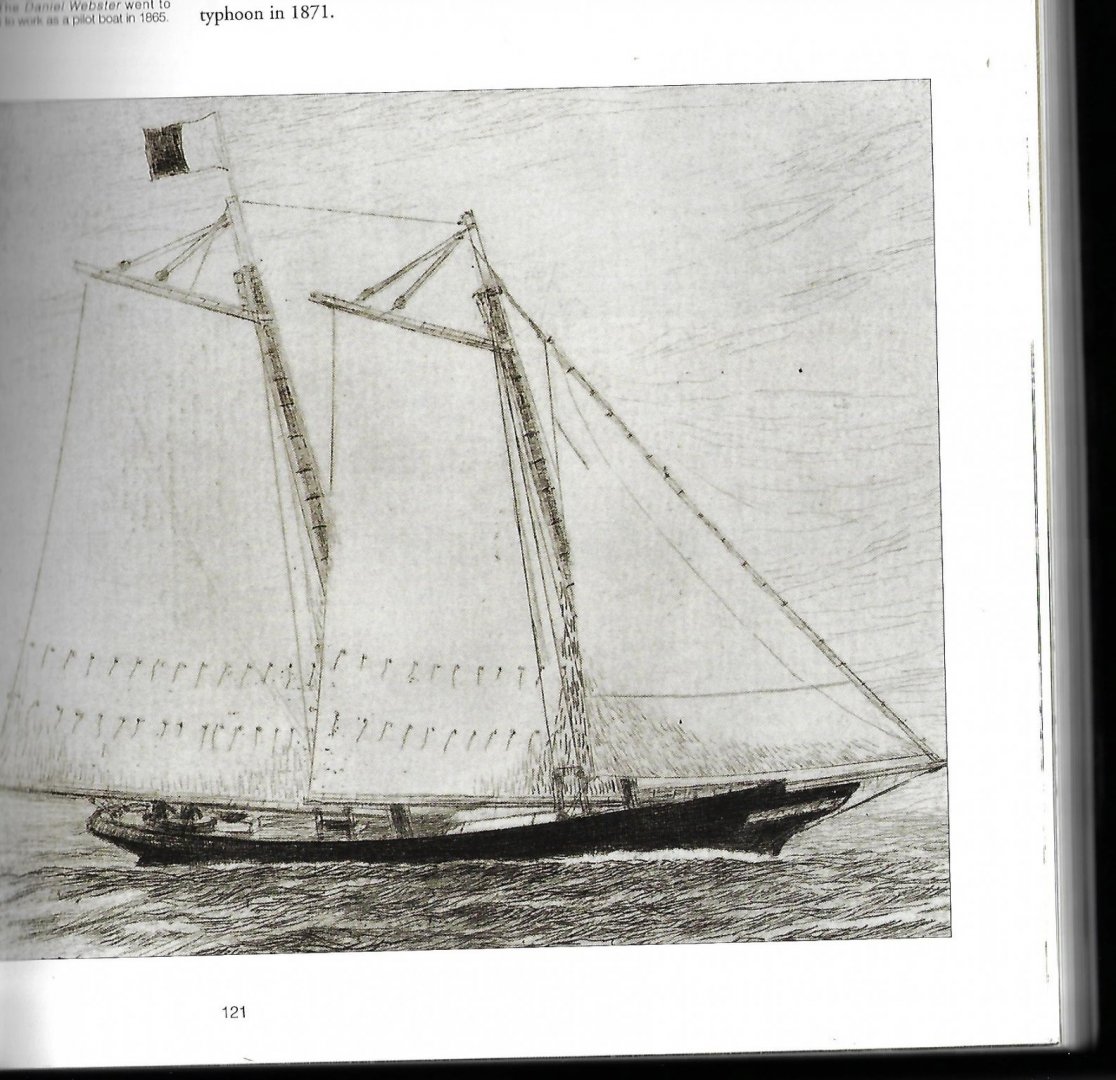
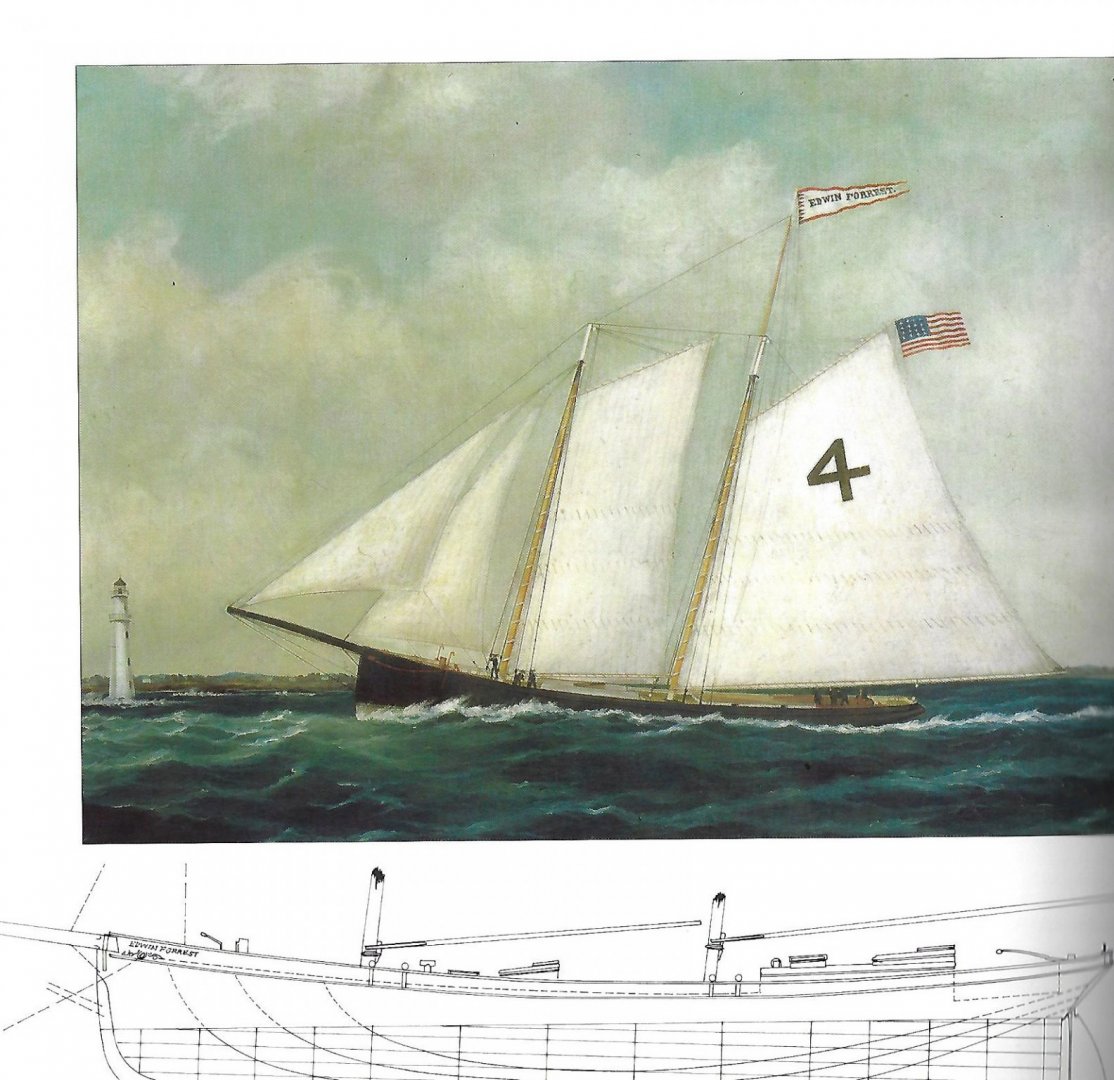
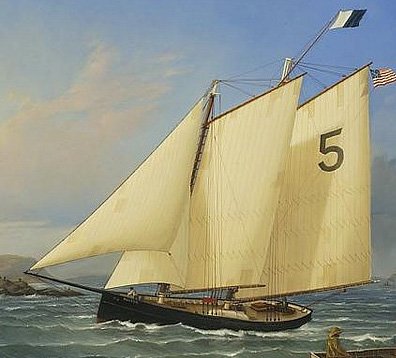
Post 02 A little history There are several references in some of our favorite books to Pilot schooners in general and Boston Pilot schooners specifically. The most exciting book came out coincidentally in 2001 as I started this build. In that period the European arm of Wooden Boat started to publish a magazine called le Chasse – Maritime. It lasted a few years with beautiful images and stories of European maritime history, ship building etc. As part of the effort they also published Pilots, Vol 1 Pilot Schooners. is was produced by a team and edited by Tom Cunliffe. A full chapter is dedicated to Boston. Many pilot schooners built in the USA, including Boston, were sent to China to work the Shanghai-Yangtze/ Canton-Pearl and other treaty ports. They were fast and rugged and popular racers too. most of the images below are from the book. Back to the pilot schooners. They evolved starting in the mid to late 18th century. There are several stories of their demise, capture and recapture during the revolution, especially in the Chesapeake where credit for most early schooner development resides. The book’s pages are filled with stories of the competition among competing pilots and variation of the schooner rig that seems persistent throughout. Each chapter moves up the coast, region by region with similar histories of mostly locally built schooners competing for market share. The New York schooners seem to get bigger than the others, and their names seem more familiar. They also have the distinction to have progressed from the Schooner Mary Taylor to the yacht America built by George Steers. In this book she is classified in the same class. The replica came to Boothbay Harbor, Maine a few years back and we had a great sail. Now as we get to Boston, one might start looking at the artwork of Fitz Hugh Lane. Many paintings include interesting companionship to the subject major ship. O6 The painting Northern Light in Boston Harbor gave us images of Pinky schooners, that I used in my last build, and here the cropped pilot schooner Coquette of 1846 in the same painting. Again and early version with Clipper bow. Moving to the builders we quickly learn of Dennison J. Lawlor. The write up tells of his career, the several Pilot schooners he designed and built, followed by fast bigger fishing schooners, small steamers and his brigantine News Boy . Several pilot schooners were built by Lawlor including, Florence, Dancing Feather, Phantom, Lillie, Edwin Forest and Hesper. Looking at artwork one finds the more famous schooner was the Hesper. Hesper built in 1884 was Lawlor’s final and crowning achievement in the pilot Schooner class [ as per the writers in the book}. She was sleek and long and long living. There are several incredible images by Don Demer and other maritime artists that include her are easy to see online, so she was quite well thought of as a fine specimen. The well-known Erik Ronnberg redrew her lines from the builder’s half model and it is all in the book. The full-page image of her in Dry dock also helps my decision of having copper on the bottom of the small-scale build depicting Dancing Feather’s real look. Hesper was much bigger at 102 feet on deck. Dancing feather was one of the first pilot schooners of 1853. She carried from experience a clipper bow that died away over the next 30 years of design evolution. She was 67’6” on deck .The image of her half model, which resides at the Smithsonian, and her lines are all there in the book. Most interesting to me is the sail plan. 07 this sail plan is set up with three foresails [ note the club boom for self-tacking] . We have much to think about about but basically, as also referenced elsewhere, this would have been only the summer light air rig, or perhaps limited to racing. I read elsewhere that top masts were often removed in winter. Also, of note. the main topmast was used for large flags. also of interest is the exaggerated clipper bow. 08 looking here at Danial Webster, another Boston pilot schooner with a clipper bow destined for Shanghai,China, We see the common view of just three sails and a large flag on the main topmast. 09 here is Edwin Forrest another Lawlor schooner in the book with four sails in a brisk breeze. 10 Here we have the famous Hesper cropped from a painting by Davis from the net. I note the large flag is on its own spar and not a normal topmast. Not the square bow, These pilot crews worked all year tacking and maneuvering within harbors and then racing out or back to pick up or deliver a pilot. If one sees 20 images of pilot schooners, the full sail rig might be on two. The flag is interesting but an important part of the look. There is much more to review and learn. I would assume all these schooners built for speed had copper bottoms. Looking online at three models they all have copper so that decision for the small hull is made. The RC hull is already painted green to represent tarnished copper. The A J Fisher model photo is also a green bottom. All for now
- 23 replies
-
- 5
-
-
- dancing feather
- pilot schooner
- (and 1 more)
-
Thanks Chris and Keith I'll really plan to enjoy this one as I get to do both a 1::64 model and a big hull @1:16 that shows of the lines well. I wonder if she will sail cheers
- 23 replies
-
- 2
-
-
- dancing feather
- pilot schooner
- (and 1 more)
-
great choice for a schooner build. I built Charles Notman in 1:48 scale and RC sailed her twice. I got quite a few fittings from Bluejacket. They can be quite helpful too. A friend was building the kit at the same time. He loved it and did a great job. She is a real beauty. I recommend you find a copy of A Shipyard in Maine. It tells the whole story of Percy and Small where Charles Notman was their first 4 master. I will definitely follow along cheers jon
- 144 replies
-
- 1
-
-
- charles p notman
- finished
- (and 1 more)
-
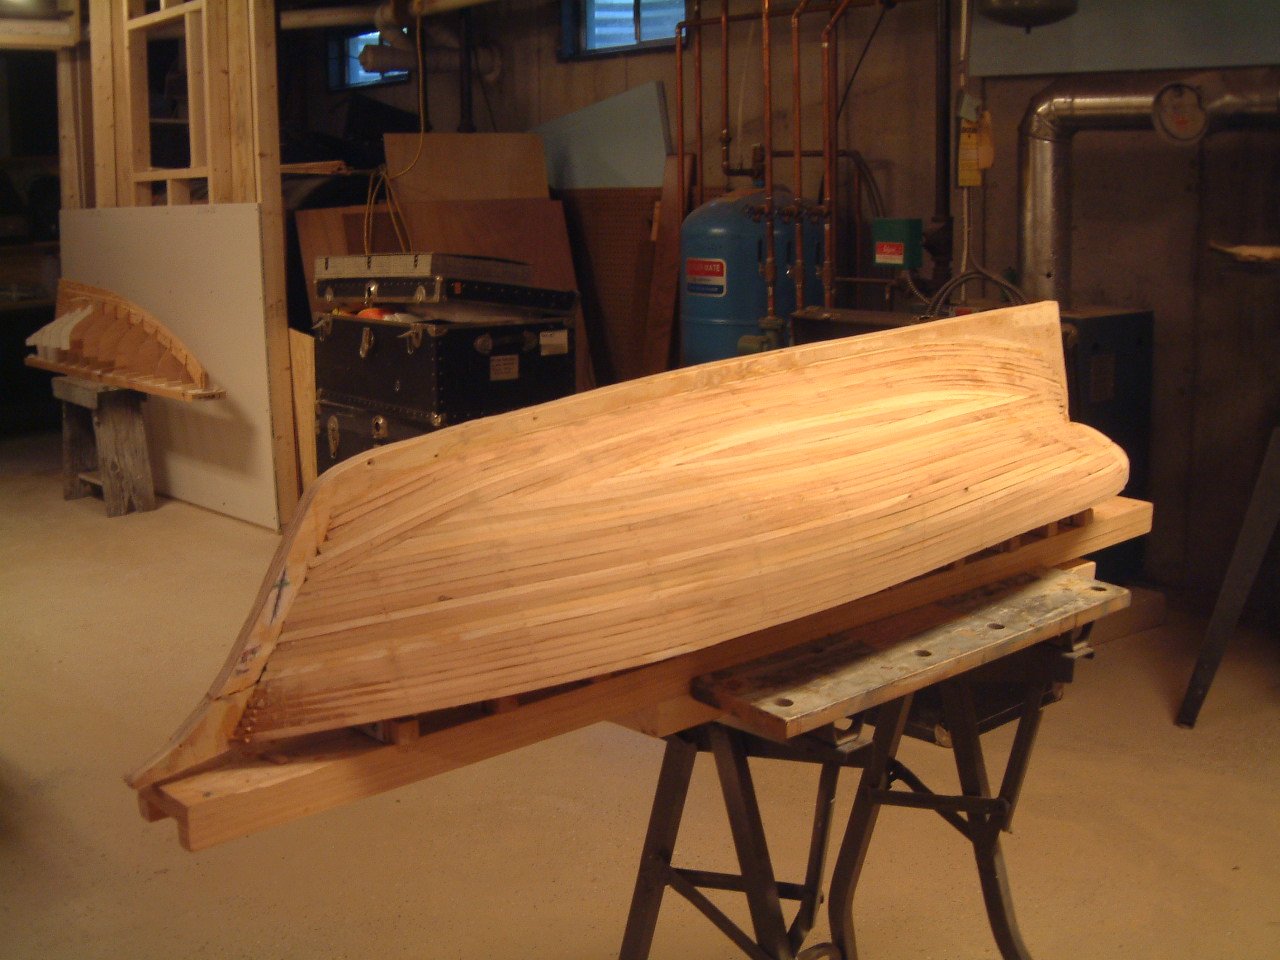
posting 01 the beginning The beginning of this story started in 2001. I was off to Newburyport, MA to buy plans for Bluenose and Gertrude Thebaud . While in the store I saw and bought a small kit of a beautiful little schooner named Dancing Feather. I was still working for many more years but got some good quality time in Maine in between foreign assignments and on weekends while working in Boston. I tell the story in my Bluenose building log where the first build of this schooner took place. It was never completed. I used the kit plans and fortunately scanned them, as they have disappeared. I built the RC hull in the winter of 2007-2008. We all know what happened in 2008 and it I went traveling for the next 5 years. It was January 2014 when I finally retired. That year was filled with other projects ending with the start of Charles Notman, a seven foot sailing Schooner. In 2015 I built the 42 inch long pair of RC sailing sloops and restarted Dancing feather at the very end of the year. Again, I never completed it, but I made progress in the direction of an under detailed potential sailing model. Everything I did was an experiment. I am glad I did that as I made many mistakes. In 2016 I drifted into Bluenose, another 7 foot sailable schooner. She was a great learning exercise. In that exercise I drifted into trying to do too much detail. My son visited and said to me that when I build a model I need to decide. Am I going to sail it or tell a history story about it. After two dioramas, I agree there is a lot of difference. Now that the Little Pinky from Boothbay [ phase one] is done I am working on the first ship of Boothbay, Aphrodite. It is very tedious at 1:96 scale and I love working on it , but I need something else to begin too. A week ago, I took out the old Dancing Feather kit. It is by A J Fisher and extremely basic. The only real piece to use is the carved hull. What I am now doing for this project is the following. I will build the Kit out as a study for what I want to do on the big ¾ scale model. I will then rework much of the rigging on the big version. Keep it simple and see if I can get it to sail. One of the issues will be how to cut down the sizing of the sails so at 1:16 it works. Full size sails at scale do not work too well as they will over power the schooner. I did it on the two racing sloops and learned that cut down of the main sail to match the cut down of the jib was bad. The main needs more power and in light air the sailing was touchy. I have a few photos of the original 2007 building of the hull and spars and will share them in a few posts to get us up to date with what was built. And then we will look at what I must undo or fix so she can sail as i go through building the small 3/16 scale version. Post 01 Early build 2007 In my Bluenose log we find the bluenose hull was planked and then hung from the ceiling of the shop. In 2007 to 2008 I was able to follow the same process and build this hull. 01 here is the same method I learned at Wooden Boat school. Bulkheads were 4 mm lauan plywood, planks were stripped cedar roughly 1/8 x 5/16. There are thin strips of 1/31 soaked and then fit as ribs over the forms. Then blue tape separates the rib from the form and the planks are glued to the ribs and toothpicks driven home into the lauan form. 02 the dagger board is a carryover from the Neskaeg Marblehead 50 design. I am experimenting on making it removable to allow display without the extended fitting 03 how about the strength of that keelson. I would never do it that thick again. 04 since we are fiber glassing the hull there is no spiling required 05 here we see the hull is planked. Behind us we see a Marblehead 50 naskeag that i built at Wooden Boat school in 2001. Note the permanent danger board keel with lead bulb. up next some history on who dancing Feather was and building the deck Cheers

- 23 replies
-
- 7
-
-
- dancing feather
- pilot schooner
- (and 1 more)
-
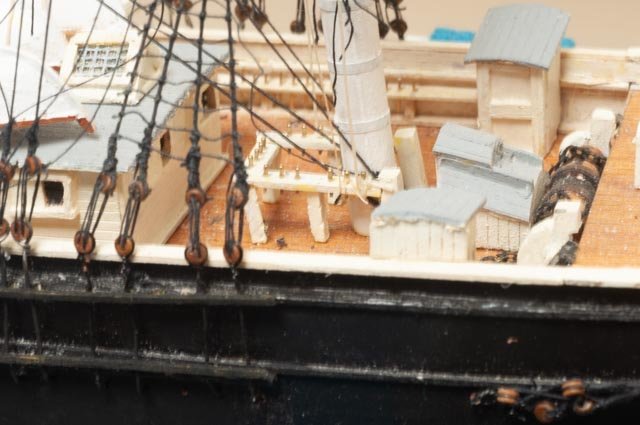
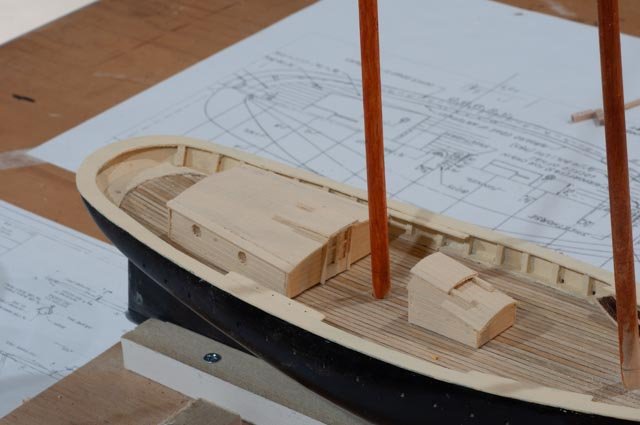
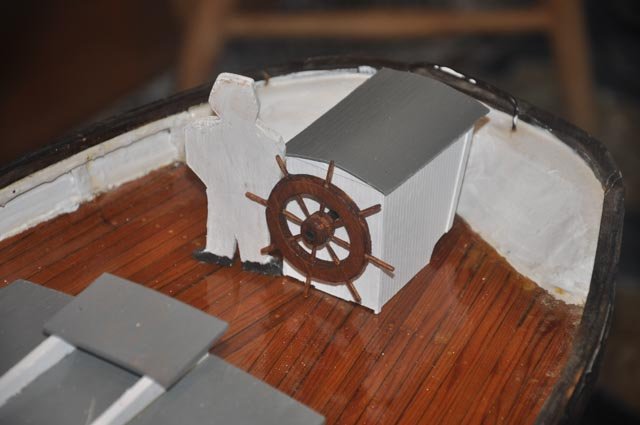
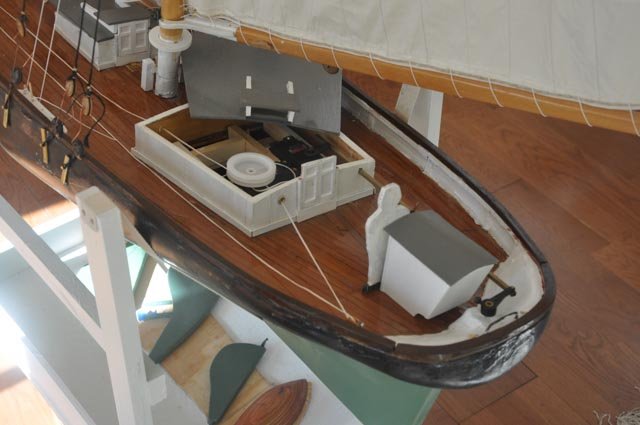
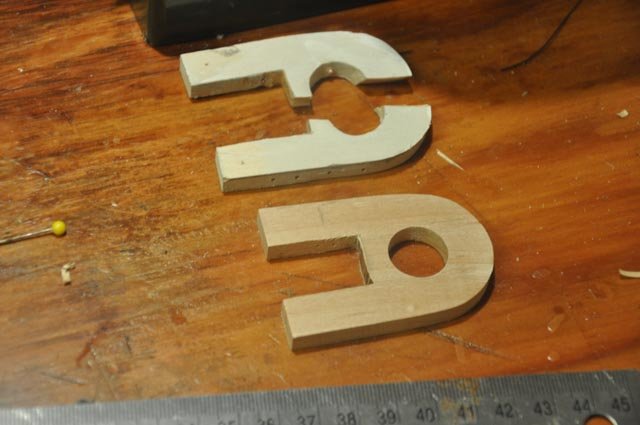
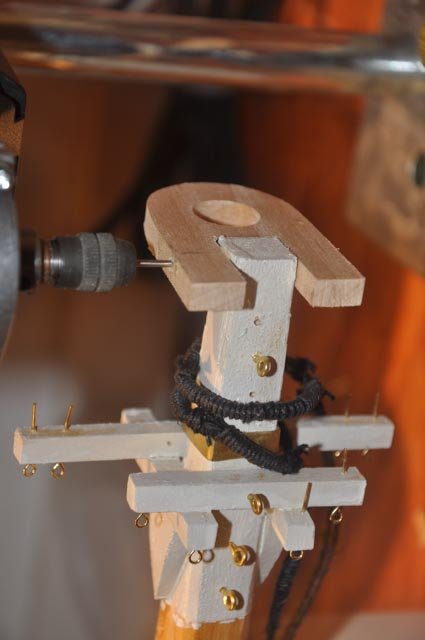
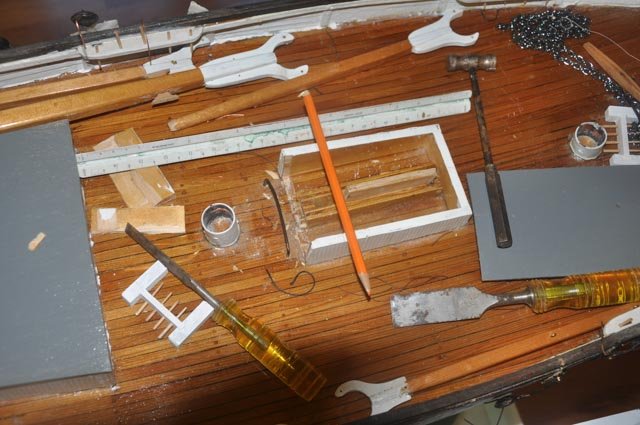
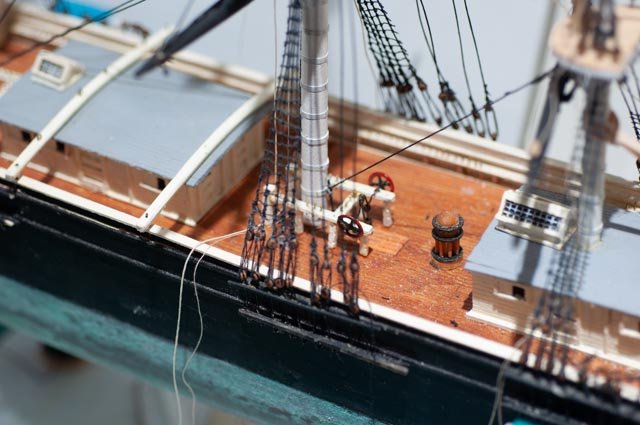
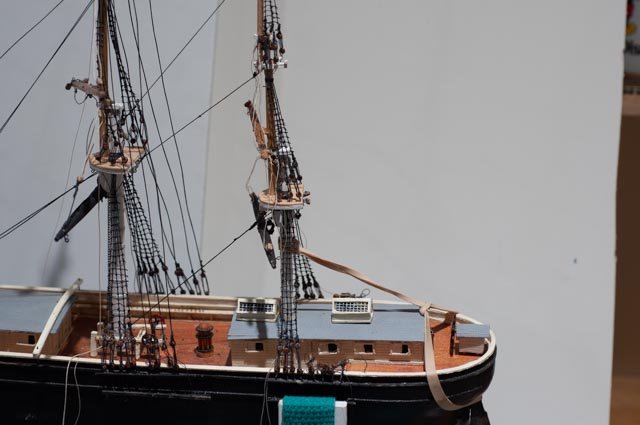
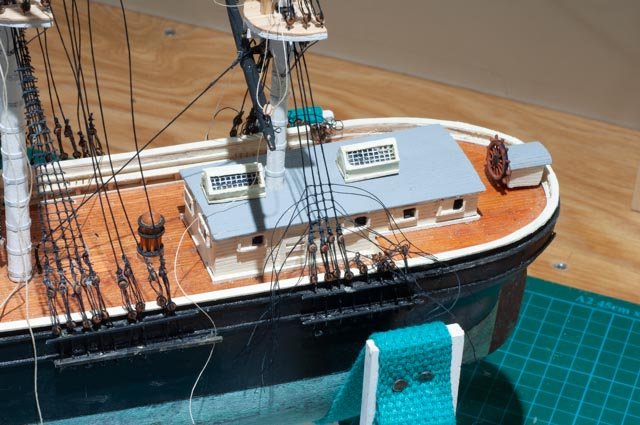
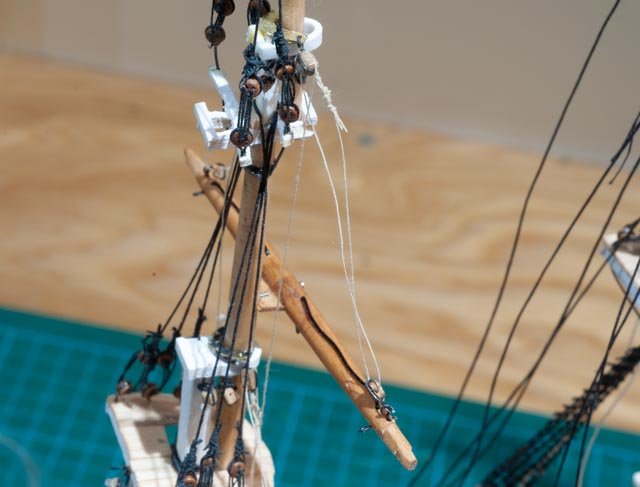
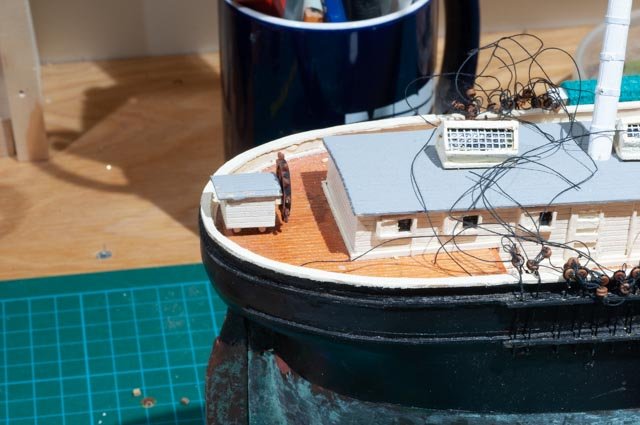
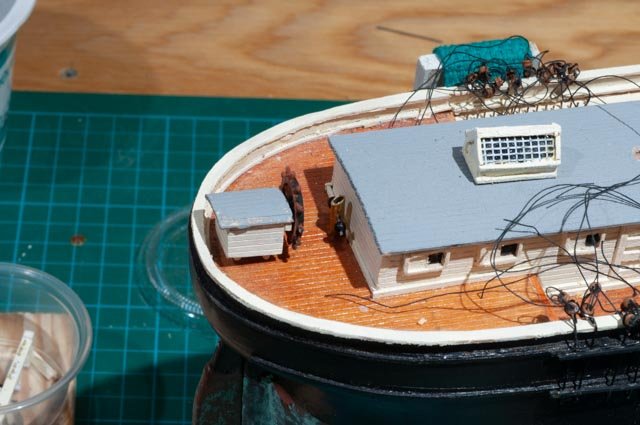
Post 24 A little bit of rigging An early spring pulls us away from the shop a lot, so things tend to slow down. I built the acrylic box for my other pinky Schooner build, and working on that also takes some time. Regardless we continue in our internship here of trying both to build a ship for the first time and to work at 1:96 scale. I have fallen into the sequence squeeze. I can not put in the pumps until I put in the Mizzen fore stay. I cannot do that until I rig off boat much of the mizzen and set it with yards in place. When do I install the main lower yard? Is it better before or after all the upper yards? Since the mast is already stepped what must be done before ratlines? I built and lost the helm in the house move last November. I found the rudder and now rebuilt the helm. Looking at it in place, I need a binnacle. The dimensions are again tight, so what to do. On and on we go. After reading professor Tosti volume 2, I decided I need to solve soldering. I leave his incredible machining and basic high quality to an upper class of builder. many of us just remain in awe. However we must learn so.....I had seen advertisements for the solid base with strong arms holding little pieces that Ed used in his book. After reading, I finally made the plunge…all of $100 plus investment was made. wow was it worth every penny. My first try was to make something that needed to hold a pin hard against another brass bar to make a tee handle. It is a handle for the windlass traveler see saw / wild cat or whatever it is called. 164 in this photo I am making a lower yard yoke. 165 here it is after solder and ready for final filing. 166 here we are on the main lower yard along with the dental bands and other hardware ready for black paint 167 and finally here we are with our first yard in place. That is sort of in place. Lots of lines need to be added. the chain yard sling is rigged and drops toward the deck. I don't know I if need to add block and tackle or where to make it off. The Crowther's book identifies 192 pins on deck and every line that makes off. No slings are listed there , just the port and starboard lifts. My confusion is that his line diagram clearly identifies the slings and shows them with a down arrow. many models just have a little chain going from the yard to an eye on the mast. i could do that , but I can not imagine how that is correct. 168 as a reminder, here are the yards from the existing model. I will throw away the wire connections, plug the holes and go from there. Hopefully I can reuse them . if not a simple dowel is all I will do for this build. I am not ready for the 7 stages of trimming a log. 169 Here I updated the main topsail yard and got her in place and continue to work away at ratlines. Now back to the overall question of sequences. I am just going for it. Working on everything at once. Tie a few ratlines, work on a yard to fix, another yard to rig etc. I am learning with each item, so I guess by the time I finish this thing I hope to be ready to start a ship. Some simple things I have learned. I was online at Bluejacket for some things and decided to buy some fine annealed steel to try to use for stropping these tiny wood blocks. The thread I have been using is just a pain. any load it breaks or comes loose. Wow the annealed steel wire is so much better than the soft copper stuff I have also been using that comes from Joann’s. The soft copper wire has no strength to hold shape. 170 here is a look at where I am today on sequence. One thing I find is the upper masts slipped and the shrouds are loose. As soon as I get all those ratlines on, I will somehow push up the mast to make the shrouds taught and pin it to the lower mast. It was easy to do on the mizzen off boat, I think it is going to be hard on the main being built in place. i have a pin acting as a fid onto the cross trees, but it is not holding. Finally, back to the deck work that was not completed aft. 171 I rebuilt a helm , put the copper treatment on the rudder and mounted it. I am nuts I know, but I need a binnacle and a bell 172 here is my first attempt at a binnacle. Surely, they would have had iron balls to adjust. I have no info as to what it might have looked like in 1853, so this try is at least a place holder. I suppose the bell could go on top of the helm. I have seen that on another model. But if it goes there, who could ever hear it. Doesn’t it belong amid ship, so the crew can hear watch changes? On most schooners it is on the foremast facing the companion way to the focs'le. I have all the dead eyes strung for the mizzen, so coming soon I hope to step it. Cheers

-
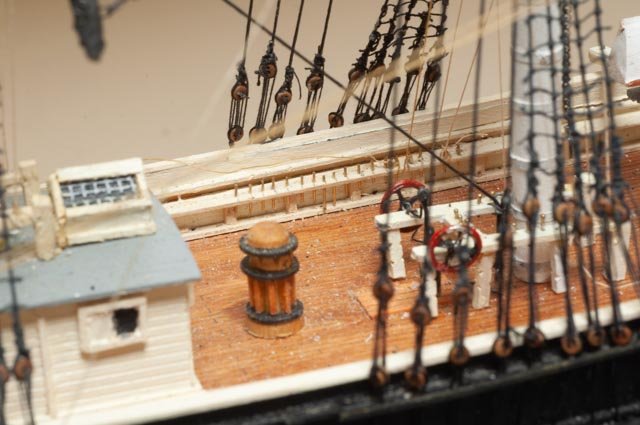
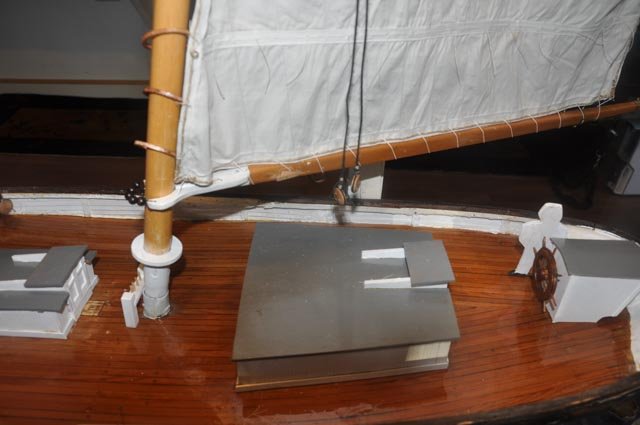
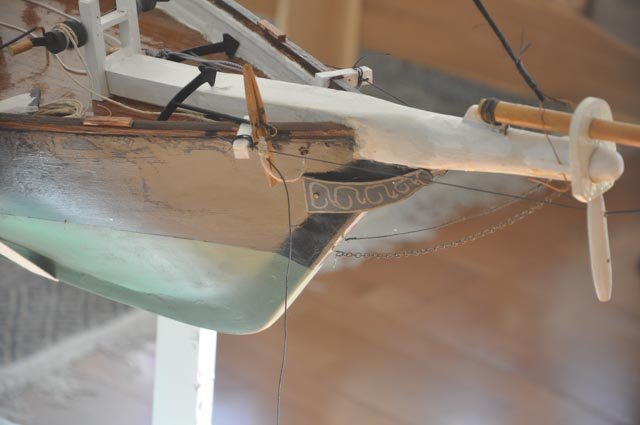
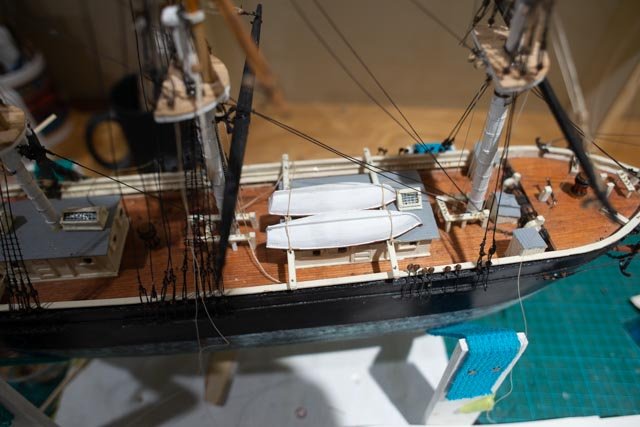
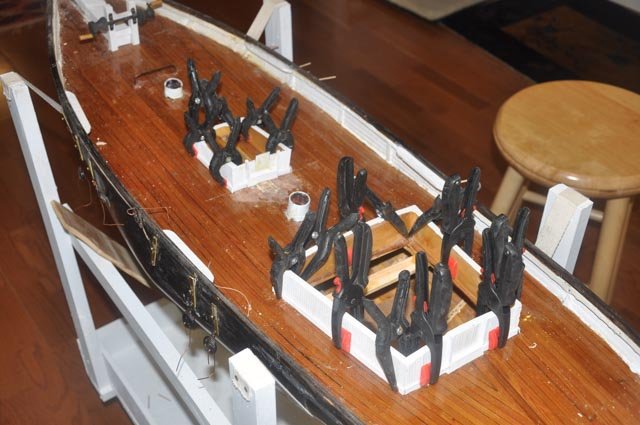
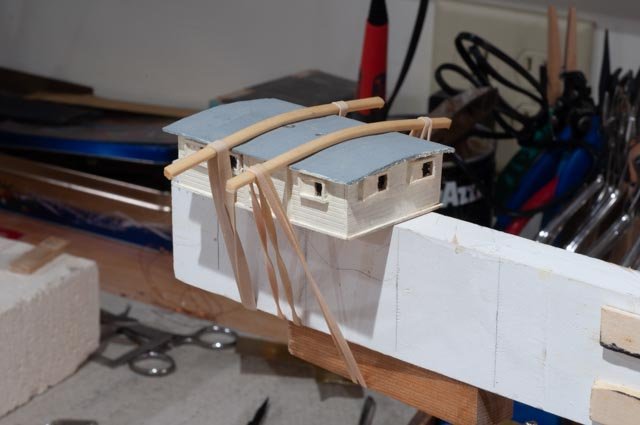
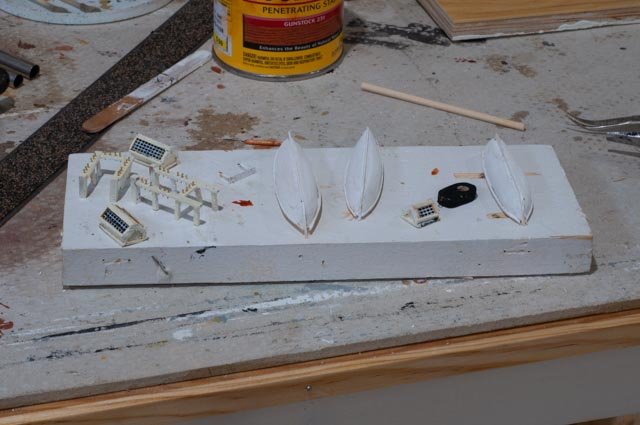
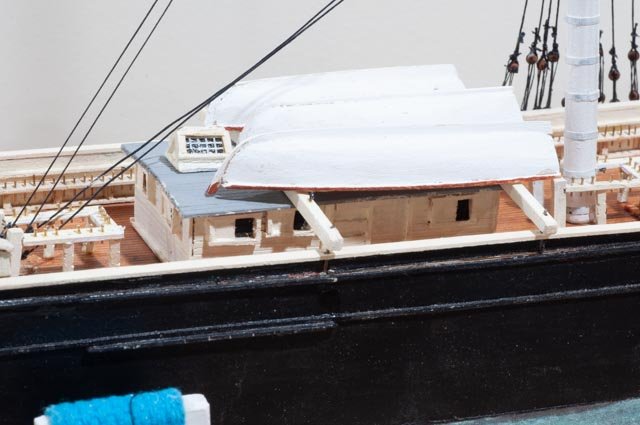
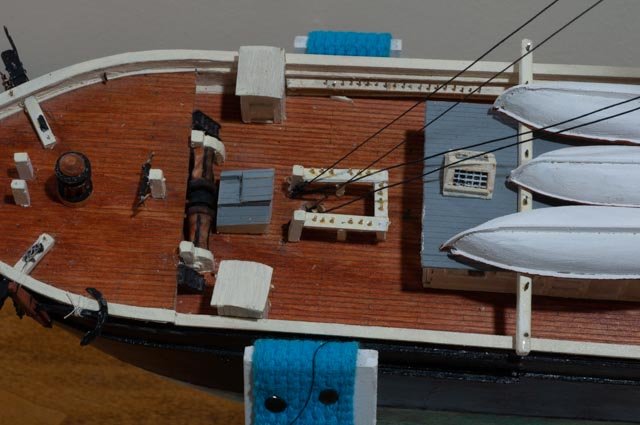
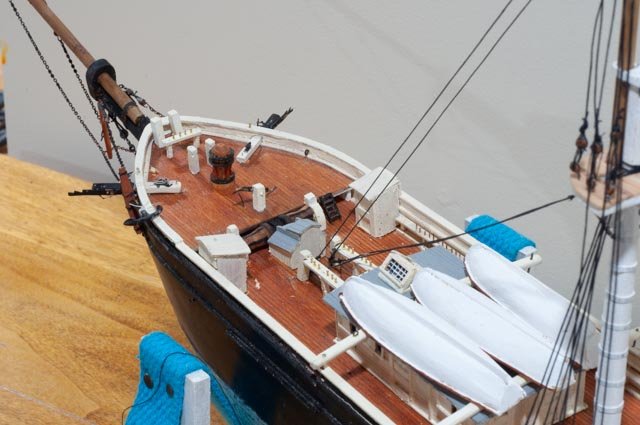
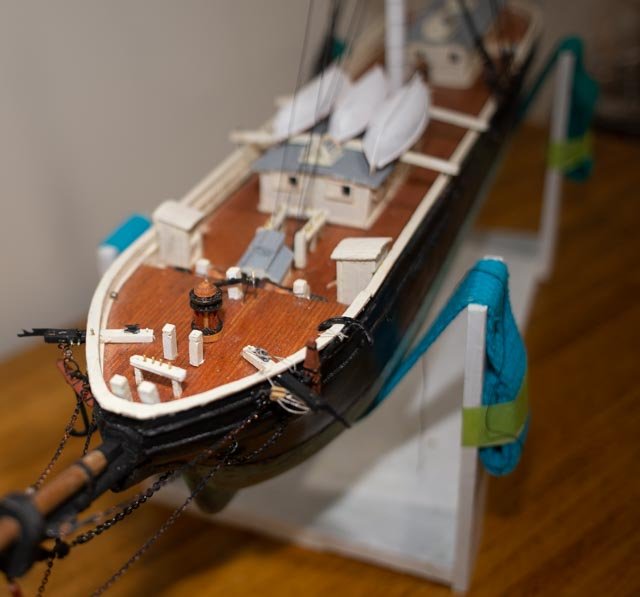
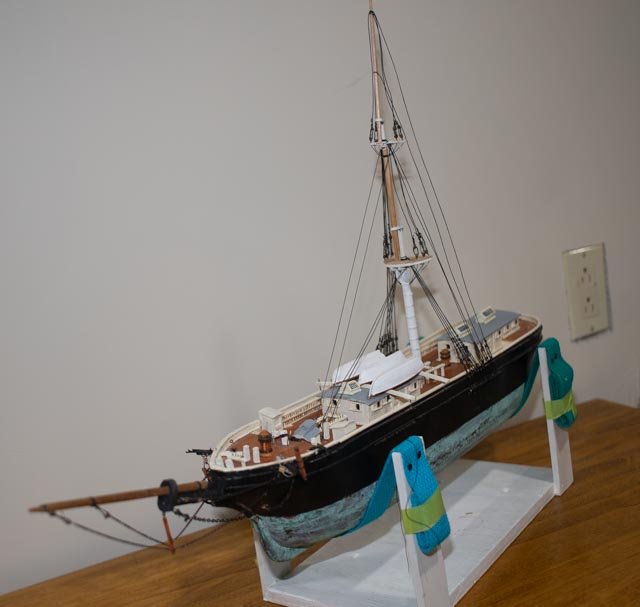
Post 23 Complete forward deck This is always the fun part. As we read others logs and learn how to do things a new way it is always fun to try things out. There will be several things here that I tried and as long as I get the idea right, I am happy. First a few assembly items 150 first up is make boat skids. I learned the are shaped to fit parallel to the cabin roof. Here we are shaping them 151 There are many small parts to make and paint. I decided to use real 3/16” belaying pins on the fife rails as they are so visible. I had some of the right scale in pear but two of eight broke while trying to install them. I assume any attempt to tie off to them would be a disaster, so I opted for brass. The boats are simple sand and file carved and solid. I added keels, bow stems and gunnels. The painted screen in the skylights is not perfect but represent windows well enough. I wish I had a source of a bigger size mesh. I should I suppose add bars and would have if working at a bigger scale 152 here I drilled in pins and installed the boat skids. This is where I decided I need to show the required 3 boats that a merchant ship was required to carry if over 400 tons. [ so I read] Now a review of the bow area 153 A general overview shot. Aphrodite is now sitting in a rigging stand. We all have our own approach. I started these stands for my former schooners that were 4 to 7 feet long. This is an experiment for now at this small size, but I am thinking to use this for models with copper tape bottoms too. These strapped stands let me rotate the hull and don’t hurt the bottom. I did add the main topmast forestays 154 The bow sprit and jib boom and lashed bob stays. I laugh at this picture as I see the cap twisted on me. oh well. 155 Here is the some of the work. I made little handles for the windless see-saw lever. I was proud of my soldering. I bought a real solder stand and found it much easier to hold a pin to a bar and get a simple solder joint without too much pain. 156 The port anchor is secured for sailing on the rail. I am still concerned as to all the anchor lifting and holding operations. I learned the schooner method which is a bit different. The 6-part block in the cat head did not work out for me at this scale, so in the rebuild cat head there are two sheaves. I chose to rig one block and with a hook that I assume grabs the chain. I also assume the fishing tackle from the top of the foremast would be hoisting the anchor. I would love to learn the right way for these ships vs Schooners. In the meantime, I lashed the block to a pin on the rail. 157 the starboard anchor is ready to drop. I have the short chain from under the cat head to an open hook on the forward side of the cat head. The L shape bar, its handle up, has a holding bar bent over the aft side of the cat head holding the handle upright. I took this idea from the well-known master in his volume II on Young America. 158 Looking aft things seem to be where they need to be. Note the added space between the head, bosun locker and center structures. I trimmed them up and squeezed them back into the sides a bit and lowered their roofs. I also replaced the forward pin rail with a new one drilled in the mill and with real belaying pins 159 Boats I will not lash them down yet as they may interfere with rigging the main mast. This is also a good shot to see the change I made to the standard plan that had a big skylight in the middle of the cabin. I literally cut it in half and lowered it to make it proportional for the space available with the added boats. 160 this to me is an important view. Please refer to picture 146 where I discuss the tightness of al this area. It was just wrong. I took it all apart, shrunk things a bit and now there is a corridor to the two little ladders and maybe 2 full feet between the bitts and the companionway. One possible change still needed that jumps out in this picture is to slide the capstan aft to center it within the area between the bitts and the samson post , I will not move it enough to expose the hole now in its center but there should be more room all around it I believe. 161 I think the general look is a reasonable representation of what a ship of 1853 would have had on deck before gobs of rigging lines. Here also is a good view of the whisker booms I added to correctly hold the head stays as they return to the side of the hull. They connect right near the head and need to give the anchor room to be rigged. 162 a fun wide angel shot coming at you Looking forward 163 I need to work aft. I am making my attempt of pumps and need to get the aft deck done. I had a wheel and small helm but lost it. Cheers
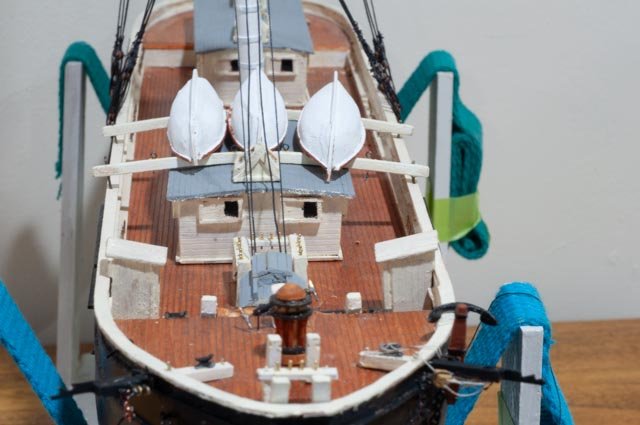
-
I love the idea of mixing in the track. it helps tell the story of what these. ships do. good luck. Jon
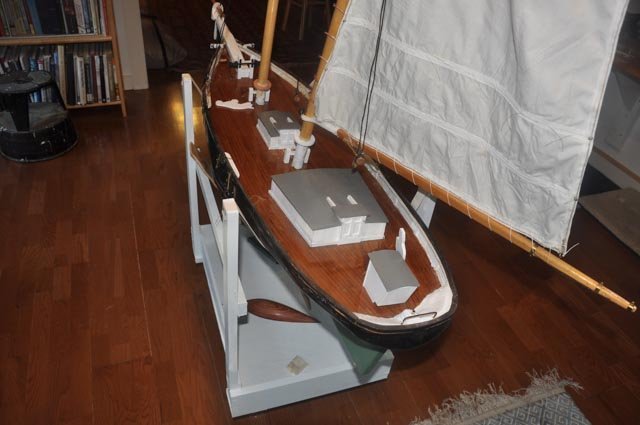
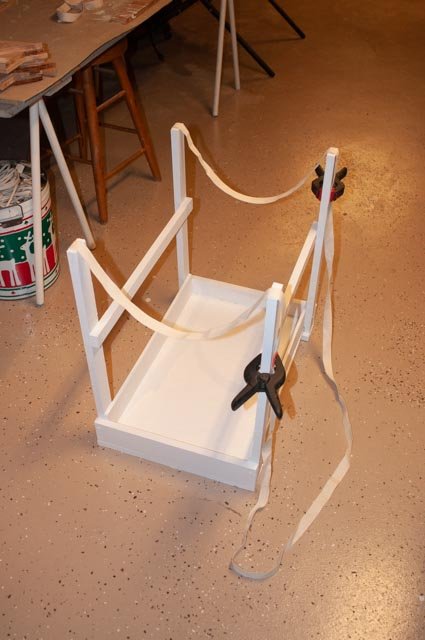
-
thank you G L I know some one who makes complete figures with wire and sculpy or other similar materials. My attempt was a disaster, so I have bought figures. I am working now at very small scale and may try..wee'll see cheers and thanks for dropping in
- 69 replies
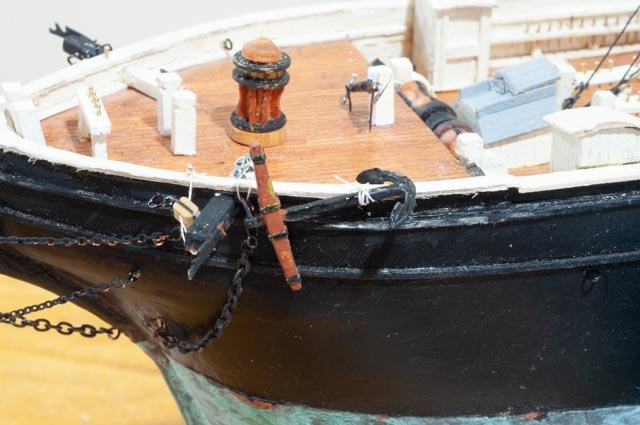
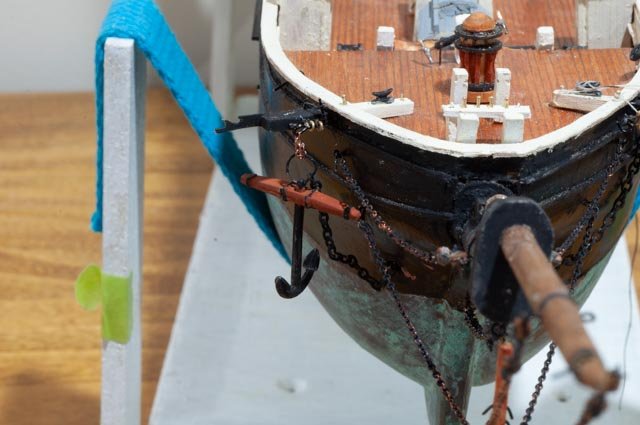
-
- 1
-
-
- diorama
- Glad Tidings
- (and 2 more)