HOLIDAY DONATION DRIVE - SUPPORT MSW - DO YOUR PART TO KEEP THIS GREAT FORUM GOING!
×


fmodajr
-
Posts
868 -
Joined
-
Last visited
Content Type
Profiles
Forums
Gallery
Events
Everything posted by fmodajr
-
 Small update. Spent time carefully taking apart the upper blocks of the fwd shrouds and flipping them per the suggestion above. Also Finished the shrouds for the mainmast. Tied the loose coils on top of the upper blocks as suggested above. I am also almost done with the Foremast and mainmast backstays and will post those soon. Mainmast Shrouds: Reworked formast shrouds As always thanks for stopping by! Frank
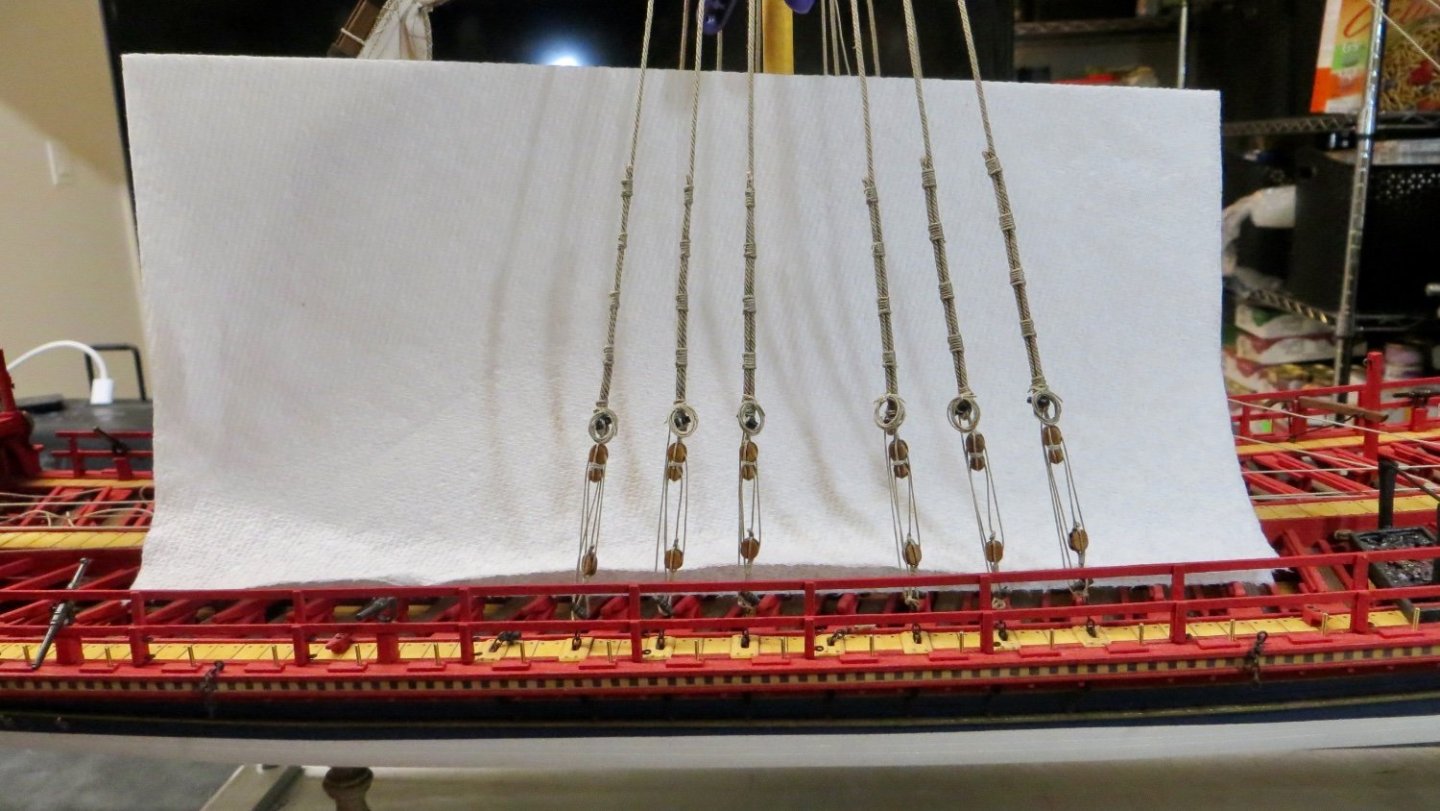


- 510 replies
-
- 4
-

-

-
- reale de france
- corel
- (and 1 more)
-
Michael, Nice to see you resuming work on the ship! Lots to digest here on your latest post! Looks beautiful! Frank
-
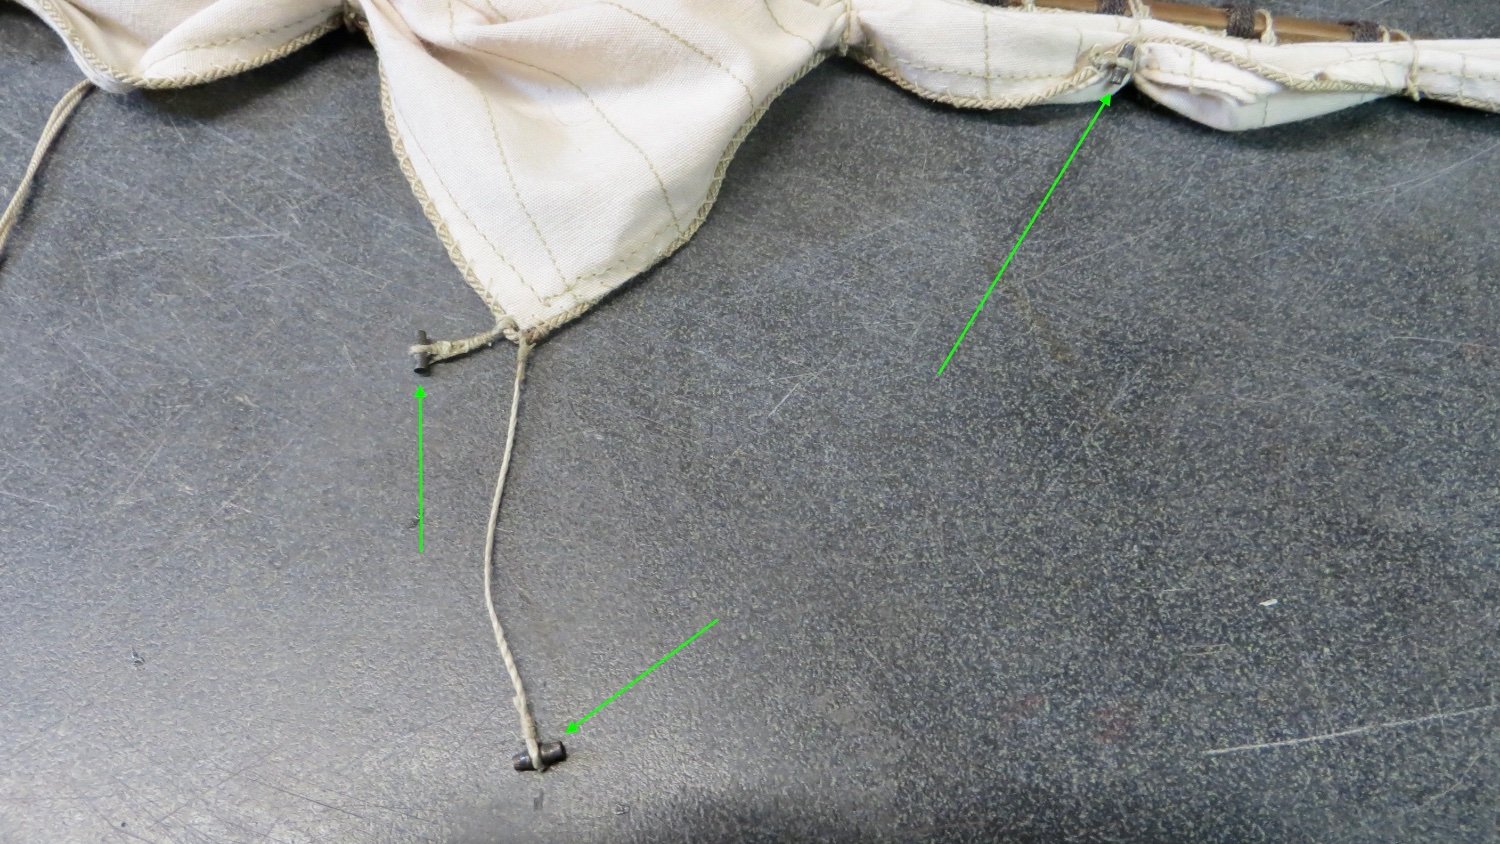
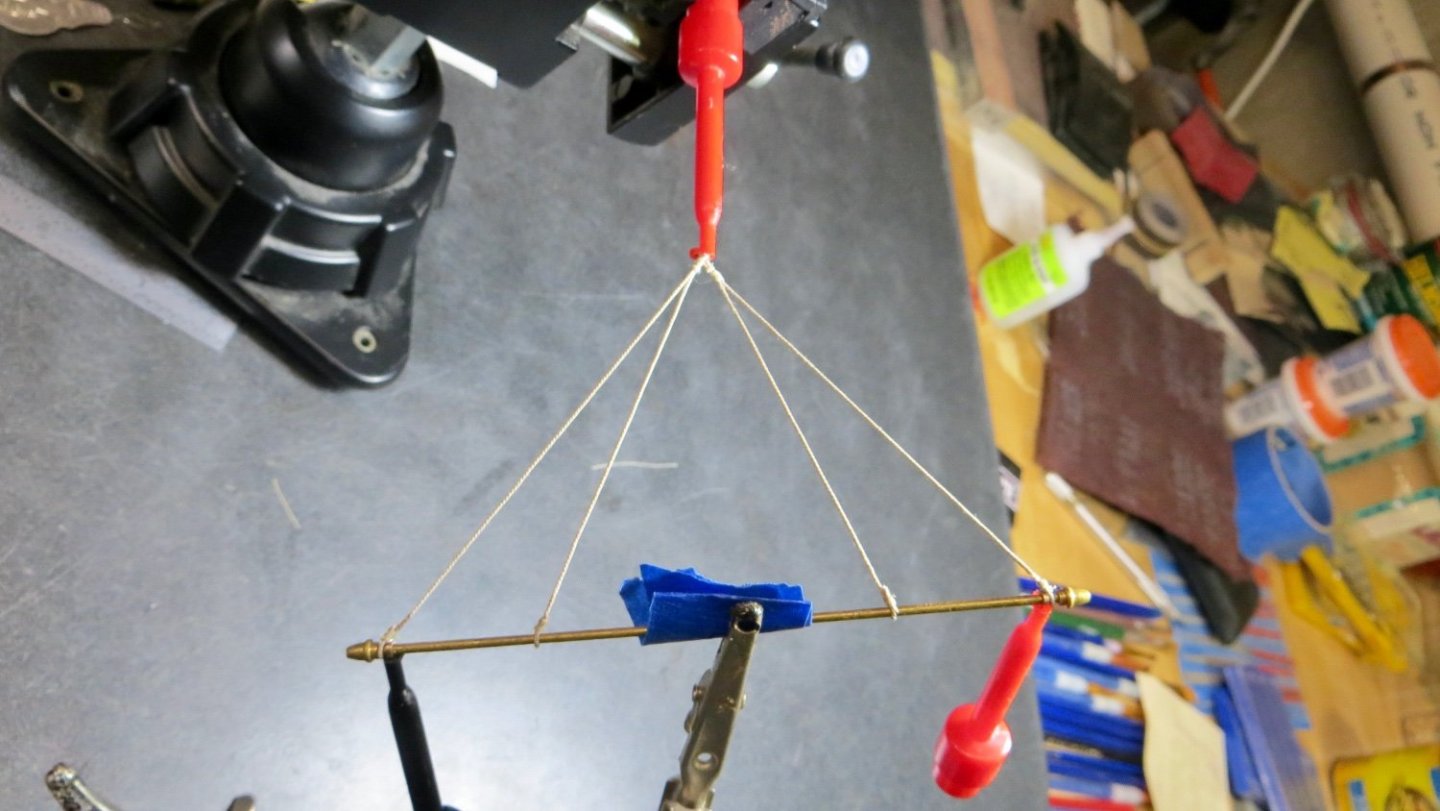
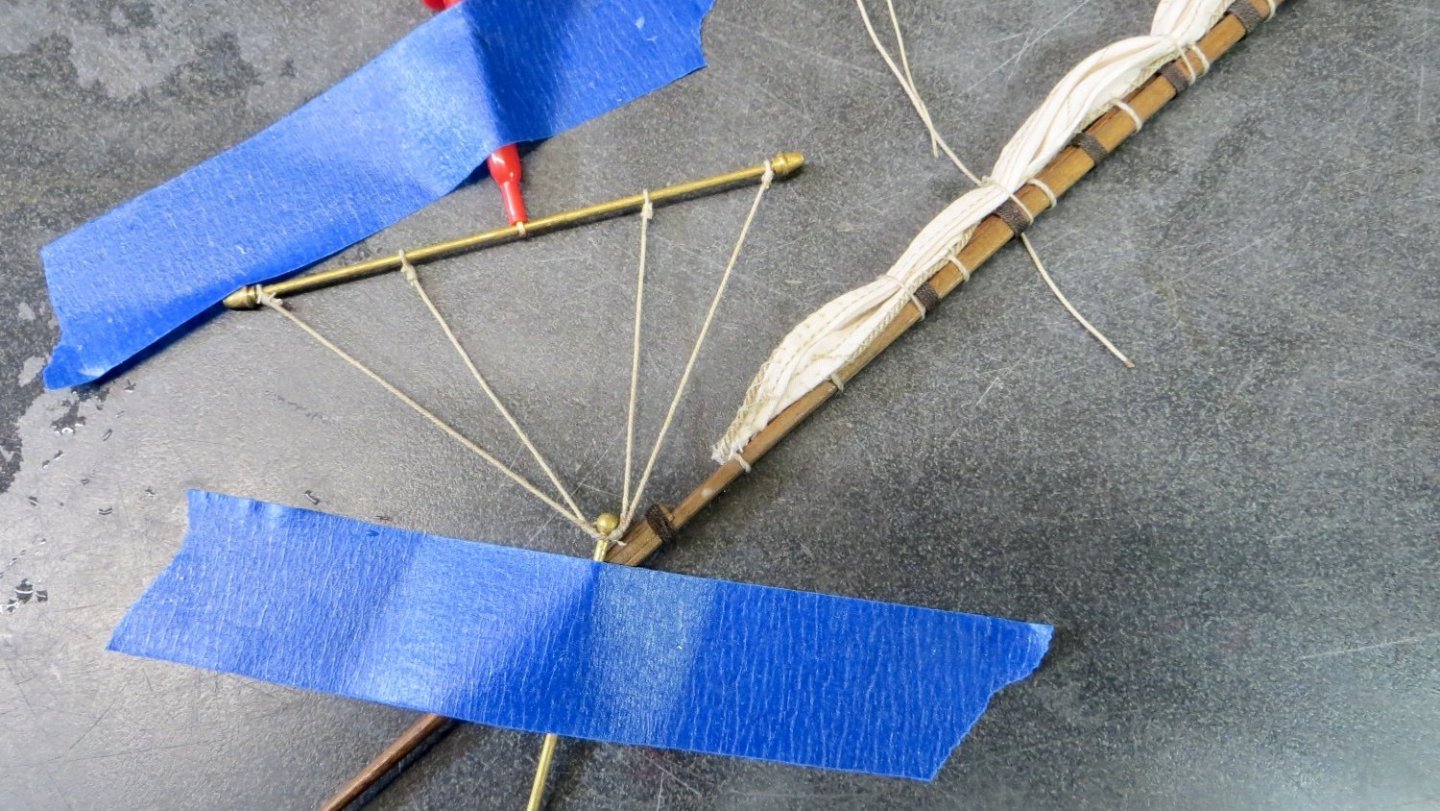
Hello Gerard, Thanks for the help and assistance. Appreciated. I spent last night re-rigging the double blocks I had made for the main mast shrouds with the smaller part downward, as you suggested. I was successful and agree they will rig up better. I then carefully took apart one of the fwd shroud blocks and reversed that block also. I think I can re-rig the fwd shrouds carefully, one at a time without ruining it. thanks again for the photo. When I zoom in on the photo (bad eyes lol) it gets fuzzy. But if I understand you correctly, tie the running line on the chain under the lower block, then run the line up and into a coil fastened near the top of the upper block! That’s what I will attempt to do. thanks again for the help Frank
-
Michael, as always, great to hear from you. glad you are all well. Wife and I attended a wedding for her niece in Seattle (wedding postponed for 2 years) and numerous people picked up the Virus despite precautions. Thankfully we are on the mend. Yes, Chuck’s fiddle blocks assemblies are great. And redesigned single blocks are even better. Although they are not entirely accurate (see post below by Gerard) I like them better than what is supplied in the kit. Hope to see some more posts soon from your wonderful build. thanks, Frank
-
Thanks for the tip and for correctly reminding me to make sure the coils are not circular, but have a droop! thanks for stopping by!
- 510 replies
-
- 1
-
-
- reale de france
- corel
- (and 1 more)
-
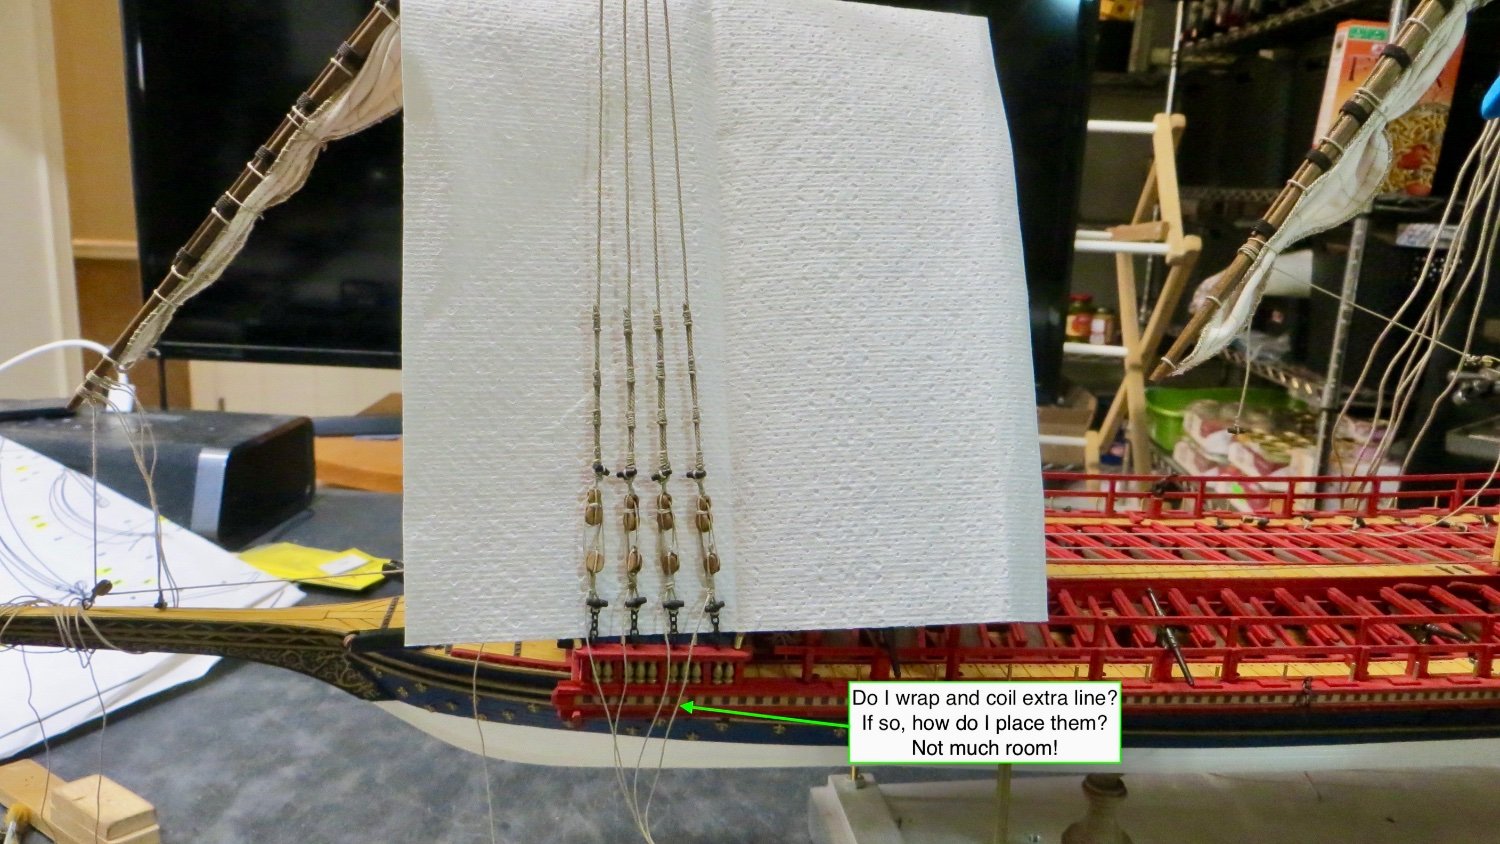
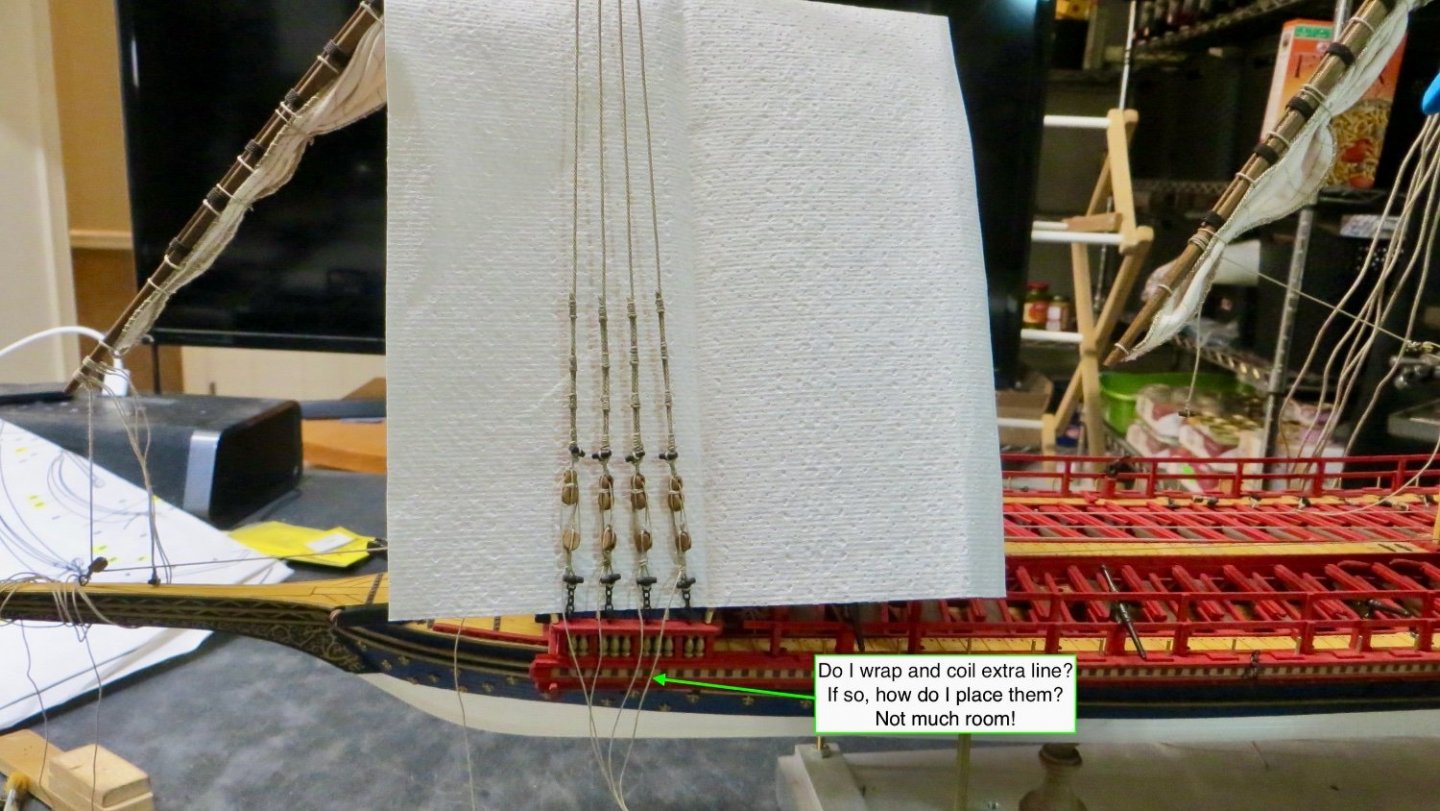
Thanks Clark. Feeling better now, but still have a bad sore throat. Hopefully near the end of the virus. Yes, I saw on your log you ended up doing a simple circle coil. I might end up doing the same. A agree there is not much room there!! thanks Frank
-
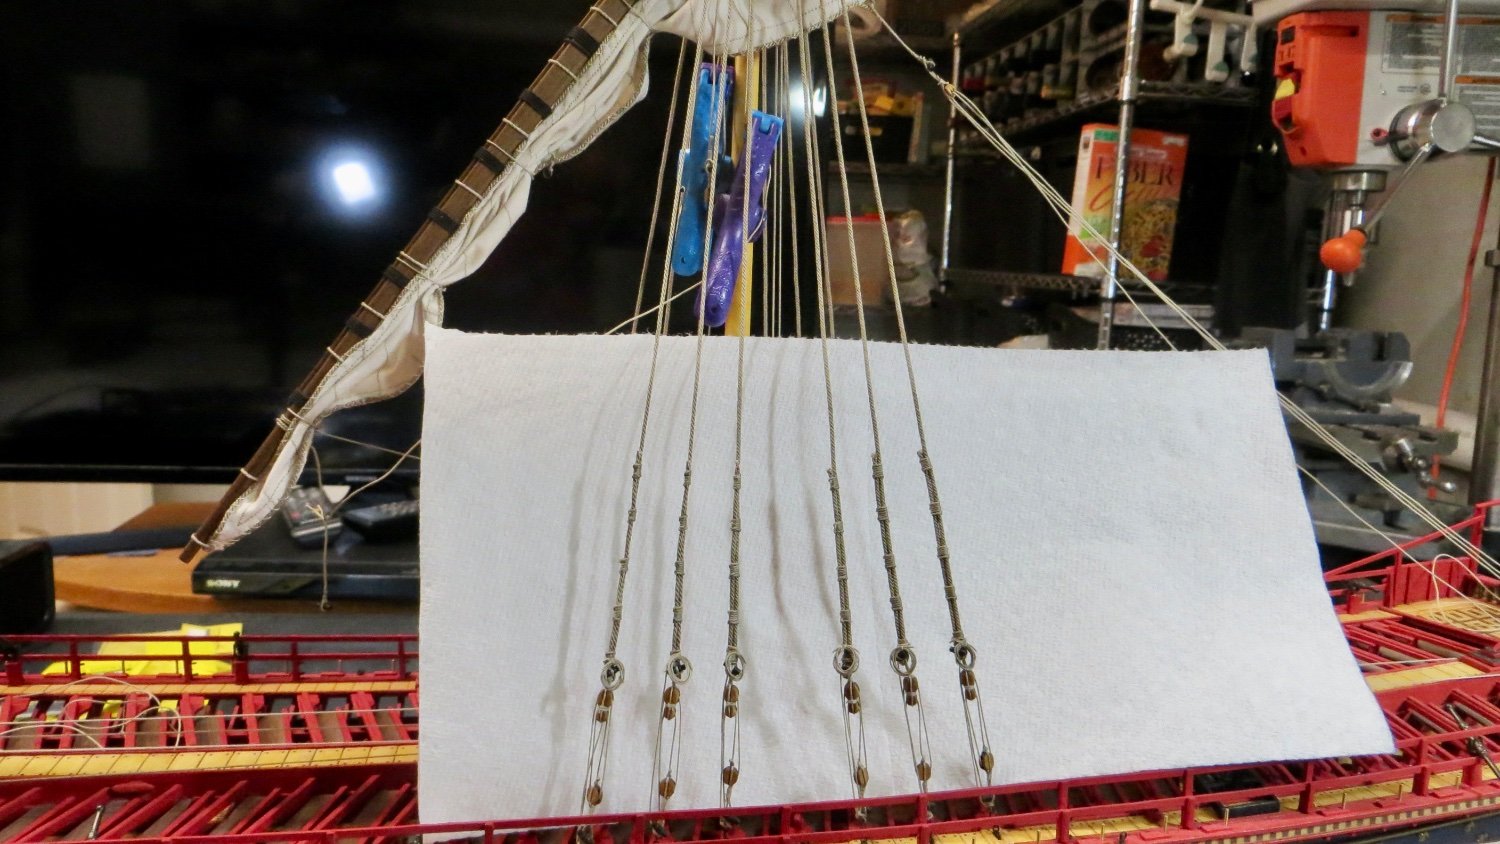
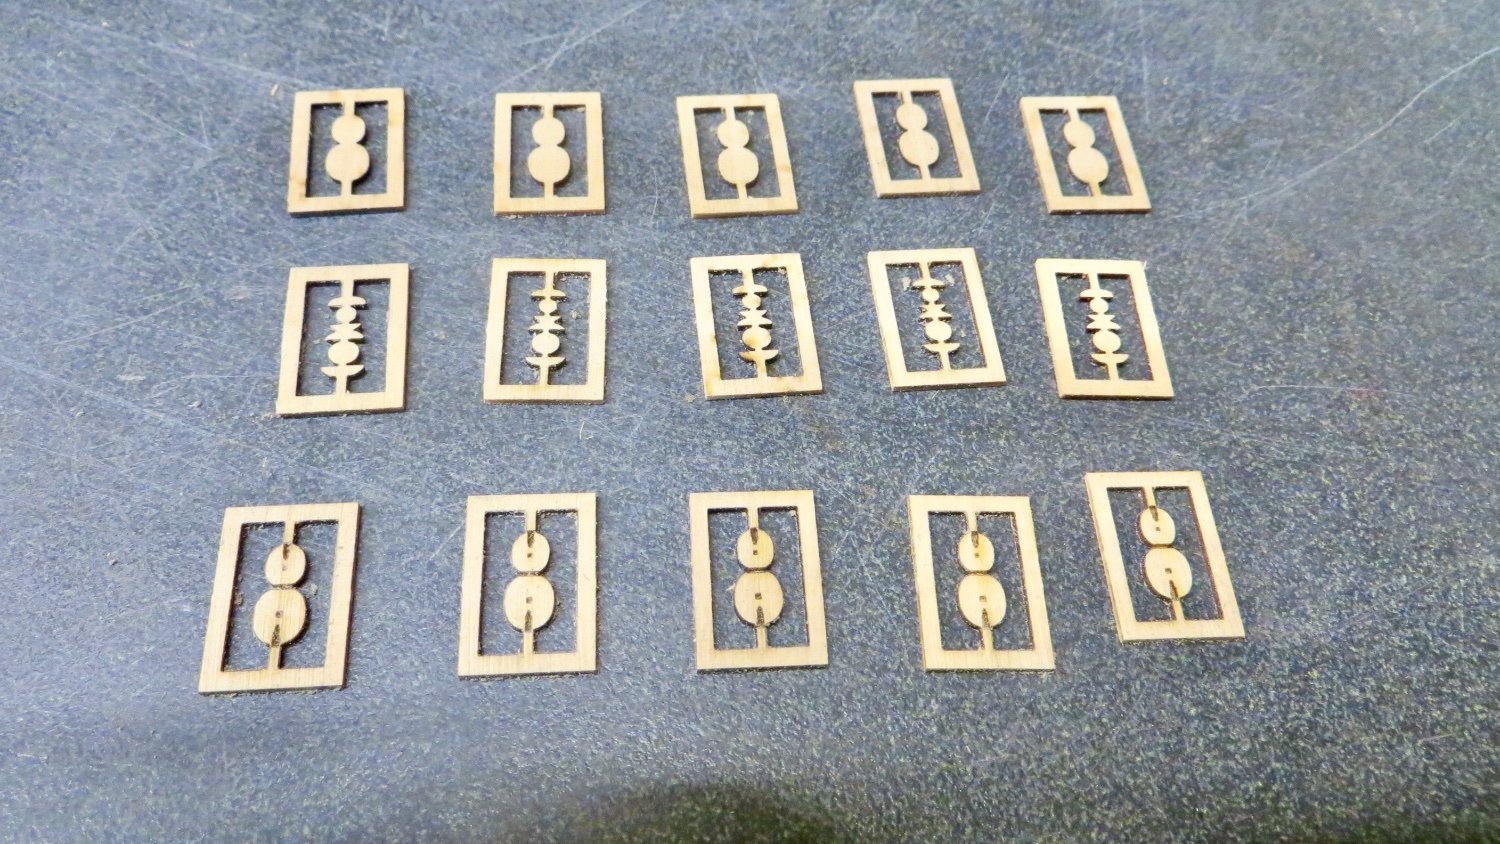
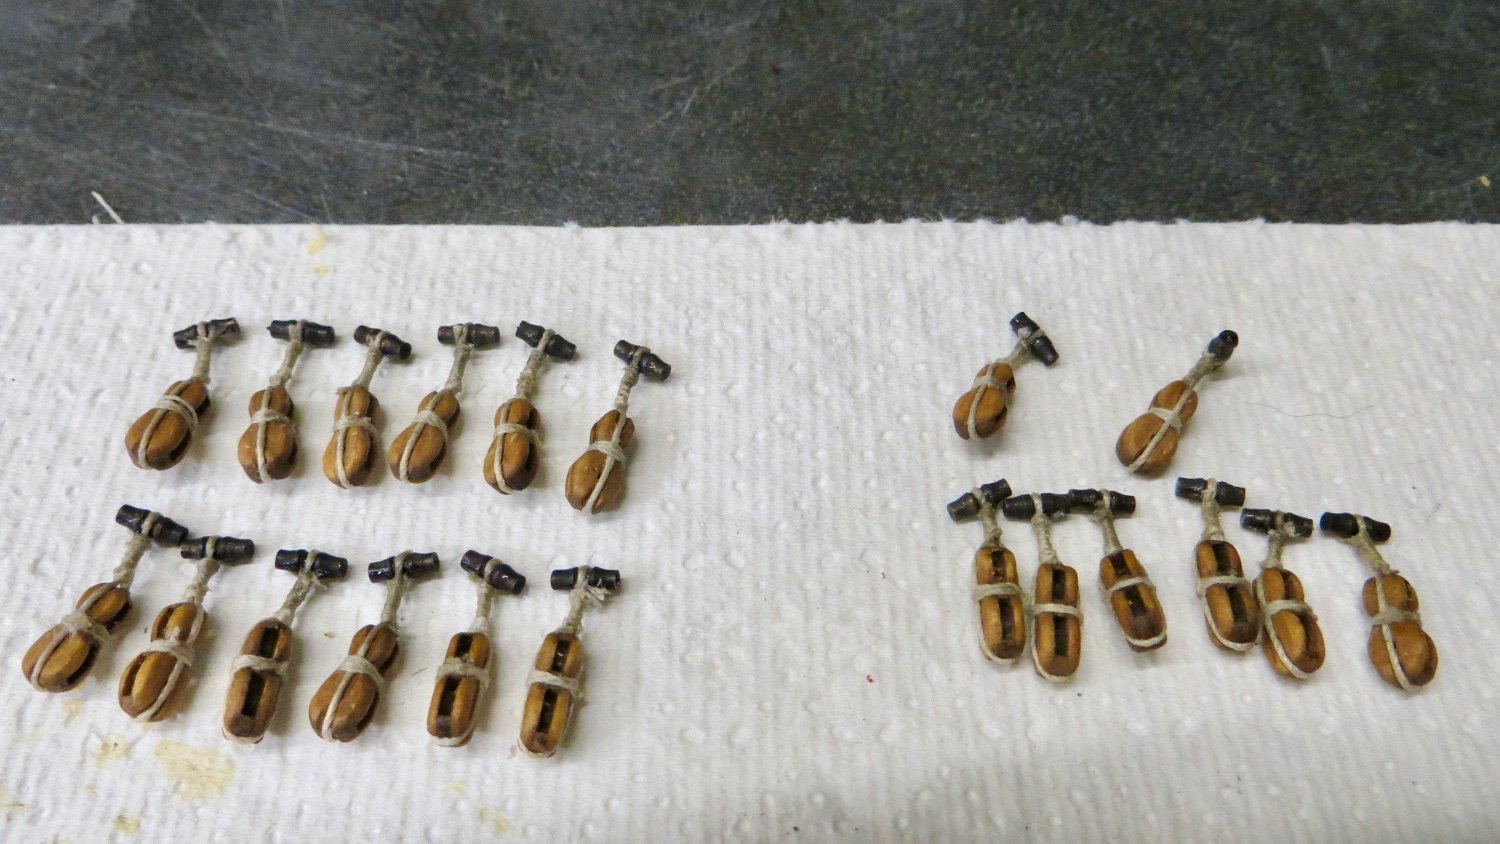
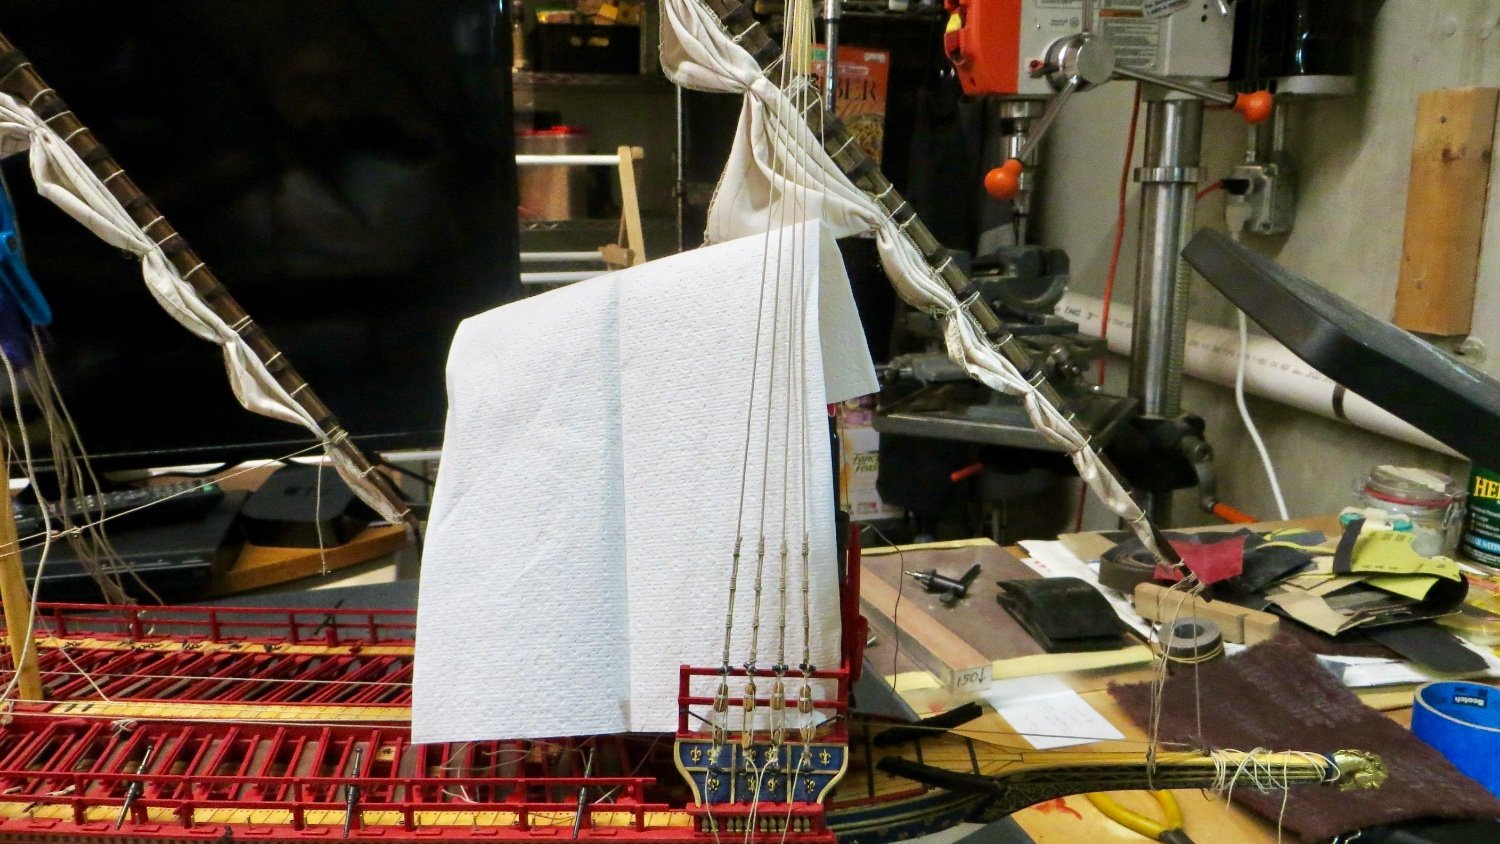
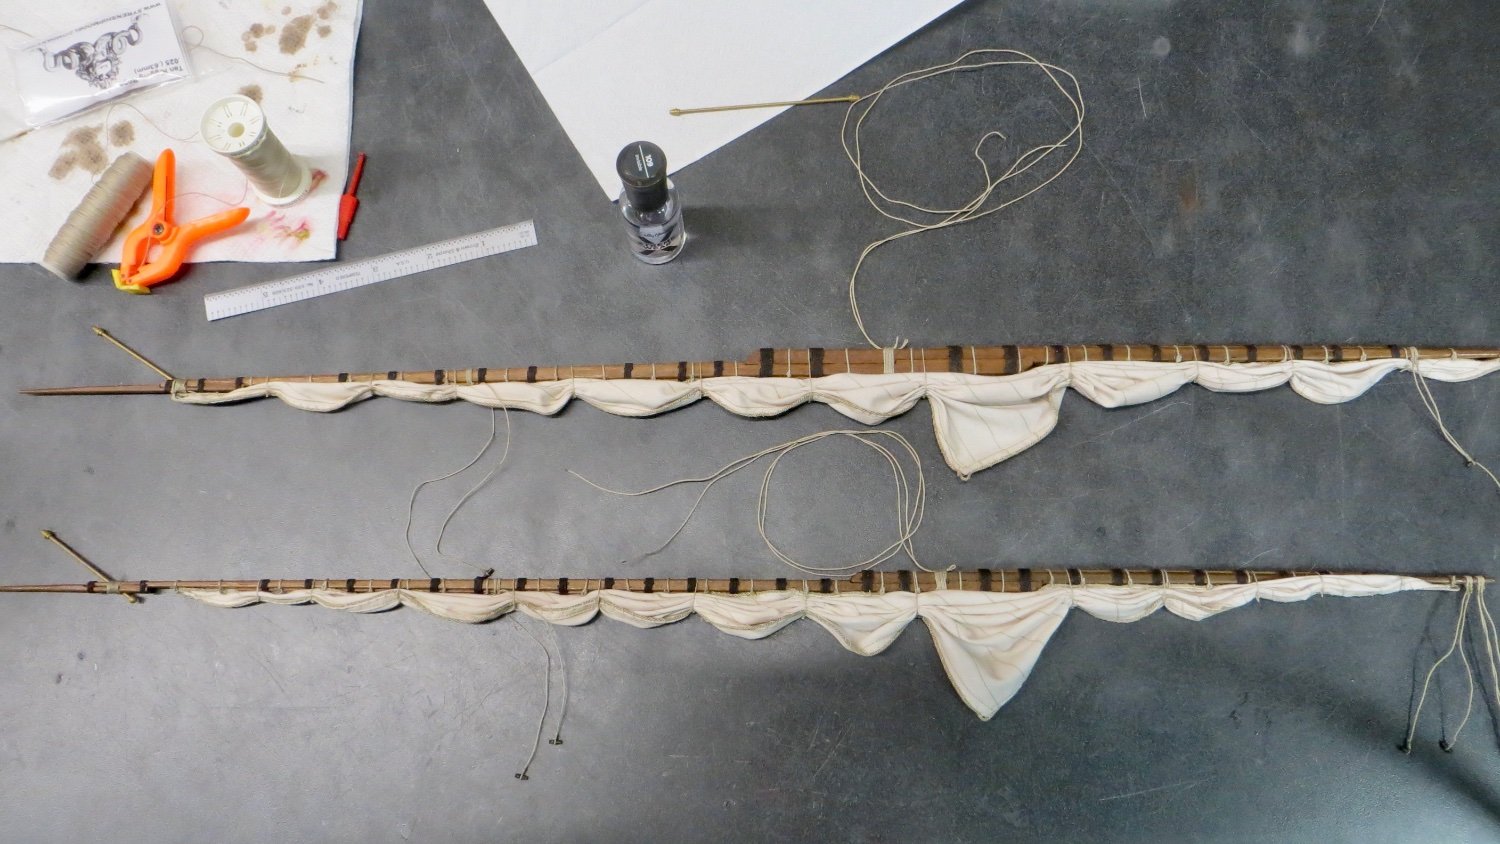
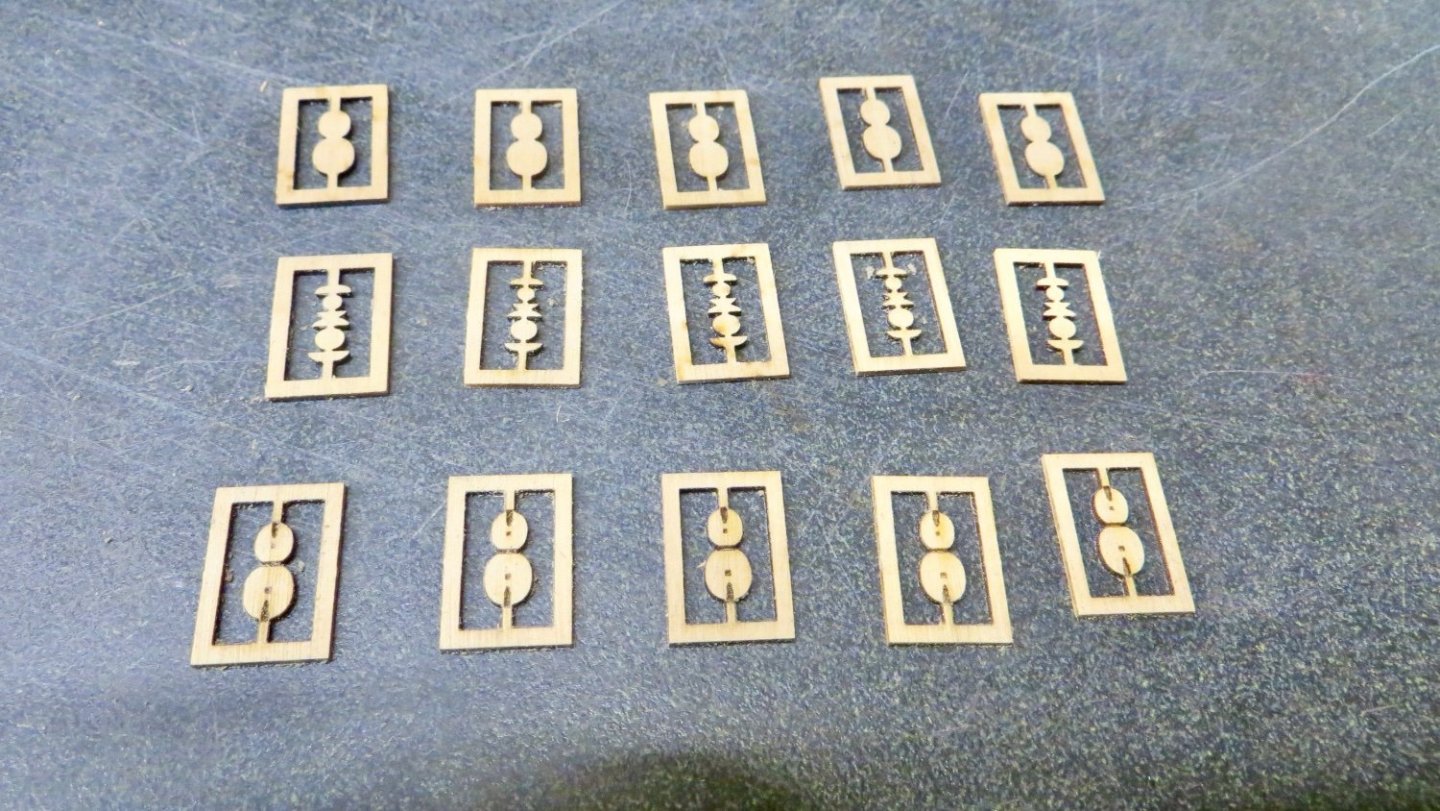
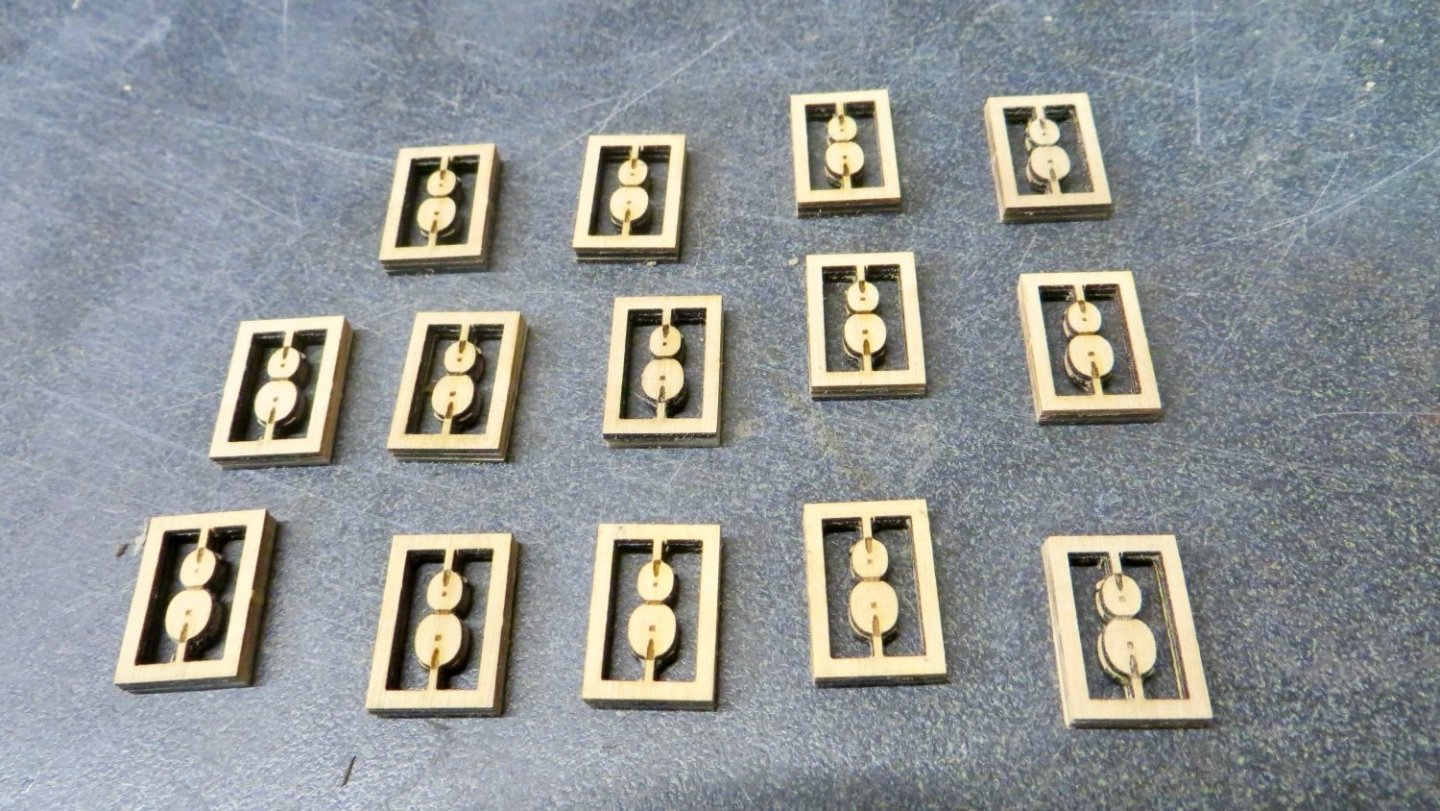
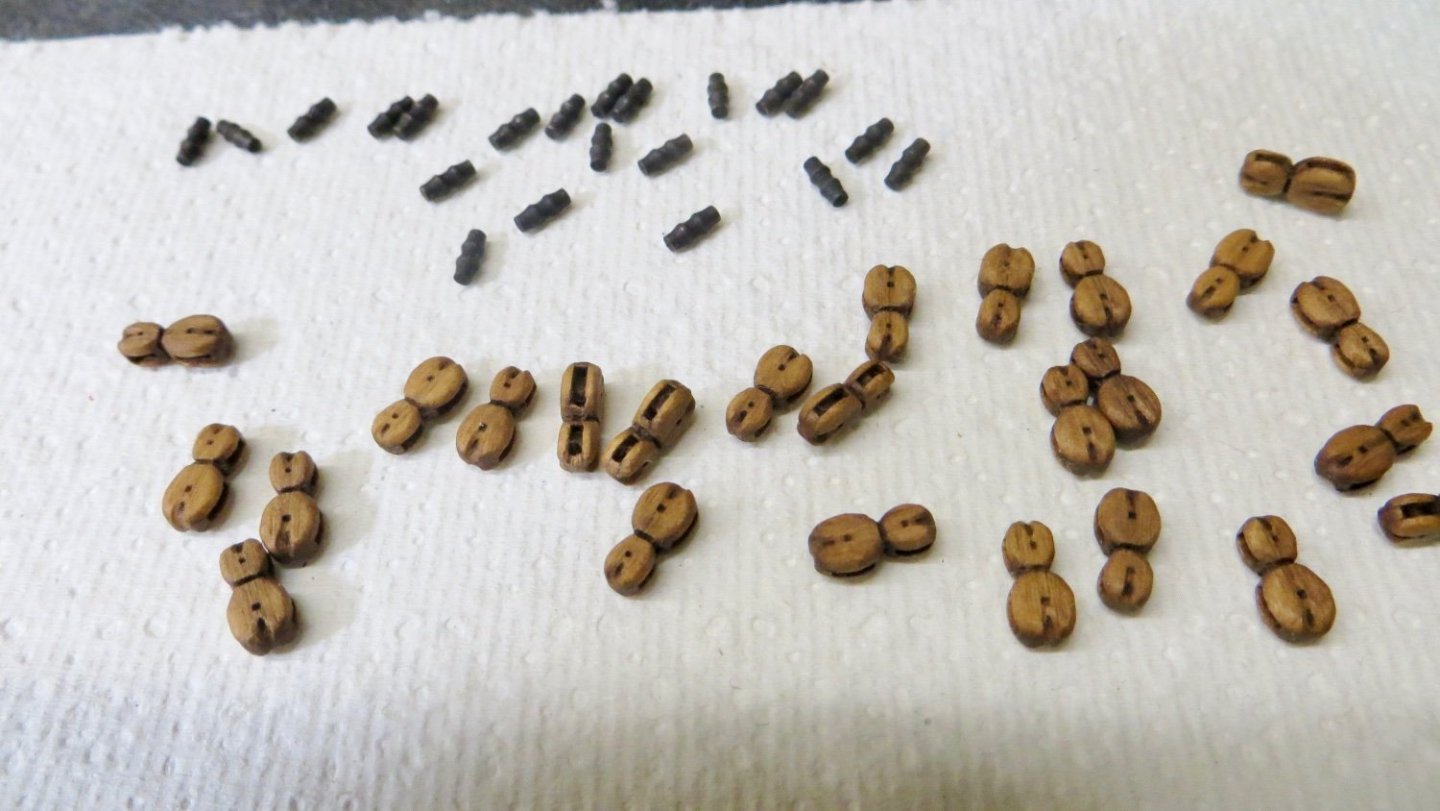
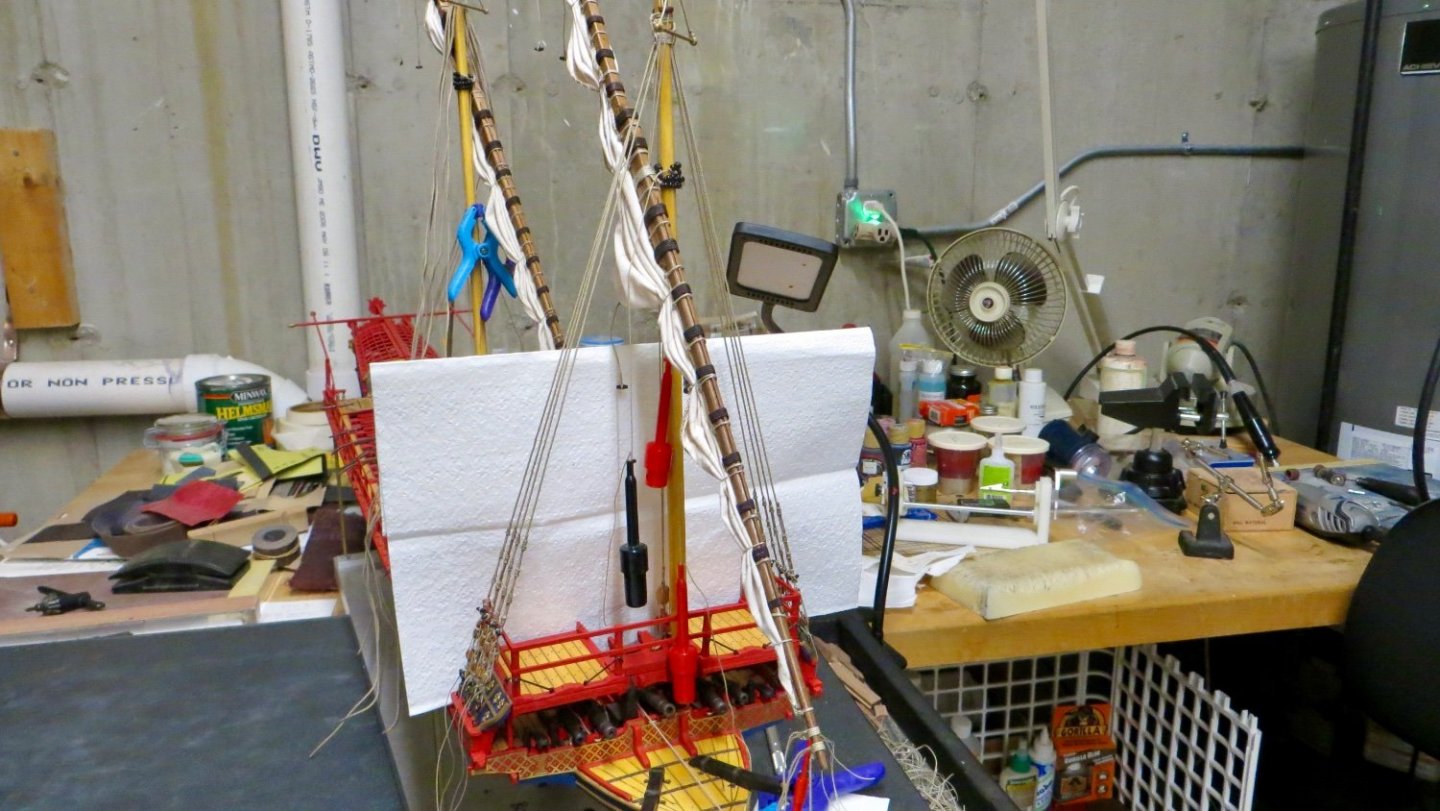
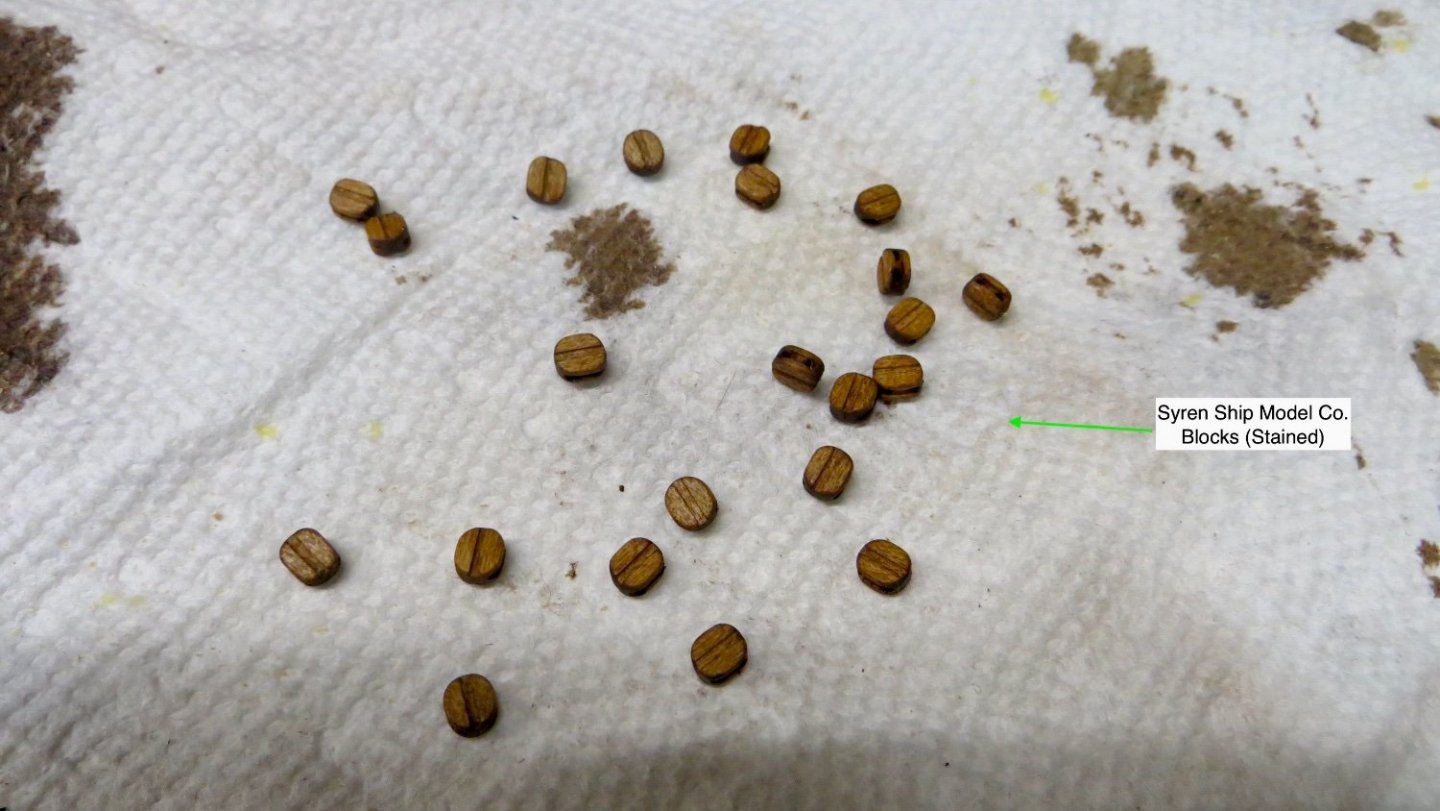
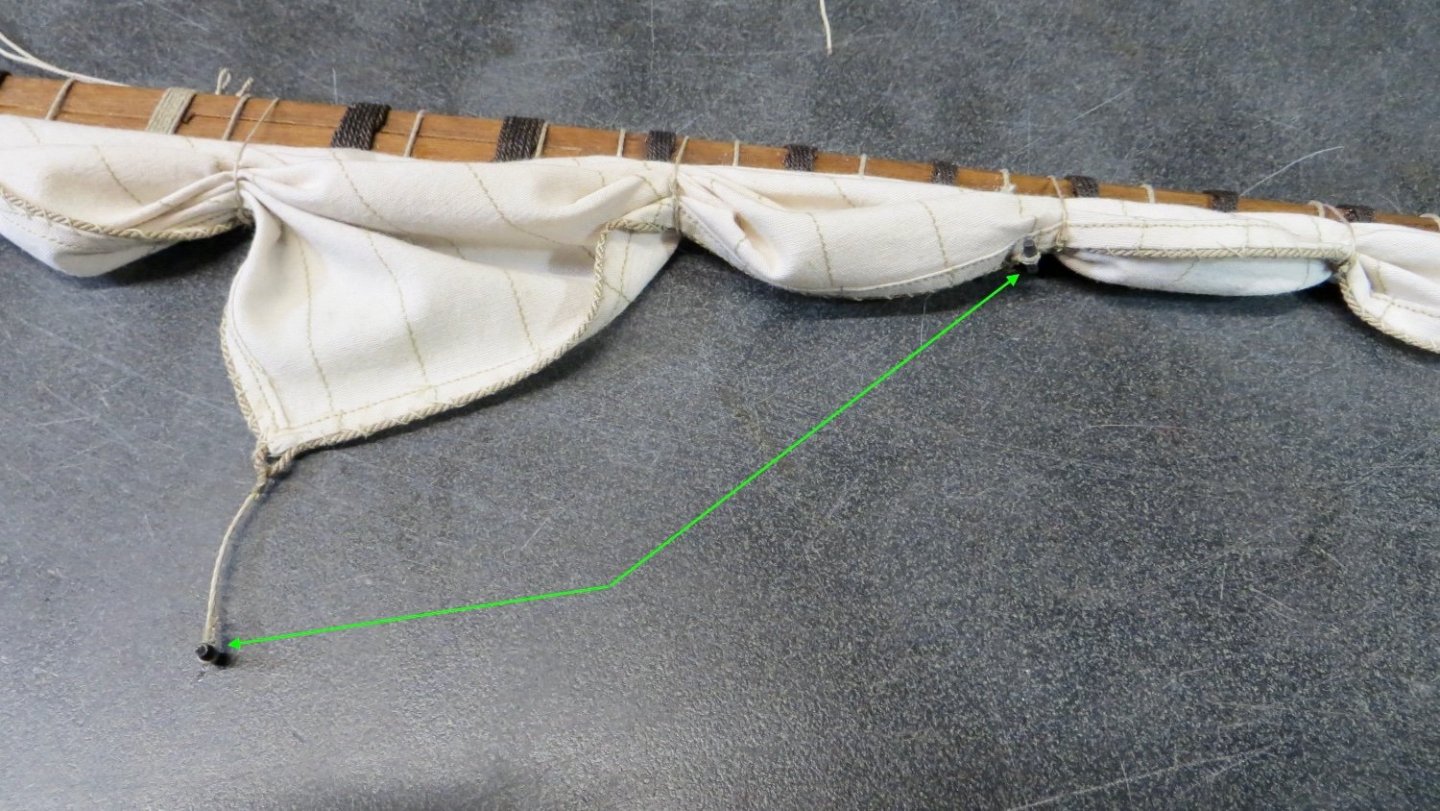
Hello, Been away on vacation for a while and then got hit with the virus! Anyway, back onto starting to rig the fwd shrouds. I wasn't too happy with the kit supplied double blocks, so I ordered some double block kits, that have to be assembled, from Syren Ship Model Company. Time consuming to assemble and finish, but I'm happy with the results. The middle row is glued on top of the top row and then the bottom row is glued on top of the middle section Glued Assembly Next step, the most time consuming, was removing the rectangle section, removing the char, and shaping and rounding the edges. Finally stained the blocks and blackened the toggles The double blocks rigged to the toggles Shrouds fastened to the toggles and blocks of fwd mast starboard side Port side fwd shrouds fastened View of Fwd shrouds from bow So, I am looking for some opinions or thoughts. The kit calls for the excess lines in the photo below to be coiled or wrapped and fastened to the blocks. I've seen photos of different models with this being done. On the wonderful Youtube dramatization from the G. Delacroix group, it seems to show the lines tied off with no coils. Thanks for stopping by, Frank


- 510 replies
-
- 7
-
-
- reale de france
- corel
- (and 1 more)
-
Thanks for your comments and for stopping by Tim! Frank
-
Thanks Michael! My favorite part (the rigging) also! Thanks for stopping by Best, Frank
- 510 replies
-
- 1
-
-
- reale de france
- corel
- (and 1 more)
-
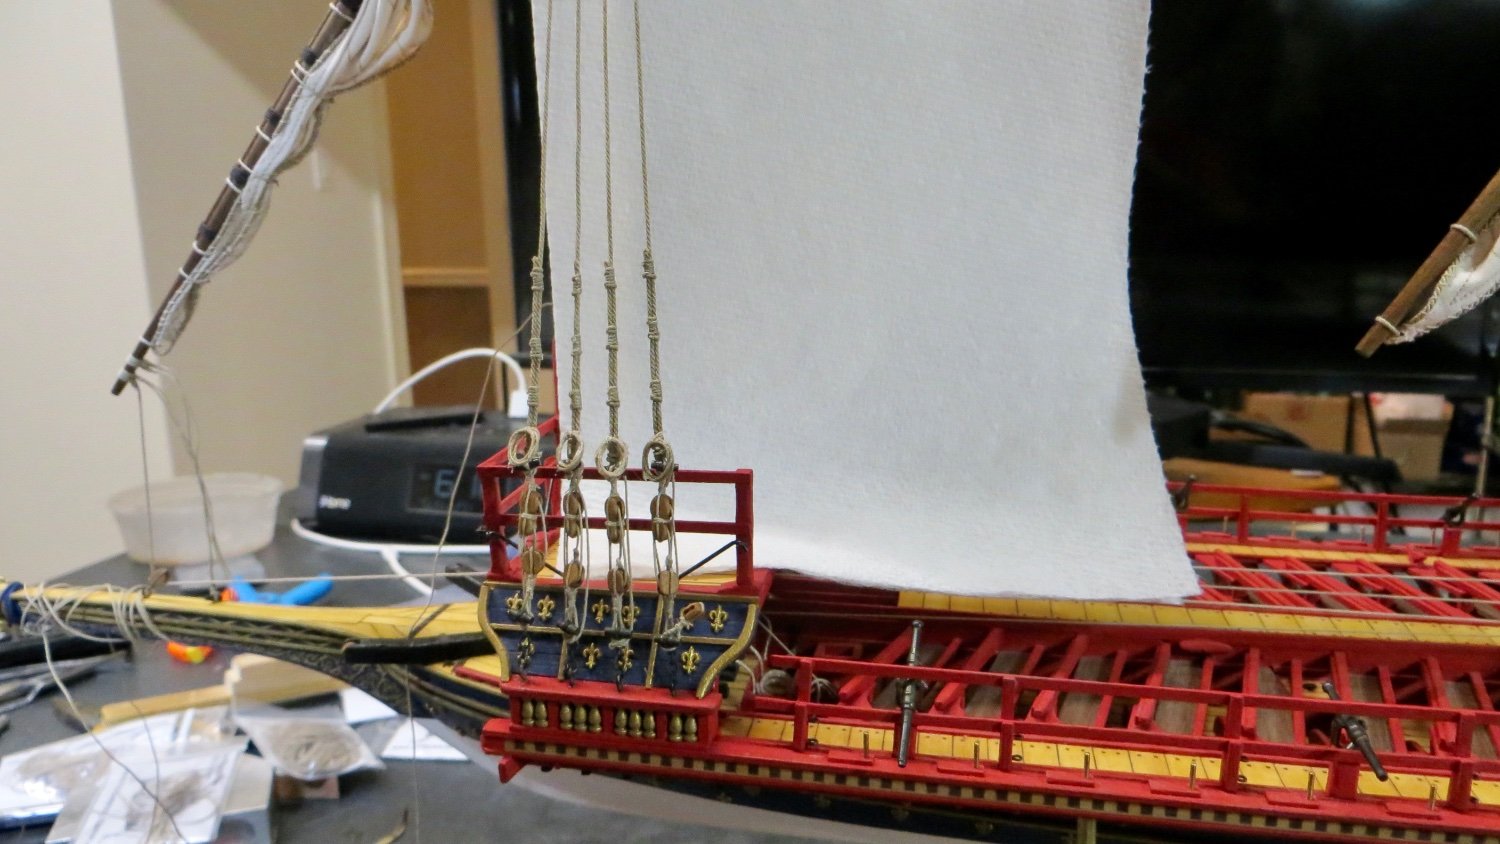
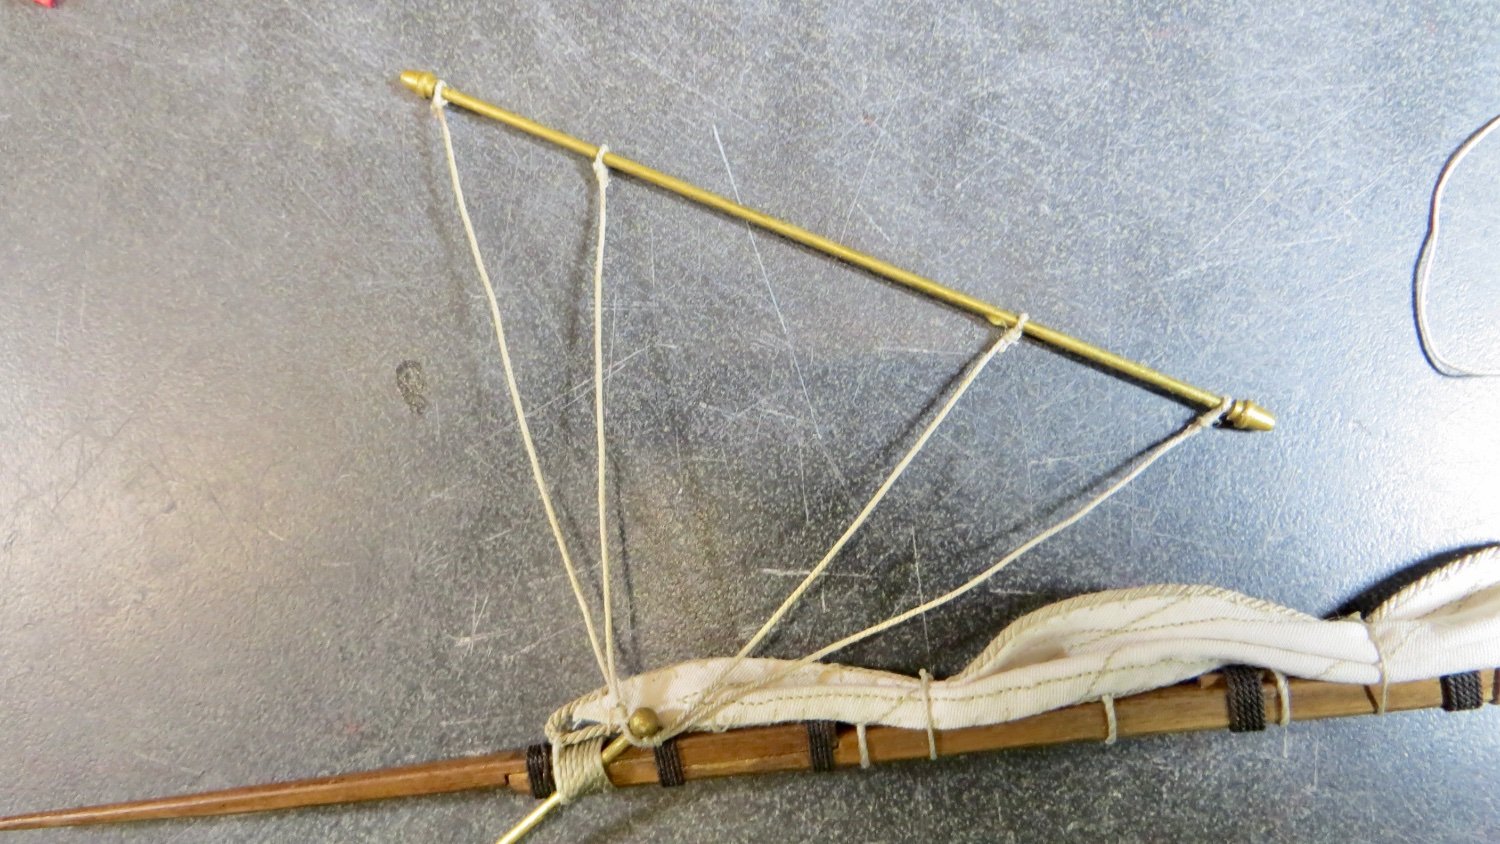
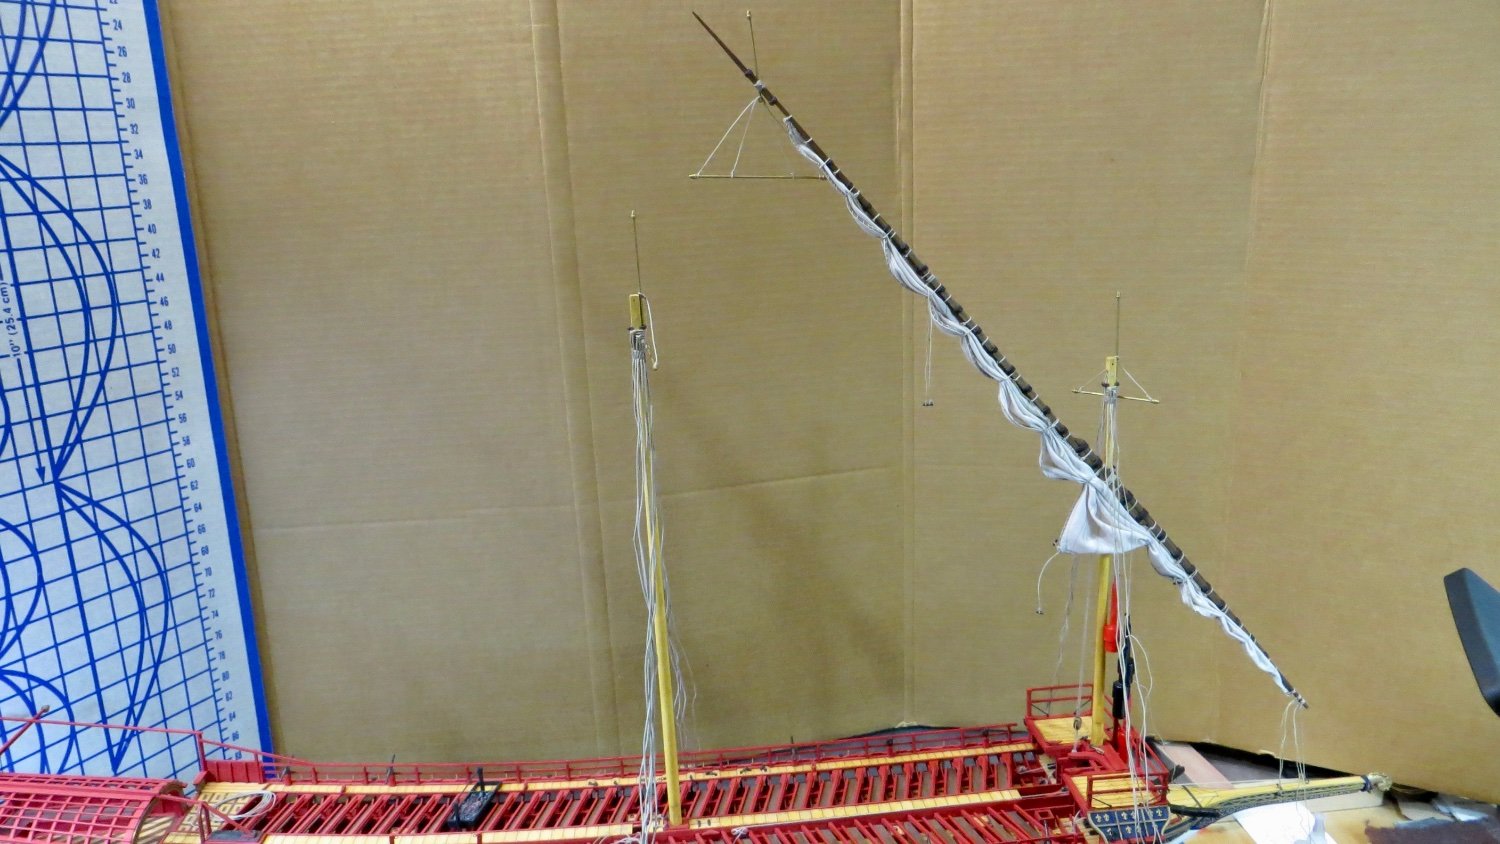
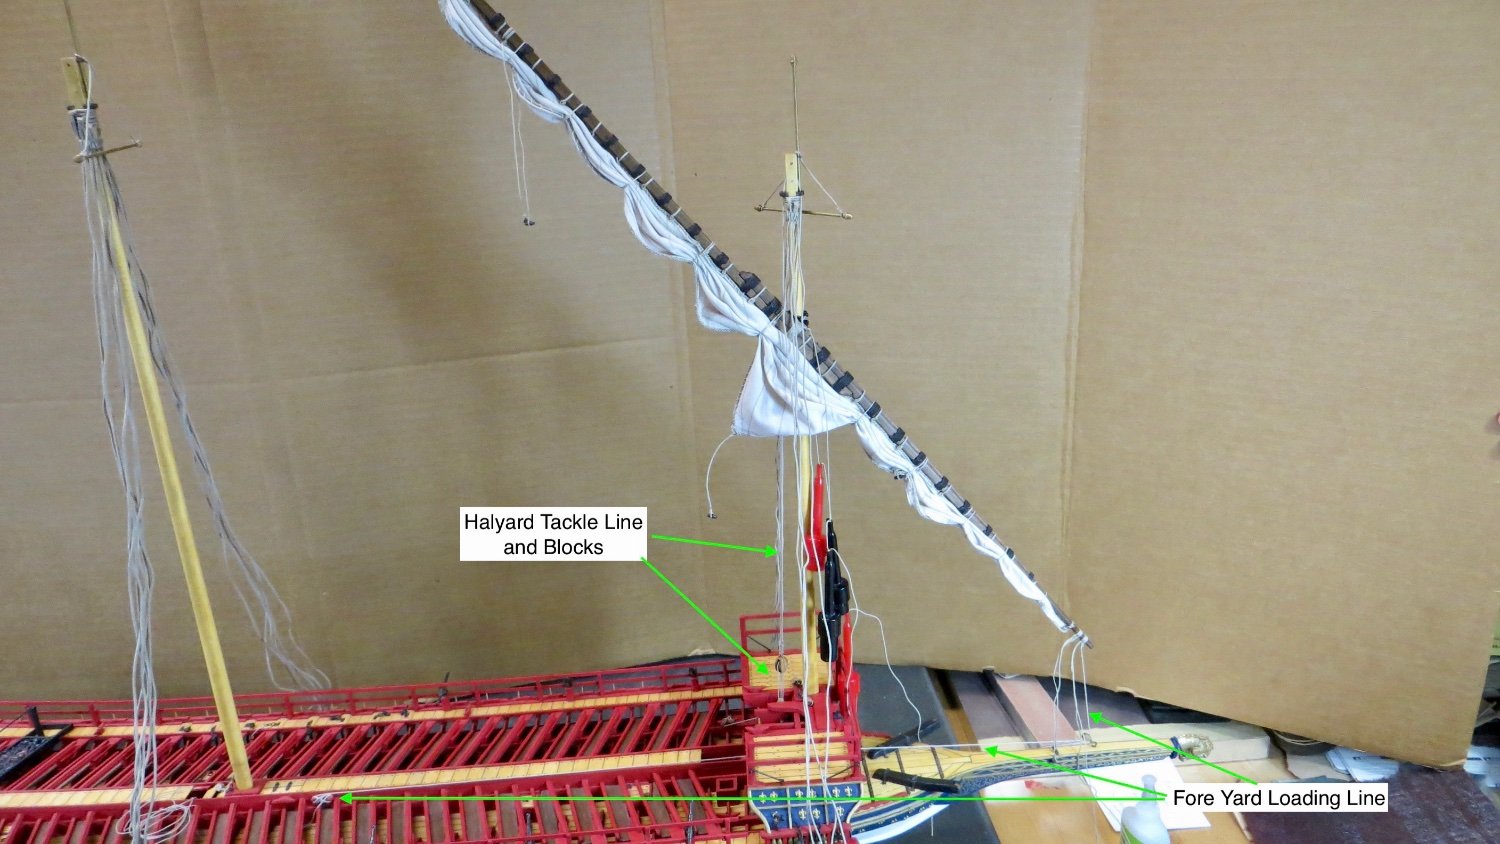
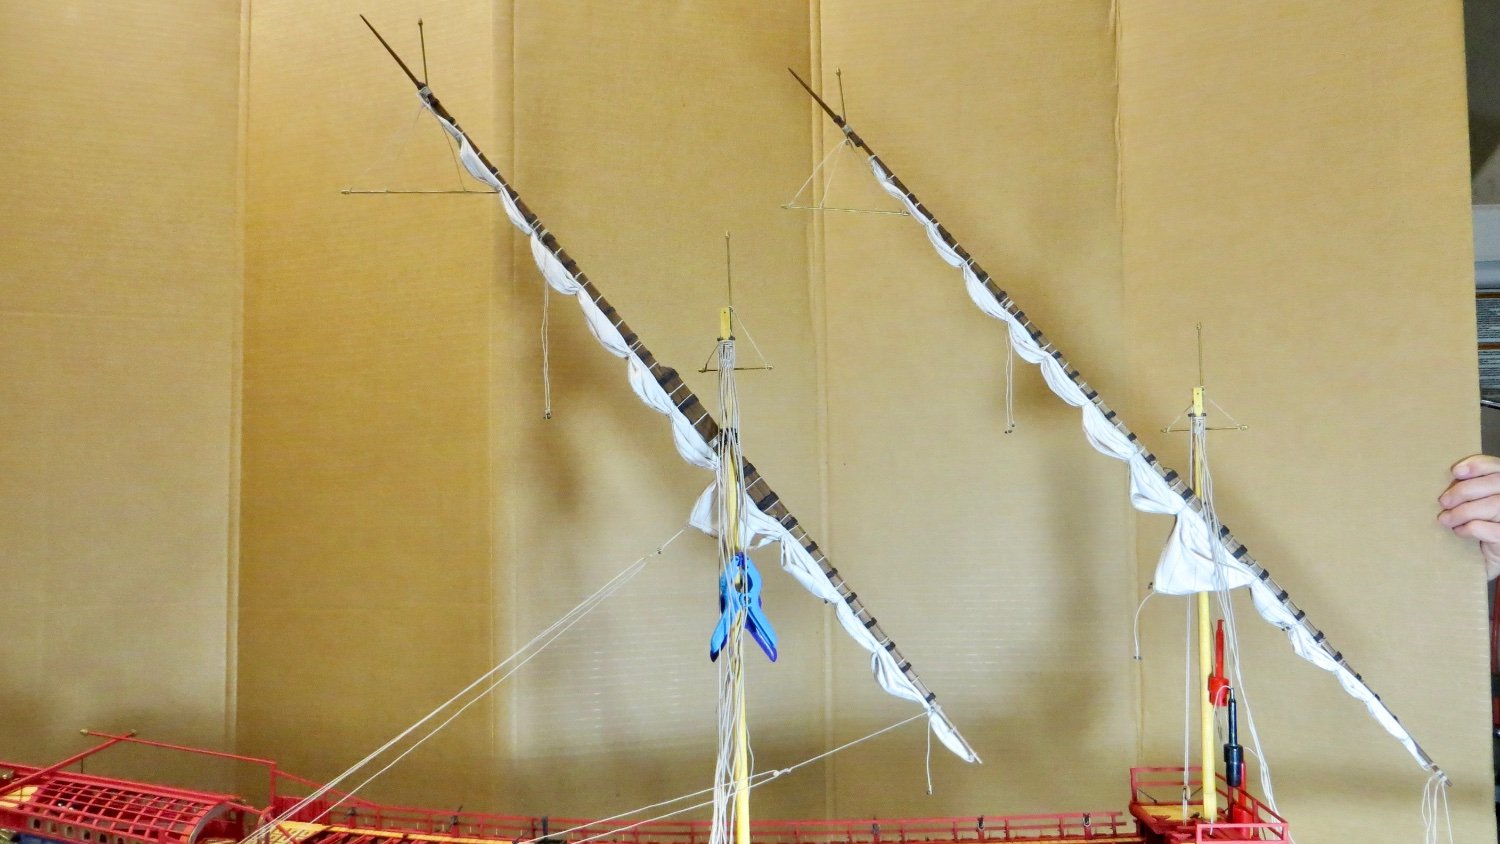
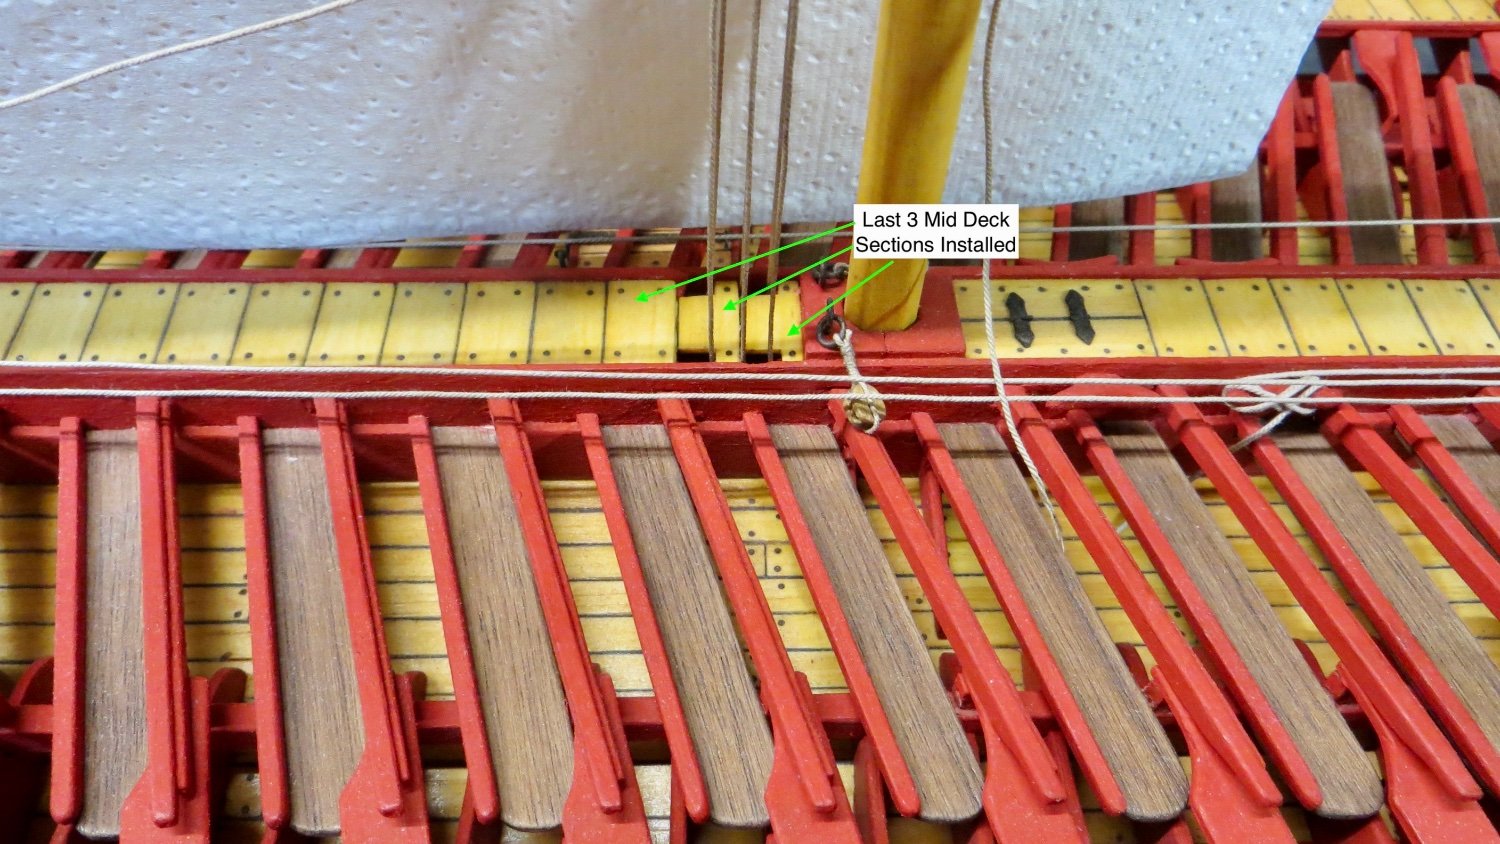
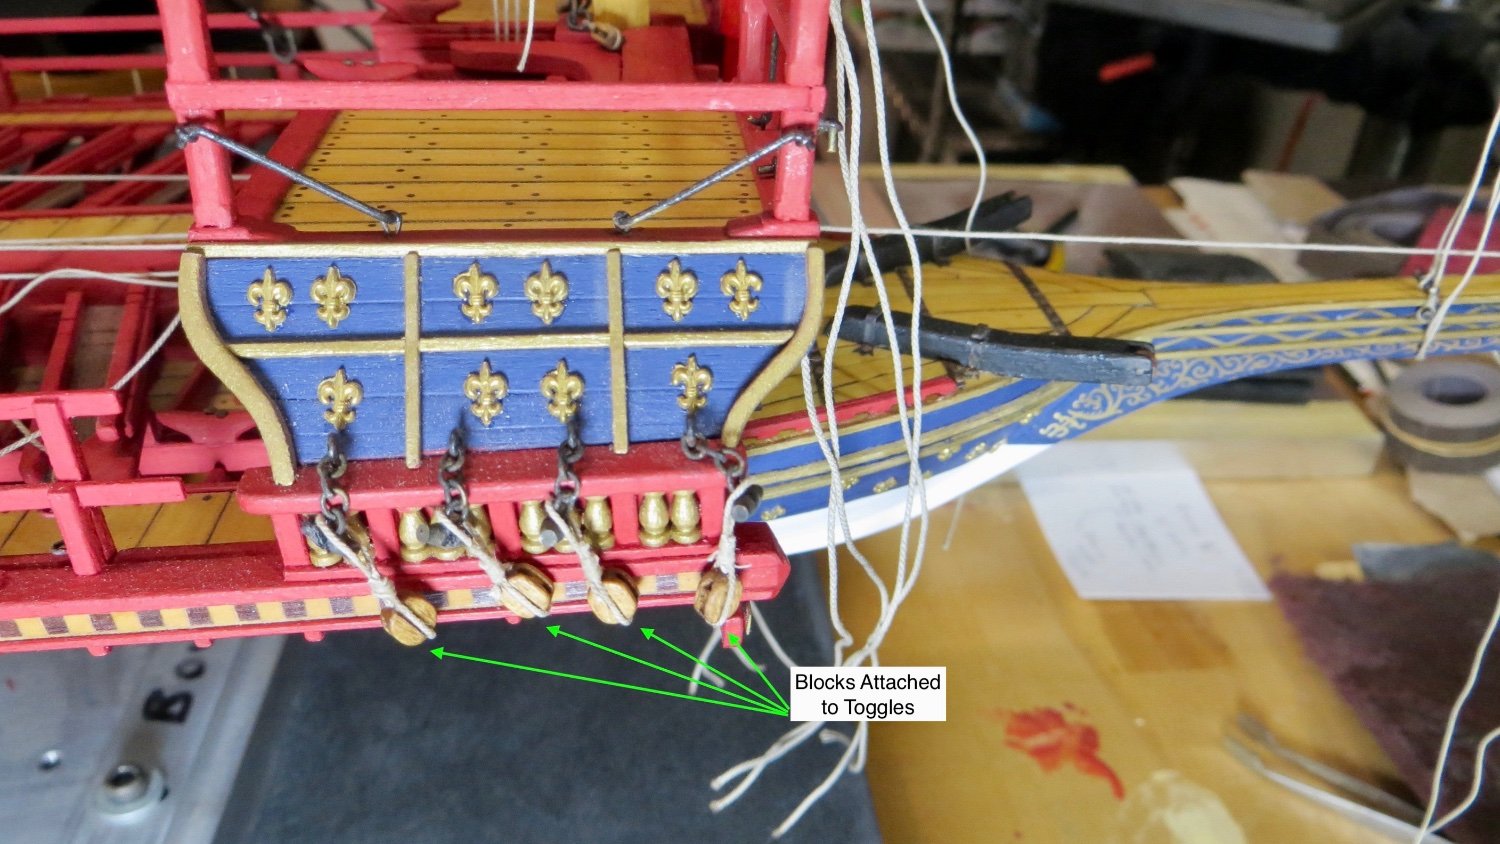
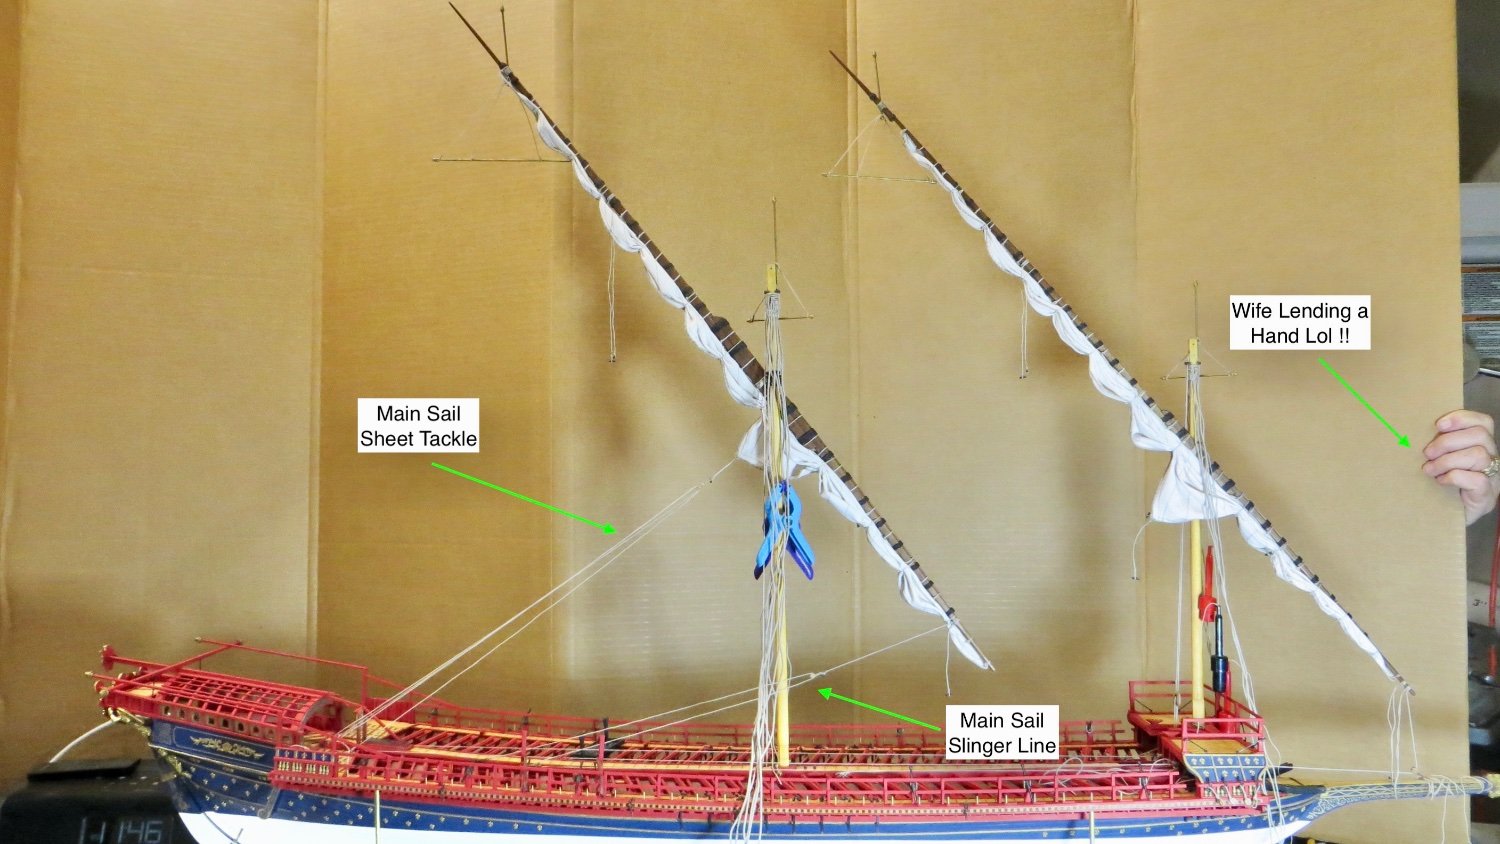
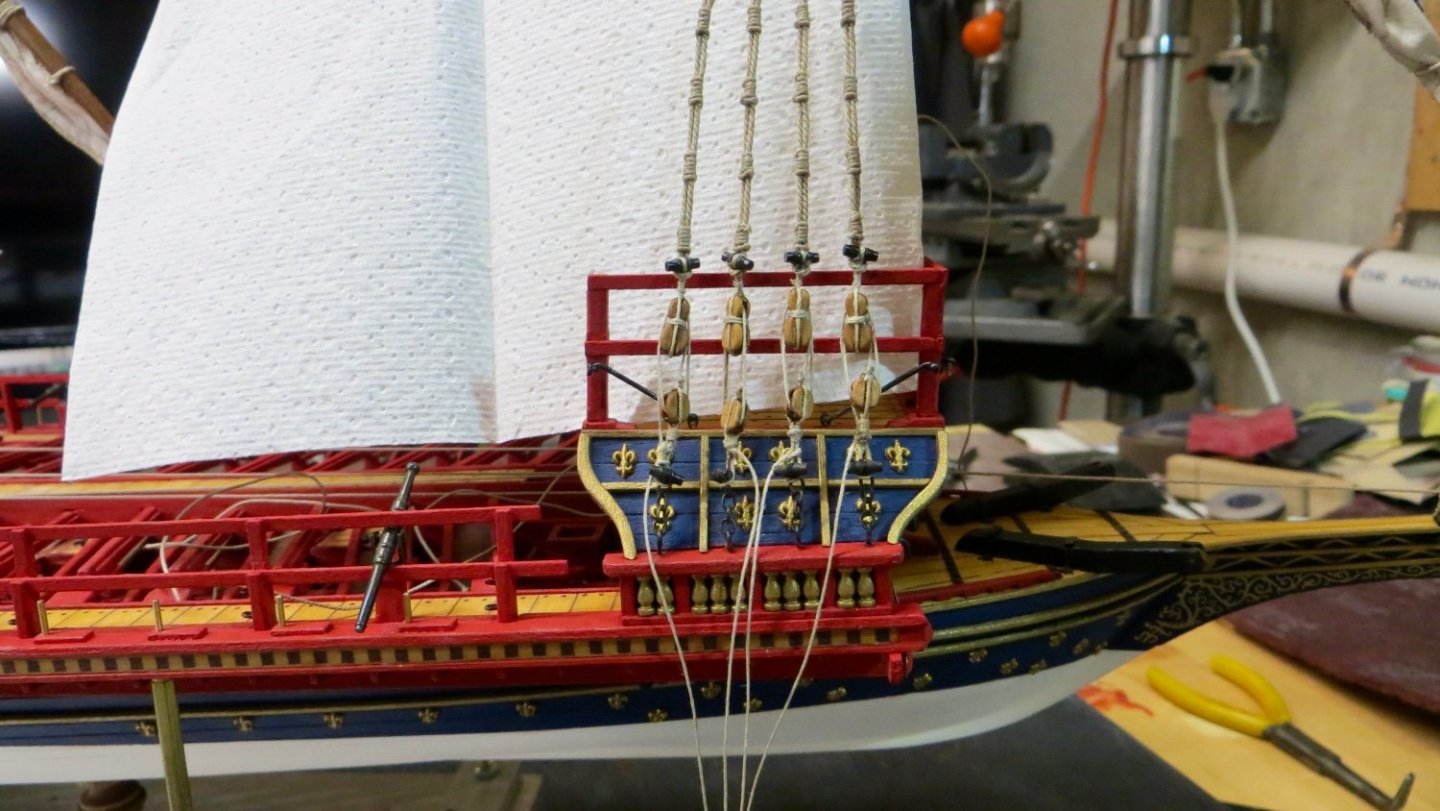
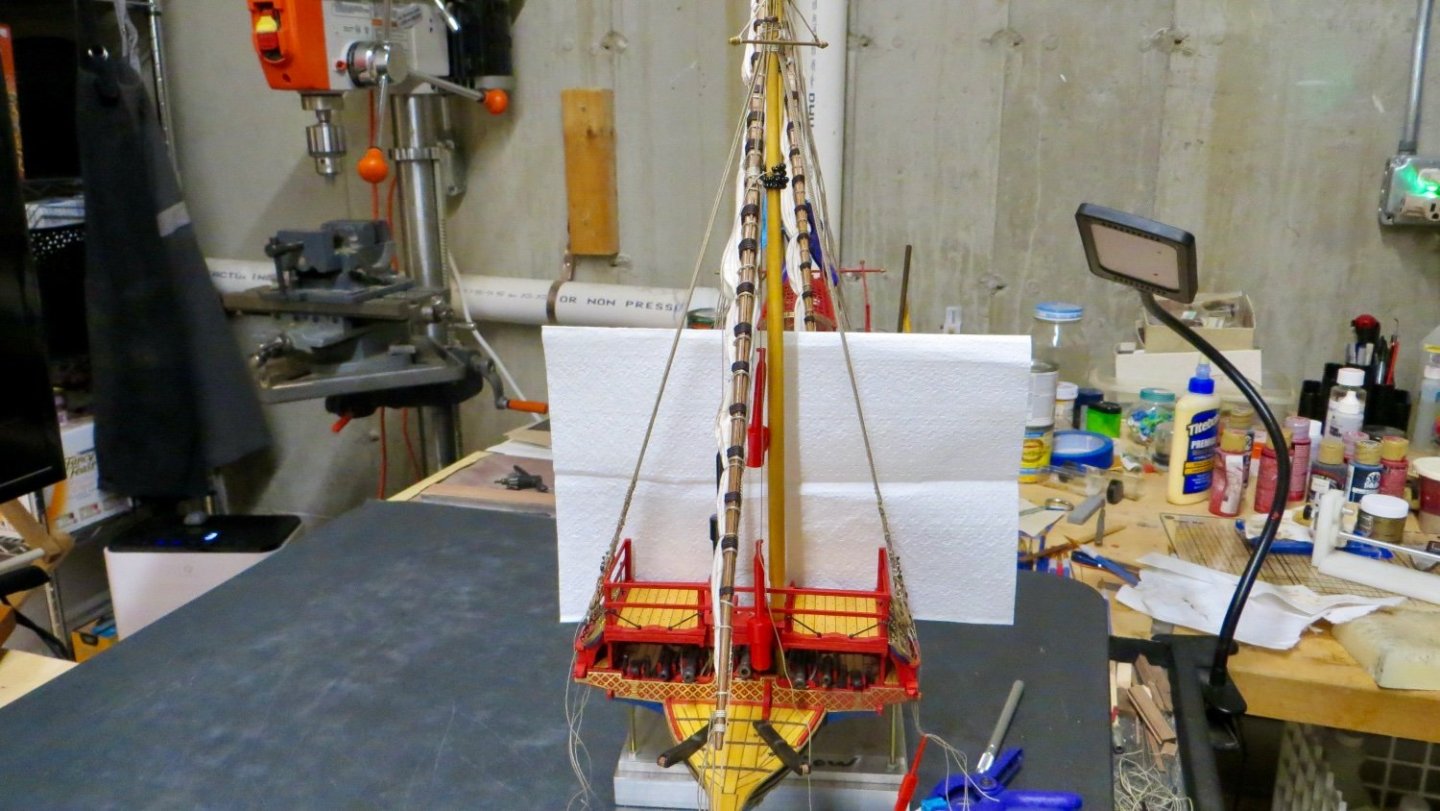
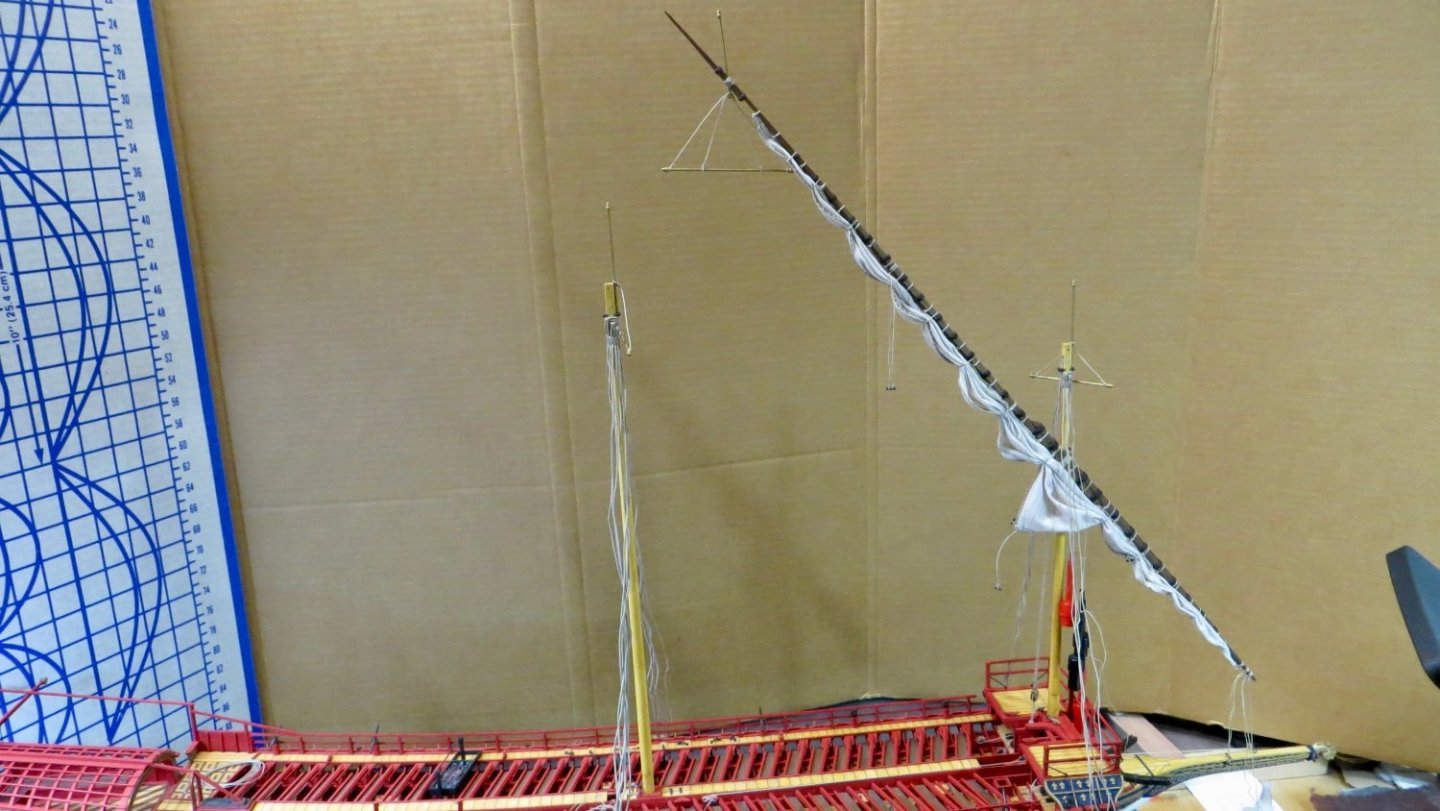
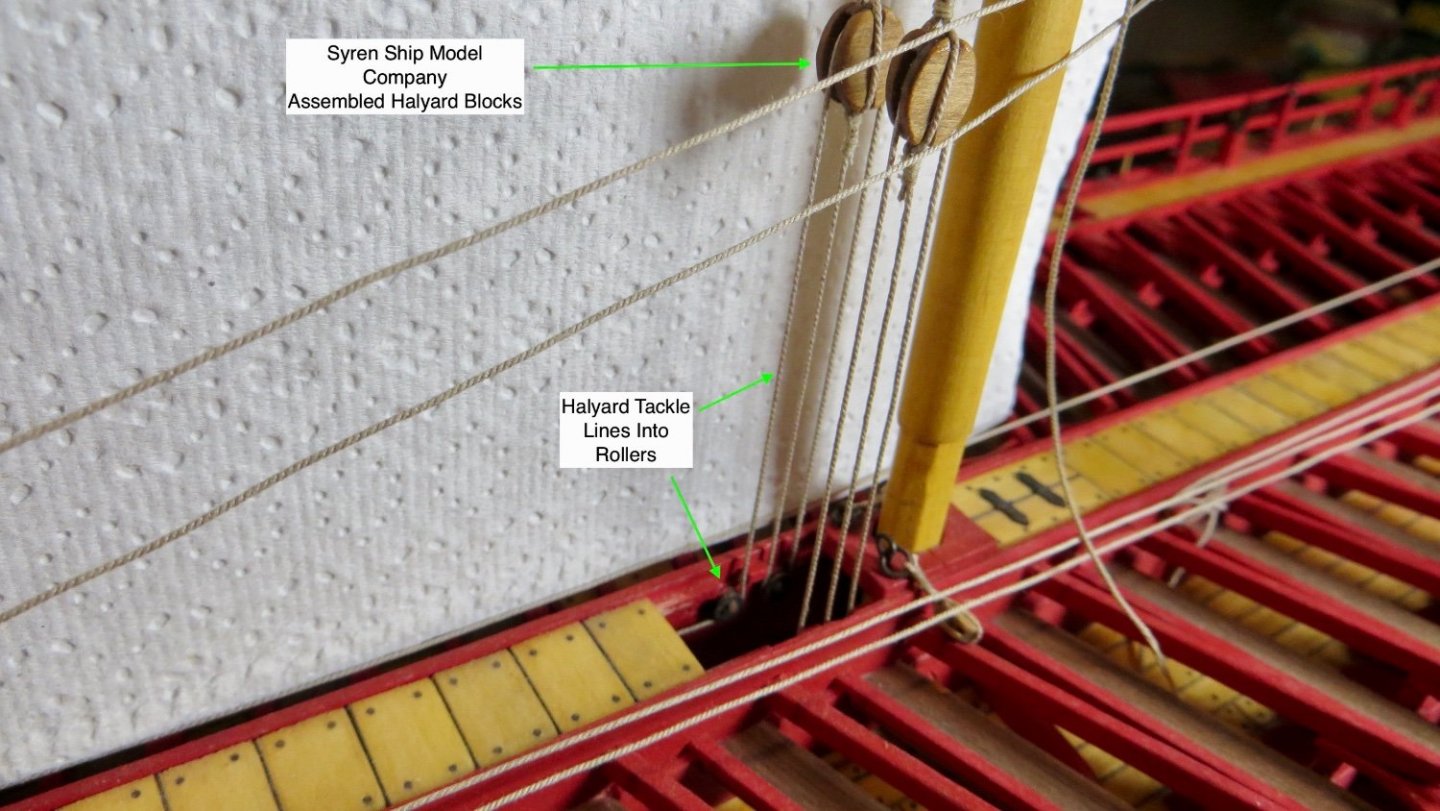
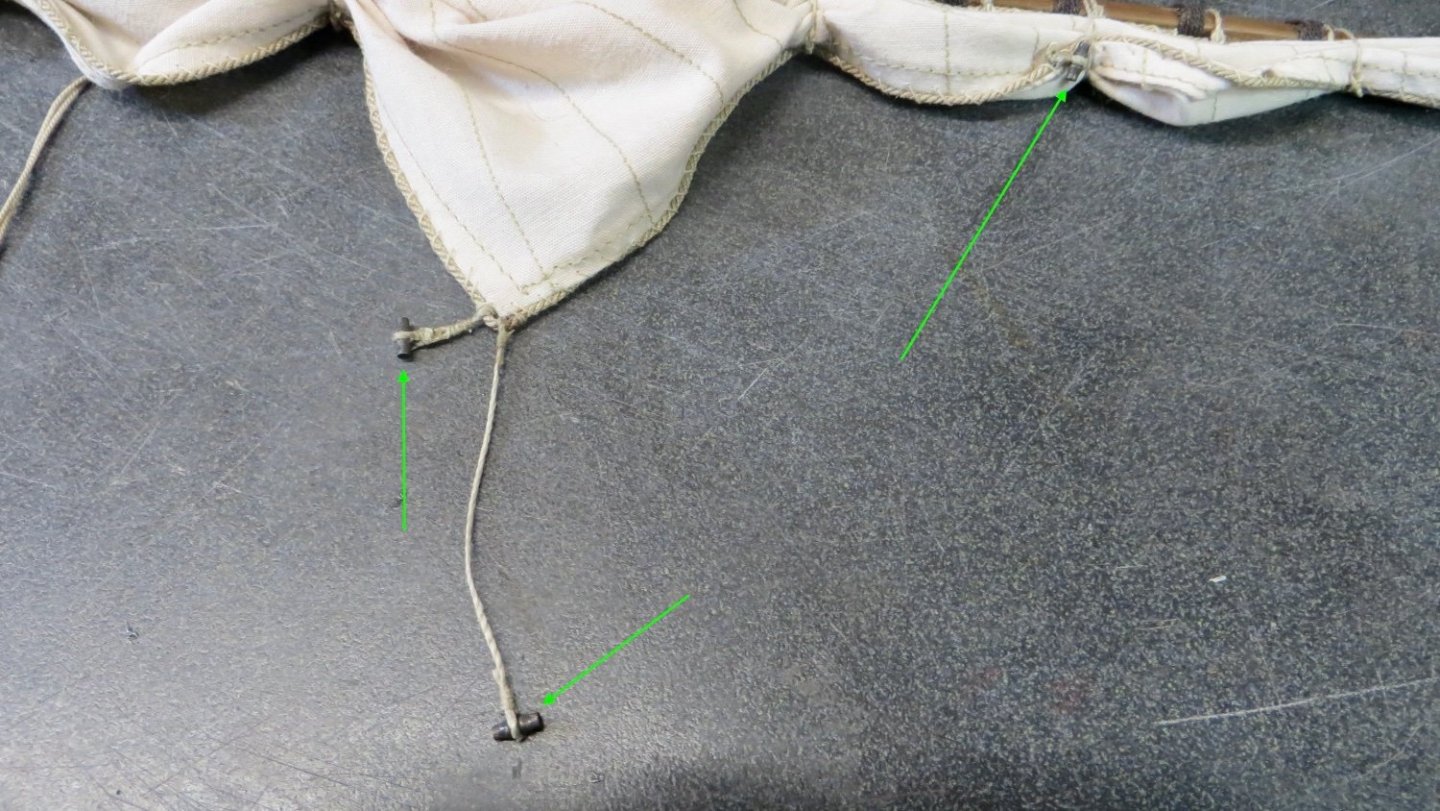
Hello, Finalizing the install of the sails and yards to the ship. There are flag pendants that hang of the yards. I started assembling and trial fitting them. Michael D ( beautiful safemaster Reale Log) was kind enough to show me his method of making tassels that would hang off these pendants. My wife also claims she know how to make them Lol! So I will attempt to install the tassels near the end of the build Setting the height of the fore yard Adding (rigging) the fore Halyard Tackle lines and blocks, along with the foreyard loading line in order to set the height and angle. All lines will be able to be tweaked and final adjusted after the shrouds are rigged. Setting of the main yard height and angle Again, all lines will have final adjustments after shrouds are installed Main Yard blocks were bought from Syren Ship Model Company. The block pieces have to be assembled and shaped. Very happy with the way they turned out. Rigged the tackle lines onto the rollers that were installed early in the build. Finally glued down the 3 remaining deck planks that I had left unfastened earlier in the build Started work on the shrouds. Also bought these blocks from Syren Ship Model Co. and stained them a darker walnut. Beginning to rig the blocks and attach them to the chain and toggles installed earlier in the build. Thanks again for the "Likes" and for stopping by! Frank


- 510 replies
-
- 8
-
-
- reale de france
- corel
- (and 1 more)
-
Hubac Historian and Michael, Thank you both for your kind comments and for checking in and following the log!! The making of the sails was a fun diversion from all the wood working I've done on this model! Best, Frank
- 510 replies
-
- 1
-
-
- reale de france
- corel
- (and 1 more)
-
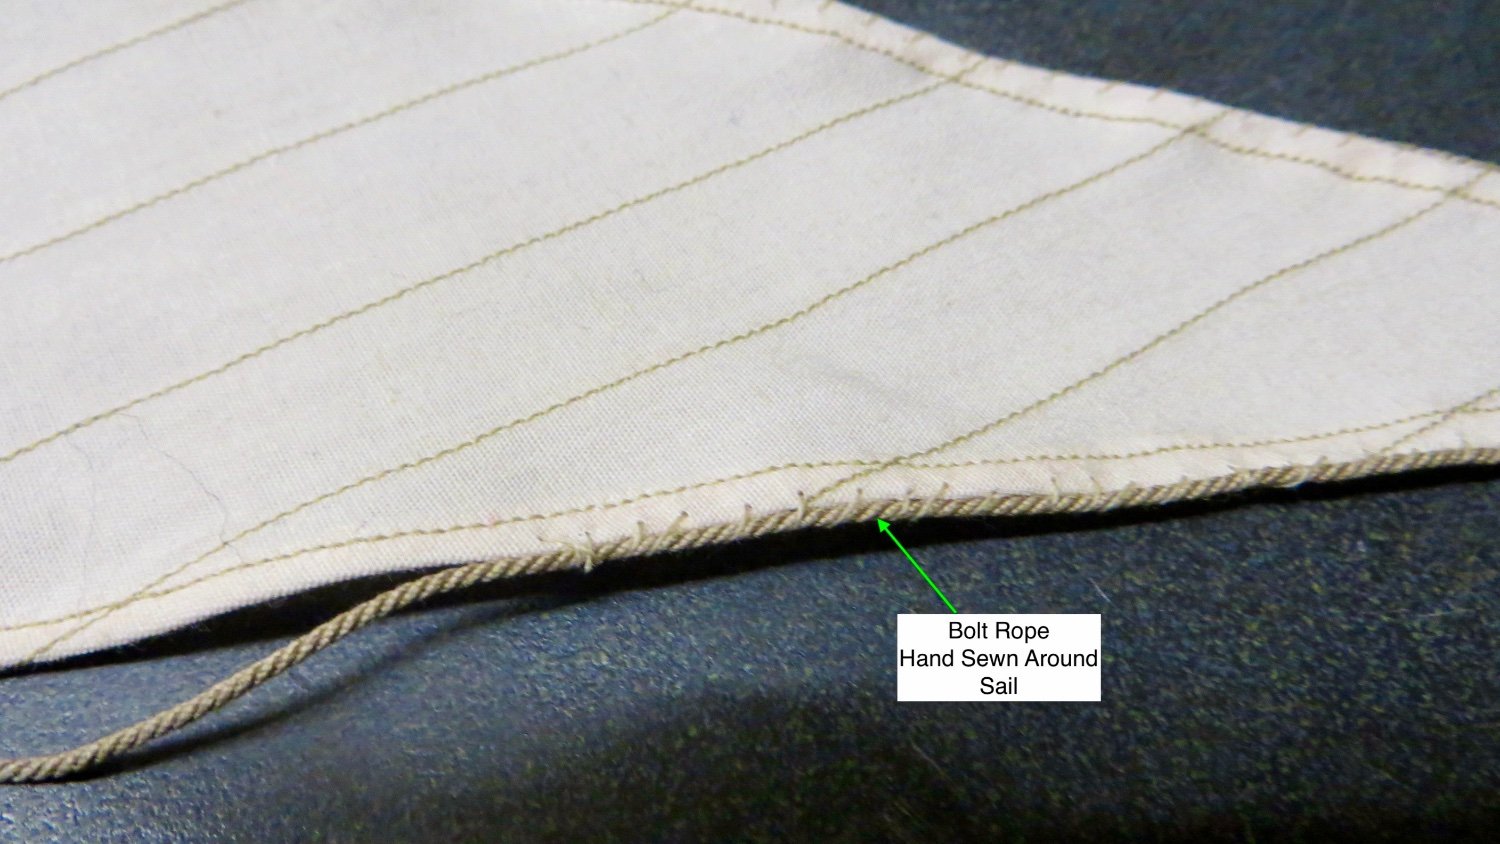
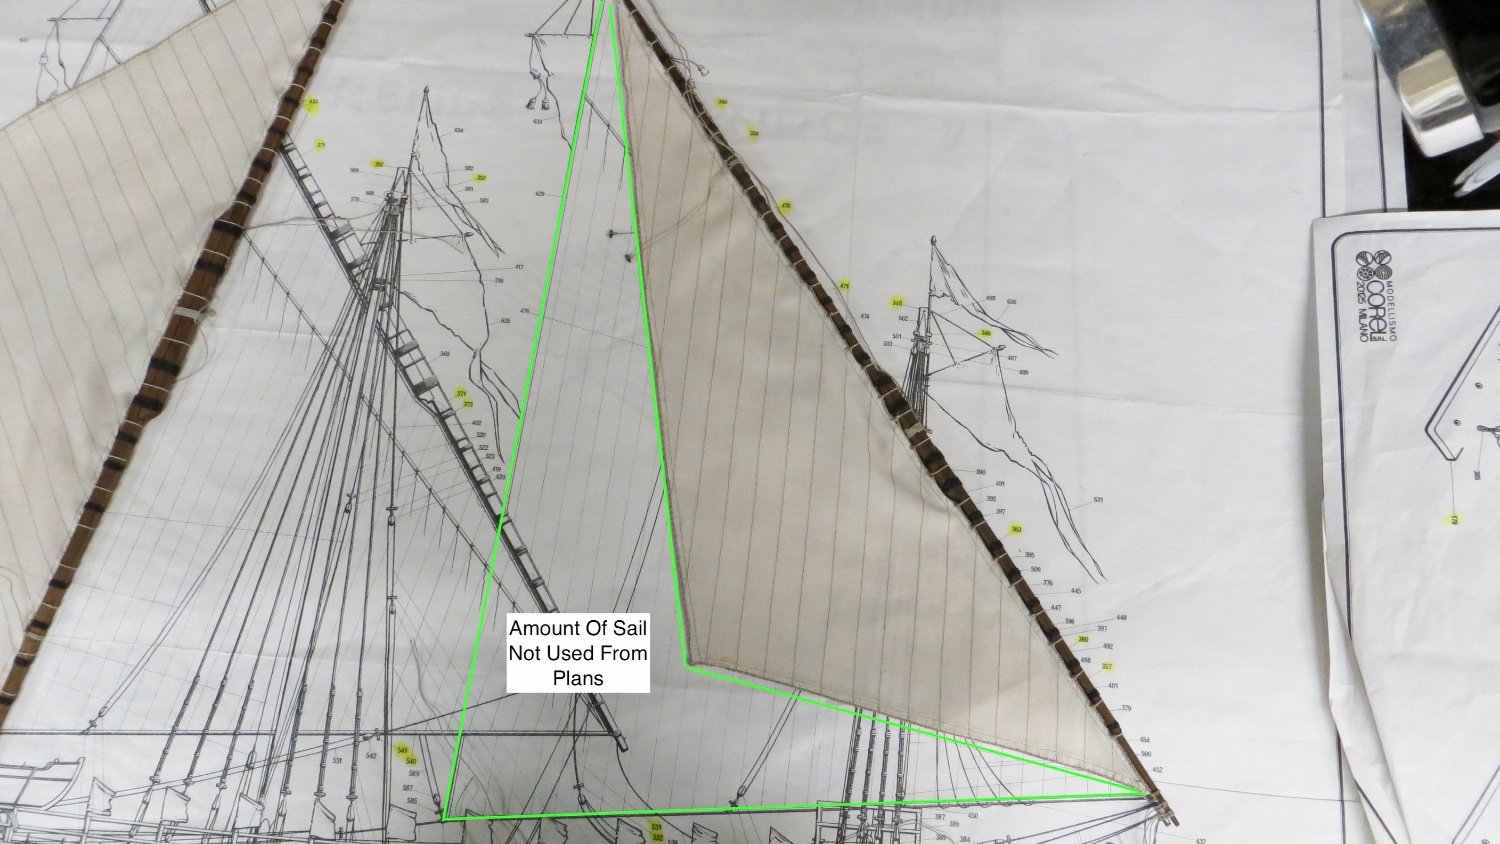
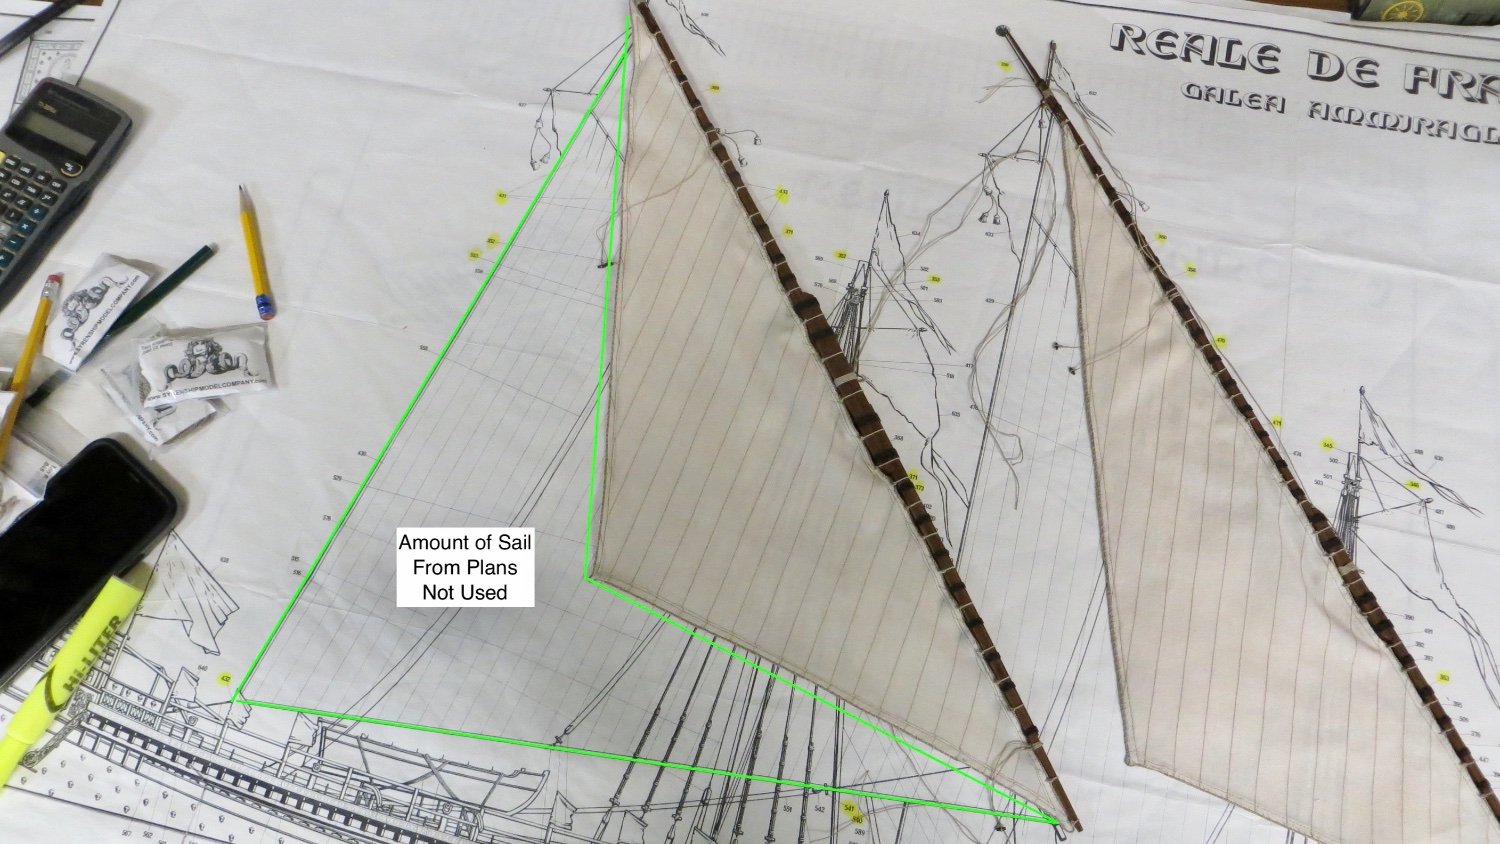
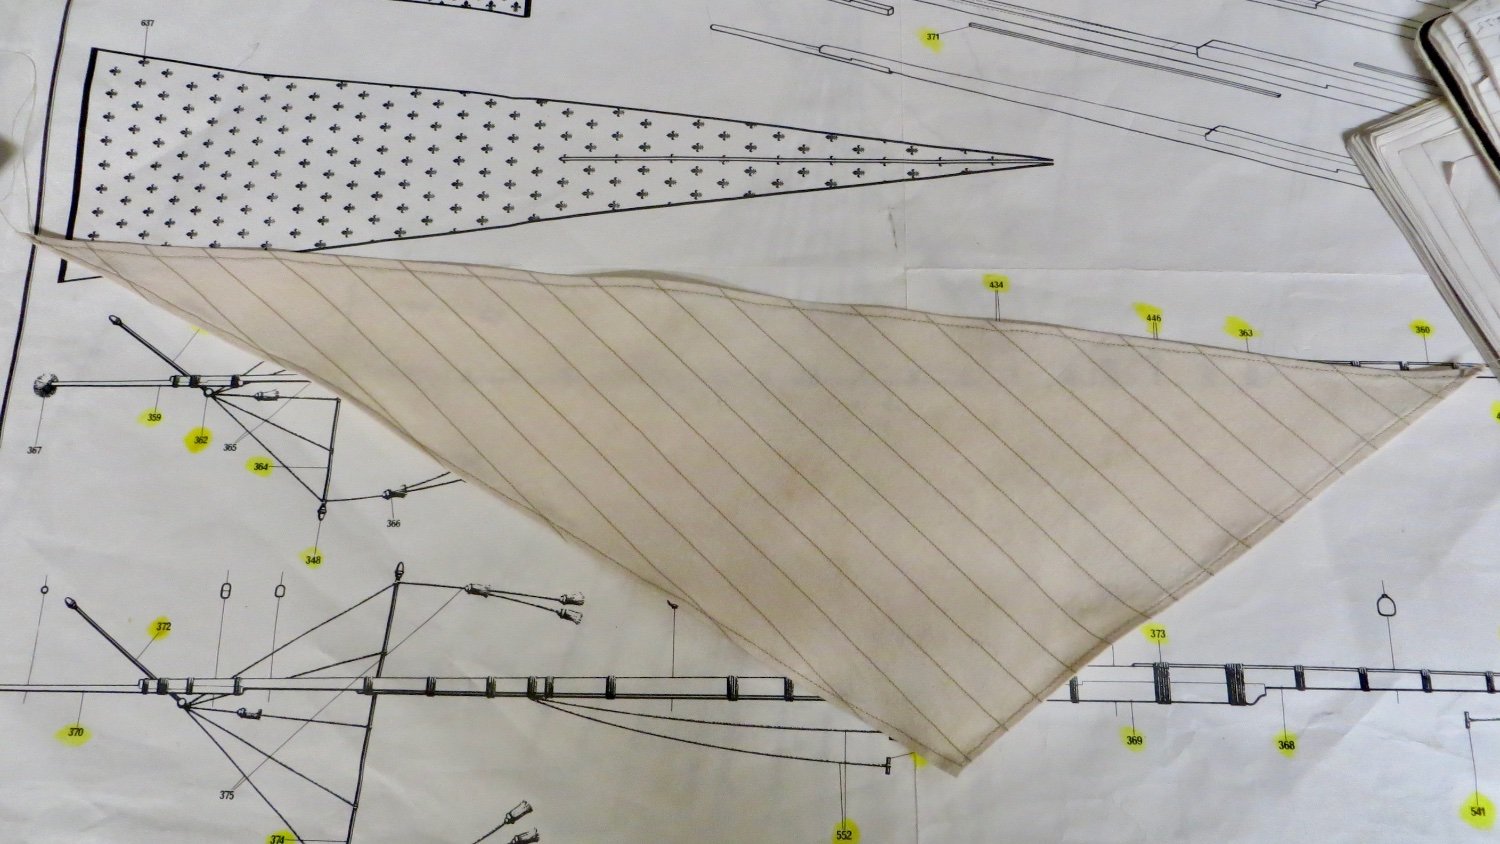
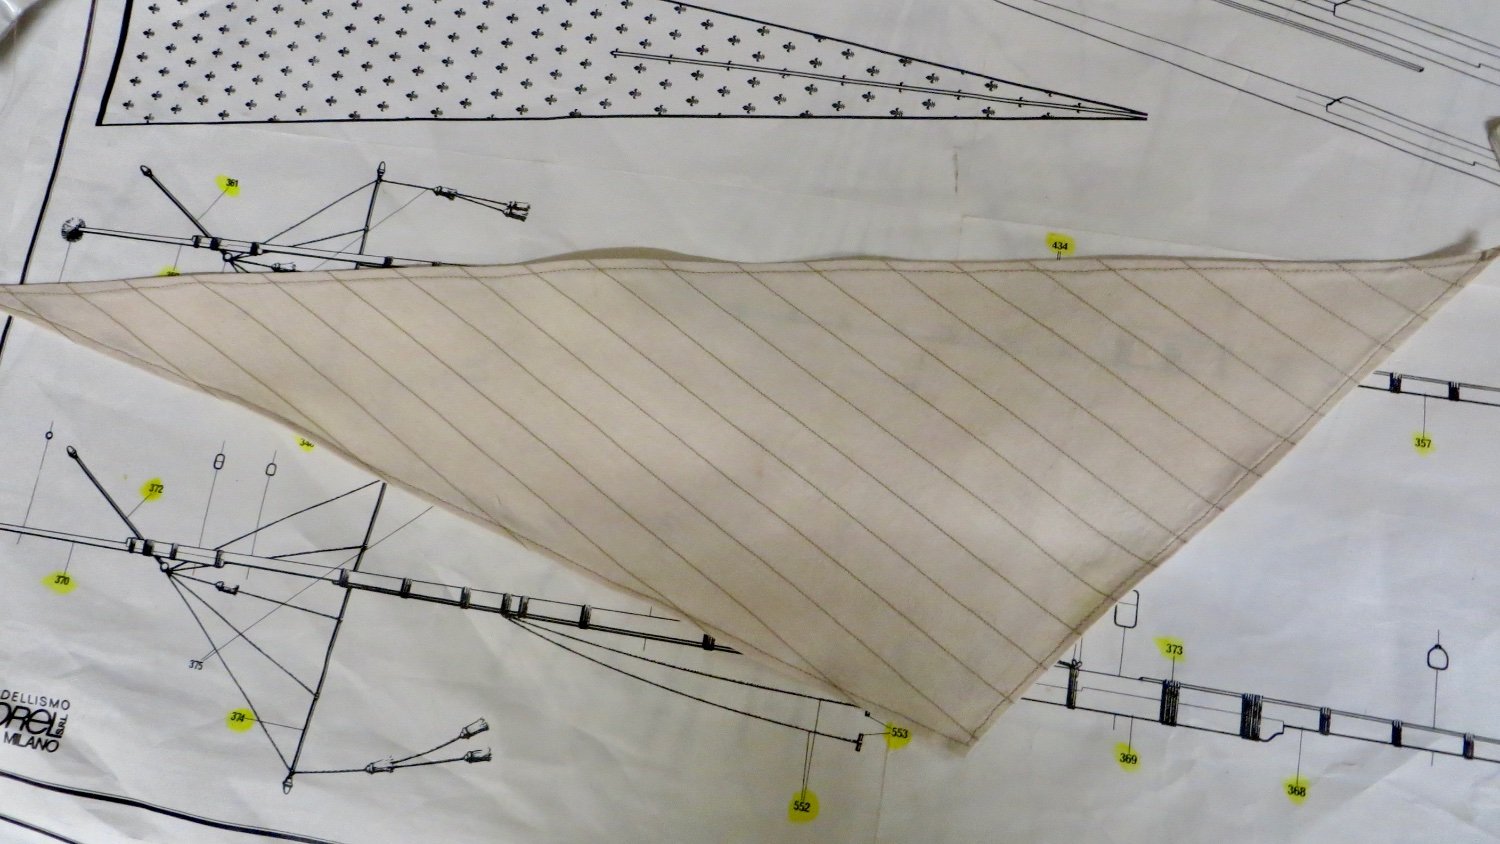
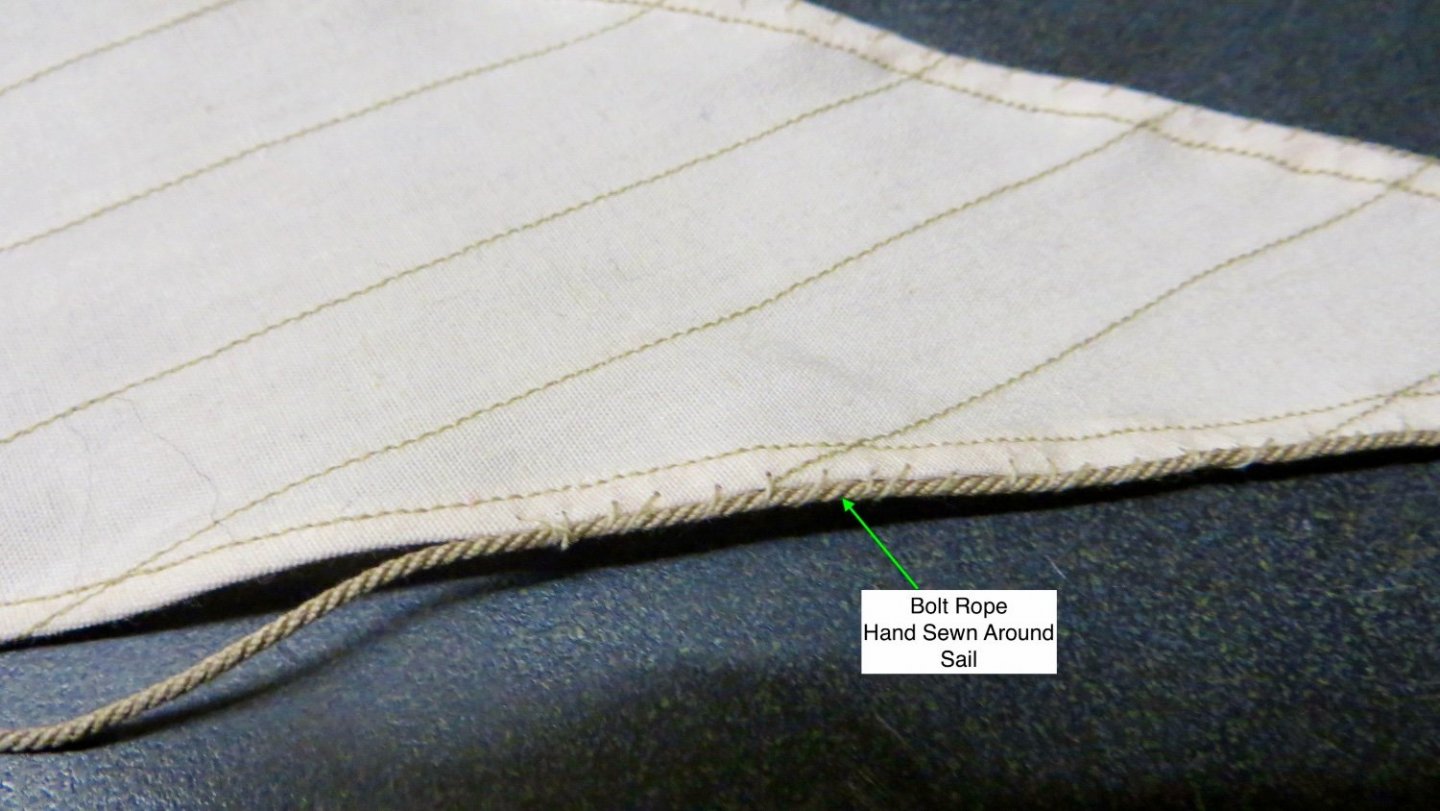
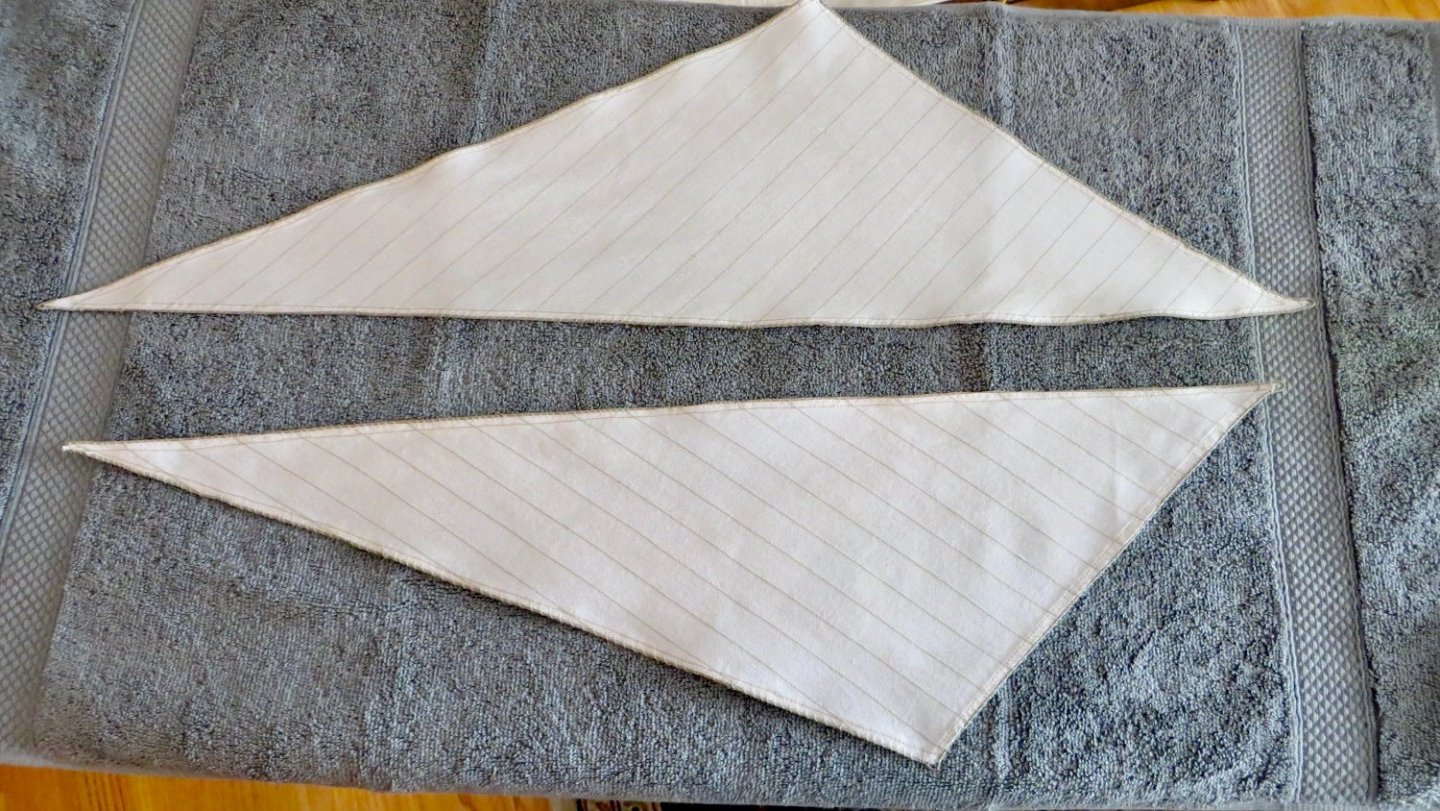
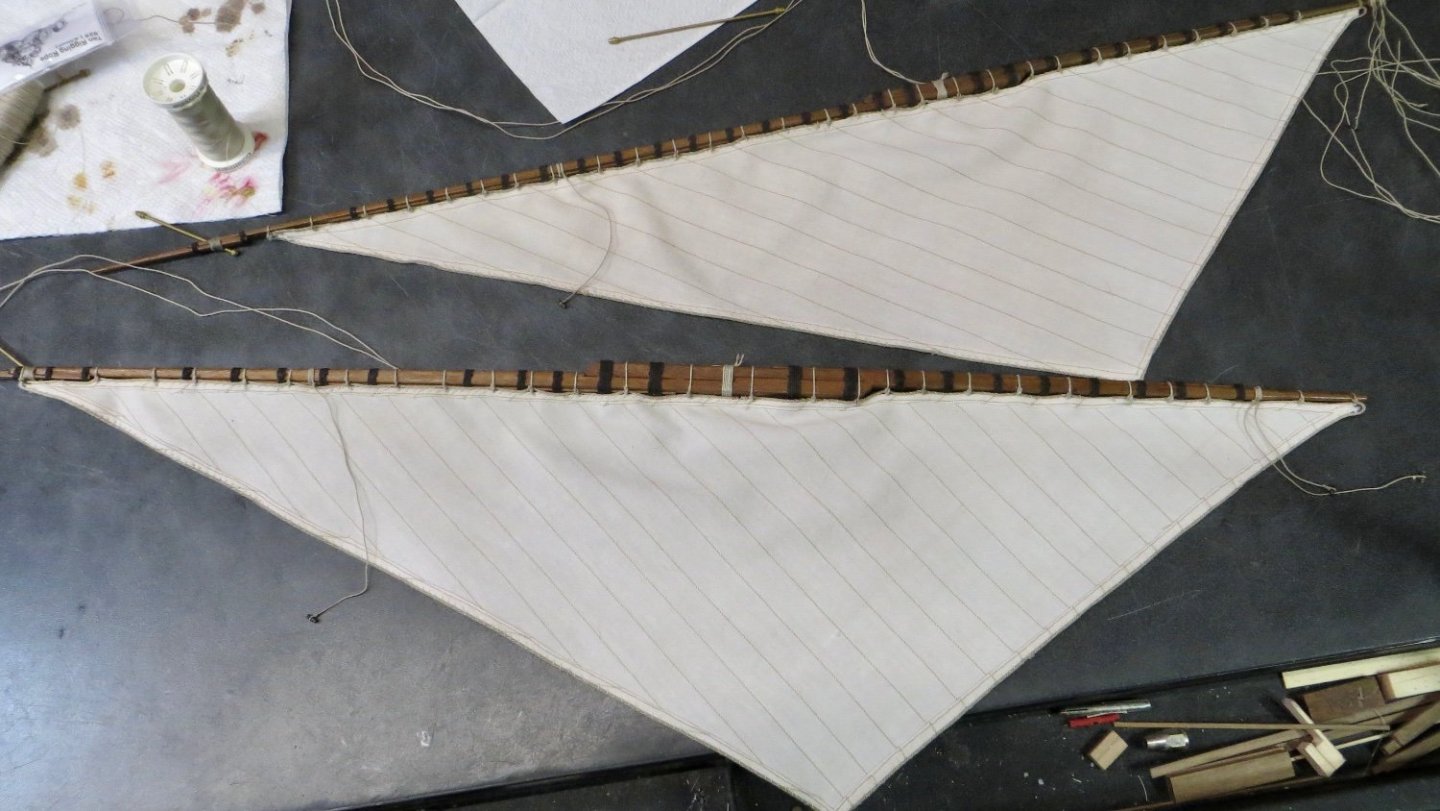
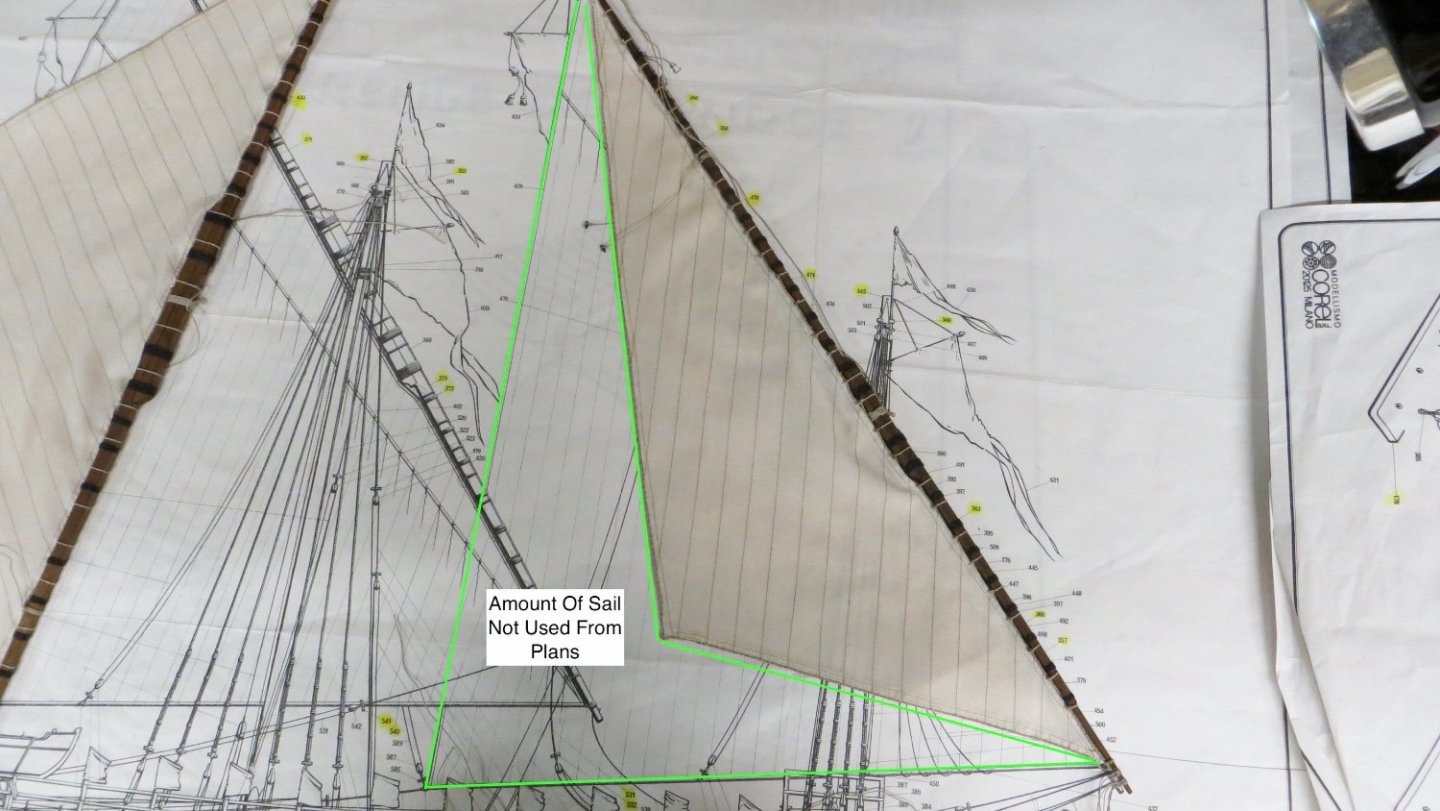
Hello, Posting some photos of the finishing up of the 2 sails. First photo shows the sewing by hand the bolt rope around the sails. Finished sails with bolt ropes attached Sails attached to the yards, ready for furling As talked about in previous posts, I shortened the width of the sails by about 50%, so there would not be too much cloth after I furled up the sails. This is the Fore Sail on top of the plan for the full sail. (Green highlights area of sail removed) View of cloth removed on the Main Sail. In hindsight, I could have removed a little more. Photo of both sails furled to yards and almost ready for mounting on masts. Adding a few rigging lines and toggles to sail before mounting to masts Next step is to start making the hanging flag pendants and mount the sail and yards to the masts, before starting work on finishing the shrouds. Thanks, Frank


- 510 replies
-
- 7
-
-

-
- reale de france
- corel
- (and 1 more)
-
Michael, I can only echo Hubac's Historians comments! Beautiful work Frank
-
Thanks for stopping by Michael! Frank
-
Thanks Tim! Yes, very curious cat. Not sure if he was more interested in me or the spinning thread bobber!! Thanks for stopping by, Frank
-
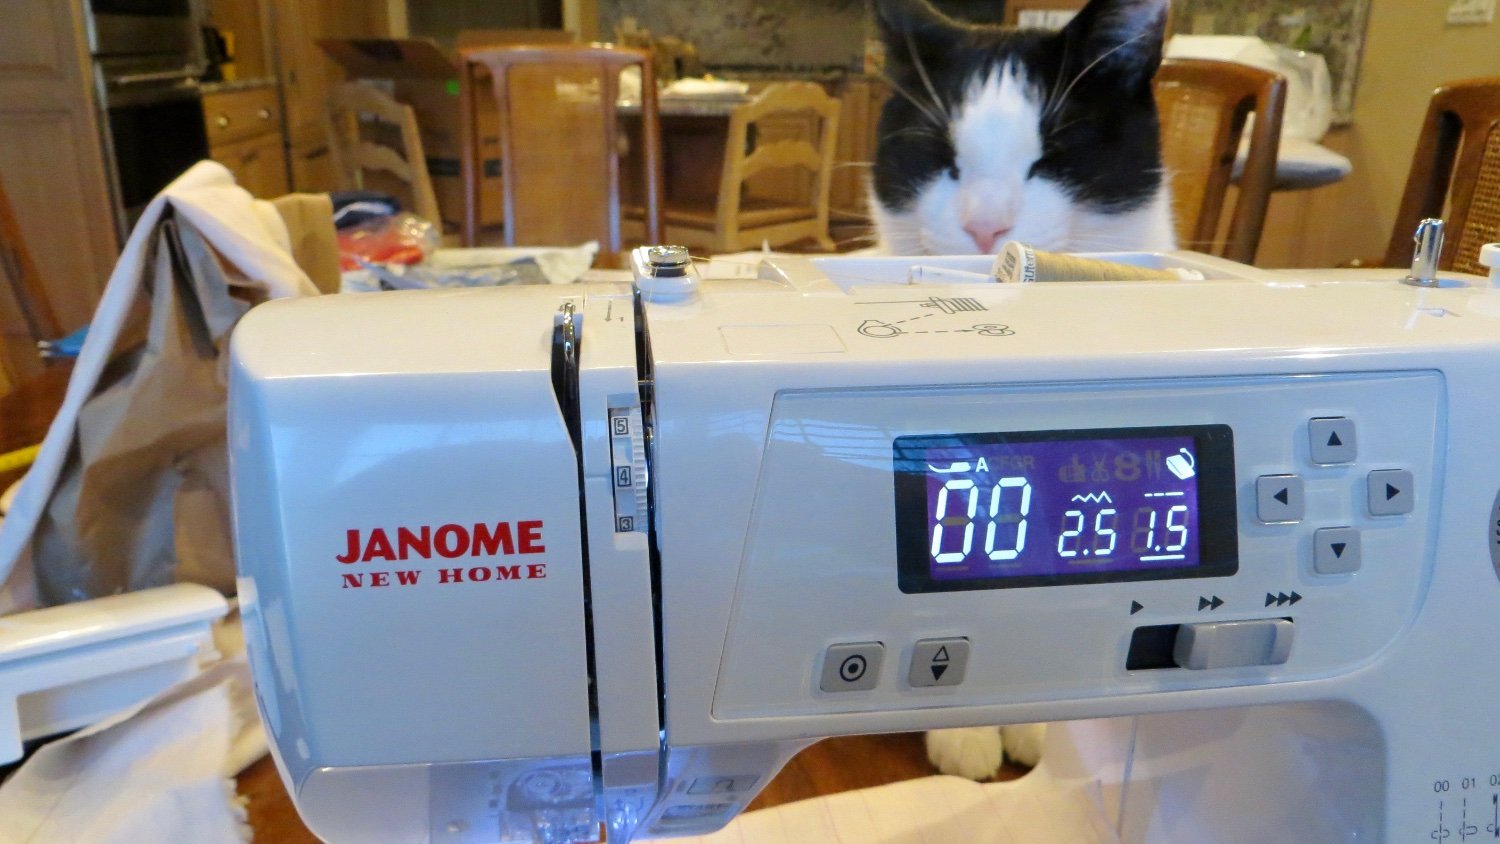
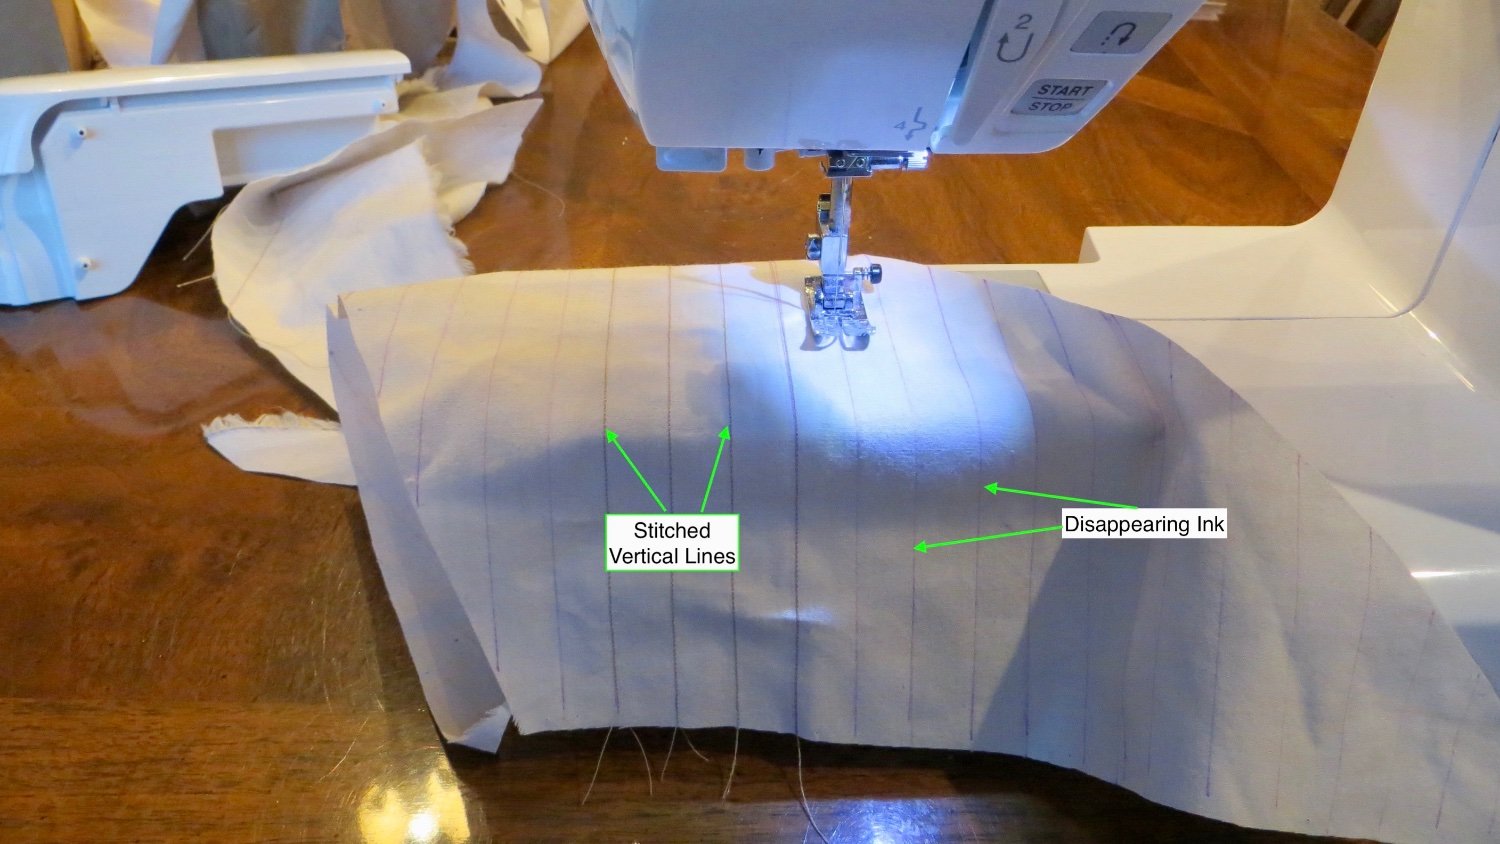
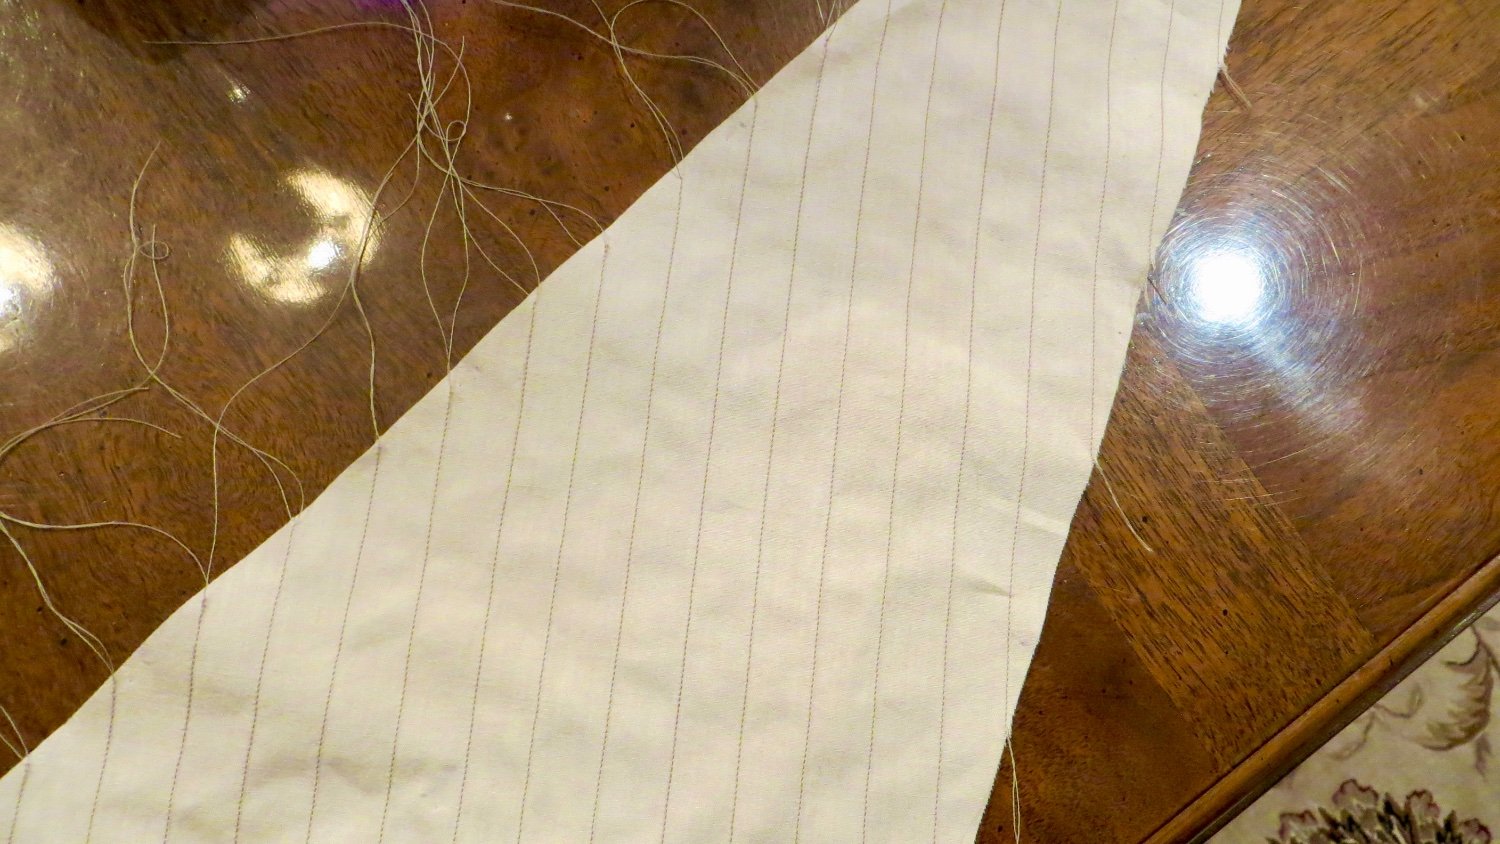
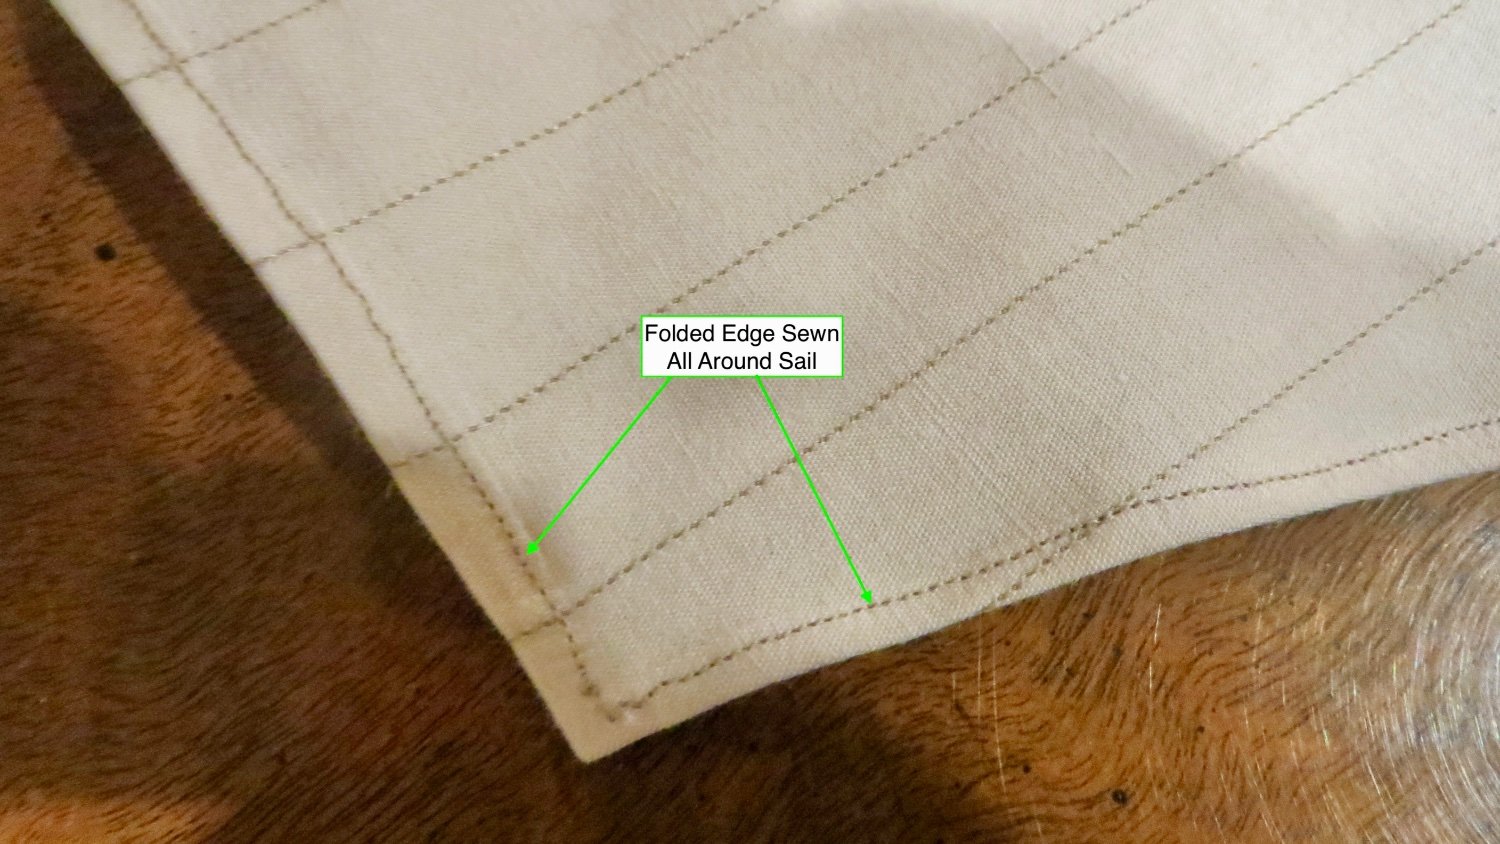
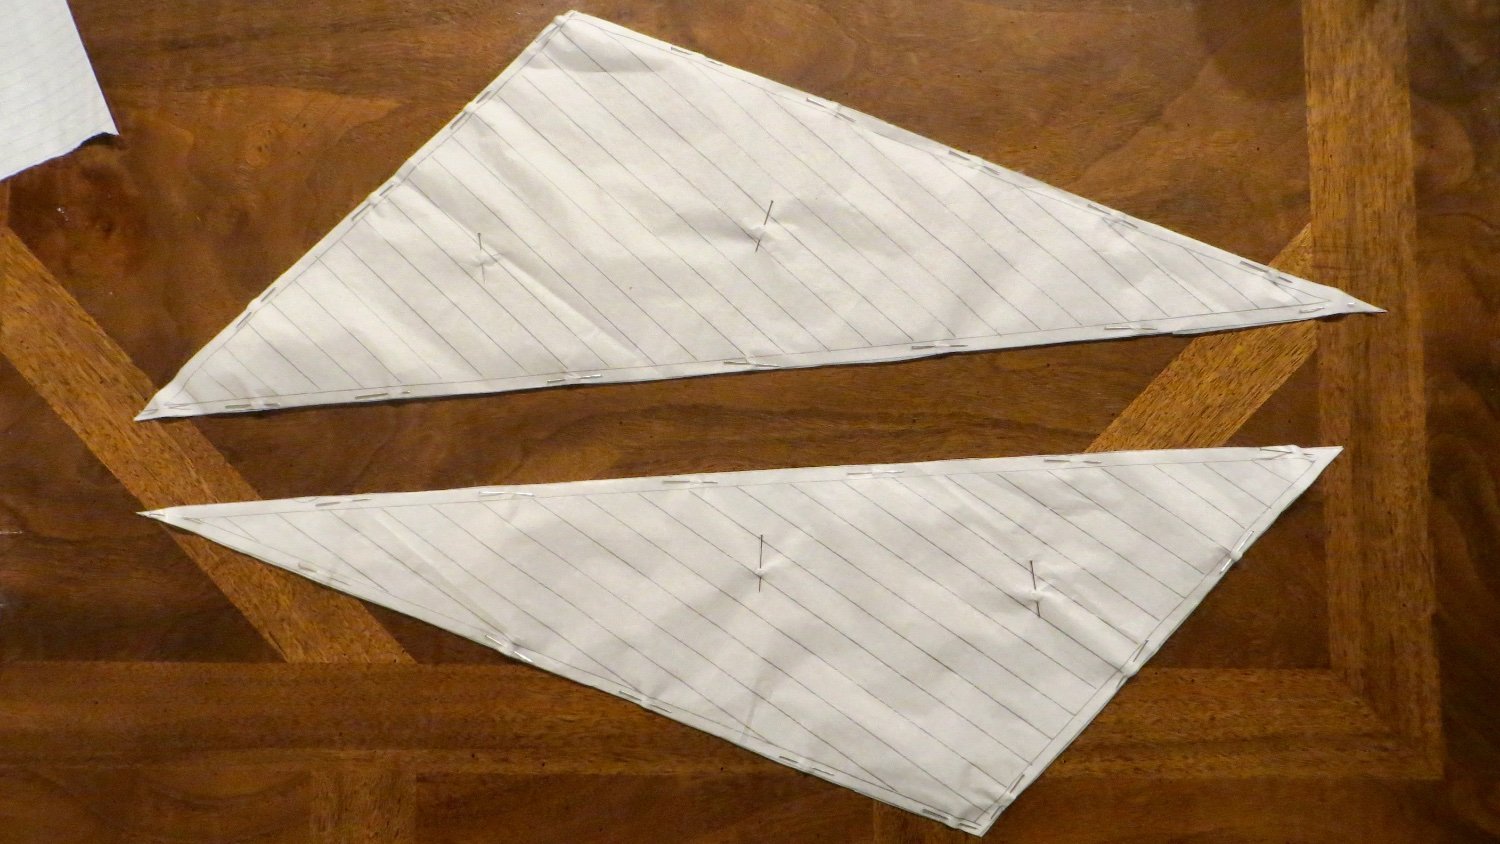
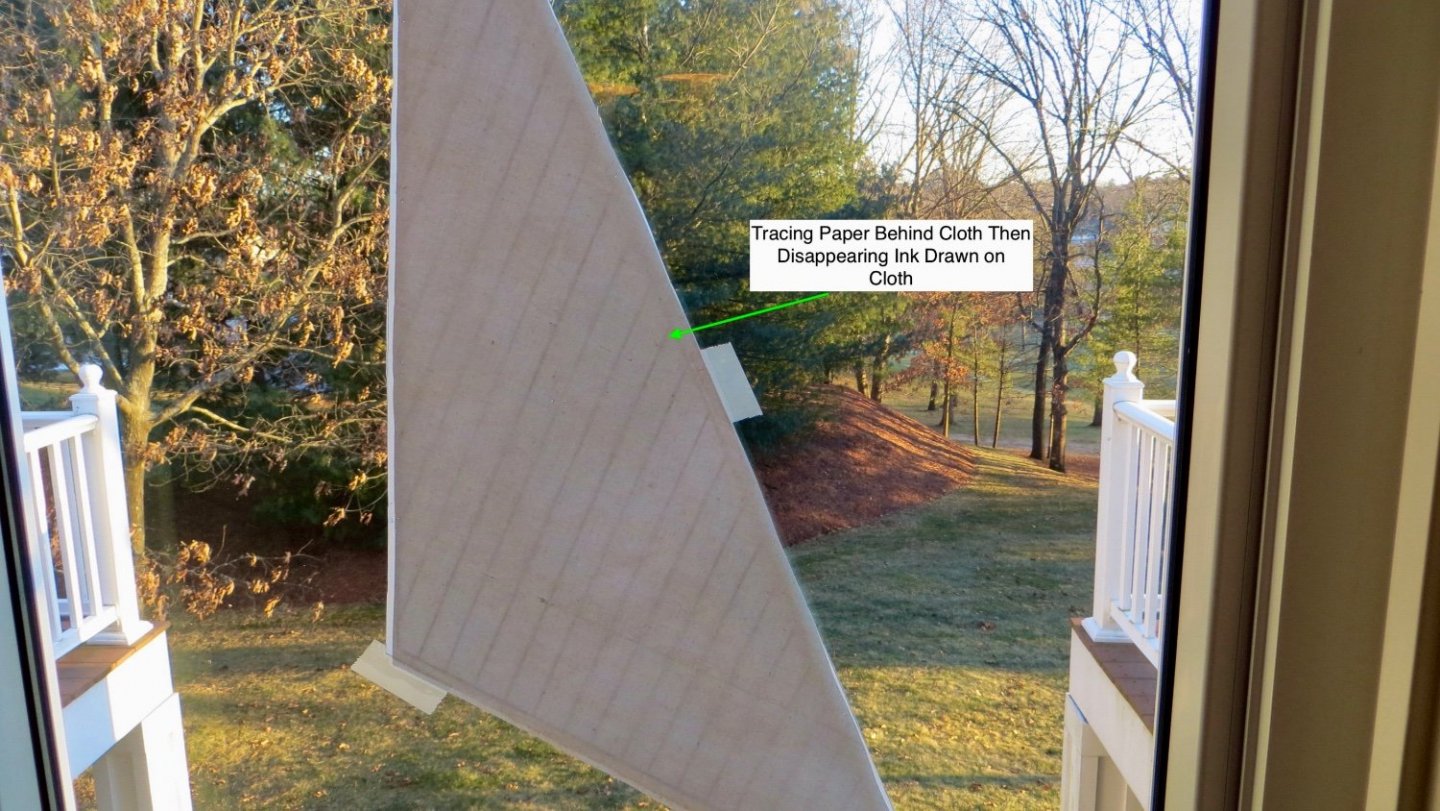
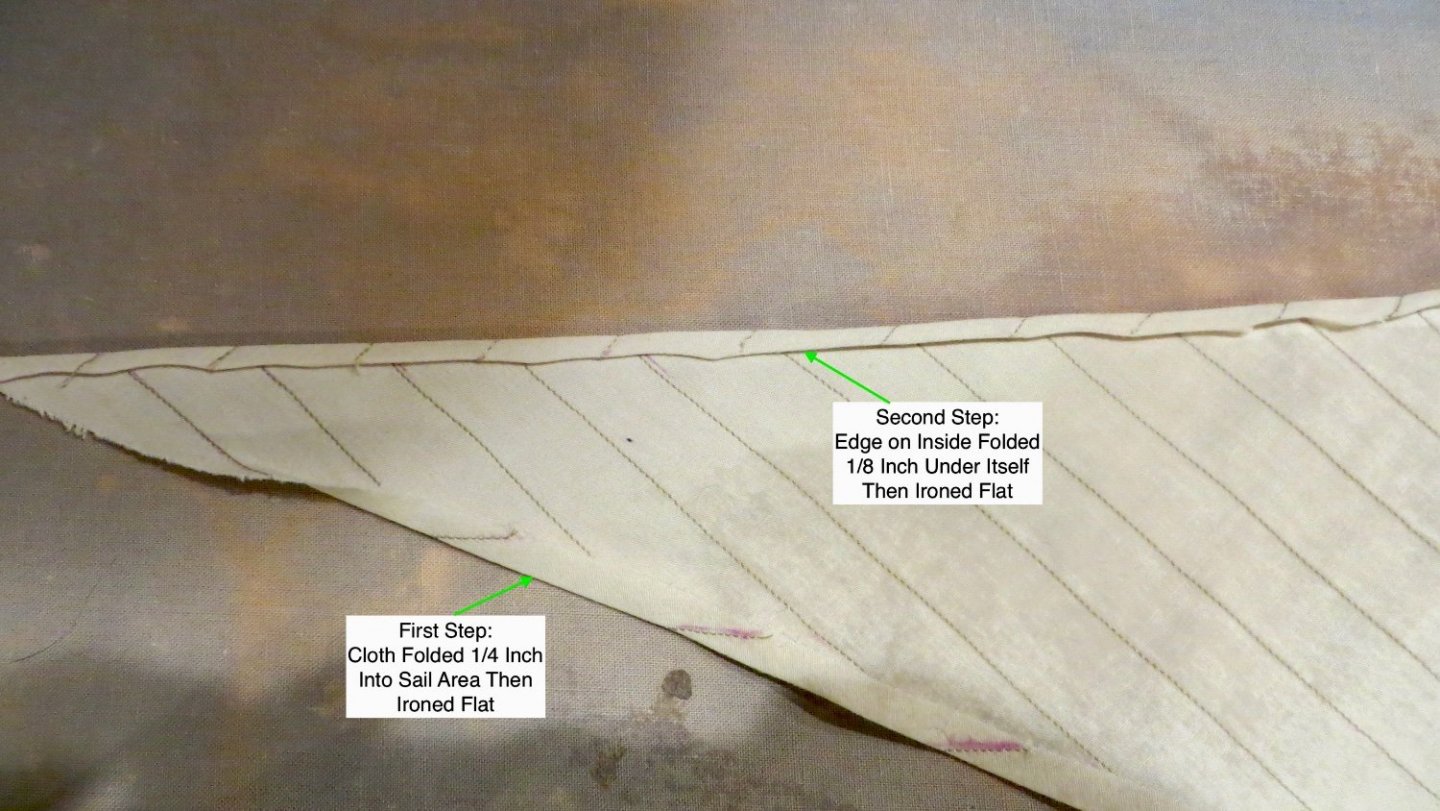
Hello, Continuing on with my sail making project. Taped the tracing paper behind the cloth (at the window so light would shine thru) and transferred the stitching lines onto the cloth using a cloth disappearing ink pen. (The pen's red ink disappears after 48 hours or earlier if dabbed with water) Under Han Solo's watchful eye, my wife helped me adjust the settings on the sewing machine and gave me a refresher course on its use. Stitched the vertical lines following the ink pattern Finished stitching lines on both Fore and main sails This next step was tricky. Around all the edges of the sail, folded the cloth 1/4 inch over onto itself and ironed flat. The next step was to take half of the folded cloth (1/8 inch) and tuck it under itself and iron flat again. Finally run a stitching pattern around the edges of the sail. On my Vasa build, for the sails that remained unfurled, I was able to place a small wire inside the edge so the sail could be bent into different shapes. Finished Main Sail and Fore Sail Next step will be to sew the bolt rope manually around the whole sail, set the sail to the yards, and furl. Thanks again to those stopping by for a look! Frank


- 510 replies
-
- 8
-
-
-
- reale de france
- corel
- (and 1 more)
-
Michael, Such a complicated build! Your patience in thinking this through is amazing. She will be a beauty when finished! Frank
-
thanks for stopping by Michael! I did not post the finished sail photos yet. Been busy. I think they came out pretty well. We both learned a lot from our Vasa builds thanks again, Frank
-
Thanks for the information Tim. I hope all is well! Frank
-
Nice job with a tight fit! I've hit and dislodged my rudder too many times. Wish I had waited to add it later. Frank
- 222 replies
-
- 2
-
-
- reale de france
- heller
- (and 1 more)
-
Thanks Michael, Working on some photos to post next week of the stitching and furling. Hopefully it will look good. As explained above, I did remove more than half of what a full sail would have looked like, reducing the amount of fabric in the furl! Thanks for chiming in! Best, Frank
- 510 replies
-
- 2
-
-
- reale de france
- corel
- (and 1 more)
-
Thanks Allen for your comments! Appreciated! I've seen posts for sailmaking with silkspan. I've never tried it, but should learn. Thanks for the tip on the booklet by D. Antscheri, also. Frank
-
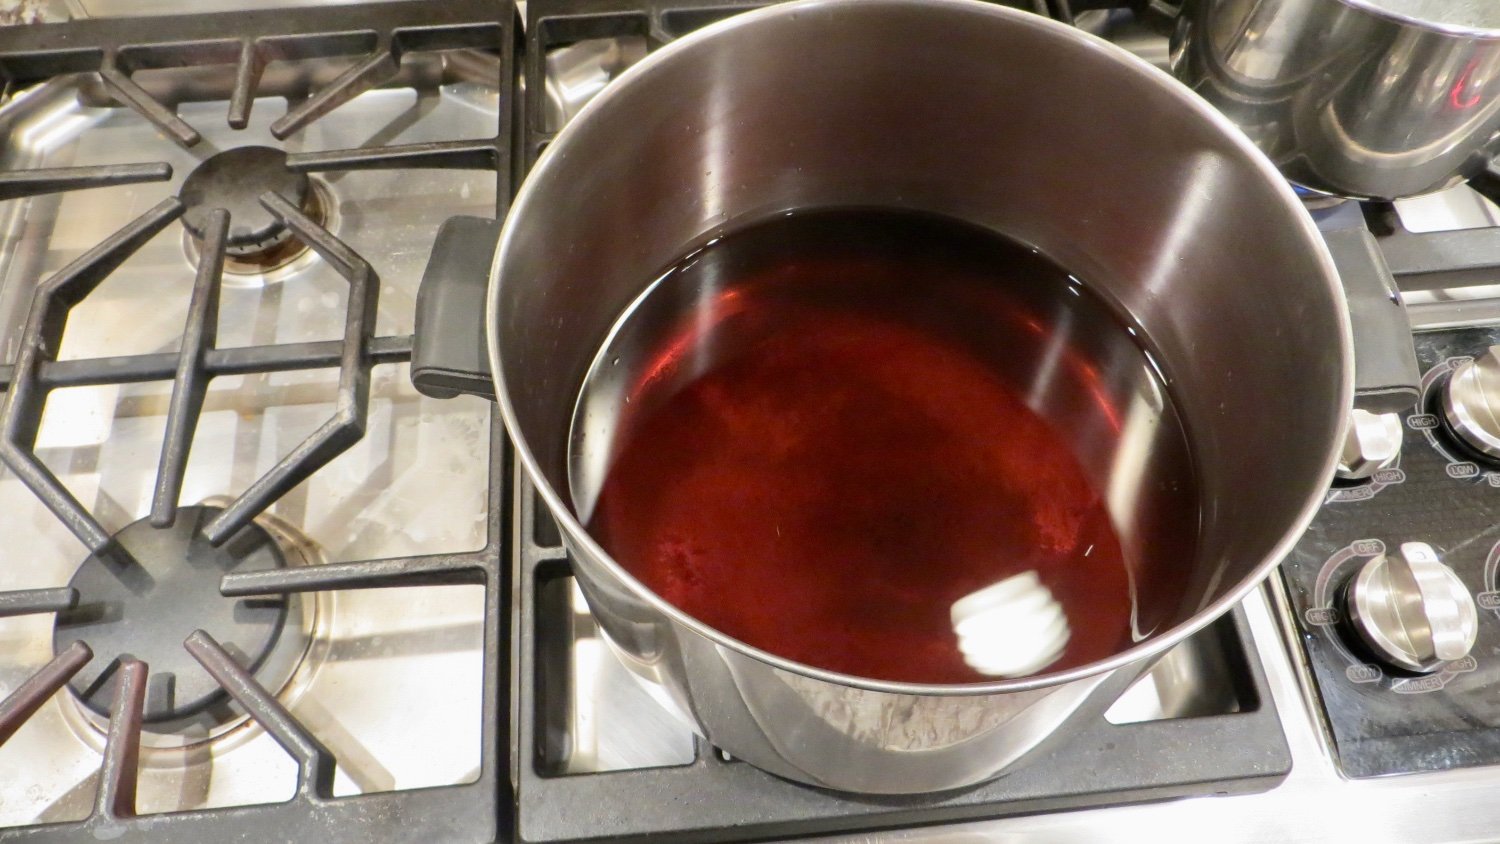
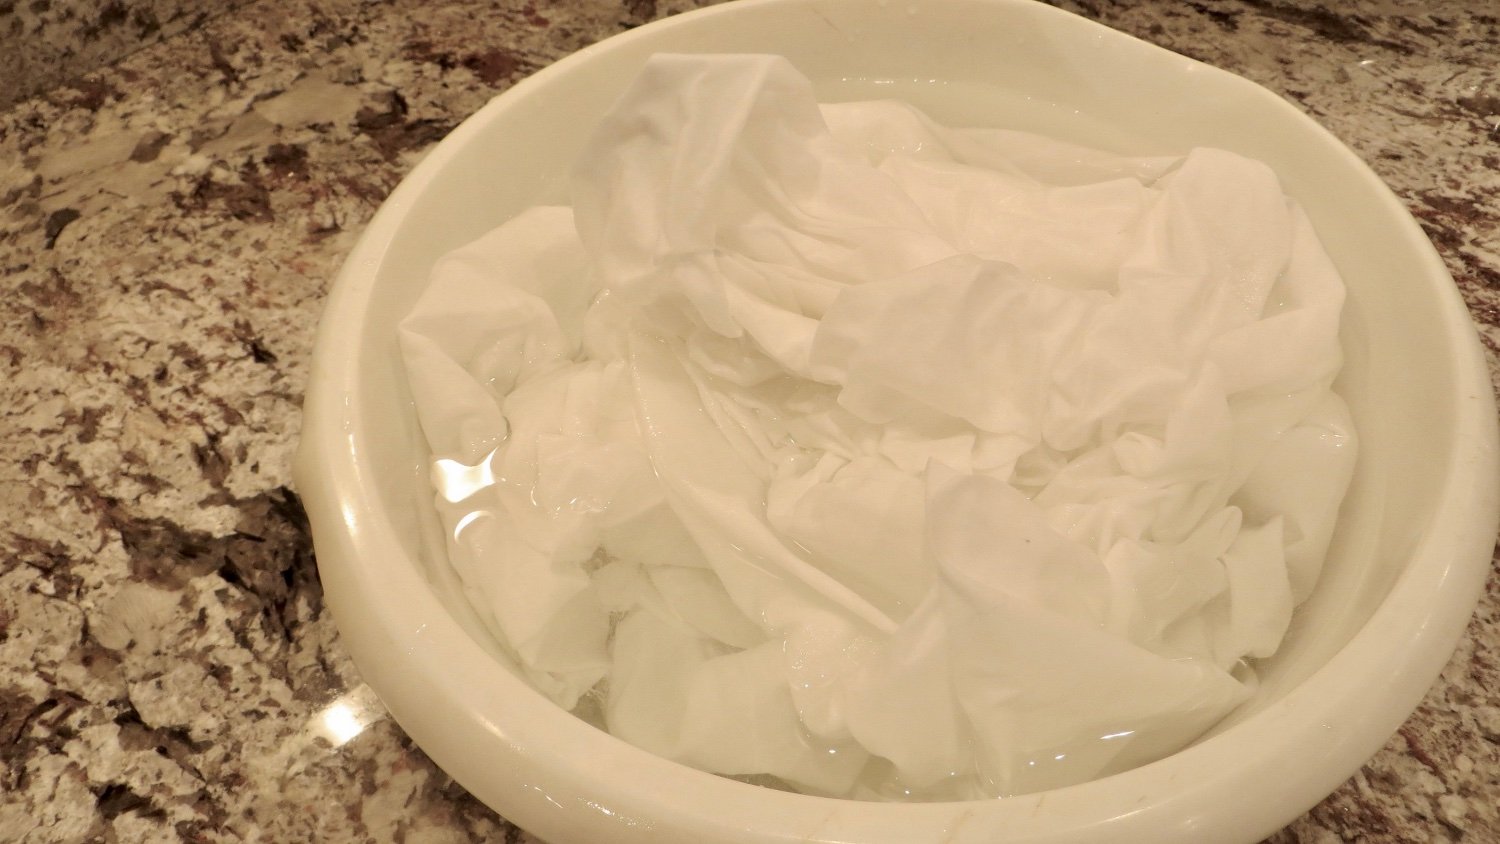
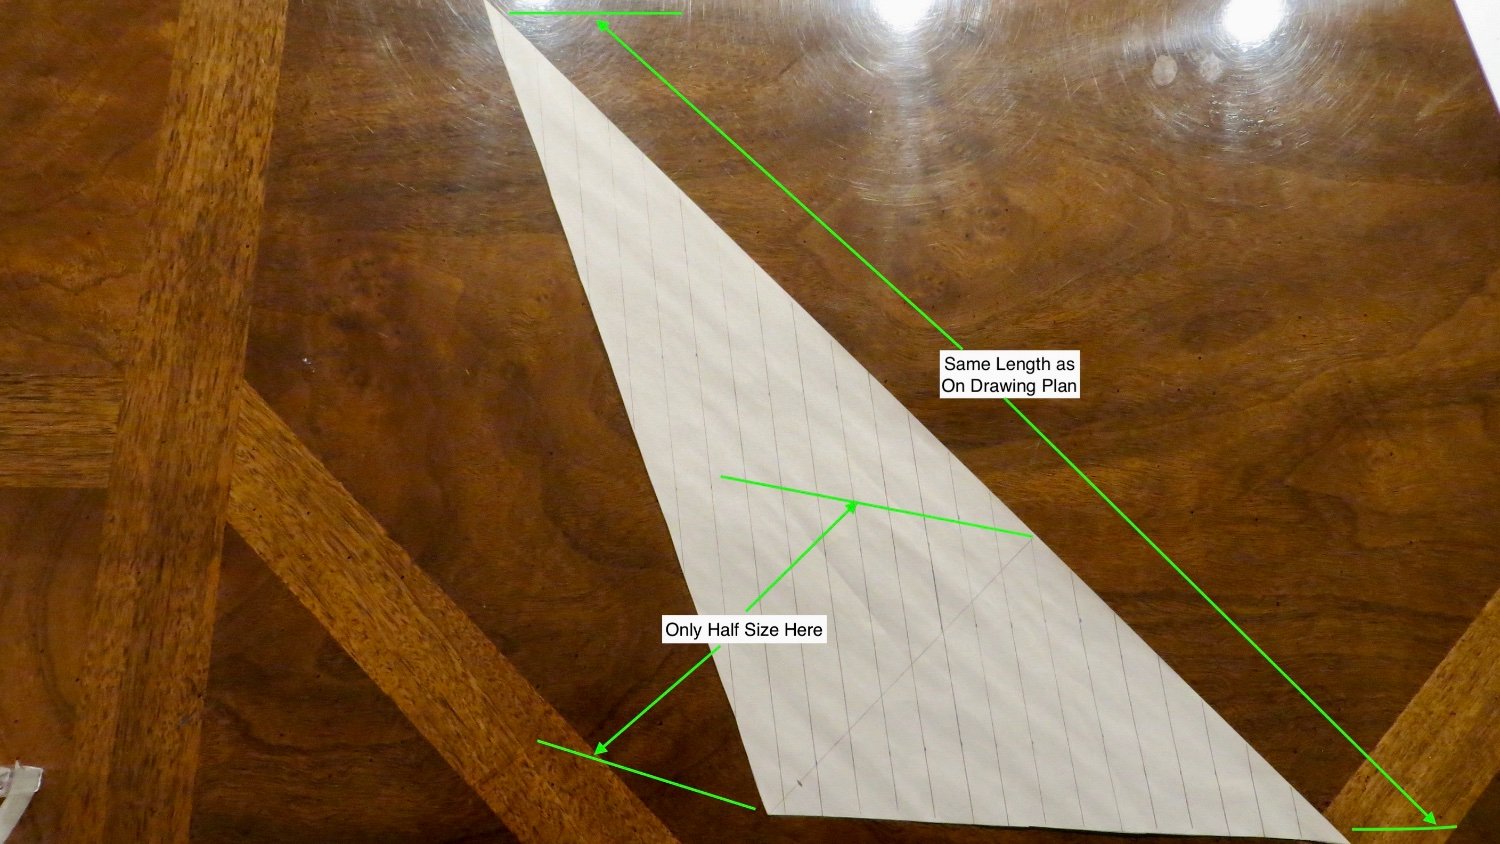
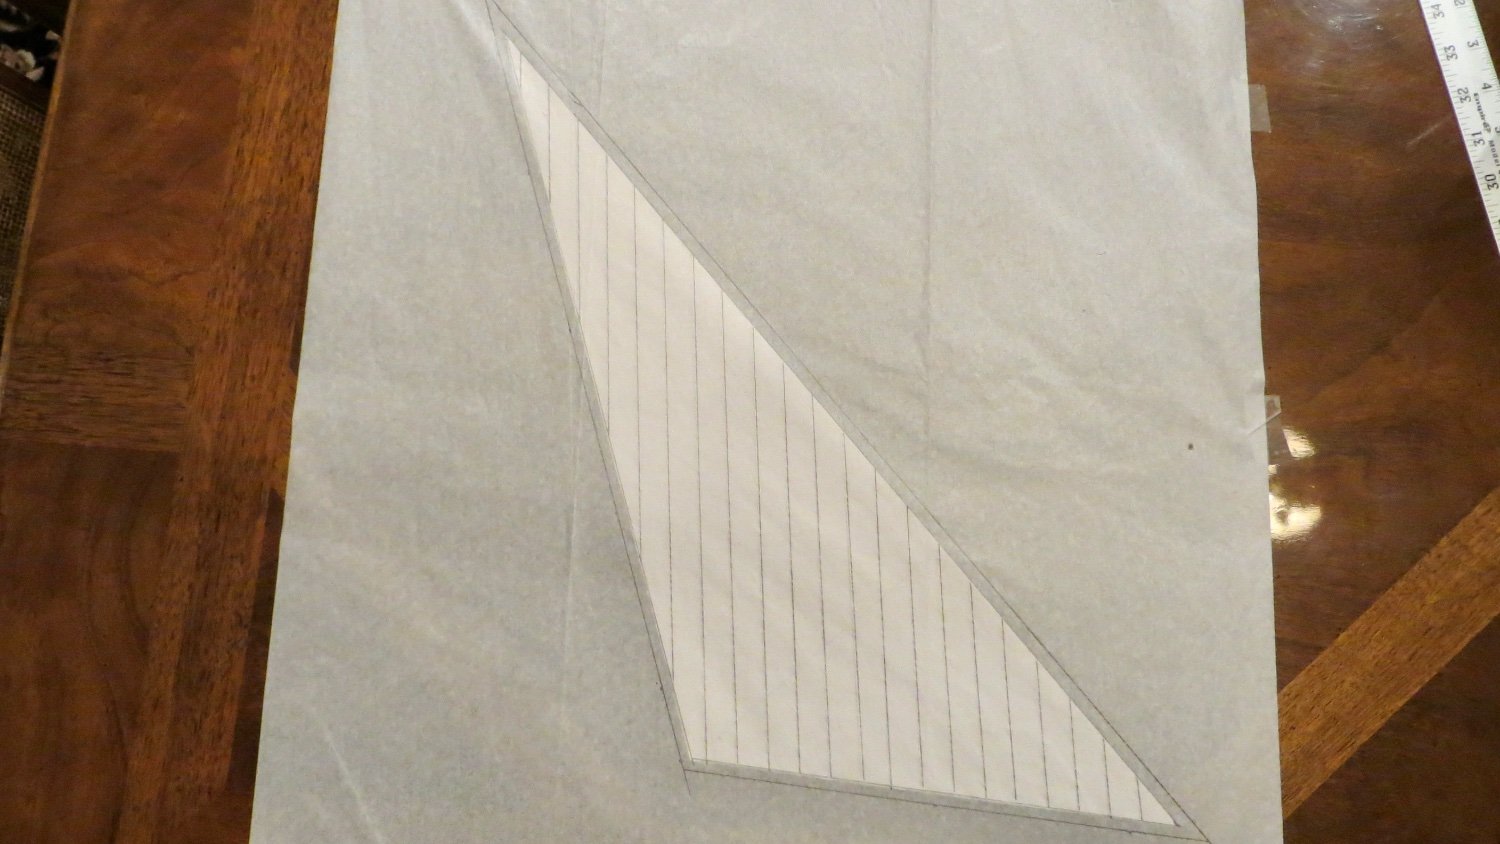
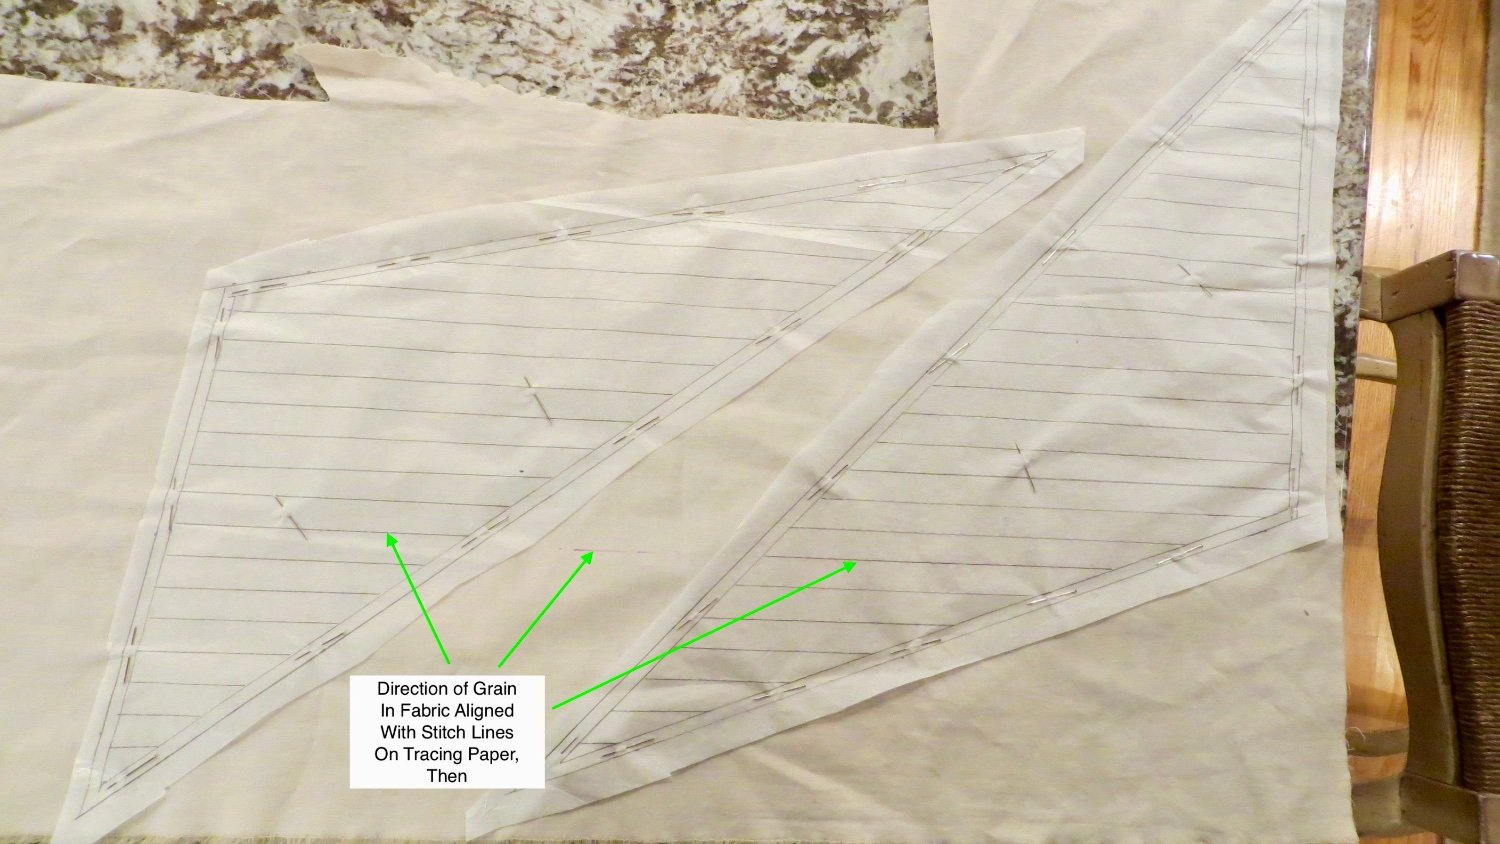
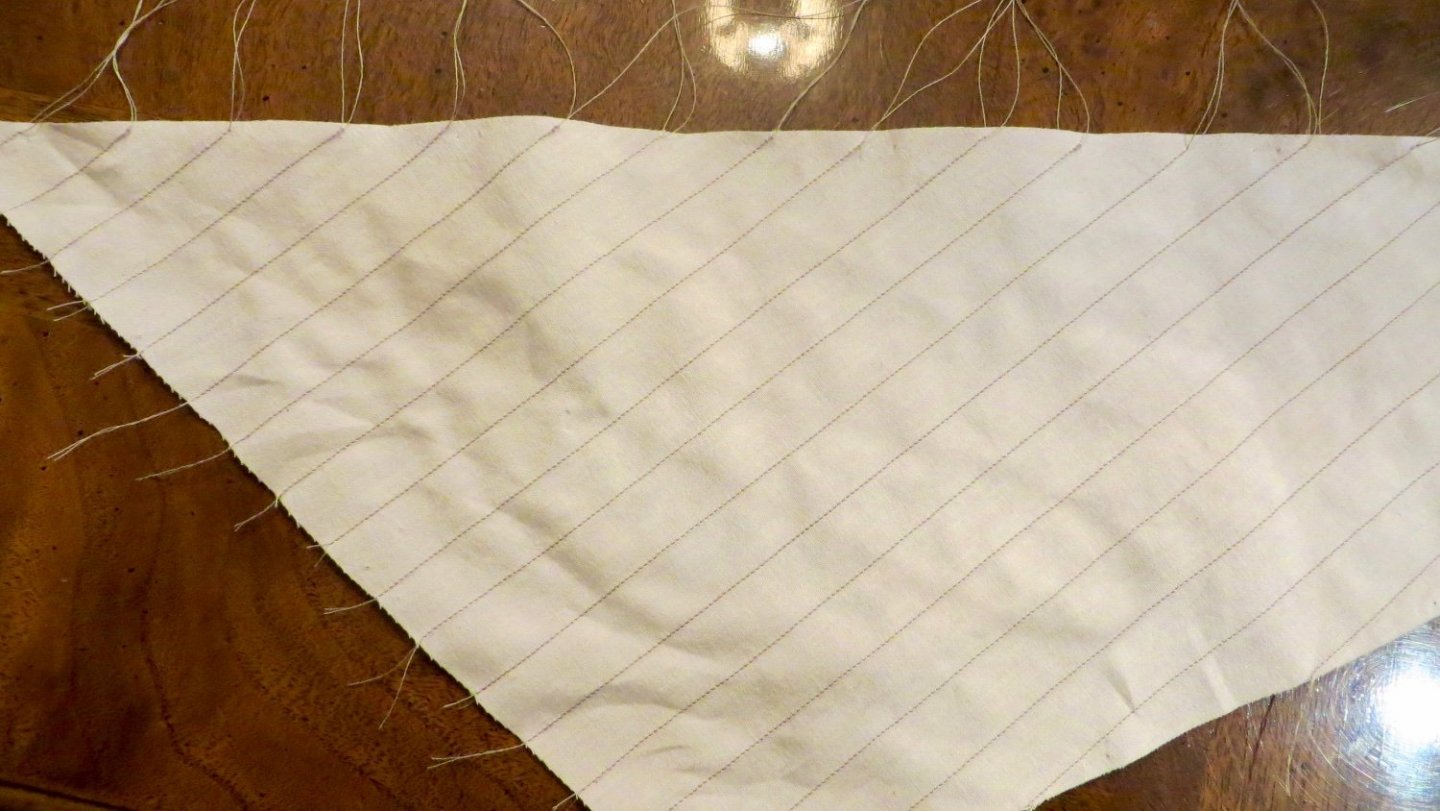
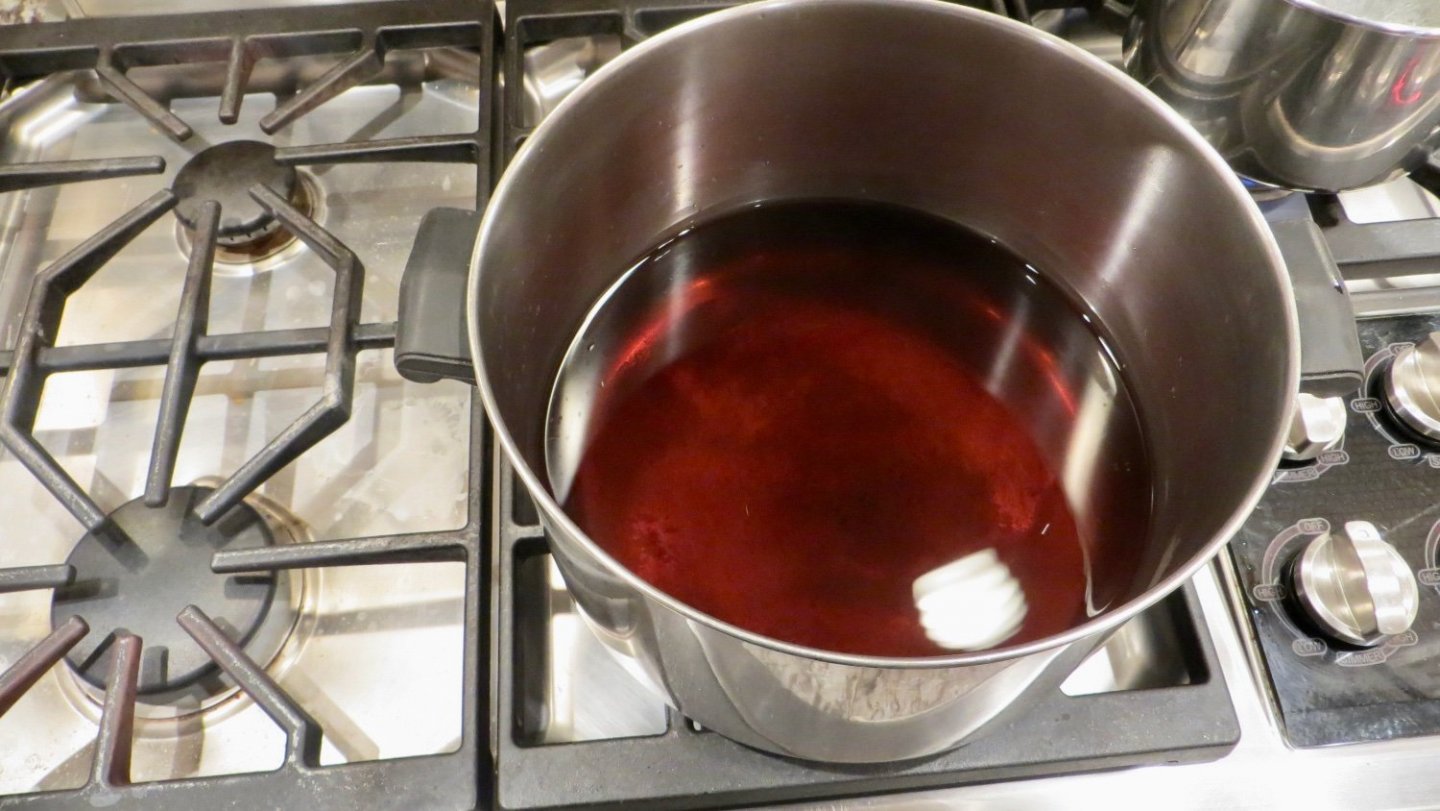
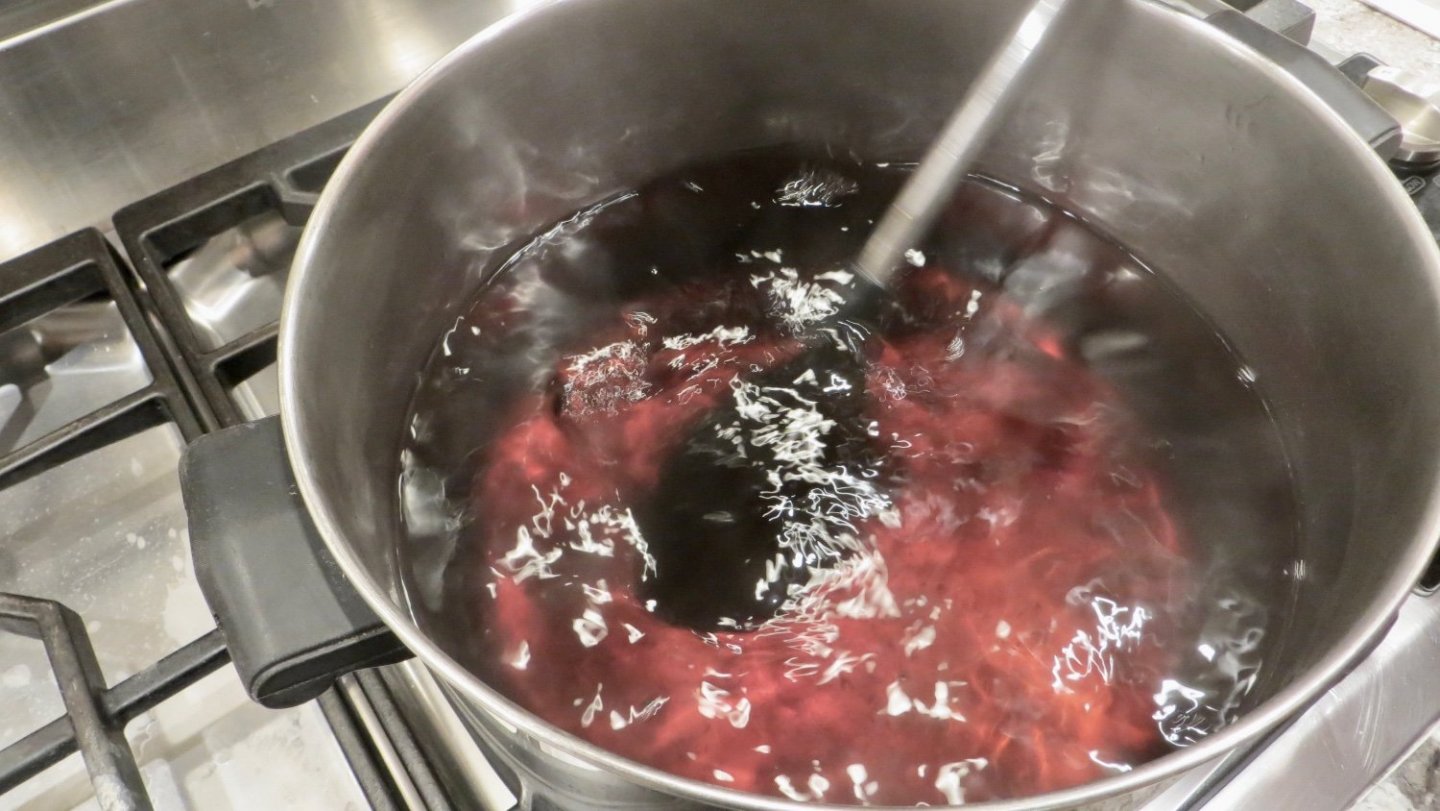
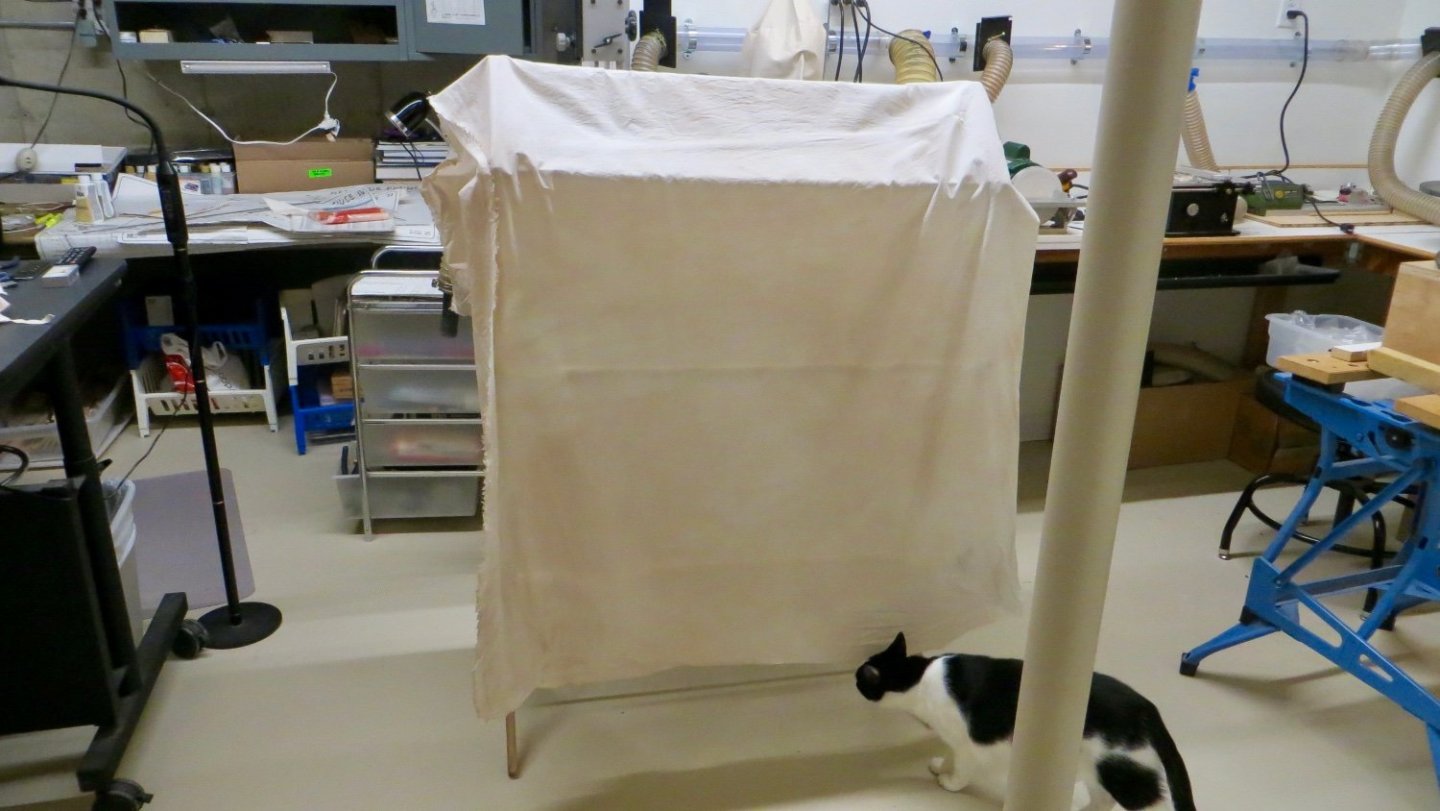
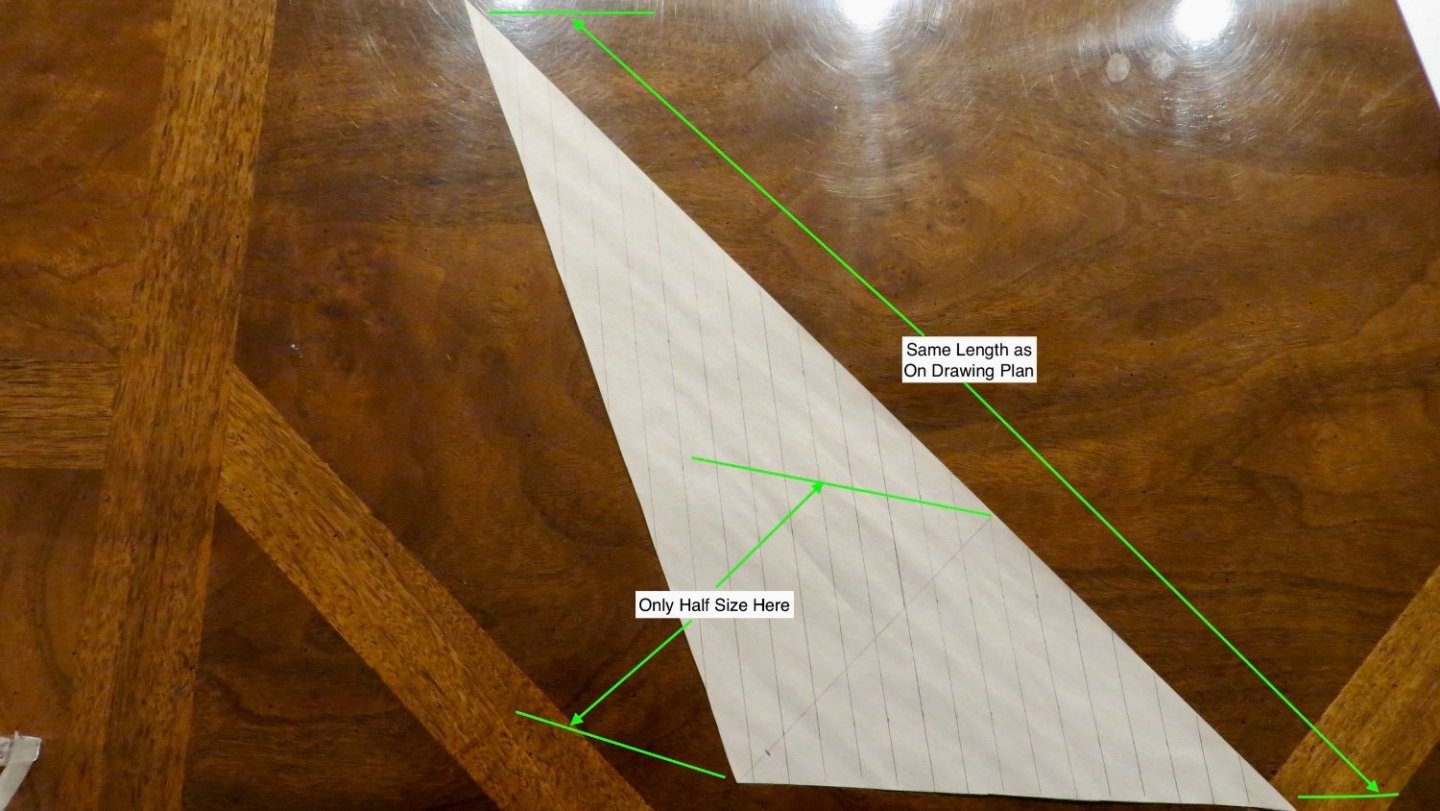
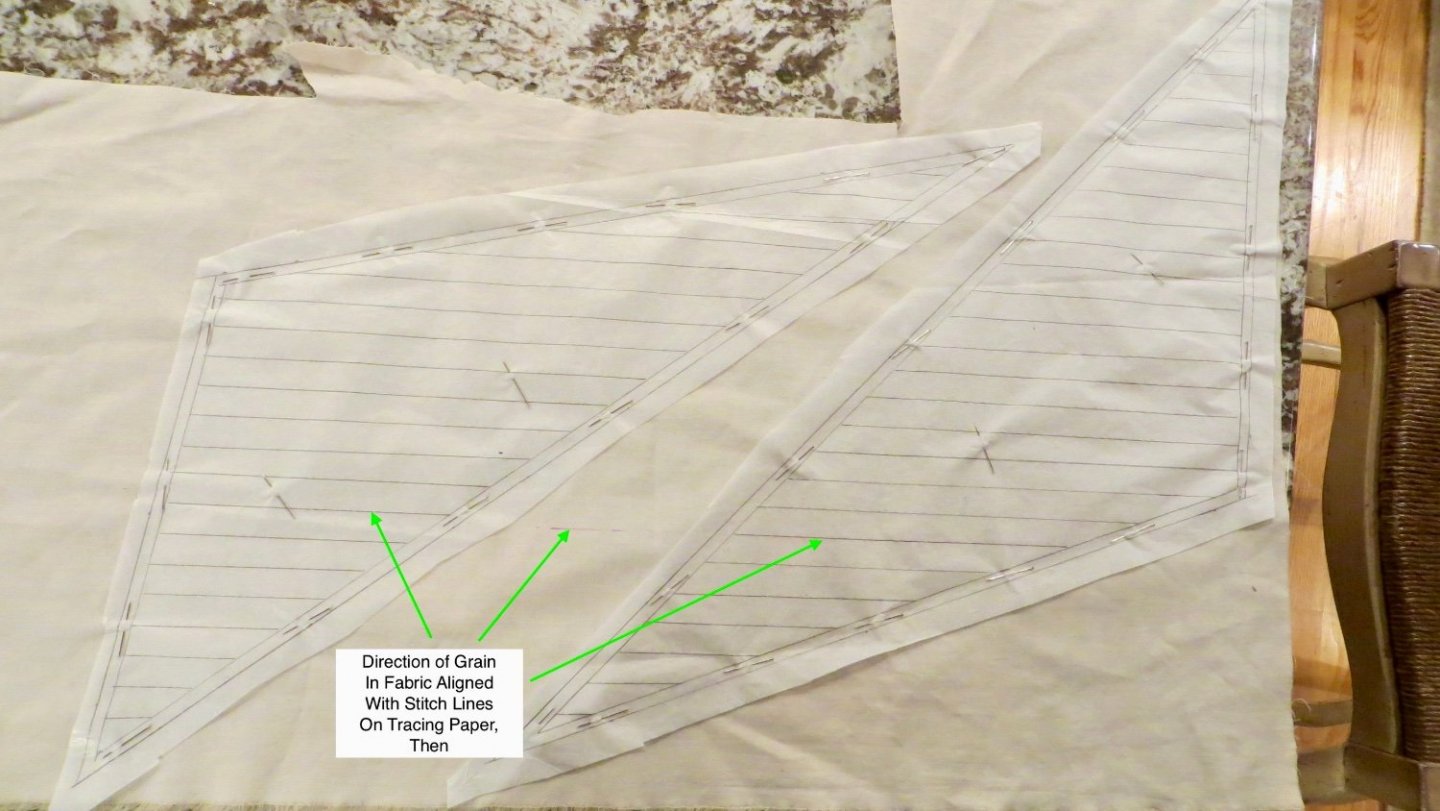
Hello, Decided not to use the kit supplied sails, but to make my own. (The kit supplied sails were too thick and bulky for me) At the Fabric store, I picked up a length of thin dense weave Muslin as my cloth of choice. First step was to mix in a pan, 8 cups of hot tap water, 8 teaspoons of Kosher Salt (Told that this would help the dye spread evenly on the cloth.) 1 Teaspoon or the RIT Tan dye and 1 Teaspoon of the RIT Taupe dye. Mixed this up in a 2 gallon pot and then added another 8 cups of almost boiling hot water. (Don't remember where I got these instructions, but they worked well on my Vasa build ) Mixture In Pot First wet the entire cloth and wring out so cloth will dye evenly. Then loosely bunched up the cloth and added to the dye bath, stirring cloth, for about 60 seconds Removed cloth from bath, and unfolded into flat sheet to let hang dry overnight (Han Solo checking out my cloth, hopefully meeting his approval!!) While cloth was drying, I placed some construction paper over the plans and drew out the sail. As shown in the next photo, I had to keep the length the same as the plan, so it would fit correctly on the yards. However, I took out about half of the distance from the yard end to the end point (See photo). I did this so when the sail is furled on the yard, there would not be too much material. In hindsight I could of made it even smaller. Later, I will take a photo of the finished sails over the plans, so the amount of material taken off can be seen. Took the construction paper and set it behind some tracing paper. Re-traced the sail lines onto the tracing paper adding a 1/4 inch all around for later adding in a double fold along the edges of the sail. (Main Sail) (Fore Sail) Cutout a section of the dyed cloth and pinned the tracing paper to the cloth, making sure, as best as possible, that the direction of the grain in the fabric aligned in the same direction as where the stitching lines will go. (Trusting my wife's instructions on this step!) Sail cloth cutout to same shapes as the tracing paper Now ready to pull out the sewing machine and have my wife give me a refresher course. Last time I used the machine, was a few years back, making the sails for the Vasa. Thanks for visiting, Frank


- 510 replies
-
- 6
-
-
- reale de france
- corel
- (and 1 more)
-
Michael, Wow! Great tutorial! Thanks for the detailed instructions on making the Tassels. Appreciated. I will definitely give it a shot later in my build!! Thanks again, Frank
-
Welcome Back! The tassels look real nice! Did they come with your kit or did you make them? My Corel plans call for them, but they were not included in my kit!! Thanks, Frank