Techtonic Posted June 1, 2021 Author #61 Posted June 1, 2021 (edited) Another photo I thought might be useful for other builders of this particular ship - what was left of the kit at the end: I thought this might help plan where you need to be careful and frugal with material. There is a huge amount of spare 2x5 limewood - I'd say pretty much enough to plank a second Beagle. There's also a large amount of spare sapelli veneer and a decent amount of sycamore veneer. Relatively there is a lot of spare: 2x2 sapelli 4x4 sapelli 6mm dowel 1x5 limewood (though much of this is needed to make up for the large shortage of 1x3 limewood) 0.8mm raw thread 0.15mm brown thread (only used for the ratlines) Brass pins There is very little remaining of: All dowel sizes except 6mm 2x2 limewood (but the excess 2x2 sapelli can be used for the painted stringers if needed) 3x3mm sapelli 0.5mm brown thread The 0.15mm raw thread was quite unbelievable for me. There is five (I think) reals of it. I was getting nervous towards the end as I saw my last real dwindling. I finished the last flag pole with literally only and inch left over - just enough to tie the knot! Now During the long lines of running rigging I had over estimated the lengths of most lines by 4 to 10 inches to be on the safe side. So all the rope coils that I added at the end were made out of the excess offcuts from previous lines that I rummaged for in by garbage can! Shortages that I had to buy substitutes for: Not enough eye bolts. Don't be deceived by the eye bolts in the picture - they are what is left after I bought an additional pack of 60 and also made maybe 10 or 20 from scraps of wire while I was waiting for them to be shipped. This seems to be a common shortage that other builders have reported. 1mm brass wire, I was maybe around 18" short of what is needed. Again this seems to be a common issue. Chain. I suspect the kit is supposed to have two lengths of chain, mine only came with one. Others have not reported a shortage of chain so it may be a one off with my kit. 1x3mm limewood. Though there is a lot of excess 1x5mm limewood spare, so I split that down the middle and used it to make up the shortage. Despite the shortages of some items (which are reasonably cheap to get replacements) I would highly recommend this kit for all levels of builders. For beginners, like me, only do this kit if you have patience and enjoy a real challenge, and understand it is going to take about 300 hours to complete. The OcCre video tutorials on YouTube are excellent, as a first timer I'm not sure I could have built this without them. But with them it really does make this an ideal kit for the ambitious newbie. You will learn a huge amount about many aspects of model ship building while completing this kit. Edited June 1, 2021 by Techtonic LucienL, DonSangria, Dean77 and 3 others 5 1 Complete: OcCre HMS Beagle 1:60 Amati Victory Models HMS Pegasus 1:64 Amati Victory Models HMS Vanguard 1:72 In Progress:
DonSangria Posted June 1, 2021 #62 Posted June 1, 2021 Congratulations! Looks really nice! Also thank you for the tipps for others who build this kit like me. The leftover picture is a nice help to give me an idea where the shortages lie. how many blocks do you have left? Techtonic 1 Current build: HMS Sphinx 1:64 (Vanguard Models) Finished: HMS Beagle 1:60 (Occre)
Techtonic Posted June 1, 2021 Author #63 Posted June 1, 2021 5 minutes ago, DonSangria said: Congratulations! Looks really nice! Also thank you for the tipps for others who build this kit like me. The leftover picture is a nice help to give me an idea where the shortages lie. how many blocks do you have left? Thanks! 8 double blocks 40+ single blocks 6 large dead eyes 10 small dead eyes 11 belaying pins 9 parrels 1 10mm brass ring 2 5mm brass ring 7 3mmm brass rings (though I used more on the actual build than the instructions show) DonSangria 1 Complete: OcCre HMS Beagle 1:60 Amati Victory Models HMS Pegasus 1:64 Amati Victory Models HMS Vanguard 1:72 In Progress:
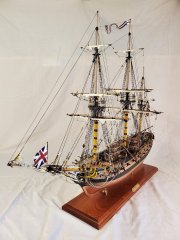
Techtonic Posted June 12, 2021 Author #64 Posted June 12, 2021 (edited) As promised before, here are some final images of the Beagle in her final resting place inside the Old Modern Handicrafts P006 display case. I also added a brass name plaque to the stand. I got the display case directly from ojcommerce.com and I can highly recommend them. The case was well over $100 cheaper direct from them than anywhere else I could find it (even their own store on Amazon), and it arrived within a week of placing the order. It comes ready built in a huge crated box: The case is a perfect size for the ship and really shows it off from all angles: You might just be able to spot one of my other hobbies in the pics, lol. Also, I decided on my next build - I just ordered the Amati Victory Models HMS Pegasus. I figured this would be a reasonable step up in size and difficulty for my second build, and I love the decorative look of the ship. It doesn't come with sails but I'm very tempted to add some fully furled sails made with silkspan. It'll be a few months before I start the build, which will give me plenty of time to research up on it. Edited June 12, 2021 by Techtonic Robp1025, usedtosail, LucienL and 5 others 7 1 Complete: OcCre HMS Beagle 1:60 Amati Victory Models HMS Pegasus 1:64 Amati Victory Models HMS Vanguard 1:72 In Progress:
Cathead Posted June 12, 2021 #65 Posted June 12, 2021 So I take it you're a Star Trek fan? The model looks great in your case, nice choice. Tim Holt and Techtonic 1 1 Eric Current project: MK&T railroad along the Missouri River (including steamboat) Missouri River craft (scratchbuilt): 1893 steamboat Peerless; 1853 steamboat Arabia; 1865 steamboat Bertrand; Lewis & Clark barge; keelboat; 1876 steamboat Far West; Nautical builds (kits): USS Cairo; NRG capstan project; NRG half-hull; Viking longship; US revenue cutter; 18th century longboat; Bounty launch
Robp1025 Posted June 12, 2021 #66 Posted June 12, 2021 4 hours ago, Cathead said: So I take it you're a Star Trek fan? The model looks great in your case, nice choice. Oh no dont open this forum post to the star trek/star wars confrontation lol. It's all starwars models in the back. Techtonic 1
Cathead Posted June 12, 2021 #67 Posted June 12, 2021 Sorry, I have a very dry sense of humor. Hope it was clear that was a joke. I'm a fan of both. Back on topic, I'm now looking into one of those cases for me. Robp1025 and Techtonic 2 Eric Current project: MK&T railroad along the Missouri River (including steamboat) Missouri River craft (scratchbuilt): 1893 steamboat Peerless; 1853 steamboat Arabia; 1865 steamboat Bertrand; Lewis & Clark barge; keelboat; 1876 steamboat Far West; Nautical builds (kits): USS Cairo; NRG capstan project; NRG half-hull; Viking longship; US revenue cutter; 18th century longboat; Bounty launch
Techtonic Posted June 13, 2021 Author #68 Posted June 13, 2021 13 hours ago, Cathead said: So I take it you're a Star Trek fan? The model looks great in your case, nice choice. While I like the Star Wars movies I'm not as fanatical as the display might suggest. I just like building the large Lego starships that are aimed at the adult builder. Problem is they only take between a day and a couple of weeks each to build and now I've run out of room. So I needed to move to a hobby where it takes a lot longer to build each model - and wooden model ship building certainly meets that criteria! It's also considerably more of a challenge - and I relish a challenge! Cathead and Robp1025 2 Complete: OcCre HMS Beagle 1:60 Amati Victory Models HMS Pegasus 1:64 Amati Victory Models HMS Vanguard 1:72 In Progress:
GrandpaPhil Posted September 9, 2021 #69 Posted September 9, 2021 Congratulations! Well done! Techtonic 1 Building: 1:64 HMS Revenge (Victory Models plans) 1:50 De Zeven Provincien (Based on Seahorse kit)
PapaJohn Posted July 1, 2022 #70 Posted July 1, 2022 On 4/26/2021 at 4:10 PM, Techtonic said: For the mizzen mast I spent about 10 minutes looking for part mt113. I couldn't figure out what it was. Then I finally realized it is one of the rings like the ones that go around the mast holes in the deck. You just have to cut one in half Thanks for explaining that! I’ve been trying to solve the mystery of mt113 for days. clearway and Techtonic 1 1
Linda DOBLE Posted July 25, 2022 #71 Posted July 25, 2022 On 4/11/2021 at 1:43 PM, Techtonic said: Thought I'd throw my hat in to the growing number of logs for this ship - I guess the more the merrier! I'm a little late to start a log - I started building in late February doing 2-3hrs work most days. I would guess I've put in the best part of 100hrs so far. This is my very first wood model ship. I've done a lot of Metal Earth type models over the past year or so, including a few ships such as PieceCool's very decorative Wind Breaker and Black Pearl This has given me a lot of experience at working at a small scale so I hoped this skill-set would help with building a wooden ship. So decided to opt for an ambitious first build of the Beagle. The scientific significance of ship was also very appealing to me. This choice was also heavily swayed by the availability of OcCre's YouTube step by step build videos. And these have indeed turned out to be an invaluable resource. Here's another excellent online resource I found for visualizing the ship: https://www.cloudtour.tv/beagle/. There are some differences in the OcCre ship compared to the virtual model in the details - but the general layout out of both versions are very similar. I only have a few pics from early in the build, just after the first planking. As you can see in these pics I was concerned about being able to remove the pins after the glue had dried. So I made myself a whole bunch of small rectangular washers from cereal box cardboard. These worked really well - you could push the pins in all the way with a pin-pusher so it holds the wood down securely. Then when dry, the pins could be easily removed by sliding a flush cutter under the cardboard washer and pulling out. You'll also see in these pics I opted to go for the more traditional way of tapering the planks along the whole length rather than the way OcCre suggest of using full width planks then inserting triangular sections to fill the gaps. I'm not sure there is any advantage to my way over OcCre's way other than it may have given me more useful experience for future builds. For bending the planks I used one of these: https://www.agesofsail.com/ecommerce/amati-form-a-strip-am7381.html. In my research I've seen many people say not to use these - but I found them really useful and made bending the planks easy and quick. The only thing is you can't use them if the inside of the bend is going to end up visible as you end up with a bunch of indentations on the inside. For the deck planking and second hull planking I highly recommend the way they do it in the OcCre videos using contact cement. I was a bit nervous about using that method as I was afraid that as soon as I attached the plank it would adhere and would not be moveable to adjust and close gaps. But this is not the case - it does not adhere properly until you apply firm pressure, so it is easy to adjust just right, then when a section is complete just apply firm pressure with a rounded wooden object and everything will stick firmly. I used DAP Weldwood Contact Cement which worked great for this application. I did manage to put quite a major slice in my thumb with an Xacto knife due to a plank splitting when I was trimming the top edge flush with the deck - certainly learned my lesson to be more careful when making cuts like that. Fortunately didn't cut through any tendons so it's all good now other than a numb section due to cutting through a nerve. So skip forward a month and I'm now just before building the dinghies and long boats. I'm very pleased with how it has progressed. There were a few mistakes along the way which required some effort to rectify - but that's how you learn right? I did have an issue with my set in that it is short probably two lengths of the 1mm brass wire. I had to start substituting the 0.5mm and 1.5mm wire for some things, and some 1mm steel wire I had laying around for some parts that get painted. Talking of paint - I used Historic Ships brand Black and White paint for the hull. This gives a semi gloss finish which looks really nice. It does take about 3 or 4 coats to get a consistent finish, but it dries pretty fast. I also used Historic Ships Clear Satin varnish for everything that needs varnishing. This dries fast and is very quick to clean off brushes with water. For stain I used Minwax Dark Walnut and Red Mahogony, and more recently got some Red Chestnut which I prefer and used for later parts of the build (e.g. the deck house roofs). In hindsight I wish I had treated all the interior sapelli wood with the Red Chestnut as that would have given a nicer contrast. For all the black fittings I used matte acrylic paint, firstly because it only needs one coat to get a good finish, and second my understanding is that on small objects gloss does not look very realistic. For the cannons and figurehead I used a mix of matte black acrylic and Liquid Leaf Classic Gold. I actually mixed the paints together in various proportions to get the desired patina rather than using the black then gold method shown in OcCre's video. Then I used a very small amount of the semi gloss black dry brushed on top to get relief around the nooks. In the next pic you can see I had to substitute 1.5mm instead of 1mm brass wire for the axle on the central pin rail due to there not being enough 1mm in the set. Looks OK though I think. In the next pic you can see an issue with the foremast belaying pins. I spaced each set of three pins exactly as shown in the scale drawings in the instructions. But this makes them too close and each set of three pins will not insert all the way due to interference. I almost remade the whole piece but in the end just decided to put up with it. If you are building this ship I would suggest spacing these pins out slightly more than shown on the drawings. There a small gap between the keel and the hull that can be seen in the next pic. I should have spent more time test fitting and shaping the keel here. I was happy with how the wire bending went for the transom decorations, I think my Metal Earth experience helped here as you have to do a lot of careful forming and shaping of metal sheets. You can see here I did not sand down the internal support blocks at the stern on the starboard side enough. It wasn't clear in the instructions that they basically need to be sanded down to the width of the keel at the very back. Here you can see another mistake I made. The anchor wale on the port side shown here is correct. But compare it to the first pic, you'll see on the starboard side I accidently made it slope the other way, towards the back as you go down. It's one of those errors that no one viewing the model would ever spot as you never see both at the same time - but I know it's there, grrr! Another mistake I used the wrong thickness of wire for some of the wires that make up the bow (this is not why I am short on the 1mm wire though). Well that's it for now. I'll post further updates as progress is made.

Recommended Posts
Create an account or sign in to comment
You need to be a member in order to leave a comment
Create an account
Sign up for a new account in our community. It's easy!
Register a new accountSign in
Already have an account? Sign in here.
Sign In Now