Iseaz Posted December 21, 2022 #1 Posted December 21, 2022 Hello everyone ! Today I'm glad to present you my new project for the upcoming months (years?). Context: I may have been too ambitious ... 🤔 My initial plan was to choose a medium size kit after finishing my King of Prussia from Corel, for less than 300€. But there was the black friday at Occre, I saw this beautiful kit at -30%, at 370€ instead of 530€, I could not resist the temptation. I am now building the most complex ship from Occre, while I am a student in last year of civil engineering school 😅 For the historical point, the Montanes was a 74 guns Spanish ship launched in 1794 and wrecked in 1810. It participated in the battle of Trafalgar but was only slightly damaged and managed to return to Cadiz. Objectives: Besides finishing this model, I have set myself a few other goals. The first one will be to illuminate the model with a method I've never seen before in model making, using LEDs designated for Lego sets. Secondly, I would have liked to have a french 74 gun ship, but I only know one kit, Le Superbe from Mantua, which does not seem to be of such good quality. So, the goal will be to modify this model to be closer to a French ship, while keeping some details specific to this model, making a hybrid Spanish/French ship. The model as a whole will be a fictional ship, but I will try to make historically accurate modifications of some elements. I will base my work on pdf's from Jean BOUDRIOT's collection "le vaisseau de 74 canons' ' and many other build logs (Montanes, san ildefonso or Superbe) , especially on John Aliprantis' video series of the Montanes. I hope this log will be interesting !! The next post will be the unboxing. ccoyle and Prowler901 2
Iseaz Posted December 21, 2022 Author #2 Posted December 21, 2022 Unboxing First of all, I don't find the box very interesting, it's just a picture printed and glued on a cardboard box. Inside, everything is well organized. There are 4 plastic boxes inside : + Lots of details, the pieces are quite clean, in wood and diecast. The door and window frames may be replaced in wood. - The cannons and carriages are in diecast, which is not very good. Moreover the barrels are not completely drilled, I think about buying better barrels. Good surprise, the pulleys and pins are made of wood! Occre uses a lot of composite on other kits, but it's not very nice. There are a lot of pre-cuts, and a big pack for the hull structure. And here's the bunch of ropes, different colors and sizes, I hope there's enough 😅! Then the set of wood rods, lots of basswood, sapele for the submerged hull and some walnut: Finally, the set of sails (over 20 sails!) Hand sewn: And as a bonus, the led kit I found on Aliexpress, 2 receivers of 10 led each, and so 20 led color yellow/orange. It's basically for Lego, but their small size and ease of use are ideal for model making! It cost me less than 20 €, and will not require soldering. Ian_Grant, OllieS, Prowler901 and 1 other 4
Iseaz Posted January 2, 2023 Author #3 Posted January 2, 2023 The Christmas holidays were very productive, I was in a rush to get as much done as possible before going back to school, so here is a summary. I started by carving the structure before gluing everything, to make 2 false decks under the gratings which will be illuminated. I drilled a lot of holes for the wire runs. The protection of the oven was scratch built. To save glue for the decks, I tried double-sided tape, with a few dots of glue, and it works! The joints were simulated with a pencil, but for the most visible bridge, I cut 8 cm planks, to show the joints and to have different textures between 2 planks end to end. It was very long but the result is much more realistic. As the stern will be illuminated and visible, I printed a tile pattern (drawn on Sketchup), as well as bulkheads, which won't be too visible. This result works perfectly for me! I added a small table with 2 chairs, and I replaced the portholes in windows on each side. The bow structure was reinforced to have a better support for the planking, which required a lot of sanding... I relocated a window in the stern by raising it, which was low to the deck ( just like on the real ship) and I didn't like it, so I aligned it with the other smaller ones. Also, I have started to build the interior bulkheads, but I am stuck because I have lost a window... To blacken the brass, I used AK burnisher. The reaction is a bit slow but with only a little bit of product, I was able to burnish all 140 rings as well as some diecast parts! Here is the progress in 2 weeks, I'm very happy with the result with the LEDs, I'm sure it will be the future masterpiece of my collection! Cmm4000, scrubbyj427, garyshipwright and 1 other 4
garyshipwright Posted January 2, 2023 #4 Posted January 2, 2023 (edited) Looking good Iseaz. She looks to be well on her way to being a master piece. Gary Edited January 2, 2023 by garyshipwright HMS Montague/Alfred class by Gary B 74 gun ship built in 1779
Iseaz Posted January 17, 2023 Author #5 Posted January 17, 2023 Thank you Gary ! On the stern, the posts were ruining the view and were not really useful to support the upper deck, I removed them to the base to keep a point of attachment to the sternpiece. The bulkheads required some extra work to run and hide the cables, but the result is worth the effort. Work has progressed on the bow, with the planking (+ walls on the ports to add some depth). You can see here that the pre-cut deck piece is not aligned with the gunport guide. I chose to add some material to compensate for this. The surface for guiding the gunports needed a lot of sanding before planking. One day to sand everything is very long ... I finally designed guides from the pre-cut leftovers to drill the false walls in the middle. Here's the epic result with the raw barrels : I hope to start soon the planking, the step I'm fearing the most, especially since it's a single planked kit... Prowler901 1
Iseaz Posted January 31, 2023 Author #6 Posted January 31, 2023 After a lot of sanding to adjust the gunports guides I started the planking. It was quite hard to align the first plank, which is crucial for the rest of the planking. I also had to think about the placement of the stringers on the deck: I like the guns to pop out of the hull, but the stringers prevent the carriage to be against the wall. So I improvised by cutting the stringers at the position of the guns. The inside of the walls was painted with the iconic red. RossR, Prowler901, ccoyle and 1 other 4
Iseaz Posted May 28, 2023 Author #7 Posted May 28, 2023 (edited) Hello everyone, It's been a long time since I've posted anything, but I've made a lot of progress on my ship! I've finished planking the entire hull, which was EXTREMELY time-consuming, as it's very large. The instructions don't describe how to do it, so I had to improvise the planking to get a nice hull. At the stern, an electric bender is necessary, as the curve is very pronounced. To avoid gaps between 2 planks, I apply wood glue to the edge, removing the excess after fitting. If any holes remain, I fill them with wood glue and sand around them, so that the dust goes into the glue. Once the hull was finished, I painted the upper part in occre and made the wales. The kit includes 2x4 rods, but this seemed too wide to me, so I used leftovers from a previous model, in 1x4. The result seems much more realistic, and the installation was much easier! Next, I painted the model in the classic blacks of the era, and then took the liberty of painting the upper part in royal blue. To add realism to the breakwater, I used a cutter to simulate the wood joints. For the gunport frames, I swapped the 1x4 sapele for 1x3 deck leftovers, which adds depth and is much easier to paint and trim. I also used a cutter to mark the space between the occre-painted planks. Finally, the hull was varnished. Please let me know what you think, and if you have any tips! Edited May 28, 2023 by Iseaz RossR, Esap and Barbossa 3
Iseaz Posted September 23, 2023 Author #8 Posted September 23, 2023 Hello again, I've spent a long time without posting but I've made good progress on the hull. I've already finished the outer lines, and I've got a spiral decoration using a 2mm thick piece of round wood with holes carved in it, which looks better than twisted brass wire. Bow : I hesitated for a long time about the colour of the wooden elements, between black or the "natural" colour. The occre-coloured curves are 1x1mm, extracted from the remaining 3x1mm strips. I love working with 1x1, it allows me to add a lot of relief on a small scale, like on the frieze above the doors. For the anchor holes, I added blackened brass circles, also to add relief, and the result is superb! Below, I used a twisted decoration: 2 brass wires wound with a drill, then flattened with a hammer, then painted in occre. I'm really pleased with the way the bow looks - the curves are magnificent! Stern: For the balcony, I started by cutting the hull right up to the wall, and added a plate for a cleaner result (it was very difficult to cut in this space). The bottles are very complex to make because of the general shape, and the photoetched parts had to be adjusted to follow the curves correctly. The back panel was delicately painted and placed on the wooden piece. As there's very little relief, I added walnut-coloured 3x1 columns on the windows, and strips around the panel, for a clean finish. After struggling to paint all the columns, I glued them in place and the result is superb! Cabin: I have no idea what this cabin is for. It's not planned in the kit, but I've opened doors and windows to get a look at the illuminated interior. If I get the inspiration, I'll add some details on the outside walls... Cannons: Certainly the biggest flaw in this kit... badly moulded, undrilled cannons, simple carriages that are impossible to drill, and no wheels for the 8 cannons on the 2nd bridge, which don't even look like the other dummy cannons on the 2nd bridge. Using scraps from other models, I was able to fit the missing wheels. Unfortunately, if I wanted to replace them with brass cannons, it would have cost too much... The gun ports took a long time to make, fortunately only the first bridge has them! I still don't know what angle I'm going to give them. I've also added scratch rings to attach the rope to the gunport
allanyed Posted September 24, 2023 #9 Posted September 24, 2023 21 hours ago, Iseaz said: if I wanted to replace them with brass cannons, it would have cost too much. It looks like it may be too late on this project but did you look at printed cannon? I have purchased them at 1:64 for about $0.75 a piece including shipping (in the USA). I sent an STL drawing of each size to the printer and had them back in about a week. They are as detailed as the drawings including the cypher even at that small scale. I have 2D drawings of various size Spanish barrels used circa 1765-1808 and 1718-1765 but we have not gotten to these in 3D yet. You are welcome to the 2D if you want to get them done in 3D drawings so you can get them printed. A larger scale printed British barrel of 1760 can be seen https://modelshipworld.com/topic/35120-armstrong-frederick-cannon-by-allanyed-124-scale/ to get an idea of the detail. Smaller scale pieces are below in the British Commonwealth pattern circa 1650-1716 Note the conical trunnions for that period. Allan Kingspoke 1
Iseaz Posted March 31, 2024 Author #10 Posted March 31, 2024 Hi, it's been a long time! Not many posts but the work continues, slowly... I've made good progress on the hull, the shroud supports, the bow and the stern I've also done the longboat, which was harder than I thought! I'm very happy with the improved crow's nest, which looks much better than the solid part supplied in the kit! I've also made good progress on the mature, all the elements have been cut, except for a few yards, as there aren't enough parts in the kit (and I should have optimised the rods to make 2 masts...). I improvised a tool to turn the wood... not incredible but it helped me a lot Nothing's glued yet because there's one big subject I'm undecided about: the cannons and their carriages. I don't really want to fit the masts before the cannons, it would be too much trouble... BikerMart, Ronald-V, Cmm4000 and 2 others 4 1
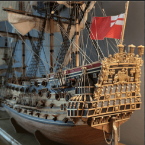
Iseaz Posted September 28, 2024 Author #11 Posted September 28, 2024 Slowly but surely, construction continues. Cannons: Cannons on the deck glued and rigged, I've found a solution to glue the rings, as the carriages are impossible to drill. I looked at many resin options, but unfortunately they were way too expensive... Bonus: a magnificent calculation of shroud right in front of a gunport! Masts: By cutting a gap in the mast, I managed to pass the lantern's calble through. But I still have no idea how I'm going to make these lamps... Next, the yards: I can't finish the main mast right now because I'm missing some deadeyes (well, that's my fault) and I have to ask Occre for some, in addition to 2 6mm rods and 4/5 3mm rods (they're missing from the kit). I'll wait a bit before asking, as other parts may be missing, so I'll keep working on the rest before I'm really stuck. I'm also waiting for as much time as possible before gluing the bowsprit, it's so big that I'm removing it to avoid breaking it. At the moment, I'm spending a lot of time studying the rigging plans: there are mistakes, too many or too few pulleys, and it's not always very clear. For the ropes, I need some “fabulon” product to remove all the ugly fuzz. I'll then use it to give wind to the sails. And here are a few nice photos taken on a (last?) sunny day: ccoyle, Gene438, Jorge_Goncalves and 2 others 5
Gene438 Posted May 5 #12 Posted May 5 Beautiful job....I too am working on the Montanes. Here is a link to photo alblum for your reference. You are a few months ahead of me.....

Recommended Posts
Create an account or sign in to comment
You need to be a member in order to leave a comment
Create an account
Sign up for a new account in our community. It's easy!
Register a new accountSign in
Already have an account? Sign in here.
Sign In Now