TurkSailor Posted February 14, 2024 #1 Posted February 14, 2024 Ahoy all! It has been a number of years since I have posted here, and for good reason. We've a new addition to the family, and both he and my eldest have been the focus of my attention and energy. In our last home reorganizing I was able to secure myself a large dining table in our second living room to use as my "miniatures workshop". Finally, onto the build, with one final preface: I am a novice, but keen to improve. I'd appreciate any and all feedback. I'm as far as the first planking but have photos of prior steps. I will upload a group of pictures and explain as best as I can. mtbediz and ccoyle 2 Eyüp Current: Fifie - Amati Coca - Amati Completed: Felucca 1887 - Amati
TurkSailor Posted February 14, 2024 Author #2 Posted February 14, 2024 Assembling the components was very straight forward. The kit quality is fantastic and the directions clear. Here you can see my "fairing" which was to be desired as I'll discover later when planking. There was quite a lot of MDF to sand down on both bow and stern. I used a homemade sanding stick which made the process take much longer. If I were to do this again I'd use a rasp, or even a rotary sander to get the bulk of it down. It wasn't till much later did I notice I had sanded away much of the keel. Next time I will be sure to mask my keels. Lastly I recall some fantastic advice on using thread to gauge progress, that was recalled much much later unfortunately. Eyüp Current: Fifie - Amati Coca - Amati Completed: Felucca 1887 - Amati
TurkSailor Posted February 14, 2024 Author #3 Posted February 14, 2024 Moving on. Here I use some lousy Amazon bought clamps to get the first planks on. Side note: I was very disappointed that the little steel clamps were so weak. I compared them to older clamps I had bought a few of from a local hardware shop and noticed the springs in the Amazon ones were significantly thinner. I'll pass these on to the kids to use for paper craft. It was after the first couple planks that I quickly realized I'd be better off using longer planks to avoid the splicing. Quite lazy of me I know. Here you'll notice the less than perfect sanding job on the bulkheads, as I did. mtbediz 1 Eyüp Current: Fifie - Amati Coca - Amati Completed: Felucca 1887 - Amati
TurkSailor Posted February 14, 2024 Author #4 Posted February 14, 2024 I continued on with planking, nailing in the planks. Trying hard to keep them against the bulkheads. I resisted the urge to taper as I knew I'd mess that up. So I soaked the planks for an excessive amount of time and simply bent them as much as possible. I figured I could get away with this for my first planking. Unfortunately it did not last. I was forced to cut some planks. I held my breath and gave it a valiant effort. It was around this time that I started reading about planking. Holy crap! Talk about a rabbit hole! So much to learn and study on the topic. I've purchased a few tools to assist me in the 2nd planking and hope to do a much better job at it. mtbediz and king derelict 2 Eyüp Current: Fifie - Amati Coca - Amati Completed: Felucca 1887 - Amati
TurkSailor Posted February 14, 2024 Author #5 Posted February 14, 2024 Closing up. It was around this point I started to use DAP's plastic wood to fill in some gaps. Not shown is my repair work to the bulkheads near the stern that I had massacred when fairing. I'd have saved myself some trouble by checking my fairing. Finished first planking with wood filler. king derelict and mtbediz 2 Eyüp Current: Fifie - Amati Coca - Amati Completed: Felucca 1887 - Amati
TurkSailor Posted February 14, 2024 Author #6 Posted February 14, 2024 I stepped into the backyard with my Fifie and a detail sander. I came back in with what I felt was a decent looking first layer of planking. I'll likely get more wood filler on and sand a few more times then tidy up the edges in order to stick on the keel bits. Cheers to everyone who stopped by my build log! ccoyle, JpR62, mtbediz and 2 others 5 Eyüp Current: Fifie - Amati Coca - Amati Completed: Felucca 1887 - Amati
TurkSailor Posted February 18, 2024 Author #7 Posted February 18, 2024 Did another round of sanding. Focusing mainly on stern and bow areas. Bringing in the first layer as tight as I could. So much so I might have made the planks paper thin. The goal is to try and emulate a rabbet? When sticking on these bits I want to have a little space to slot in my second layer. I’m fairly nervous about this next layer. I cannot use CA glue and will be using white wood glue. I’ll be using the method Chuck employs for his incredible vessels. I’ll instead be attempting to clamp on my planks once bent. I used the garbage clamps again.. last time. mtbediz 1 Eyüp Current: Fifie - Amati Coca - Amati Completed: Felucca 1887 - Amati
TurkSailor Posted February 24, 2024 Author #8 Posted February 24, 2024 Some progress with the second planking. I’m giving myself a break considering it’s my first time doing this. I am a perfectionist in my trade but learn best through doing and just wanted to jump in. I really enjoy edge bending and I’m really surprised by how much easier it is to fit the planks. So far everything has just been by eye. As a result the Fifie has a few imperfections and scorches. Notice also a little wobble. I’ve used a rasp to sort that for the planks that come after. Hopefully it’ll turn out ok. I was quite worried about the second planking but I’m pleased with how it is turning out so far. Opting not to make it harder for myself and cutting the planks into small bits is a trade off I’m willing to live with for this model. So far I’ve been using Titebond white glue, but may switch to the quicker and thicker variant as I approach the belly of the hull (forgive my terminology). Knocklouder, king derelict, RichieS and 2 others 5 Eyüp Current: Fifie - Amati Coca - Amati Completed: Felucca 1887 - Amati
TurkSailor Posted February 27, 2024 Author #9 Posted February 27, 2024 So far so good…quite chuffed with my progress. For the next vessel, I’ll try my hand at measuring things out. Before I started my Fifie I had found a very small Woody Joe kit in my cupboards. The Catalonia. This was really fun to put together albeit at a size that I struggled with. Here are some pictures. I just couldn’t manage the sails at this size so opted to roll them up. Cheers! king derelict, Knocklouder, mtbediz and 1 other 4 Eyüp Current: Fifie - Amati Coca - Amati Completed: Felucca 1887 - Amati
king derelict Posted February 27, 2024 #10 Posted February 27, 2024 Second planking looks very nice Alan TurkSailor 1
TurkSailor Posted March 9, 2024 Author #11 Posted March 9, 2024 Moving steadily onward. Certainly gaps have been an issue. As well as less than perfect cuts. But as my first go, I reckon it looks well enough. I’ll be using a little bit of walnut plastic wood to fill in the gaps before sanding. In the meanwhile I’ve been reading more on planking, and studying builds here on MSW. It’s obvious that I’m hardly doing this correctly, however, I’m not going to just get up and quit. I’d love to emulate how they made ships properly one day. That’d have to be a scratch build. Perhaps in 20 years? 😅 mtbediz and king derelict 2 Eyüp Current: Fifie - Amati Coca - Amati Completed: Felucca 1887 - Amati
TurkSailor Posted March 11, 2024 Author #12 Posted March 11, 2024 Second planking is now complete. Though not correctly, I’m quite happy with the result. I’ve filled in with walnut filler and will start sanding when I can. This was solid practice, next vessel I’ll measure much more. mtbediz and king derelict 2 Eyüp Current: Fifie - Amati Coca - Amati Completed: Felucca 1887 - Amati
TurkSailor Posted March 12, 2024 Author #13 Posted March 12, 2024 Couple pictures after a brief sand. Im terrified of screwing up the finishing. Plan is to do the deck before doing so, while researching various stains, and polys. mikegr, king derelict, mtbediz and 1 other 4 Eyüp Current: Fifie - Amati Coca - Amati Completed: Felucca 1887 - Amati
king derelict Posted March 12, 2024 #14 Posted March 12, 2024 The second planking finish looks very nice. Alan TurkSailor 1
TurkSailor Posted March 23, 2024 Author #15 Posted March 23, 2024 Moving merrily along. Did yet more sanding, and along with that noticed more flaws in my second planking, never mind the accuracy. Almost done with the rubbing strakes. I used a compass and the plans to get these on as accurately as I could. Still ruminating on the finish. I’m thinking to emulate a color motif that I saw here using a dark red stain, an oil based white, and an ebony stain. mtbediz and king derelict 2 Eyüp Current: Fifie - Amati Coca - Amati Completed: Felucca 1887 - Amati
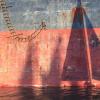
TurkSailor Posted April 2, 2024 Author #16 Posted April 2, 2024 Disaster averted! I was anxious about how to finish hull for good reason. I’ve never succeeded in staining anything. Initially I chose a stain that I thought would look good. So I brushed it on naively without pre stain conditioner. I was very disheartened by the result. So I slapped on another layer hoping it’d cover more and perhaps hide the blotchy bits. Unfortunately this just made it look worse. I waited till the stain fully cured and sanded as much of it down as I could. This was surprisingly easy as it hadn’t actually penetrated the wood. In my second attempt I used a water based stain conditioner, then applied an opaque “barn red” stain. After 2 layers I felt satisfied with the results. king derelict, mtbediz and RichieS 3 Eyüp Current: Fifie - Amati Coca - Amati Completed: Felucca 1887 - Amati
TurkSailor Posted April 9, 2024 Author #17 Posted April 9, 2024 I used a “semi transparent” stain for the upper hull. I’d argue it’s actually opaque. Still, I think it turned out well enough. I’m allowing this to dry a bit before I paint the white. Folks, I’m not an airbrush user, well not yet. I’m going to use some sanding sealer, apply a Vallejo primer with a foam brush, then matte white with a brush. Any advice here would be appreciated. I’m knee deep in the paints section here on MSW, hopefully this method will work for me. Another option was to use a gesso base, then brush on an oil based titanium white. Though I’m concerned it’ll be too thick. I’m going to try and setup some space to take better pictures, but currently I’m doing some major home renovations so it’ll have to wait till after. Thanks for stopping by my log! mgatrost, JpR62, mtbediz and 2 others 5 Eyüp Current: Fifie - Amati Coca - Amati Completed: Felucca 1887 - Amati
mtbediz Posted April 9, 2024 #18 Posted April 9, 2024 You are way ahead of me in the paint business. Good job! TurkSailor 1 Mustafa Current Build, USS Constitution 1:76 Scratch https://modelshipworld.com/topic/34741-uss-constitution-by-mtbediz-176/#comment-991858 Finished, HM Cutter Alert 1777. Scratch https://modelshipworld.com/topic/31859-hm-naval-cutter-alert-by-mtbediz-finished-136-scale/#comment-902949 Finished, USF Essex, Scratch https://modelshipworld.com/topic/25954-usf-essex-by-mtbediz-150/ Finished, Santa Maria, Mantua Kit https://modelshipworld.com/topic/23113-santa-maria-by-mtbediz-finished-mantua-150/?tab=comments#comment-683297 Finished, HMS Pickle (Scratch) https://modelshipworld.com/topic/21684-hms-pickle-by-mtbediz-140-finished/?tab=comments#comment-651070 Finished, Santa Maria https://modelshipworld.com/index.php?/topic/15541-santa-maria-by-mtbediz-handmade-kit-by-a-friend/&do=findComment&comment=483052 Finished, San Francisco II, AL Kit https://modelshipworld.com/topic/17344-san-francisco-ii-by-mtbediz-finished/
Mirabell61 Posted April 9, 2024 #19 Posted April 9, 2024 good planking and painting job Eyüp Nils TurkSailor 1 Current builds -Lightship Elbe 1 Completed - Steamship Ergenstrasse ex Laker Corsicana 1918- scale 1:87 scratchbuild - "Zeesboot" heritage wooden fishing small craft around 1870, POB clinker scratch build scale 1:24 - Pilot Schooner # 5 ELBE ex Wanderbird, scale 1:50 scratchbuild - Mississippi Sterwheelsteamer built as christmapresent for grandson modified kit build - Chebec "Eagle of Algier" 1753--scale 1:48-POB-(scratchbuild) "SS Kaiser Wilhelm der Grosse" four stacker passenger liner of 1897, blue ribbond awarded, 1:144 (scratchbuild) "HMS Pegasus" , 16 gun sloop, Swan-Class 1776-1777 scale 1:64 from Amati plan -"Pamir" 4-mast barque, P-liner, 1:96 (scratchbuild) -"Gorch Fock 2" German Navy cadet training 3-mast barque, 1:95 (scratchbuild) "Heinrich Kayser" heritage Merchant Steamship, 1:96 (scratchbuild) original was my grandfathers ship -"Bohuslän" , heritage ,live Swedish museum passenger steamer (Billings kit), 1:50 "Lorbas", river tug, steam driven for RC, fictive design (scratchbuild), scale appr. 1:32 under restoration / restoration finished "Hjejlen" steam paddlewheeler, 1861, Billings Boats rare old kit, scale 1:50
TurkSailor Posted April 9, 2024 Author #20 Posted April 9, 2024 (edited) @mtbediz Olmaz Abi! Ne yaptığım hakkında hiçbir fikrim yok! Thank you for the compliment @Mirabell61 Thank you for the kind words. I've looked at your logs and they've left me gob smacked! Incredible skill, especially in your metal work. Edited April 9, 2024 by TurkSailor mtbediz and Mirabell61 1 1 Eyüp Current: Fifie - Amati Coca - Amati Completed: Felucca 1887 - Amati
king derelict Posted April 9, 2024 #21 Posted April 9, 2024 The paintwork looks neat and well done. Great job Alan TurkSailor 1

Recommended Posts
Create an account or sign in to comment
You need to be a member in order to leave a comment
Create an account
Sign up for a new account in our community. It's easy!
Register a new accountSign in
Already have an account? Sign in here.
Sign In Now