


mikiek
-
Posts
2,229 -
Joined
-
Last visited
Content Type
Profiles
Forums
Gallery
Events
Everything posted by mikiek
-
 I should have posted this sooner. I went through the same adventure with the Trajta build. I started the sails at about post 128 and was receiving advice from the kit designer. It drags on for a while but you might find some helpful tips there if you don't mind reading some more.
 -
Aww man! - I guess I didn't pick up that you were sewing. Just the hems or are you making them from scratch? re: twisted lines, if you wet the lines and then stretch them it can help. If you have the time cut them to length, tie or clamp one end, wet them and then weight down the other end and let them dangle, even for just a few hours - this is before you would rig them obviously.
-
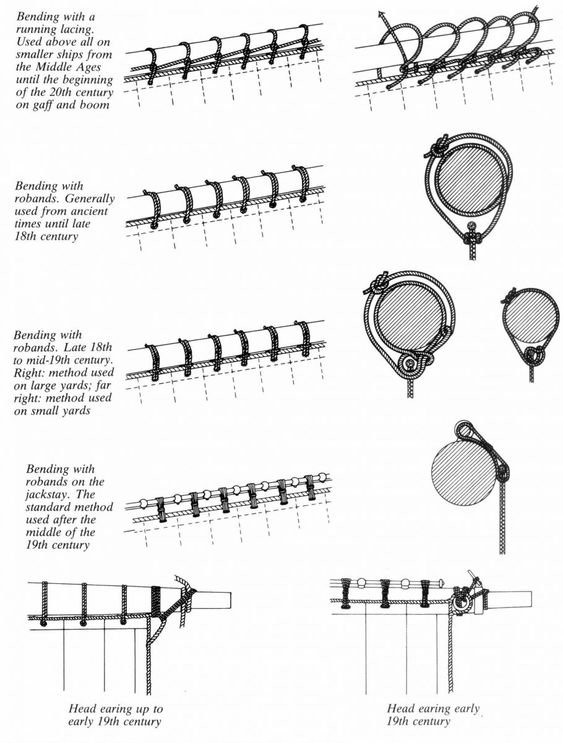
Hey Rowboat - this is a little late but for future ratlines I just use half hitches all the way across. Tie one to the outer shroud first and then use a dot of glue. work across but don't glue the hitches in the middle - at least at first. Do glue the other outside hitch. You can then slide the inner knots up or down to get them even and then glue them. A lot of people use white-ish line for the rats so they are easier to see. Post #93 in my log shows how to fix a sail to a gaff or yard. It's some sort of lashing but I don't remember the specific name. You will have to do that before mounting the spar. I poked small evenly spaced holes along the edge of the sail. Then I mixed some walnut shell & water to make a brown die. Then dipping a toothpick into the dye and then carefully stick the toothpick into the sail holes. This gives the appearance of something almost like a grommet in the sail. Granted they didn't have the grommets we know today, but they did put stitching around the holes to reinforce. You can barely see it on post 93. Just practice a few times first - you don't want to over do it. Found a sample of the lacing I was talking about. This will work on yard or gaff. The upper left lacing example shows an easy way to bend sails to spars.
-
Hey Rowboat - I was actually out working on E tonite and was thinking of you. You are almost to the point where you are going to have to make another decision(s). As you start to rig (running rig) you will hit a point where you have to start adding sails. The square sails don't fit into this decision but the fore/aft sails will for sure. Think about it - those sails are going to billow out on one side (hopefully). With all the rigging they pretty much have to stay running down the center of the boat but you will want them to look like they are filled. So one question will be what side of the the boat do I want to see the filled sails (billowing out). I guess that's the leeward side? Along with that comes - do I want to display the windward or leeward side of the boat (assuming the boat will display against a wall). Part of that may be decided by - which side of the boat do I think is the best to display? That may be decided by better planking, covering a big snafu or something else like that. So once you determine the display side, you have to figure out how those fore/aft sails should be set - windward or leeward. Once you start working with the sails you will need to shape them accordingly. There are many processes to do that so be sure you ask before you begin with them. The fore/aft sails have a lot less rigging but need a lot more shaping. The opposite is true of the square sails. I'm just rambling all this because it's better to have that worked out ahead of time. I'll be taking some pics of where I am at on my E so check that thread in a few days. I am running into a few things that could help you out down the road. Almost forgot. The plans for our boat show ratlines on the main shrouds running up to the main top. They DO NOT show rats running up the shrouds (just 2 ropes) from the main top to the top of the upper mast. How the heck did the guys get to those upper sails? You may want to consider doing rats on those upper shrouds as well! The yard looks great!
- 195 replies
-
- 1
-

-
- enterprise
- constructo
- (and 1 more)
-
Aww - we all do that once in a while. I used to insert masts then stick the yards to the masts with that adhesive gum stuff just to see what it all looked like. I would take pix and then then tear it all down.
-
although be sure your yards have all the items like stirrups, footropes, etc. - if the yards have parrels or something else to hold it to the mast tie one end to the yard and leave the other end be so that you can grab it with some tweezers and wrap around the mast and the other side of the yard - thats the only real tough thing with yards - the rats make it hard to get to stuff at the mast but thats about it
- 195 replies
-
- 1
-
-
- enterprise
- constructo
- (and 1 more)
-
Rowboat - let me know which drawing you are referring to and I can help you decipher it. Sometimes when the drawing is shown from the side there may actually be 2 blocks (side by side) and they only show one. For instance on the rigging page on the big drawing, the head of the lower & middle jib sails each have a block attached to them. However the rope that goes thru each block looks like they both go back to a single block. In fact, there are 2 blocks, one for each sail. The 2 mini drawings that show the jibs kinda show this. One drawing shows the bottom jib and its tackle. The other shows the middle (and top) jib and its tackle. So sometimes you can put it all together from the combination of drawings.
-
A good start Rowboat. And as for the stanchions and netting - definitely wait. It will really be in the way otherwise. The frapping you did for the guns is called seizing (pronounced sizing) when you do it for things like blocks, lines, deadeyes, etc. As a suggestion for your next build, you might consider a smaller dimension rope for a lot of the seizing. I actually use flyline. It's a scale thing. When you consider that the seizing was done by hand often using rope carried in a belt pouch, it would be a lot smaller than the rope being seized. I did a tutorial on an easy way to seize, I'll try to find it for you. Photographing your work is a lot harder than doing the work. I always say a good photo can make a mediocre build look great. A bad photo can make the best build look awful. Stay with it...
- 195 replies
-
- 2
-
-
- enterprise
- constructo
- (and 1 more)
-
This post has been helpful in regards to the pins. I am going to try a different plan. Up to now I have been threading a line thru a hole in the pinrail and then jamming a pin in the hole to hold the rope. I was going to eventually glue the pin in place. That makes it almost impossible to tighten lines in the future if needed. Instead I will try a couple of under and over wraps around the pin, like would be done in real life. Then I'll put a little white glue on the rope to fix it. I can leave almost an extra inch hanging and that should be covered by the coil and the extra will give me some slack to play with if I have to readjust. It's a slow process as I have to hold the rope in place while the glue dries.
-
OK - I tried a couple of pins. I will say thank goodness for alligator forceps. They make reaching across a rigged deck a lot easier. They also help with the over/under wrap. Worst part of it all is holding the line tight until the white glue dries. It will be a slow process.
-
Rich - I think I will probably give what you describe a go. As far as looking better I see your point, but I wonder if this is one of those things that no one notices but the modeller.
-
Thanks for that Rich. I'm also concerned that reworking with a under/over wrap will end up with me doing more harm than good. Can you get away with just one under and one over? Do you have to hold the line in place while the glue dries?
-
Well the plan at least to this point was feeding a line thru a hole in the pinrail then jamming the pin in the hole after that. And then of course adding a coil. I guess if I actually did wrap the rope around the pin with a under and over then glue the rope it might not be too hard to get a rope loose later on. And it probably wouldn't matter then if the pin was glued or not. Unfortunately, at this point that is a lot of rework. I will reassess.
-
Looking good Rowboat. I like the 2 tone hull. It adds a lot of interest. Different plans have different ways of depicting parts. As you have noticed eyebolts are rectangles here whereas on other plans they may be circles. Good plan in getting to know your lines and know what they do. The running rigging will be interesting because in most cases they should actually work - like hoisting a sail or adjusting a yard.
- 195 replies
-
- 2
-
-
- enterprise
- constructo
- (and 1 more)
-
Hello Rowboat - I apologize for leaving you hanging for so long. I am just now getting back to E and trying to finish up. Maybe you are past this stage now, but as to your question - forestays do not have blocks, the backstays do use a tackle that attaches to the deck with an eyebolt. Of course your shrouds will be rigged to the deadeyes and you will need to add ratlines to those. NOTE: the plans do not show ratlines on the shrouds running from the main top up to the top and top gallant masts. You may want to add those. Your running rigging will almost always have at least one block and often two usually near a mast or yard and the other end will run down to the pin rail. Make sure you have all blocks seized to masts or yards before you start playing with rope. Trying to add those later is not fun. It is worth rechecking your parts with the plans to make sure you have them all in place. While I gripe about the plans somtimes, they did a smart thing when showing the rigging by breaking it up into multiple drawings. That way you can focus on one area and be pretty sure you haven't overlooked something. Find the drawings that have running rigging going down to the pin ring on the mast and fife rail and do those first. Then work out from there. If you do the opposite you will be reaching thru outside ropes to reach inside. I also did all the fore/aft sails and jibs before moving to the square rigged ones. Again, those are inside and easier to get to if you do them first. You caught the suggestion to not glue any pins while you are working. In fact I just put a post in the rigging forum asking about not gluing the pins at all. I am seriously considering that. I have another model on display and after just 2 years on display several of the ropes are droopy and with the pins glued there is no way to adjust them. I'll let you know how that conversation turns out.
- 136 replies
-
- 2
-
-
- enterprise
- constructo
- (and 1 more)
-
I am finishing up Enterprise. All the rigging is in but I have not glued pins in yet as I want to go back and tighten some of the lines. Then I need to add rope coils on the pins. That got me to thinking which is always a dangerous thing. My only completed square rigged model has more than a few droopy lines after 2 years on display. Those pins are glued so there is no way to tighten the lines now without major surgery. This is making me think about NOT gluing the pins on E. This would allow adjustments down the road but the catch seems to be I would have to leave enough rope coming out the underside of the rail so that I could grab hold of it if I needed to tighten. I guess the coils would hide most of that. I'm wondering how you guys have handled this?
-
Auger - your sails appear to be like mine. Someone else commented here that the sails from their kit did not look like mine. Since you are in France I assume you bought your kit over there? I bought mine from Cornwall Models in the U.K. Do you happen to remember if there was a sail upgrade option when you bought your kit? I sort of remember that but I can't say for sure. Otherwise we have been wondering why the sails in kits from the same manufacturer would be different. Only other reason I can come up with is maybe a US version and a E.U. version of the kit?
-
The doctors orders? We will both get there one day. Stick with it!
-
Deck furniture looks great Per. Some day we will finish our builds huh? 😉
-
The saga continues. Went back for round 2 and ended up breaking a pinrail off the bulwark. That meant unpinning all the ropes to glue it back. Luckily it was just a 5 hole rail. The only good thing was 2 of the pins were glued in, so I had to rip them out. But that means when I re-pin, those ropes are now adjustable. A small win. Down side is 2 of the ropes were already trimmed leaving no chance of restringing them - not enough rope to go thru the hole and pull thru from the underside of the rail. I wasn't about to re-rig a new rope so I tied a few inches of extra rope to the end. That works but now there's a small knot in the line. I think I'll live. The alligator forceps proved their value again - was able to grab the pinrail, apply the glue then reach thru the rigging to the bulwark on the opposite side to place the rail. No other way that could have been done. I'll reiterate in case you missed my first lesson learned here - DO NOT glue pins to rails until the very end of your build. You will need to adjust sails and rigging at the end. In fact, I would suggest paying more attention to the holes you drill into the pinrail. If you get them the perfect diameter where the pins fit snug you probably shouldn't even need to glue the pins at all.
- 136 replies
-
- 1
-
-
- enterprise
- constructo
- (and 1 more)
-
Wow man - I got up some gumption this afternoon and headed to the shop to start adjusting sails. This is really going to take some time. I loosened up a rope so I could bring one side of a yard down to level it and that loosened two rigs on the other side. Tightened those up which loosened the brace. Probably took 30 minutes to get the yard level and now the sail hanging on it has a foot thats too loose. 😣 I'm finding alligator clips to be extremely helpful here. I clip one on the rope I am working with so it's easy find in all the others. Like I said, this is going to take a while......
- 136 replies
-
- 1
-
-
- enterprise
- constructo
- (and 1 more)
-
The rework was worth it. One thing that can help with soldering is be sure the surfaces you are soldering are hot as well. A drop of hot solder on a relatively cold surface will not bond very well. That's why I started using a butane torch for soldering instead of an iron. It's easier and quicker to heat up your surfaces before you apply the solder. If you use a torch you can also switch to silver or even gold solder, which for me seems to work better. And as I mentioned earlier, be sure there is no gap between the 2 surfaces.
-
Atze99 - I had to rethink the deck for a minute. I did use a stain there, but it is actually a clear stain - Minwax Natural Stain. I use that one a lot in various places on a build. It has no real color, but gives the wood a deeper, wet look especially down in the grain. I highly recommend it especially on premium wood. Your mileage my vary. Always test before you apply to your build.