James H
-
Posts
6,139 -
Joined
-
Last visited
Content Type
Profiles
Forums
Gallery
Events
Everything posted by James H
-
 That really does look excellent, and your work is so clean.
 -
I’ll watch the new videos tonight.
-
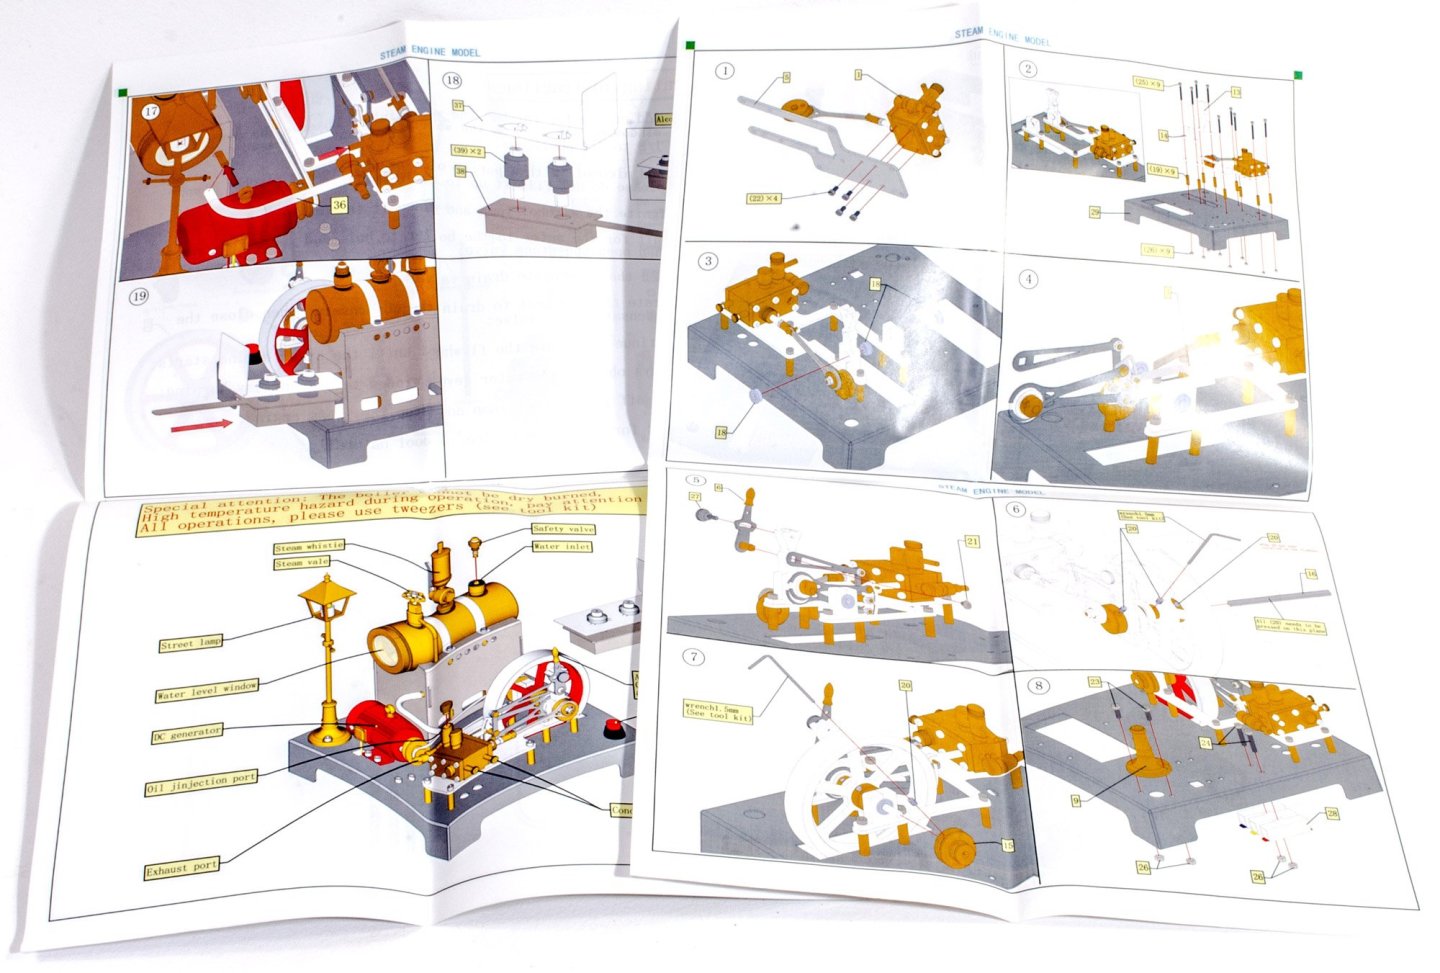
Kit review Vertical Steam Engine Kit - Enjomor - from EngineDIY
James H replied to James H's topic in Non ship-related reviews
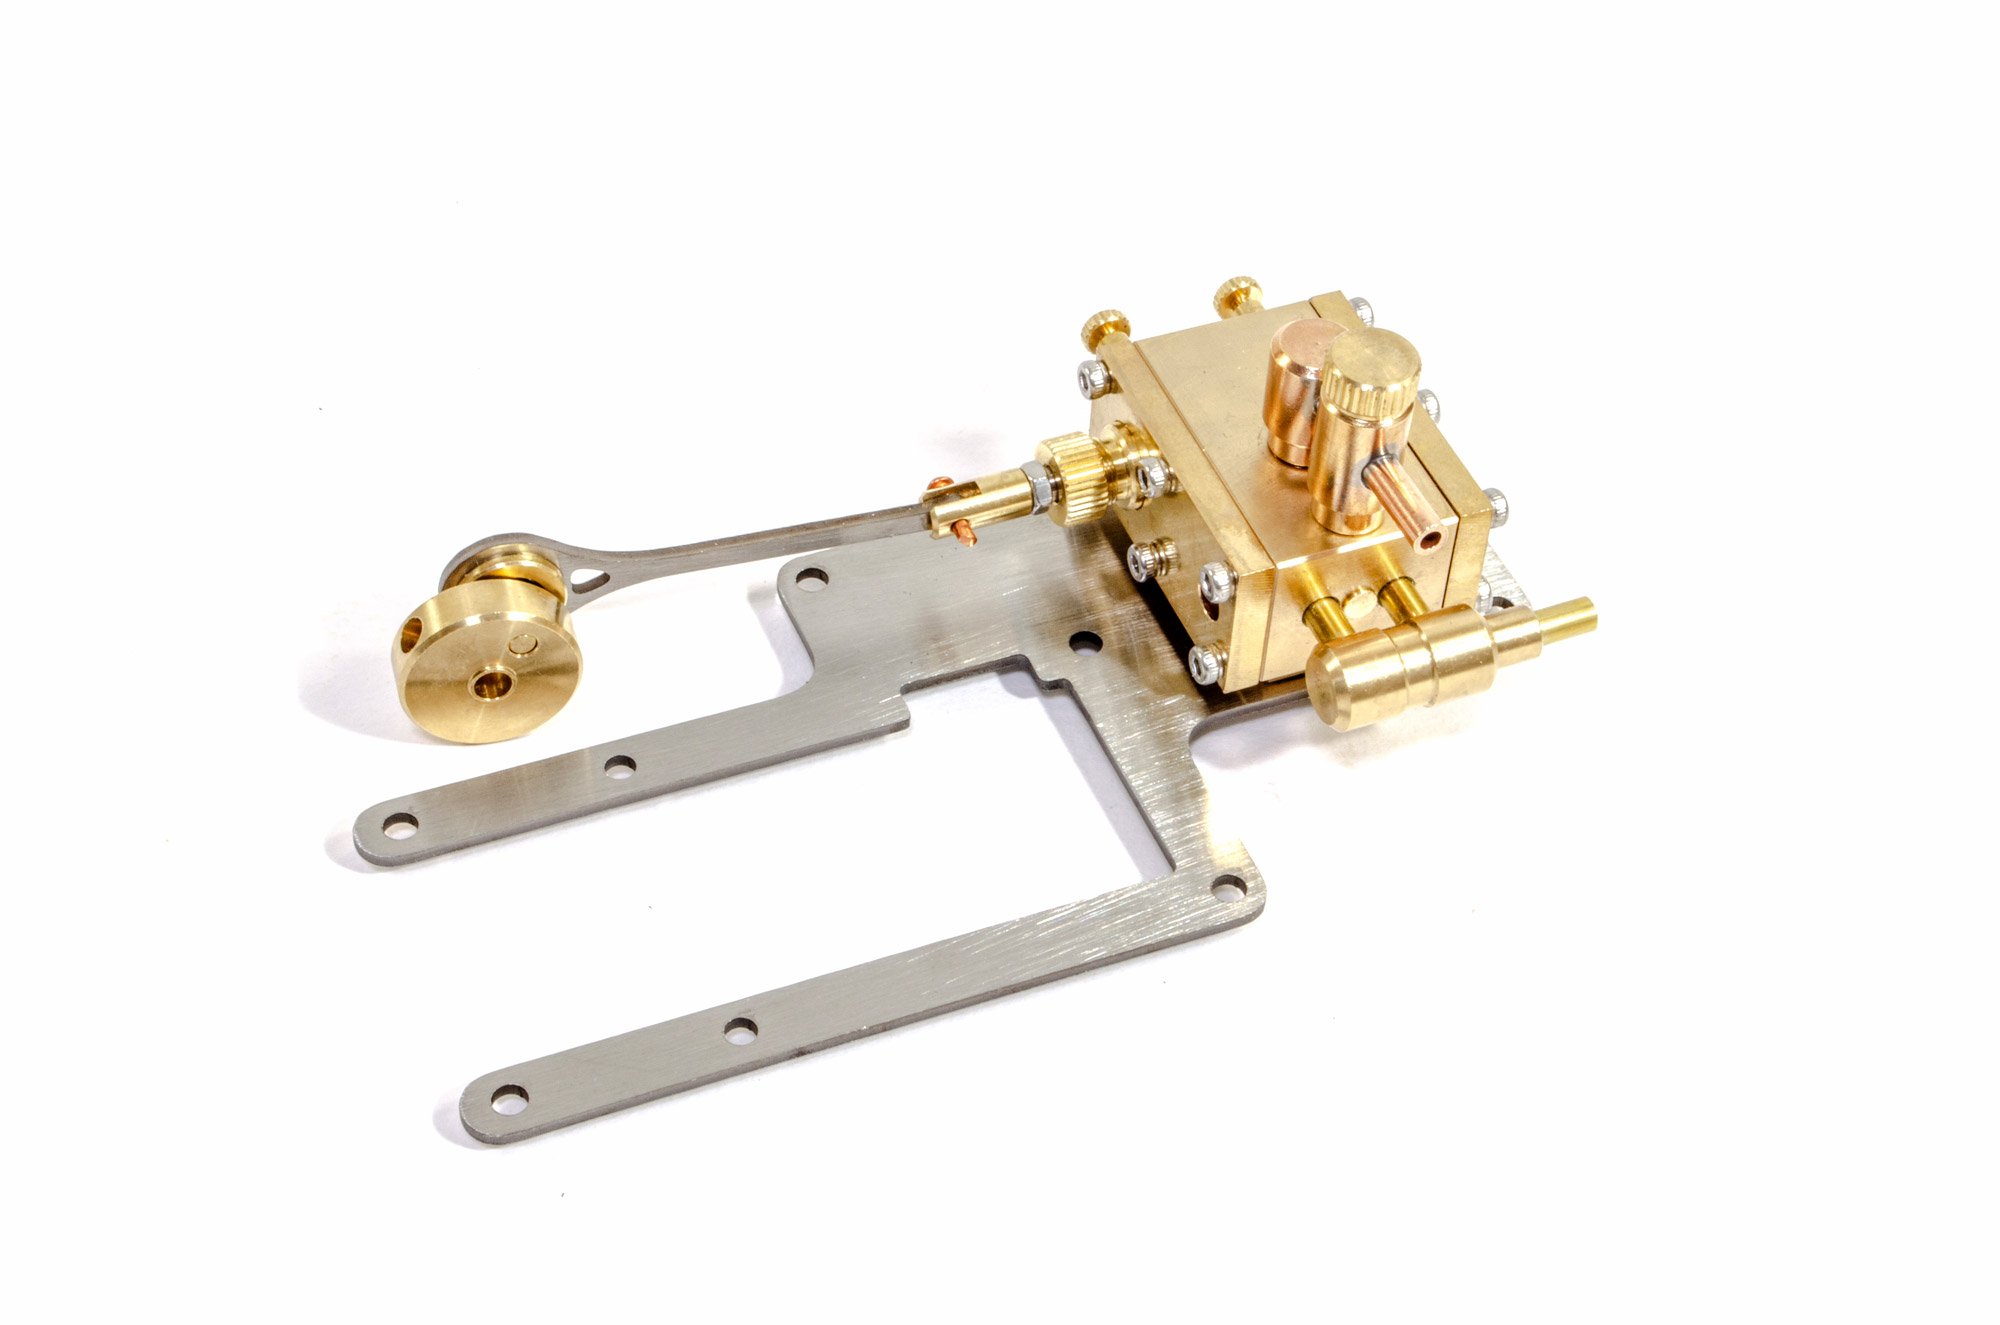
25ml of water was injected into the boiler and then the safety valve fitted. The fuel pot was filled with ethanol and the synthetic wool was soaked thoroughly before lighting. It took about 2 minutes for the boiler to reach pressure, and the flywheel was turned a few times before it set off by itself. When the boiler has been running for a short while, it can be stopped by putting the flame damper tool over the fire pot. The engine stops very quickly once you do this. Conclusion This is a perfect little project for anyone new to building steam engines. The kit parts are perfectly machined and fit together beautifully. Engine operation is also easy to understand with the bare minimum of user interaction needed to ensure smooth operation. This is also a nicely priced little kit and the finished project does look quite ornamental too, so it'll look real nice on your desk or shelf. This is one I absolutely recommend! My sincere thanks to EngineDIY for sending this little model to be built and reviewed here on Model Ship World. To purchase this directly, click the link at the top of the article.
-
Kit review Vertical Steam Engine Kit - Enjomor - from EngineDIY
James H replied to James H's topic in Non ship-related reviews
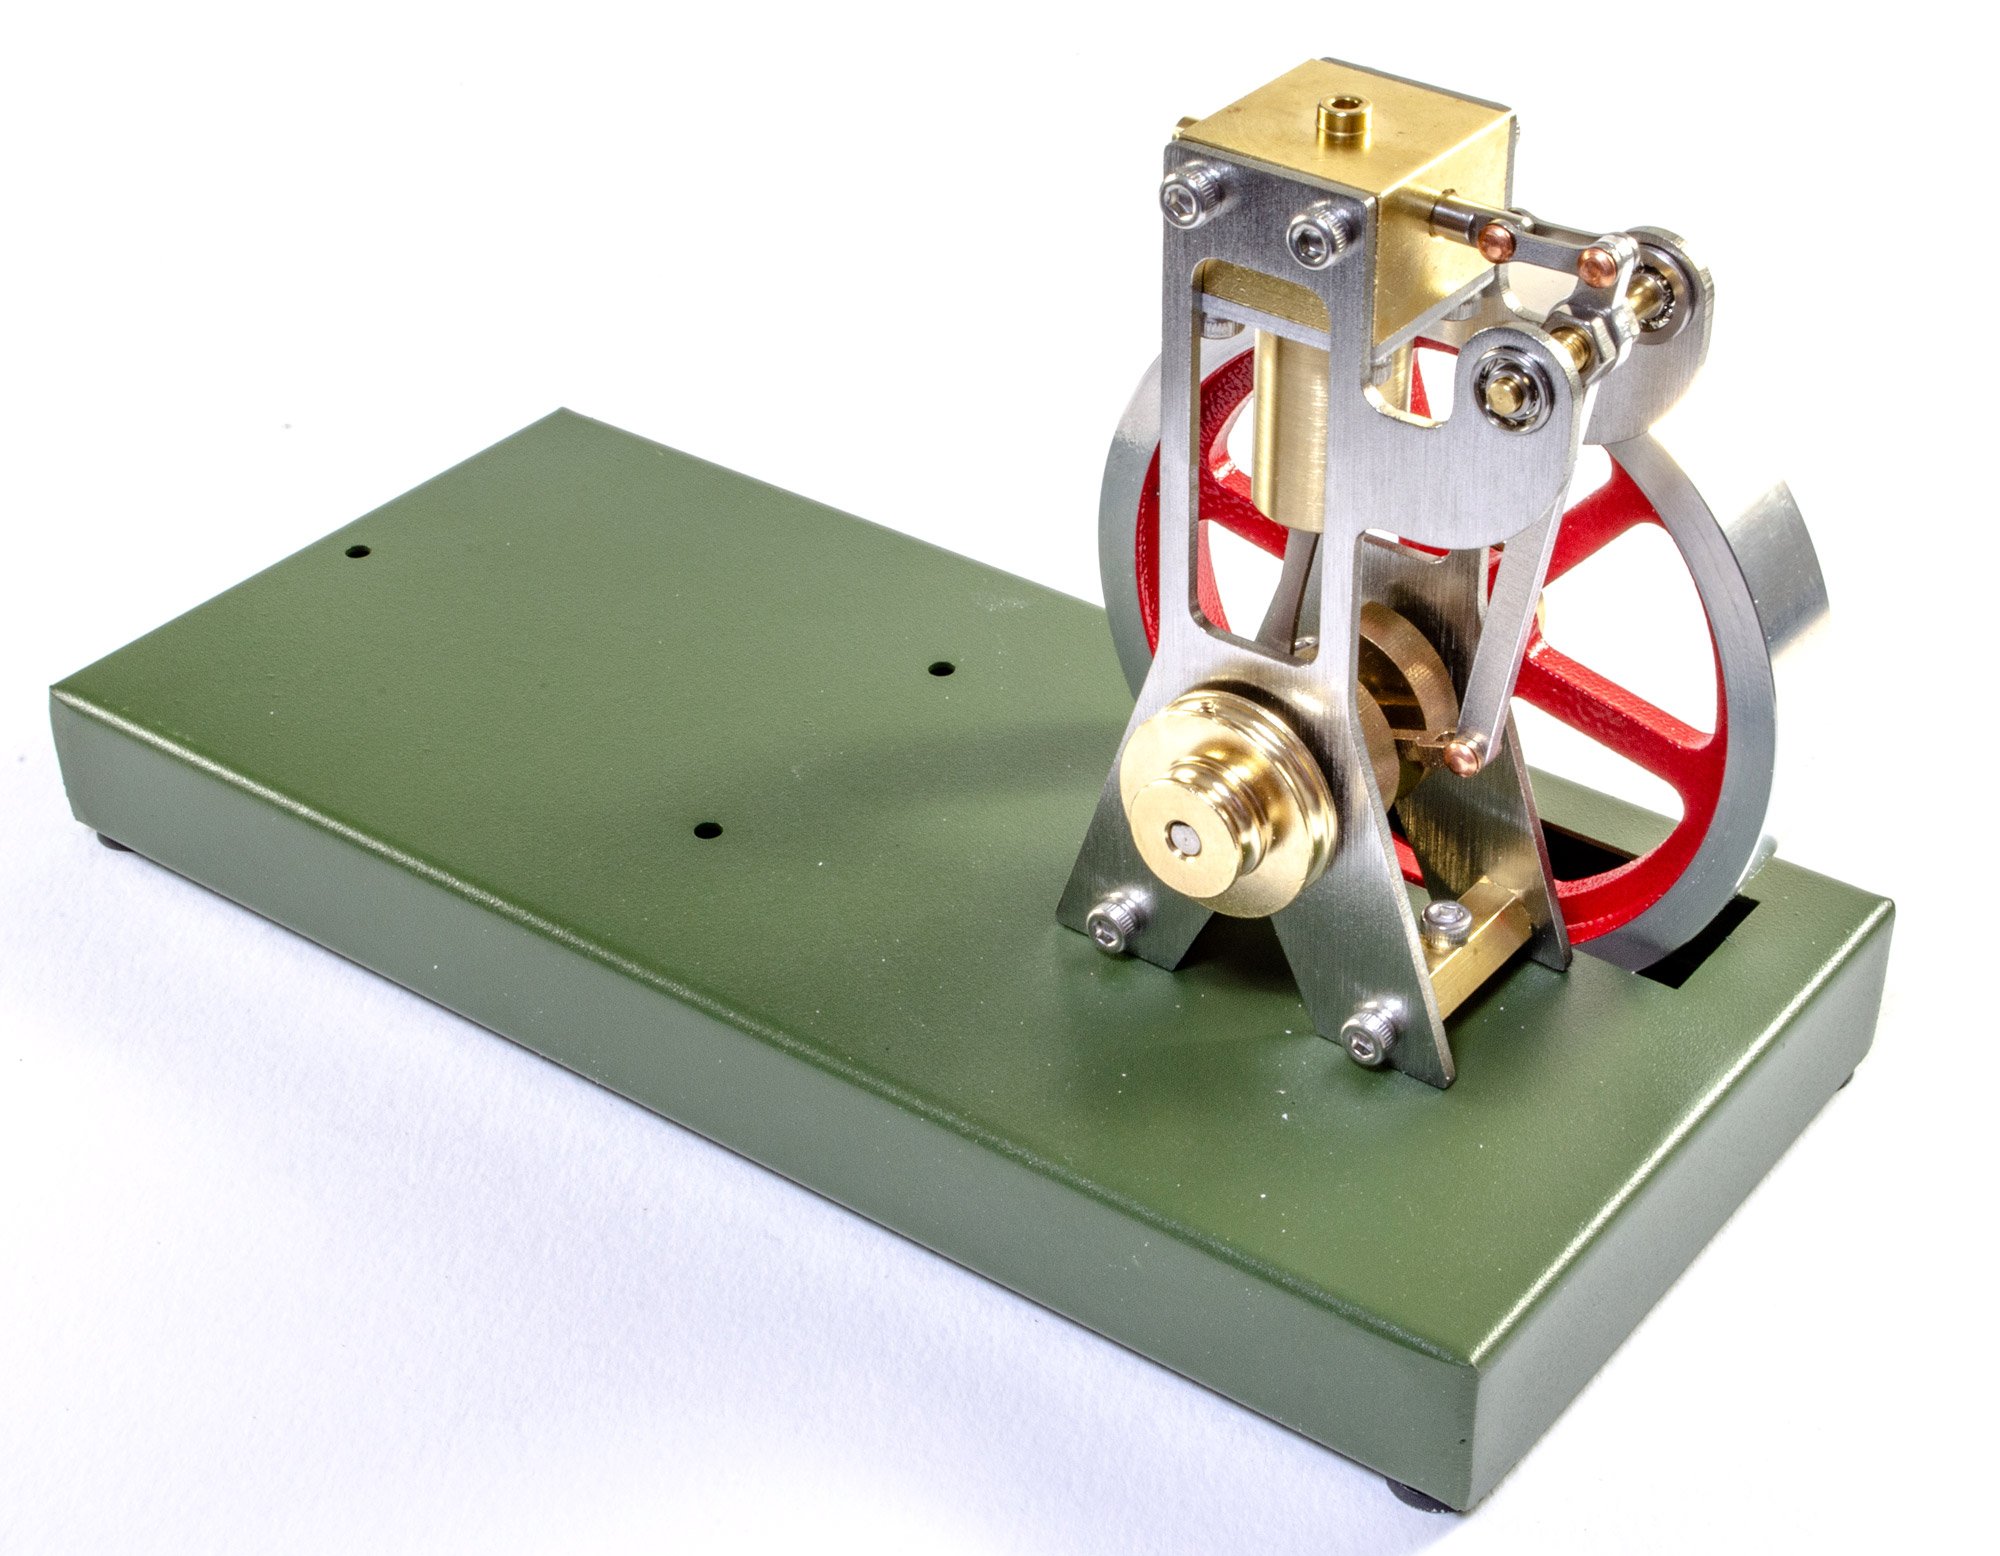
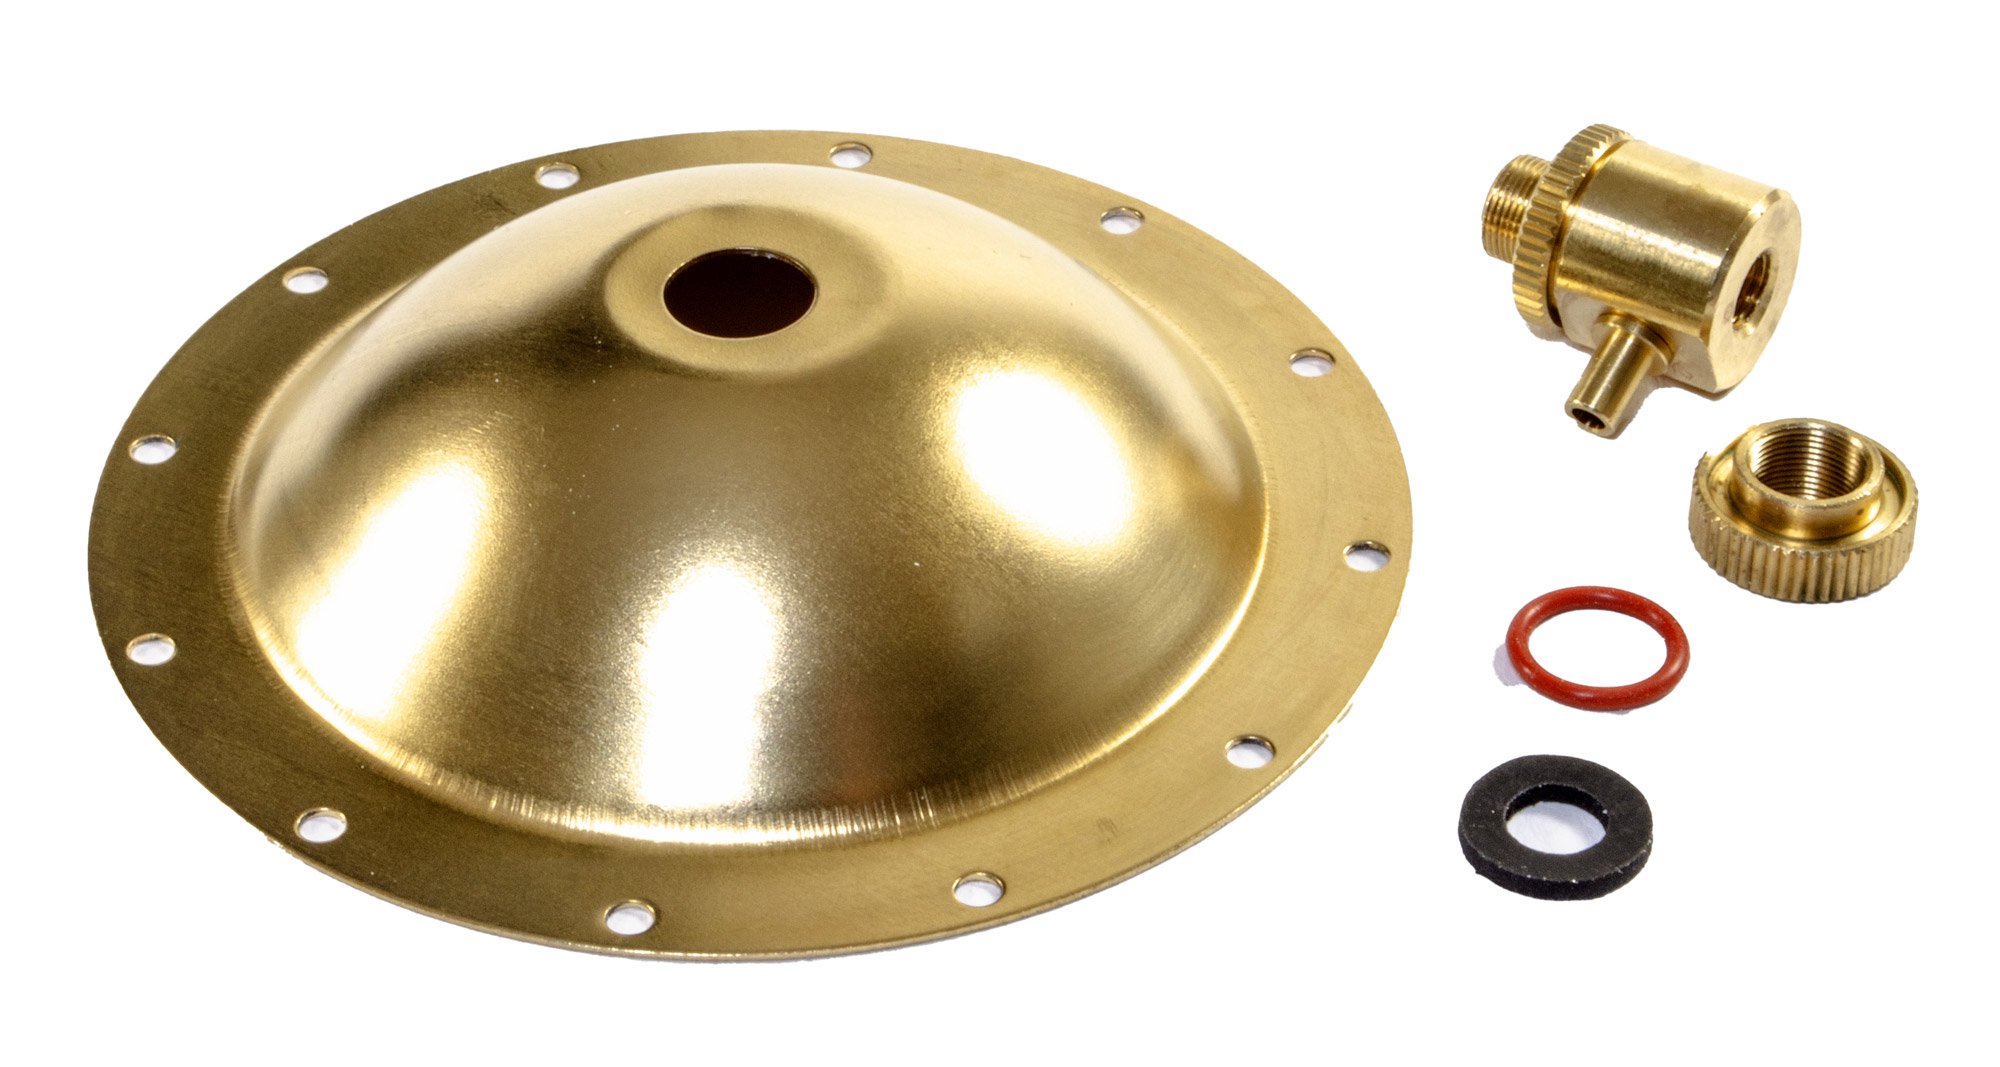
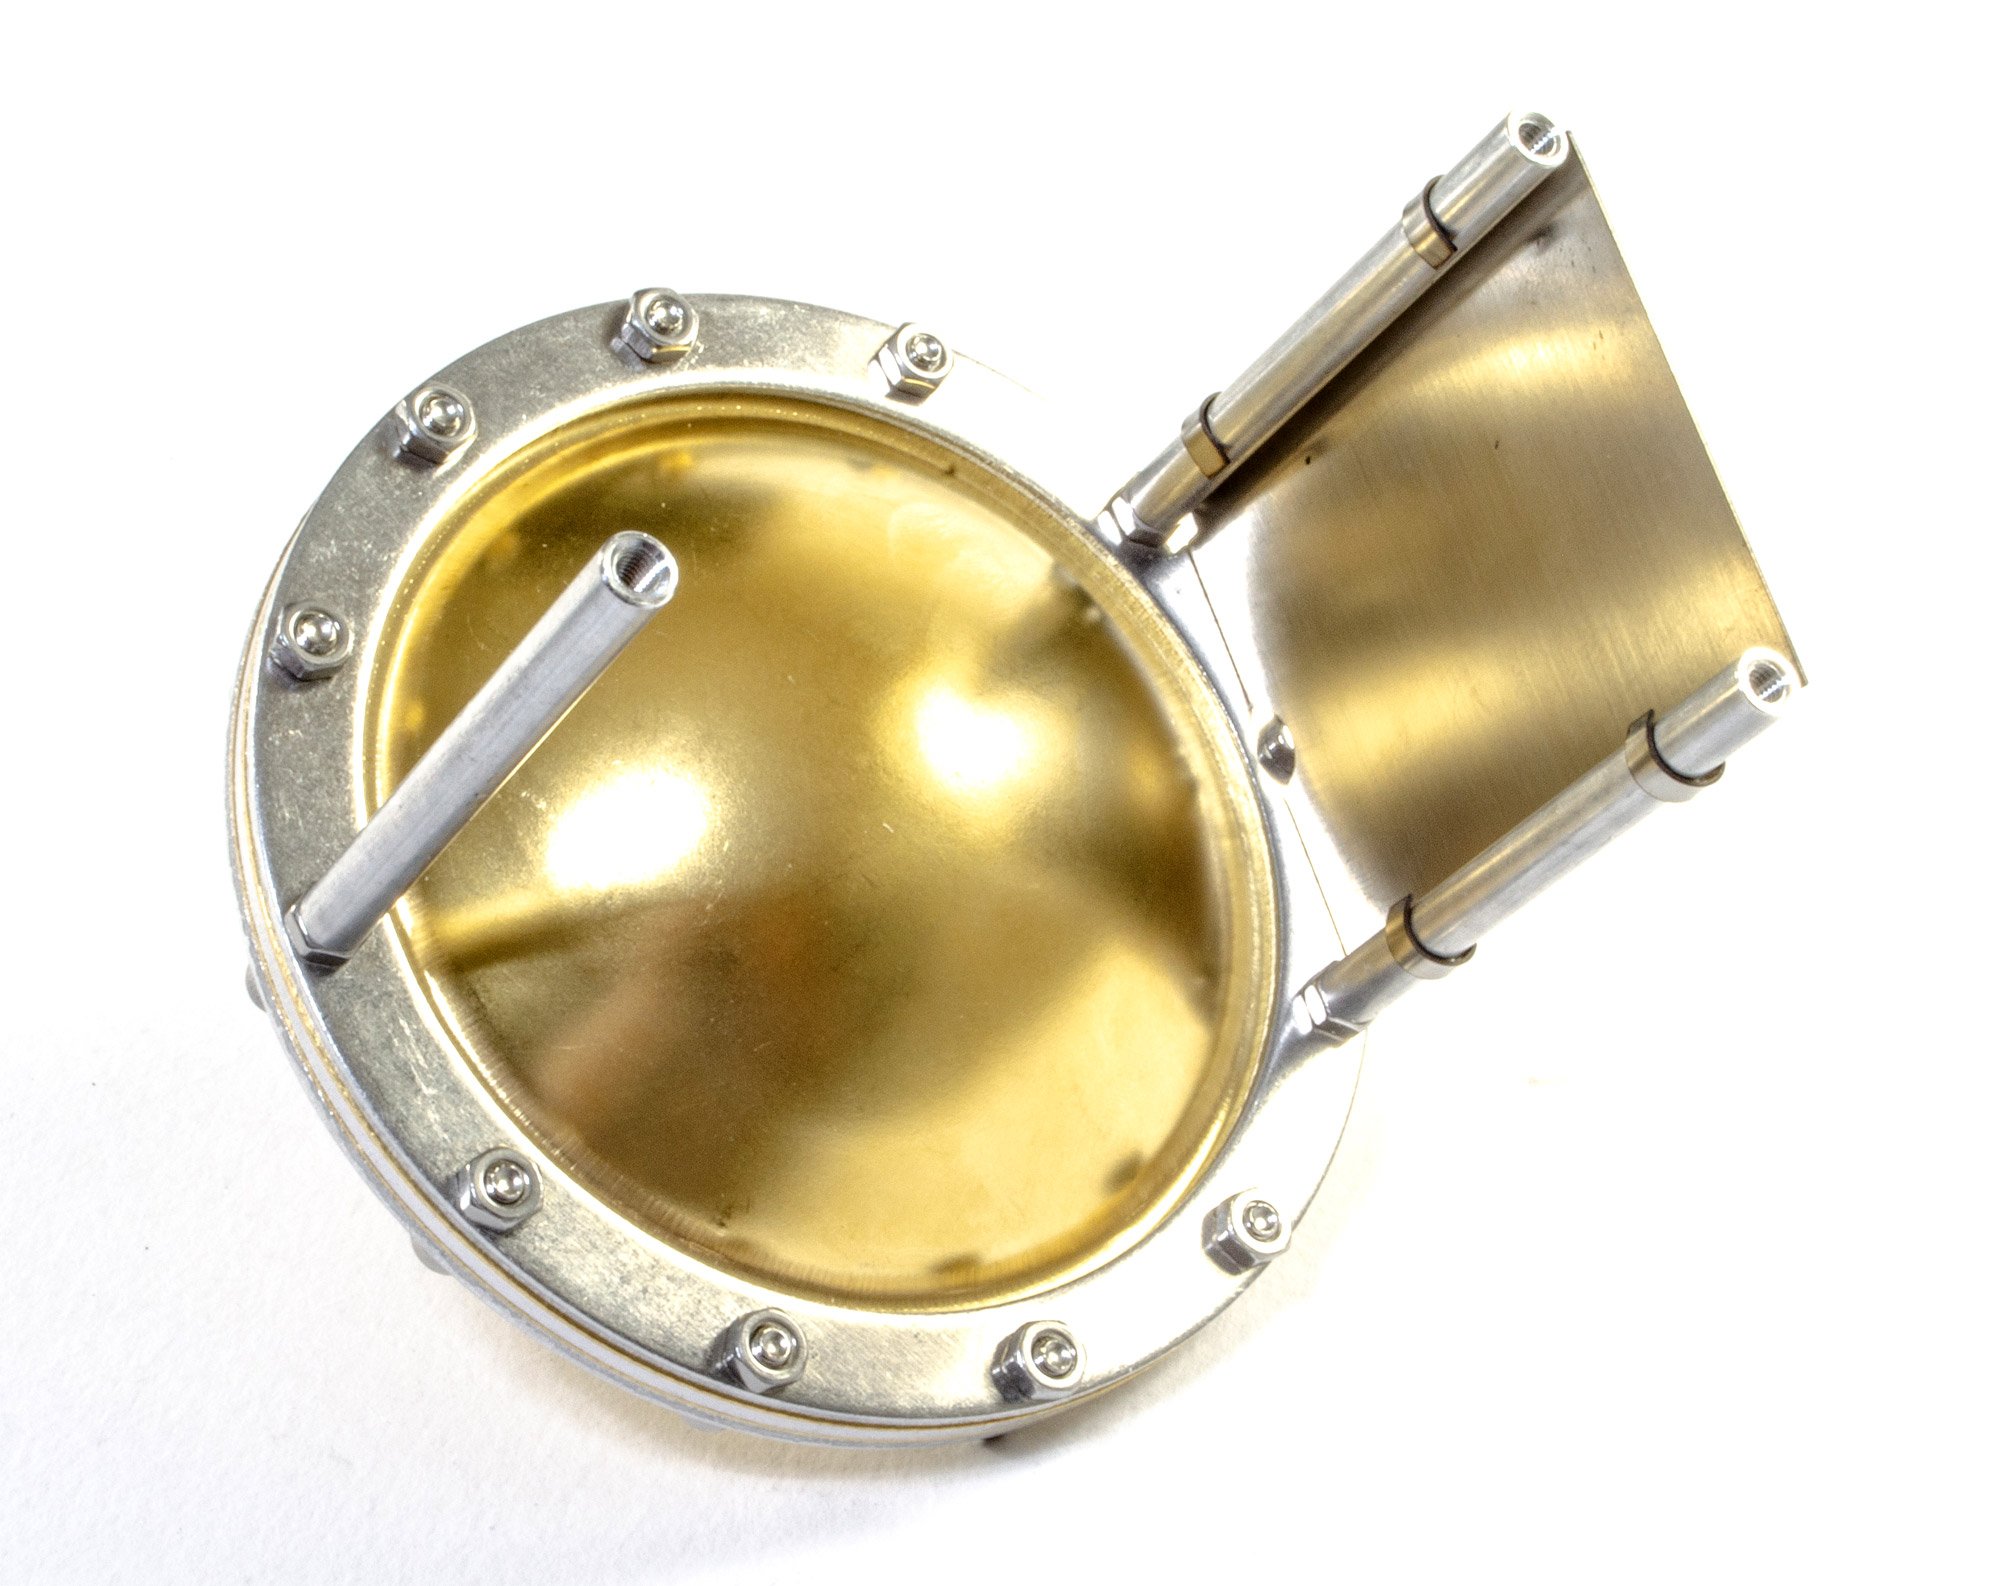
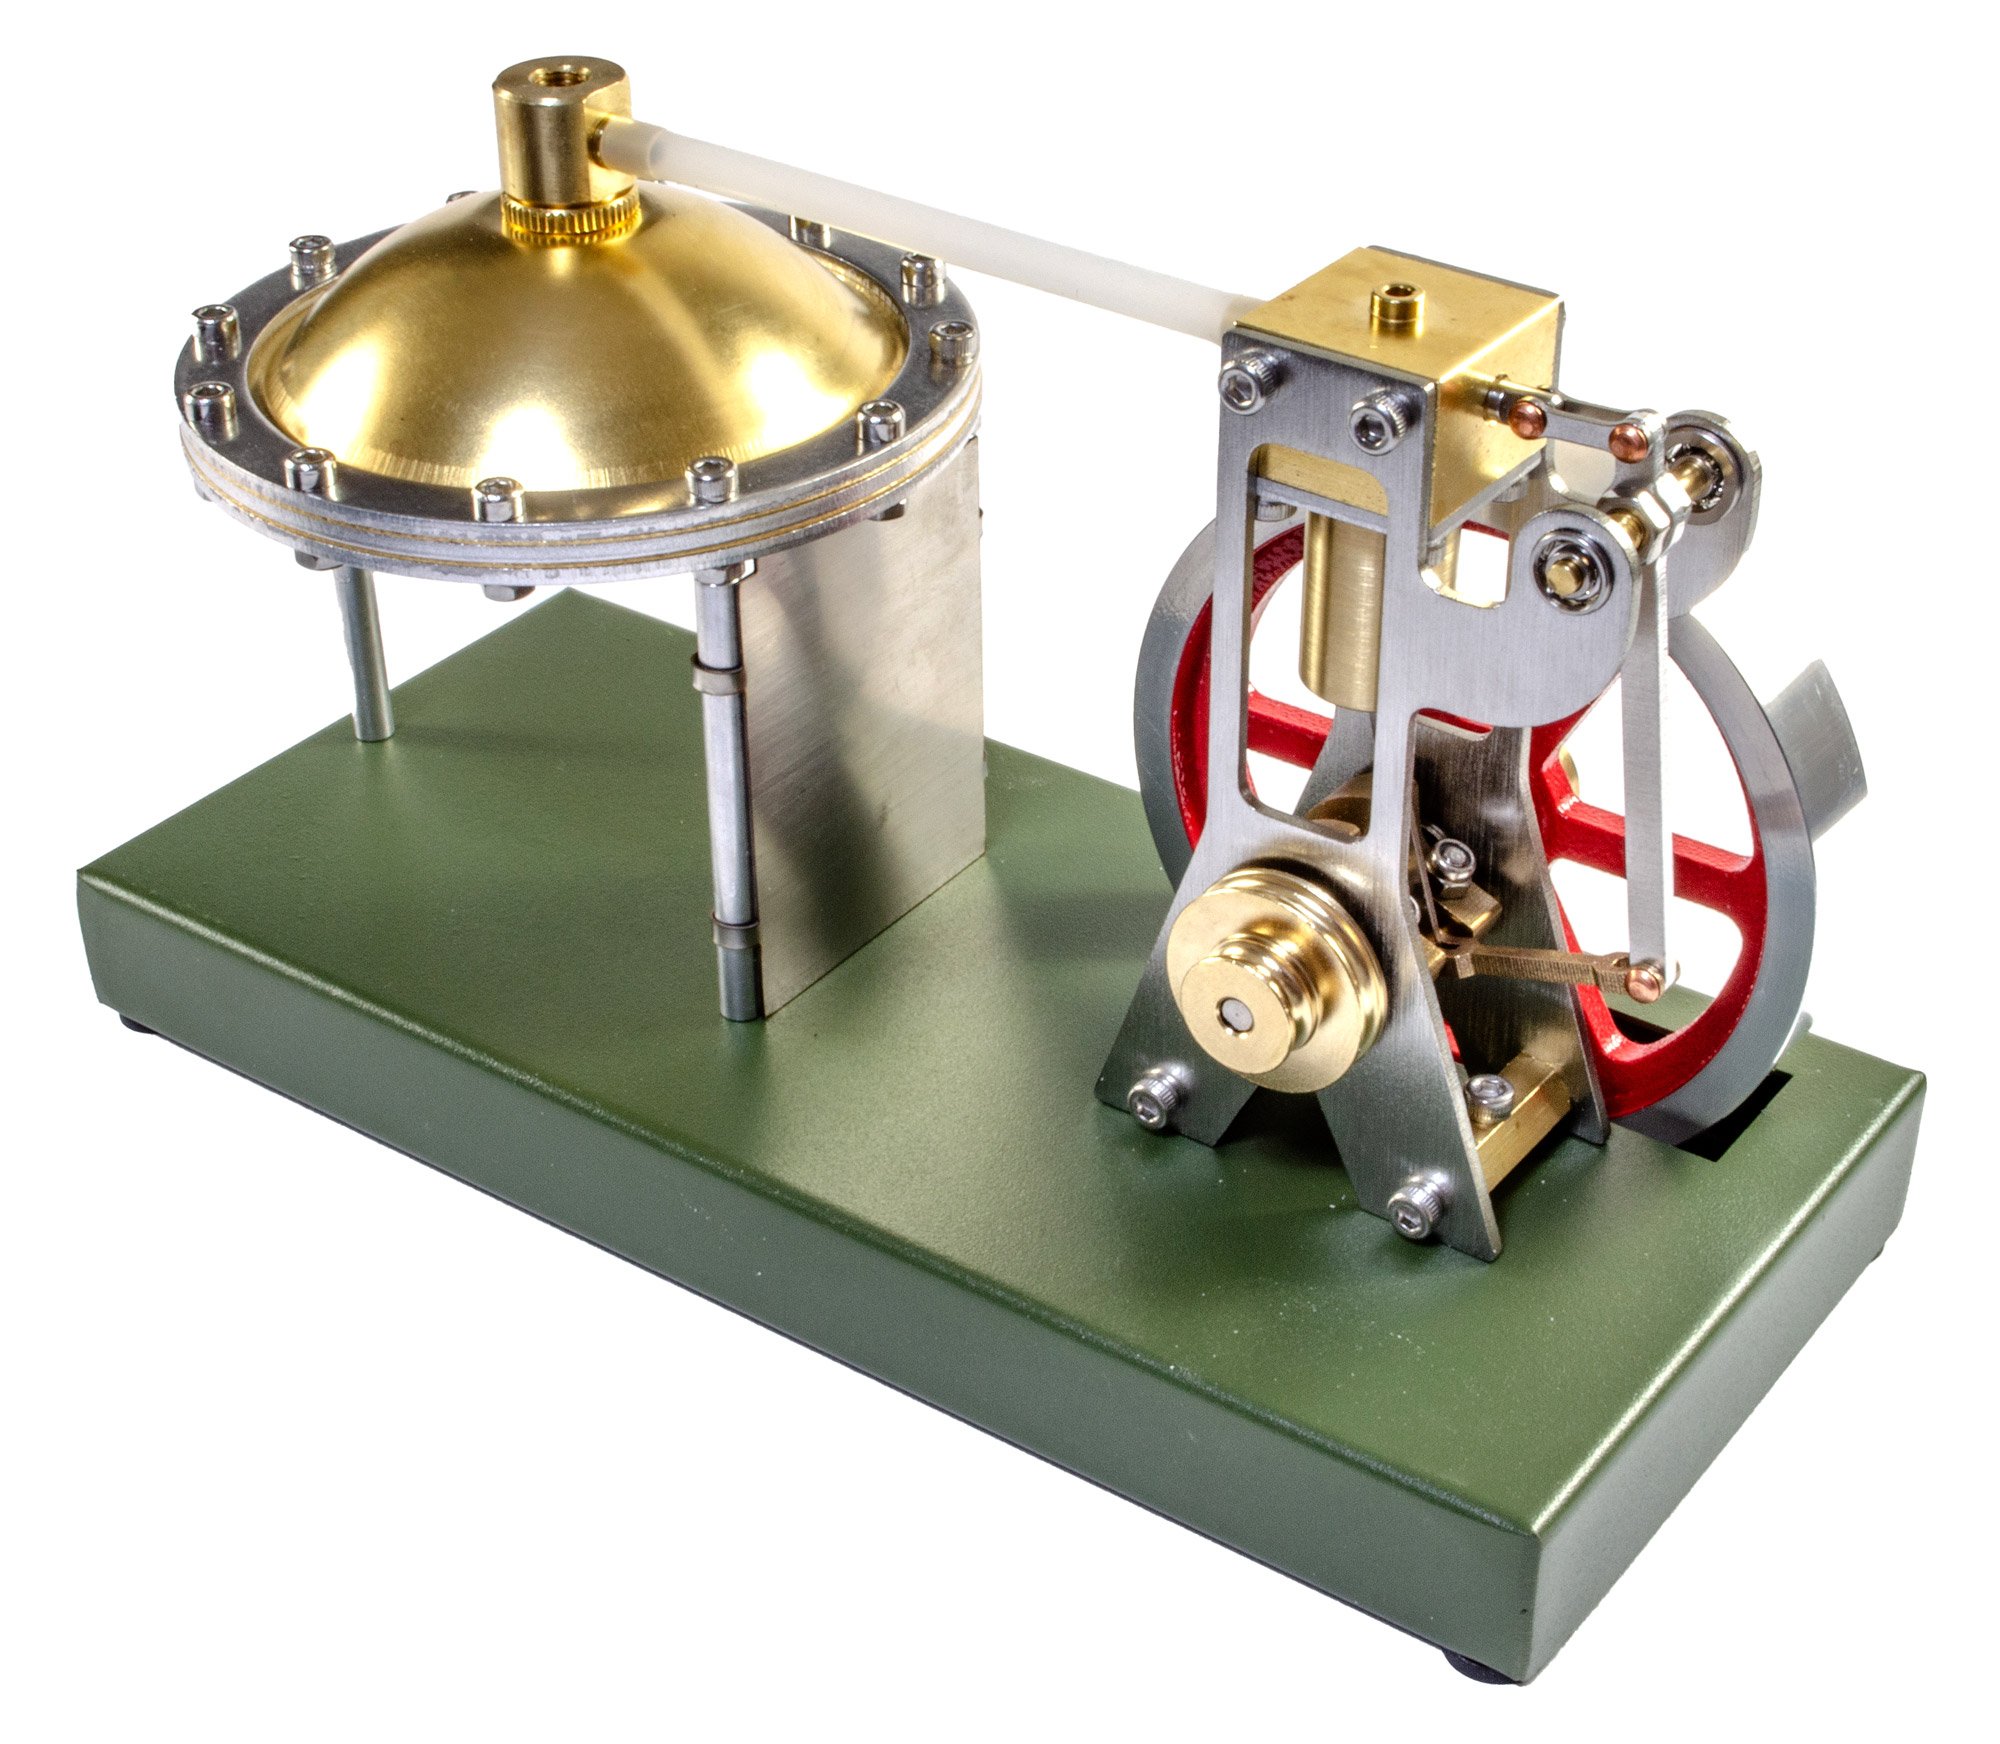
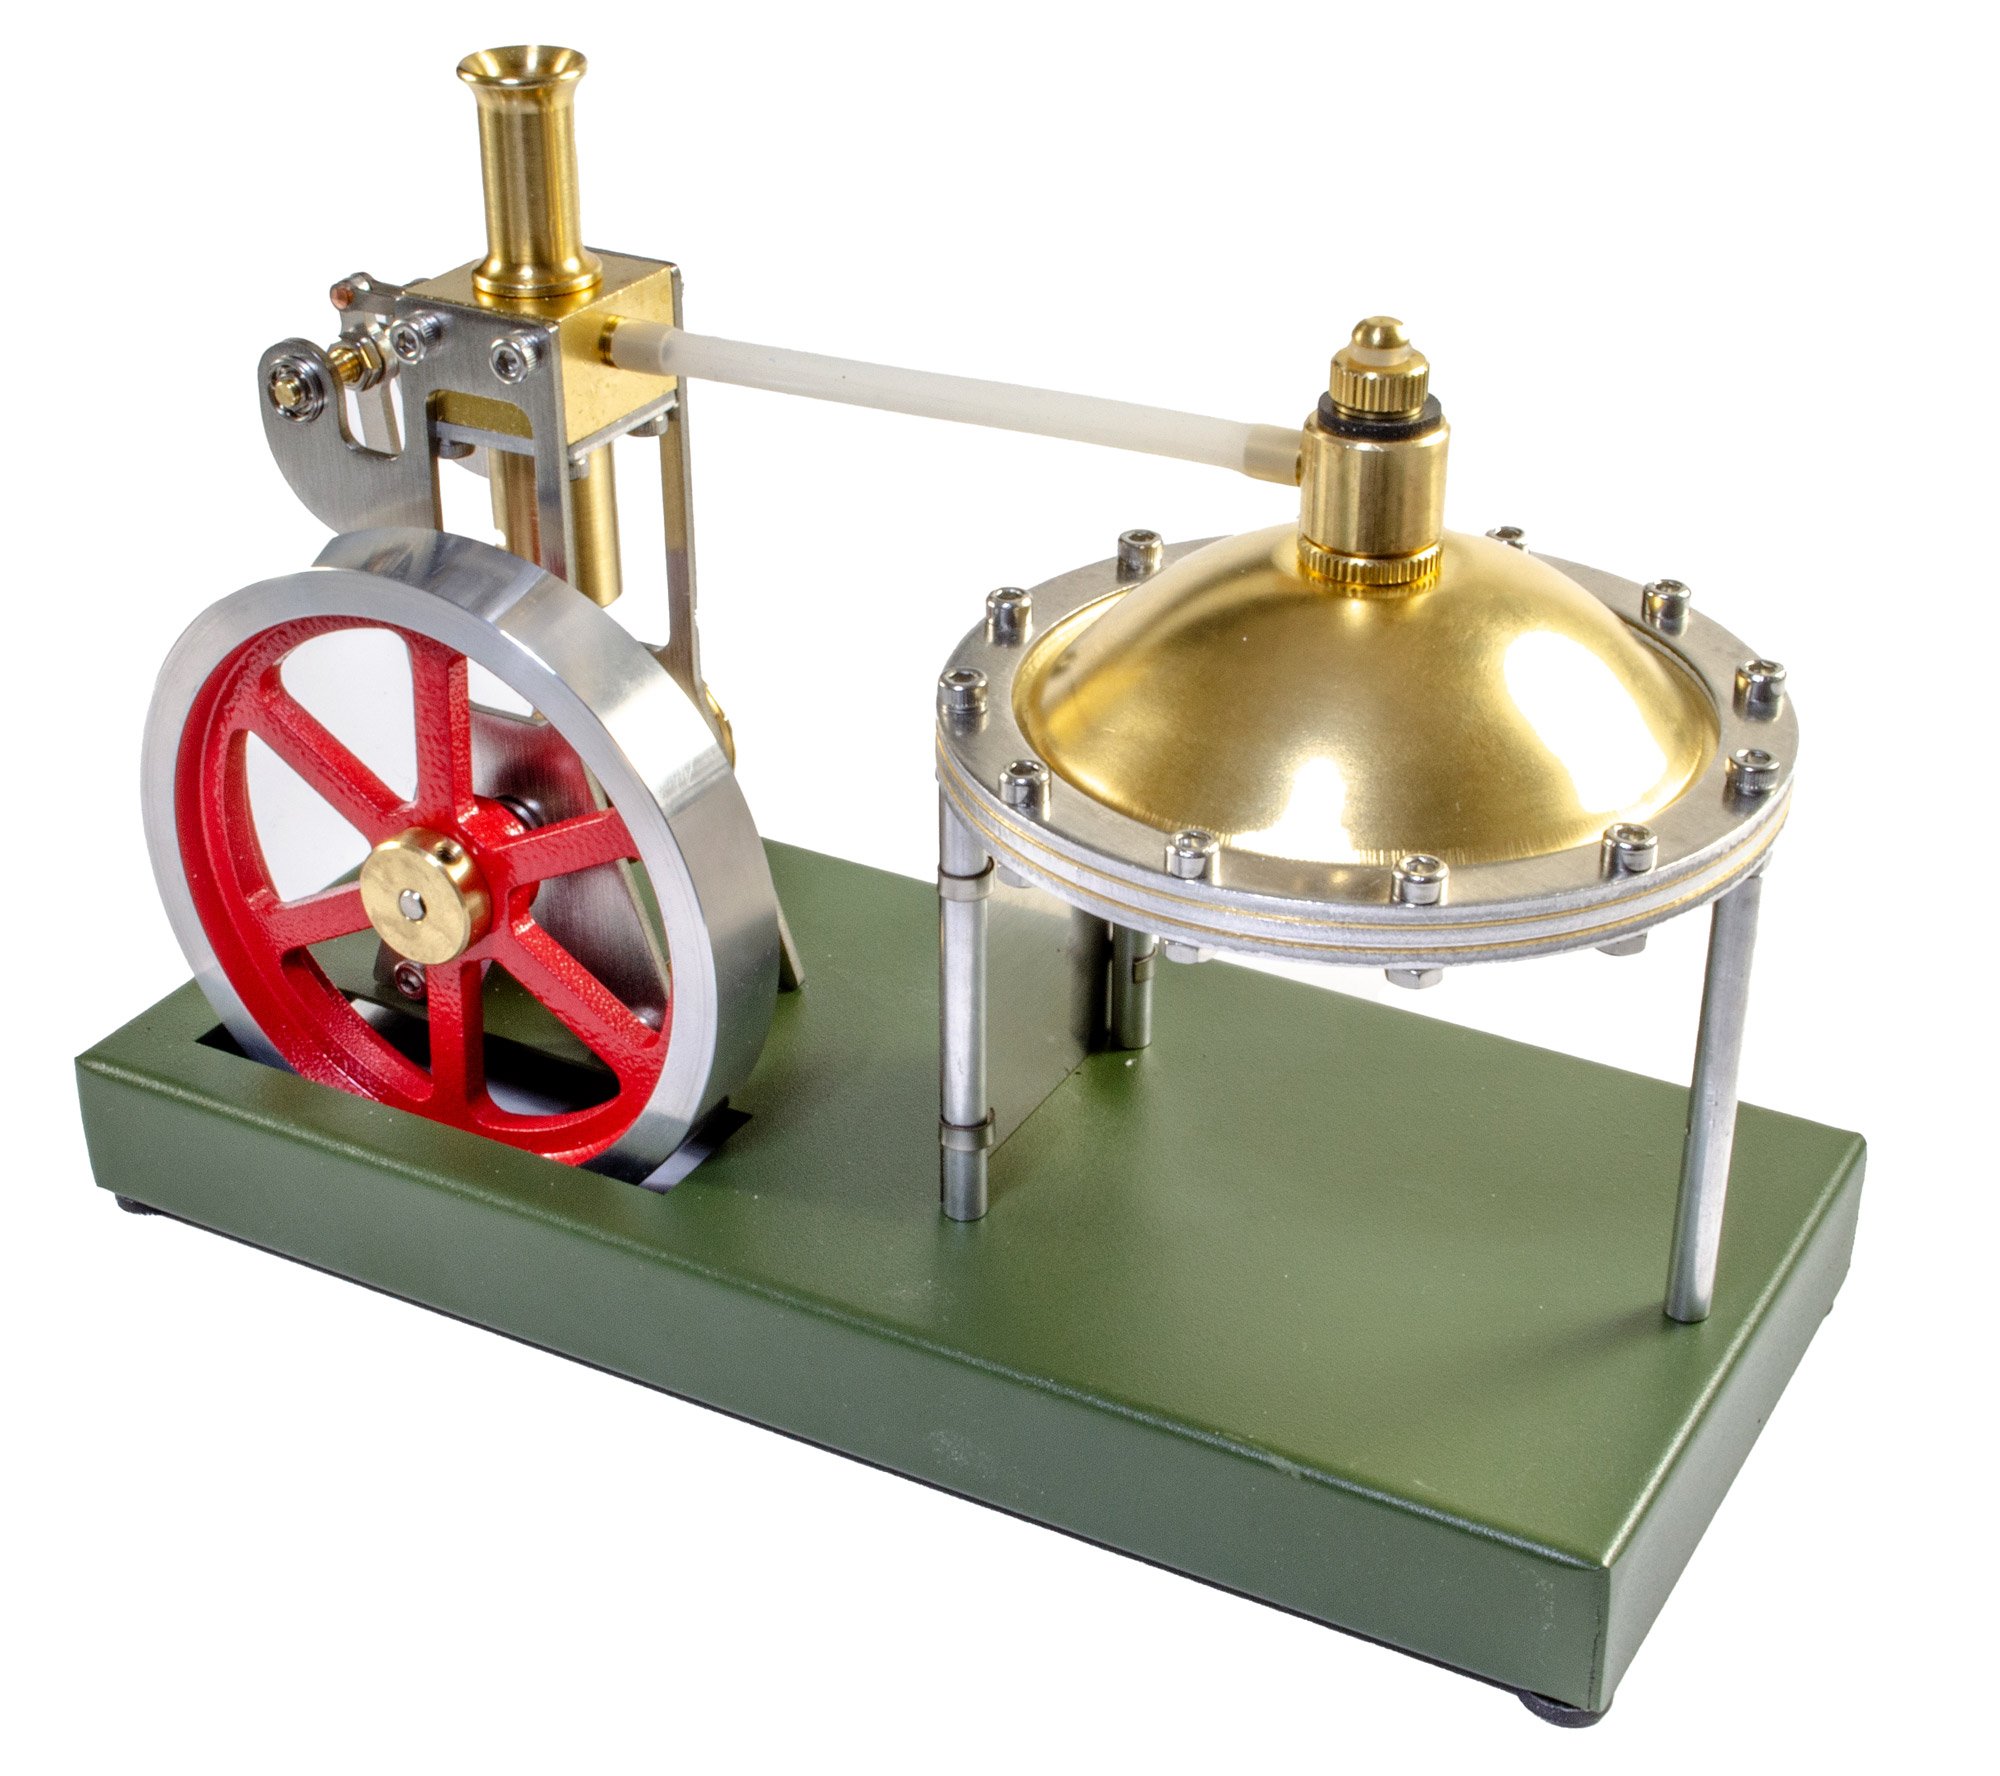
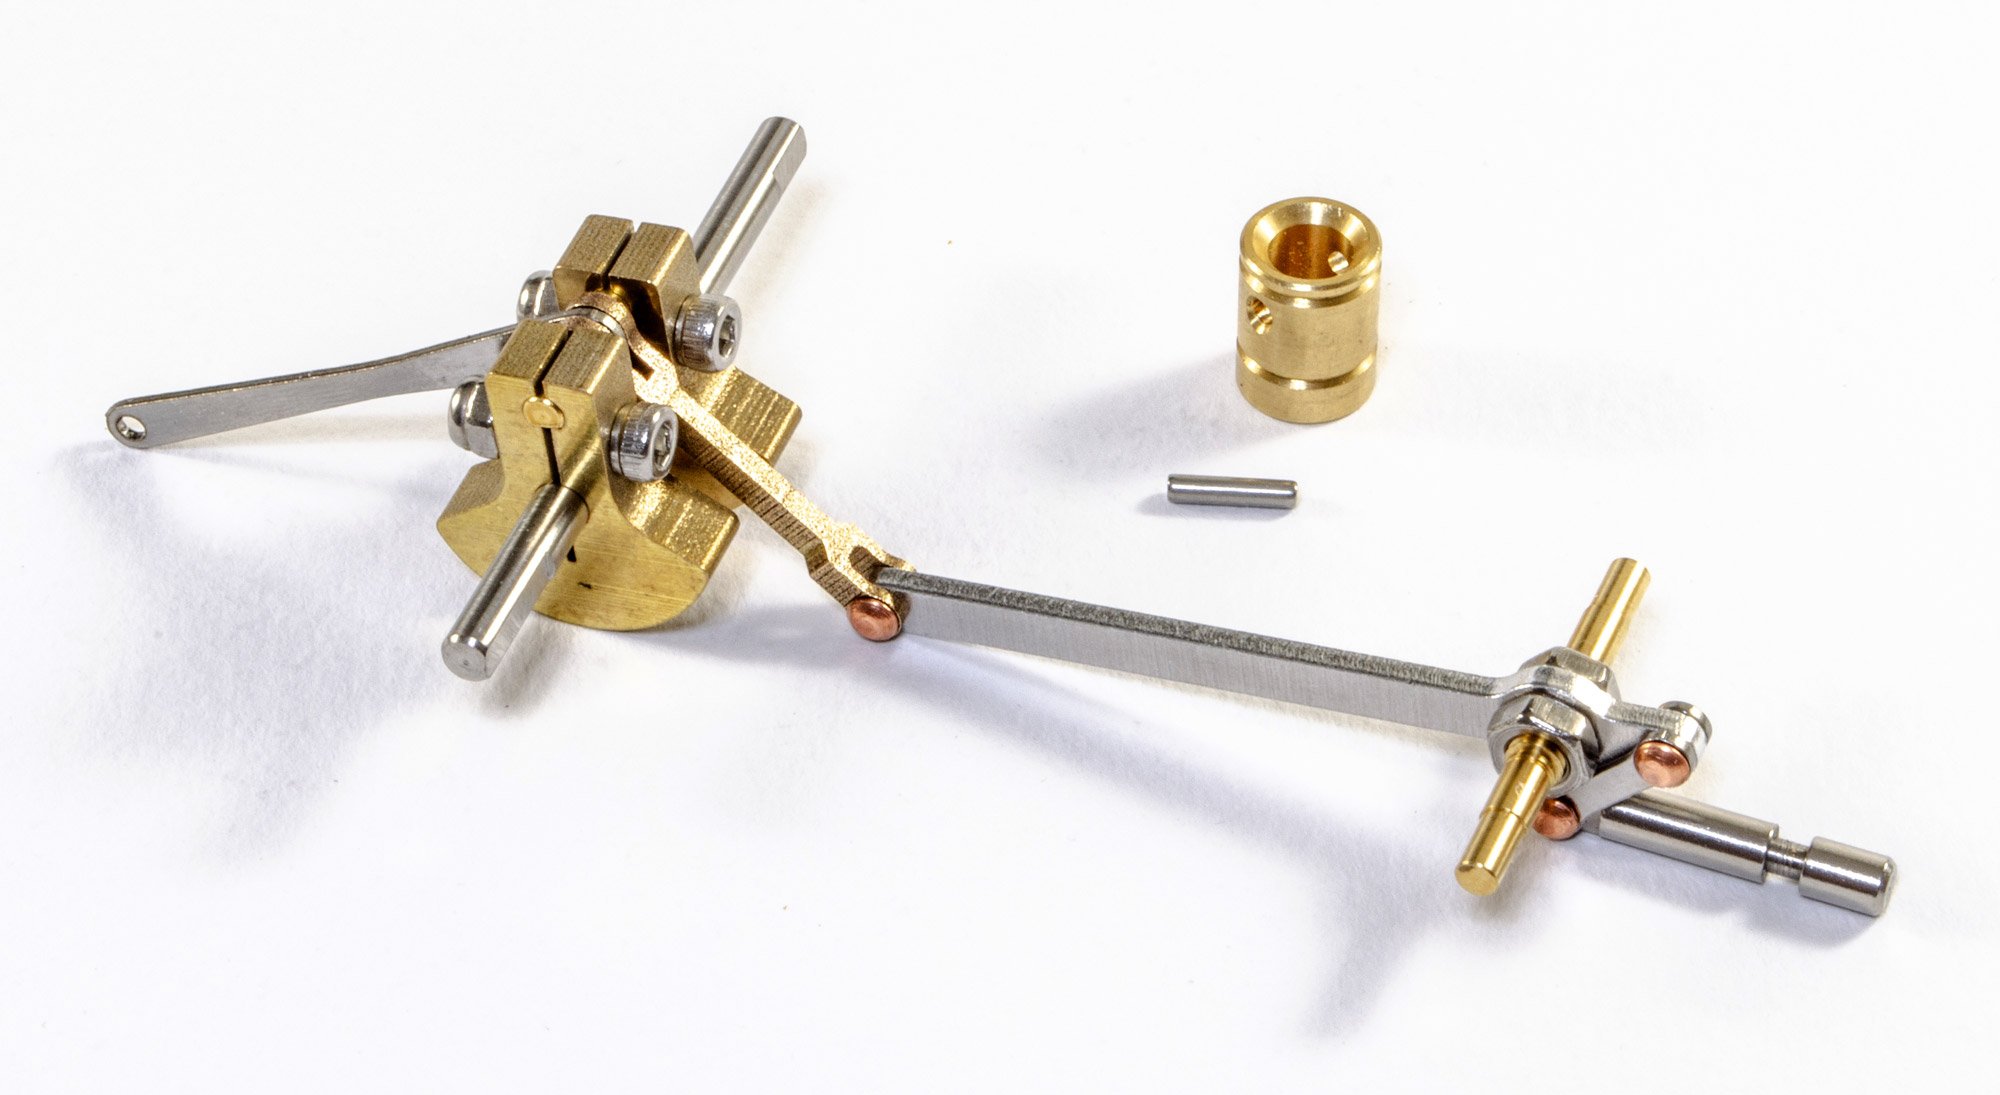
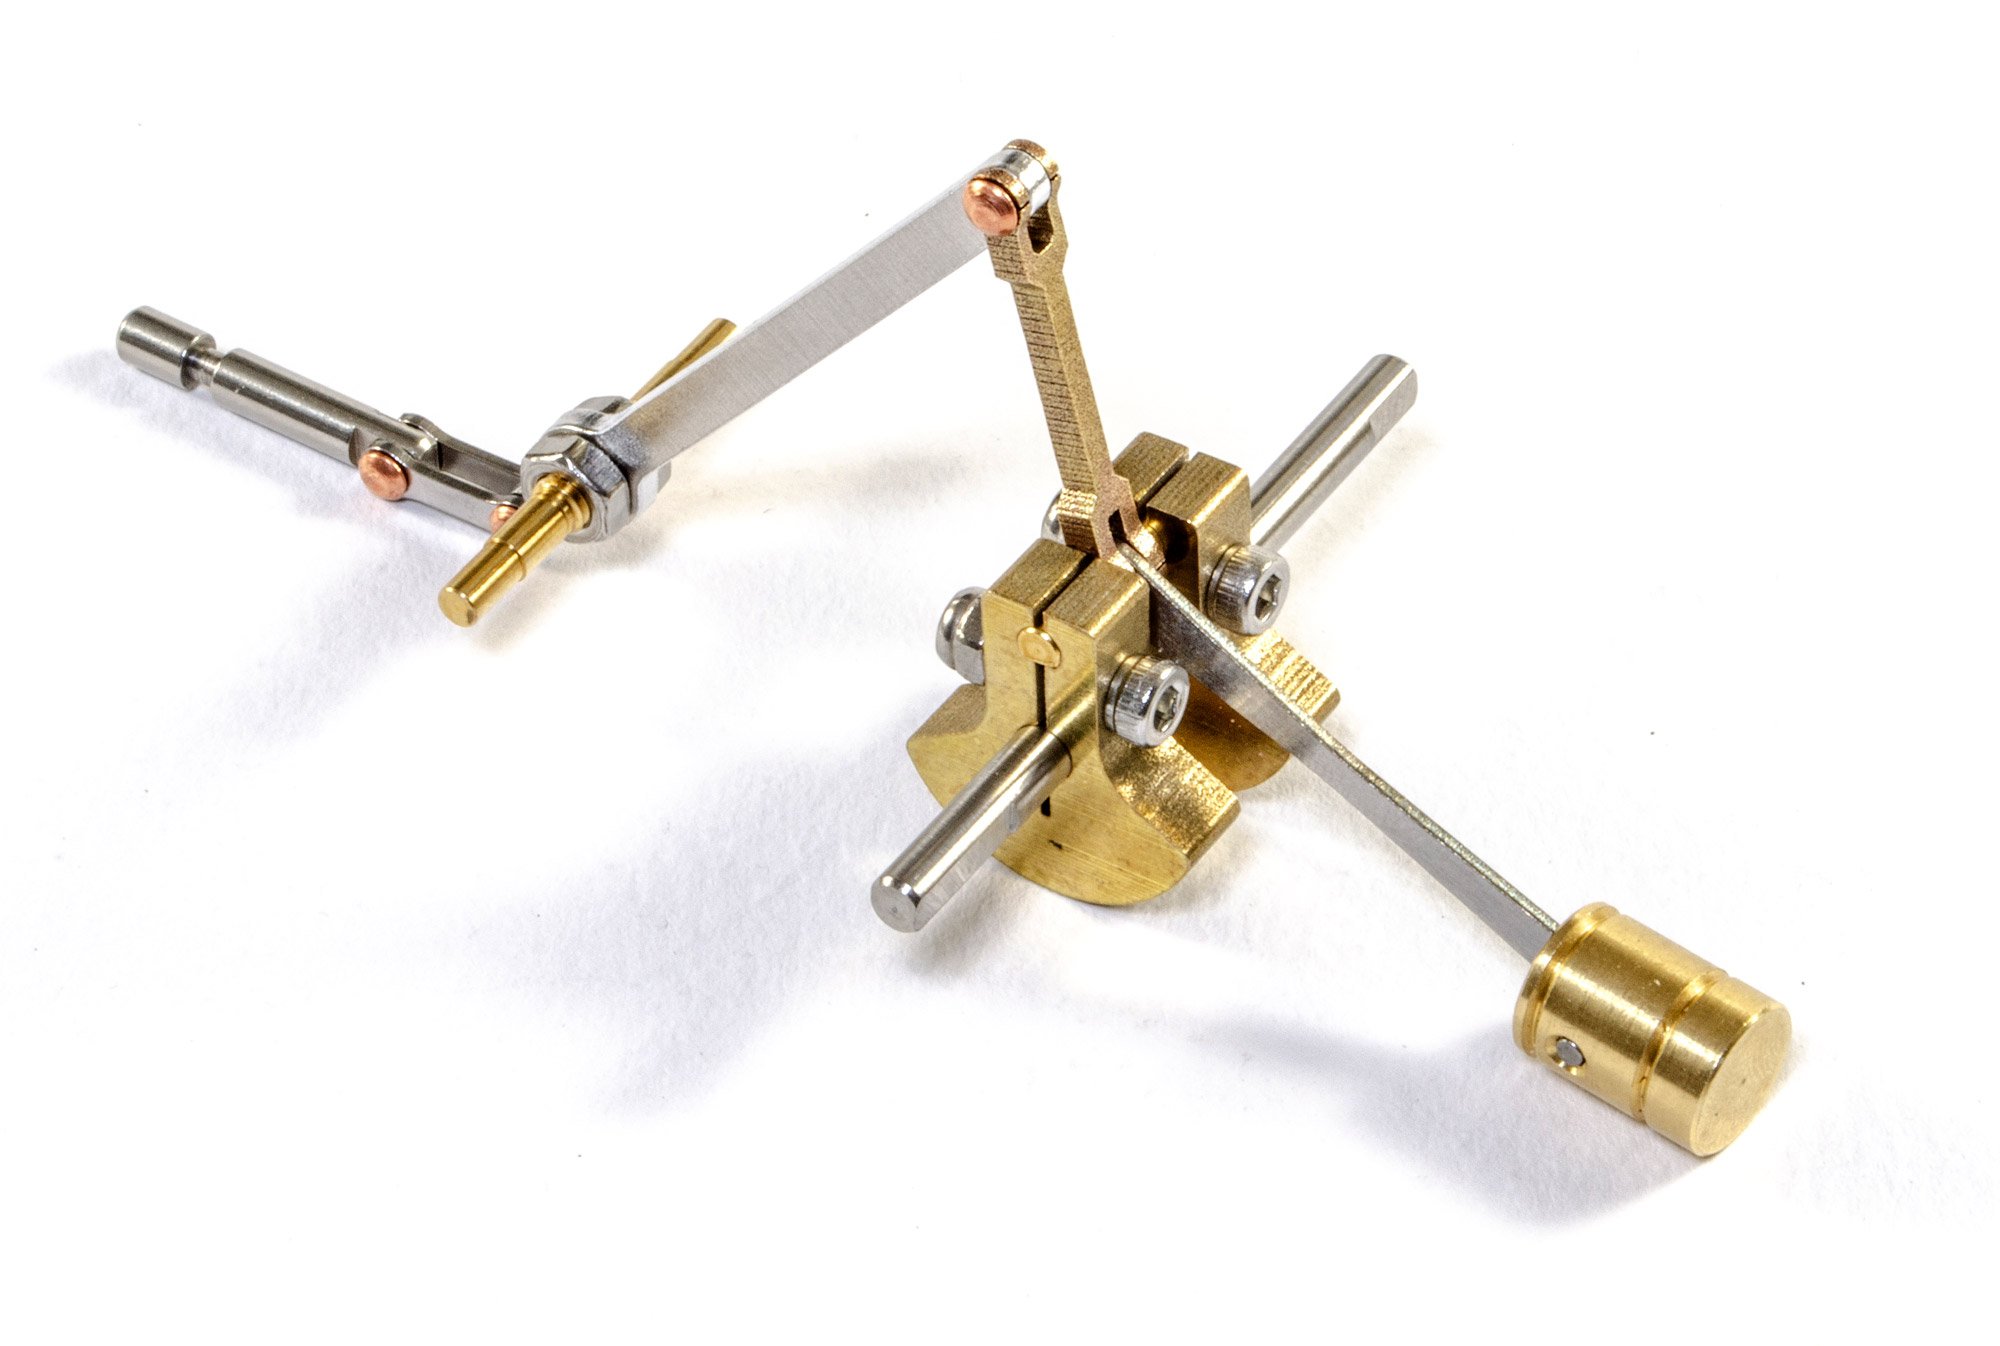
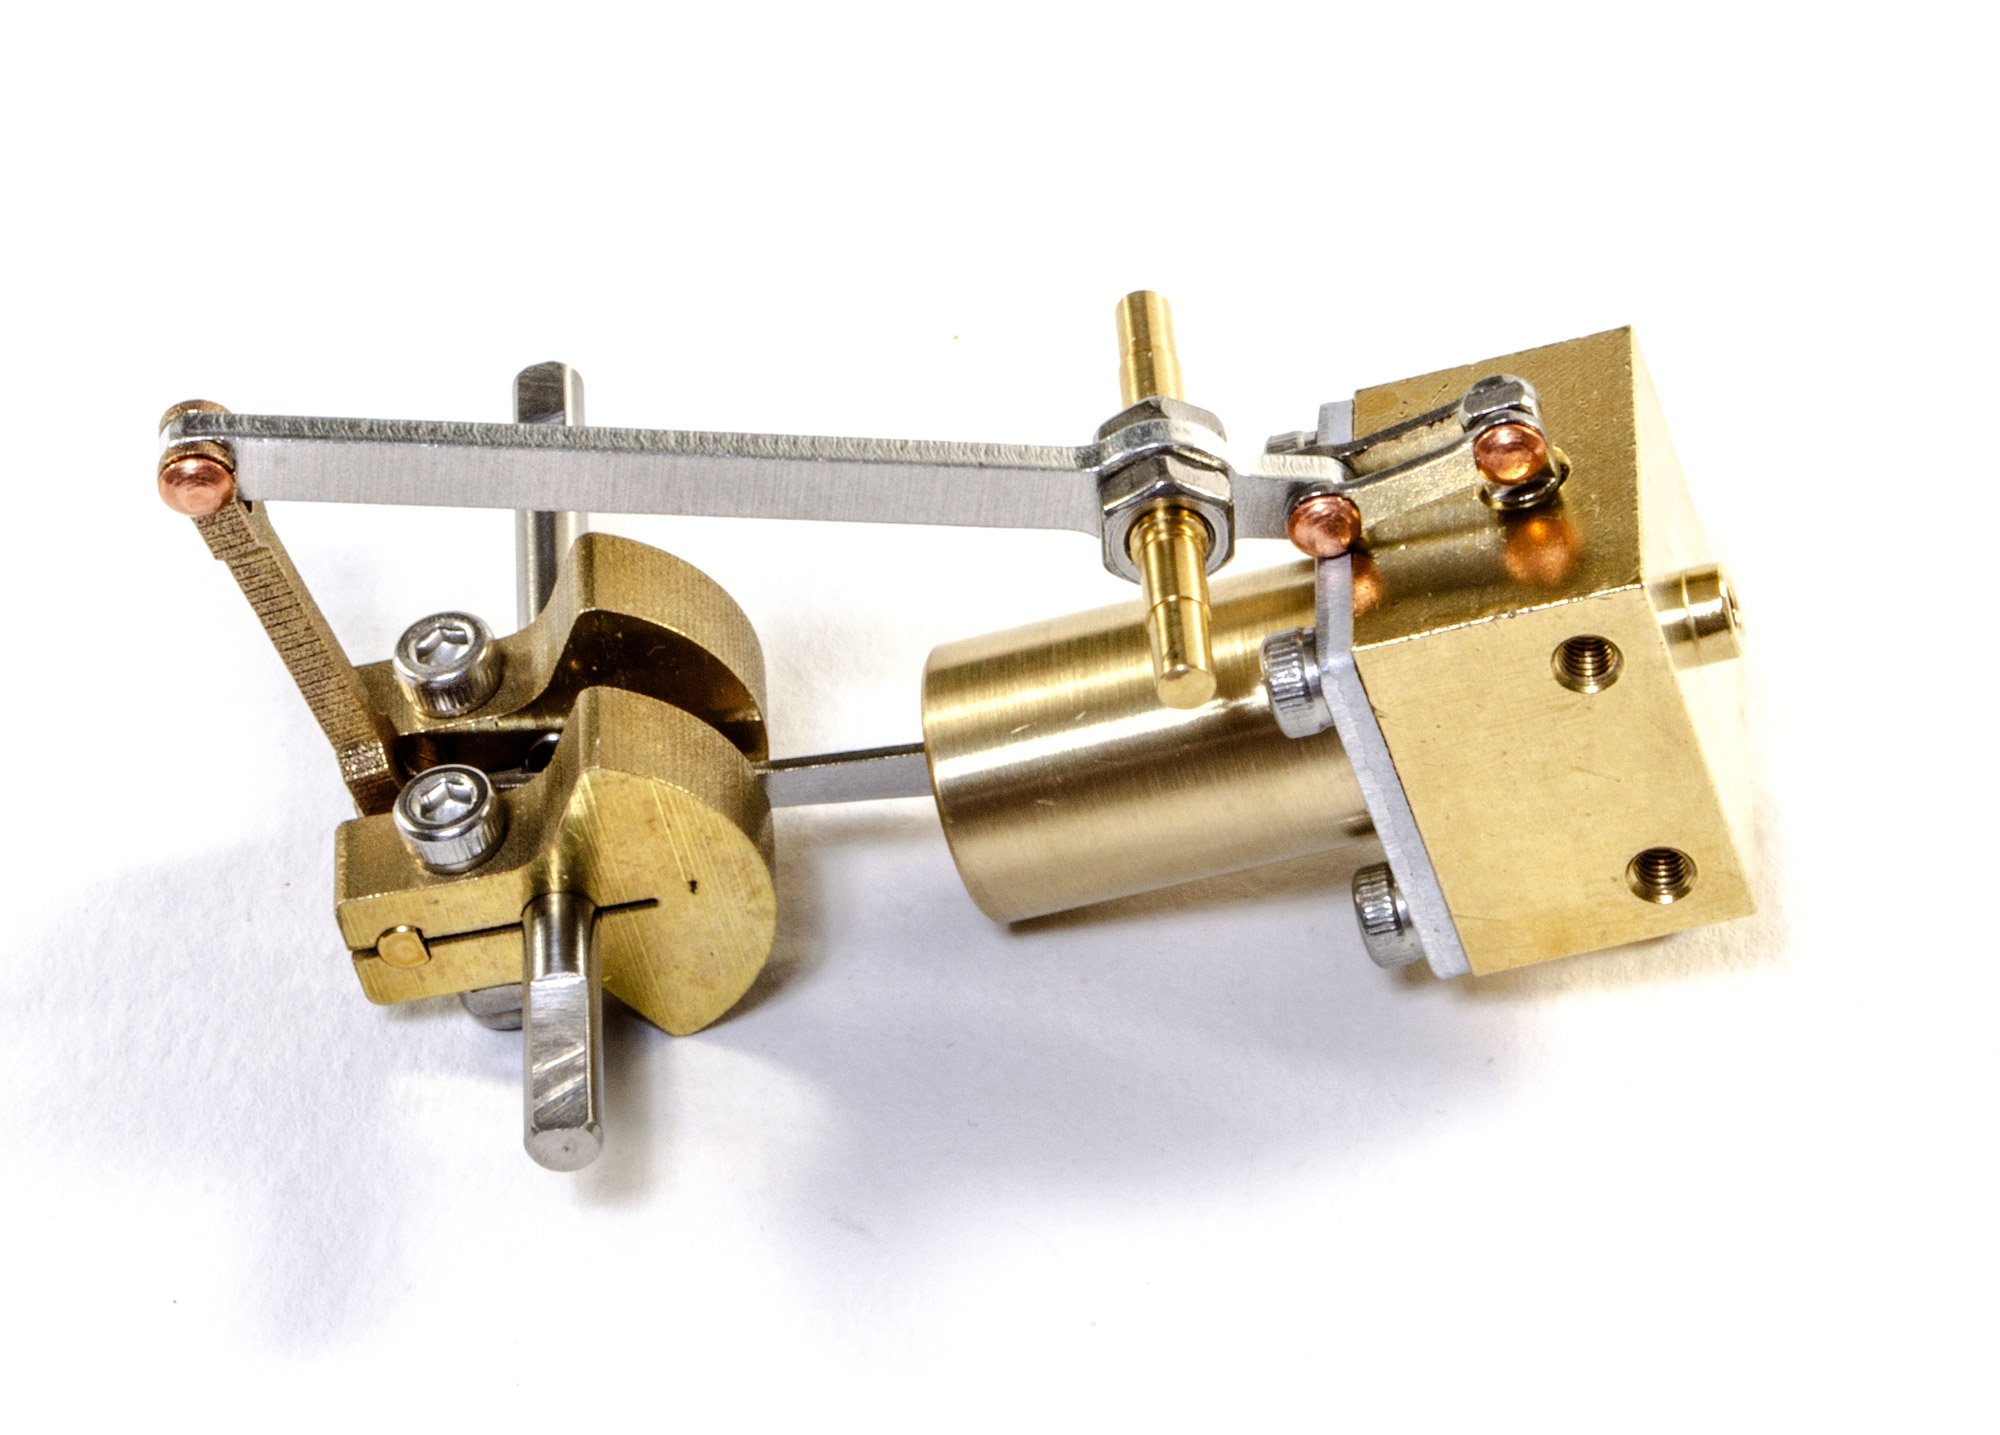
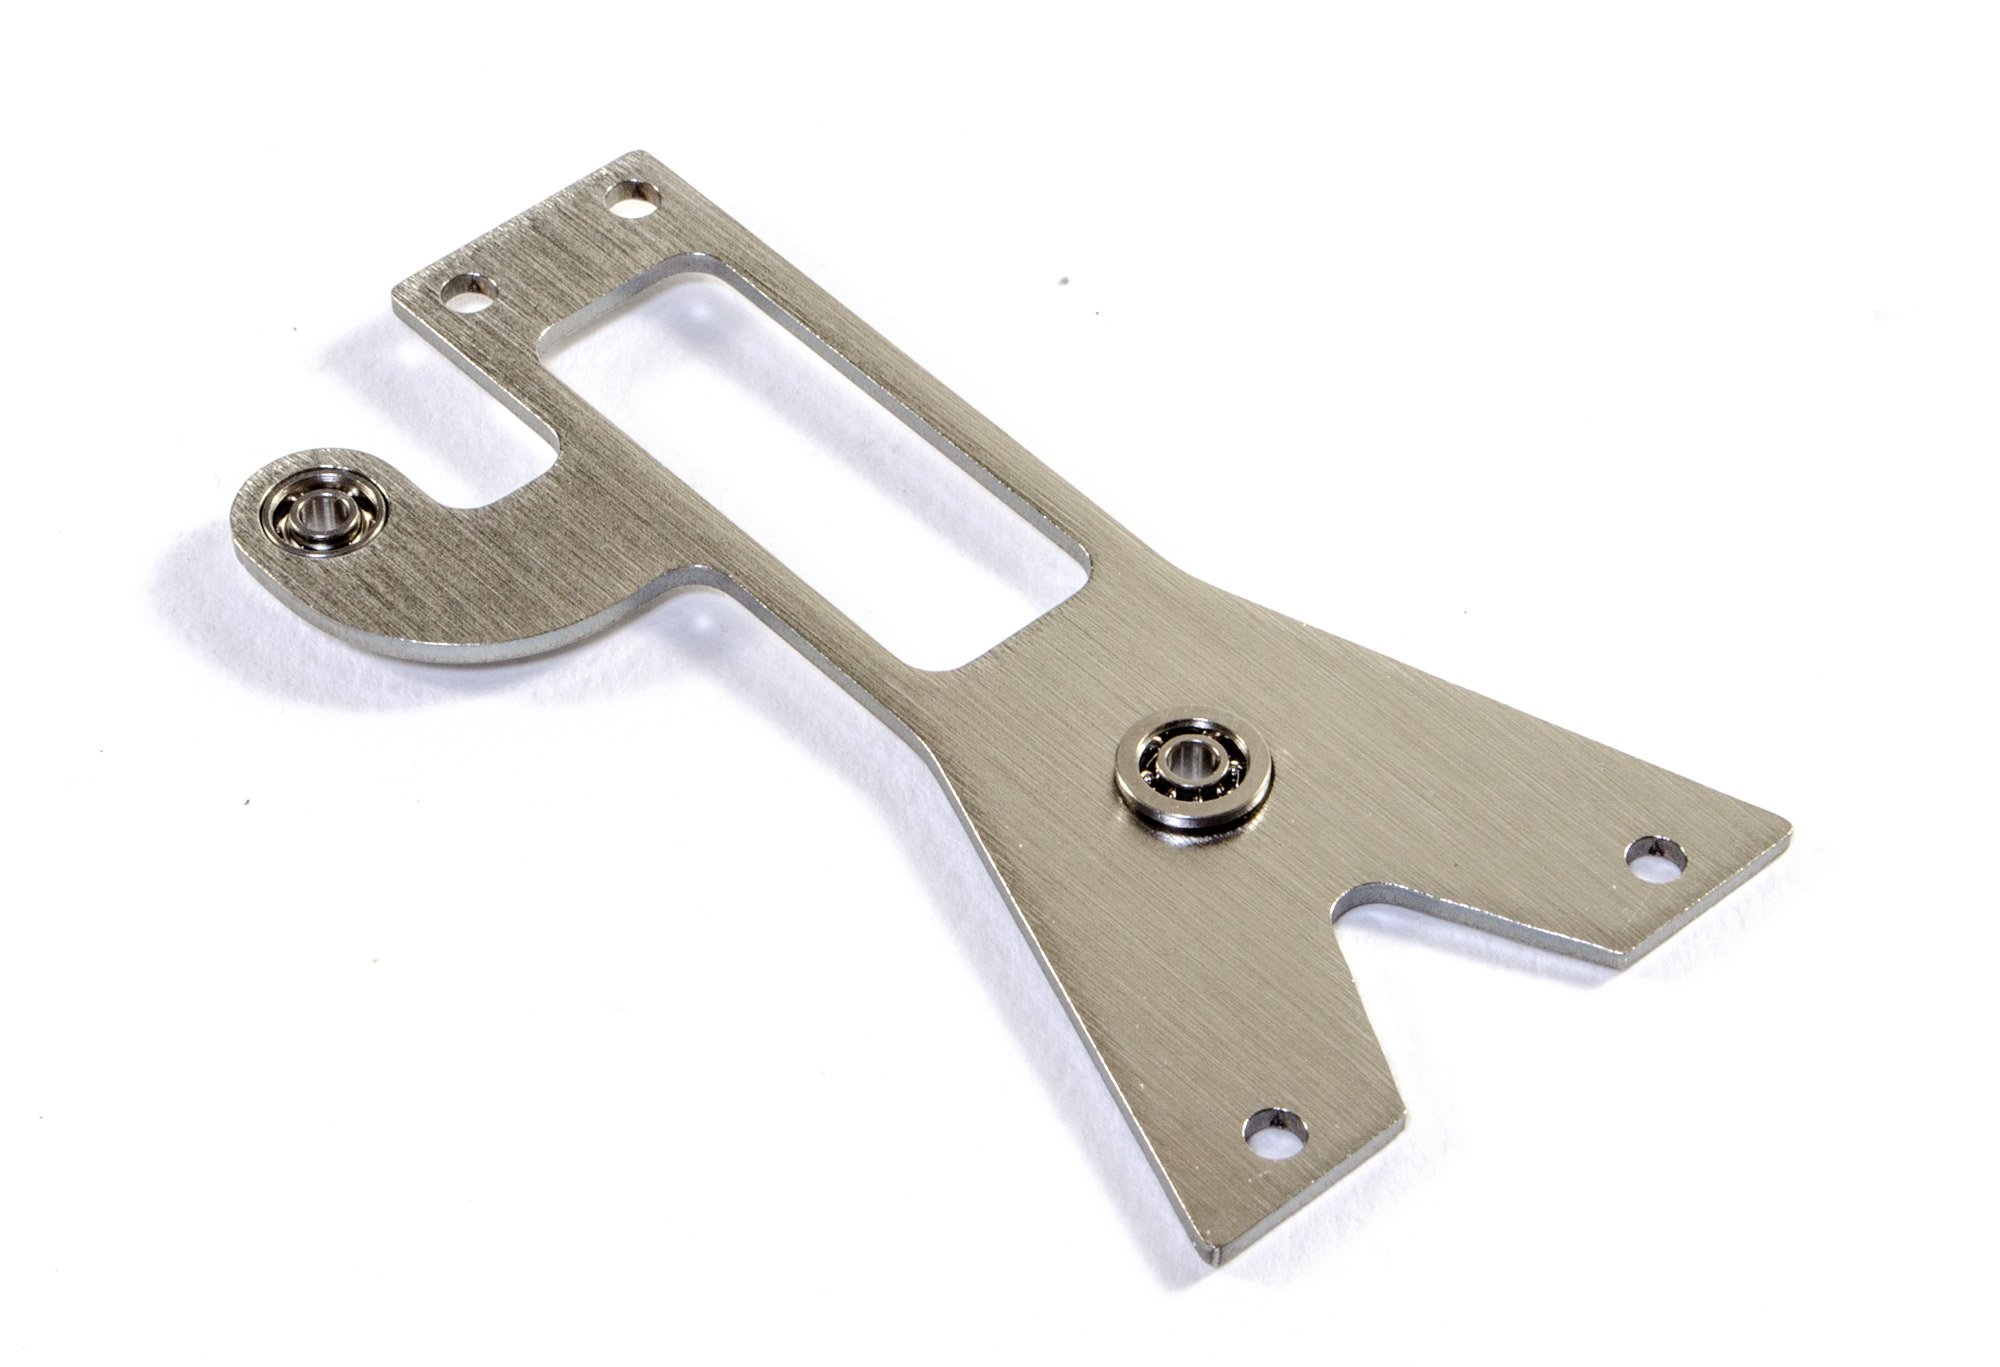
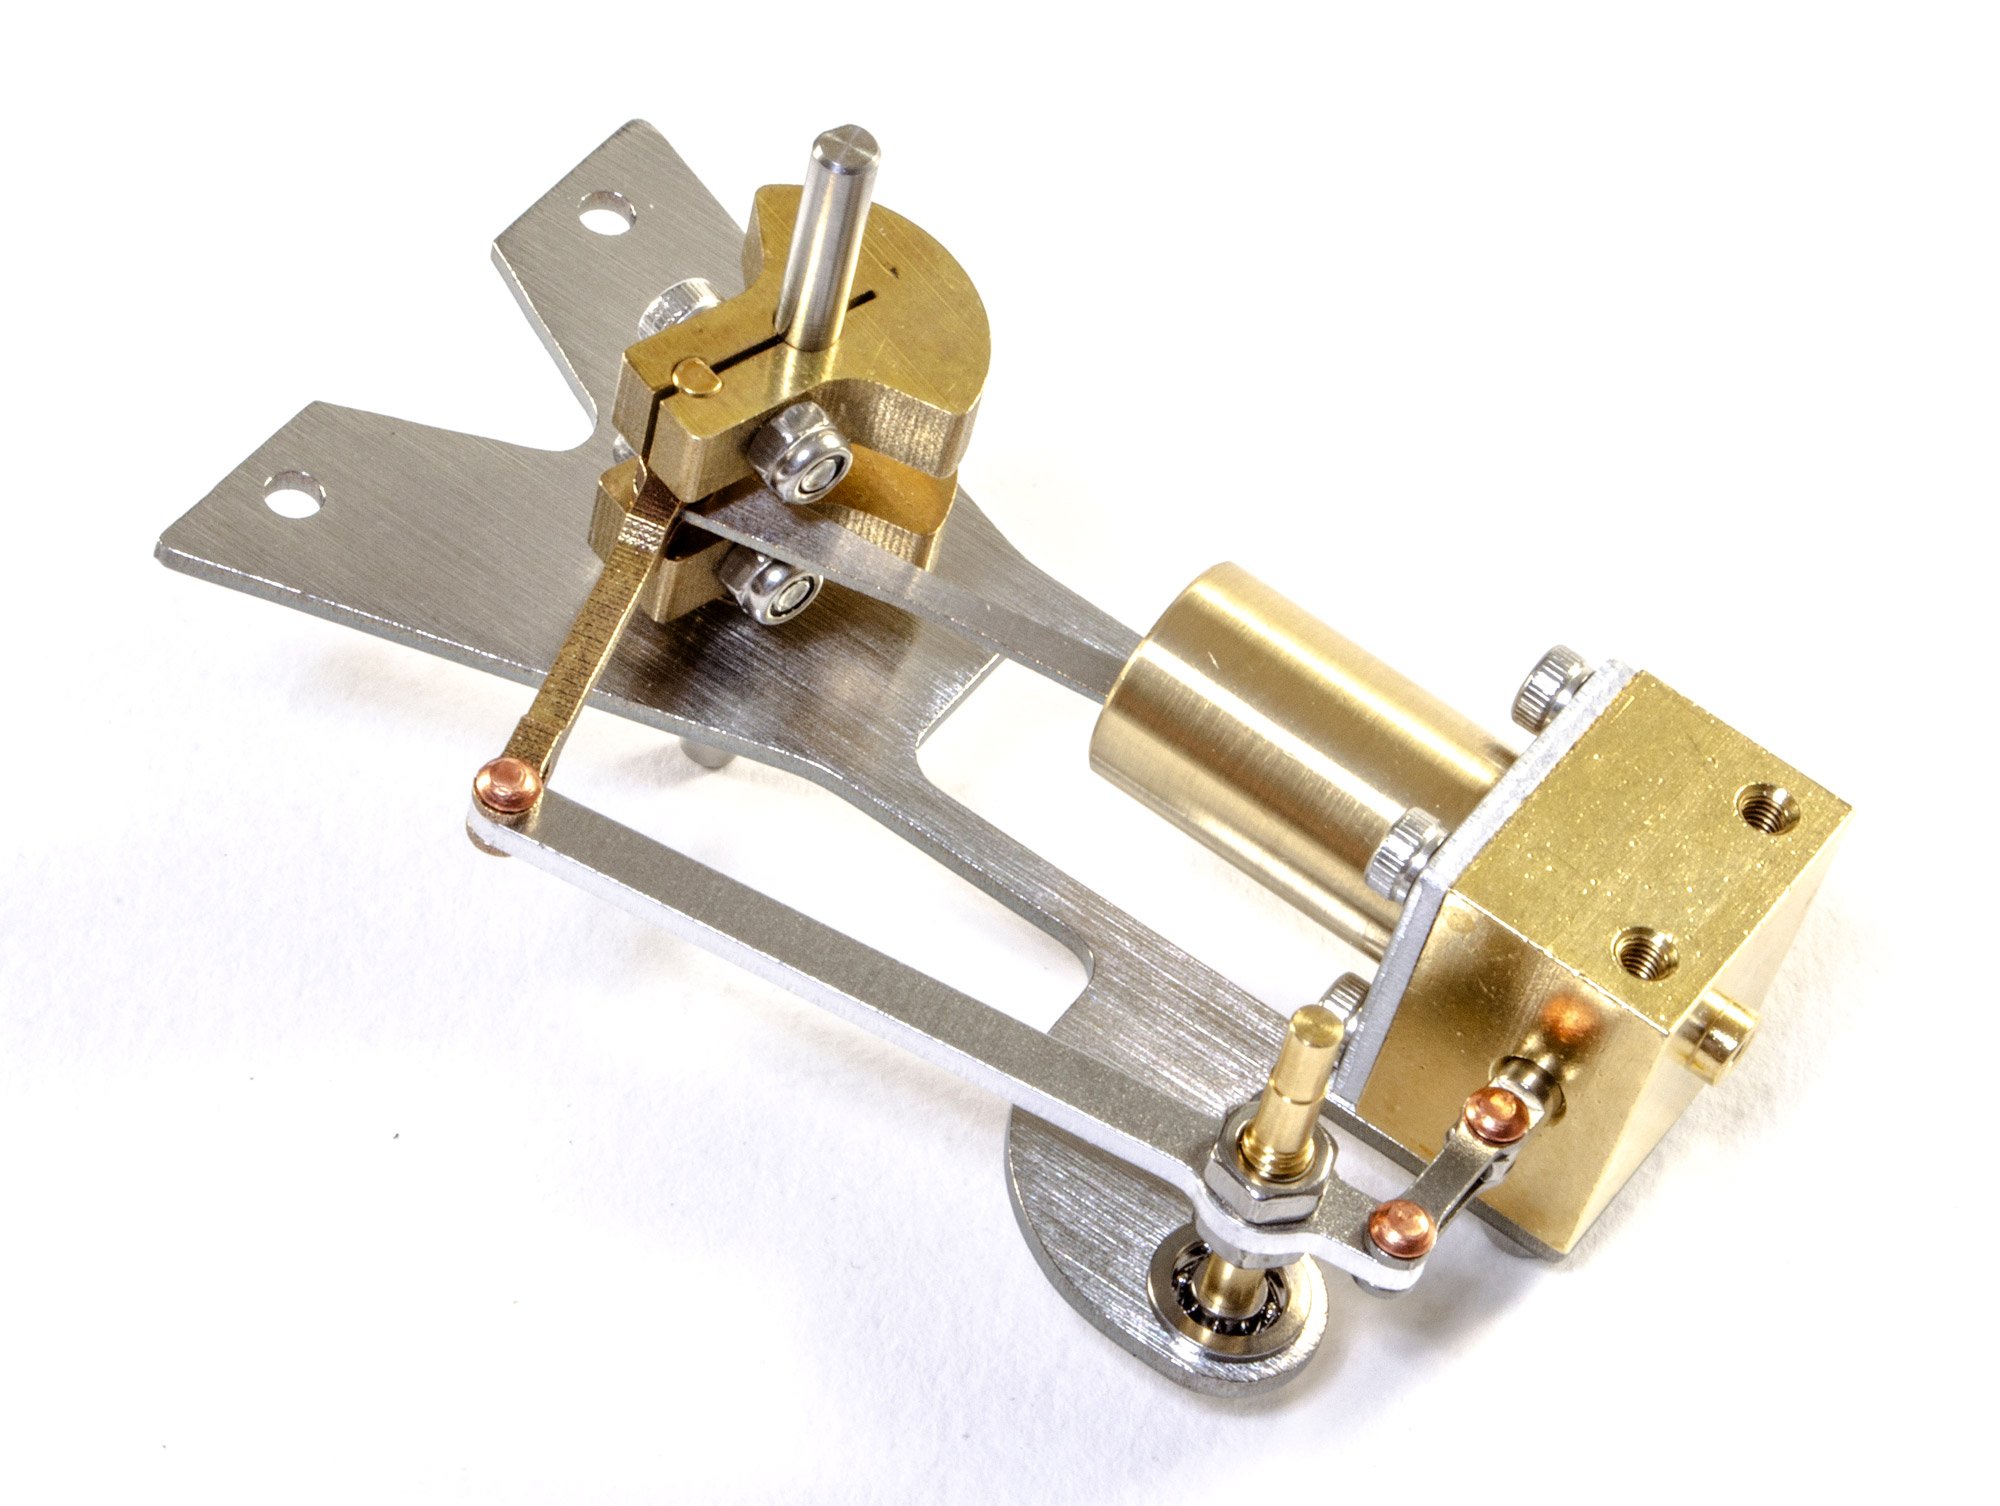
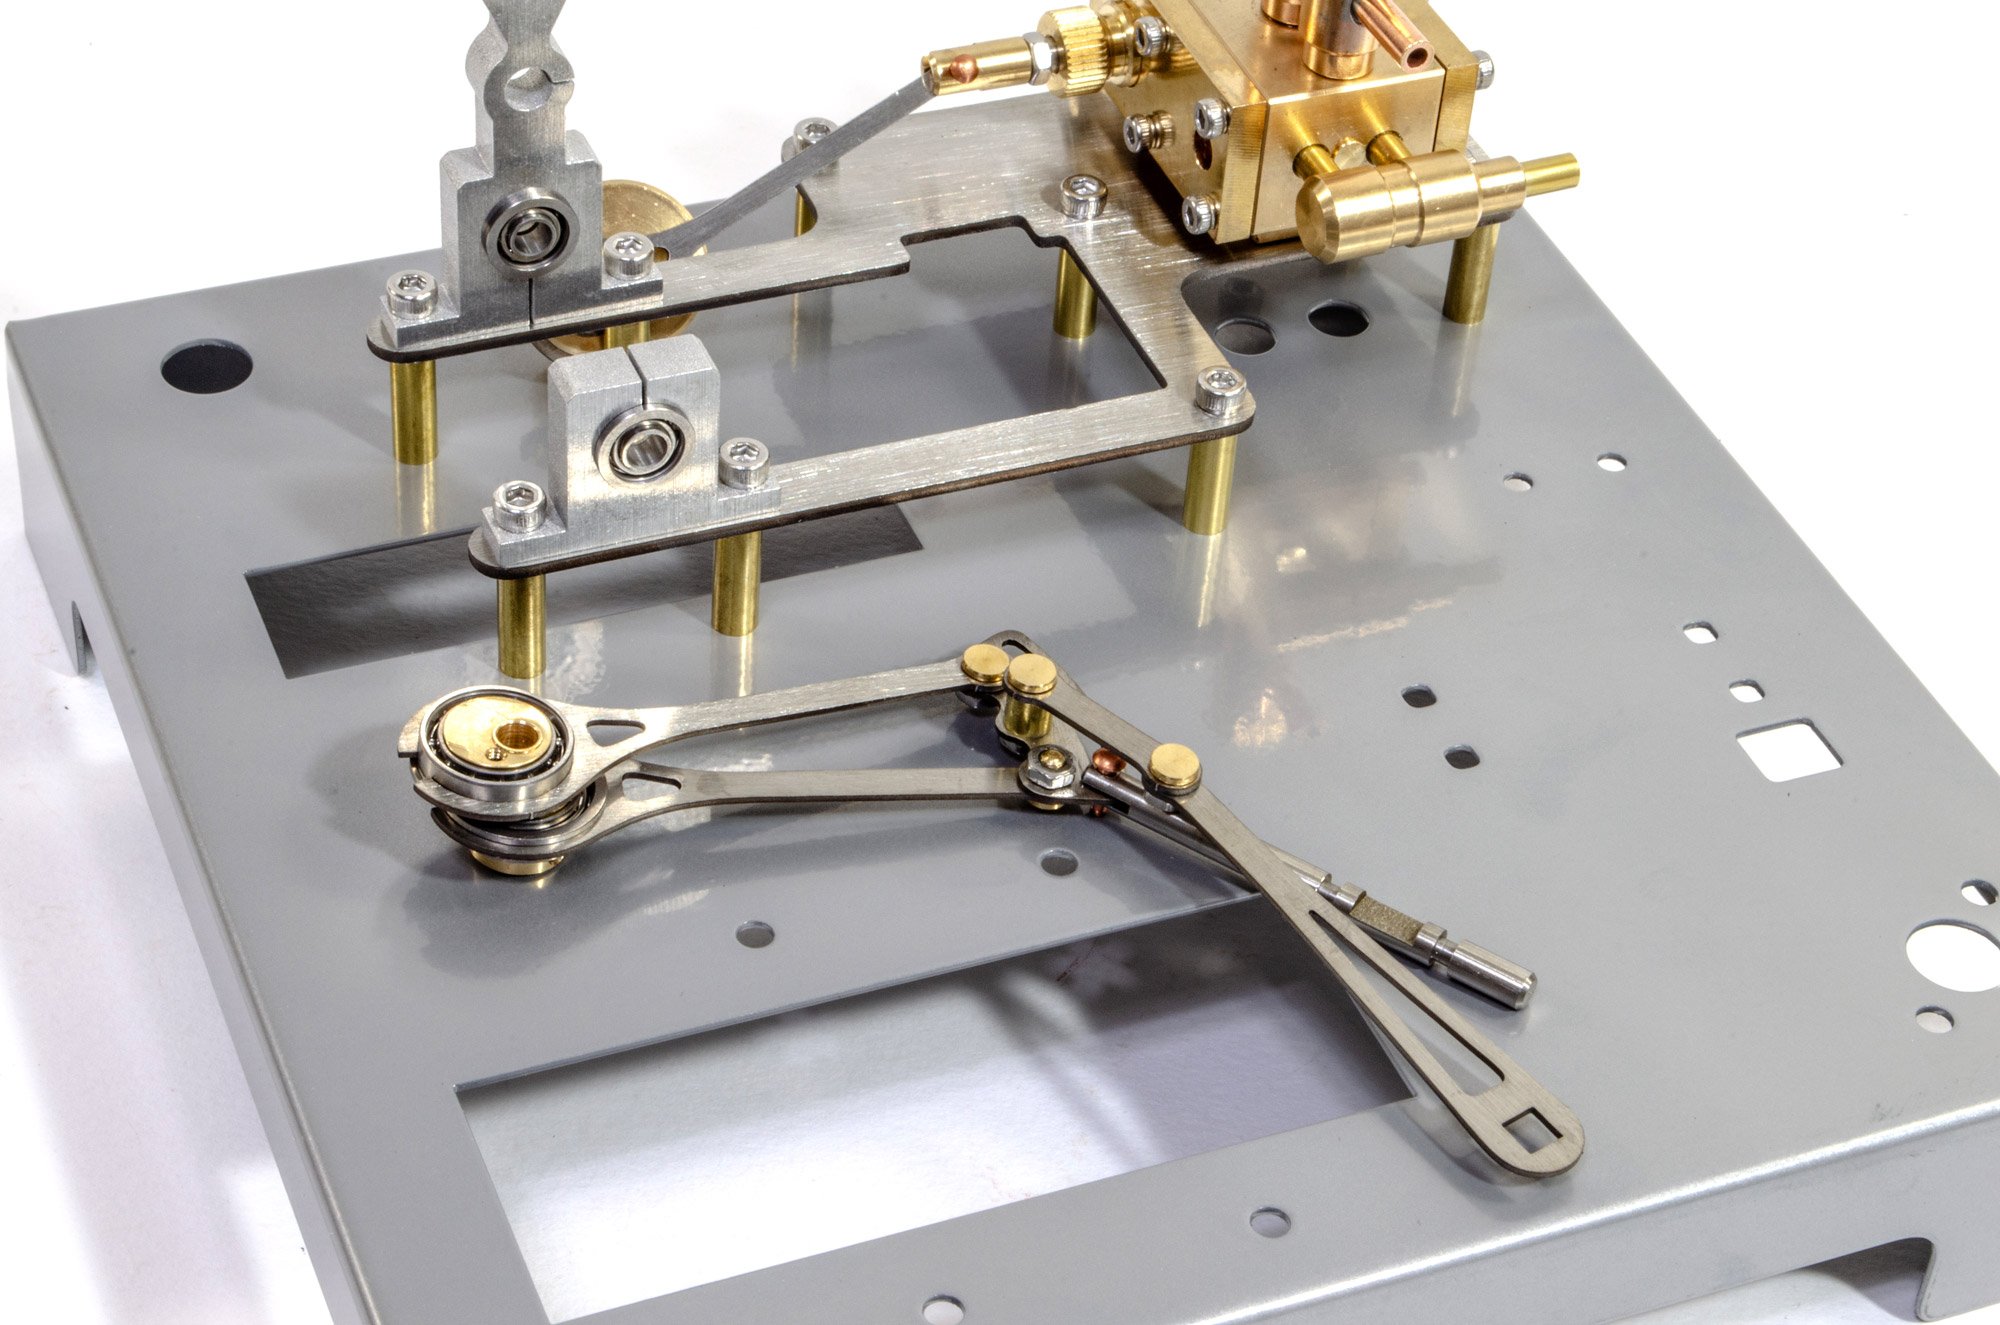
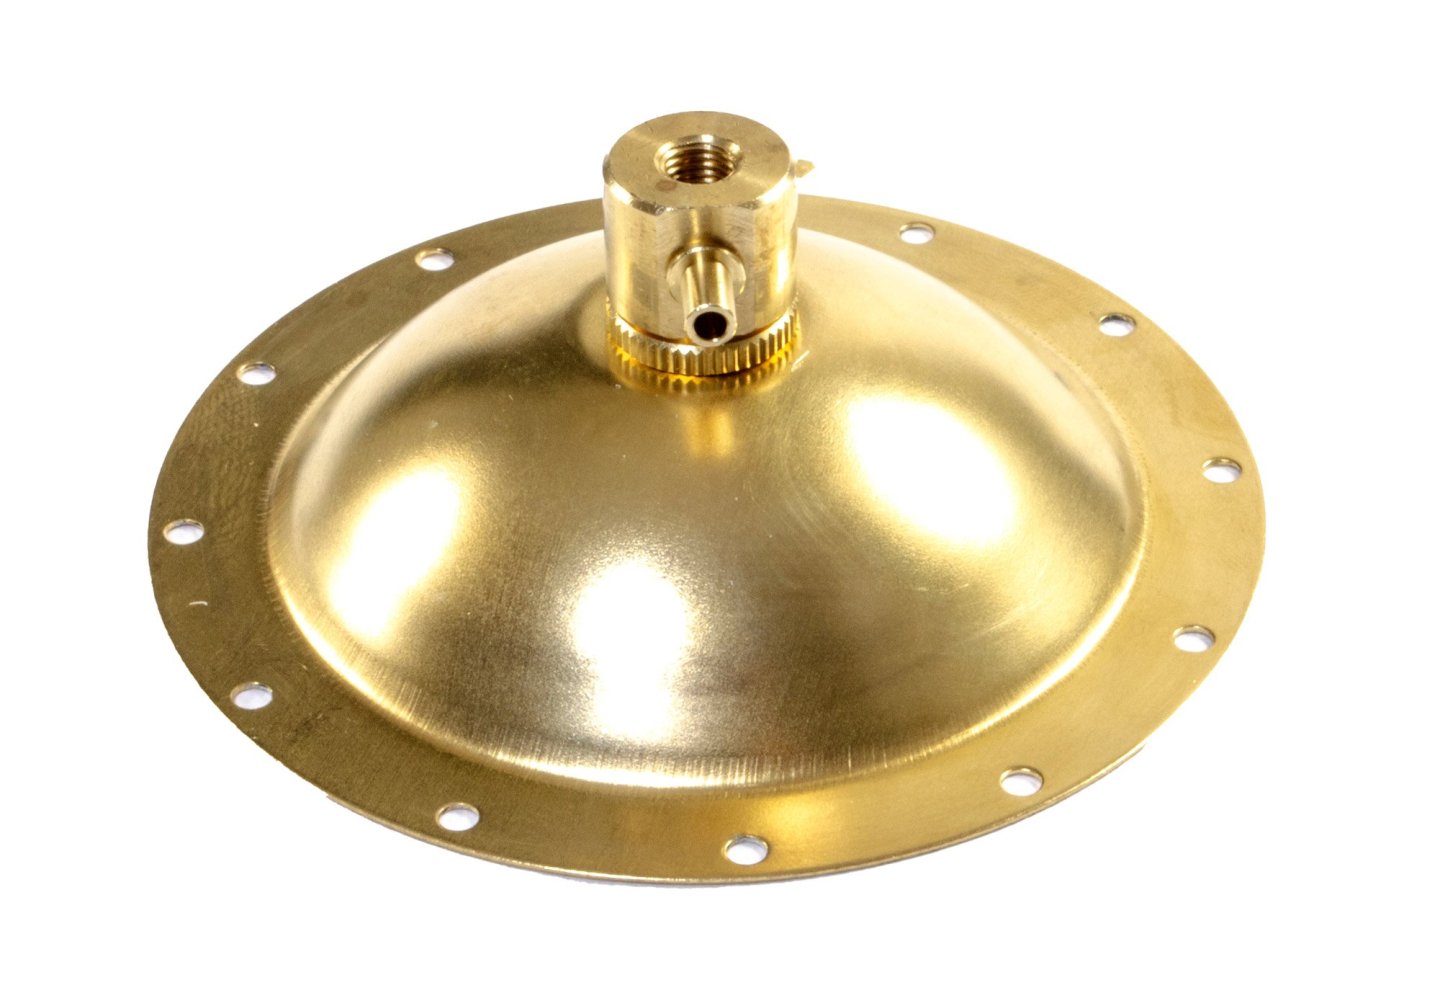
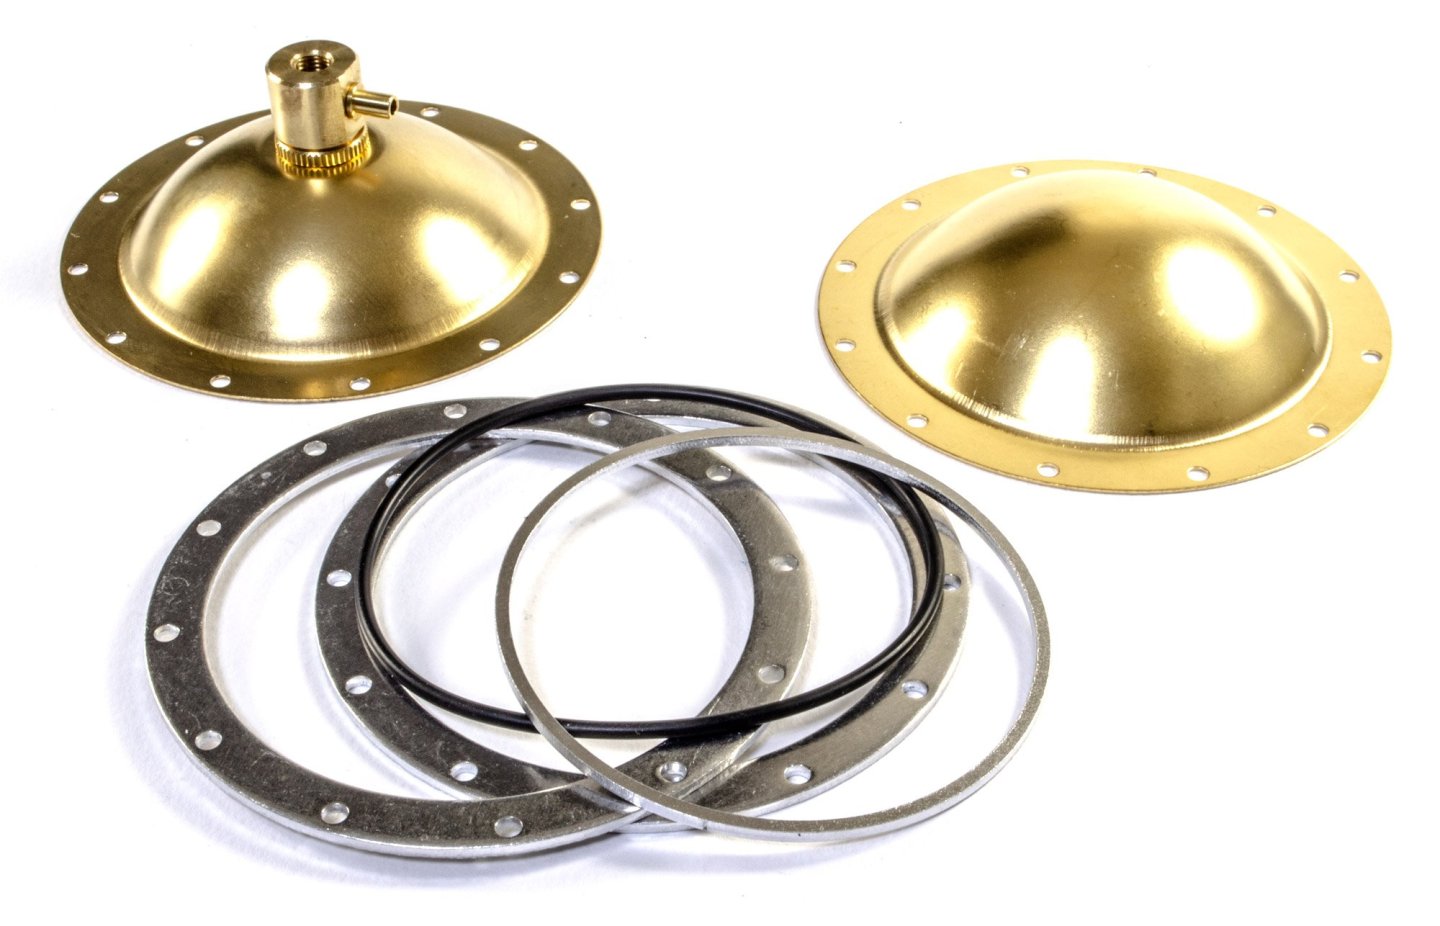
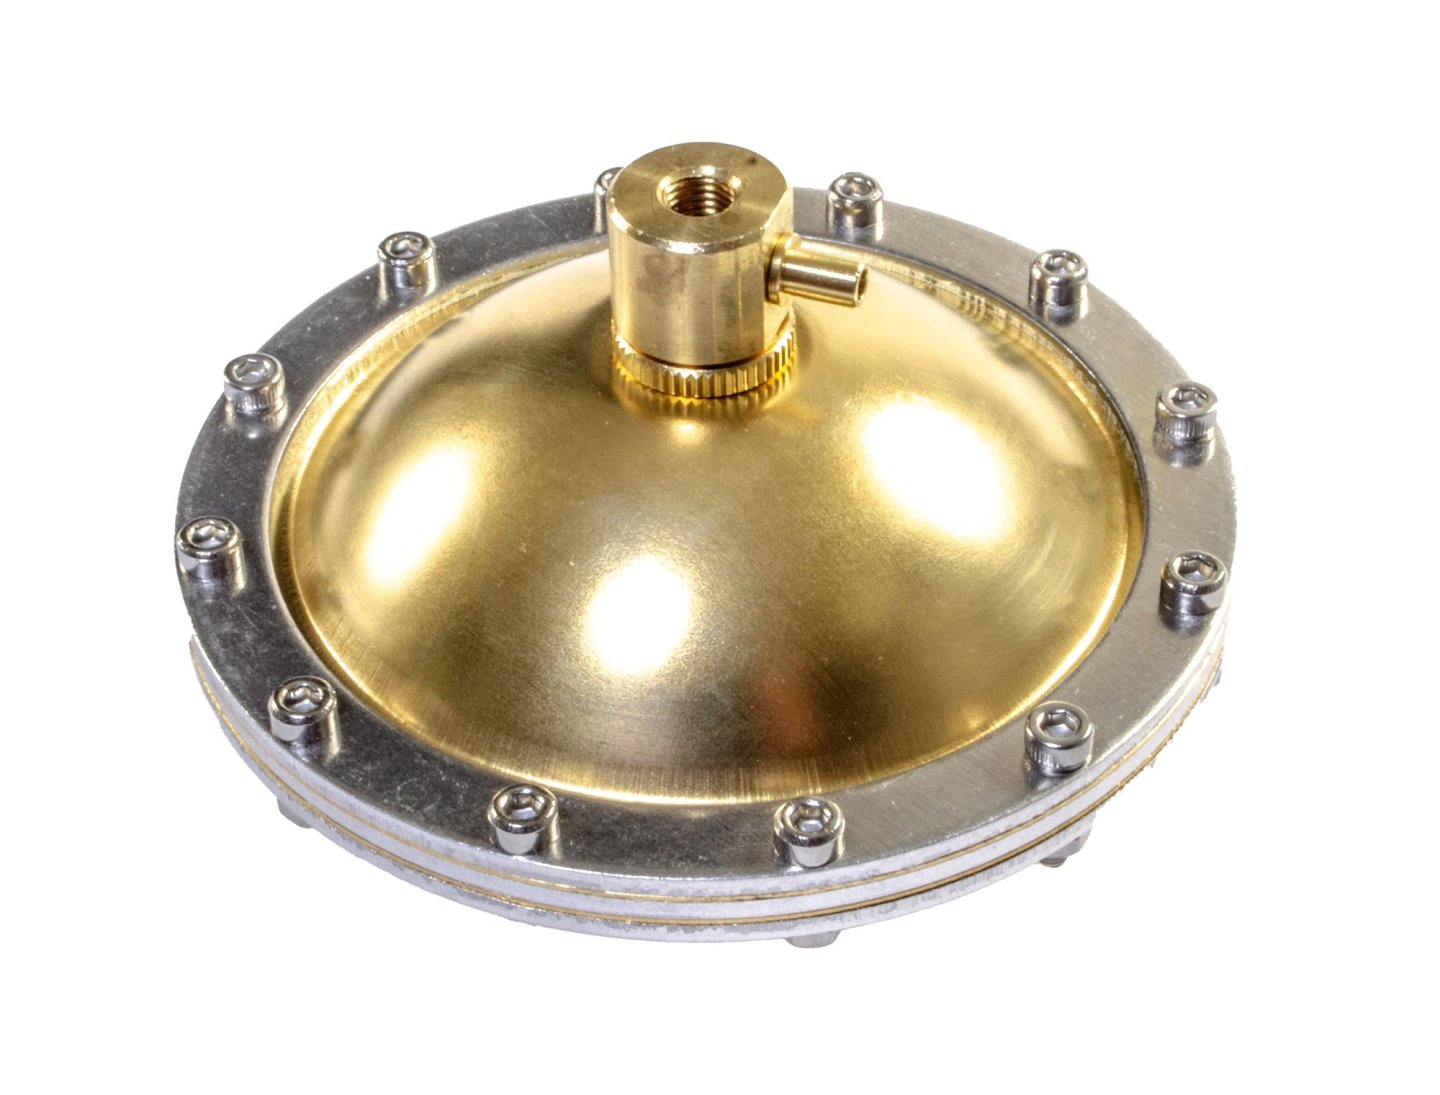
The flywheel is now attached, as are two brass mounts which will be used to secure this assembly to the base. The whole assembly is now fitted to the base. The flywheel is checked for clearance all around. The other bracket is now fitted to the main assembly and then drive belt wheel added. At this point, I have to tell you nothing is attached to this. The kit is simply to show you how this simple type of steam engine operates. The boiler for this is comprised of two brass discs, secured with metal flanges and an internal rib and rubber gasket. On top of the boiler is a safety valve which will operate if the boiler goes over-pressure. Once the boiler is made, three standoffs are first fitted to the specific bolts that are used in certain circumferential positions. A firewall is then slipped between the two closest. This is to protect the main piston assembly from the alcohol pot. This boiler is then mounted to the base, and a silicone tube used to link the piston to the boiler. The condensate chimney and safety valve are fitted. Lastly, the alcohol pot is added. This is actually magnetic, meaning it won't flop about on the steel base, once it's lit and in operation. The part you see sat underneath is actual a flame damper, used to put out the pot. This will not sit here during operation. Now it's time to run the engine...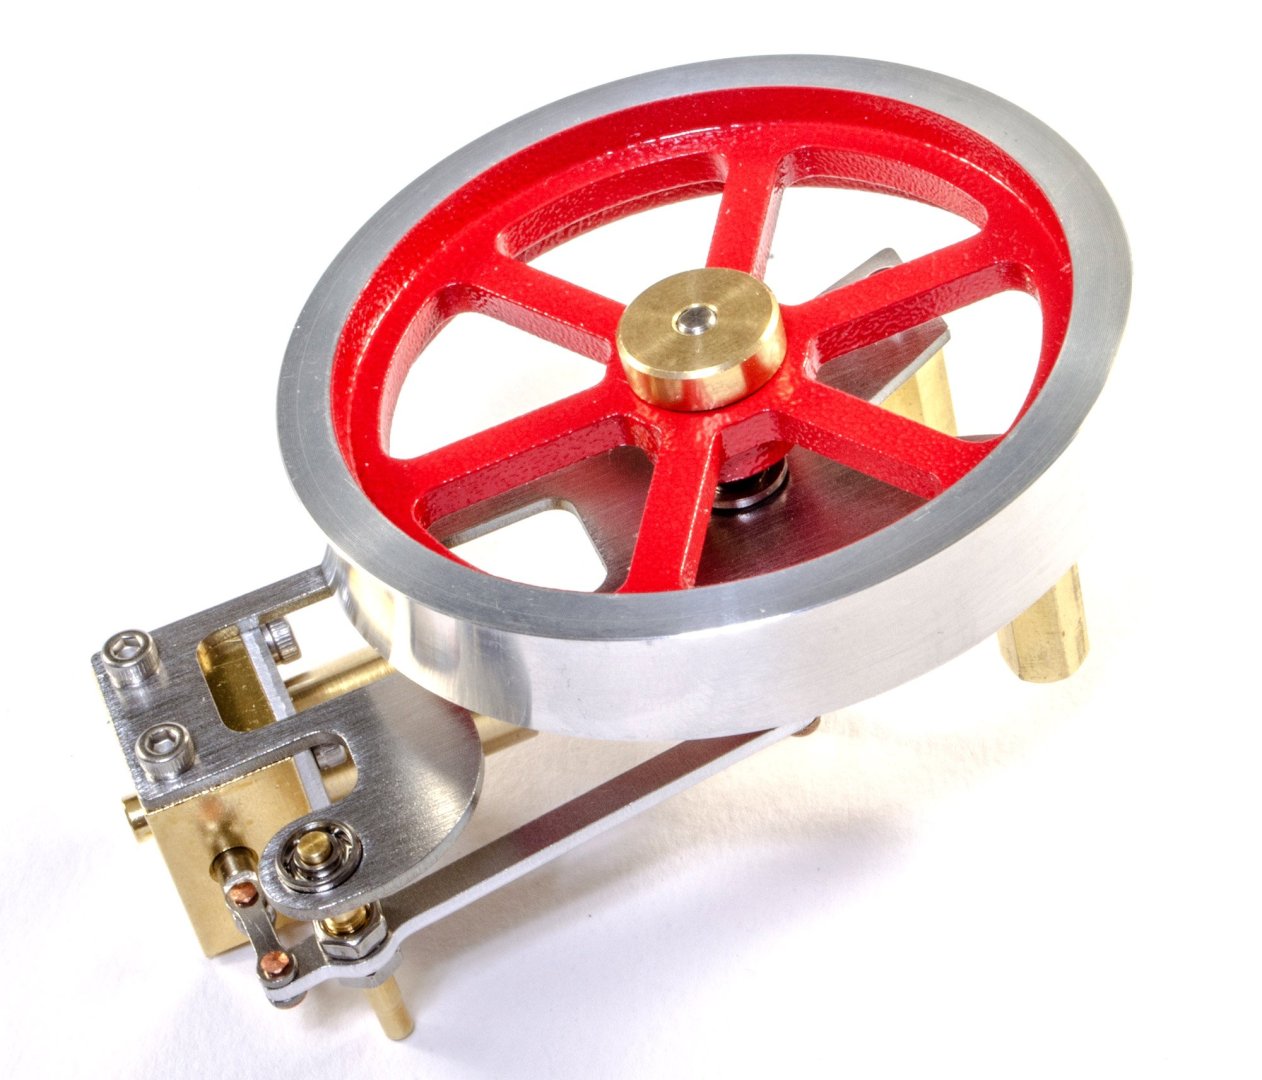


-
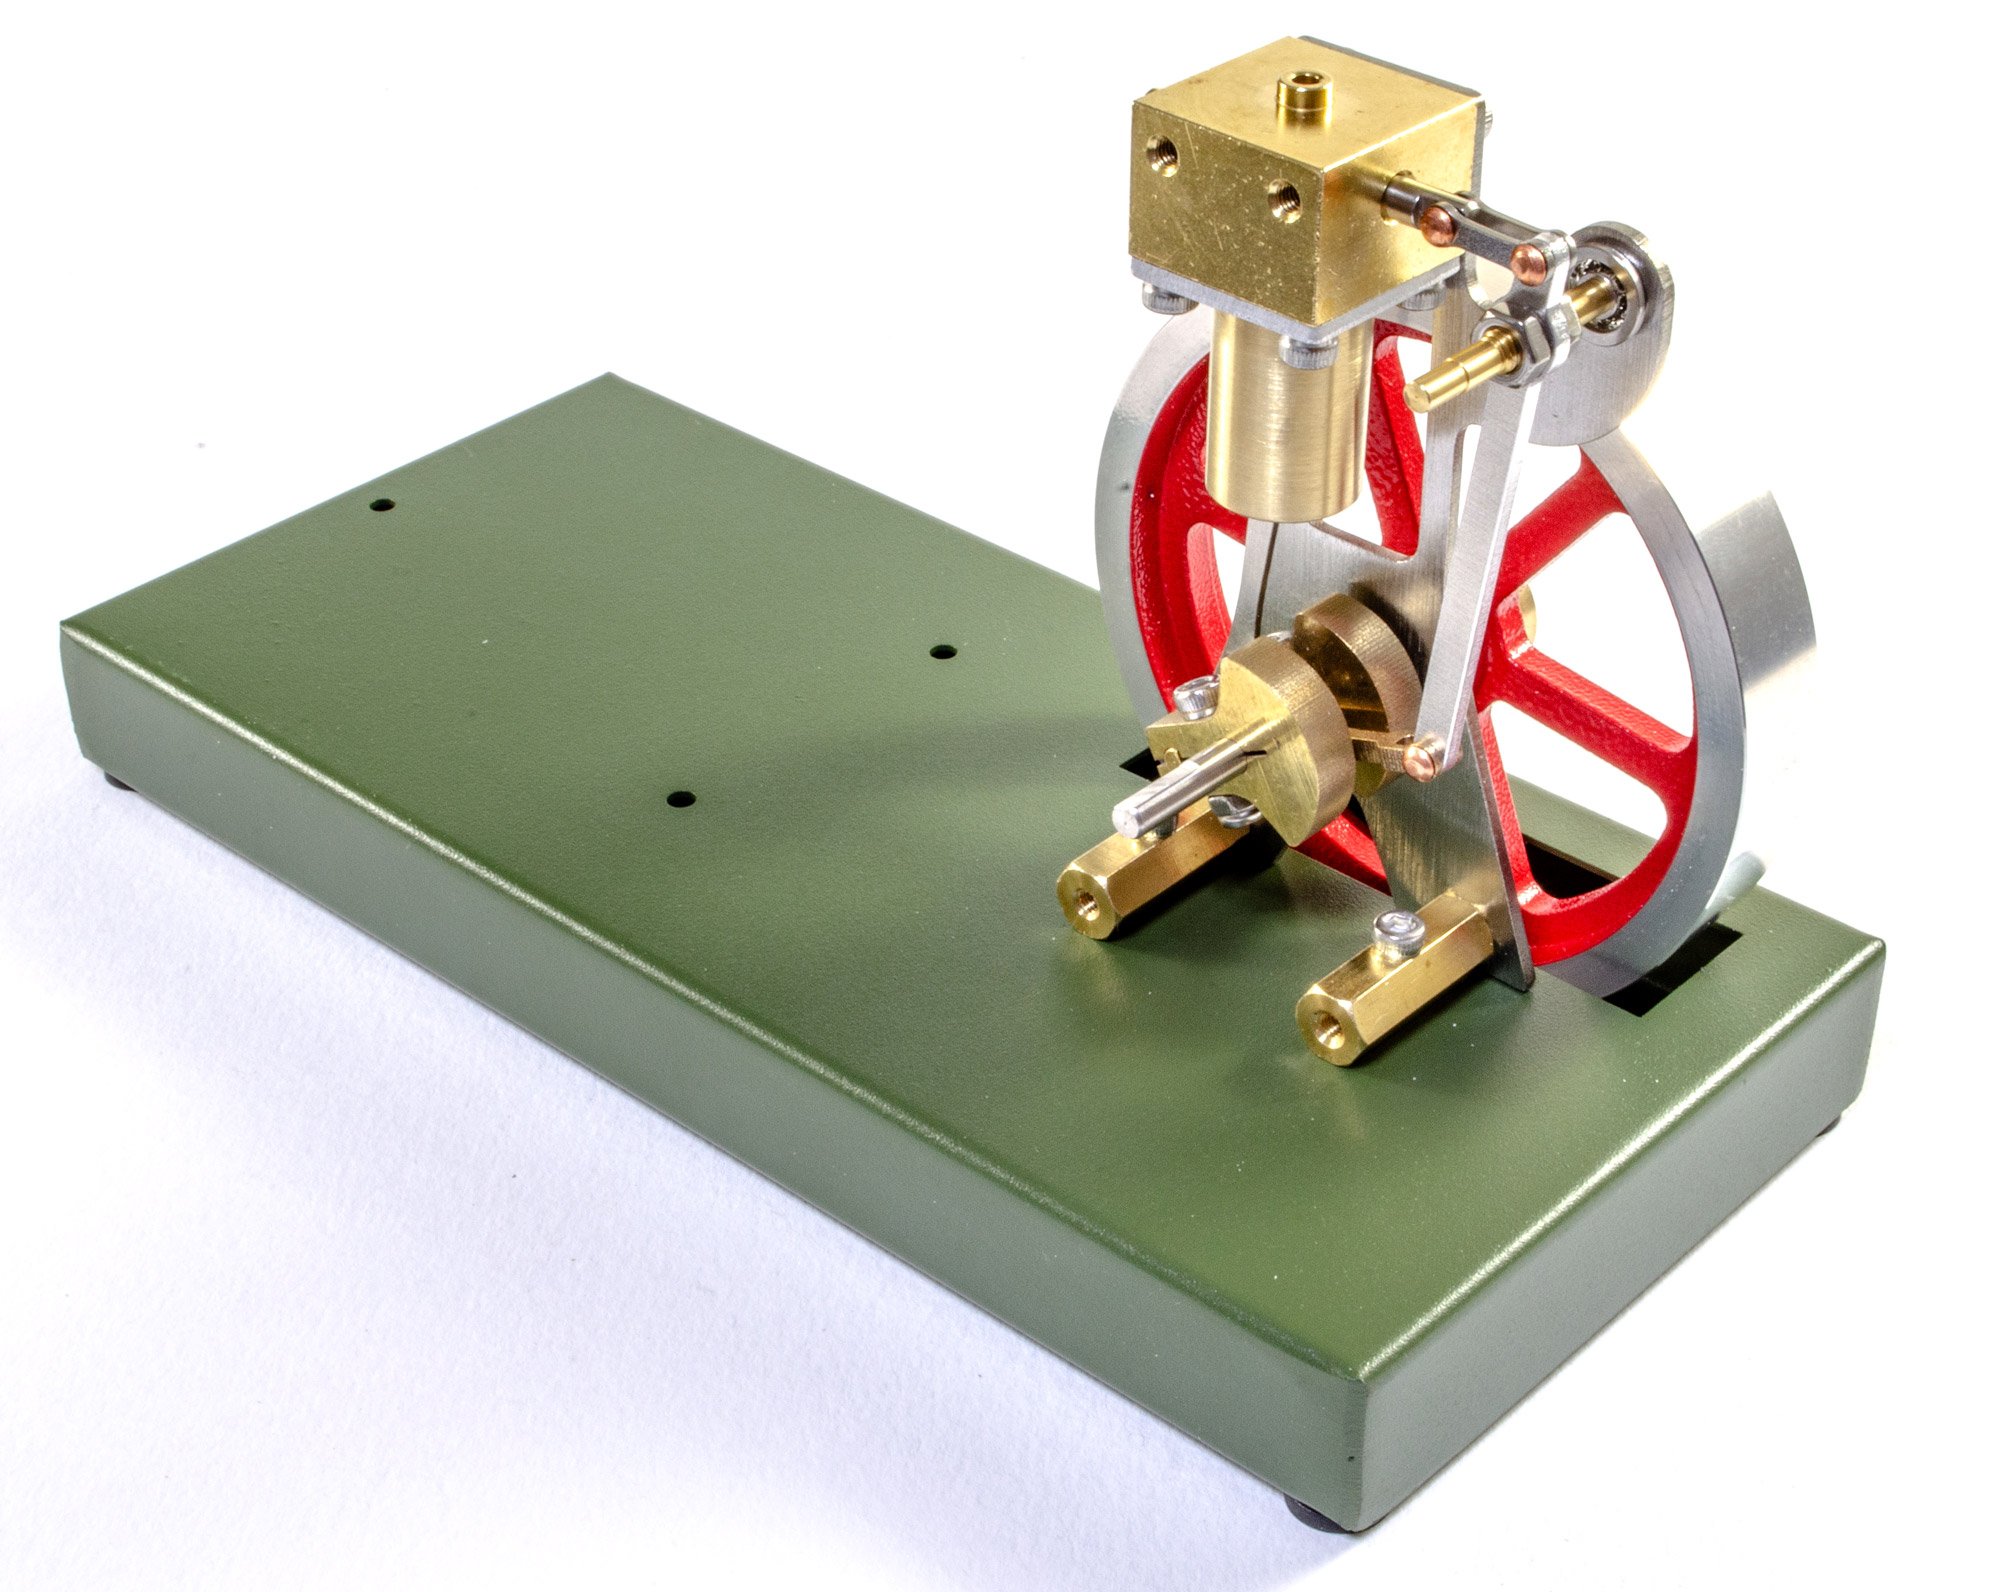
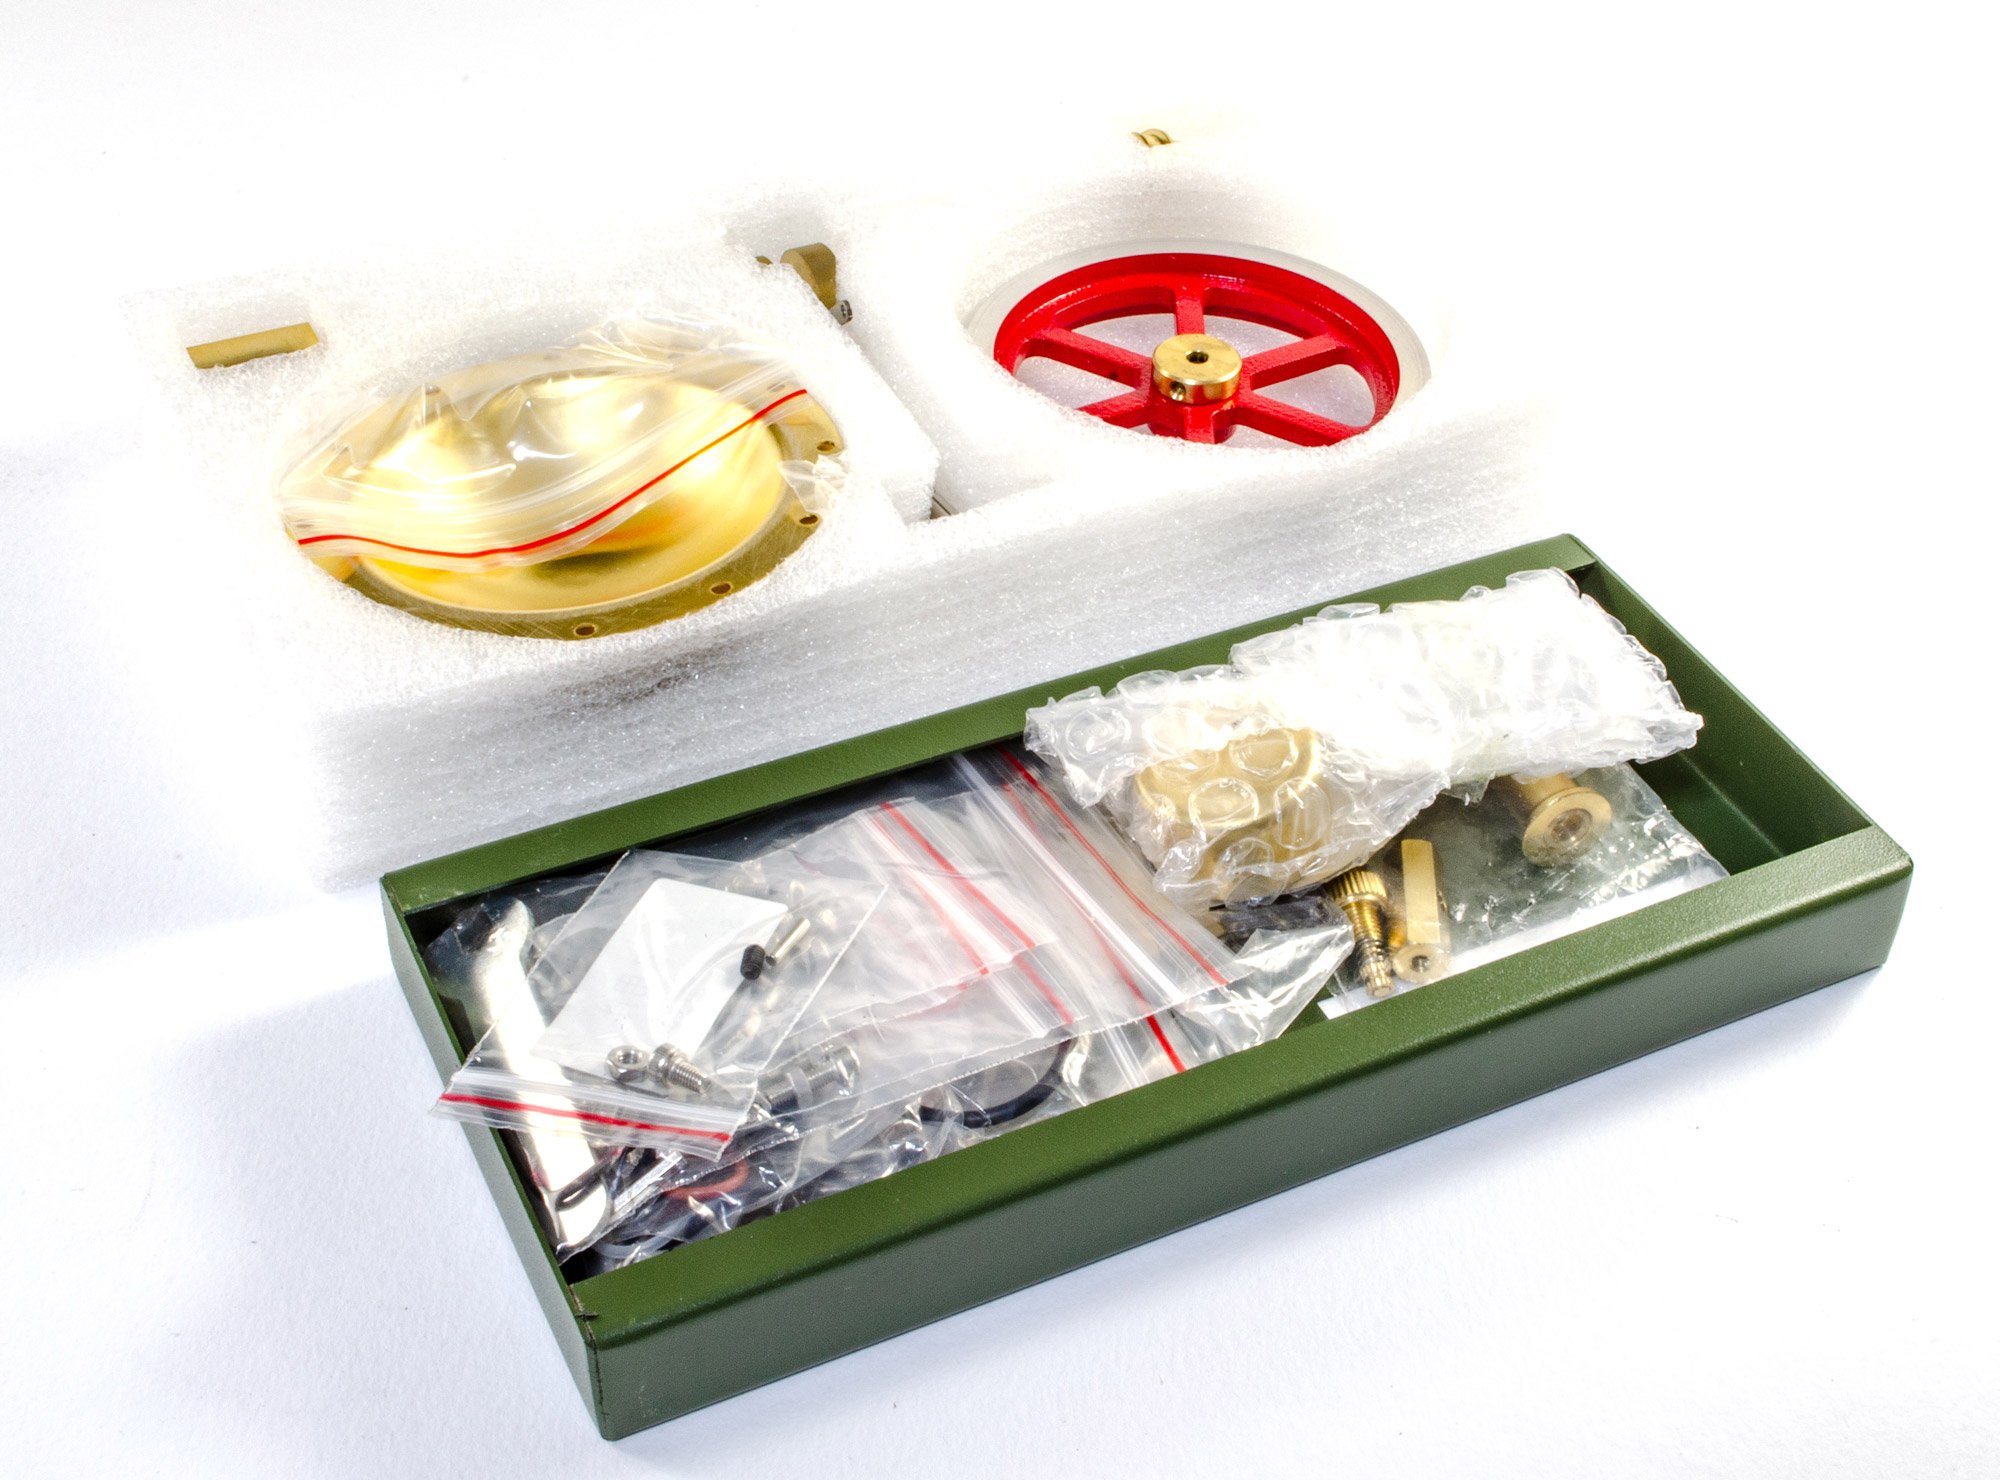
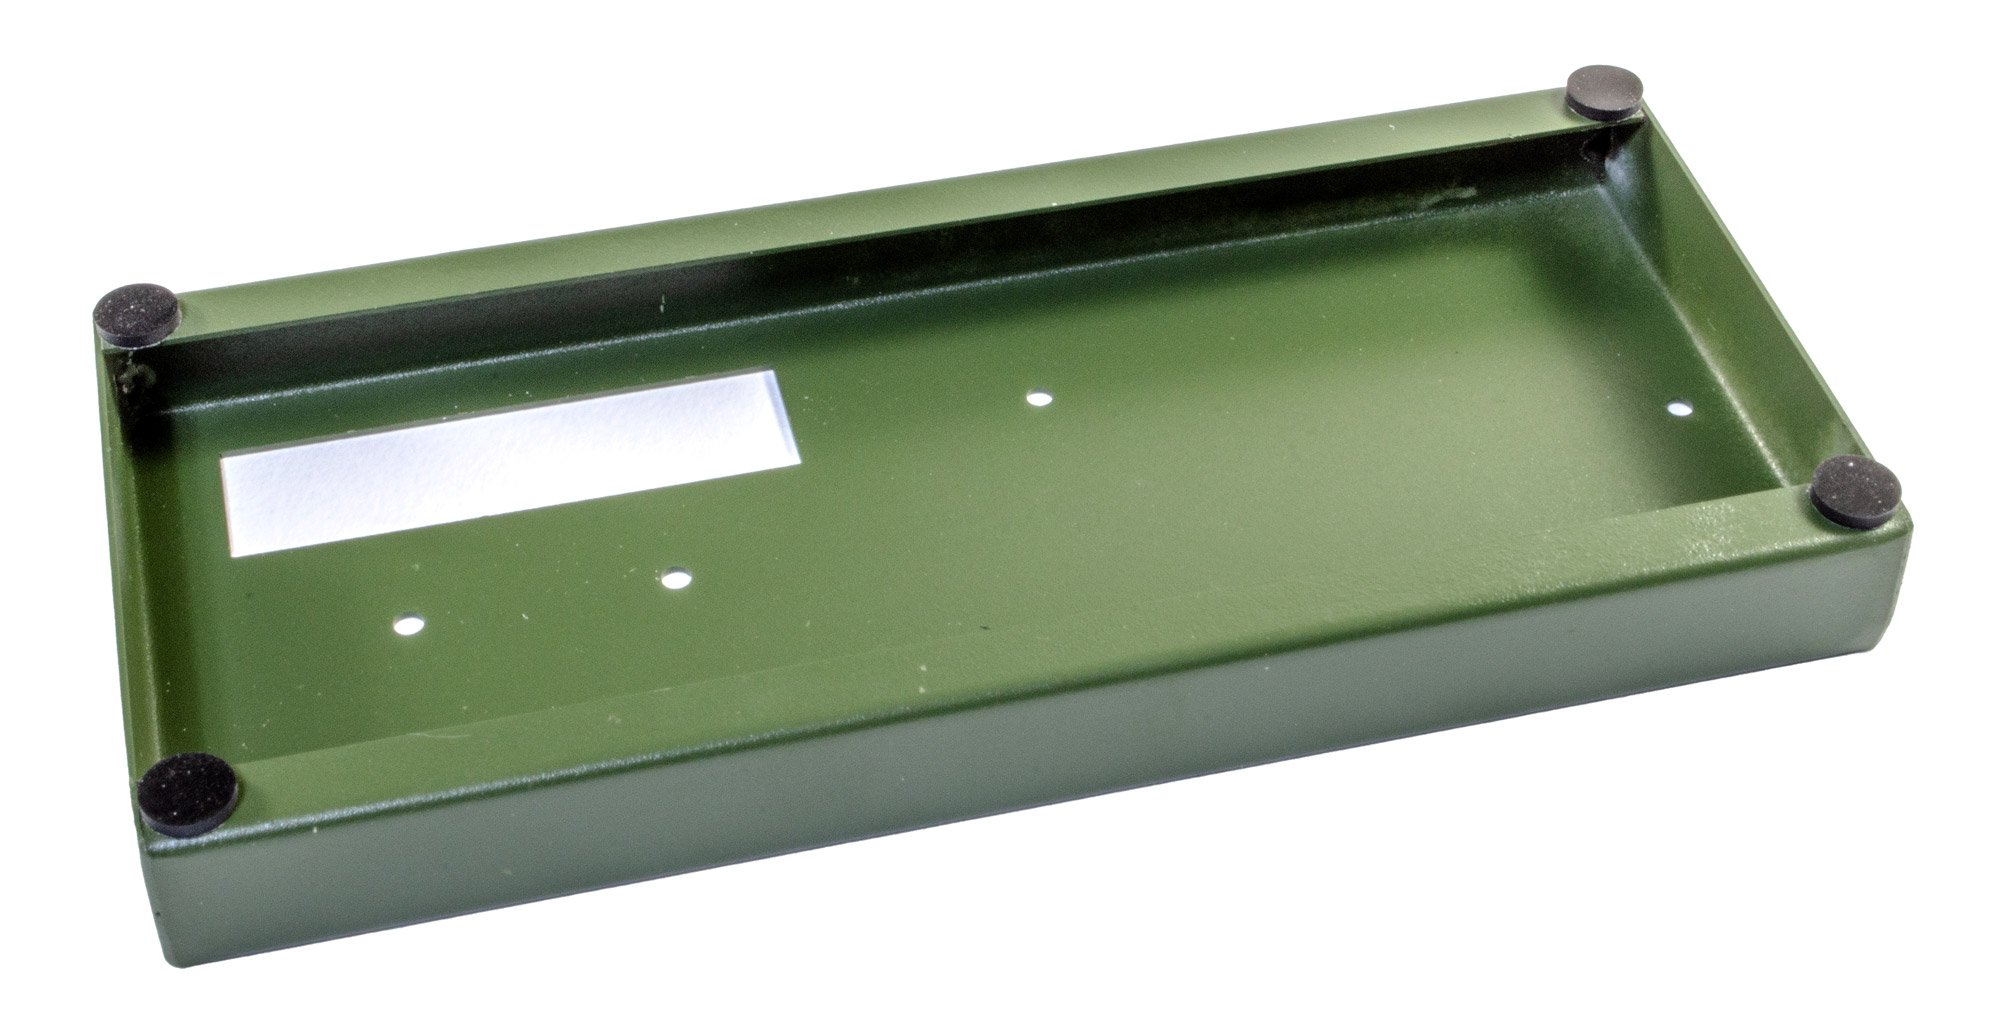
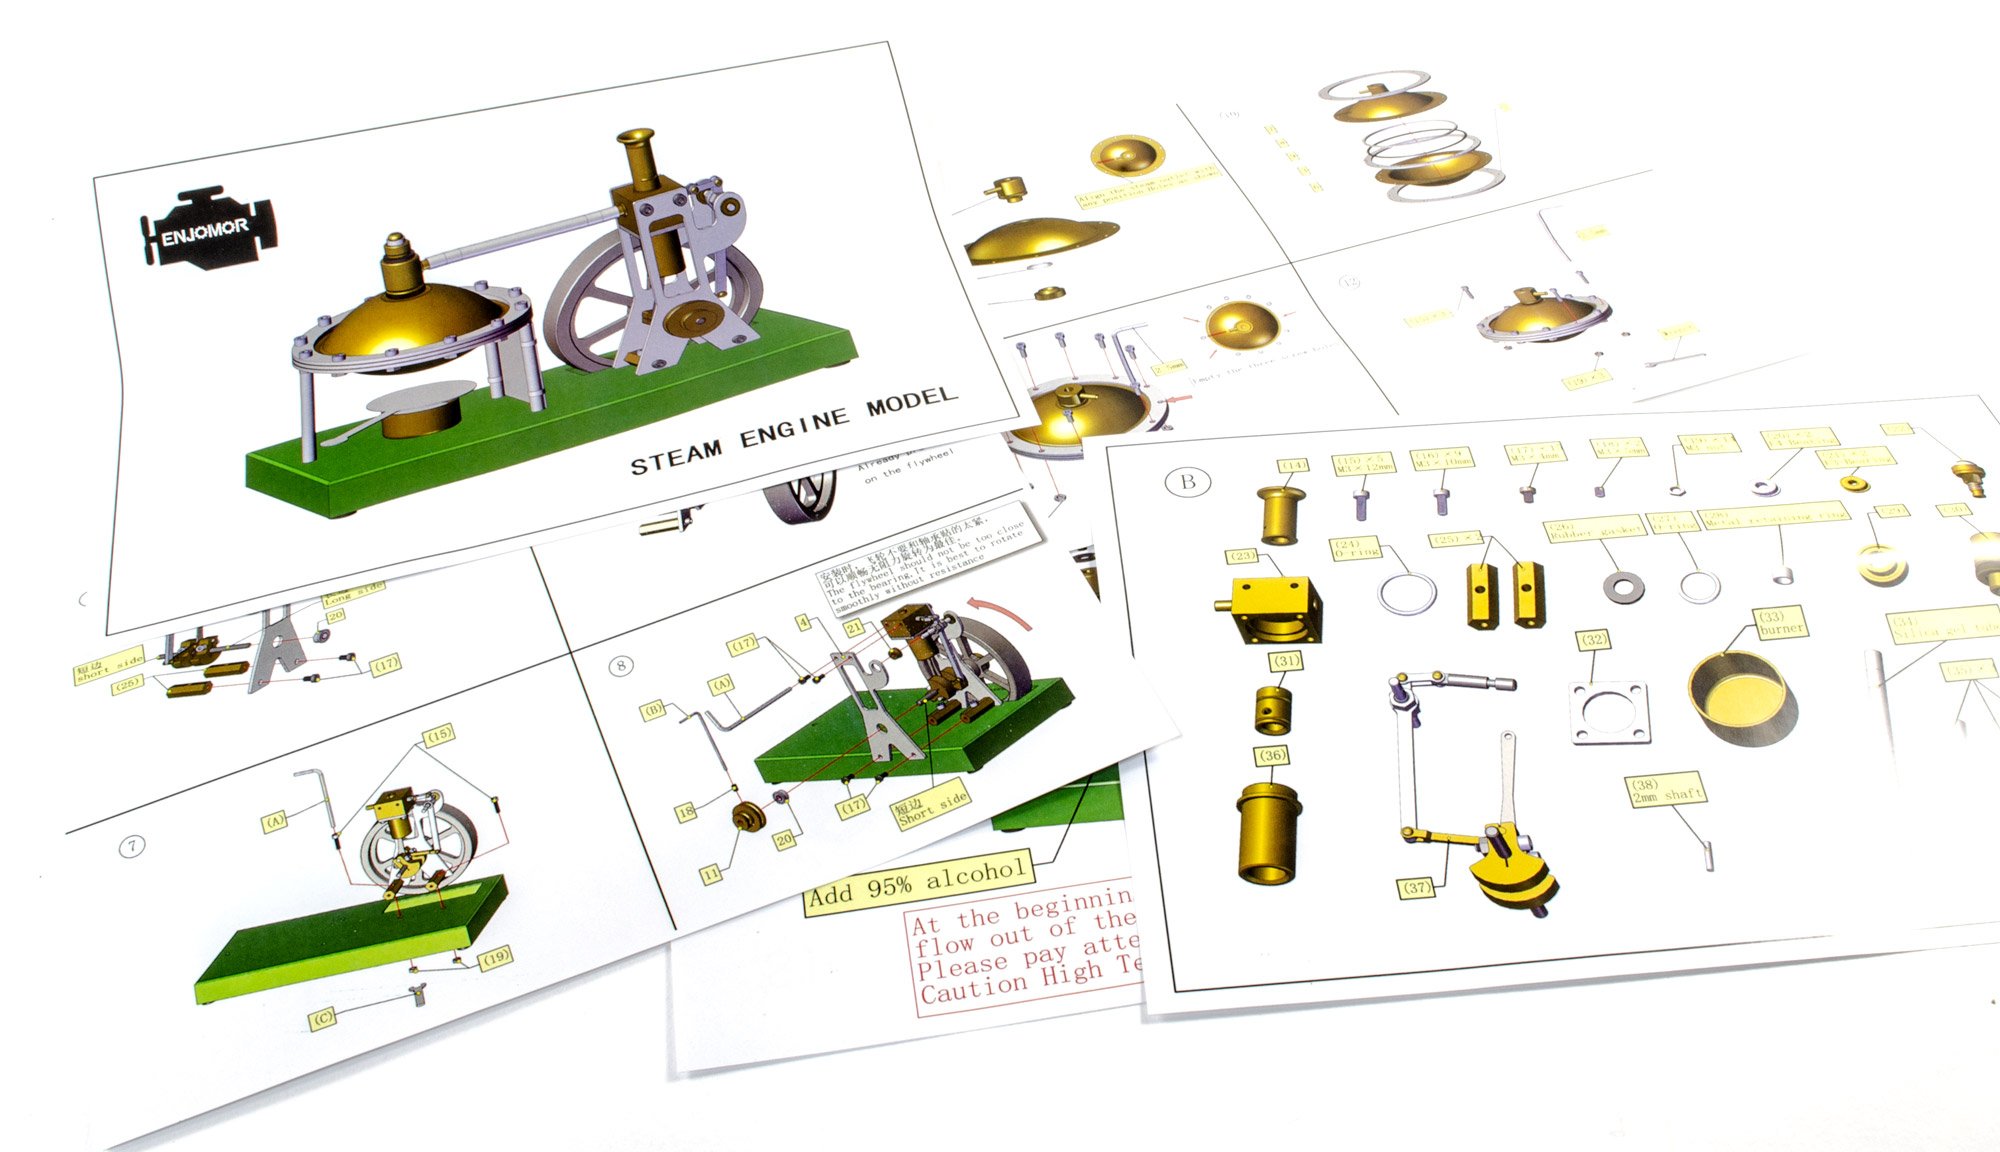
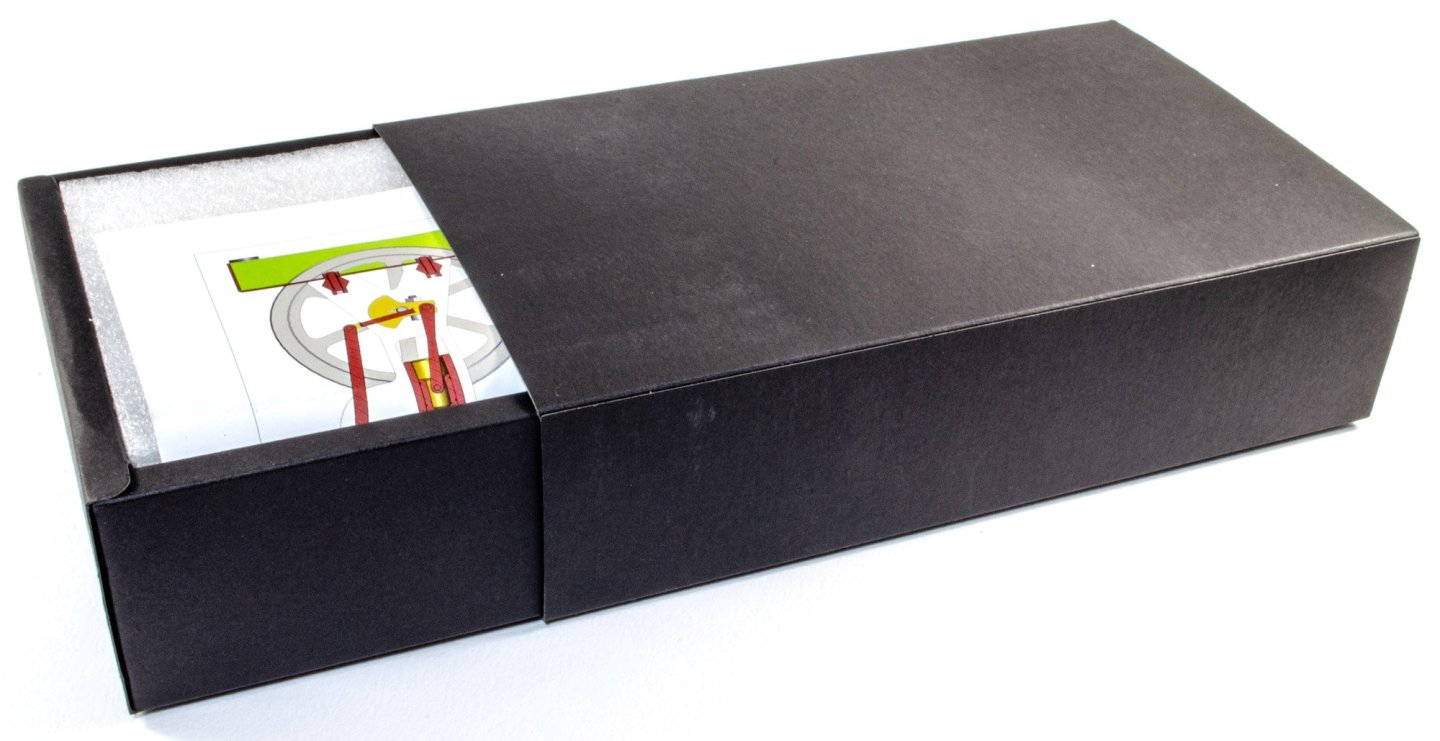
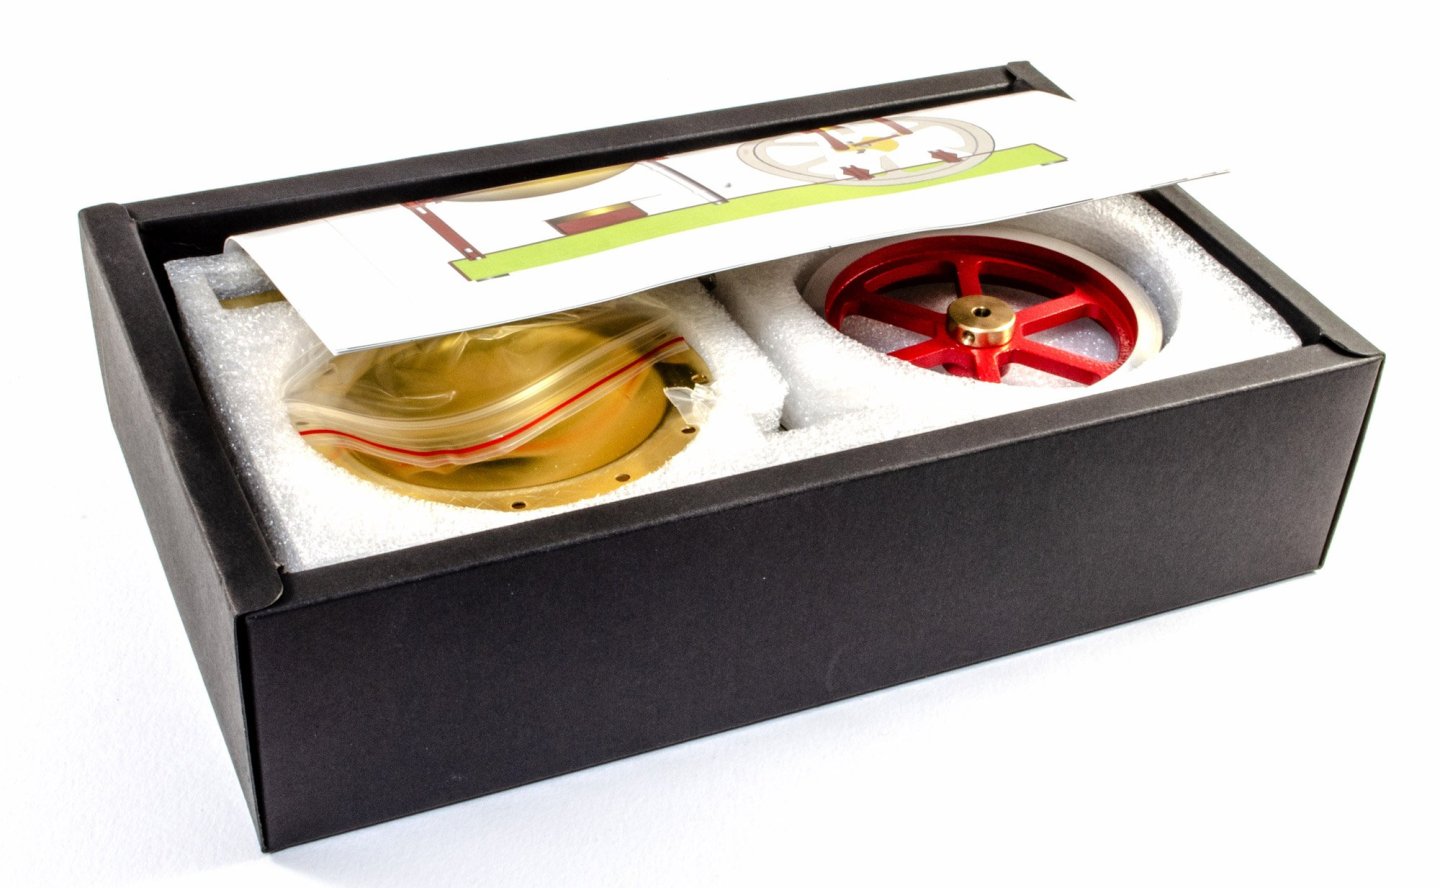
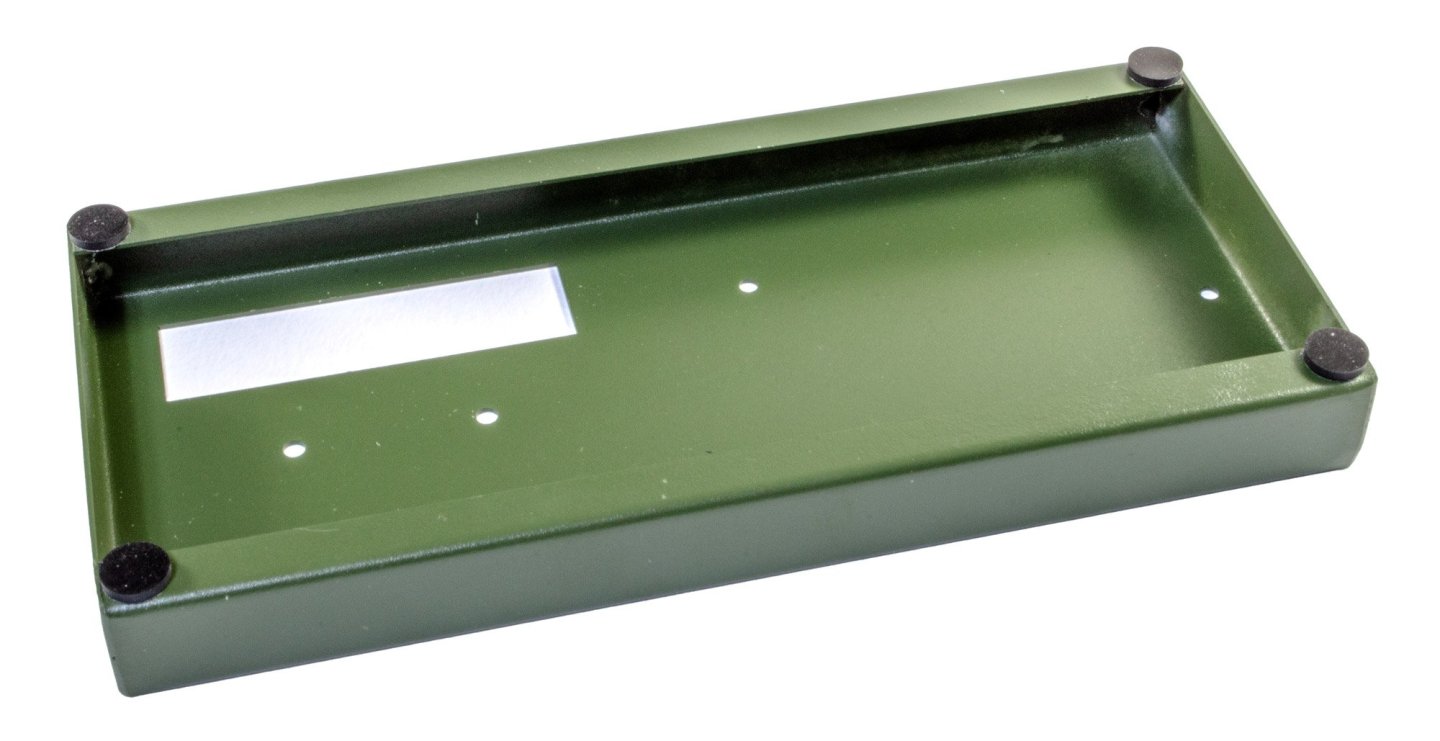
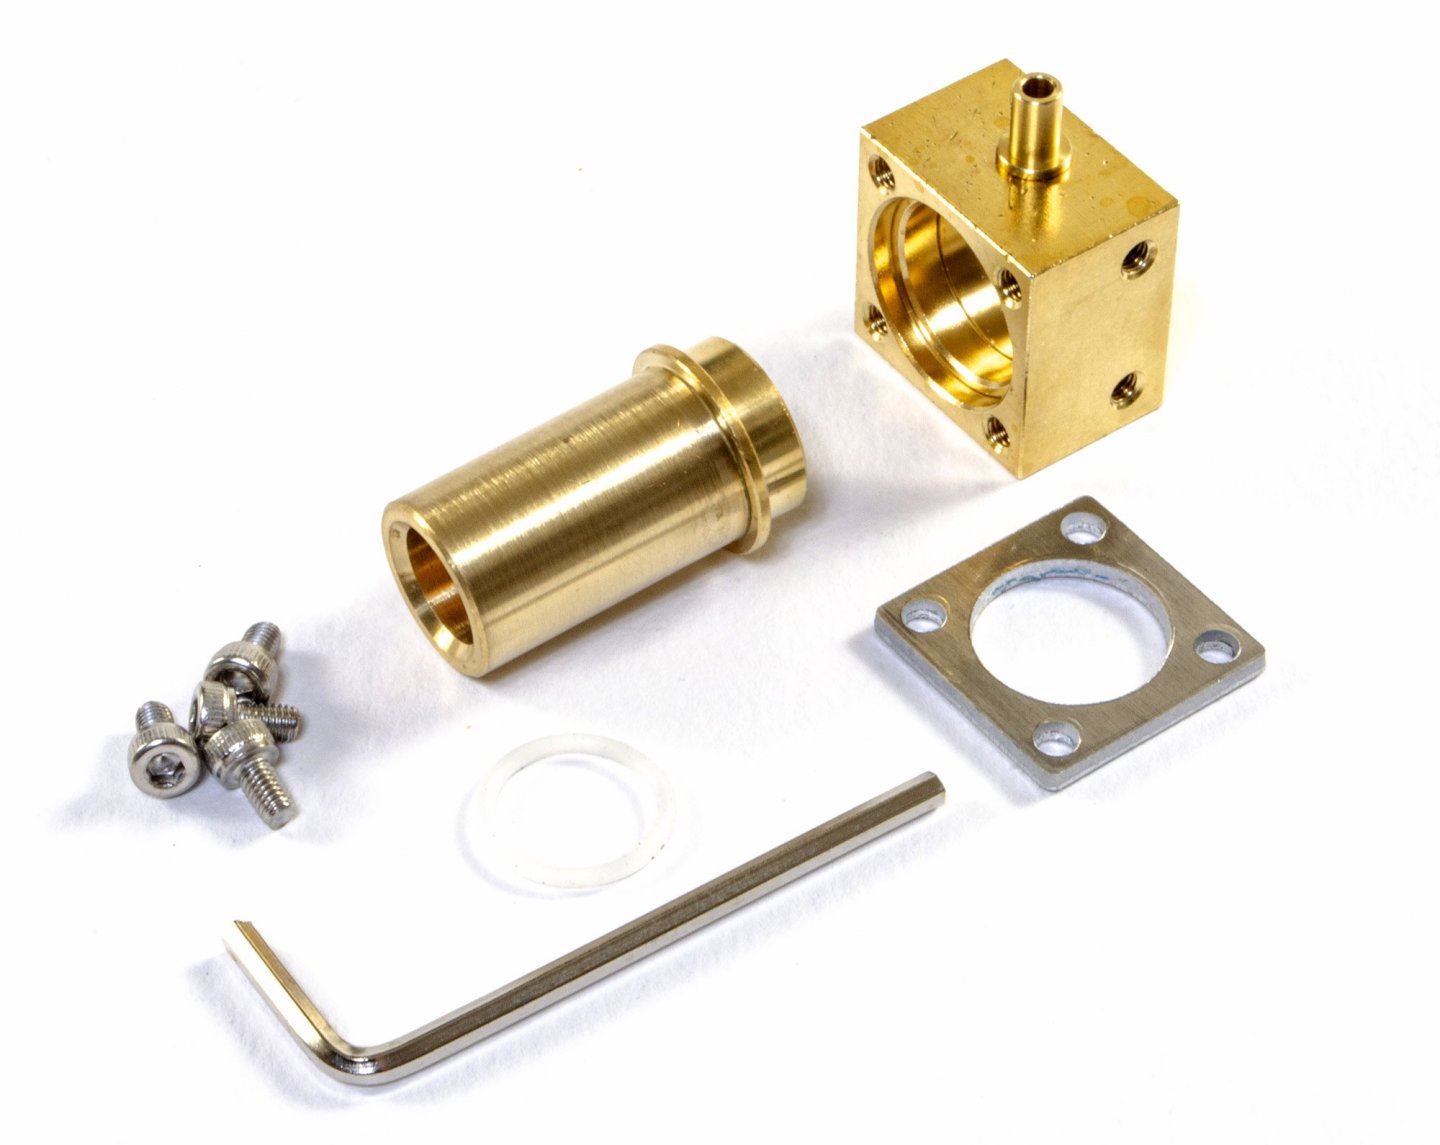
Vertical Steam Engine Kit - ENJOMOR Available from EngineDIY for $129.99 A vertical steam engine is a type of stationary steam engine with a vertical cylinder and cylinders located directly above the crankshaft. They are also known as "hammer" or "steam hammer" engines because of their similar appearance to the steam hammer, a common 19th-century steam technology. Vertical steam engines became more common in the 19th century as steamships grew in size and tonnage. This was because they were simpler, more efficient, and easier to maintain than other engine designs. The kit This is the simplest of the steam engine kits that I've looked at here, but one that's quite elegant in its operation, plus this could sit easily on a shelf, due to its narrow footprint. The kit comes in a fairly small and plain, black card box, with a single tray of parts and the remainder of parts, tools and fixings, found underneath the white foam tray. A series of colour sheets is included for the instructions, guiding you through everything you need to know to build this simple kit. The base for this, as stated, is quite narrow, and made from tough paint-coated steel. The colour is quite neat too, having that industrial feel to it. The very first thing that needs doing is to attach the self-adhesive feet to each underside corner, as shown here. The pushrod and counterweight assembly is now coupled to the piston and locating pin. It's now time to build the piston chamber. The machined brass sleeve is first fitted with a silicone ring and then the pair inserted into the steam receptor box. These are then coupled with a steel retainer, held in situ by four screws. This assembly is now attached to the pulley. A little oil is used to lubricate the moving parts. Two mounting brackets are included. These are first fitted with the appropriate bearings, and then this bracket it mounted to the piston/hammer assembly. More in a moment...


-
Ah! It does look very nice indeed.
-
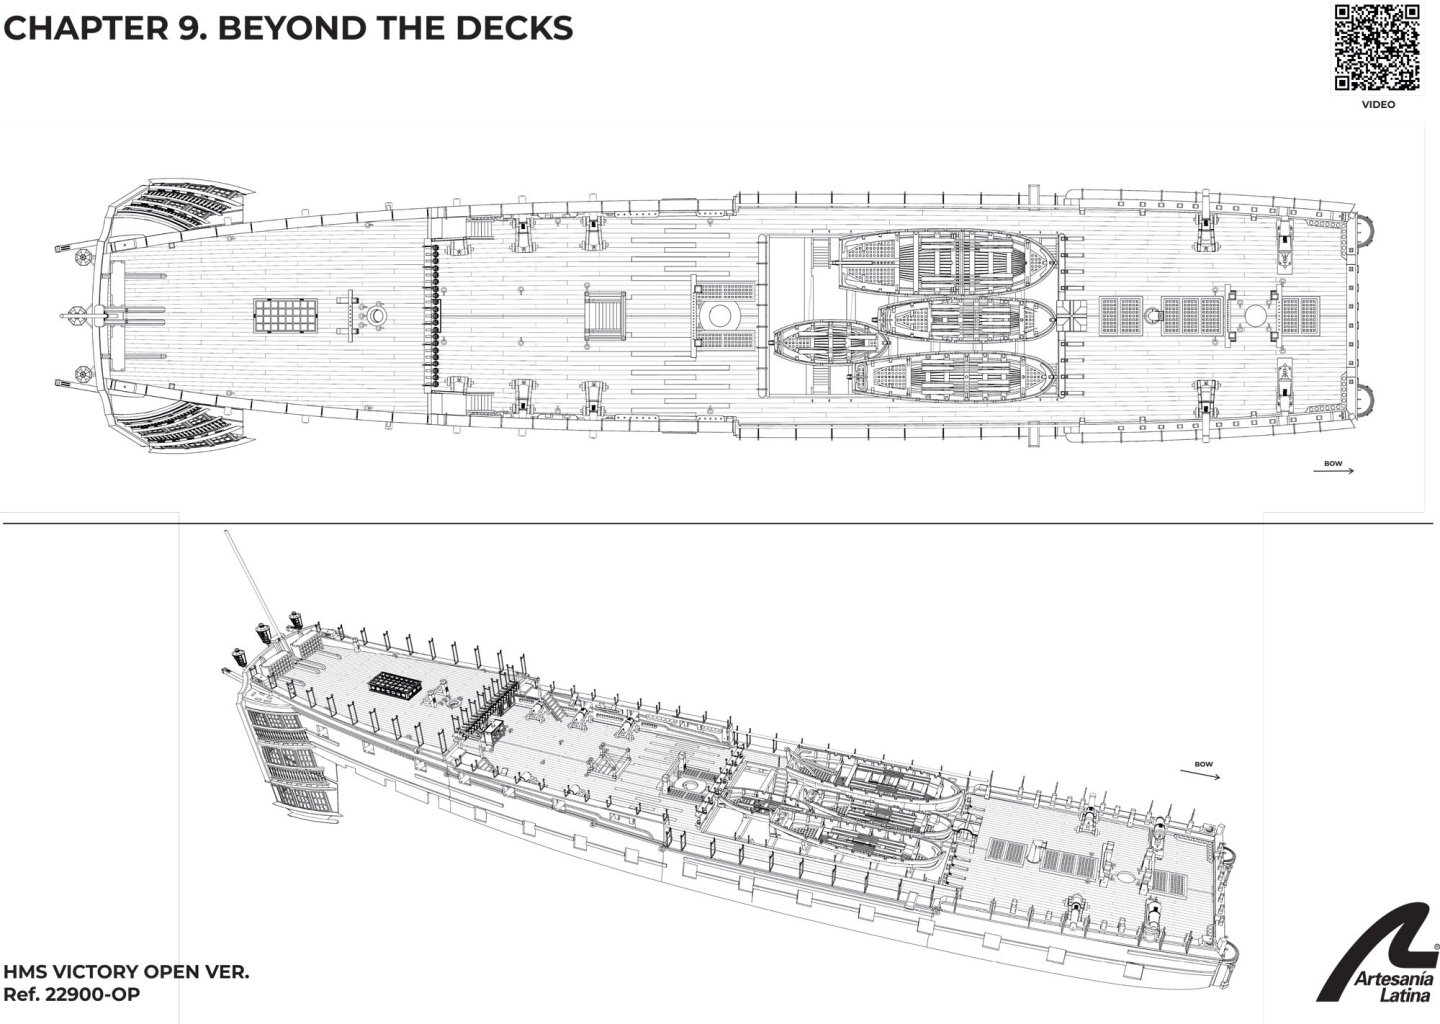
Conclusion This would always be an ambitious project and I think Artesania have pulled it off quite well. They certainly have reproduced pretty much the entire interior of Victory in a way that no other company has yet attempted to do so. The detail levels are quite extraordinary and will certainly add up to be one seriously long and rewarding project. This is by no means a project that I could consider for a newcomer, no matter how tempting the subject is, and the experience of building that interior. The hull on this kit is single planked, so you will need to take that into account when you consider your own abilities. The videos are wonderful at showing how the hull is planked, but you will need to be attentive to them and be confident in your approach to replicating what you are shown. With some experience, this model will doubtless build up into a masterpiece. There aren't the same generic fittings on this kit as you would see on some contemporaries, and even others from AL's own range, and the finesse in detail throughout is at another level. This isn't a cheap kit, but £/$ per hour, then as a long term project, you will definitely get your money's worth on getting yourself one of these kits. Of course, there's always the voyeuristic side of modellers who like to see the interior stuff, and this kit satisfies that need in bucketloads! I do have a few extras for this kit and I will review them shortly. My sincere thanks to Artesania Latina for sending this kit for the purpose of review here on Model Ship World. To buy this kit directly, click the link at the top of this article.

-
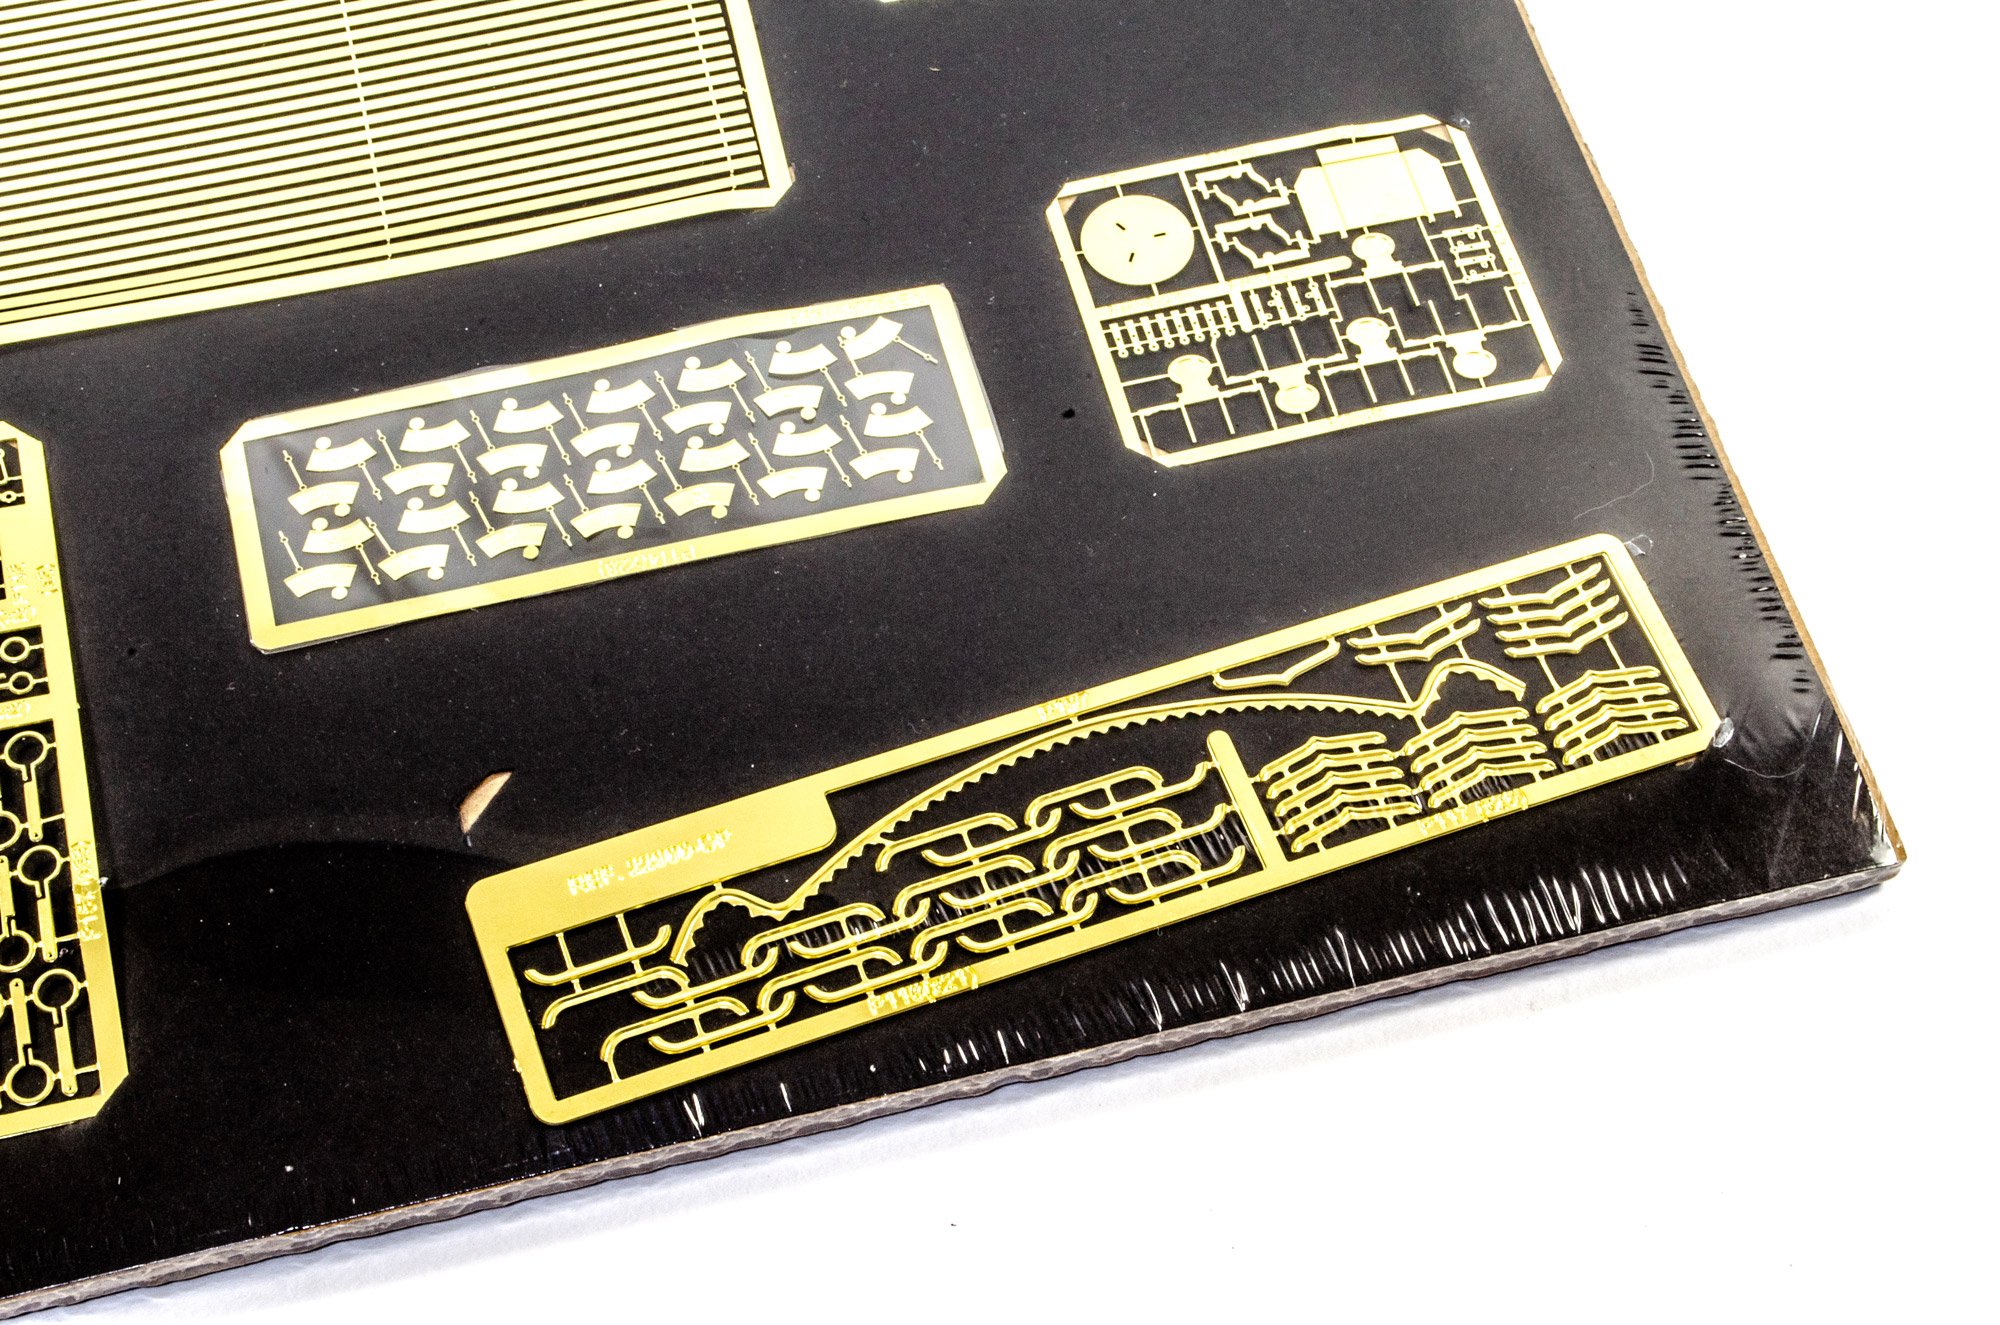
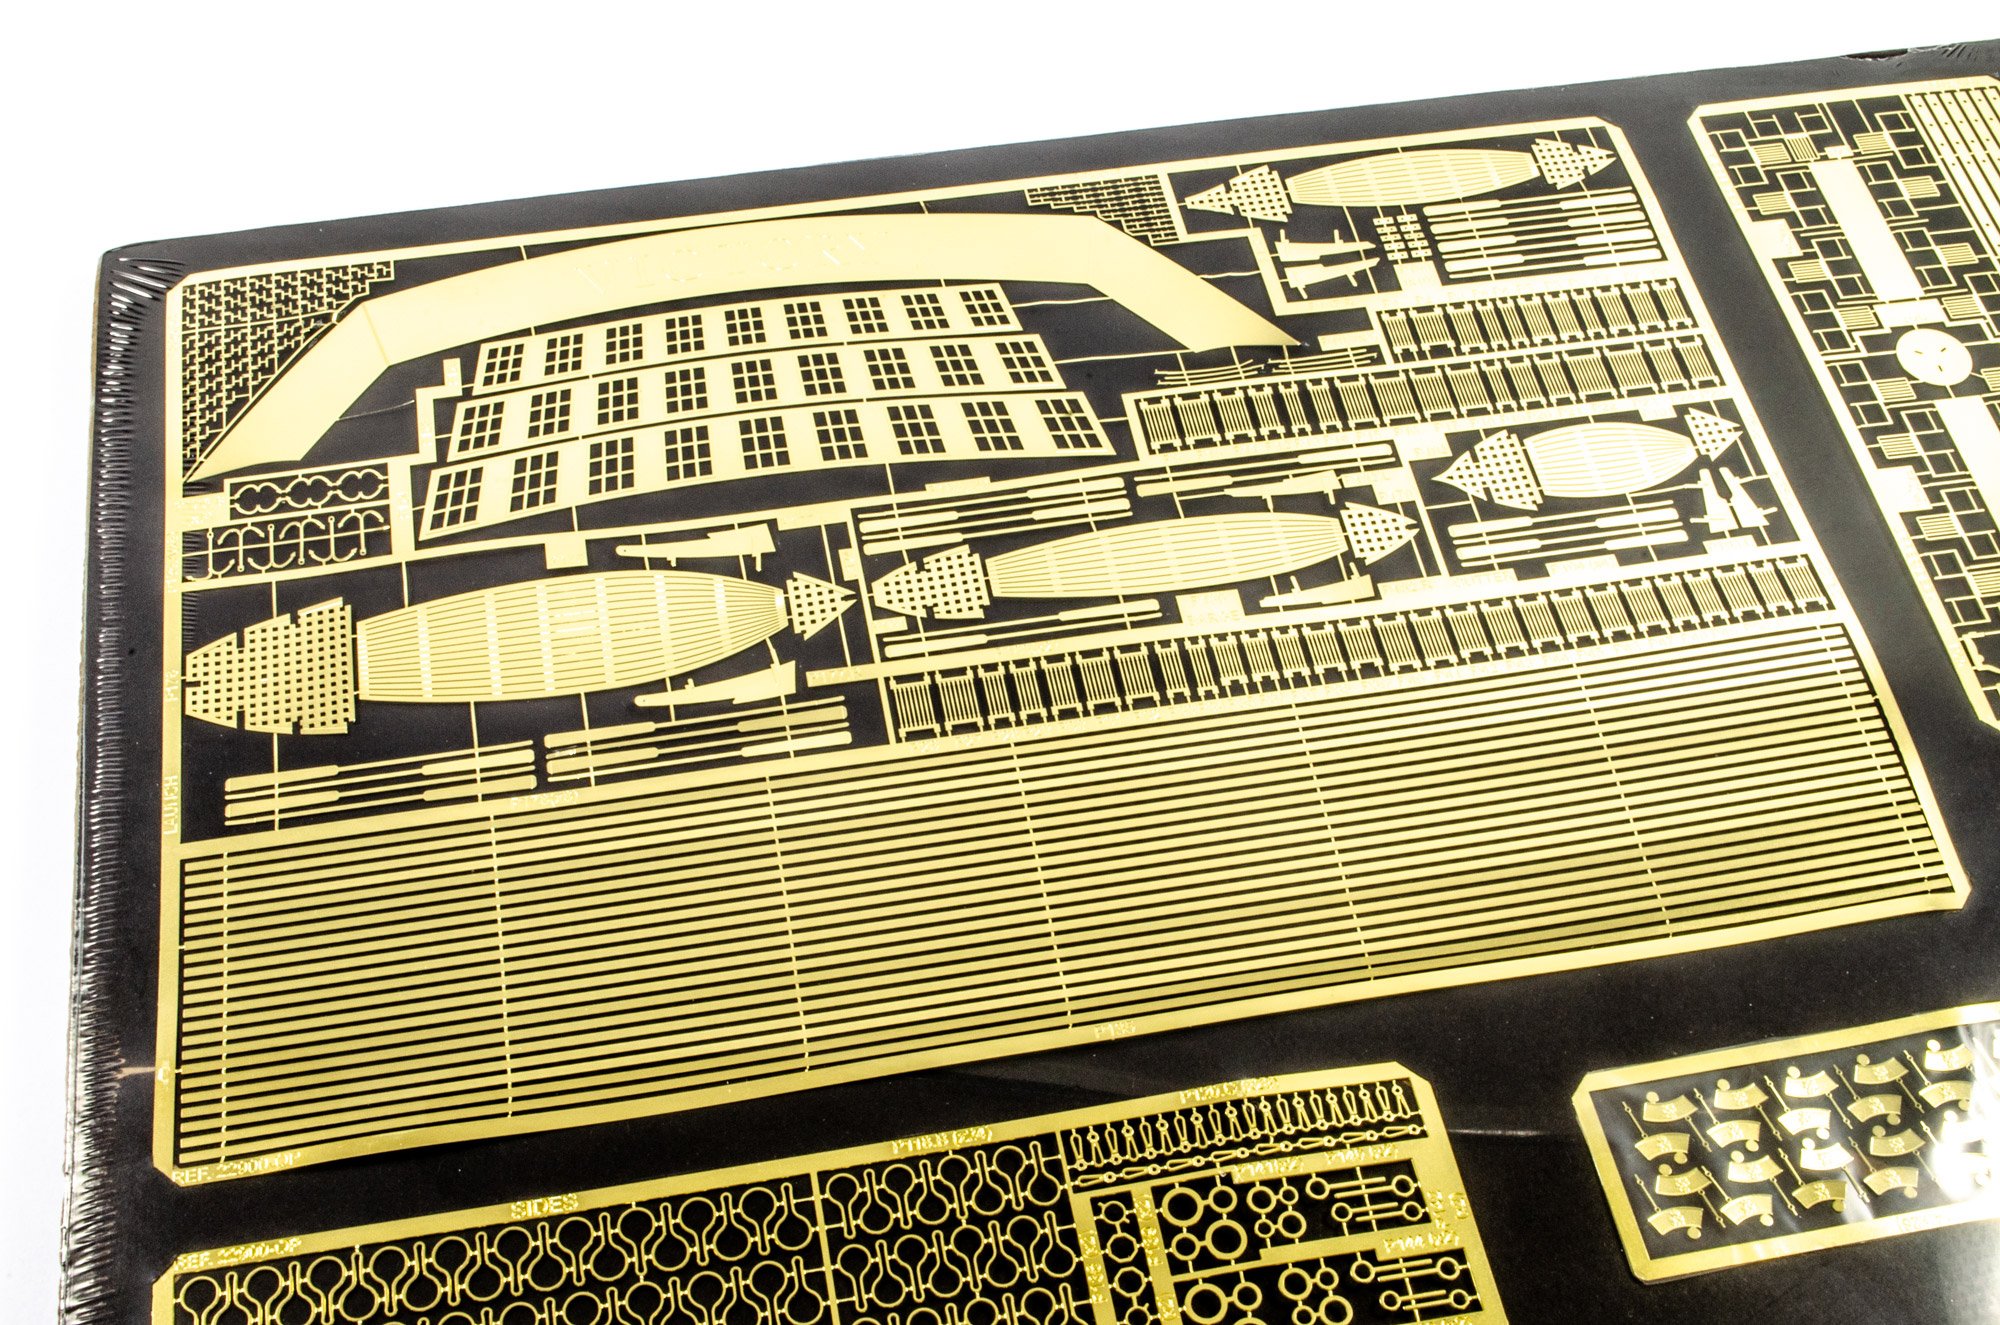
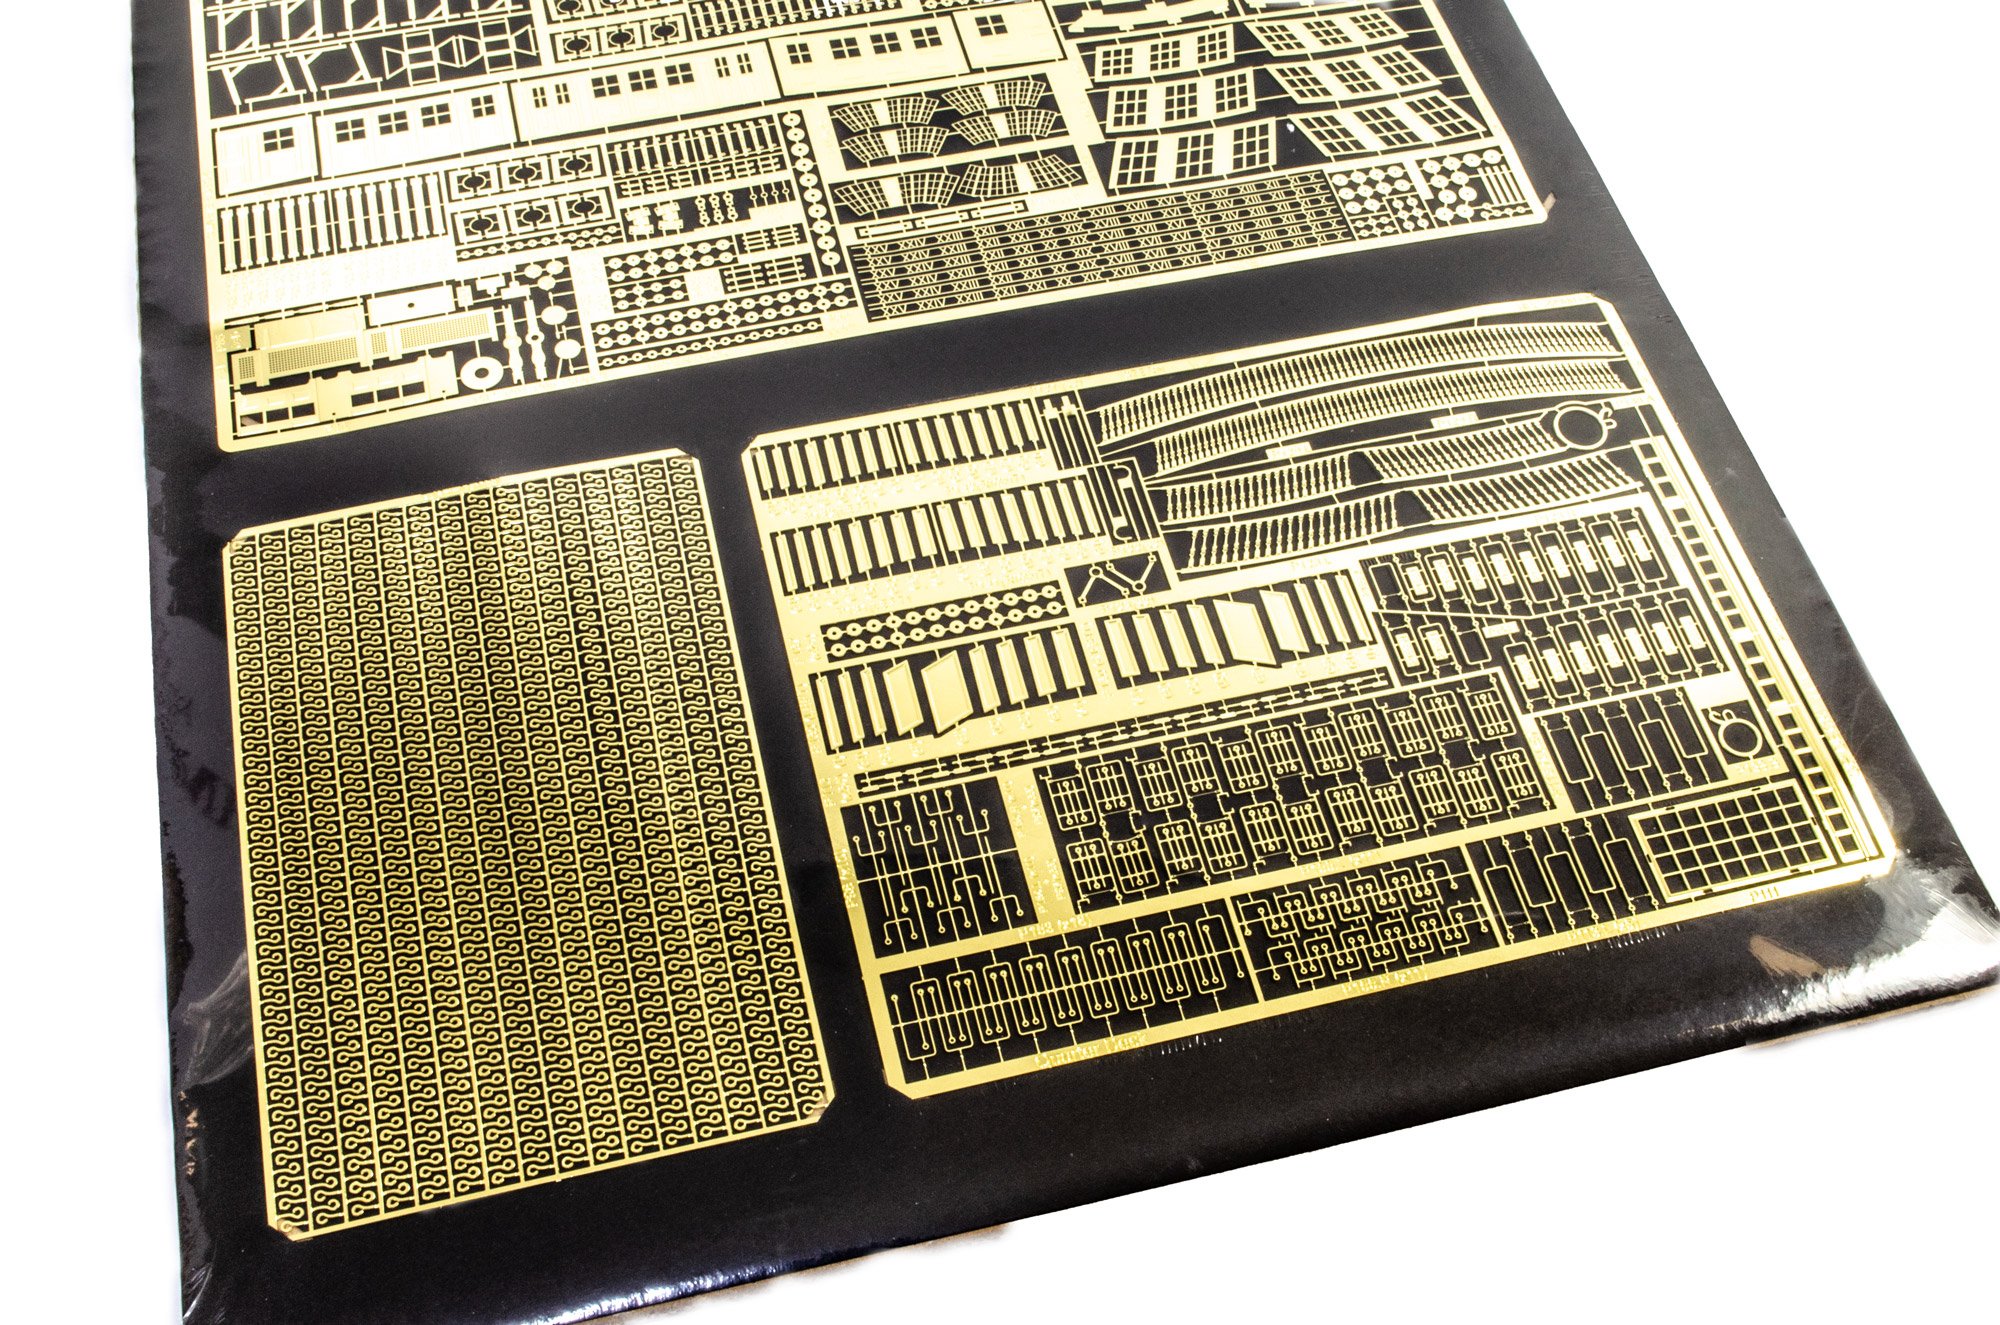
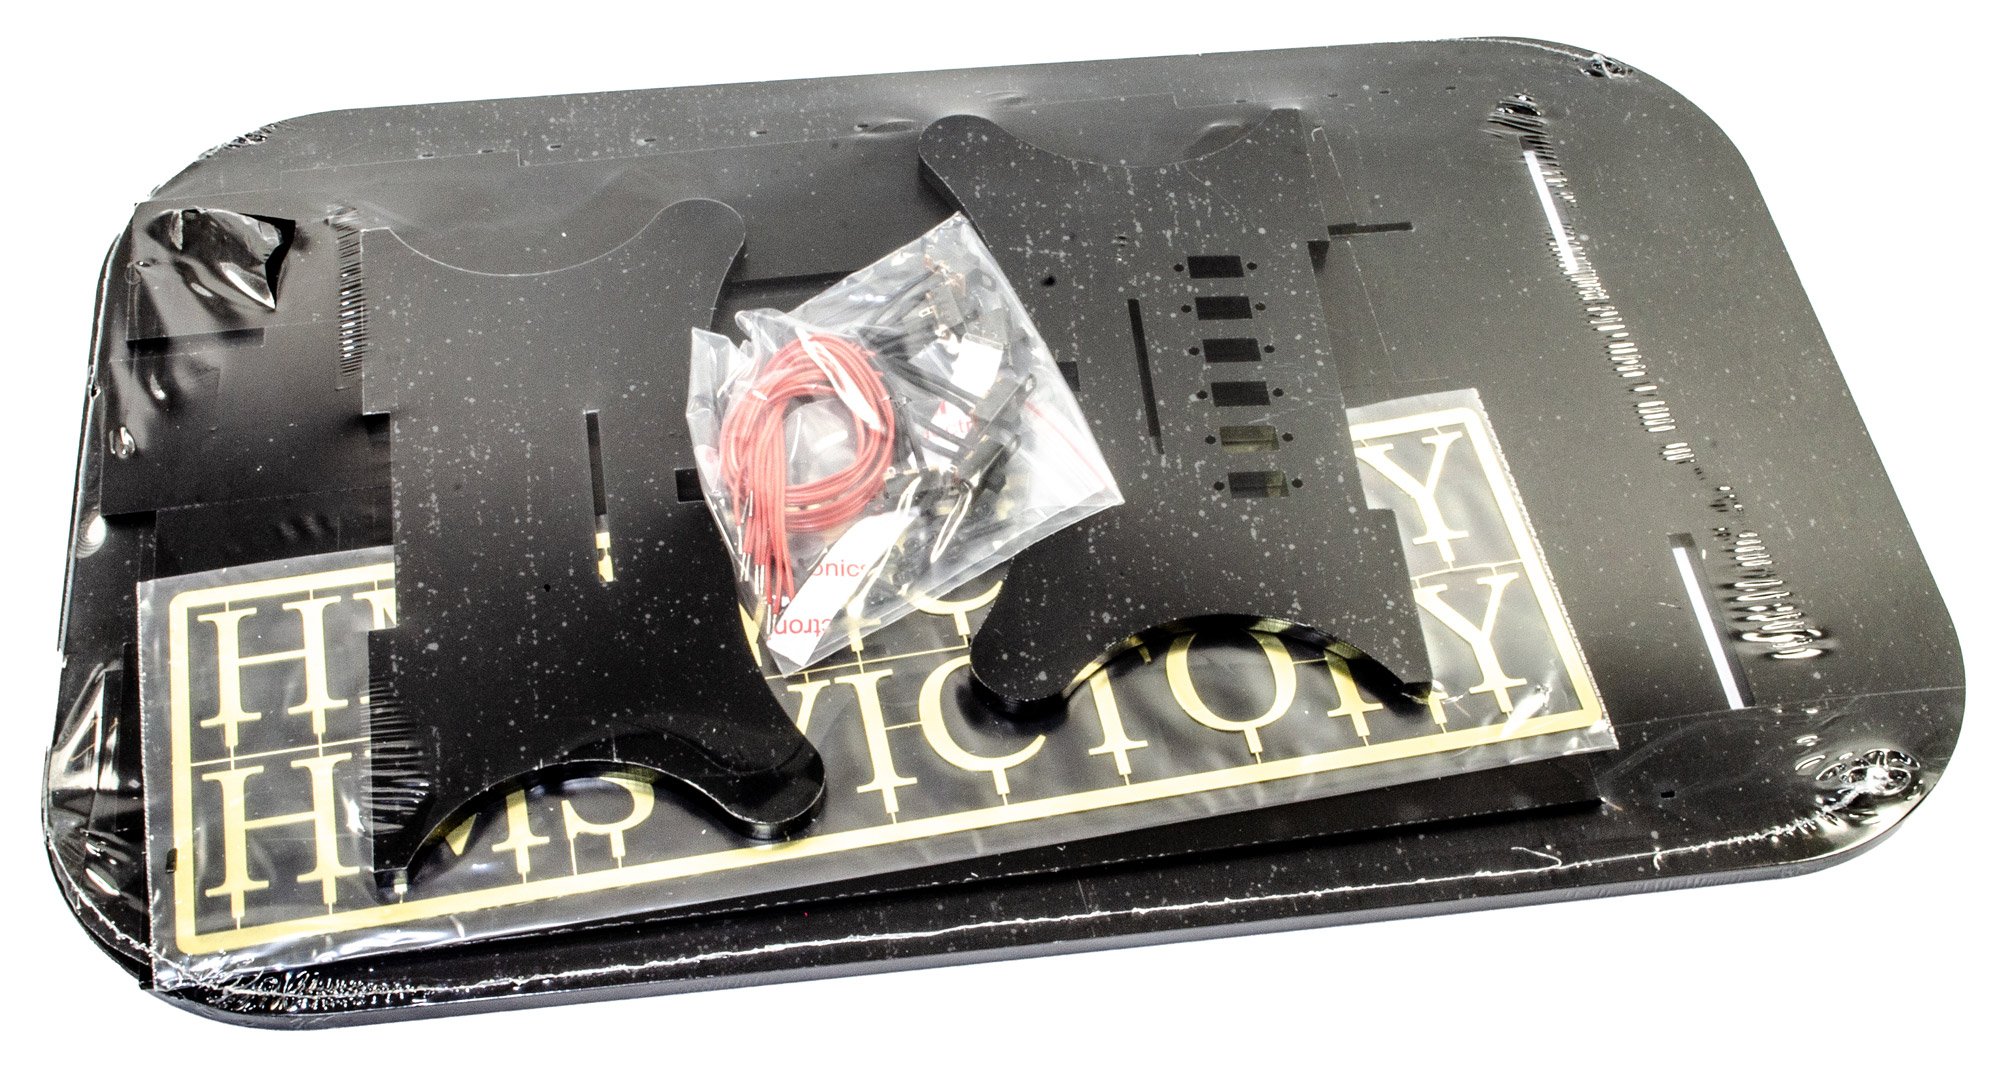
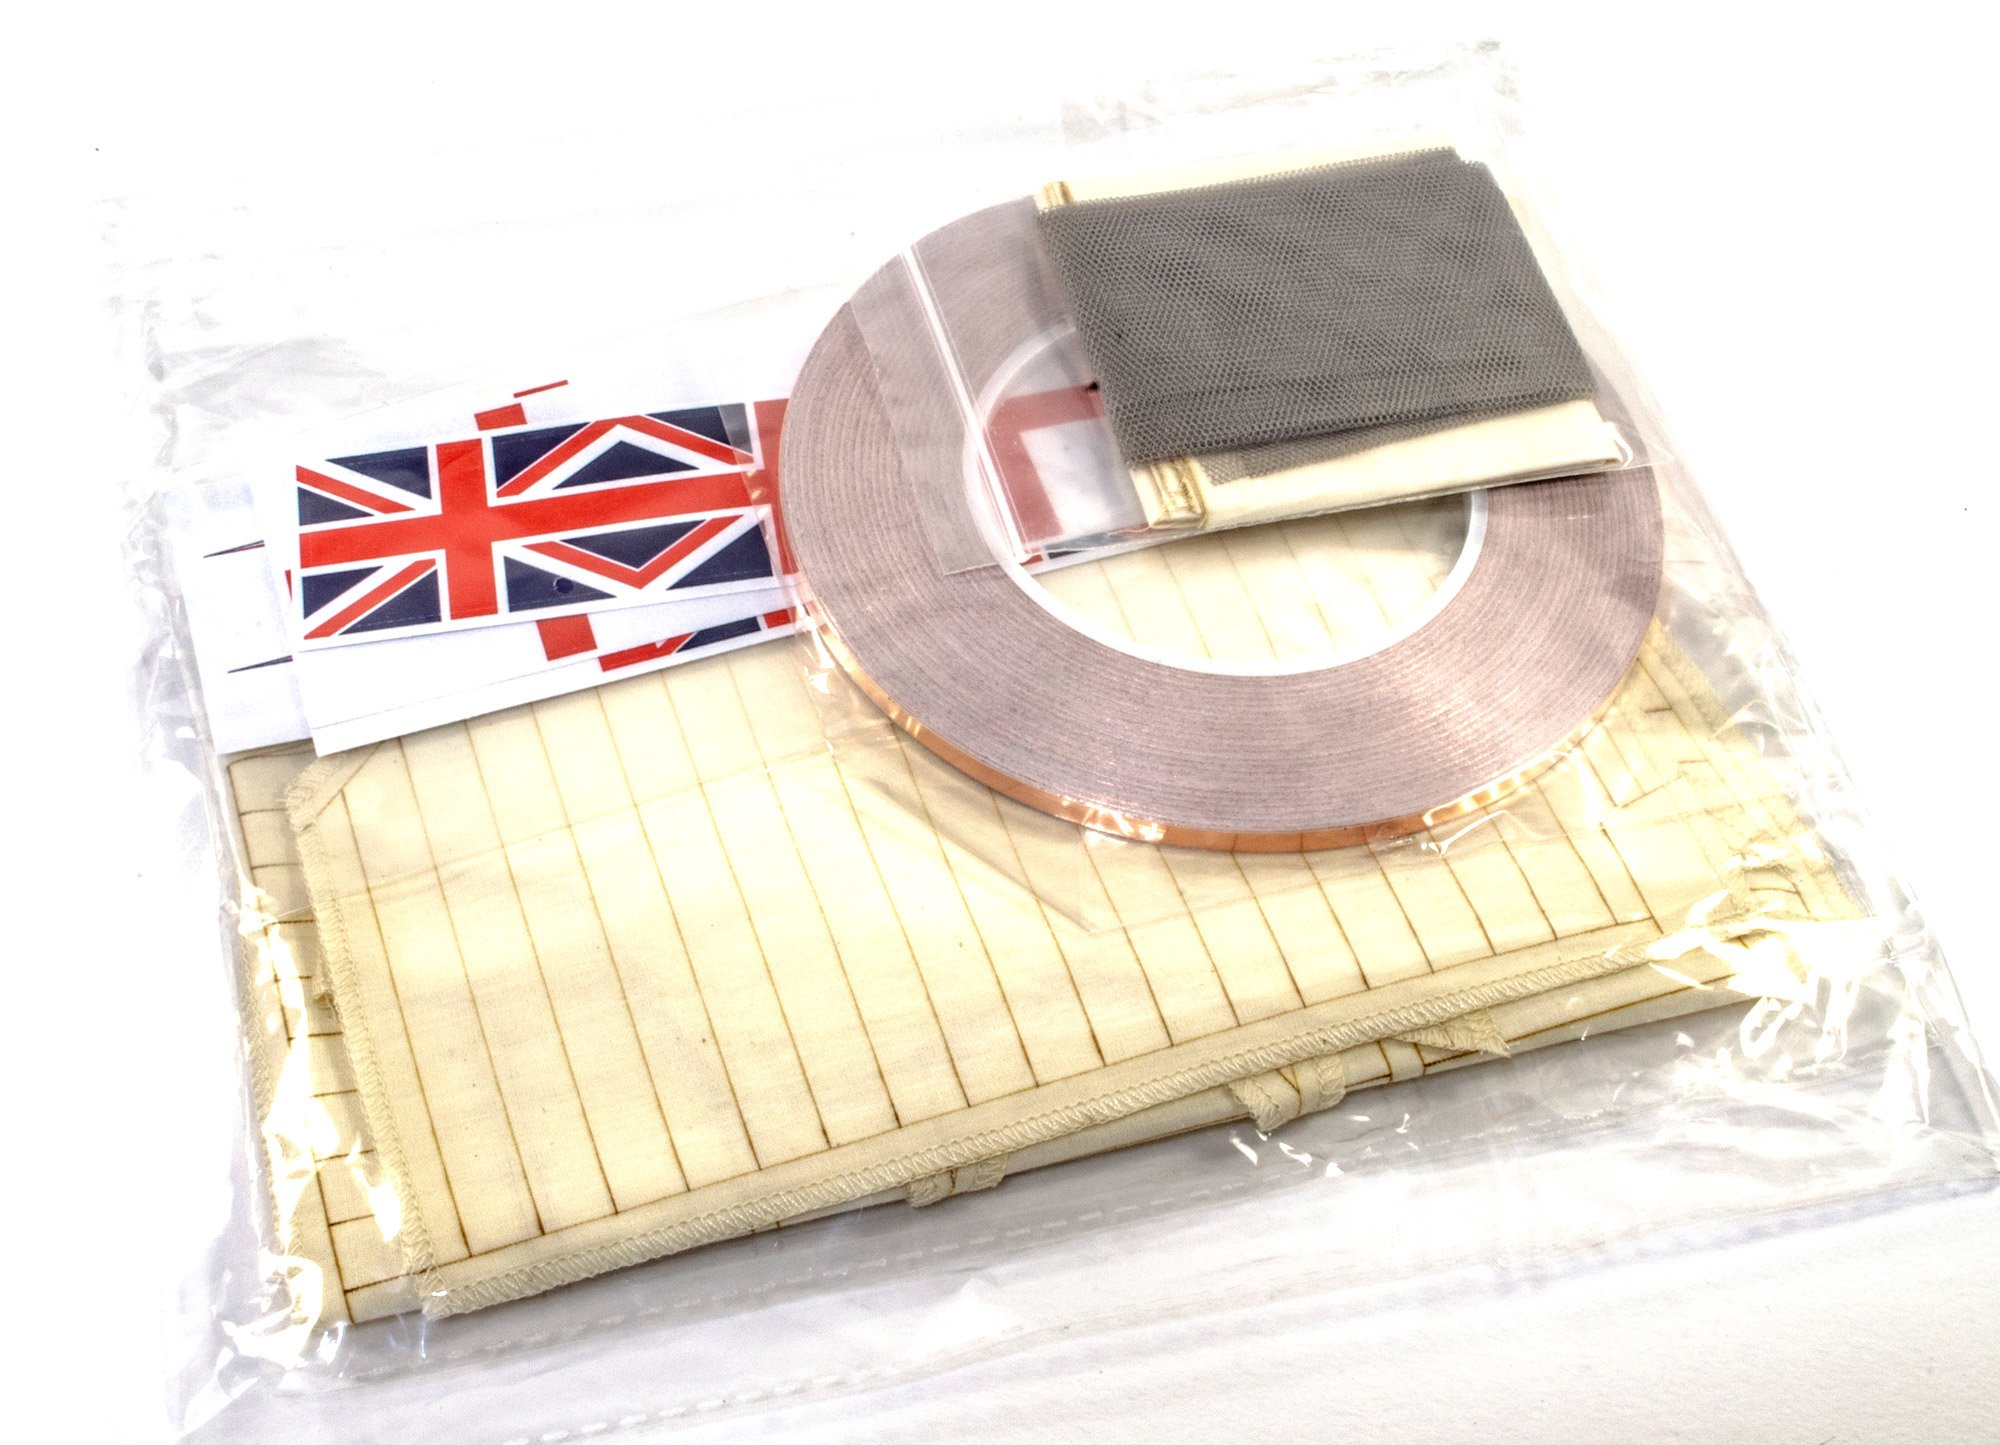
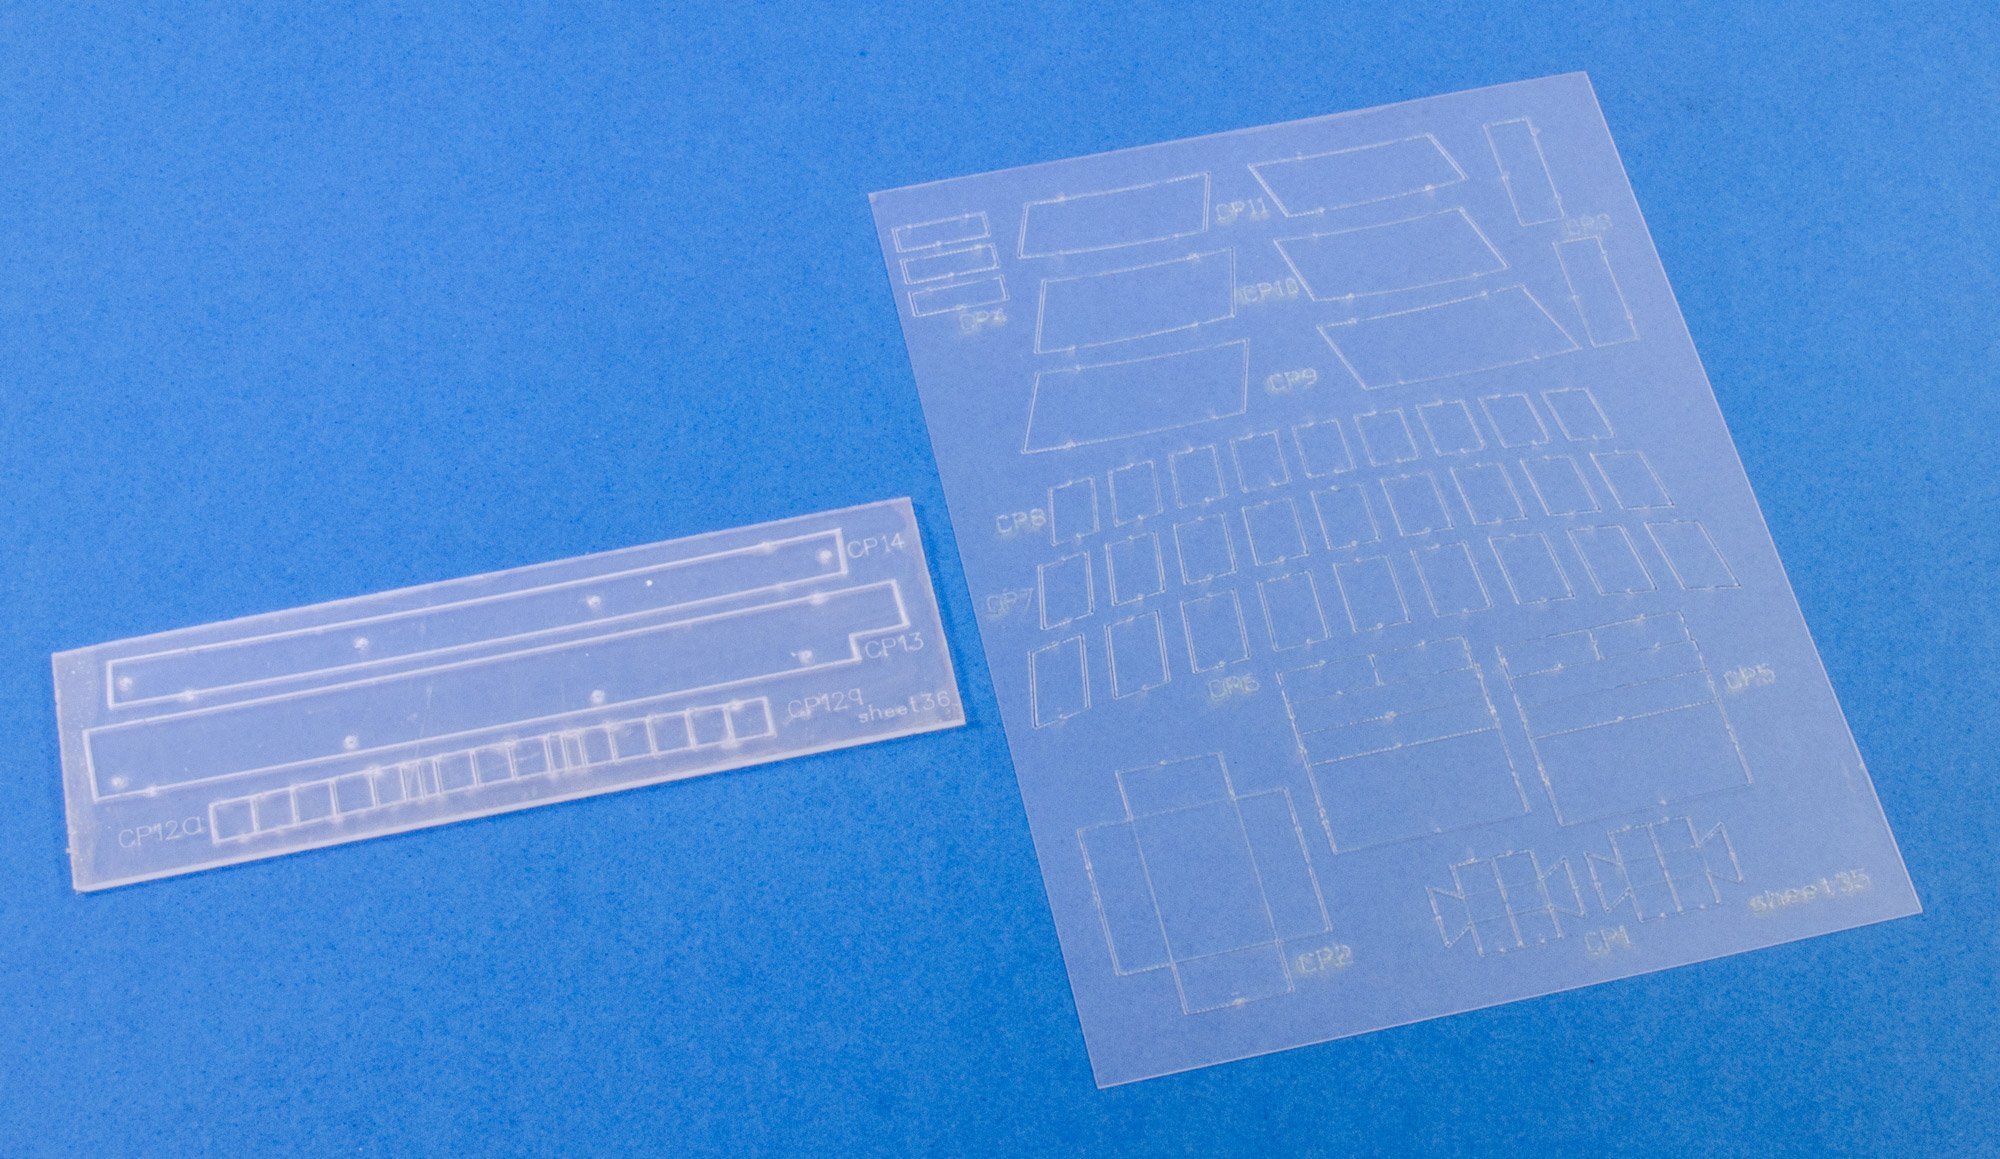
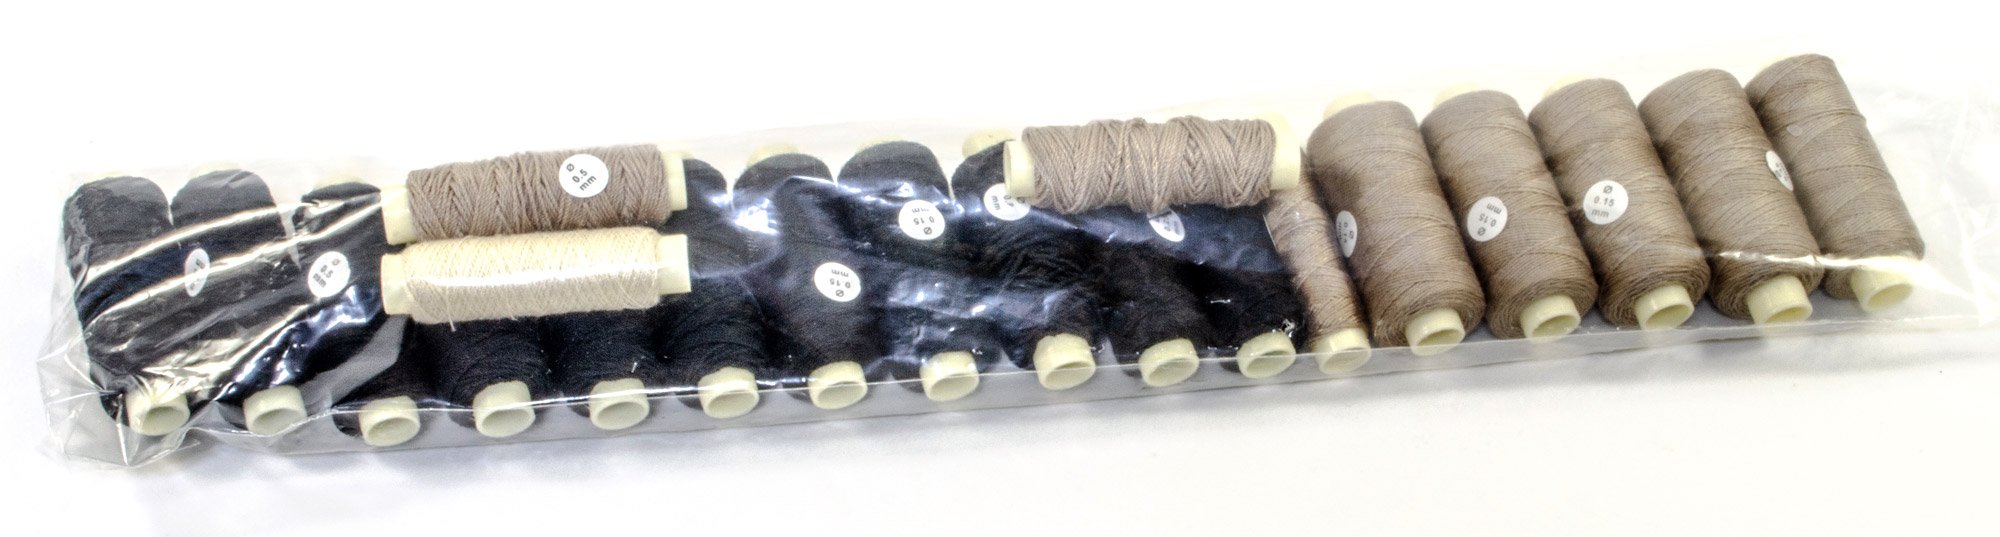
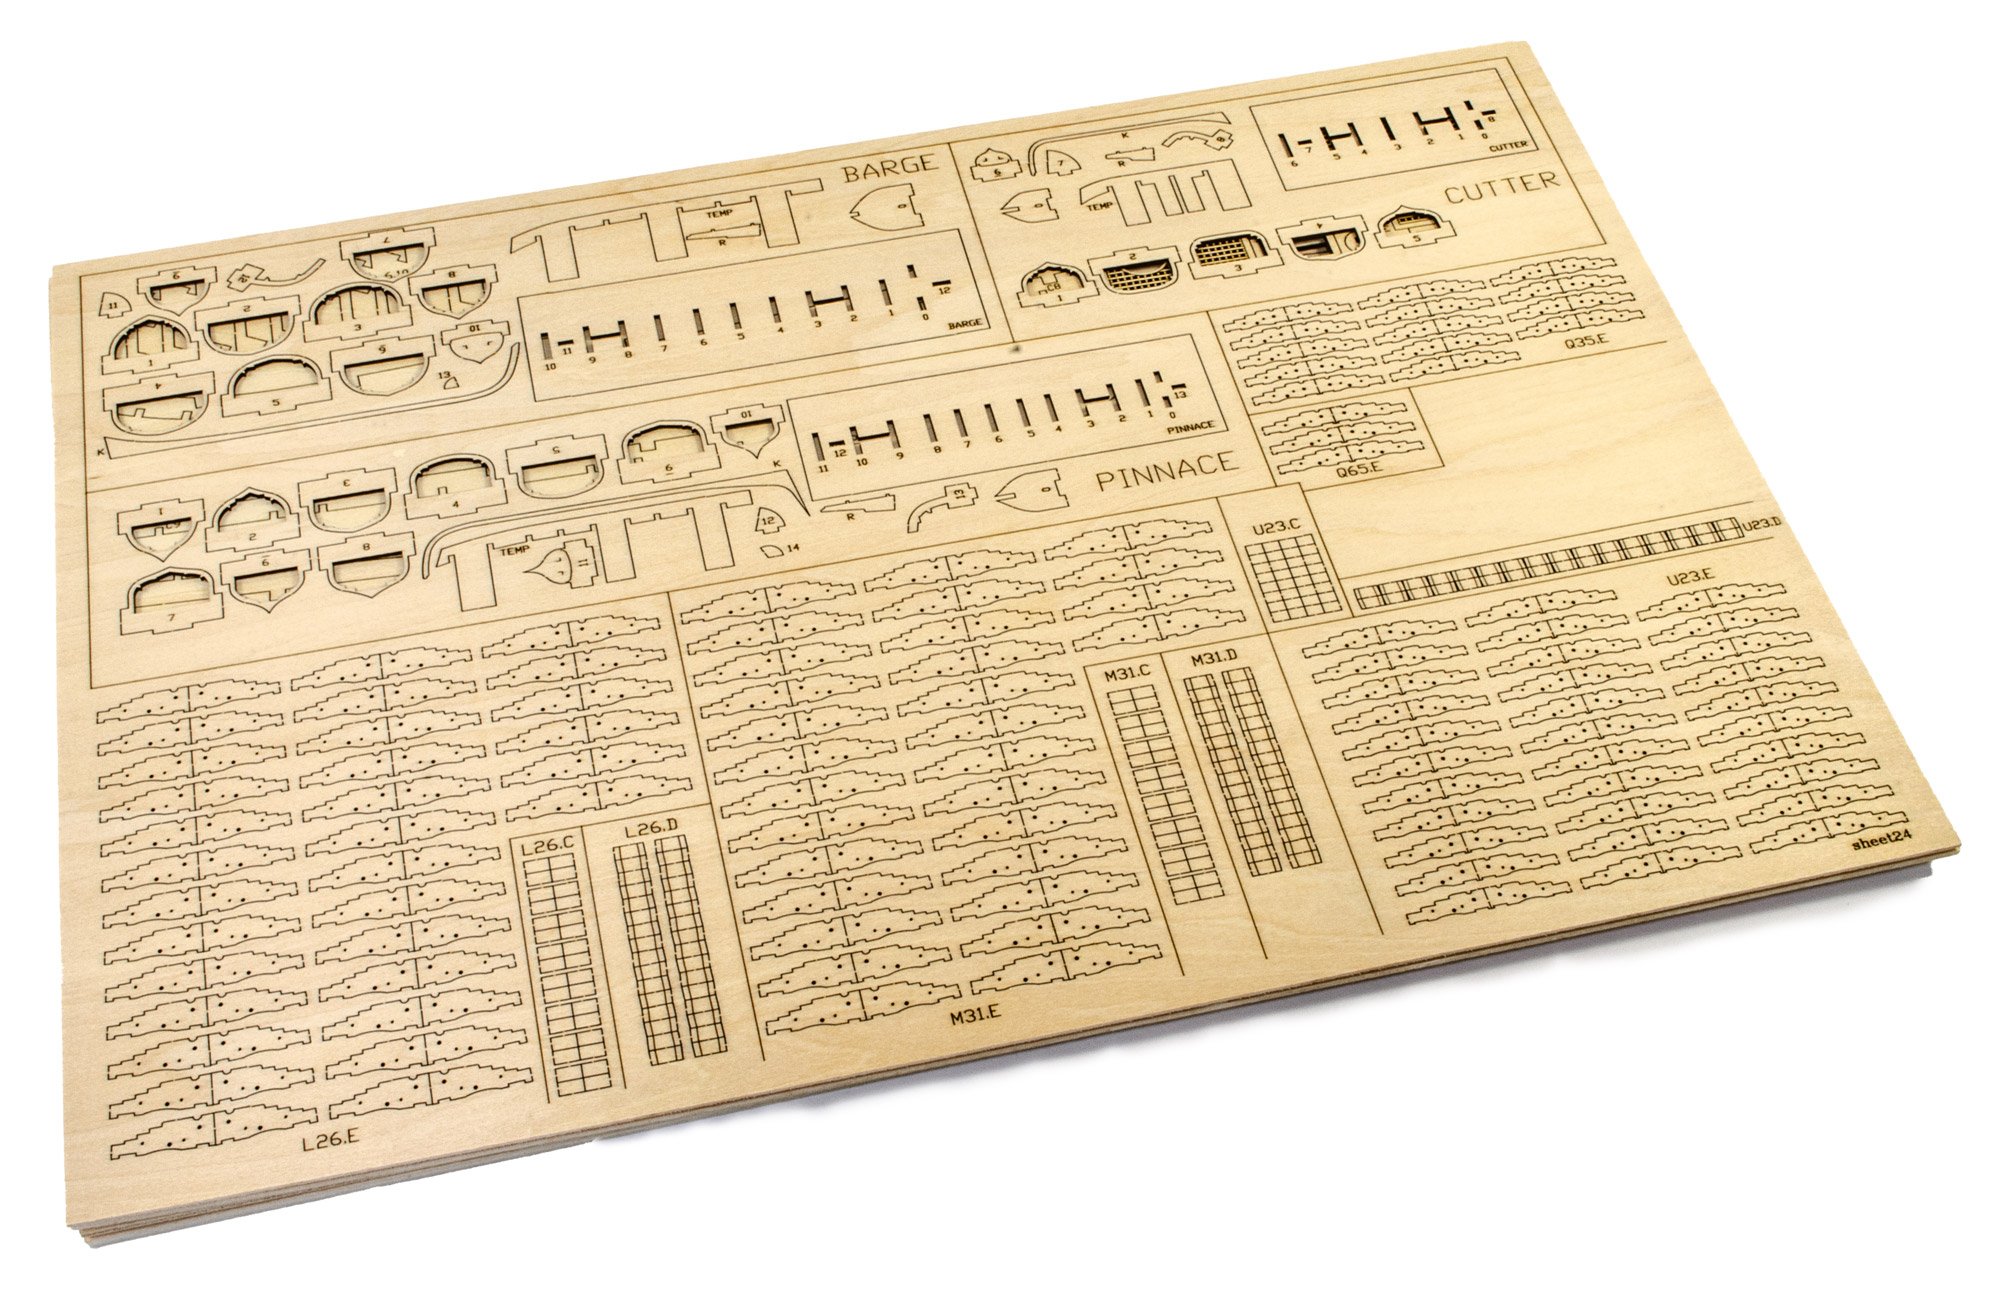
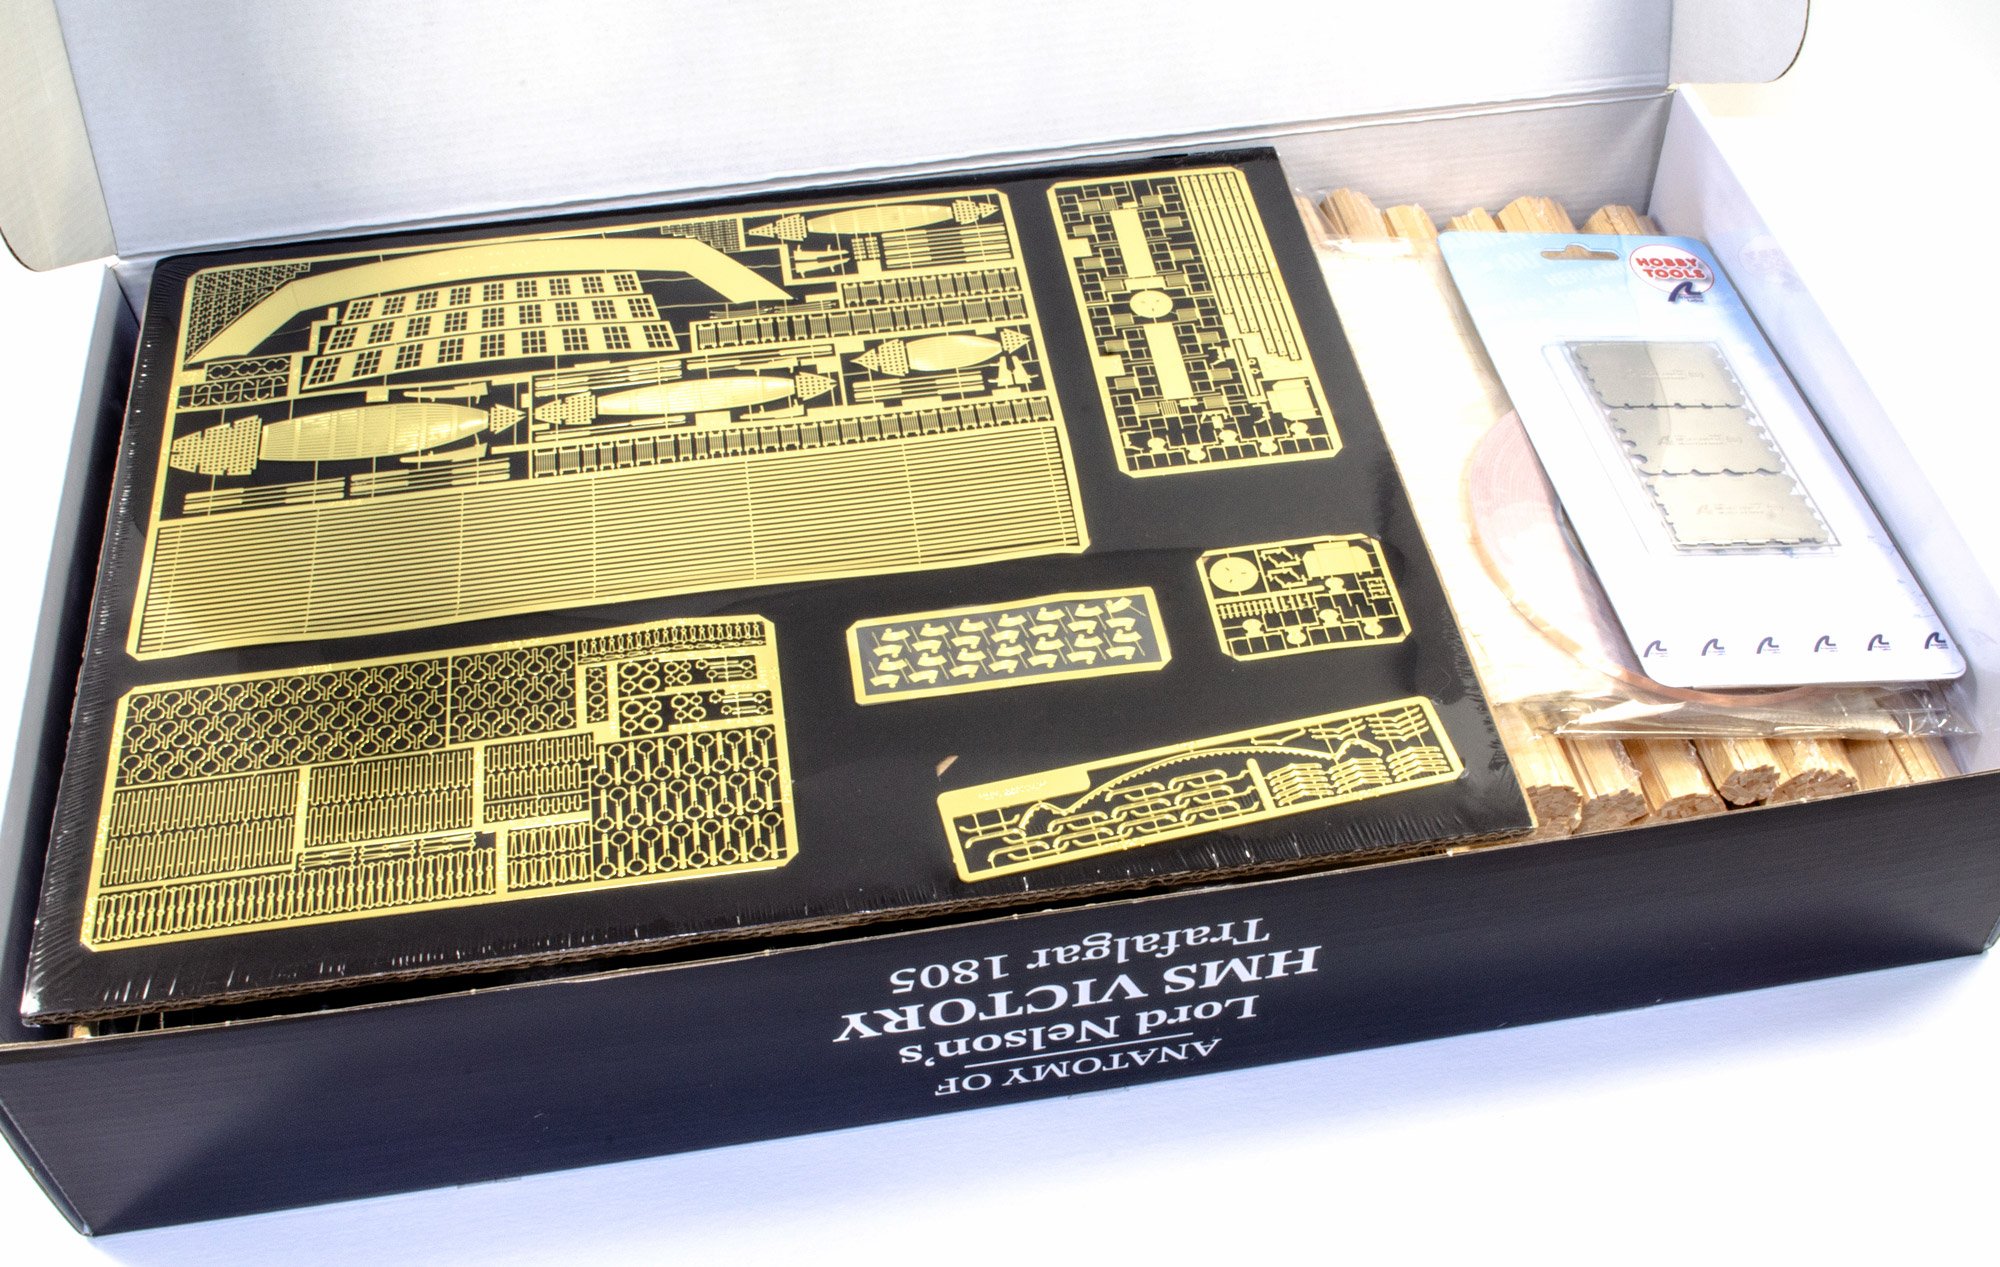
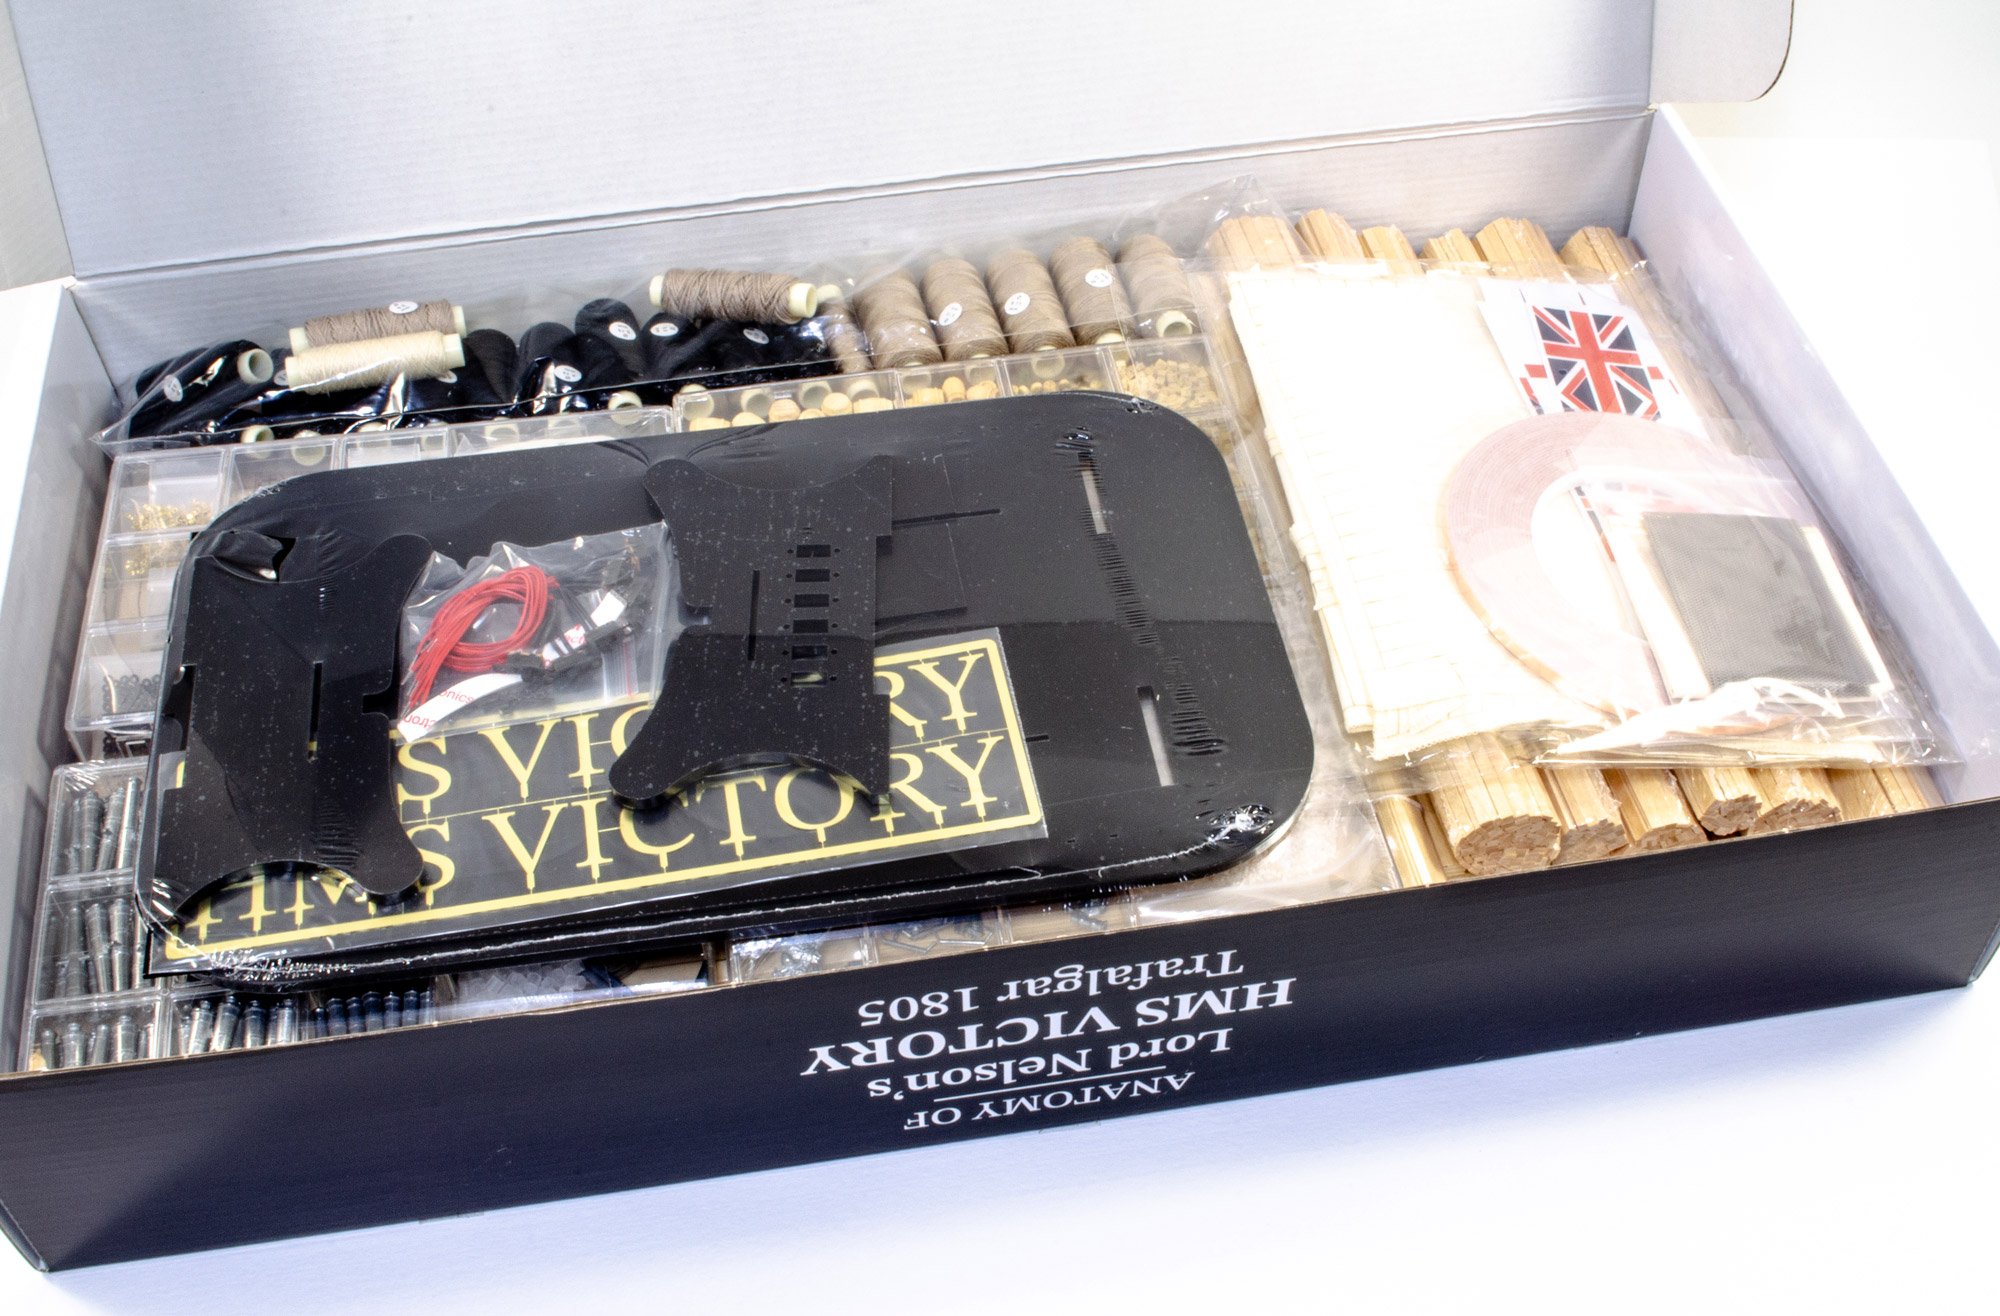
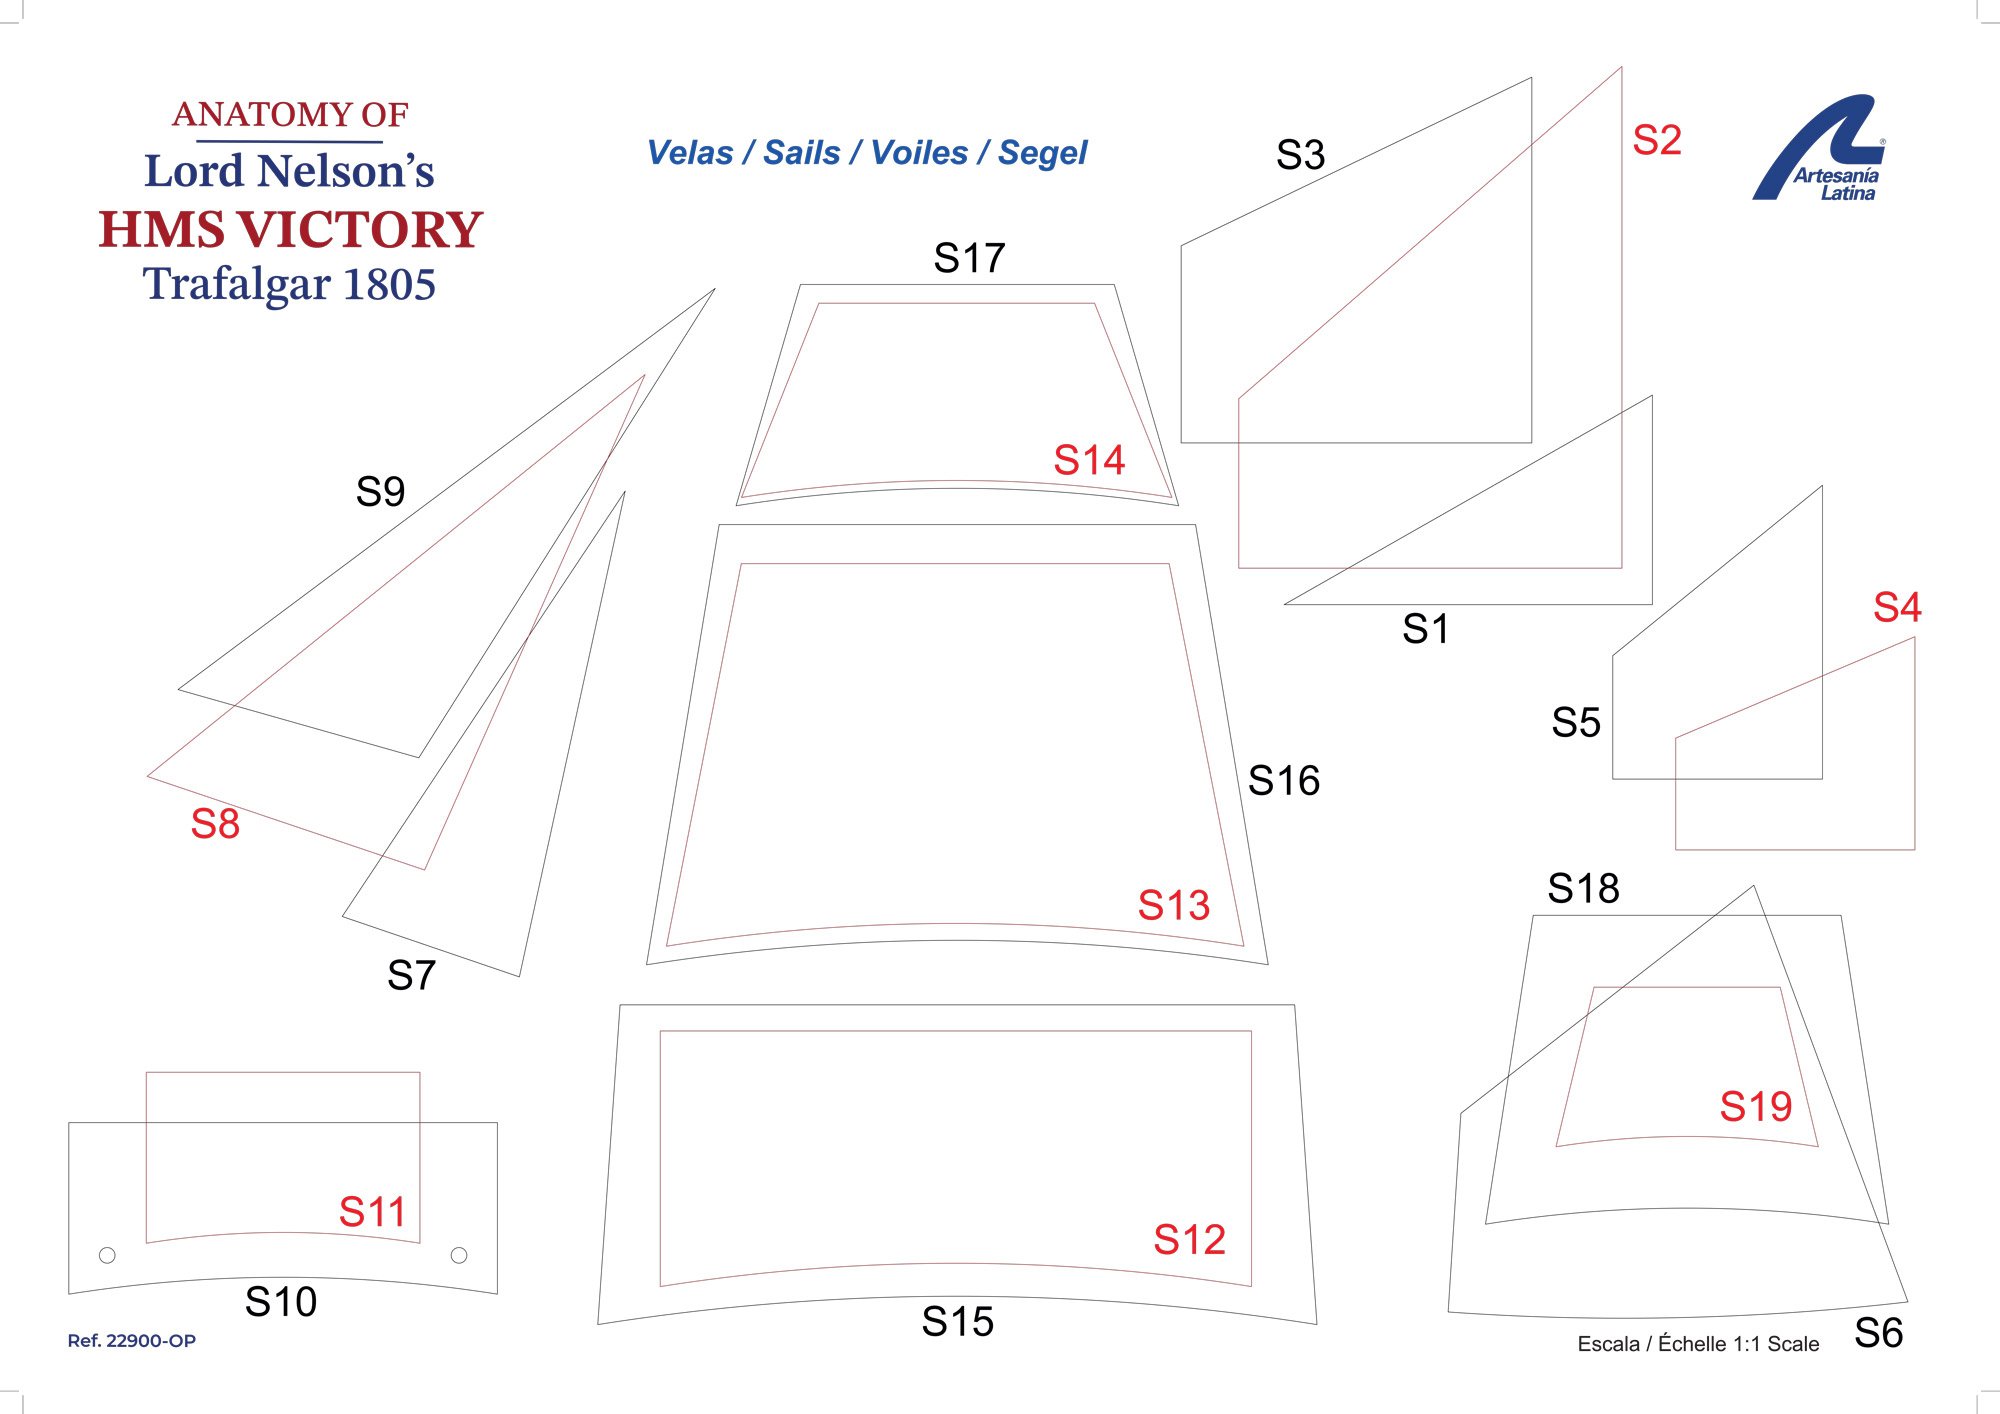
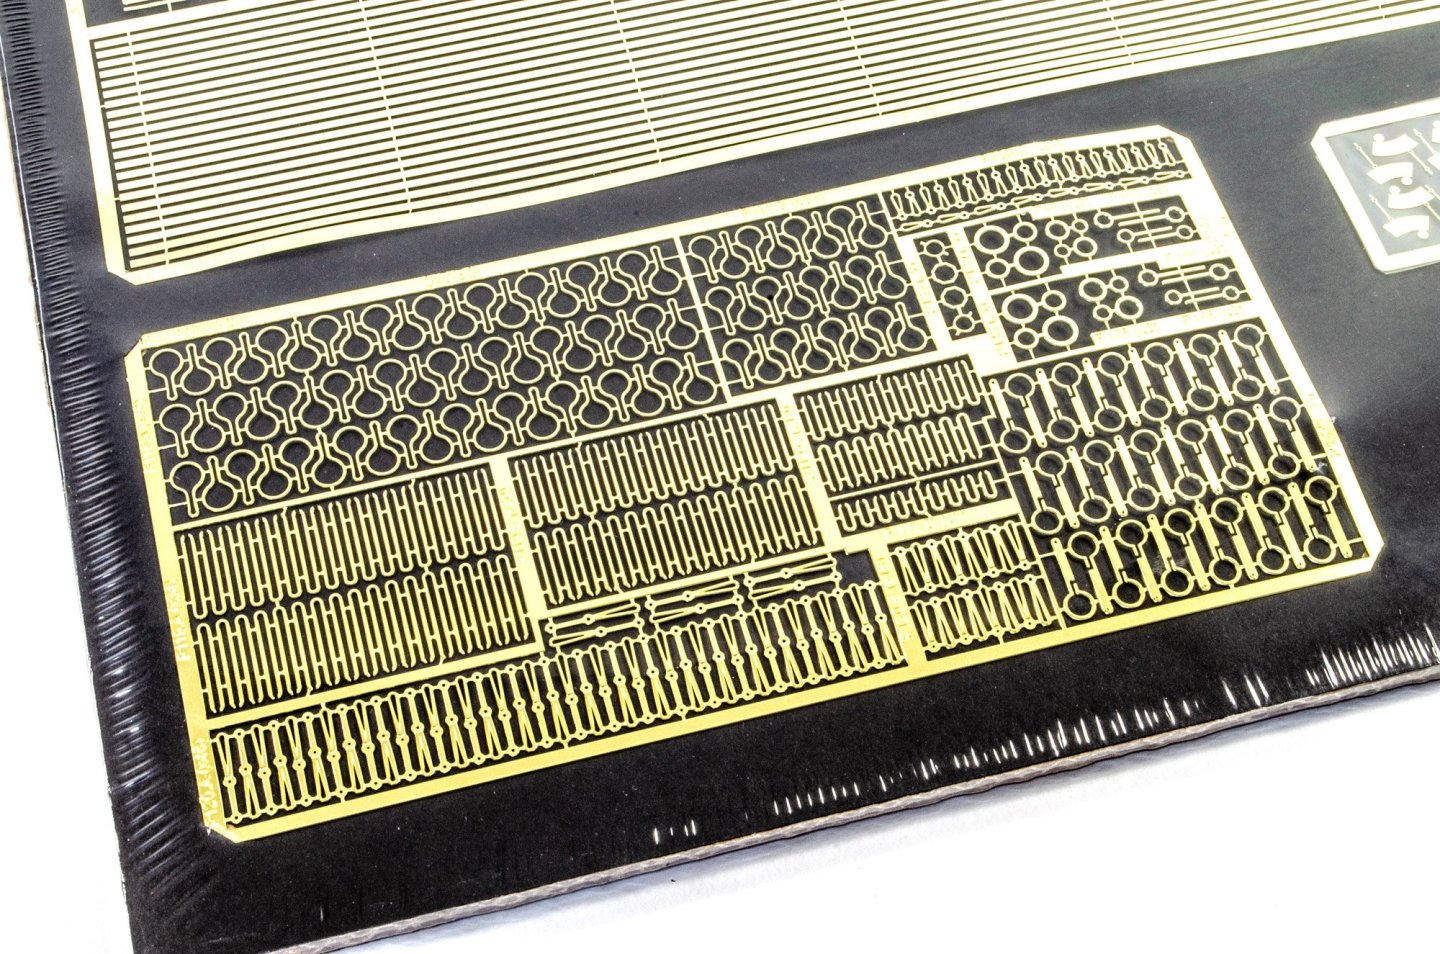
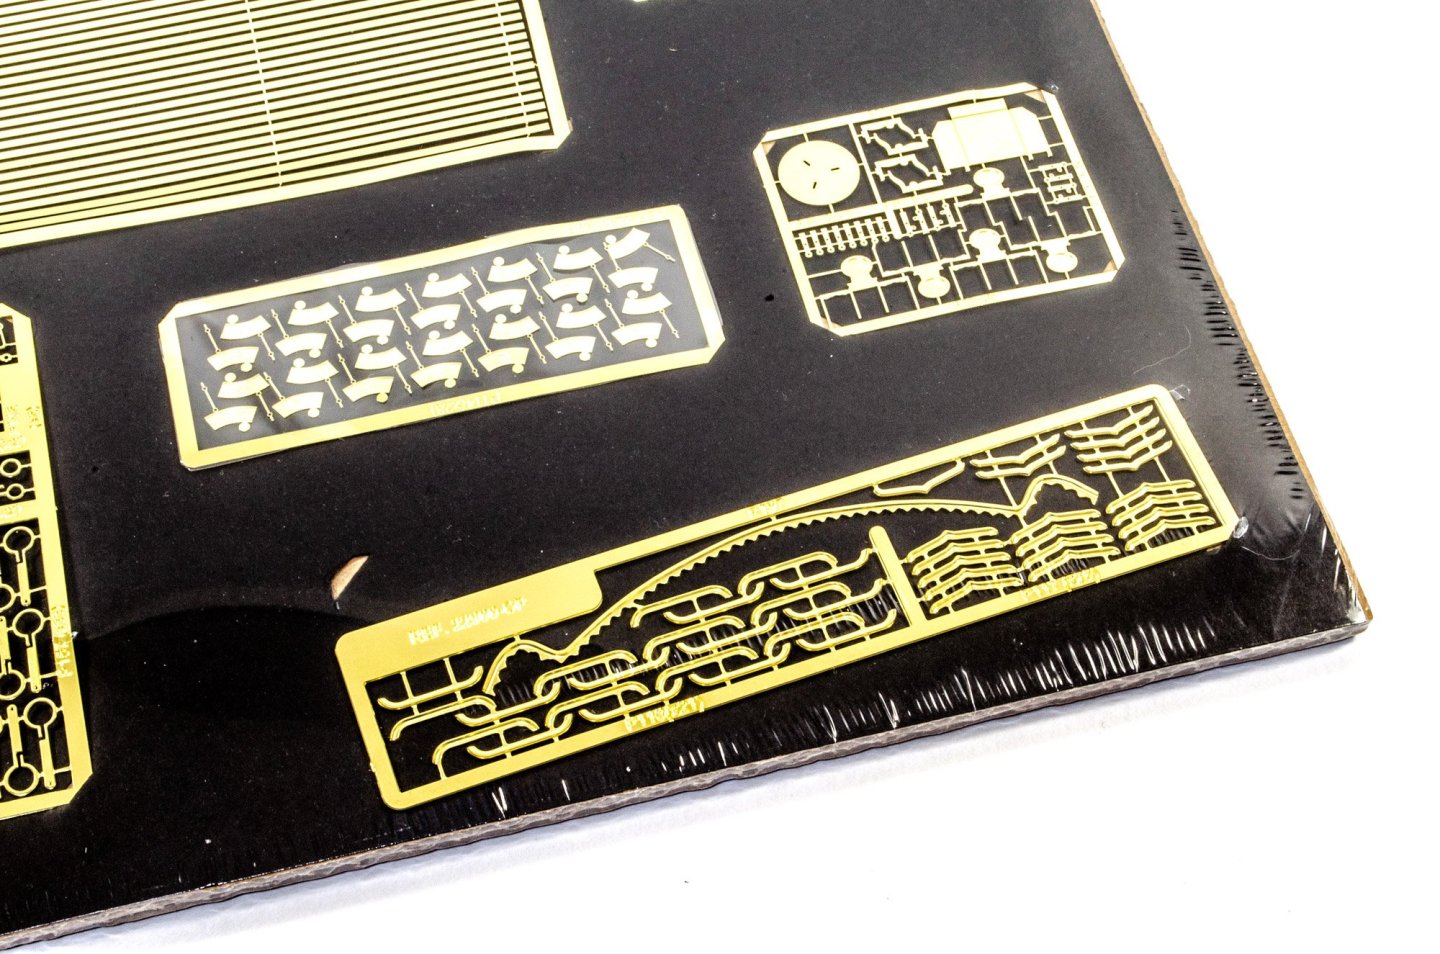
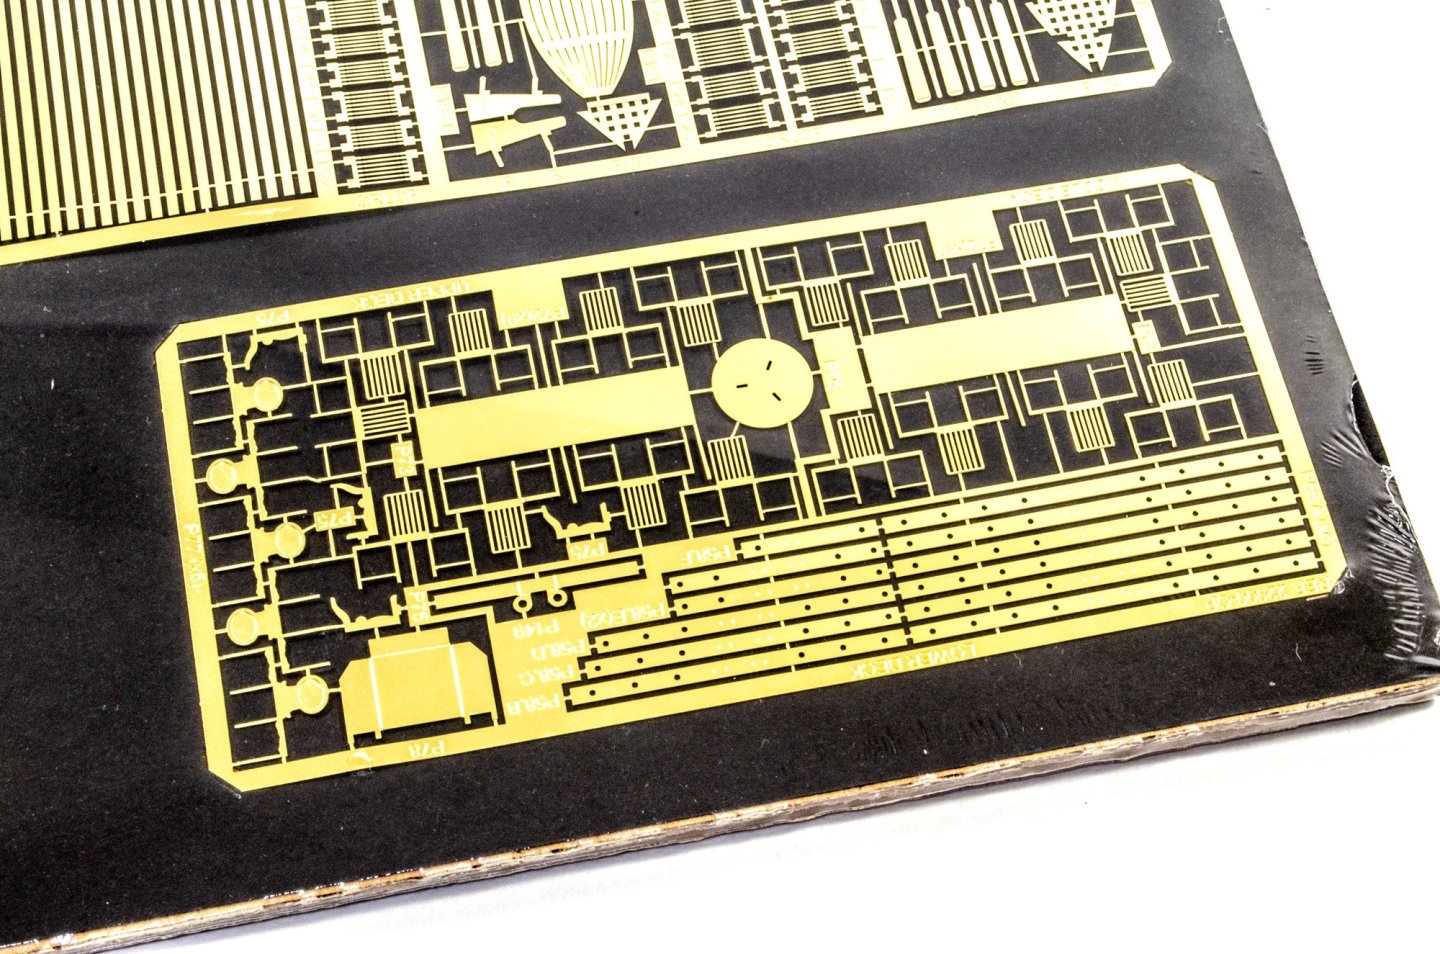
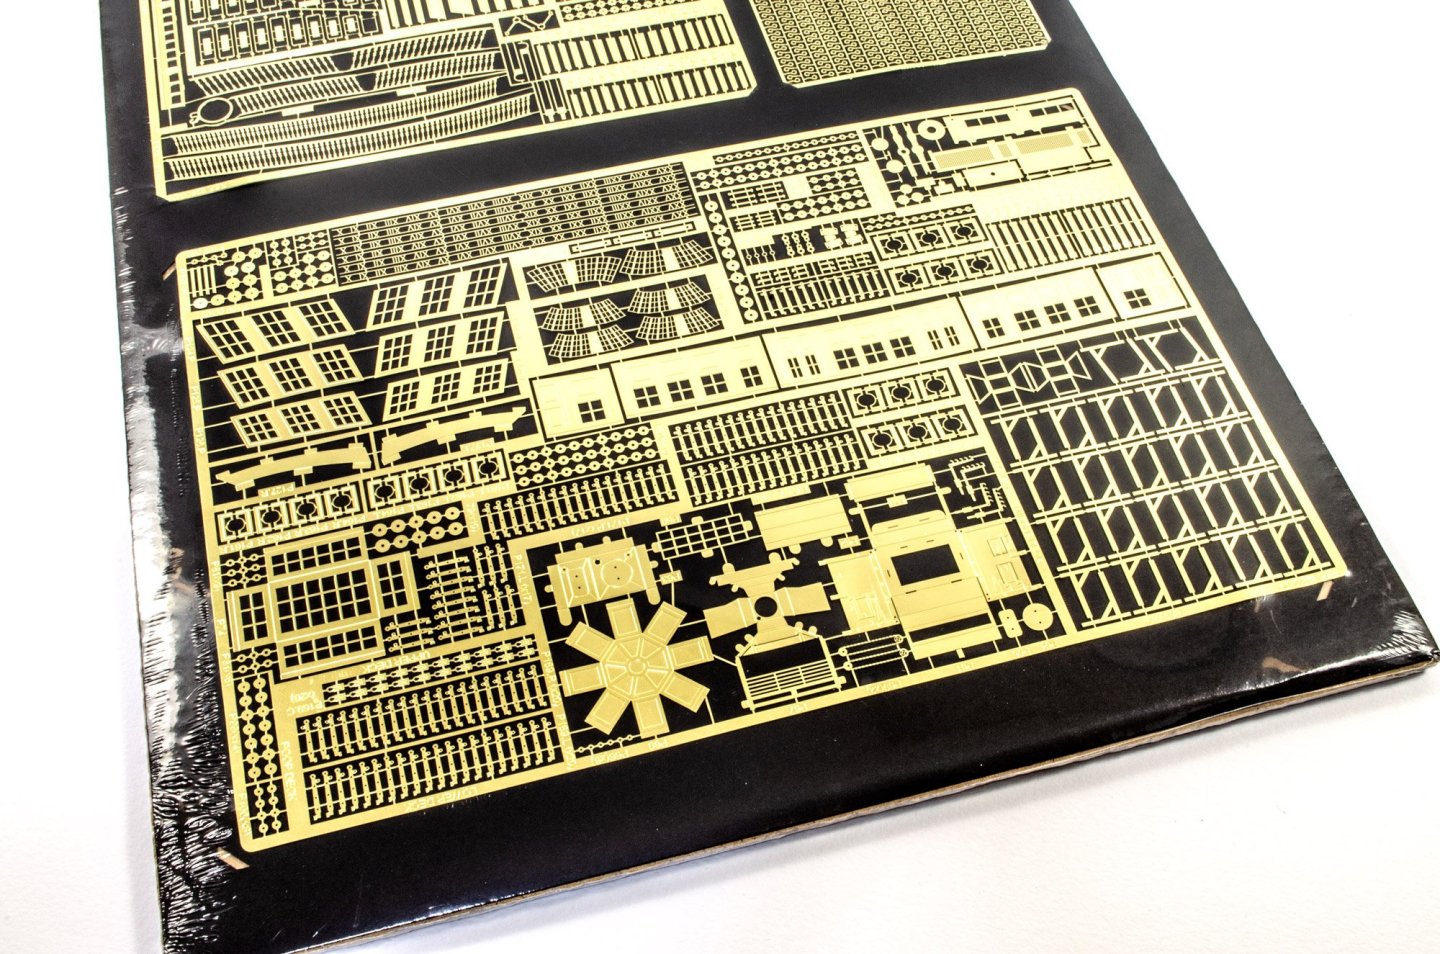
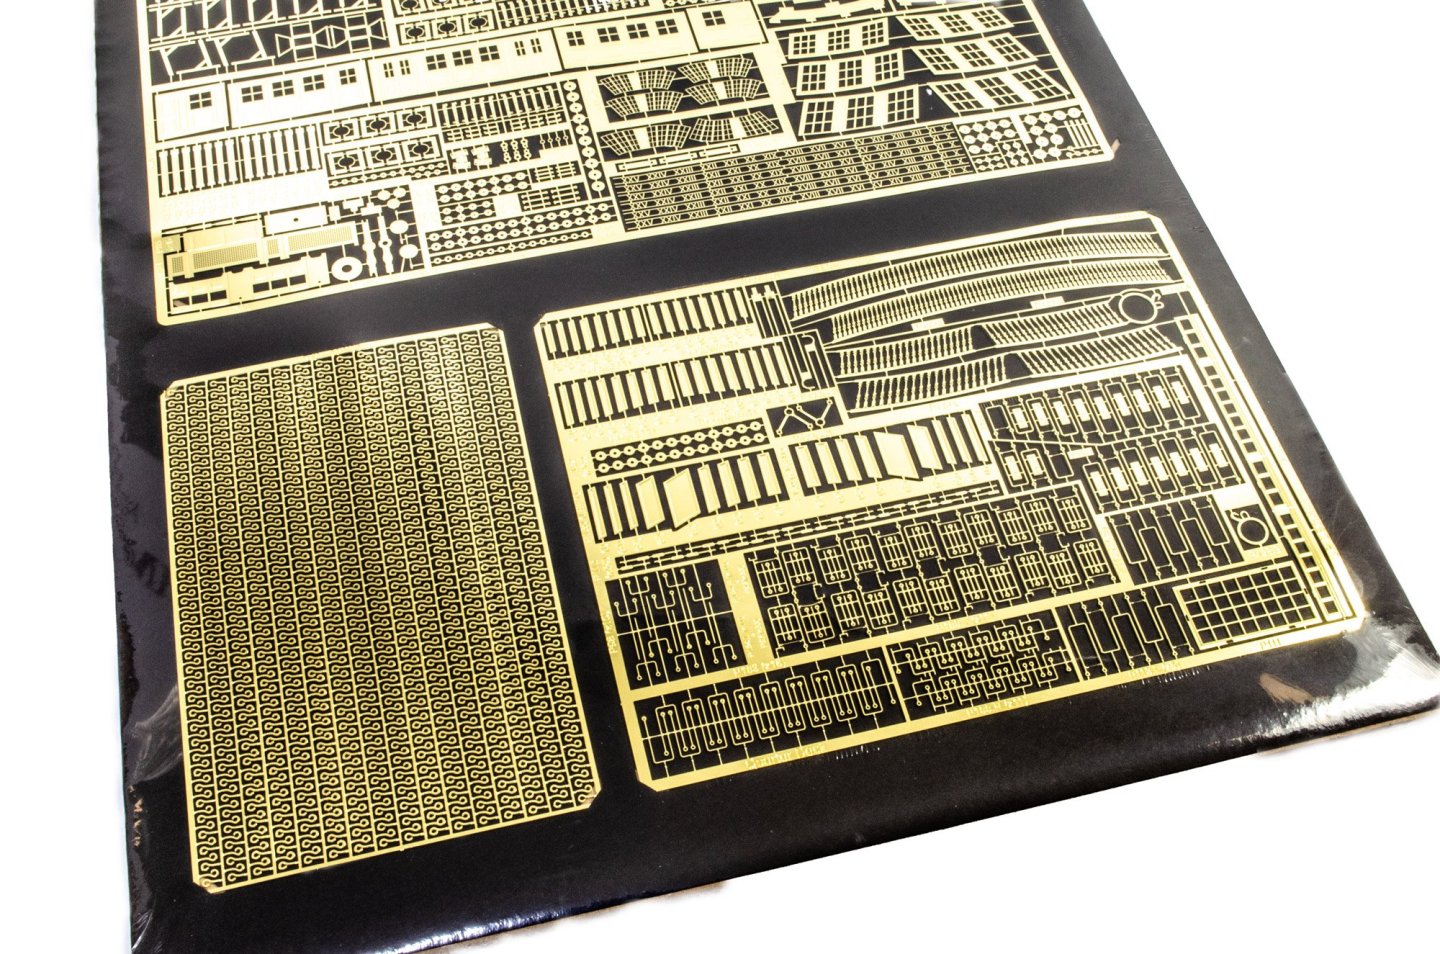
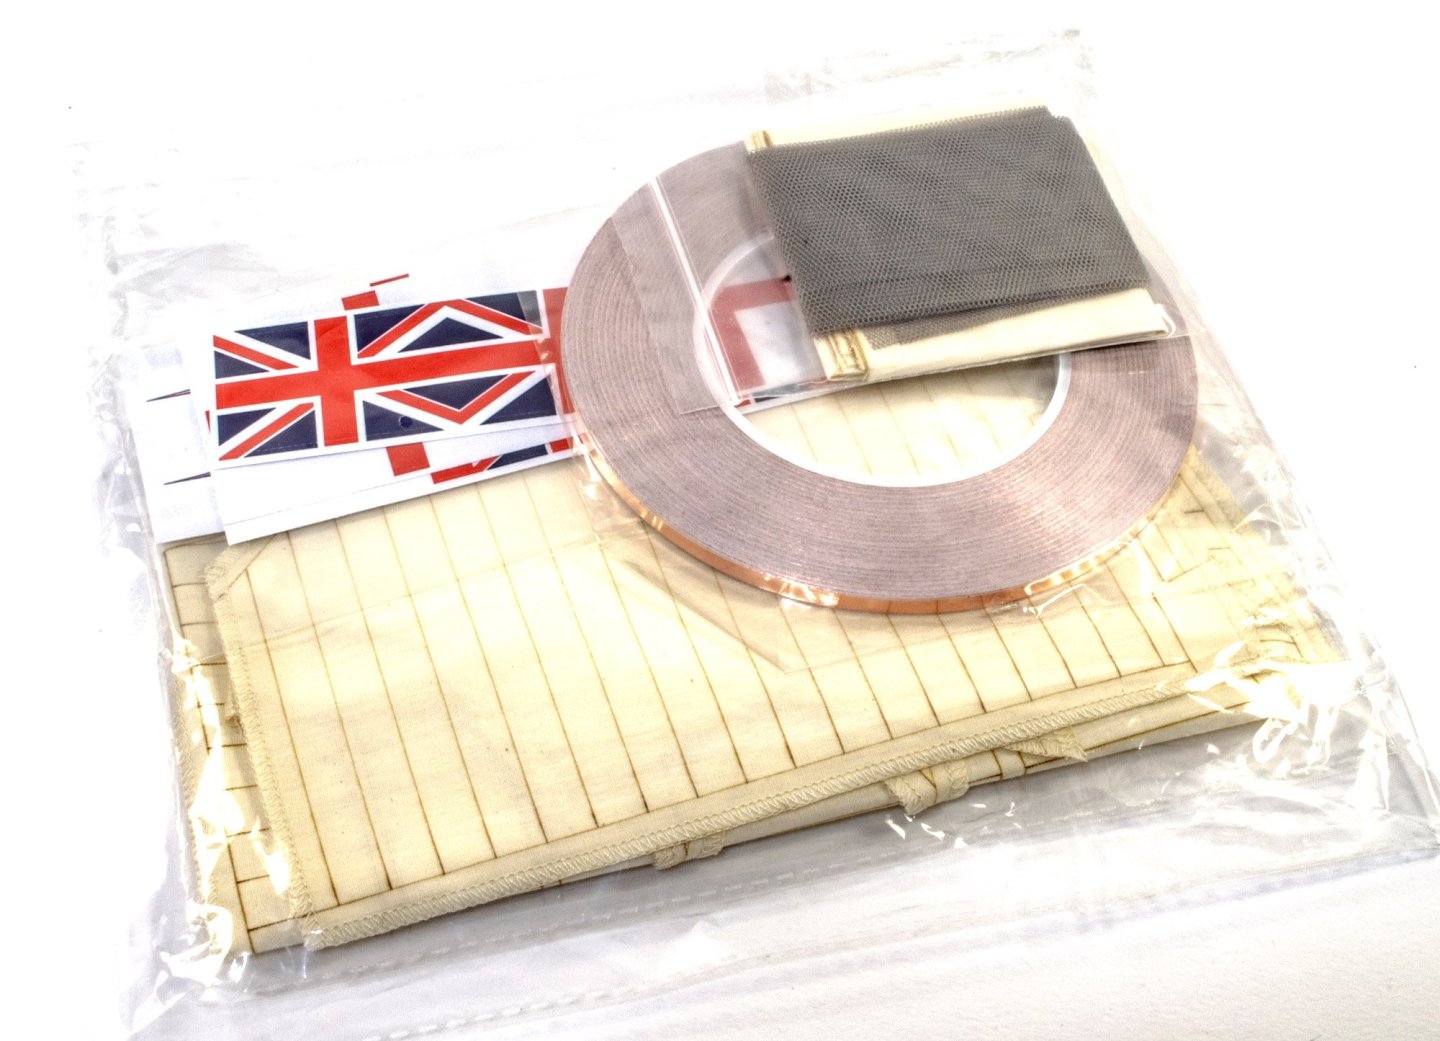
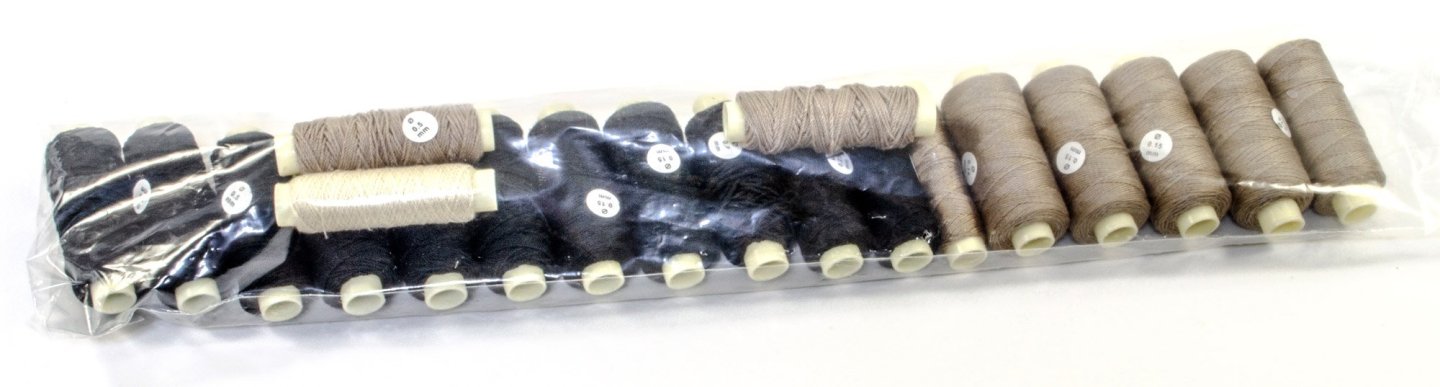
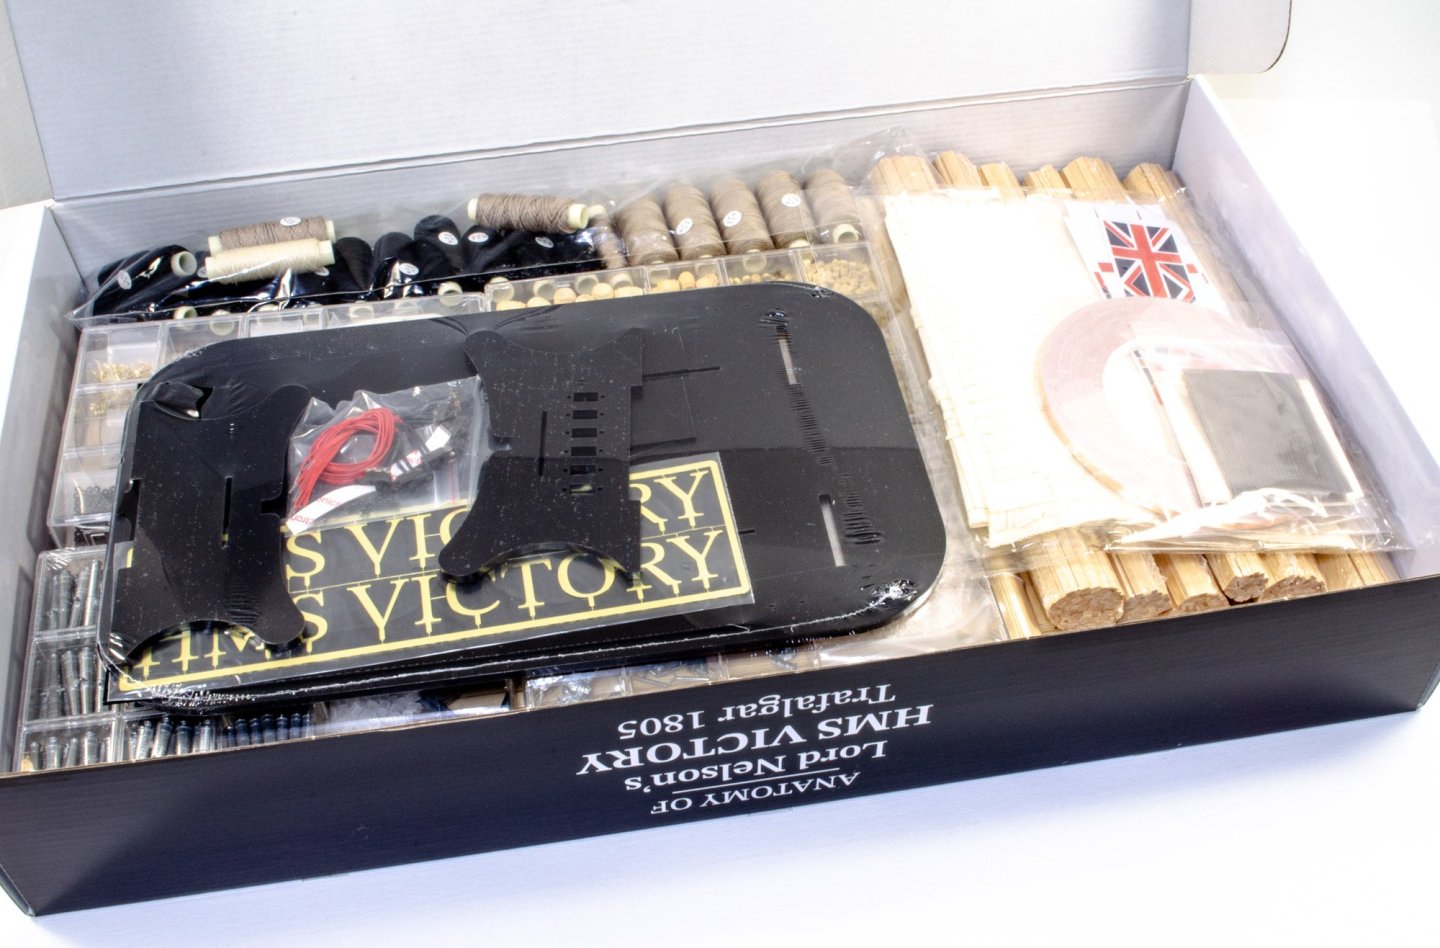
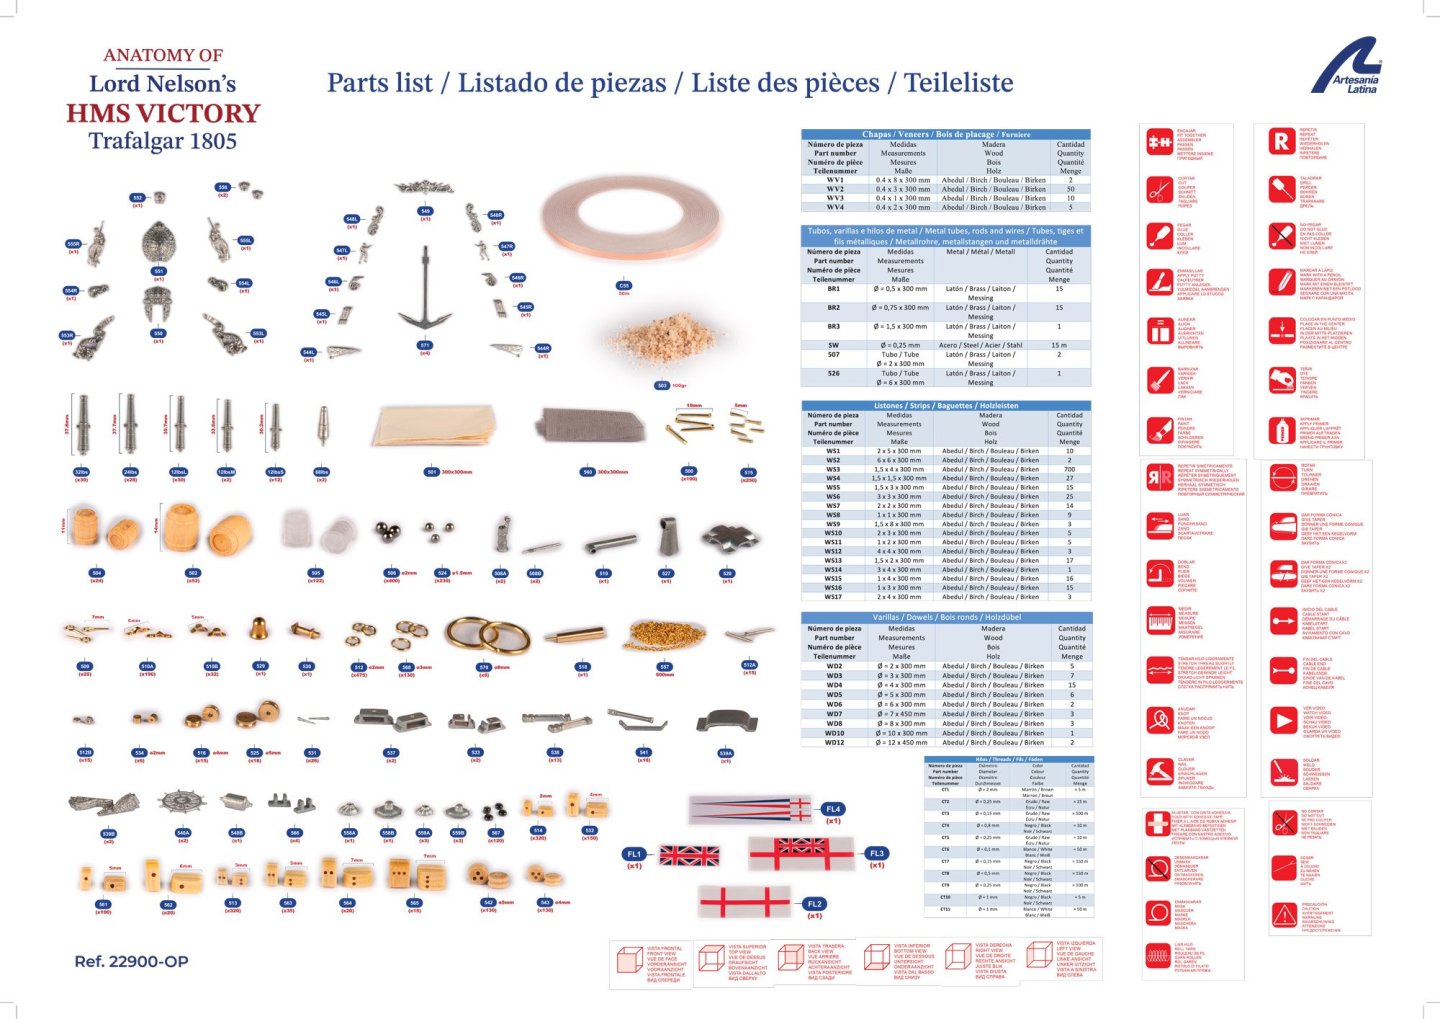
Decoration There are NINE sheets of photo-etch parts....or at first glance there appears to be. One of these looks to be moulded plastic, but plastic in a gold colour. The colour is quite academic though, as all ornamentation would be in the same ochre colour as the hull paint. All sheets are fixed to a large black card sheet, and then wrapped in cellophane to further protect them. A look through these sheets can clearly identify other parts such as those to finish off the ship's boats etc. Also note the strops and chainplates, ship's stove, cabin furniture, quarter gallery sides, lantern bodies, etc. All PE is very nicely etched and is very much of the quality we now normally see on other contemporary kits. Display stand Suppliers usually add some sort of stand, usually in ply. Very few companies offer acetate stands, such as those that VM include. With this kit, Artesania have also opted to include an acrylic stand. This is quite a simple but attractive stand, made from black acrylic sheet, and to be adorned with photo etc lettering which names the ship, so the effect will be in black and gold. Note also some wire and switches, plus cutouts in one stand part so these can be wired. This obviously pertains to the optional lighting set that you can install as you build the kit. This pack contains hammock material as well as copper tape for the hull, flags, and a complete set of pre-cut and sewn sails. Lastly, these are photos of those printed materials I mentioned already, plus a set of parts maps you can see here on the last image. More soon...


-
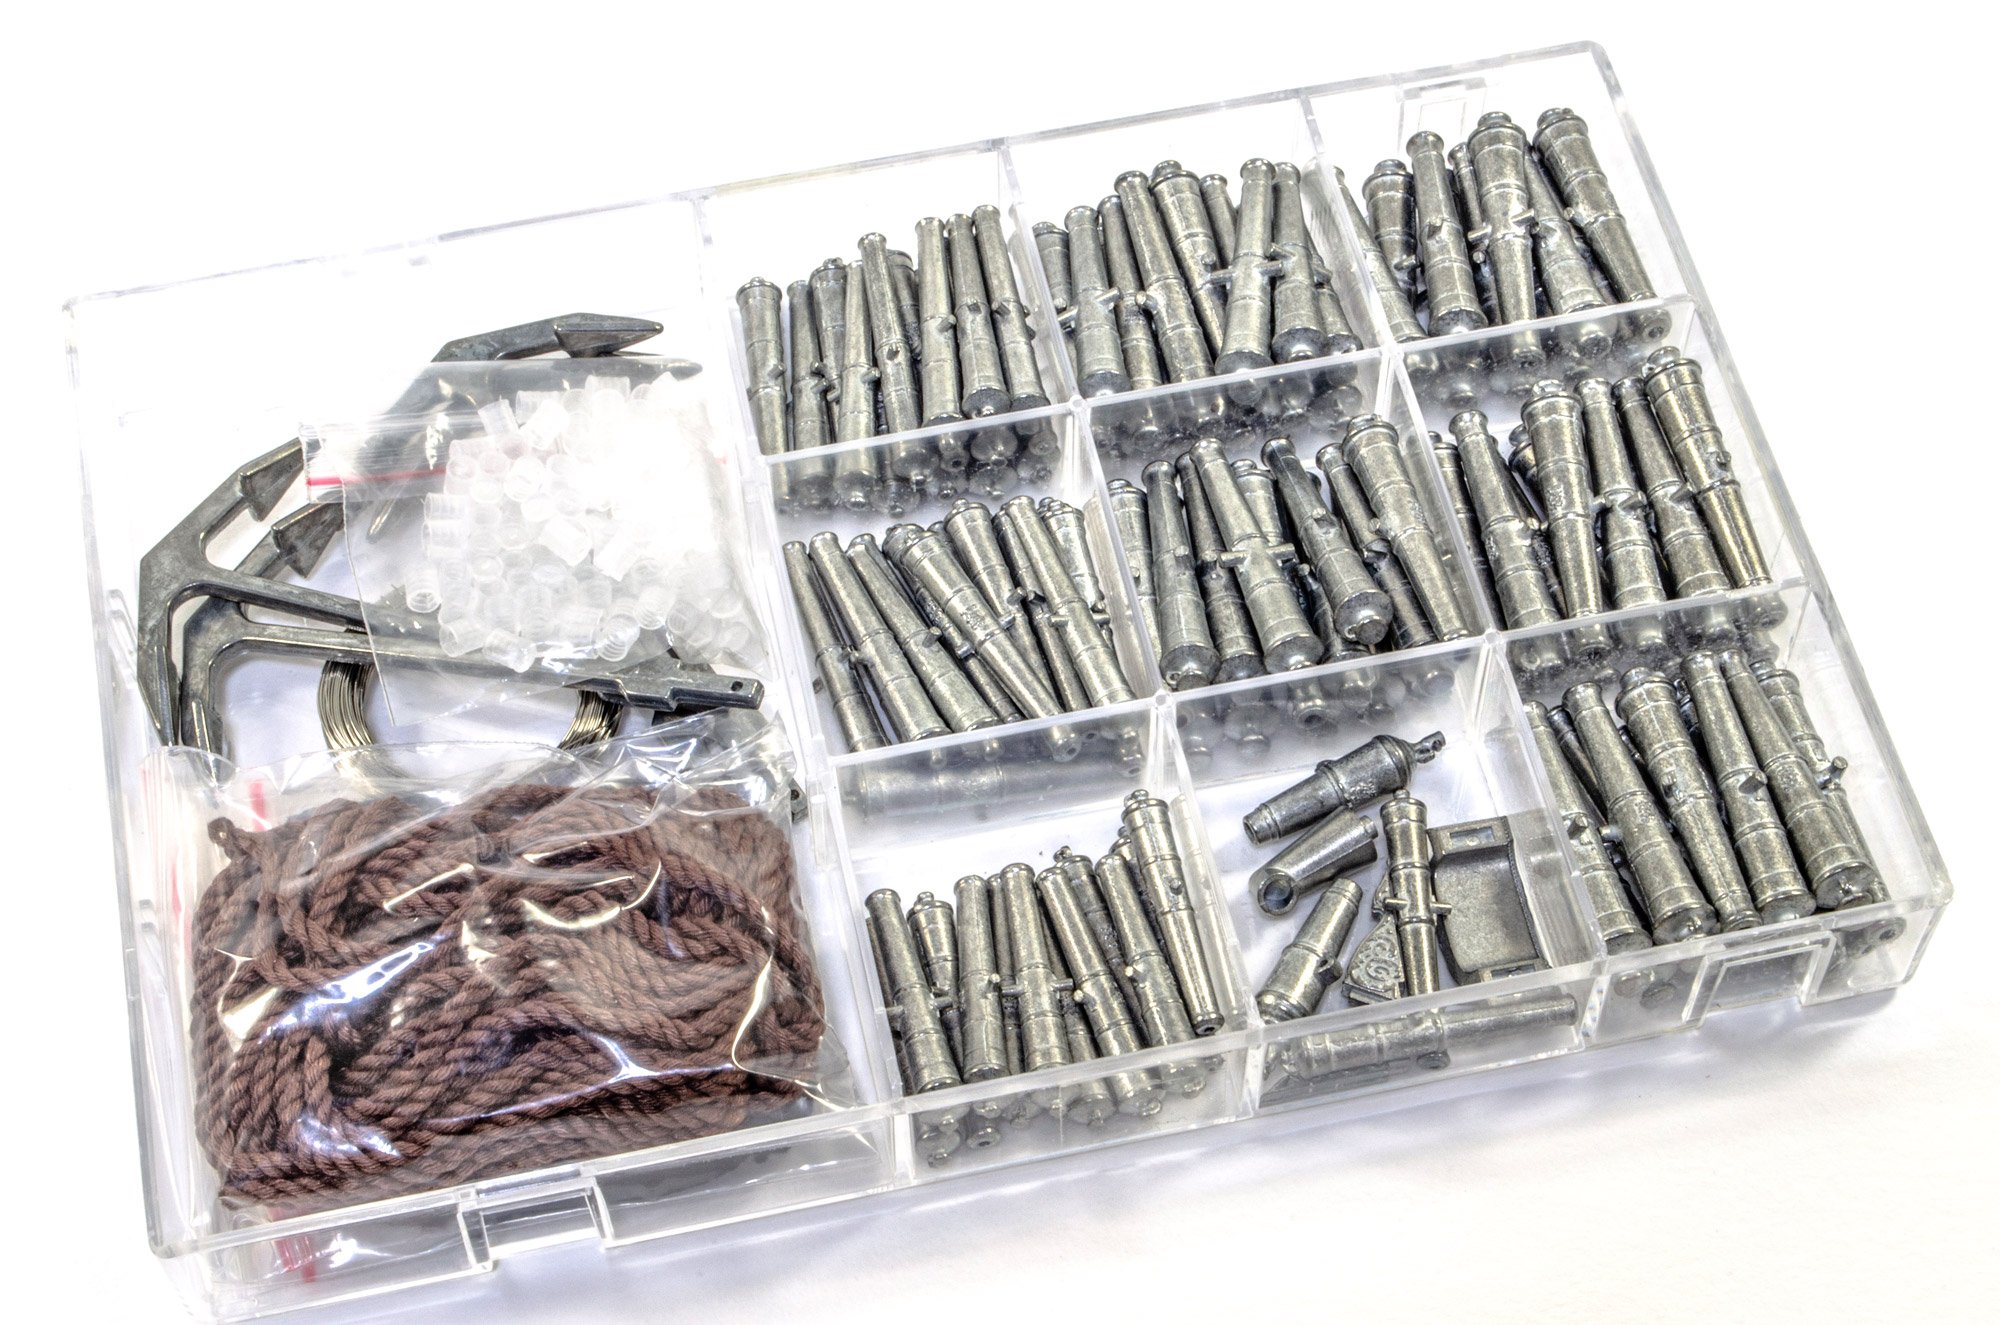
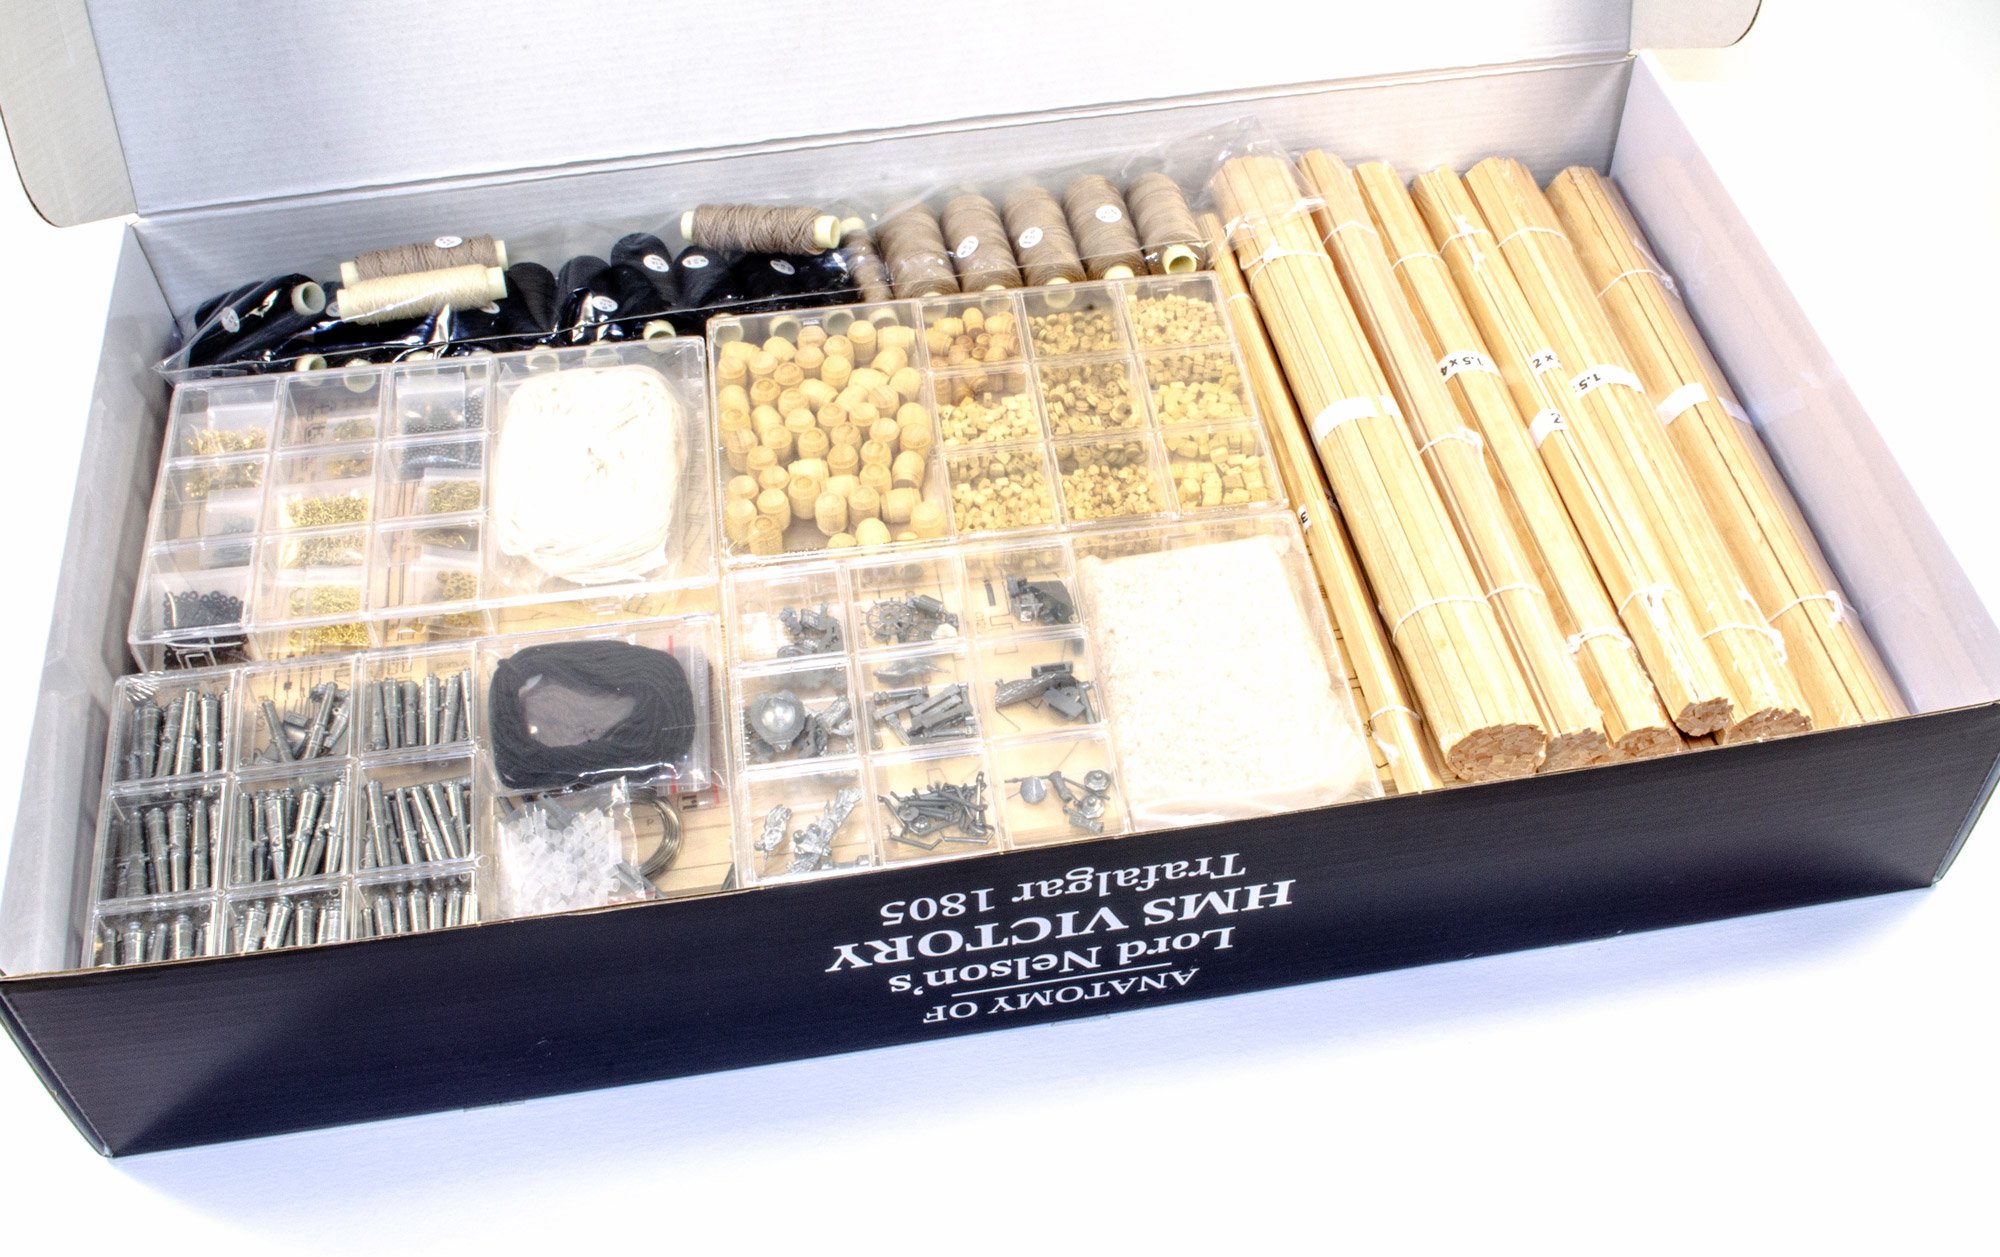
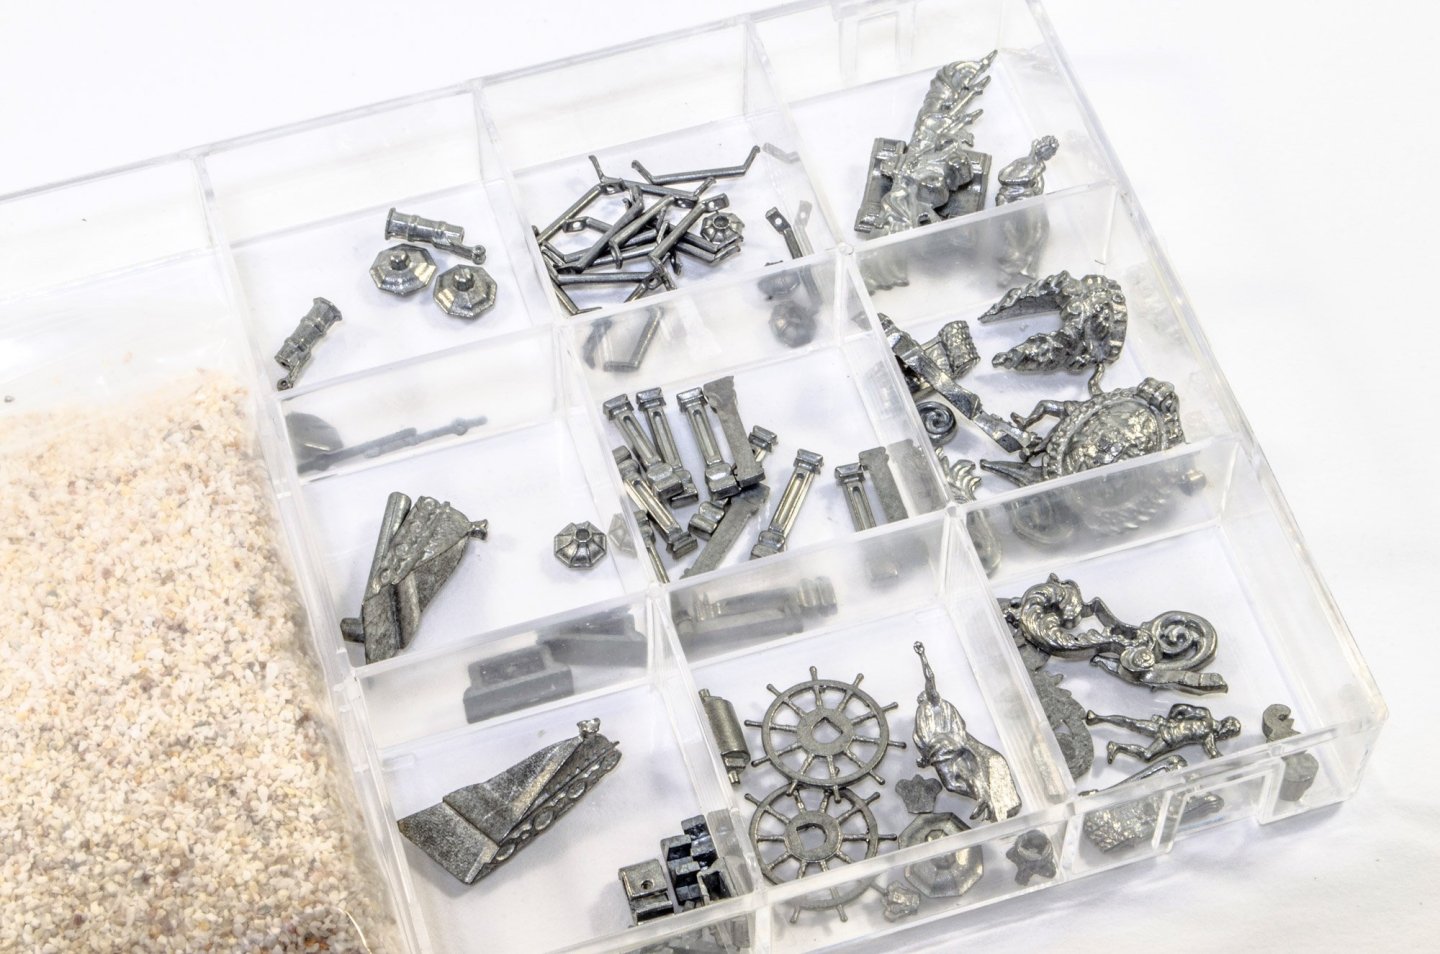
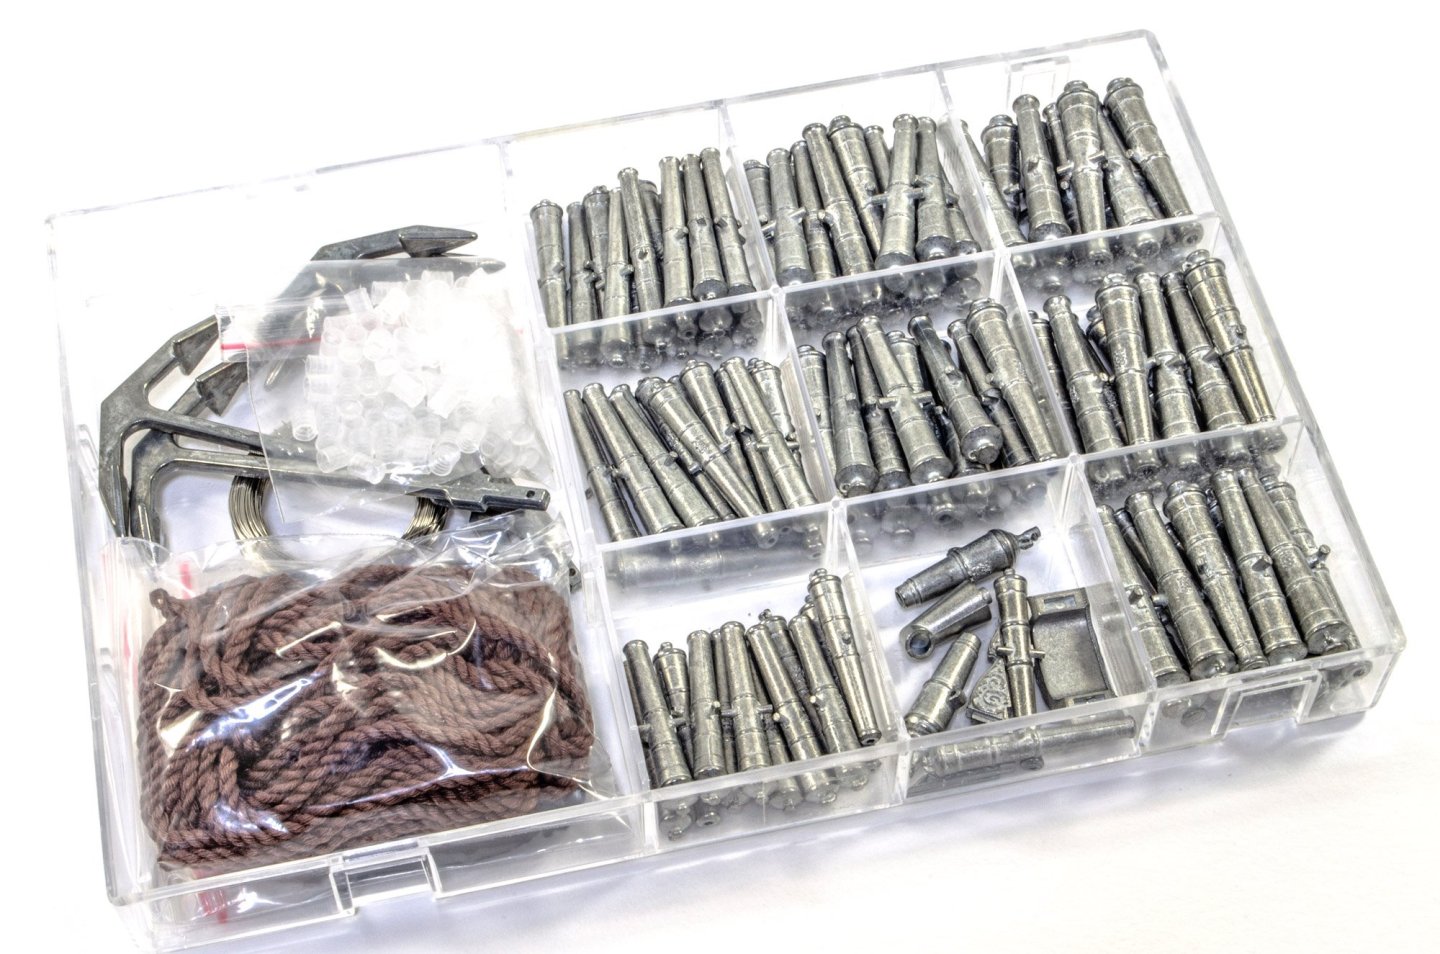
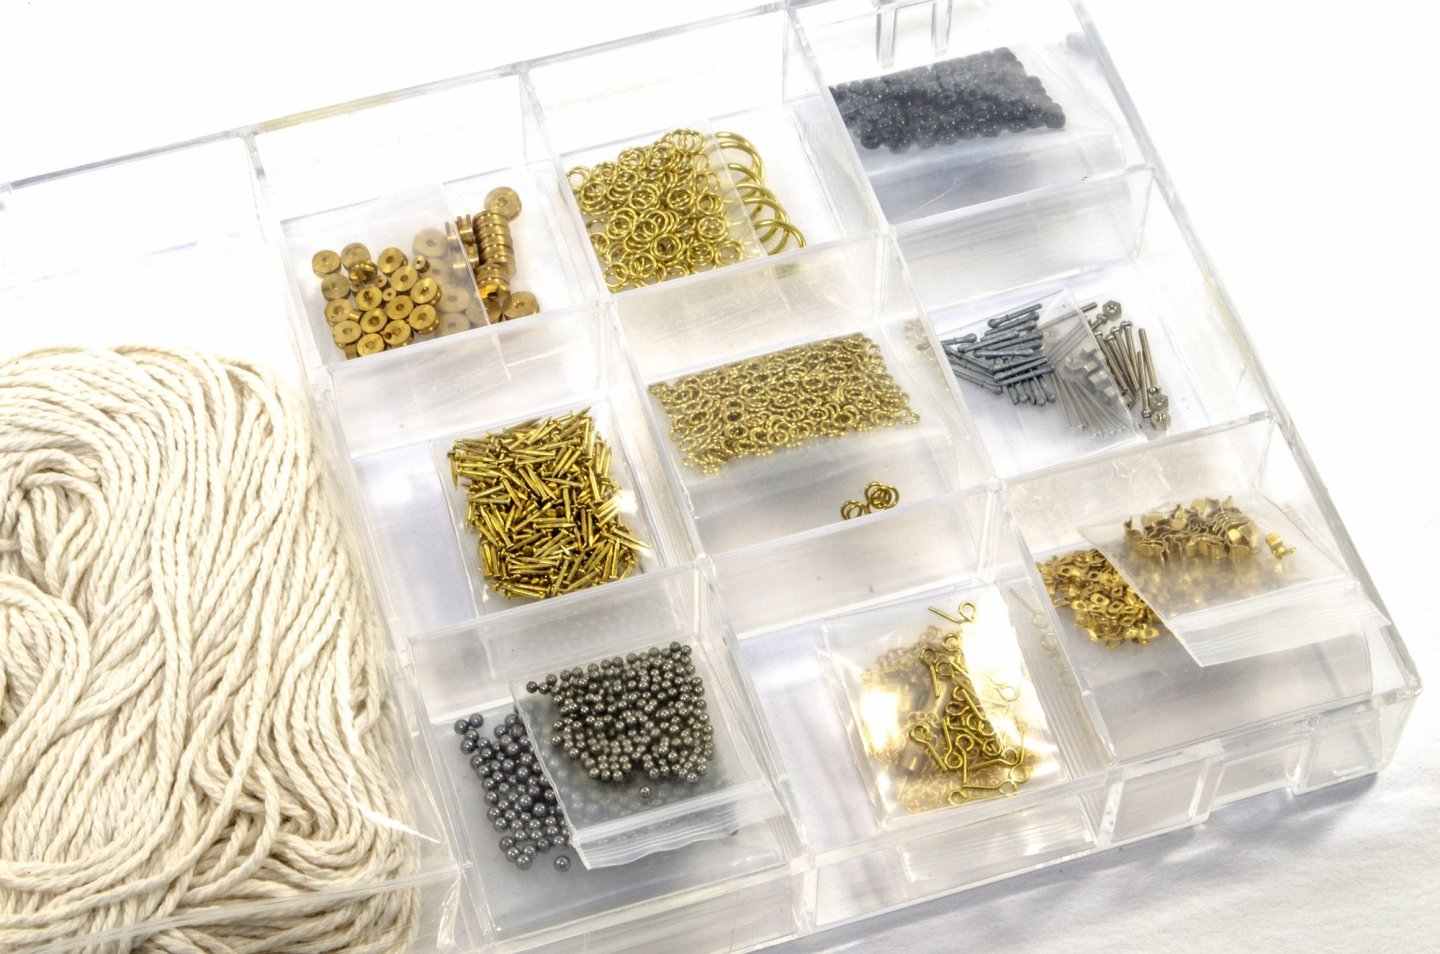
There are FOUR boxes of fittings in this kit release, with one of them in particular being quite heavy. The rigging blocks are quite generic Tamil-type, and there are a hell of a lot, as you'd expect with Victory. A lot of barrels are also included for you to sit around the various decks, to make them look a little busy. Here you see the various pillars and ornamentation for the stern etc. as well as parts for the lanterns. Note also the figurehead crest and other castings that are used for the ship's wheel and the underside of the quarter galleries. The bag on the left is gravel, for the hold. This box contains wire, anchors, hawse rope and cannon. The cannon are very nicely cast with only minimal seam lines to remove, plus they do carry the royal crest too. There is a packet of clear parts here, and these are either the fire buckets or the lantern exteriors. There is another pack of slightly larger, similar parts which would be whatever these parts are not (either lanterns or buckets). Lastly, another box containing rope and various turned and cast parts. There aren't too many brass pins included here, so you will need to pull and re-use them as you go. They aren't aren't very fine, and I would perhaps opt to use those from Amati as you work. This is the other packet of clear parts which do appear to be the lantern covers which you can use to sheath the optional LED parts you can install across the various deck interiors. These sheets contain parts for Victory's various glazed areas. And now, the rigging pack. This is quite generic rope, but is of very reasonable quality. This could be improved further with a block of wax to kill any potential fuzz that this can entail. More soon.


-
Sheet materials (Part 2) More soon...


-
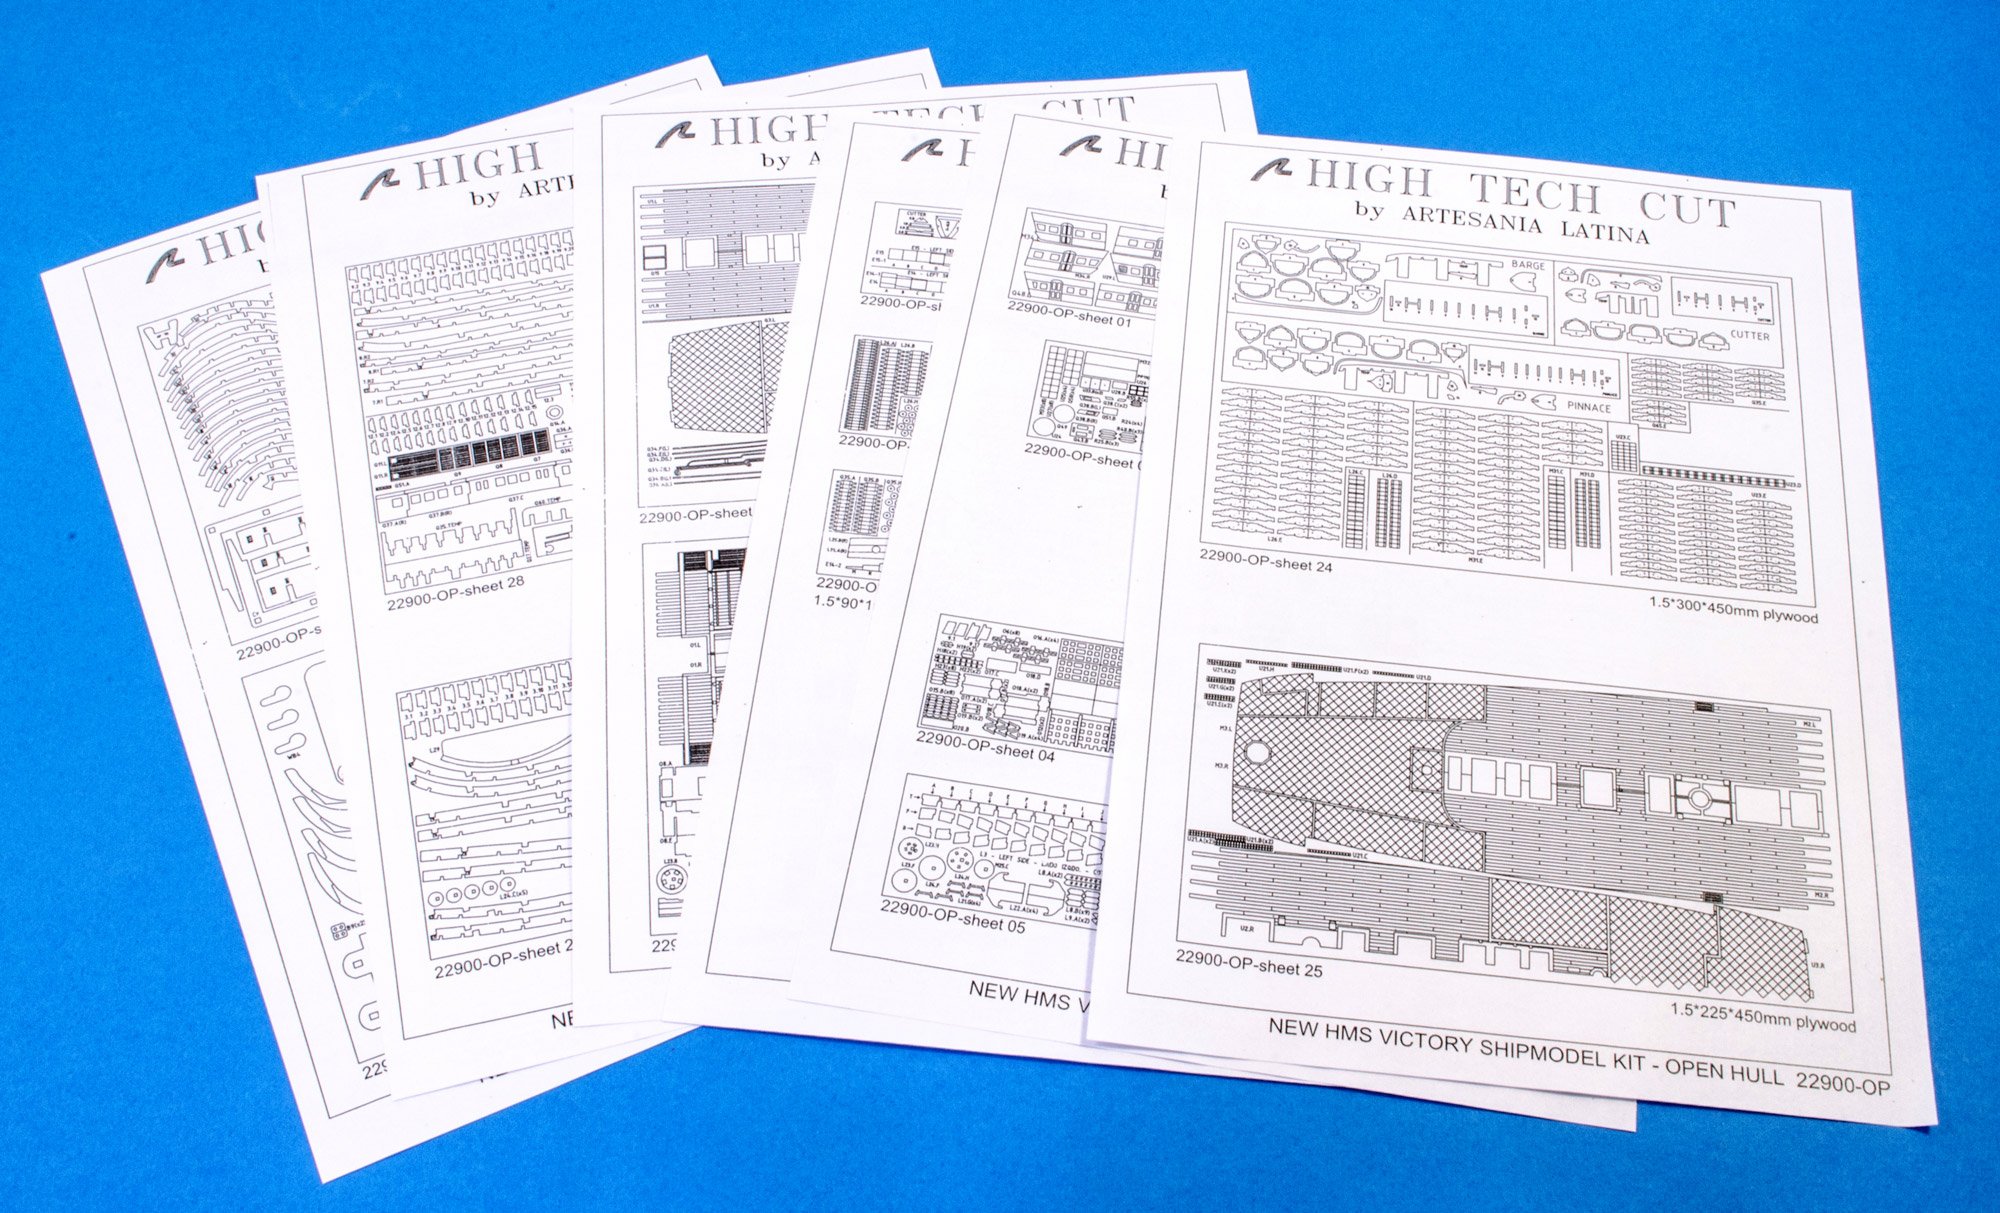
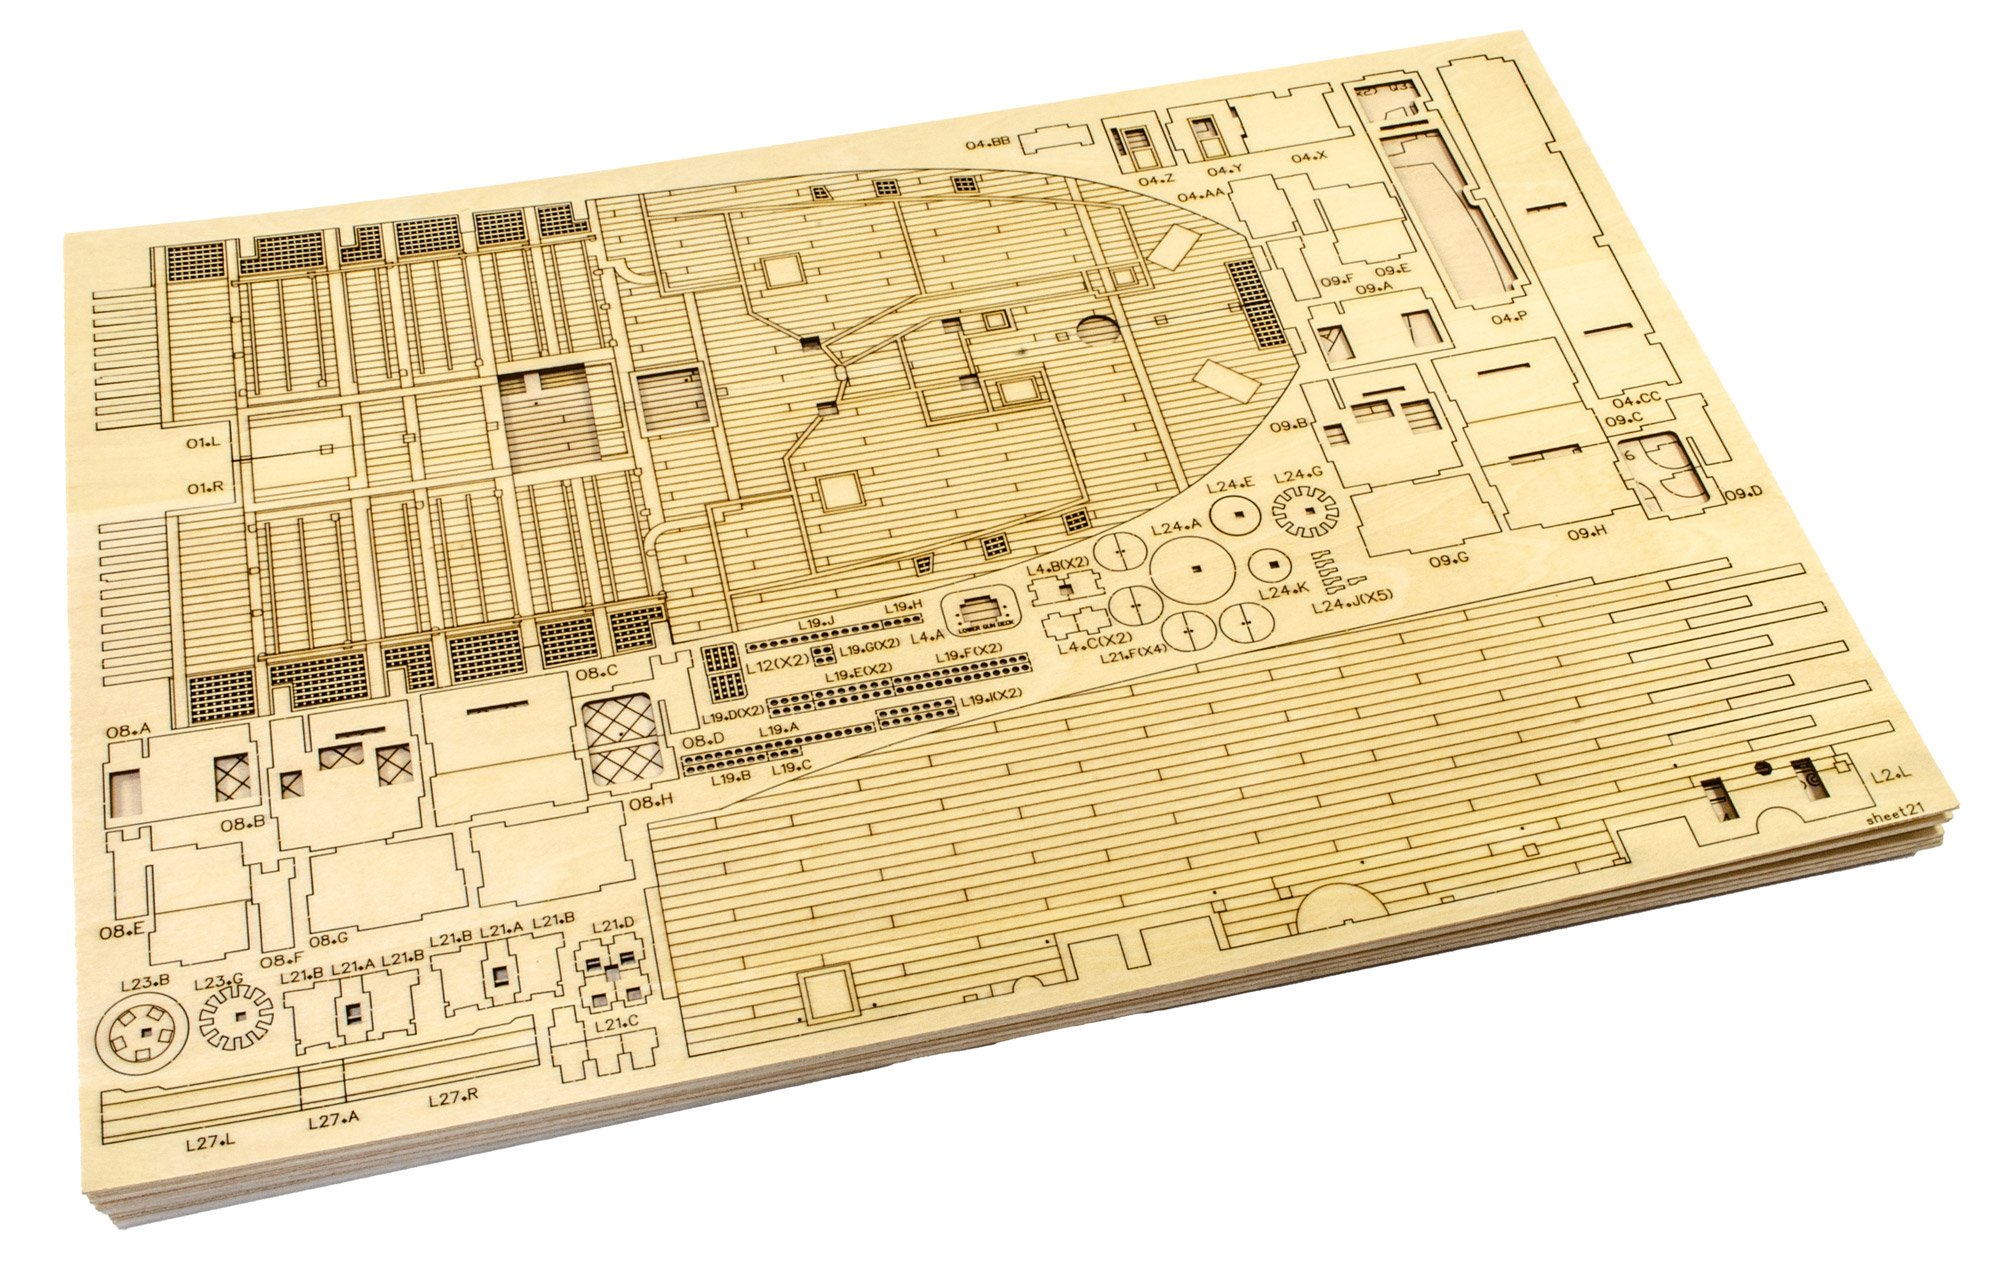
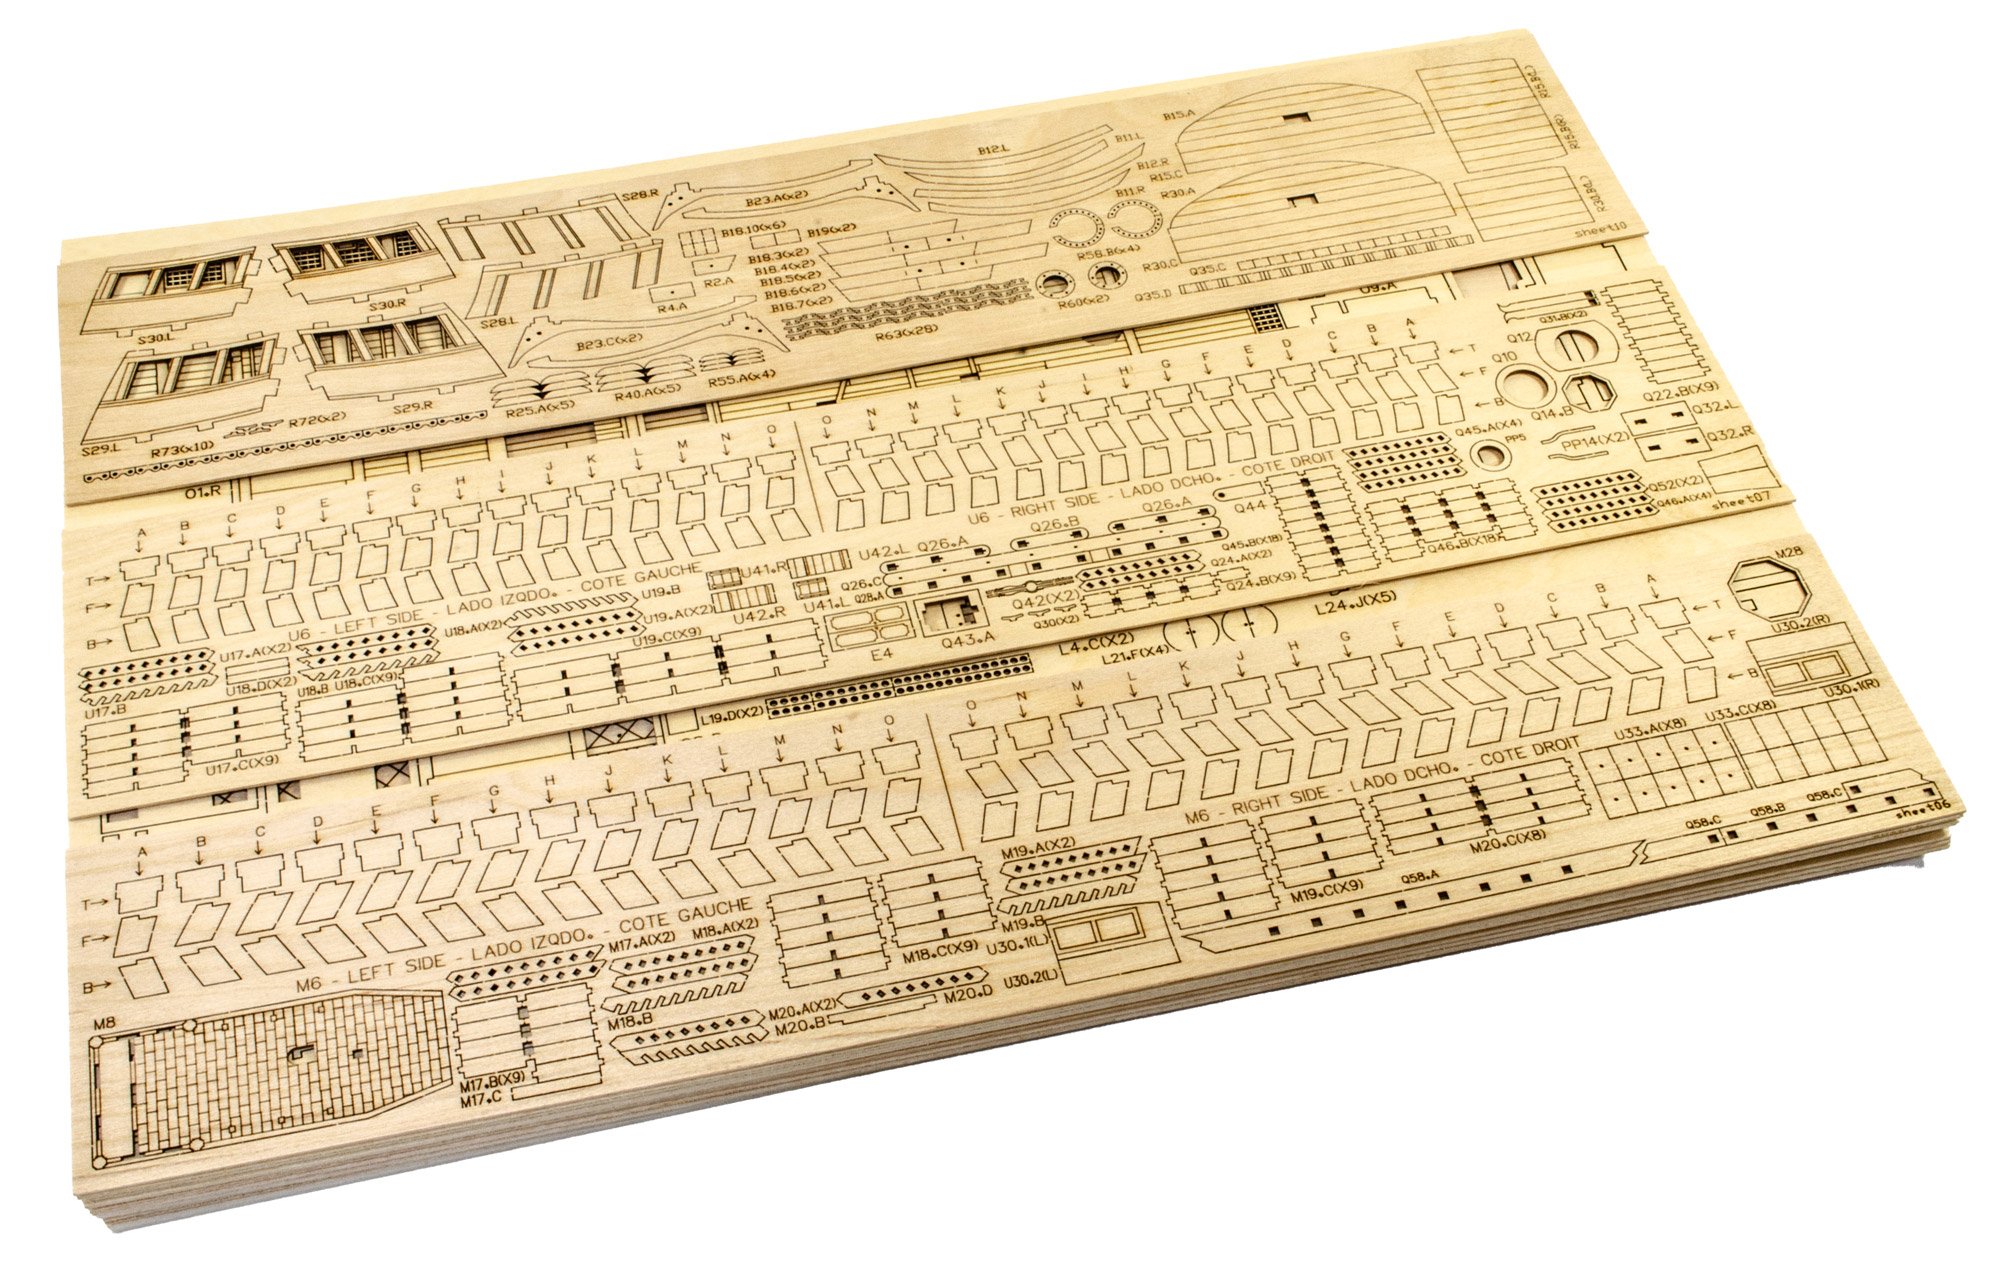
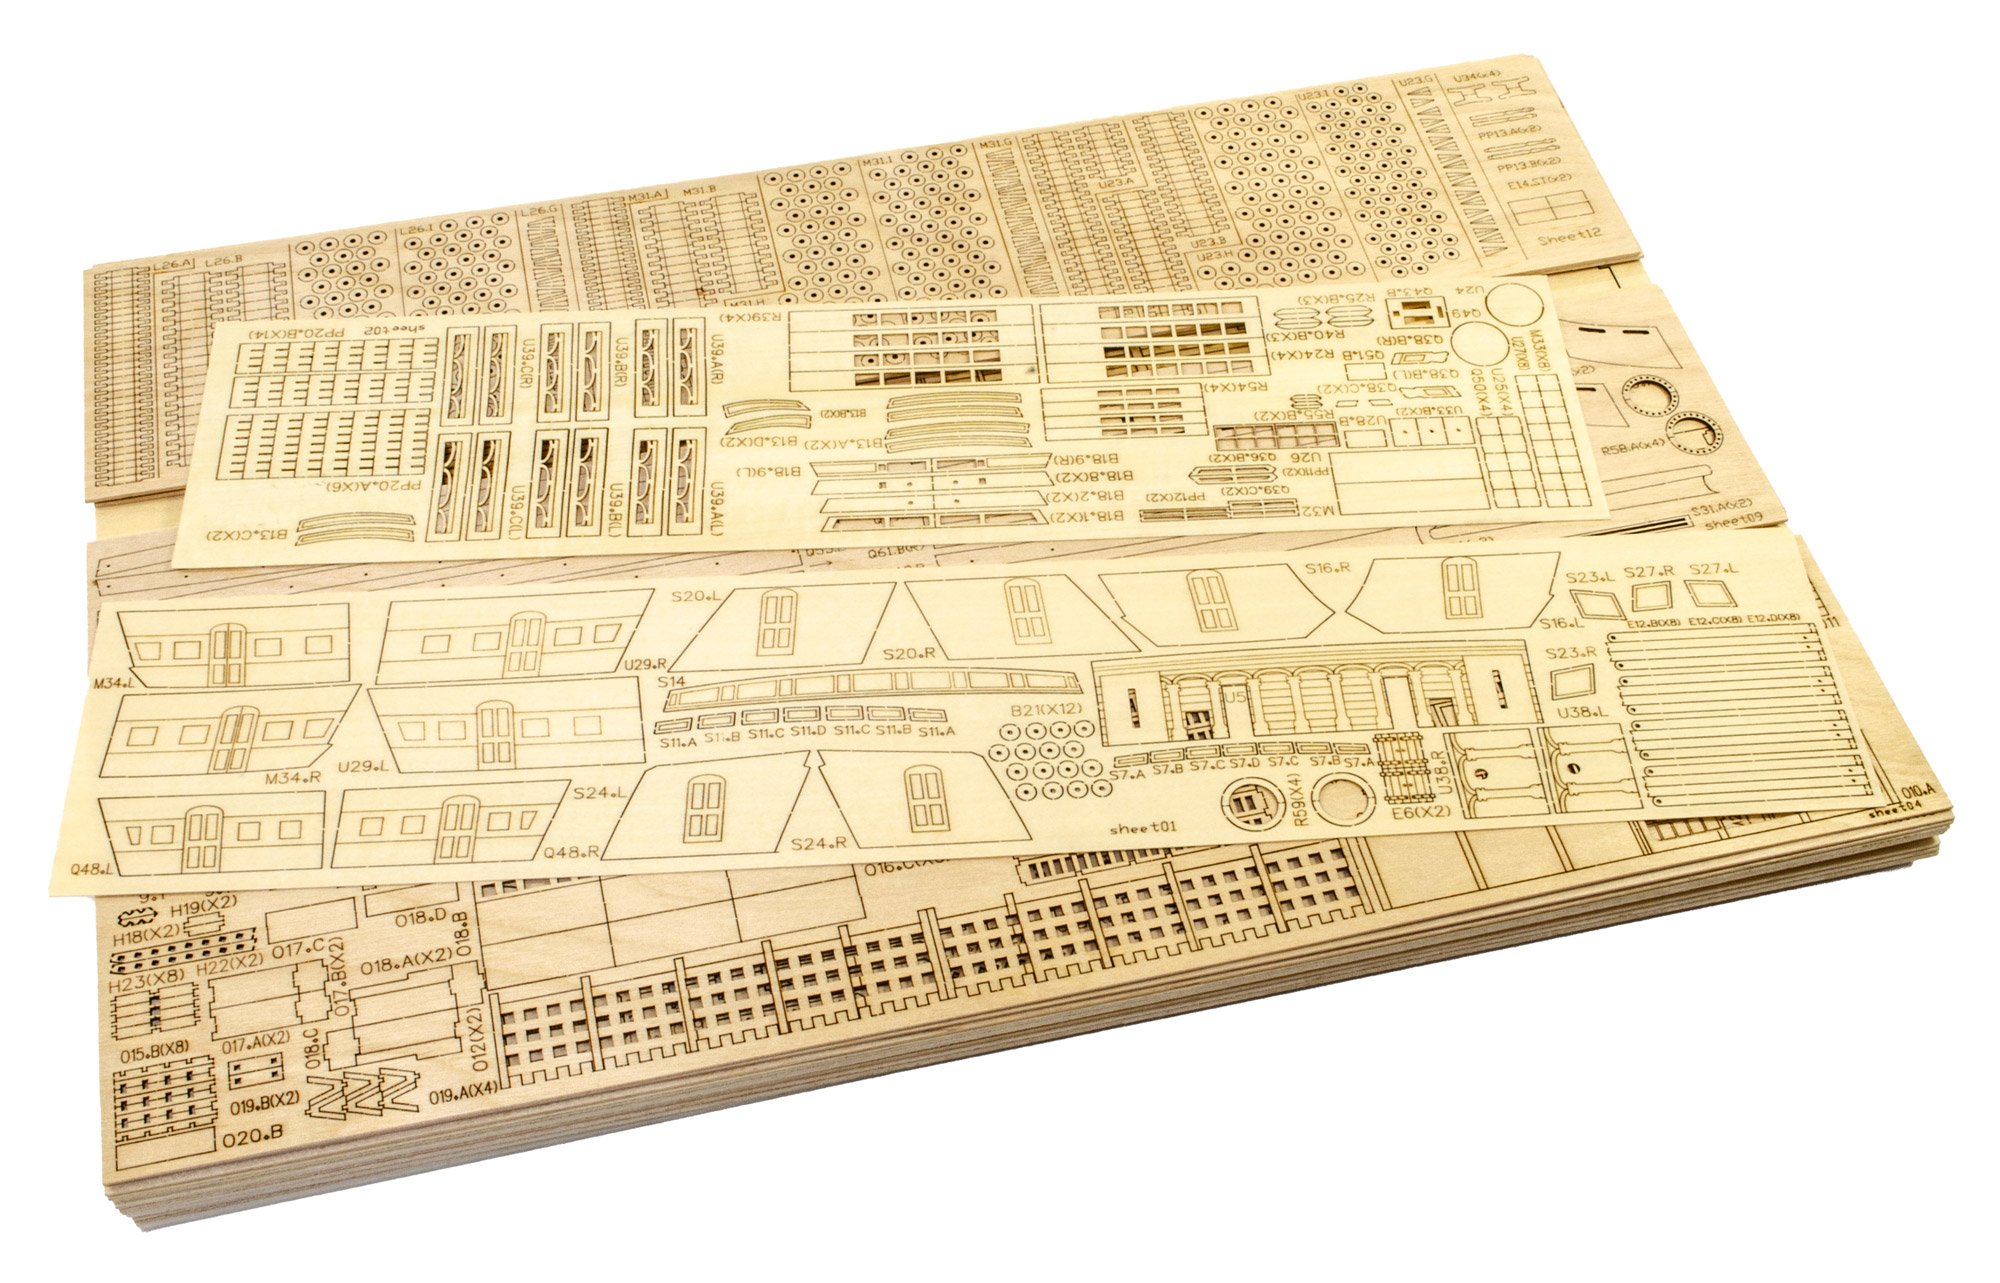
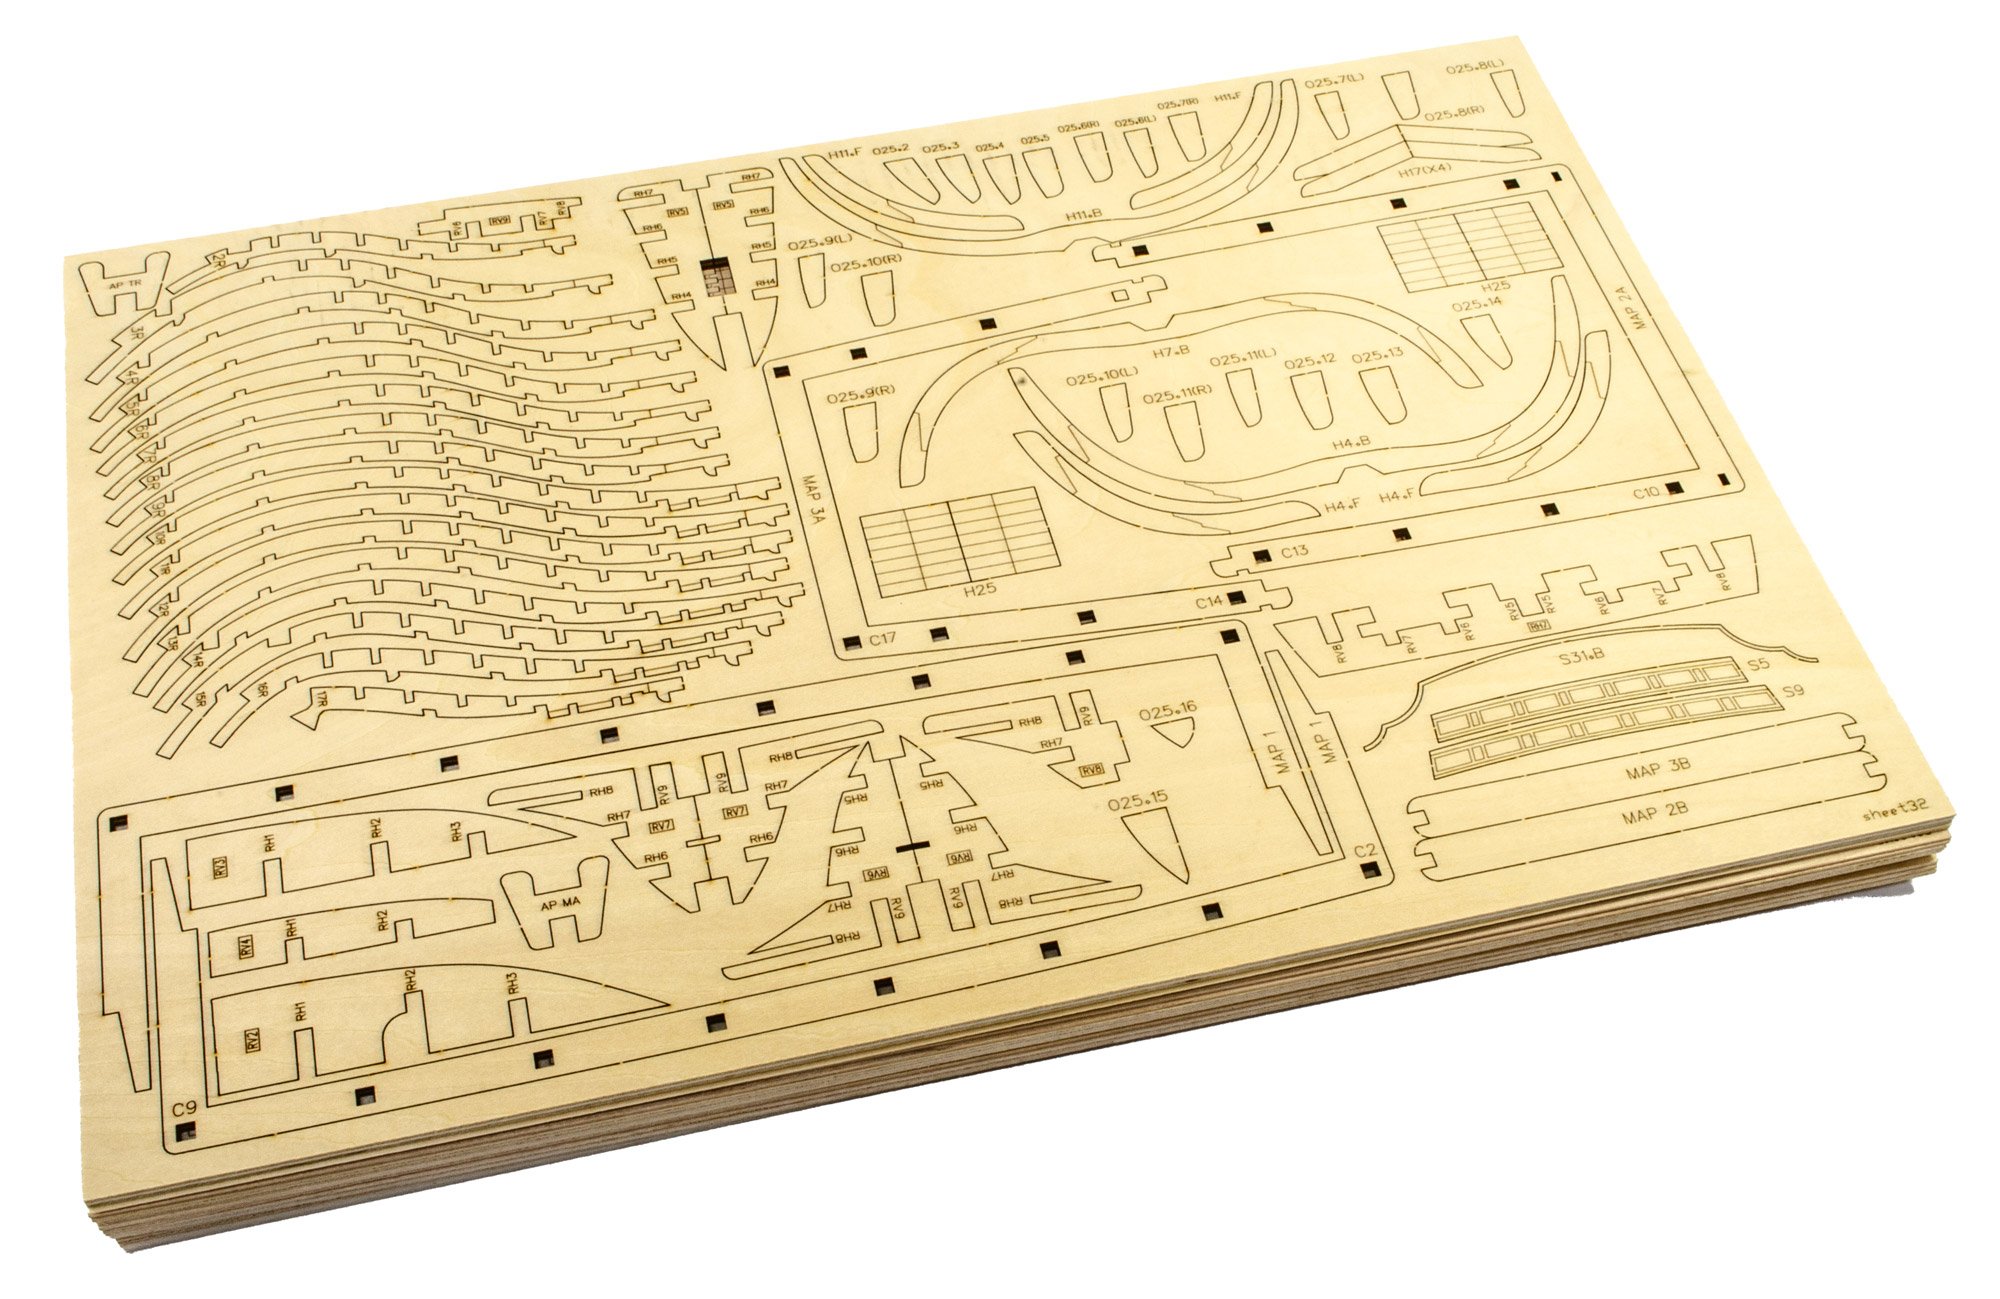
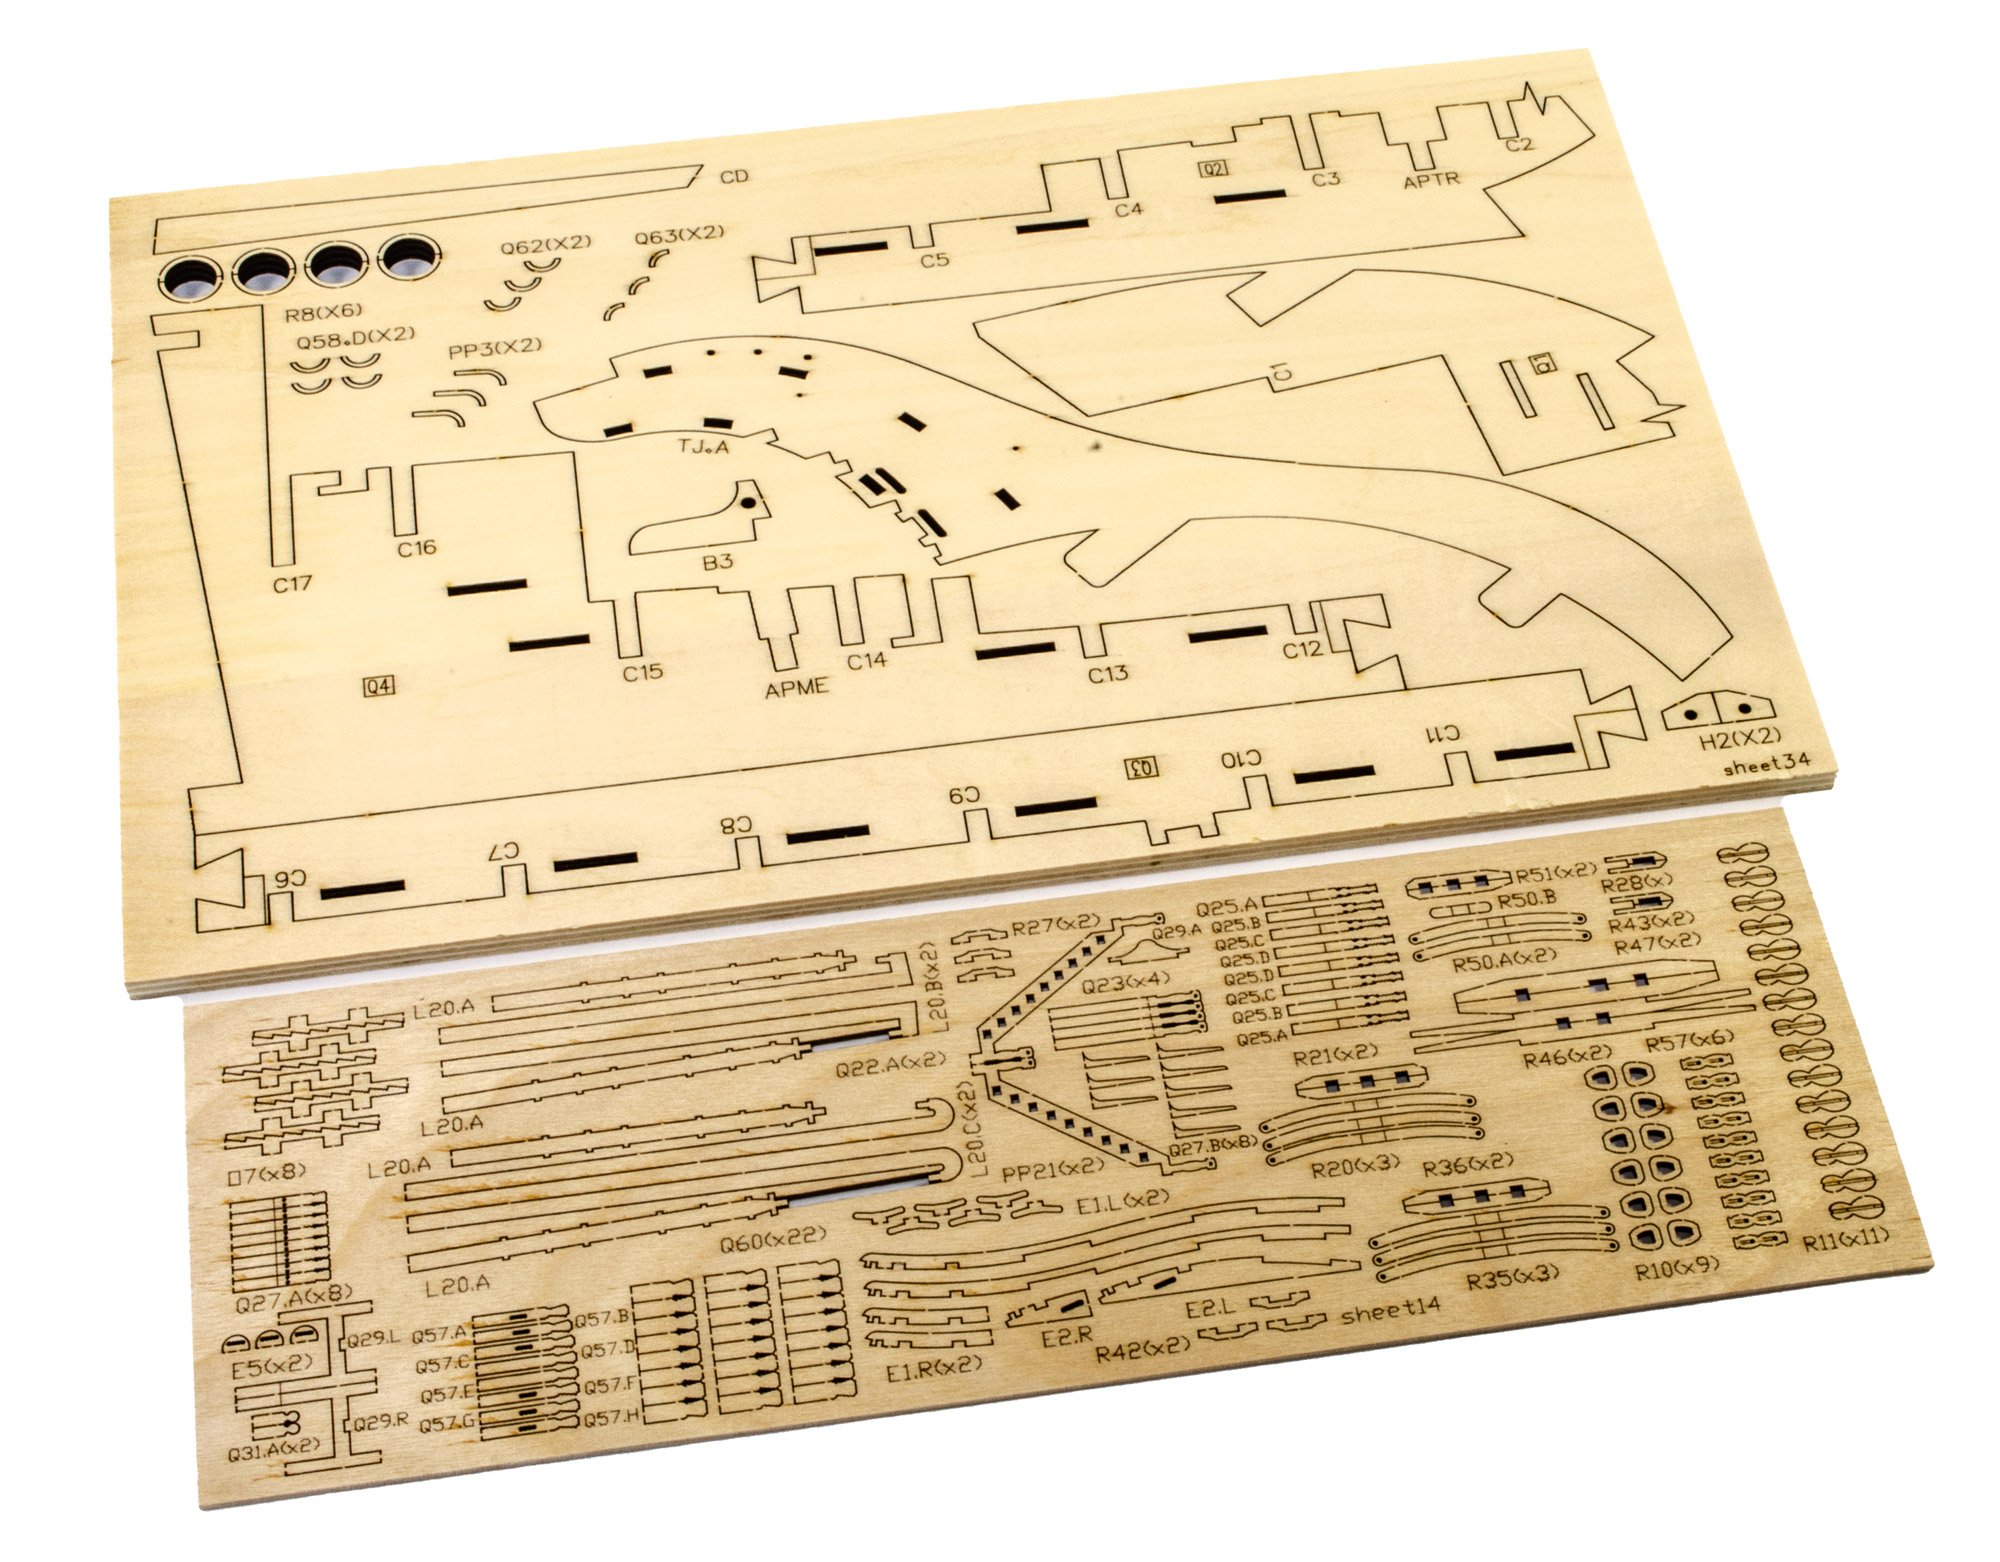
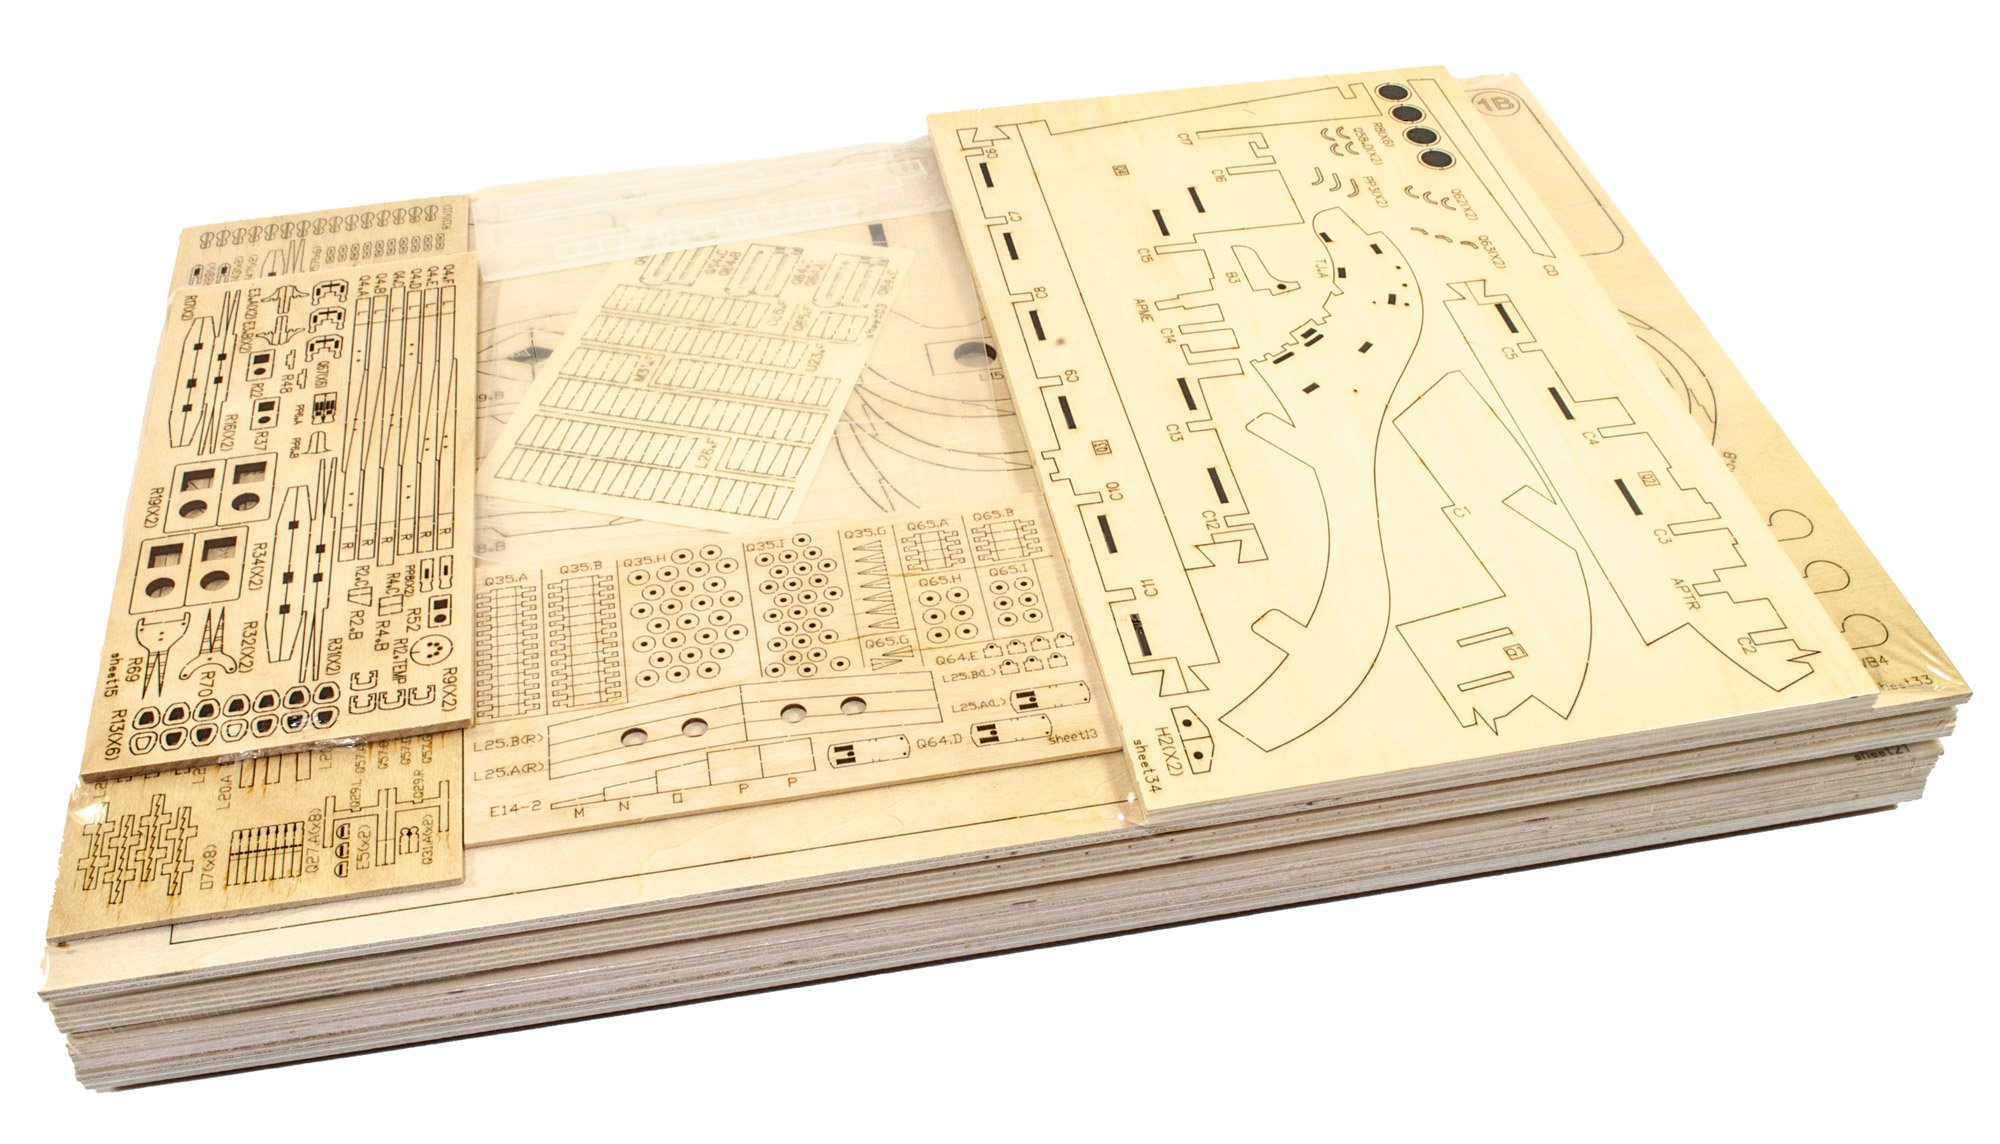
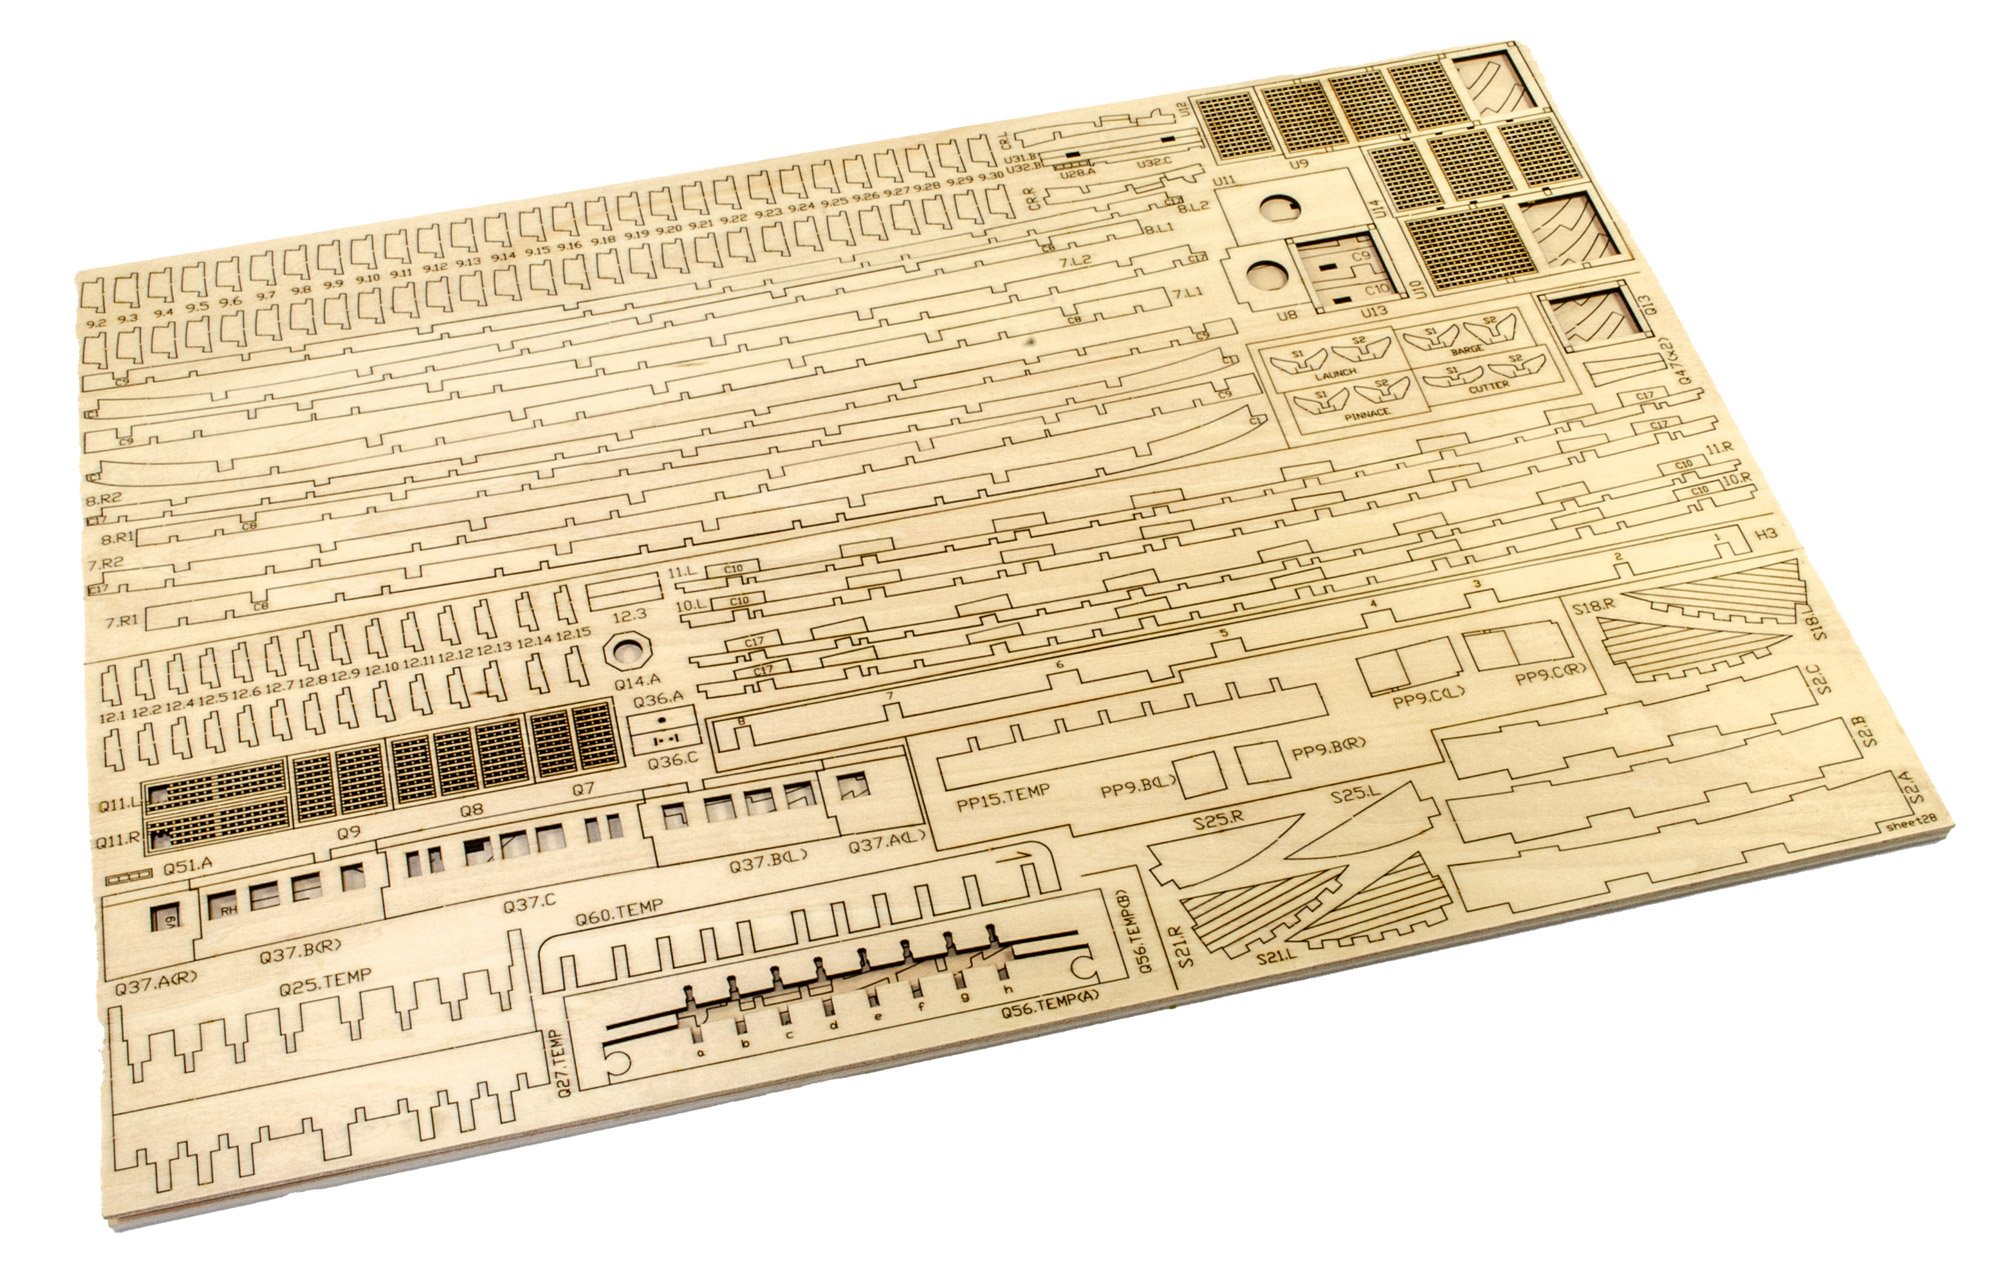
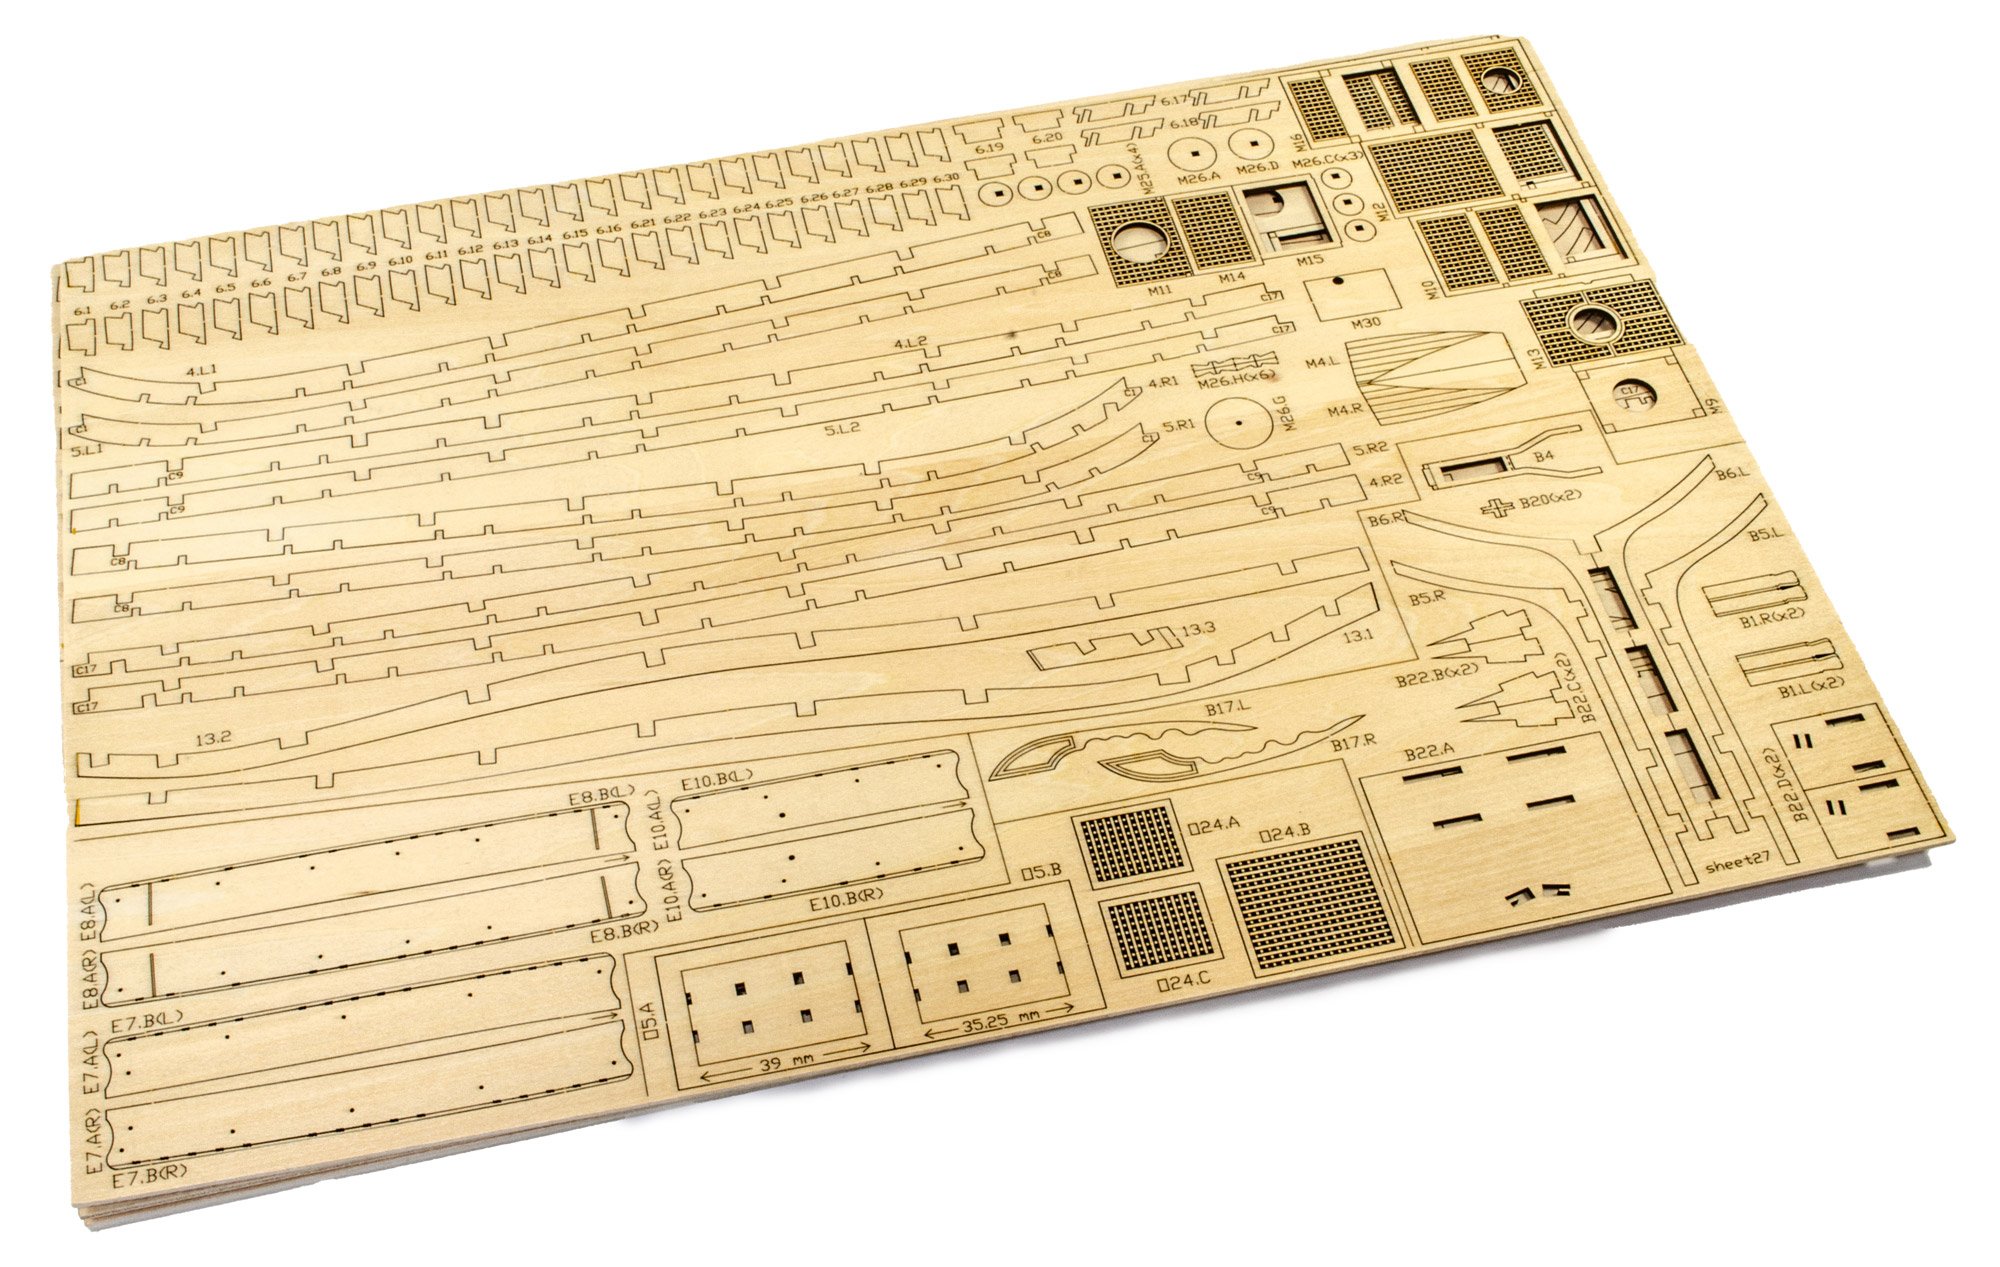
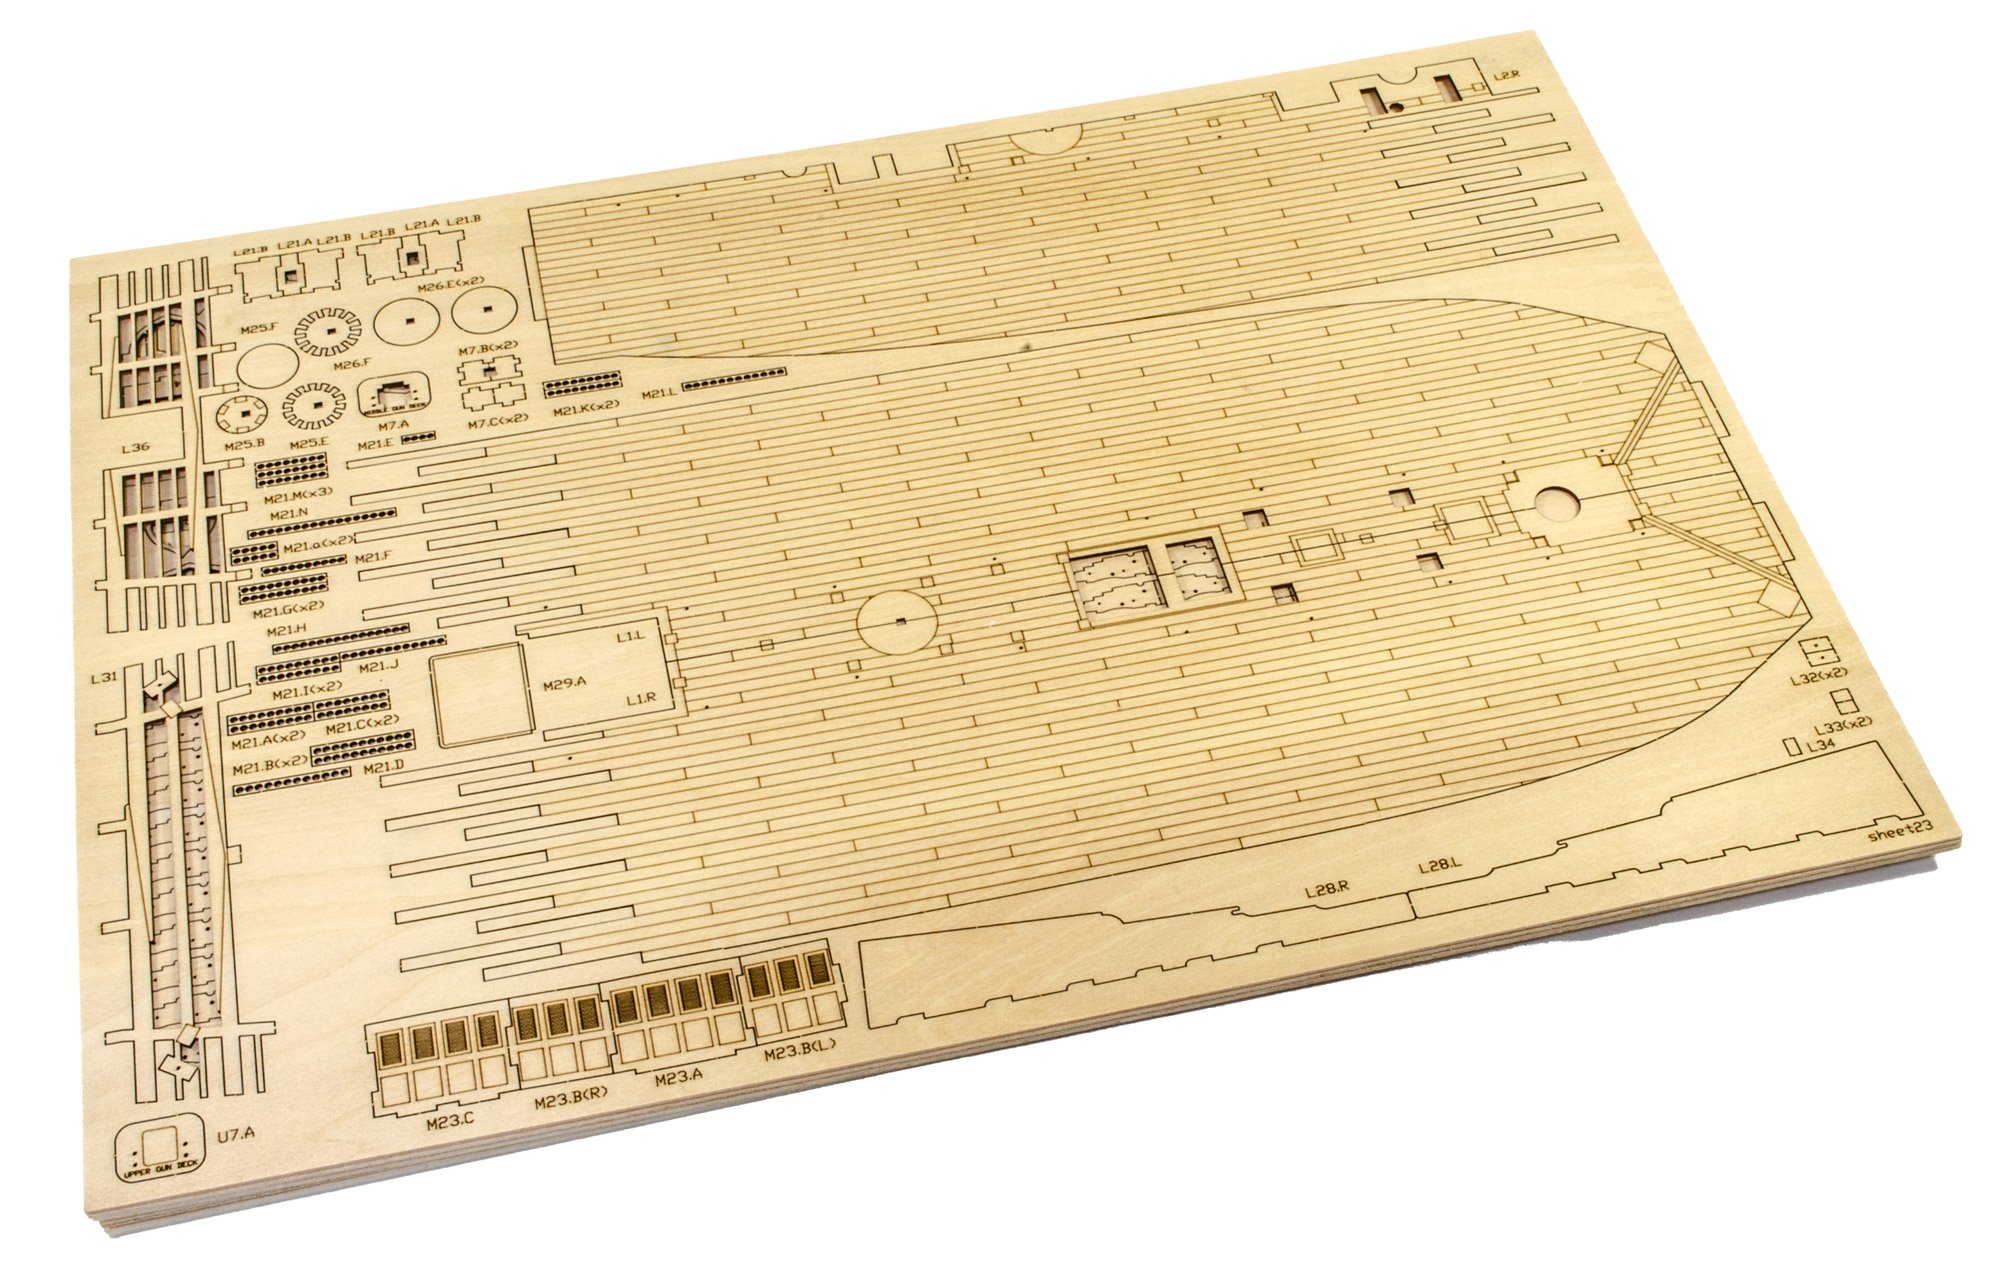
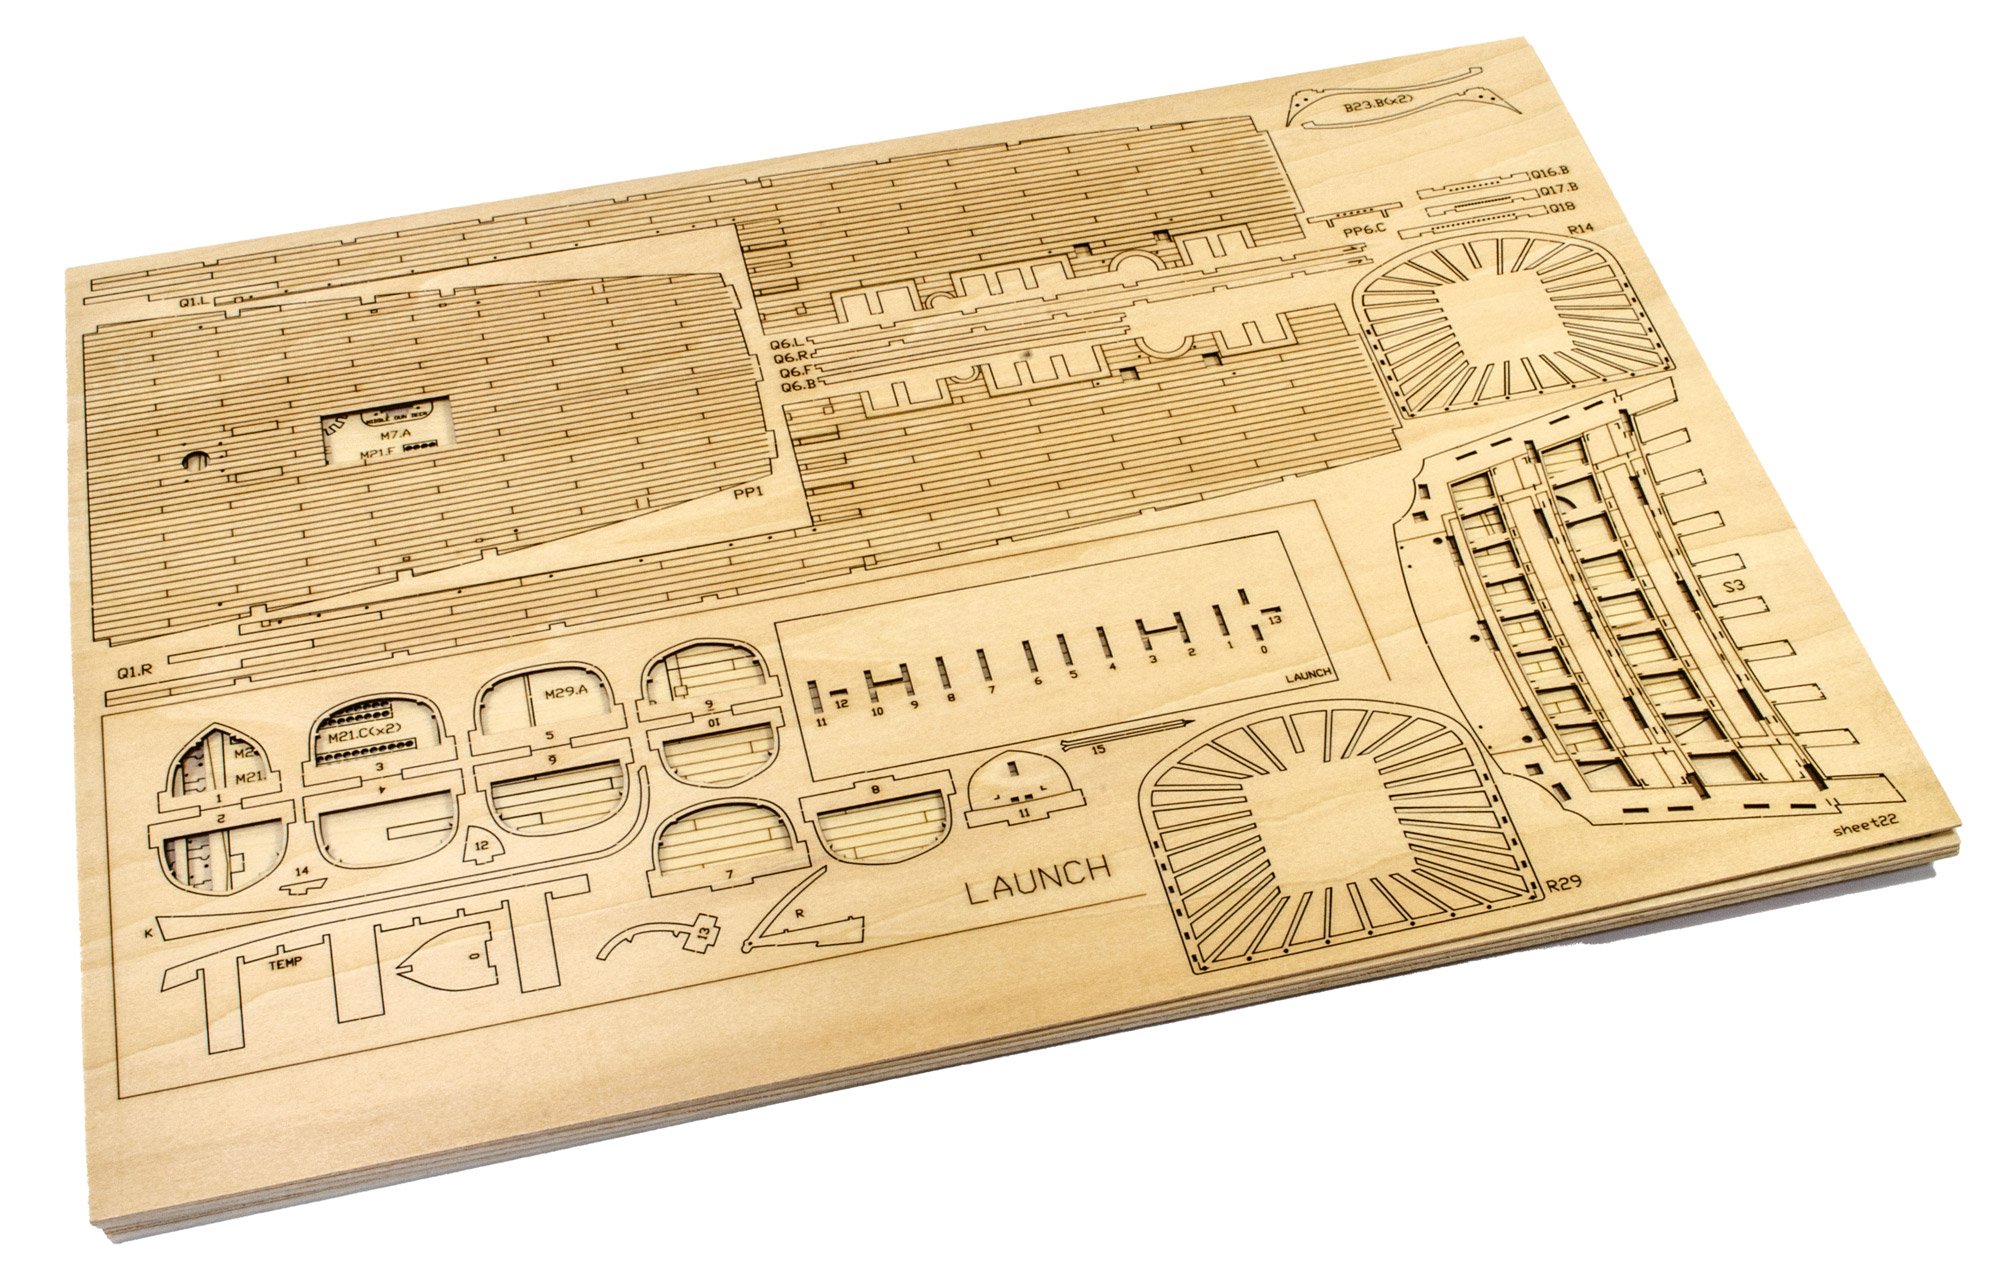
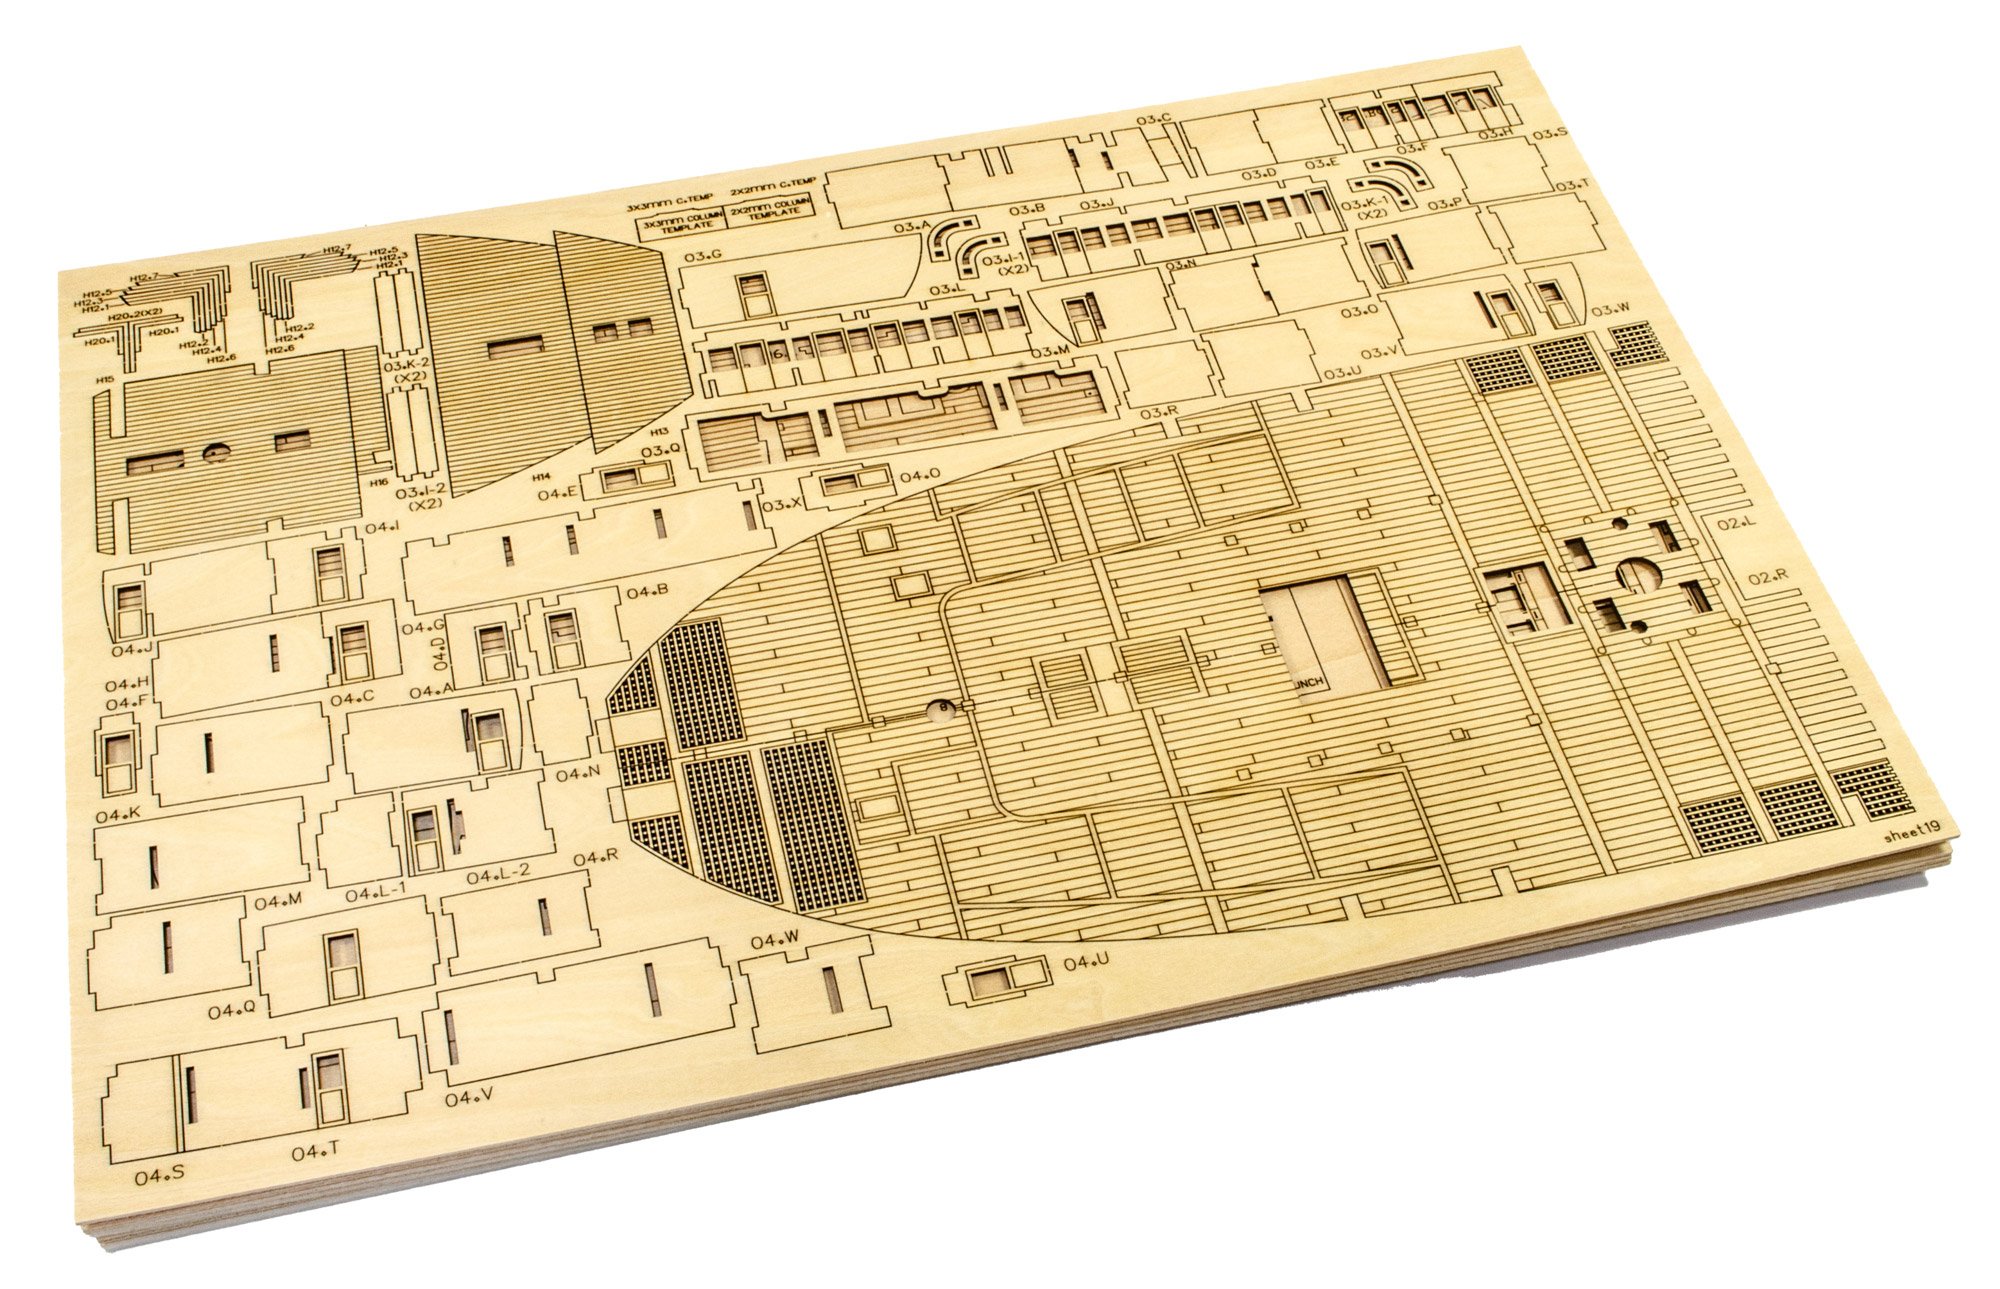
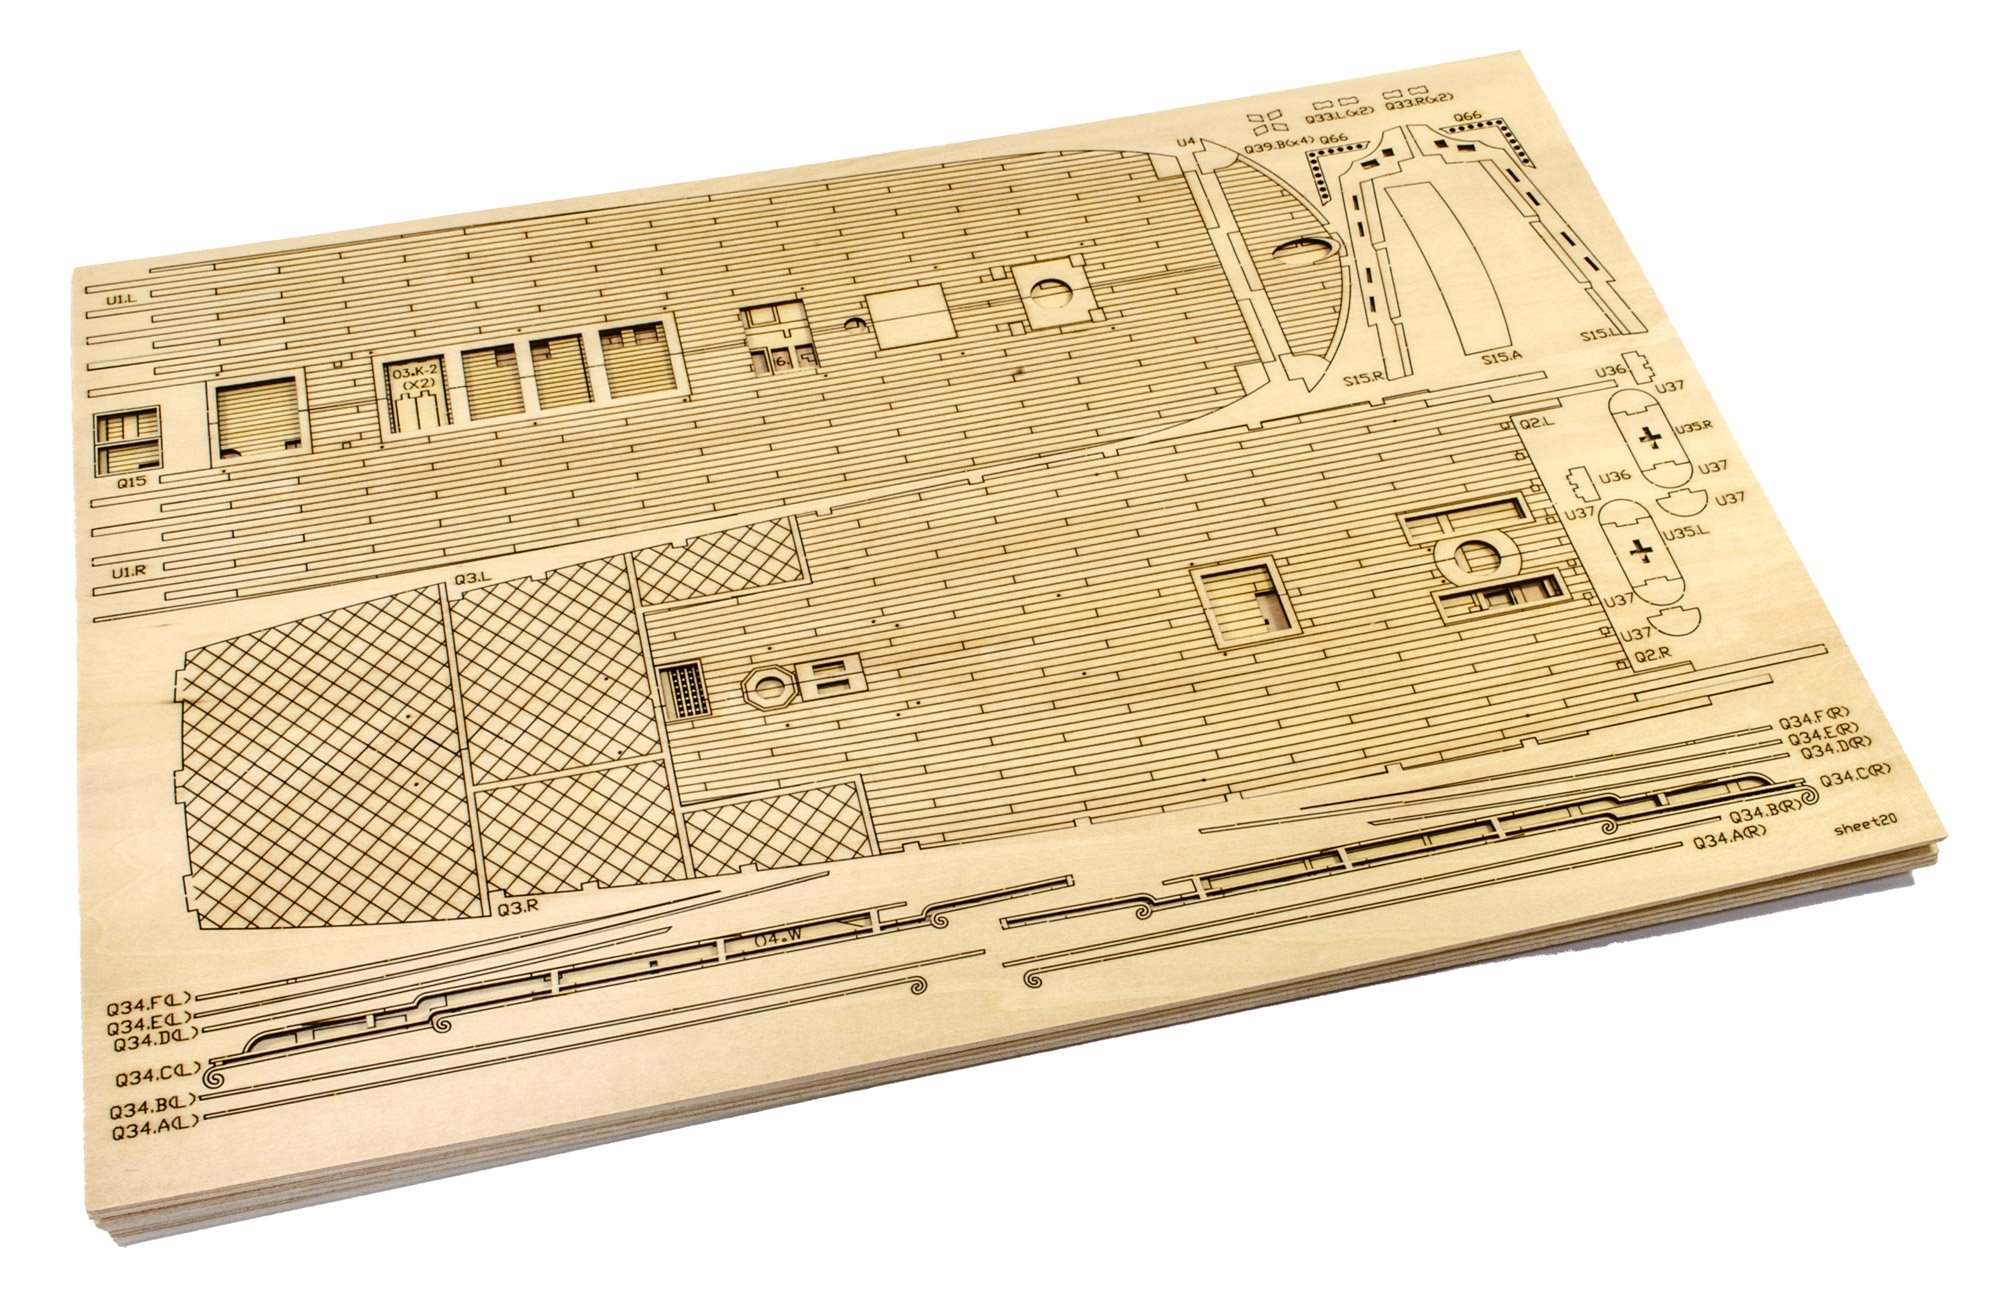
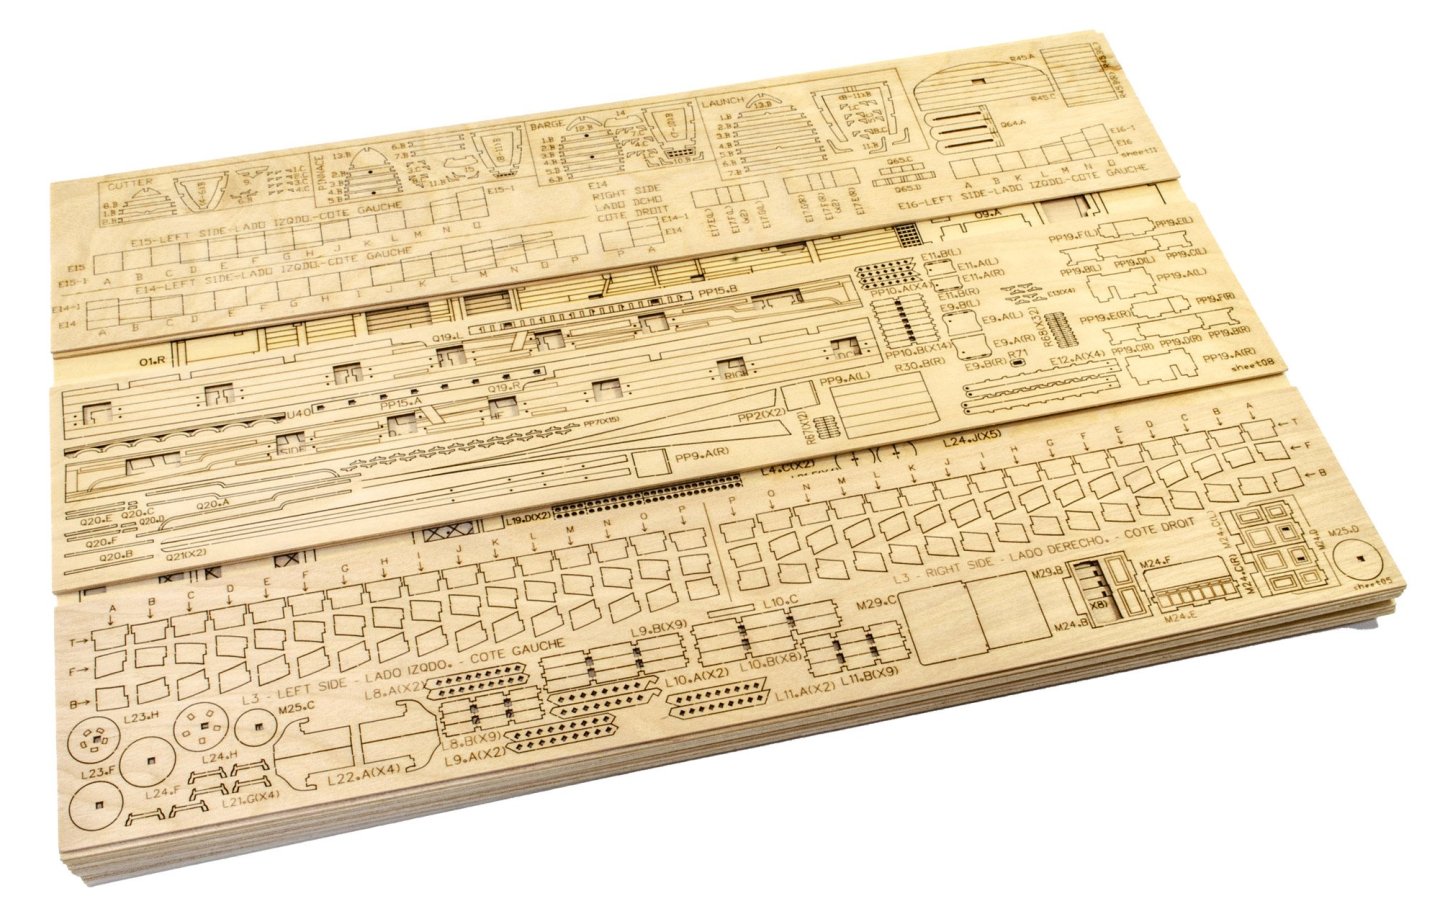
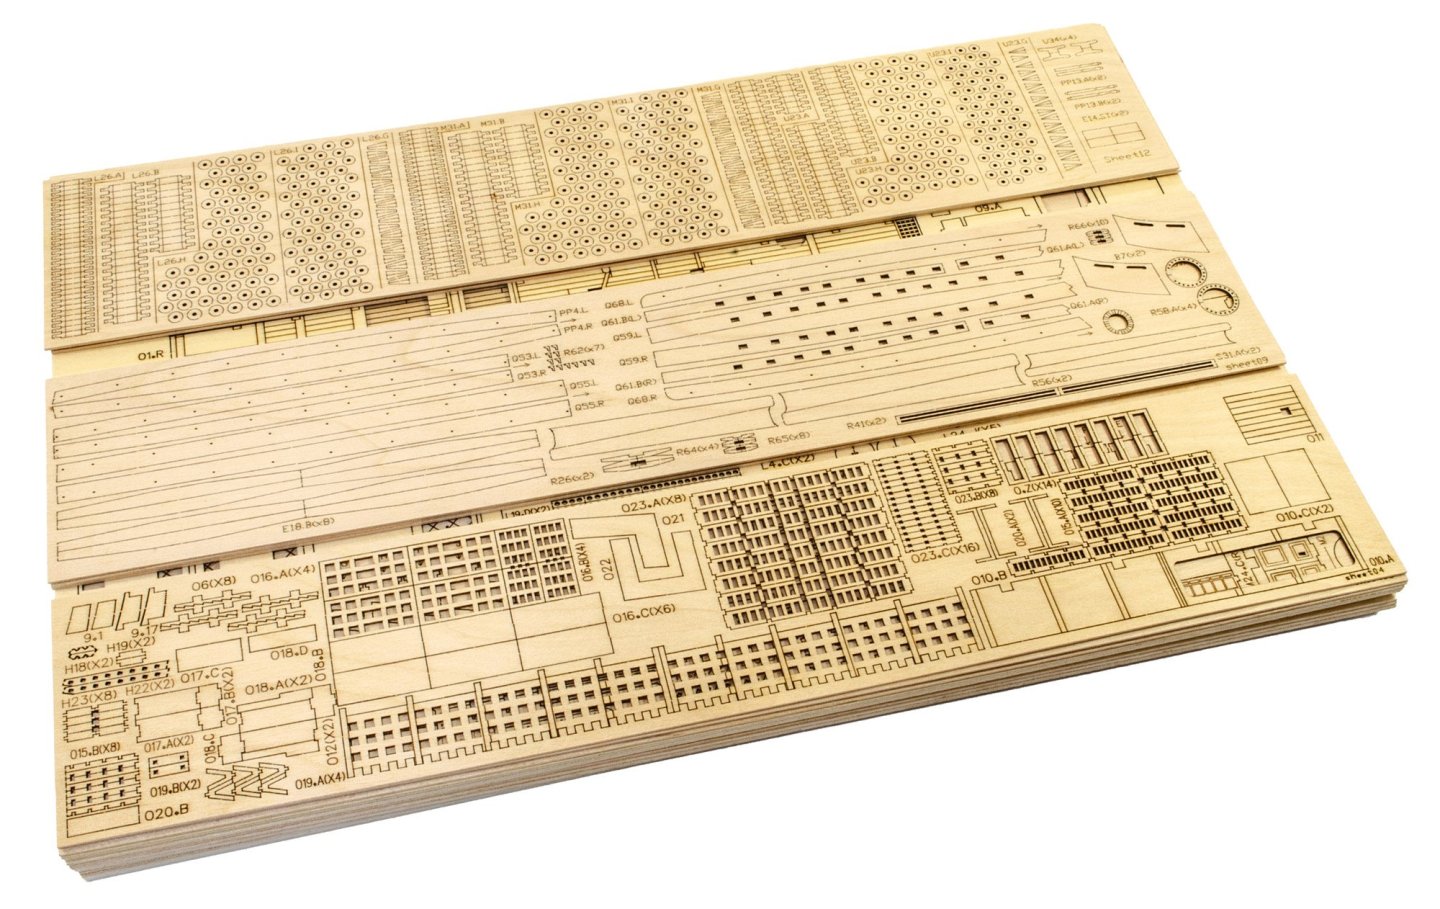
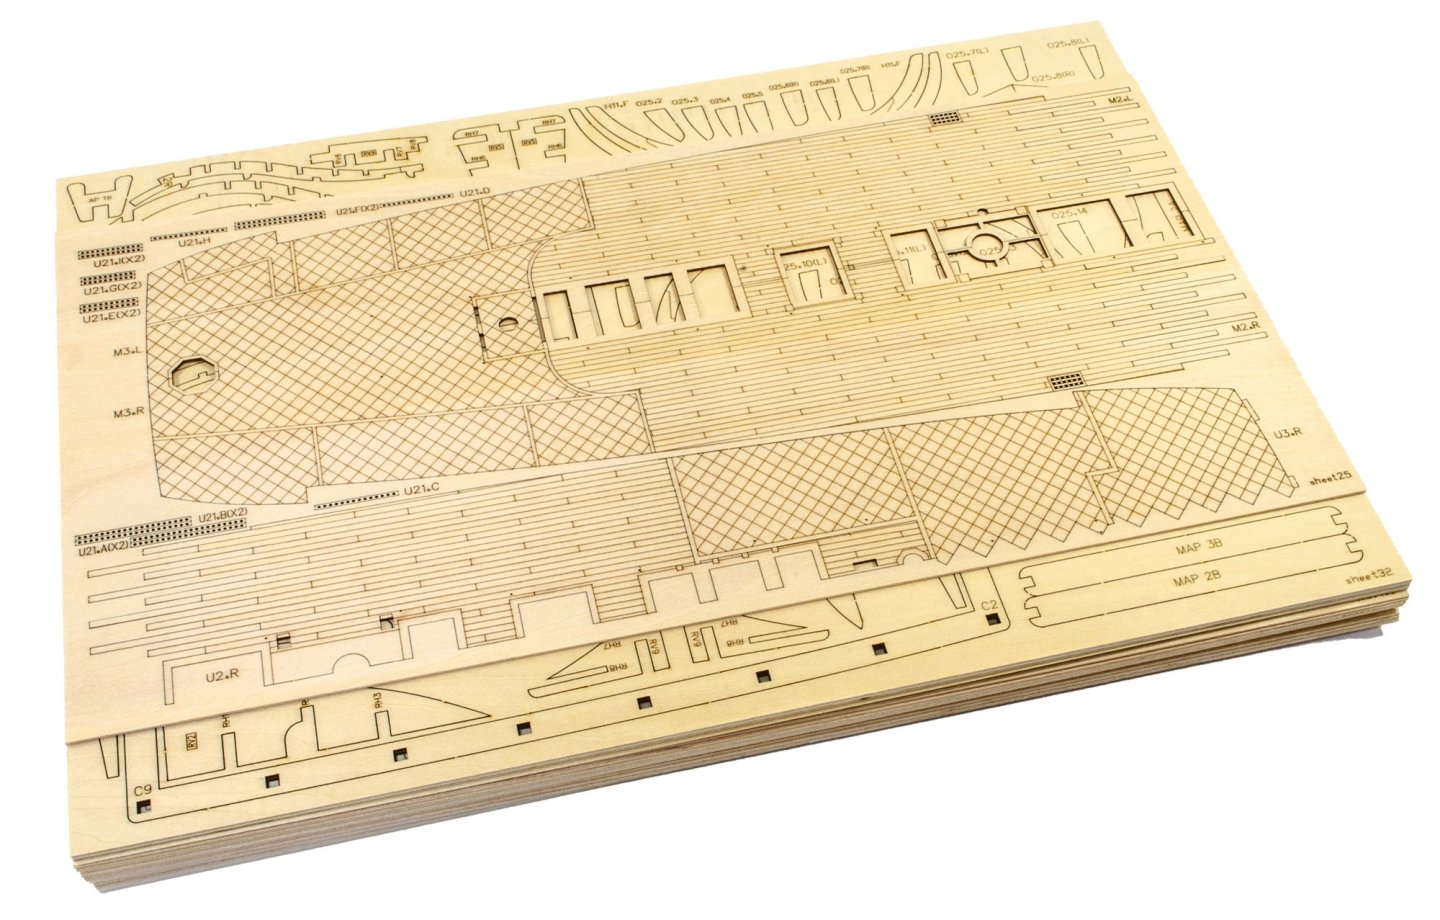
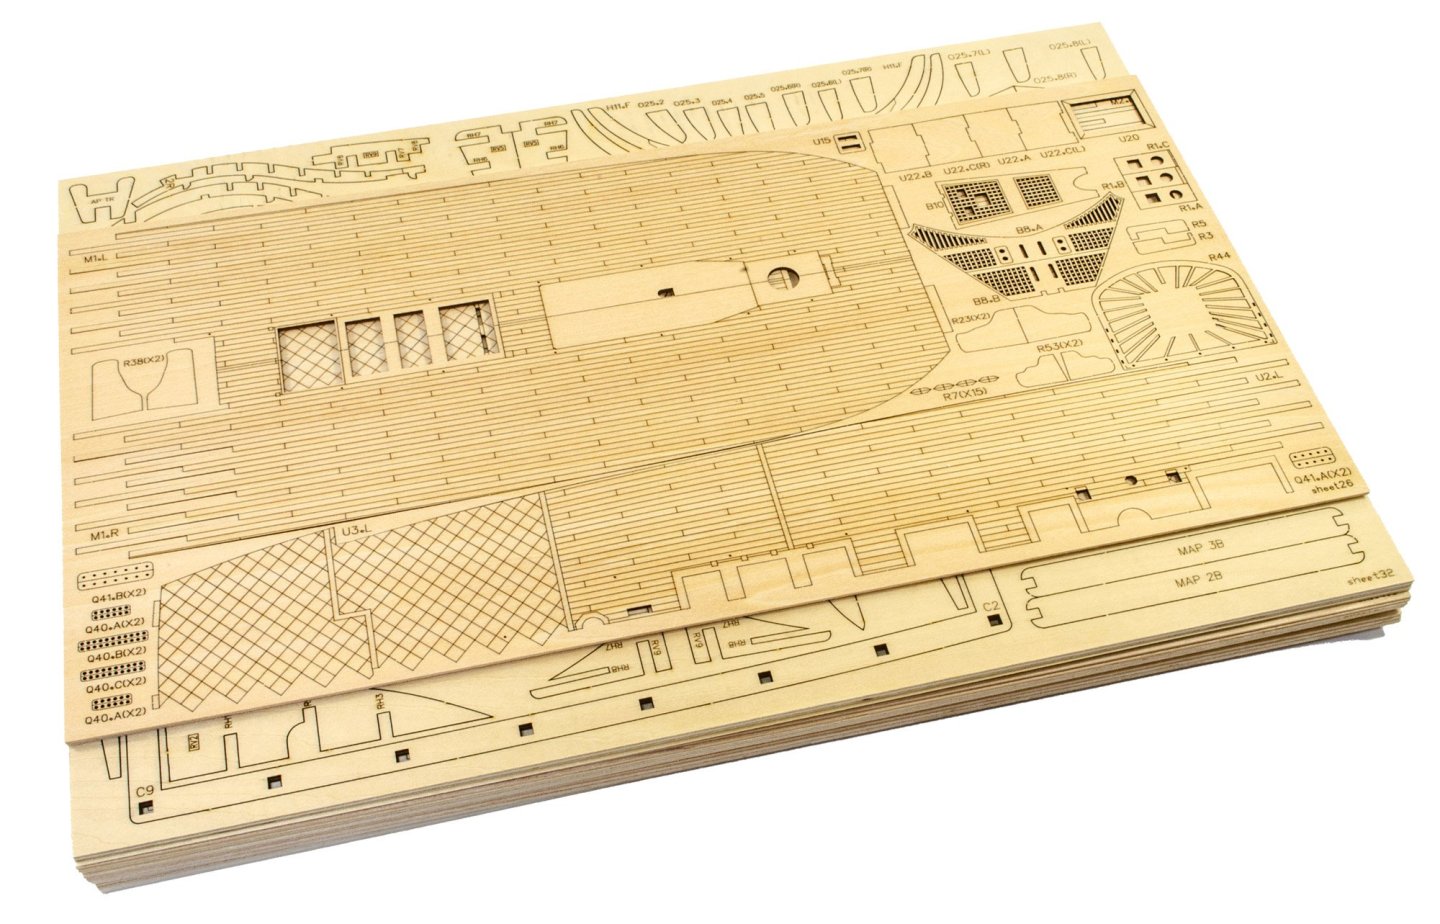
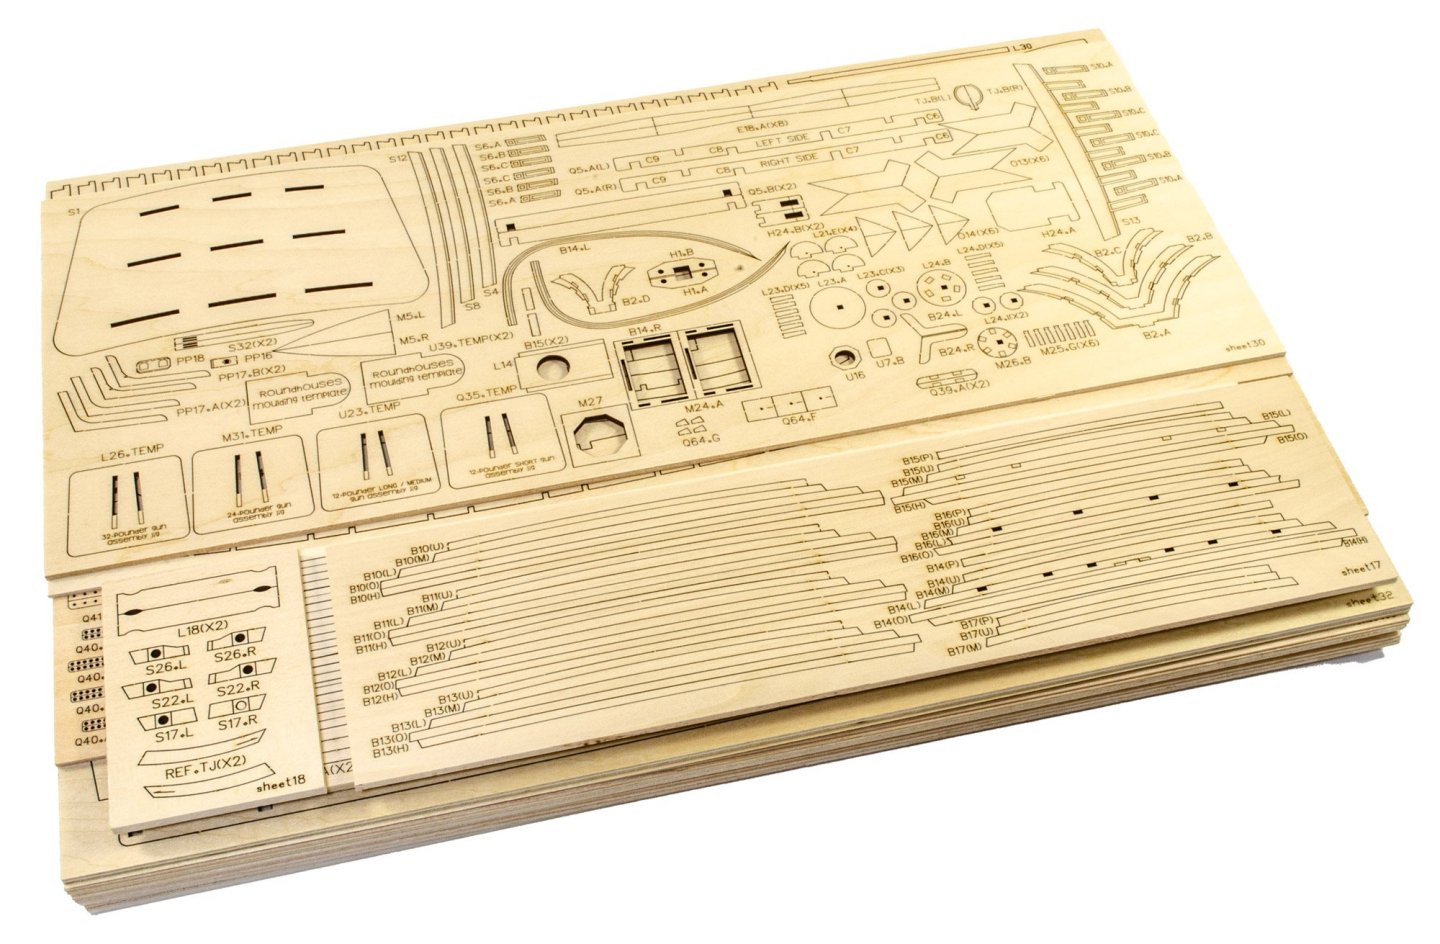
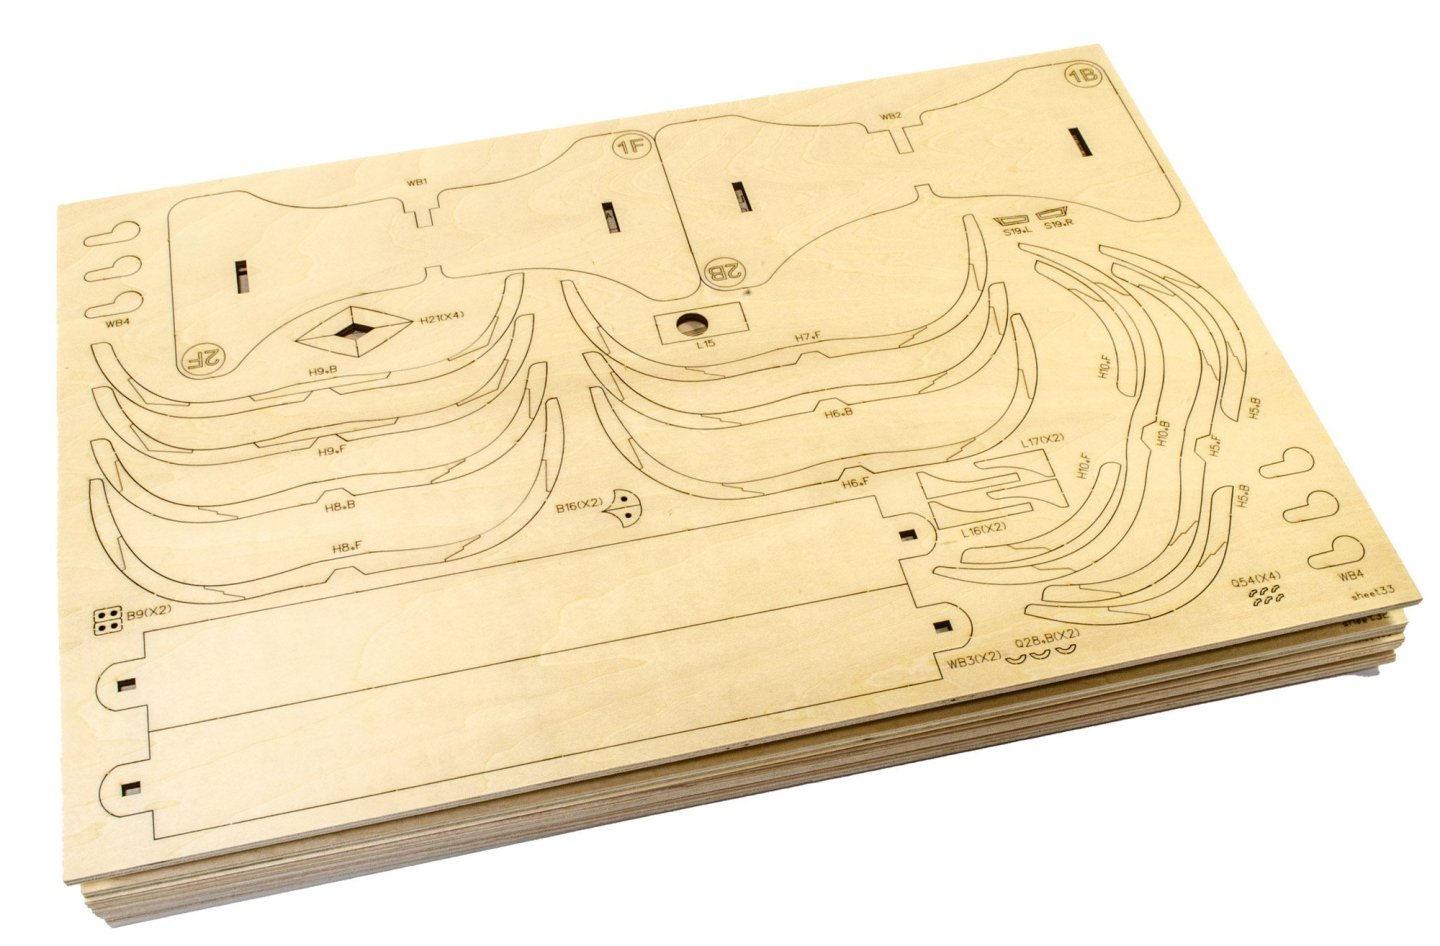
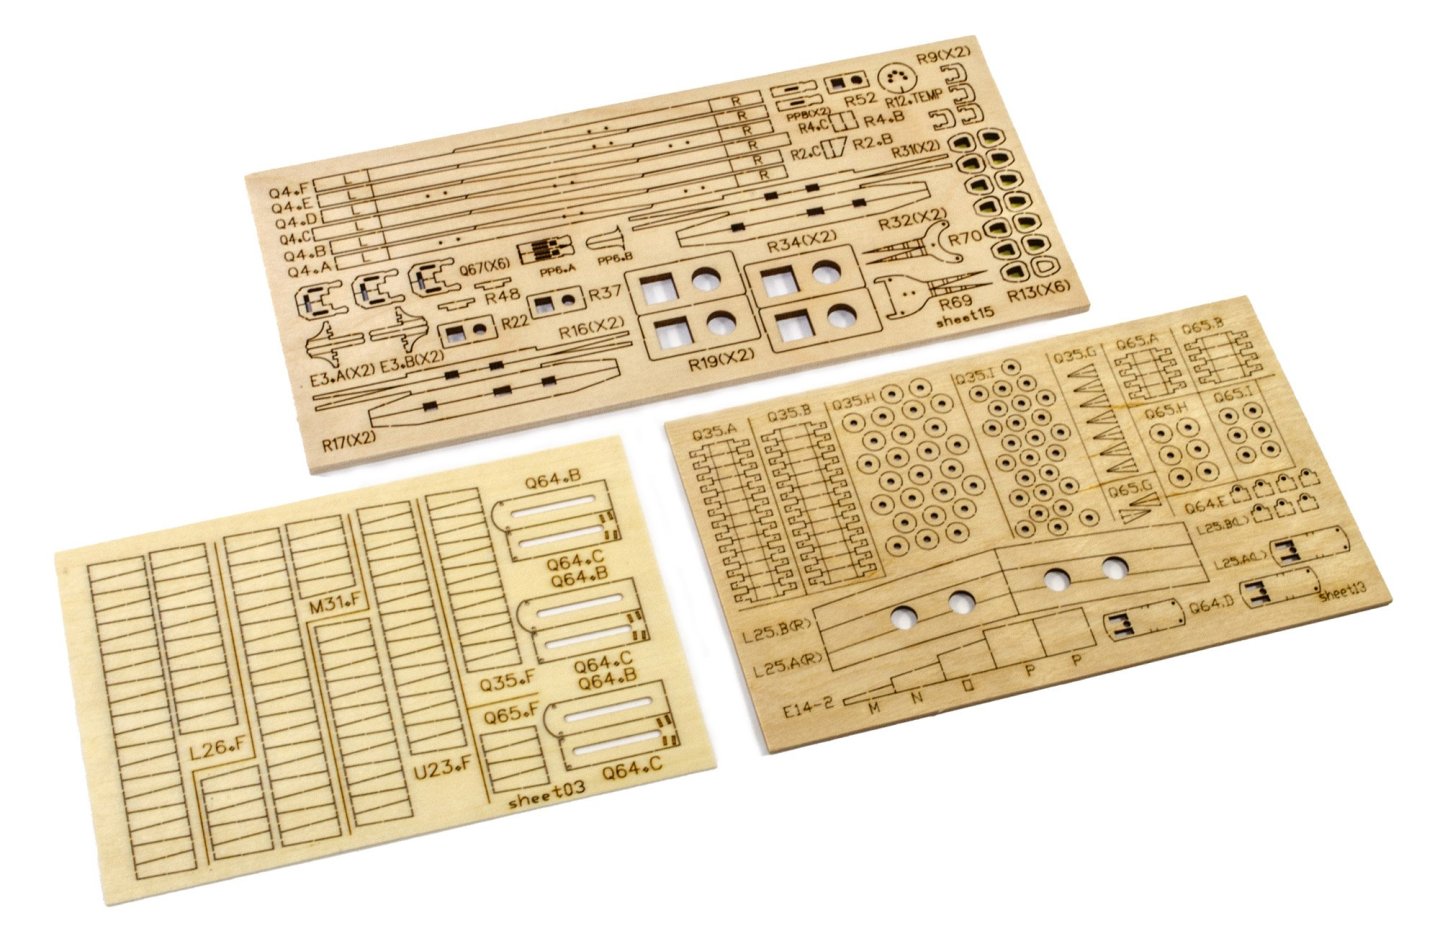
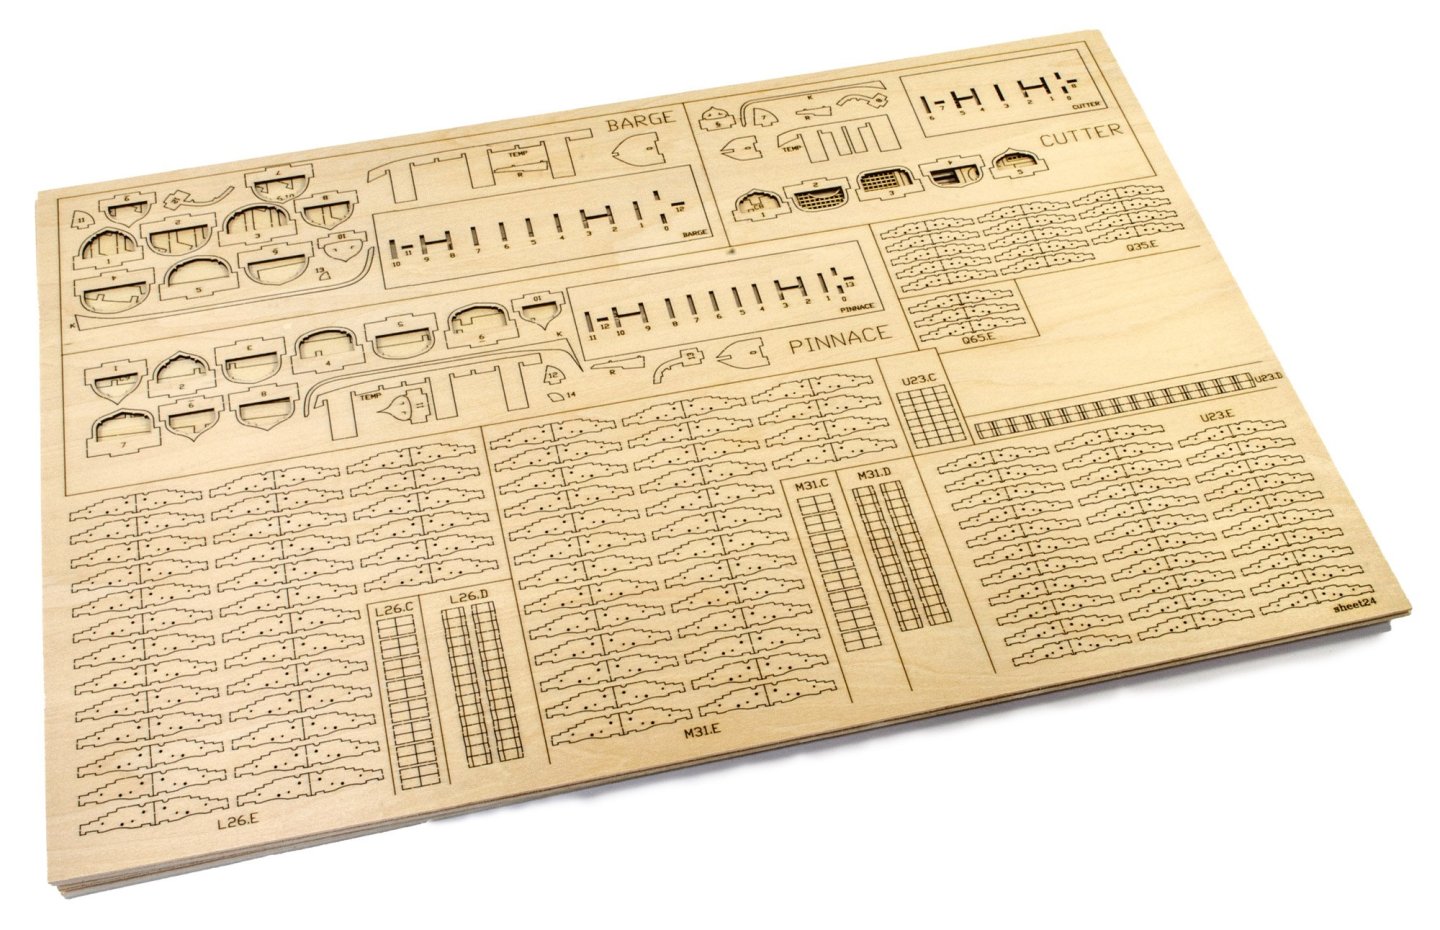
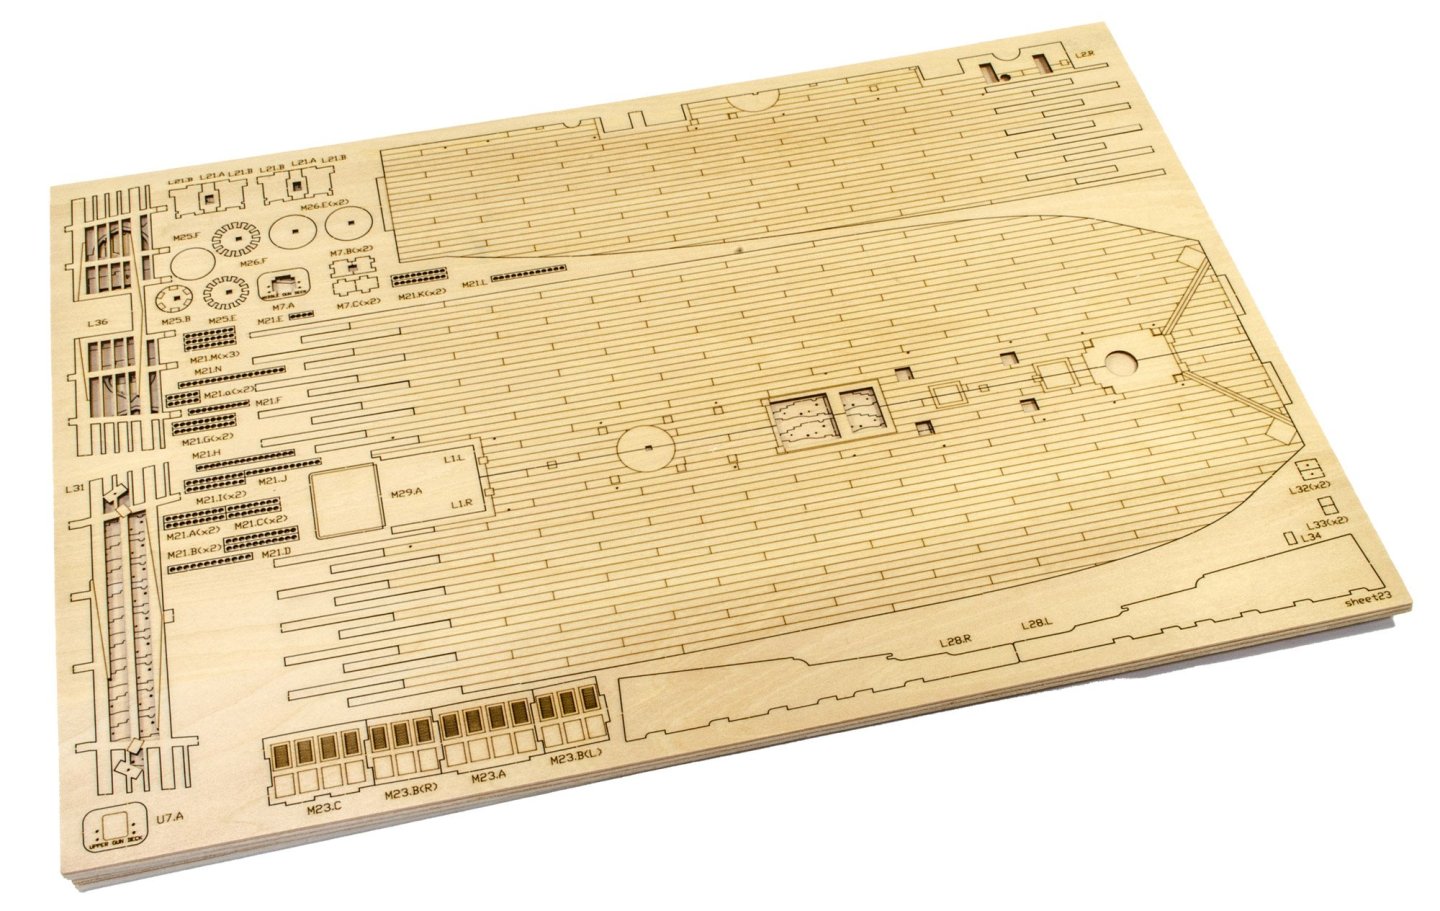
Sheet materials (Part 1) There are a LOT of laster cut sheets...around THIRTY-FOUR in total, made up from ply, birch and beech, with some of these sheets being veneers. All sheets are initials packed into a cellophane wrap. As you will imagine, the construction of the hull will be different to a regular model, simply due to the fact that the entire interior will be fitted out as per the actual ship. The decks themselves are all laser engraved, and these tend to interlock. I think that you'd need to be careful how you execute that so that you hide as much of the connection as is possible. Please look through these sheets as that is what's necessary to gain an insight to how Artesania have broken down the vessel so that you can reproduce it as easily as possible. More soon...


-
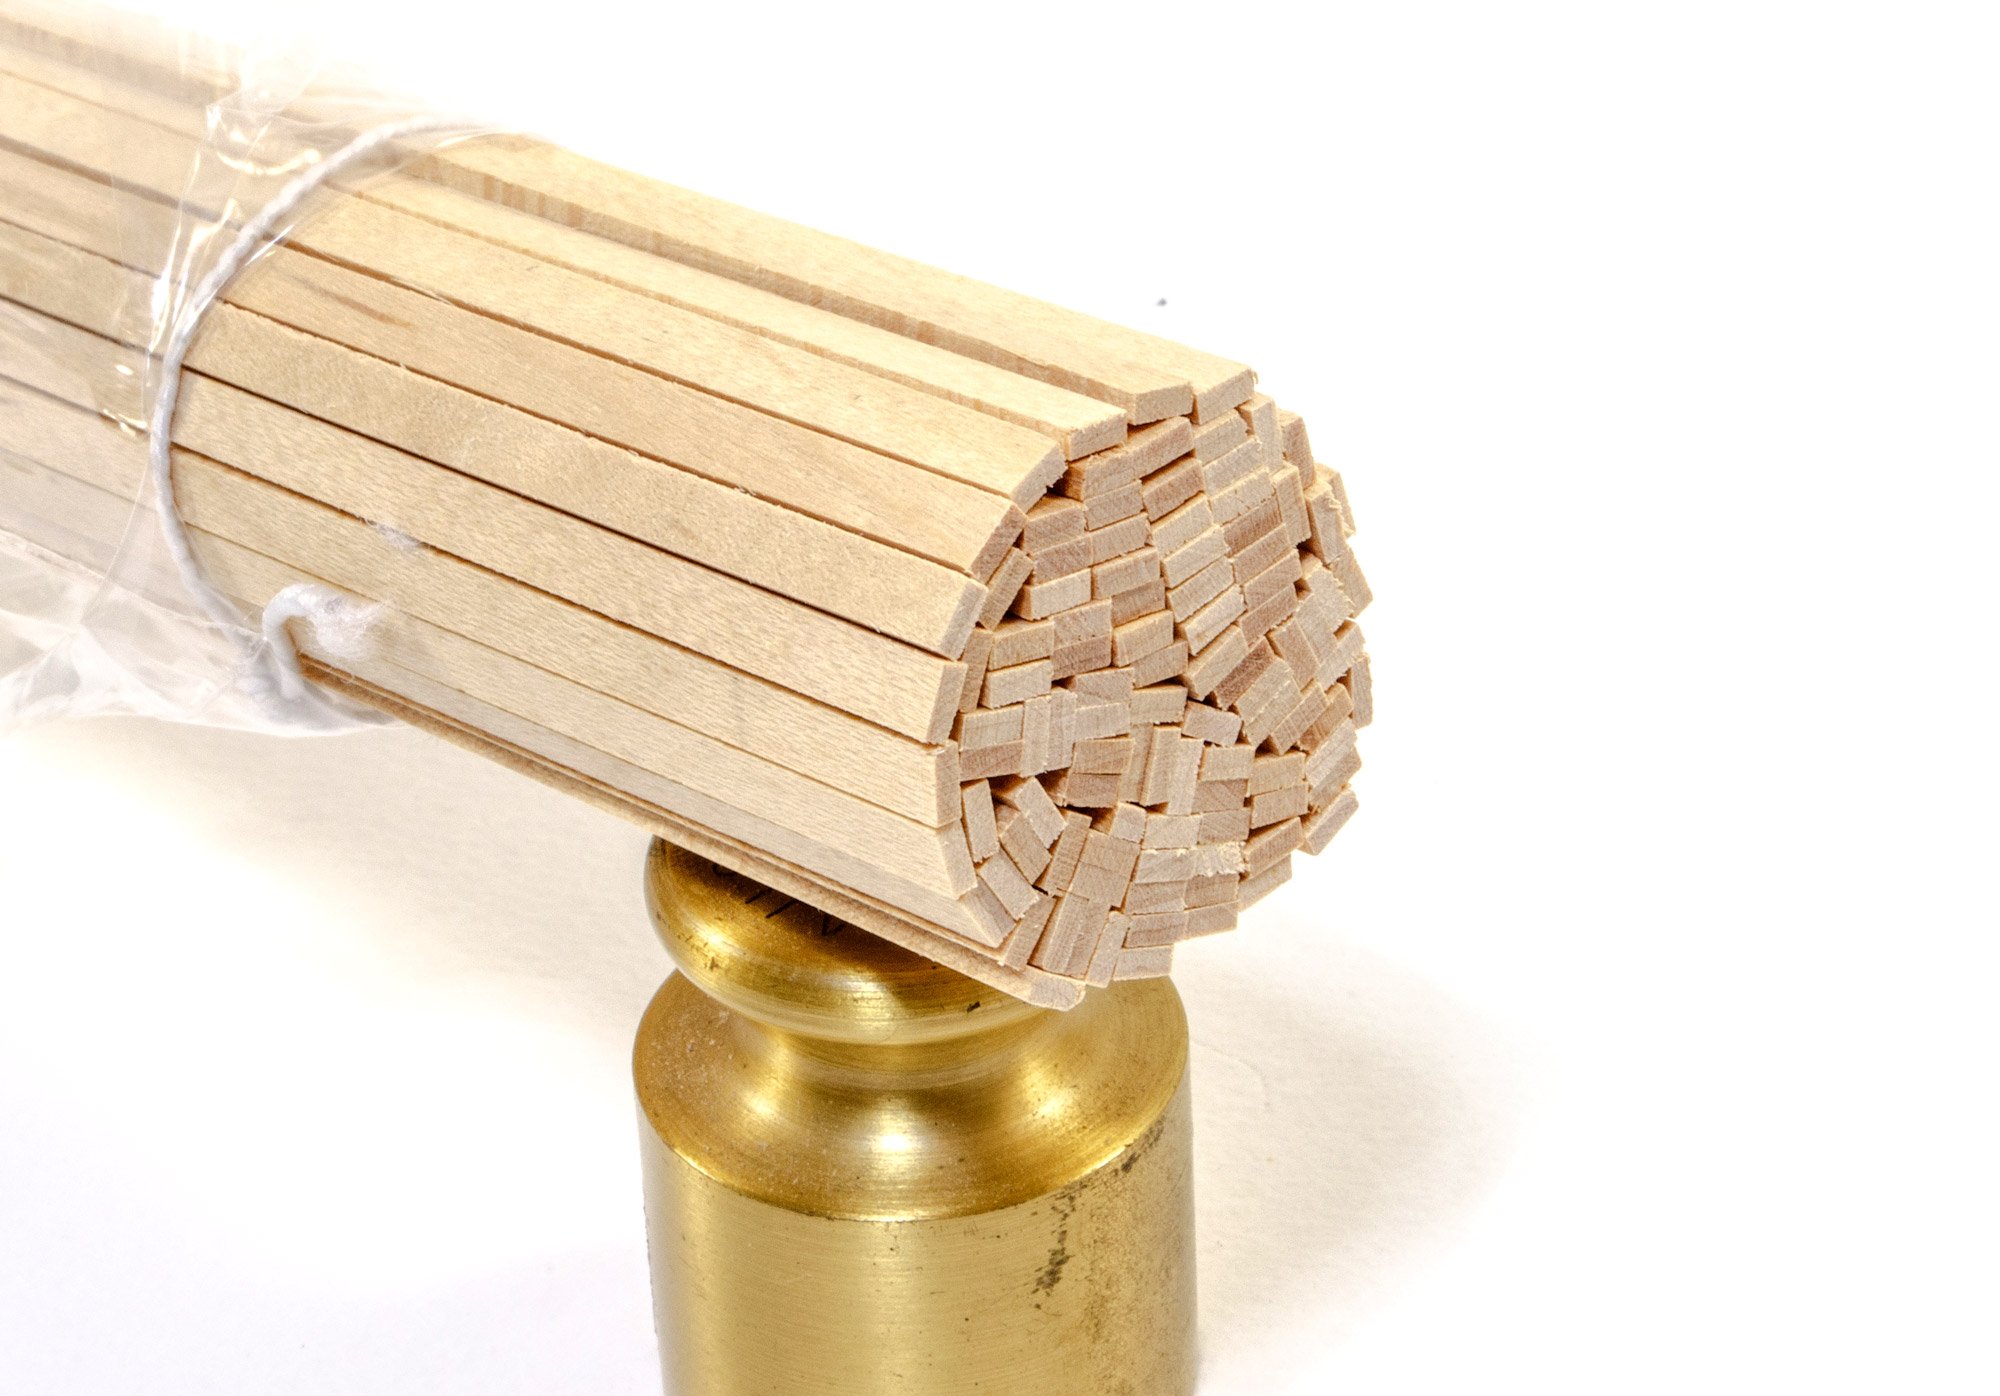
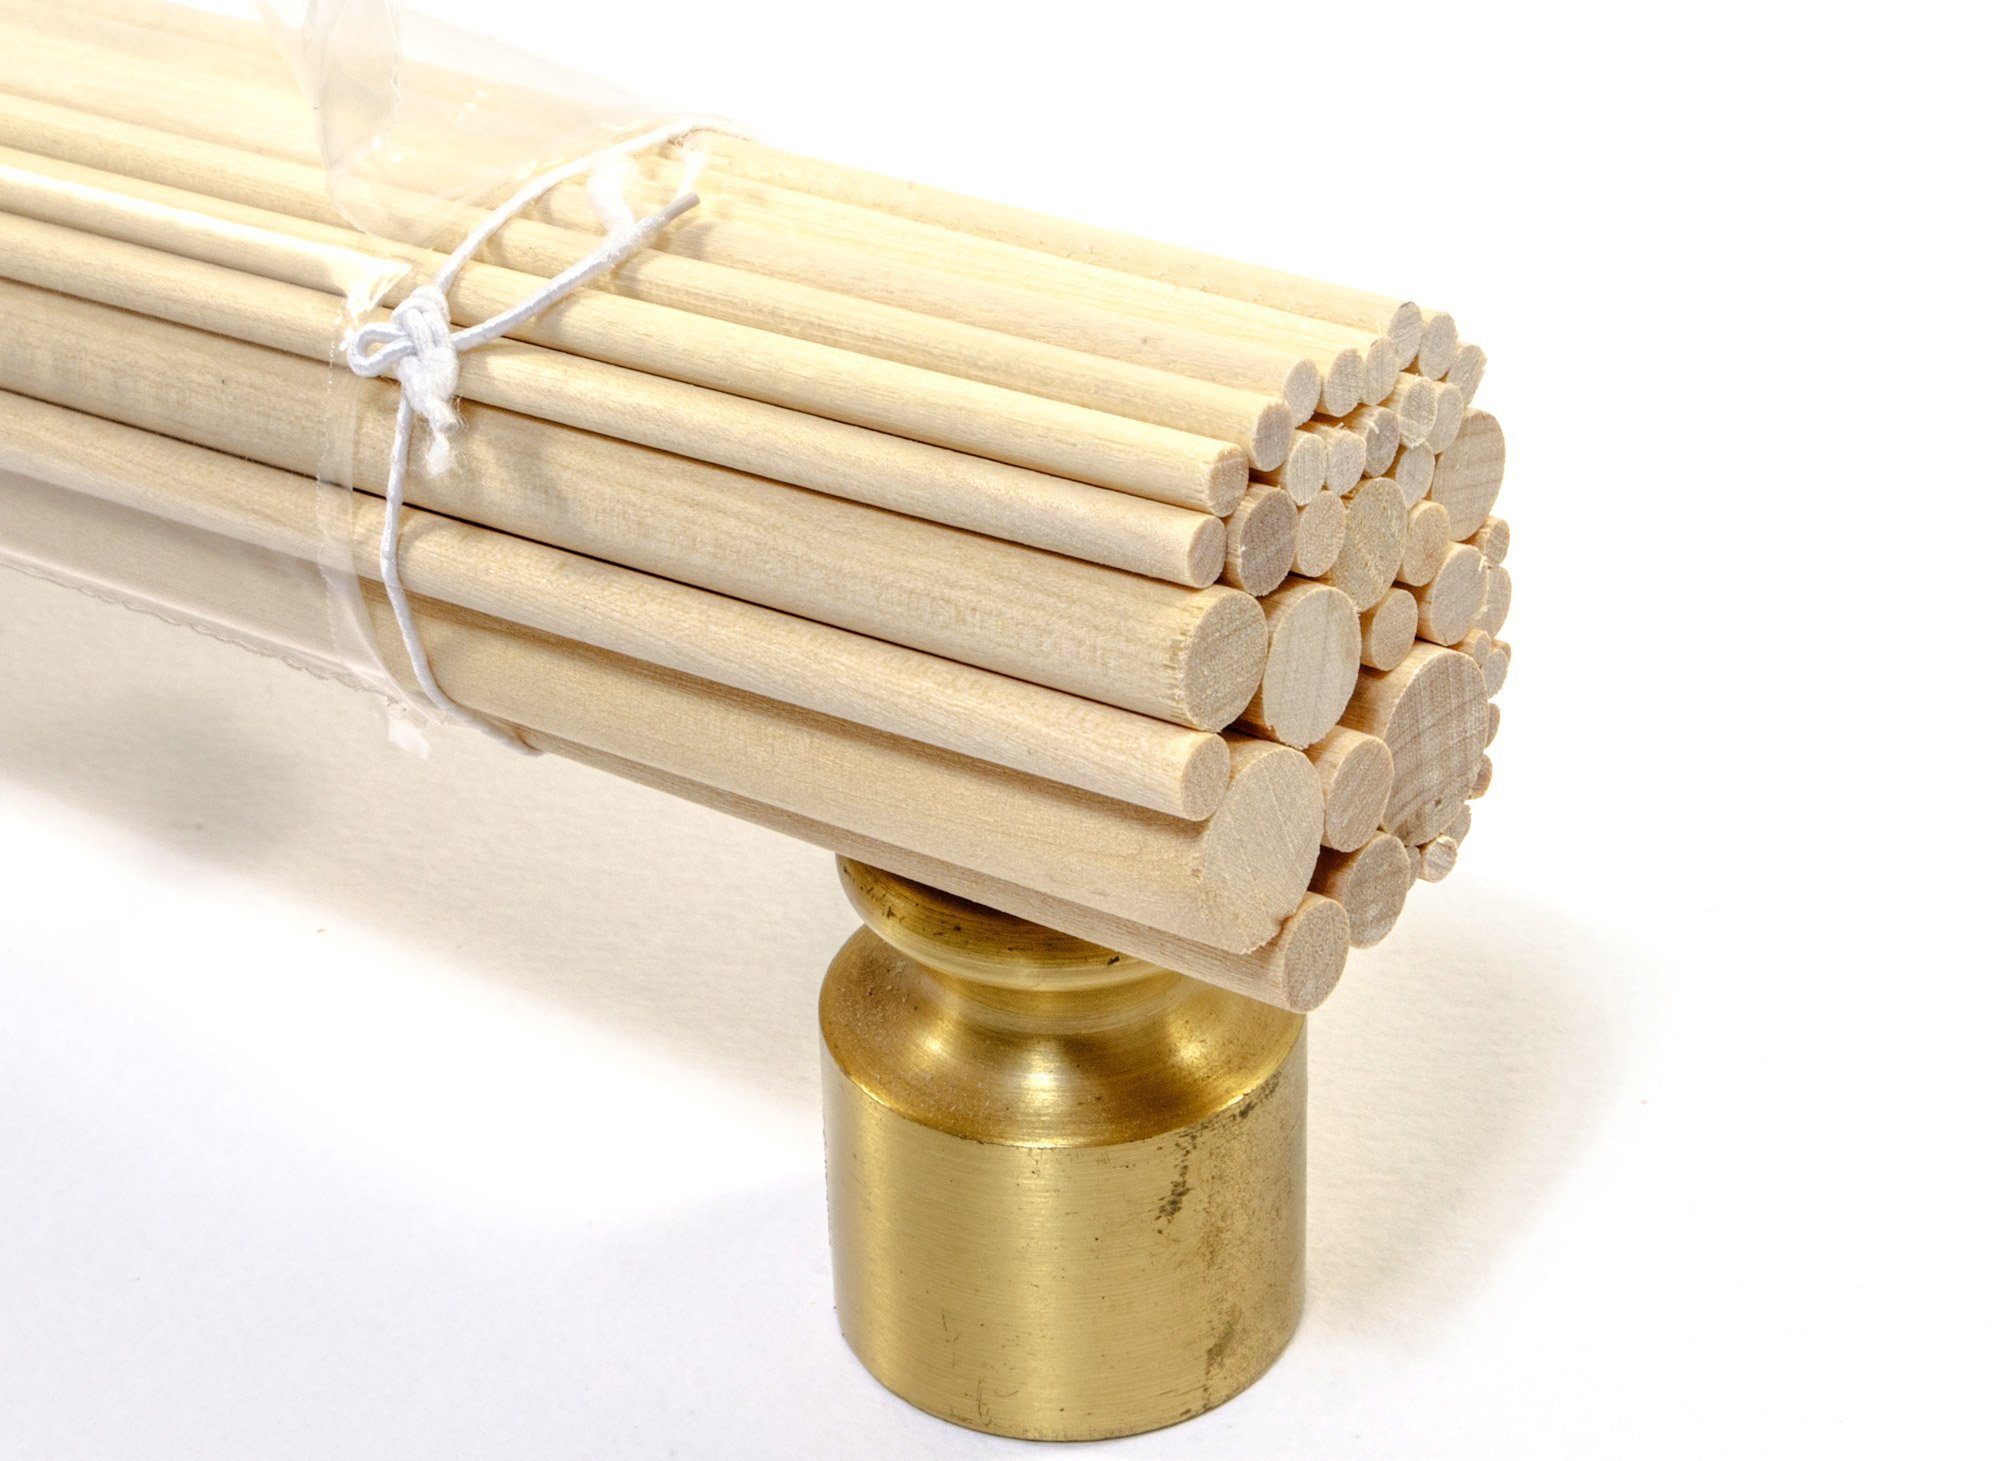
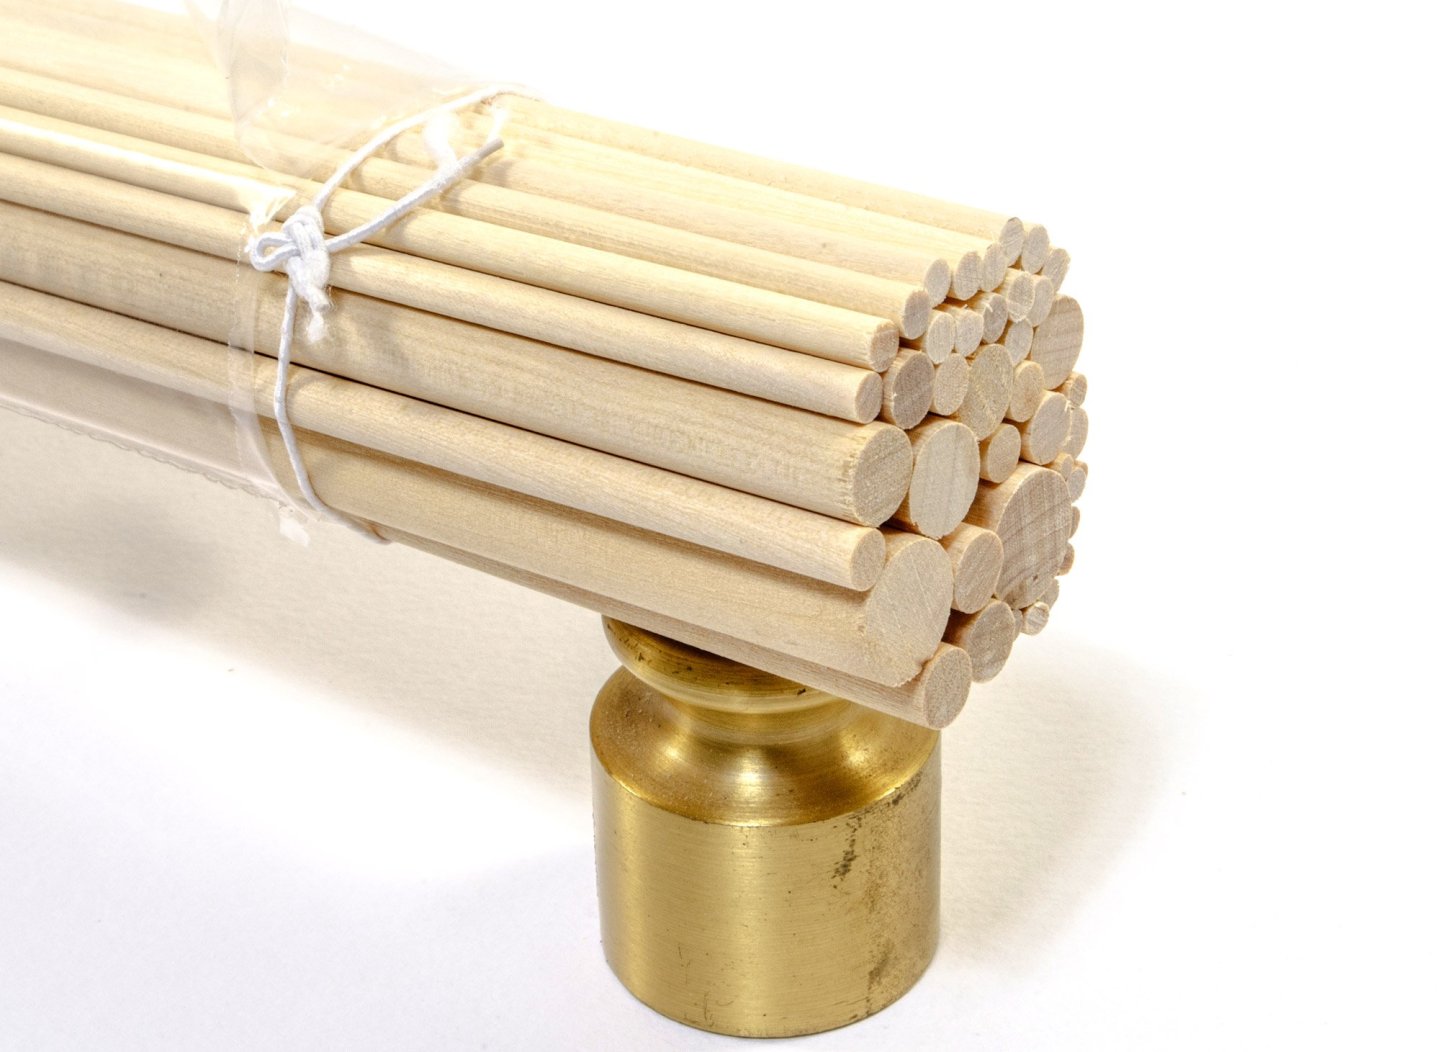
Dowel and strip stock There is a hell of a lot of strip material supplied in this new release. However, the packs are physically short, with the strip wood being long enough to satisfy half a hull's length, due to the method of planking. The majority of planking is 1.5 x 4mm and there are SEVEN packets of this. As with all strip bundles, these come laced up in elastic and then cellophane wrapped. The quality of the strip wood is clearly evident, with sharp edges and clean cutting. the material quality is also excellent. See that for yourself, here: A pack of dowel is included, with lengths of brass rod within the pack. Again, please check out the quality for yourself: More soon.....


-
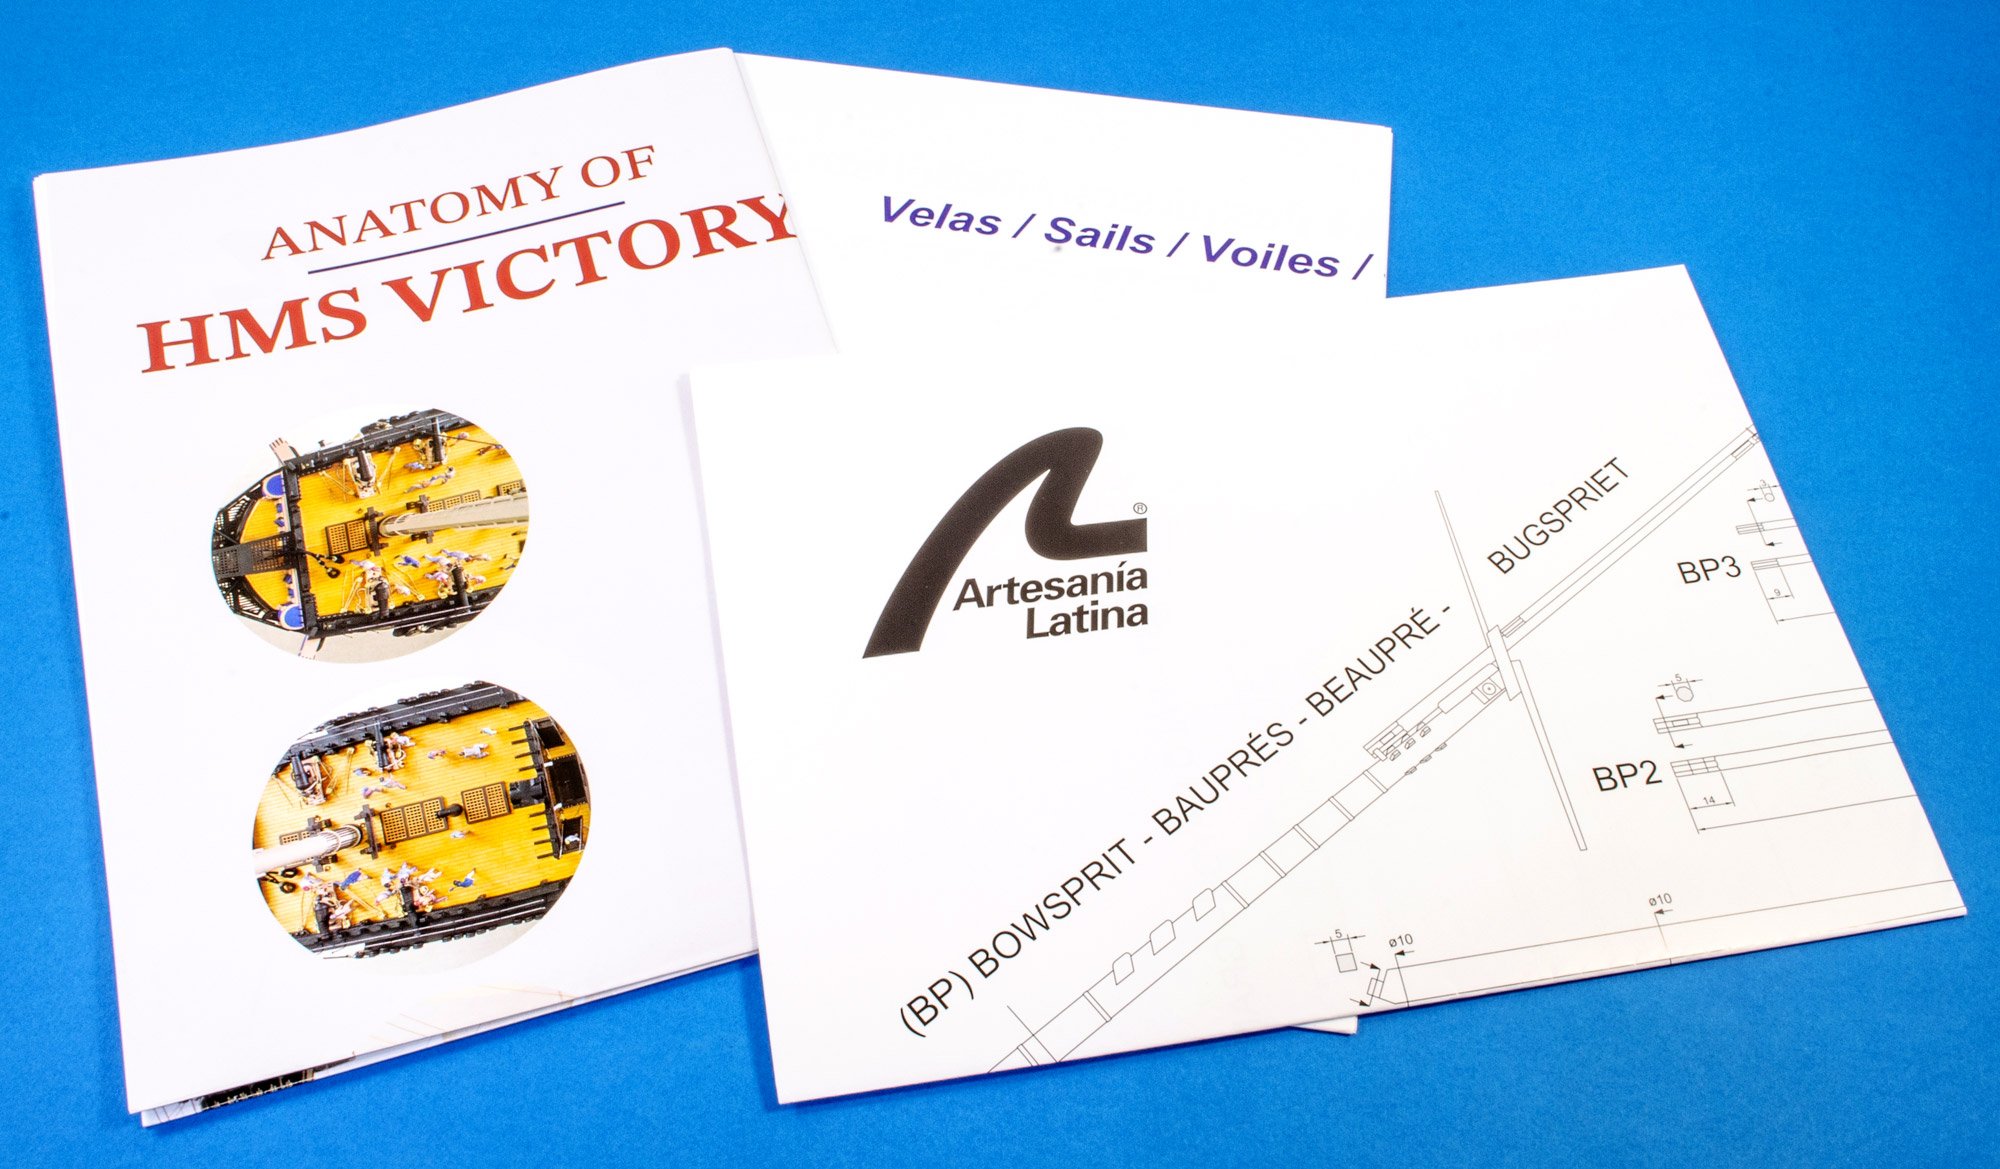
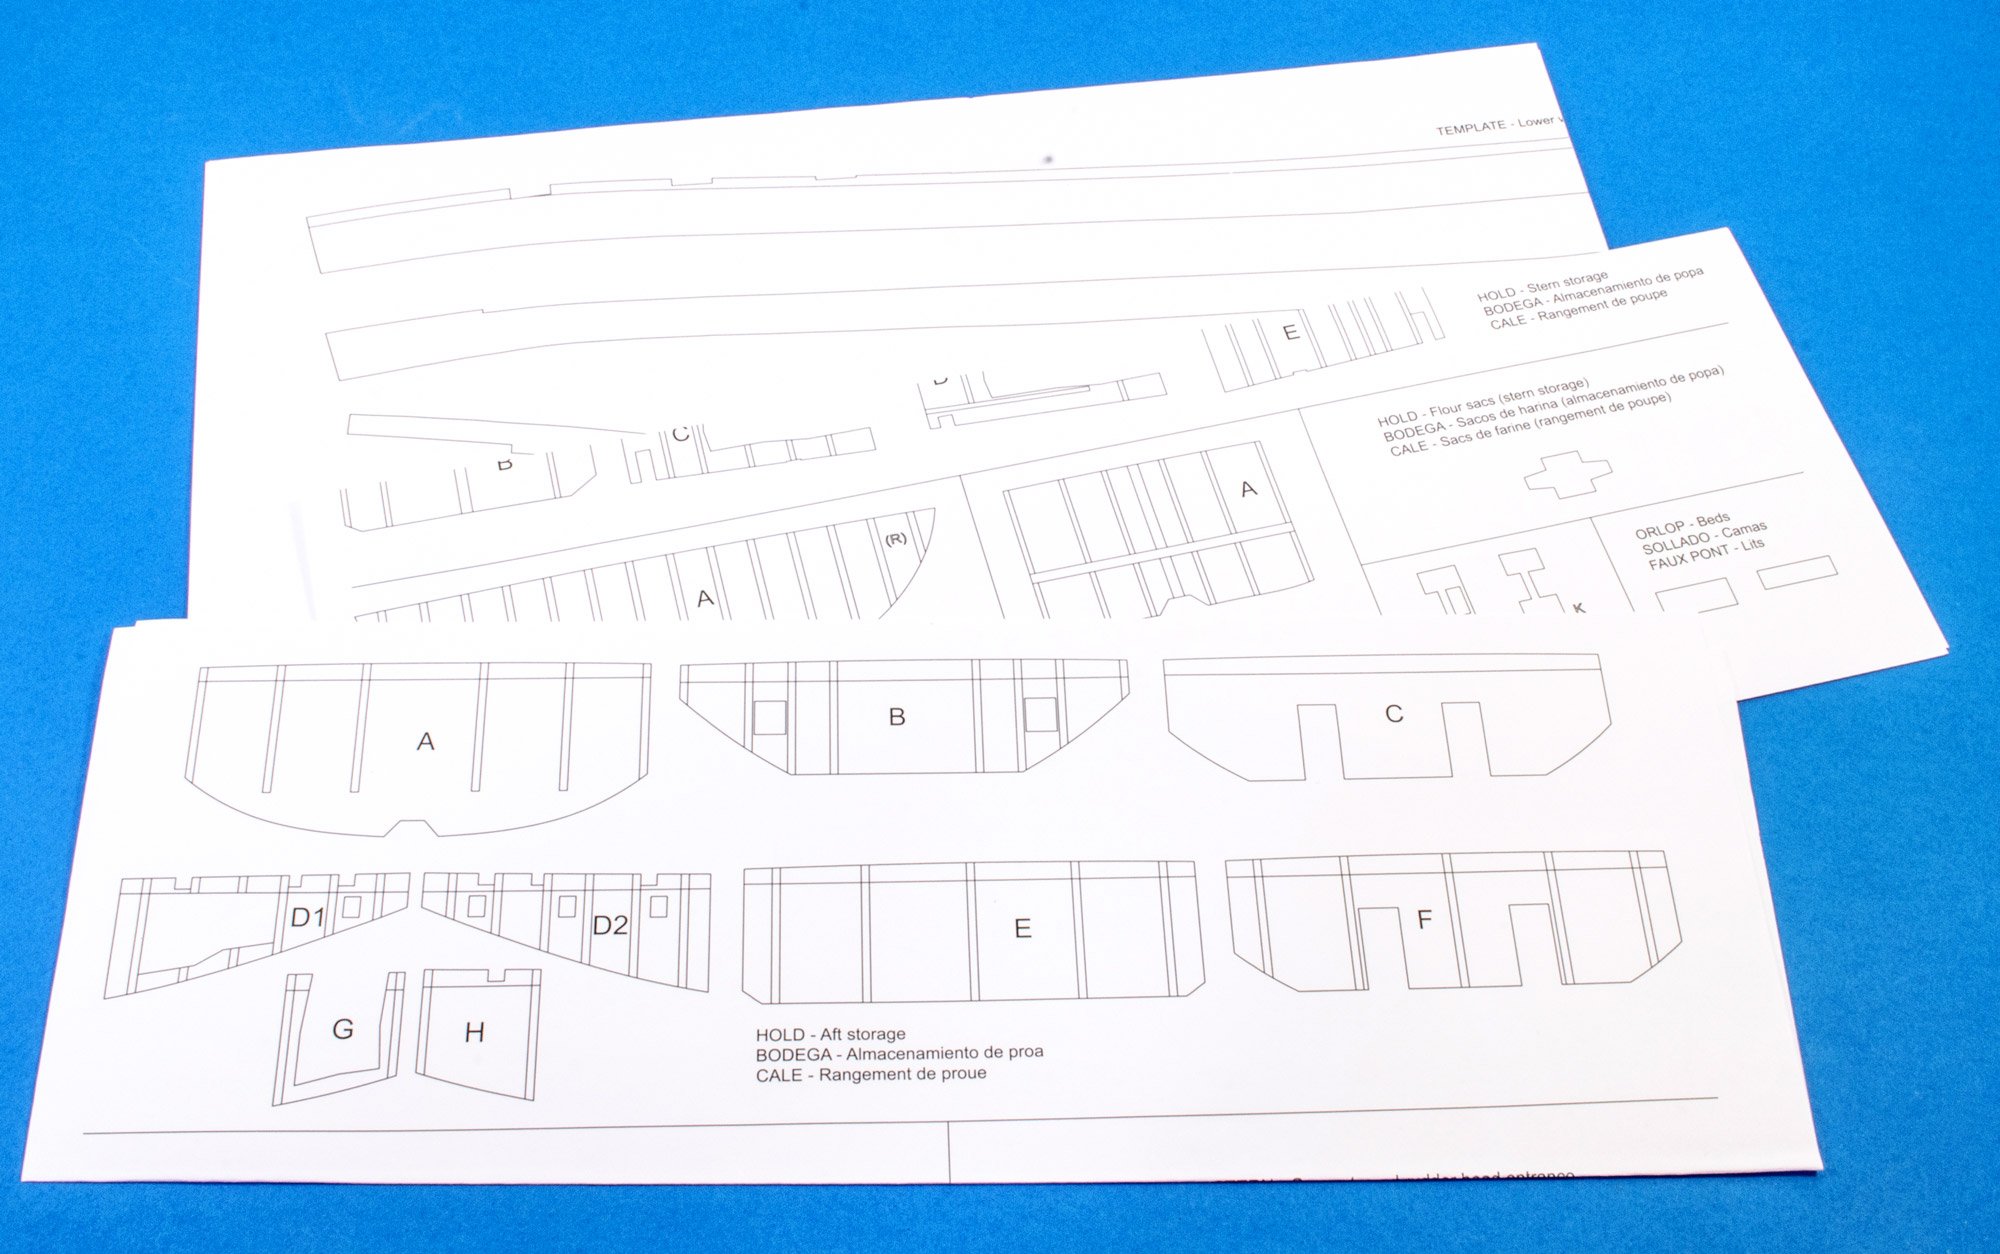
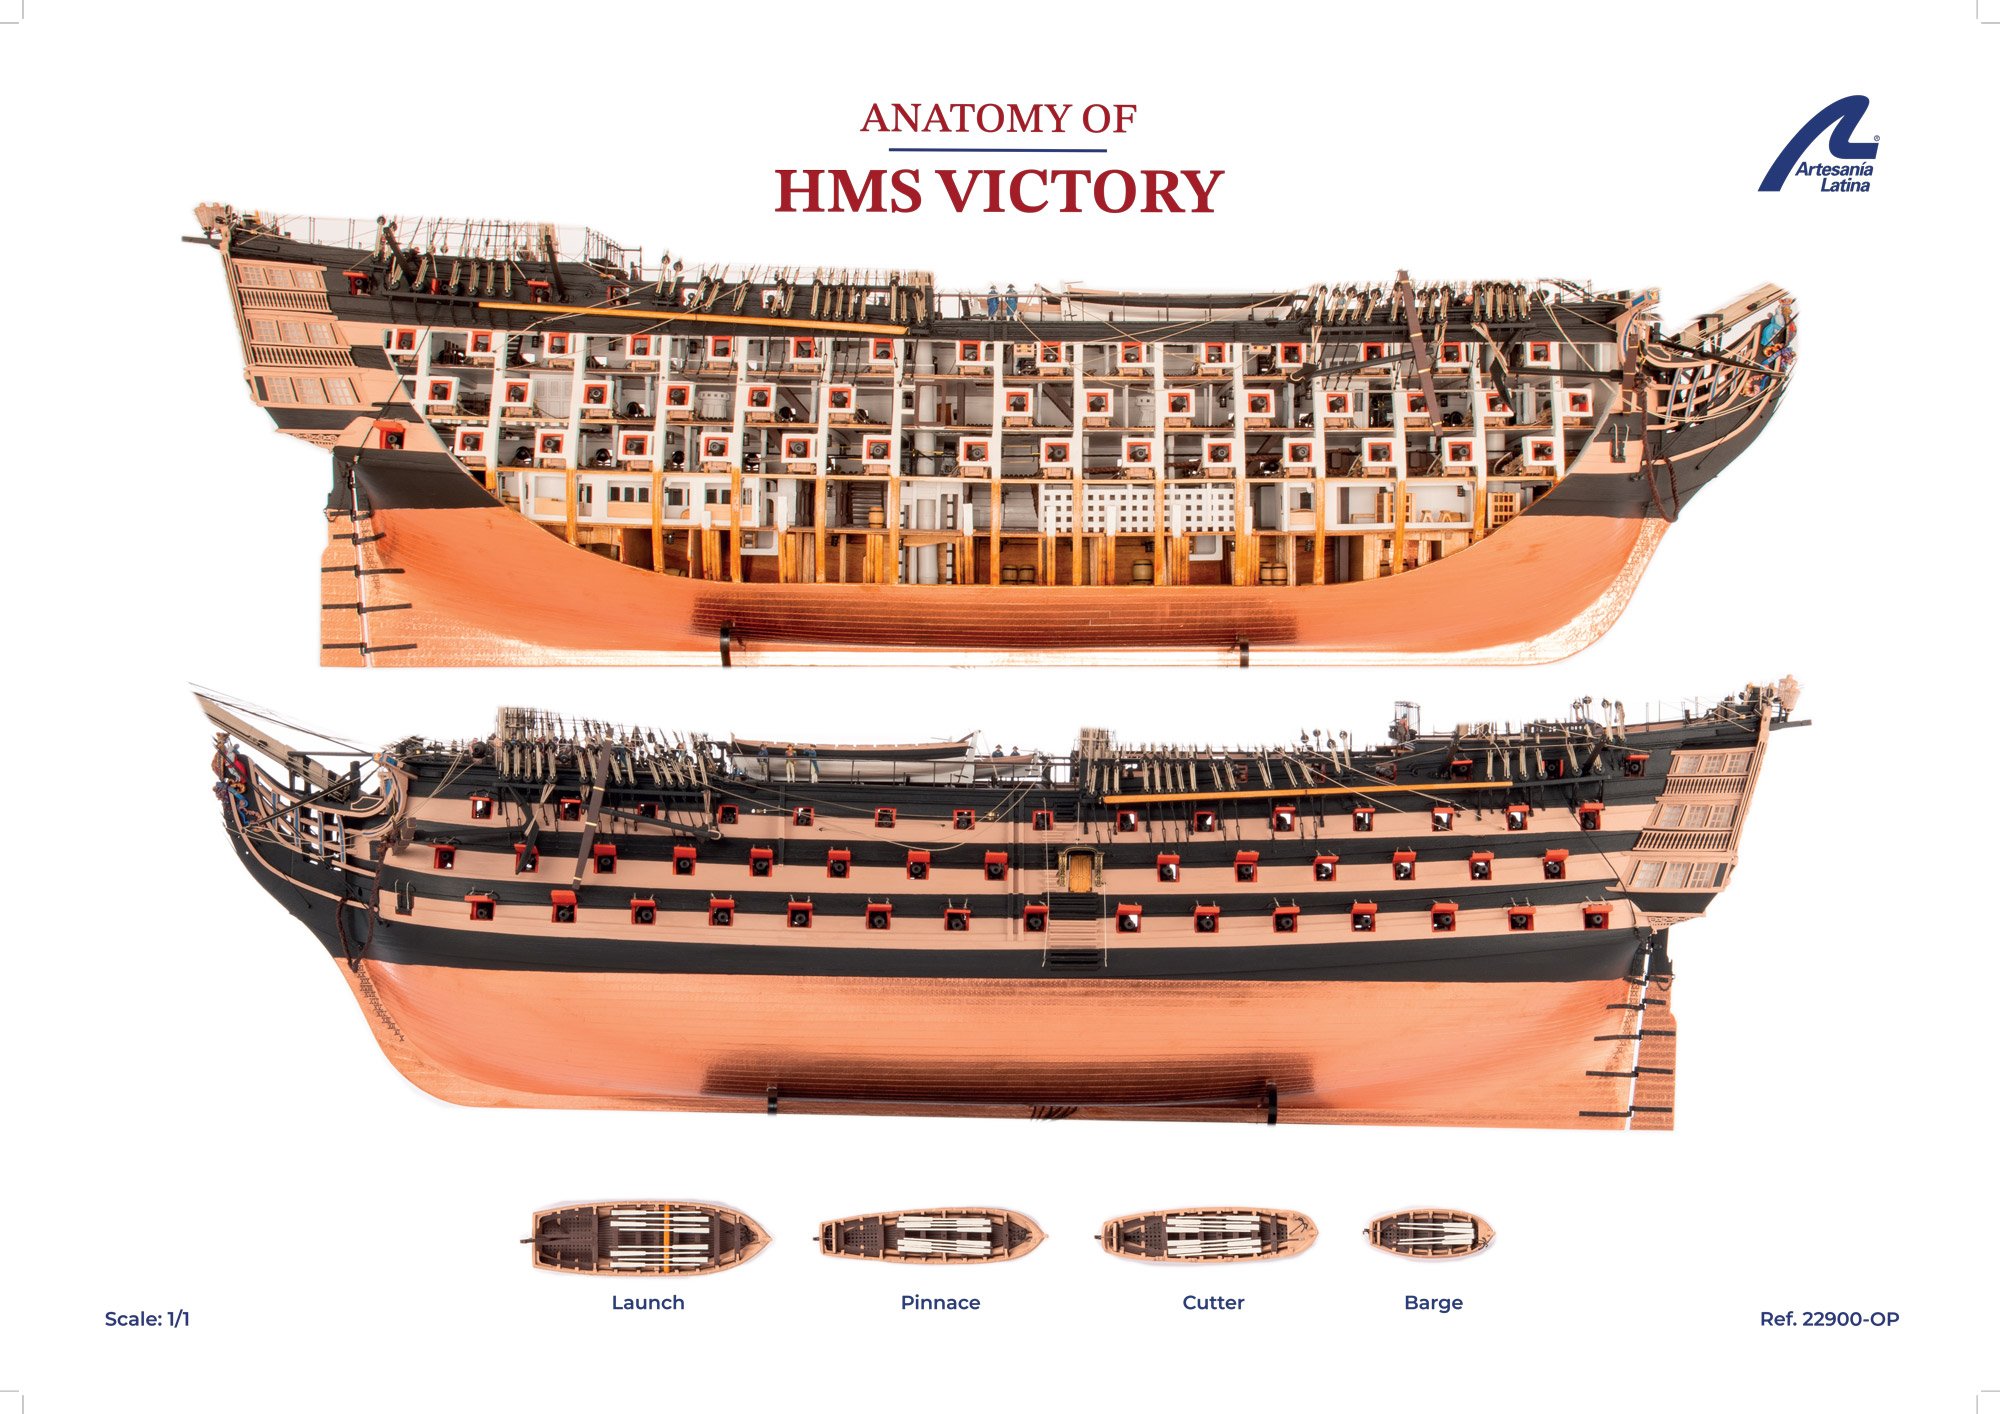
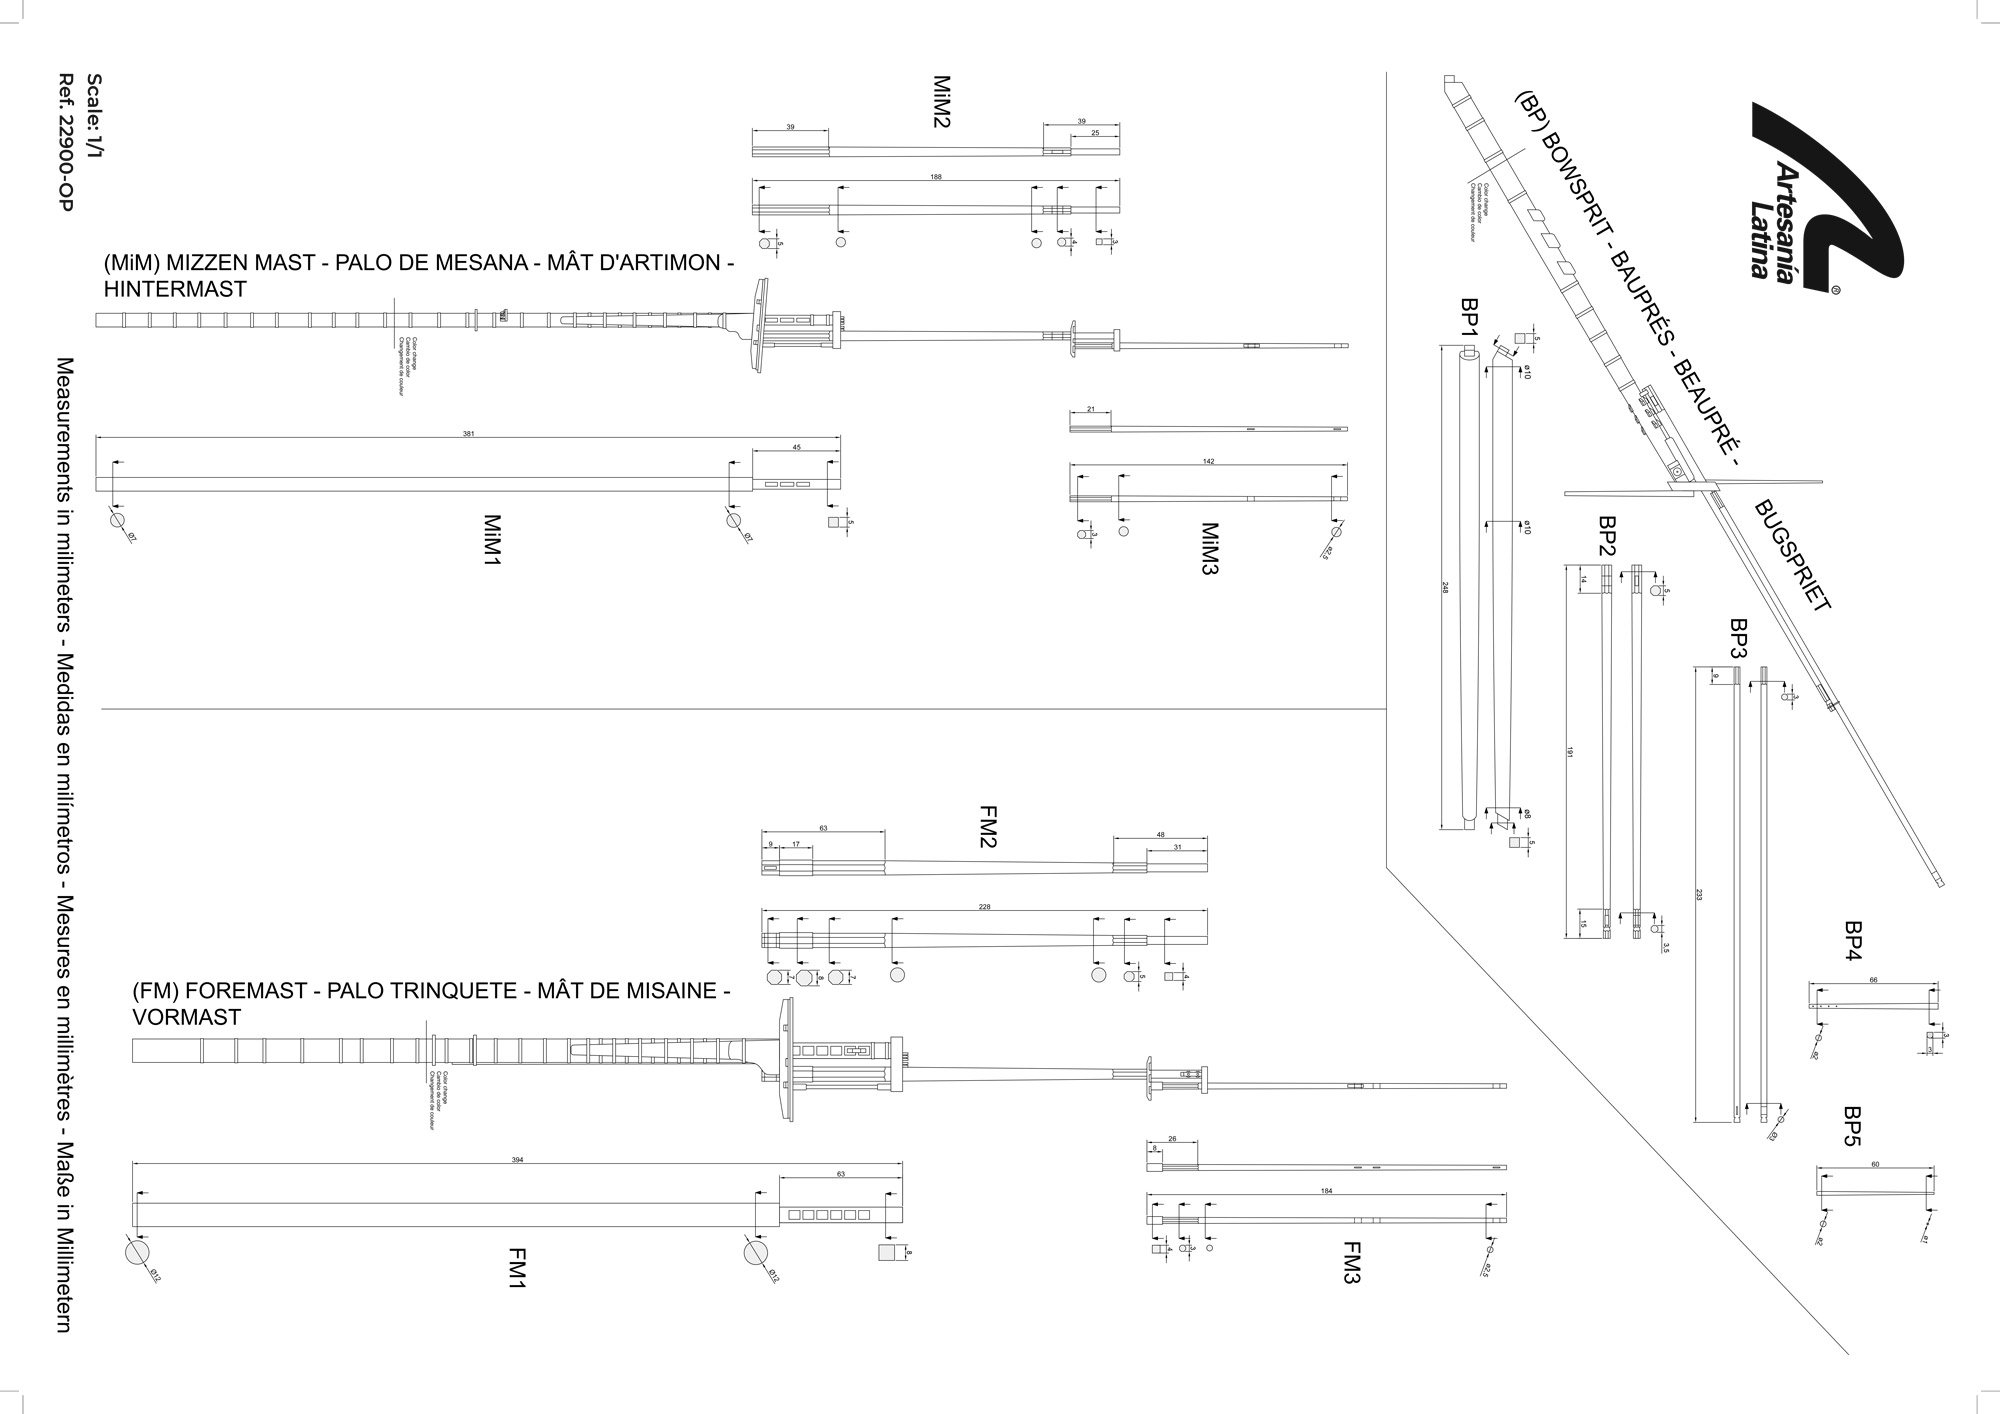
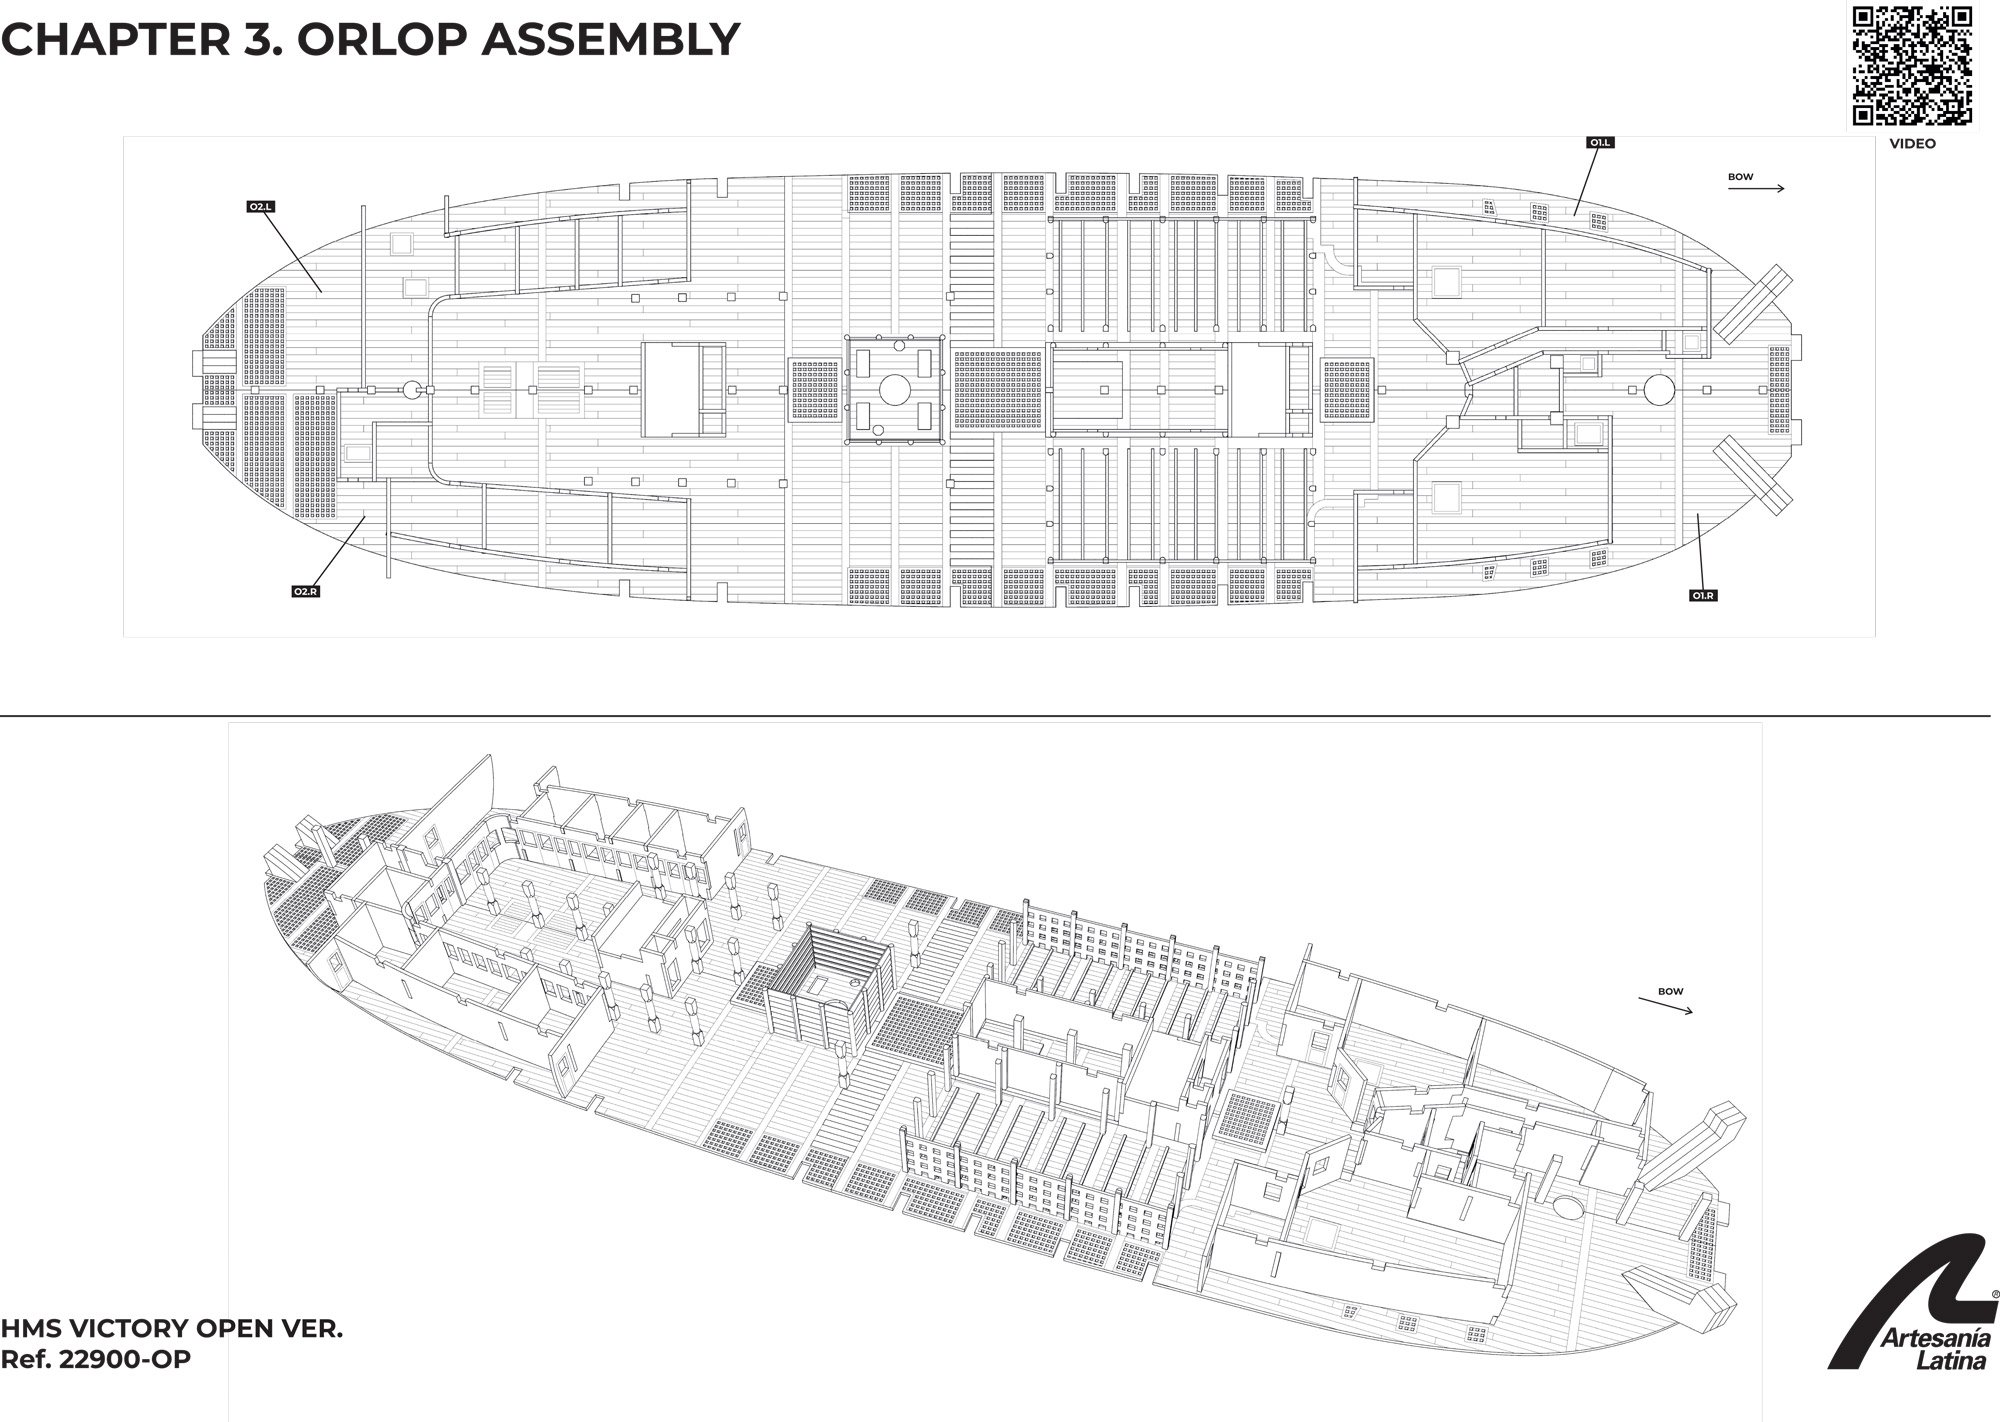
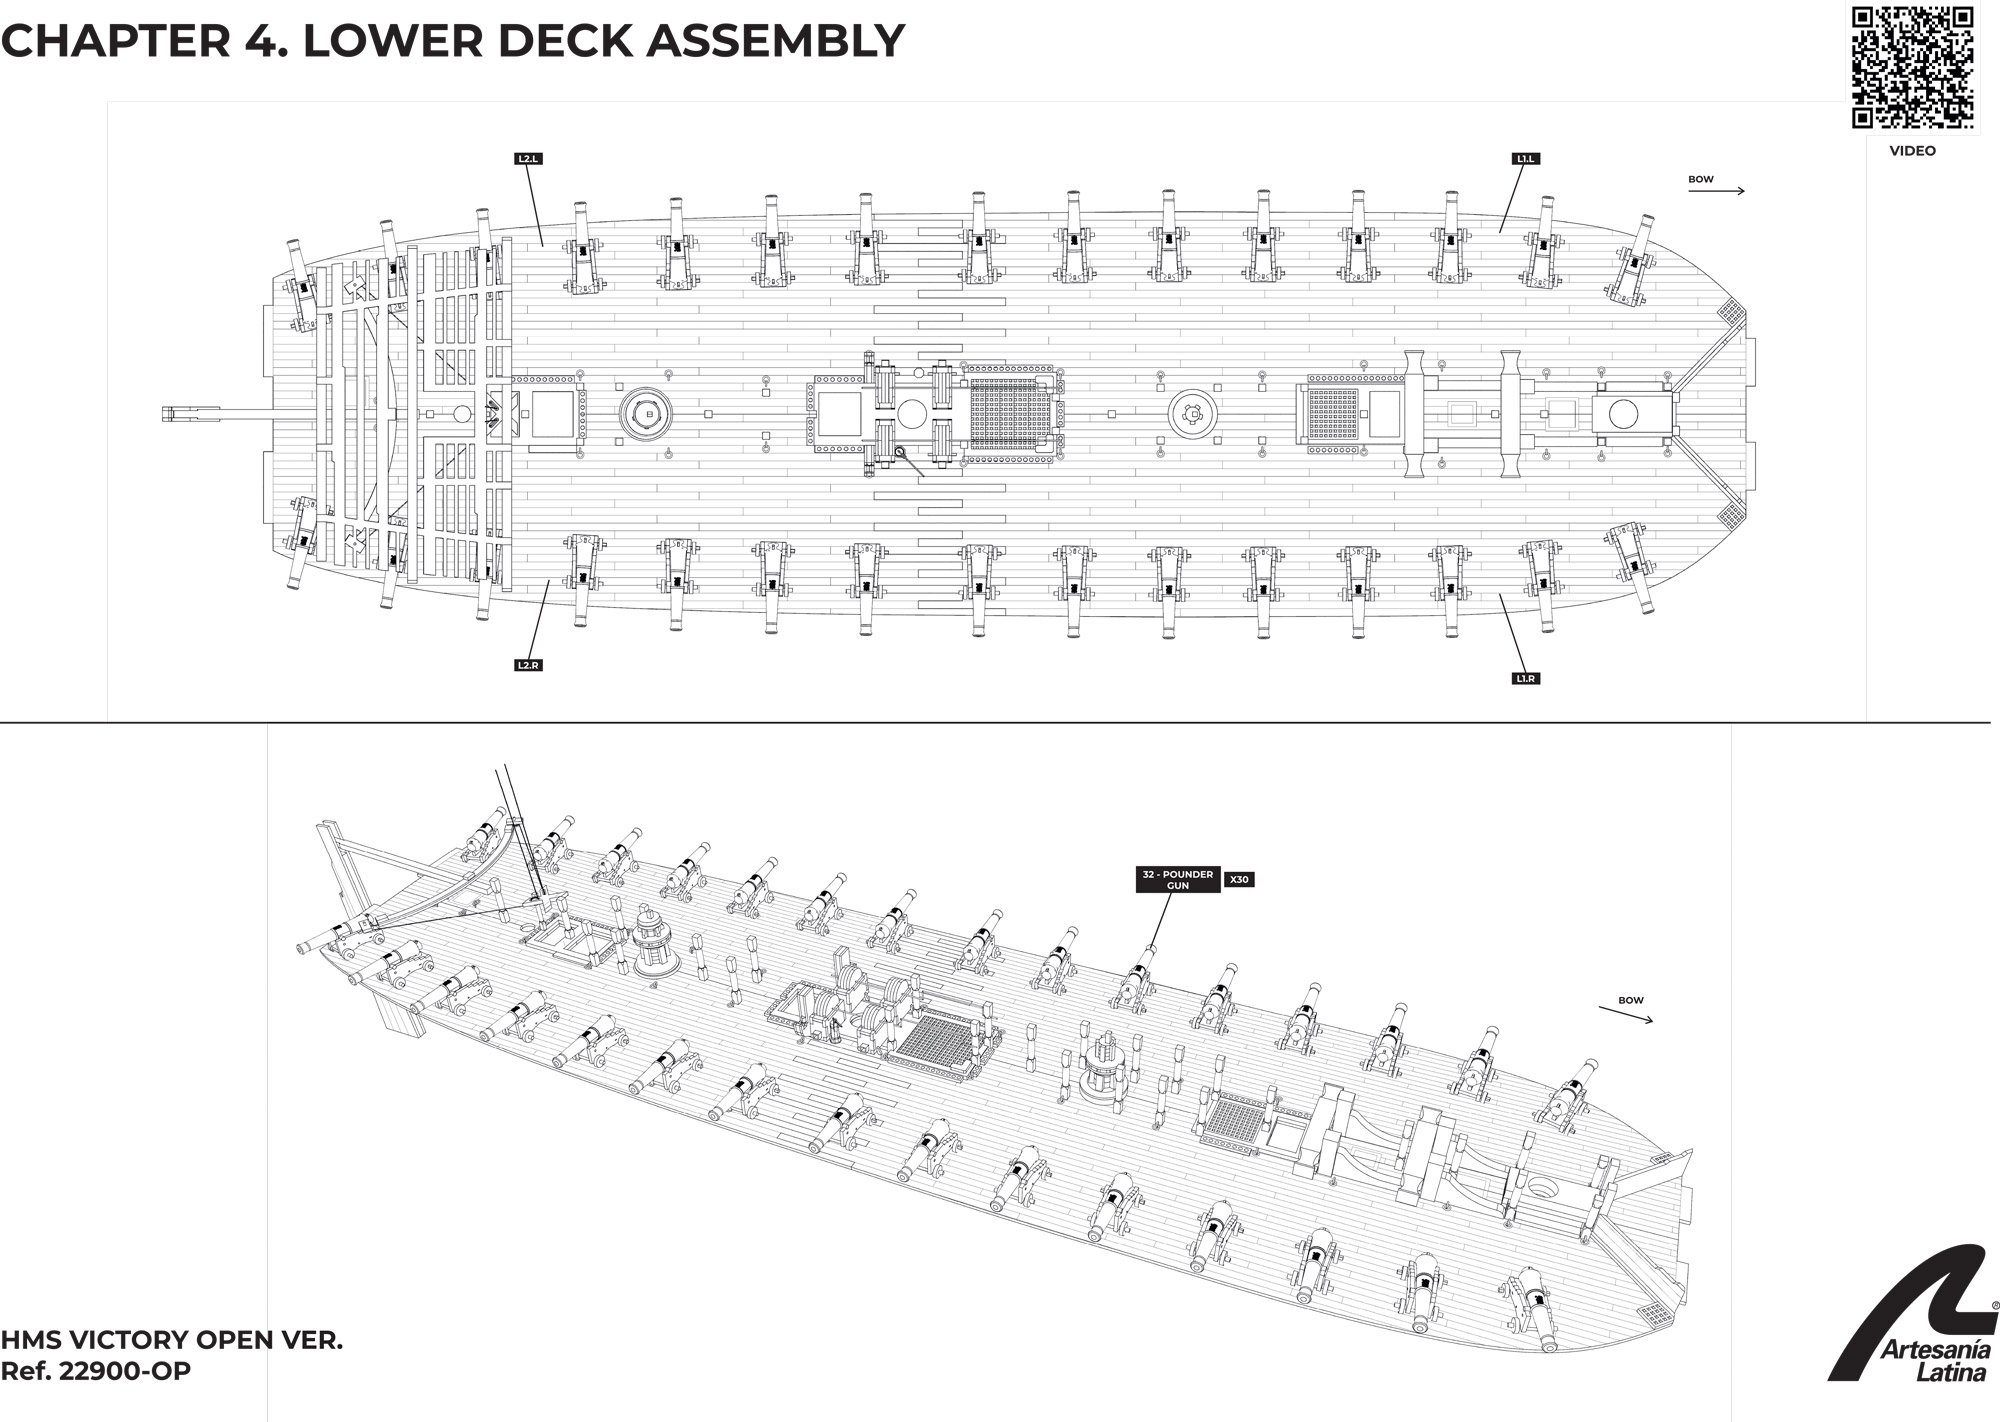
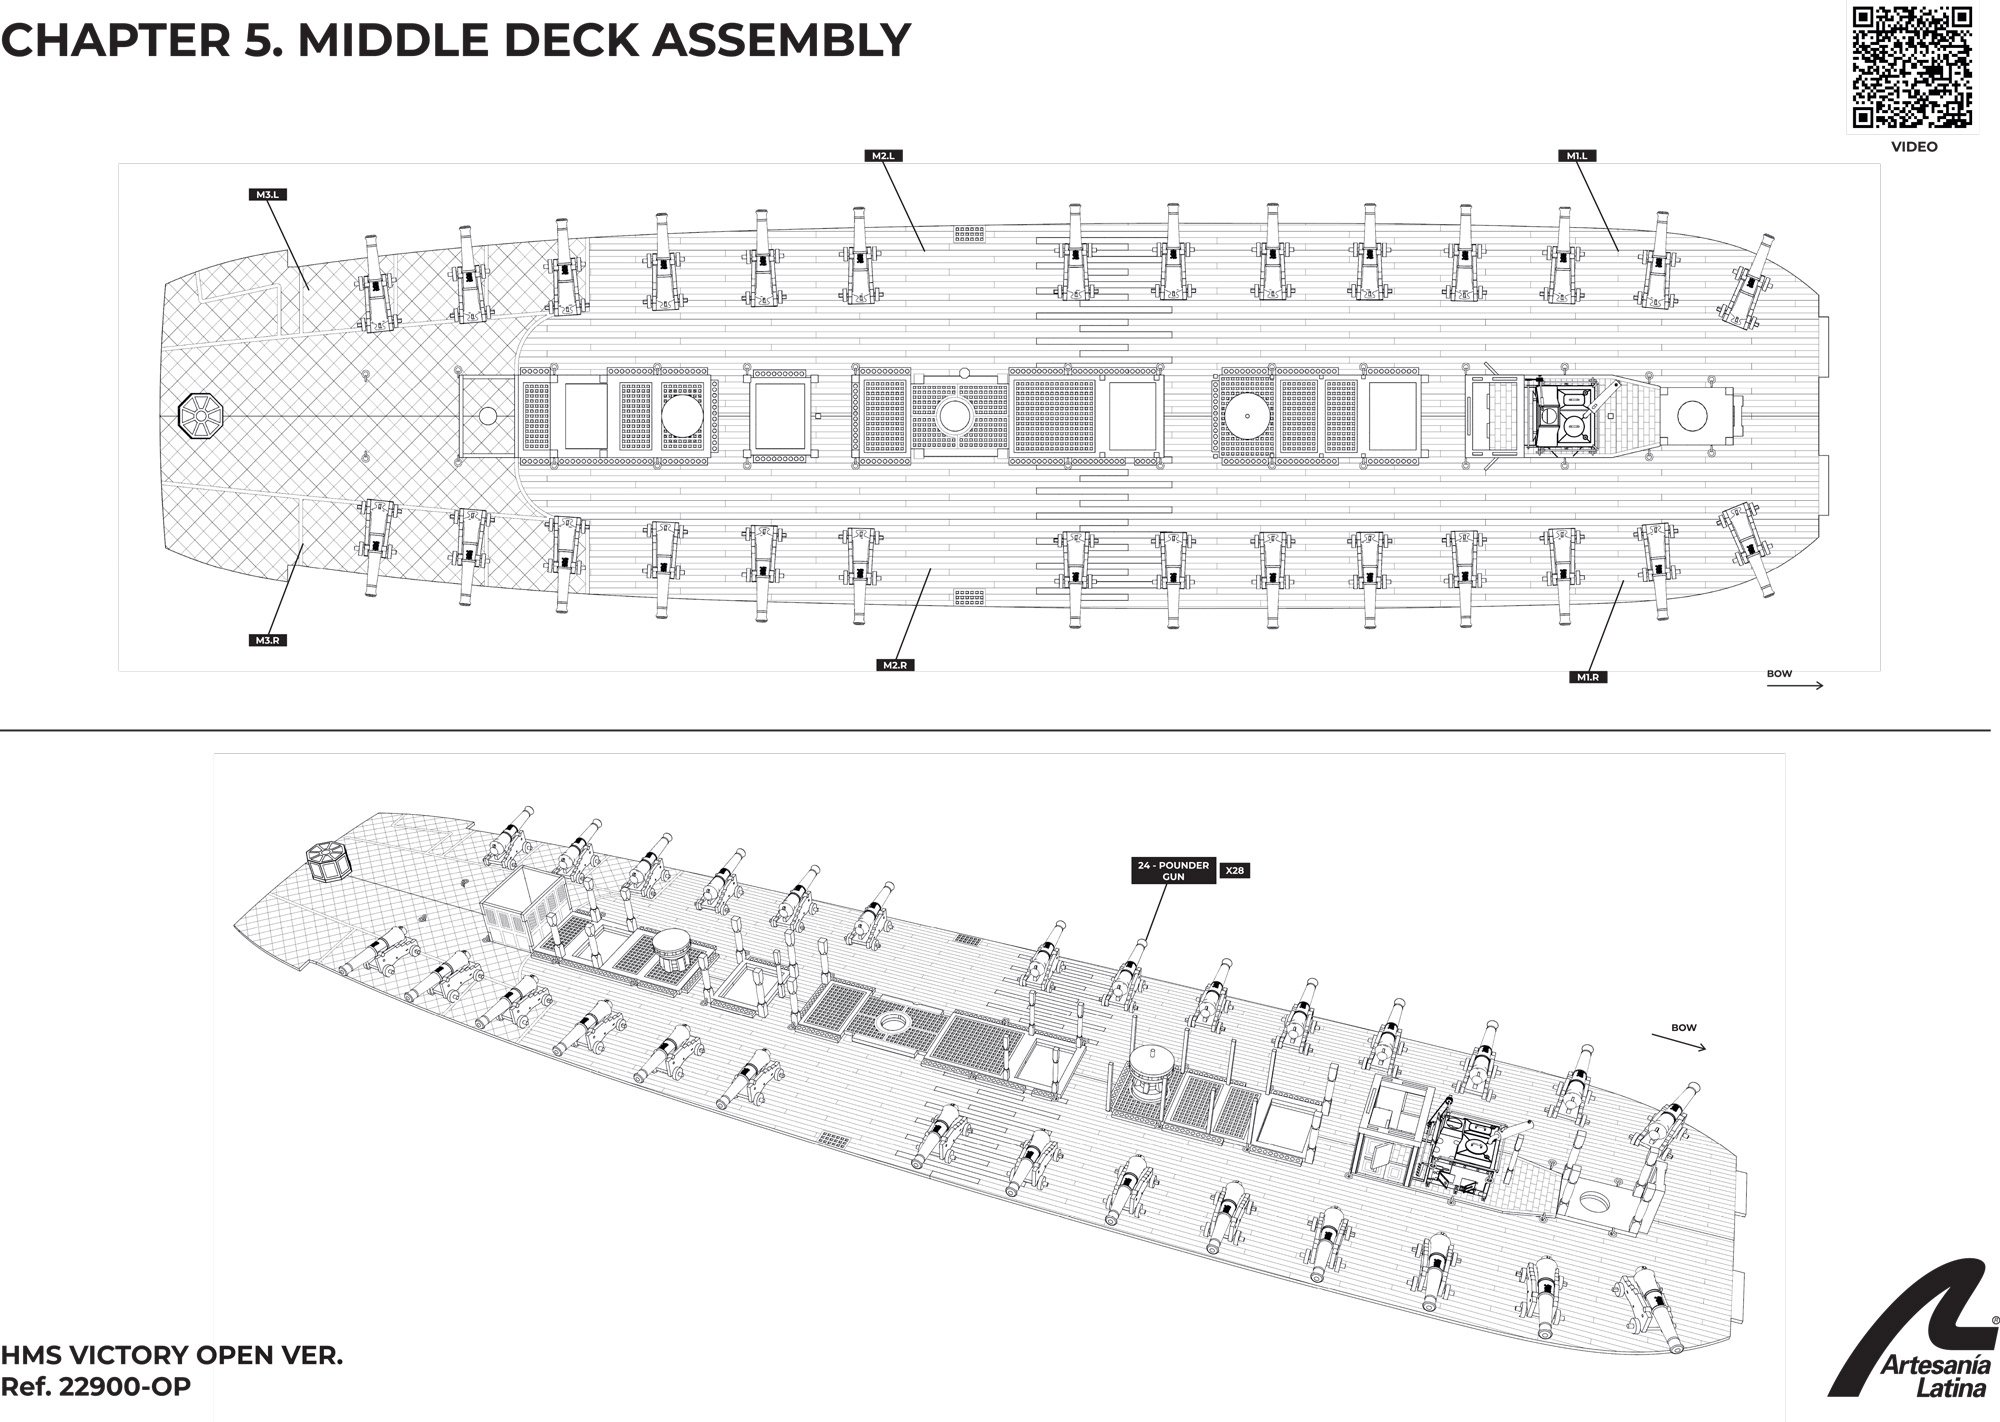
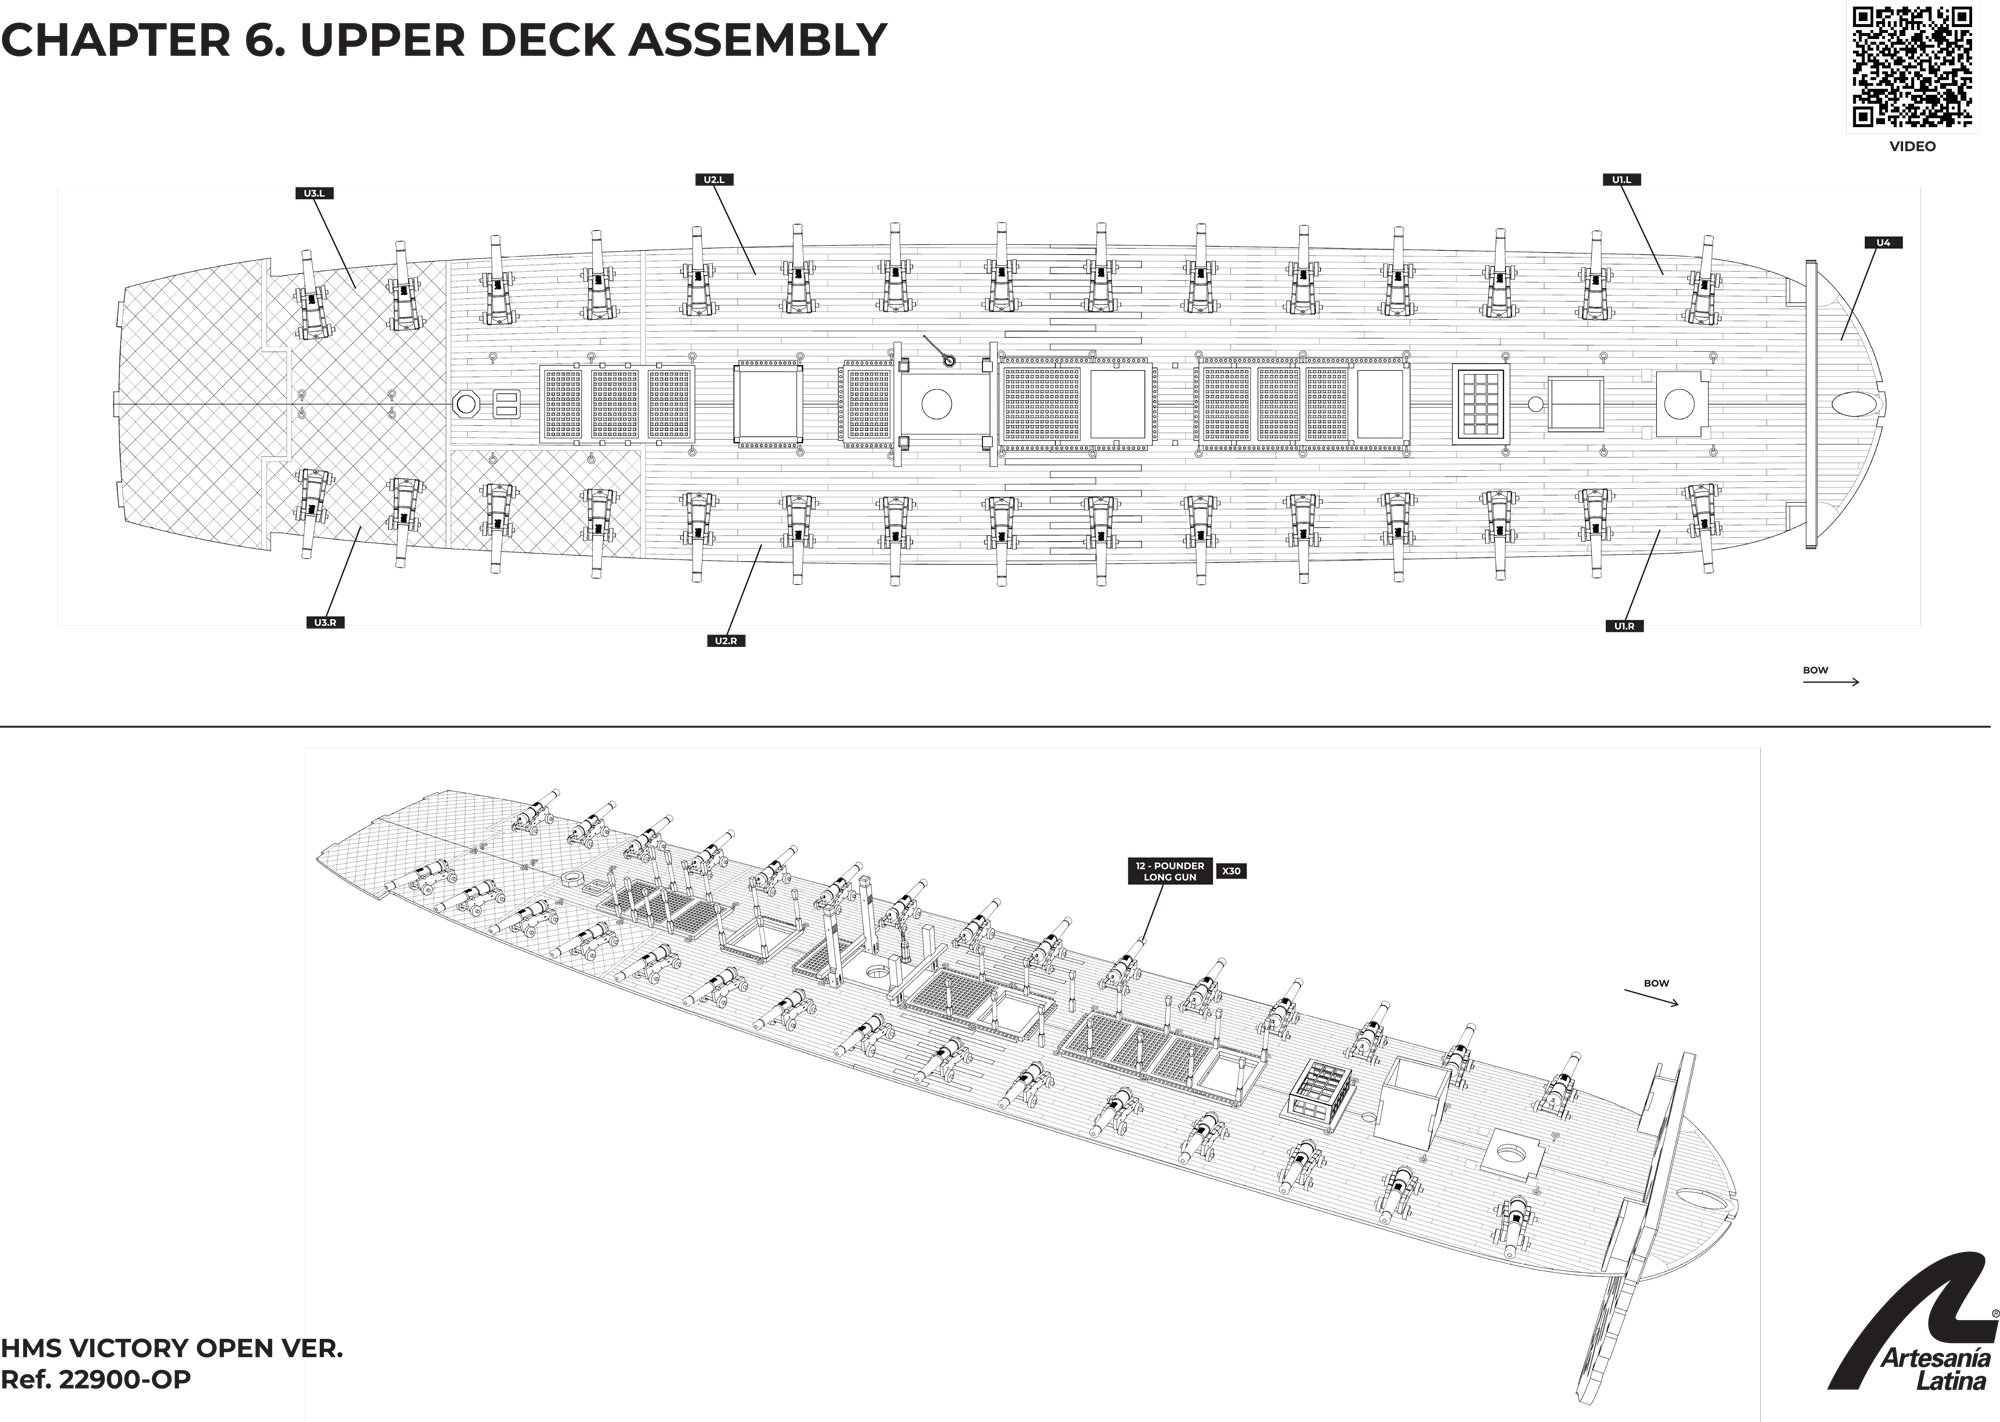
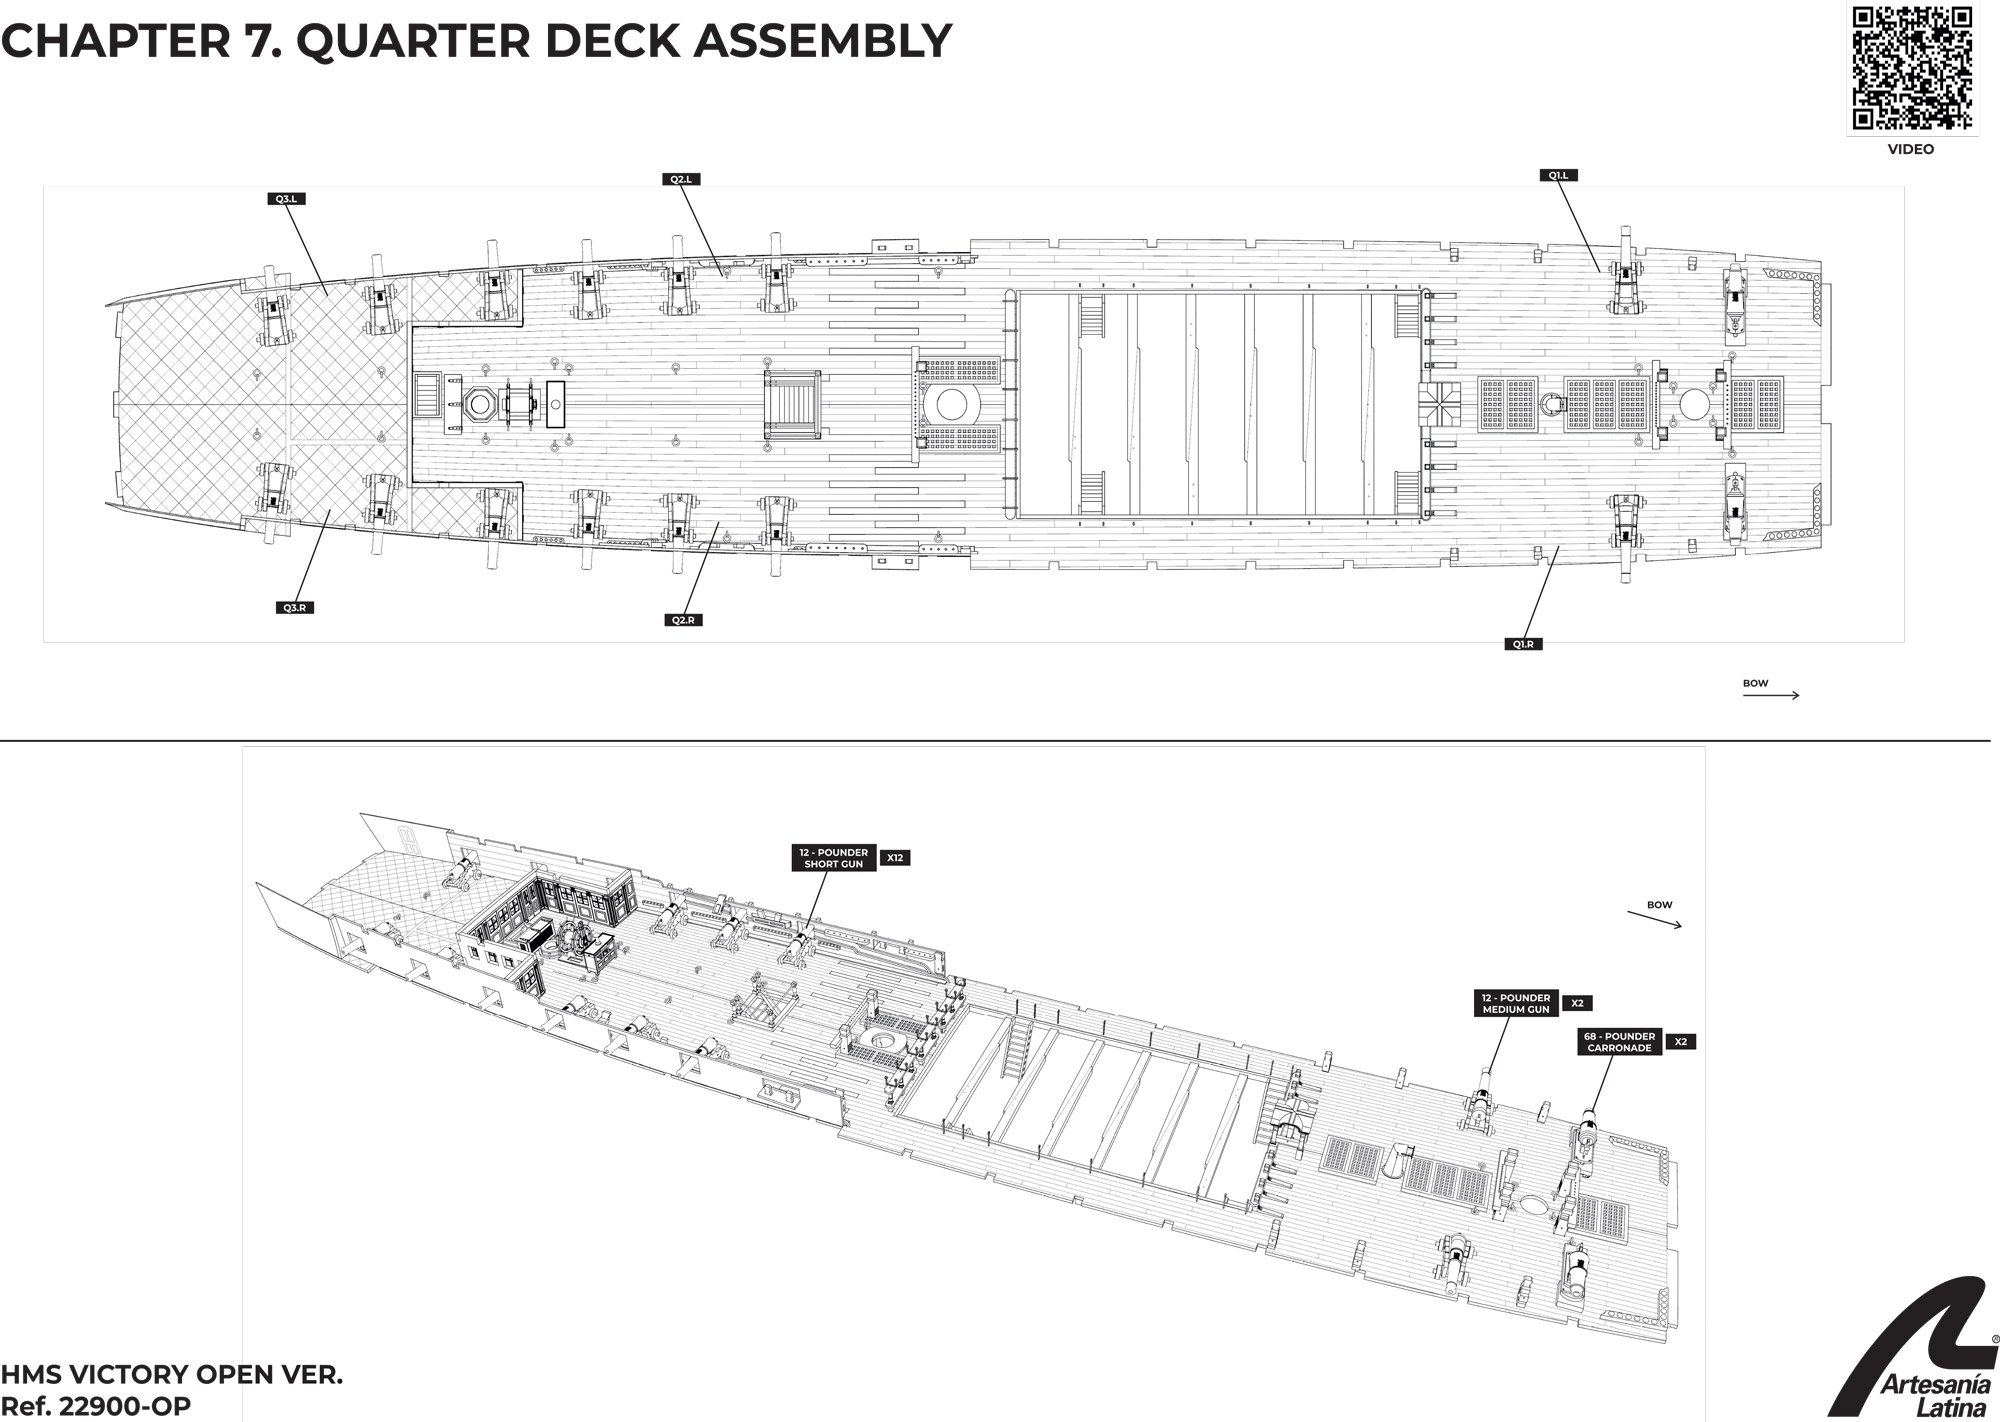
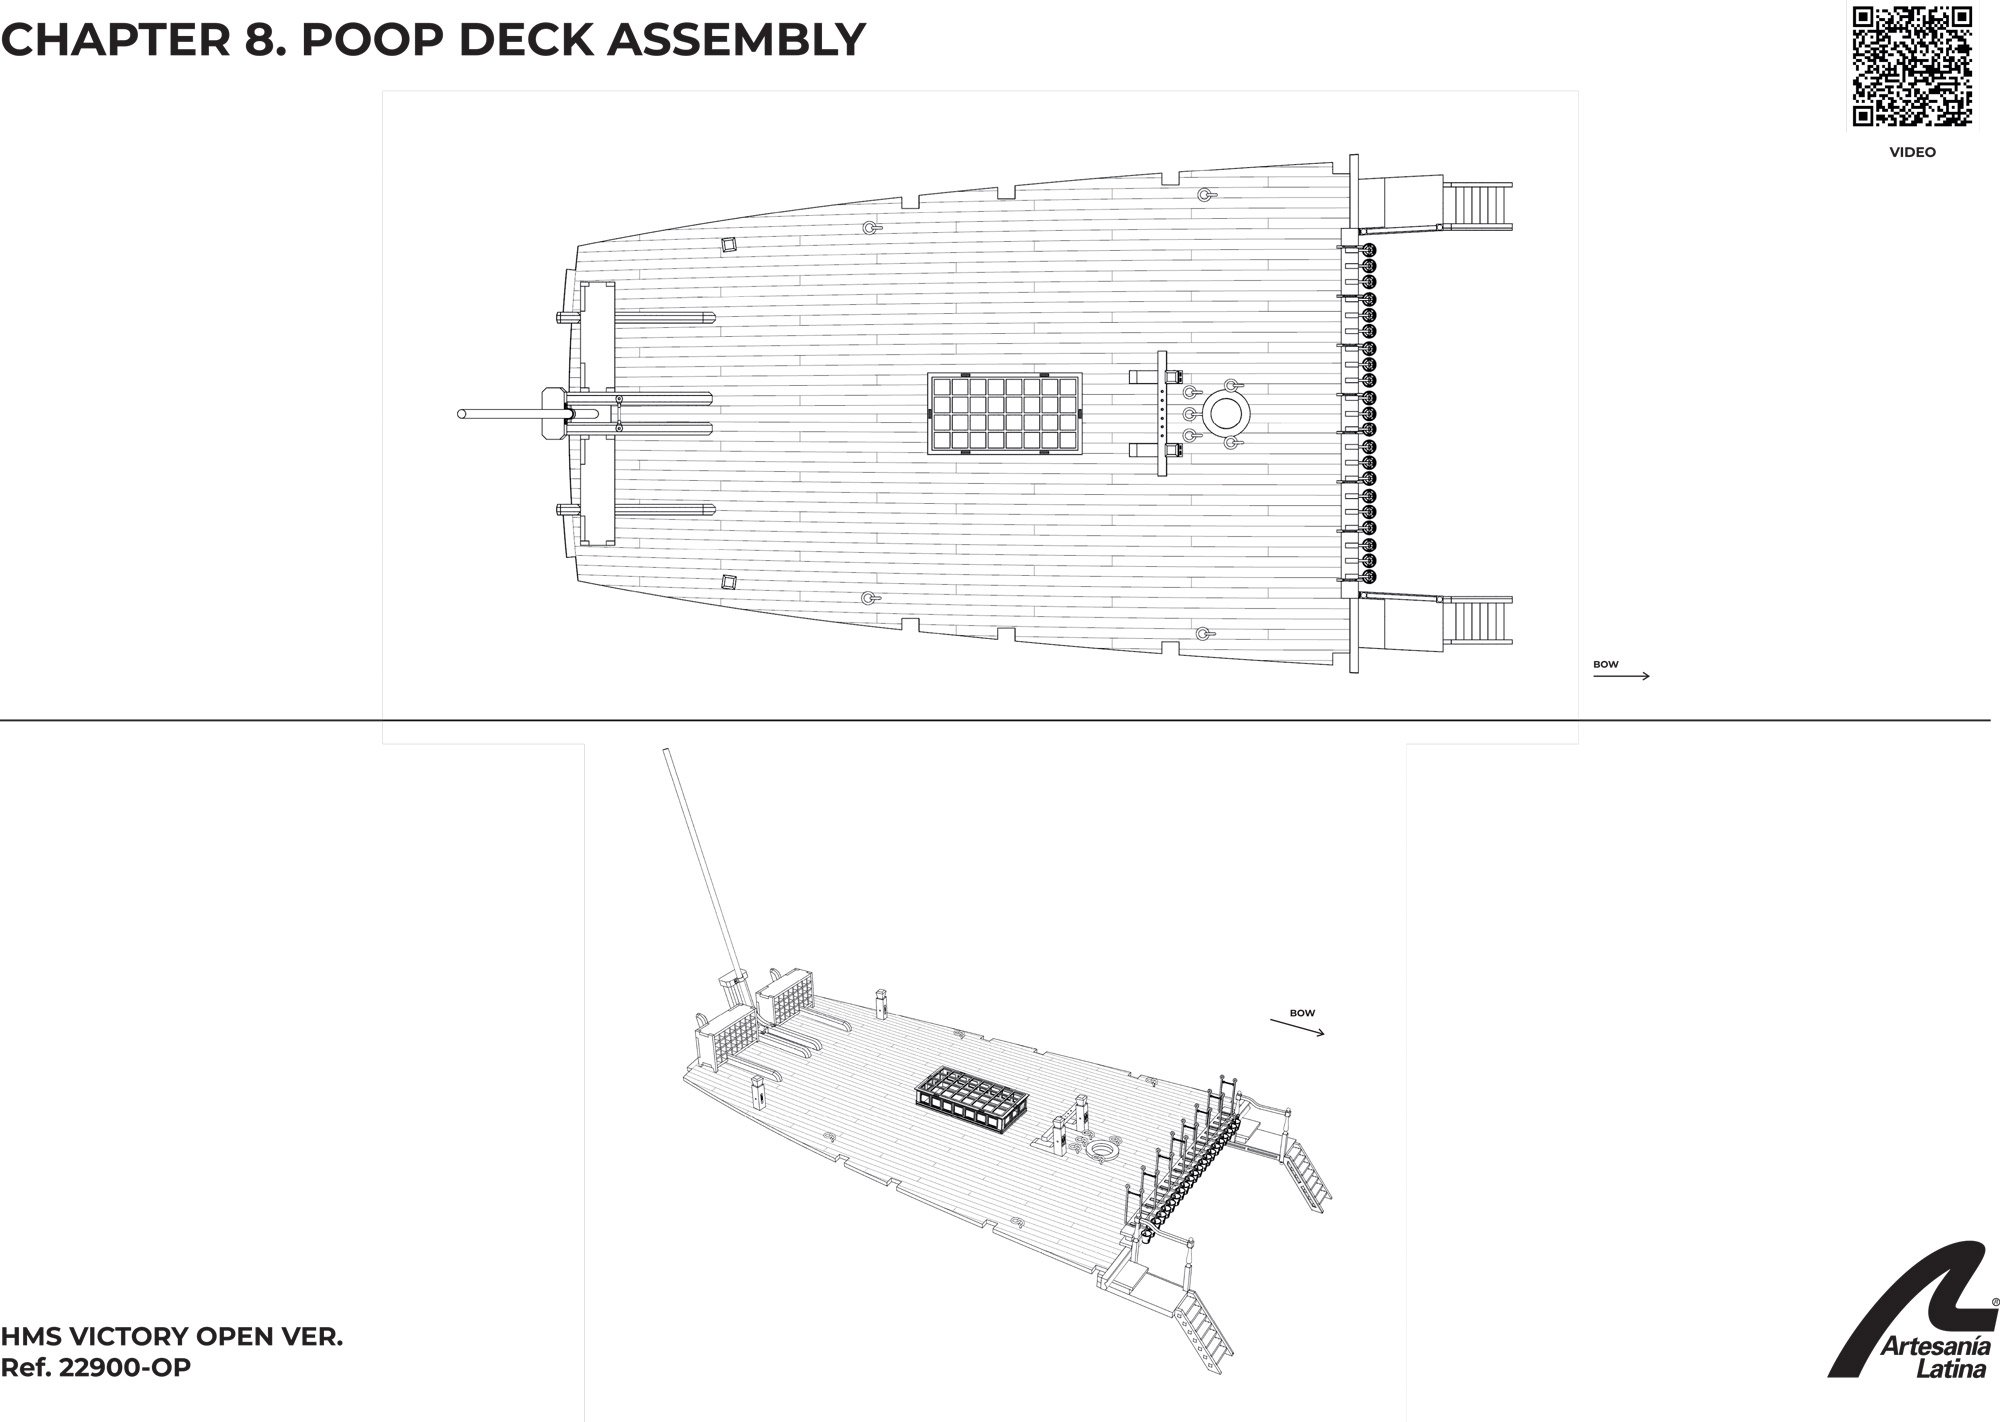
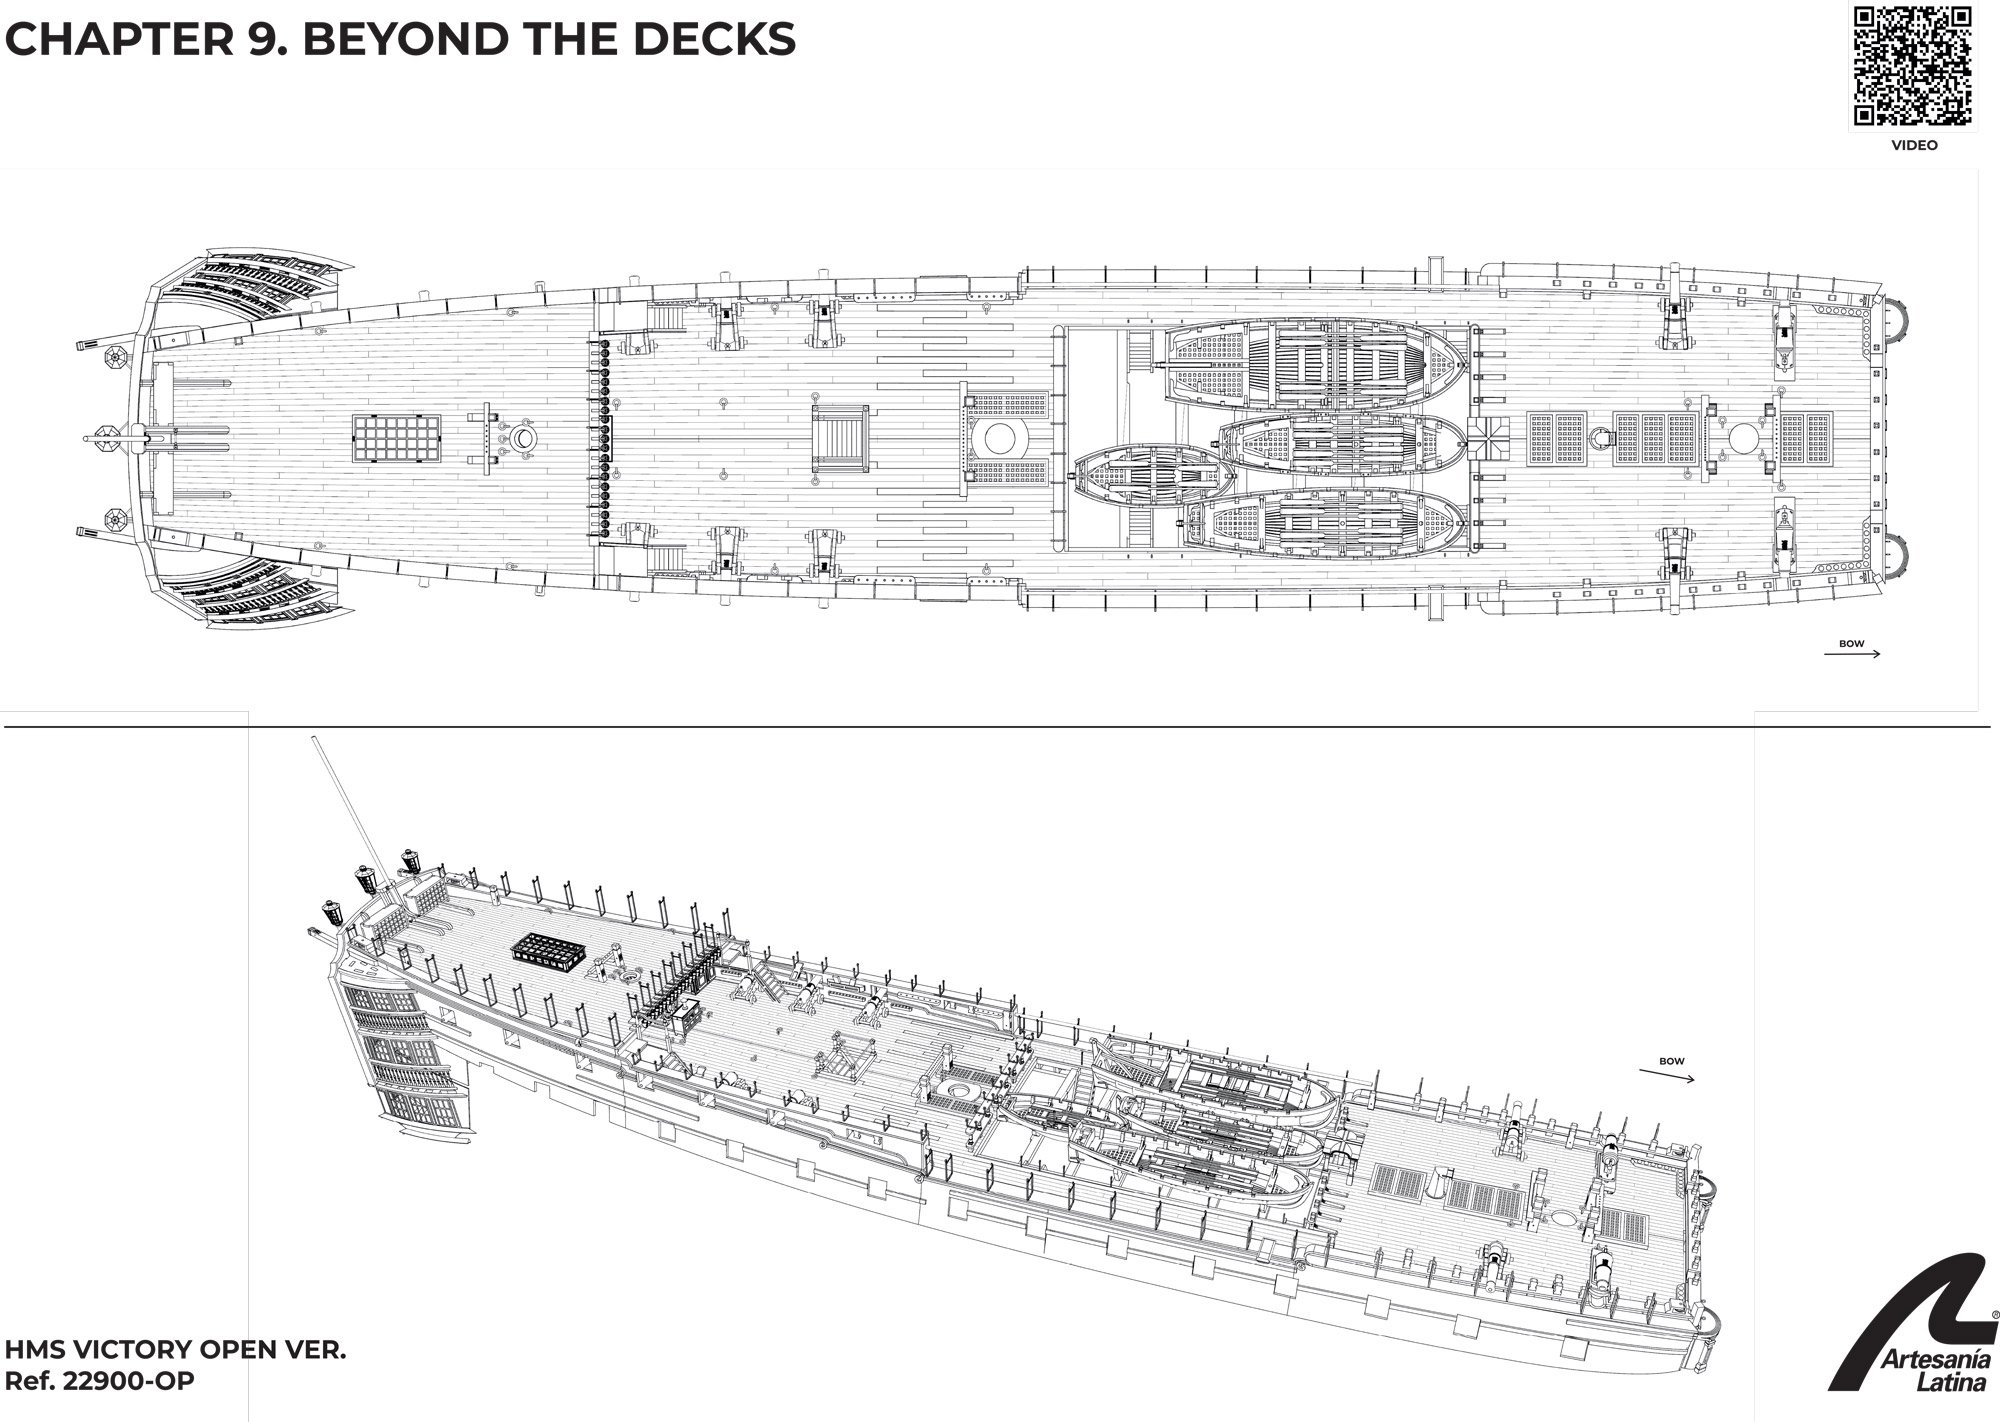
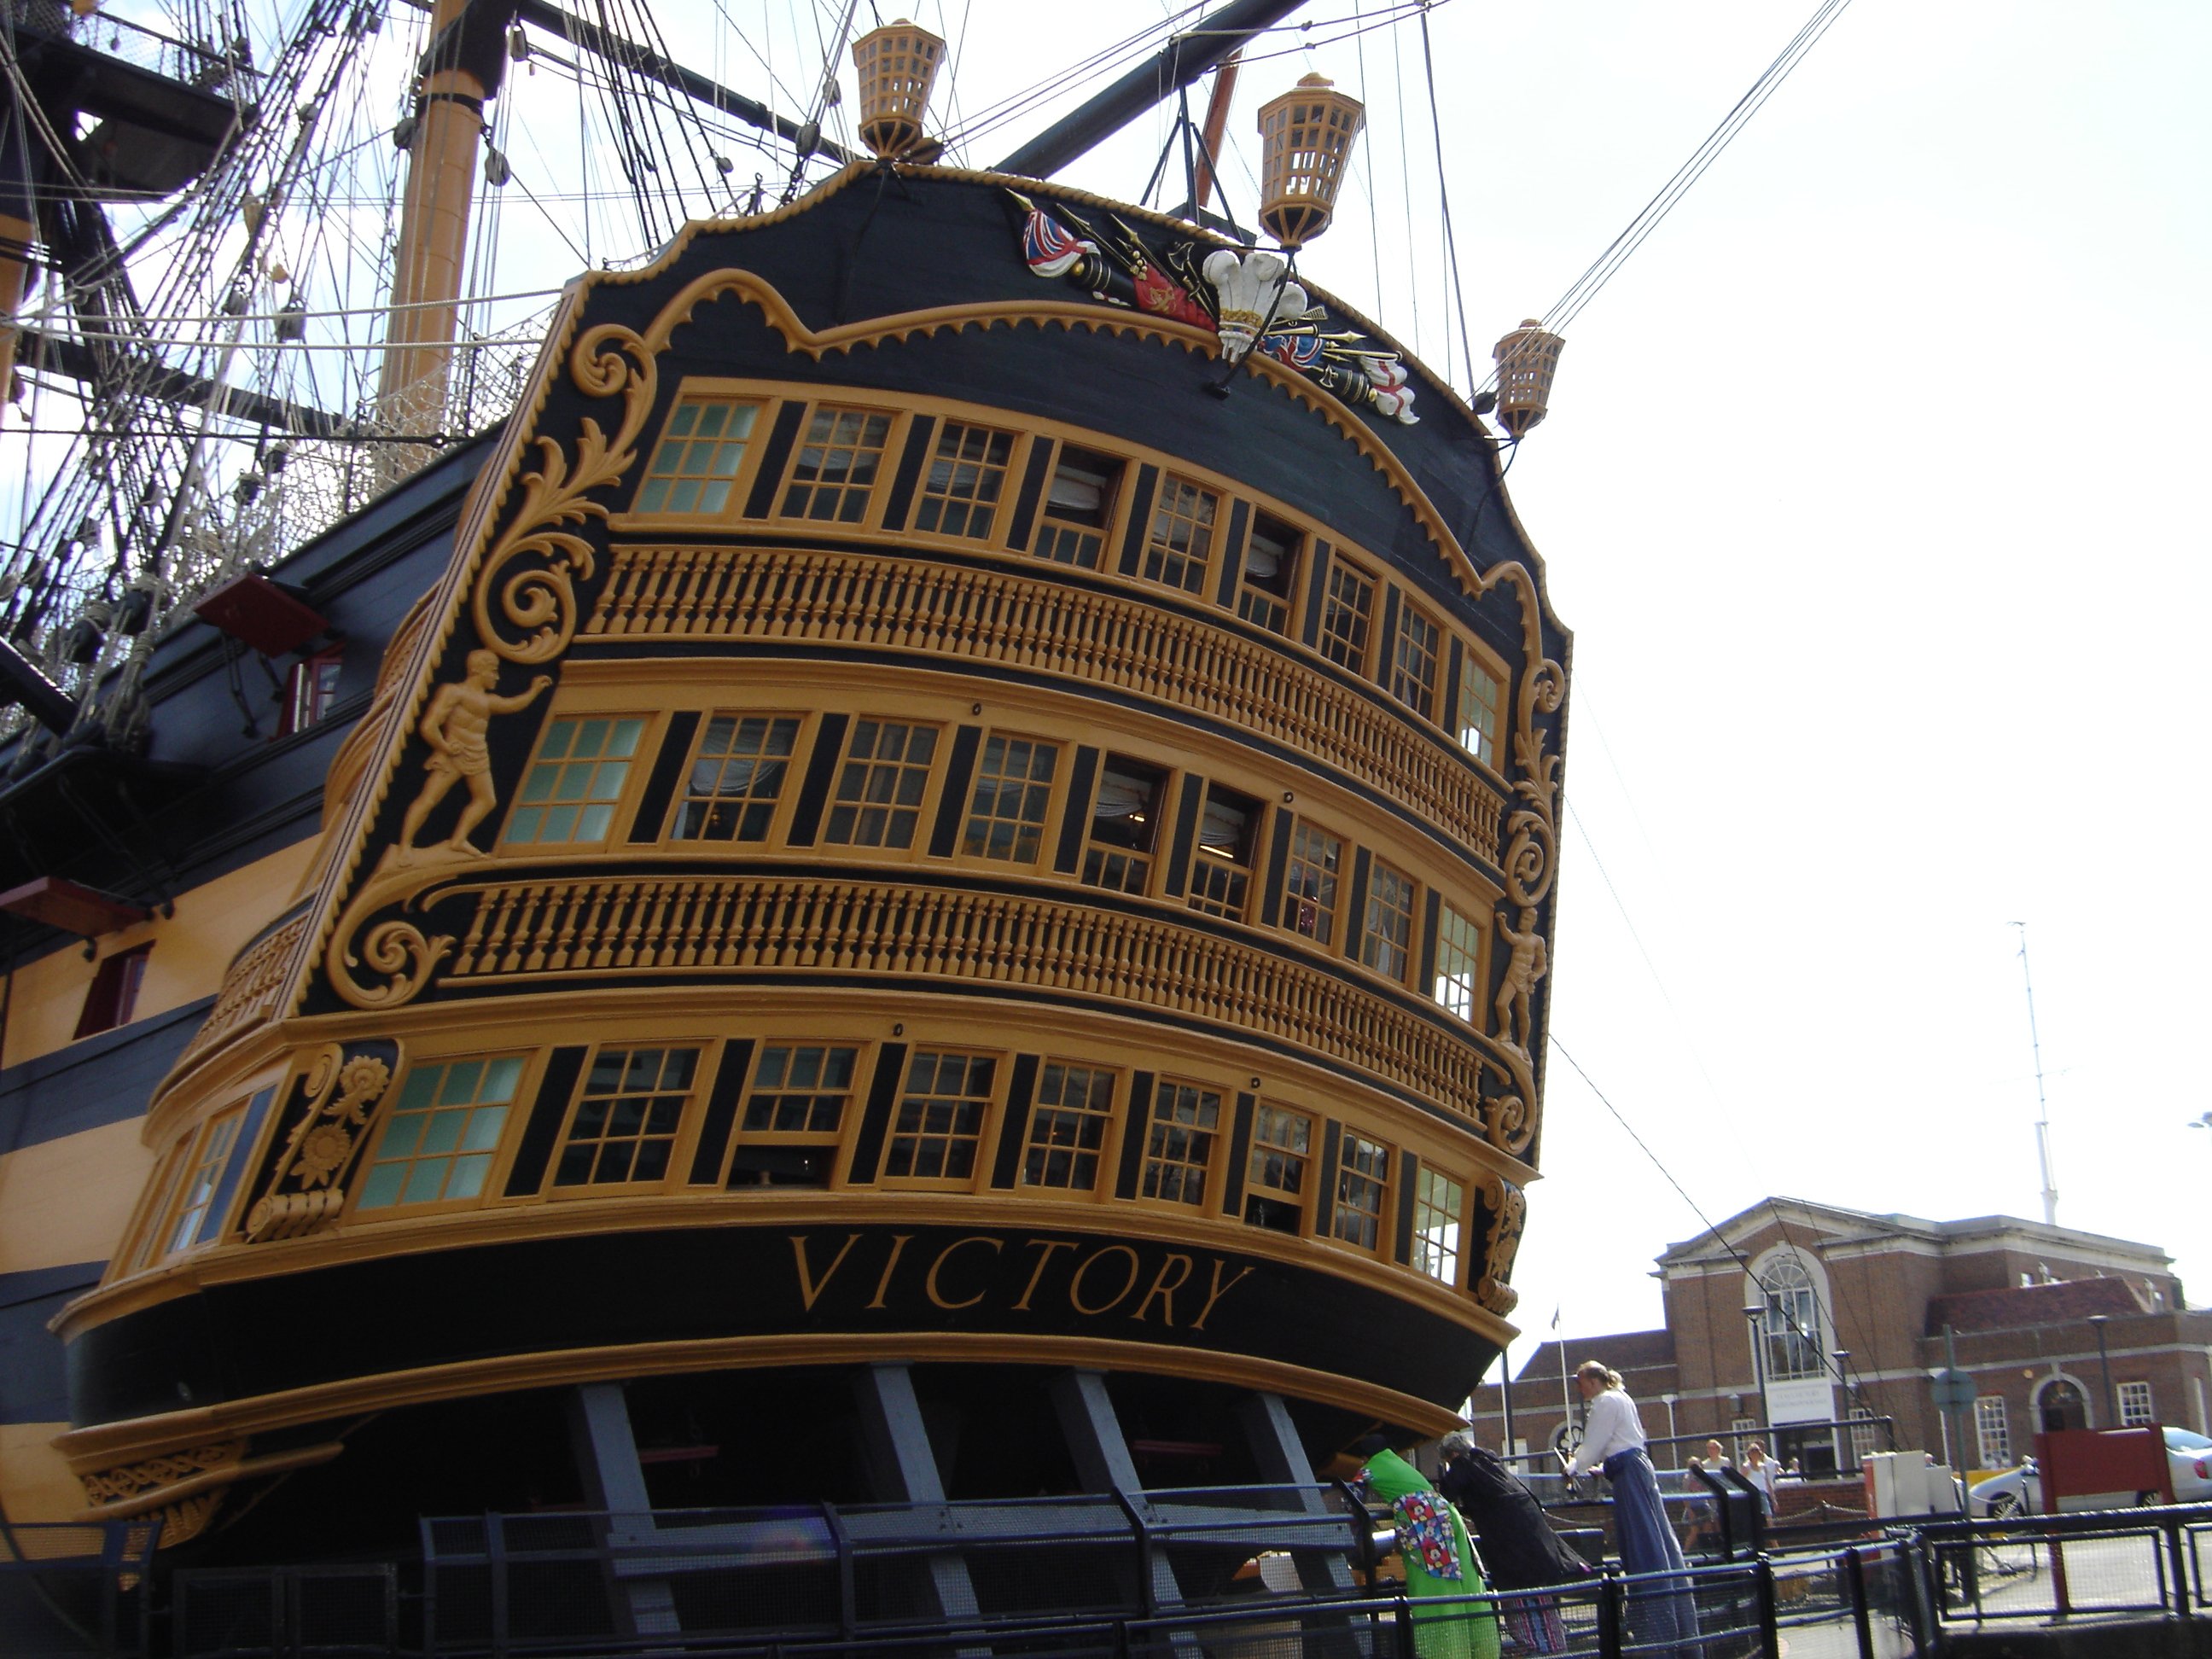
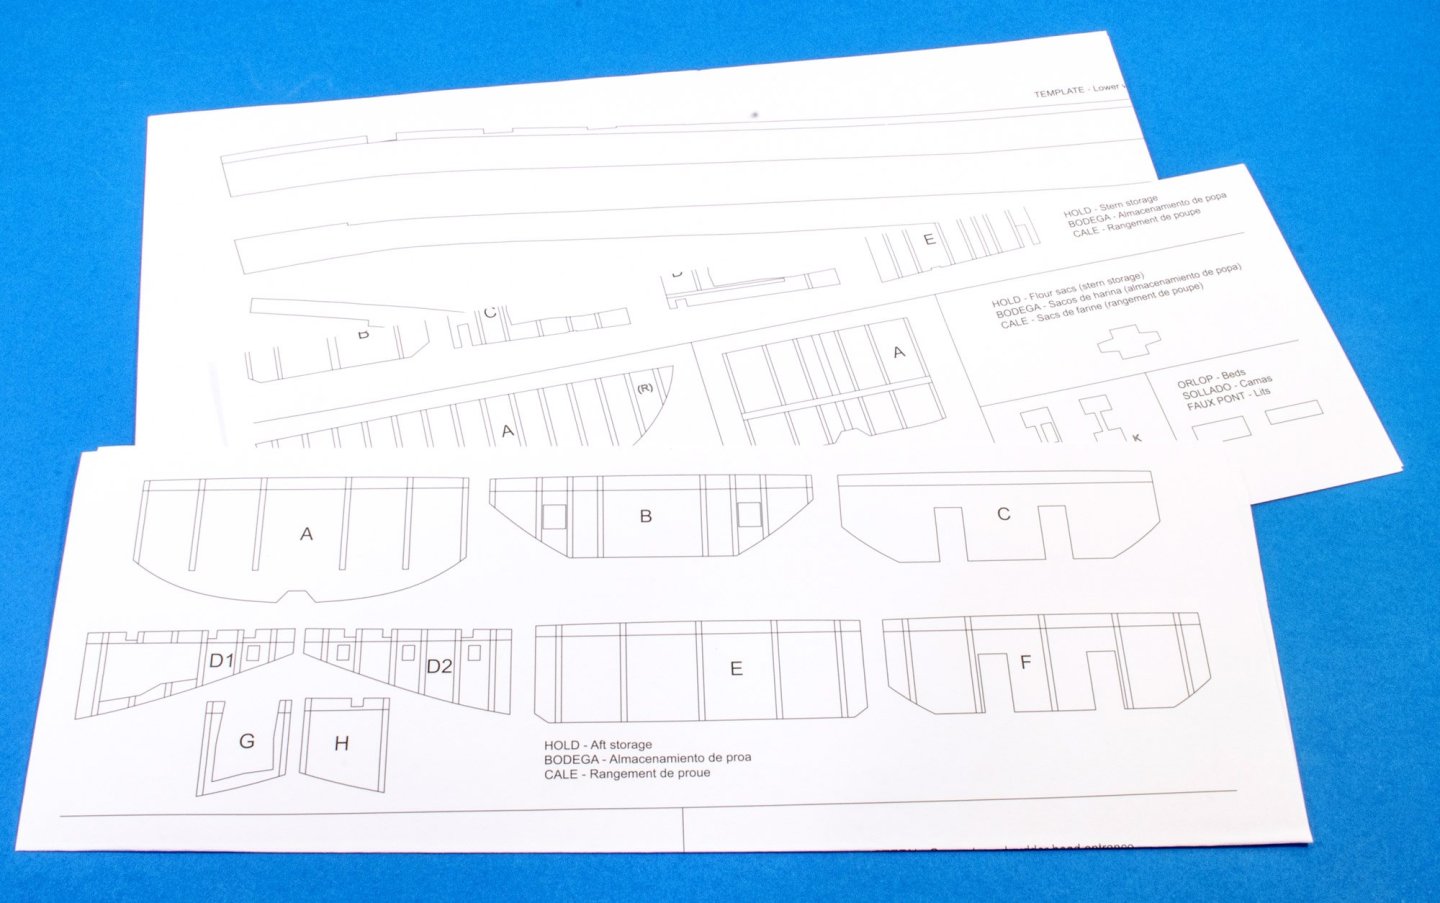
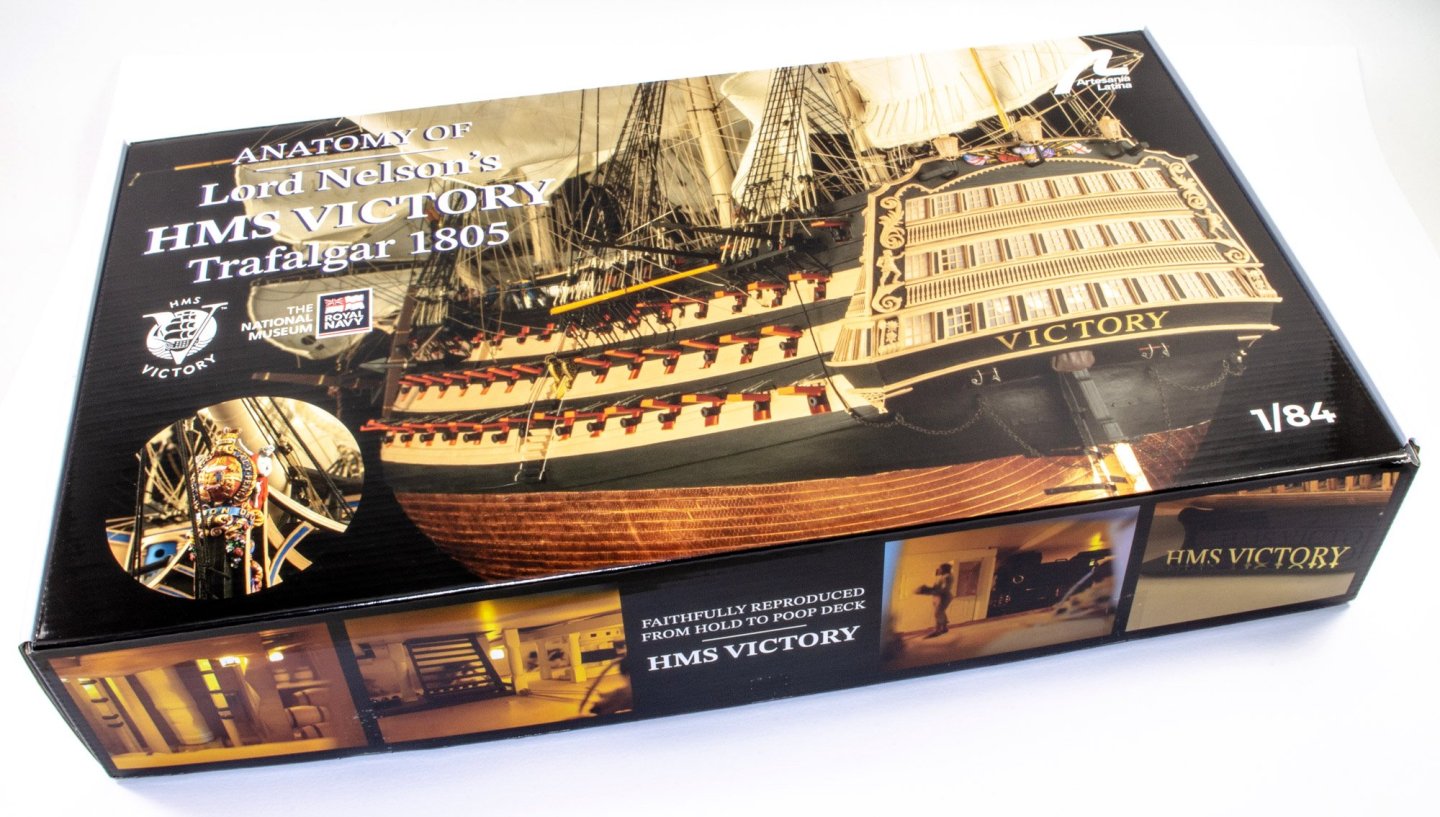
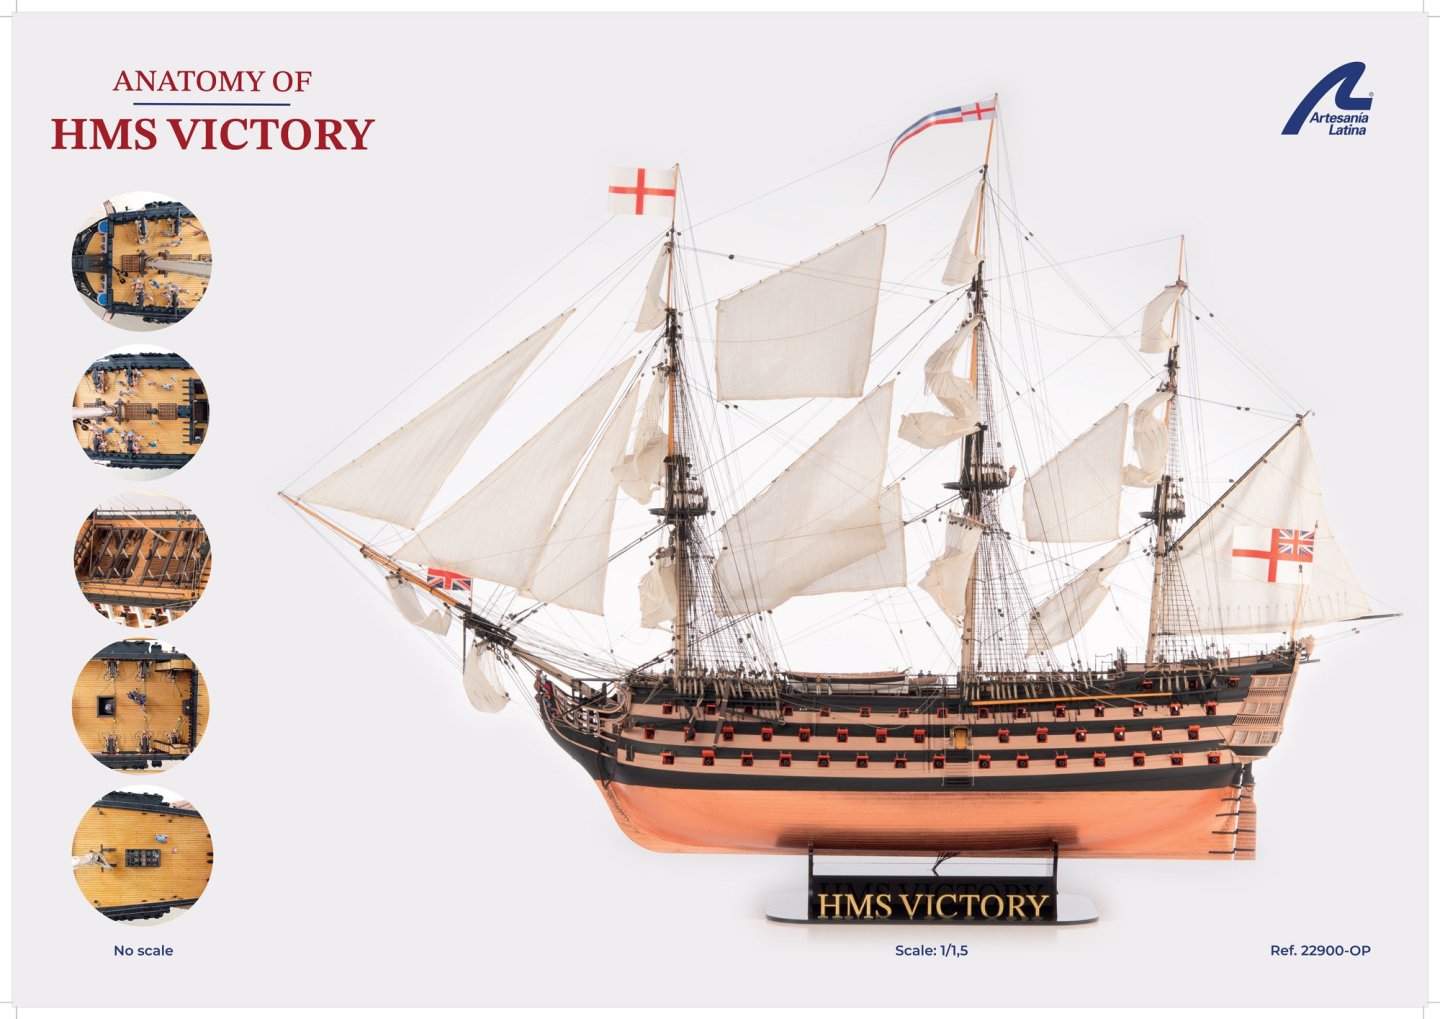
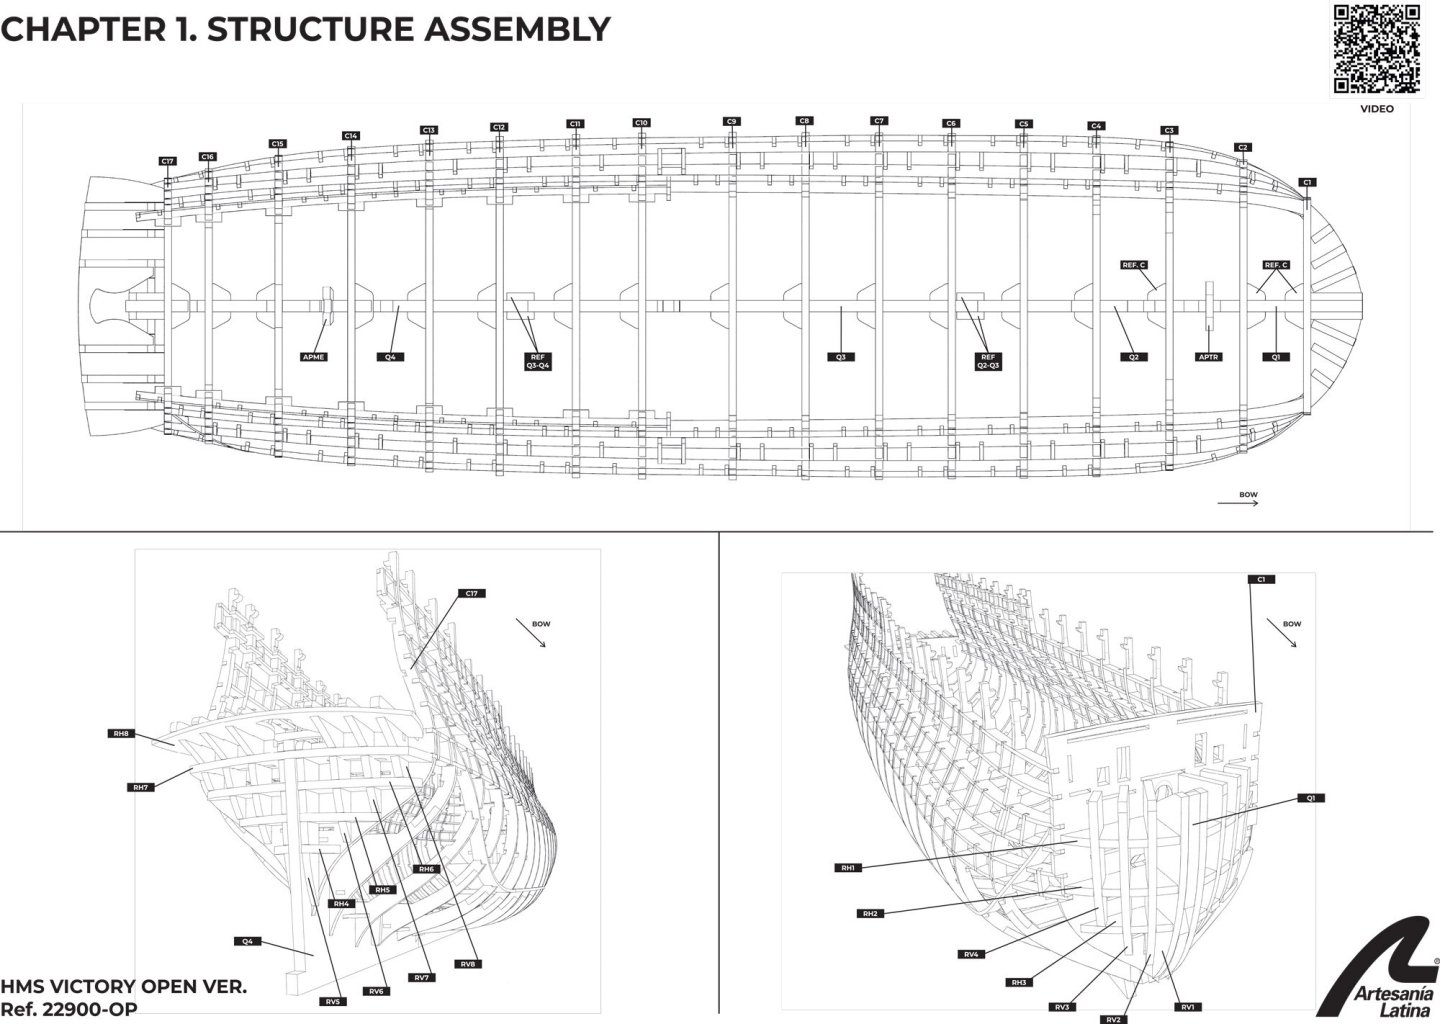
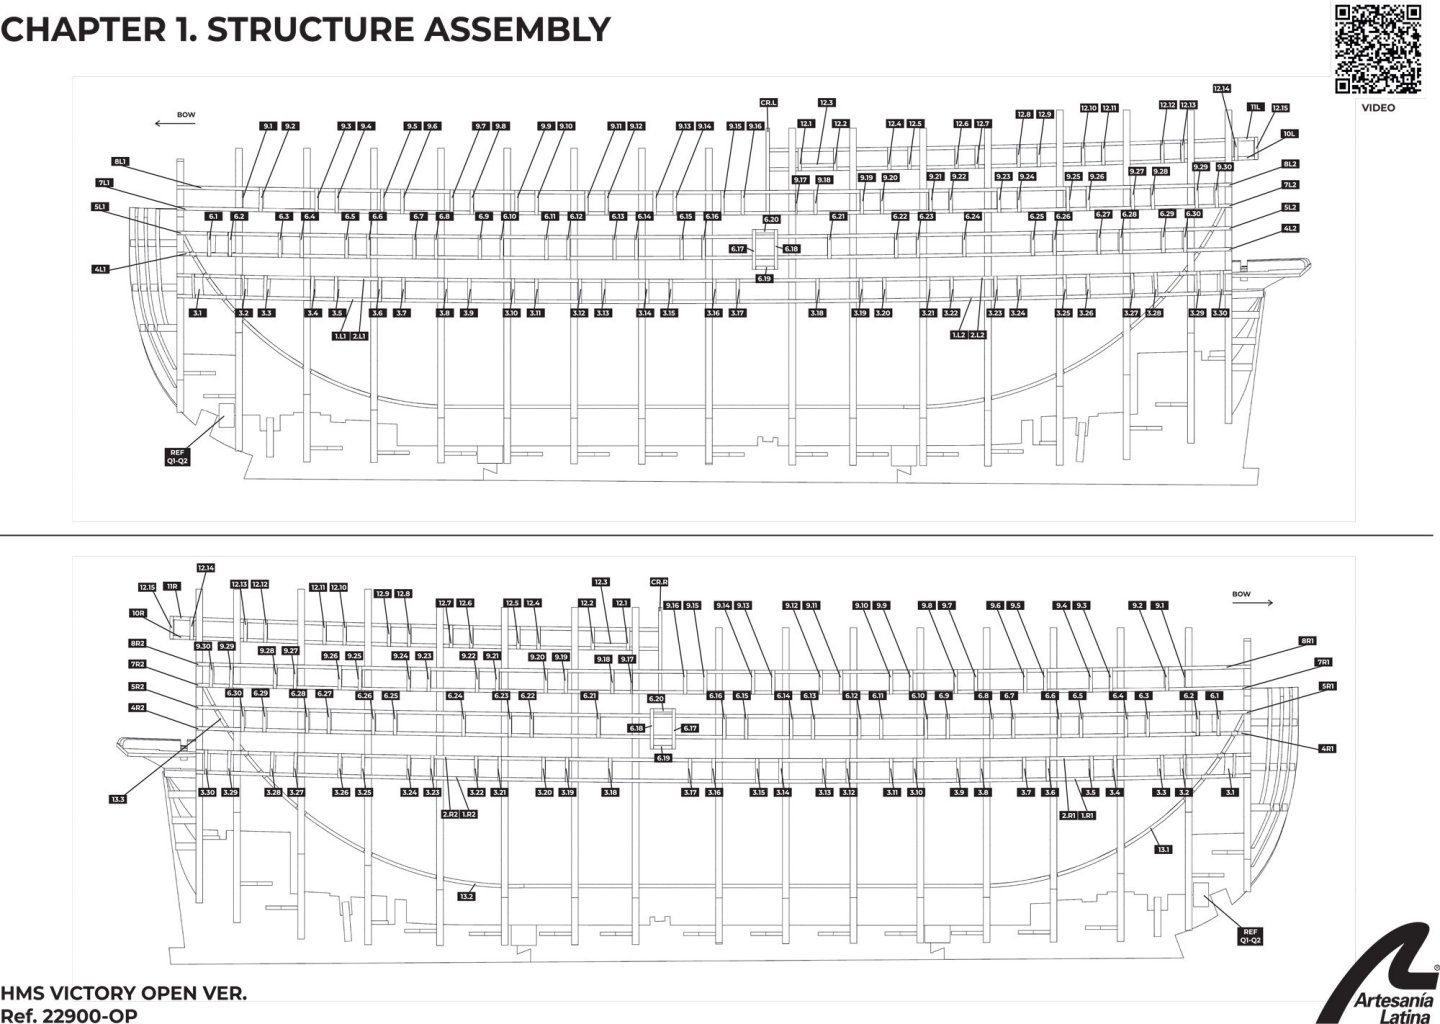
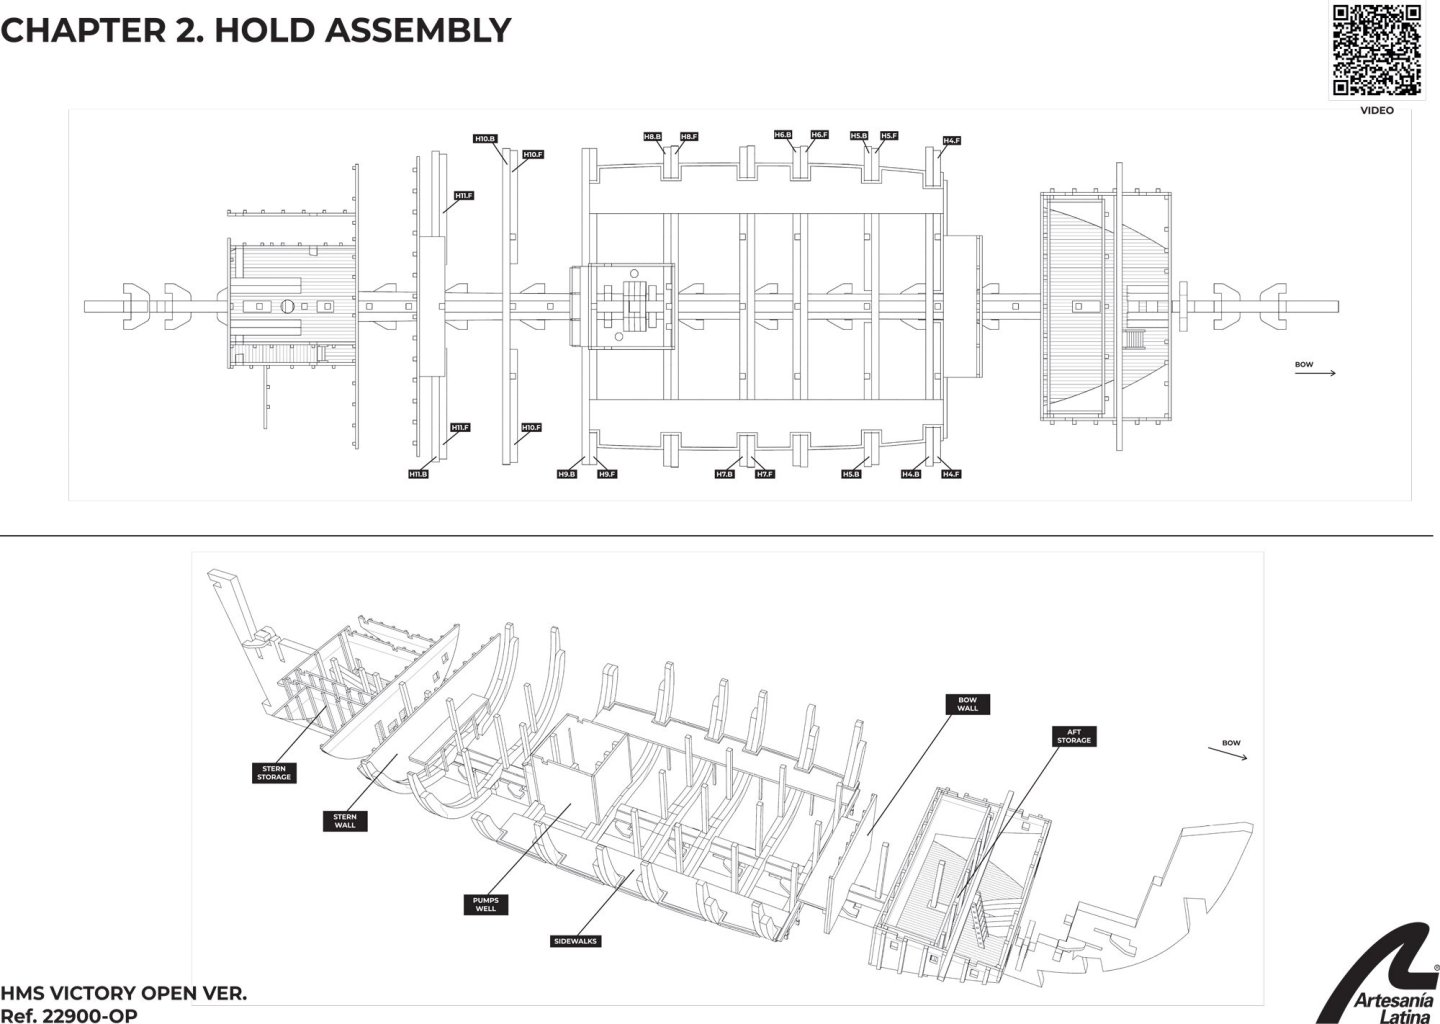
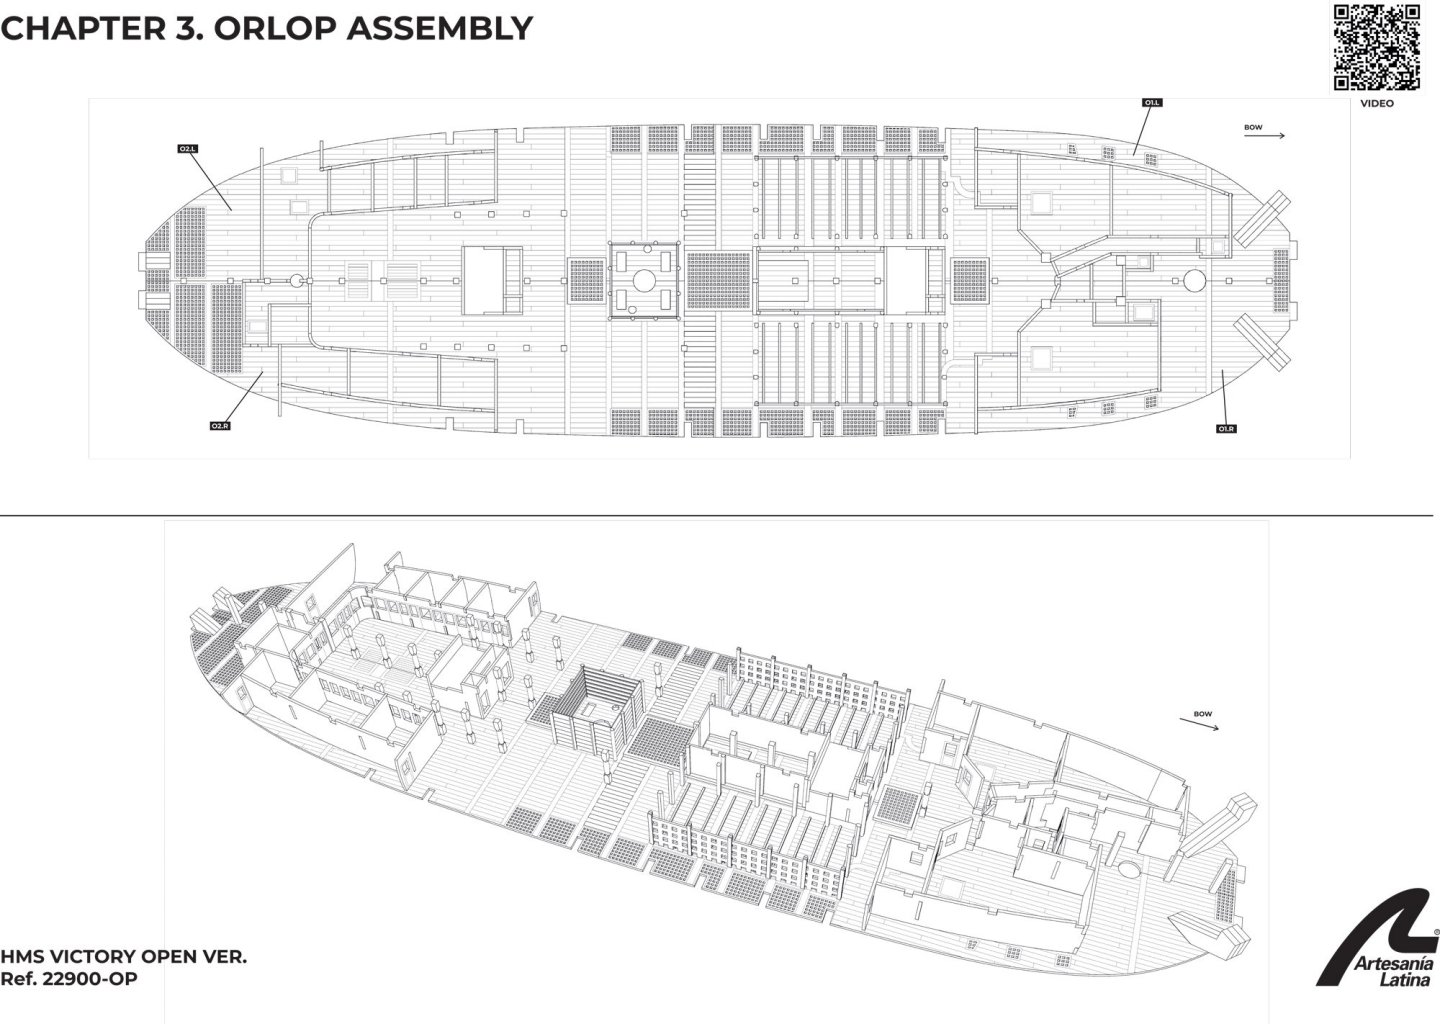
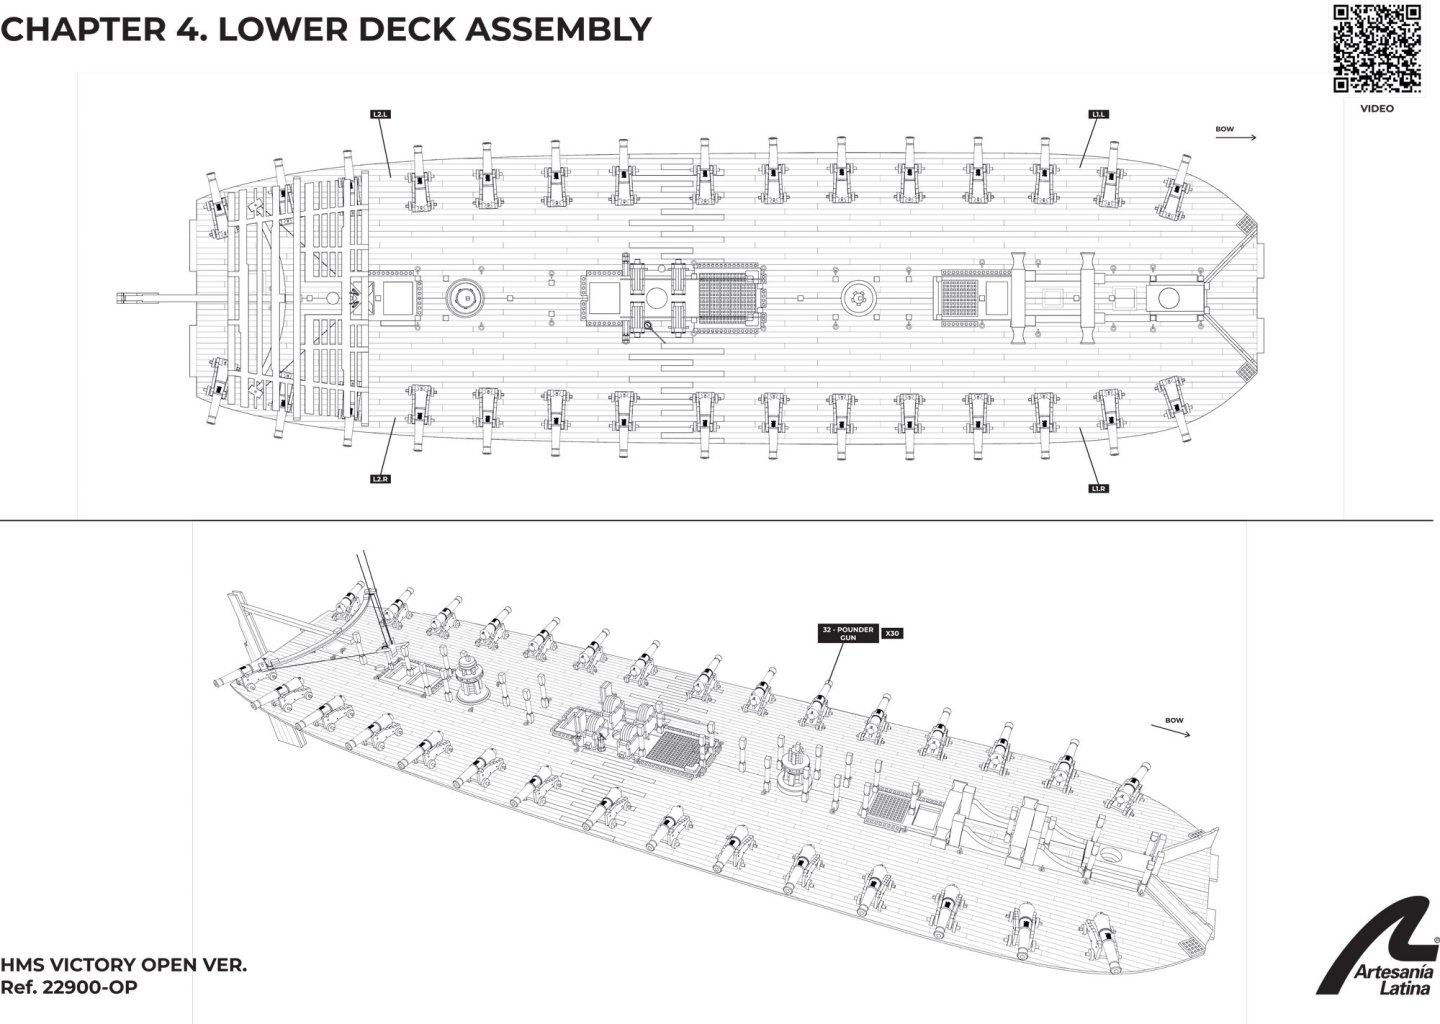
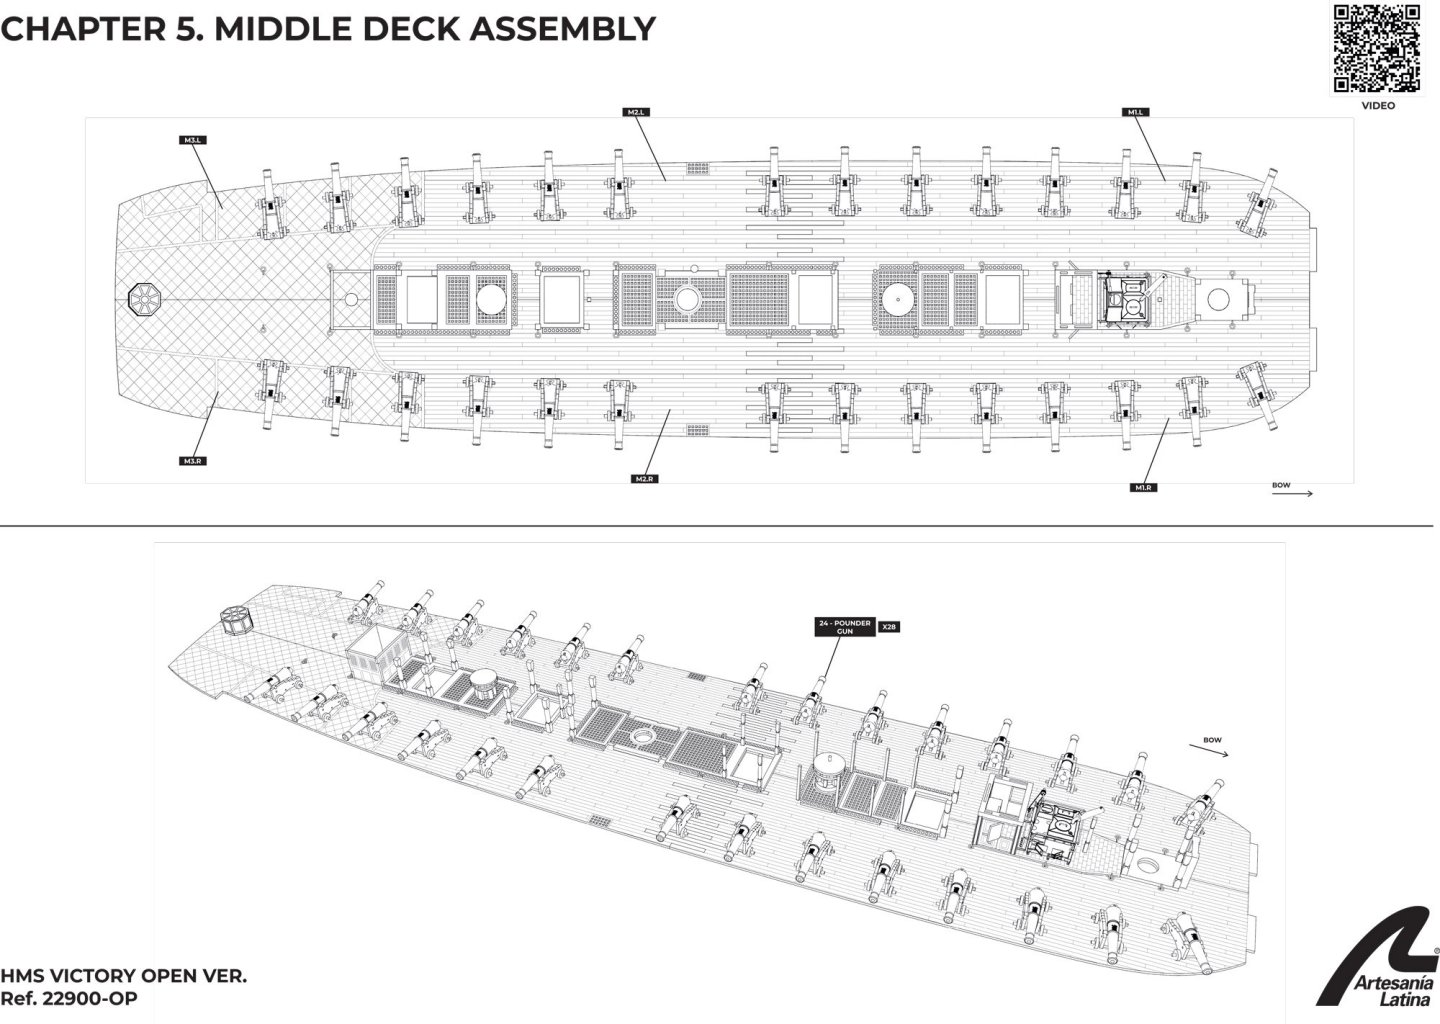
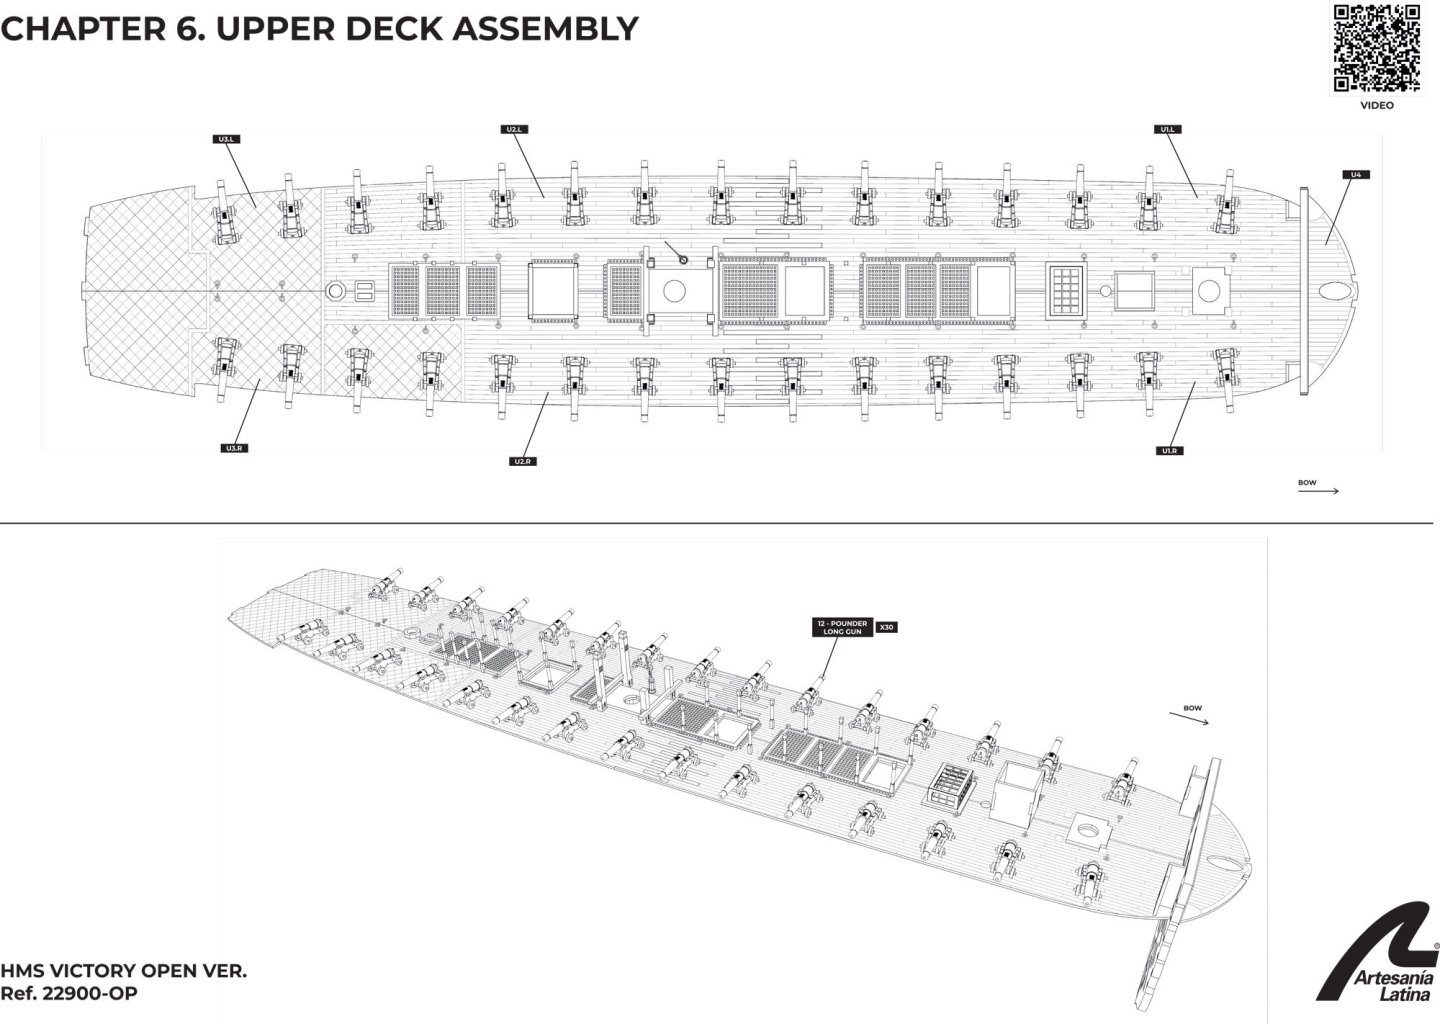
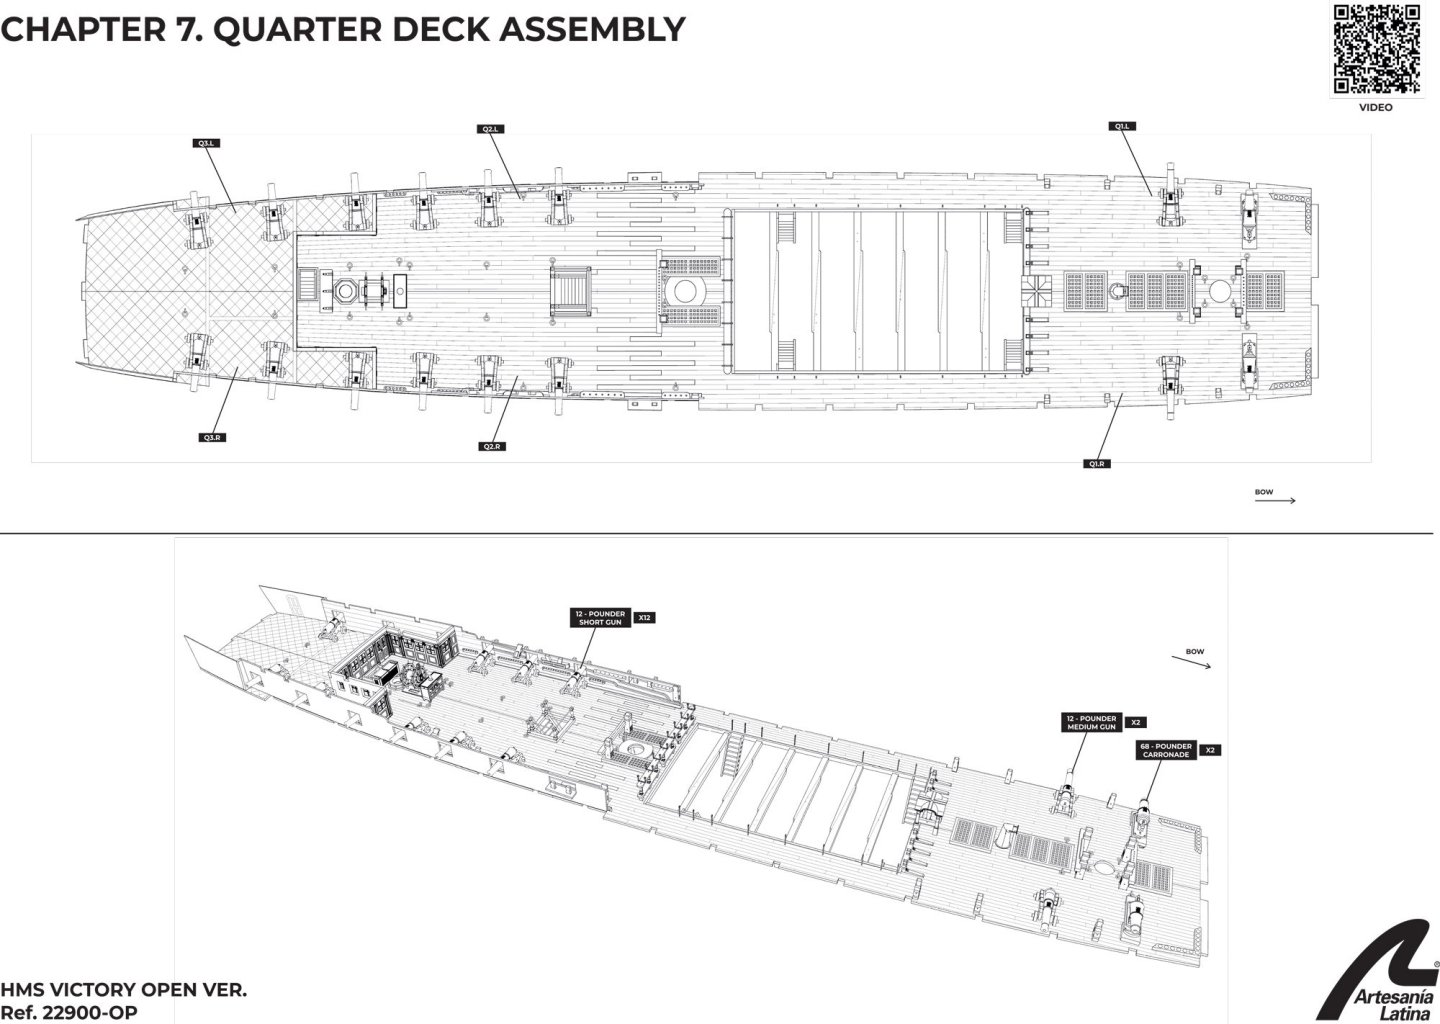
1:84 HMS Victory Trafalgar 1805 – ANATOMY Version Artesania Latina Catalogue # 22900-OP Available from Artesania Latina for £1140 HMS Victory is a 104-gun first-rate wooden sailing ship of the line. With 246 years of service as of 2024, she is the world's oldest naval vessel still in commission. She was ordered for the Royal Navy in 1758, during the Seven Years' War and laid down in 1759. That year saw British victories at Quebec, Minden, Lagos and Quiberon Bay and these may have influenced the choice of name when it was selected in October the following year. In particular, the action in Quiberon Bay had a profound effect on the course of the war; severely weakening the French Navy and shifting its focus away from the sea. There was therefore no urgency to complete the ship and the signing of the Treaty of Paris in February 1763, meant that when Victory was finally floated out in 1765, she was placed in ordinary. Her construction had taken 6,000 trees, 90% of them oak. Victory was first commissioned in March 1778 during the American Revolutionary War, seeing action at the First Battle of Ushant in 1778, shortly after France had openly declared her support for Britain's rebel colonies in North America, and the Second Battle of Ushant in 1781. After taking part in the relief of Gibraltar in 1782, Victory, and the fleet she was sailing with, encountered a combined Spanish and French force at the Battle of Cape Spartel. Much of the shot from the allied ships fell short and the British, with orders to return to the English Channel, did not bother to reply. This was her last action of the war; hostilities ended in 1783, and Victory was placed in ordinary once more. In 1787, Victory was ordered to be fitted for sea following a revolt in the Netherlands, but the threat had subsided before the work had been completed. She was ready for the Nootka Crisis and Russian Armament in 1790 but both events were settled before she was called into action. During the French Revolutionary War, Victory served in the Mediterranean Fleet, co-operating in the occupation of Toulon in August and the Invasion of Corsica between February and August 1794. She was at the Battle of the Hyeres Islands in 1795 and the Battle of Cape St Vincent in 1797. When Admiral Horatio Nelson was appointed Commander-in-Chief of the Mediterranean Fleet in 1803, he hoisted his flag aboard Victory and in 1805 took her into action at the Battle of Trafalgar. After 1824, she was relegated to the role of harbour ship. In 1922, she was moved to a dry dock at Portsmouth, England, and preserved as a museum ship. She has been the flagship of the First Sea Lord since October 2012. Abridged from Wikipedia The kit Well, we already had one Victory kit this year, from another Spanish manufacturer, with a skeletal theme, so we definitely weren’t expecting this ANATOMY version from Spanish company, Artesania Latina. Quite a few jaded modellers decried ‘yet another HMS Victory’, but this one promised to be different…by Artesania themselves. Working with a nod to Artesania’s old ‘Anatomy of HMS Bounty’ kit, revised around 10 or 11yrs ago, this kit was quite unexpected, but promised to offer the modeller a complete interior hull model, with every detail from the lowest ballast and orlop deck, through to the smallest details on the gun and upper decks. The represented scale was a little unusual too, not being a run of the mill ‘72 or ’64. Artesania chose to release their kit in 1:84, which is a tad larger than the other release from this year. This kit is presented in a robust and glossy top-opening box which is specific to this release. The sides are adorned with images from the inside of the completed ship, and they do point to what appears to be a model with a very realistic interior. Artesania has also designed the model so that a complete lighting set can be installed, and indeed they have also released such a set of flickering lights to be fitted in this model. I have that set here and will post something about this later on. Now, instructions. This is quite early to touch on this subject, but at this point I will tell you that this kit has no paper instructions. The only paper aspects of this kit are a large and colour sheet showing the completed model, and a series of exploded maps and deck plans (there are some paper guilds and templates too). Artesania has instead created a series of videos which that have posted on their YouTube channel. As I write this, there are approaching THIRTY videos available, with a final number which is supposed to be around NINETY videos! I have watched all the videos so far, giving me an idea about how this model is to be built. A lot of effort has gone into showing the minutiae of the build, as it should, part by part. The videos are concise and easy to follow, but if you’re not used to building by video, it’ll have to be something you’d need to get used to. The interior aspect of the model does necessitate a different style of construction, right from the outset. At this point, I’ll give you some text from AL, explaining a little more about this kit. I’ve highlighted the completed dimensions: “The new Anatomy version of HMS Victory, the legendary 18th and 19th century British ship of the line, Lord Nelson's flagship and sailing's most celebrated ship, is an impressive and majestic wooden naval modelling kit for expert modellers. The model is completely faithful to the original ship as she fought at the Battle of Trafalgar and includes full interior detail on all decks, visible through the open right side of the hull. This model is officially licensed by the British National Museum of the Royal Navy. Assemble your 1:84 scale wooden model of the Anatomy of the HMS Victory, our extraordinary model of the 18th and 19th century English ship of the line. Its construction system using false keel and frames brings the assembly of the miniature closer to the construction of the real ship. Once built, it measures 1,202 mm long, 470 mm wide and 805 mm high -875 mm with the base. This Anatomy will allow you, while assembling the model, to examine in depth the construction and structure of the ship, as well as the very high level of detail. The model kit contains thousands of pieces of high-precision laser-cut board, hardwoods, brass and cast iron. As well as copper lining for the hull, cotton sails sewn and ready to be placed and a wood working base. Not forgetting the beautiful methacrylate base with the name in gold to display the model once finished. In order for this fantastic Anatomy of HMS Victory to be a completely faithful model of the original replica, we recommend... First, paint it with your Specific Set of Water Based Acrylic Paints (277PACK11) sold separately. Secondly, to add your two 1:84 scale figurine sets, also sold separately, which will be available soon: Royal Navy (22900F1) y Sailors 1700-1815 (22900F2). And finally, illuminate the ship for even more realism with the 122 sail effect lights of the HMS Victory Model Ship LED Lighting Set (22900-LED).” As I’ve already said, this kit is very heavy. The shipping weight to the UK was around 10kg, albeit some extras were added, but it does give an idea of the weight of the product. Artesania put the parts count of this kit at around 10,000, so there's plenty enough to satisfy a modeller who likes a long term project. As it would be beneficial to show you the contents of the printed material before the actual timber, this is what we'll look at right now. Instructions As I've already said, Artesania are providing the actual instructions as a series of videos. You can find those HERE. However, you will need a series of profiles and maps which show the layout of the decks etc. These are provided in the kit, as well as those card templates you'll need for installing the wales etc. Plans are included for the masting and sails too. To be continued....


-
And finally, my video: Conclusion I don't know whether it's because I come from 'Oop North' in an old mill town that makes me like steam engines or whether Fred Dibnah lives on through his lovely daughter who is a friend of mine, but there's something about the smell of these when they start running....the metal, the oil, the steam. It's magical. This kit really is the perfect intro to this genre as there's no finicky adjustments to make like there can be with the single beam engine. You can literally build this in a couple of hours and have it running shortly afterwards. I added about 50ml water to the boiler and 15ml of ethanol to the burner. It takes no more than 10 mins to heat up and then you open the steam valve, open/close the condensate valves, and off she goes! I really do like this gorgeous little kit. A beauty, and deserves to be built and enjoyed, as well as making a nice shelf-sitter too. Most definitely recommended. My sincere thanks to Engine DIY for this kit, sent for the purposes of review here on Model Ship World. To buy direct, click the link at the top of the topic.

-
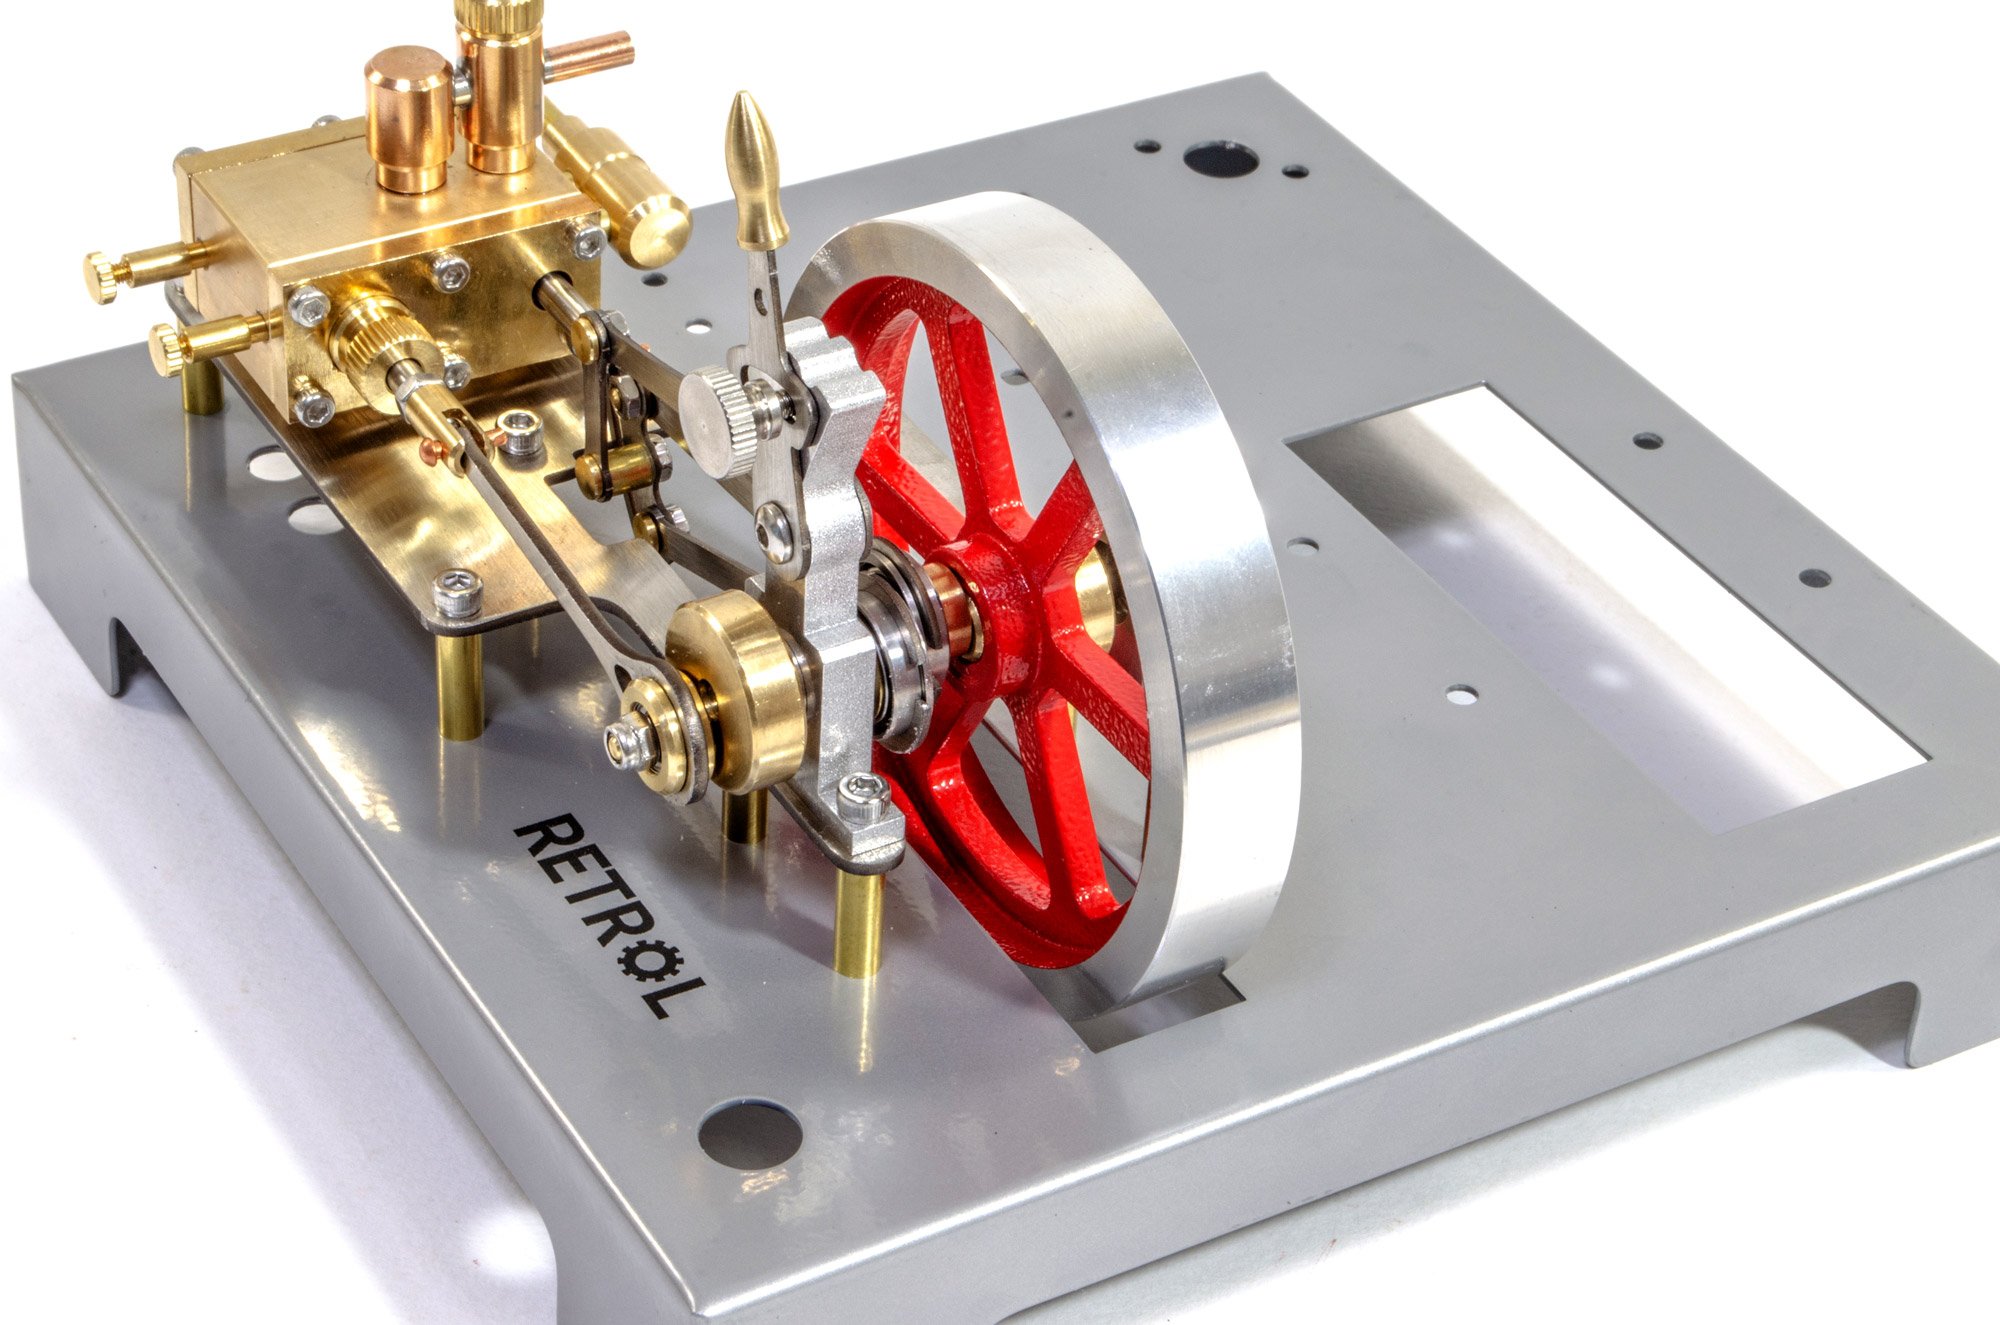
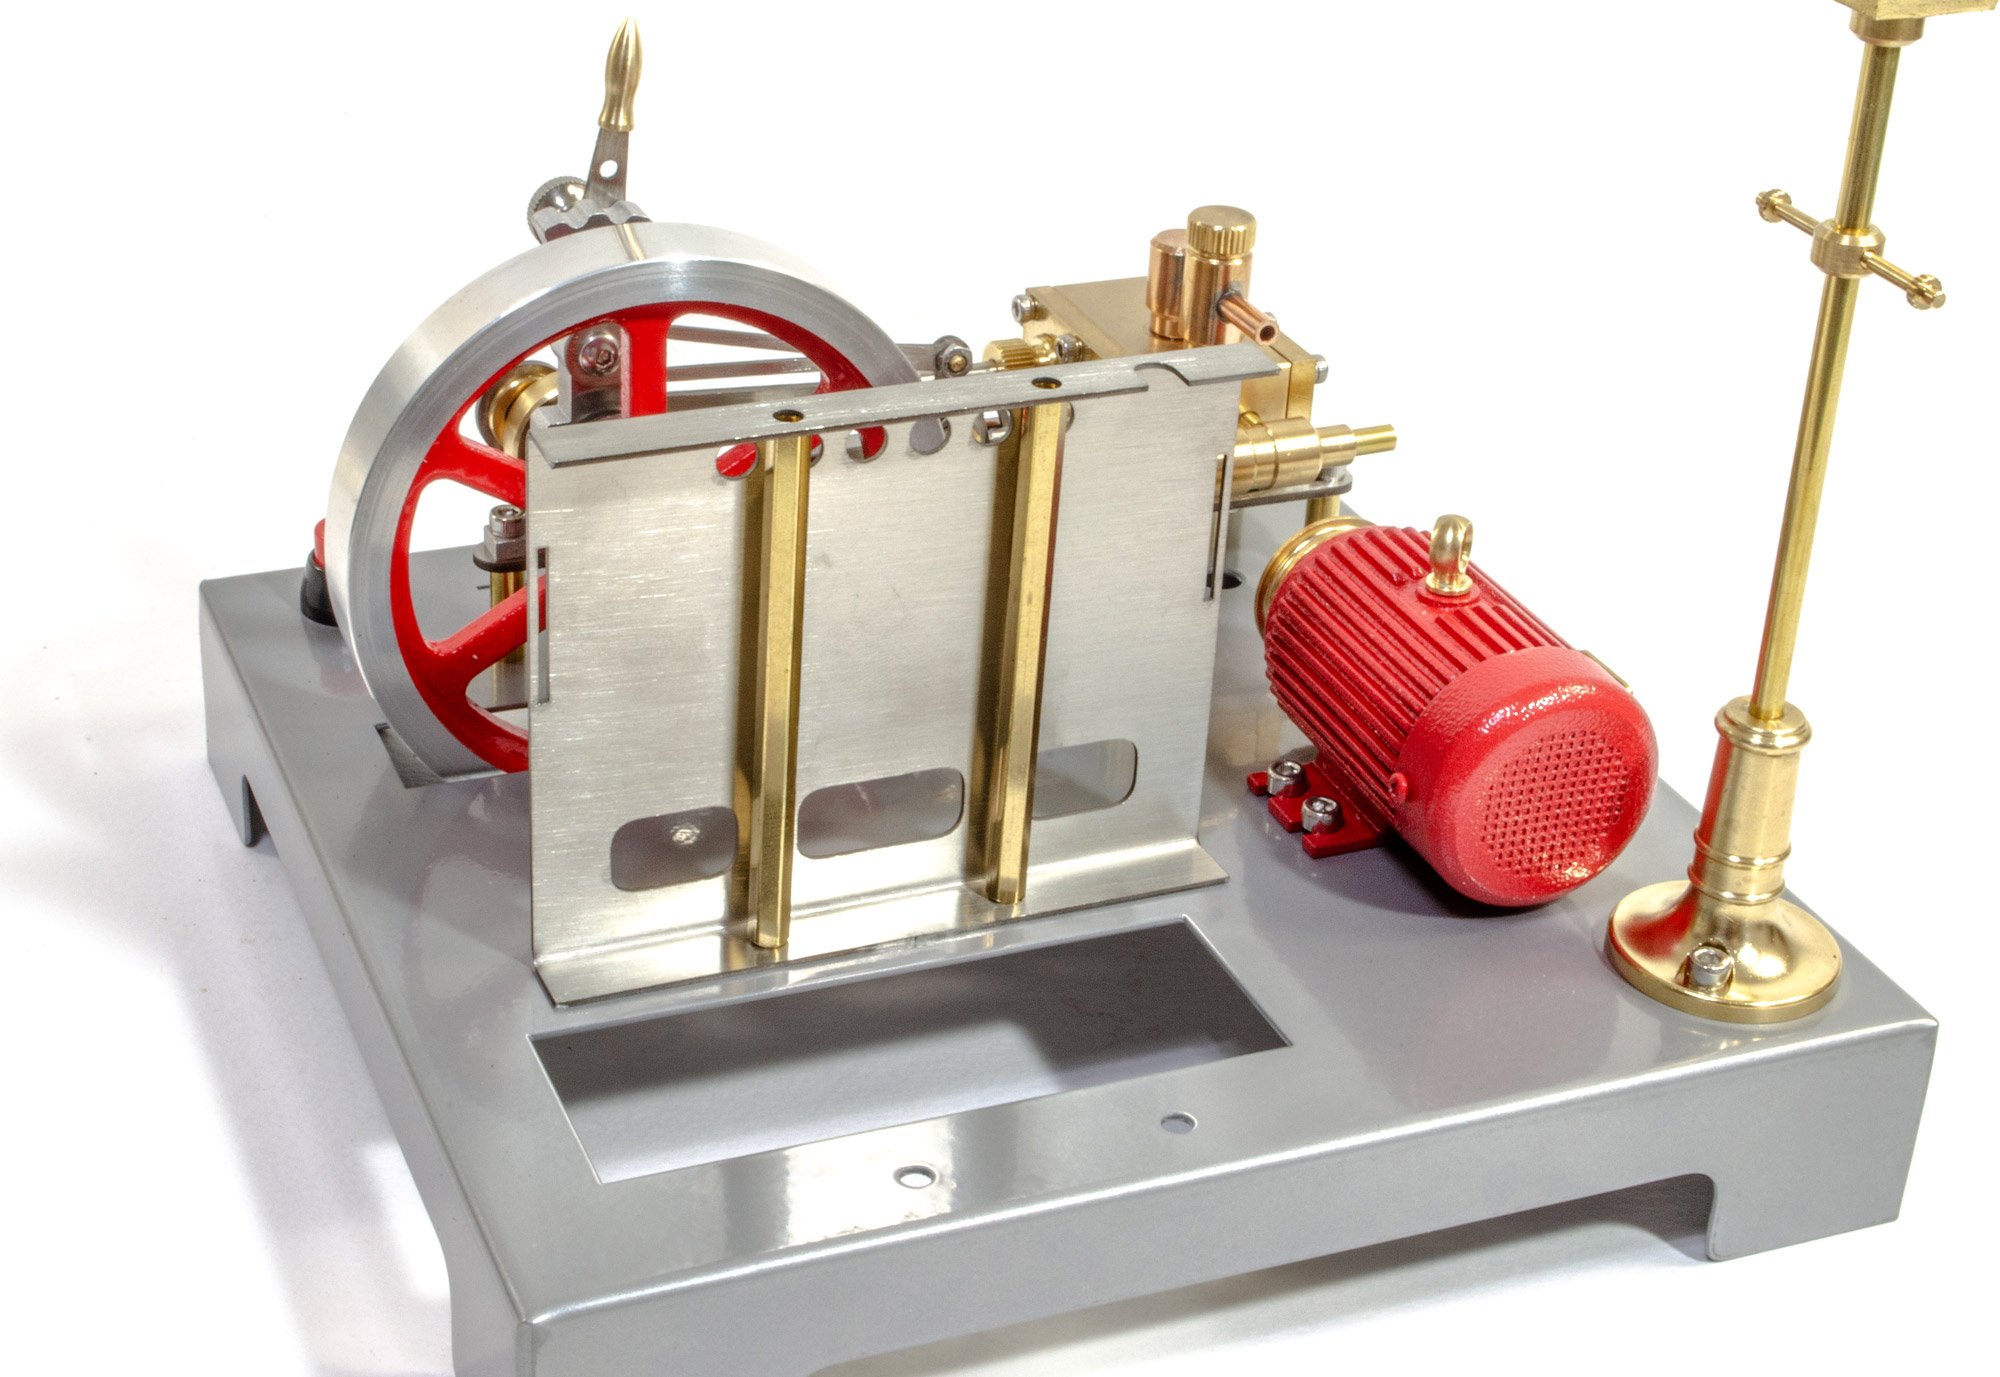
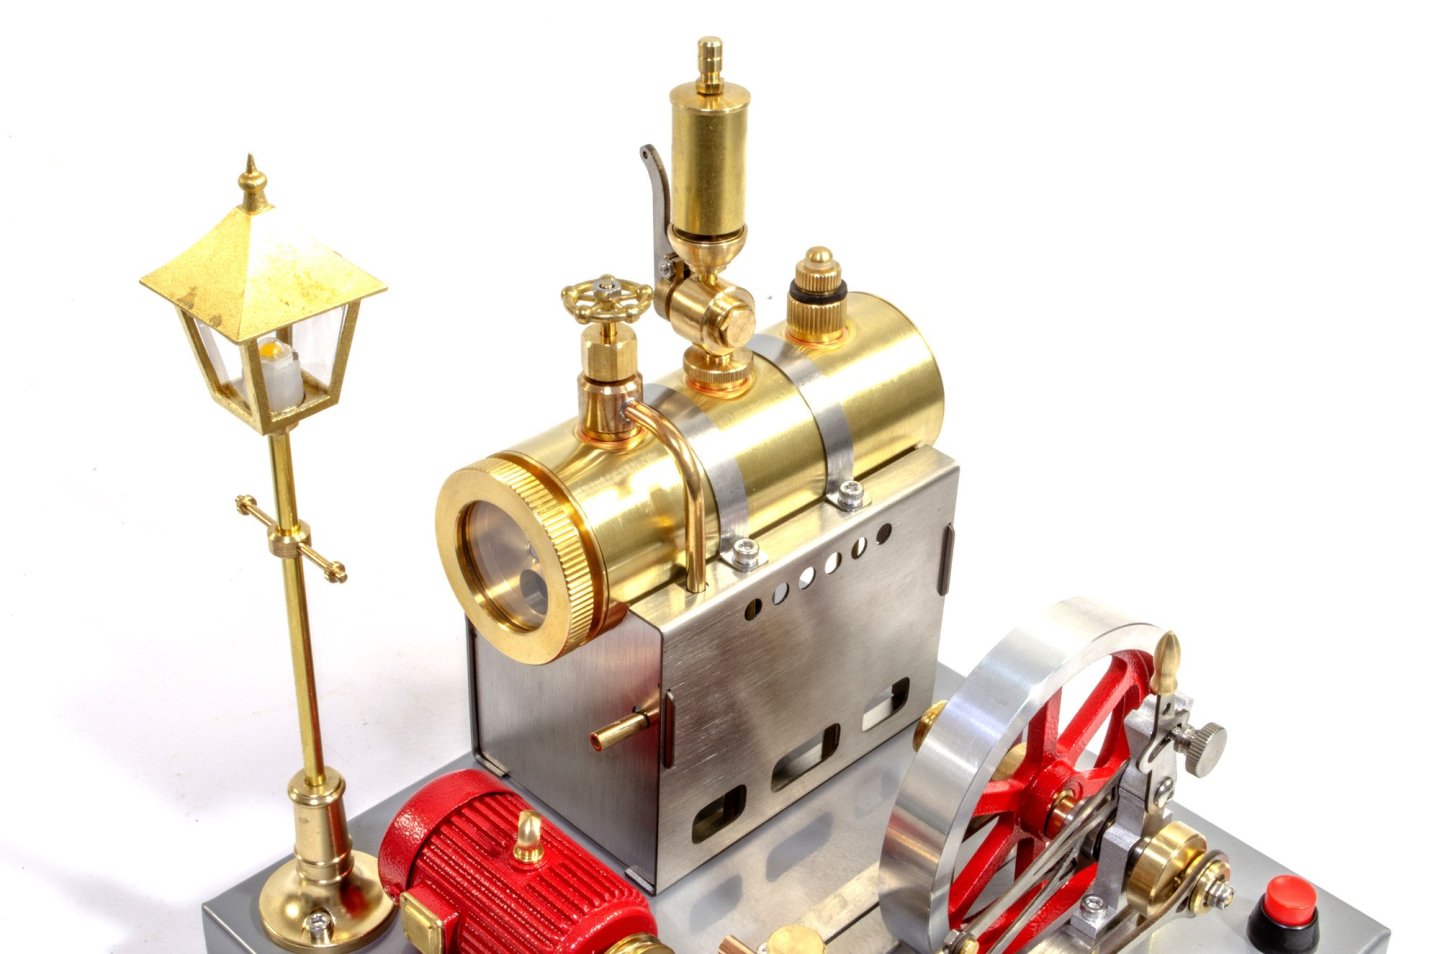
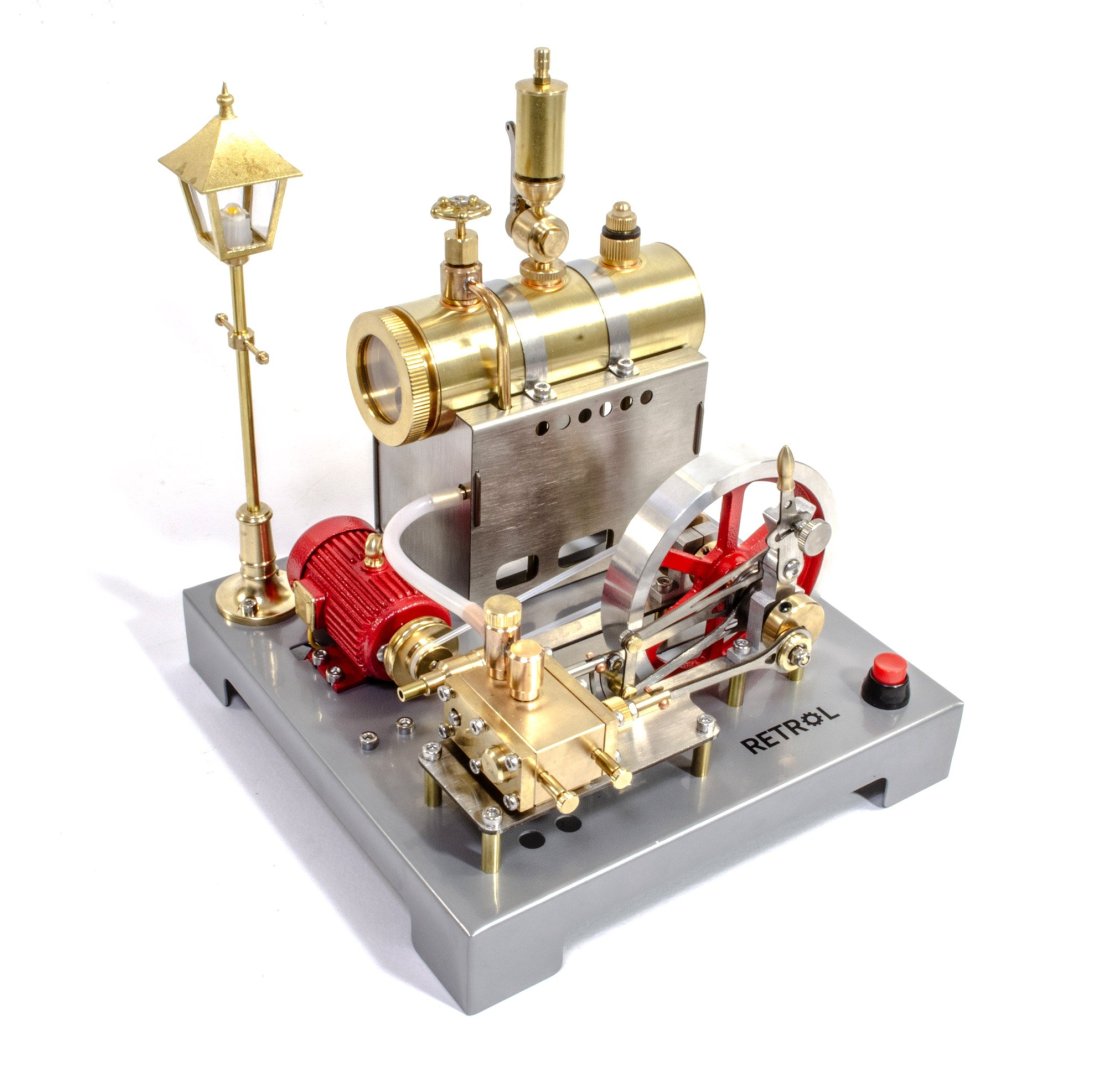
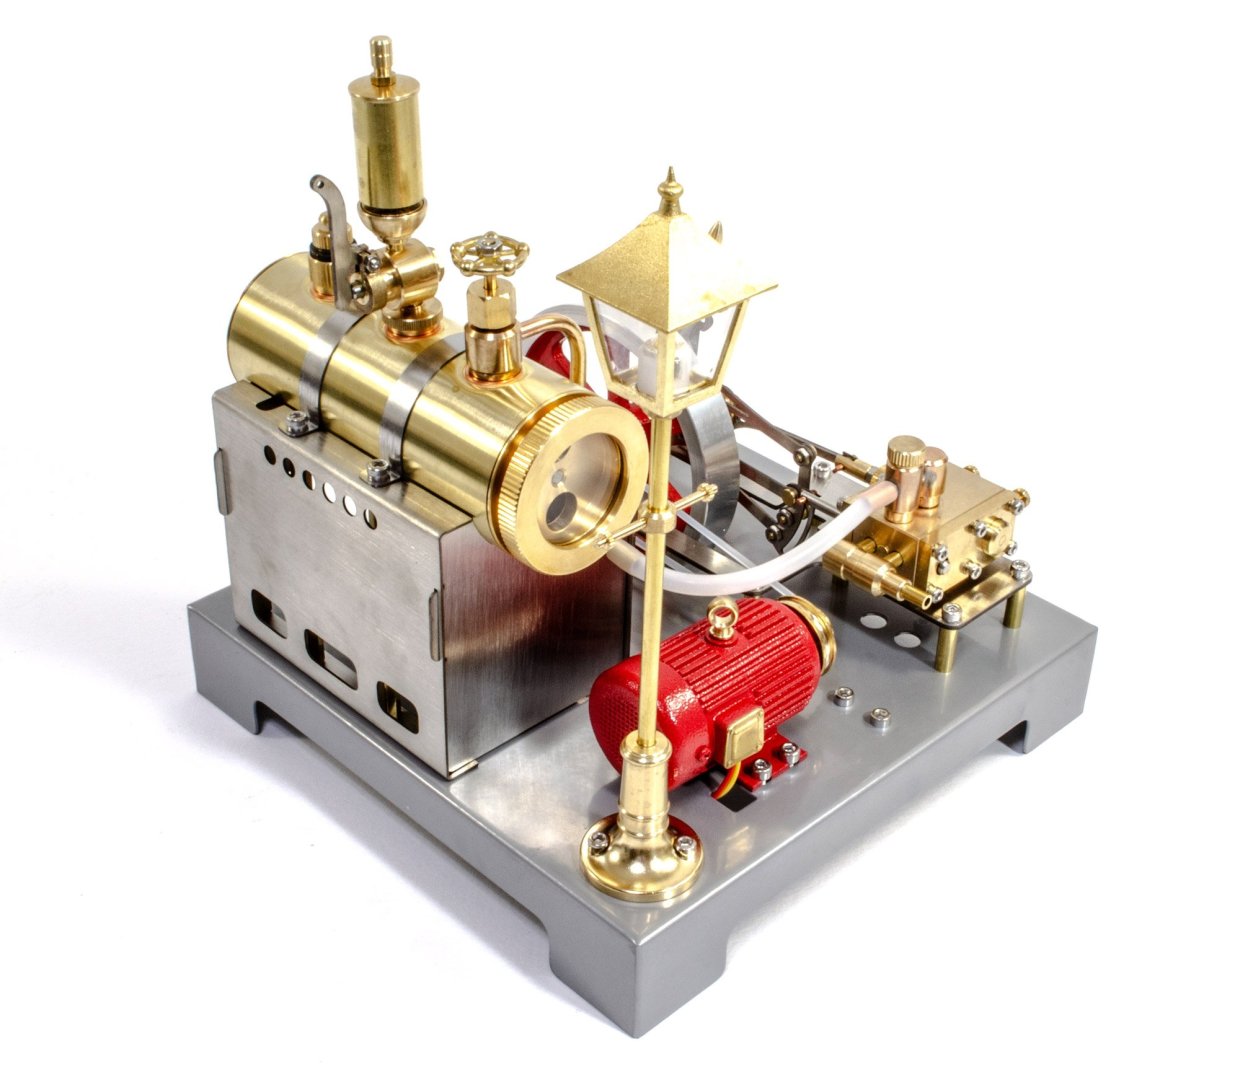
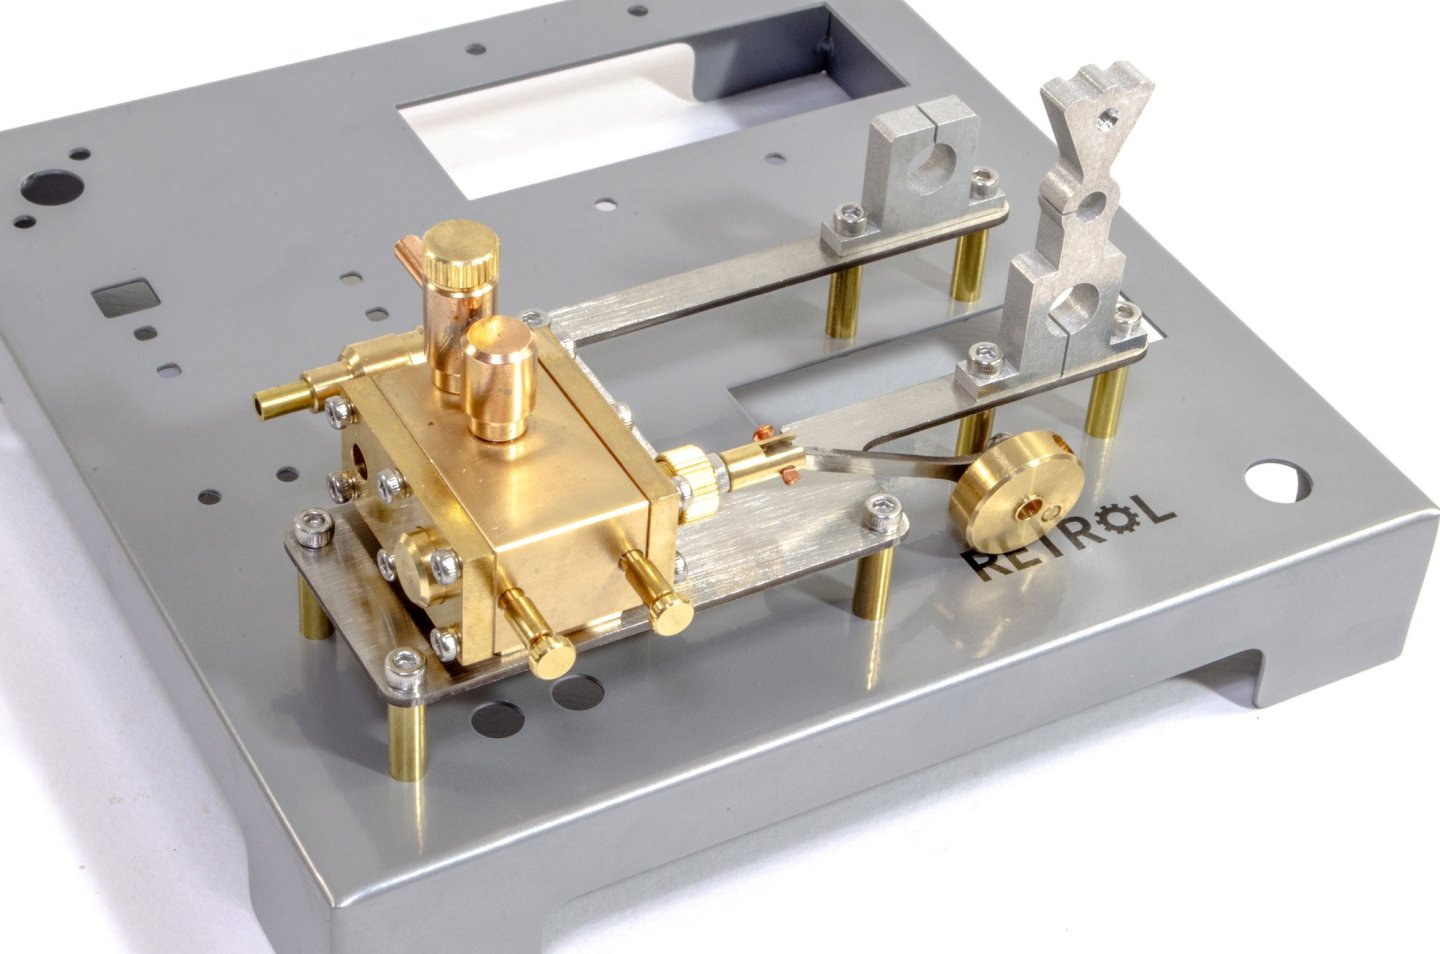
The boiler is securely seated above the firebox and metal straps are used to bolt this attractive assemble securely in place. Lastly, the drive belt and silicone steam tubing are fitted. Here you see the completed engine! Very attractive, don't you think? My next post will show the engine running. Come back very soon!

-
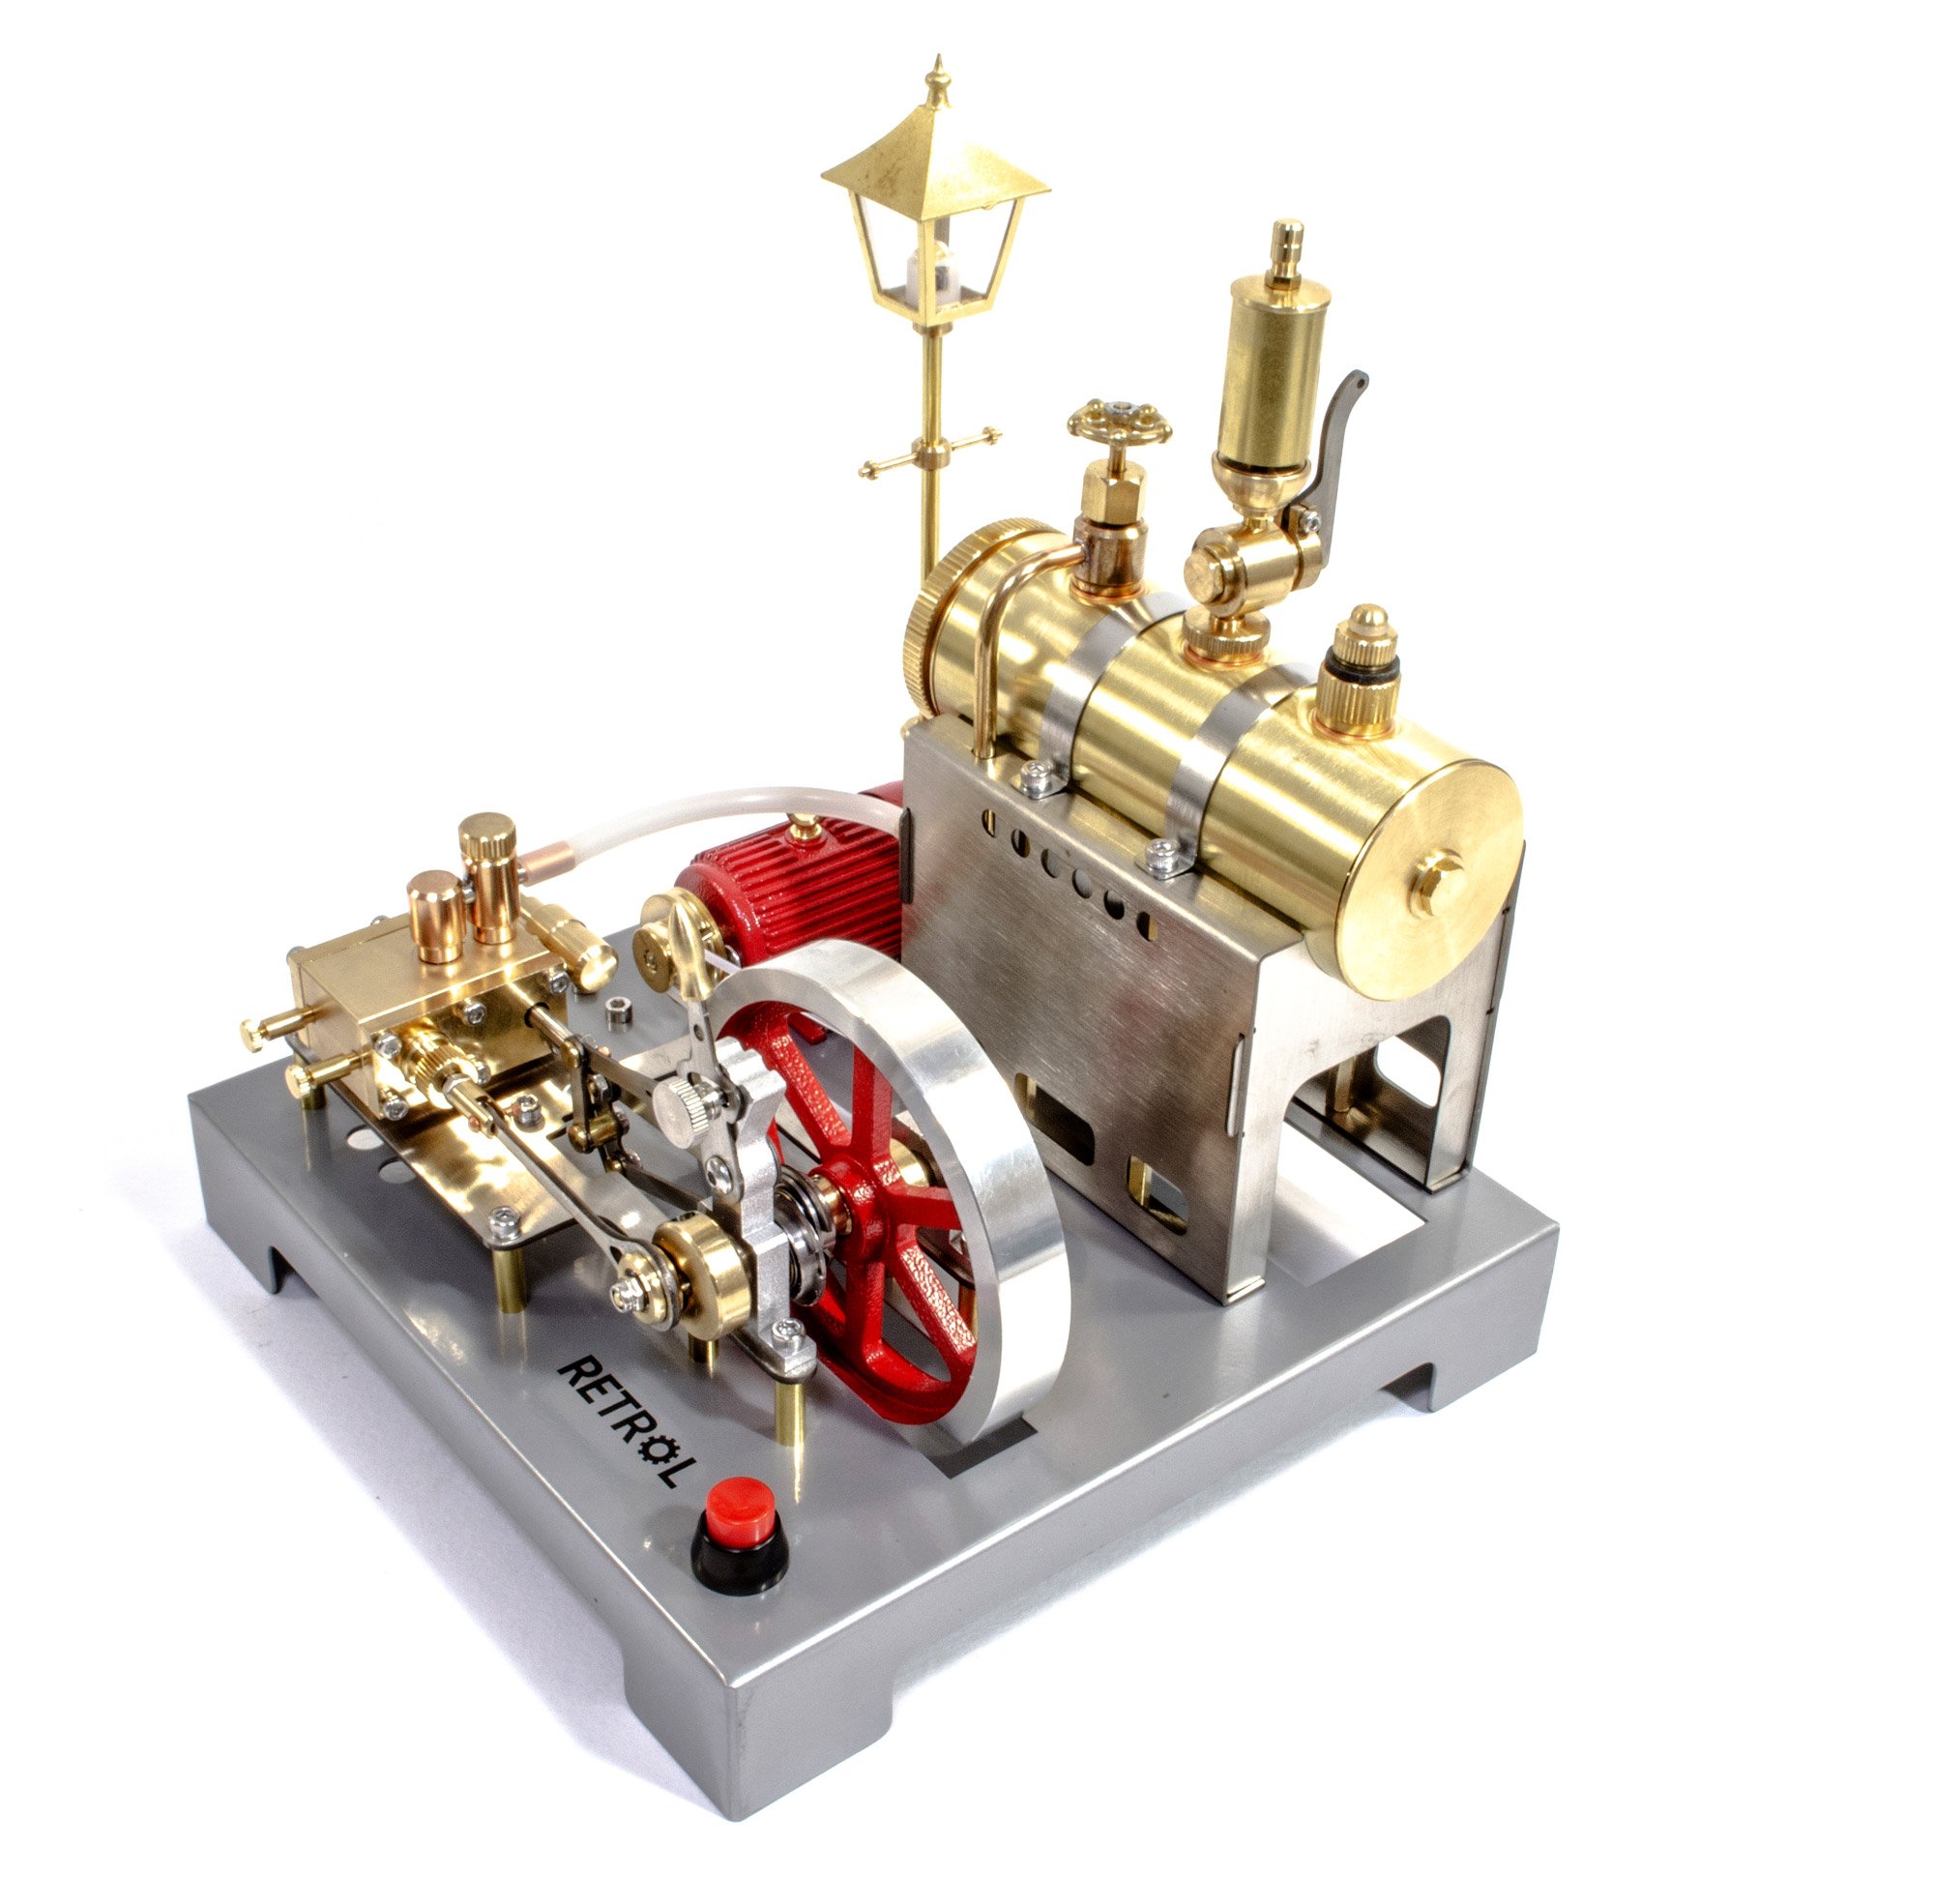
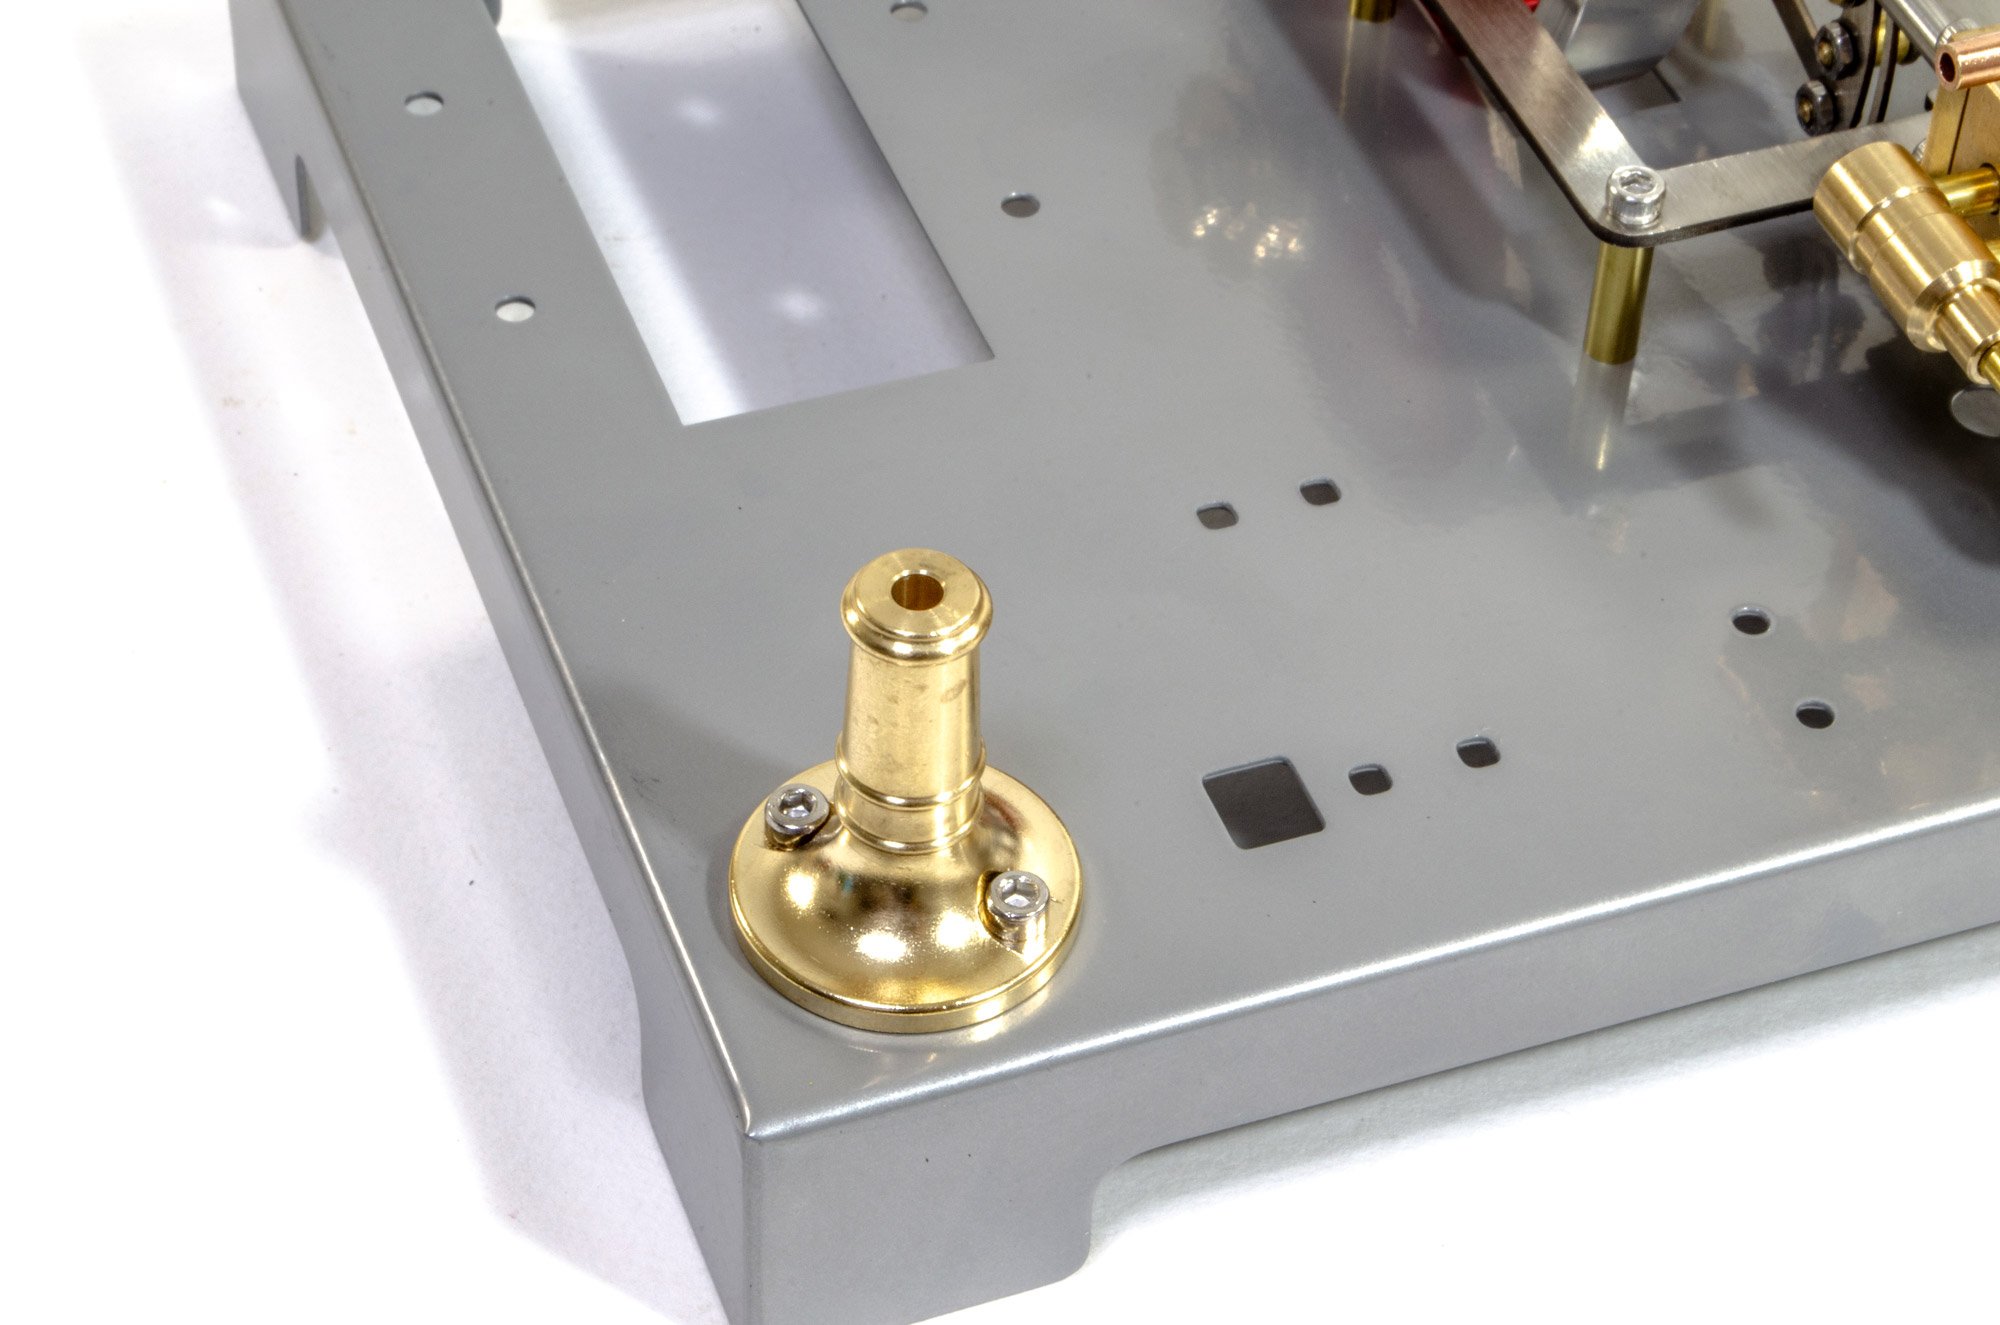
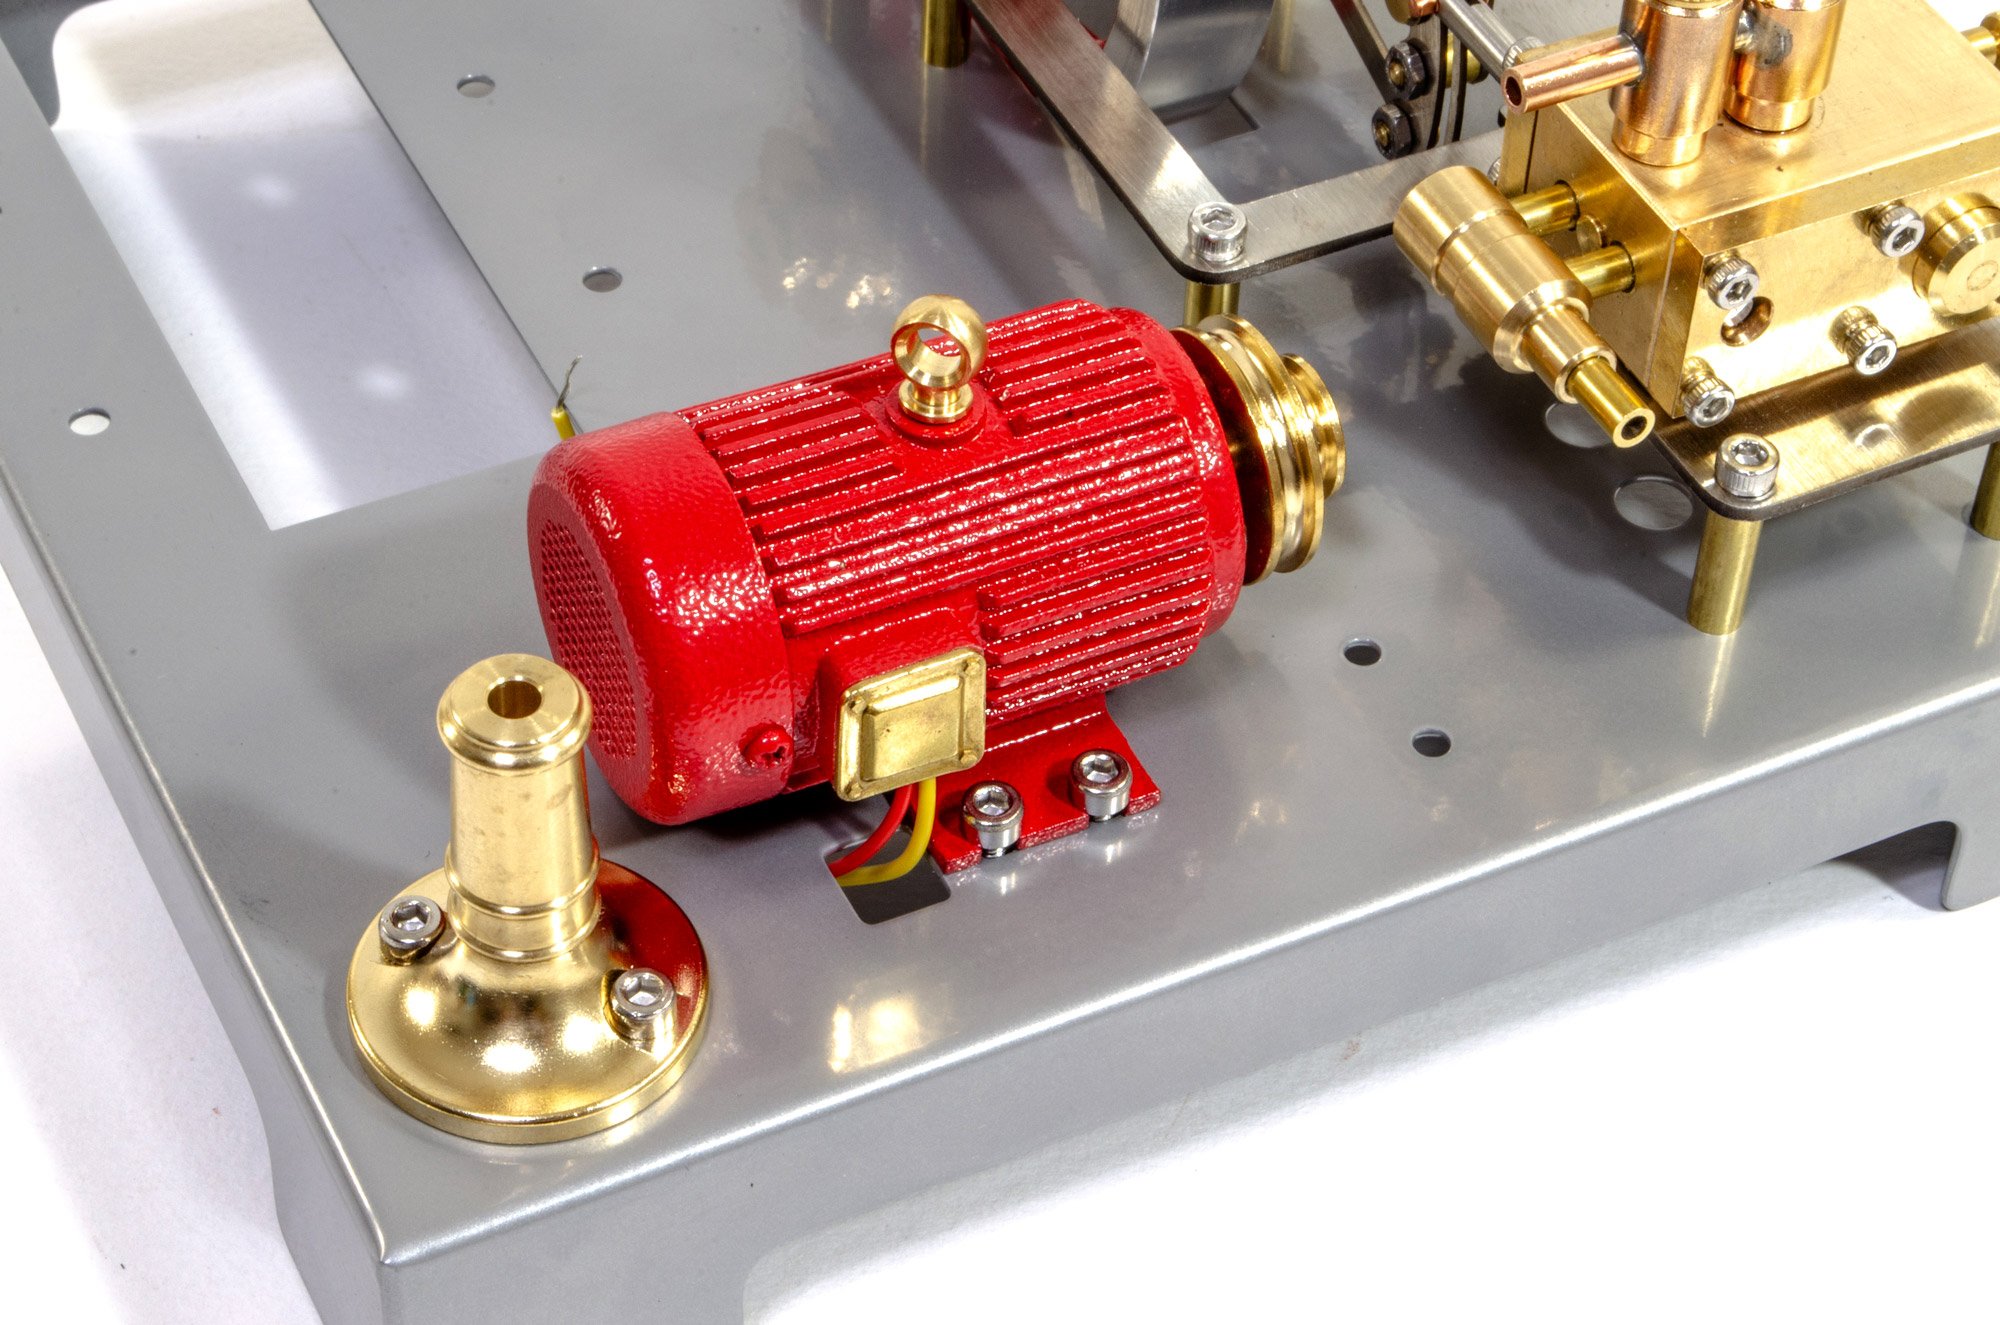
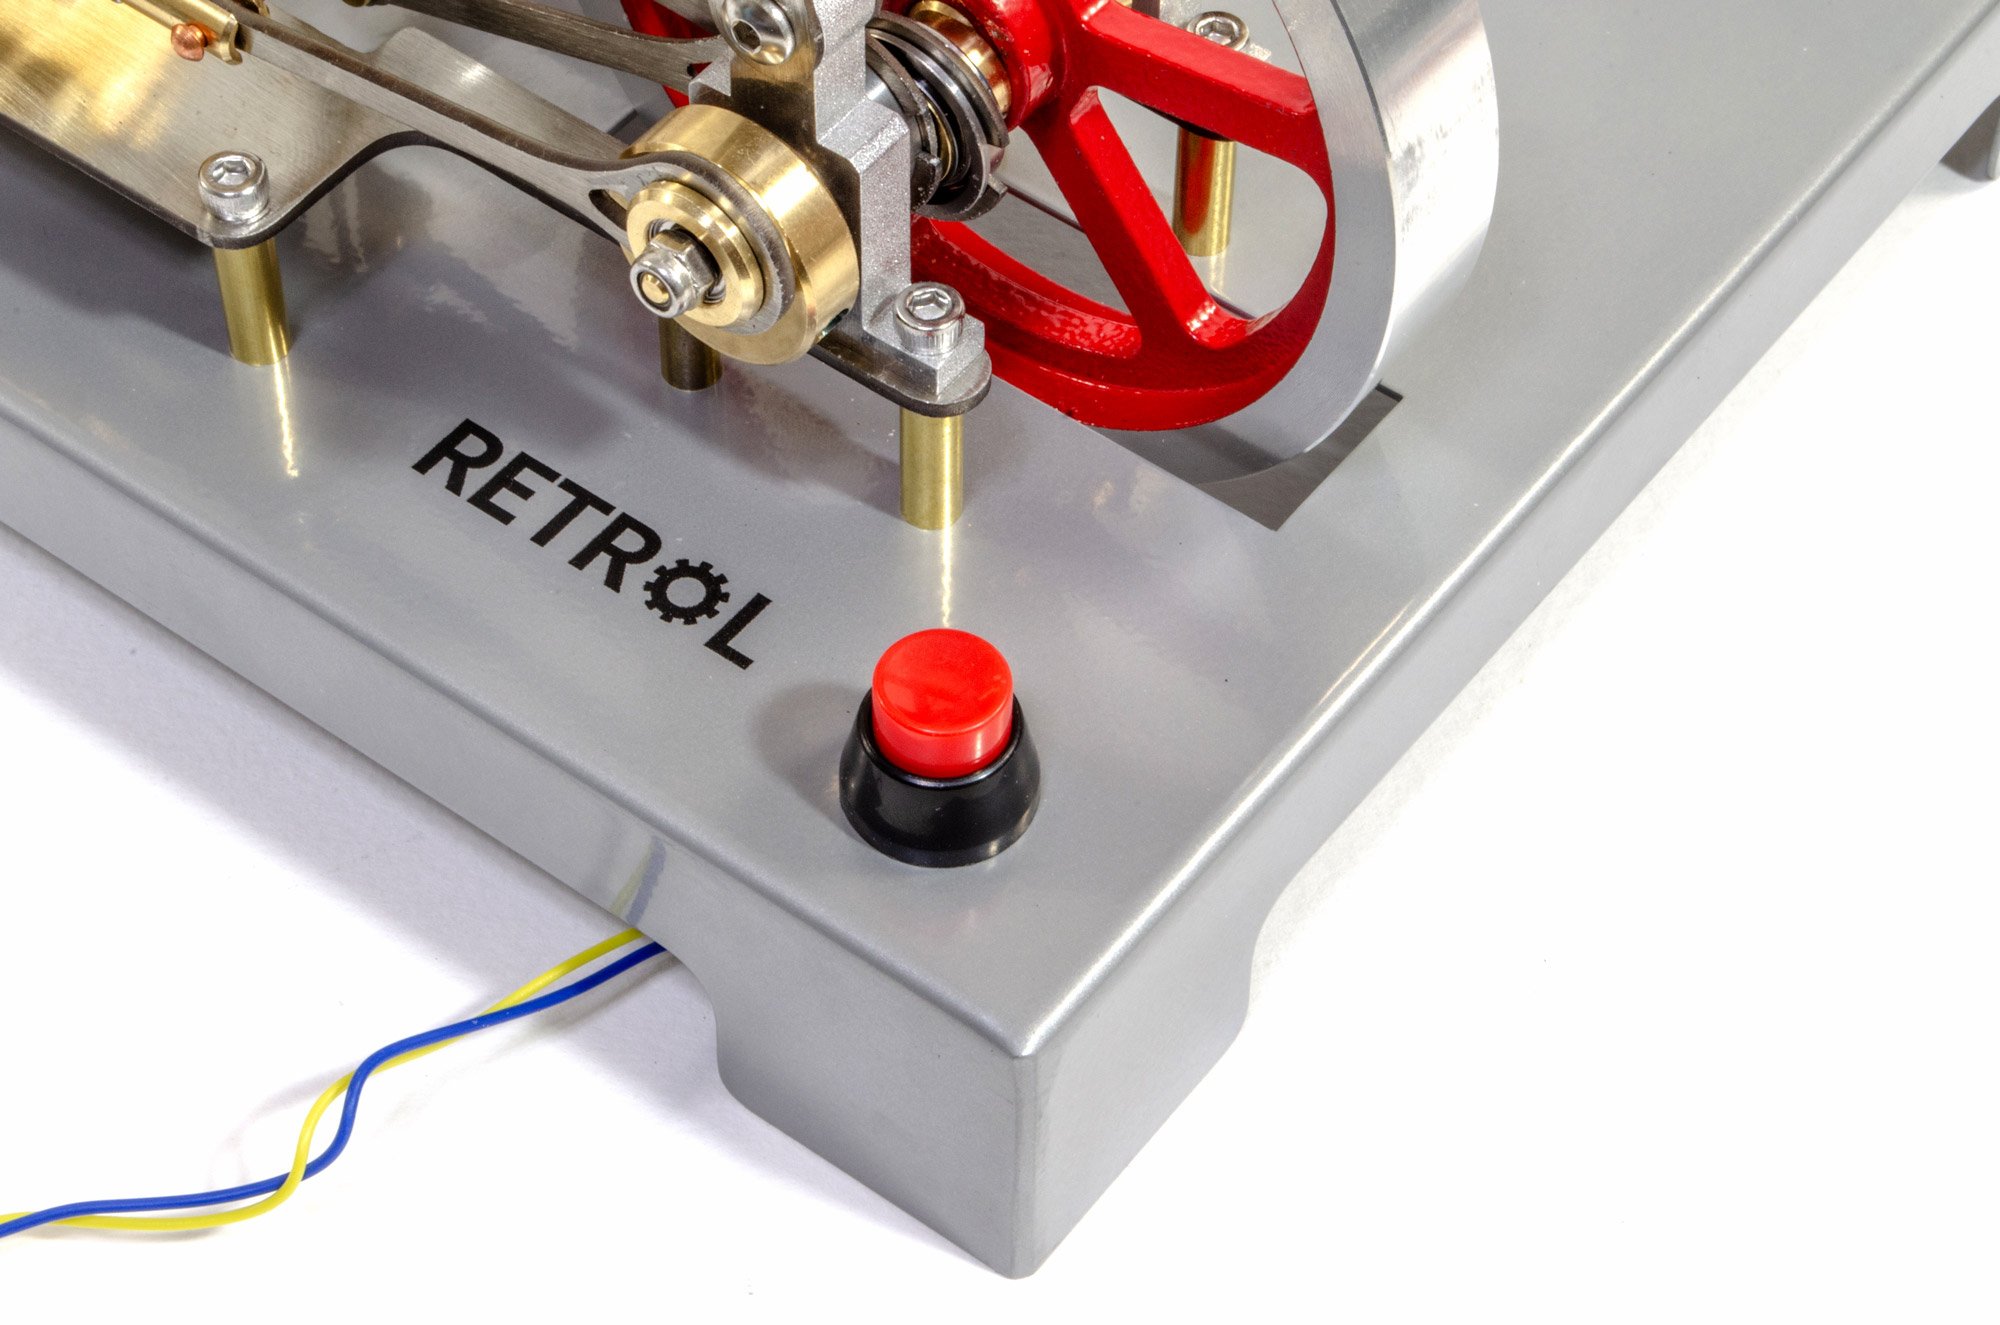
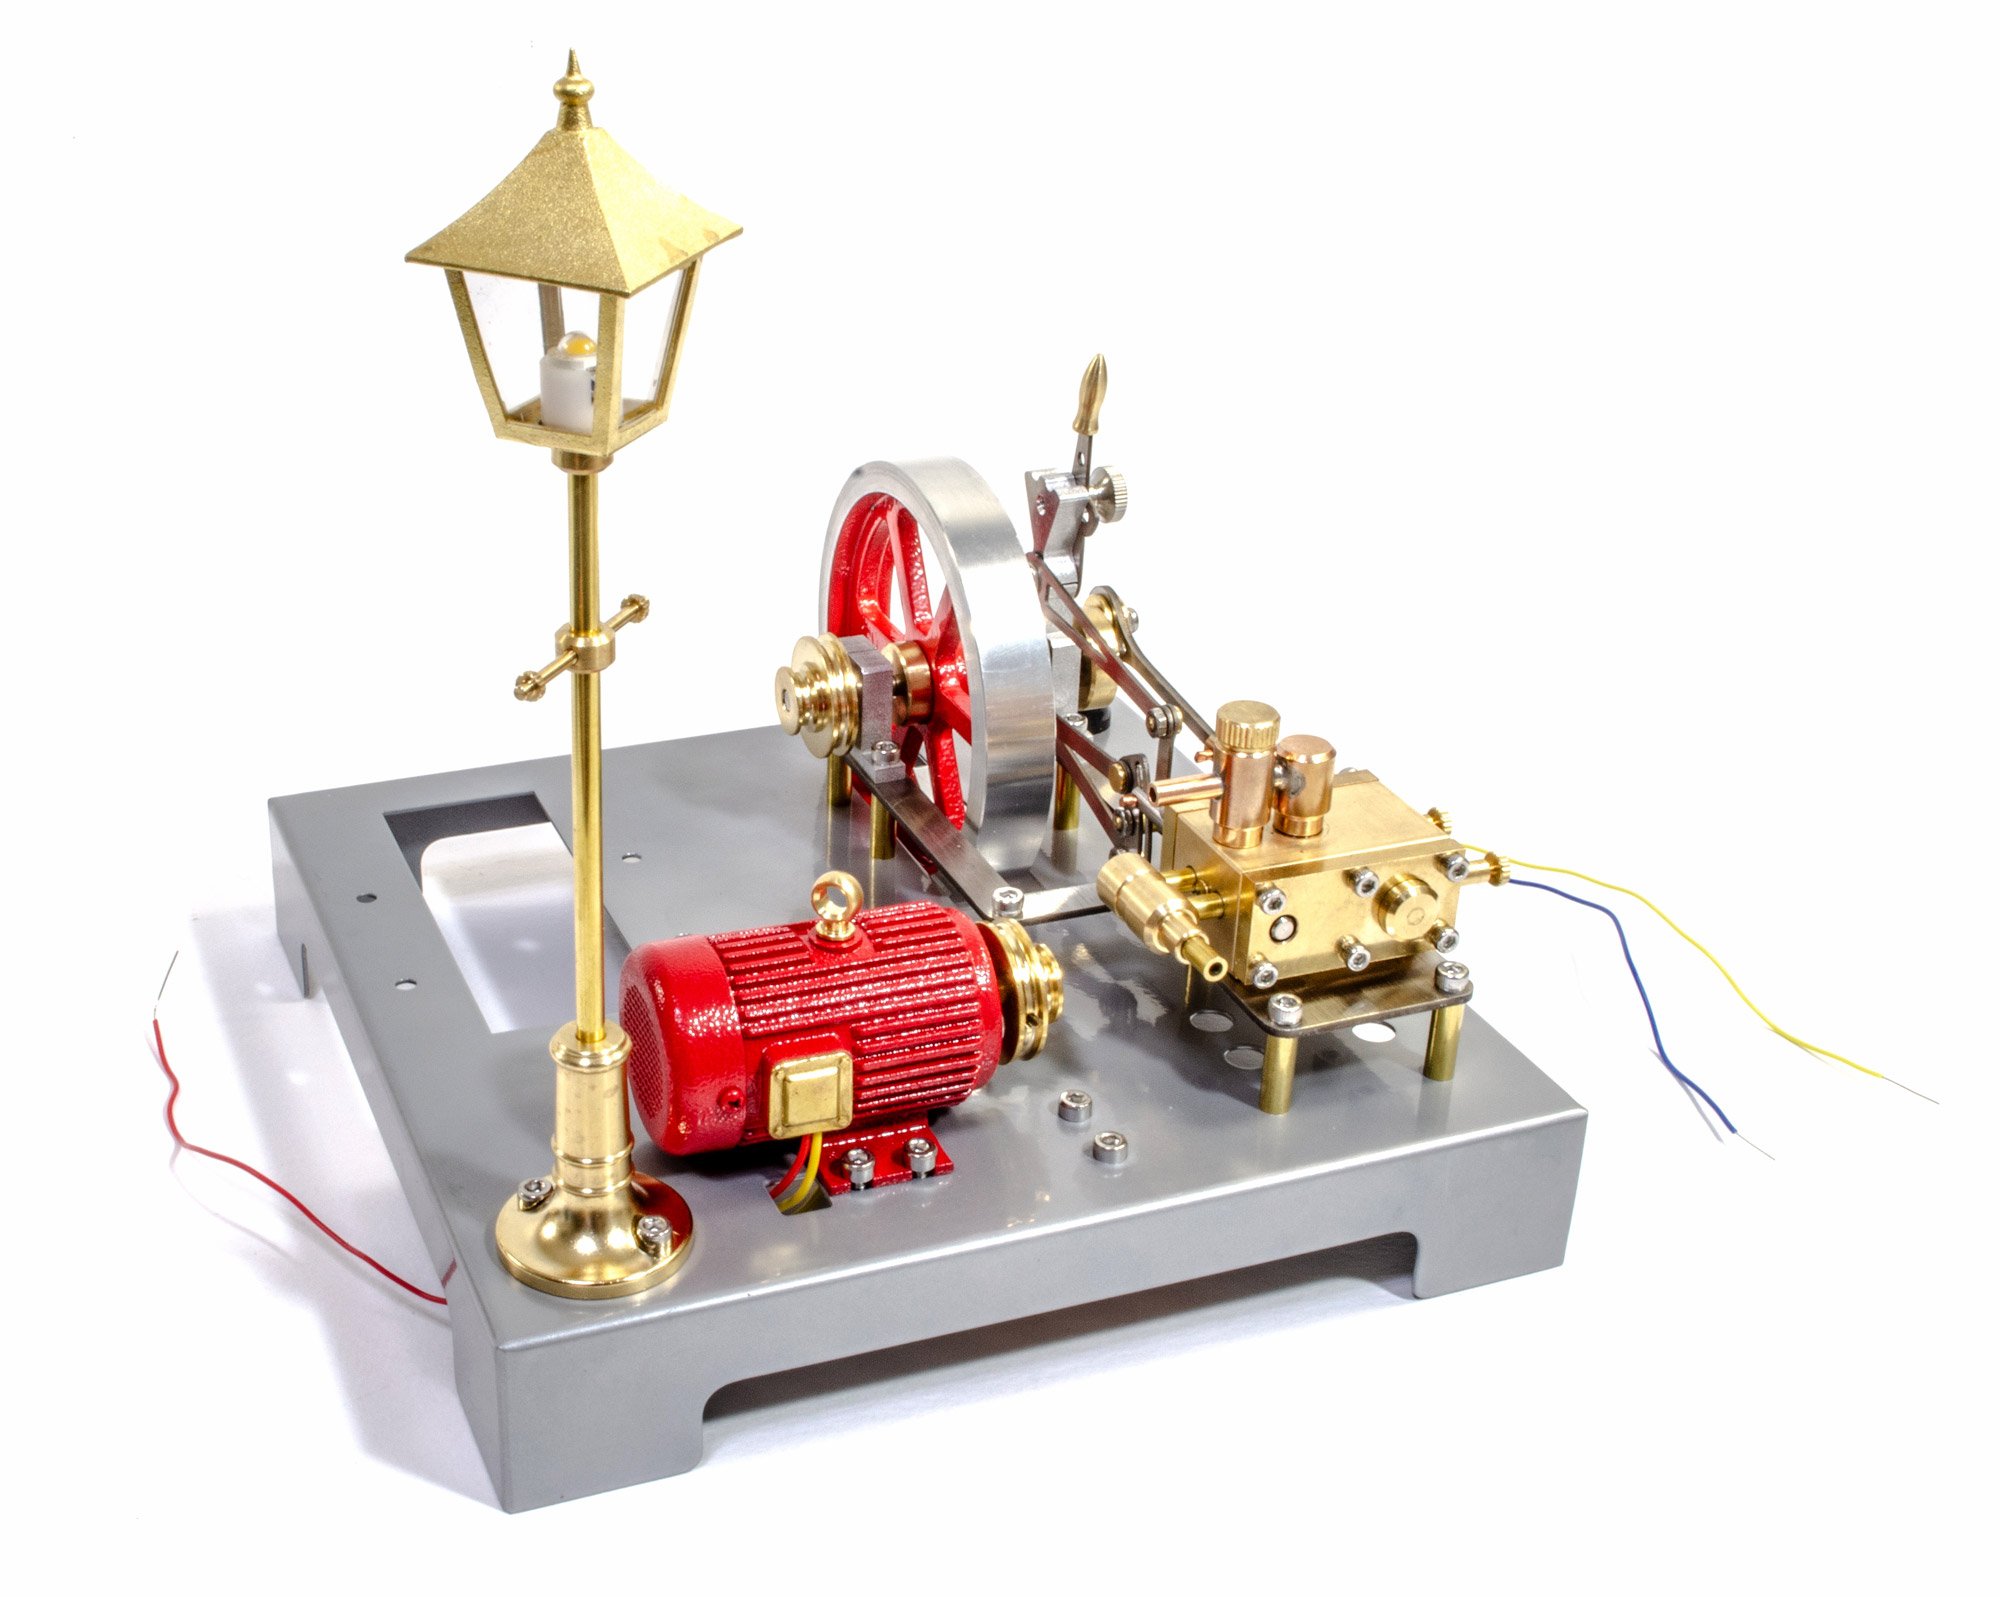
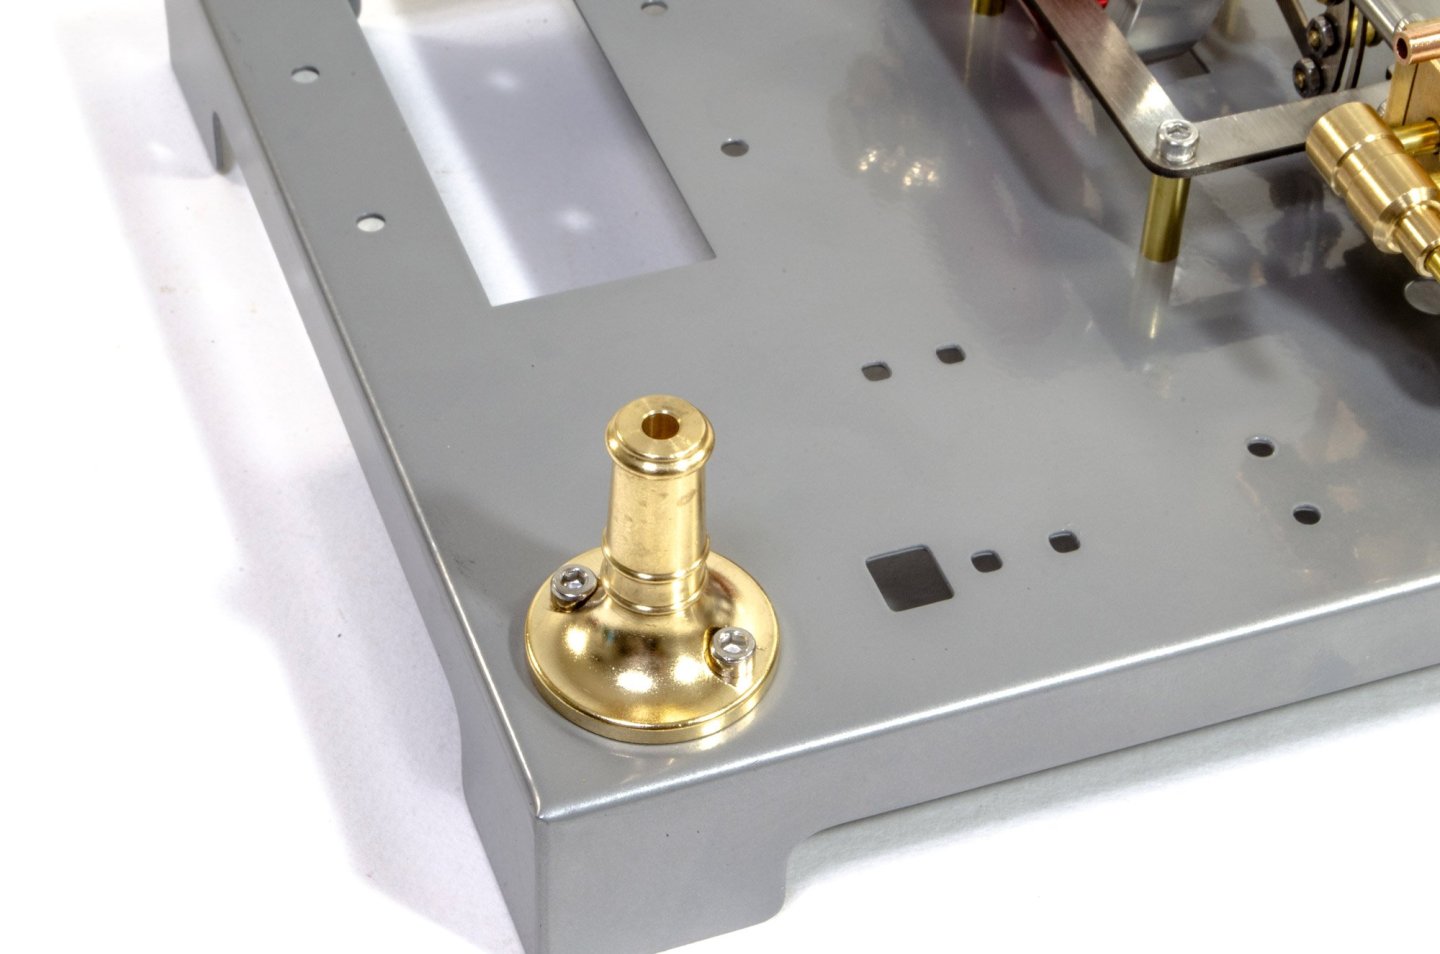
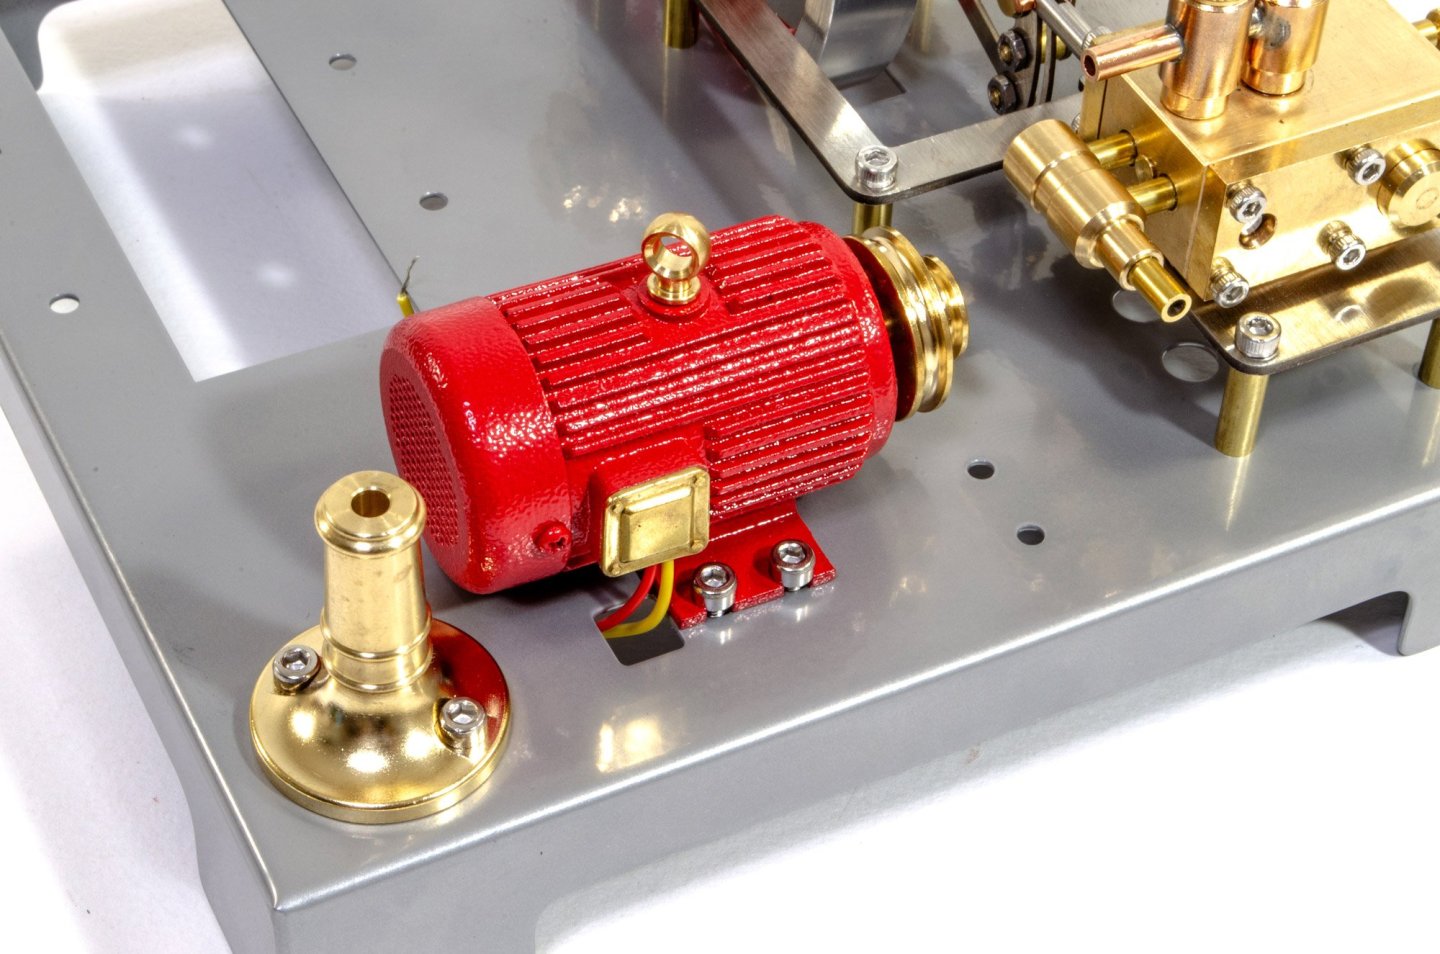
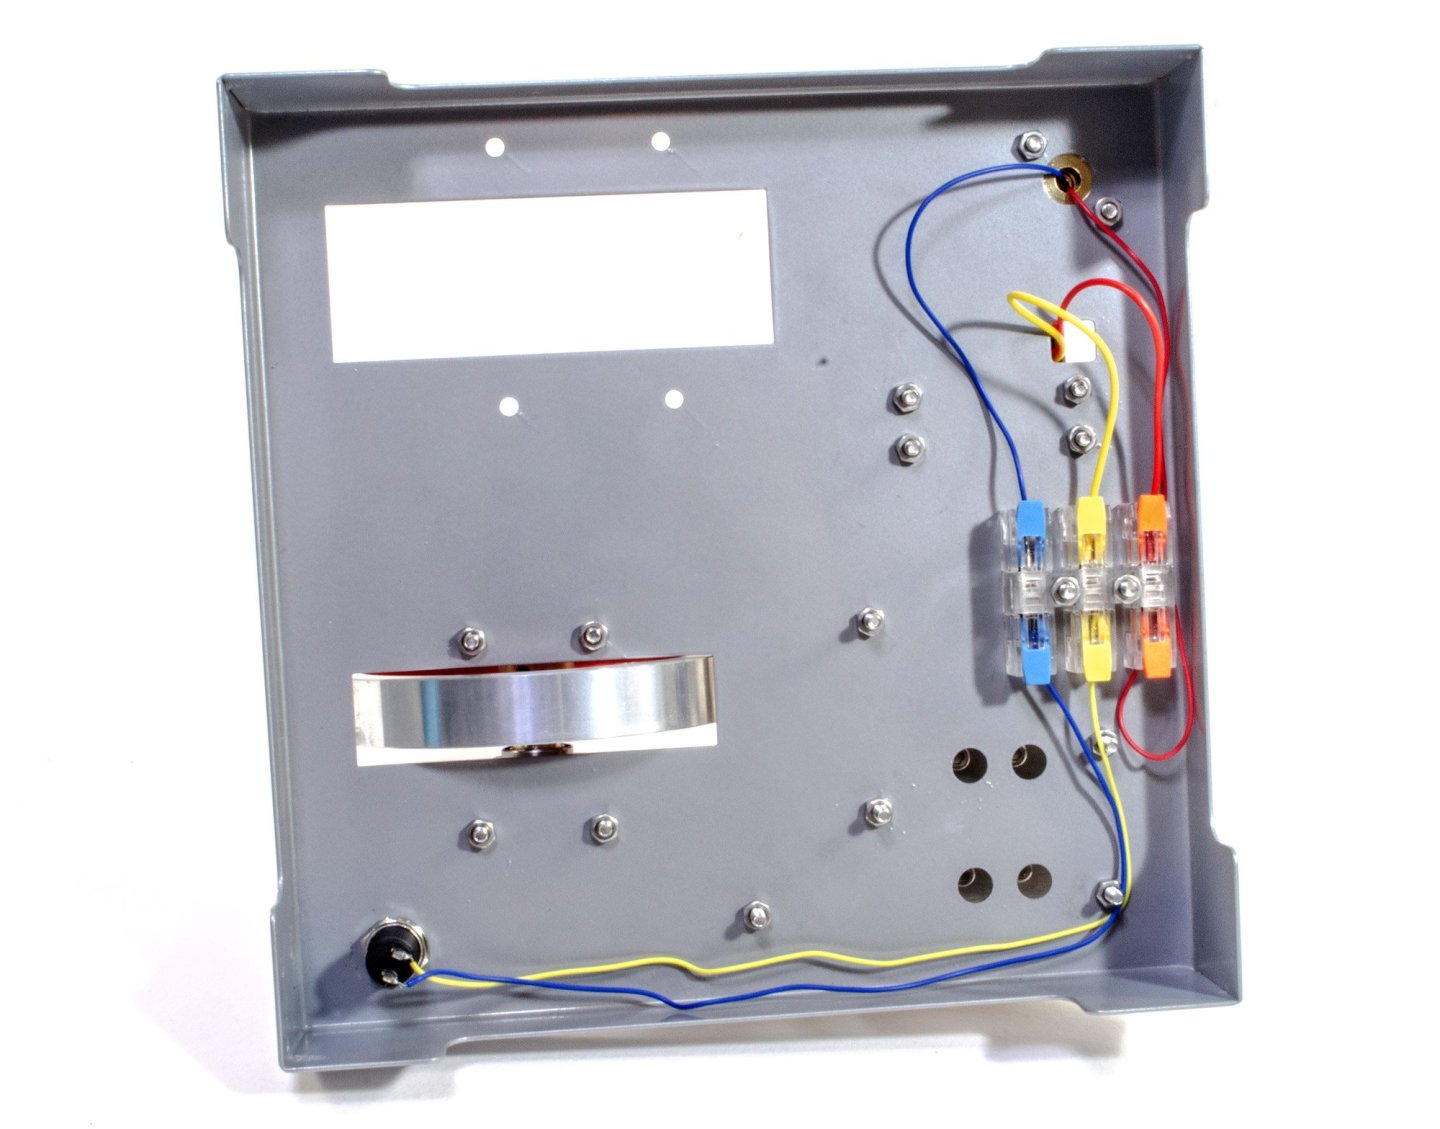
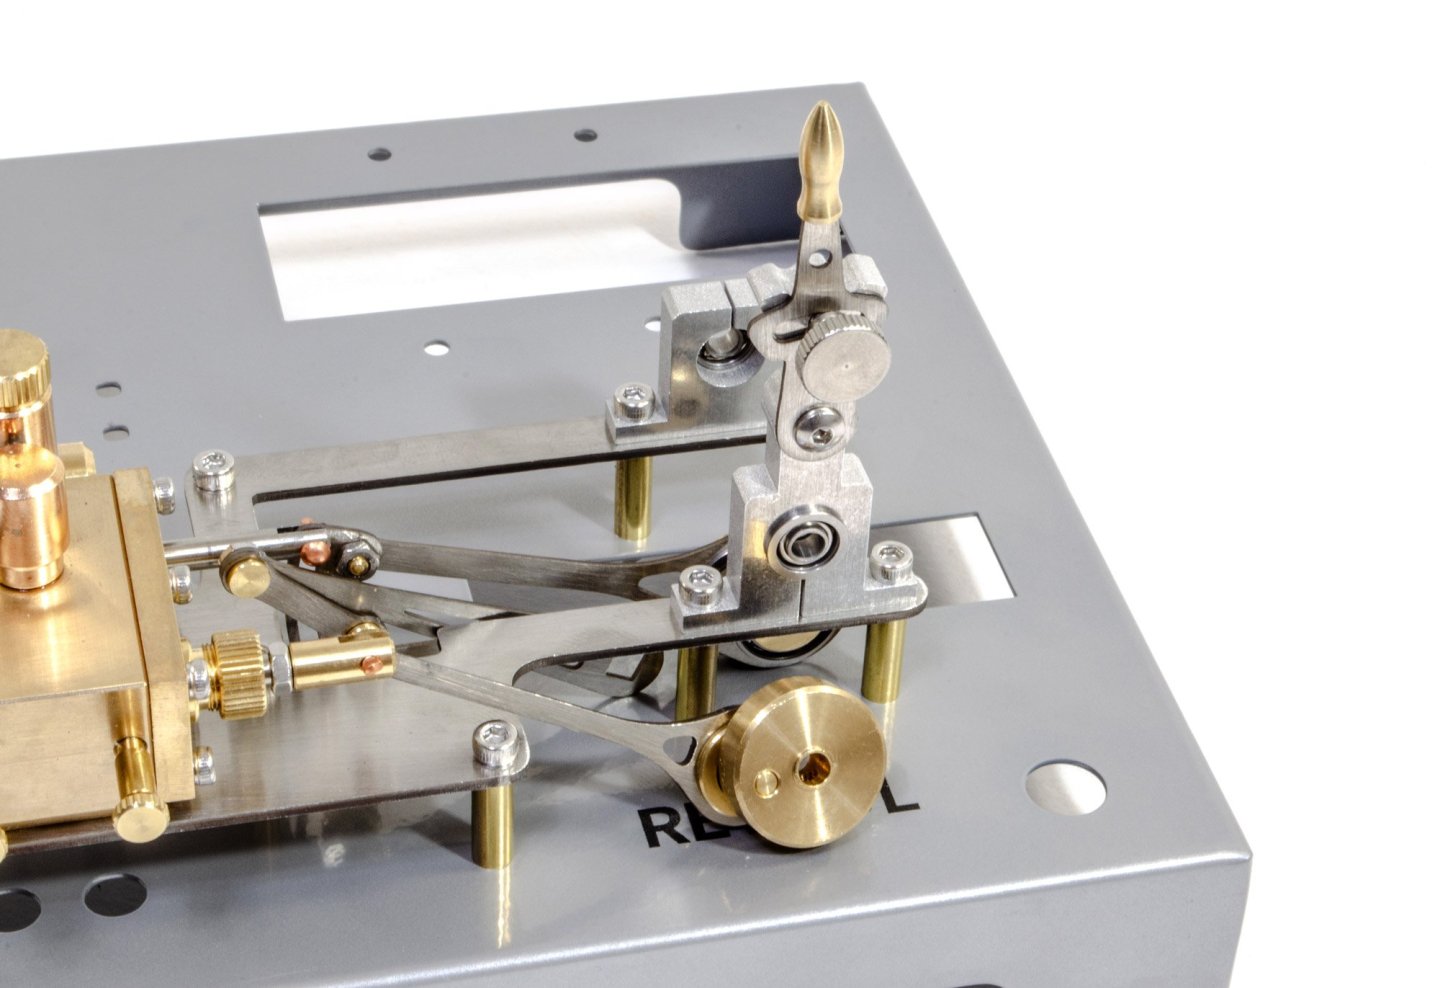
The crank is now connected to the handle as shown here. And the rest is then located via the drive shaft, through the bearings, and trapping the flywheel in situ. Everything is tightened so that there I a little clearance between all the elements and nothing with rub against anything else. Here you can see the opposite side of this assembly before the belt pulley is added. The base for the street lamp is now bolted into place. This is a nicely turned, solid brass part. And now the electrical generator is now bolted to the base. .....followed by the electrical switch. The lamp head now has its wired threaded down its pole and this is then inserted into the base of the lamp. It's time to wire everything up. To do this, a neat little electrical connection block is included. All you need to do is lift each side of this and push into it the pre-stripped wire ends. Here you see the firebox being installed. Time for the main event....


-
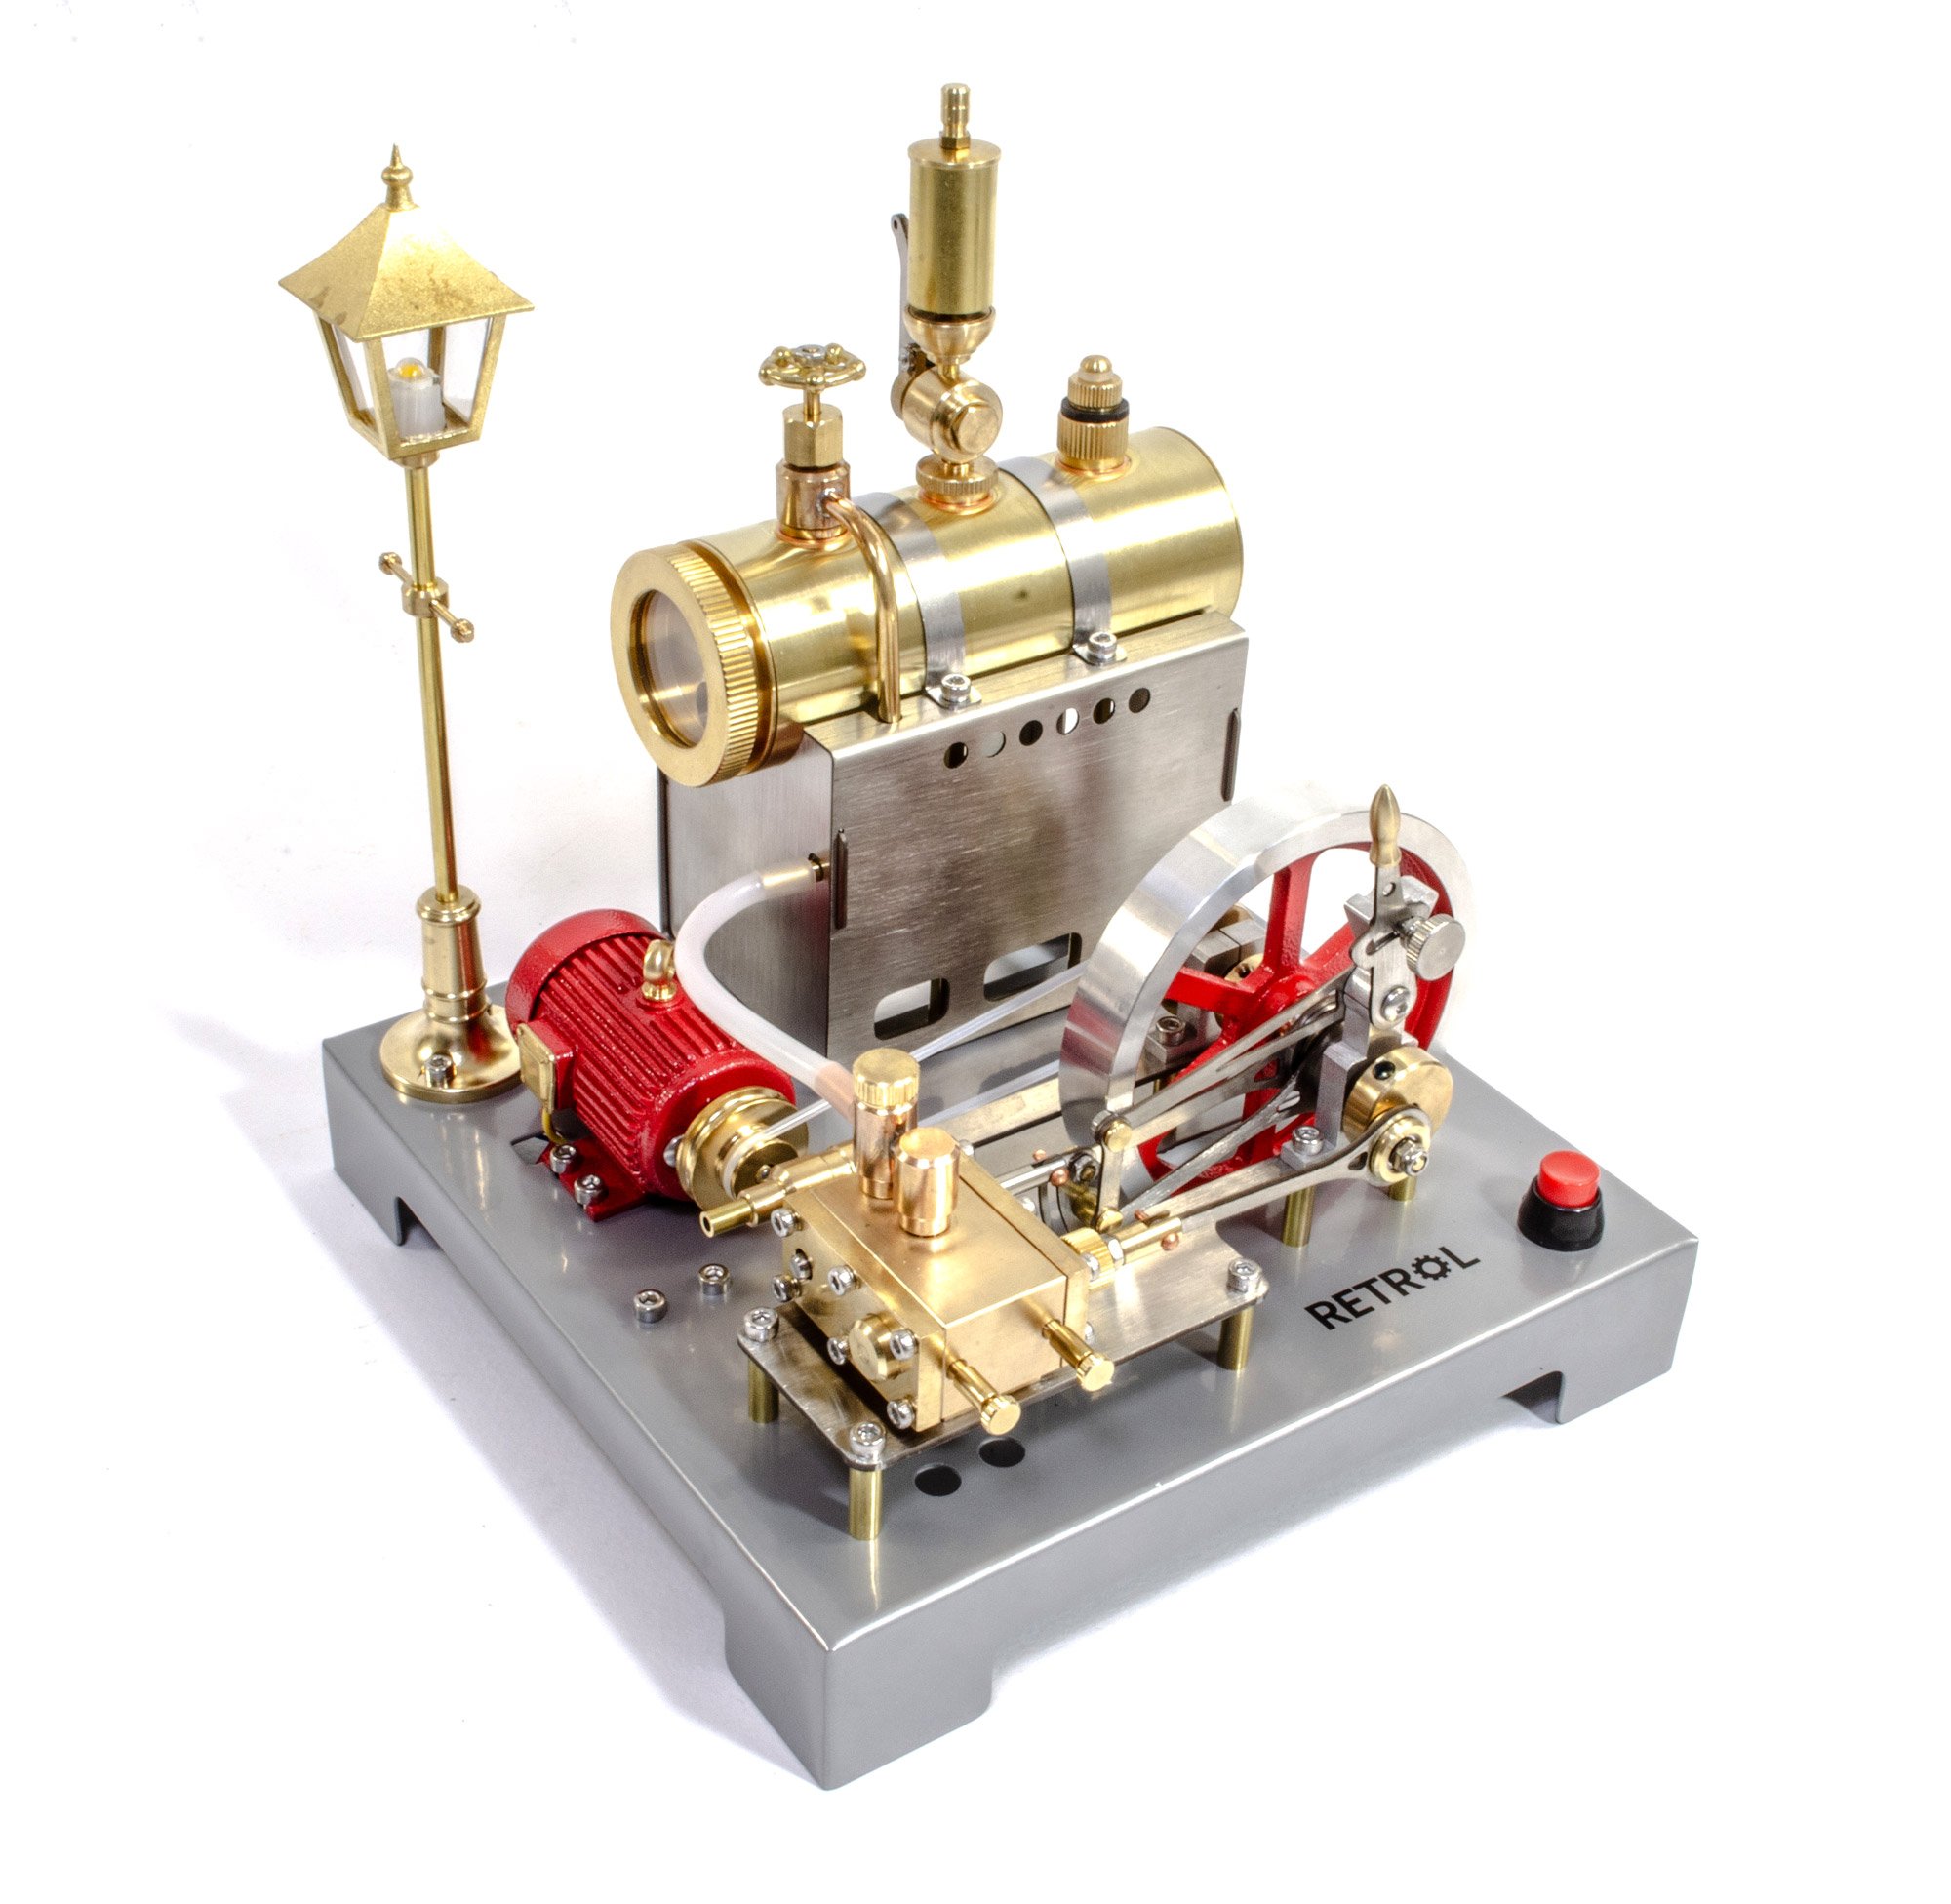
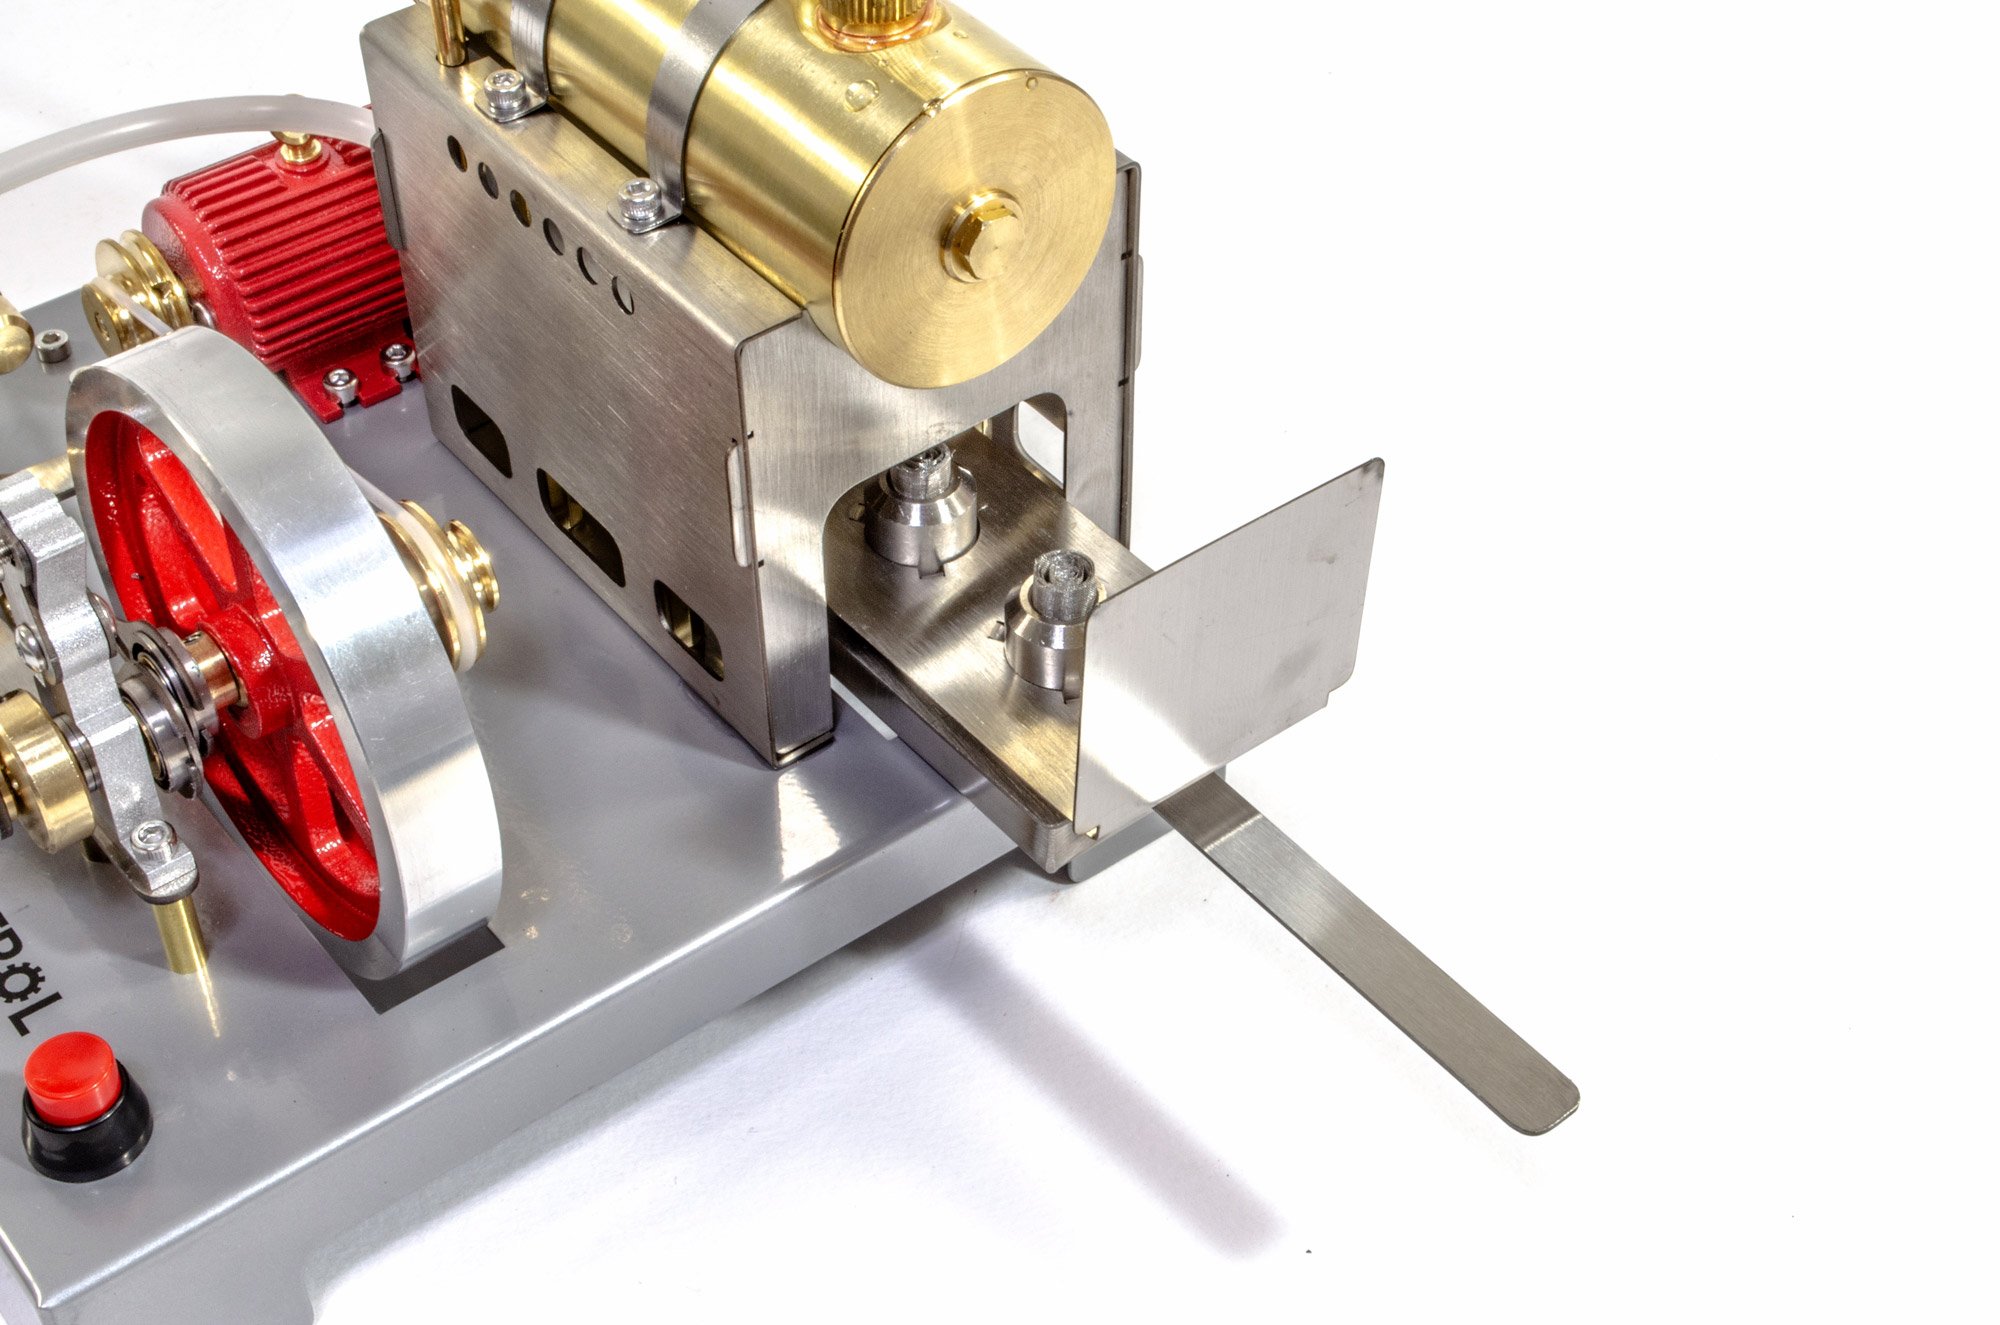
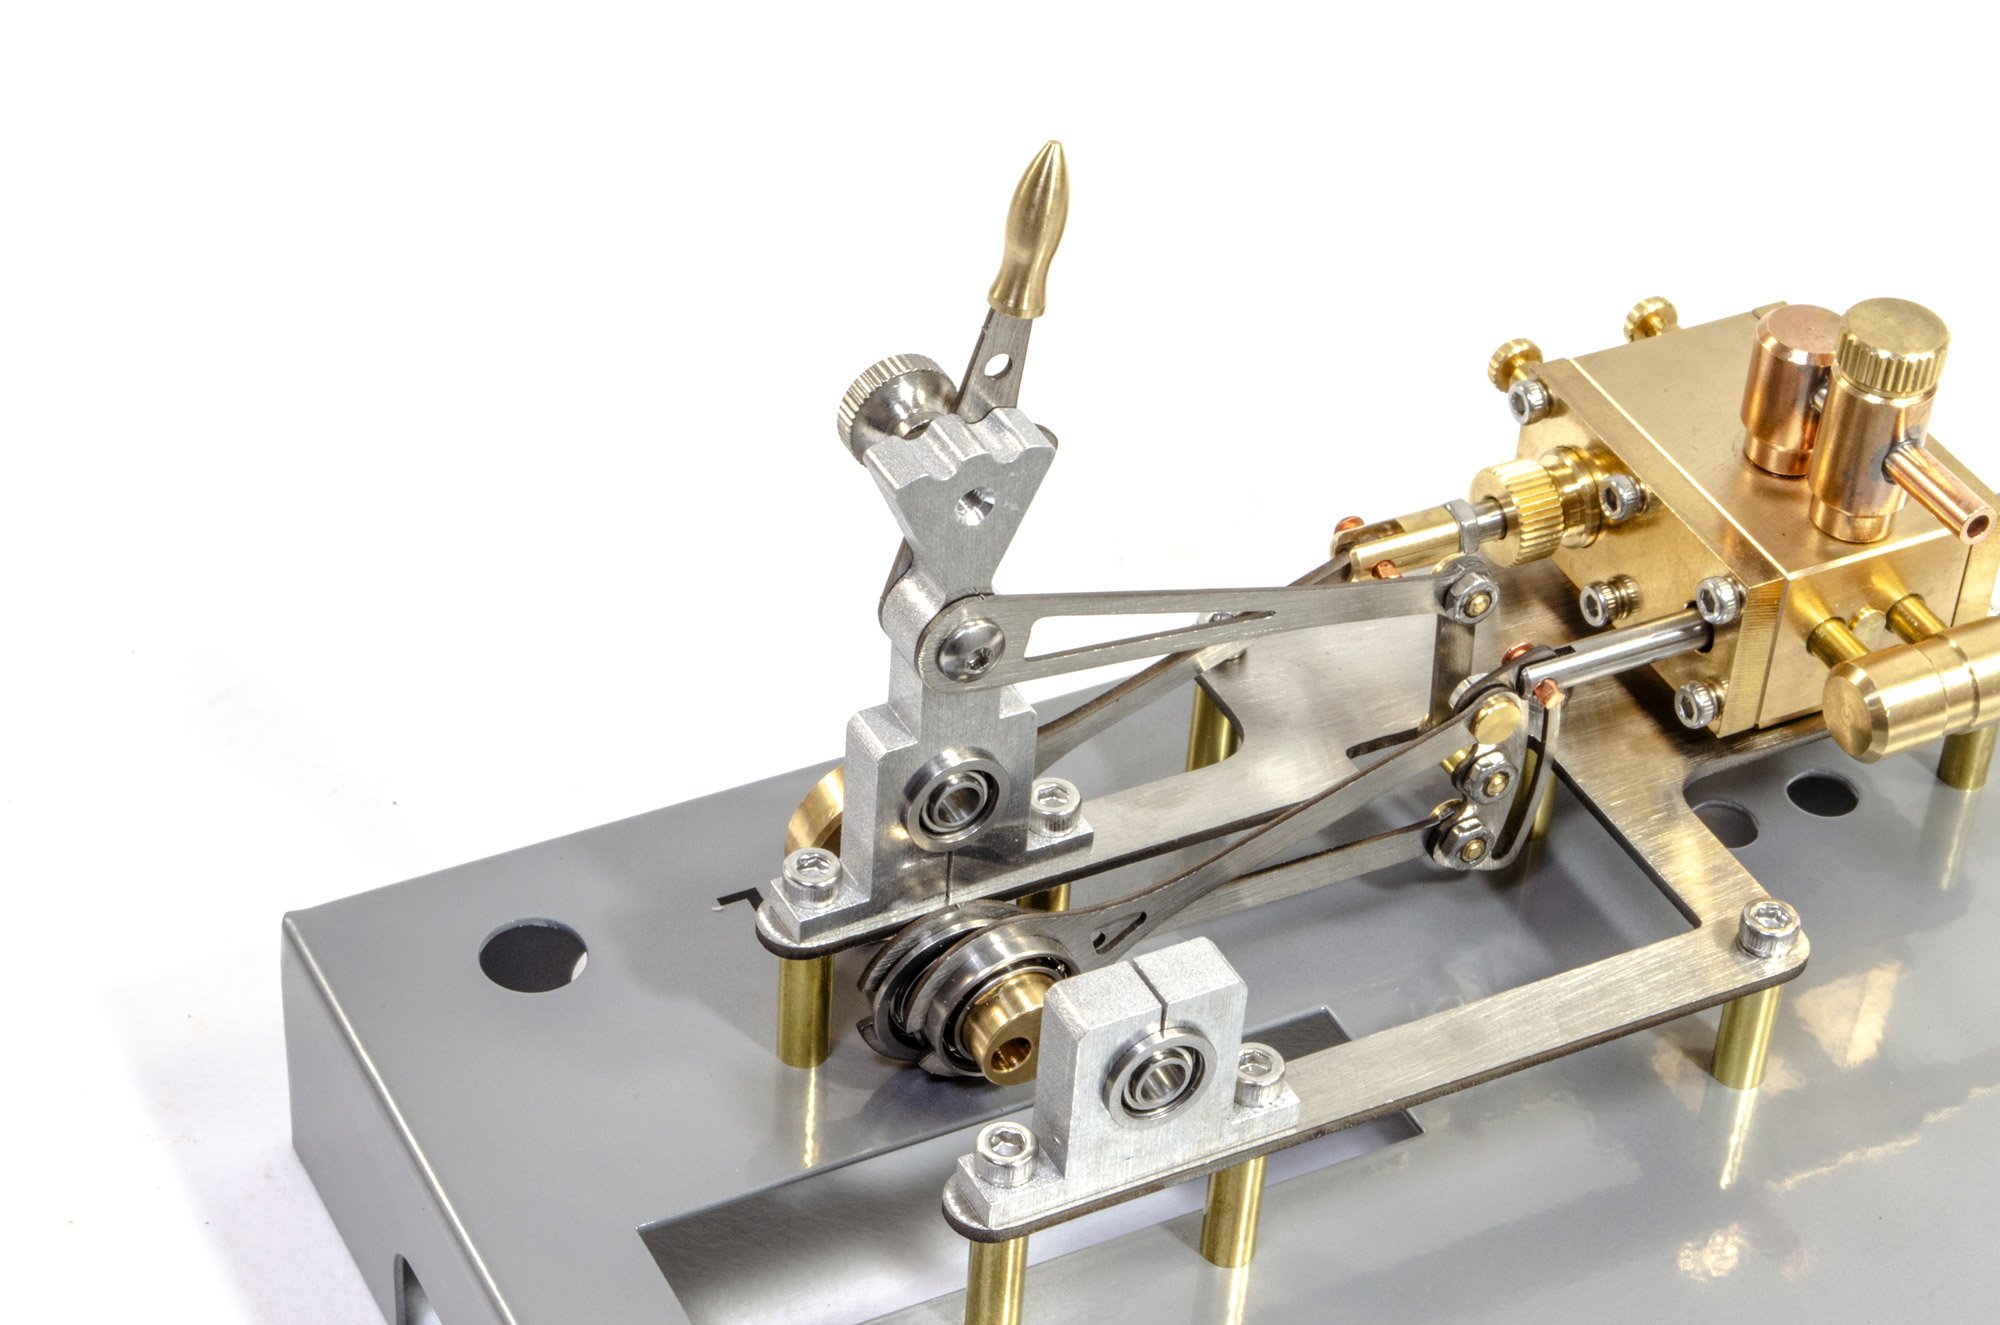
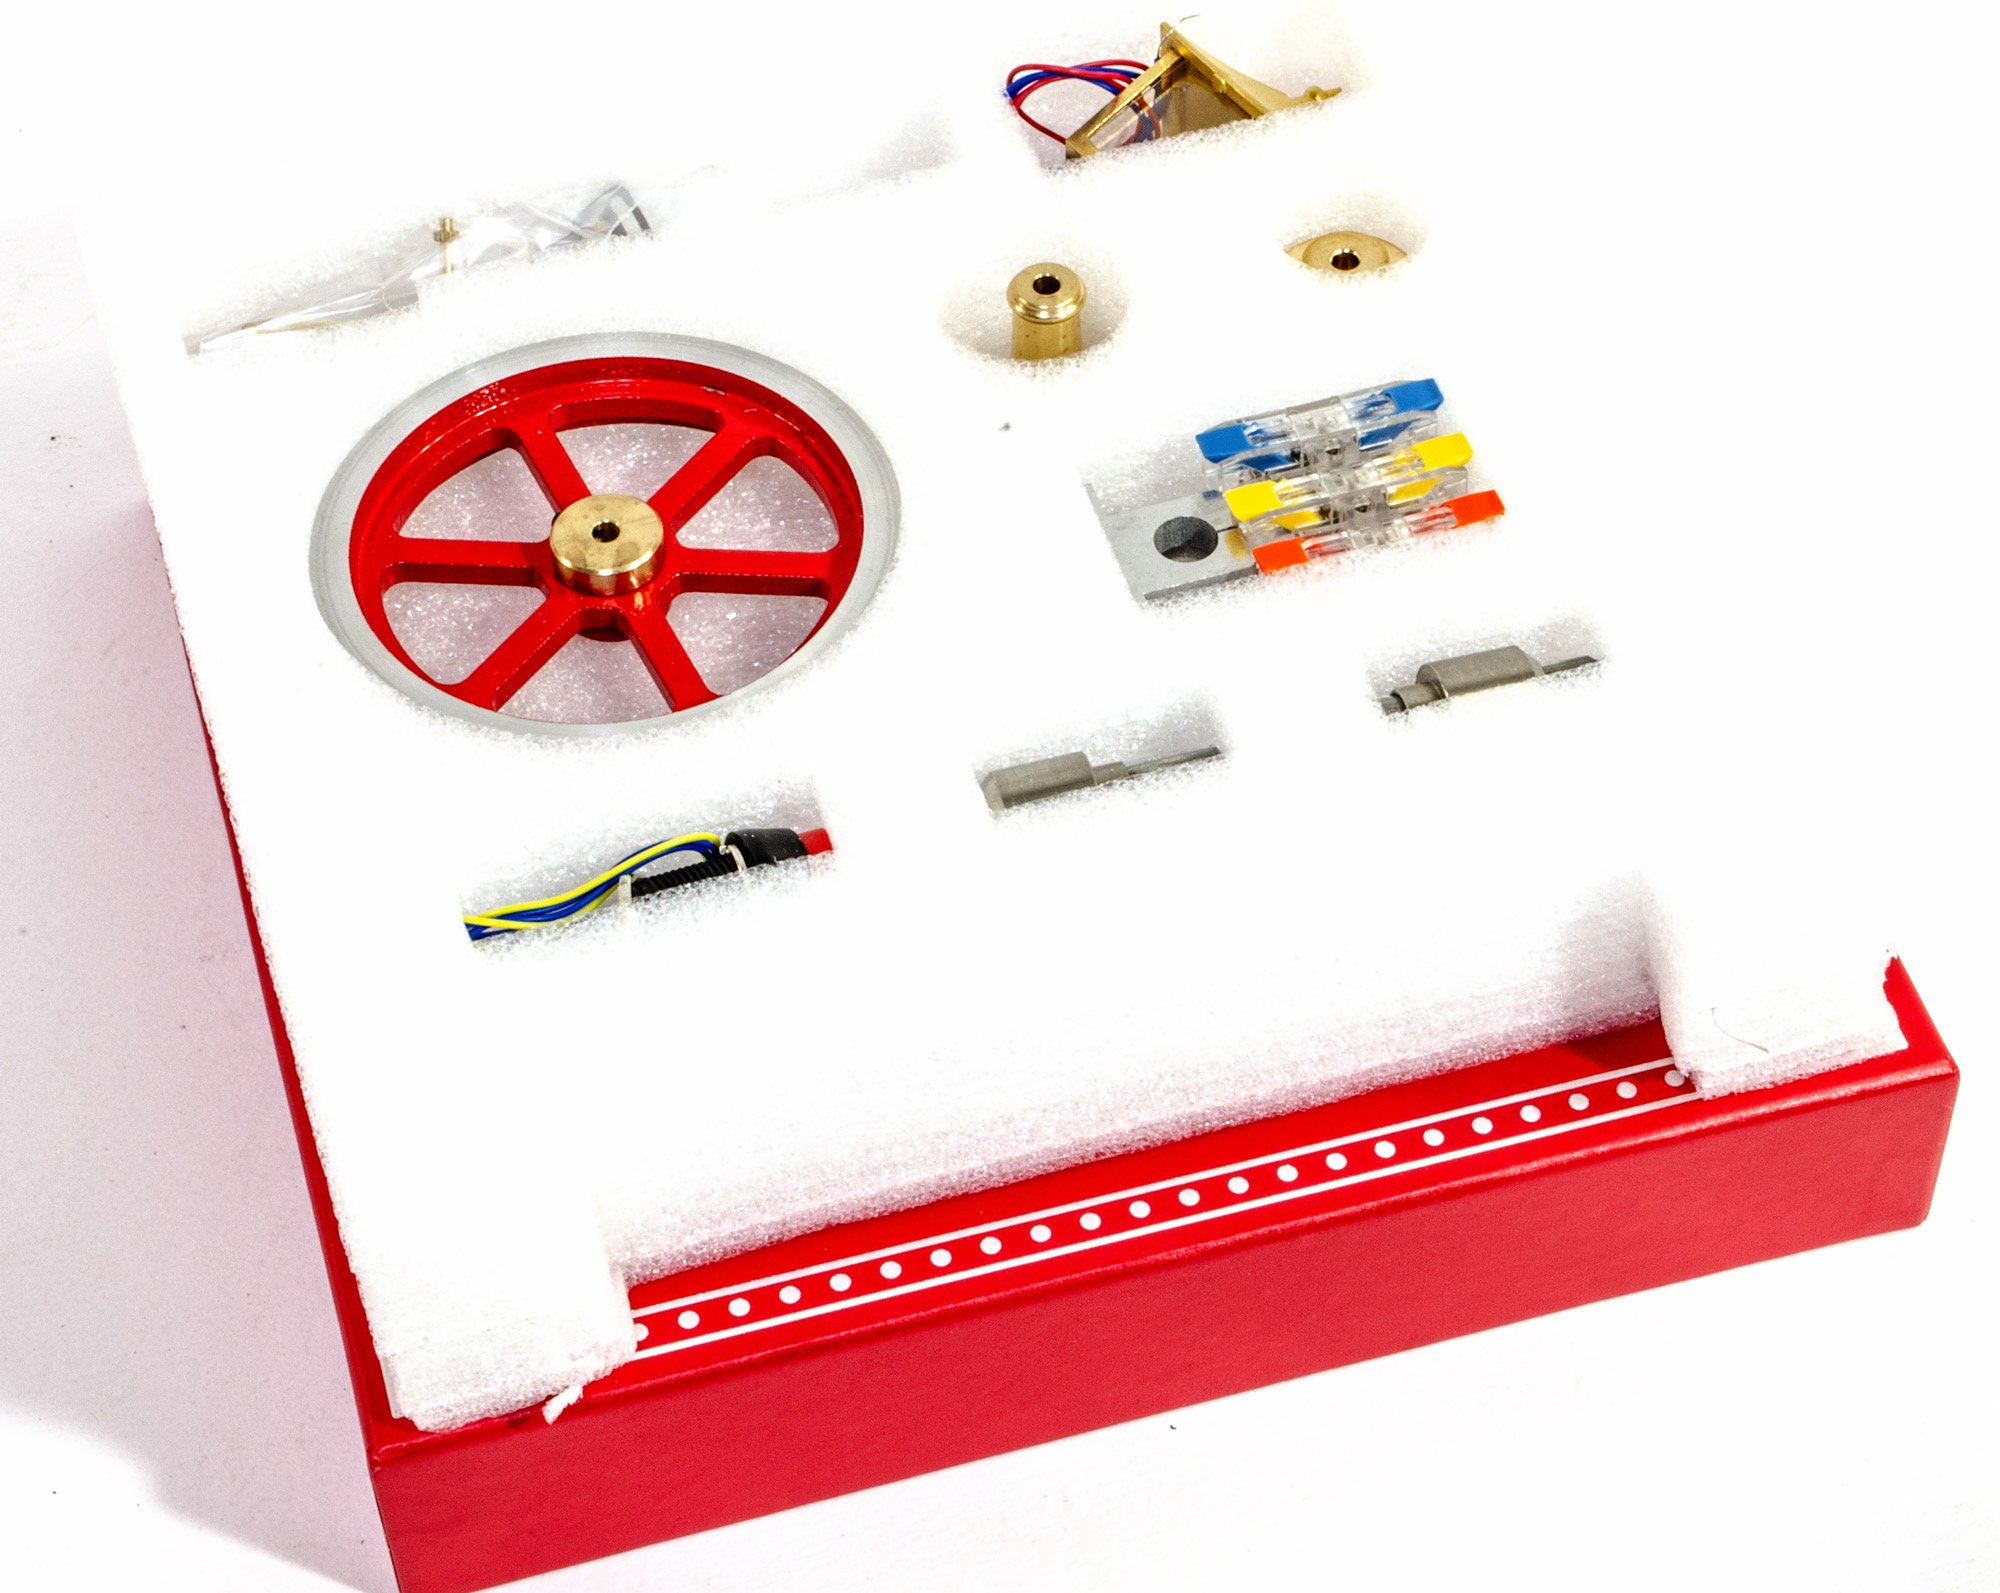
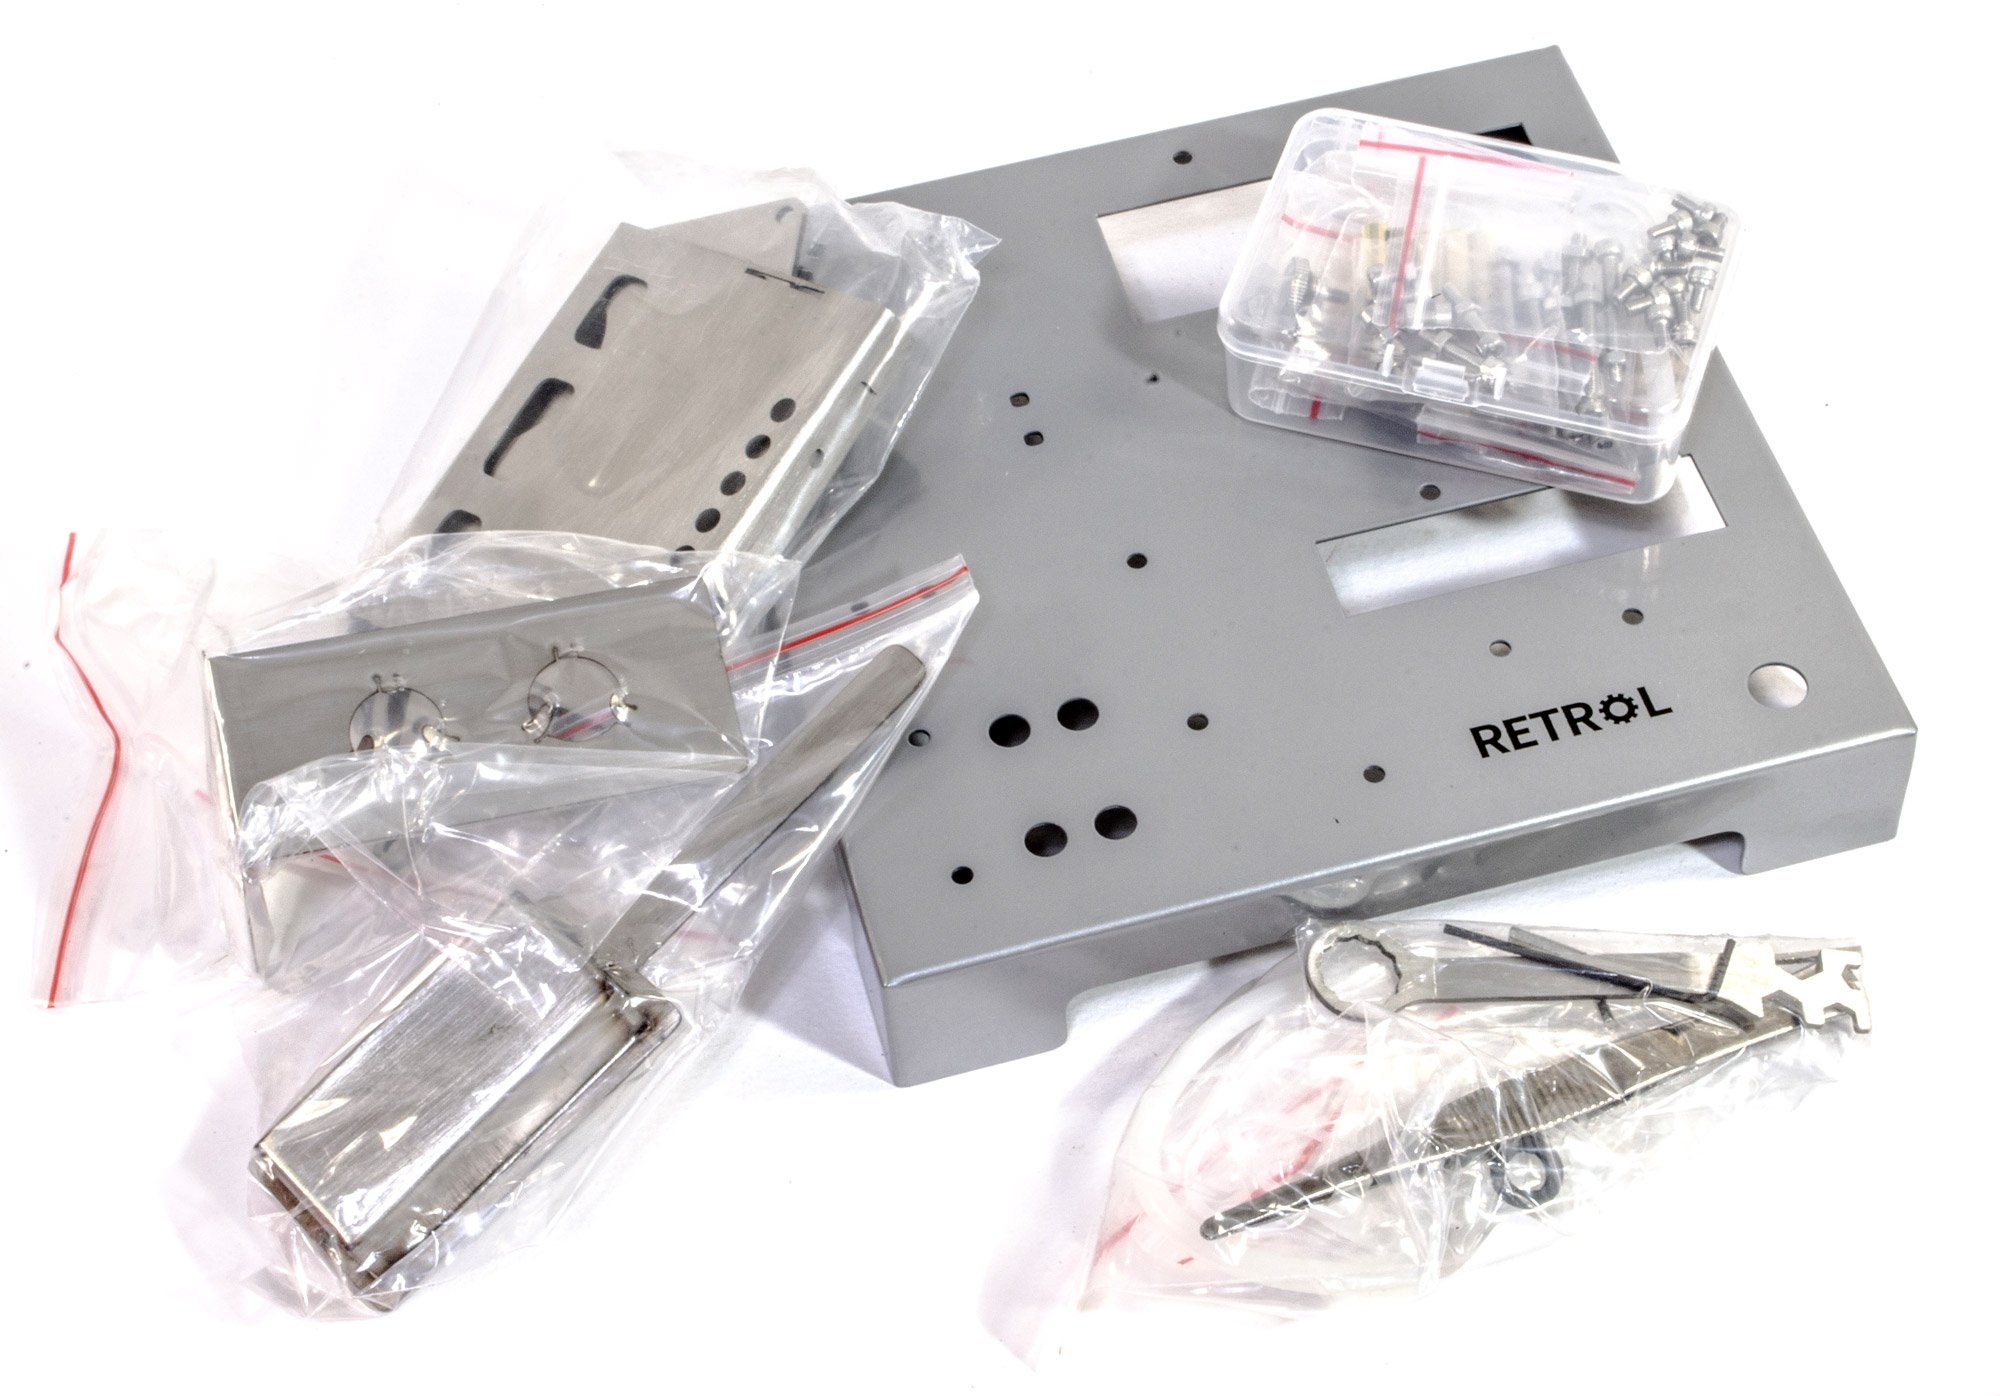
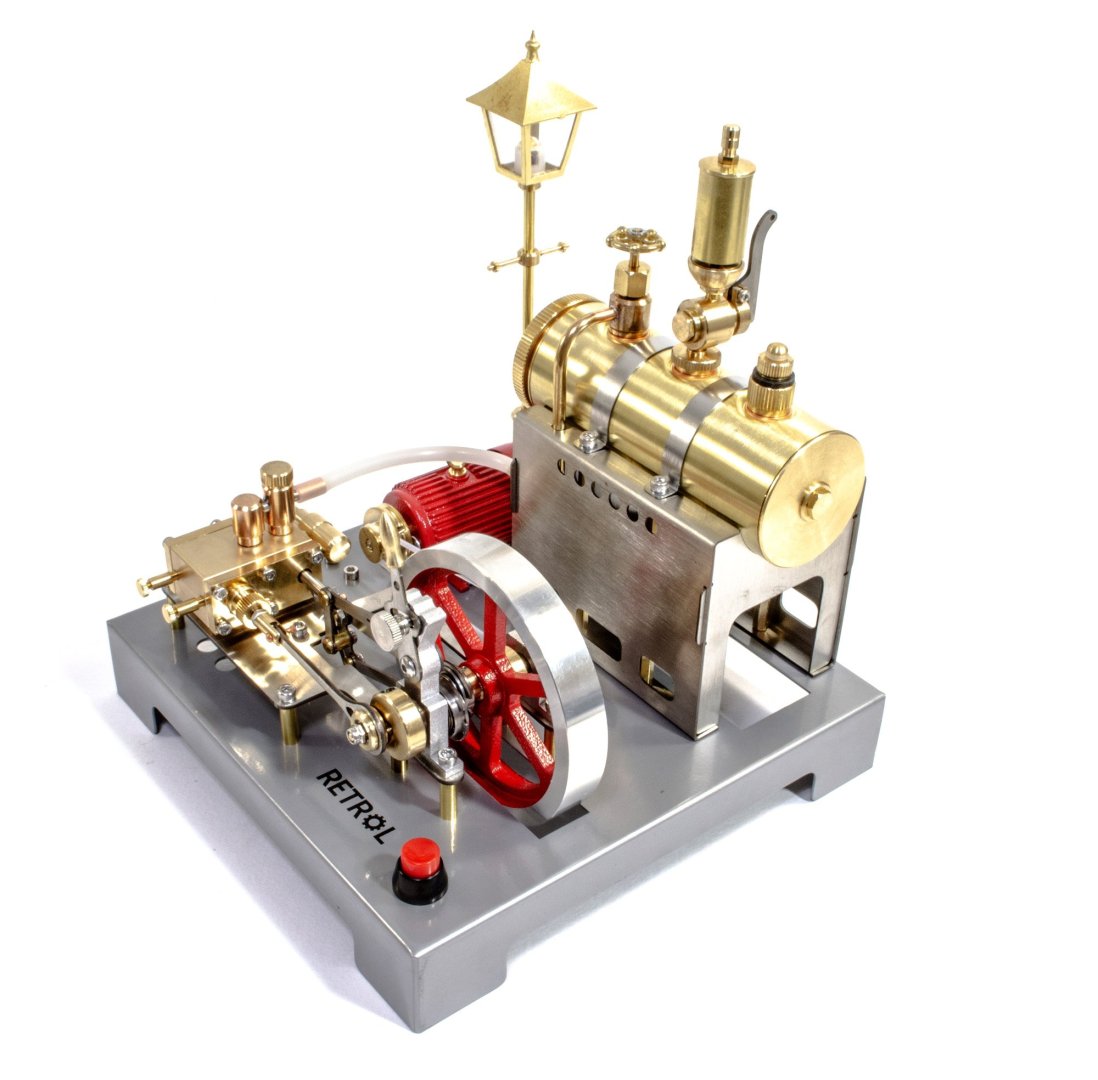
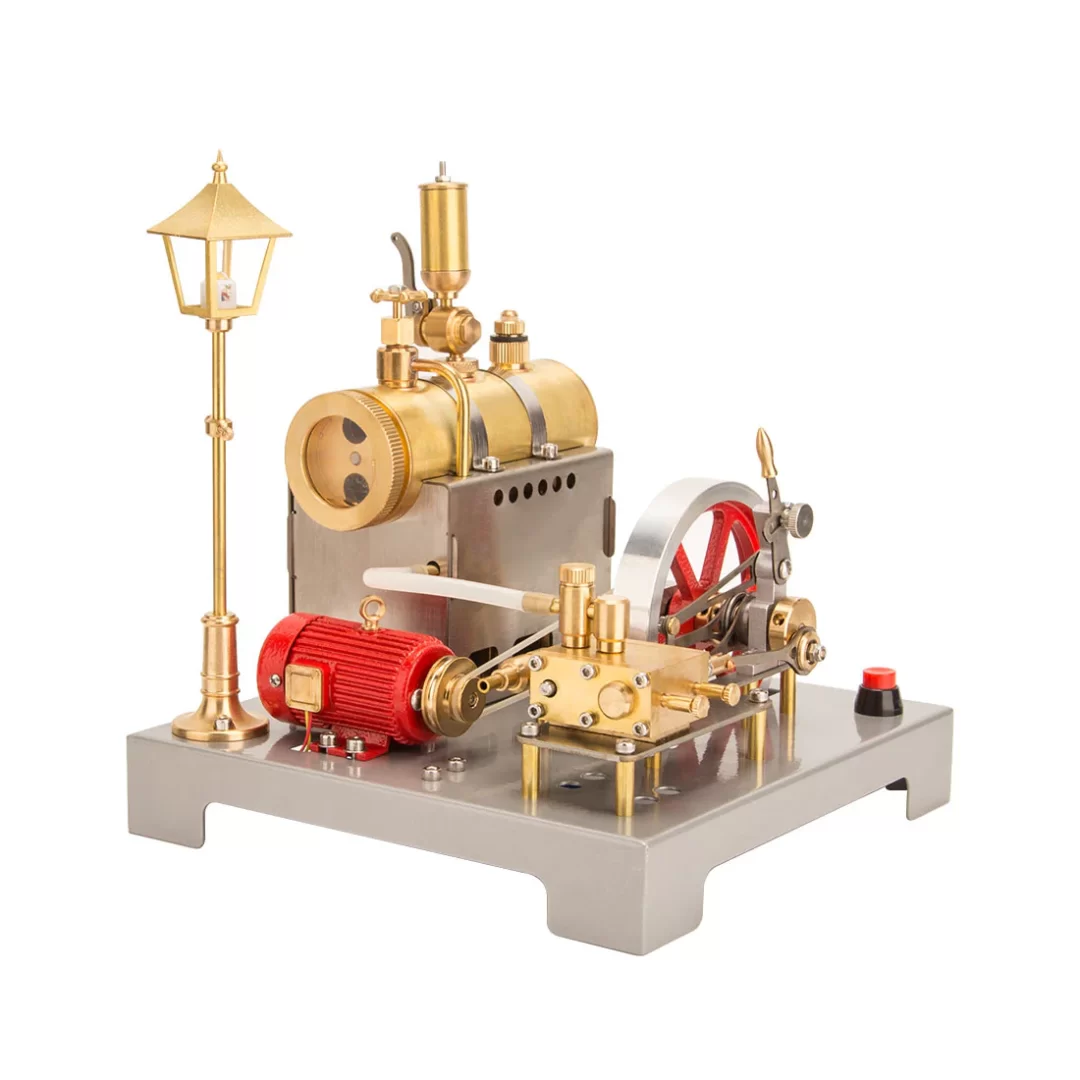
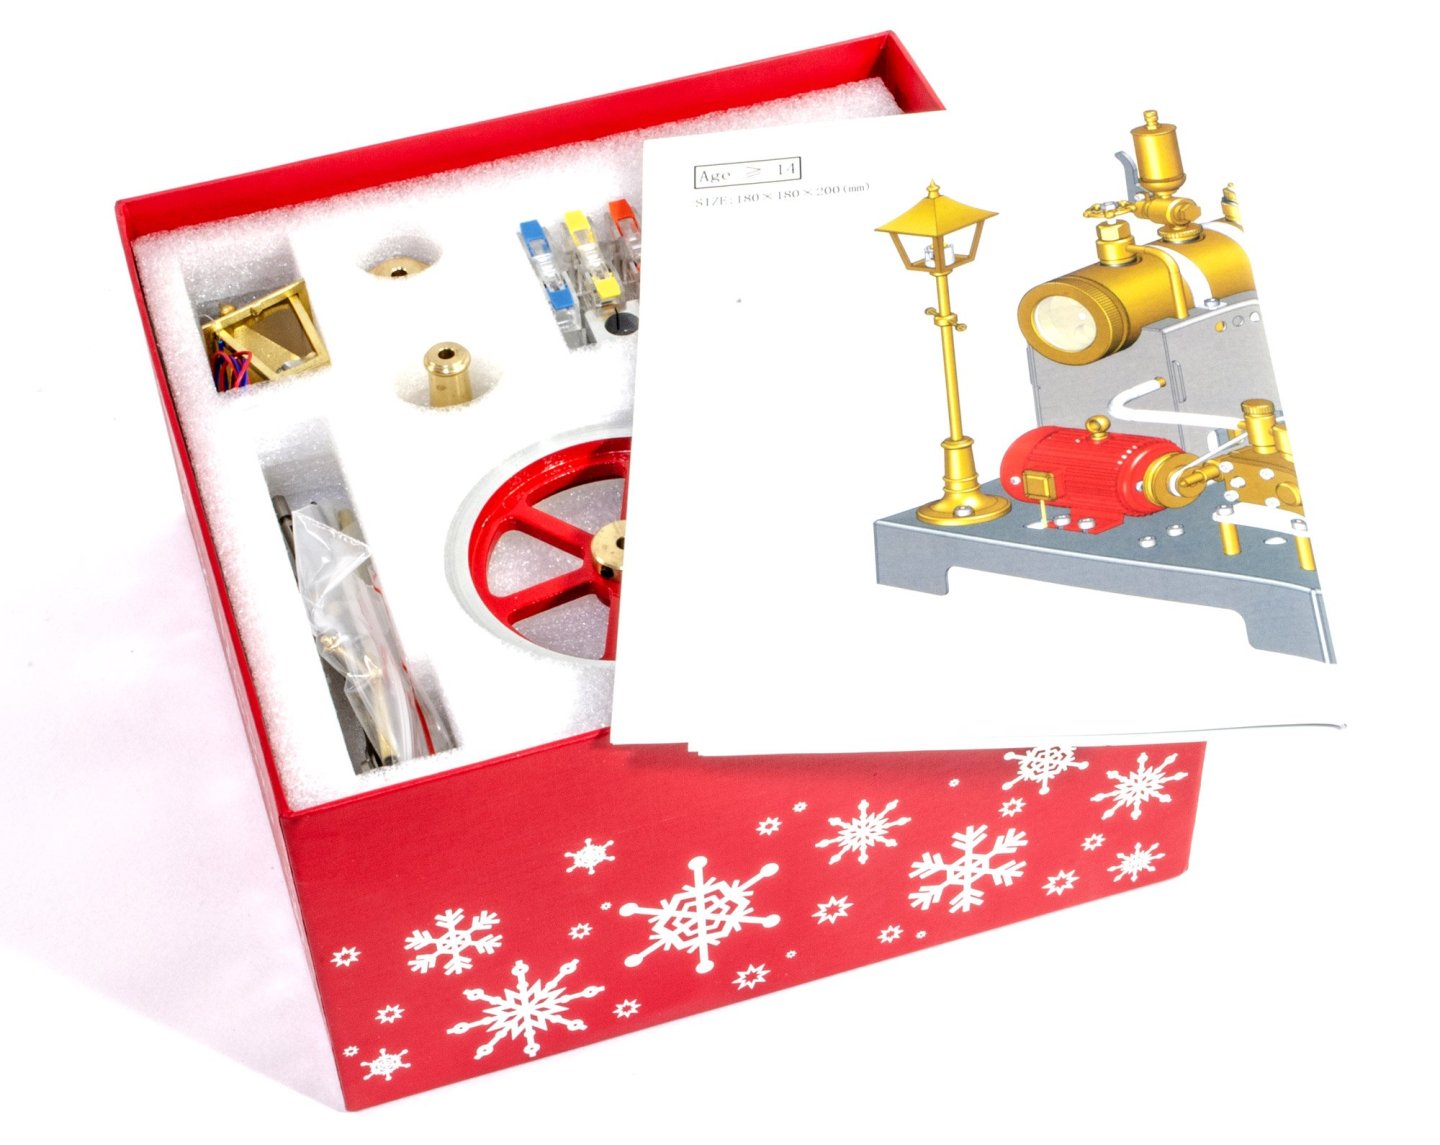
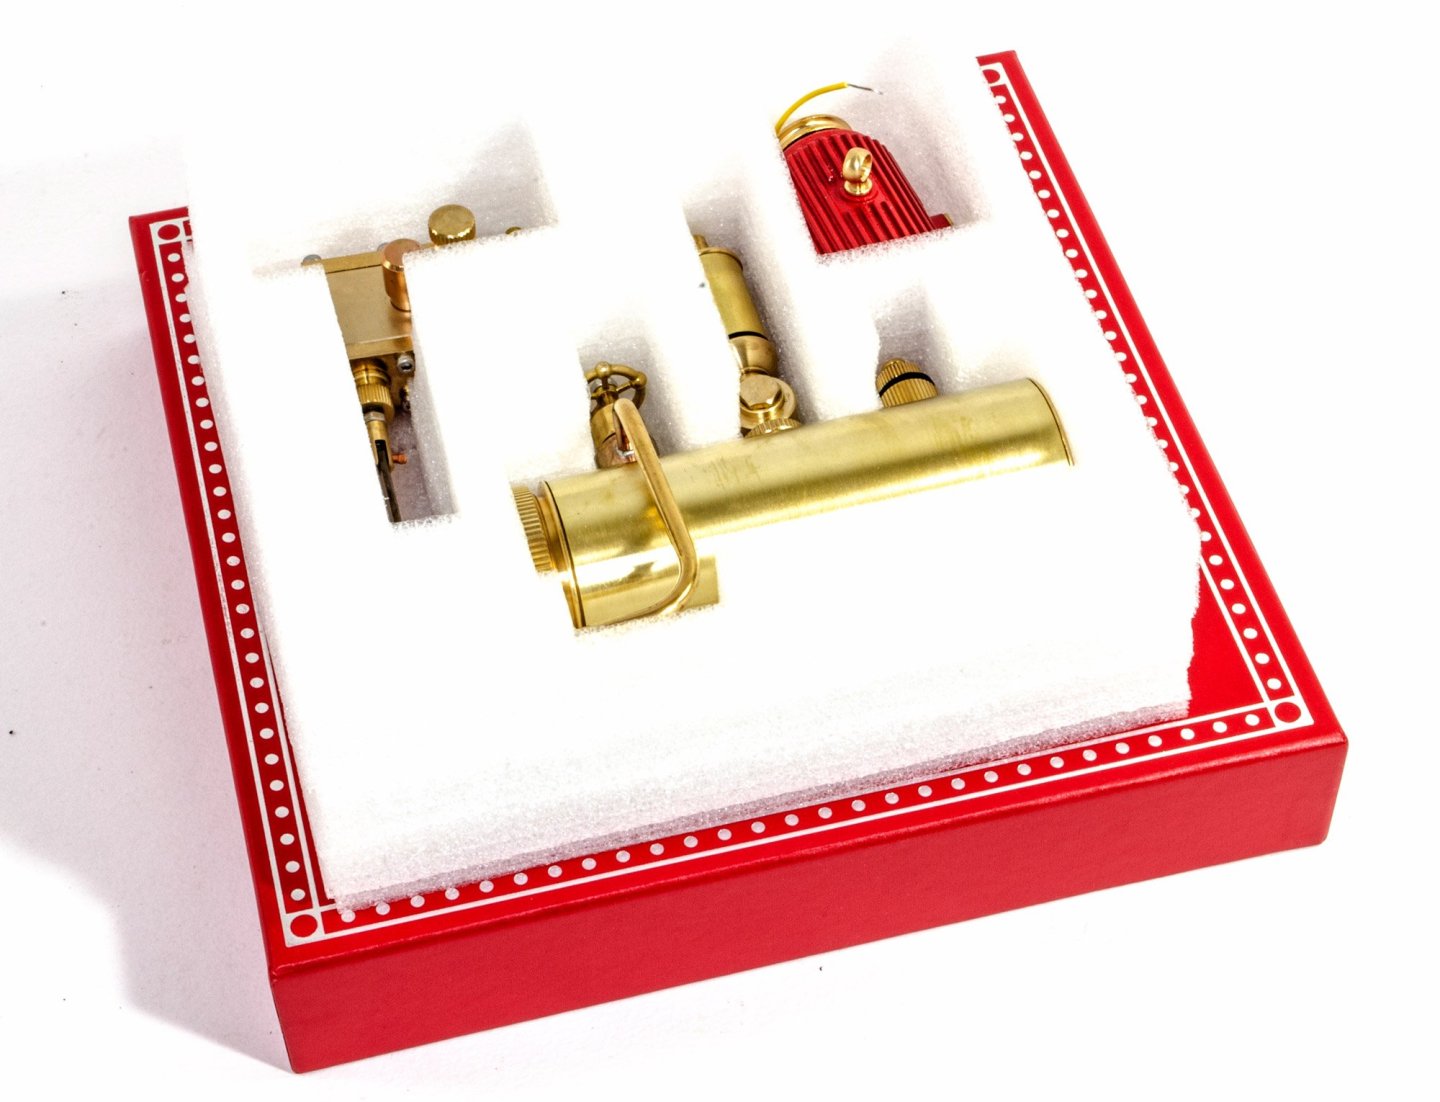
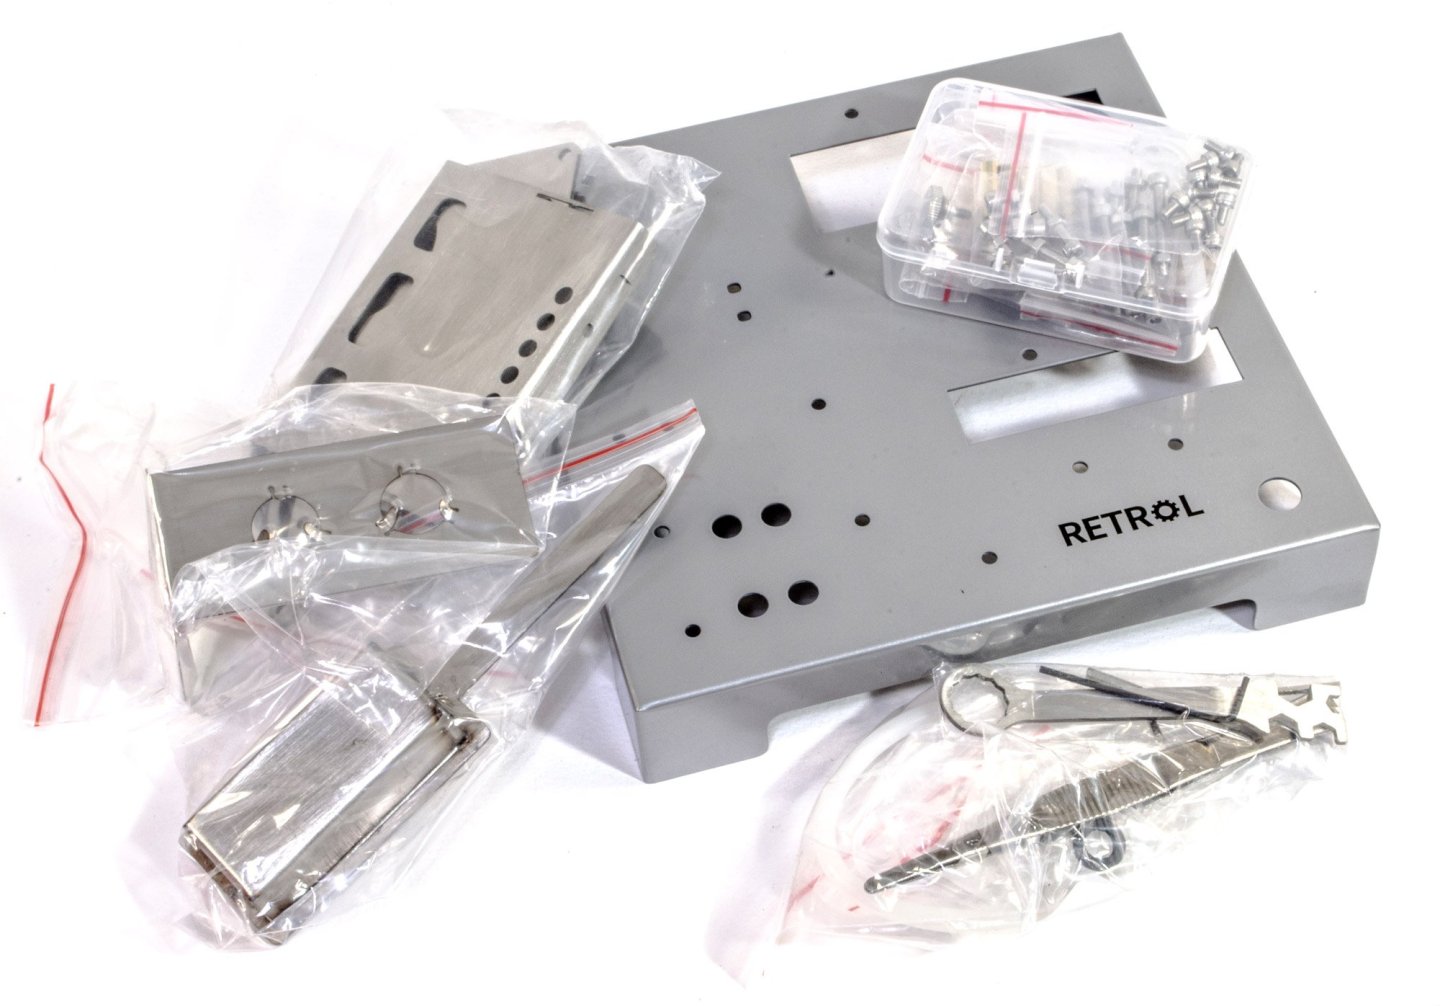
Steam Engine Model with Generator and Street Lamp - RETROL via EngineDIY Catalogue SE-02 Available from EngineDIY for $329.99 A steam engine A steam engine is a heat engine that performs mechanical work using steam as its working fluid. The steam engine uses the force produced by steam pressure to push a piston back and forth inside a cylinder. This pushing force can be transformed by a connecting rod and crank into rotational force for work. The term "steam engine" is most commonly applied to reciprocating engines as just described, although some authorities have also referred to the steam turbine and devices such as Hero's aeolipile as "steam engines". The essential feature of steam engines is that they are external combustion engines, where the working fluid is separated from the combustion products. The kit featured here is a very simplistic version of how steam power is converted into electrical energy that goes to power either industrial, commercial, or urban applications by the flywheel output being tethered to an electrical dynamo. The flywheel drives the dynamo drive shaft and the motion is converted into electricity by using a rotating coil of wire and a magnetic field to convert mechanical rotation into electric current. The kit This is actually the second Retrol steam engine kit I've reviewed here, and I think this one is perhaps more suited to the beginner, s the setup procedure is so simple that it's pretty much foolproof. The info on the EngineDIY site says this: "Following the impressive Beam Steam Engine Model Kit, this Horizontal Steam Engine Model Kit is another remarkable creation, giving you the opportunity to construct a fully functional miniature steam power scene and simulate an early industrial marvel. The steam engine features a classic horizontal single-cylinder design with forward and reverse switching capabilities. It comes paired with a highly polished brass boiler, complete with a steam whistle, steam handwheel cut-off valve, and spring-loaded safety valve. The iron baseplate is painted gray and supports a miniature generator that powers an industrial street lamp located at the rear of the boiler. A switch button on the base controls the lamp, illuminating the entire model when the steam engine is running. This is a perfect entry-level kit for hobbyists, providing the joy of assembly and the chance to experience the allure of steam power from the industrial age!" The kit itself comes in a sturdy and very festive box with just the company name on the box lid. Inside the box, there are two foam trays of parts. Many of these parts are already pre-built assemblies, such as the boiler unit, street lamp head, piston box etc. There are also a good number of plastic bag containing the rest of the kit, as well as a small box containing bolts etc. Also included are the various drive belts/tubing and some tools required to build the kit. That's right, there's nothing else needed for this kit, except for some alcohol for fuel. Three printed sheets are also included for instructions and parts map. First task is to bolt the cylinder and crank unit to the installation board. Just four bolts is all that's needed here and there's no real 'play' in anything that would need adjustment later. This is now installed to the main base unit via pillars that give the mechanics some clearance that's seen to be needed for the flywheel etc. Also note that I've added the two bearing seats to the outboard lets of the installation board. Bearings are now fitted to the two seats I just mentioned. At this point, this complicated-looking unit is needed. This is the valve shaft & crank. This unit has the drive shaft inserted into the cylinder box. Before further work installing that unit, the adjusting handle is now inserted and the thumbscrew locked into position.


-
Kit review 1:10 Military Turbofan engine - TECHING (build review)
James H replied to James H's topic in Non ship-related reviews
I do agree there. -
Kit review 1:10 Military Turbofan engine - TECHING (build review)
James H replied to James H's topic in Non ship-related reviews
If it's commercial aviation, then take a look at this one: -
Kit review 1:10 Military Turbofan engine - TECHING (build review)
James H replied to James H's topic in Non ship-related reviews
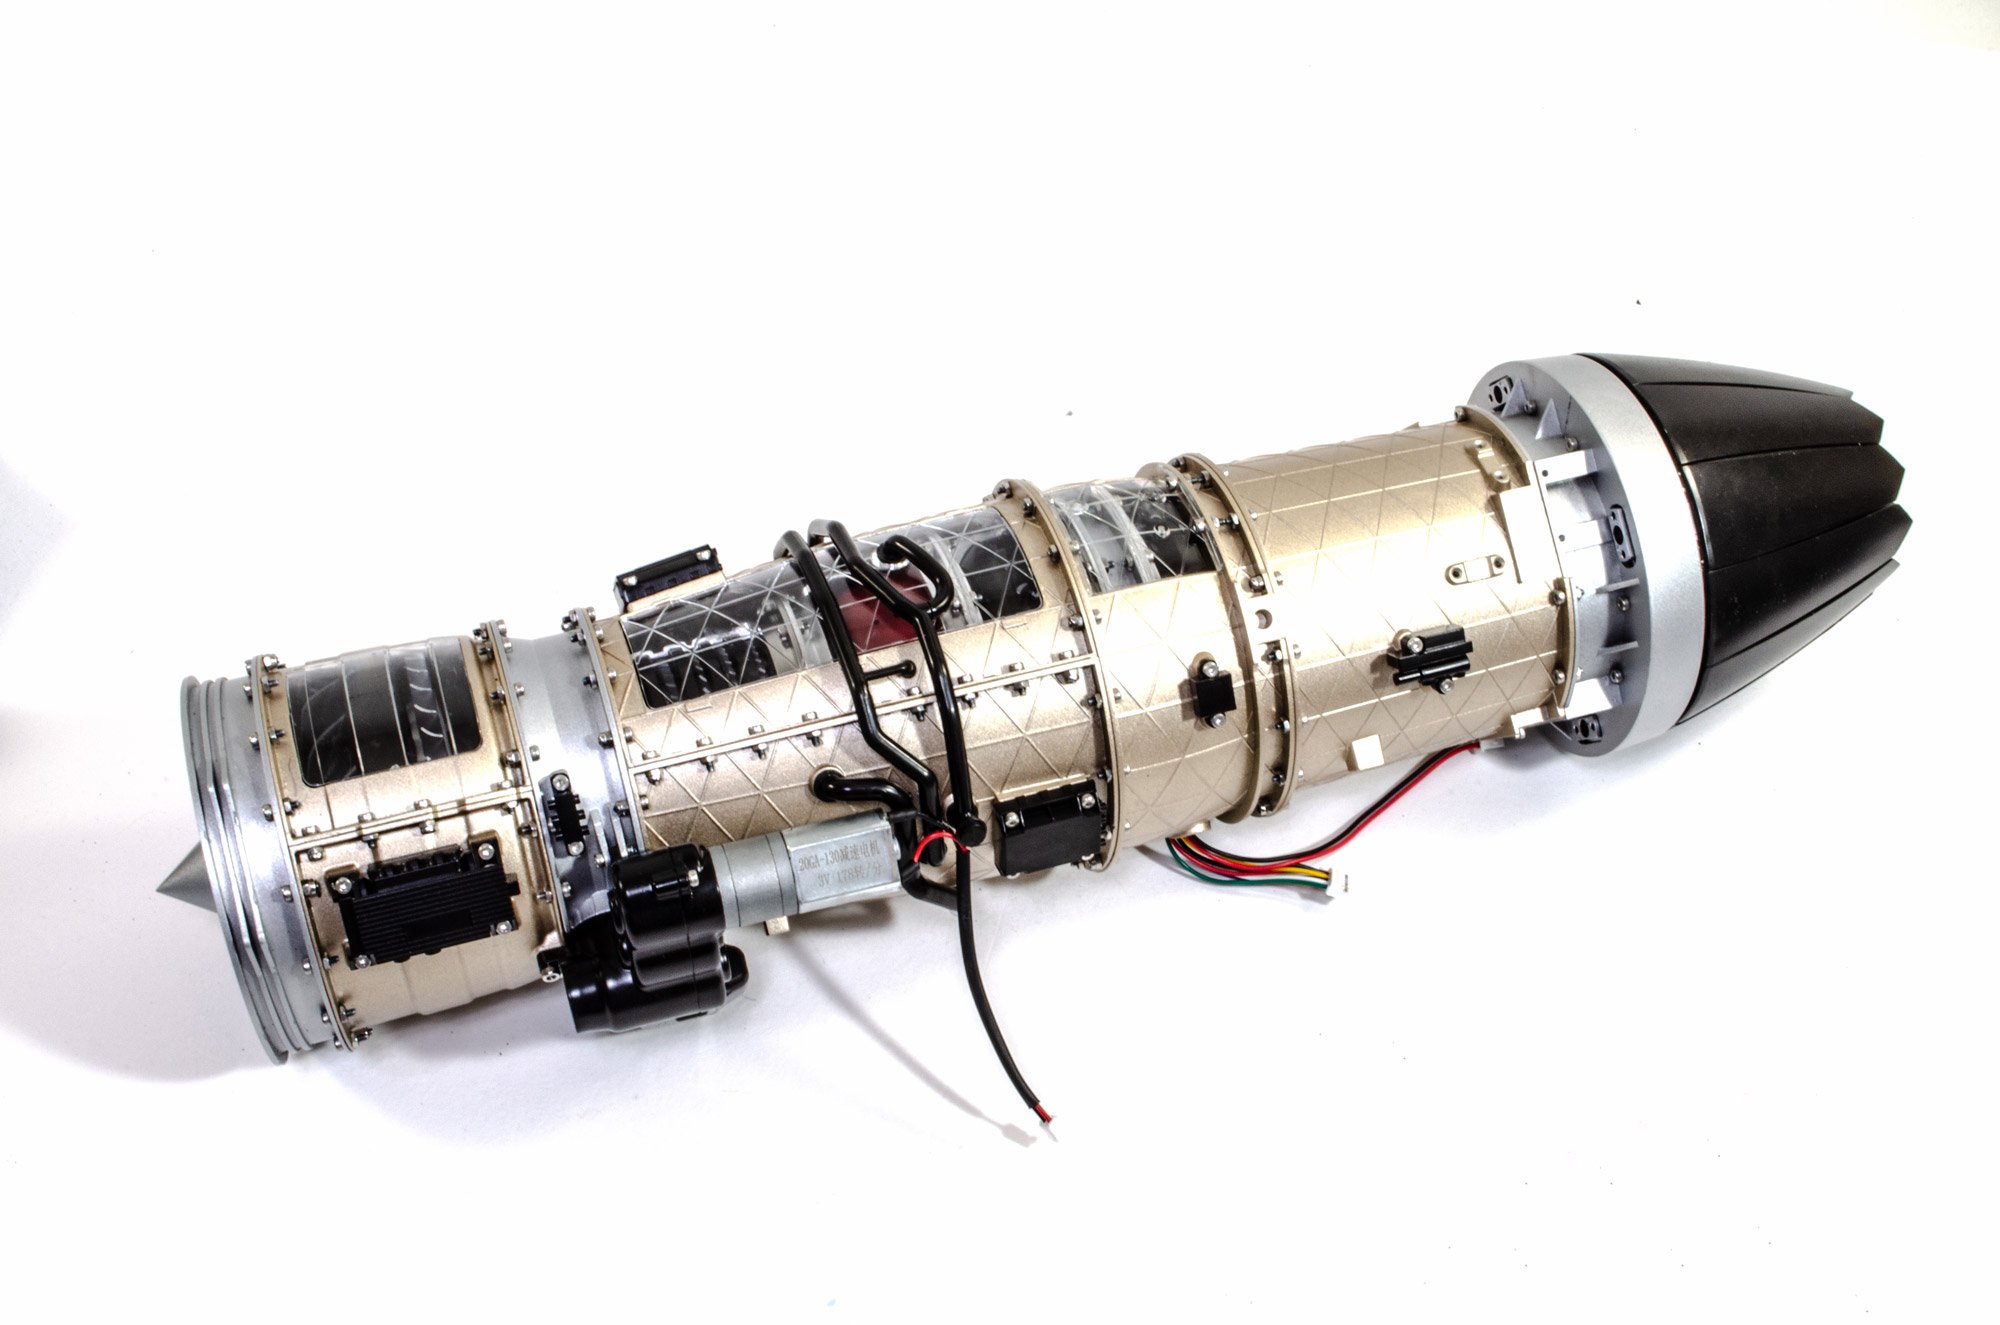
I removed the comments as it just came over as disingenuous. This was never going to be an actual turbofan engine. It's a hobby kit. An engine that has as much thrust as one of the wooden ships we build, has actual sail power. It's an electrically operated kit that is a whole hobby genre in itself, and one that many enjoy participating in. Many of these are used for display or will sit on an executive's desk. You will surely never find an actual model turbine engine (with thrust) for £700. -
Kit review 1:10 Military Turbofan engine - TECHING (build review)
James H replied to James H's topic in Non ship-related reviews
Conclusion In all, this is a seriously nice kit. The very nature of construction means that you need to thoroughly read the instructions and ensure everything is assembled exactly as it should. I wouldn't say this was a beginner kit, unless you are a stickler in the way you work. There are over 600 parts to this model, including nuts and bolts, and the finished project is a real eye-opener in every sense. Also remember that this model is incredibly heavy too, so I wouldn't recommend a glass shelf for display! My sincere thanks to EngineDIY for sending this kit out for the purpose of review here on Model Ship World. To buy directly, click the link at the top of the article.
-
Kit review 1:10 Military Turbofan engine - TECHING (build review)
James H replied to James H's topic in Non ship-related reviews
And finally, here's the video! -
Kit review 1:10 Military Turbofan engine - TECHING (build review)
James H replied to James H's topic in Non ship-related reviews
This kit is currently 20% off on their Black Friday deal.
-
Kit review 1:10 Military Turbofan engine - TECHING (build review)
James H replied to James H's topic in Non ship-related reviews
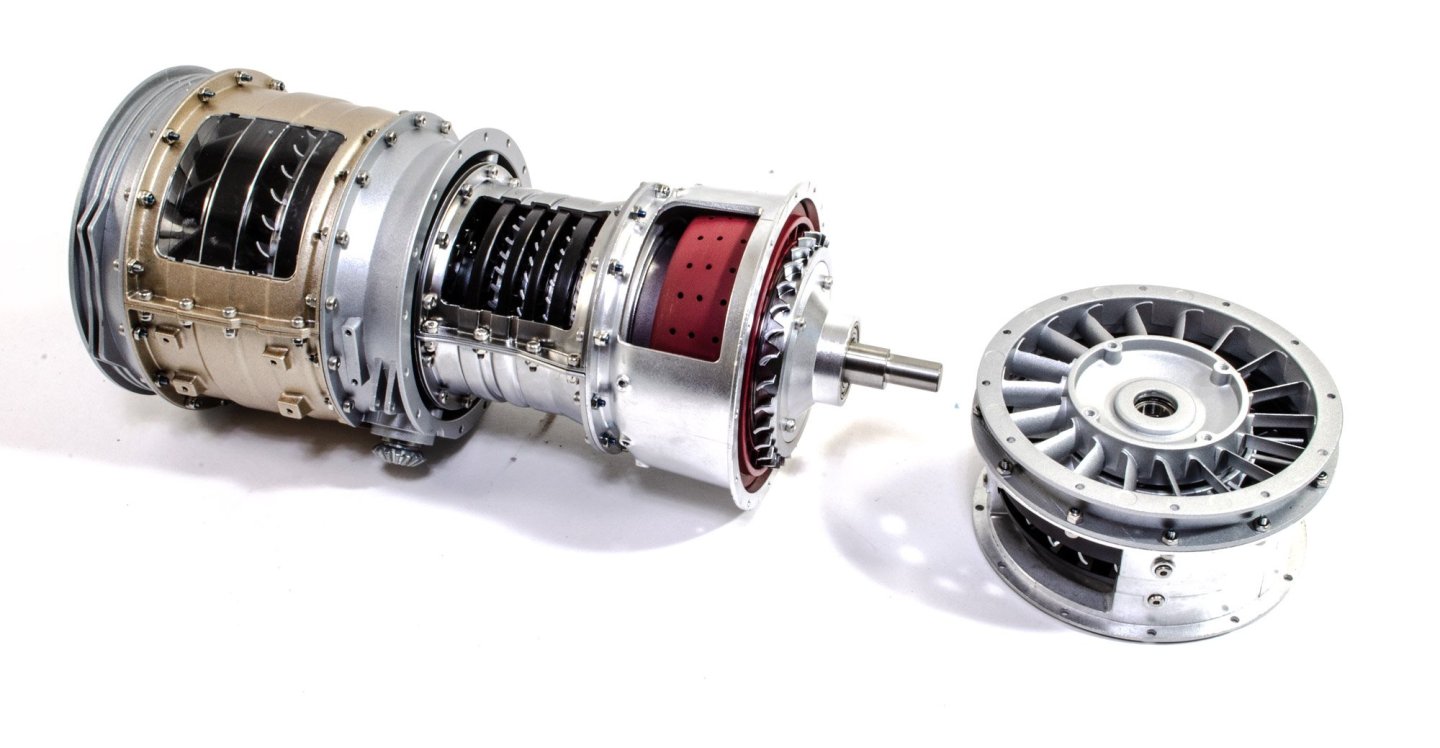
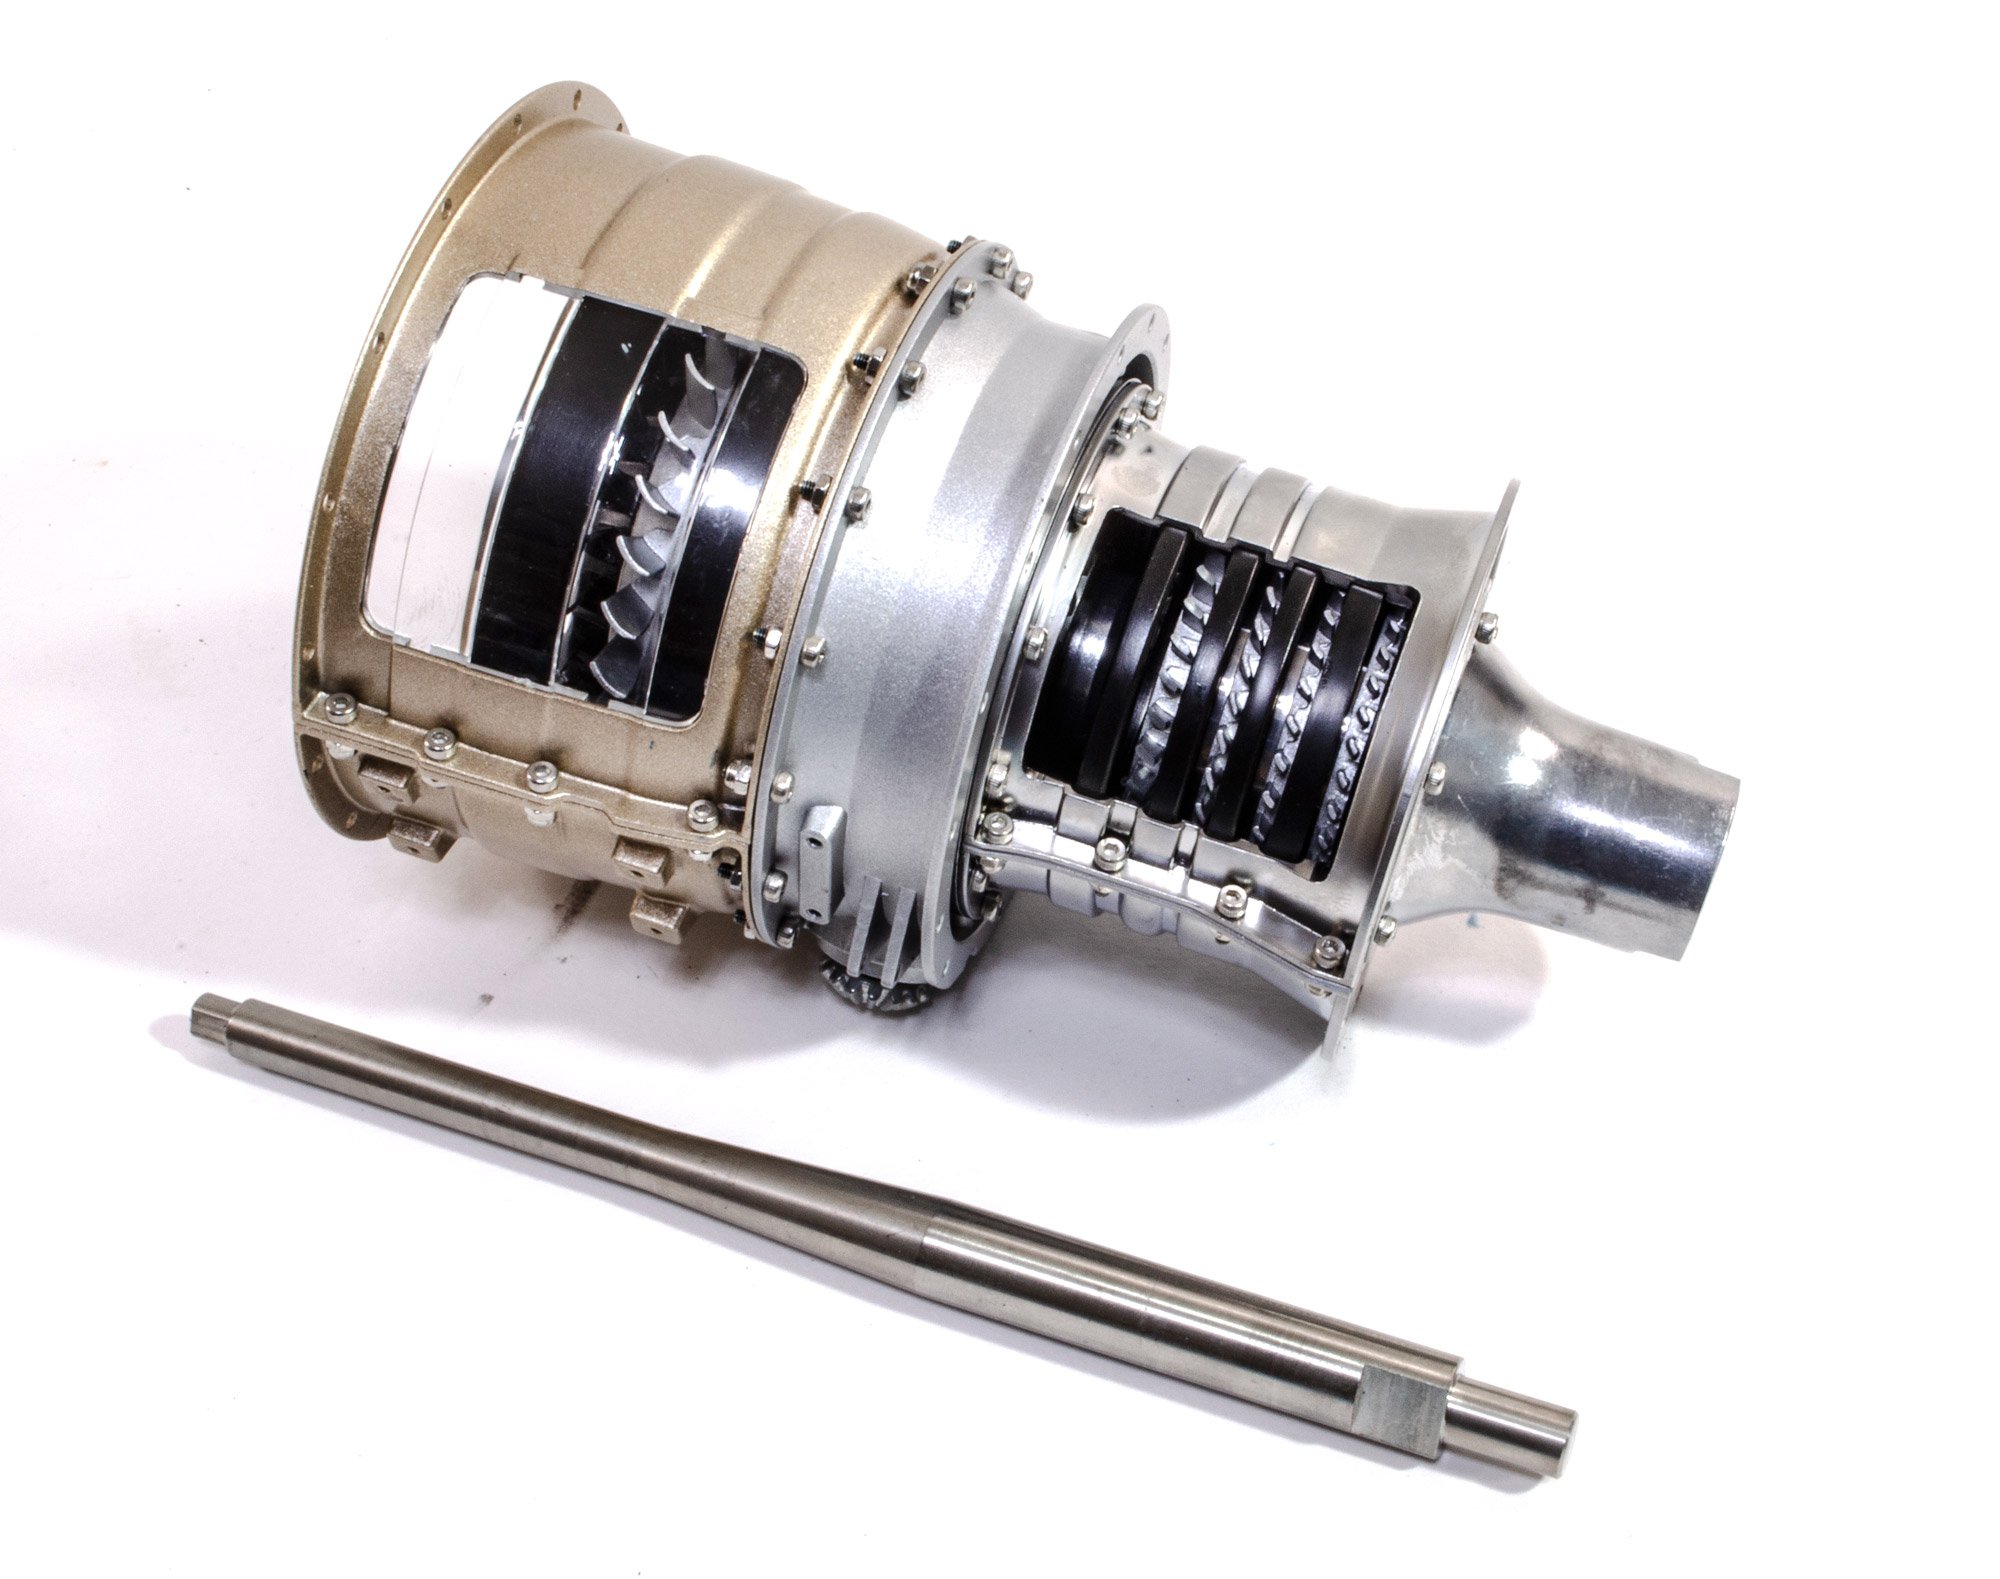
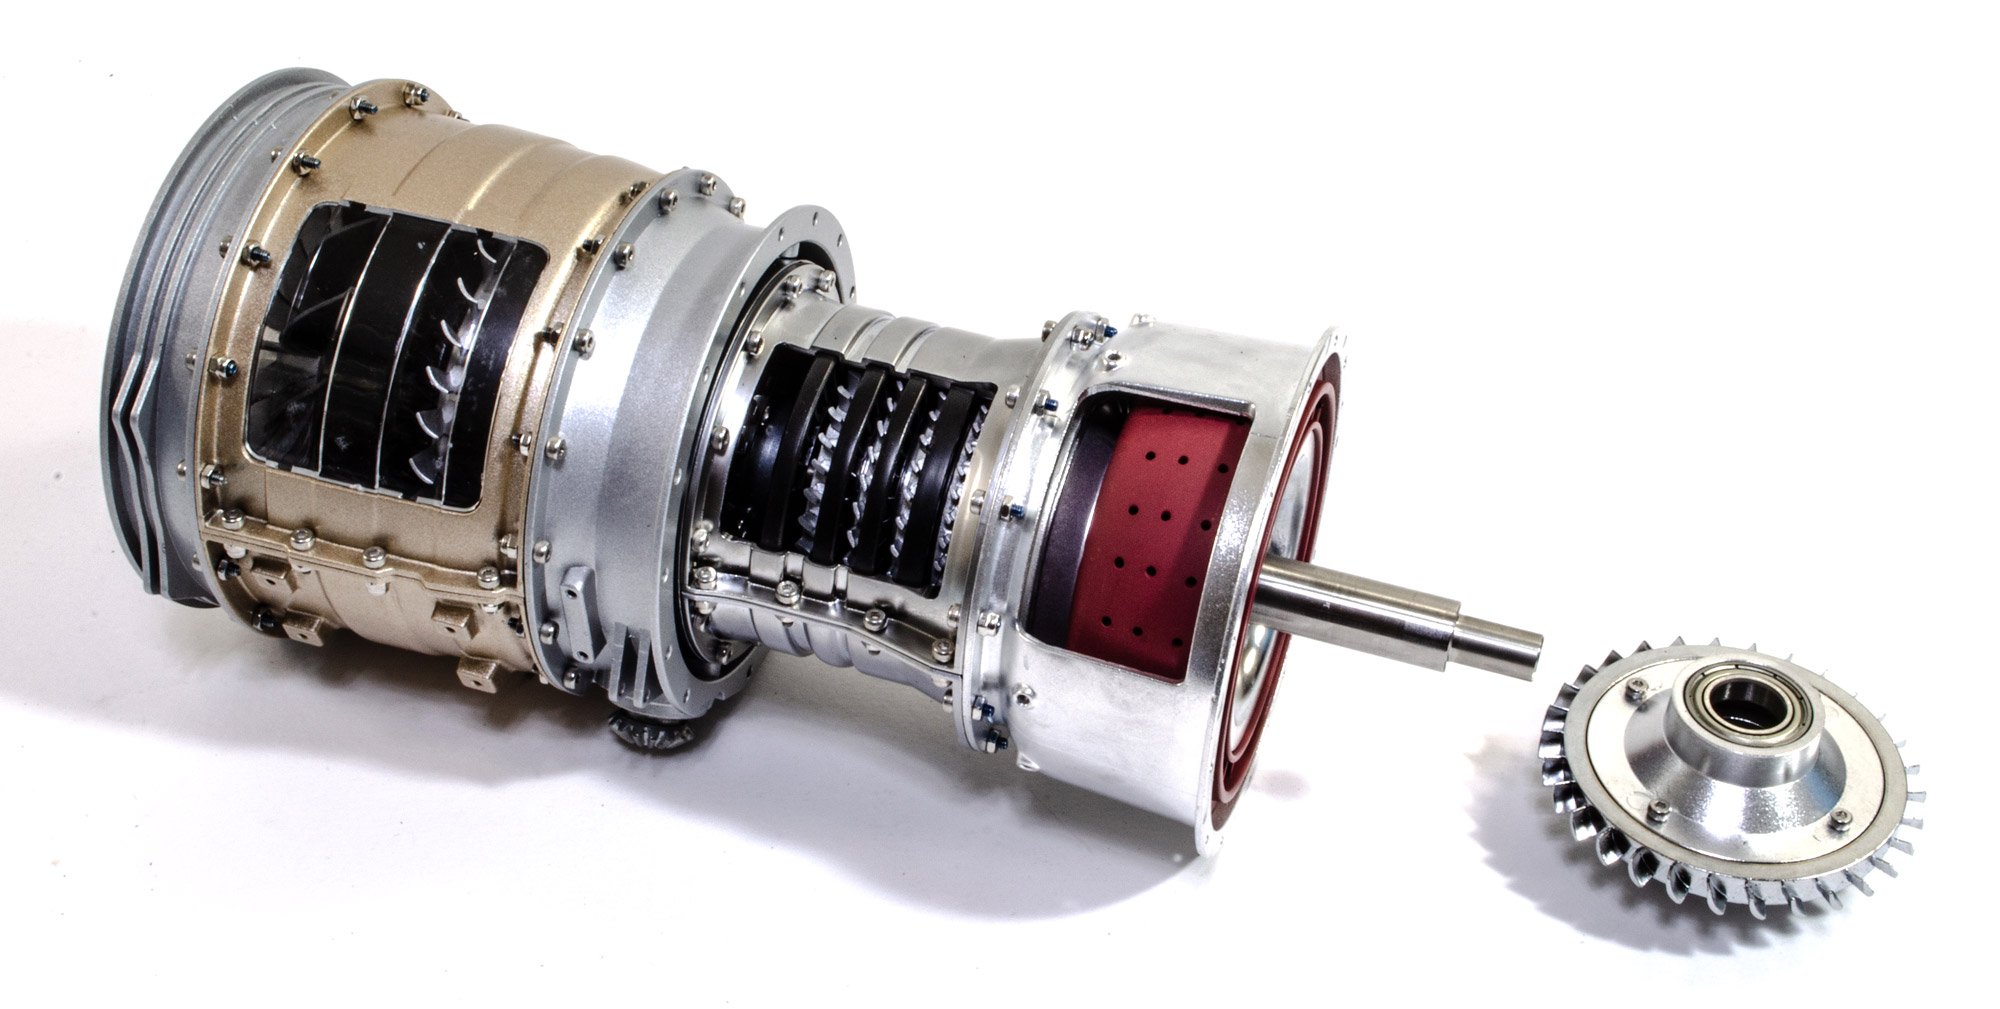
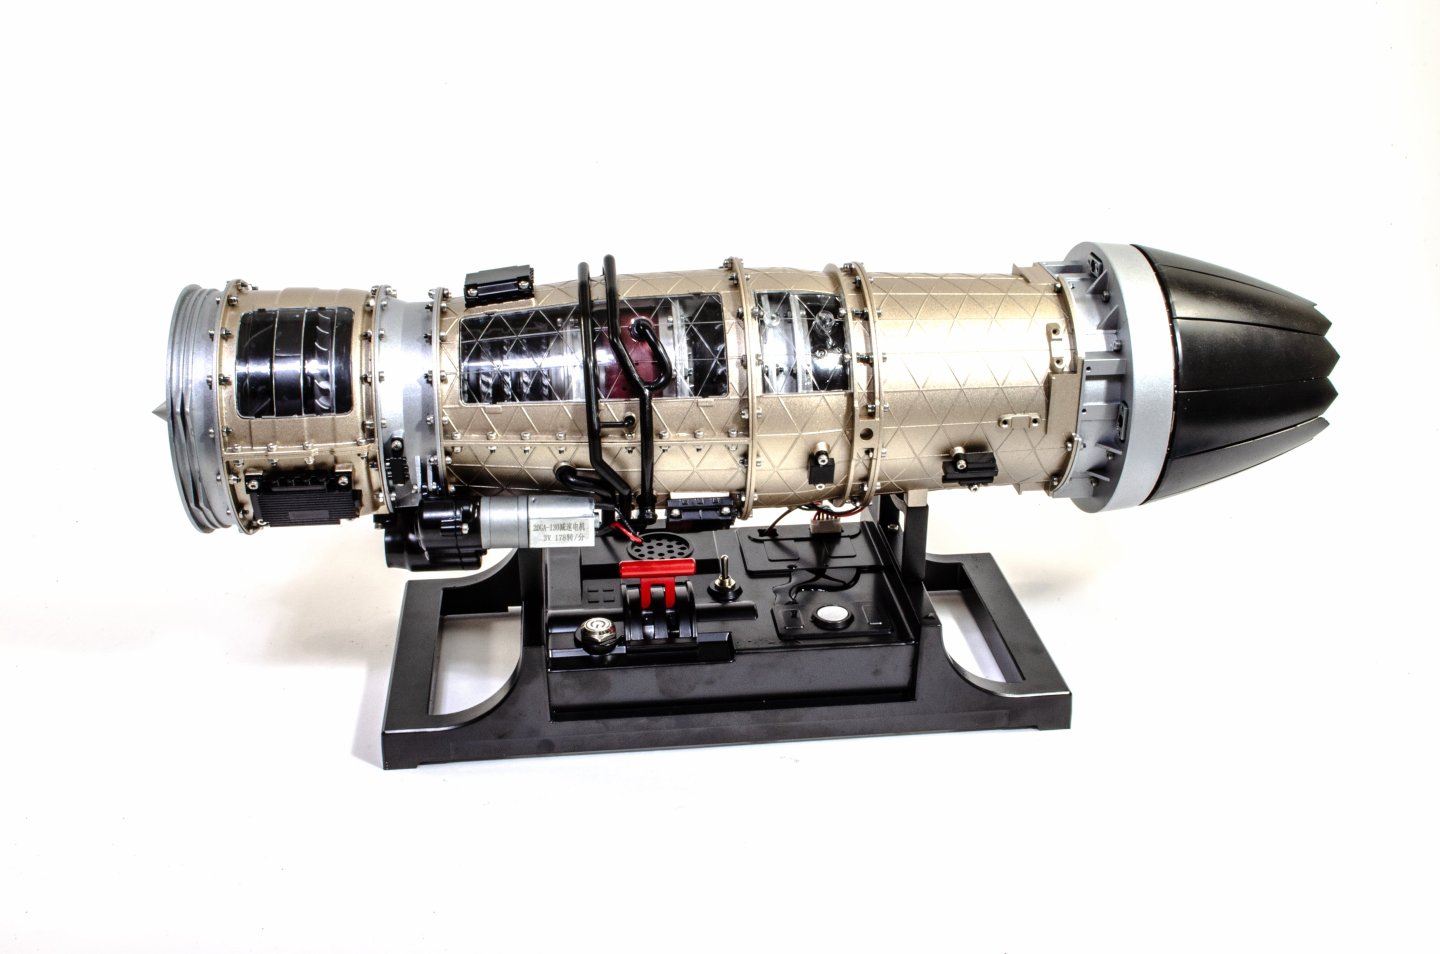
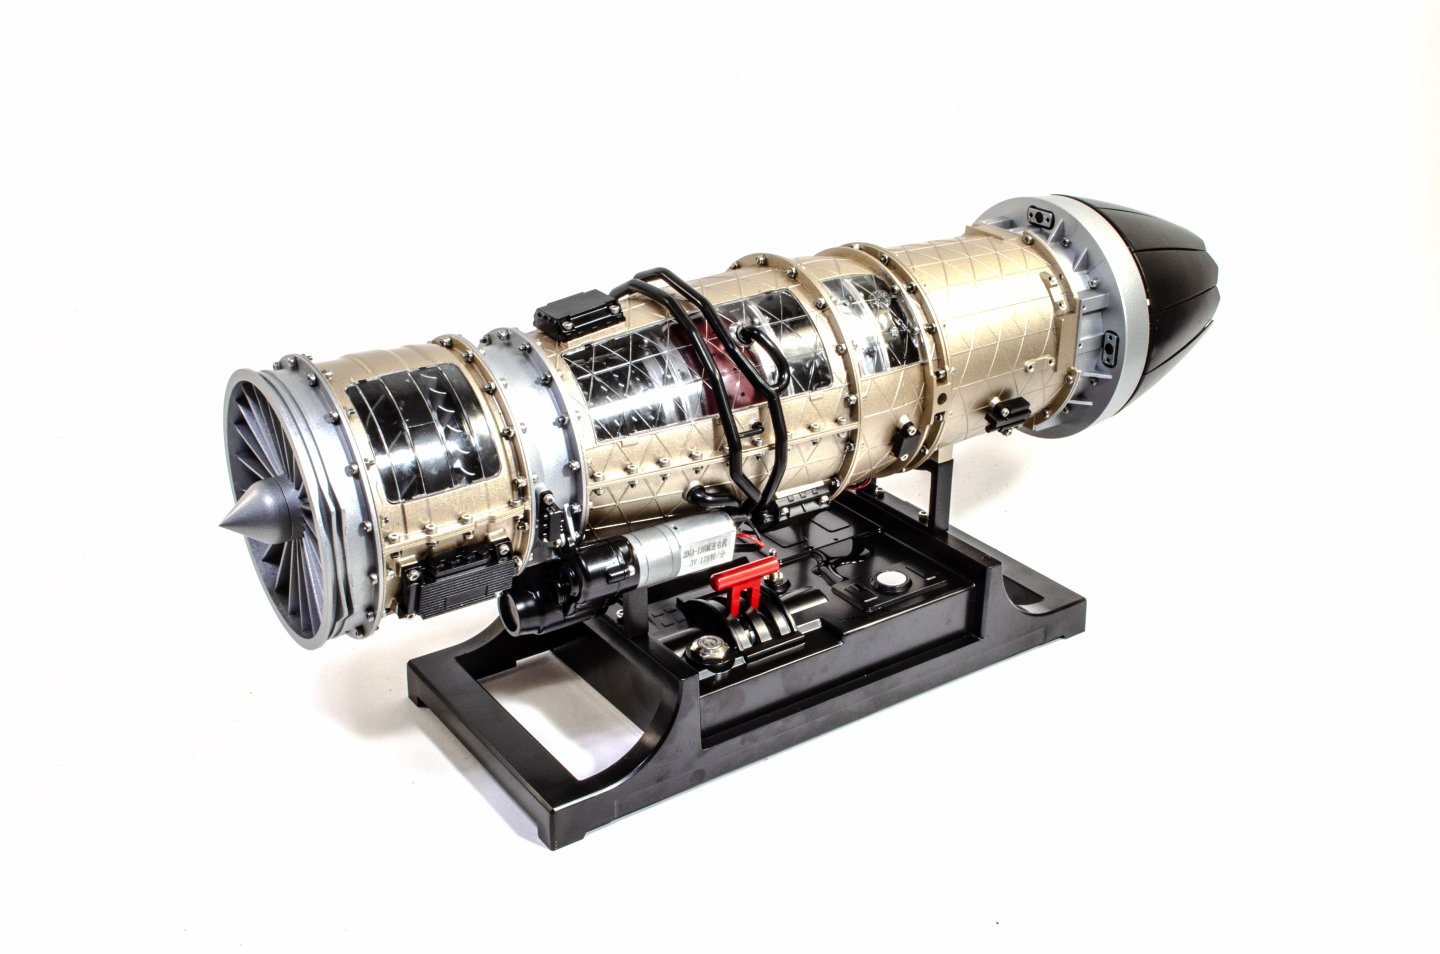
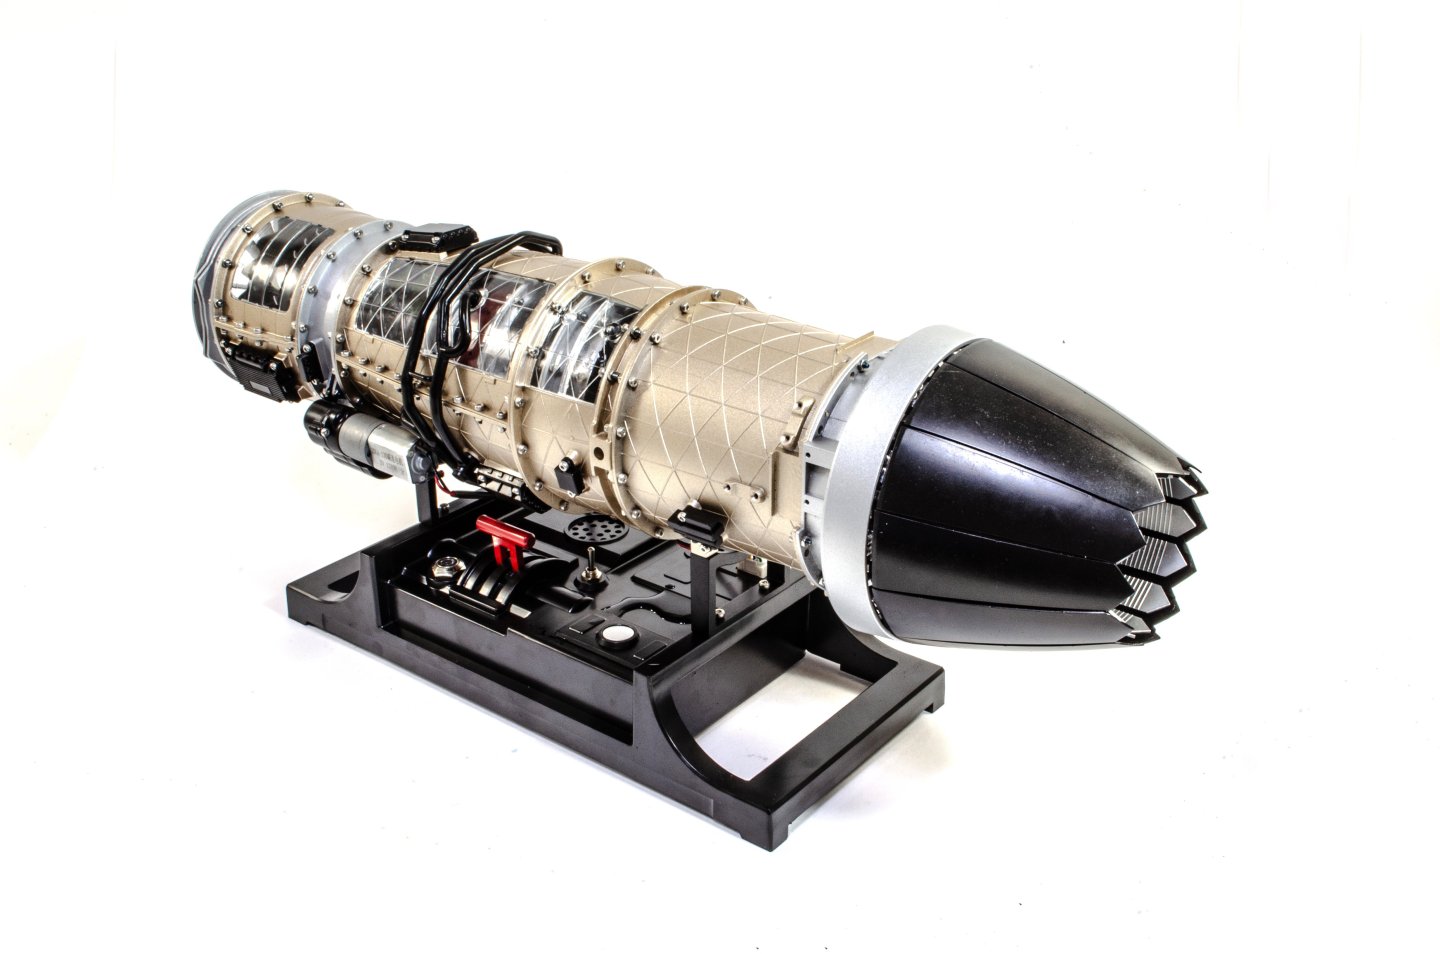
The gearbox is now bolted into position.... ....followed by the external ancillary details, such as electrical boxes and plumbing. With that done, the engine can now be mounted to the stand and be ready for running in. All I need to do now is to make a video of the engine running. I'll do that very shortly.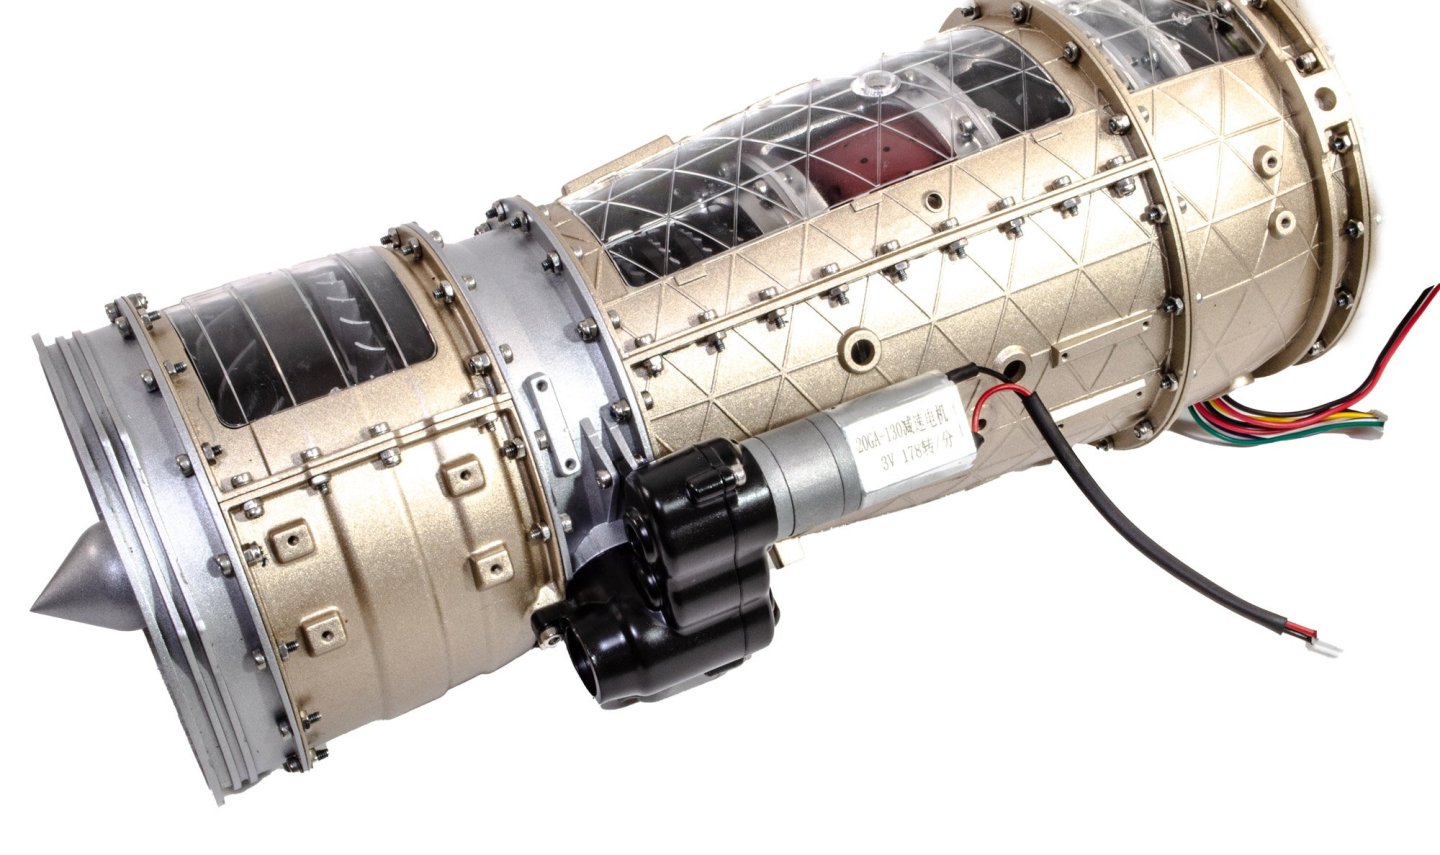

-
Kit review 1:10 Military Turbofan engine - TECHING (build review)
James H replied to James H's topic in Non ship-related reviews
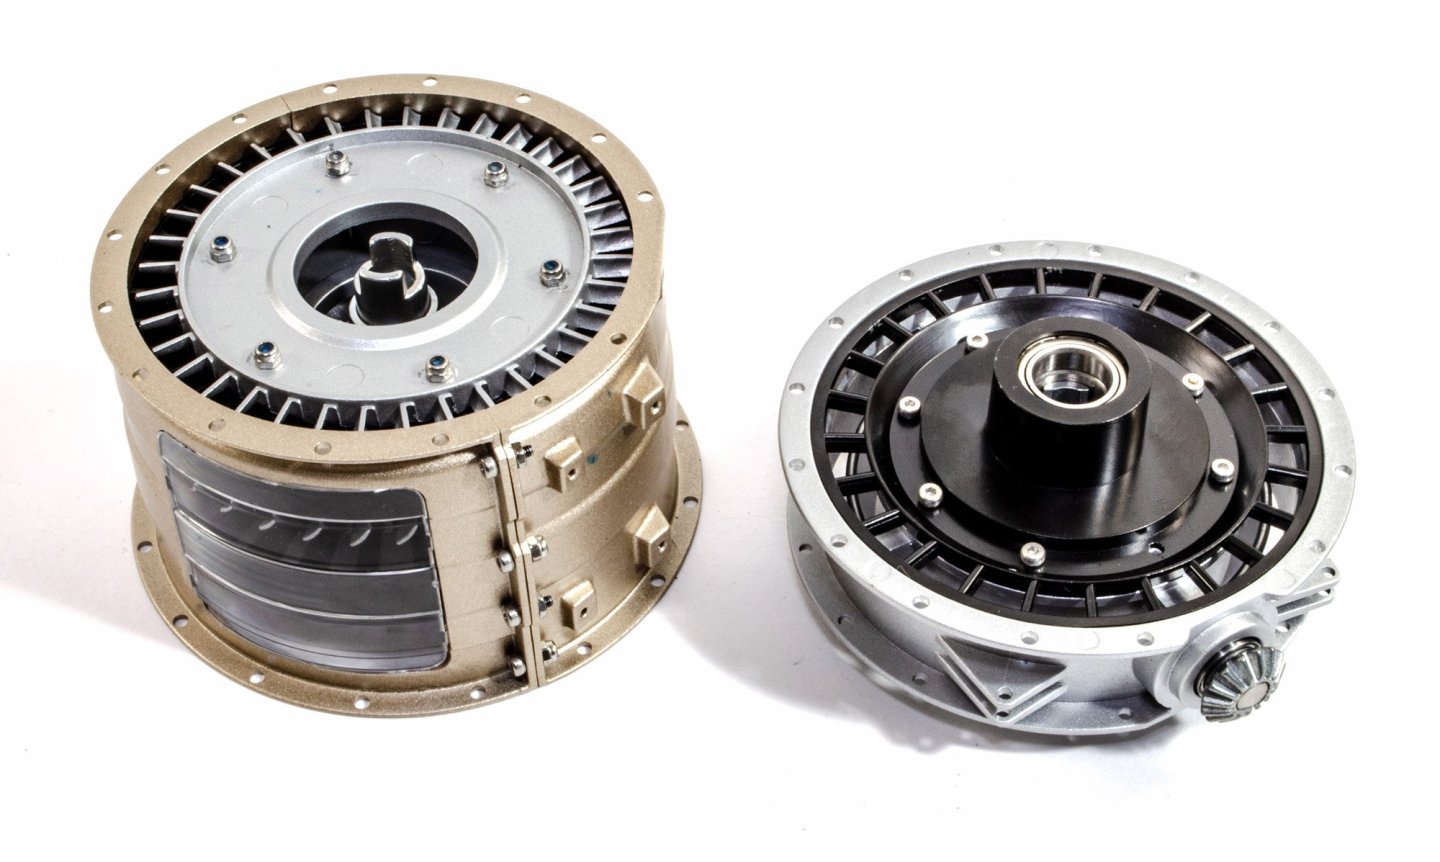
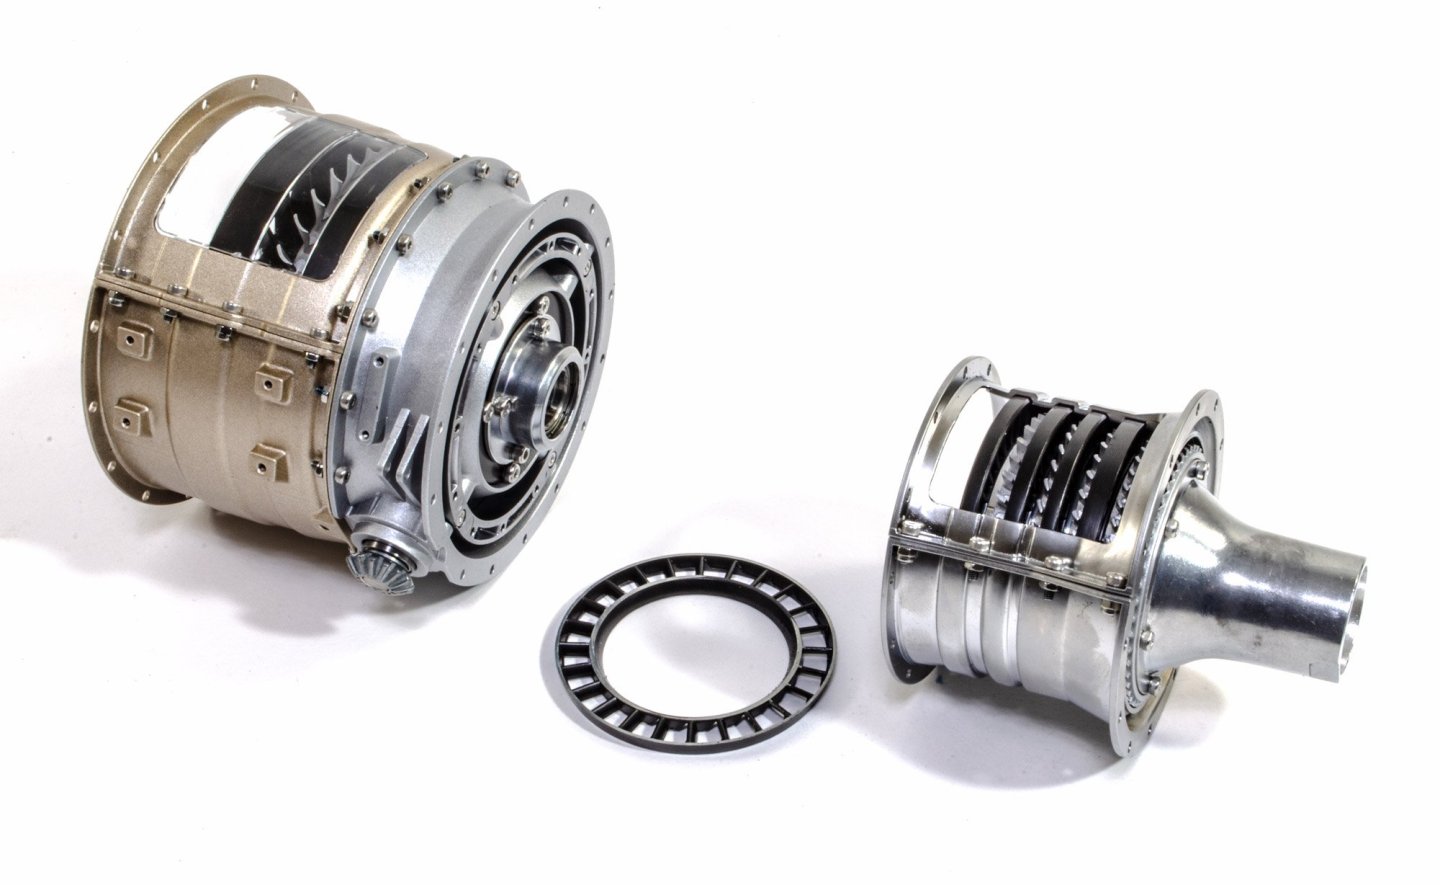
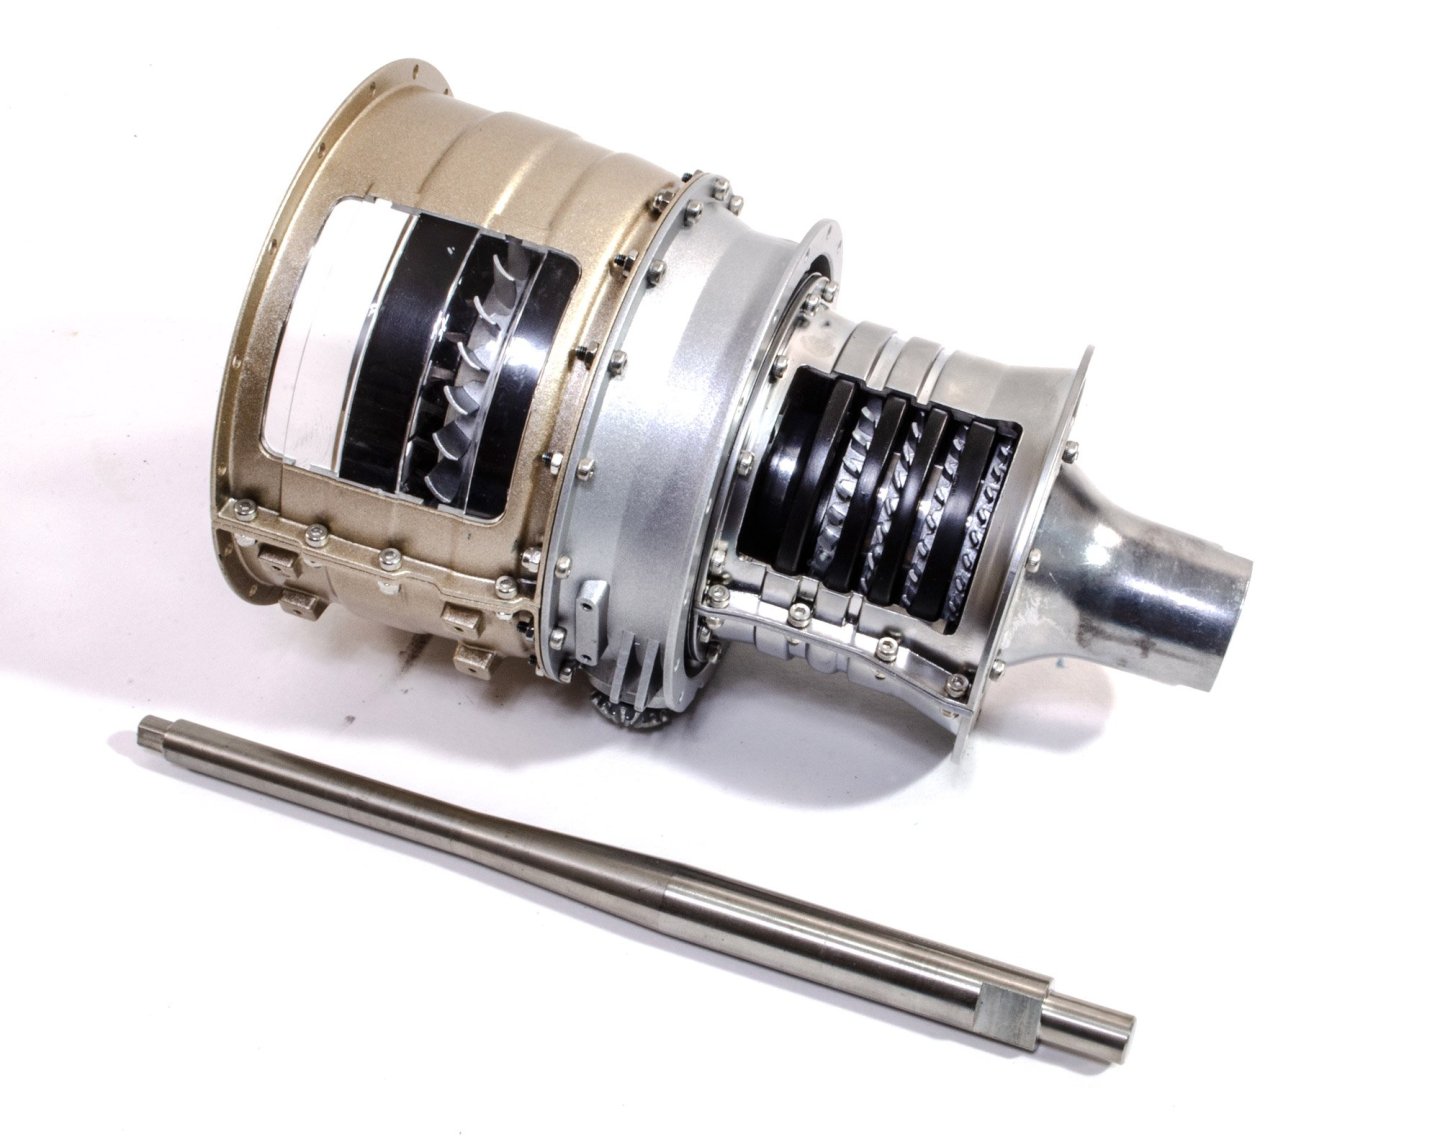
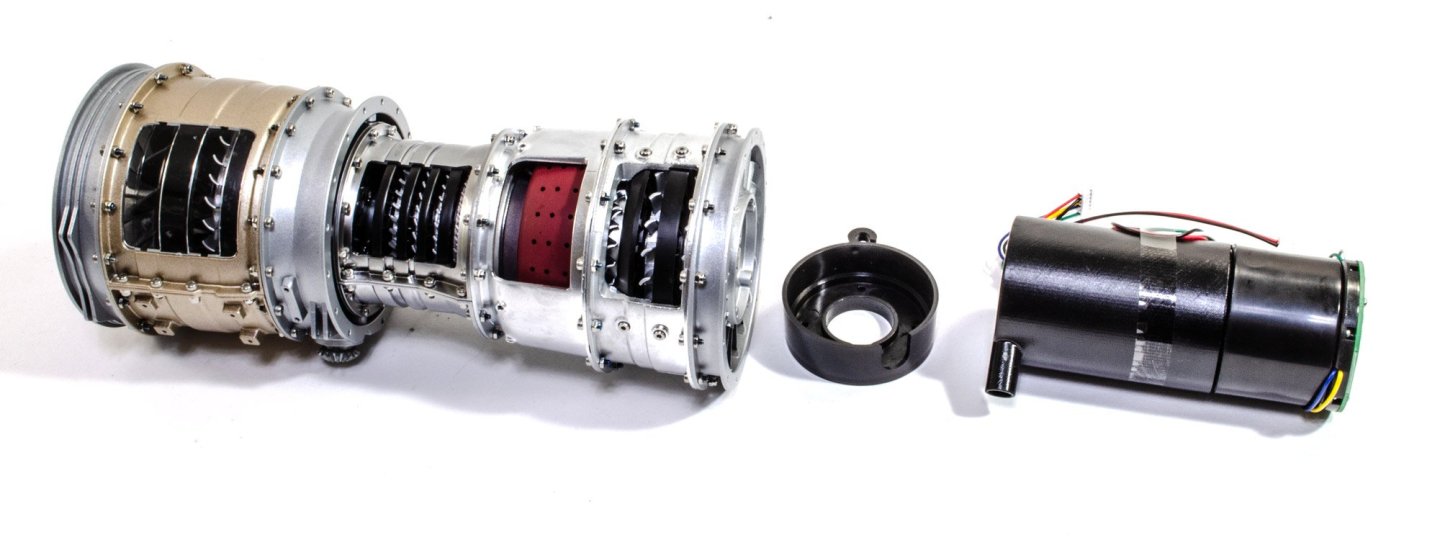
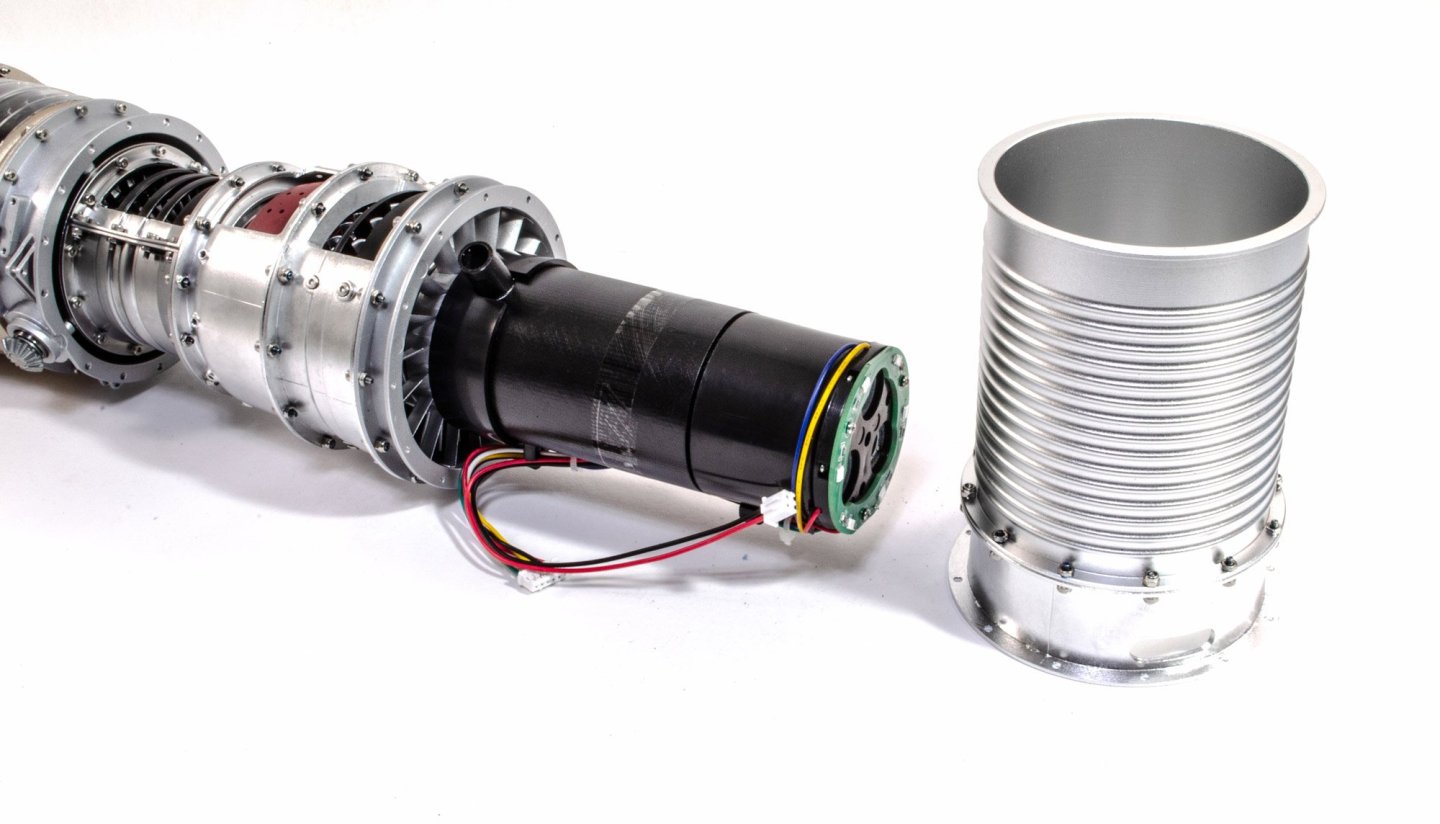
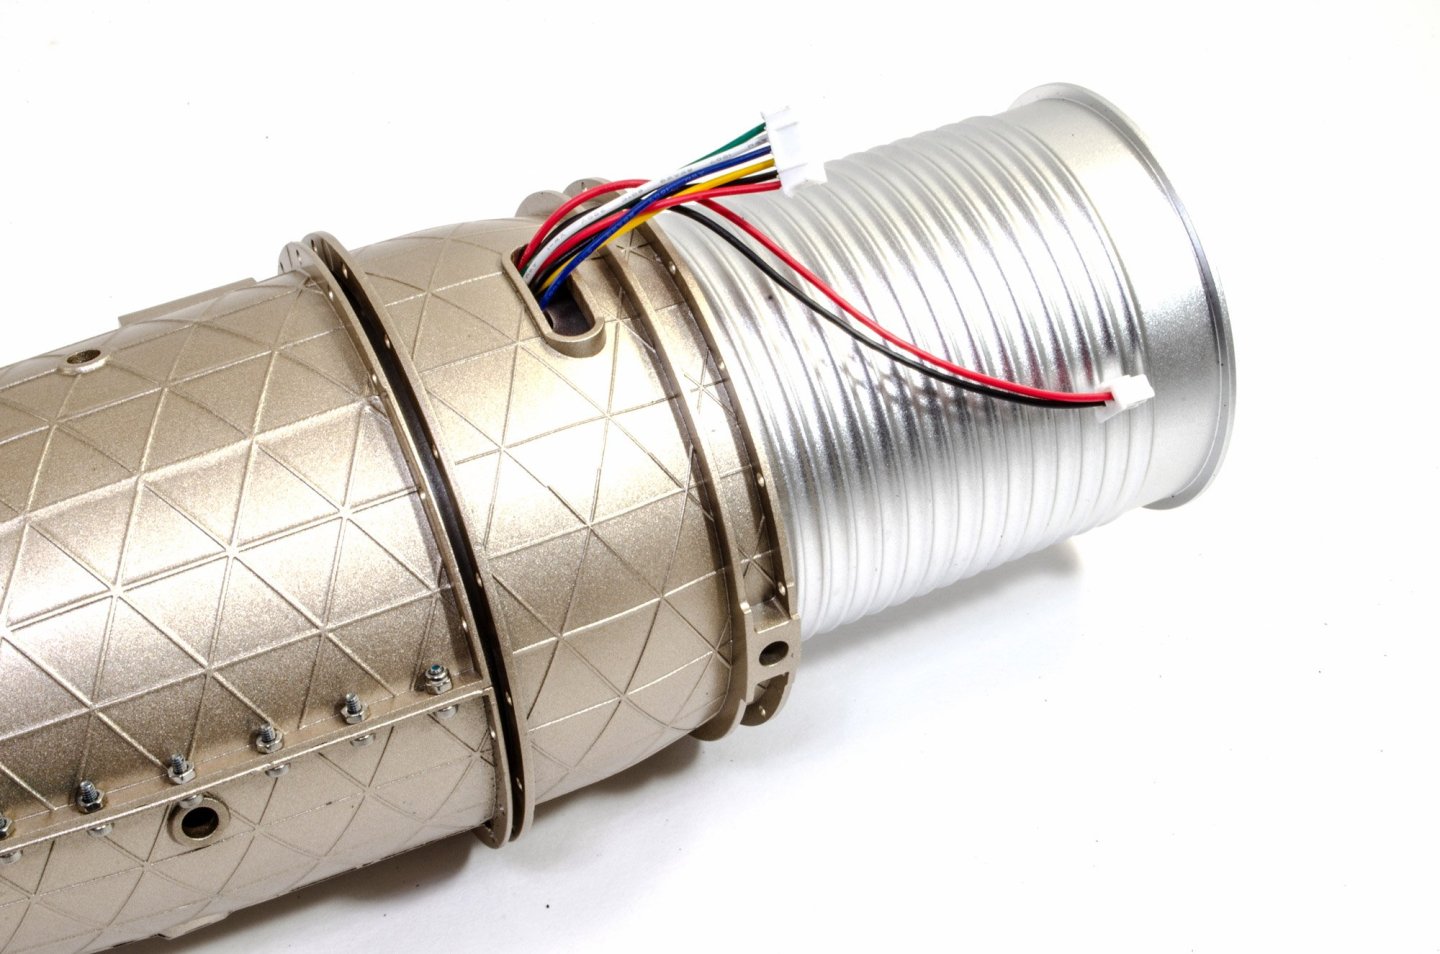
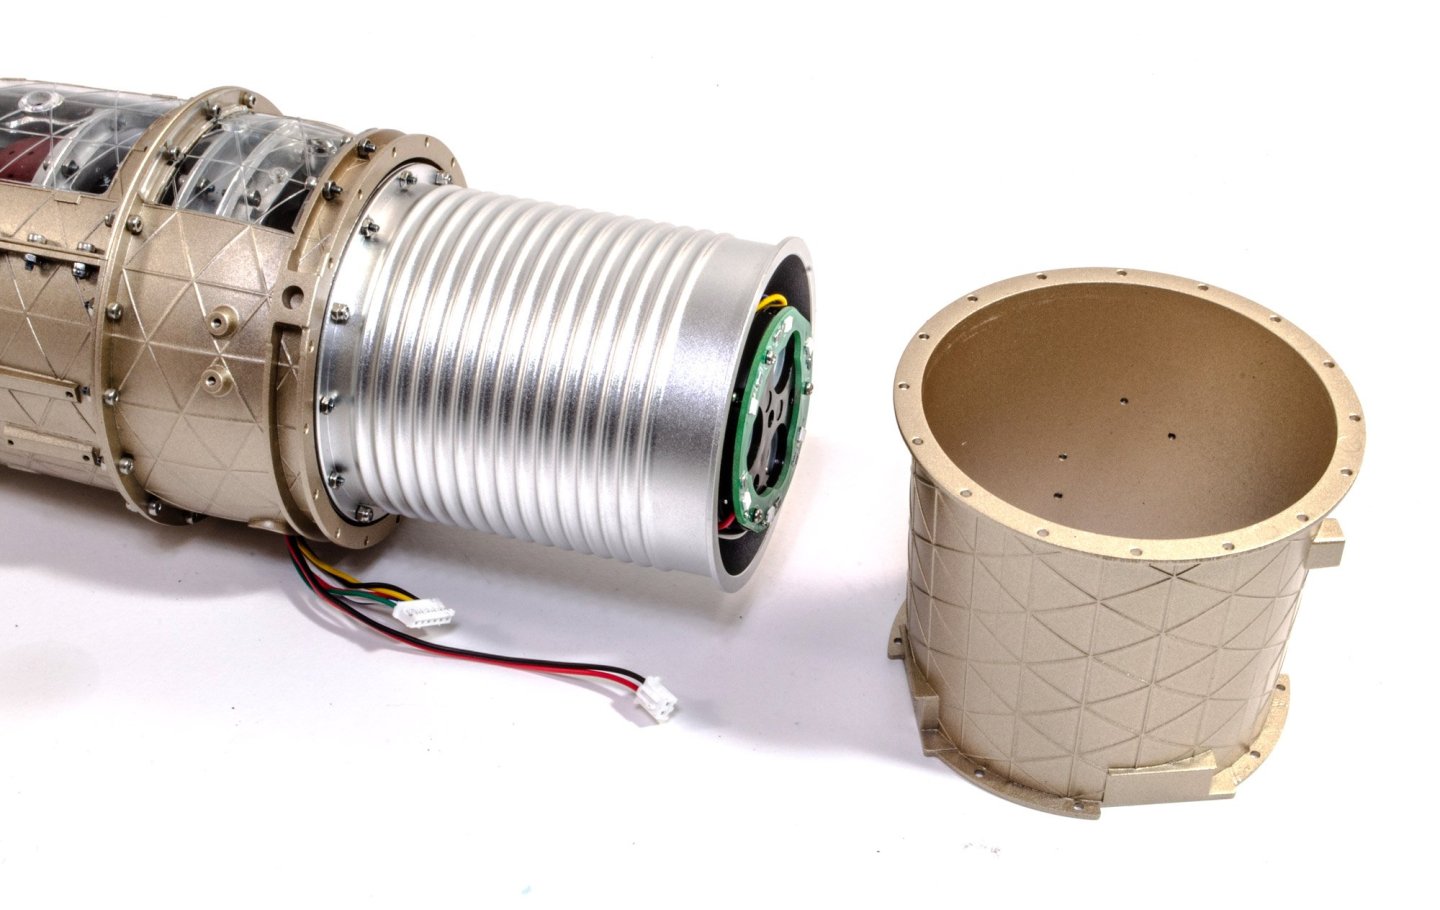
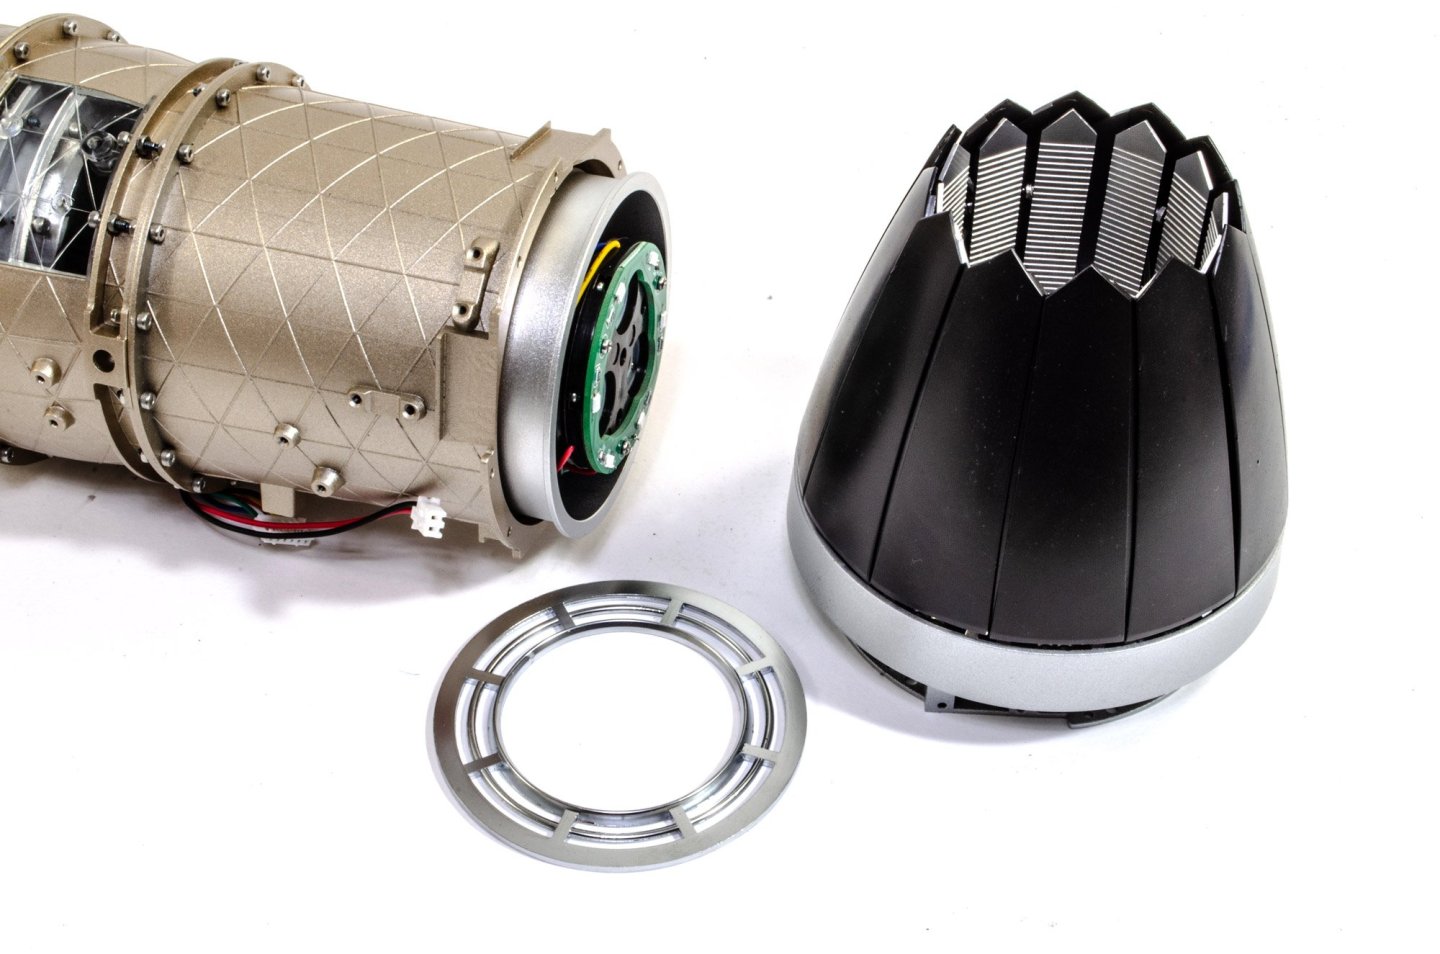
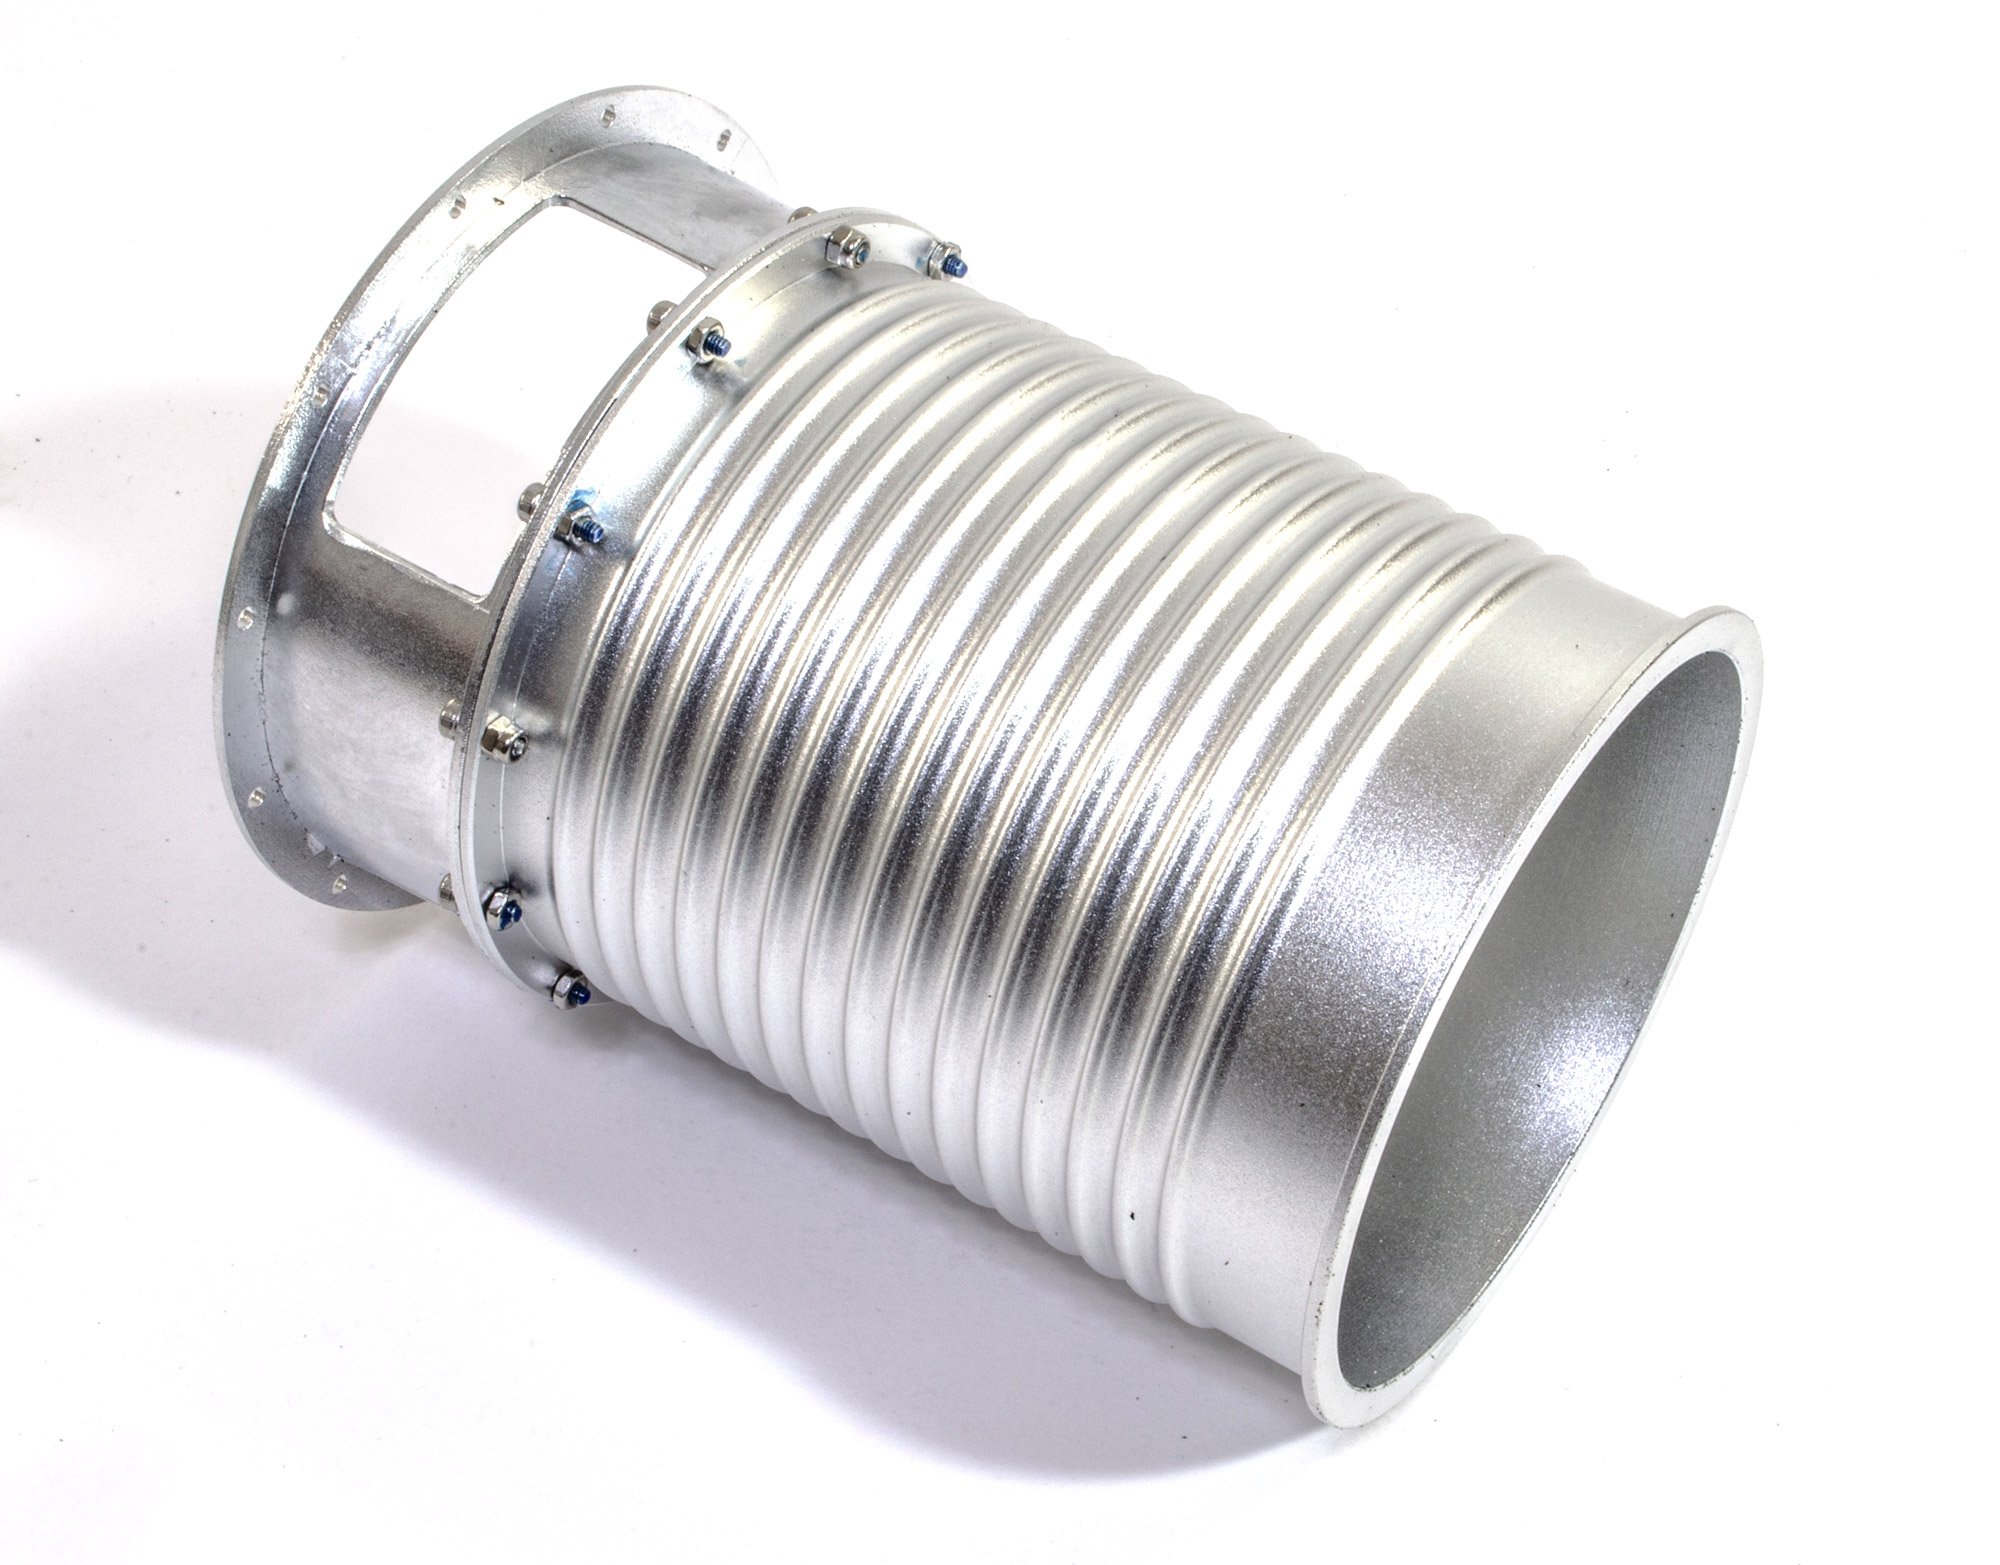
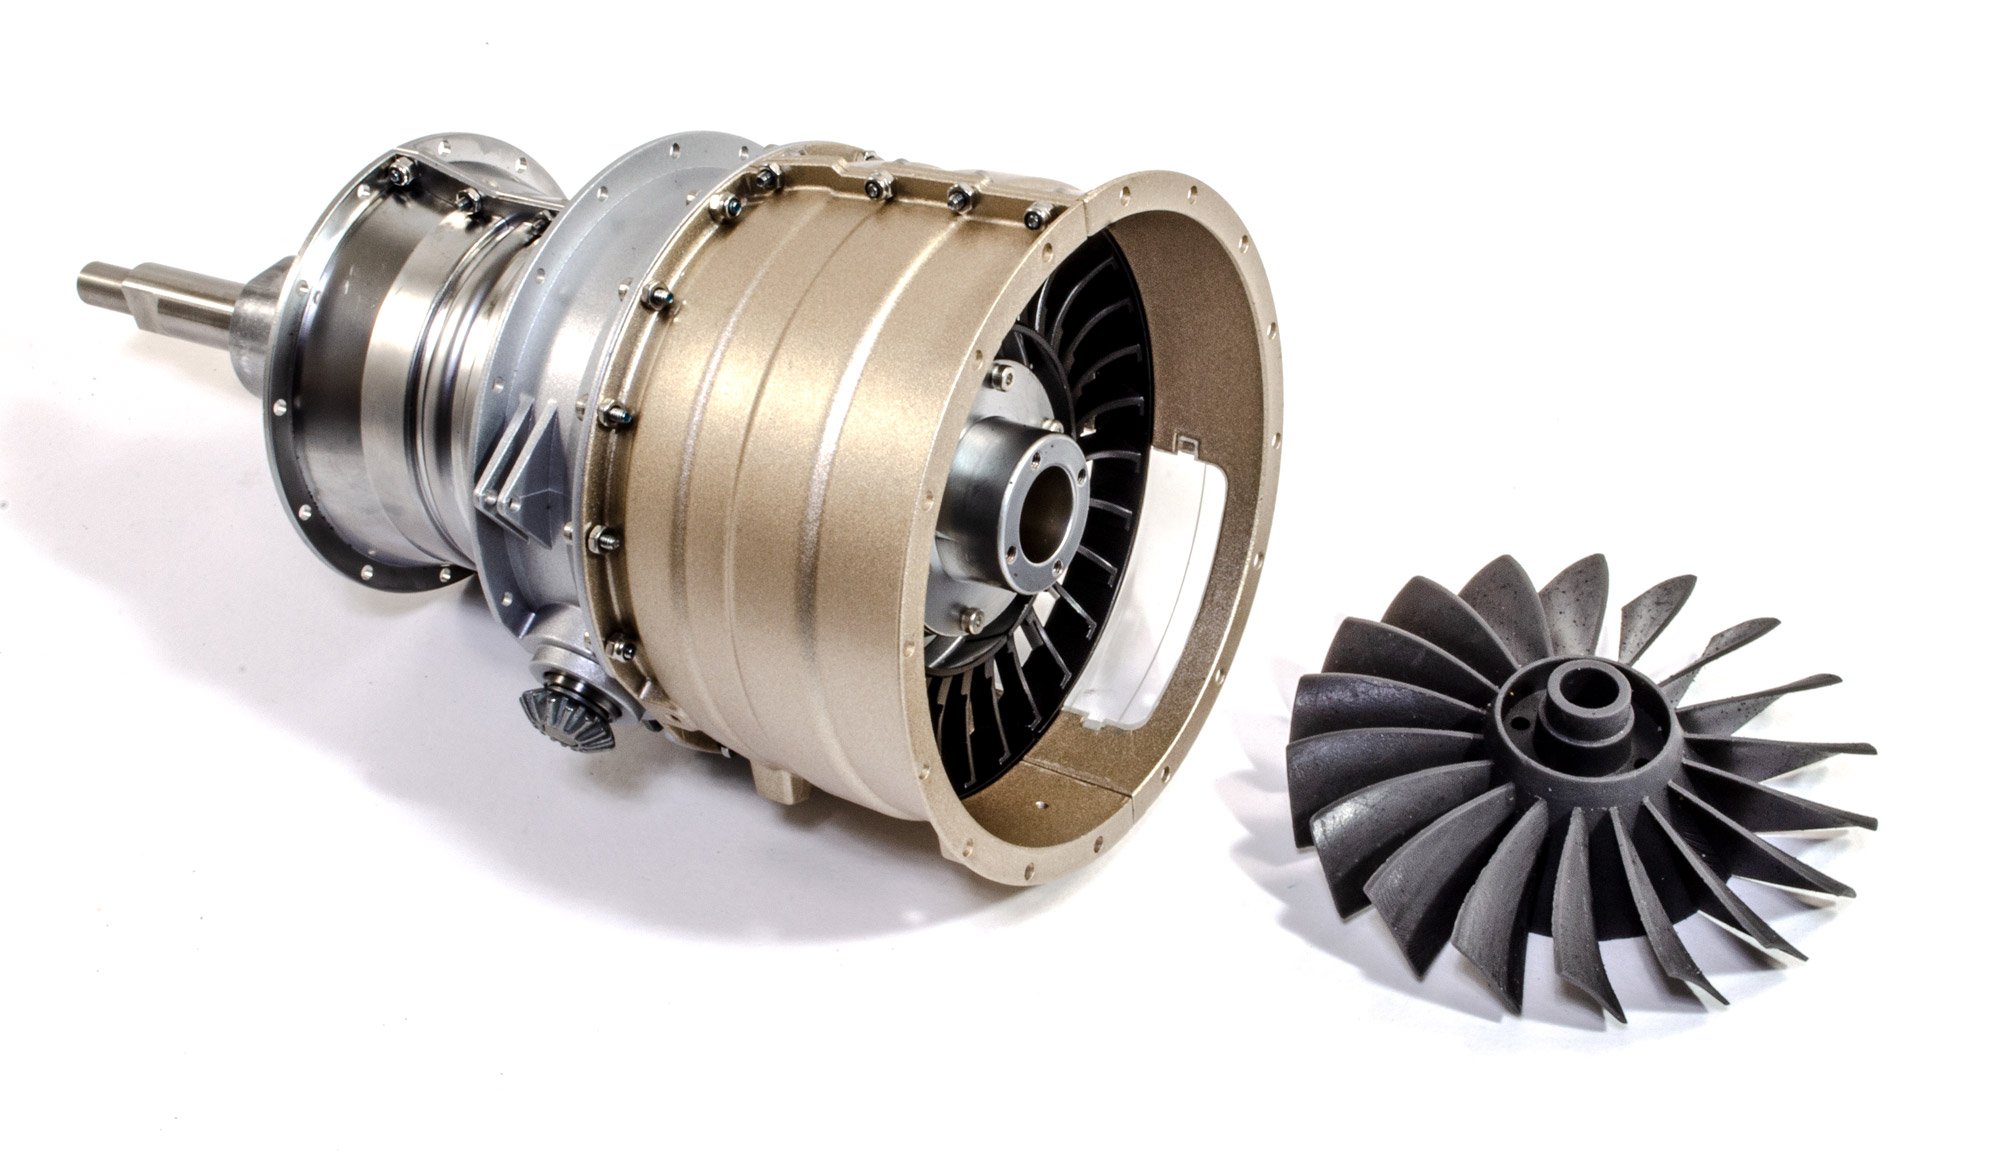
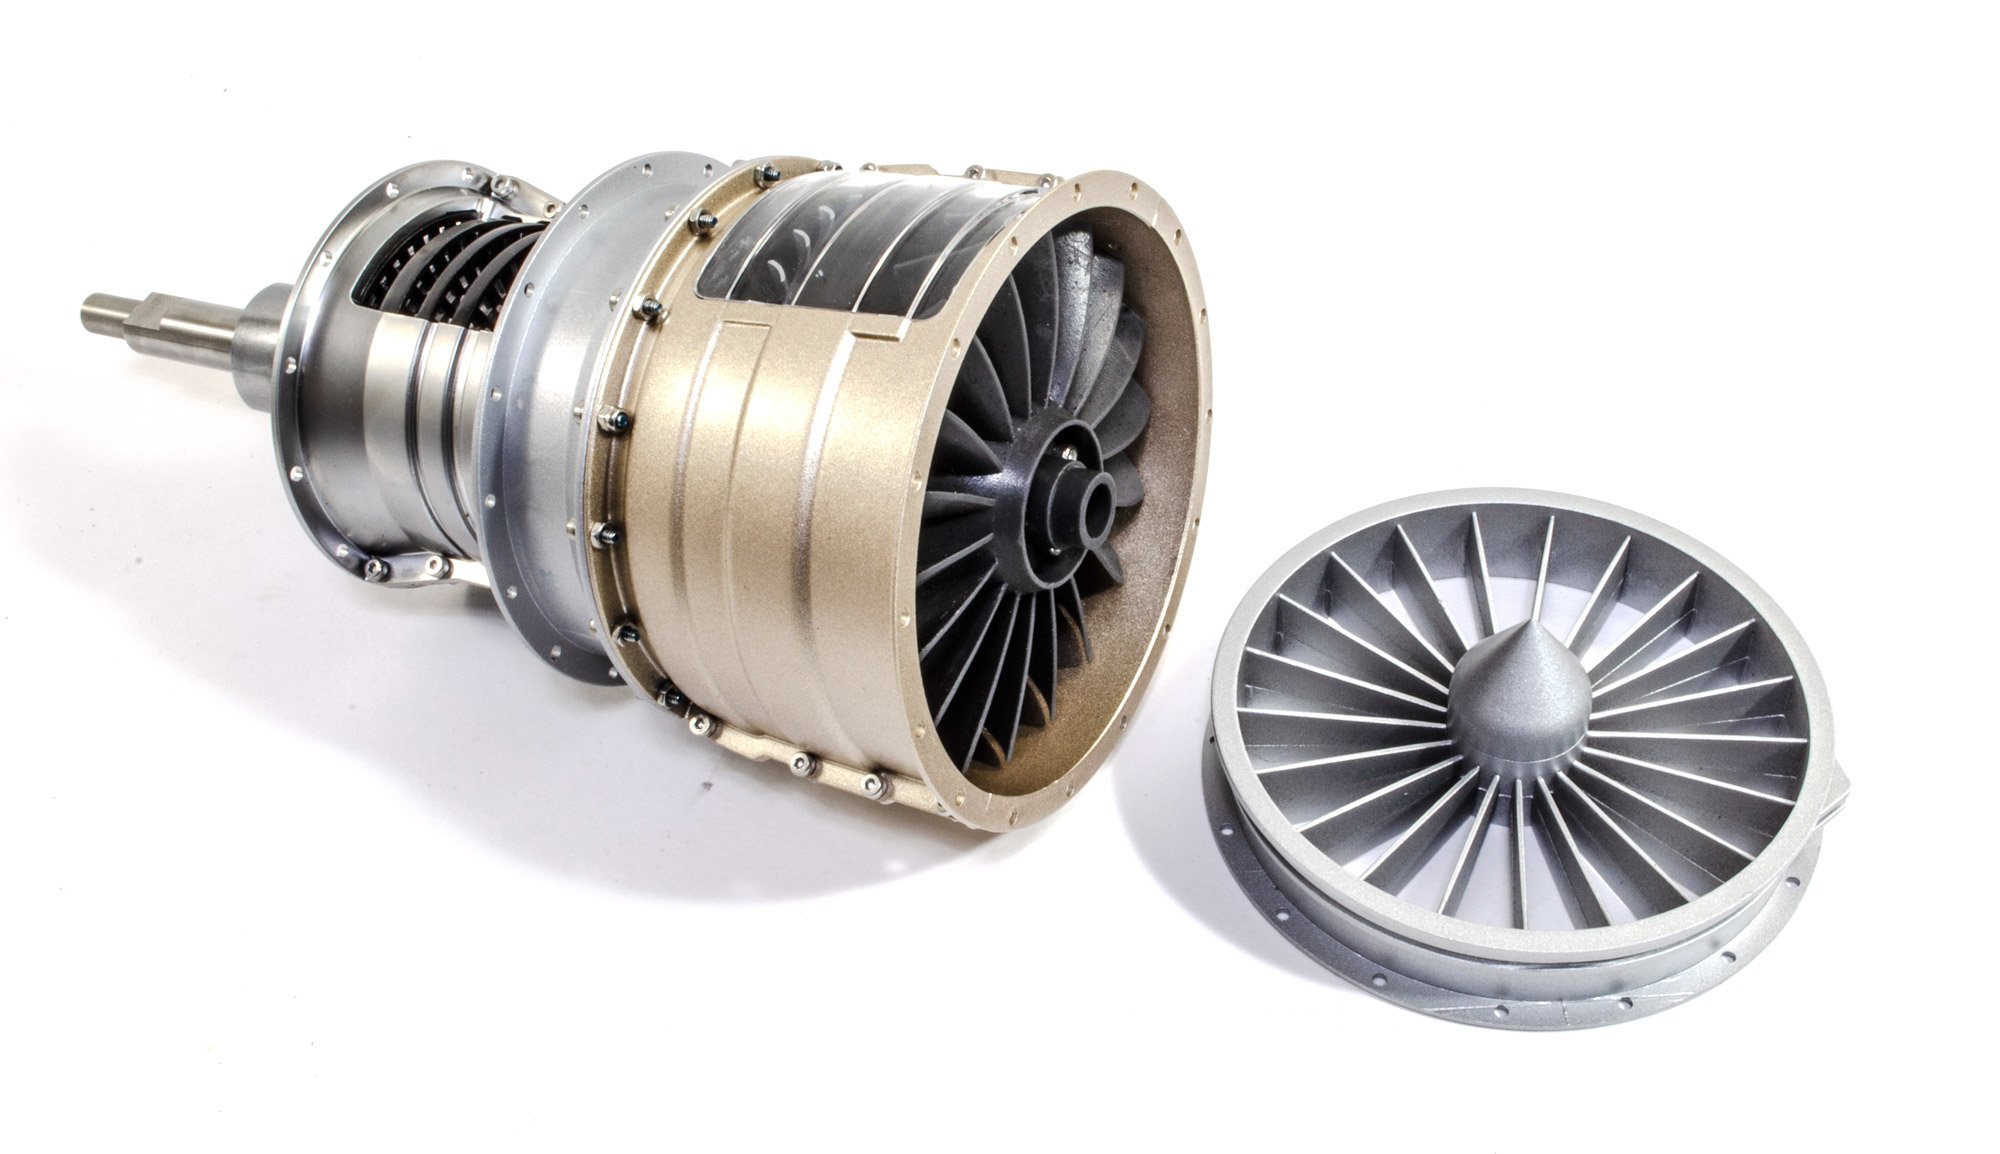
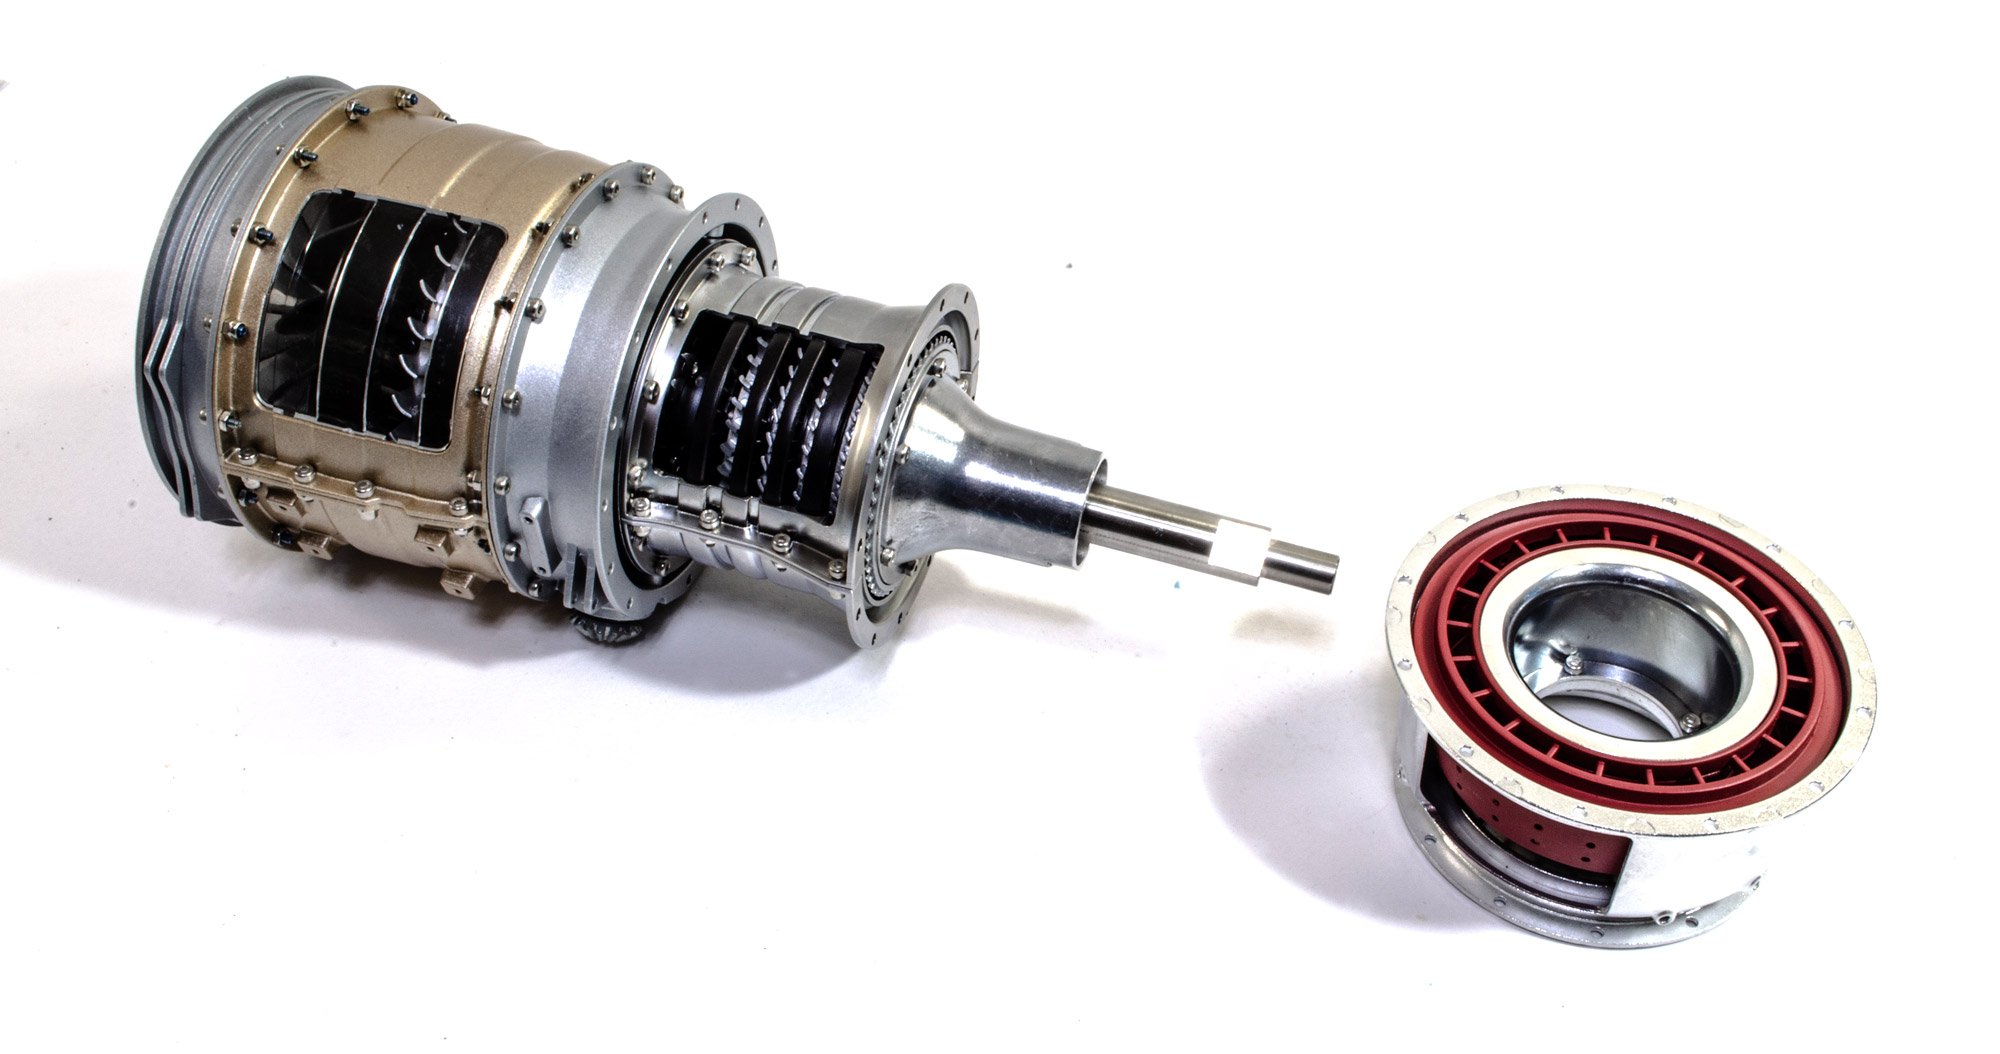
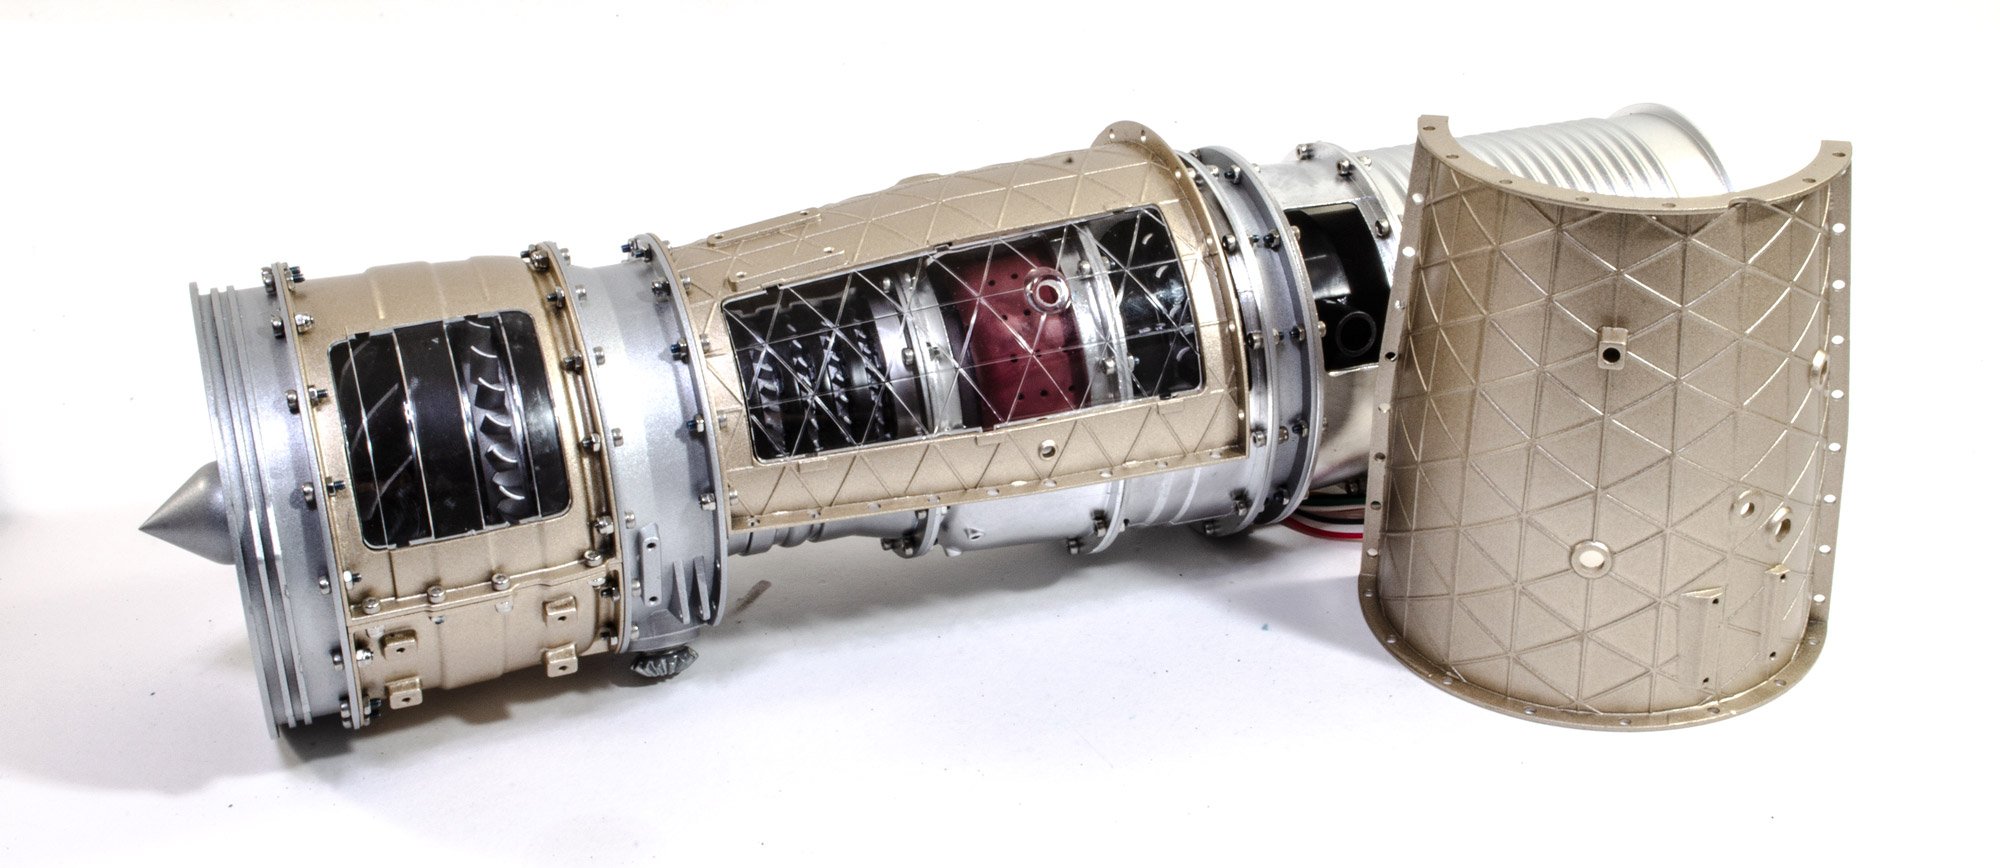
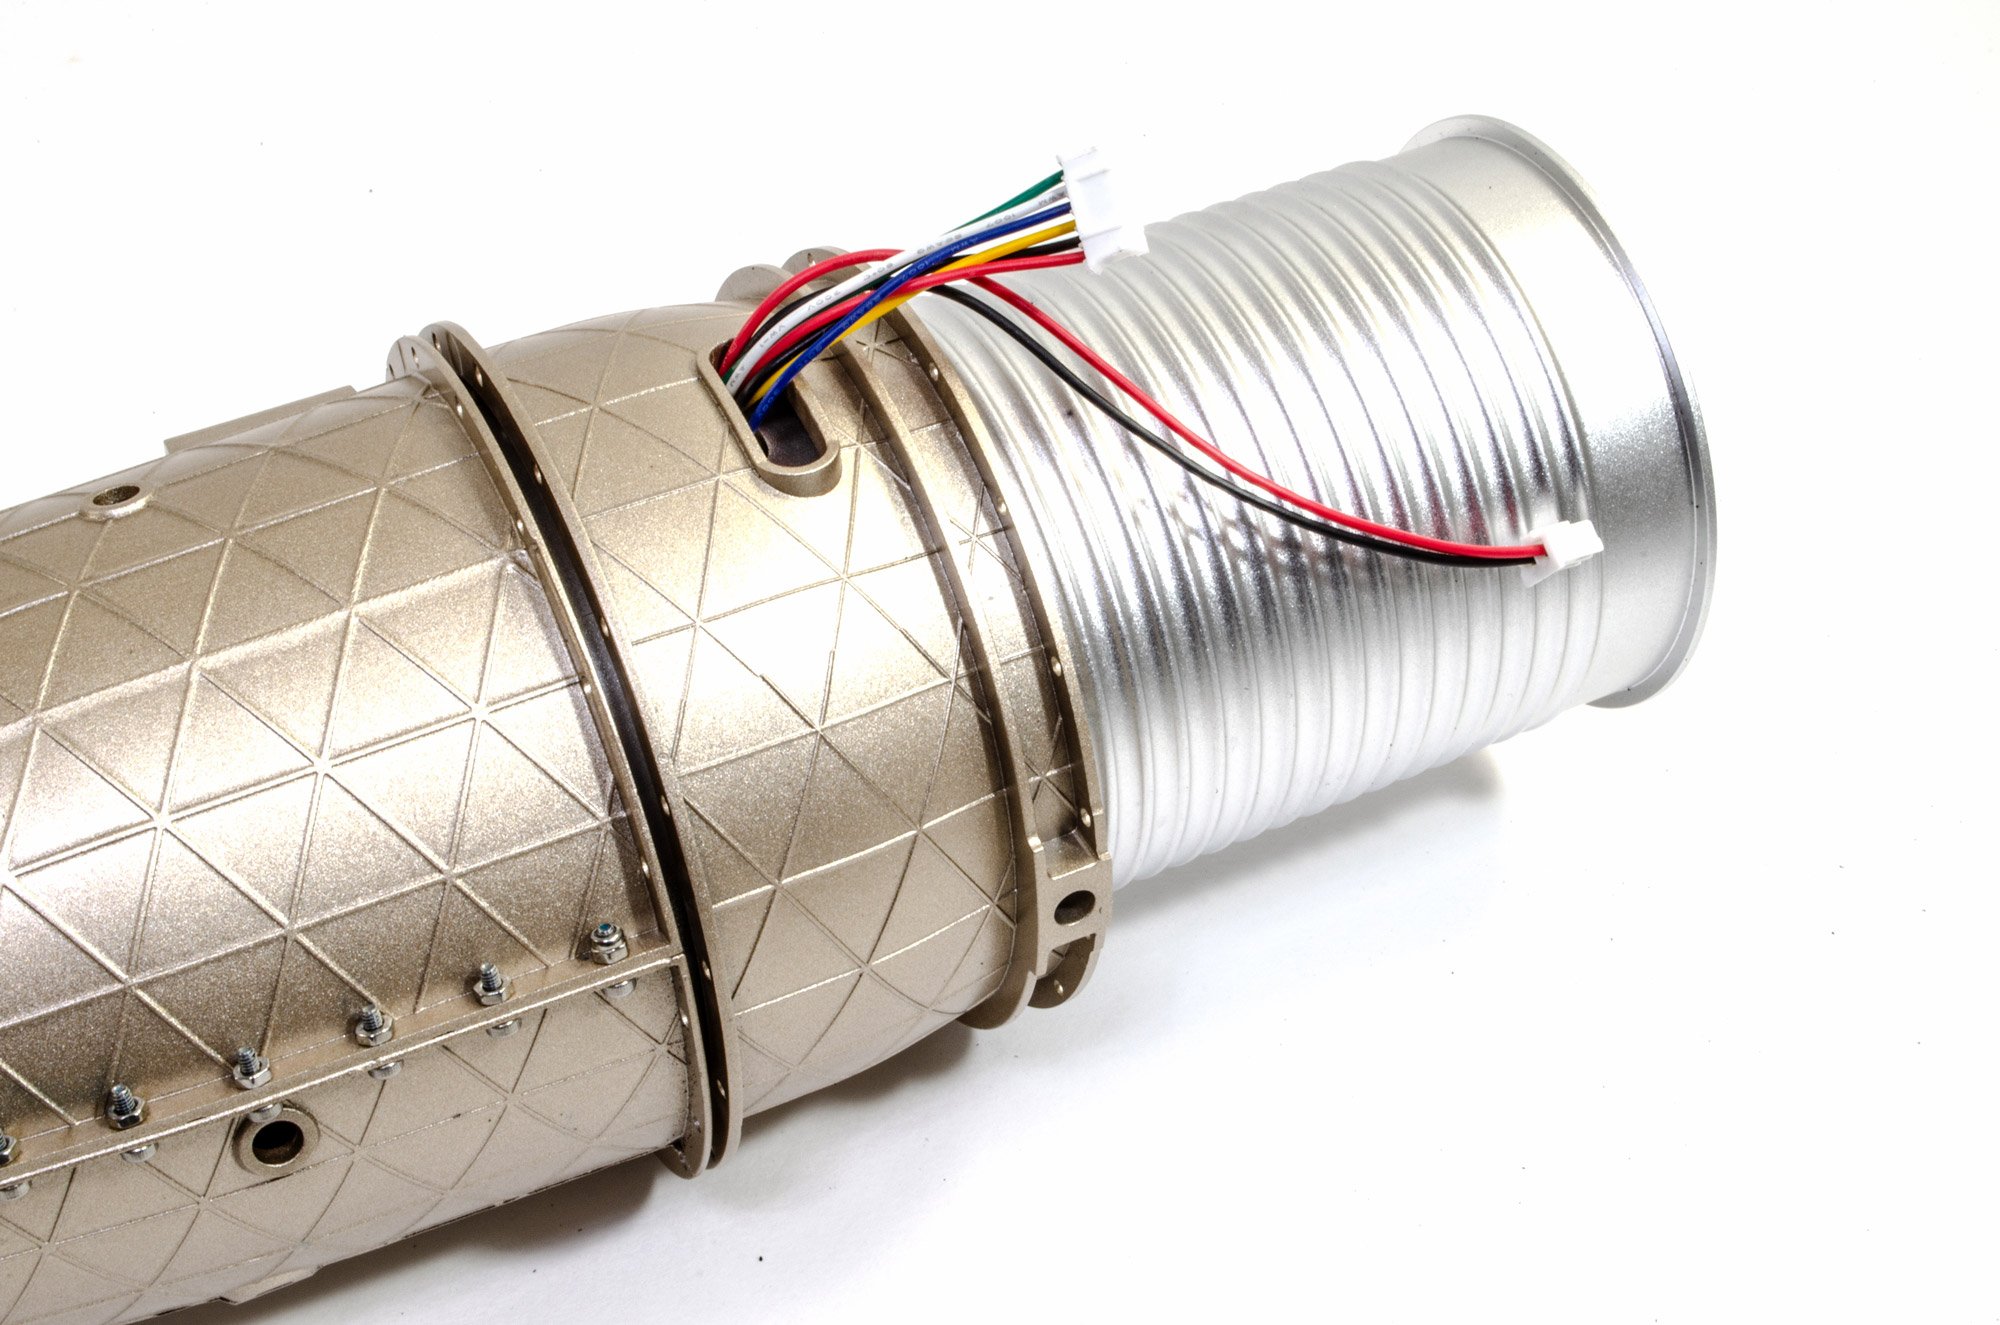
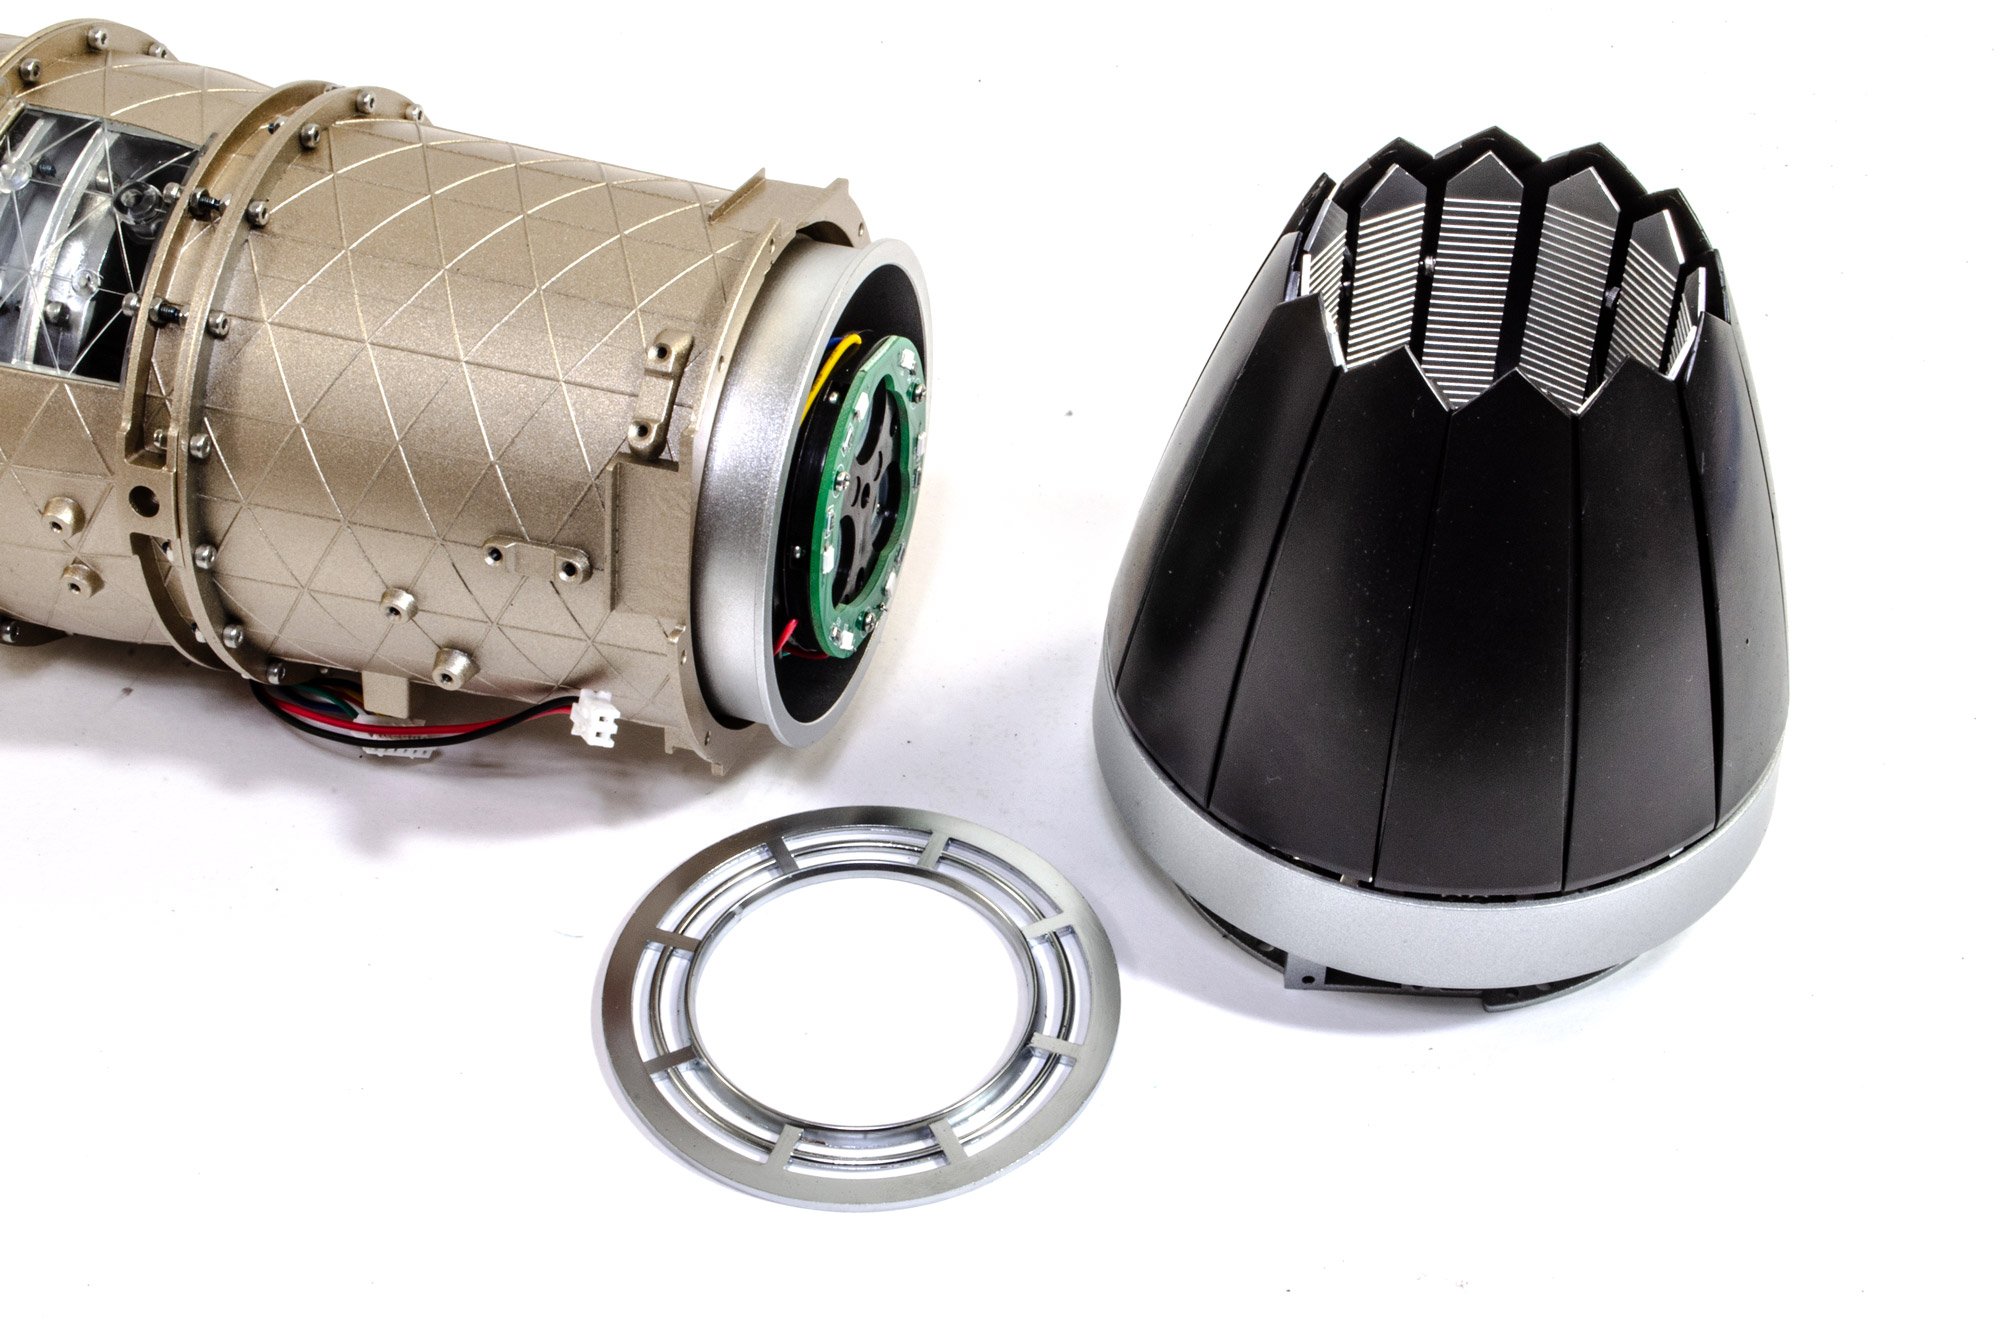
This is called the enhanced nozzle, for some reason. However, this is very simple to assemble. Just two parts. At this point, all of the assemblies you've seen being built, will now be put together. Orientation is VITAL as you progress. The drive shaft is now slotted into the engine. Note its taper. That taper will mean that any error you make will mean a full strip down due to the nature of design. Keep your eye on the ball as you progress, and you will have no problems. A 3D printed fan is now fitted into the forward engine housing, followed by the intake/spinner assembly. More of our assemblies are now slotted and bolted into place. Ok, this is one thing you've not yet seen. That drum on the right, is actually a water/atomiser tank which you will fill, and clouds of vapour will emit from it. It also has a ring of blue LEDs to simulate the heat from the engine. A lot of the work so far built will now be covered up with the exterior engine casings. These have clear panels and align with the cutouts in the interior engine. The nozzle assembly,mbly can now be fitted. Careful with this one as it's quite heavy.