


JPett
-
Posts
881 -
Joined
-
Last visited
Content Type
Profiles
Forums
Gallery
Events
Posts posted by JPett
-
-
Ahoy Dan

Great tutorial on cannon construction
Thanks for sharing

-
Ahoy David
Beautiful work and excellent technic. Learning a lot here
Can I ask why you would round the top of the wales, or am I misreading that
-
-
Ahoy Augie
Can you include the case construction in your build log. I was looking at one of those myself.
-
Ahoy Brian
Funny, I wonder if your ears were ringing when I placed the order for replacement wood on my build "lol"
Looking forward to the pics.
-
Ahoy Mates
I wonder if this recent turn of events has had an affect on their sale items. I follow the site and the European Kits have missed the last few sales.
I will also go with the positive view on Franks retirement.
First, THANK YOU Frank, you did a great job. And secondly here's wishing the new guy a long and happy career at model Expo
- ModelExpoOnline, fnkershner and lb0190
-
 3
3
-
Ahoy Mates
Mark: I can see it just fine with my Optivisor
Augie: I am with you. Its two steps back on a good day
Ferit: Fear not, I take very little seriously. Even less here
Back to the build

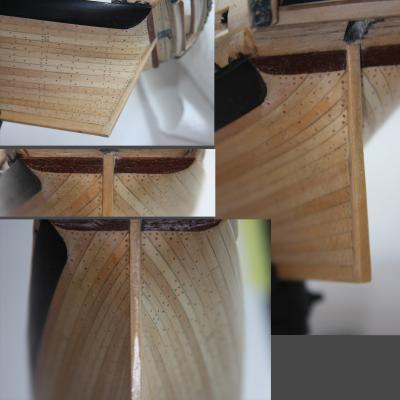
I am posting a pic of my painting technic which I learned here on MSW (TYVM)
The wood already has three coats of Wipe on Poly. I used Tamiya tape in varying widths to get my line. It does drop in towards the bow but not into any treenails. Some are very close. If I don't like it I will re-tape that area and hit it with some more paint. I used some cheaper yellow painters tape to catch any "oops". Next I sanded down the tape line and then applied a thinned coat of WOP, same as I used on the hull. That will dry for 24 hours when I will sand the area with some 400 grade and then apply a 50/50 coat of Testors Classic Black. The first side needed three coats with 24 hours intervals, wet sanding each one and I see no reason this side will not need the same. This will be followed with the acrylic flat black (I nixed the other black (for now)) My plan is to work on the gun ports and at the end of my session do the painting. I am also coating the inside of the hull with PVA. I do not thin it much, just enough to move around. It has added some needed strength to the single planked basswood.
Next:
I have a question:

As you can see I have already removed all my gun ports, oar ports and those flimsy upper deck supports. I want to now add one or two strakes on the gunwales. My concern is the black wales. I have noticed the WOP will reactivate the black paint and could drag some into gunwales. I am sure I could tape off the Wales but should I also consider pretreating the wood before applying it. Comments welcome
PS: I replaced the kit supplied wood with some Boxwood for the Gunwales and holly for the deck. The Lumberyard took very good care of me. There will be very little basswood upstairs

-
Ahoy Ferit
My key to patience is not having the priority on finishing but only having a nice time while I play in the shipyard. I just call the redo's "practice".
I would also prefer to start the Berlin with a decent skillset and accomplish something similar to what you and some others have done with their builds when that time comes.
-
Ahoy Mates
I wonder if any of the white we are seeing is sun bleached or oxidized
-
Ahoy Mates
Please note that these small discrepancies do not bother me either.
It is only reported in my log so that anyone following who may have tapered their wales a bit too much knows to lower the position on these treenails should they have a temporary loss of sanity and then decide to add 3500 of them

All kidding aside, Things like this remind me that I can still build a good kit with mistakes (both big and small). When I finish this build, I hope that if anything my log demonstrates this more then anything else.
Some will remember that there were some whoppers back in MSW1.0 and "NO" I will not be ripping these planks out either "lol"
As for the gun ports that I have already done twice. "Yes" those will be going..............
-
Ahoy wefalck
Very interesting site
Thanks for posting
If anything those ships made me feel much better about my build
"Ouch" could you image taking one of those out
-
Ahoy Mates
My first endeavors into flying model aircraft were with control line.
I can still remember the fun I had, I was ten, and until I turned twelve, none of my planes lasted more then two outings
I am amazed I have all my fingers "lol"
Mark: Funny I feel the same why about this hobby
-
Ahoy Brian
"Impressive"
Nice touch
Its so much better when the extra work can be seen
-
Ahoy Mates
If you follow the paint line there are two places that I see right away "lol". Isn't that always the truth
They look like the paint bled under the tape a tiny bit. It didn't. it is where the paint comes over line between planks and runs through a treenail on the forth strake (Wales are only three). It is minor issue and doesn't bother me especially considering the alternative. Had I followed the planks; the taper in the wales which themselves are very prominent would have started much further back then then do now. This would have been very obvious.
If you want to see where the paint actually did bled that would be the white dust by the curve in the stern in the pics I posted for Eric. I see I did not clean up the residue from wet sanding that area.
-
Ahoy Buck
I have to admit that I am very disappointed.
Considering how many "non water" substances age so well in barrels I can not believe you made this blunder.
"lol"
Just kidding: It looks great and is very impressive, as with all of your work
-
Ahoy Eric
Kind of : My cheat was because I over sanded too much on one side and it would have left a gap. If you look at the darker wood (which BTW is Model Shipways Mahogany) the two sides are not symmetrical. I fudged the transom to cover this mistake. As for the wood, I did plan to use it there from the start but did not plan on it being so difficult to work with. It falls apart if you look at it wrong, weeps glue and is near impossible to cut. The remainder of the transom will be another project.
As for the gap, Post a pic in your log. I made a temporary counter/transom and then planked to that. Removed it and then put in the Mahogany. I also found it much easier to plank both ends first (stem, stern), then fill in the middle. This allowed me make multiple attempts (mistakes) to fit these pieces. Being able to remove and reinstall the temporary transom was extremely helpful for fitting the pieces in the stern. I mitered the angles on both the planks and the transom (including the temp), It took many attempts before I got them right. As I said before, I burned through a lot of wood planking my hull. The Ents were pissed.
If it helps I made a paste out of wood dust to fill gaps. I had a few tricks but for bigger ones I started with 80 grit sandpaper to make dust from scrap planking, it left some fibers in tack. Mixed it with very diluted PVA glue and "carefully" filled the holes. Excess filler must be removed or the PVA in the mixture will cause a problem on any untreated/exposed wood around the gap. Most of my gaps ( I think all) required multiple applications with me using finer sandpaper to make the dust on each successive layer. One of my fillings actually fell out too
 . I don't think their cool until you seal them with a clear coat. Well that's what I am selling myself on my repairs.
Good Luck
-
-
Ahoy Eric
Sorry she isn't all cleaned up. Holiday weekend and all. She likes to party
- sonicmcdude, mtaylor and 4whelr
-
3
-
-
Ahoy Mates
I have been using these for years in my hobbies and professional endeavors. They are much cheaper then canned air, provide plenty of easy to control pressure and zero residue. Although it will not provide you with a 30 second continuous burst; a few quick puffs is generally enough to clean parts, smaller work areas, or remove dust on sections prior to stain or paint. I do own a compressor, which for me is where I turn for more air; although I have yet to use this for shipbuilding. The globe is all I have ever needed. I use it daily
Mine is Super Rocket and can be seen in some of the pics in my log. I own a few of them
Pic is from their web site
http://www.giottos.com/pro_view.aspx?nid=8&typeid=77
B&H Photo sells them

-
Ahoy Ferit
Looking at your pictures and not ever having silver soldered any deadeye hardware I would think that you could close the "gap" as you have it named in your pic without the wooden deadeye installed. Provided you were neat with the solder and did not attach the two linear sections you would then be able to place a wedge between the linear parts, opening the circle just enough to then insert the deadeye. Once the wedge is removed it should secure the deadeye
This being said I really think what you have done will work just fine. Maybe I will try this on my Berlin build. This after I finish my current build which as we both know will be some time from now.
PS: She looks great
-
-
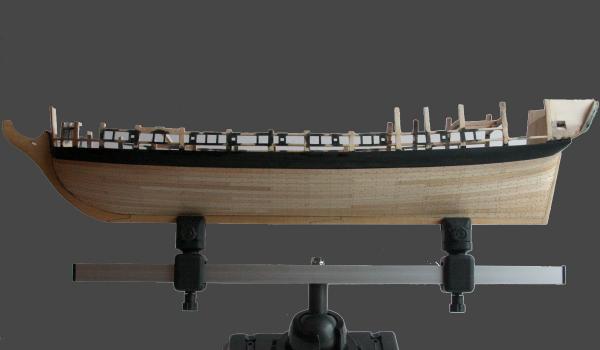
Ahoy Mates
This is where I am as of this morning.
The wales have been taped off and painted but I am not finished with the weathering. I laid down 3 coats of Testors Classic Black enamel. I wet sanded between each coat with 600 grade sandpaper and then went to a finer grade on the finish coat. Now I am applying watered down coats of Tamiya acrylic flat black which I alternate with Tamiya regular black. After that I will borrow Ben's trick of burnishing it with a cloth. My hope is to create a less uniform color on the wale to eliminate the effect a solid color like black tends to have on models.
I have also Photoshoped the background to add more contrast. The original was just too bright and overpowered the image of the hull. Sorry about that. I should have just taken another pic.
I will finish the wales and make a determination on whether I will add any more paint to the hull. The wales have toned down the speckled look of the treenails which was a good thing. As I am still undecided on how much more paint I will add your comments would be very much appreciated. Alternative points of view are very welcome here.
PS: I am very happy with how fudging the line on the wale came out. If you look you can see how the line runs into a treenail or two near the bow. Tapering these planks was a mistake I made right from the start but I guess that is a part of the process. I also see now that they are a little low overall. If I am correct they should follow the top of the deck which they do not. I'm learning "I think .
Deduct another scale point "lol" I have plenty of them to use for this build.
- muratx, Perls, Beef Wellington and 3 others
-
6
-
Ahoy Buck
I understand the Colorado Shipyard is run by some guy whose always either fishing or flying
Good luck with that
'Lol"
All kidding aside, Colorado is a great place to call home. Best wishes for a quick sale on the house and a pleasant moving experience (if there is such a thing)


Charles W Morgan by texxn5 - FINISHED - Model Shipways - 1:64
in - Kit build logs for subjects built from 1801 - 1850
Posted
Ahoy John
WOW, you have really made some progress since my last visit. I was kind of thinking you left on V-K . "lol" Where did you go, ship building school
She looks great, very impressive work