Chuck Seiler
-
Posts
1,878 -
Joined
-
Last visited
Content Type
Profiles
Forums
Gallery
Events
Everything posted by Chuck Seiler
-
 Looking at " BRATTEN"* I see that, in addition to the nails in the hull itself, they recovered 18 assorted iron nails/spikes. All square. None over 1/2 width. I agree with Steve. I will tinker with this as I progress, but more pressing things await. * "The Gondola PHILADELPHIA & the Battle of Lake Champlain" by John R. Bratten
 -
Russ, Not in this case. They just whacked the nails into place and when on to the next. They weren't all that concerned with corrosion since they didn't expect the ships/gunboats to be around very long. Their goal was to get as many hulls into the water as they could. Counter sinking and plugging the nails took too long. As it was, IIRC they got the full compliment of gunboats completed and got all but one row galley completed in time. (It was completed but not fitted out in time for the battle.) As you see, the nails are relatively visible.

- 308 replies
-
- 1
-

-
- finished
- model shipways
- (and 1 more)
-
I believe it was/is square, but at that scale, does it matter? Particularly if the nails are subdued enough? What are your recommendos?
-
Dremal Power Tool
Chuck Seiler replied to Spiderpig's topic in Modeling tools and Workshop Equipment
That's the one. I have the next size up for my 770, but it screws into the head. It takes from #80 drill to 1/8" shank. -
Dremal Power Tool
Chuck Seiler replied to Spiderpig's topic in Modeling tools and Workshop Equipment
Bart, The chuck I am thinking of inserts into the dremel like a collet rather than screws into the head. -
Nails! Uhhhg!!!! I think I am going to use the underside to experiment with my nails. As previously discussed, there are ALOT of nails. It could become overwhelming fast if not careful. (Overwhelming both in terms of the work required as well as the visual effect.) I have seen alot of models that look like an outbrak of measles because the trunnels are too obvious. I used subdued pencil point dots on my scratch Philly, but that was 1/2 the scale of this one. I don't know if that will be TOO subdued or not. I was hoping to blow it off for awhile. What do you plan on using for 'nails'? ...and for those out ther not paying attention, they are actual iron nails, not trunnels.
-
Ron, If it had/has masts it almost certainly has to have standing rigging. Looking at some pictures of it online shows me that it has set of shrouds for each mast and a fore stay. Probably more. Its a pretty simple rig, so there is not much there.
-
A multi-legged mini table!!!!! Looks good. Time for fairing and planking.
- 308 replies
-
- 1
-
-
- finished
- model shipways
- (and 1 more)
-
Bart, That's good to hear. Another Philly for all to see. Hopefully Steve wil post some more pics soon. :-)
- 259 replies
-
- 1
-
-
- Gunboat
- Philadelphia
- (and 1 more)
-
I am installing one side at a time. With the way these are set up, it pretty much doesn't matter, as long as you ensure they are square.
-
Dremal Power Tool
Chuck Seiler replied to Spiderpig's topic in Modeling tools and Workshop Equipment
Try the micro chuck. -
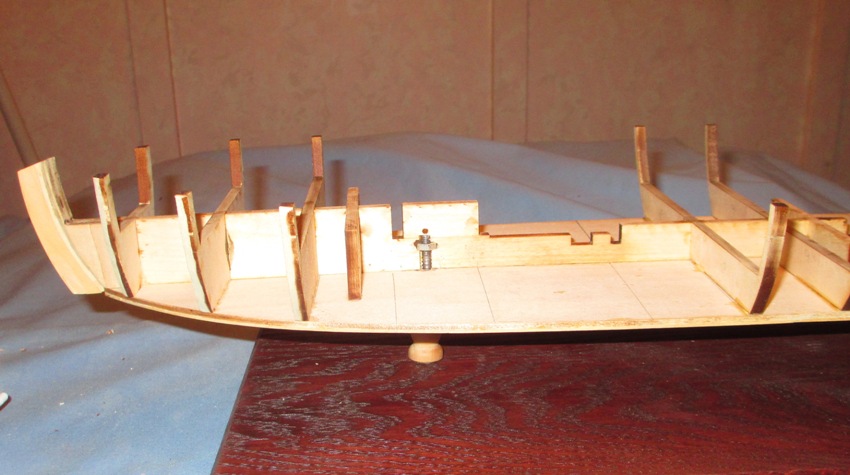
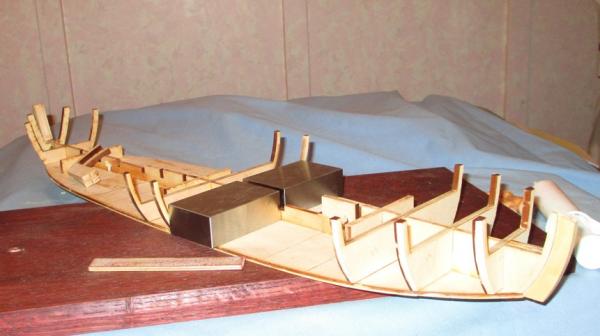
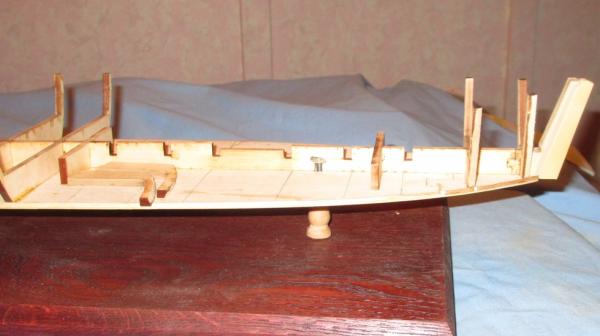
Progress!!! At this rate, I will be done by Halloween. (not likely). Progress continues on installing frames. At this point, before it gets too cluttered, I want to install the pedestal assemblies. Basically these are the nuts that the hanger bolts will screw into. Here is the forward assembly. Aft assembly. I need to be careful here to ensure (1) all is straight and (2) I don't glue the bolt to the nut.
-
Dremal Power Tool
Chuck Seiler replied to Spiderpig's topic in Modeling tools and Workshop Equipment
For what it's worth, I have several Dremels; both corded and battery, big Lithium and old fashioned small-guy. Each has its place. However, I put the most mileage on the small battery Dremel. I had (have) a 770 with a extra battery. Agreed, the charge does not last as long as I would like, but it is not a show stopper. The oldest battery is about to give up the ghost after many years of use. Instead of getting another battery, I decided to get another Dremel...this time the 7700. It seems quieter (although that may because I drove the bearings into the ground on my old one), it is quite light and has enough power for what I need most of the time. I found that the amount of material removed has alot to do with the attachment used and the 'touch' you apply. Whatever brand or model you choose, I think you will find it is a handy tool to have. -
I wanted to get 1-2 and 15-16 in to anchor the ends, then 9-10 for the middle. After that it is based on room available for my squares to fit. I want to avid the areas adjacent to the pedestals until the nuts are glued in place.
-
With the keel installed, I ran lines perpendicular to the keel in order to ensure the frames remained square to the keel when installed.
- 259 replies
-
- 2
-
-
- Gunboat
- Philadelphia
- (and 1 more)
-
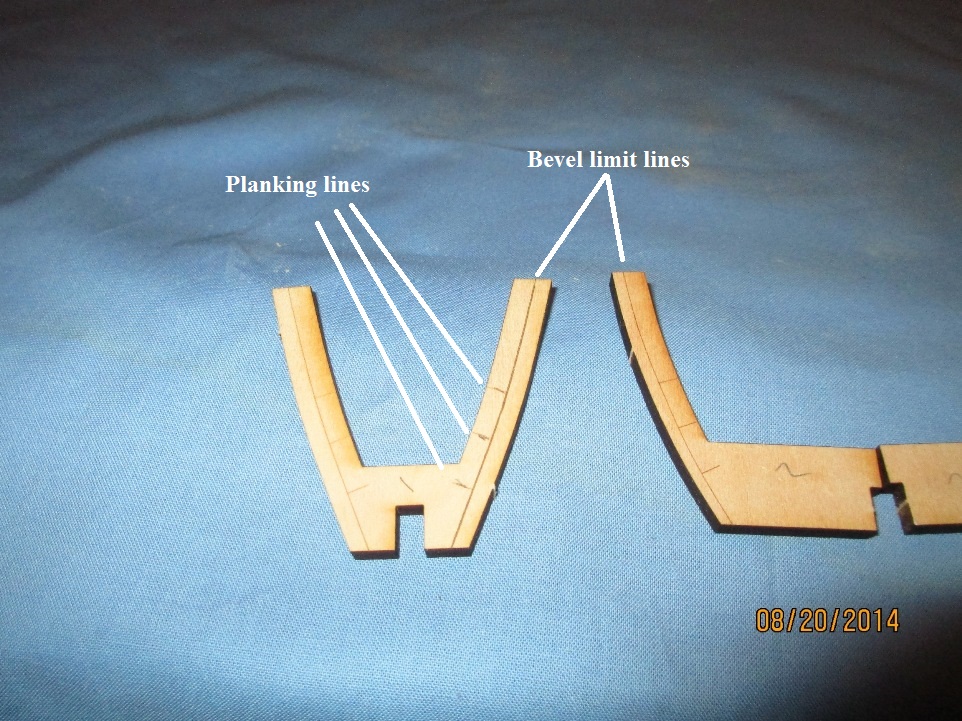
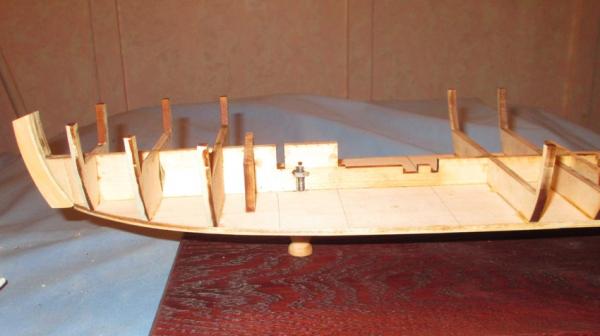
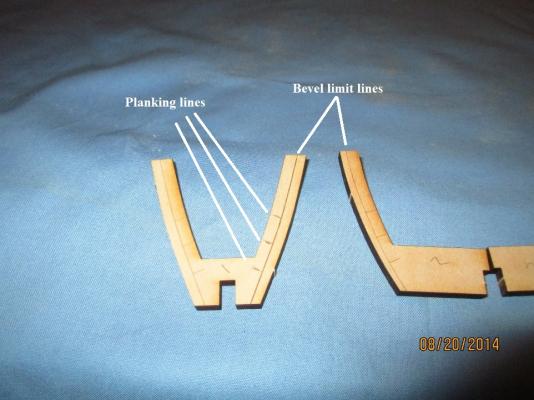
Dave, How's that? For those of you not familiar with the kit, the frames/bulkheads are pre-scribed with limit lines for beveling and tick mark for planking. These are in lieu of tick strips and lining off the hull.
- 259 replies
-
- 5
-
-
- Gunboat
- Philadelphia
- (and 1 more)
-
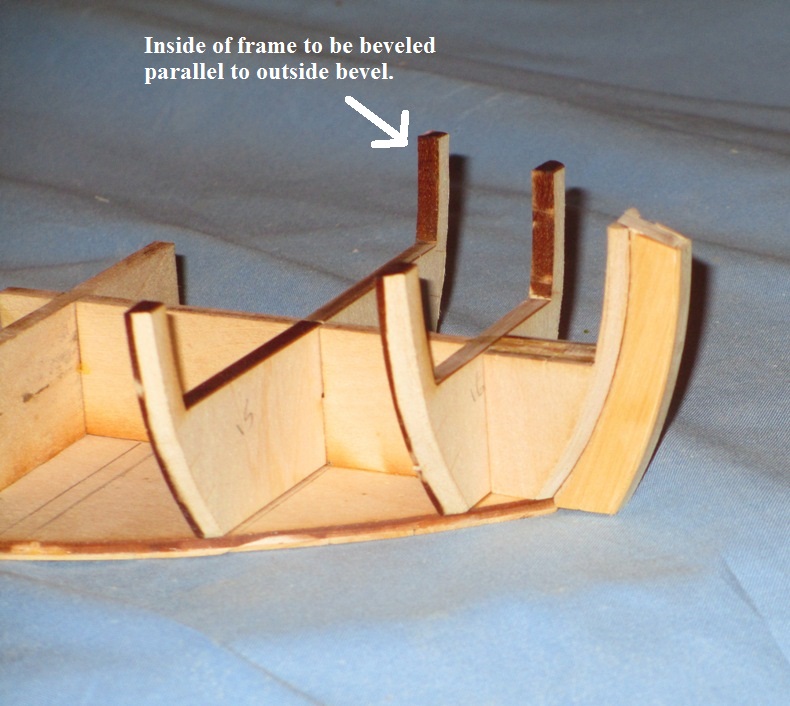
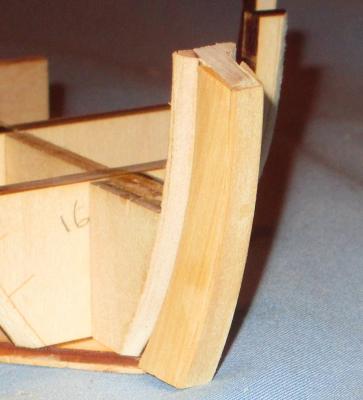
PUBLISH OR DIE Sadly, I am drawn back to modeling rather than being at the beach. Oh well. Next week when the crowds leave. I have attached the keel piece. The 'rabbet pieces' (18a and 18b) have bee added to the stem. Frames 16 and 15 are dry fitted. The inside of the frame uprights remain unsanded. They will eventually be sanded on a bevel parallel to the exterior bevels. Exterior bevels have been partially cut with about 75% of the material removed. These will be finalized once all frames are in place. I used boxwood for parts 18a and 18b. I also added a boxwood piece in front of the stem. It appears that a need to do a little more sanding to blend in the joint.

- 259 replies
-
- 3
-
-
- Gunboat
- Philadelphia
- (and 1 more)
-
I agree with Kurt that one should read the instructions all the way through before starting. It helps from being surprised later on by some step you should have prepared for early on. Being a guy, however (i.e. adverse to maps, instructions and the like, until after all else has failed) I find that even though I read the instructions, they don't make much of an impact because I am not familiar with the whys-and-wherefores of later stages of the build. What I find helpful is (1) the initial read thru,and (2) reading ahead a couple steps each time I finish a phase. That way I find the read ahead makes more sense. I did just the opposite of Kurt. (It's not my fault....I didn't have instructions). On my scratch Philly, I waited until much later to rig and install the guns. I didn't want them to get in the way. It ended up being difficult. This time I will do as Kurt indicates...Rig and install the carriages, install guns later. I also plan on drilling two holes in the pieces that hold down the trunnions and pinning them in place as well as gluing. For metal on wood or metal on metal (that cannot be silver brazed) I have been using "Loc-tite All Purpose 'Go-2' Glue".
- 308 replies
-
- 1
-
-
- finished
- model shipways
- (and 1 more)
-
I suppose that would also work when the glue that is stuck to your hand is also stuck to the model. (Seriously, I have done that)
-
Knocking something off....or knocking over a lamp...or punching a hole in the wall.......
- 308 replies
-
- 2
-
-
- finished
- model shipways
- (and 1 more)
-
Steve, There is nothing wrong with taking your time and making sure everything is correct. It will save alot of time and grief down the road. Looking good.
- 308 replies
-
- 1
-
-
- finished
- model shipways
- (and 1 more)
-
I would use whatever you are using on your interior planking. I will be using Golden Pecan for interior.
-
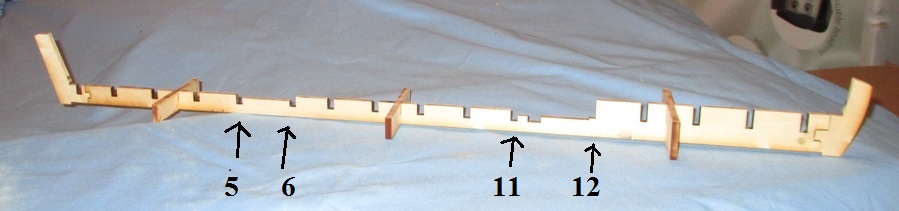
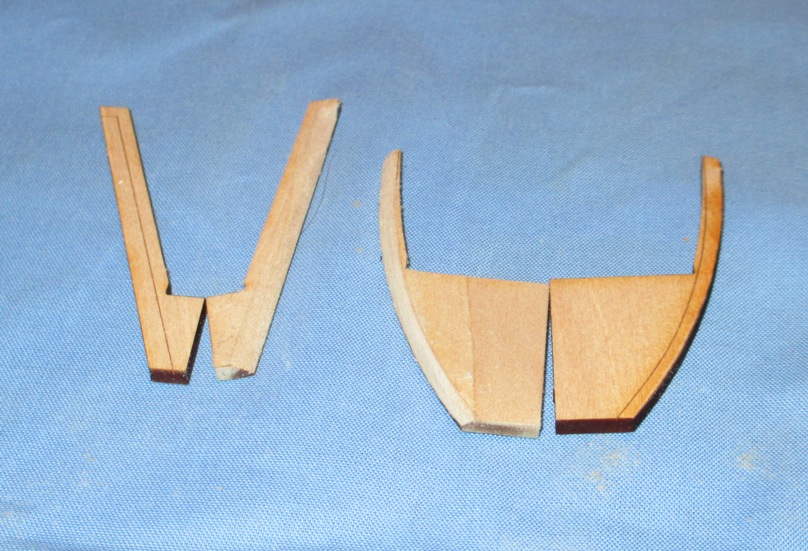
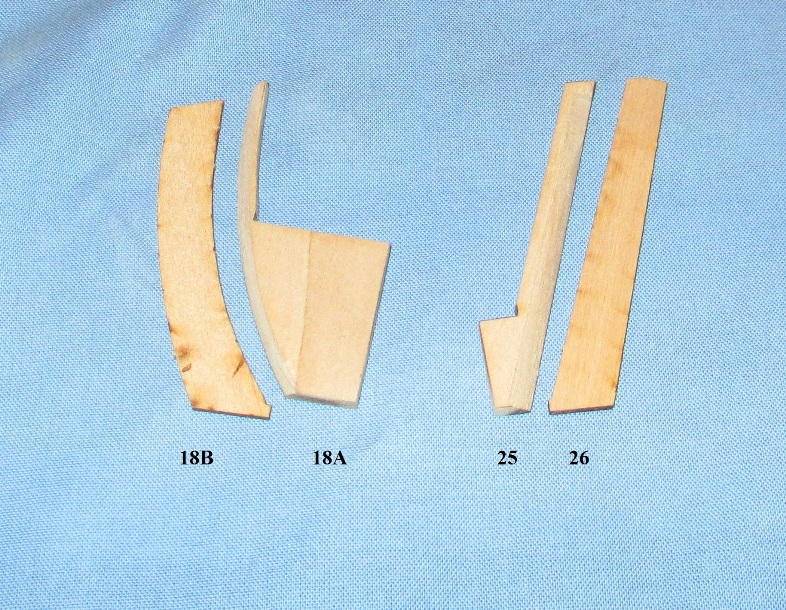
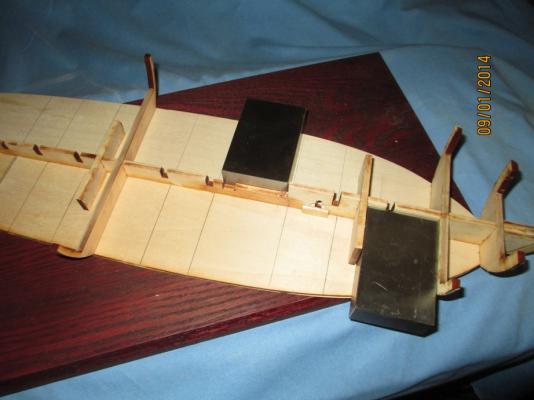
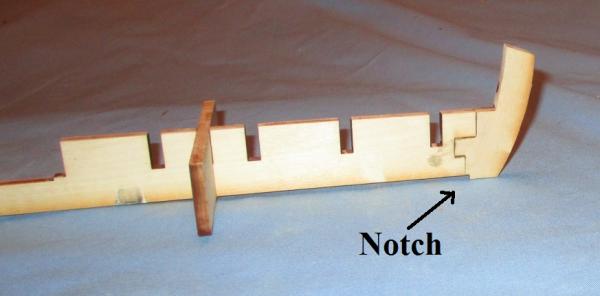
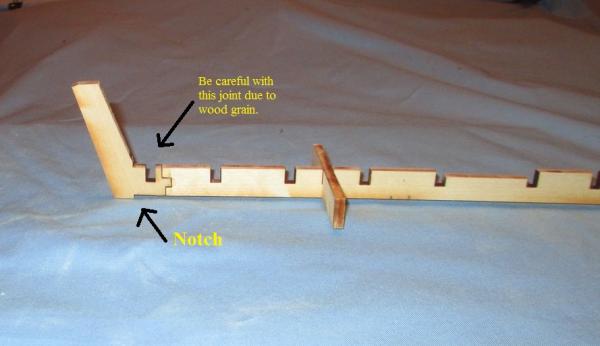
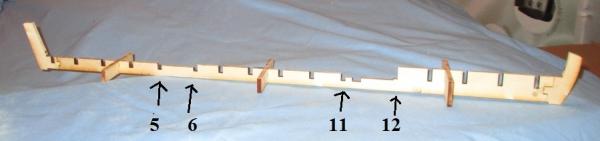
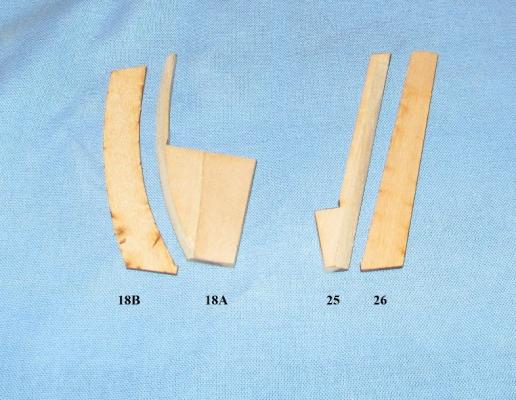
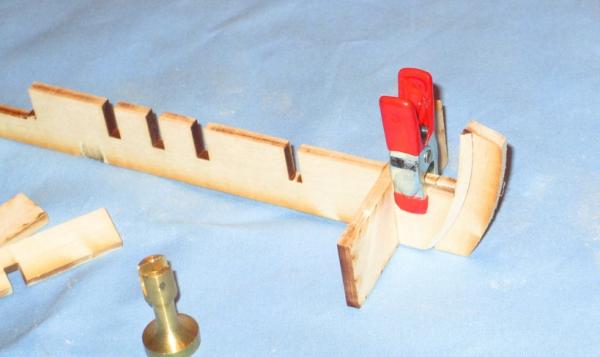
Keel Assembly The basic keel assembly is also a three piece. It is long and bendy, so I need to be careful with it. I will be happy when it is safely glued to the floorboard. As you know, I will be cutting MORE slots in it to accommodate the screws. Any wagers as to how many times it will break before I glue it to the floor? I placed the keel piece on a flat board...glass would be better, but I didn't have any this size. I first attached the stem piece. I placed a heavy, flat object on top to keep it flat. Notice that most of the keel is intended. That is where the floorboard will go. Next comes the stern piece. Same-o, same-o. It doesn't matter if you do the stem first or the stern. You have to be careful not to be brandishing the assembly like an Arabian cymatar lest that first slot from the rear cracks off (or so I have heard). Before I get too far, I will want to stain the keel between slots 5-6 and 11-12. IIRC, some of this will stick up from the fore and aft cockpits. Its easier to stain and sand it now than later. Next, I will be placing some pieces in the stem and stern that will help form the rabbet. These pieces will be inside the planking and not visible, so I can leave them basswood. Note the bevel. Another piece will be added to form the other side of the rabbet. These will be visible and I will make these out of boxwood rather than use the basswood piece provided in the kit. The pieces on the stem are 18a and 18b, while the ones in the stern are 25 and 26. Yeah, I don't know either. I think the kit was designed by army guys too.* Here is how the stem piece will fit. I am using one of the cross supports to square the piece and ensure it fits in the correct location. * PHILADELPHIA has alot of things you don't normally find on a ship, or is rigged/built different than you would normally find. I attribute that to the fact it was designed by army guys. For a discussion of those, you can browse my PHILLY 1 log. ...or wait around, I am sure I will mention them again.

- 259 replies
-
- 6
-
-
- Gunboat
- Philadelphia
- (and 1 more)
-
Tim, I will be staining the pedestals. I am looking at using FRUITWOOD (which I just bought and want to try out). Pops, I think the hanger bolts will work out well. I will probably go with a woodscrew into the bottom of the pedestal.
-
Bart, How over-thick is it? If it is reasonable, it can always be sanded down. You will be sanding alot of the bottom anyway. A little dremel action to get the meat and then sanding bvlock for the whole surface.