Chuck Seiler
-
Posts
1,878 -
Joined
-
Last visited
Content Type
Profiles
Forums
Gallery
Events
Everything posted by Chuck Seiler
-
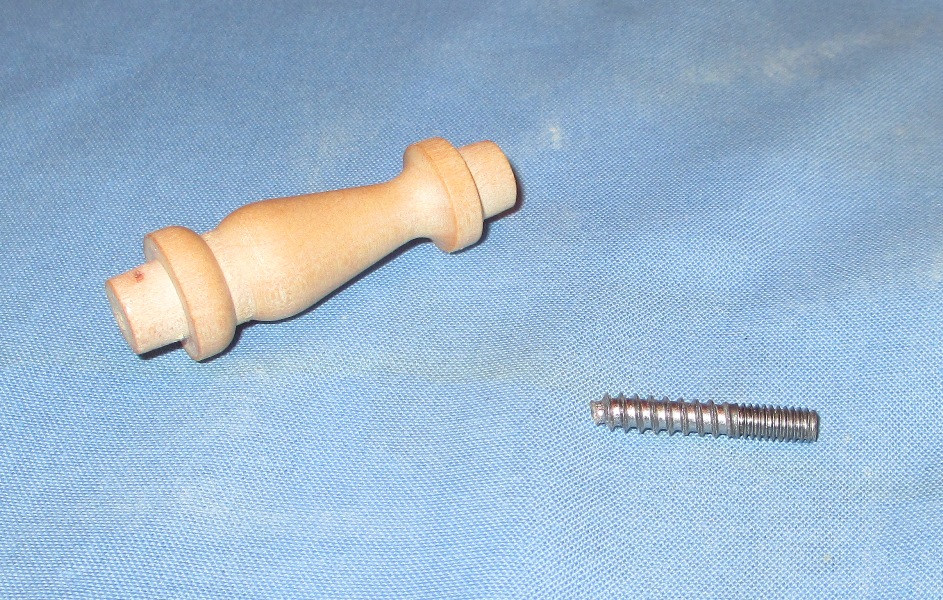
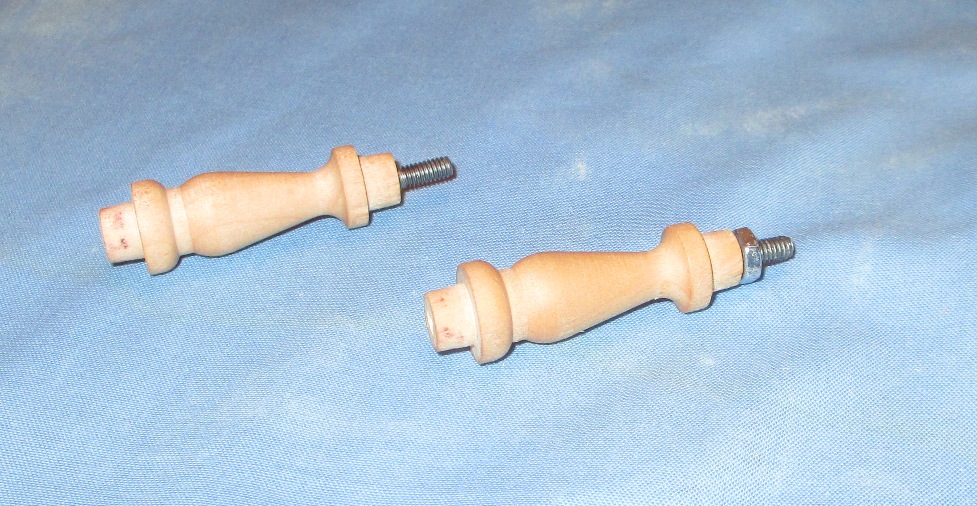
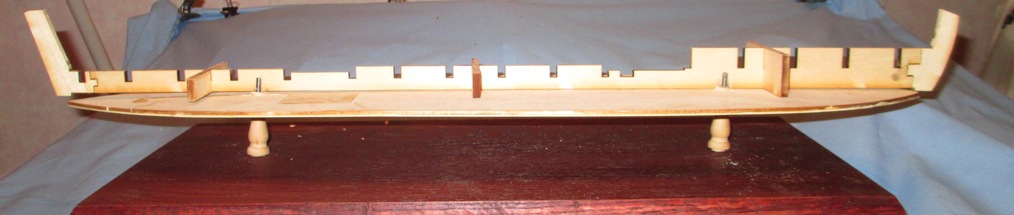
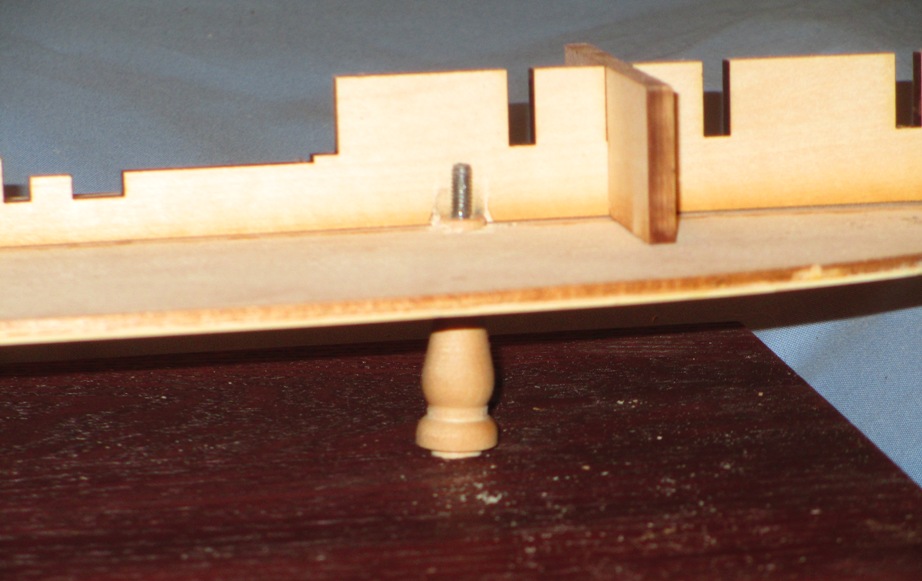
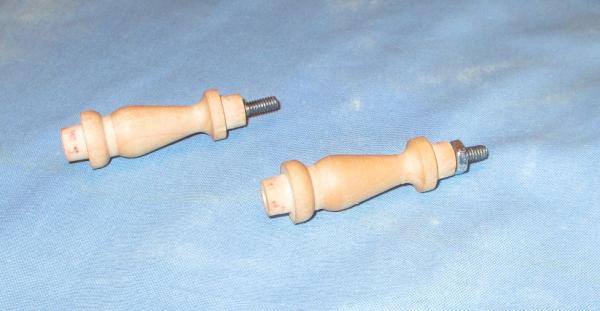
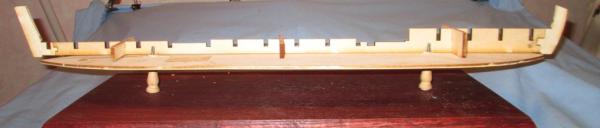
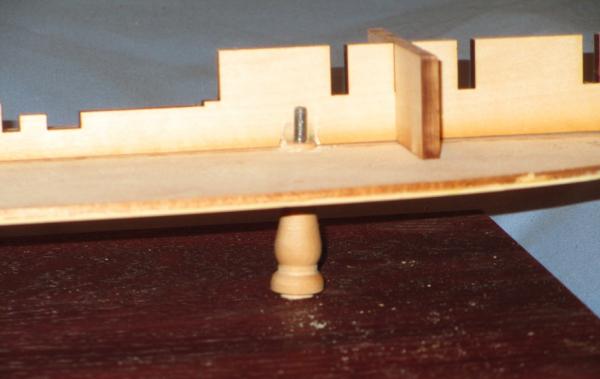
 Huzzah!!! The hanger bolts have arrived!!!! Let's go back a step. Pedestal and hanger bolt. I am using a 1" 8-32. Hanger bolts installed into pedestals. One has bolt for fit. HB-P assemblies test fitted into floorboard with keel aligned. Close up. I will level the pedestals so the topis even with the floor. I will then mark the keel so that I can slot it for the screw, then widen one part to accommodate the nut. More to follow.
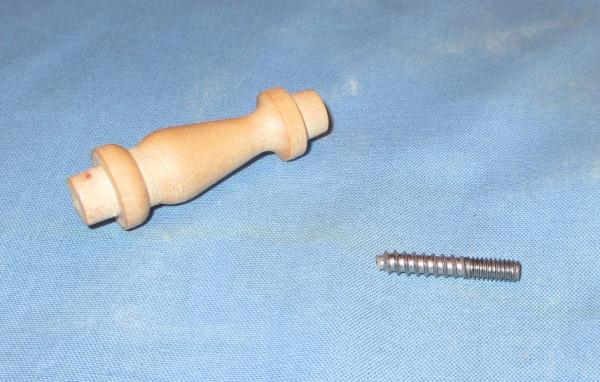
- 259 replies
-
- 4
-

-
- Gunboat
- Philadelphia
- (and 1 more)
-
I have not gone as far as you, so I am not sure what the issue is. My thought is that all we need to do is have the bottom plank 1/32" wider that originally planned and we may have to notch the floorboard to extend the rabbet. Could you IM me with a picture of what you are concerned about?
-
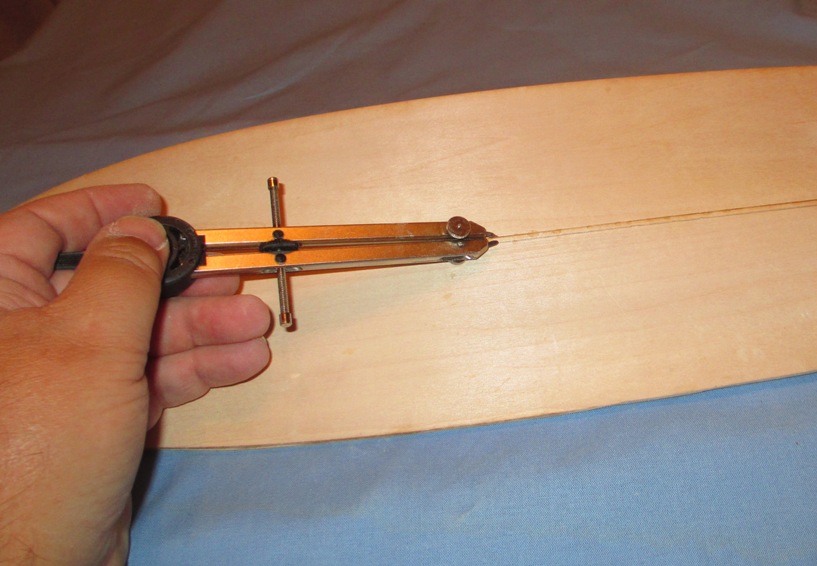
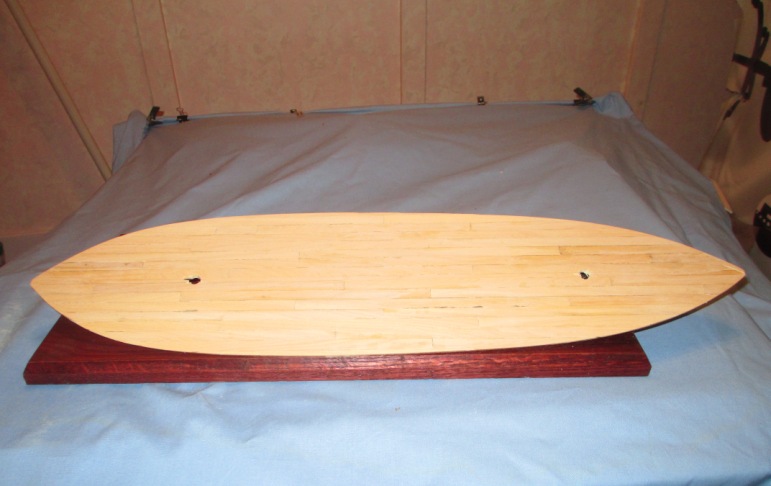
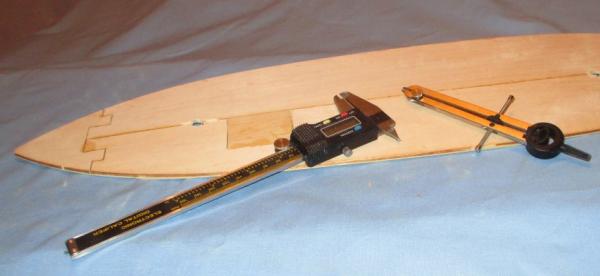
I guess it's time to start in earnest. We first start by assembling the bottom piece (or as I call it, the floor board) and the keel assembly. I believe the instructions actually start with the keel, but I will start with the floorboard because I think it flows better. This is pretty straight forward. Three pieces. I was careful to place on a flat surface and weight down the pieces while the glue dried. This thing is a surfboard. As you already know, I inserted the planking for the bailing well and have planked the underside. The next thing I did was prepare the floorboard for the keel piece. The keel piece is long and thin and prone to bending. As such, I wanted to provide a reference line to ensure the keel was true. Using a caliper, I measured exact width of keel. 1/2 of that was marked one side of center line. Using compass/dividers I took that that measurement and ran a line down both sides of the center line. The keel fits snugly betwixt the two lines.

- 259 replies
-
- 5
-
-
- Gunboat
- Philadelphia
- (and 1 more)
-
Thanks Tim. I can't say that there is much progress yet. I'm waiting for my hanger bolts to arrive and enjoying what is left of the summer. Meanwhile, I am preparing floorboard, keelpiece and frames. I may post some of that tonight or tomorrow.
- 259 replies
-
- 1
-
-
- Gunboat
- Philadelphia
- (and 1 more)
-
Kurt, The last two issues were parts 1 and 2. I don't know how many more issues the build will cover. At least 2, I suspect.
-
In honor of our being part of the Nautical research Guild...here is a little nautical research. Here is a virtual 3D representation of PHILADELPHIA. Bookmark this page because I may be referring back to it. I had problems with it using older versions of Explorer, but with the current one and Firefox, I have no problems. http://3d.si.edu/explorer?modelid=47 Pan, zoom, top, bottom, P&S views of Philadelphia as she sits in the Smithsonian. There's a measuring tape you can use to find dimensions and spacing of chosen features, like beam and frame spacing. For those of you planking the underside, it shows the underside...I think. It's hard to tell if it is accurate because I done see the center keel.
- 259 replies
-
- 5
-
-
- Gunboat
- Philadelphia
- (and 1 more)
-
That's important. If the keel is crooked, everything sucks wind.
-
How long are the pieces?
-
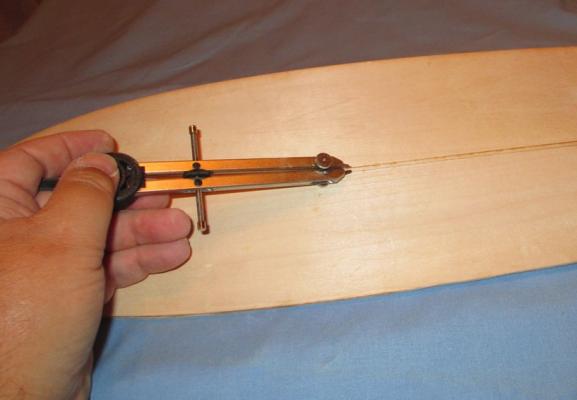
You can never take TOOOOO much time, if you get it right. Better that than rushing it and getting it wrong. I plan on centering the keel much like I centered the "underside center strip". Measure width of keel, divide by 2, set my compass at that distance and using the center groove, run a line up one side of the center groove. That SHOULD be the limit line for the keel and can be used to ensure the keel is straight, As a check, I will turn the compas around and run an identical line on the other side of the center groove. The keel should fit snugly betwixt the two.
-
Micheals only has balsa? I am pretty certain the Mike's here in Santee has basswood as well. Steve-where did you get yours?
-
I just measured. 3/8" wide.
-
Bill, What is th edifference between the Bluejacket kit and what you are calling "the military version"? I thought they were all military versions? Were some converted after the war?
-
Yes, I think th ekeel and frames are the next step. That will help stabilize. I don't know if there is a real need to do anything special with the underside except NOT placing it on a hard scratchy surface. I don't think I finished the underside until I was well done with the whole hull structure...not just planking. I think I gave it another coat of stain, just for gaffaws. However, do as you see fit.
-
Bart, Looking back at some old IMs to Steve, I recommended 1/2 planking. I don't recall what he eventually went with, but both he and I have 7+ planks on either side of center. I would say our dimensions are the same. Bottom line, unless you have something to cut with, use what is available.
-
I am going to wait until I have more structure in place in order to avoid the curling. AT LEAST keel piece and ribs---probably full exterior planking. Okay....you responded while I was responding..so I have to catch up. I used a satin finish on my Philly 1. I will let you know when I get home....but I would wait until you are done the whole hull.
-
Floyd, Never been. Some day. I did see the virtual 3D Philly...which I can repost the link to. Bart, It will not be wood from the kit...the kit does not tell you to plank the underside. Mine are definitely more than 1/4. I am thinking 1/2 because I think I made them a foot wide. If you are using basswood, check with Steve. I think he got some from a hobby store or Micheal's. Definitely use th ewood conditioner. (and be careful of that curling.
-
I think it was the balsa wood.
-
Bart, let the folks at Model Expo know. They will replace it.
-
Steve, Looks good. You can see the difference between the center strip and the rest. The caulking shows up nicely; its there but not too overpowering. How do you like that Golden Pecan? On Philly 1 I used GP for interior planking and regular Pecan for exterior. It provided a little contrast, but I am not sure if it really made a diff. I like playing with colors, so I had both sitting around. I have a can of Fruitwood I am going to experiment with this time...maybe on the wales.
-
Good question. I want to say 1/2" x 10 to 12 inches (depending on frame spacing). I will check when I get home. That would equate to 1 foot x 20 to 24 feet. It seems a bit on the long side, but I set my legnth based on the length of the longest hull plank. As far as I know, the underside planks are not documented...at least for this model. I can check with somebody who has the Smithsonian plans. The side planking, however, is historically correct, so if Y x Z is the size of a known plank, that dimension could be used elsewhere. They had plenty of timber.
-
Don, What is the scale on this?
-
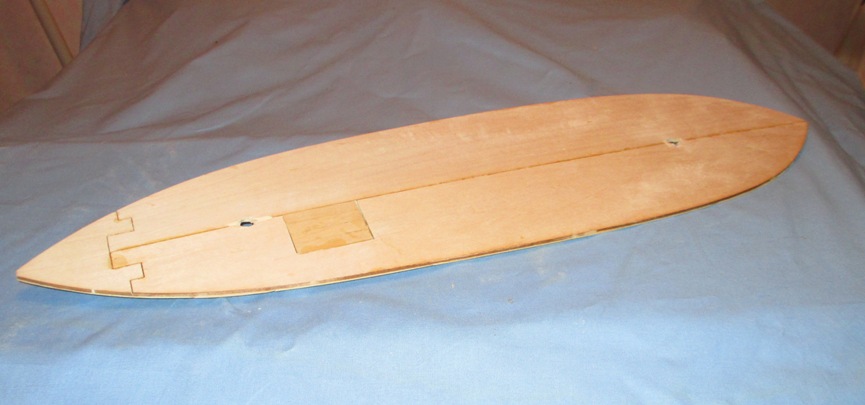
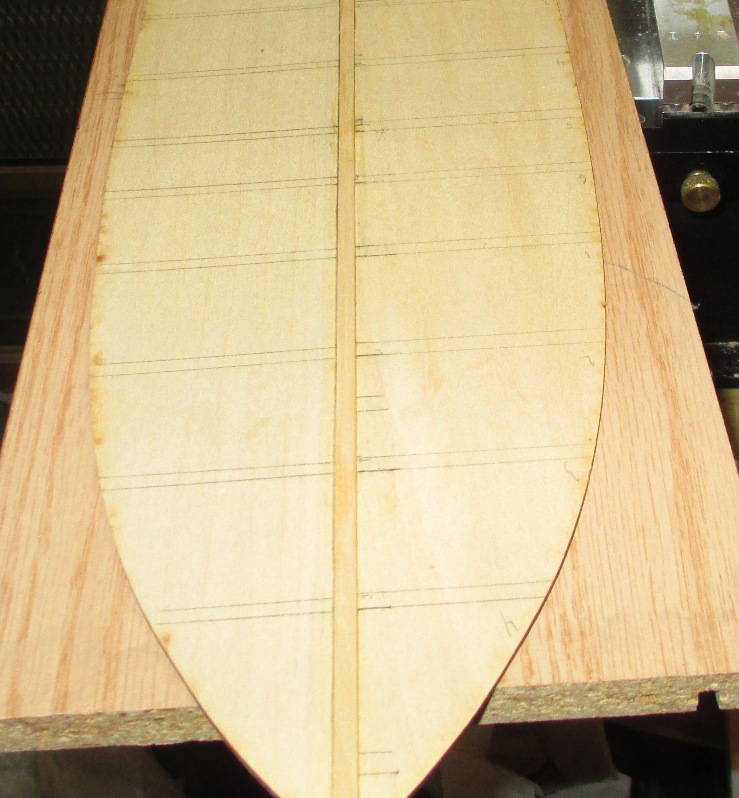
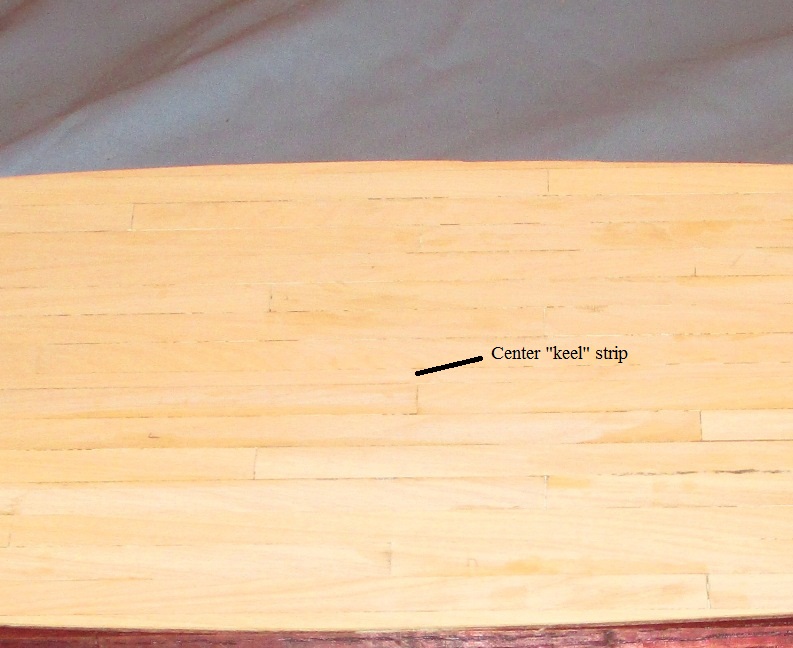
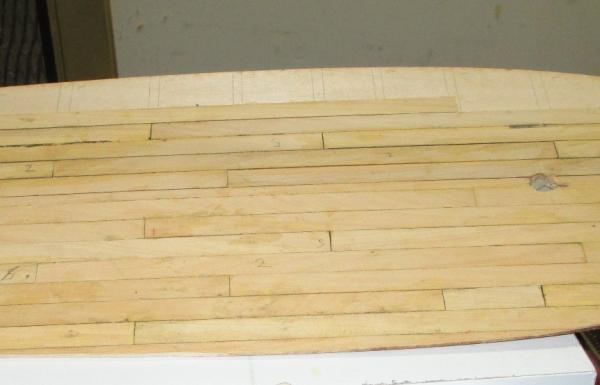
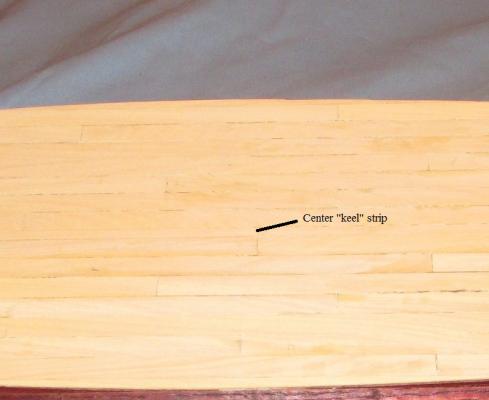
The second thing I want to do that is not in the instruction is to plank the underside of the model. I am surprised that it is NOT planked, per the instruction. Even though virtually nobody will see the underside, I think it is important to make it complete. Invariably SOMEBODY will take a peek. It should be planked. It also makes it very clear that this is NOT a waterline model. That is REALLY the bottom of the boat. Once the floorboard has been assembled (to be covered in future step) I ran a strip up the center representing the keel. In real life the keel was a few scale inches, but putting that in now would make the model tippy when sitting on the flat. I may add it later. I had to be very careful to ensure he strip stayed straight, since all the other planking will guide on it. Prior to this, I had marked the frame locations based on the center keel-piece. I will use these marks to locate my plank joints. Planking in progress using a 5 plank shift. 1-3-5-2-4 Number 2 pencil used for caulking. Planking complete with some light sanding. I am hoping the caulking will be a little more visible once I finish the wood. I will do some more sanding and possibly experiment with 'nails' while I figure out how to mount the model.


- 259 replies
-
- 4
-
-
- Gunboat
- Philadelphia
- (and 1 more)
-
Indeed. Again, my apologies if I came across the wrong way. I have been IMing Steve for awhile, so there may be some things I say that we both understand in a different context that sounds different out of context. For the record....by my rough calculation, that's about 1400 nails. ---ooops. More like 900. Piece o cake.
-
Foxy, Hey, no...not upset. Sorry if I gave that impression. I am jumping from one swamp to the other, keeping the gators in check. I pop in to MSW from time to time, so if I am a little curt, I apologize. Keep the observations and comments coming. Philadelphia is a strange bird...designed by army guys, built in a hurry with full knowledge that it would not last very long. There are alot of things that don't make sense about it. As mentioned, the instructions do not even call for planking the bottom. I have addressed the reason why I chose to do it with Steve in an IM, and I will re-post that in my build log when I get to that point. Depending on how it is mounted, it will not be widely viewed (if at all)..
-
Money is probably negligible, depending on what you use. You could probably get away with pencil dots. Time is the issue. At this point he is probably raring to get started on the model...goofing around with this underside is less than desirous. Of course, one could always use the underside to experiment with nail techniques....if one had a mind to.