


jack.aubrey
-
Posts
1,268 -
Joined
-
Last visited
Content Type
Profiles
Forums
Gallery
Events
Posts posted by jack.aubrey
-
-
Posted: Tue Aug 14, 2007
August 14th, 2007 - Current building activities:
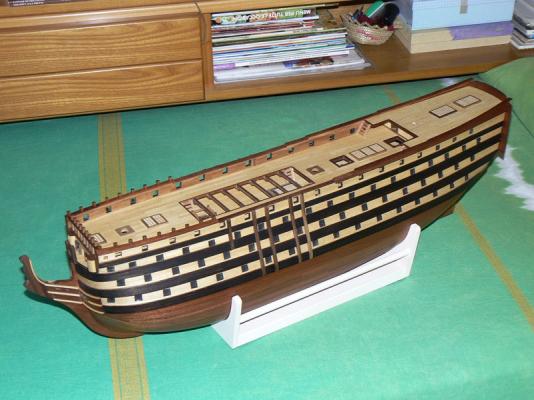
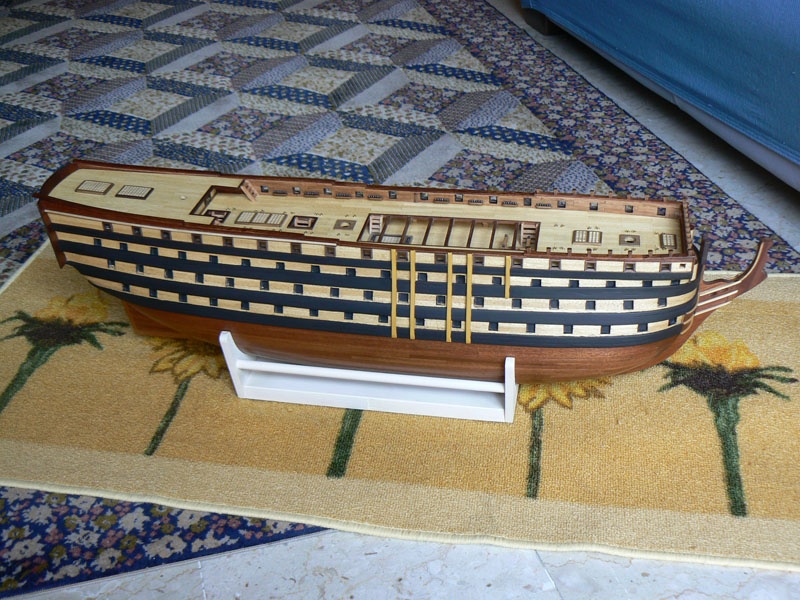
Some messages ago I said that I was in trouble with the painting of the wales.
I don't know exactly what was happening but, after the application of a coat of transparent paint (Humbrol Matt 49) the result was:
- the paint didn't dry, or better it took days to dry
- instead of becoming matt, it's partly matt (and dry) and partly gloss (and not dry).
Most probably the Humbrol paint contains some kind of component that is not absorbed by the walnut of my wales.
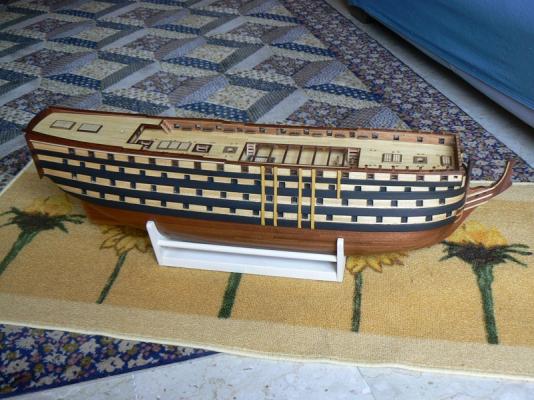
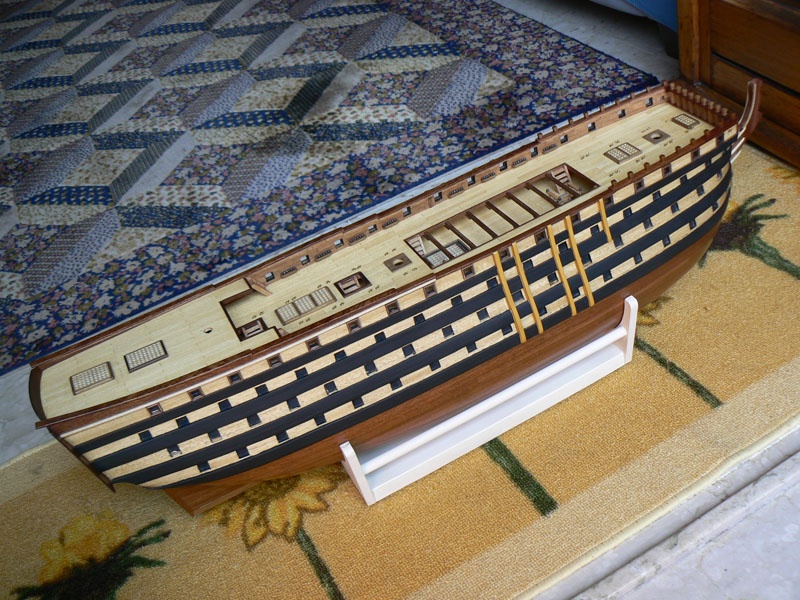
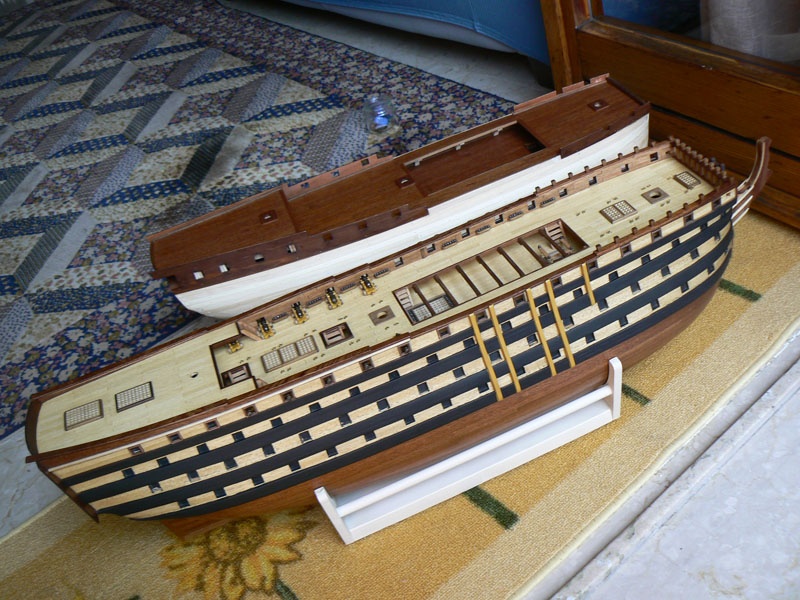
To conclude the result was not satisfactory so, after many attempts I take the final decision to paint the wales with an acrylic black paint. With this new kind of paint, were the essence that was rejected by the wood of my wales is probably absent, the result is shown in the next three photos of the complete hull.
After, having realized that this solution was really good and definitive, I also took the decision to paint the wale vertical reinforcements with an acrylic ochre colour.
The whole operation (black on the wale and ochre on the reinforcements) needed an eagle eye, a very firm hand and several days to obtain the final result but, I am honestly very satisfied.
The last image shows the Santìsima Trinidad in the foreground and the San Juan in the background. I think you can appreciate the difference in terms of hull and dimensions, being them at the same scale.
Next message will contain more detailed images of the newly coloured hull.
Regards. Jack.


-
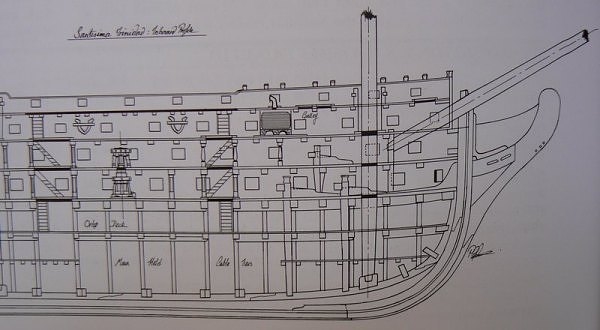
Hi Yves, there are two threads from me about Santìsima Trinidad:
1) The full model http://modelshipworld.com/index.php/topic/8514-santìsima-trinidad-by-jackaubrey-de-agostini-scale-190-full-model/
2) The cross section: this one.
If you go back to the beginning messages of thread #1 you will find everything about the whole parts work
Jack.
-
Posted: 04/09/2011
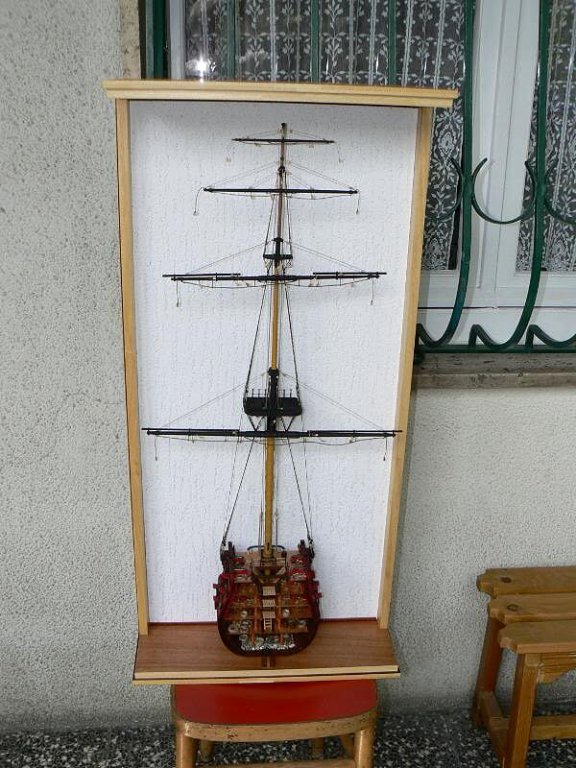
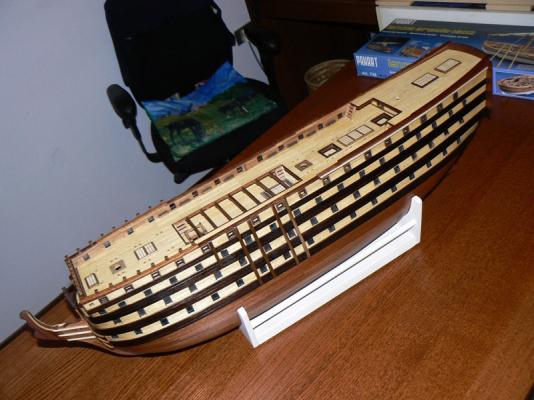
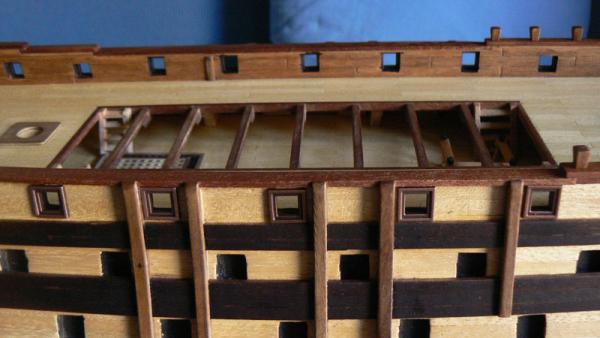
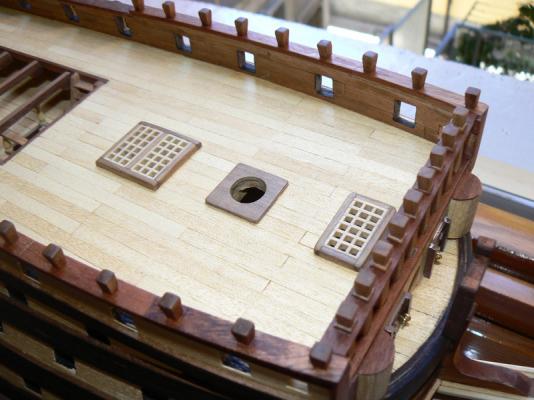
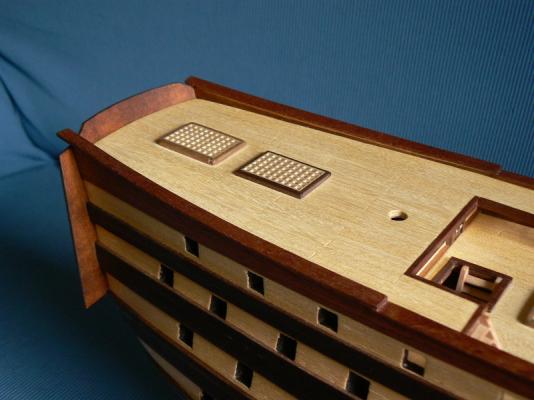
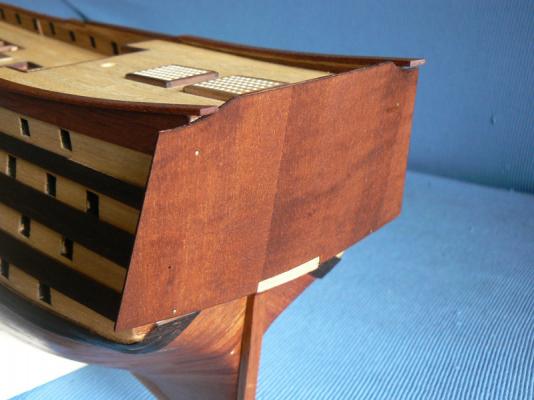
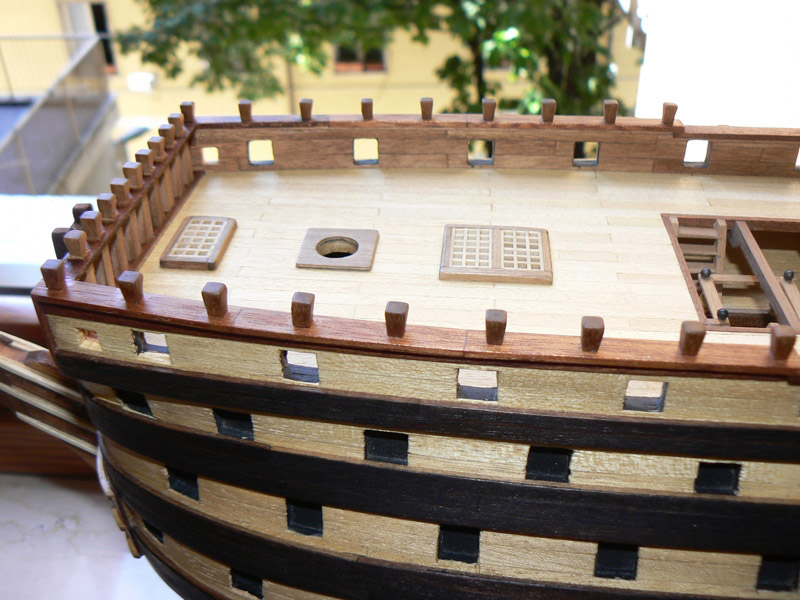
In the three images below I made a test of inserting the subject of this topic in its planned place.
At this point I need to stop on both paths because on one hand I have to wait for the new sails (as I wrote earlier), and, with respect to the display case, the baton passes to the plexiglass artisan.
01 Cross%20Section%20Santisima%20Trinidad/P1070777.jpg
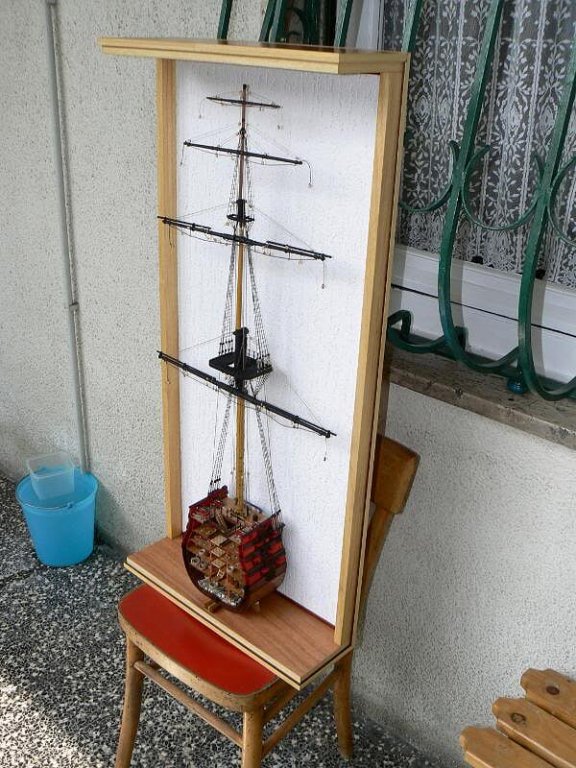
02 Cross%20Section%20Santisima%20Trinidad/P1070778.jpg

03 Cross%20Section%20Santisima%20Trinidad/P1070779.jpg
Coming back to reconsider the sails I could use the ones I decided to discard to make a bit of experience with them before working on the final ones. It should ease the work later. Regards, Jack.Aubrey.
-
Wednesday, November 19, 2014
Today it's more than ten days that I do not add anything to this topic.
As I said in an exchange of SMS messages with my friend Shark, unfortunately between fall and winter I feel in a insane way the arrival of the cold season, and if in addition it's also raining, I became meteorologically addicted to the highest level.
So, given the incredibly bad weather that happened in Italy during these past days, I was not really able to find any will to do something against this model.
Only yesterday, with the return of a better weather, I started to do something.
Before the bad weather I successfully bevelled the bulkheads on the right side to setup as usual the classical bevel angle; there is still the left side missing.
Given that the hull is now crushproof, yesterday I decided to apply three strakes downwards on the ready-to-go side and this afternoon I installed other three of them.
There are no photos, but now it's time to do the same on the left side . . first I have to bevel the bulkheads to continue . .
Sincerely, Jack.
-
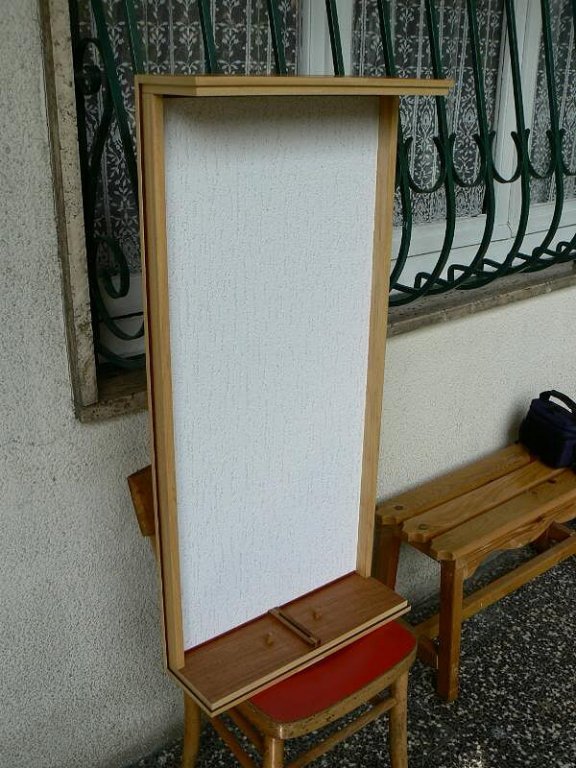
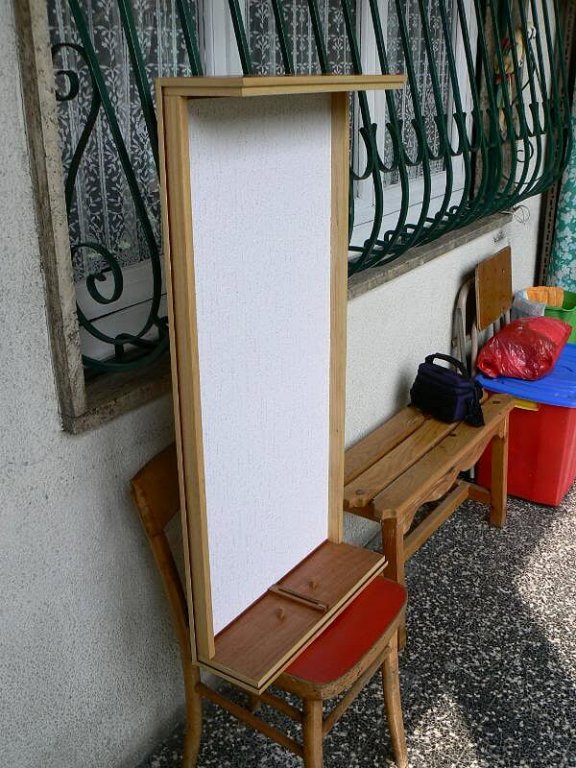
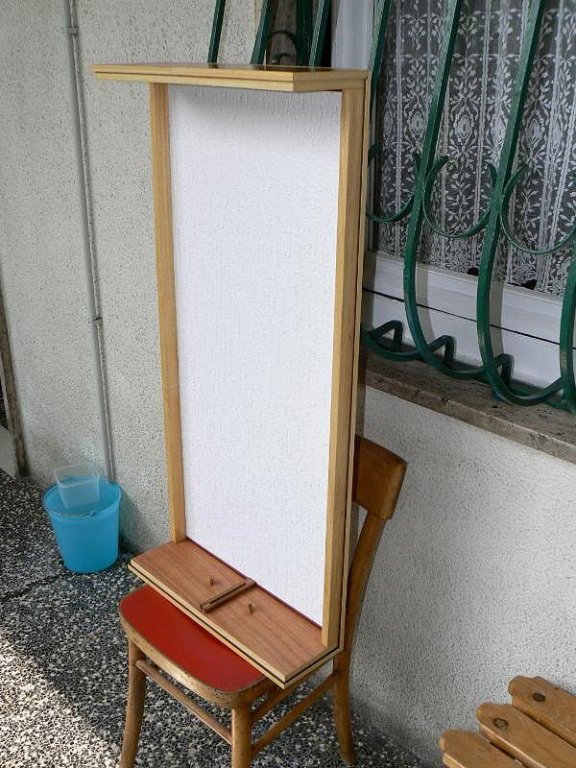
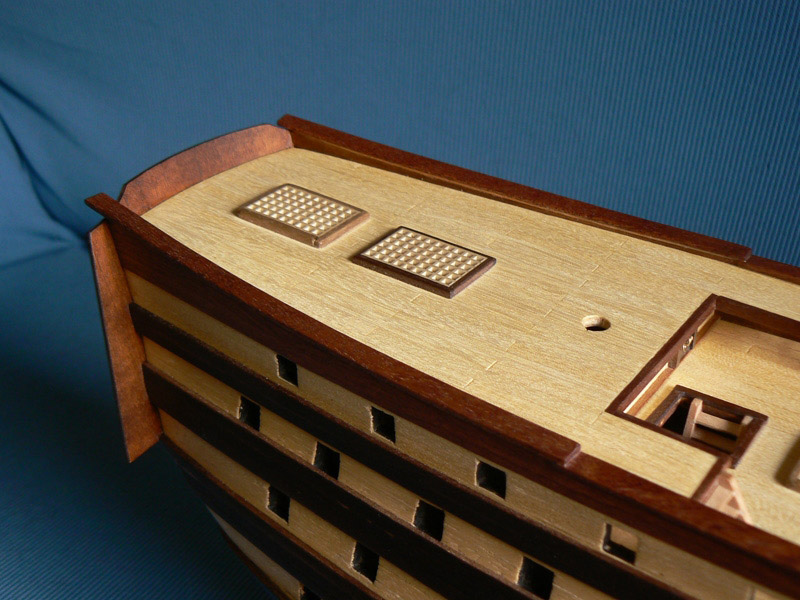
Saturday, September 3, 2011 - Display Case
After spending half a day to prepare drawings of the sails for the tailor and having acquired the canvas and the necessary material, I dedicated all myself to the display case.
Among the many options for the background wall, which I suggested and evaluated some options time ago, in the end I decided for a solution ever described above, but that I loved it. The only drawback of this solution, the color, which I could not find if not white, perhaps due to the small amount that I needed: 1 kg package, the minimum size available. I only used a few part. I would preferred a slightly cream or light brown colour but I didn't find, but surely would have been for me the most.
This is the same material that is used to dye the facades of houses, a type of very thick paint that is mixed with grains of sand (I think) and is applied with a brush, and then, once applied, it is levelled with a wood plank and, at the end, presents an scratched effect. Given the size of the picture here proposed, this effect can be only seen in the first image below:
01 Cross%20Section%20Santisima%20Trinidad/P1070776.jpg
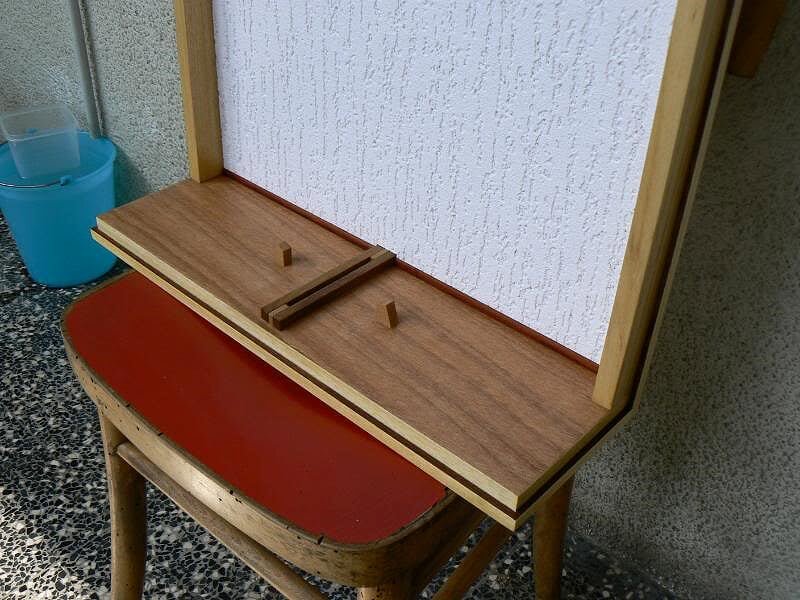
These are overall views. What we now need are the three sides of plexiglass. For this I have a trusted supplier that will come into action as soon as possible. According to my intentions should be in three pieces glued with special glue and will be fixed with some small screw on the timber base. I must still look for the right material at a hardware store.
I know that there are some brass wood screws with the thread inverted where inside there is a thread for normal screws. The first part would be screwed into the wood support and maybe even fixed with some assembly glue, the second is for a screw that will hold the plexiglass that will be removable for maintenance.02 Cross%20Section%20Santisima%20Trinidad/P1070773.jpg
03 Cross%20Section%20Santisima%20Trinidad/P1070774.jpg
04 Cross%20Section%20Santisima%20Trinidad/P1070775.jpg
Other photo with the model inside, as it is today, will follow. Regards, Jack.
-
Monday, August 29, 2011 - Sails
I had the opportunity to closely observe the sails distributed with the booklets, in order to study the best way to mount them and, above all, to display them.
I immediately discarded the idea of letting them loose: would hide, once in the display case, virtually all the rigging and the great deal of work that has been done to equip it.
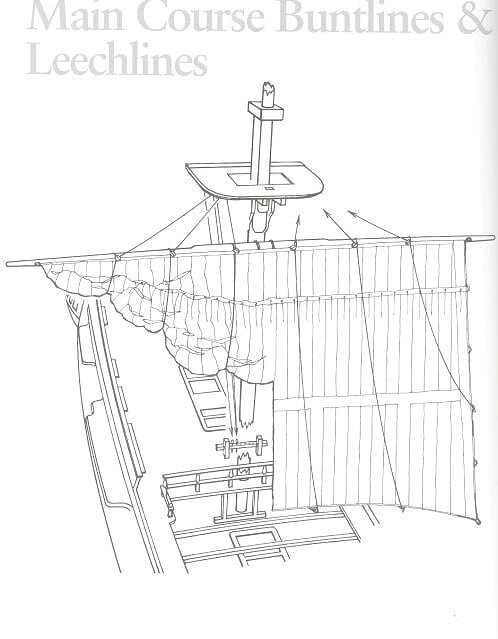
So I focused toward a solution already presented elsewhere in an italian forum (http://www.forumscuoladimodellismo.com/t226-le-vele-di-un-vascello-del-xviii-secolo) that is visible in the image below, taken from the famous book by Lennarth Petersson "Rigging Period Ship Models". Obviously I am referring to the part visible in the left side of the image.
01 Vele001.jpg
But as I watched the sails, I also realized that, although valid globally as presentation, were somewhat coarse in the seams and, above all, they had the vertical seams generally "out of scale". In reality what made me decide to make them from scratch was the fact that these seams were not only not in scale but they were not all at the same distance, which immediately struck the eye.
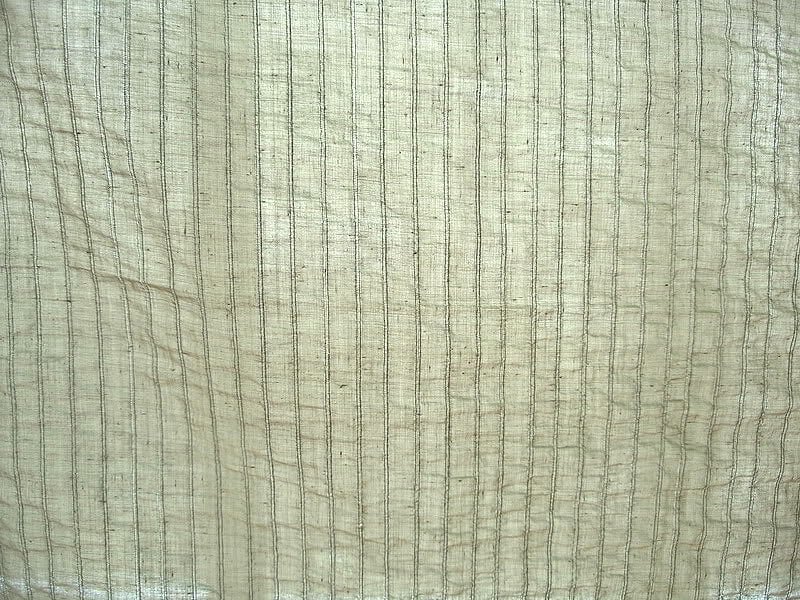
And then I searched and I found the suitable fabric. It is none other than the famous fabric used by A.Baranov to build the sails of his Panteleimon Victoria and described in the discussion mentioned above.
Below is a photo of the fabric, pure linen, which simulates, already in the plot of weaving, the typical vertical seams in all the sails. A great advantage and help to realism. In addition it also has the appropriate color for the ships of the period of the Santisima Trinidad.
02 p3060003_164.jpg
But since I am not able to sew, either because I'm not capable, but above all for the lack of suitable hardware, I commissioned the work to a tailor I know. The problem is that I have to wait the end of September.
So for the moment the site most likely will stop this trend for a while and will continue describing better the display case.
We'll see how the situation will evolve, I don't exclude to resume the Soleil Royal shipyard, if I'll found enough time, which is still waiting to progress from the last achievement: the first planking . . .
Sincerely, Jack.Aubrey.
PS: my example to follow, at least for the yards and sails of the main mast, is here below, even if it's for me surely impossible to duplicate:
03 p4170001_330.jpg
-
Posted: Sun Aug 12, 2007
August 12, 2007 - Current activities - Part 1:
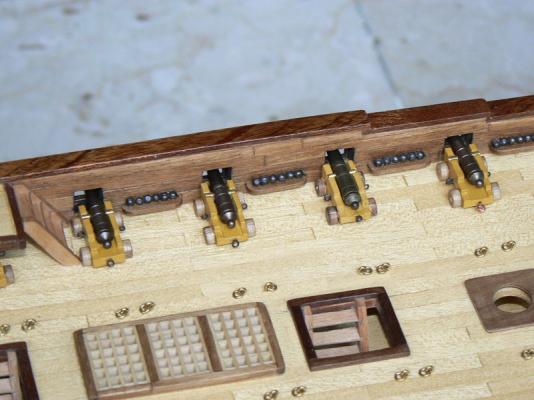
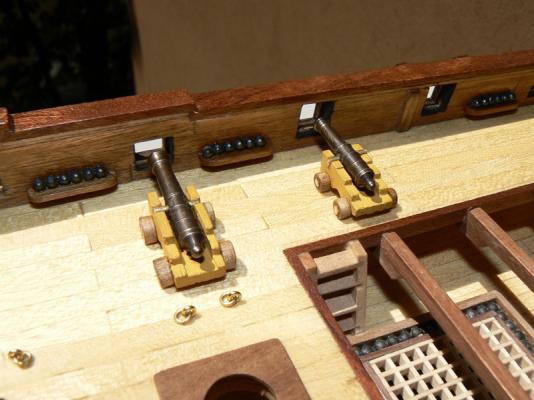
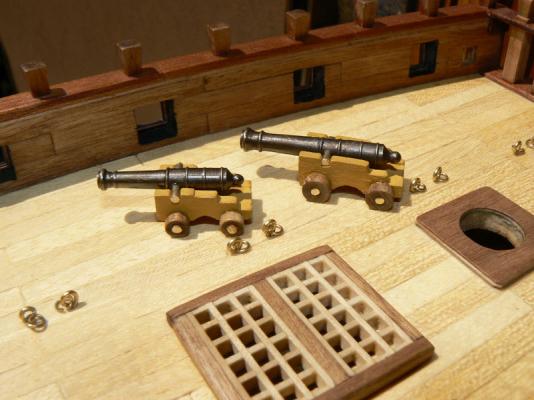
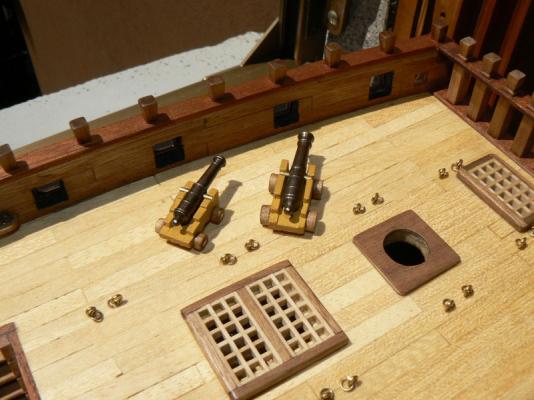
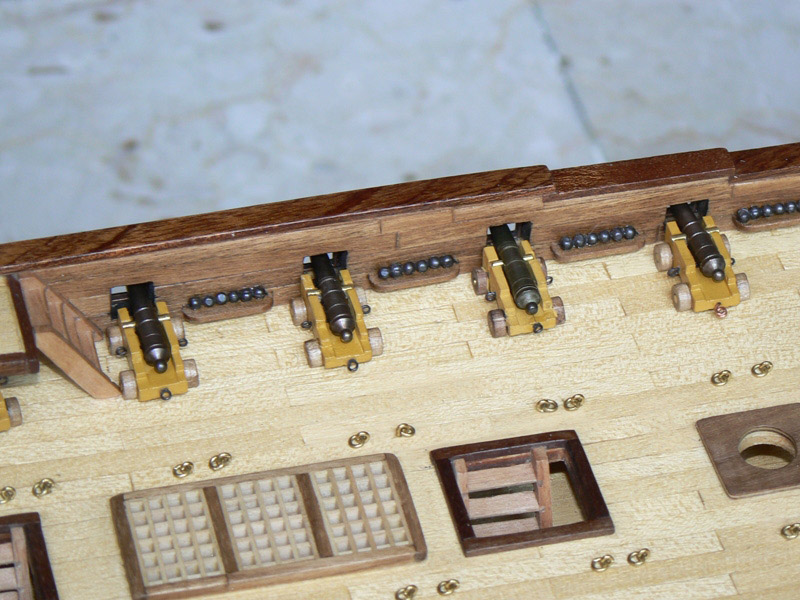
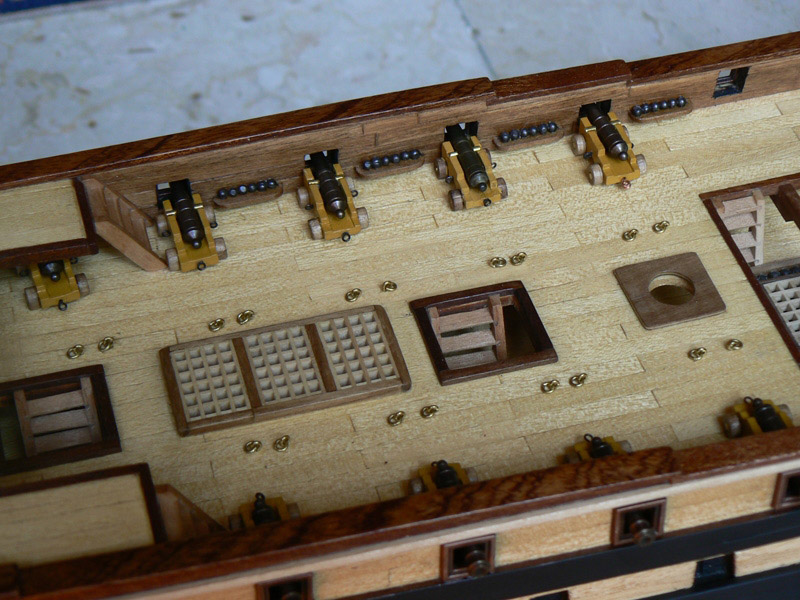
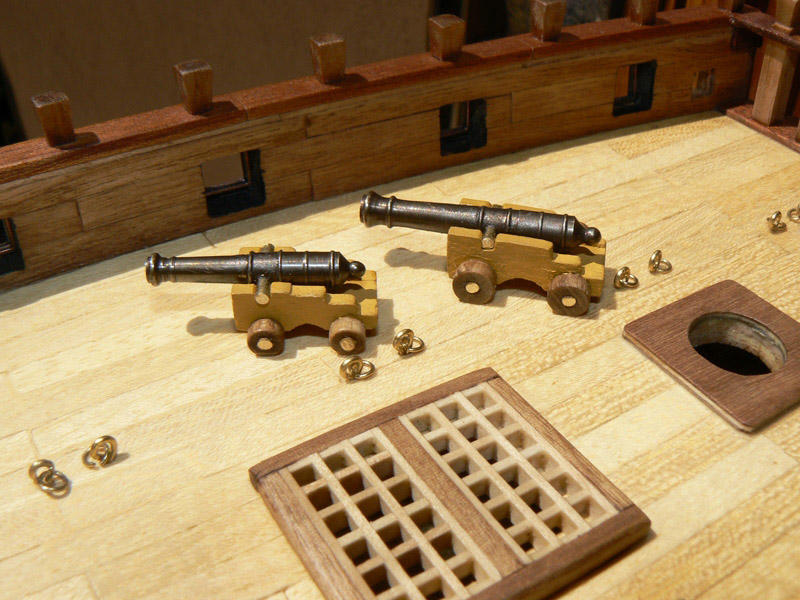
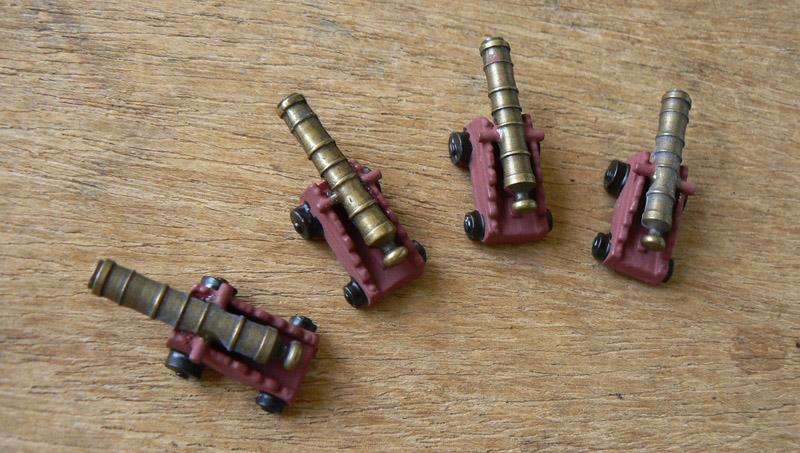
I have terminated the assembly of the 10 eight pounders guns.
In the following three images I have positoned them in the proper location just to provide an idea of the general outlook. Now it is not the right moment to install them, but, when this moment will come, I will have to provide the proper rigging for each gun.
I suspect that this task will be very similar to a nightmare but I live now in the illusion this will be solved anyway.
I am convinced that these "demi scratch built" guns are immensely better than the kit provided ones. See in message #67 the first image to compare. But the work necessary to reach this result is absolutely worthy of a crazy mind ....

-
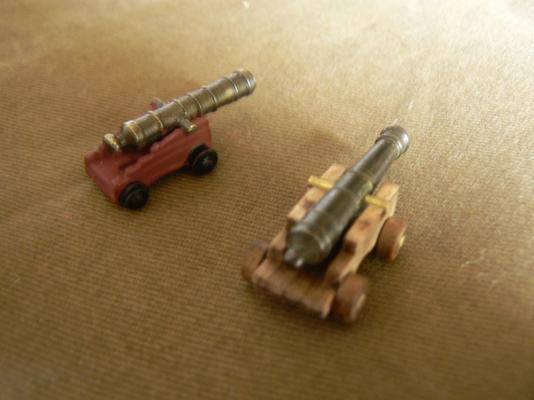
Posted: Sat Jul 28, 2007
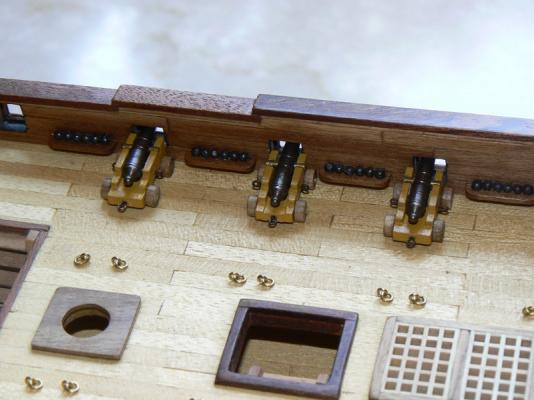
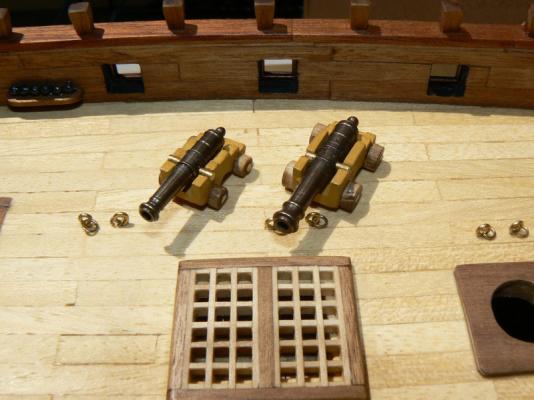
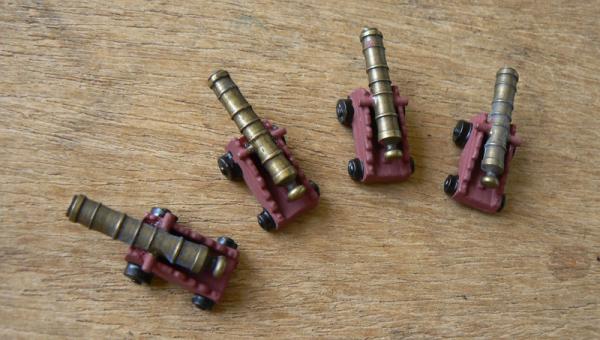
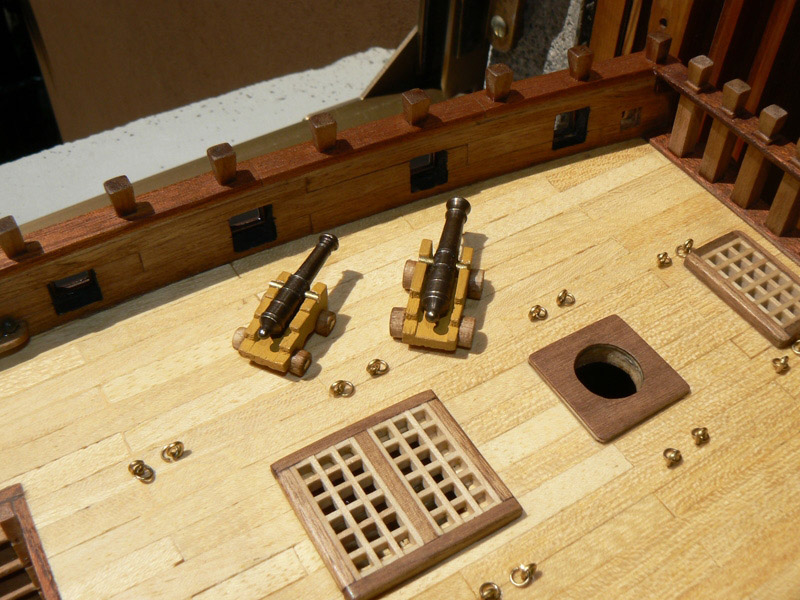
In these five images I want to show you the two new prototypes of the Santisima Trinidad's guns.
These are prototypes of two different guns.
The bigger should be the 8 pounders long gun, located in the quarterdeck. There was ten of these guns installed as recorded in my reference book.
The second type, the smaller, should be the 4 pounders gun, located in (or what should be ) the waist. Also this caliber was installed in number of ten.
Last, there should be in the forecastle 8 carronades of 24 pounders. I haven't yet found a solution for the carronades. I'm looking for a gun barrel greater than the 8 pounders to be cut (by using ie. my Dremel) shorter and install on a different carriage.
I'll keep you informed of the progresses. Jack.

-
Hi nick, when, some messages ago I used the term "Danish Oil" I made a mistake . . As you probably know I'm trying to rebuild a WIP lost in MSW1 and I've used the text I used in the original WIP. Looking at the wikipedia explanation of danish oil, here below . .Hi Jack
Fantastic build. I remember it from MSW1. Quick question you say that there is no problem with using vinyl glue after applying the danish oil. Is that the same as PVA wood glue? I am asking because I have seen lots of info saying danish oil and wood glue dont mix.
Nick
Danish oil is a wood finishing oil, made of either tung oil or polymerized linseed oil.
Danish oil is a 'long oil' finish: a mixture of oil and varnish, predominantly of oil.[1][2] A typical Danish oil is around one third varnish. The function of Danish oil is to provide a hard-wearing finish, rather than a particularly fine or high-gloss finish. Compared to oil, it is hard-wearing. Compared to a varnish, it is simple to apply. As the finished coating is not glossy or slippery, it is a suitable finish for tool handles, giving some additional weather resistance.
Danish oil is a hard drying oil which provides a tough, water-resistant finish. It can be used as a finish, or as a primer or sealer on bare wood before applying paint or varnish.
When used, Danish oil provides a satin finish and provides coverage of approx 12.5 sq. m/l (600 sq. ft./gallon) and is usually applied over a course of three coats by brush or cloth, with any excess being wiped off shortly after application. The finish is left to dry for around 6-24 hours between coats, depending on the mixture being used and the wood being treated.
Rags used for Danish oil have some potential risk of spontaneous combustion and starting fires, so it is best to dry rags flat before disposing of them, or else soak them in water.
you can read that a part of the mix is varnish. Assuming this is true, this product most probably closes the wood pores and this is the reason why the vinyl glue doesn't work satisfactory.
The product I used and I still use doesn't contain varnish, it is only oil, mainly vegetable and sintetic oils suitable to protect the wood but that doesn't close the wood pores. That's why I can use the wood glue without problems . . I made a post with a picture of the oil I use: unfortunately it is an Italian product and I haven't found the UK equivalent but most probably a similar product surely exists.
On some models I have applied several coats of this product always maintaining the ability to use the wood glue (see: http://modelshipworld.com/index.php?/topic/1044-le-soleil-royal-by-jackaubrey-de-agostini-scale-170/).
Hoping to have cleared the concept, I apologize for the confusion I made with that wrong post. Sincerely, Jack.Aubrey.
- CaptainSteve and fnick
-
 2
2
-
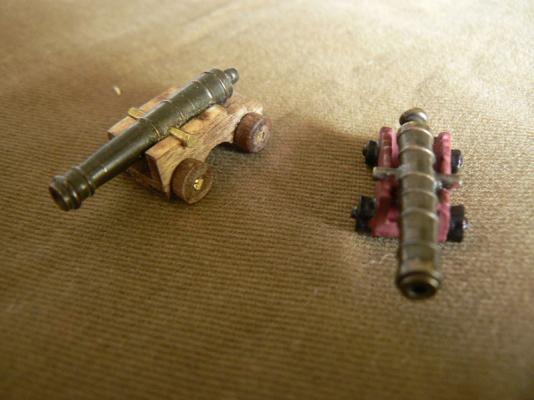
Posted: Thu Jul 26, 2007
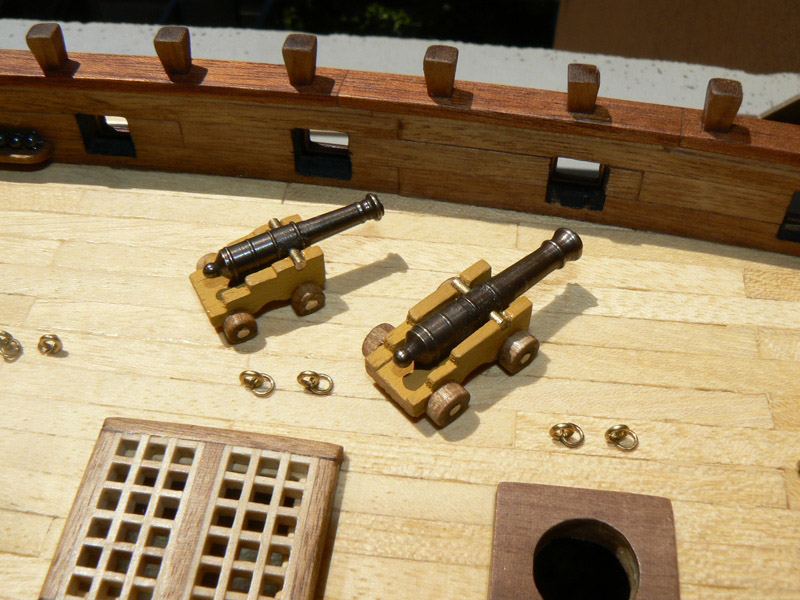
Some messages ago I published one photo of the ship guns, to be installed on the fourth deck (quarterdeck+waist+forecastle).
I probably said that I was not too much satisfied by the guns provided with the kit.
For this reason I watched several modelers shop in order to look for alternatives. The next two photos are showing a gun, partially acquired on the market but strongly modified by me, mainly for maintaining the right dimensions.
This gun is a prototype, mainly focused to obtain a sample to check on the model for the proper sizing and positioning. Now I'm building the final model, where the carriage is painted with an ochre acrylic paint. I will keep the weels in natural wood.
I have found two other similar guns and, if they will be ok, I will try to adopt and install three different guns: one model for the quarterdeck (8pdrs), another for the forecastle and another, smaller, for the waist (4pdrs). The model showed here will be for the quarterdeck.
- WackoWolf and CaptainSteve
-
2
-
Posted: Tue Jul 17, 2007
A general view of the Santìsima Trinidad as it is today.
Unfortunately I'm in trouble with the painting. I'm painting with transparent matt enamel the hull and I got some problems.
In practice there are three kind of wood: mahogany, walnut and ramin. I have covered with two coats of paint the hull and I'm waiting for the paint to become dry.
And here is the problem: it's five days I'm waiting and the paint is still wet !! It is dry only over the mahogany. In this situation I can't work on the model and I'm worried because I am not able to explain the reason.
For the moment I can only wait ... and I have resumed the San Juan Nepomuceno. I have started the hull planking and, at this time, I have installed the first four planks on each side.
In the background on the first photo you can see the kit box of a third model I'm building. It's close to be finished.
In the second photo here posted another detail of a shot garland, totally different from the others.

- cristikc, CaptainSteve and WackoWolf
-
3
-
Posted: Sun Jul 15, 2007
Here are the shot garlands once terminated.
I didn't drill any holes for the balls. I used some lead balls used for fishing. There are different sizes. The one selected are of the same caliber of the guns provided.
I have mounted six of them on a nylon string and then I glued the result on the garland. That's why they are quite perfectly aligned !!
-
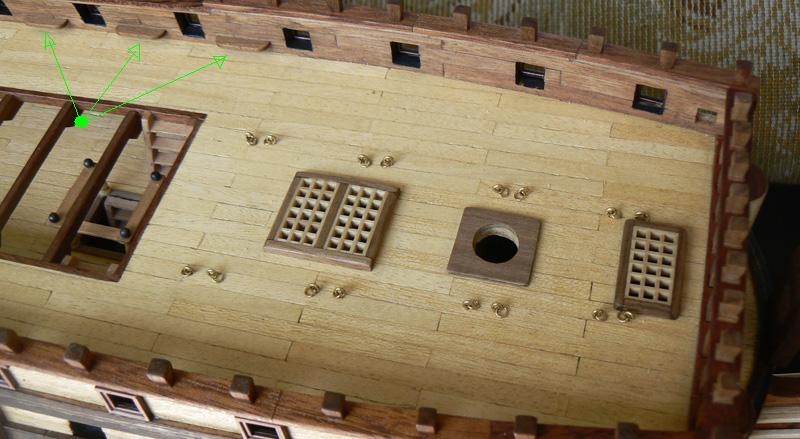
Posted: Sun Jul 15, 2007
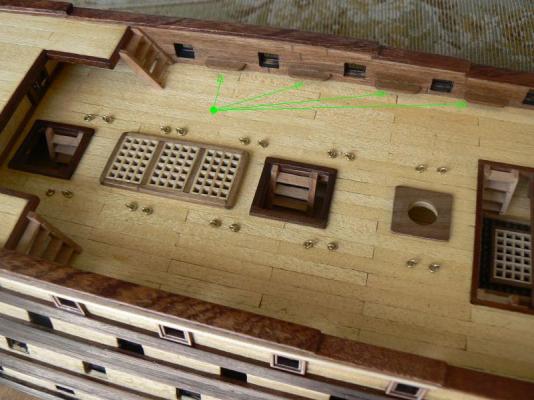
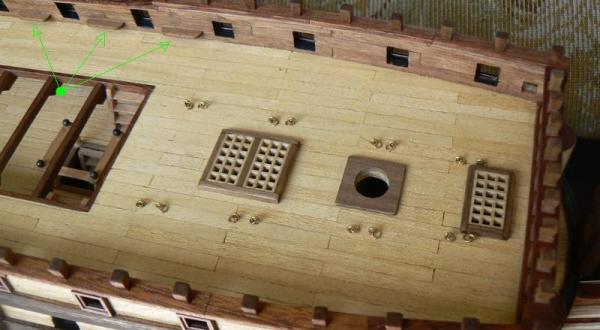
Some new details that are not included in the kit. The green arrows shows the shot garlands. These pieces are taken from plans I have downloaded from the internet http://en.santisima-trinidad.astillero.net/
They were very easy to reproduce. I have used a strip of walnut of 1.5X4 in size. Today I have added also the shots, six for each garland. There are eight garlands on each side.
- WackoWolf and CaptainSteve
-
2
-
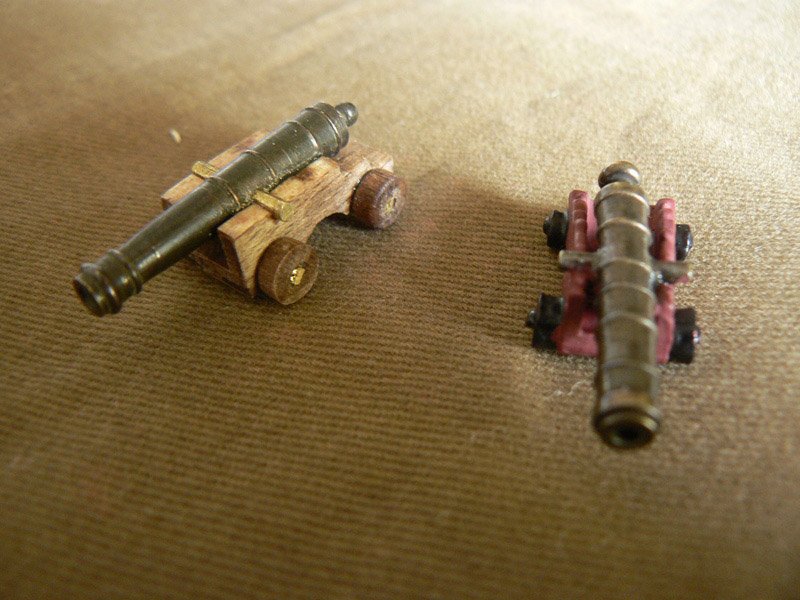
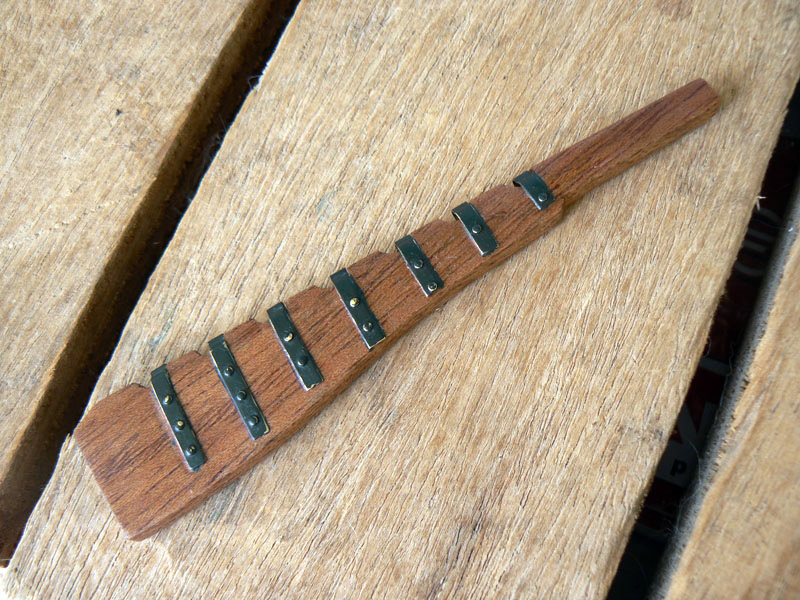
Posted: Thu Jul 12, 2007
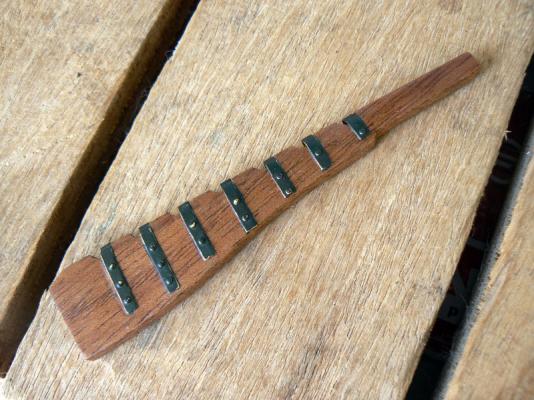
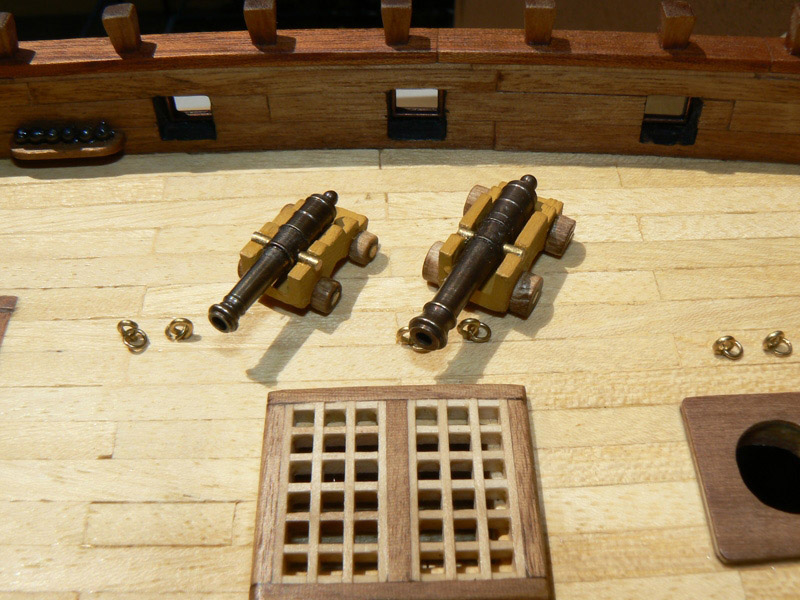
Here is the rudder close to be finished.
I have inserted the nail heads in the proper position. Everything is glued with the Super Attack. I have then painted the pintles with a dark green Humbrol matt enamel. Once dry I wiped the pintles with a cleaning cloth in order to obtain an used visual effect. Last a coat of transparent paint to fix everything.
Last a sample of the guns to be applied on the quarterdeck. They are completely made with metal. The gun carriage is painted with a dark red painting. I don't like too much these guns. I would like to find another (probably expensive) solution but unfortunately their size is difficult to find. I need to search on the market for alternatives. If successful I will evaluate what to do.
- WackoWolf, GuntherMT and CaptainSteve
-
3
-
Posted: Wed Jul 11, 2007
I have made a lot of work in these days but, unfortunately, it is not so visible. It was concentrated on a lot of very small items. The rudder. Painting and mounting a lot of guns on their carriage, building and mounting some kind of containers for the iron balls, gun ports, and over all, I'm painting with transparent matt enamel the hull.
So, I don't have interesting pictures to show.
I've made also some researches about the ship and I have found some interesting pictures. I've discovered that my model doesn't match completely with the attached plans. I know that the vessel was rebuild several times, so, most probably, there is not a "right" plan or a "right" model. Or at least I hope, otherwise .....
-
Posted: Fri Jul 06, 2007
Last, an image of the rudder, partially finished.

-
She is getting better and better in every new update. Thank you for sharing this, Please keep the updates and Pictures coming.
Thanks for your comment, it's a pleasure for me . . Jack.
Posted: Fri Jul 06, 2007
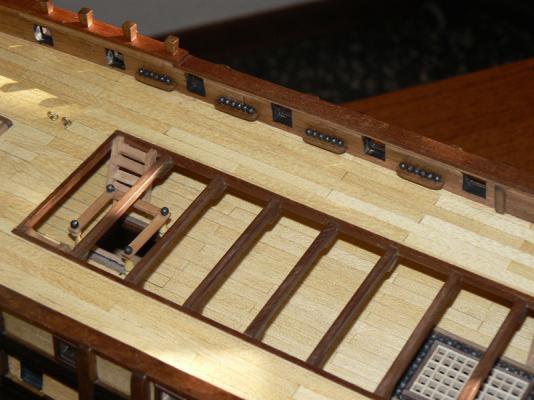
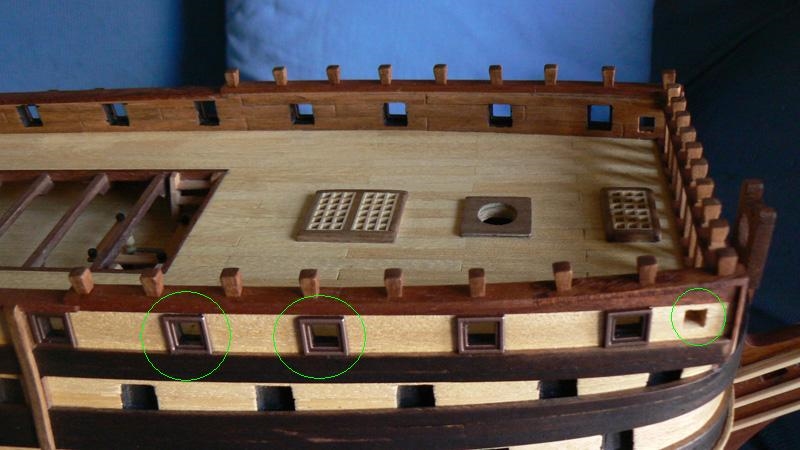
Here is a sequence of images of the starboard side, fore and aft.
The activity here performed was the installation of the gun frames, made of (I believe) anodyzed aluminium, in the quarterdeck.
I had to adapt the gunport holes with a file but the result is very satisfactory.
In the first photo, the green circle in the extreme right higlights the square hole ready for the istallation of the cathead.
I had to use the cyanacrylate. It's the only glue useful in this situation: fast, clean and strong.
The real work will start in the underneath decks !!!! Here the frames are different and I have to adapt many holes to align them to the wales.
I made some trials and the proper tool is the Dremel with a milling cutter and a lot of patience.
I also think that before proceeding with the frames installation it should be better to paint the area with some coats of transparent paint. Also a coat of black in the refined holes. In this latter case I will need some days to complete this task and resume the frames.

- CaptainSteve, WackoWolf and GuntherMT
-
3
-
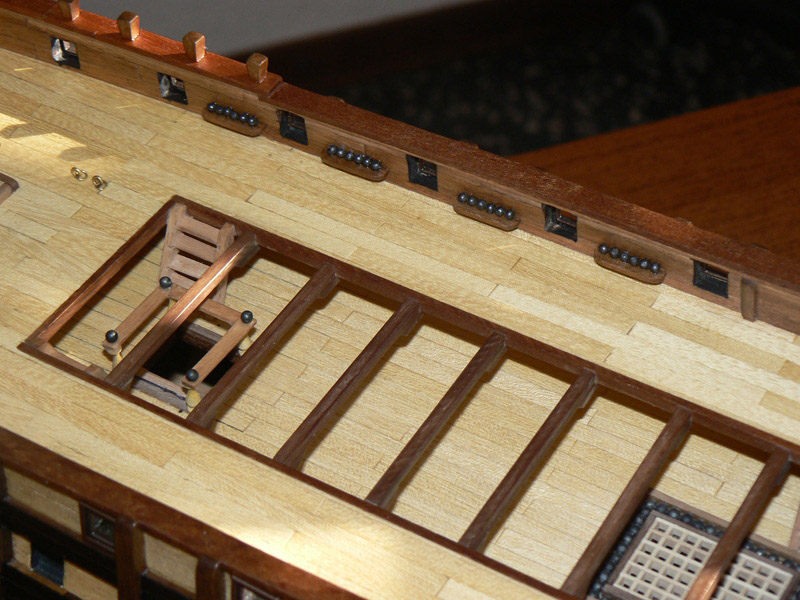
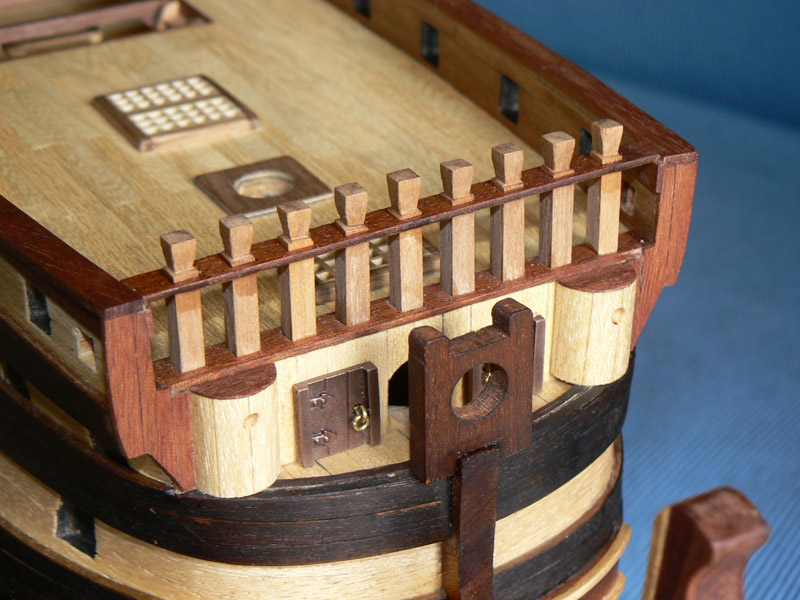
Posted: Thu Jul 05, 2007
Five new photos of the work done yesterday afternoon.
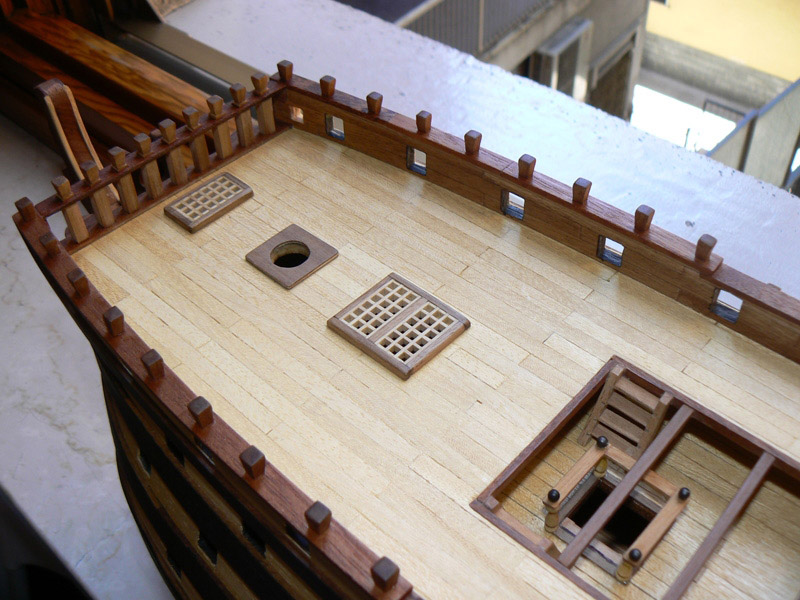
I have built and installed 18 new timber heads in the forecastle. It seems easy but in practice I spent more or less 3 hours around them.
I started from a plank of walnut of 4x4mm. Each head is 6mm long. When the 18 pieces were ready I drill all of them in order to insert and glue a pivot. In practice a nail of brass.
Then I drill 18 holes on the planksheer in the proper position and finally I have fixed the timber heads into them. As glue I used Super Attack.
That's all for now. Regards.


-
Posted: Tue Jul 03, 2007
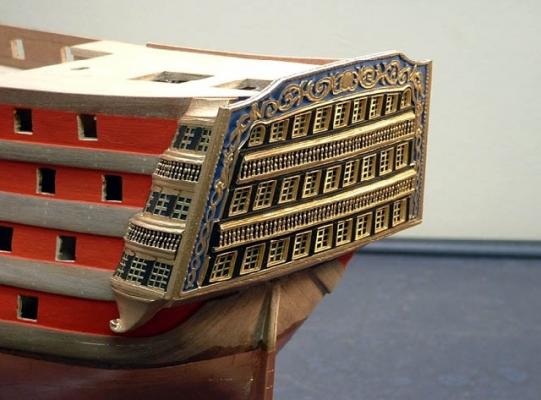
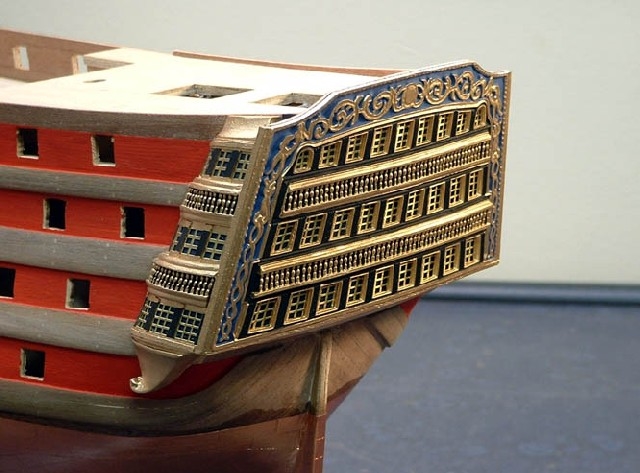
Here are some images of the last activity, on the poop area.
Here I have finally terminated to install all the planksheers, with the same tecnique explained sometime ago. In addition I'm now working to prepare the transom to receive the decorations.
I have no idea how the work will proceed in this area because I have not yet received material and instructions bu I know the final result should be very similar to the first attached image. This is not my model, it's an image from a forum member that kindly sent me some photos of his model.
-
Posted: Tue Jul 03, 2007
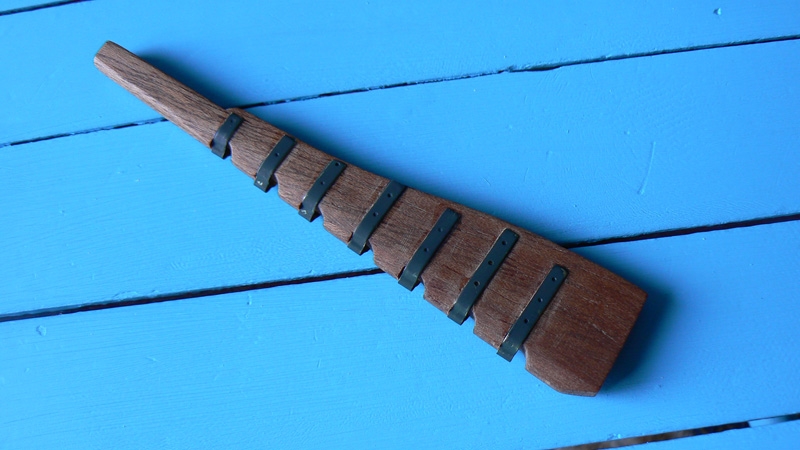
The next two photos are documenting another activity, this one much more long and difficult of the previous: the construction of the fiferail with its timber heads. I hope fiferail is the proper name. I've found it on "The 100-gun ship Victory", a book from John McKay, Conway Maritime Press.
I took about 3 hours to cut the timber heads and to sand them properly. In addition I had to use my Dremel tool to adapt the size of the square holes in the fiferail and in the underneath planksheer.
I consider the final result as very, very good. Then I have coated the fiferail and the timber heads with transparent paint. Next I will try to refine better the heads.
To complete the forecastle I need now to prepare 18 additional heads, 9 per each side and to fix them on the forecastle planksheer.
A very ..... boring job !


- le débutant and WackoWolf
-
2
-
Posted: Tue Jul 03, 2007
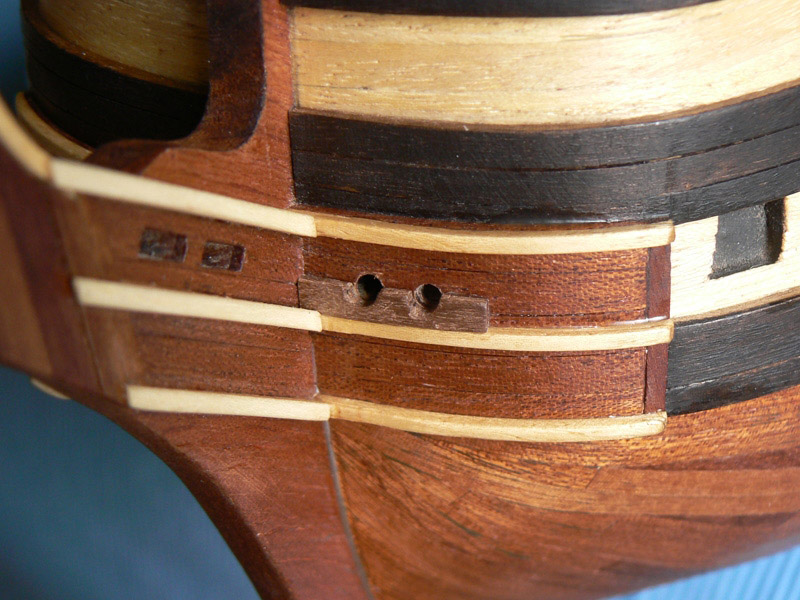
First activity after my (short) holiday was this one. In practice a very simple detail on the bow. I don't know the name of this piece. They are two holes in each side of the hull, with their reinforcements, from which the anchors were raised or lowered. The difficulty here was to drill the hole considering the two levels of wood.

-
Posted: Sat Jun 30, 2007
Back yesterday from my Tuscany trip in Pisa and Leghorn, but ....
The training ship "Amerigo Vespucci" was offshore ....
bad weather .... clouds and wind ....
no baths were possible at all.
In the meantime I received four new issues of the magazine and the work on Santisima Trinidad can be resumed.
Lot of small things to do .. with lot of patience. Next I will:
- build the rudder
- continue to work on the bow
- terminate the forecastle
- apply the last planksheers on the poop deck.
-
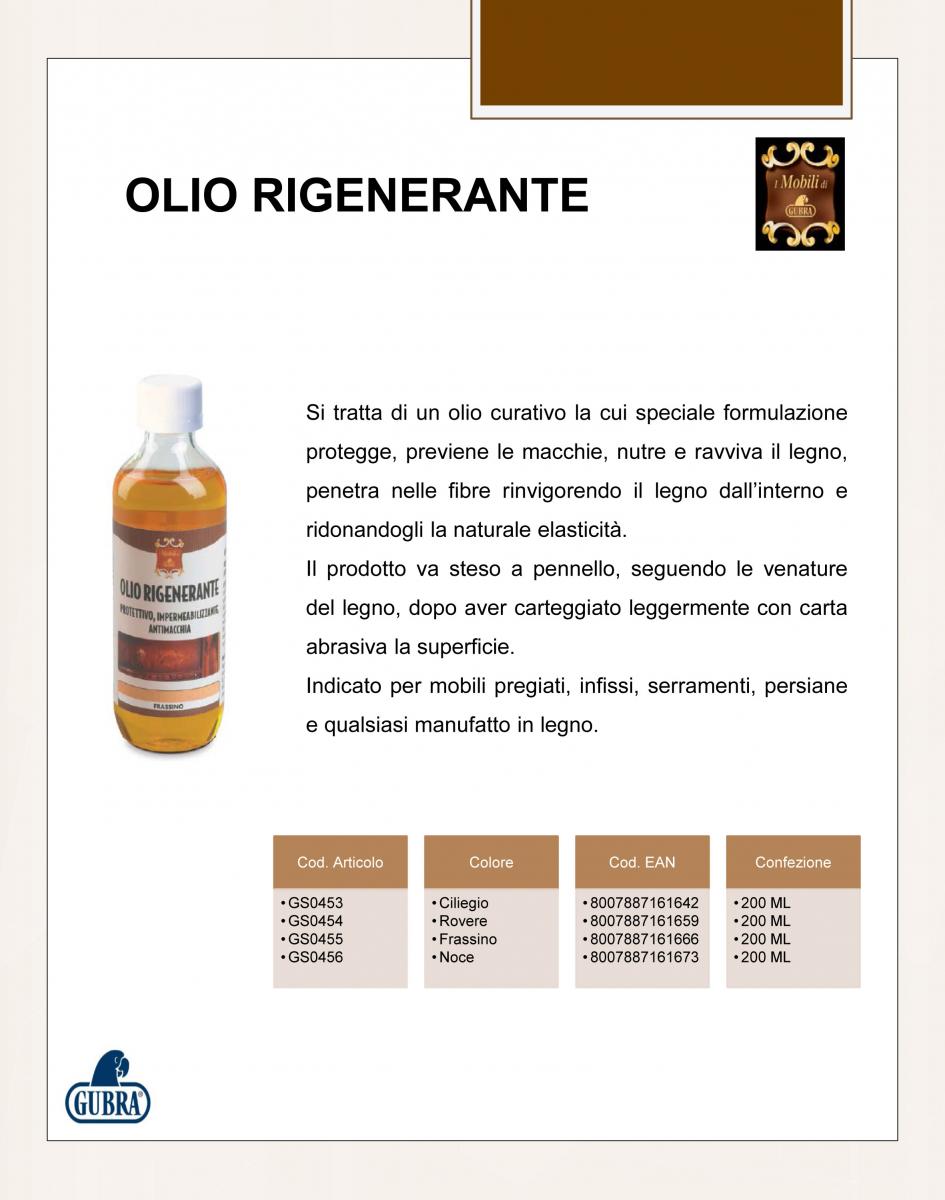
Very nice work.
I am interested to no wich product you use for getting a nice wood like that.(for your keel,the name please)
It is an italian product, the image shows the technical description. It is in Italian language . . I apologize. Jack.

-
Posted: Mon Jun 25, 2007
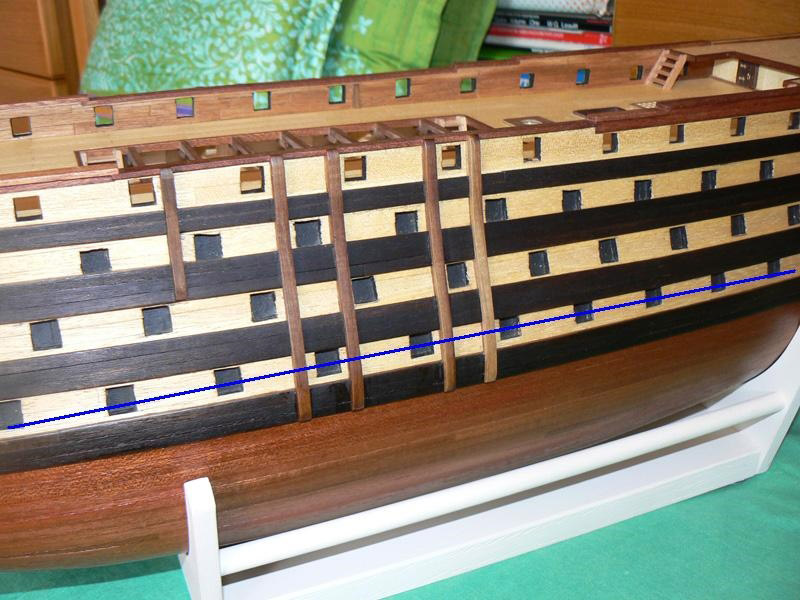
Then, as last activity done, I have started to paint the lower part of the hull. In the attached image the area below the blue line.
I the past the area was coated with danish oil that now is totally dry. In this area I don't foresee further activities, with the exception of the installation of the rudder.
So, in my mind, it was time to do something. I used then a transparent matt varnish with two main objectives:
1) fill as much as possible the invisible slits (I hope this is the right word)
2) protect the lower part of the hull from any possible accidental damage
Working on this activity I have done a quite strange experience. In practice I have applied the same paint, practically in the same moment, over two different types of wood, both coated previously with oil: 1) sapele and 2) walnut.
The result was that the day after the coat of varnish, I found it completely dry over the sapele wood and absolutely wet over the walnut !! It took four additional days to dry over the walnut !! I can't explain this fact. Has anyone tasted the same experience ?
Please note in the image the new stand. I had to build it when the keel clanper was no further usable on this model. It is very, very stable and, if needed, can be clamped to the workbench. Also the lateral wale reinforcements are clearly visible here.

- GuntherMT, le débutant, WackoWolf and 3 others
-
6


Santìsima Trinidad by jack.aubrey - De Agostini - Scale 1:90 - Full Model
in - Kit build logs for subjects built from 1751 - 1800
Posted
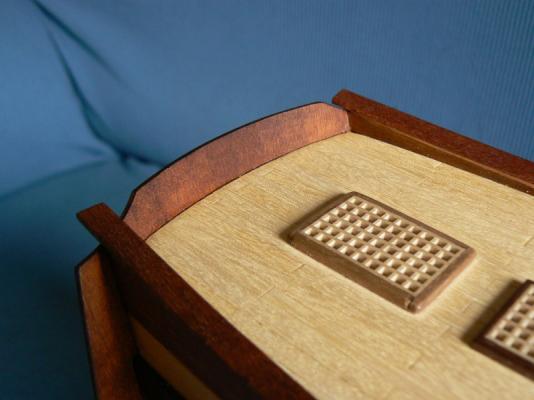
Posted: Fri Aug 17, 2007
New more detailed photos of the repainted wales and vertical wales reinforcements. Nothing new on the model. Only photos.