jack.aubrey
-
Posts
1,268 -
Joined
-
Last visited
Content Type
Profiles
Forums
Gallery
Events
Posts posted by jack.aubrey
-
-
Posted: Mon May 14, 2007
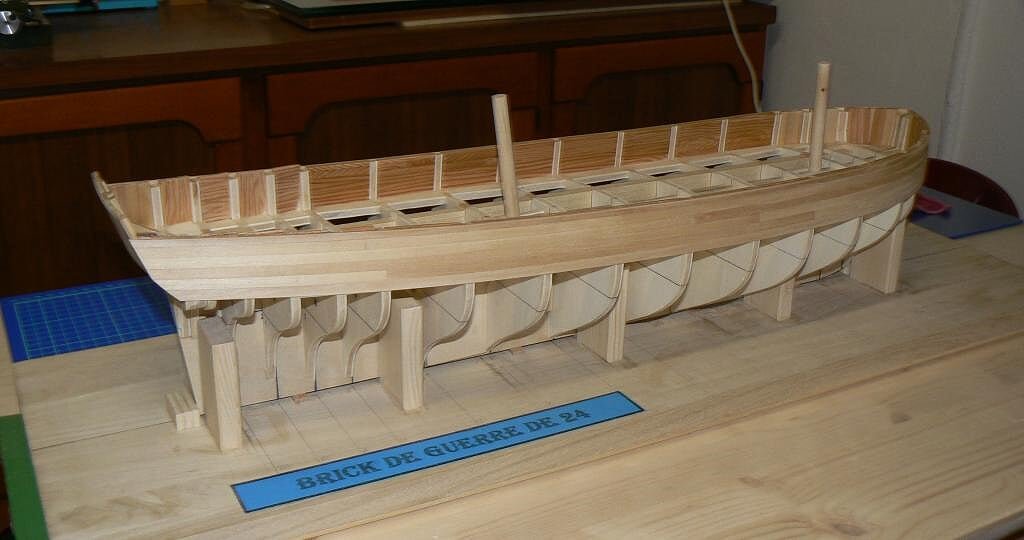
And now, let's change completely ...
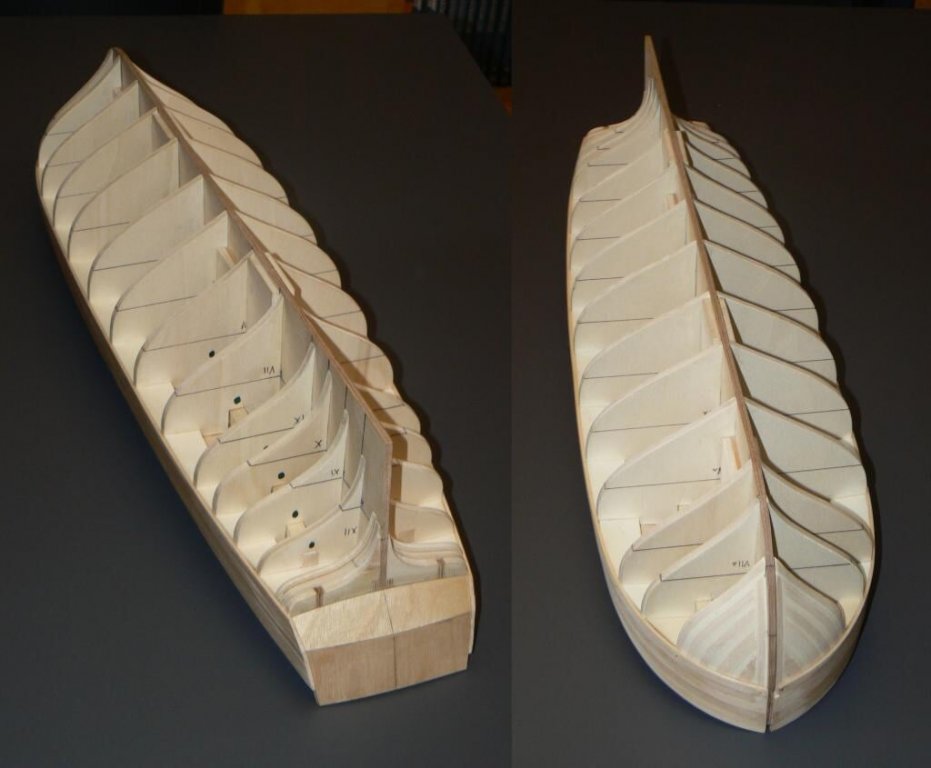
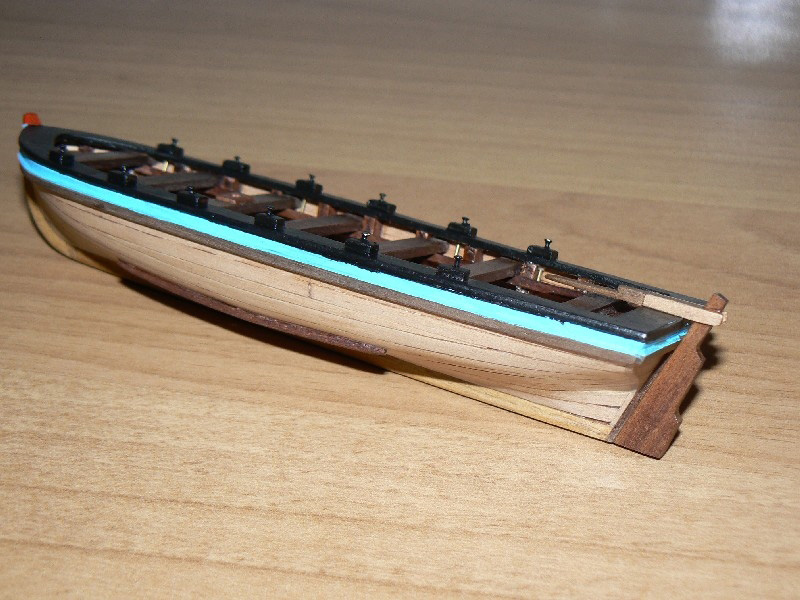
Just in the middle of the planking activites of the ship hull, the magazine "management" decided to have a break in the main building plan and start, in another shipyard, to build one of the ship's boats (....)
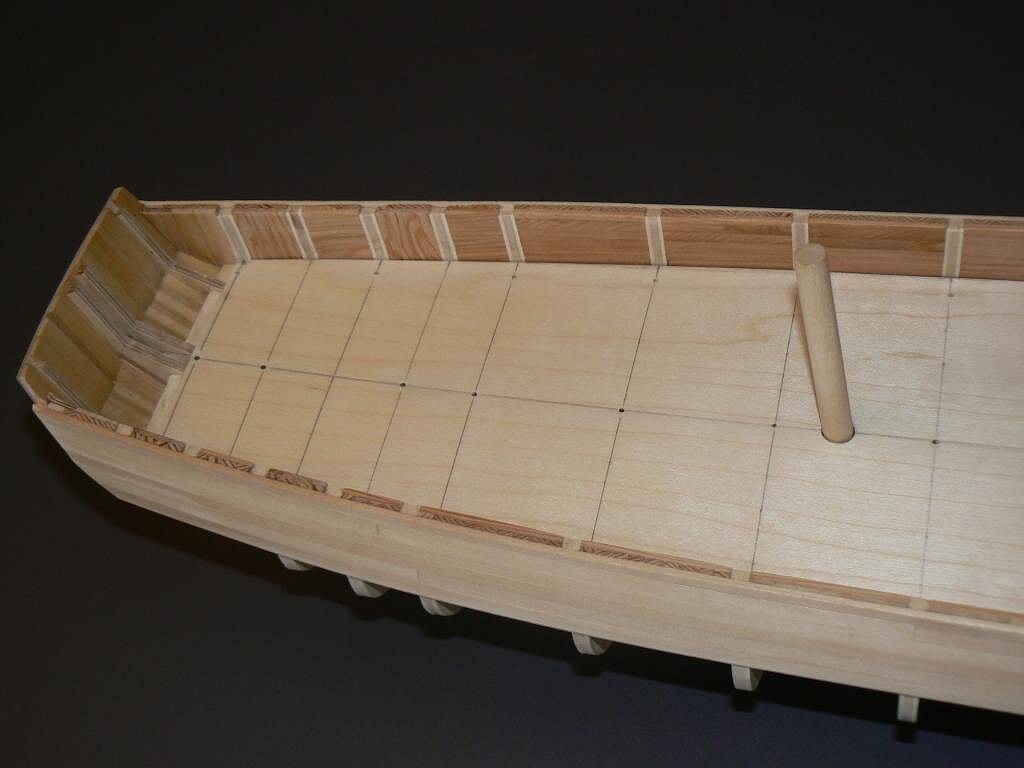
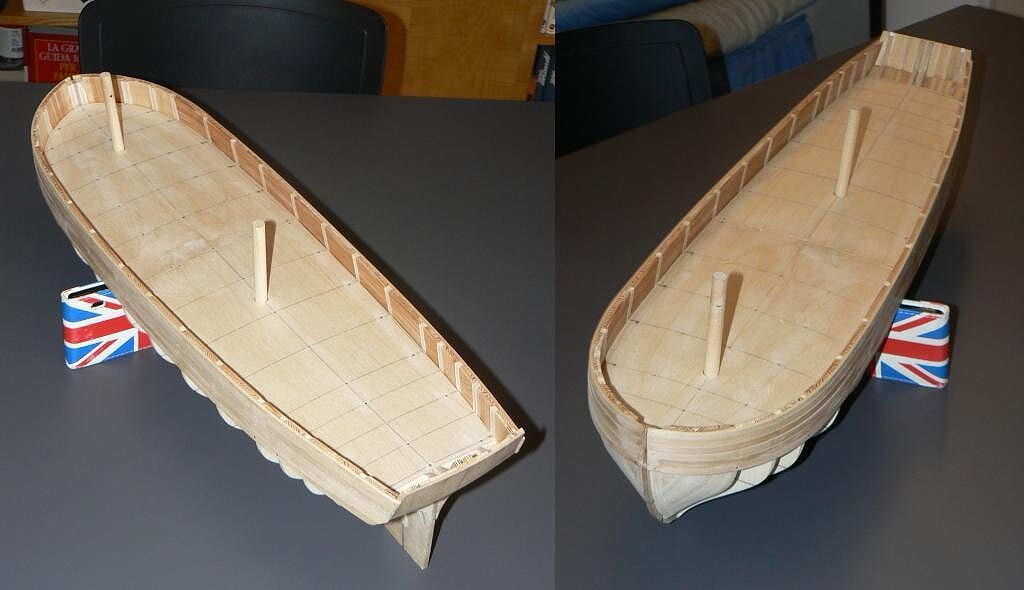
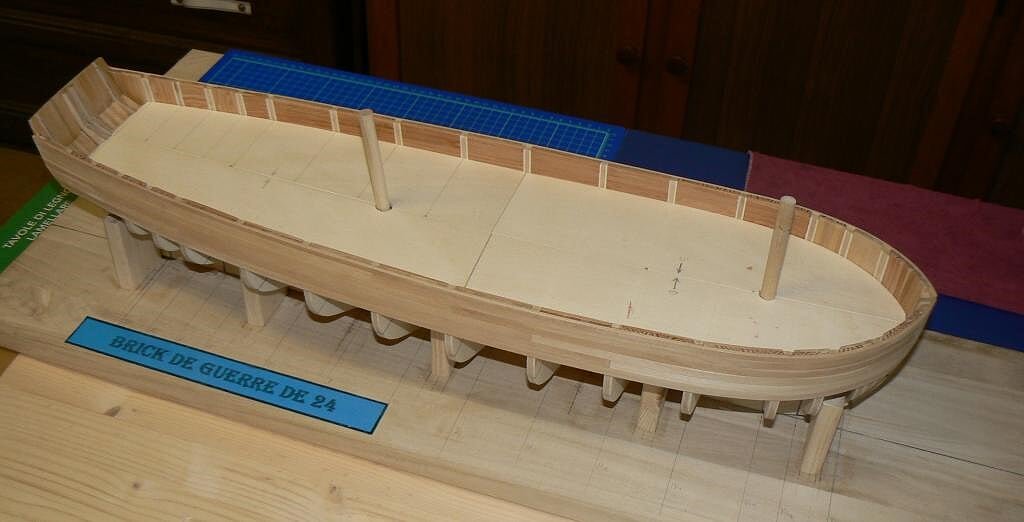
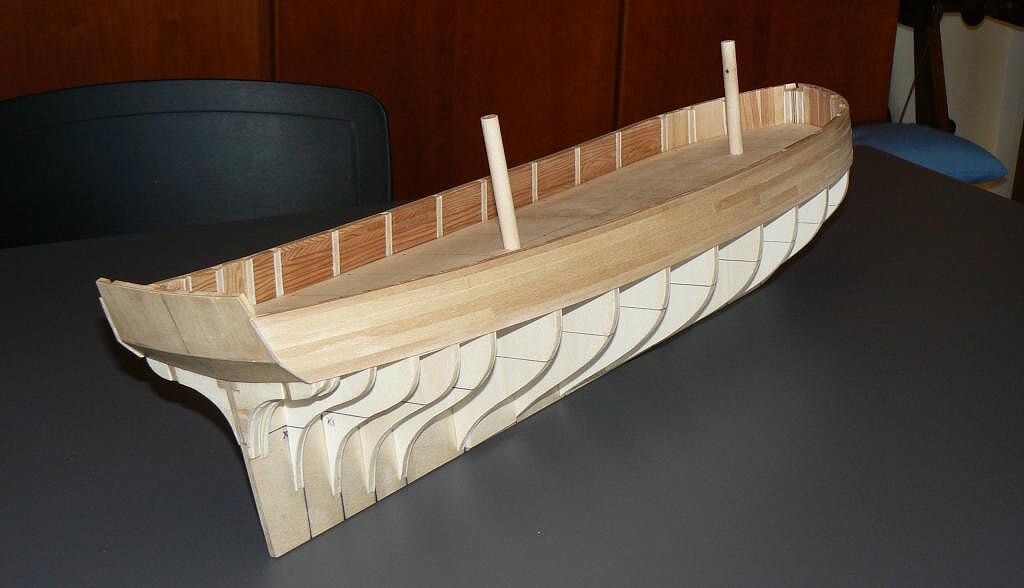
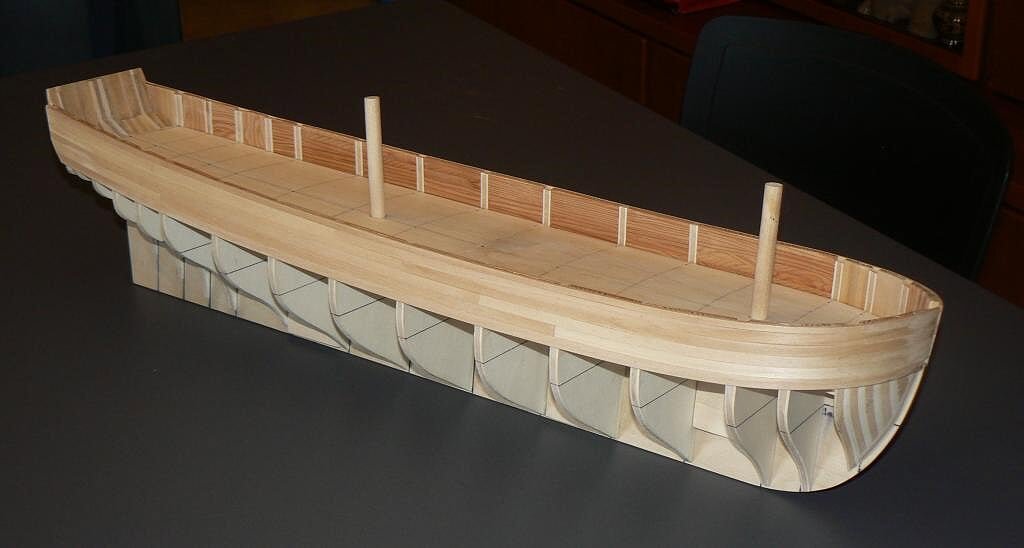
The following is the longboat. It's length is about 13 centimeters. And the history begins ...
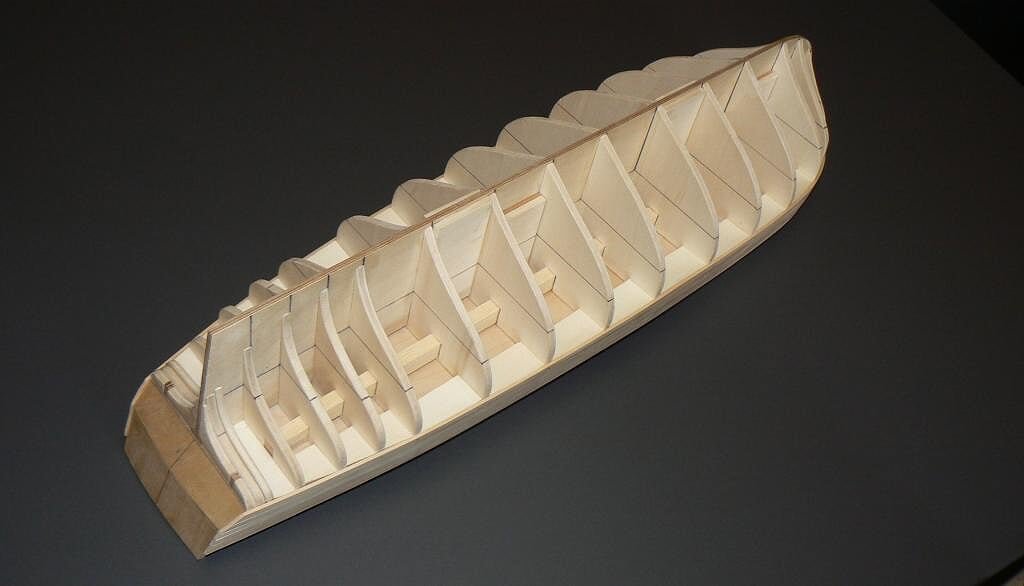
First, the hull assembly: the keel, the bulkheads. The several pieces are glued each other and then are glued turned upside down on a plywood tablet to maintain rigid the structure. I have unfortunately no photos of the boat at this stage.
Second, the planks. The stripes are very, very small but also flexible. I used a special kind (less liquid) of cyano-acrylate glue to mount the planks. I glued together with the boat also my fingers several times but, finally also this unbelivable step was terminated.
Third, finishing the hull: filler where necessary (two or three very small places) and sanding. Then I have fixed the keel, the front and the rear.
Fourth, the boat was removed from the tablet by cutting the bulhead hedges and then I started to work on the internal fittings and the rudder.
Fifth, sixth, etc. and finally the boat is completed.
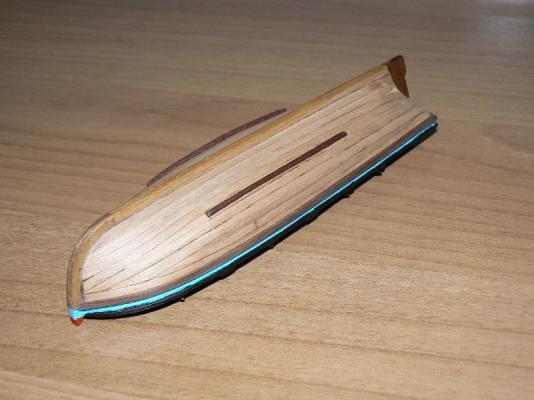
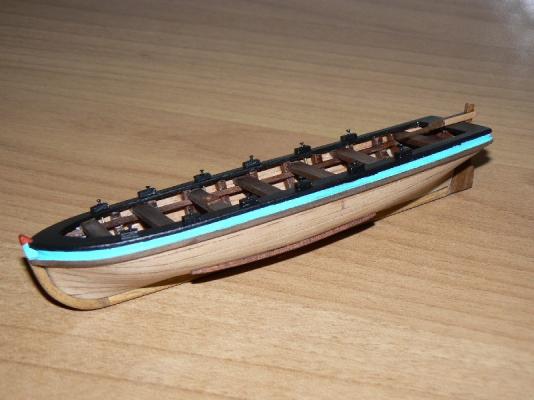
At this point the boat should be terminated by painting her with matt transparent enamel. But I didn't like this kind of painting and so I decided to add some color here and there ...
Today the boat is finished without oars. The building instructions do not explain if the oars will be built in the future. If not I will decide at the proper time if it is worth to build them, in spite of the intructions, or not.
Next: the second boat ... but, for now, four images of the longboat.


-
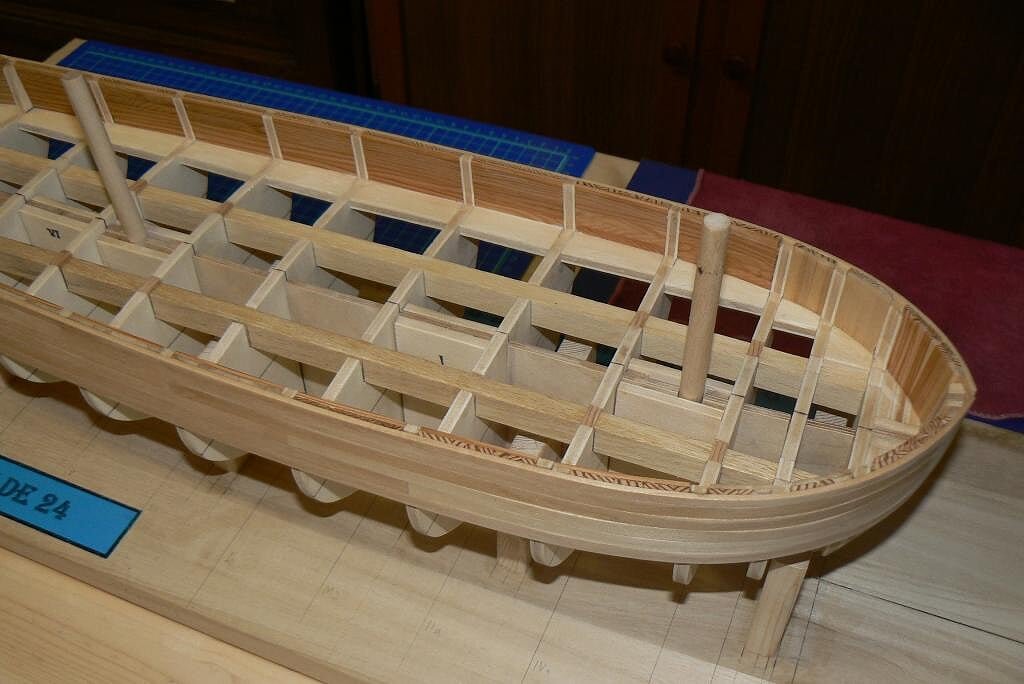
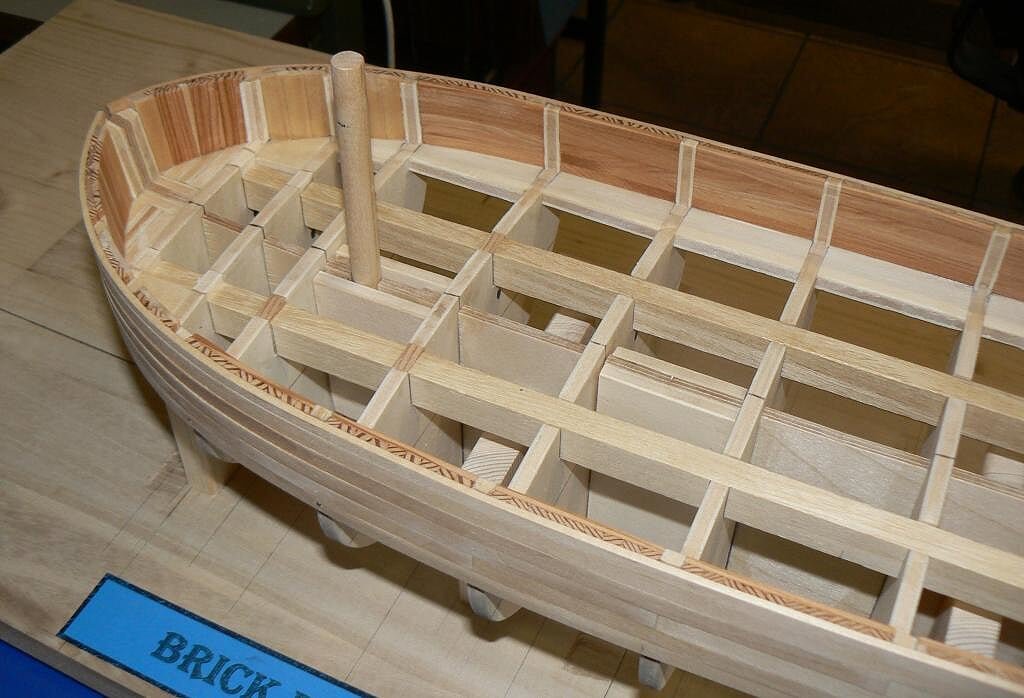
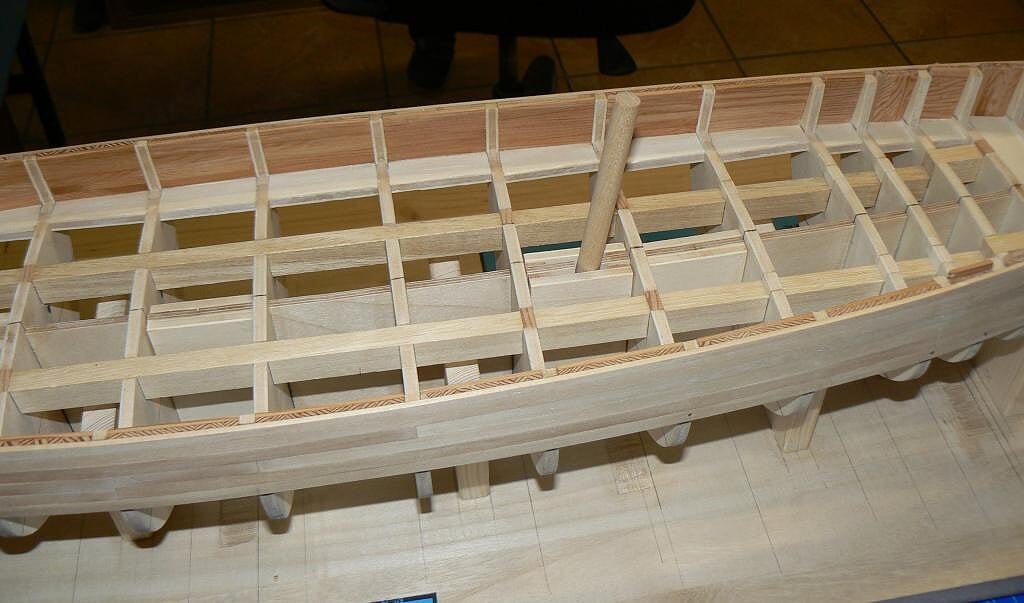
Posted: Mon May 14, 2007
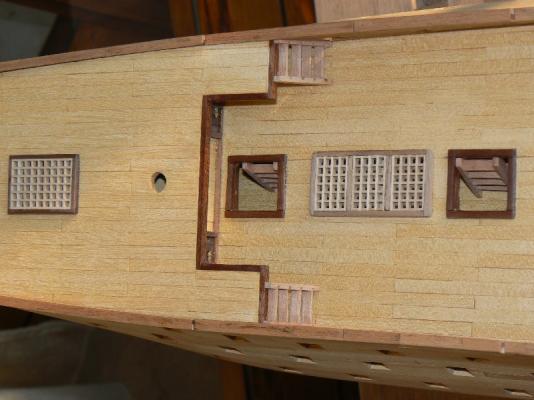
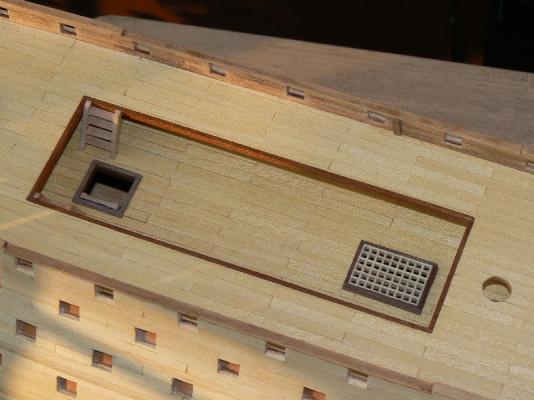
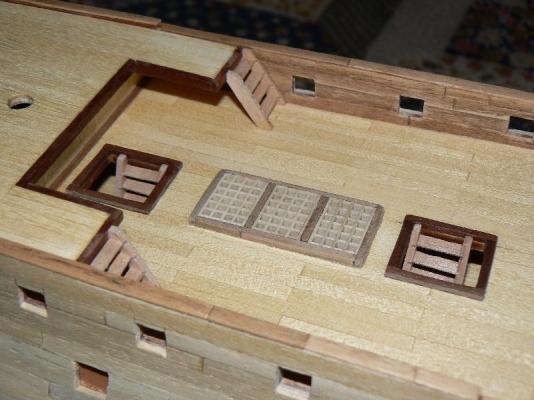
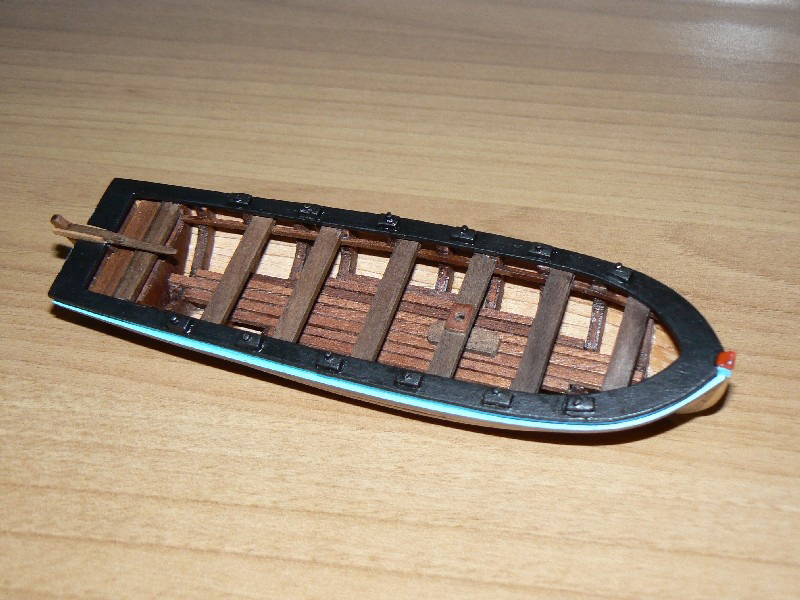
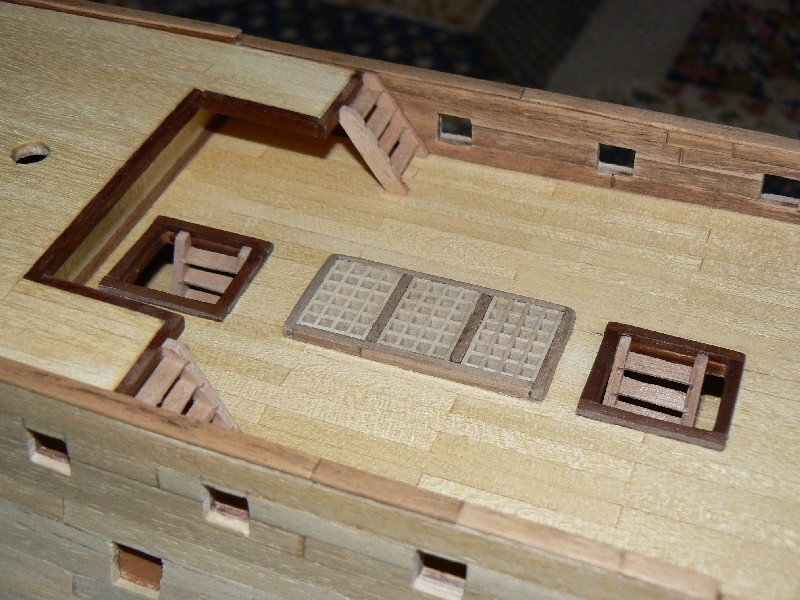
New closer images of the decks, gratings and stairs ... same date as the previous message.
-
Saturday, November 1, 2014
Friday I managed successfully to buy at the last minute some birch plywood with a thickness of 2 mm at a hobbymodel shop.
I would have preferred a thickness of 1.5 mm, but was not available . . . today here in Italy these shops are increasingly focused on helicopters, drones, remote-controlled cars and its accessories while the offer that interests our hobby becomes increasingly scarce. . normally you find kits and few other.
However, despite having to take into account the impact ot this unplanned thickness on the internal height of the bulwarks (at the proper time I'll fix this matter), Saturday I cut out from the templates the two pieces that form the first layer of the deck and, after some unavoidable adjustements I proceeded to install them permanently with glue and brass nails.
01 Brick%20by%20JackAubrey/7edd1c35-8e95-447c-9674-f8e70a09d259_zpsf5f85ed2.jpg

02 Brick%20by%20JackAubrey/P1100071_zps60297ed7.jpg
After a couple of hours, with the glue virtually dry, I proceeded to grind the heads of the brass nails (.. then I discovered that they were of gilded iron ..) with the minidrill and the correct tool. Now everything is ready for the installation of the final deck planking . .
03 Brick%20by%20JackAubrey/P1100065_zps22acac08.jpg

04 Brick%20by%20JackAubrey/P1100066U_zps5456a5b9.jpg
However, before proceeding with the deck planking I need to get hold of the suitable material and especially I need to finalize a method for applying the tapered and folded planks as I explained some message ago. I also have to choose the wood to use: I would like a pretty clear coloured wood, but not overly, and according to this choice I could use material already in my possession or try to purchase it somewhere. .
Greetings to all, Jack.
-
Posted: Sun May 13, 2007
December 2006: The first plank layer is completed !!!
Finally after some weeks I have terminated to plank the hull. It's only the first layer but it was exciting. This was a new method explained in the magazine, especially developped when the double planking is selected. I cannot explain it now because I have no photos to show, I will do that for the second layer in the future. It's quite easy and intuitive.
After I spent some hours with sandpaper, sanding blocks and so on in order to made the hull as smoothest as possible. Samewhere some filler, of the same colour of the wood.
Finally I have mixed some glue with much more water and I have painted the complete hull. When dry it not visible, completely adsorbed by the wood, but the wook becames more strong. Then another work with sandpaper ...
-
-
Posted: Thu May 10, 2007
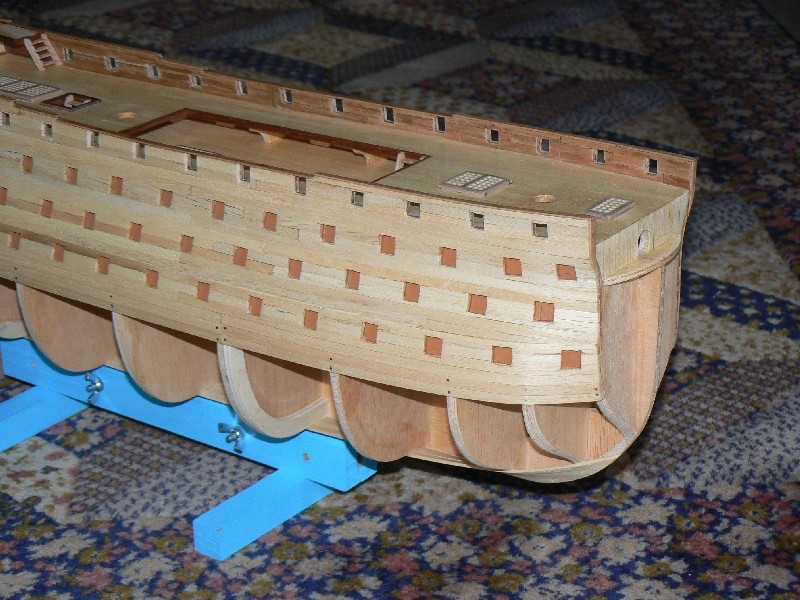
September 2006 - new activities on the Santisima Trinidad ...
A lot of activities done:
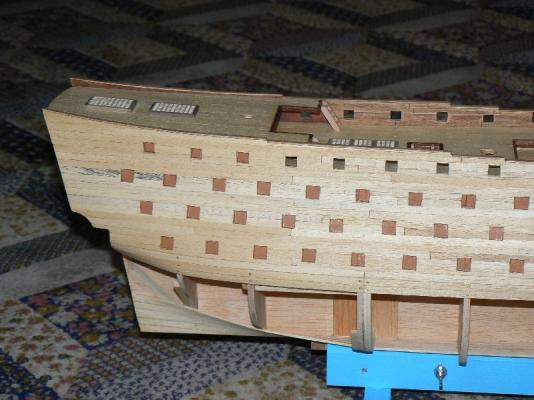
1) Planking the upper side of the hull,
2) planking the inside of the bulkwarks,
3) new gratings,
4) stairs,
5) initial planking of the lower side of the hull.
Upper side of the hull:
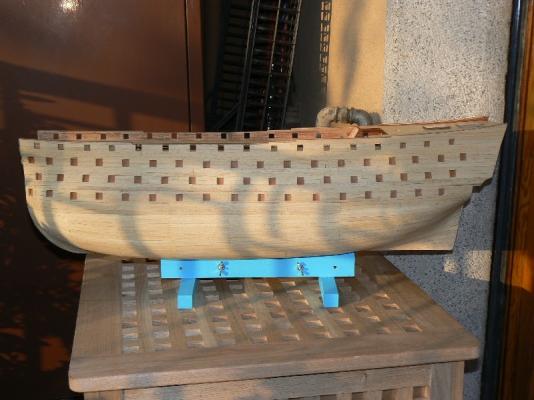
The strips I used were of mm. 2 x 5 of a softwood called "ramin".
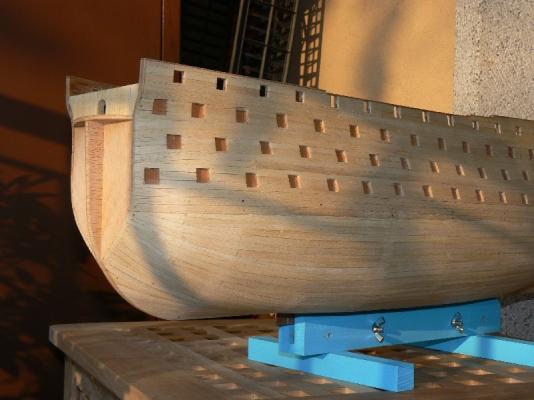
With the exception of three planks is was quite easy to manage but ... ... here you understand REALLY what it means 140 guns.
I had to cut out 70 gun ports per each side during the planking ... fortunately that it was a matter of soft wood !! My fingers still remenber these days ...
The inside of the bulkwarks:
This was an unplanned work, in the sense that was not part of the project from the magazine. The original plan was to colour this area with aniline before applying the bulkwarks. But I didn't like very much so I planked the inside with strips of a very old walnut of mm. 1 x 5.
New gratings and stairs:
One of the many deviations from the main street planned by the magazine. Instead of continuing with planking I had to build new gratings, many stairs and mounting and paint many quarter deck guns. I have no photos of the guns but I think everybody knows how is a gun.
Initial planking of the lower side of the hull:
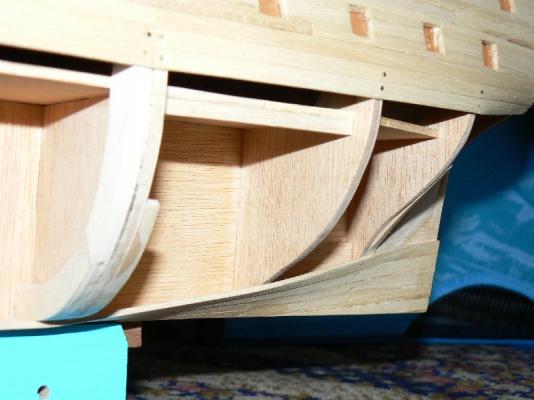
Last I started to plank the lower part. Same strips of the upper part but here the matter was much more complicated. The last photo shows details of the stern with four planks istalled. I had also to install two very small stealers.

-
Posted: Thu May 10, 2007
Here were the activities planned for and achieved in the month of August 2006. It seems I worked on a different model ..


-
Continuation . .
Some images with the templates positioned to see the overall appearance . .
01 Brick%20by%20JackAubrey/P1100056_zps37d19a23.jpg
02 Brick%20by%20JackAubrey/P1100055_zps5847bfc1.jpg
03 Brick%20by%20JackAubrey/P1100063_zpse27edb64.jpg
Have a good weekend, this afternoon if I'll can go to buy the plywood then I'll have something to work on this weekend, otherwise I'll rest (there's Superbike races) or prototyping the planking . . I'll see.
Jack.- mtaylor, Mirabell61, hexnut and 4 others
-
 7
7
-
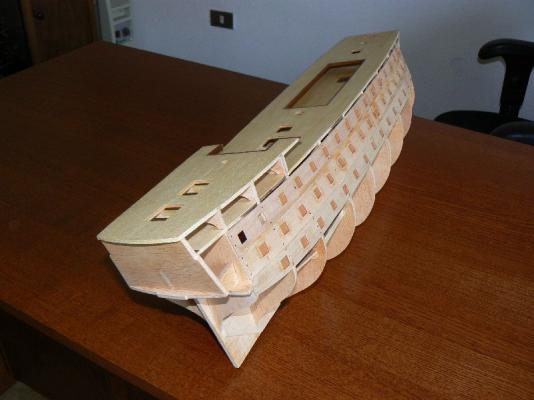
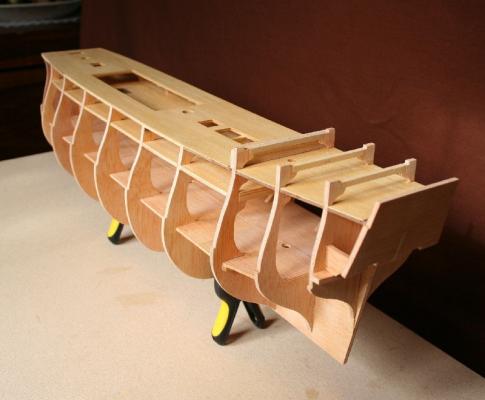
Thursday October 30, 2014
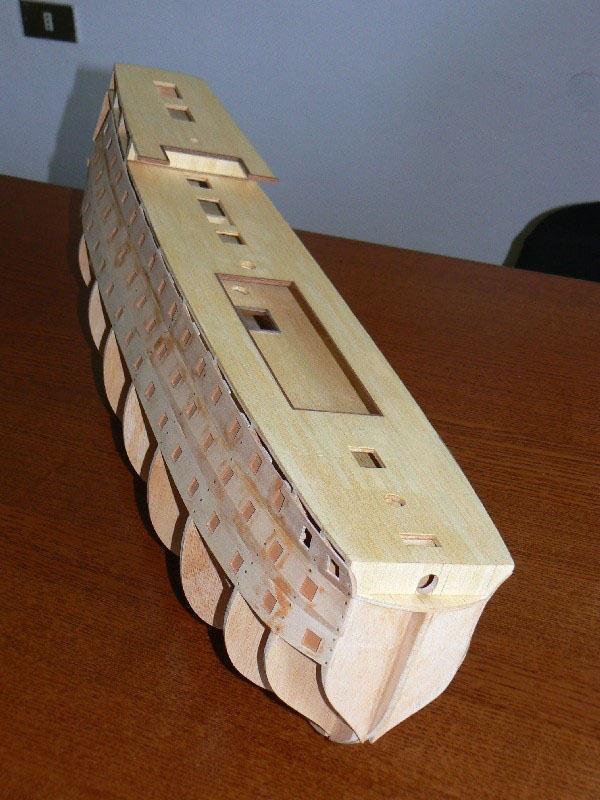
As I wrote Wednesday I finished leveling the remaining toptimbers aft. Using the belt sander it was resolved quickly and effortlessly. Below a couple of pictures as documentation of what has been done. .
01 Brick%20by%20JackAubrey/P1100059_zps2b132962.jpg
02 Brick%20by%20JackAubrey/P1100058_zpsd96aa7fd.jpg
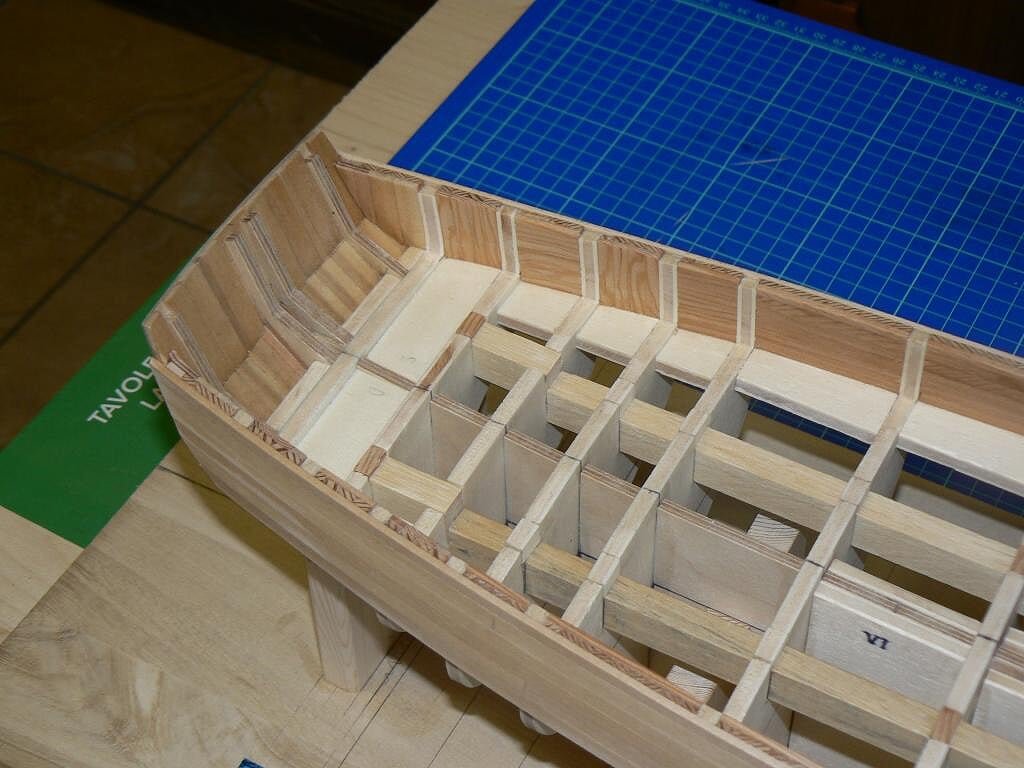
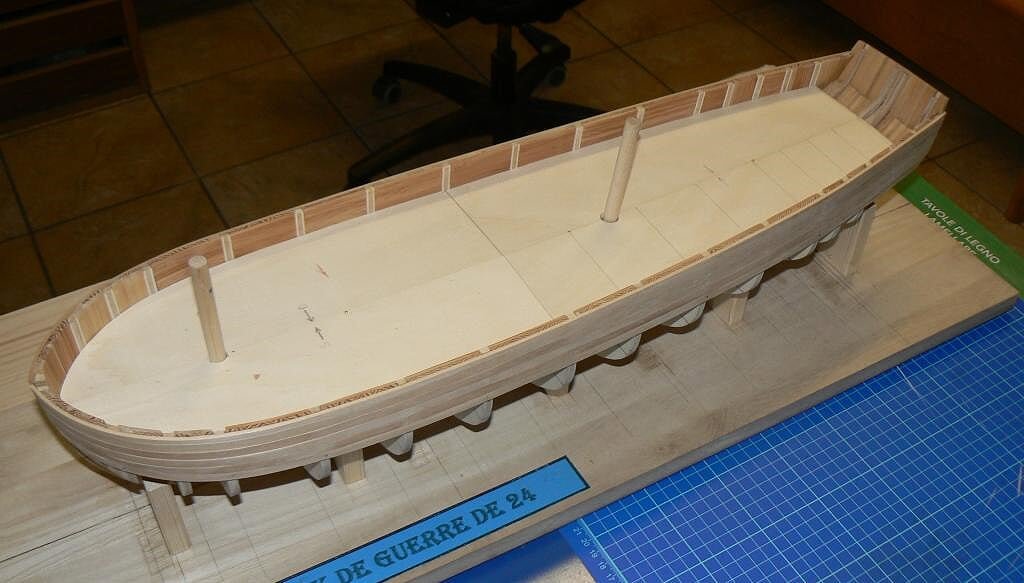
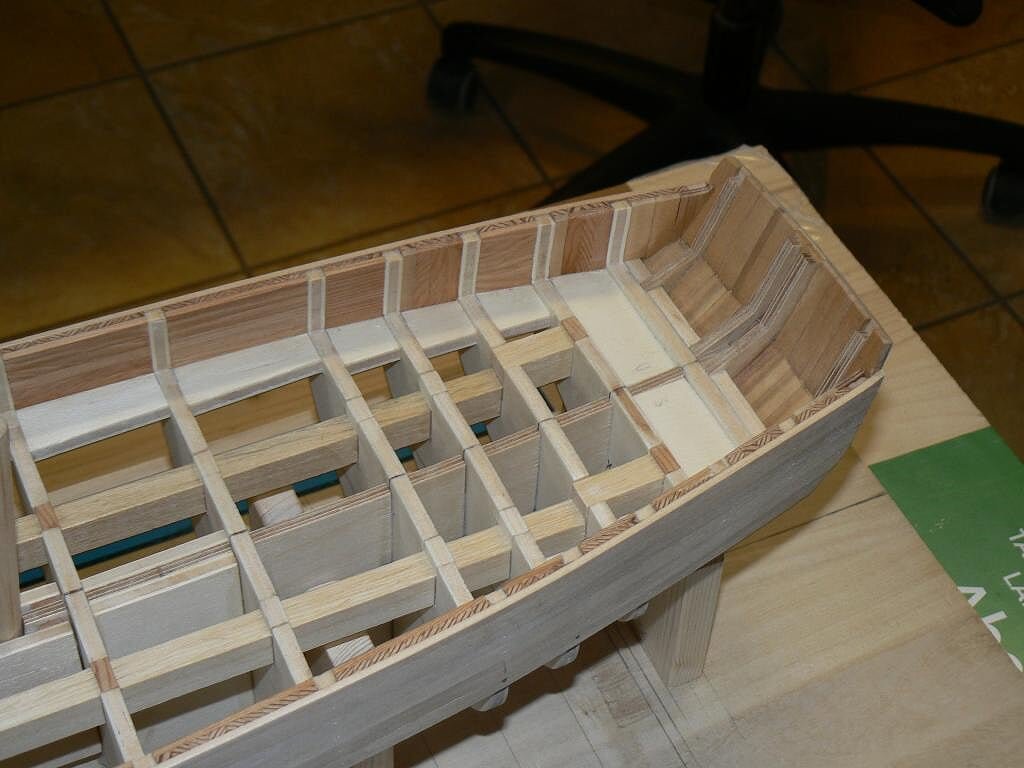
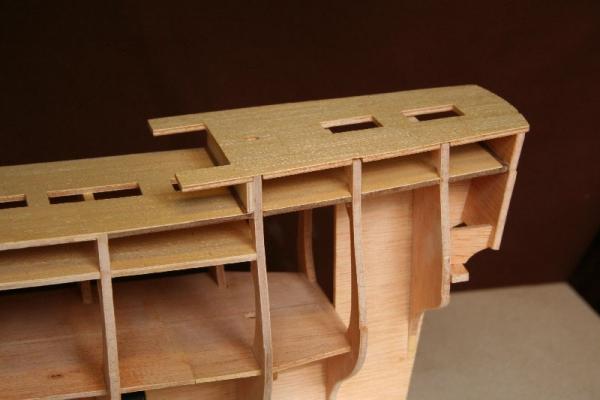
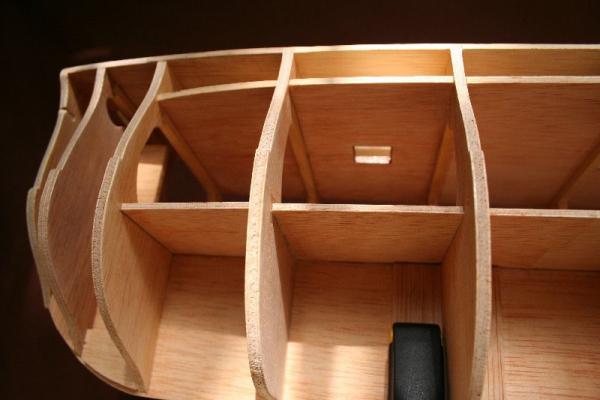
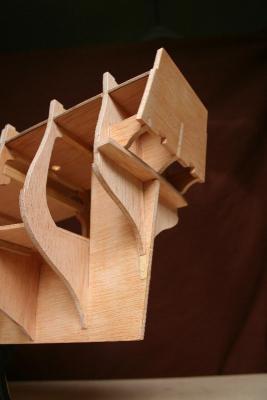
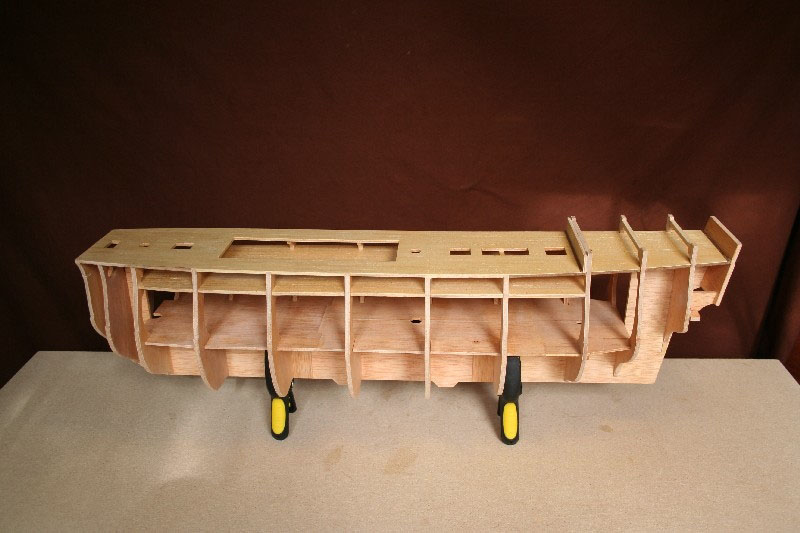
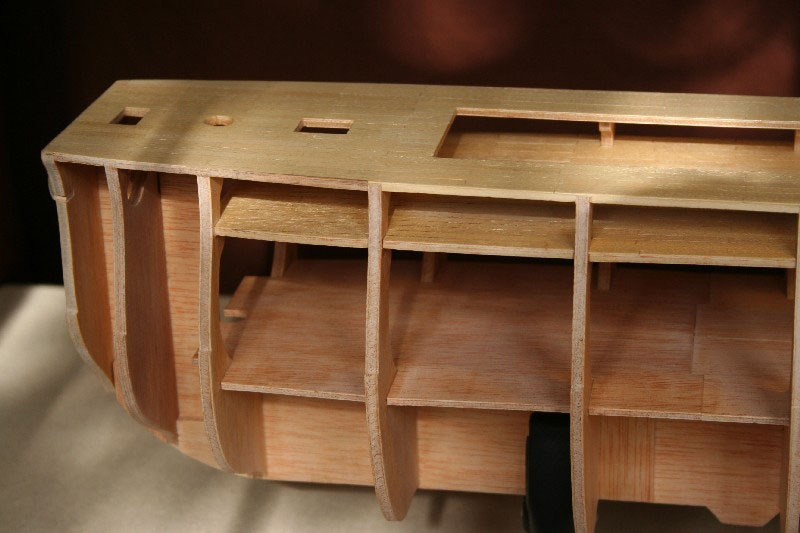
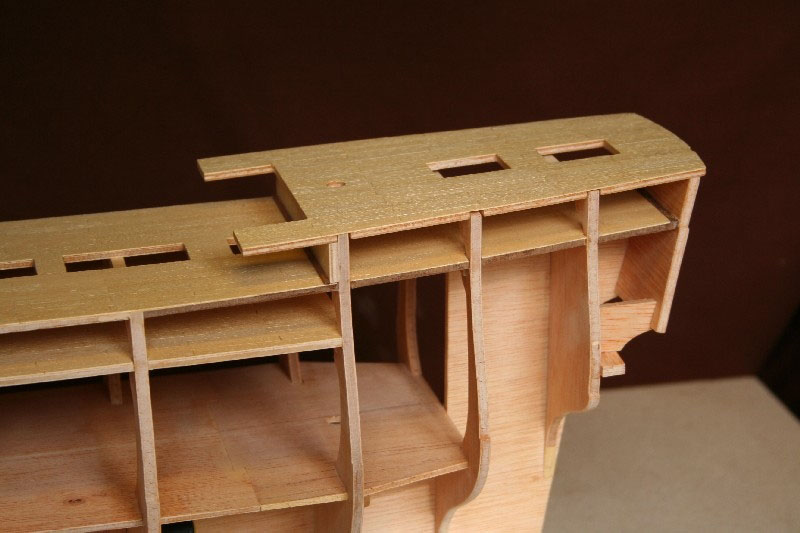
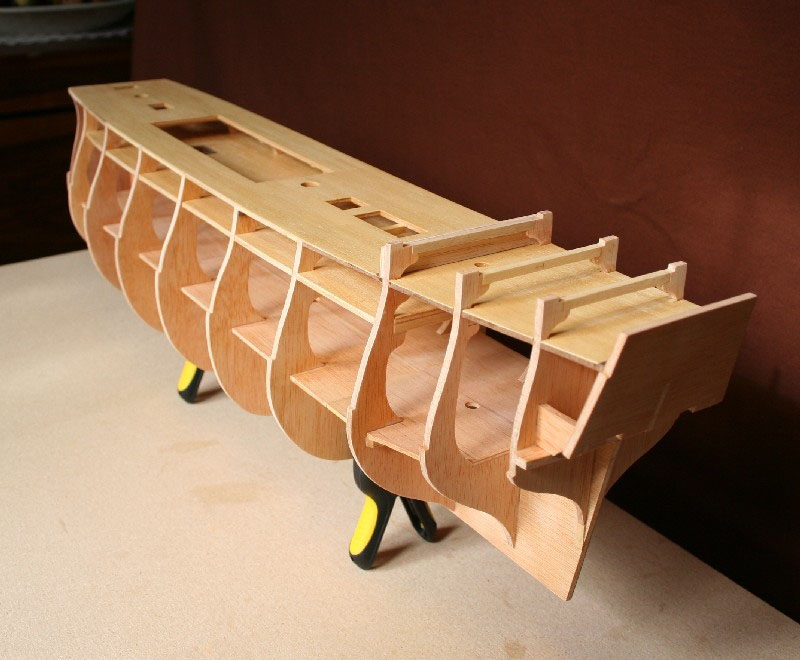
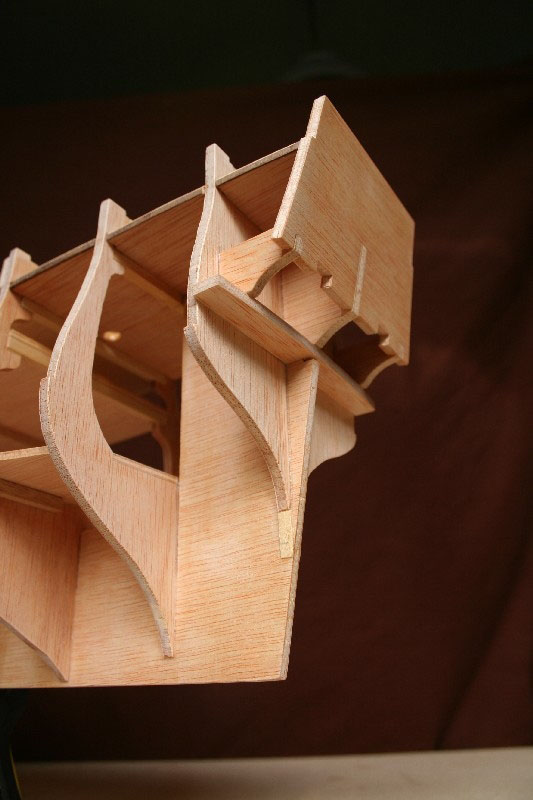
So Thursday I started to do something new, and the choice of what to do was to focus on the building of the deck, leaving pending, for the moment, the planking of the exterior sides of the hull.
The reason of this choice, which could be interpreted a bit twisted, is linked to the way in which the deck planking is applied. Let me explain better.
So far in all the models that I made, the planking of the decks was made up of straight planks not tapered, so that its implementation was relatively simple: you only needed a good deal of patience and precision and the result was assured.
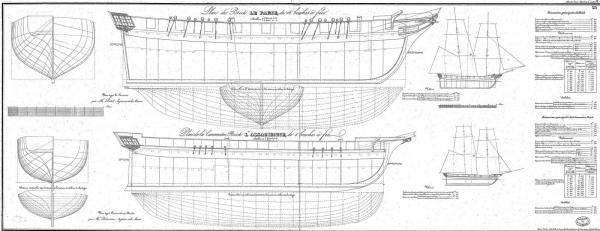
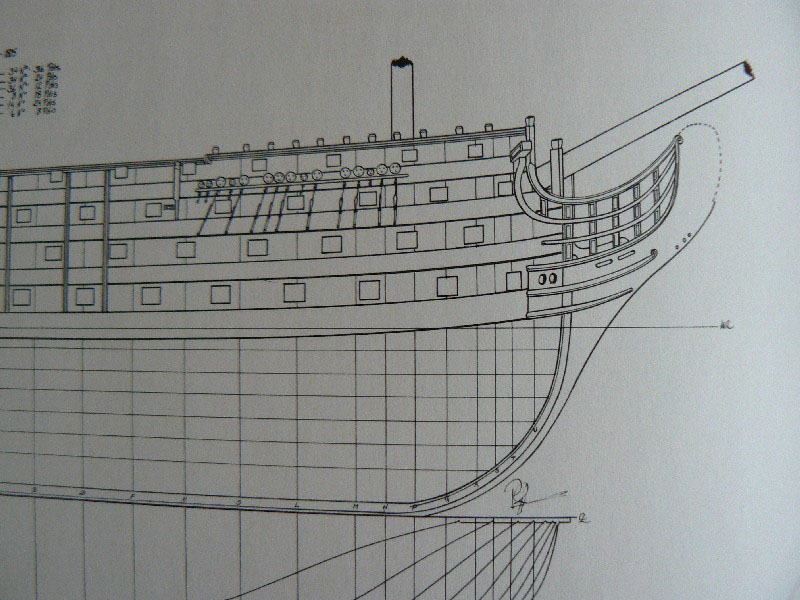
But in this brick model the deck planks are not installed right but curved and tapered at the two ends of the ship.The following illustration probably explains better the difference than a thousand words:
03 Brick%20de%2024%20Plans/DeckPlanking_zpsdf503266.jpg
So for me, this technique is considered to be a totally new experience and usually in these cases, due to my nature, I tend to proceed very carefully . .
Initially my idea was to apply the deck planks directly on the bulkheads, with tapered planks having a thickness of two millimeters apart from a small number of them, are located in the central part of the deck, with a greater thickness.
A have some ideas on how to proceed but, just to avoid possible unplanned problems, I finally decided to forget the original idea and build the deck with two layers of wood:
a) an underlying base, directly fixed to the bulkheads, made of plywood (of 1-1,5mm thickness) in order to completely close the deck and assure a uniform base on which") to lay the second layer, based on tapered planks of suitable thickness.
to lay the second layer, based on tapered planks of suitable thickness.
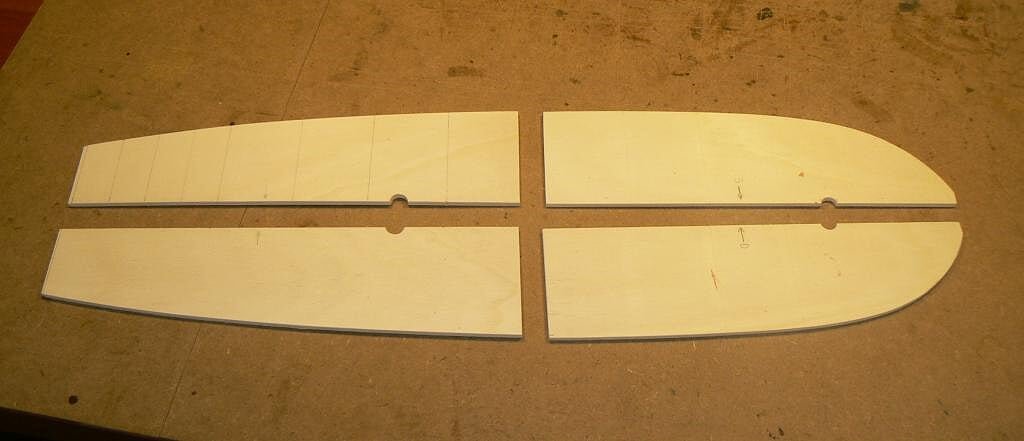
Consistently with this choice, I worked all afternoon to draw and cut out the inner profile of the deck. To realise these pieces, that must be considered as accurate templates from which derive the final plywood deck base, I used some unused poplar plywood, 4 millimeter thick.
Below you can see the templates, four for my comfortable working, obtained after continuous adjustments before getting the most accurate shape of the deck.
04 Brick%20by%20JackAubrey/P1100057_zps79c9a952.jpg
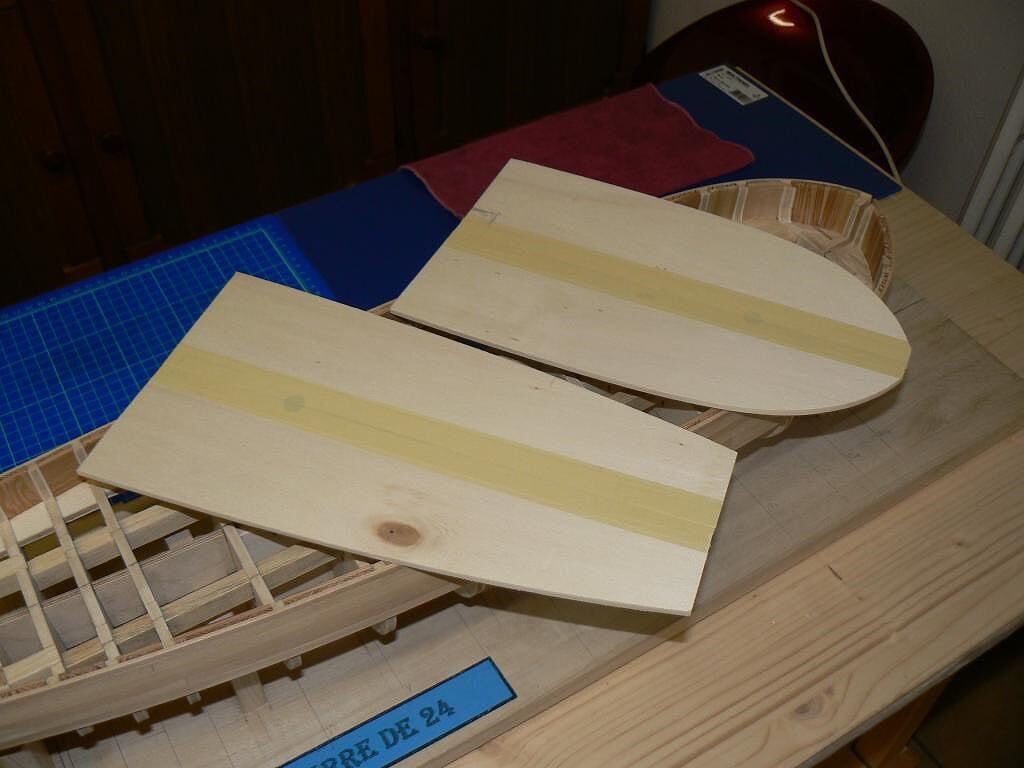
Finally, I put together the four pieces with some adhesive tape in order to obtain only two pieces, the half-bridges for the bow and stern. Now I just have to get plywood of the proper thickness, cut it according to these templates and apply it on the bulkheads, but I have to go to a hobby store and buy it.
05 Brick%20by%20JackAubrey/P1100060_zps4dcb2d4a.jpg
Maybe, before I'll start to install the planks on the real deck, I think to do a bit of experience installing the planks on these templates . . make a small prototyping usually helps to gain experience. . and to avoid stupid mistakes.
I'll continue in the next message. . Jack.
-
On 29/10/2014 at 11:39 PM, mtaylor said:
Try setting up the vacuum cleaner so that it will suck up the dust as you sand. I do this frequently and does keep things clean.
Hi Mark, are you referring to the vacuum cleaner that can be directly connected to the power tool ? A wide choice of Proxxon tools has this possibility and they also sell a proprietary vacuum cleaner as shown here below . . unfortunately it doesn't seem to be usable with the belt sander BSL 220/E.

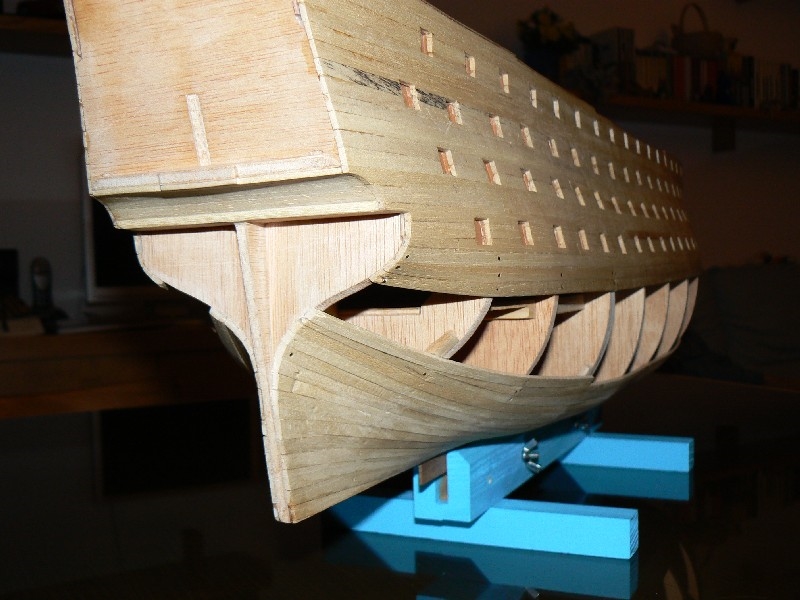
Two other overall viewpoints, that do not add anything new to the work done the past Tuesday. .
Wednesday I finished the leveling of the aft toptimbers that I wasn't able to finish Tuesday. I used the "belt sander method" that definitely proved to be incredibly better than the other one I have described.
Regarding the wood dust . . patience, I finally sucked the workshop and the session ended there.
Regards, Jack.01 Brick%20by%20JackAubrey/P1100052_zpsb10fa7c9.jpg
02 Brick%20by%20JackAubrey/P1100051_zpsd15f38f6.jpg
-
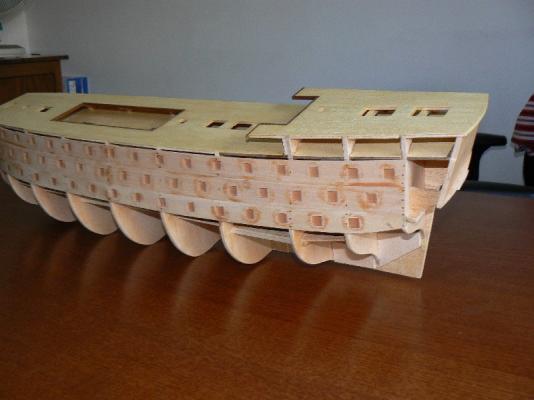
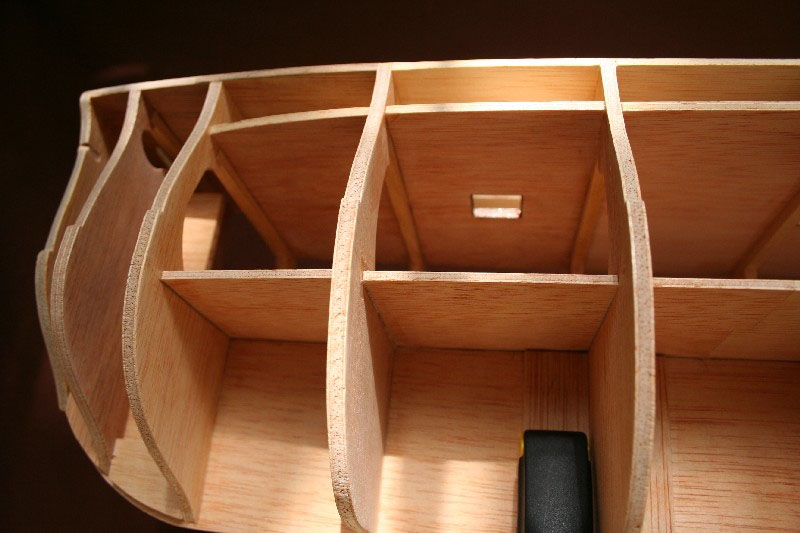
Tuesday, October 28, 2014
Last monday I did nothing but today I started with good will to finish the inside of the bulwarks, removing , as scheduled, the excess of plywood toptimbers.
Initially I started using a method that produced few dust and which consisted of a blade of a small hacksaw for iron. I only used the blade, without the bow, and to use it I covered the ends with tape. Then, holding the blade folded properly, I started to cut the plywood in excess.
The method worked adeguately but then I had to sand and trim the corners with the deck that was impossible to achieve well in any way except by using abrasive blocks and wood cutters.
Then I wanted to try to use the belt sander BSL 220/E presented in one previous message and I immediately noticed a positive difference . . no effort and pace.
Of course, the bad side was the dust, in fact produced in great quantity, so much that I finally decided to leave and to complete the last remaining toptimbers tomorrow.I spent the time I had left to suck the laboratory with a vacuum cleaner.
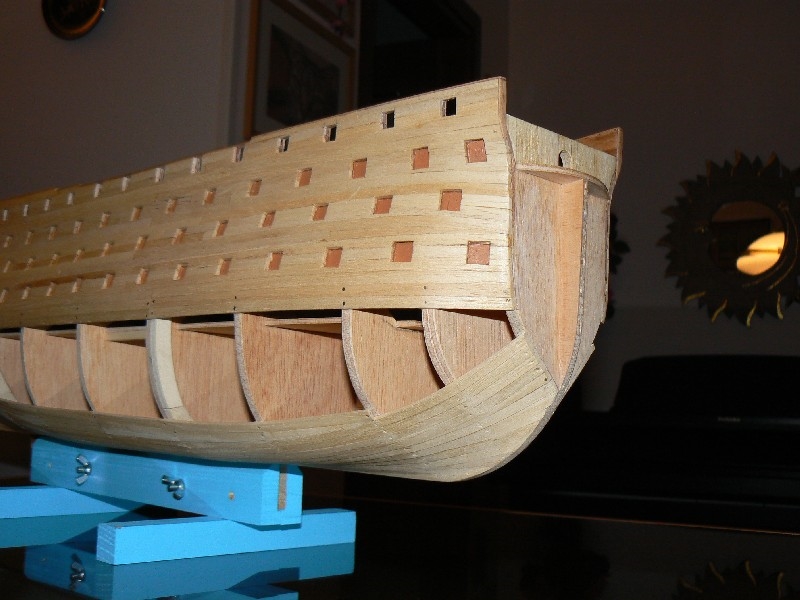
Below two pictures of the front of the hull, showing the inner sides of both right and left bulwarks nearly finished . .
01 Brick%20by%20JackAubrey/P1100050_zpsa78bcf51.jpg
02 Brick%20by%20JackAubrey/P1100047_zps6ba96ebd.jpg
Instead at the poop there are still five toprtimbers per side I have left for tomorrow, which, however, give an idea of the work that had to be put on the track to get rid of the excess wood.
Finally, having already done much dust, I sanded adeguately the top of the bulwarks leveling the three layers of planks: this was a job that came with the belt sander incredibly ease: it is a tool that I highly recommend, of course for those who can afford it. .
03 Brick%20by%20JackAubrey/P1100048_zpsf1050203.jpg
04 Brick%20by%20JackAubrey/P1100049_zpsa806d014.jpg
All for now, until next time, Jack.Aubrey.
-
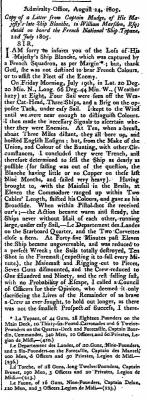
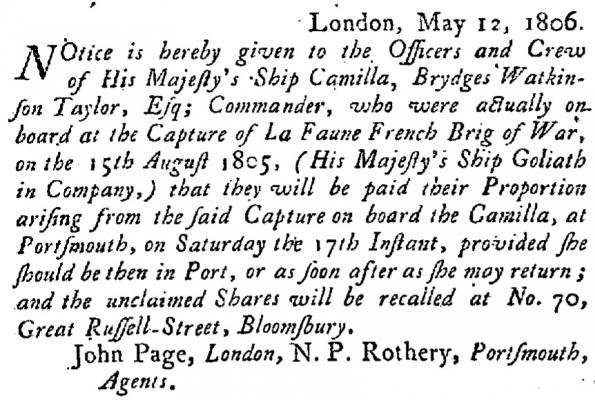
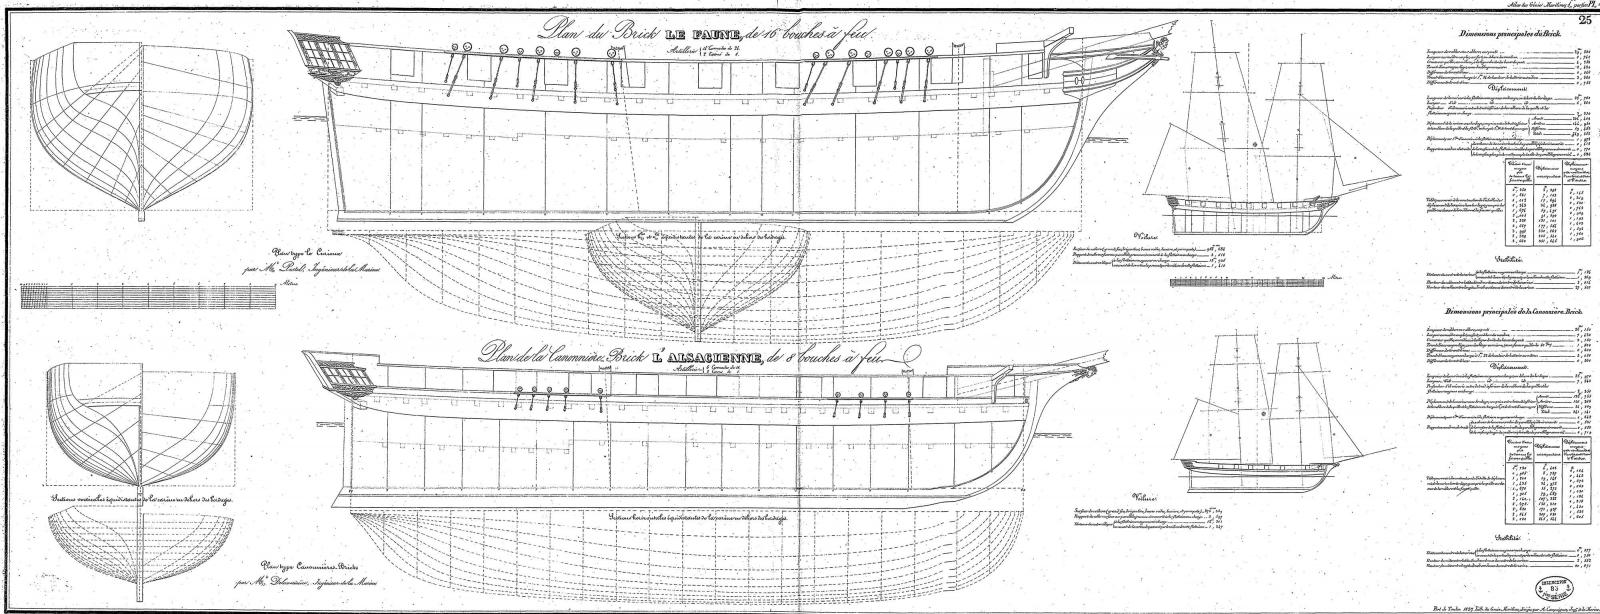
French Brick Le Faune (1804)
"Le Faune" was a French naval Le Cygne-class brig launched in 1804 to a design by François Pestel in 1803. She participated in the capture of HMS Blanche in July 1805. The Royal Navy captured Le Faune in August 1805. She was taken into service as HMS Fawn, but the last record of her dates to 1806. In 1807 the Royal Navy launched a new HMS Fawn.
Career:
On 19 July 1805 Le Faune was part of a squadron of four vessels that captured HMS Blanche off Puerto Rico, three days after they had left Martinique. The other three were the 40-gun French frigate "Topaze", the 22-gun corvette "Department des Landes", and the 18-gun "Torche". Le Faune was under the command of Lieutenant Charles Brunet.About one month later, Le Faune, still under the command of "enseigne de vaisseau" Brunet, was carrying dispatches from Fort-de-France to Saint-Nazaire via Saint-Martin-de-Ré. When she was southwest of Ouessant, on 15 August, she had the misfortune to encounter HMS Camilla.
Camilla chased Le Faune for nine hours before capturing her at Lat. 45 Deg. 18 Min. N. Long. 7 Deg. 36 Min.
The 74-gun, third rate HMS Goliath was in the Channel Fleet when she saw a sail to eastward and three sail to westward. Goliath sailed east and joined the chase, helping Camilla to capture Le Faune. Faune was armed with 16 guns and had on board 98 men. She also had on board as prisoners 22 men from HMS Blanche.
After Goliath helped Camilla capture Faune, she set off after the other three French vessels. Raisonnable joined Goliath and they were able to capture Torche, which the Royal Navy took into service as HMS Torch, but Topaze and Department-des-Landes escaped.
Captain Robert Barton of Goliath sent Le Faune into Portsmouth with Camilla. Barton reported that Le Faune was a new ship, on her first voyage, from Martinique, extremely fast, and would make a good addition to the Royal Navy.
The Royal Navy took Le Faune into service as HMS Fawn.However, after 1806 there are no records of her.
Here below three articles fron the London Gazette describing some events where Le Faune was involved . .

-
Posted: Wed May 09, 2007
Two weeks later (July 25th, 2006) I made the following three photos.
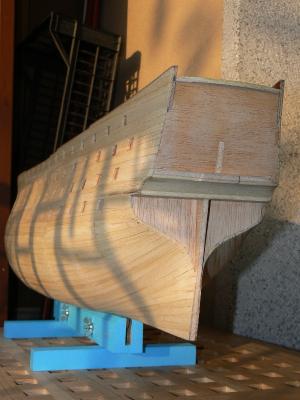
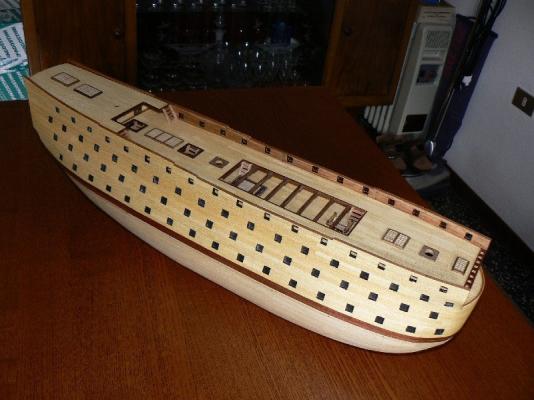
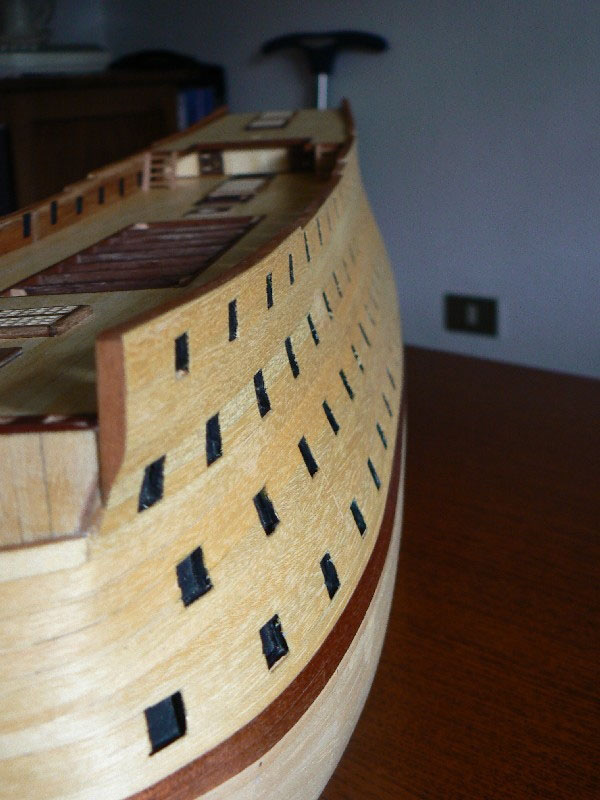
As you can see I have installed the last four stripes of plywood at the quarter deck level. This completes now the upper part of the hull. The inside area of these stripes was previously coloured with water and aniline.
Just to anticipate some things, all this upper area of the hull will be planked, as well as the lower part, with strips of soft wood of mm. 2 x 5.
Here for the first time you can see my "artisanal" keel clamper. It's very easy but it works well. Today I no more use it for this model so I have transferred this clamper to the SAN JUAN where it is still in use.
I have also built and installed three gratings on the decks. They are not very well visible in these images.


-
Posted: Tue May 08, 2007
The following images are dated July 12, 2006.
In these two months the model has progressed slowly because of the monthly shipments that did'nt contain much things to do.
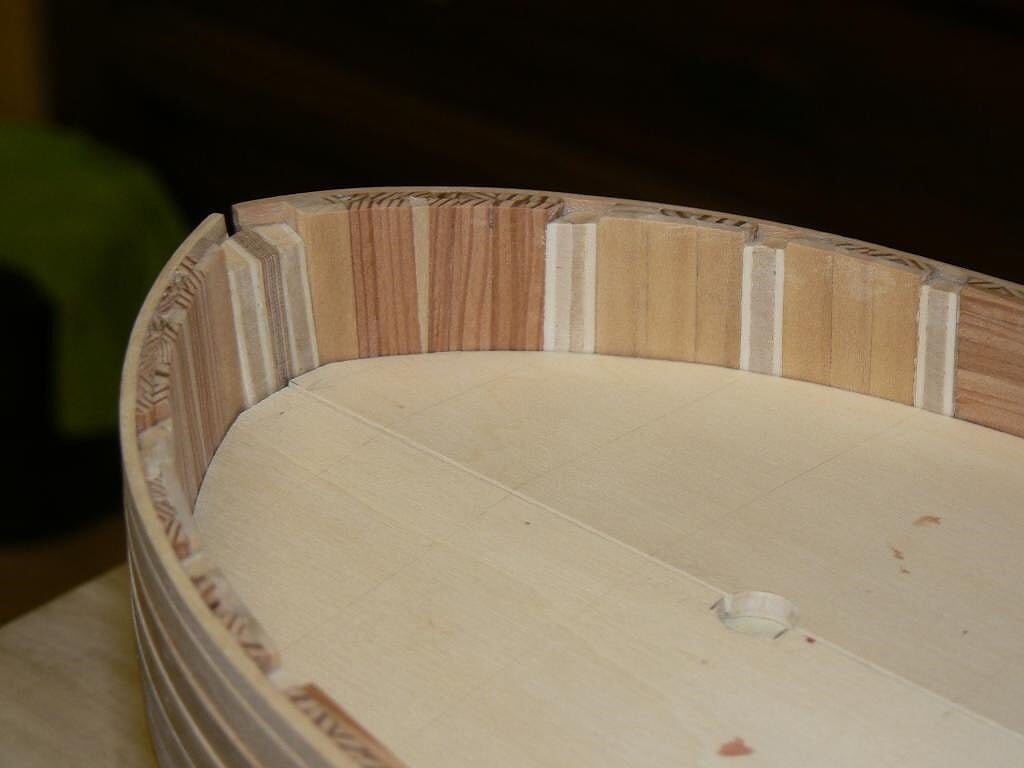
In summary what I had to do was to put in place twelve stripes of plywood, six per side, on the hull sides at the gun decks level. The stripes have the gun ports pre cutted and are 1.5 mm. in thickness. Subsequently this area will be planked with basswood stripes of mm 2 x 5.
The tasks undertaken were:
1) shape the hull only where the 12 stripes must lye. This was done with a typical sanding block made with sandpaper glued onto some pieces of wood. It is best to use a long piece of wood to sand the ends of the bulkheads instead of a short one.
2) install two stripes per side at the level of the lower gun deck. Then fix behind the gun port holes a small square piece of wood. In the images they are painted in ochre colour. It is important to install this first "plank" exactly in the right position.
3) repeat the same of 2) for the middle gun deck and the upper gun deck stripes.
4) at the end, smooth down as well as possible with sandpaper.
A final comment.
Here you begin to understand what it means more or less 140 guns .... build 140 square pieces, glue them, clean them, paint them, etc ...... I will understand completely what it means in the near future .....

-
Here is a beautiful example for those who wonder about the usefulness of the forums . . . Sometimes the tool really proves valuable, as in the case mentioned here below.
Elsewhere someone else has taken up the issue raised by me long ago on the figurehead and sent me something really useful, something which I thank him publicly:
Hello Jack,
Meanwhile, congratulations for what you are doing and how you teach it: for me as a beginner it is a real lesson of shipmodelling. I would like to re-open the issue of the figurehead sending a file that I found surfing on the internet: it is "Le Faune". Of course the Royal Navy changed its name as HMS Fawn, but as you can see the figurehead I thought would be of interest, of course if you do not already have it. Friendliness
The attached file is the following:
-
Posted: Mon May 07, 2007
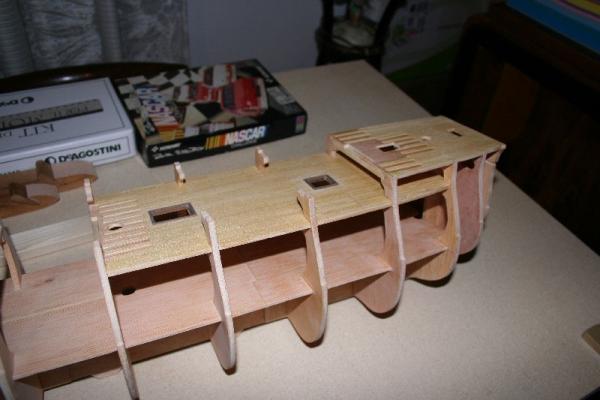
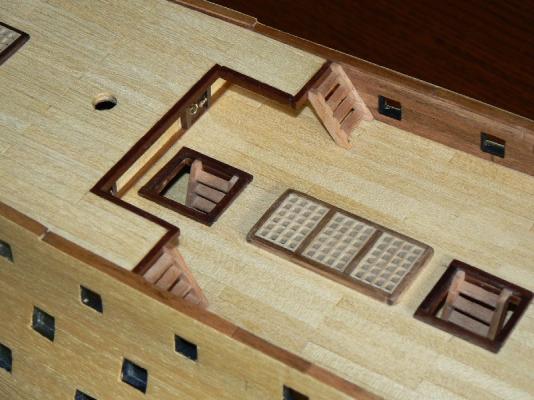
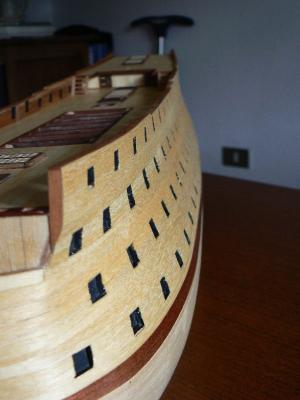
The following photos are dated May 9th, 2006. Three week later the previous images.
Here, the bulkheads are all in their right place and the quarter deck is very close to completion.
The planking of the decks is also terminated. The last photo shows the poop deck in place.
Please note the three holes for the masts. They are all ready and fit perfectly.

-
Posted: Sun May 06, 2007
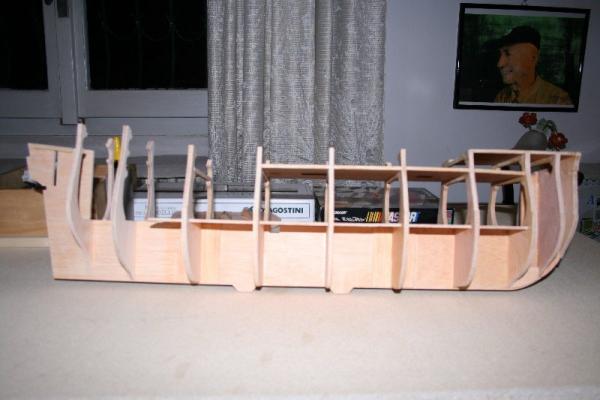
These are the first two photos I made to my model. Their date is April 17th, 2006.
There are some bulkheads still missing and the decks are partially installed and partially planked.
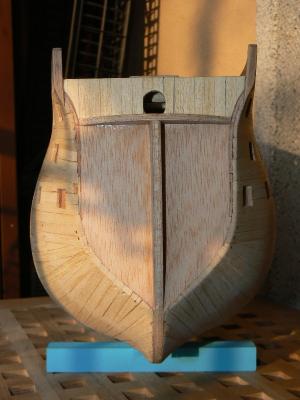
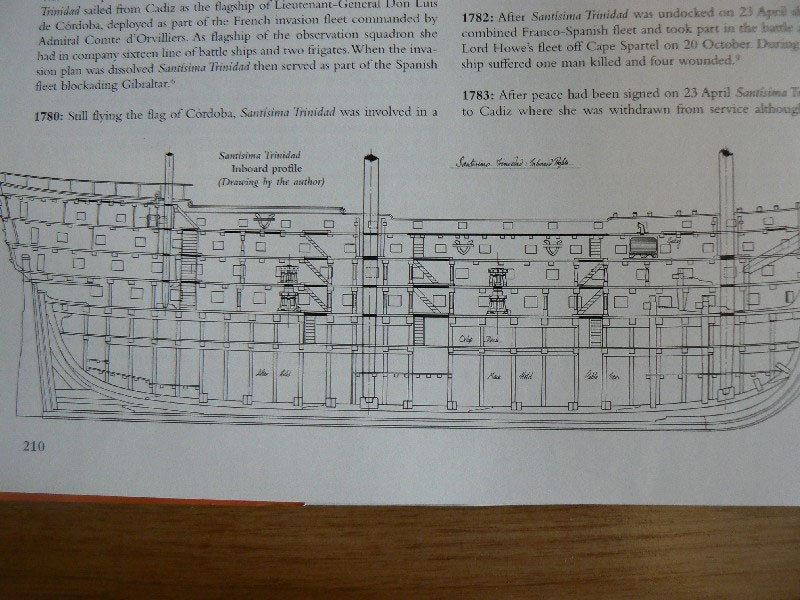
Although it is not probably so clear from the first image the keel is made up of three pieces of plywood glued together on bulkhead no. 5 and no. 8. The reason is that all the pieces delivered with the magazine cannot exceed the A4 paper sheet size.
The decks are planked with stripes of a clear wood that is called "ramin". Honestly I don't know which may be the english name. The stripes are mm. 65 x 5 x 0.5 in size.
The keel has two shelves in its lower side that are intended to allow the usage of a keel clamper that will be delivered in the next issues of the magazine.
-
-
Posted: Sat May 05, 2007
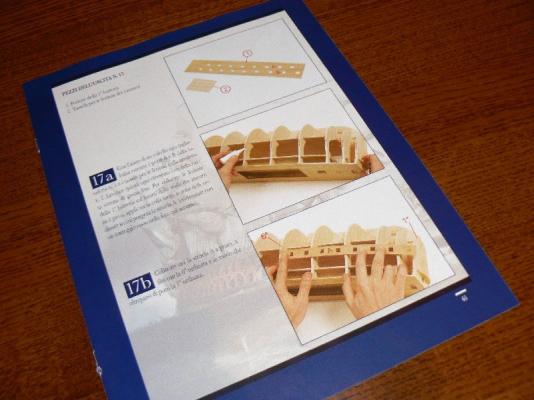
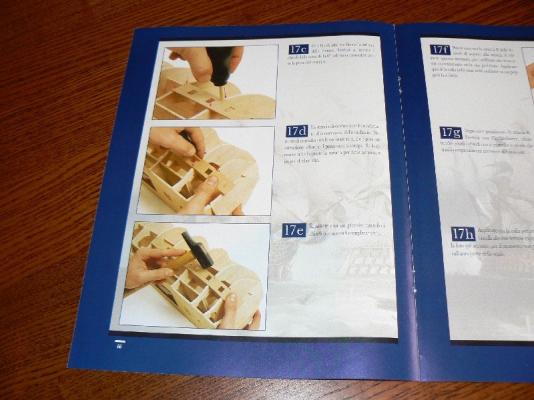
One problem with this project is that the full plans of the model are not available.
This means that you cannot foresee how your work will evolve and this is sometimes a great limitation. Another problem is that if you destroy, for example, a bulkhead and you don’t have the plans you cannot redo it.
To avoid this potential problem, I have acquired with a scanner device on my computer the “object” so that I can print and reproduce it if necessary.
Probably if you are a “rookie” as ship modeler this method will simplify very much your life, but when you become more expert this probably will limit you and your fantasy. Anyway the method works well.
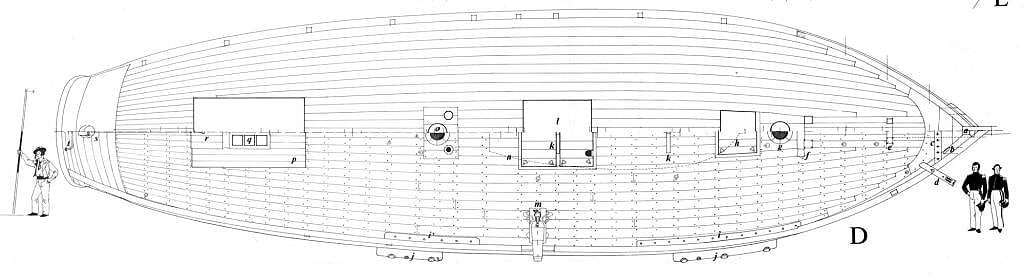
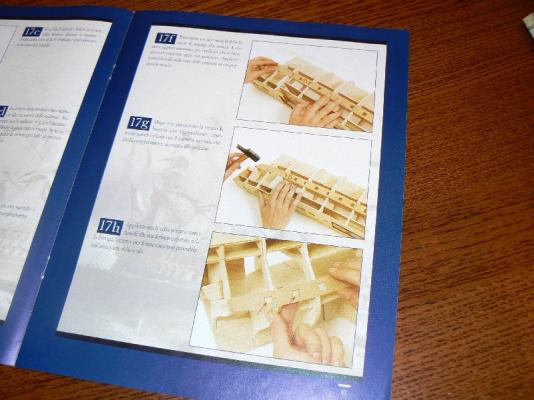
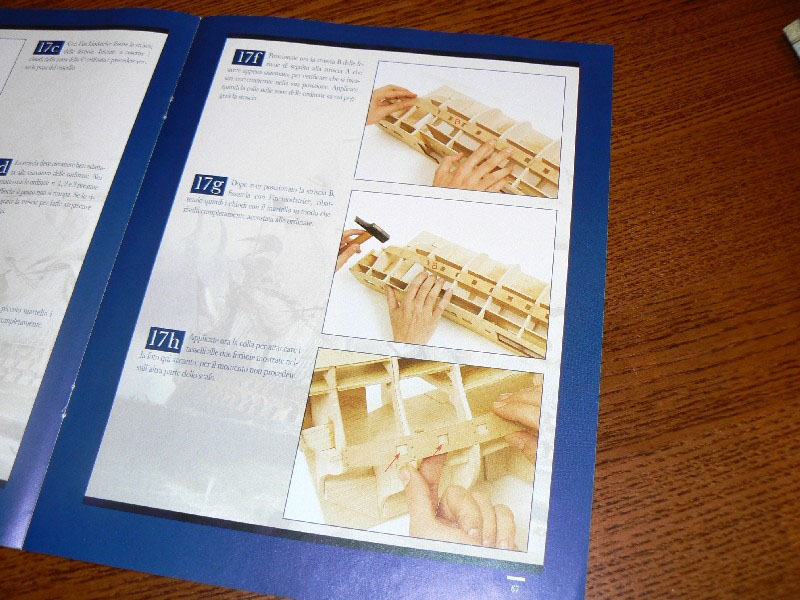
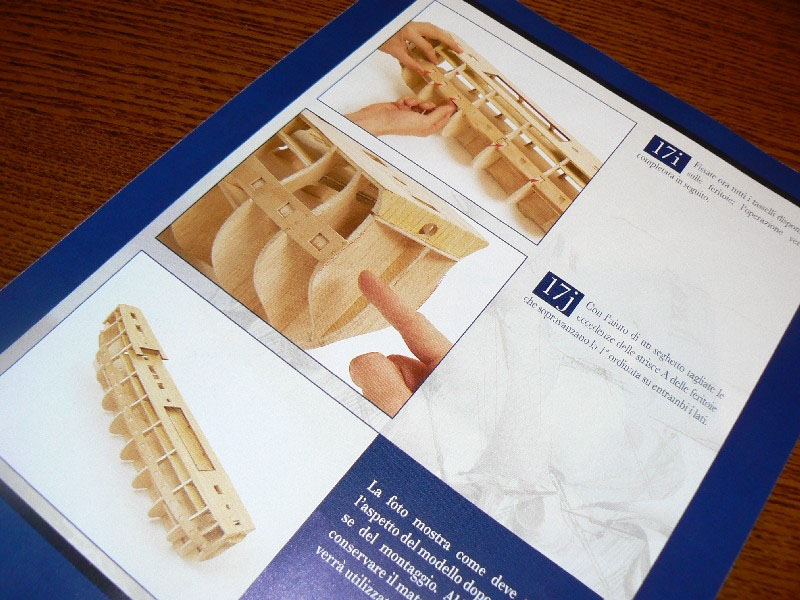
The following four pictures are a sample of the building instructions that are contained, together with the material in each issue.
They are very simple to understand and very, very much detailed.

- CaptainSteve, yvesvidal and WackoWolf
-
3
-
Posted: Sat May 05, 2007
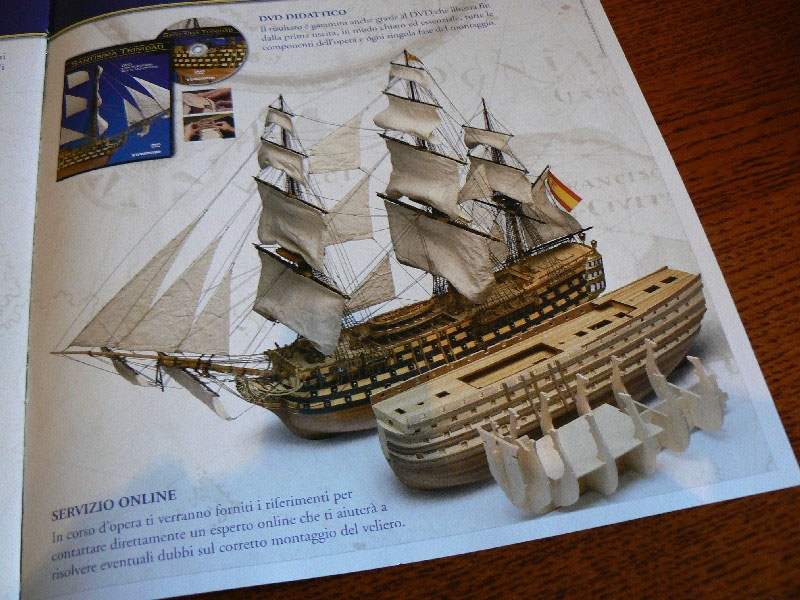
The following three photos are from the issue number 1. This first issue contains in detail the explanation of how the collection will be published, the timings and so on. In this issue there is also a DVD that shows in generals how the model is built.
The first 140 issues will deliver instructions and materials to construct the Santisima Trinidad full model, while the remaining 25 will be dedicated to build its cross section.
Please note the great similarity with the OCCRE model pictures shown before.
The DVD was sometime very helpful to understand better some future activities.


-
-
Posted: Fri May 04, 2007
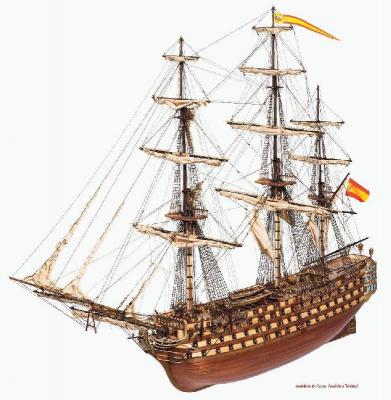
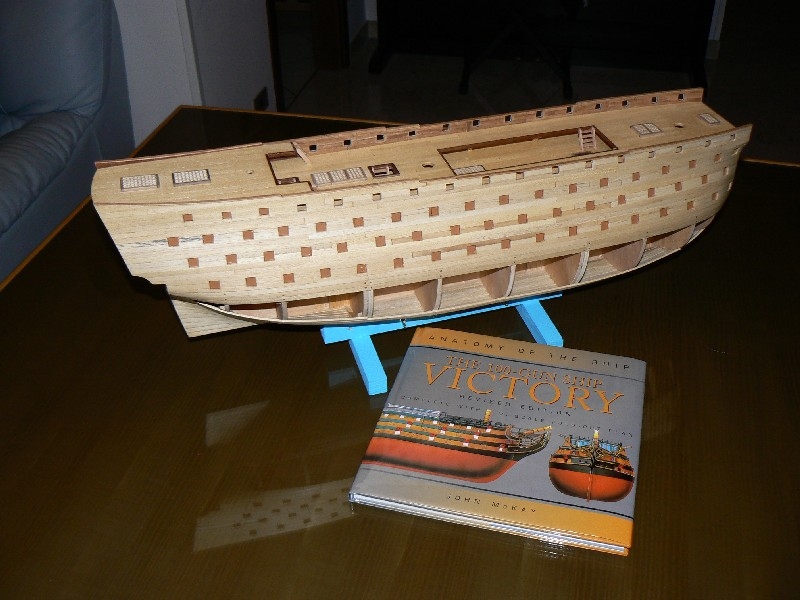
I believe you may be eager to see the model, so the following three photos are an anticipation of my Santìsima Trinidad as it is today, May 4th, 2007.
- CaptainSteve, yvesvidal, WackoWolf and 2 others
-
5
-
Posted: Fri May 04, 2007
Today, let’s have a change in the way to manage this log.
Instead of continuing in writing about the history of our Santìsima Trinidad, I would like to write something about the model I am building.
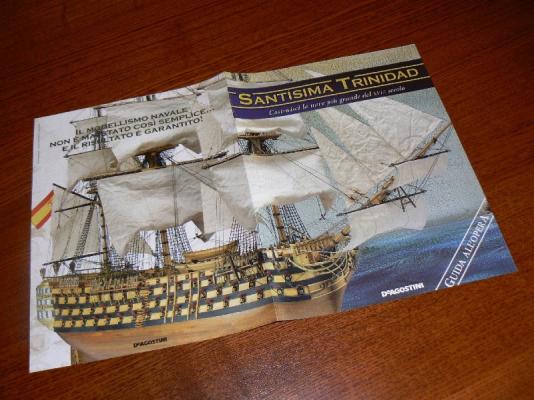
As I said before this model is not scratch built and it is not a kit. It is a model that is built around a magazine of naval matters and history published periodically by an italian company: De Agostini.
Every week there is a new issue in the newspaper stand. Alternatively there is the possibility to have a monthly postal shipment directly at home. In the latter case every shipment contains four issues.
There will be an overall number of 165 issues, and, at the end of the collection I will have completed two models:
1) the complete model, in 1/90 scale, of the Santìsima Trinidad,
2) the main cross section of Santisima Trinidad.
Every issue contains 3 things:
1) the magazine itself,
2) material for the construction of the model,
3) detailed building and assemblying instructions of the model.
The collection started about 15 months ago and today the issue 62 is available. The following pictures in this forum will give you an idea of the collection.
Honestly the amount of work contained in each issue is not too much as well as it is not too difficult. This fact leaves me enough time to build two other models in the same time. But this is another story.
Now you know that I started this model more than one year ago and that I receive four issues every month. This means at least two things: a) I have to reconstruct a log of the last year and
for the future I will update this forum monthly.Regarding a) I have made many photos during the time so I believe to describe and show the progress quite easily. So in the next days I will try to add regularly new things.
Surfing on the internet I have found a kit from the Spanish OCCRE that is very, very similar to my Santìsima Trinidad. I believe that my model is a variation of the OCCRE kit. With some interesting enhancements.

-
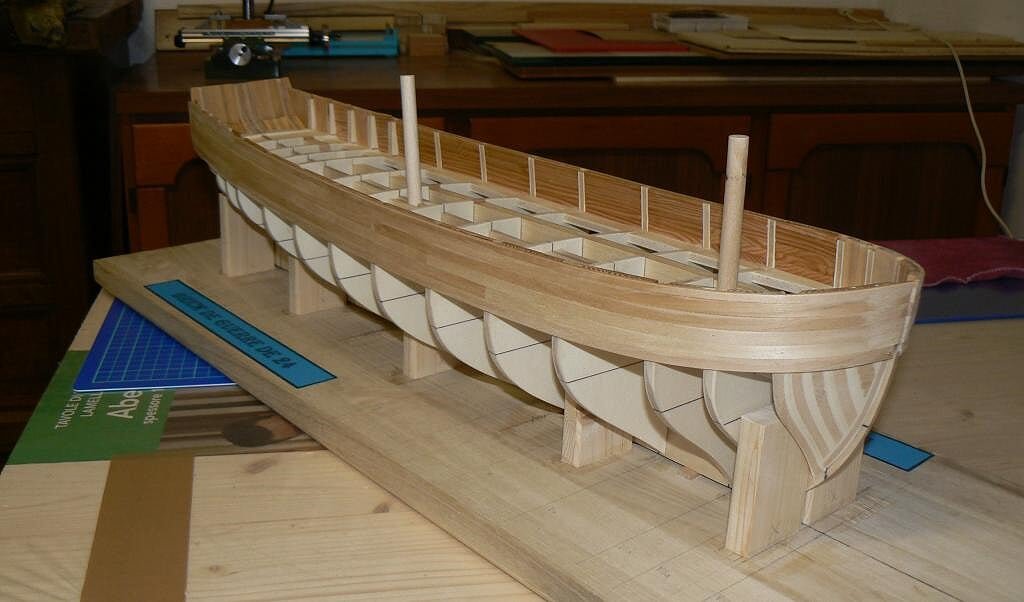
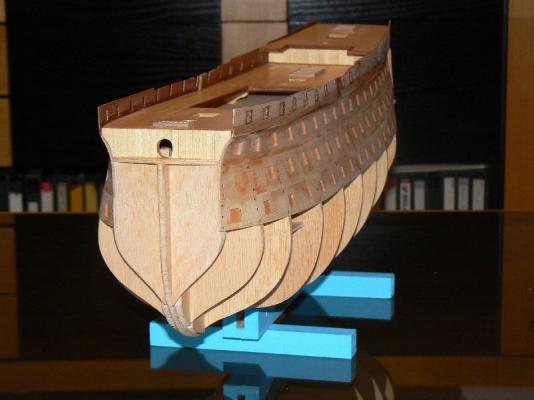
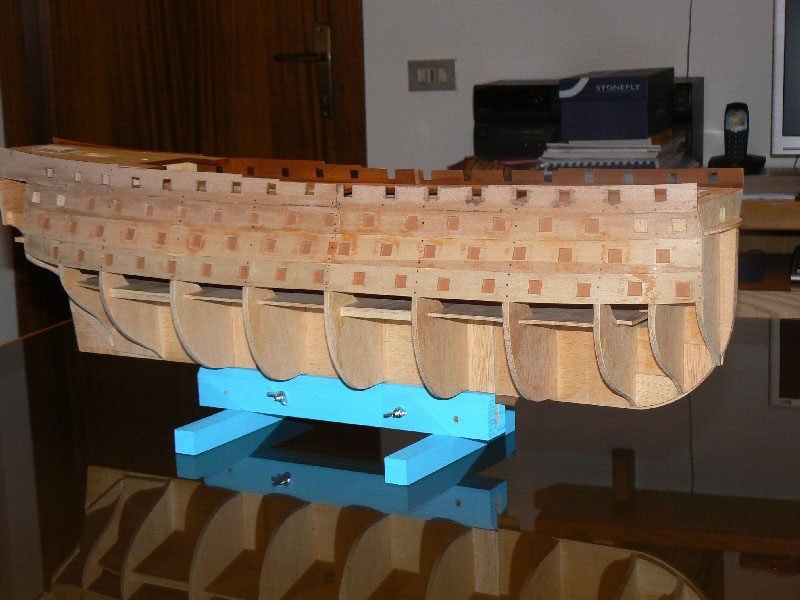
Sunday October 26th, 2014
I spent some afternoon sessions in this past week to continue the task of building the interior of the bulwarks. Friday I finished and now I'm here to plan the bulwarks refinements. They will be the task for the coming week.
At the moment I have no images to show but I will add something asap.
I spent Saturday afternoon speaking in my workshop with another italian ship modeler that decided to build the same brick, with a different name but belonging to the same "Pestel" class, using my CAD enhancements of the ANCRE plans.
Very interesting and pleasant afternoon . .
where I also had the possibility to watch closely an almost finished model of a "Knorr", the merchant ship equivalent of the Viking Drakkar. Outstanding model with a delicious klinker planking very difficult to achieve . . .
See you soon, Jack.


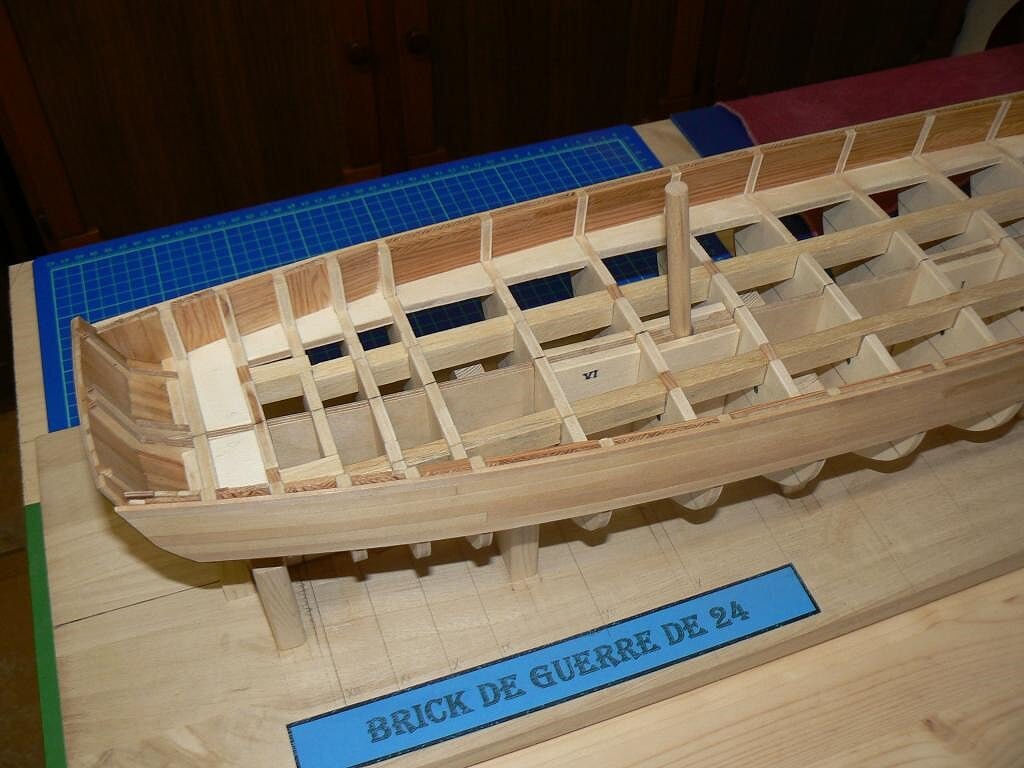
HMS Guadeloupe by jack.aubrey - 1:48 scale - ex French Le Nisus - Brick de 24
in - Build logs for subjects built 1751 - 1800
Posted · Edited by jack.aubrey
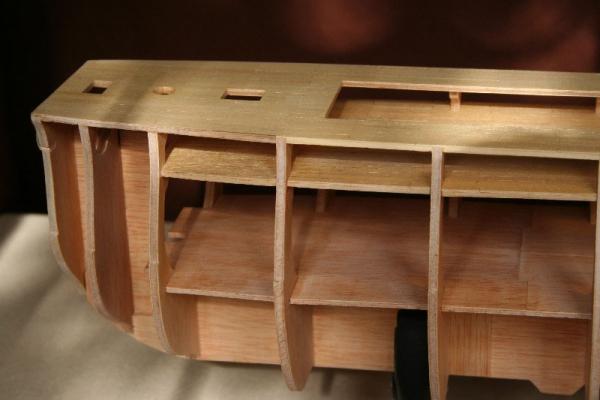
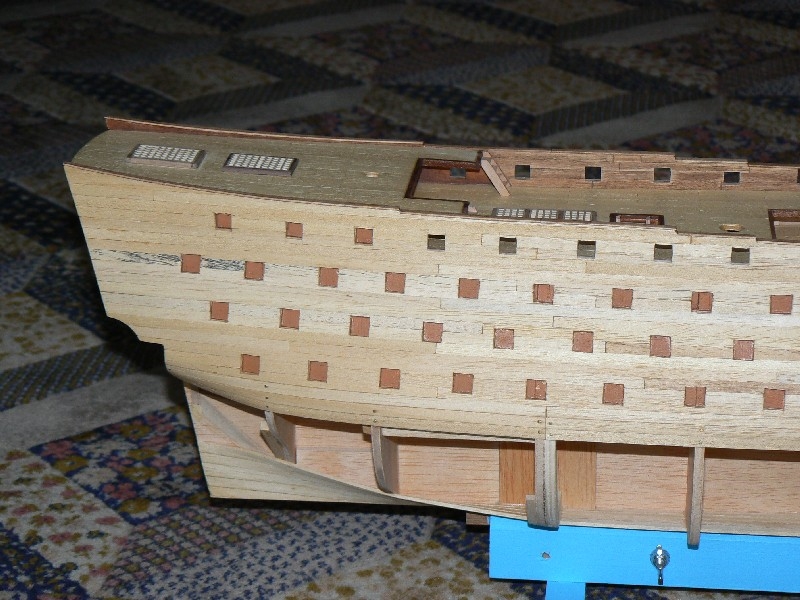
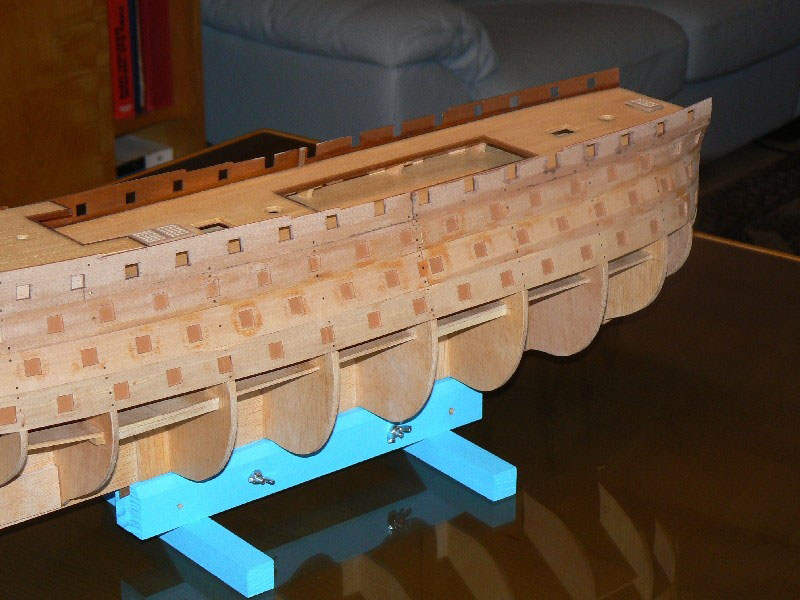
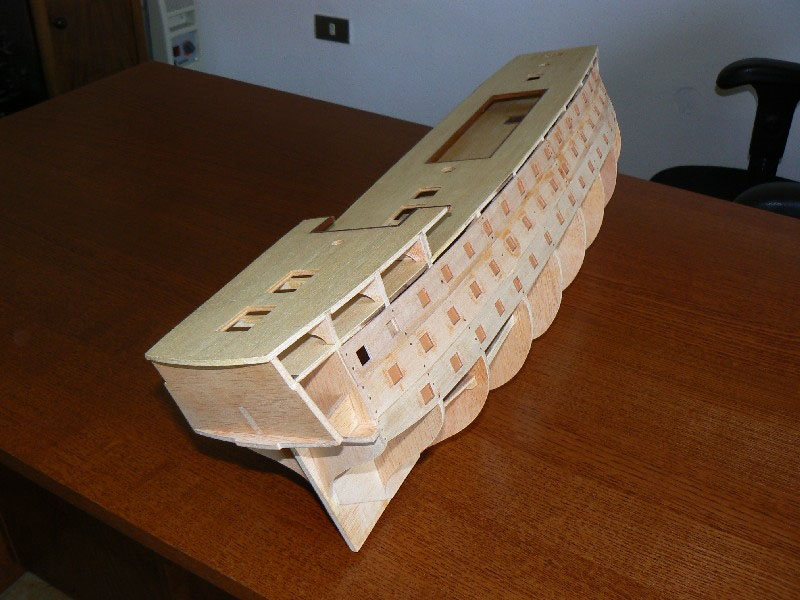
Monday, November 3rd, 2014
As I mentioned, prior to the application of the deck planks, I have some things to clarify that require a pause for reflection: the choice of the type of wood to use (light? Dark?) and tests to identify the best method for applying the tapered planks are a couple of topics that should be cleared with calm.
So as I leave to settle these issues, I decided to continue installing the planks on the hull, task interrupted just below the deck level. So in the coming days I will work in this direction.
It 's very likely that for some time you will see photos with the hull capsized more than anything else. . . .
Regards, Jack.
01 Brick%20by%20JackAubrey/P1100069_zpsd163f179.jpg
02 Brick%20by%20JackAubrey/P1100068_zpsd9633cb6.jpg
03 Brick%20by%20JackAubrey/P1100073_zpsd967677f.jpg
04 Brick%20by%20JackAubrey/P1100074U_zpsfadcc774.jpg