Landlubber Mike
-
Posts
4,547 -
Joined
-
Last visited
Content Type
Profiles
Forums
Gallery
Events
Everything posted by Landlubber Mike
-
 Very cool - this book seems to have been written using the same framework as Robert Gardiner's "The Sailing Frigate" that was published last year, which I really enjoyed. This book on sloops is about double the length of the frigate book Any good details for those of us building sloops, like the Swan class line of ships?
 -
Take a look at the Proxxon DB250. I used it on my Badger and really liked it. It was very well made, stable and easy to use. I sold it after getting my hands on a Sherline, but if you are planning on staying with wood turning, I don't think you can go wrong with it.
-
Hi John, you're right that I should wait until the second planking is on. Things will be fairly flimsy until then. I'll probably pre-cut the bulkhead uprights to make removal easier. I'm a little torn as to whether to color the bulwarks or not. A lot of the models in the NMM have red painted bulwarks, which I think looks very nice. I have a couple of stains from General Finishes that look pretty nice on walnut - I believe they are Cinnamon and Empire Red. On the other hand, I'm hoping to have as few colors as possible - right now I'm looking at pear, ebonized pear, and boxwood, so red would be a fourth color to add to the mix. Another option I've considered is using walnut for the carriages and deck items, and oiling it. I kinda like the look of darker deck items (like the hatch coamings) against a lighter deck. One thing I'm really hoping to avoid is scratching the gun carriages out of a new wood just for consistency sake - so, I'd probably want the deck items and/or inner bulwark planking to be consistent with whatever I did for gun carriages. That's a really nice picture. The way the stern looks, it could very well be the Unicorn with those windows
-
Hi Ian, I agree with you on what seems to be a big safety issue. That's one thing that has always made things unsettled for me regarding Chapman's plans and the raised quarterdeck. I couldn't find any other ships that had open portholes like Chapman's Unicorn. And ships that did have a raised quarterdeck either had solid bulwarks or a rail. As a result, I thought there might be a bit of detail missing from his plans - kinda like how the two Lyme plans differ in what details are shown.
-
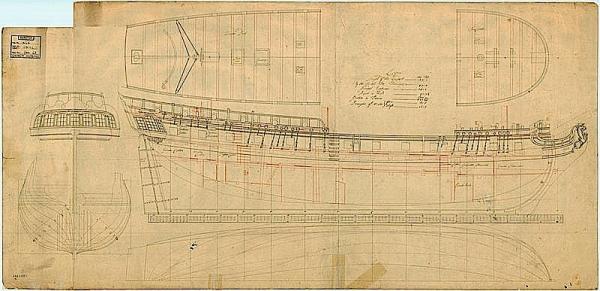
Do the Chapman plans show the mizzen below the rail? Looking at the link below, I can see where that is the case on the upper ship plans, but not on the Unicorn plans below. Not that Corel has it right or anything, but Corel has solid bulwarks around the portholes I thought? Looking at the Lyme plans, however, I see what you mean by the mizzen extending below the top rail. That's a very cool look, as you can see more of the details from the profile like the capstan. Interestingly, it also looks like the second of the profile plans shows what might be posts for the swivel guns. Looking at the second of the profile plans, it looks like the portholes have vertical frames to either side to support them - for a minute there, I thought they must have discovered levitation back then Supporting the portholes with vertical frames should make it much easier to add the portholes - I was a bit nervous as to drilling holes of the proper orientation into the bulwarks to cleanly fit the portholes. Thanks for the picture of the Lowestoft. It's one of my favorite models on the NMM site. I love the way the railing looks! Hmm, maybe this is all telling me to go with the Lyme? How do I go about changing the title of my build log?
-
Ian, thanks for the pic on the lateen rigging of the mizzen. I remember you mentioning this a while back, but this picture is very helpful. John, feel free to borrow away if there is anything that works. That's what's been great about these forums. Frankly, I think I would still be working on my Badger and less far along the learning curve if MSW and all my friends here weren't around I think you've diagnosed maybe what is a subconscious desire to procrastinate on the build. I feel like I've done so much planning and thinking the past few months will little to show for it. Last night felt really good in actually moving the build along. Kester, thanks very much for the kind words. I'm glad you enjoy reading my log. Sometimes I feel like I am a bit wordy and with a tendency to point out issues and questions, rather than posting progress with pictures to make the log interesting Hopefully now that a lot of the planning and structural issues are mostly resolved, I can starting making some progress.
-
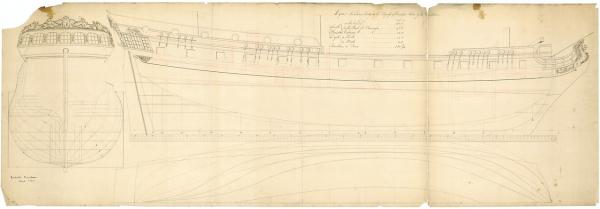
Hi Ian, thanks for the thoughts. A collateral benefit of going the Lyme route and having a unique build is that my build won't be compared to the gorgeous Unicorn builds out there I did see that about the external differences. The rails might be slightly different, with the ends of the railings on the Unicorn slightly more decorative. Interestingly, it looks like big middle stern gallery window might pop up onto the quarterdeck, or end just at it. Also, in the two profile plans, the second has what looks like two portholes in the transom, whereas the first plan, from the transom decoration, doesn't look like it would accommodate two portfolios. On the plans below, do you know what the rail looking thing is that extends above the transom in the stern view? It looks like railings, but I think the bulwark sides of the quarterdeck are solid given that the portholes are shown.
-
The beakhead is probably the only reason that I'd stick with the Unicorn. Unfortunately, the "Lyme Class" only consisted of two members - the Lyme and the Unicorn. The design was successful however, and there were a number of close descendants of the class, including the Guadaloupe and the Pandora. You can probably build any of those ships off the Corel kit with relatively few modifications.
-
Hi Jason, Going with the replacement is a good idea. I know some people are able to use the soaking and weighting technique, but I would be very nervous that the keel would have a tendency to warp over time. If you pay good money for a kit, the least you should expect is a flat keel in my opinion. Glad to hear that Caldercraft is standing by their product. Interesting on the by air versus by sea results. On my Unicorn, I bought a couple of sheets of plywood from Micro Mark to cut out a new keel. Both the sheets, even at 5mm, were significantly warped, worse than the kit keel. I then bought a package of 5 sheets from Hobbylinc (maybe Revell brand, I forget), and 3 of the 5 had a decent sized warp to them, and really only one was workable. MDF might be a better way to go.
-
Thanks Ian. So far everything is working out nicely, but before I get too excited, I have to see how well I pull this all off I posted this on my Pegasus log, but I thought I would post it here as well to get your thoughts and thoughts from others that have been following my Unicorn log. Recently, I've been strongly considering building this kit as the Lyme, rather than the Unicorn. There are a few reasons for this: (1) the stern and galleries would be much easier to execute from scratch I think, and in my opinion, look nicer than that of the Unicorn; (2) the figureheads would take about the same amount of carving and skill, and (3) the quarterdeck bulwarks would be easier to execute with the full portholes, and again, would probably look nicer than the Unicorn. There are some minor differences like the railings, but I think the main consideration is whether I want to build a ship with a beakhead bulkhead (the Unicorn), or go with a rounded bow like the Lyme. I think the beakhead is a cool feature, but I'm not wedded to it as the stern transom and galleries, and the figurehead, are all more interesting to look at. Just curious what you and others think on this change of plans. I still have a little time to think about it, but probably need to come to a decision before the first planking so that I can frame out the rounded bow if I went the Lyme route.
-
Ian - with the amount of crisp detail on the plans, I might look into buying the Lyme plans. Since I'm pretty much scratch building most of the Unicorn anyway, recently I've been considering converting the Unicorn to the Lyme as: (1) the stern and galleries would be much easier to execute from scratch I think - and in my opinion, look nicer than that of the Unicorn; (2) the figureheads would take about the same amount of carving work and skill; and (3) the quarterdeck bulwarks would be easier to execute with the full portholes, and again would probably look nicer than the Unicorn. There are some minor differences like the railings, but I think the main consideration is whether I want to build a ship with a beakhead bulkhead (the Unicorn), or go with the rounded bow like the Lyme. I think the beakhead is a cool feature, but I'm not wedded to it. If you had the choice, what would you do?
-
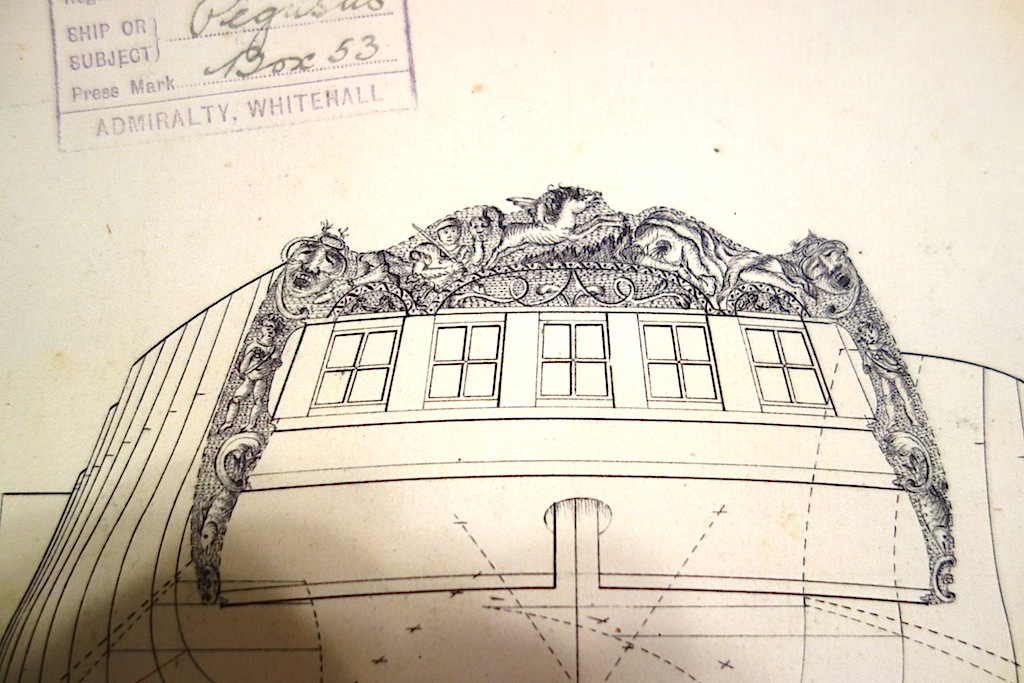
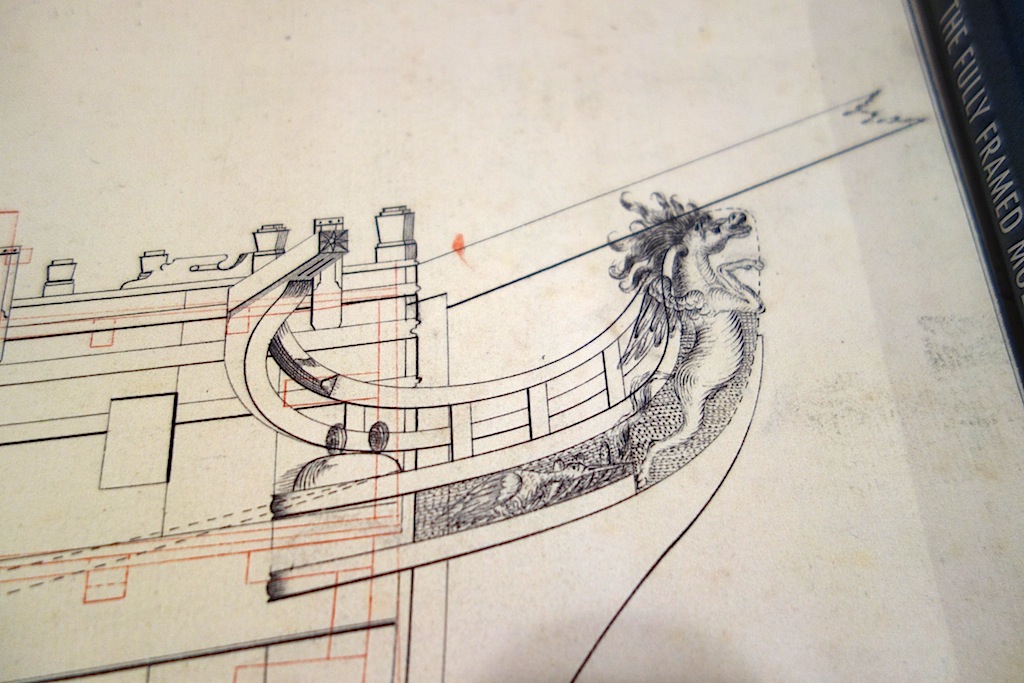
B.E., thanks very much for the recommendation on the plans. They are gorgeous like you say. I'll probably frame mine as well after my build is completed, so if the model stinks, at least I'll have nice artwork that people can look at I'll have to take a closer look at the stern carvings. I remember reading about your concerns over the Norman knights. The figurehead to me looks really wild - I might have to start practicing carving now, so that in a few years, I can carve something similar. Alistair, the plans are really fantastic. I'm not sure what they are printed on, but it's sort of a laminated paper so they are very sturdy. As B.E. notes, they are of nice decorative quality as well and can be displayed as artwork -- although, take my opinion for what you paid for it as my sense of what is "art" isn't all that great I remember seeing someone post the Fly plans on here, and they looked to be just as good as the Pegasus plans.
-
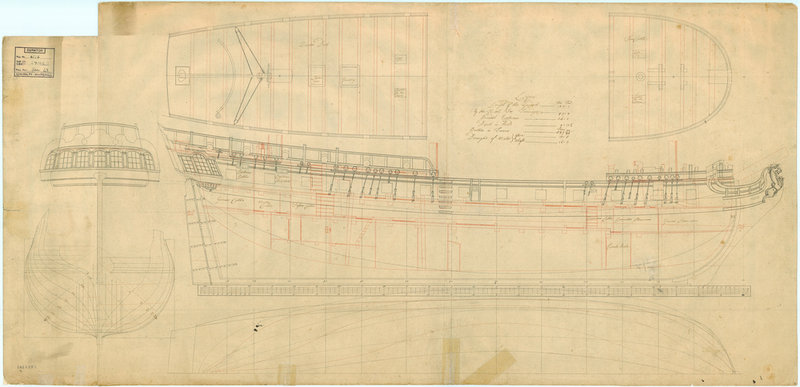
A little present arrived in the mail today - plans of the Pegasus from the NMM! The plans are really gorgeous and show a lot of detail. I know some people had some issues ordering plans from there, but my transaction went very smoothly. Interestingly, the stern figures as well as the figurehead are quite different than the kit. Not sure what that means for my build, but the figurehead looks pretty wild relative to the kit figurehead. Don't mind my toes in the first picture


-
Very nice work Mark. This is going to be a beauty
-
One point of caution for future Unicorn builders -- make sure you check the symmetry of your bulkheads. The bulkheads are not laser cut, and a couple of them were not symmetrical. So, I used my disc sander to get them in better shape. It's another very annoying thing about this kit. Not only are the plans off, but the bulkheads are not symmetrical
-
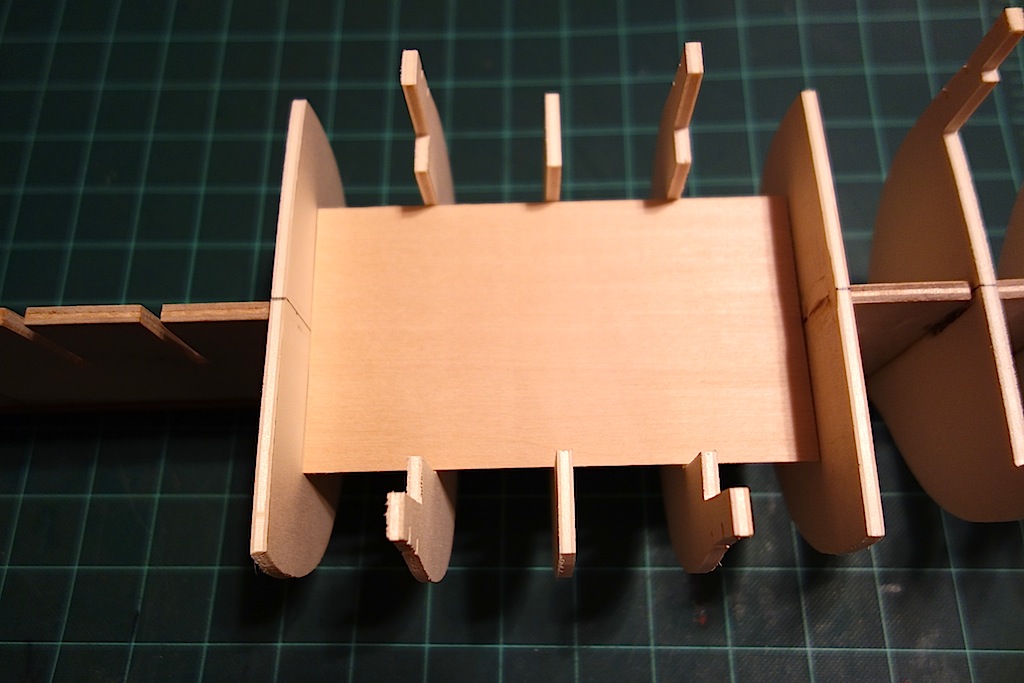
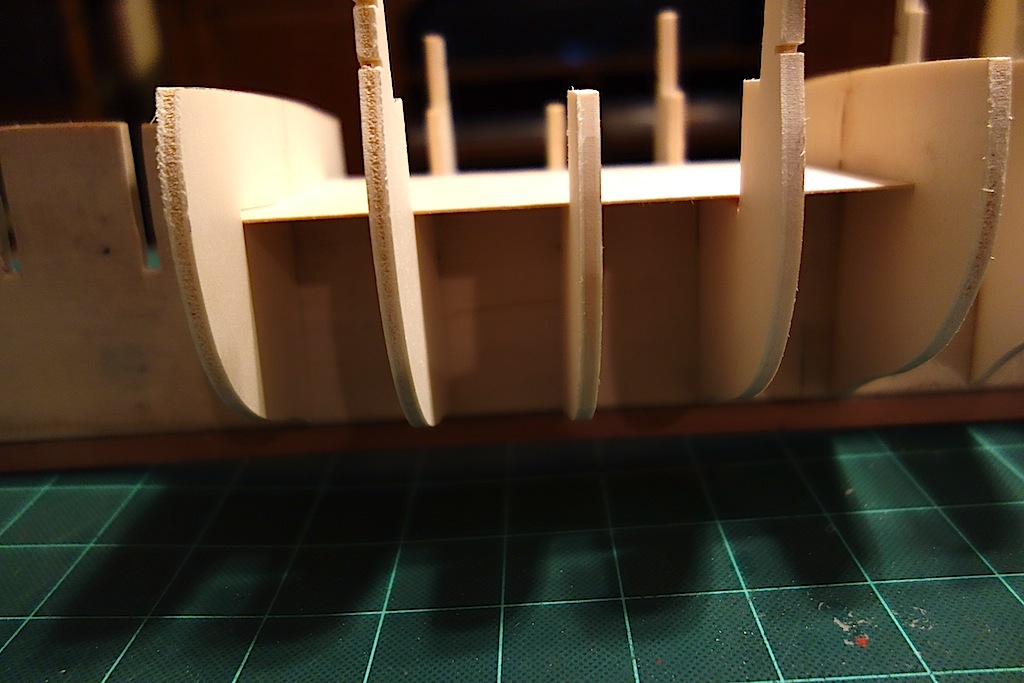
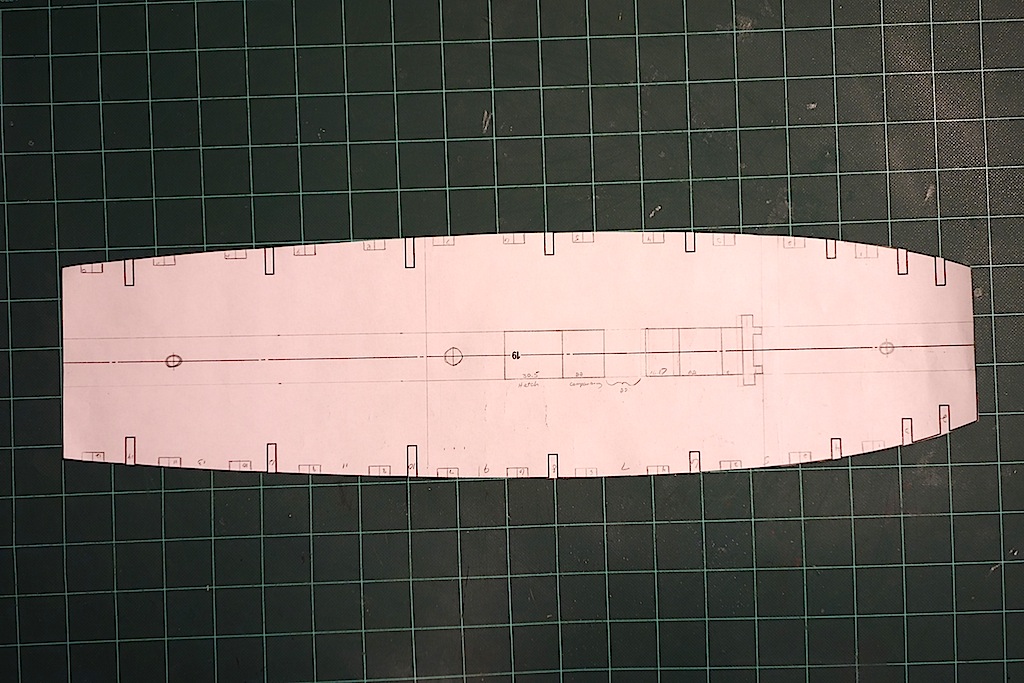
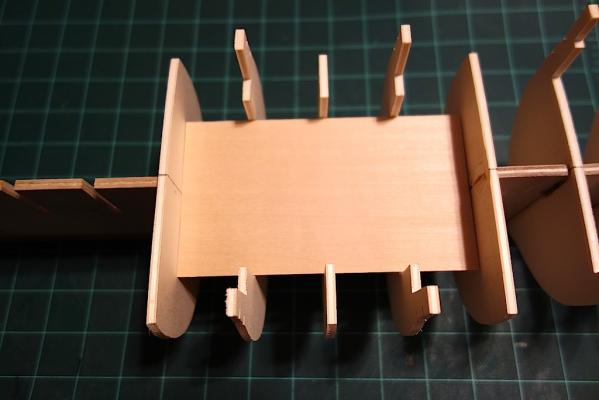
With the modified upper deck waist area to include companionways, I needed to build a sub/false lower deck. This meant cutting out a section of the keel where I could drop in the lower deck. ZyXuZ did something very similar on his Unicorn build. Based on my planned arrangement for the waist area, the area between bulkheads 5 and 9 needed to be removed. After marking out the section to be cut, I used a Dremel with a cut-off wheel to remove the sections of the keel. The only difficulty i ran into was the fact that I had already glued in bulkhead 5. It was a pretty easy fix in that I got as close to the after face of the bulkhead with the cut-off wheel, then used a sanding drum on the Dremel to remove the remainder of the keel that was along the bulkhead's after face. I then used my scroll saw to cut out a profile into bulkheads 6 through 8, cut out a lower deck template, and used my thickness sander to get the template thinned down. Here is what the assembly will look like after dry fitting the bulkheads and the false deck template. I'm adding frames that will sit along the after face of bulkhead 5 and fore face of bulkhead 9 to help seat the deck template (not pictured).


-
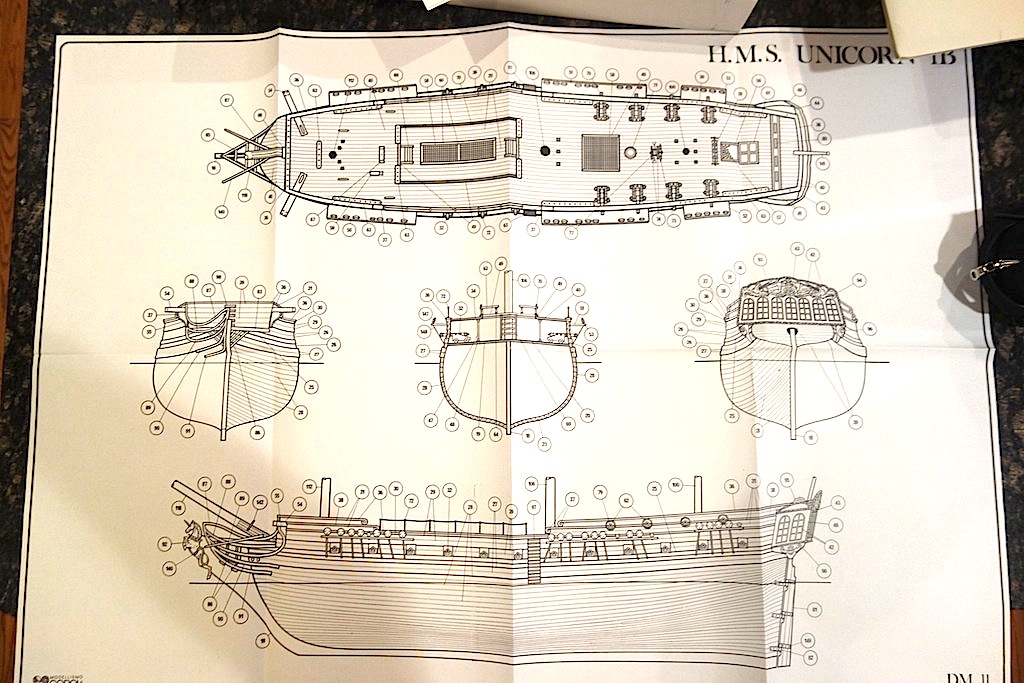
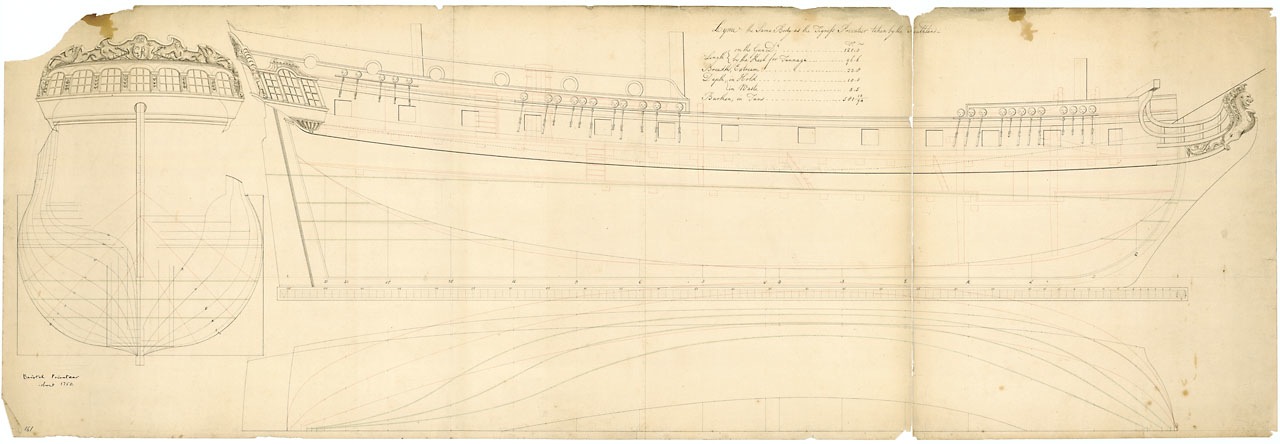
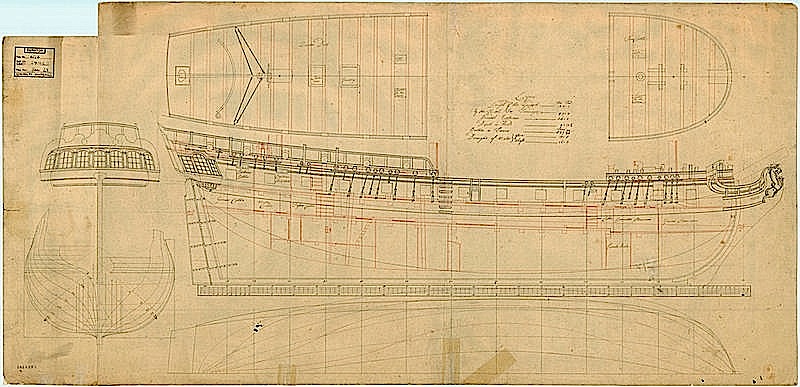
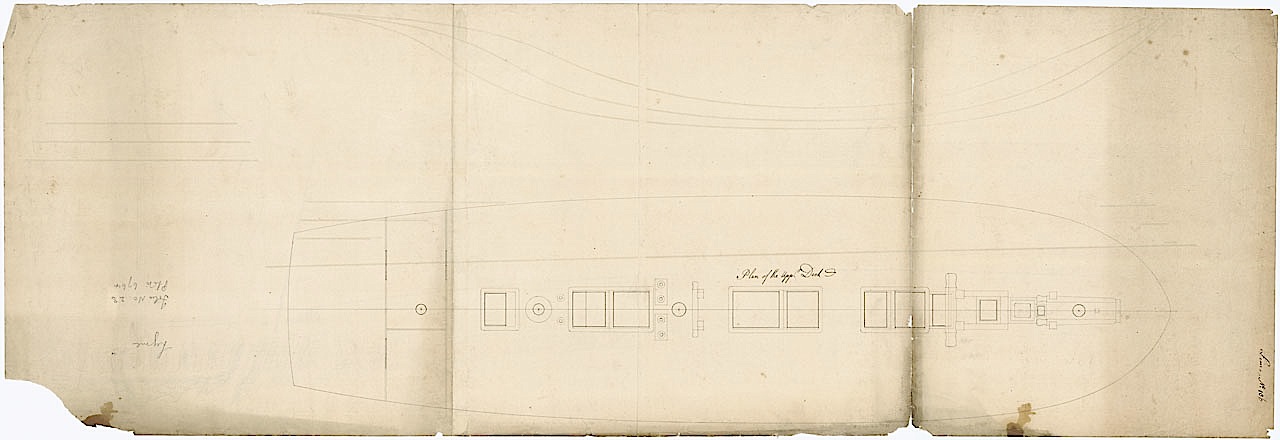
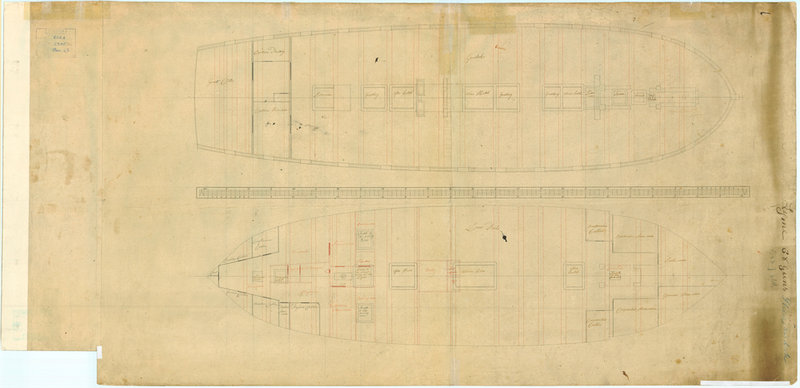
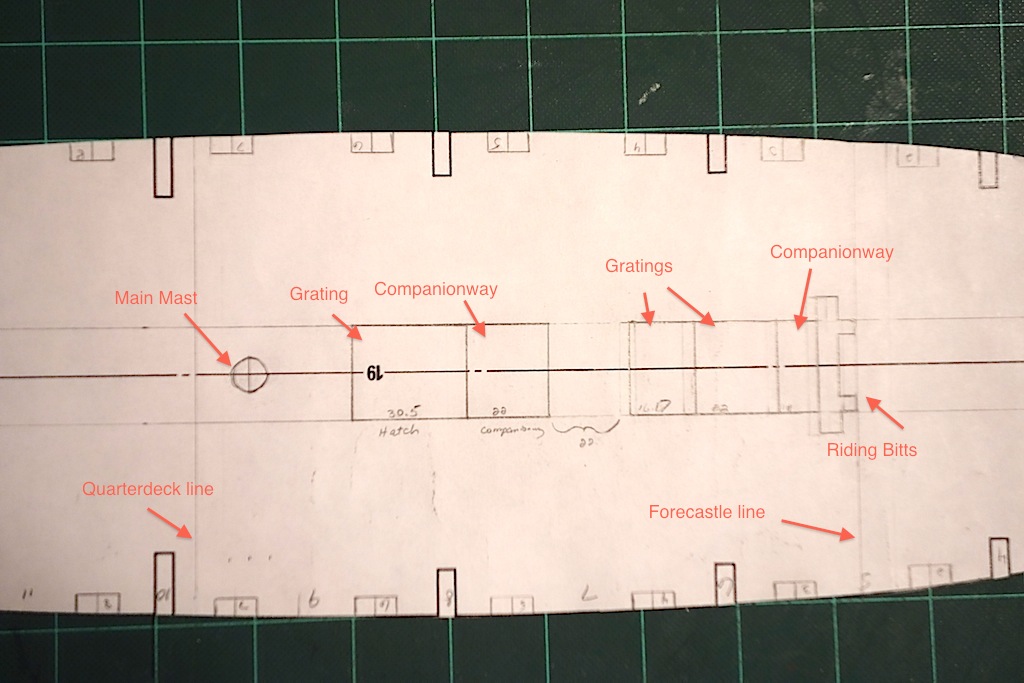
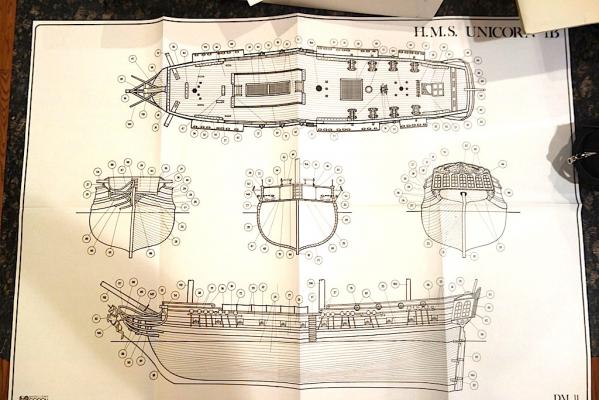
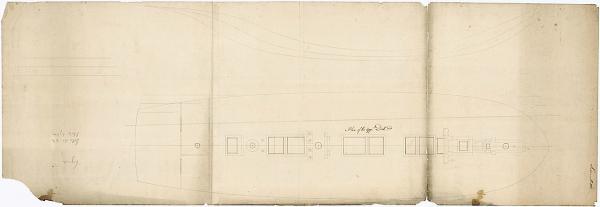
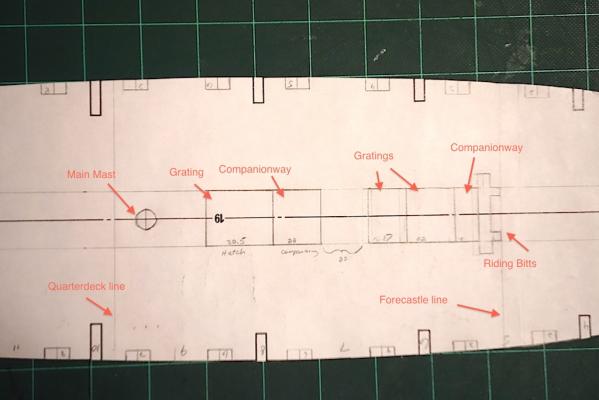
I spent time this weekend planning out the waist area of the upper deck. The kit plans call for a narrow waist, with two sets of double gratings in the middle of the waist: After researching and conferring with my fellow Unicorn builders, the consensus is that the waist on the ship should be a lot more open. That means reconfiguring the hatches and companionways. Thankfully, plans of the Lyme, the Unicorn's sister ship of the Lyme class, are on the NMM site and provide plenty of detail. Also very helpful is the fact that these plans are very close to the Pandora plans, that can be found in the AOTS book. One interesting thing to point out is that on the second set of plans below, the plans show the tiller on the quarterdeck, which means that Ian was spot on as always in saying that the tiller had to be on the quarterdeck. So, here is where I came out on the waist area of the upper deck. Essentially, moving aft from the riding bitts, you have a a companionway and two gratings, followed by empty deck space, and then another two gratings. I still need to add the various deck items around the main mast, but you can see the general configuration. Interestingly, there's a very steep set of stairs just aft of the riding bits on the Lyme plans. The Pandora omits this set of stairs, but adds them one level lower (lower deck to orlop deck). On my plans, I've drawn the gratings with a width of 25mm, which was shamelessly borrowed from Ian's deck calculations (he I believe used 24.5, but I rounded up). The width might change slightly depending on how the coamings line up with the deck planking. In terms of their length, I scaled up the Lyme plans as best I could. As I mentioned earlier to Ian, surprisingly, the Corel plans actually matched up with the upper deck template. Even more surprisingly, in scaling up the Lyme plans and drawing the gratings and companionways onto the Corel upper deck template plan, the Corel plans seemed to be actually quite accurate relative to the Lyme plans, as well as the plans for the Pandora and the Guadaloupe, close descendents of the Unicorn.

-
Very nice work Bill. Amazing progress given that the build was dormant for 21 years
- 335 replies
-
- 1
-

-
- Constitution
- Mamoli
- (and 3 more)
-
Really amazing work Richard. Thanks very much for sharing. I hope my fifth build looks as nice as your first
- 227 replies
-
- 1
-
-
- syren
- model shipways
- (and 1 more)
-
Very nice work Peter. This is bringing back flashbacks of when I added sails to my Badger - some good memories, some not so good What I remember is how much time all this detail takes to do, and yours came out very nicely. I'll have to try out your approach when I add sails to my build. Alistair, I'm a big fan of adding sails. With your attention to detail and precise work, your Fly would look fantastic with sails. It took me a lot of time to research and experiment adding them to my Badger, but I think it was all very worth it if not for the aesthetics, but also to better understand how sails operated.
- 431 replies
-
- 1
-
-
- pegasus
- victory models
- (and 1 more)
-
Hi Denis, very very nice work on the sails. Having gone through sailmaking on my Badger, I know how much time and effort it takes to add them to the model. I love the look and color of them - very well done! Can you also send me a PM of what material you used? I used the thinnest cotton fabric I could find at my local fabric shop, but it was probably a bit too thick for my liking.
- 555 replies
-
- 1
-
-
- sovereign of the seas
- mantua
- (and 1 more)
-
Hi John, very nice work on the galleries. They came out very nicely and look much better than the cast metal parts. I'll be very interested to follow your work on installing the false deck. I haven't quite figured out how, and in what way, I want to raise/re-angle the quarterdeck on my build. Since I'm planning on avoiding paint but will likely stain the bulwarks and cannon carriages red, I'm worried that the color on the walnut (bulwark planks and cannon carriages) won't match the color on the plywood uprights that serve as support for the quarterdeck frames -- so I will have to remove them anyhow. What I'm thinking I'll do is install the bulkheads as per the plans, add the first planking, then remove the uprights and replace them with walnut uprights to serve as the new supports. I can build the walnut uprights to the proper height to raise the quarterdeck level, which hopefully should do the trick. If you're interested, I spent some time studying the Chapman plans and came up with new upper deck and quarterdeck lines at the post below. The only modification I would probably make to my diagram is to run the line of the two decks closer to the Corel plans from about the last gunport to bulkhead 16 -- essentially to keep the upward sweep of the decks as you move towards the stern. http://modelshipworld.com/index.php?/topic/6223-hms-unicorn-by-landlubber-mike-corel-scale-175-1748-1771/?p=202411
-
Love the floor and great cabin Augie. I better not show my wife or she may ask me to hire you to put in new floors in our house
- 2,191 replies
-
- 1
-
-
- confederacy
- Model Shipways
- (and 1 more)
-
Hi Kester, thanks very much for your thoughts. I was hoping that you would weigh in In terms of the companionways versus the hatches, I'm fairly certain that the two I identified are the companionways. I used the highly scientific approach of opening both pictures on my computer, put one on top of the other, and expanded them until the masts lined up. Then used a piece of paper as a straight edge to draw a vertical line from the stairs to the respective openings All that makes a lot of sense, and is what my other go to person, Ian, said The two companionways seem a bit awkward, but with tight quarters, nothing should surprise me I suppose. The Unicorn was also based off a French ship (the Tygre), so maybe that explains things as well You are indeed correct that the Pandora and Guadaloupe were later designs off the Lyme class. Thank you!