Landlubber Mike
-
Posts
4,544 -
Joined
-
Last visited
Content Type
Profiles
Forums
Gallery
Events
Everything posted by Landlubber Mike
-
 Thanks for the reminder SpyGlass. Before gluing, I do plan to cut the rabbet, sand the bearding line, and add the mounting points For the bulkhead extensions, don't the ones on the upper deck serve as supports for the beams for the quarterdeck and forecastle?
 -
That's very interesting SpyGlass. It almost looks like the blonde 5mm sheet (I don't think it is ply) that I got might be for the Fly (assuming that the Pegasus and Fly have the exact same parts). The quality of the 5mm sheet looks very good relative to the other two types of ply sheets. For whatever reason, I think the other ply sheets are all 1.5mm thick - makes me wonder why Amati mixed and matched color tones with my kit? Looking at your last picture, I'm surprised how well the colors matched up. Tonight I will put the planking strips against the 5mm sheet. By the way, the MDF keel, lower deck and bulkheads fit together like a glove. I dry fit the assembly last night, and I almost feel like I can dry fit the bulkheads and glue the lower deck on top and call it a day - the assembly really fit perfectly and solidly, almost to the point that you don't need any glue at all. One thing I'm beginning to realize might cause me some angst in painting with wood is dealing with the bulkhead extensions. I am going to have to cut them off at some point and replace them with different wood. The question is whether to do that now, or wait until after the exterior is planked and then break off the extensions and replace them. I'm thinking that the first option would be easier in the long run.
-
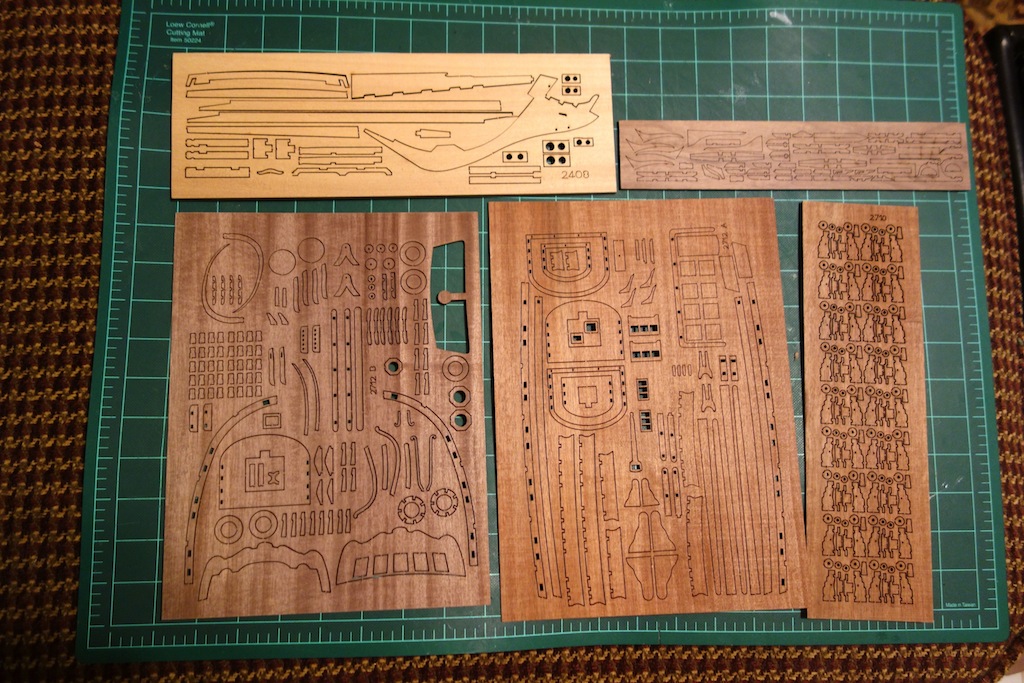
Thanks very much guys. I took a closer look at the walnut strip last night, and it actually looks pretty good - much better quality than the walnut strip I used on the Badger. Since I plan on coppering the hull, I can select the strips I want for the upper hull so the variation is less of an issue. What is annoying is that the 5mm sheet (upper left corner in the first picture) contains the stem post and rudder, each of which have exposed wood sections that won't be colored or coppered. The wood is so blonde, that it would need to be replaced. But in replacing it, I might then need to replace the upper hull planks so that there is a match. Thanks very much for the kind words Clare. I agree that pear is very nice! I'll have to look up your Higaki Kaisen - did you post photos of it? BE, thanks for your thoughts. It's good to hear that the walnut held up well. The strip wood looks very good in my kit, so maybe I'll just stick with it and replace the walnut pieces on the sheets that are the off colors that I intend to leave natural. I'm still working out the color scheme on the masts. I'm thinking of maybe using boxwood for the lower sections and maple for the upper sections. It looks like the lower masts on the ship might have been painted yellow, so boxwood might work out nicely. The alternative would be to use walnut or pear (whichever is used for the upper hull planking), and then maybe maple for the upper sections.
-
If you wrap it around your finger, the coils will start out way too big. That's why I used a pin when making my coils. In terms of the tie offs, I think you have to remember that for running rigging, the line was a working line so I imagine that you would want extra line so that you could properly secure it, have extra lengths for when you need to release the line, etc. That being said, I think I tied off some of my rigging to the strops at the mast tops.
-
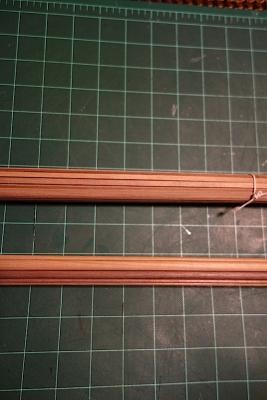
For people thinking of the Pegasus, here's an idea of the color variation in the kit walnut: Variation is fine if you are painting or otherwise like that sort of thing, but if you are trying to go with a matched natural color, it is a bit problematic. Hence my dilemma of what to do. I might see if when dyed/stained black, the walnut all takes the same color. If that's the case, then I probably won't have to replace as many of the parts.

-
Ugh, that's disappointing to hear Spyglass. Maybe I just need to plan to replace all the walnut. I was hoping I could get away with dying/staining the black stuff and it would be fine, but maybe I should plan to scratch the various items. I was hoping to avoid that, but since I didn't pay retail for the kit, I don't feel as bad replacing the kit wood. Jeff mentioned that some folks might not like the look of a tight grained wood like pear or boxwood against a loose grained wood like walnut. I didn't really consider that, and maybe I should just stick with pear. I was thinking of doing something a little different than the Unicorn, but it's really hard to beat pear for color, grain and workability.
-
Hi guys, thanks very much for your thoughts on using walnut. With the curves on the Pegasus, maybe it's not a good idea to use it for the hull planking. Hmm...I'll have to think a little more on this. Maybe I should stick with pear, which i have really enjoyed using thus far.
-
I've been giving the wood/color choice some more thought the past couple of days. I've been trading emails with Jeff at Hobbymill, who has been incredibly helpful and generous with his time. I mentioned before that my Unicorn will be primarily pear with boxwood decks and accents, so I'm looking to go with a different scheme with the Pegasus to keep things interesting. I'd still like to go on the darker side, so I think I'm going to stick with walnut as the primary wood for the model - hull planking, deck items like hatch coamings and companionways, etc. Given the large color variation and structural issues with the walnut ply in the kit, I'll probably just replace some/all of the kit wood with walnut from Jeff. As for the deck, after seeing this picture of Jeff's walnut against Jeff's maple from Len's Bellerophon log, I'm sold on maple for the decking: Other colors and wood choices: -- boxwood will be used for some of the rails, and likely some of the accents. -- I'm still deciding on whether to go with red for the bulwark planking and some of the deck items. If I do, I think I might try using redheart, which looks like a gorgeous wood. -- rather than painting the photo-etched windows white (I'm not a fan of white paint on models), I will probably replace them with scratch built windows made of holly, and use holly for the planking on the small boats as well. -- the photo etched decorations will be painted in a burnished gold/bronze color. This brings me to the masts. Does anyone have any suggestions on what I could use? With the wood I'm planning to use, I think I have four options: -- walnut for entirety of masts -- walnut for lower sections, maple for upper sections -- walnut for lower sections, boxwood for upper sections -- boxwood for the masts, with maybe maple for the upper sections I'd like to stick to these woods just to keep a consistent color theme. I'd very much appreciate any thoughts or other suggestions.
-
While waiting for the Lyme plans to come from the NMM, I've been giving my color/wood choices for the build some more thought. I've traded a few emails with Jeff at Hobbymill, who has been incredibly helpful and generous with his time. Here is where I am at the moment: -- my primary wood on the model will be pear. The keel, rudder, stern post, and stem, as well as the hull planking, will be in pear. The wales, black planking, black background on the transom, and spars will be ebonized pear. Some of the deck fittings, like the hatch coamings and companionways, will also be in pear. -- I plan on using boxwood for the deck planking, accent rails on the hull, and possibly some of the decorations and stern carvings. -- for the bulwark planking, gun carriages and maybe some of the deck items like the bitts may be in red. I was thinking of using red stains to achieve this, but after seeing Rusty's cross-section, redheart looks like it could be a real winner here (tight grain, and apparently relatively easy to work with). That would mean scratching the gun carriages, but there are only 24 of them on this ship so maybe not such a big deal -- for the masts, I haven't figured that out. Pear would be a nice contrast with the boxwood deck, and would tie in with the rest of the build. Do folks think that pear would work? Or would boxwood be better?

-
Hi John, To add to the confusion, Le debutant (first link below) and Ollyweb (second link below) built the kit with the bowsprit following diagram 1, while the gentleman who scratch built the Unicorn (third link below) has the bowsprit following diagram 3: http://modelshipworld.com/index.php?/topic/6223-hms-unicorn-by-landlubber-mike-corel-scale-175-1748-1771/?p=180937 http://modelshipworld.com/index.php?/topic/4326-unicorn-by-ollyweb-corel-upgrade/?p=222408 http://modelshipworld.com/index.php?/topic/6223-hms-unicorn-by-landlubber-mike-corel-scale-175-1748-1771/?p=193080 Here's a link to a website that has completed models for sale. One of the ships is the Unicorn, which is almost guaranteed to be the Corel kit (and the builder has the bowsprit following diagram 1): http://www.modelships.de/Verkaufte_Schiffe/Unicorn,_Fregatte_1/Photos_Frigate_Unicorn.htm For the three NMM models, two things to keep in mind is that they predated the Lyme class (1741, 1745 and 1710, respectively) and that the Lyme class was based on the lines of a french vessel. Maybe the french had the bowsprit oriented into the bulkhead rather than the deck? Using the NMM online plans for the Lyme and projecting a rounded bow, I think my bowsprit is in the right location and orientation. If I decided to go with the Unicorn, I probably will build out the front bulkhead to extend the forecastle (which would push me further into diagram 3). Extending it 9mm may be a bit much, as the beakhead deck would shrink by a third, but maybe that is appropriate. That should be relatively easy, as all I would need to do is add plywood to the front of bulkhead 1 (which I could base off of the templates for bulkhead 1). Then, depending on where the bowsprit should enter the bulkhead and/or deck, I could raise or lower the deck appropriately. It will be interesting to see what the Lyme plans show, thought now that I think about it, with the rounded bow the plans might not be all that helpful. Nice work on the shifting of the quarterdeck. Look forward to seeing how it all comes out. I also like the railings/gun positions in the second frigate as well. Just out of curiosity, I guess that means that you wont include the portholes?
-
Micro Jig Gripper
Landlubber Mike replied to Landlubber Mike's topic in Modeling tools and Workshop Equipment
It looks like the guy here at the 1:30 mark is using the gizmo on his hobby table saw: So it looks like with the 1/8" attachment you can cut very thin stock down to 1/8"/3.12mm. That seems like it would work very well for cutting most scale planks in our hobby. It's not cheap, but I might give it a try. Working with the table saw really makes my back end pucker up, so this might help for most table saw jobs. -
John, sorry to have not seen your post until now. For some reason the notifications function for new posts on builds I'm following doesn't work. I'm actually even sorrier for seeing your post now, as this brings up a traumatic memory of when I realized the discrepancy one late evening a few weeks ago. Ian had pointed it out, but I think I didn't fully appreciate what he was getting at at the time. But, this was particularly highlighted when I realized by trying to place the keel and bowsprit on the two main plans that the plans are not consistent and that there was a question of the bowsprit orientation/location (though, I think Corel has the angle of the bowsprit correct). The short answer is that I don't know whether the bowsprit on beakhead ships goes fully through the beakhead deck, the bulkhead, or somewhere in between, as my research from books came up empty. Corel seems to be at diagram 2. As Ian points out, moving the bulkhead forward would put the arrangement closer to diagram 3. Chapman seems to have the bowsprit fully through the bulkhead as in your diagram 3, though it's hard to tell with the headrails in place. On the other hand, if you take a look at my log at post 118 (linked below), I think the beakhead models suggest that the bowsprit is going fully through the deck as in your diagram 1. http://modelshipworld.com/index.php?/topic/6223-hms-unicorn-by-landlubber-mike-corel-scale-175-1748-1771/?p=208269 What I did was closer to your diagram 2, which even when the deck and the bulkhead are planked, the bowsprit will intersect both the deck and bulkhead. Without really thinking that Corel could be incorrect (shame on me), I lined up the keel with one of the plans, lined up the bowsprit, drew a line into the keel and noted its intersection, and shaved off that corner on the keel. From a structural standpoint, I wonder if that configuration would have been very stable. I probably have a few more options than you do given where I am with the build, but I'll let you know what I'm thinking. Of course, I'm a bit stuck now that I glued on the stem extension onto which the bowsprit rests. If diagram 3 is the right answer, I can build a new bulkhead one to push the forecastle a little more forward for consistency with Chapman as Ian points out, and I can drop the beakhead deck a bit so that the bowsprit sits fully above it where it enters the new bulkhead. If diagram 1 is correct, then adding a new forward bulkhead is probably not an option and I don't think I can move the deck higher or bowspirit forward, so I'm probably out of luck. Of course, all this discussion is moot if I decide to build the Lyme, which has a rounded bow In any event, I should have the Lyme plans in next week, and hopefully the bowsprit location will be clear on the plans. I'll pass that info along as soon as I get it. By the way, for what it's worth, I was planning on locating the fore mast a bit forward of where it is on the Corel plans to get closer to Chapman.
-
Micro Jig Gripper
Landlubber Mike replied to Landlubber Mike's topic in Modeling tools and Workshop Equipment
Jud, it's 7"x4.5"x4.5", so it will take up quite a bit of the Byrnes table. I don't know if this is a problem or not. Otherwise, from what I can tell, it looks like it's adjustable enough to work with wood on the scale that we use in this hobby. Maturin, I think you're right that you can probably build something very similar on a smaller scale. -
I'm getting close to the point of cutting strip wood on my Byrnes table saw, and have been looking into ways to improve the safety of how I operate it. One thing I came across recently was this Micro Jig Gripper system. Has anyone used it on a hobby table saw? There is an attachment that allows you to cut strips as thin as 1/8" (second link below). It gets very good reviews, and seems like a very good safety option. http://www.amazon.com/Micro-Jig-GR-100-GRR-Ripper/dp/B001I9UNWC/ref=sr_1_5?s=hi&ie=UTF8&qid=1406298396&sr=1-5 http://www.amazon.com/dp/B003E65XXQ/ref=wl_it_dp_o_pC_nS_img?_encoding=UTF8&colid=Q98WCH1760LZ&coliid=IHRUH9PG7315D It's not cheap, but if it saves my fingers, it seems worth every penny.
-
Very nice work Ian - the details are coming along very nicely. One thought on the figurehead and transom decoration. Have you considered using washes for low lights and dry brushing a lighter color for highlights? That might make the decorations pop a little more. For what it's worth, Chris passed along his technique for painting items to match boxwood - a technique he got from Chuck: Basically the formula for painting to resemble boxwood is a 50/50 mix of Raw Sienna and Yellow Ochre as a base coat. You then go in with light washes of Raw Sienna mixed with a touch of white for your low lights and Yellow Ochre mixed with a touch of white for your highlights. Use several washes to give the piece dimension. Then apply Minwax Golden Oak - allow to get tacky for about 30 minutes then brush off. Repeat if necessary
-
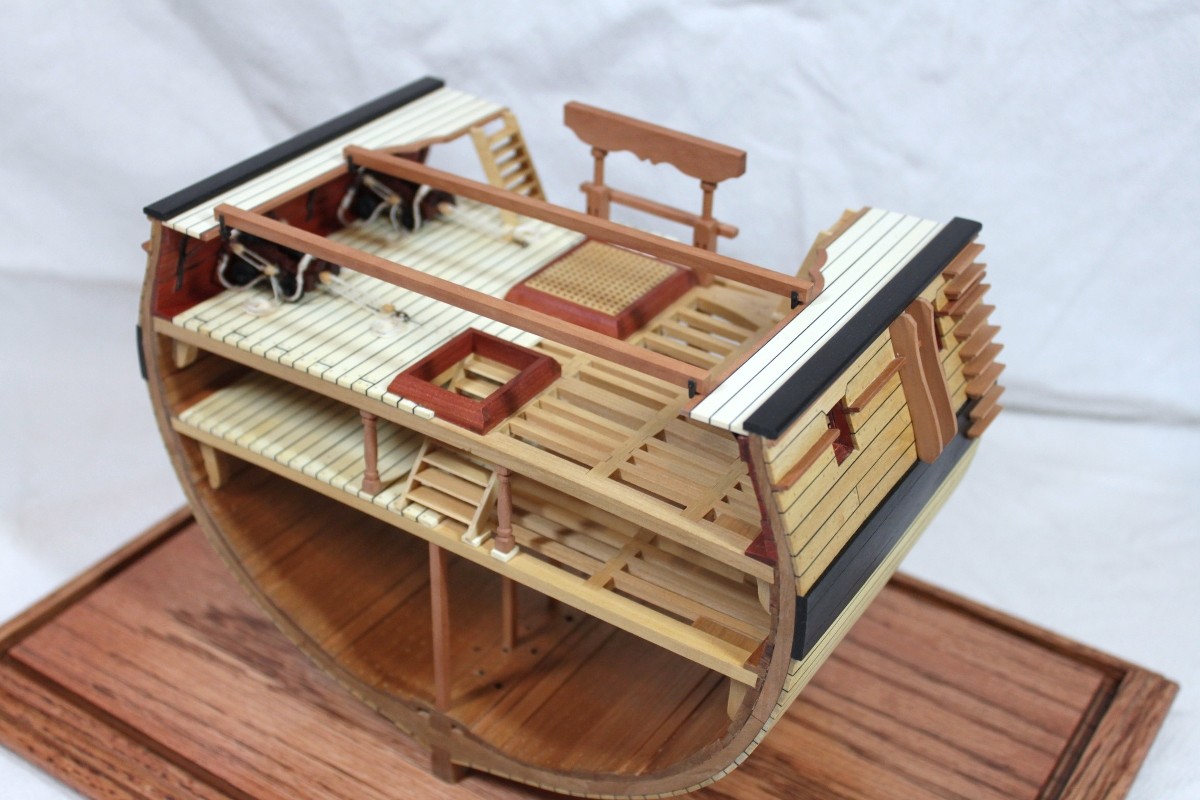
Thanks Martin. I figured I would try it out to see if it could be a viable option. I think the stains look pretty nice, but after seeing Rusty's cross-build this morning where he used redheart, I'm strongly considering taking a look at using that wood instead. Hope Rusty doesn't mind me borrowing his pictures. First picture below is from Rusty's log - redheart strip against bloodwood gun carriage. Second is his completed cross section, where he used redheart for the coamings and bulwark planking.


-
Hi Spyglass, I definitely won't get red for sure, particularly on a dark wood like walnut. Probably the closest I got to a red ochre color was using the Empire Red on the plywood and the pear. I really don't want to go down the path of scratching the gun carriages out of a lighter material, so I think I'm stuck working with a darker wood for the rest of the reddish areas. I'm actually fine if I dont get the full red look - a "warm deep brown" with a hint of red would make me very happy. I think either of these two stains get me there.
-
Hi Alistair, very good question. I guess for me, I value the beauty of the natural wood -- oiled, stained, or otherwise -- and the character that comes with it, over keeping things in scale. When I look at my Badger, I love the look of the walnut and tanganiyka that was oiled with tung oil. I also like the masts that were from birch dowels that were treated with a walnut stain. The painted sections on the other hand just dont look like they go well with the natural wood sections. Those sections almost seem plastic or artificial compared to the unpainted sections. The red ochre and black weren't bad, but the white really bothered me. It's quite possible that maybe I would have a different opinion if I could paint like you, Chuck and the other excellent painters on here. But, another reason I'm looking to avoid paint is that I prefer a darker overall hue to the model (the main reason I'm going with pear over boxwood for the bulk of the model), with a sort of "patina" (for lack of a better word) as you see with old models. In those models, sections are not necessarily perfectly uniform in color, but you have highlights, lowlights, etc. Stains can get you that look a lot easier I think than painting. Plus, the woods I tested the stains on had a relatively tight grain, the stains didn't really make the grain stand out all that much. It all comes down to your sense of aesthetics I suppose, and how you, as an artist, want to present your model.
-
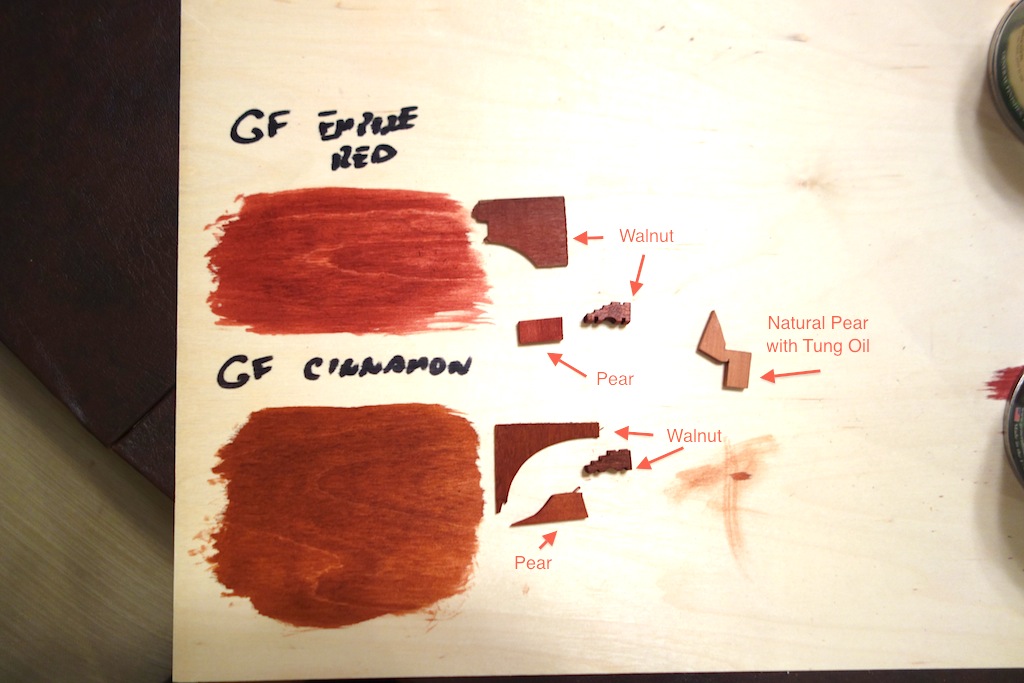
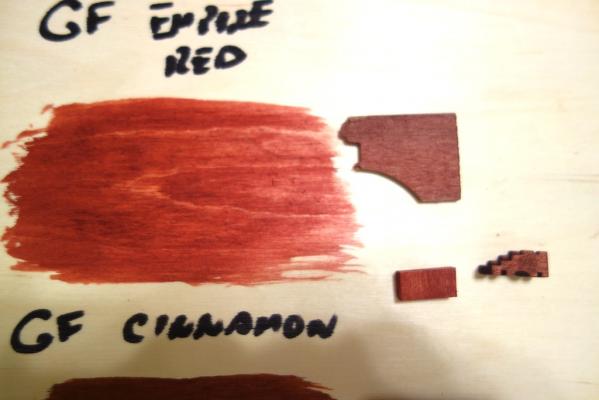
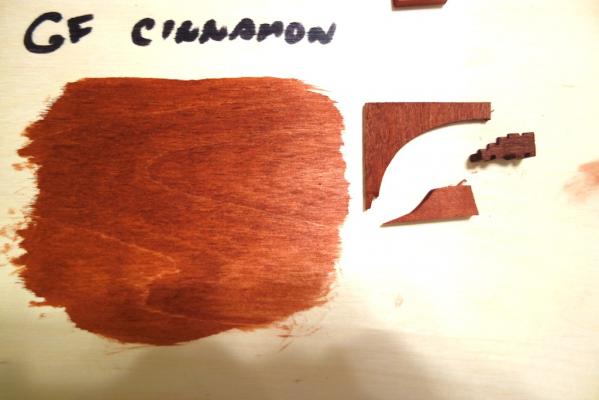
I posted this on my Unicorn log, but thought I'd post here as well. Tonight I tried out a couple of reddish "dye stains" from General Finishes as possibilities for the bulwark planking, gun carriages, and maybe some of the deck items. The colors are Empire Red and Cinnamon. I took some pics, but it's always a bit tricky to get the colors in pictures to match the real life hues. I got pretty close though. I first tried the colors out on some warped plywood that I had, and then thought that it made more sense to try then on scrap pieces of the actual woods I would most likely use them on, like walnut (including the walnut gun carriages in the Unicorn kit) and pear. Also in the pictures is a piece of scrap pear that was only treated with tung oil. I really like both colors. The Empire Red has a bit more red to it, while the Cinnamon has more brown to it. I probably like the Empire Red on the scrap walnut the best, but it didn't come out very well on the walnut gun carriage -- might need to pre-treat them with sanding sealer. But, I think either could be viable options if I wanted to add a red ochre-ish color to my build.


-
Good news! I received an email from the NMM today that my Lyme plans are on their way. I imagine that I should get them sometime late next week, so I can report back on how they look and hopefully, make a decision on whether to build the kit as the Unicorn or as the Lyme. In the meantime, I tried out a couple of reddish "dye stains" from General Finishes as possibilities for the bulwark planking, gun carriages, and maybe some of the deck items. The colors are Empire Red and Cinnamon. I took some pics, but it's always a bit tricky to get the colors in pictures to match the real life hues. I got pretty close though. I first tried the colors out on some warped plywood that I had, and then thought that it made more sense to try then on scrap pieces of the actual woods I would most likely use them on, like walnut (including the walnut gun carriages in the kit) and pear. Also in the pictures is a piece of scrap pear that was only treated with tung oil. I really like both colors. The Empire Red has a bit more red to it, while the Cinnamon has more brown to it. I probably like the Empire Red on the scrap walnut the best, but it didn't come out very well on the walnut gun carriage -- might need to pre-treat them with sanding sealer. But, I think either could be viable options if I wanted to add a red ochre-ish color to my build.


-
Hey Chris, Twins are exhausting, aren't they? Mine are almost 16 months (along with my 4-year old) and it takes a lot of energy for me after working a full day and coming home to my real job to get motivated to work on my model. Lately though I've found a lot more inspiration, mostly from my interactions with friends here on our builds. Plus, like Rusty, I started a second build so that I don't get too burned out on the first and step away from the hobby for months at a time like I did with my Badger. Frankly, I'd be inspired just looking at your build or even the pictures In any event, it's a hobby and like anything else, there are ebbs and flows. In the meantime, enjoy the twins! We'll be here when you're ready to get back into it.
- 290 replies
-
- 1
-

-
- confederacy
- frigate
- (and 1 more)
-
Very nice work Joe. I'll have to ask Jeff about his walnut as I'm looking for something a little darker than his swiss pear for the hull planking, coamings, etc. on my Pegasus. Glad to hear that you're impressed with the quality. Not sure what Caldercraft is doing with their walnut. The ply crumbles, and their strips were very prone to splintering. Everything else about their kits, or at least the Badger kit, was really nice to work with.
-
Hi Alistair, I was wondering about the yellowing effect on the holly. I think I want to go a little darker, so I might be leaning towards maple. I'll check with Jeff to see what he recommends. Your copper looks amazing. I plan on following your same technique - don't tell the Admiral or my kids! I just need to go to the store to buy my favorite coffee roast and I should be all set to go
-
Another question for my fellow Swan class builders - for the bulwark planking on the upper deck, do the planks go in between the bulkhead uprights? I'm wondering if I'll need to cut the MDF uprights off and install new supports in the wood I plan to use for the bulwark planking if I try to paint with wood - which will likely be using a red stain. Also, are the MDF supports visible under the forecastle deck and quarterdeck? If I have to replace some of the bulkhead uprights, I might as well replace them all, but it would be nice to be able to skip a few bulkheads.
-
Thanks B.E. I think my wife would say "too much thinking, not enough doing." Hopefully I can pull the look off - the good thing about painting with wood is that the wood does most of the work.