


Landlubber Mike
-
Posts
4,078 -
Joined
-
Last visited
Reputation Activity
-

 Landlubber Mike got a reaction from captgino in Badger by Landlubber Mike - FINISHED - Caldercraft - 1:64 - Brig
First, the clews are created and attached. I made them using 0.25mm natural thread from kit. I ended up making them a tad longer and ran them into the sail and up along the outside edge a bit farther than necessary to ensure that the clews were visible when the dog-ears were folded down. They were attached with fabric glue.
Next step was to bend the sail to the yard. I didn't take pictures while this was in process, so hopefully the following description makes sense. I used 0.25mm thread here as well. First step was to mark on the front of the sail the points where the thread would be run through the sail - I marked points 5mm apart. Second, I used a running knot to attach the line on one end of the yard. Third step was to run the line from the front into the rear of the sail, then as you loop it over the yard, run it underneath the prior line and repeat til the end. It got a bit tricky with the yard horses and blocks, but after a while you get the hang of it. Once the sail was fully attached, go back and tighten the lines by pulling the vertical line towards the other end of the yard, and down along the top of the rear of the sail.
Next step was the first fold. From the front of the sail, the bottom half was folded up so that the bottom line between the two dog ears was at the top of the sail.
Next step was to fold the bottom corners up and in, to help add more volume to the middle of the yard, and reduce the volume at the ends.
Next step was to furl the sail and attach the gaskets. From my research, when furling the sails, the sails were "gathered up" such that the sail was folded into an accordion type of pattern with the final fold up and against the top of the yard. That was a bit hard to do at this scale, so I ended up just folding and rolling the sail up from the front until it was tight against the yard. Took a few tries, which helped I think to get the cloth more relaxed to get a tighter furl.
Then the gaskets were installed. I started with one in the middle, and then added three to each side roughly evenly spaced out. These were fairly easy to do using a running knot, and then using tweezers to help tighten the furl as the gasket was tightened (sometimes with the help of some fabric glue to help keep the material furled). After a few final adjustments, the knots were sealed with diluted PVA, and then the extra lines cut off.
Finally, using fabric glue, the dog ears for the clews were bent downward and glued into position.
There you have it - the no sew method of furling sails. I spent an inordinate amount of time researching and thinking about how to do these, so hopefully these look relatively authentic. I know that opinions differ on whether sails should be attached or not, but I think furled sails add a nice touch and are a good compromise given the scale issues with adding full sails - plus, these are sailing ships after all
I think there were lines running from the clews downward which helped to keep them in their downward orientation (and probably keep the furl tight). I haven't figured out where those lines go, so if anyone has the answer, I would love to hear it
The topsails and courses will be a bit trickier, given that they have blocks for the bunt lines, and yard horses. I'm thinking that I will pre-rig the bunt lines by gluing a portion of the line into the sail to be furled, which will eventually be run through the blocks. The instructions have the line started at the block by knotting one end of the line before it is run through the blocks - I think, however, that the line is technically started at the buntlines in the sail which are run through the blocks on the yard. Haven't fully figured that out yet, so again, would love to hear from anyone with answers on how that works.
I also have to do a little more research on the spanker and jibs - the spanker should be relatively straightforward, but how to reduce the sail to remove bulk while maintaining the brail lines will be tricky. The jibs are are complicated, in that there are hanks, jib stays and travelers that need to be attached. All part of the fun I suppose
Thanks for looking in!
-
 Landlubber Mike got a reaction from Ferit in Badger by Landlubber Mike - FINISHED - Caldercraft - 1:64 - Brig
After delaying on creating the furled sails, I finally took a stab at doing one this weekend and furled the main topgallant sail. I ended up coming up with a process that involved zero sewing, aside from running the thread to bend the sail to the yard.
Hope it looks somewhat right - it's probably a tad bulkier than it should be, but I think it came out better than I expected. I'll try and detail my construction process with the next one. Thanks for looking in.
-
 Landlubber Mike got a reaction from JesseLee in Badger by Landlubber Mike - FINISHED - Caldercraft - 1:64 - Brig
After delaying on creating the furled sails, I finally took a stab at doing one this weekend and furled the main topgallant sail. I ended up coming up with a process that involved zero sewing, aside from running the thread to bend the sail to the yard.
Hope it looks somewhat right - it's probably a tad bulkier than it should be, but I think it came out better than I expected. I'll try and detail my construction process with the next one. Thanks for looking in.
-
 Landlubber Mike reacted to riverboat in Badger by Landlubber Mike - FINISHED - Caldercraft - 1:64 - Brig
Look'n good! Mike..... I'll bet you're happy to get started on them you'll be finished before you know it . Don't forget to brush them with diluted white glue when you finish shaping them.
Frank
-
Landlubber Mike reacted to texxn5 in Badger by Landlubber Mike - FINISHED - Caldercraft - 1:64 - Brig
Looks really good Mike, keep it up and you'll get em all done.....
-
 Landlubber Mike got a reaction from Beef Wellington in Badger by Landlubber Mike - FINISHED - Caldercraft - 1:64 - Brig
After delaying on creating the furled sails, I finally took a stab at doing one this weekend and furled the main topgallant sail. I ended up coming up with a process that involved zero sewing, aside from running the thread to bend the sail to the yard.
Hope it looks somewhat right - it's probably a tad bulkier than it should be, but I think it came out better than I expected. I'll try and detail my construction process with the next one. Thanks for looking in.
-
 Landlubber Mike got a reaction from ianmajor in Badger by Landlubber Mike - FINISHED - Caldercraft - 1:64 - Brig
After delaying on creating the furled sails, I finally took a stab at doing one this weekend and furled the main topgallant sail. I ended up coming up with a process that involved zero sewing, aside from running the thread to bend the sail to the yard.
Hope it looks somewhat right - it's probably a tad bulkier than it should be, but I think it came out better than I expected. I'll try and detail my construction process with the next one. Thanks for looking in.
-
Landlubber Mike reacted to DSiemens in Mercury by DSiemens - FINISHED - BOTTLE
Thanks Augie and Bob. Mark I think I will have to try a bigger model one of these days.
She went in today and so far so good. I hope to have her wrapped up this weekend.
-
Landlubber Mike reacted to marsalv in Royal Caroline by marsalv - FINISHED - Panart
Hi Jeff, I am very glad that you like my work. Today I´m posting last pictures from the production of hull - lanterns. This concludes the first phase of construction.
After a short break I will continue with production of masts, sails and rigging.
-
 Landlubber Mike got a reaction from hamilton in HMS Blandford by hamilton - FINISHED - from Corel HMS Greyhound - 1:100
Hey Hamilton, looking great. I have the Amati Hannah in a bottle as well that I've been working on in parallel to my Badger build. It's a bit tricky to work at that scale to say the least I'm just about done with mine, but decided to make things even more difficult by adding water to the bottle. It's a fun little kit though.
-
Landlubber Mike reacted to ChrisLBren in USF Confederacy by ChrisLBren - FINISHED - 3/16 Scale
Thanks Mark ! The rails are my carving - the wolves and the filagree are Chucks resin copies painted to look like boxwood. I cut them out of his resin trailboards and added them to my trailboards I cut to spec out of 1/32nd swiss pear on my model - then dyed with Fiebings. Again nice to be able to rely on Chucks beautiful carvings for this part of the build.
-
Landlubber Mike reacted to ChrisLBren in USF Confederacy by ChrisLBren - FINISHED - 3/16 Scale
Thanks ! Trail boards are built - need to finish the rails with their grooves/moldings
-
Landlubber Mike reacted to ZyXuz in HMS Unicorn by ZyXuz - Corel - Scale 1:75
Laying Keel and Fitting Bulkheads
Just one week before this, I've already made my DIY keel clamp for this build. The previous one which I used for my Race Horse is no longer strong enough to hold a ship size like this. So, this is how it looks like:
First problem... the bulkheads don't fit to the keel.
Didn't happen on my previous build..
Argh~~ so close...
Fortunately, I've also made myself a DIY drill press last week.. just that it's not completed yet, I'll still need to add compound table to it. Anyway, it helps a lot on sanding the bulkheads' slots wider.
Here it is:
There's actually a screw at the right which it to stop the drill at desirable position. To fix the slots, I used a HSS square router bit. It works well so far
So, after like 45 minutes I've done them all, and I thought the bulkheads can now all fit...
I was wrong...
Now comes the problem that the slots on the keel are not wide enough too to fit the bulkheads... oh Corel...
And then some issues commonly seen...
So, after a whole long night of fixing and sanding.. I can finally put my decks and bulkheads on. This is how she looks like now.
Anyway, they are not glued yet. Just sitting in place so that I can plan on my modification to be made.
Cheers!!
-
Landlubber Mike reacted to ZyXuz in HMS Unicorn by ZyXuz - Corel - Scale 1:75
Greetings!!!
After resting from ship modelling for 2 months, I am finally back! (Not a long time tough... )
I've been lucky enough to win this kit from an auction at a cheaper price right after my Race Horse, and it's in great condition. She arrived my door 2 weeks after that, and I've been studying the plans and instruction since then. Thanks to Ianmajor and Mike who had discussed about this ship earlier in other topic, so I can now plan for some modification on this ship. The wide waist of the Unicorn really makes this model a good ship to add more fittings on.
Anyway, here's some quick peeks to the kit.
Brief Introduction According to Corel Kit
Historically, the frigate Unicorn has left as no tales of outstanding war feats or important enterprises, those which often mark the career of a man of-war so that be remembered even after his disappearance. All we know is that this ship has been designed by F.H. af Chapman for H.M.S Fleet in 1700s. On the other hand we have many accurate data regarding its construction. In fact, Chapman, member of the Swedish Royal Academy of Sciences in his admirable volume "Architectura Navalis Mercatoria" printed in Stockholm in 1768, gives an extremely detailed account of the calculation relating to the design of the ship and not only the constructional ones, but also those relating to the study hydrodynamic-resistances. All this together with a most beautiful drawing of the frigate, which have used to develop this model. The results of Chapman hydrodynamic investigation are clearly visible in the lines of the hull which are quite advanced for the epoch in which the ship has been built.
So...
In conclusion, even Corel doesn't really understand much about the ship! You can try search through the internet or wikipedia, and you will find there were around 6 Unicorns between 17th to 18th Century!! LOL!! Here's the link.
Anyway, I do agree with Ianmajor that this HMS Unicorn is the one as mentioned in wikipedia which serviced from year 1747 to 1771.
"... the Unicorn having a beakhead bow, a unicorn figurehead , two-light quarter galleries and only five pairs of quarterdeck gunports... "
This line describes real close to the ship
Check here if you're interested to know
However, whether it's historical accurate or not, I'm gonna kit bash it
Time to unbox!!
The instruction plans of Corel is a bit... err... mehh...
The font used is too small... might need magnifying glass (just pretend the sunglasses as magnifying glass )
Anyway, the picture instruction are good
Excellent wood quality
Some well cut strips..
Same goes to dowels
Shiny figure head
Terrible capstan...
Despite the excellent quality of the wood strips and dowels, some fittings are badly shaped.. This is one example.
Smaller blocks and gratings are to be trashed too
I love this!!!
Even the cannons are already blackened!
And the stern gallery... hmm
I don't blame the manufacturers for this, there's no way they can provide their customers well carved galleries.. planning to remake them. It's challenging, but learn a new skill.. y not?
I'm overall satisfy with this kit. at least the wood quality is much better than Sergal ones.. oh ya, the ship cradle is included too!
I've just done putting on the bulkheads, but haven't taken pictures.. Will upload them soon!
Cheers!
-
Landlubber Mike reacted to shipmodel in Queen Anne's Revenge 1710 by shipmodel - FINISHED - 1/36 scale
Hi all –
Thanks for your comments and suggestions. I plan to incorporate them into the second iteration of the boat which will be built when the hardwood strips arrive from the supplier.
When we left the shipyard the hull of the boat had been fully planked with the shutter planks fitted on both sides. The hull had been marked out in pencil for the rib locations in preparation for the nails which would have fastened the planks to the ribs. Here you can see the lines for all of the ribs that sit square to the keel as well as for the two cant ribs, drawn on the port side of the hull.
For the fasteners I had to find a way to make them look right without devoting an excessive amount of time to the task. Since there are 11 planks on each side, 25 rib or transom/stem lines that the planks cross, and two fasteners per crossing, the math says that there have to be 1100 fasteners for the exterior of each boat. Add in some more for the interior work and you can see the magnitude of the problem.
The original boat probably had the planks nailed to the ribs, with the ends peened over to clinch them. I experimented with a plank/rib mockup and could never get the holes in the planks to come through the ribs in the proper places. Instead, I decided to drill the holes through only the planks and worry about indicating the nails on the inside of the ribs later.
I first drilled all the holes. Here you can see how there are two in each plank in an offset pattern. I used a 0.012” drill, which scales up to 1/2”, which would be about right.
At first I tried inserting pieces of annealed iron wire into the holes, clipping them short, painting them with glue, then filing the tops flush with the face of the planks. This was incredibly time consuming and fiddly. I then decided to try the technique of leaving the holes empty, sanding the planks to fill the holes with sawdust, then painting on a finish to hold in the sawdust. This looked good and I don’t believe that anyone can tell the difference with this short cut.
* * *
Aarrrgh, scalawag that ye are! Ye’ll not be taking any modern short cuts with me boats. I be Dread Pirate Peter, and I’ll have yer guts fer garters if ye dinna do a manly and proper piece of work.
No, no, it will be OK. Really it will. Here, this is what the nail holes look like after filling and staining. I have had several critical people, including my wife, compare them to the ones with the iron nails in them and no one could tell the difference. In fact, the slightly spread discoloration of the wood grain closely mimics the way old wood stains when a nail rusts into it.
* * *
Tis all very well and comely, but rest ye not on yer laurels, lest ye rest on yer ****. I be watching ye. . .
* * *
Soooo, with that out of the way, I turned to fitting out the interior. First the missing ribs were bent and fitted into the interior. These were the two cant ribs at the bow and the aftmost rib at Station 21 that had been left off to make planking easier.
The first interior piece to be installed was the tapered central plank of the flooring. It strengthens the keel and is the location for the lifting rings and mast step.
To each side the rest of the floor planks were installed. They are not tapered but fit against the tapered center plank due to the curvature of the hull. They are held in place while the glue dries by inexpensive hair clips from the cosmetics section of the drug store. They initially look like the one at the lower left, but are easily bent by hand to the shape in the lower right. This now allows them to reach around the hull to apply pressure at the tips.
Next to be installed are the sheets, the planked platforms at the bow and stern. They will appear in later photos, but I did not take pictures as they were being built. Construction is straightforward. Planks were glued to a pair of battens underneath to make a flat sheet larger than needed. A paper pattern is cut to fit the space and the wood sheet is cut to that shape. The edges are bevelled to match the curve of the hull and it is glued in place to the ribs.
Now the thwart stringers are installed. I first bent one piece of stripwood to shape and glued it in on the starboard side at the height indicated on the plans. The matching strip was bent and trimmed for the port side and held in place temporarily while I balanced pieces of stripwood across from side to side and set perpendicular to the keel. These are known in woodworking as ‘winding sticks’ although I don’t know why. Looking across their tops you can easily see any variation from side to side and any tipping compared to the centerline and the edge of the sheets. Once I was satisfied with the levels, the port stringer was glued in place.
The plans show square section wood pieces running side to side just under the thwart stringers near the bow and stern. They have a short section in the center that has a round cross section. I do not know what they were for, but perhaps the rounded section would have a halyard led around it when the sail was raised, sort of a non-turning sheave. Whatever they are they were shaped, fitted and glued in.
The lifting rings and mast step were located and attached to the central floor plank. I also drilled the nail holes for the floors and sheets as I did for the hull planks. My one regret is that I did not do this for the ribs at this point when they were exposed. It turned out to be too crowded later – a detail that will be corrected on the next boats.
The thwarts were cut from 1mm thick stock, with the middle one being wider in the center and having added knees. It holds and supports the metalwork that acts as the mast partner. This fitting is made from brass strip which is chemically blackened, then glued and pinned with wire nails to the edge of the thwart. A decorative beading was scribed into the edges of the thwarts, then they were installed on top of the stringers with spacers between them.
Unfortunately, once the thwarts were installed it was clear that they were sitting too high in the boat. No rowers could have sat on them and had their feet reach the floor for leverage. Here the flexibility of the Lineco glue came to my rescue. With the tip of a #10 blade I was able to pry up the thwarts from the stringers and then remove the stringers without any damage to the hull or ribs.
The stringers were lowered 6 scale inches and reinstalled, followed by the thwarts, which looked much better after the adjustment. I went back to the plans and determined that the problem was there and not in my measuring or building. Just one of those problems that had to be built to be discovered.
Fitting out the rest of the interior is self-explanatory. Working up from the thwarts the stern seats were planked up over battens. They sit on top of the thwart stringers and the aftmost thwart. The foremost thwart has a pair of knees set on top.
Square section stringers were fitted and glued to the inner sides of the sheer strake so their tops matched, and were strengthened at the bow by a breasthook and at the stern by two transom knees. Thole blocks were set on top of the sheer strakes and stringers and will be drilled for the thole pins to be added later. The locations of several of these had to be adjusted from the plans, which did not have them at a consistent distance from the associated thwart.
The only difficult woodworking came at the bow where the curved and carved fairleads on either side of the stem were joined with a double-dovetailed cross-support.
With the boat all but complete the rudder was fashioned to match the plans. Two planks were fitted and tapered, then cut to the proper profile. The pintle straps were made from brass strip, pinned through with iron wire and chemically blackened. The tiller is brass bar that was tapered and blackened, with an epoxy bulb at its tip.
Top and bottom gudgeons were fashioned from blackened brass strip. The upper one simply slipped into a hole drilled into the aft face of the sternpost, while the lower one had to be bent in several directions before being pinned against the sides of the sternpost. It only remained for the thole pins to be installed and the boat was complete.
* * *
So ye think ye be quite clever, do ye? Quite the boat builder? I be the judge of that. I also bring me great-great-great grandson Peter who says he has worked with ye before. He be a great galoot of a puppy, but he be useful to judge yer work. He set up this temporary mast and I grant ye that said boat be mightily even side to side.
He sits well in the stern and nothing pulls my eye to say that he could not reach and steer the tiller, should he take it into his head to do some work, the lazy lout that he be.
It shivers me innards to grudge ye my approval, but i’ faith I canna find much to dislike. But be warned that I will no be put off with such minor success. Ye must do as well or better, or feel me wrath fall upon ye like to the Trump of Doom.
Well, there you have it. The second boat will be made from hardwoods now that most of the construction problems have been identified, although I am sure that new ones will appear and demand solutions. Those may be harder to find while looking over my shoulder all the time; Dread Pirate Peter seems to have very high standards, and a very short temper.
Till then, be well.
Dan
-
Landlubber Mike reacted to shipmodel in Queen Anne's Revenge 1710 by shipmodel - FINISHED - 1/36 scale
Good day to all -
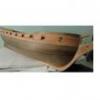
This segment will be a bit of a detour from where I left the hull construction last time. The sheer size of the model means that I have to work on it in the basement of the family’s weekend house near Albany, NY. There is no way that I can fit it into the shipyard in the Brooklyn apartment, which is a converted walk-in closet. I haven’t been up to the house in several weeks, so I am working on smaller pieces here in the city that can be added later. The first of these are the ship’s boats. As always, there are half a dozen good ways to get the job done. Here is mine. The recitation is quite long, so I have broken it up into two parts. The first will cover the shaping and planking of the hull, and the second will finish with the fitting out of the interior.
The Mercure drawings that I am working from include plans and schematics for two boats, a large launch (boat 7) and a sleek pinnace (boat 6). Here I will be building the launch. The drawings had been sent to me as .tif files, so it was easy to drop them into Photoshop and start manipulating them.
First I used the rule stick in the hand of the little gnome dancing on the page to scale the drawing to the size of the model. I cropped and copied the forward and aft station lines portions of the plans and moved them to a new blank image. Identical square outlines were superimposed around the two drawings to give them the same registration planes and centerlines.
Once I was happy that everything was square and aligned correctly they were copied repeatedly to fill a page sized image and printed out several times to get one image for each of the 21 stations shown on the profile and cross section plans. These were cut apart and glued with spray mount to squares of 1/8” wood sheet.
The outline at each station was cut out with a notch for the keel and shoulders at the sheer. The three in the upper right are standing up because they have already had spacers glued to their back sides like the one in the upper left. These are used with the building board, which is marked out for the centerline and each numbered station.
The station formers are glued to the board and to each other one at a time with a top spacer used to keep them at the proper distance and an engineer’s square to see that they are perfectly vertical.
While the glue was drying on the developing stack of formers the two strongbacks (stem-keel-sternpost) were cut out. It is somewhat weaker to do it this way, as you end up with cross-grain on the stem and sternpost, but it is faster, and this boat is something of a test bed for techniques. For the same reason, the wood used is almost exclusively basswood. It is easy to work, glues well, and when stained correctly is almost impossible to distinguish from a close-grained hardwood.
The portion of the plans showing the longitudinal cross section was mounted on an 1/8” wood sheet which was then glued to a second sheet, with the glue placed only where the wood would be chucked. The outline of the strongback was cut out on the band saw, leaving a glued central piece to be cut last. This yielded two identical pieces that came apart as soon as the last cut was completed.
Here is the completed stack of formers on the building board with one of the strongbacks temporarily set up in the notch for the keel. It goes without saying that once the stack was fully glued it was shaped and faired with sanding rods to get smooth curves from bow to stern.
The strongback is held vertically with small blocks at the bow and stern that sandwich the tops at the centerline. Two transom pieces were taken from the plans, laid out and cut as before, and each was test fit into the notch cut for it at the base of the sternpost. The location of the forward edge of the plank rabbet was determined and marked out on the strongback, then the small extensions that had been left above the stem and sternpost were trimmed until it snuggled down into the keel notch at the proper level.
The strongback was removed and the rabbet was carved along the line with rotary bitts, then finished with files and rifflers. The transom was planked on the outside and glued in place against the sternpost.
Now I fit the ribs to the station formers. It was a happy fact that Budriot drew the boat with a rib at each station line and a station line at each rib. To make room for them I had cut out the station formers a little inside the line, and the sanding and fairing had further reduced the breadth of the stack. The ribs were fairly thin in any case, made from wood strips milled to 1mm x 2mm (about 1.5” x 3” in scale”). These were soaked in water to soften, then bent around each former and wired in place. No glue was used.
All of the ribs were wired in place except the aftmost one at Station 21. Leaving it off gave me a little more flexibility in fairing the planks to the transom. The strongback was replaced in the keel notch of the formers and the initial two planks were shaped.
The first was the sheer strake. From the plans it measured out to exactly ¼” in width and was left full width its entire length. A strip of basswood that width and 1/16” thick was soaked for a few minutes, then shaped first at the bow, where the tip was cut and angled to fit into the rabbet. The forward few inches were steam bent using an Amati plank bender (the one that looks like a soldering iron with a nautiloid shaped head). It is 25 years old and still works a treat. Using the shoulders cut into the formers at the sheer the plank was edge bent to match the curve before being clamped and glued to each rib and the transom.
The garboard strake against the keel was similarly fitted and glued. However, when I tried to impose the required twists into a basswood plank it repeatedly splintered. I therefore used pau marfim, a California hardwood. It is also ¼” wide for most of its length but flares to about twice that at the sternpost. To accommodate this, a tapered plank was pieced in from Station 15 to the sternpost. When I was happy with the look of the shape it was clamped and glued to the ribs. Here is what they looked like with most of the clamps removed.
A word here about stains and glues. Before any piece was installed it was given a staining with a mixture of ½ clear Minwax wood stain which they call Natural, ¼ Early American and ¼ Cherry. I find this combination the best to reduce any splotchiness in the basswood and makes basswood resemble boxwood or one of the lighter cherry varieties, a look that I like a lot. However, the stain is a bit oily, so the wood has to be well wiped and has to dry for a while before normal PVA glues will hold well.
As for glue, I use a pH neutral white glue made by Lineco which I used to get from an art conservation supply house. It sets up fast and holds well, yet is still flexible for an extended time, which will come in handy later. Now I get it through Amazon where it is competitively priced with carpenters’ wood glues.
This process was repeated for the second sheer plank and the first broad strake against the garboard, but these had to be tapered to fit at the bow. I knew from test fittings with strips of paper that there was almost exactly half the space between the garboard and sheer strake at the bow than there was between these planks amidships. Therefore the next two planks were tapered for their forward three inches to that dimension. Holding the plank to the formers and letting it find its own best fit, it was evident that the tapering on the second sheer strake should come off the edge that mated with the sheer strake, while the broad strake should taper on the garboard side.
After the bulk of the wood was removed the edge was sanded to a fair curve. This spiling was all done by eye, with the curve examined from every angle and refined as needed on this and every successive plank.
Once acceptably shaped the planks were stained, then caulking was indicated by coloring the uncut edge of the plank with an indelible black marker. The planks were bent to final shape, fitted, glued and clamped in place.
With two strakes at the keel and two at the sheer, the cage of ribs had a good deal of strength and rigidity. Now all of the wires were pulled out and the developing hull was removed from the formers. I must have done a clean job with the glue because I didn’t have to pry it loose at any point.
Subsequent strakes were processed in a similar way. For clamps I used bulldog clips that had a handle piece from a second clip fitted into the top of the clip. A modified clip was used on every other former to hold the plank to the ribs as the glue dried.
Here is what the hull looked like with 8 of the 11 strakes in place. At this point the remaining space was divided into thirds as you can see from the pencil marks on the ribs. This would be filled with two standard width planks and one custom fit ‘shutter plank’ that closed in the hull.
Here is one completed side. The shutter plank location was selected to lie just under the curve of the chine of the hull, making it less visible than any other spot. It is the fourth from the keel. It is slightly wider than the other planks and flares at the stern to fill the larger space.
While it was on the formers the location of each rib was penciled onto the planks in preparation for the ‘nails’ holding the planks to the ribs.
Once the other side was closed up the hull was removed from the formers. I think the method worked quite well and resulted in a hull that is strong, symmetric, and gives a convincing appearance of an actual boat structure. The white plastic figure in the corner is useful to judge scale appearance and will appear again.
Spiling the planking by eye in this way is an acquired skill, but not difficult if each plank is critically examined and adjusted as needed. The final hull has a nice run of planking that tapers smoothly to the stem and matches, port to starboard, and even has the little variations in width that a real boat does.
In the next installment I use the penciled lines to drill the nail holes for the more than 1100 fasteners used for the hull planks. Then I fit out the interior and finish the boat.
As always, critical review by the eyes of my peers is requested. This is even more so in this case since the boat is the first generation attempt and, despite the work and time invested, may not make the final cut.
Looking forward to hearing from all.
Dan
-
Landlubber Mike reacted to RGL in HMS Unicorn by ianmajor - Corel - Scale 1:75, 1748 to 1771
Wow, I mean wow, Frolich would ask you to make stoves for him. You sir are one of the true artists on the forum.
-
Landlubber Mike reacted to ianmajor in HMS Unicorn by ianmajor - Corel - Scale 1:75, 1748 to 1771
I thought I would shew the solders and fluxes that I use.
In the front row the solders (from left to right) are 70 deg, 145 deg, 188 deg, 225 deg (the strip) and some silver solder. Behind in a jar is solder paste plus a reel of 60:40 solder. The latter I mainly use for electrical wiring since it has a flux core.
Behind are the fluxes. I generally use liquid acid fluxes applied with a brush. The "Red" is best for Brass and N/S, the "Green" for whitemetal and steel. I occasionally use the flux paste from the green tin. The white container holds my borax for silver soldering.
After a soldering session with the acid flux I give the work piece a wash in dilute caustic soda (normally used for cleaning drains). Without this the model would start to turn green in a few hours.
Finally a picture of items used for preparing/cleaning the metal.
Another big cause of poor soldered joints is grot or a coating on the metal.
I tend not to use solvents to clean the metal. Instead I use glass fibre scratch brushes which along with the acid fluxes go a good job.The photo shews two of them. The blue one is a bundle of glass fibres held in a plastic sheath. I use it on fairly large areas such as sheet metal by just scrubbing away with its end (the plastic wears away).
The red one is like a propelling pencil except it has a small bundle of glass fibres in stead of a lead. I use this around detail and along the area where a joint will be made.The plastic packet has refills for it.
I also use these scratch brushes (along with a three cornered scaper) to clean off excess solder.
A contra to these items is that they shed small lengths of glass fibres which if they get in to your fingers really hurt and they are hard to spot. So a couple of tools in the photo are the jewelers lense and fine tweezers to remove these bits of glass.
Rather than get the fibres in my fingers I regularly use the old suede leather brush to clean the fibres directly in to a bin. (No blowing else they go in your eyes - no sucking either.)
The other item in the photo is a garryflex abrassive cleaner. It is just a large (pick the word carefully here) eraser. This is great on large areas of metal but leaves a lot of bits everywhere.
Now - back to cleaning the stove............. -
Landlubber Mike reacted to ianmajor in HMS Unicorn by ianmajor - Corel - Scale 1:75, 1748 to 1771
This photo is of a lovely piece of equipment. It is an ERSA Digital 2000. It is a soldering station that makes soldering a delight - in fact it is the only unit that I used on the stove. (Which is sat in front of it)
The organisation selling this type said they were made to US military specifications. No matter whether this is true or not it is top notch.
It has loads of grunt, is programmable to give different heating profiles and has a temperature display so you know exactly what is going on. It gets a lot of heat quickly in to a small spot getting promptly up to the temperature that you want. So you can readily solder small bits successfully before the heat has a chance to spread to the rest of the joints.
Why do you need an iron with plenty of grunt?
One of the causes of bad joints is the solder not being fully melted when the joint is made. Solder is an alloy that has two important temperatures - the solidus and liquidus.
Below the solidus temperature the solder is totally solid. Above the liquidus temperature the solder is totally liquid. Between those temperatures the solder is in a semi liquid plastic state. If your iron doesn't get the work above the liquidus temperature a joint will be produced but it won't be any good. Equally if you move the parts as the solder is cooling through this plastic state a bad joint will also result.
By way of an example, plumbers 60:40 solder has a solidus temperature of 183 deg C and a liquidus temperature of 191 deg C.
There are a few solders where the two temperatures are the same - these are refered to as eutectic solders.
For silver soldering I have a couple of torches as shewn in the next photo. These sit with me in the workshop. I also use these for annealing.
If I have a bigger job then in the garage I have a medium blow torch and a large one on a gas bottle.
-
Landlubber Mike reacted to ianmajor in HMS Unicorn by ianmajor - Corel - Scale 1:75, 1748 to 1771
Whilst waiting for the cleaning material for the stove I thought I would add a few words about my soldering equipment - hopefully it might prove useful to somebody!
I had my first soldering iron when I was 10 years old. It had been my grandfather's so was pretty ancient even then. It consists of a large octahedron shaped bit of copper 3 inches long for the bit. The bit is riveted to a 12 inch long steel rod with a wooden handle at the other end. It needs a gas fire heater to heat it up. In practice a pair would be used - one being heated up whilst the other was in use soldering. I have seen delicate work done with these monsters - the last time was in 1986. I still have it somewhere.
The next photograph has a selection of the next generations of irons that I owned.
The one on the left has a copper bit that needs regular dressing with a file. I used to use it for detail work but not now. This is the only one I lend out.
The middle one (red) is a 75 watt Weller iron. It has plenty of grunt for the heavier jobs and I still use it on large components in my railway loco modelling. This type of iron comes with a coated bit that doesn't need dressing - just cleaning with a damp sponge - in fact taking a file to this bit ruins it (I loaned a similar one to a colleague who did just that).
The third iron in the photo (yellow) was a big step forward. It is an Antex TCSU1 soldering station into which I have a 30 watt iron plugged (you can plug more powerful irons in to it). The slider control allows the temperature of the iron to be varied. Sadly there is no temperature indicator.
Why would you want to control the temperature of an iron? For me two reasons.
The first is that it can be used to solder whitemetal castings without fear of melting them.
The second is that low melting point solders contain Cadmium. If you heat this type of solder above 321 deg C you will start to boil the Cadmium off - and then inhale it - not good.
I still use this soldering station for jobs where access is restricted.
++++
The next photo shews a Resistance Soldering Unit usually refered to as an RSU (indicated by the arrow).
This is a unit that I made myself and is basically a step down transformer. This type can be bought commercially so I I won't describe its construction - I don't want agrieved spouses accusing me of electrocuting their loved ones!
It has a black cable with a crocodile clip on the end, a red cable with a probe on the end and the black object in front of it is a foot pedal.
To use it you put a sheet of metal (preferably steel) on the bench and connect the black cable to it. You place the items you wish to solder together on top of this plate with solder paste between them. You then put the probe (red wire) on to the items to solder, press the pedal for a few seconds, and the joint is made. Whilst the pedal is pressed current flows through the joint heating it up.
This unit is great for soldering small etched detail parts on to larger parts.
Two advantages. One - when you take your foot off the power the probe goes cold, so you can hold the soldered detail in place with the probe until the solder sets. The second advantage is that there is no solder on the probe so the detail won't disappear under a blob of the stuff.
One thing to watch out for is to ensure you have taken your foot off the pedal before lifting the probe off the work. If you do get this wrong you strike an arc which immediately burns the detail away. Been there - done that.
The next photo shows the probe in detail.
Clamped in the end is a carbon bit. The plastic bag contains two spares. Basically they are carbon rods with a copper jacket. To get (or renew the point) you simply sharpen it with a pencil sharpener. -
Landlubber Mike reacted to ianmajor in HMS Unicorn by ianmajor - Corel - Scale 1:75, 1748 to 1771
Thanks Ray.
Hum - I am now starting to think perhaps it ought to go in to a battle station model. But if I did that I would have to make another for the Unicorn!
-
 Landlubber Mike got a reaction from rdsaplala in Badger by Landlubber Mike - FINISHED - Caldercraft - 1:64 - Brig
Thanks very much Aldo, really appreciate it. Nice work on the Triton
I've been researching how to do the furled sails, and have some confusion on how to approach the jib and flying jib sails. It looks like I'll need to add jib stays and travelers. Didn't realize it would all be so complicated, but I think I'm too stubborn at this point to drop the furled sail idea (especially after all the research I've been putting in). I asked for some help at the post below in case anyone has any ideas:
http://modelshipworld.com/index.php?/topic/3761-adding-jib-and-flying-jib-sails-to-badger/
Thanks!
-
Landlubber Mike got a reaction from ianmajor in HMS Unicorn by ianmajor - Corel - Scale 1:75, 1748 to 1771
Wow Ian, incredible! Like I said before, it deserves its own showcase!
-
 Landlubber Mike got a reaction from mobbsie in HMS Agamemnon by mobbsie - FINISHED - Caldercraft / Jotika - 1/64
Very nice work Mobbsie. I like the fact that on this kit you can plank the small ships, rather than paint the plastic shells. Looks much better in my opinion
-
Landlubber Mike reacted to Modeler12 in USS Constitution by Modeler12 - FINISHED - Model Shipways
Jib and flying jib as a dry fit. No halyards, no sheets, just a flutter of sails.