Foremast
-
Posts
262 -
Joined
-
Last visited
Content Type
Profiles
Forums
Gallery
Events
Everything posted by Foremast
-

Coca by Foremast - Amati -1:60
Foremast replied to Foremast's topic in - Kit subjects built Up to and including 1500 AD
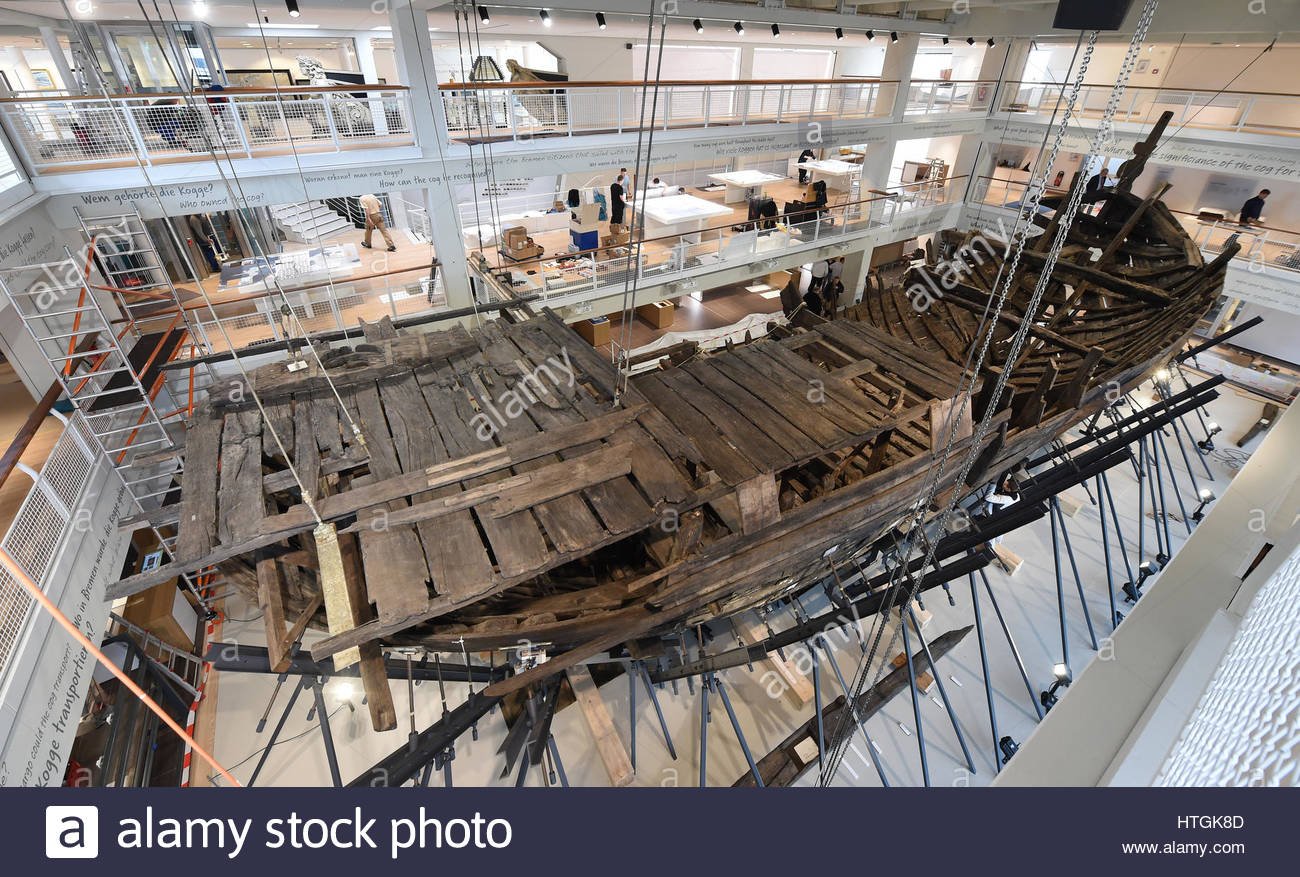
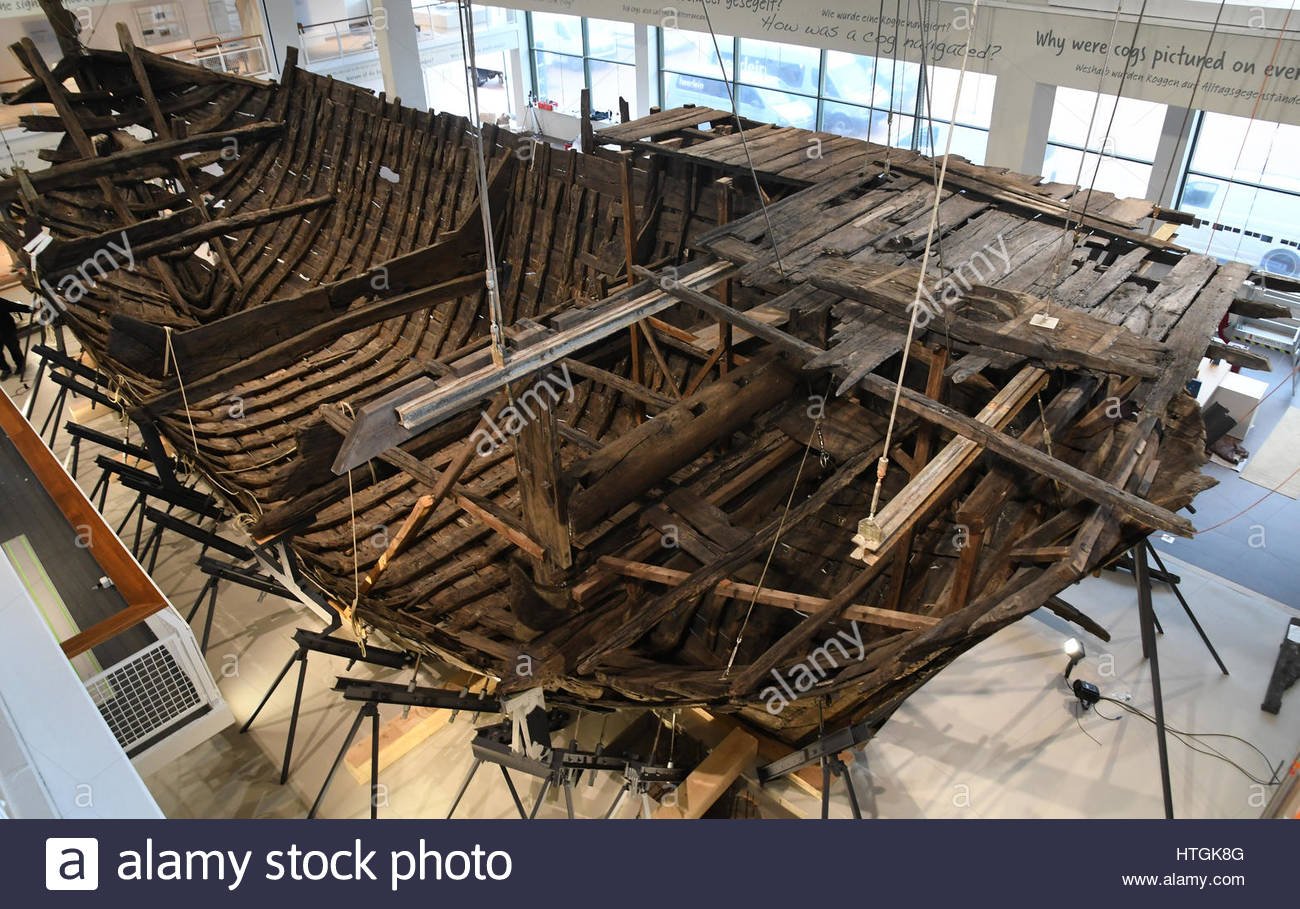
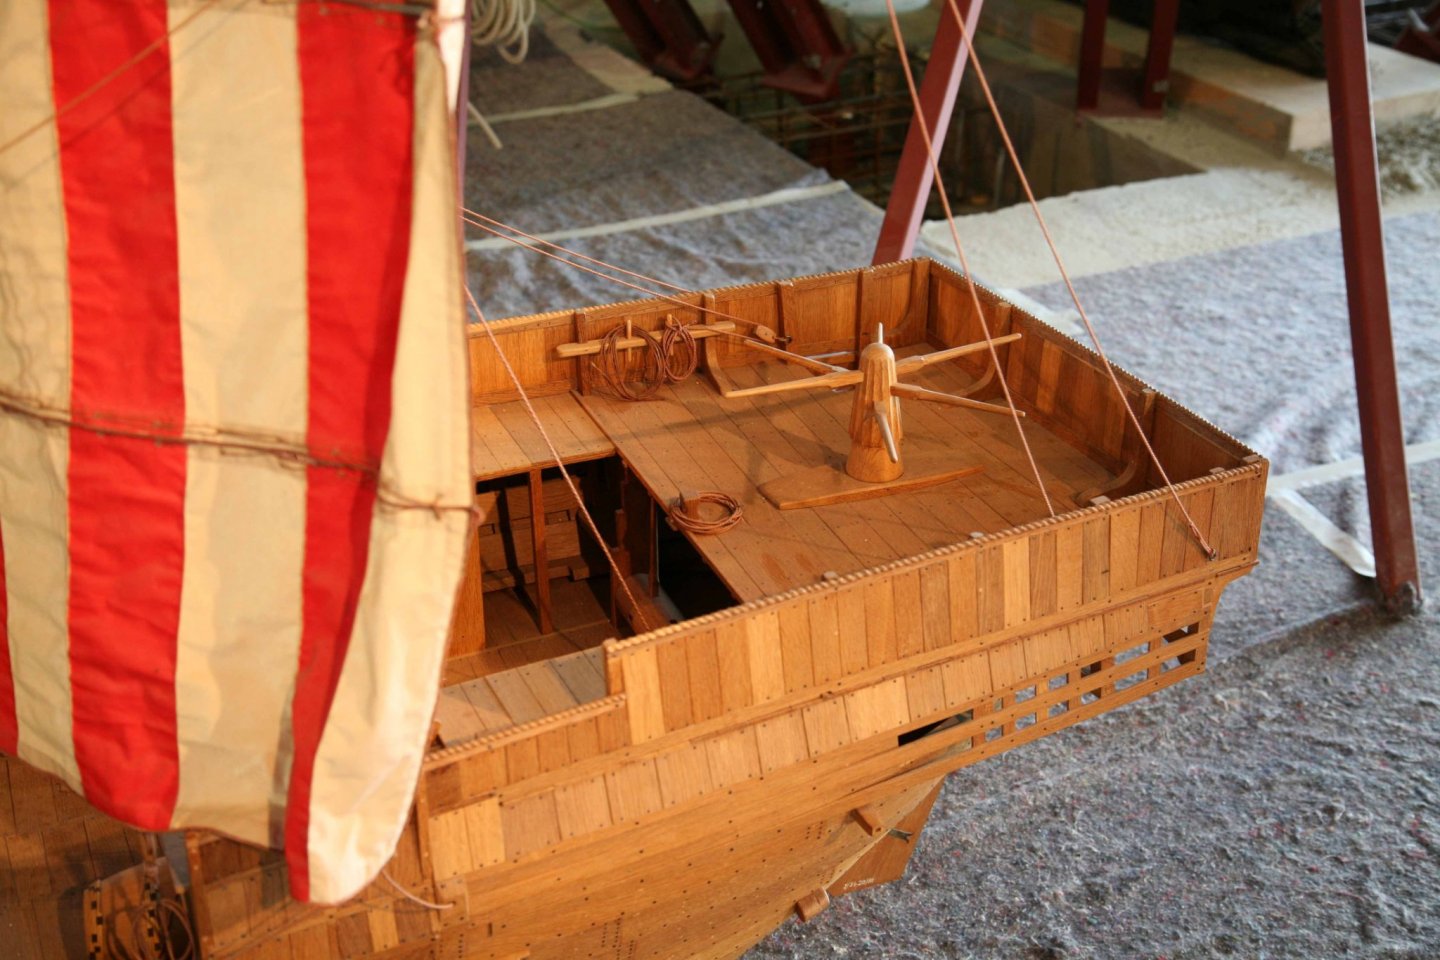
Thanks for your support, Patrick and Waldemar. The capstan shown in the drawing you posted, Patrick, is a heavy device. I think it was intendend for a multi-pourposal use (including anchors lifting). I'm asking to myself: is it thinkable to split functions in heavy work (anchors and big goods) and light works (little goods and yard)? If possible, the solution just seems the one chosen by northern shipwrights of the XV century: Cogs had both a windlass or a capstan; a light capstan without any support beneath, as shown in the Bremen shipwreck (photos attached, plus detail of a great scale of the same ship's model). As an alternative I could think to two windlasses, but in my opinion only one of them - in the forecastle - couldn't be used to lift the yard, cause of the position of the yard's pole (i still don't know the proper name, it's circled in red😁) All this is only a free thinking, obviously ....
-
Hi popeye,
Thanks for birthday wishes (2017 😅) but it's only few days I have come back on msw. Changed job, changed home so I have had to manage lots of things before to make sawdust again! I'm sorry not to have replied before.
I hope it goes you all ok, and see you in the next days here around.
Alex
-
Coca by Foremast - Amati -1:60
Foremast replied to Foremast's topic in - Kit subjects built Up to and including 1500 AD
I had considered that layout. The issue is, the uncorrect lenght/width ratio of the model. If it had been 2.5 (as usual for these ships in that era) no problem, but with a ratio of 1.7 (like in the model) the longitudinal space under the rear castle is a real challenge for any fitting distribution. I have to keep in mind, overall, the lenght of the tiller and the underneath part of the yard's pole (is the term "yard" correct? I mean where the halyard is pulled ... some problems with the naval english ... 😁) because I haven't a lot useful space between them. If I put the capstan just back the mast - or between the tiller and the wooden pole - the crew wouldn'have space enough to turn around it with its bars. So, I thought to put the capstan on the upper deck, and a pump close to the mast - where usually is placed. Thanks Alex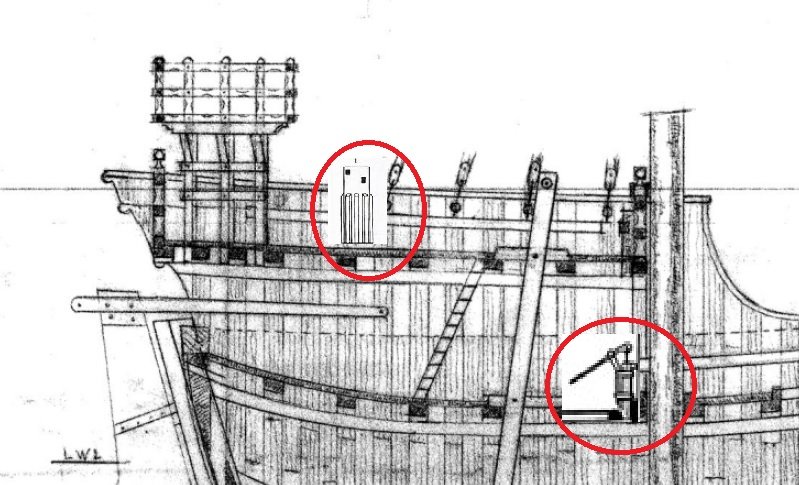
-
Very interesting model and great planking. I gave a look to this carrack time ago and I found strange and fascinating how much tall the forecastle was. I’ll follow your work with interest cheers Alex
- 156 replies
-
- 1
-

-
- marisstella
- marisstella model ship kits
- (and 4 more)
-
Coca by Foremast - Amati -1:60
Foremast replied to Foremast's topic in - Kit subjects built Up to and including 1500 AD
Exact, Waldemar. In my opinion: this was a cargo ship, so the crew needed systems to operate, as far as their mates did in northern Europe. For this reason they probably had same devices, being look-a-like ships. I don't know if the layout I'm forecasting is fully correct, but I hope ... that crew tanks me. The windlass is for the anchors and for the mooring of the ship; the capstan is for the goods and lifts the heavy yard. How could the crew had lift that enormous wooden pole without space to get in line and pull, behind the main mast? Thanks for the visit, Patrick. Cheers Alex -
Coca by Foremast - Amati -1:60
Foremast replied to Foremast's topic in - Kit subjects built Up to and including 1500 AD
Uh, I didn' have thougt to lavatory holes! Now - after customization of the stern - there's place. I know what to think in the next few days 🤙 Regarding the internal layout, I'm inspired by northen eurpoean cogs. I think, what you can see in a Mediterrnean cog of the XV century couldn't be far different from its "ancestor" of the late XIV century. So, I think to place either a windlass or a capstan, like in the Bremen cog. The capstan on the upper deck: the hole close to the little castle (you can see in the original model) couldn't be done for a mast - no sense in the whole layout of the ship - but could be the interlocking for a capstan, like in the Bremen cog, it's in the same place. About the windlass... I'm not sure to place it just rear the main mast, like in the Bremen cog. I prefer to think it between the main bitt and the anchor holes ... now, after the demolition, there's a lot of space. Cheers Alex -
Coca by Foremast - Amati -1:60
Foremast replied to Foremast's topic in - Kit subjects built Up to and including 1500 AD
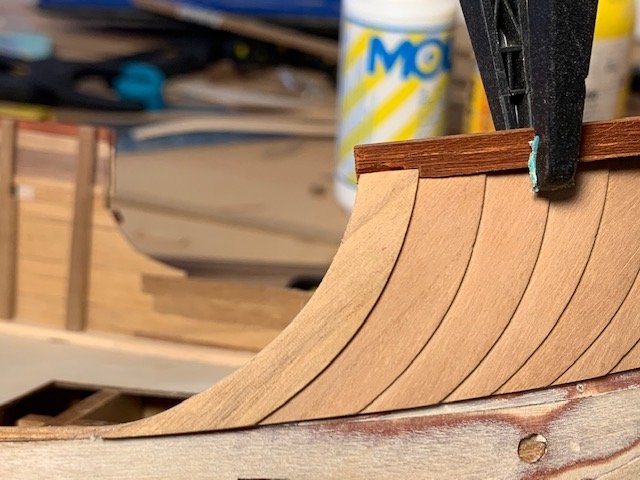
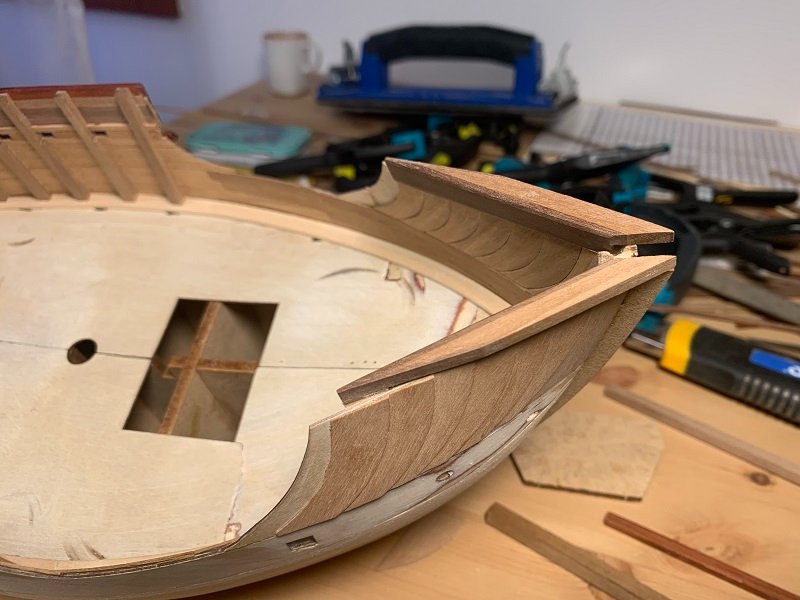
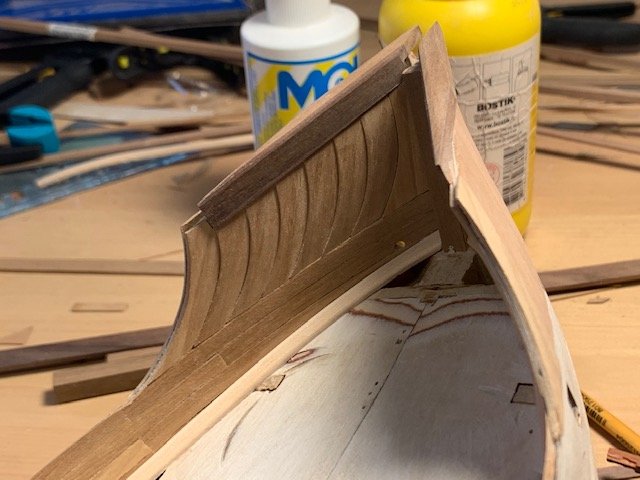
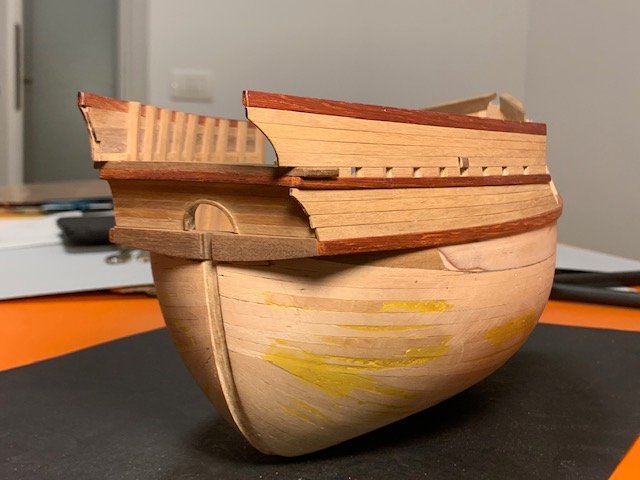
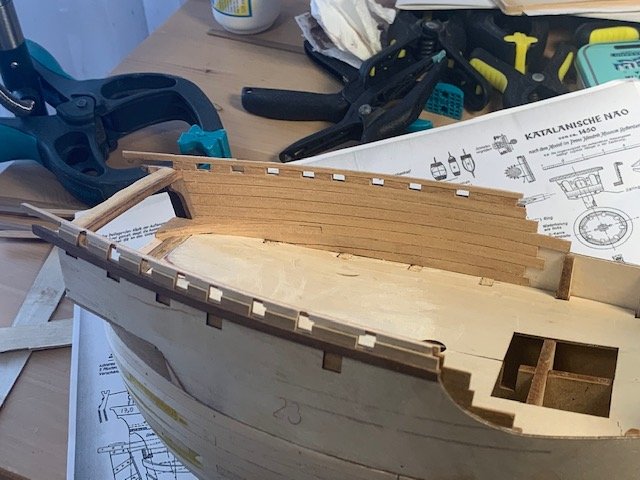
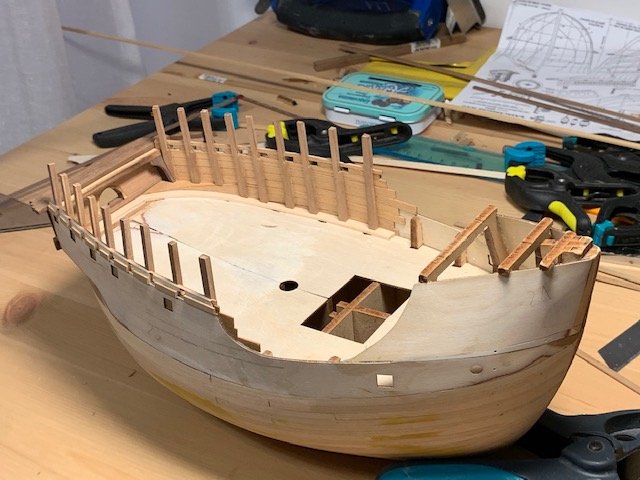
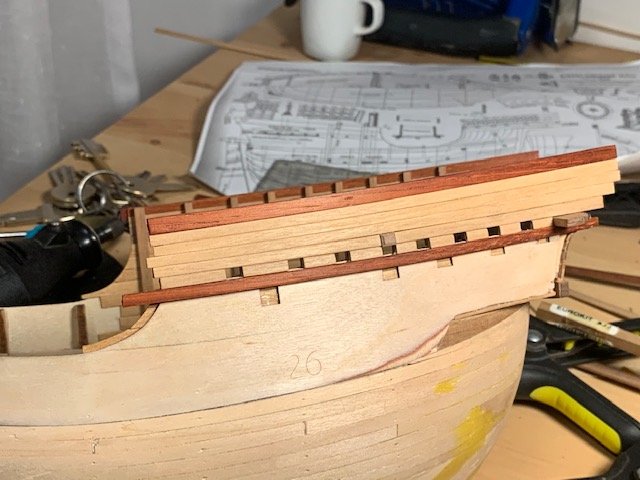
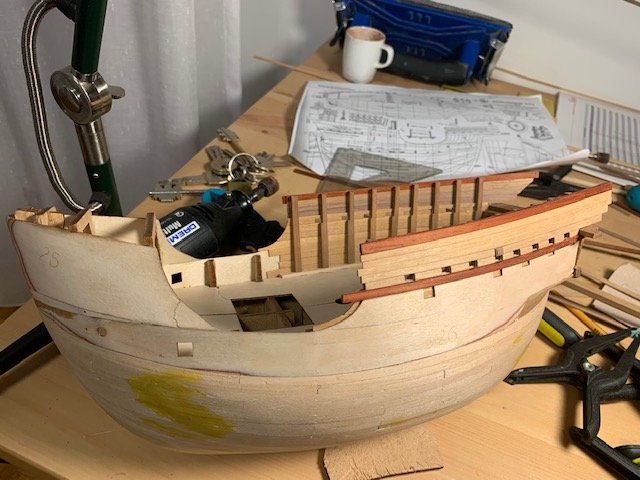
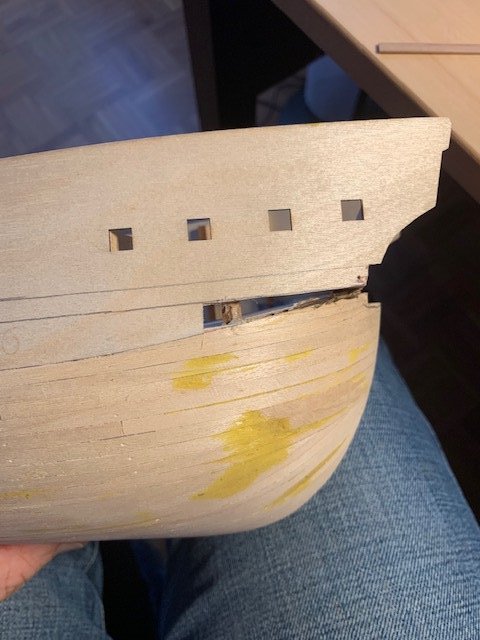
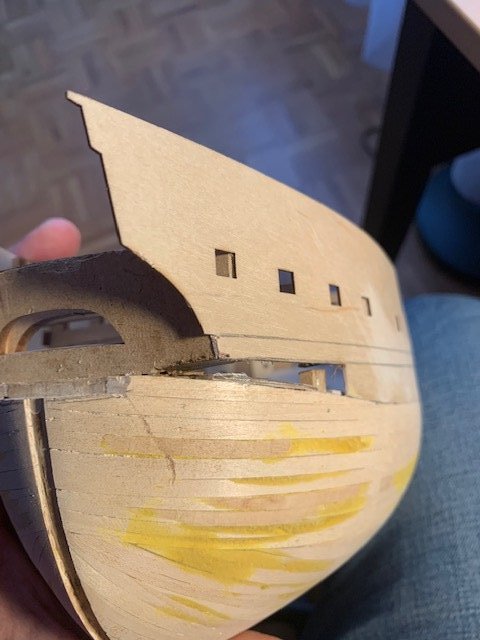
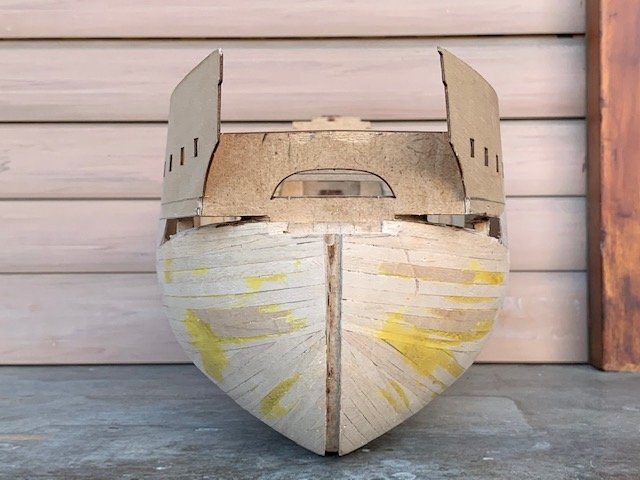
Thanks, Waldemar. I didn't know the publication, this morning I've found it by a U.K. seller and just bought ! I'm glad to see your interest in this log, if you need I'm available for any detail. Third step. Clinker planking of the external bow; demolition of the internal area (under the castle) and internal clinker planking; laying of the second row of rear external planking; laying of the low frame (from rear to bow, under the clinker - padouc wood); done the upper part of the stern. I made clinker planking with two different techniques. External was made by overlapping thin slices of walnut wood; internal was made by juxtaposing them (after having thinned one side). I matched internal and esternal sections to simulate they're the same The superstructure you see at the top of clinker planking is the support of the beams that will be posed as the base of the castle.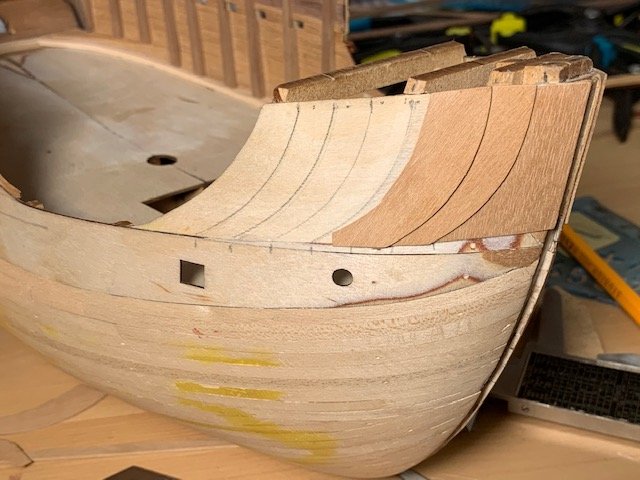
.jpg.b01651924f82d969ef4297a67af73452.jpg)
-
Coca by Foremast - Amati -1:60
Foremast replied to Foremast's topic in - Kit subjects built Up to and including 1500 AD
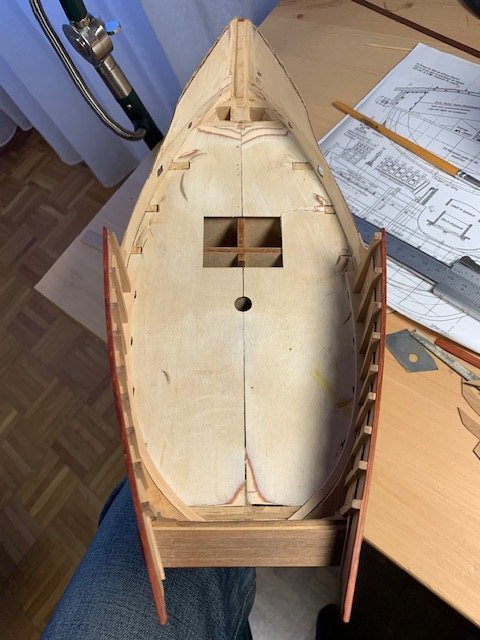
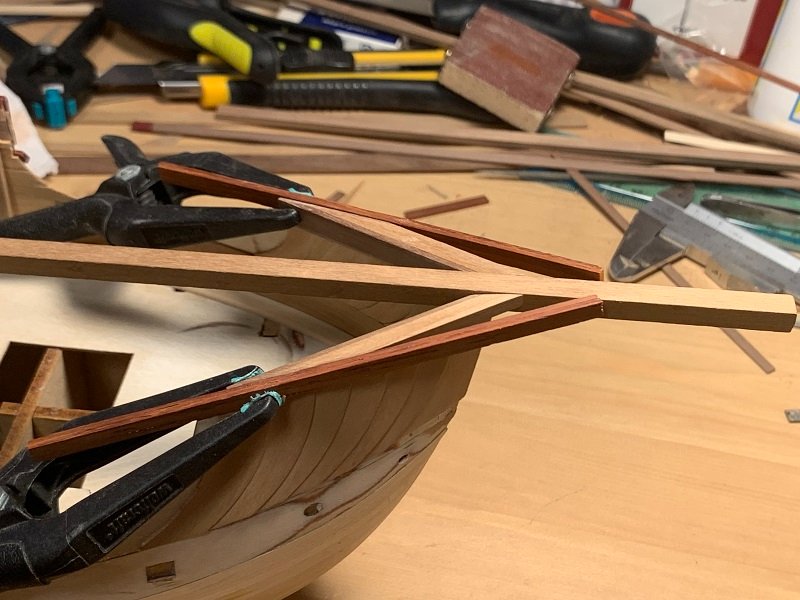
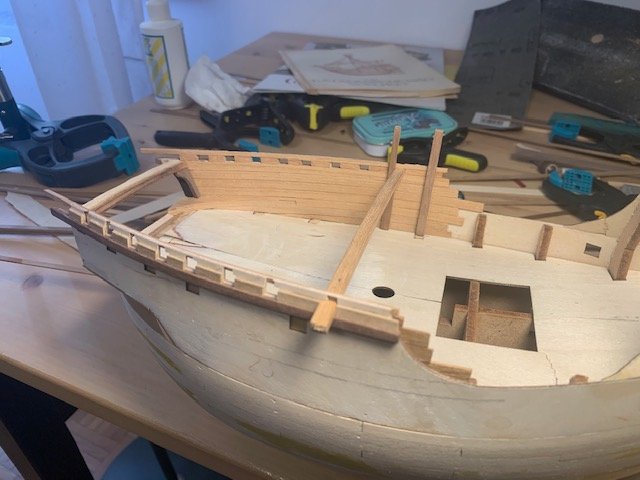
Second step, demolition of the whole internal structure of the rear deck area. Two reasons: first, the height wasn't correct, unrealistic; no one could stand under the upper deck, too low. Second, I wanted to let the internal bulwark open, not covered; so I had to make something thinner than the kit purposal. False bulwark (plywood) , plus internal planking (walnut), plus external planking (walnut) made a thickness of about 3 - 3,5 mm and it would have been unrealistic; in addition, the three layers - seen from above - would have been ugly, really. So, I decided to remove the upper bulwark, lay the internal planking of the main deck, make the beams of the upper deck (I find not realistic to use 5x5 mm strips, as Amati's purposal), make the ribs of the whole rear area (deck plus upper deck), then lay the internal and external planking on the ribs. Double trick: 1) external and internal planking are staggered, so the structure is strong and without cracks; 2) the different thickness of the bulwark (3 mm in the lower section, 2 mm in the upper one) is masked by the external decoration frame. I used a light color walnut for planking and padouk wood for frames. So, the result is something that remembers the colours of the Catalan flag (yellow and red) as seen in some paintings.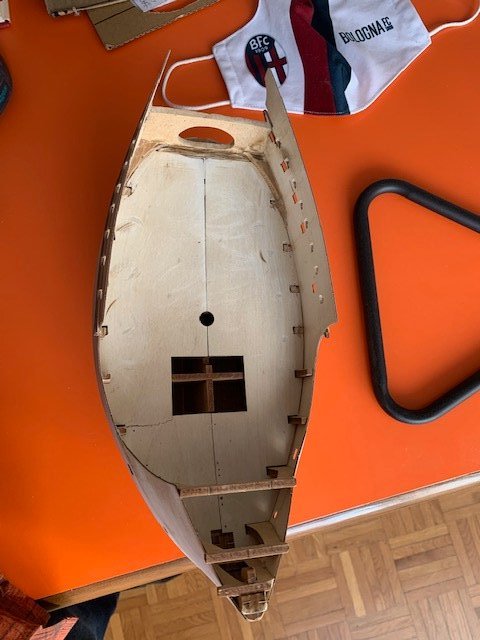


-
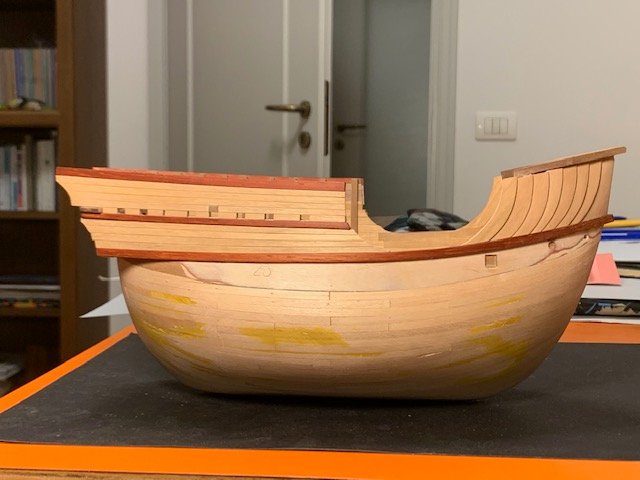
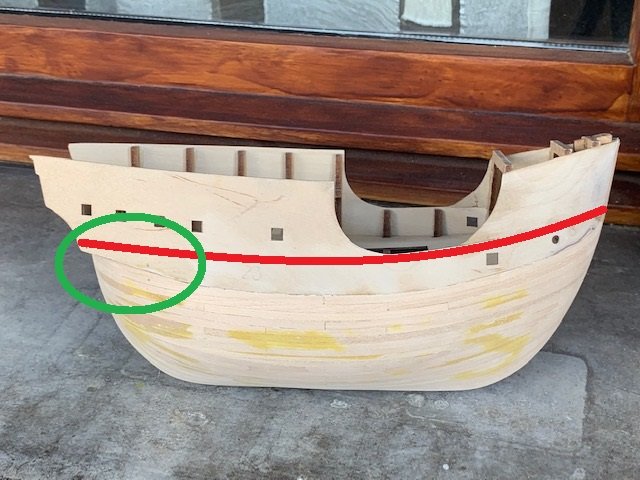
Hi all, friends. It's been a long time since last time I laid anchor on this dock. I hope not to have lost my modeller's hand neither my english speaking. A few months ago I started a new model, the ancient spanish cargo "Mataro's cog" inspired to the Catalan ex-voto now exposed in the Rotterdam's naval museum. I'm used to scratch-buildings but wanting to spare time, I decided to buy the Amati proposal - that seemed a really well done kit. During my work, my scratch builder spirit popped out and I started to change many things - with the only limit imposed by the basic structure - trying to aim my model to the ancient paintings that show similar ships, as possible .... also adding to the model something that in my opinion couldn't be missing in a cargo vessel (e.g: a windlass or a capstan). As said, my work has already started, but I would like to show some phases of work that have already been completed, before to pass in "on time" mode. As I see, this is not the first log about this model so I'll not bore you, repeating what has been already said about the ship. Anyway, I'm available for any clarification and further information. I have been basing my work mostly on Heinrich Winter's drawings, as shown in his book (Delius Klasing edition) and photos of the museum's model. For shapes and coluours I based my work - as said - on ancient paintings. I think, first planking is not interesting, (if not, I'll post something about it) so I start with the first changing I did: the shape of the stern and the hight of the rear bulwark. The internal deck's course was uncorrected, and that fail has beeen reproduced by the kit designers on the external. Following the kit drawings and intructions I'd have had many problems at the moment to place the second planking on the bulwark. I hope you'll find all this interesting. Cheers Alessandro


-
Nice work, Popeye. I like it a lot Alex
-
What a good fixing! For the inside panels, perhaps you can make them so: first pasting wooden strips on a card sheet; then drawing the correct shape on the reverse side of the sheet, than shaping the panel in its correct form, in the end pasting the whole new panel on the old one. It's better to keep a bit abundant the sides and shape their edges little by little with sand paper or a file. Cheers Alex
-
Thanks for your reply, Channel. I know Tamya products; I found excellent quality but a bit speed in drying. Good work and good model Alex
-
Hi, Channel! I like Bismark a lot, and you're doing an excellent model. Which set of colours are you using? Cheers Alex
-
It sems Padouck (or Paduc, Paduca, Padouk). It's an African wood used for furnitures or high quality wooden details. Time ago I bought a piece of it but it's difficult to use for shipmodellers because of its little holes in the texture. Cheers Alex
-
It's always a pleasure to give a look in your log, Ferit. I see, now you're doing stays (just where I have been stopping my Berlin ) and ... who knows ... maybe the looking to your good work will give me a new motivation to finish that model. I'm really curious to see all your rigging. Cheers Alex
-
I think the replica surely needs a door for ... the customers who pay a fee for a voyage on it ! Ancient sailors surely got a different care. Anyway, in Dutch flutes there was usually a door but beneath the aft castle, not beneath the fore castle. It was usually open, under the fore deck, but kit manufacturers prefer to keep it closed to simplify the work to modellers: if we think to all things that could be there (knees, beams, stays, anchor devices, ...) we can understand the reasons of this choice. Because of the little height of the first aft upper deck, the aft door was usually higher than the deck, which had a typical rounded shape. In this case, a middle-way between flute and gallion, I think it's better to follow BB instructions and really think that we weren't on the shipyards of that era to control the shipwrights' work ... and our shipmaster Popeye have been doing an excellent model. Cheers Alex
-
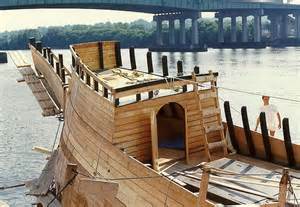
Half Moon is a Dutch ship, more flute than a gallion, and was common - in these vessels - to make horizzontal covering of the bulkheads. It was common, in general, for all vessels of the XVI-XVII century. I post a couple of pictures of the replica to show that, and there's a suggestion for colour and fore door ... You're right: leave what you have done, so. None of us was there, in the XVI century, to see that ship Chhers Alex photos by topfoto.co.uk (first) and flickr.com (second)

-
.... naaaaa ...... until now I had been missing this thread! And I had been missing also the upgrade to commodore. A great !!!! (and a lap of keel for me) The building looks really good. Only a dubt: you made the covering of the bulkheads with vertical strips but, usually, they're horizontal .... Cheers Alex
-
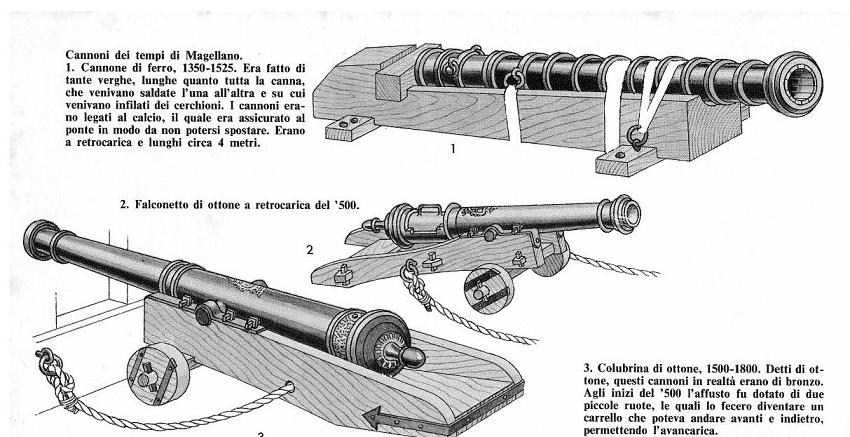
I've found a picture about that cannon, and others, used by Magellan (...at least, so wrote the author of the article...) Alex

-
Hi, Walter! Yes, the device you talking about is just the charger. It was a sort of iron can with a handle grip to move it in and out the cannon (I think, that handle grip served to make easier the handling of the device and avoided the crew burning their hands after a shoot). To make a shoot, in order: the ball (iron or stone made) was inserted in the barrel; the gunpowder then the wad were stuffed in the can; the can was inserted (better, embedded) in the barrel; a piece of wooden block was fit between the back of the can and the back of the gun support. At this point the gun was ready to fire. Yes, it was a retro-charged weapon. I saw these kind of weapons not only in that naval museaum (Galata museum, Genova, Italy) but even in Rome, Castel Sant'Angelo (Saint Angel Castle). They were great-caliber cannons and defended the castle during the XV-XVI century. Cheers Alex
-
Randy and Michael, thanks for the kind words. I hope you'll have the same opinion when you and me will see the final result !!!! Cheers Alex
-
it has been a good business, then! It's not easy to match wood colours using staining products. I still remember the swearwords of my uncle, carpenter, when customers asked him to do that (... and, I ensure you, the Italian language can be really very creative, in formulating swearwords....) . Congratulations Cheers Alex
- 1,668 replies
-
- 1
-
-
- syren
- model shipways
- (and 1 more)
-
Hi Augie! what a series of news. Glad to hear that nothing serious happened you, but ... did you go to the hospital before or after the order of the Confederacy? I hope the Confed's price haven't been the cause of the ill Cheers Alex
- 1,668 replies
-
- 1
-
-
- syren
- model shipways
- (and 1 more)
-
Thanks, mates! This is my first (I hope not the last) medieval ship model and many building aspects of that era are still surrounded by a "dark fog". I'm groping in that fog with my modeller tools and, in the end, I'll glad if the result will be something realistic ... more or less. If you think my Hanseatic ship is a good ship to see, it's a good motivation for me to continue in this challenge; I sincerely thank you for your looking here and for your positive opinion. @ janos. The deck is made with aged maple strips (1x5 mm). Cheers Alex
-
Thanks for your kind worlds! I don't like two things, in that deck. First, what Popeye correctly said; the deck was designed too long, and that obliged me to make strange knees. The outer knees aren't a bit thin but ... carved! I hadn't space to place knees beside the beams, so ... I carved a bit the internal section and the beams are in part beside the knee and in part on the knee. Second, I don't lke completely the shape of the lateral axes of the deck: perhaps it would have been better to bend a bit all axes an make something more harmonious. You're right, Mark. I'm a strict judge of myself Cheers Alex