bgarden
-
Posts
74 -
Joined
-
Last visited
Content Type
Profiles
Forums
Gallery
Events
Everything posted by bgarden
-
 Hello, I have yet to see your build log but I would like to say that you are doing a great job. Your ship has some really nice lines. I like the balance between the painted lines and the exposed finished wood, as well as, the bow and stern are very royal and strong looking. Keep up the good work. You chose a great kit to build. Brian
 -
When I saw your first attempt at cutting deadeyes using stock dowel I though, wow, what great work... But of coarse your work isn't good enough at "wow" you re-did said dowel in cherry and all I can say is that the test deadeye looks Fantastic! Keep keeping the bar set so high. Brian
-
Yes Bob your repairs seem to have worked out just fine. Working with such small parts can really be a challenge. Things like those jaws can be delicate. Giving them a little more strength might be good to keep your ship from breaking down the road while working around it. Brian
-
Hey Salty, It is great to see all the little details, they really are like little models within a model. And I totally know what it is like to have flap-jack hands, half of the time these little parts that I am holding end up on the ground and there goes 10 minutes of modelling. Lets just say I am well acquainted with my floors. I am a little jealous about how easy it is too find blackening solutions. Here where I live (and from what I understand all of Canada) these products are really limited and the only thing I could find is gun metal blue used to touch up guns but it does not work well. By the way I think your avatar dog truly looks like one gritty salty sailor! Brian
-
Larry, your waterways looked great from the pictures that I saw. Piece by piece is perfectly acceptable method. I guess what matters is that how ever you build it that your think ahead to the future steps on the build.... much like Ron had pointed out. Ron, TIm, Patrick, David, Buck, get to hear from you! Thanks for checking in. Bob, my avatar is me showing you the blue prints to this build. When done thats what she should look like... and I do, do a bit of test fitting but in this case because the plank sheer is pre-notched, I will want to fit my boat to the part and not the other way around...if that makes sense. I did check though to make sure that I am not way off. So far so good...I think Thank you everyone for stopping in and giving little encouragement's along the way! Truly, I am grateful. I am sure that some of my approach's to my build will be a little unconventional and in turn probably will not work out but hey, what the heck, you only live once right! As for some of these initial parts that I am installing, I thought that it might be good to achieve the desired shapes and curves before installing them allowing me to really check the individual parts against the plans and then when installing them I can adjust the ships framing as need be. This idea also comes from my last model where when painting parts that were installed on the ship already, the difficulty in sanding and repainting parts became very difficult. I am using on this model Humbrol paints which are oil based, so painting will be slow and when I will paint any given part I will want to paint it at least 3 to 4 times, sanding in between. I think that when I got started with installing the bulkheads I had a difficult time keeping everything a 100%. I found that as I squared one thing up another thing I would notice become out of line and so on. I don't think that there is anything major that is at issue but as with everything when your attention is completely on one thing that thing will never be perfectly right to you unless you are one of those master ship modellers (like a few of you) of which I am jealous at your skills. Tomorrow I will put on my third coat of red pain on the waterways (hopefully) and if I can I will take a picture. Brian
-
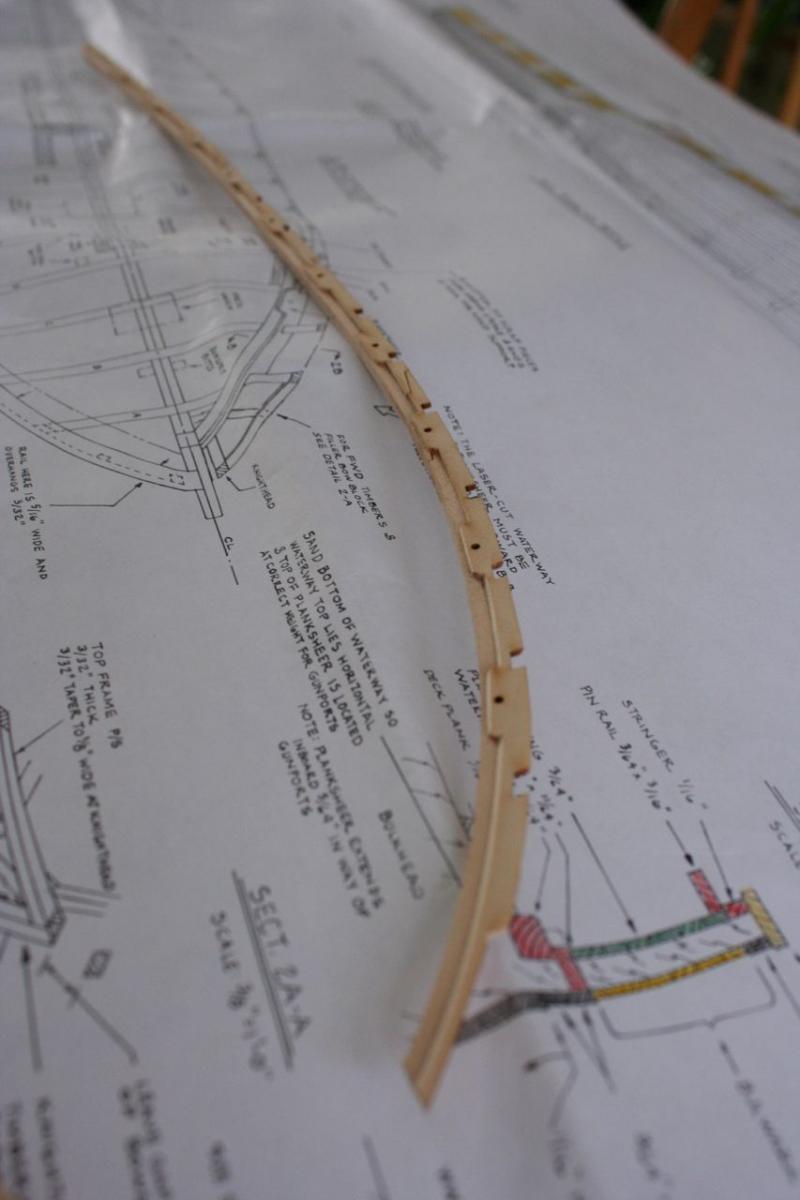
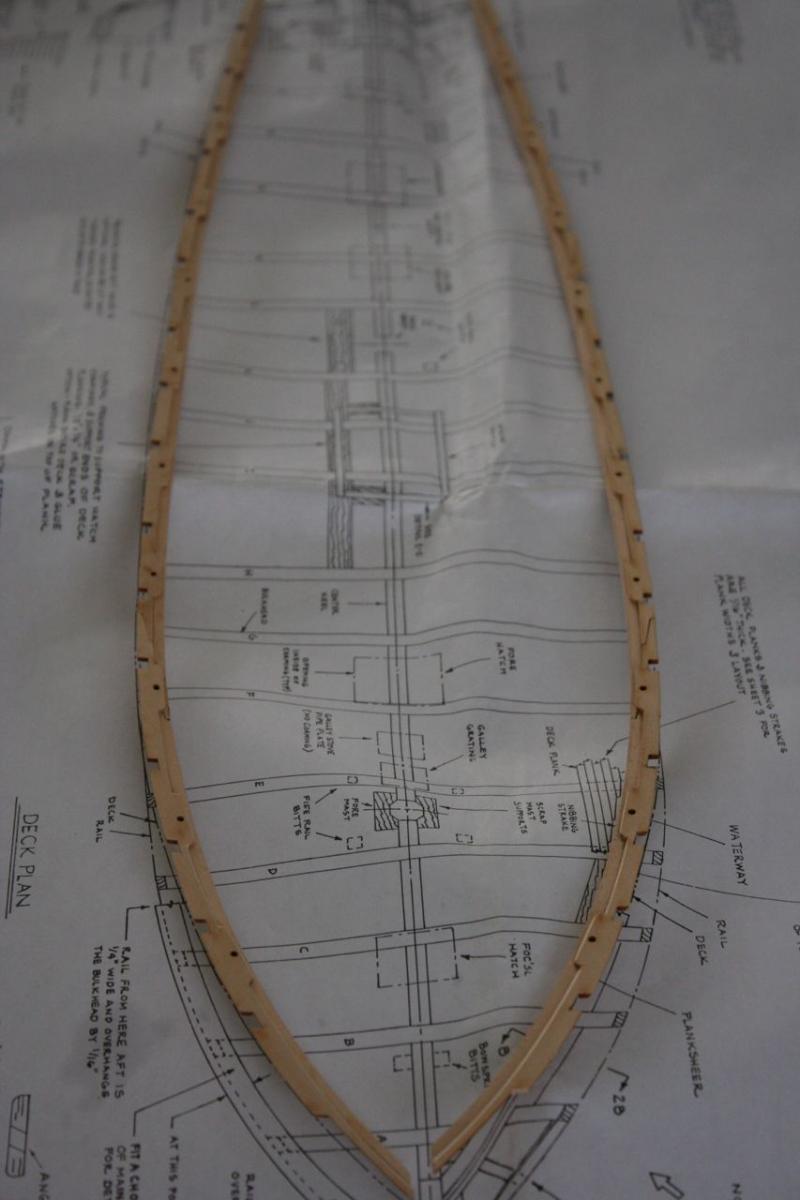
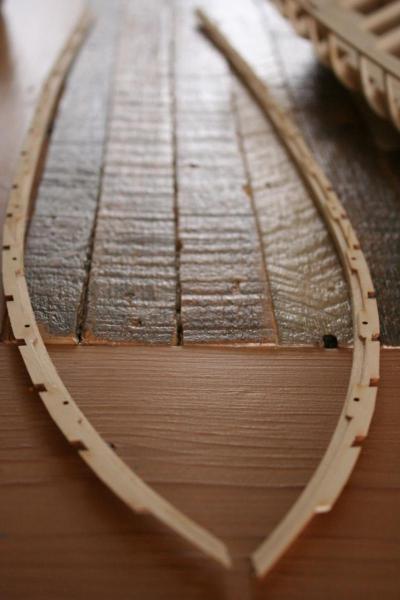
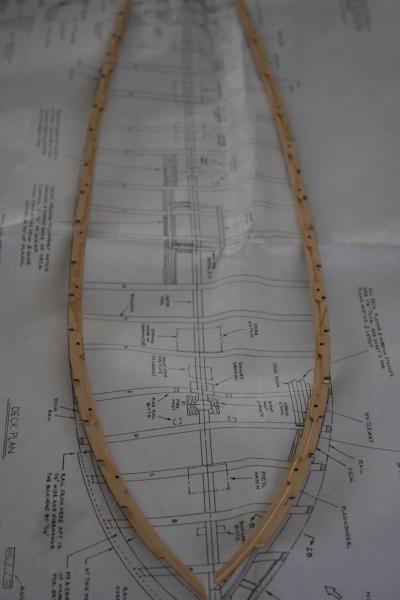
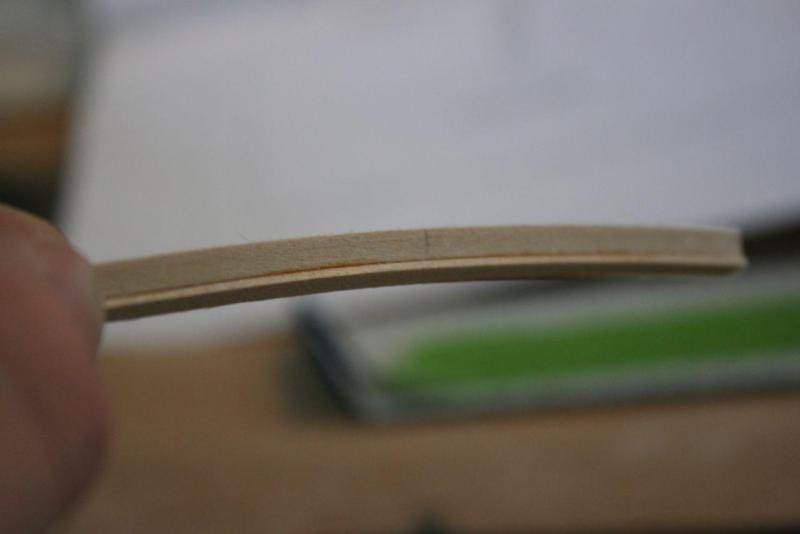
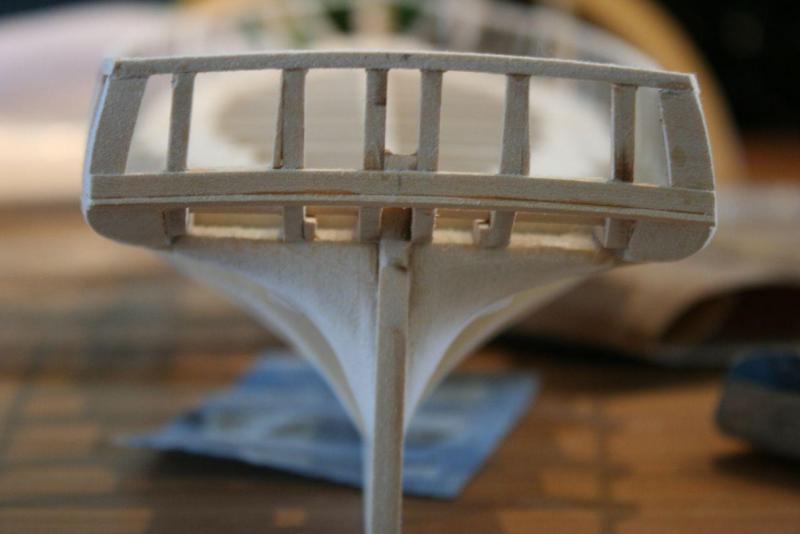
So this weekend I got a few hours to put into the Niagara. I thought that it might not be such a bad idea to pre construct the waterway and the plank sheer and assemble each sides 6 pieces into one fluid piece. Among assembling the plank sheer and water way I keep doing minor adjustments to the top rail that was recently installed. I figure that over the coming weeks as I work around the hull I will keep an eye on the ships lines and do what I can to adjust an improve. But here are a few pictures of the waterways and plank sheer. Next this week I will paint these pieces before installing them, and then next weekend install them. Brian

-
I think I remember seeing a few different builds by others who had also used construction paper technique to simulate the ships caulking and it seems to come out really great I may consider doing the same in the future. I can't wait to see a whole deck done this way. Get to see your posts. Brian
-
Hey Larry, it is great to see that you are giving so much care to each task that you perform on your ship. Working with wood can be tricky as each piece is different from the last and from one type to another wood performs in many different ways from carving to bending to rigidity, even to how the relative humidity can contract or expand the wood can really affect things along the way. If I remember correctly and to piggy back on one of Patricks comments when I planked my Bluenose I glued each plank to each other at the width (or sides) as well as to the bulkhead. This help tremendously and kept the hull planking a little bit more on the same plain so that sanding was not to labour intensive. I also held off from planking the deck untill the hull was done so that I could smear a generous coating of wood glue on the inside to keep the moisture out. I just painted the glue on with a brush and let dry for a day or so and was good to go. Your stern planking looks to me like it will turn out terrific. Keep out the good work and have a safe a good trip North where ever you are going. Brian
-
Patrick- First I admire your ability to receive a Cony Kit and hold off from building it for a year. Your a better man then me. I have been building the bluenose for a year and just decided that taking a break for a period may clear my mind a little before jumping back into it. The Constitution is a beautiful ship, marking a really interesting part in your National history. As for a Model shipways kit, you are bang on about the wood that is supplied. I have been generally very happy about their standards. And would fully endorse their kits. Larry, I thought that after fairing the outer side of the hull this left the inner side of the bulkhead posts (or stanchions as I think they are called??) to be a little to flimsy to fair. So it was my thinking that a good way of pulling those members in line and to stiffen them it would be better to use the extra wood and draw a false rail in the framing. This also would give me the edge I needed to develop the hulls curve at the rails before building the gun ports. Unfortunately I am not the fastest modeller due to work and life. Tonight my wife is out so I thought I would catch up on some logs and maybe even do a little work.... Ken, Thanks for the welcome. The Niagara must be a magnificent boat to attract the attention of so many modellers. I look forward to hunting down your log and seeing your build. Brian
-
Hey Bob, I have been quietly enjoying your log for sometime now but I cannot remain silent any more. Your build is truly fantastic. And the log you had on the old site was such a wealth of knowledge... I am so glad you are back up and running. I want you to know that I have been building a bluenose for over a year now (the same kit as yours) and this log help to persuade me to do it. I thank you. The bluenose is truly one of the most beautiful ships to me. Her lines are like no other. I just wish I lived back in the days of the original America cup. To see those boats rip through the rough water like titans would have been amazing. And the guts those sailers must have had to sail in the rough Atlantic waters....nuts. I read somewhere that most of those who sail amongst those ships could not even swim. They thought that there was no point, that by the time a man fell over board in those types of waves they were a goner anyways... Keep up the good work. I think builds like your bluenose are staples among the "halls" of the Model Ship World. Brian
-
I love your techniques with wood working and even with the brass are very crisp and clean. I really like the tools that you employe to form the wood and not stress or damage anything, this leaves the wood to sing with the inherent beauty of the woods you have chosen. The lemon oil seems really fantastic. I think that it gives the wood the perfect depth without going too over board and drowning out the grain. Thanks for the posts. Brian
-
Sitting in all that wood and fittings is a ship crying out to be built. Good luck, and have fun starting. Brian
-
Hello David, I have yet to post on your log yet but I must say your build is looking great! I am blown away at the huge bowsprit the Niagara has, I mean check out the nose on that one... Beyond your beautiful bowsprit, the deck details like the capstan and the pump, channel plates are all first class. Brian
-
Welcome. I'm sure many people here will be glad to see your log, and will walk with you along the way as you build the Trinidad. Happy modelling Brian
-
Buck your work looks terrific. The finish on the wood looks so rich your hinge joint on the rudder is first class and your hand made keel is perfect! Good job on showing so much care on the little things they really shine. Your boat makes me wish I was by the sea sailing away. Thanks for the posts. Brian
-
Having a ship at the stage yours is at is great no matter how long you take to finish because she is already a mantle piece. I'm sure you must often poke your head into the room she is docked from time to time and just enjoy the view. Brian
- 299 replies
-
- 1
-

-
- niagara
- model shipways
- (and 1 more)
-
Wow Ron I am somewhat new to this forum and to your build but I must admit that your work is truly, with out exception, marvellous. I know that when i need a little inspiration in my own build I will look to yours to help. Brian
-
It is nice to see these kits as they get past their skeleton stage. Installing the waterways and the plank sheers really will help give you boat a face. I also love that as more and more items are installed there is more reference points to measure off of to check your work against the plans. At the begging for me all I find to reference is to use my eye and my judgment. Keep up the good work sir! Brian
-
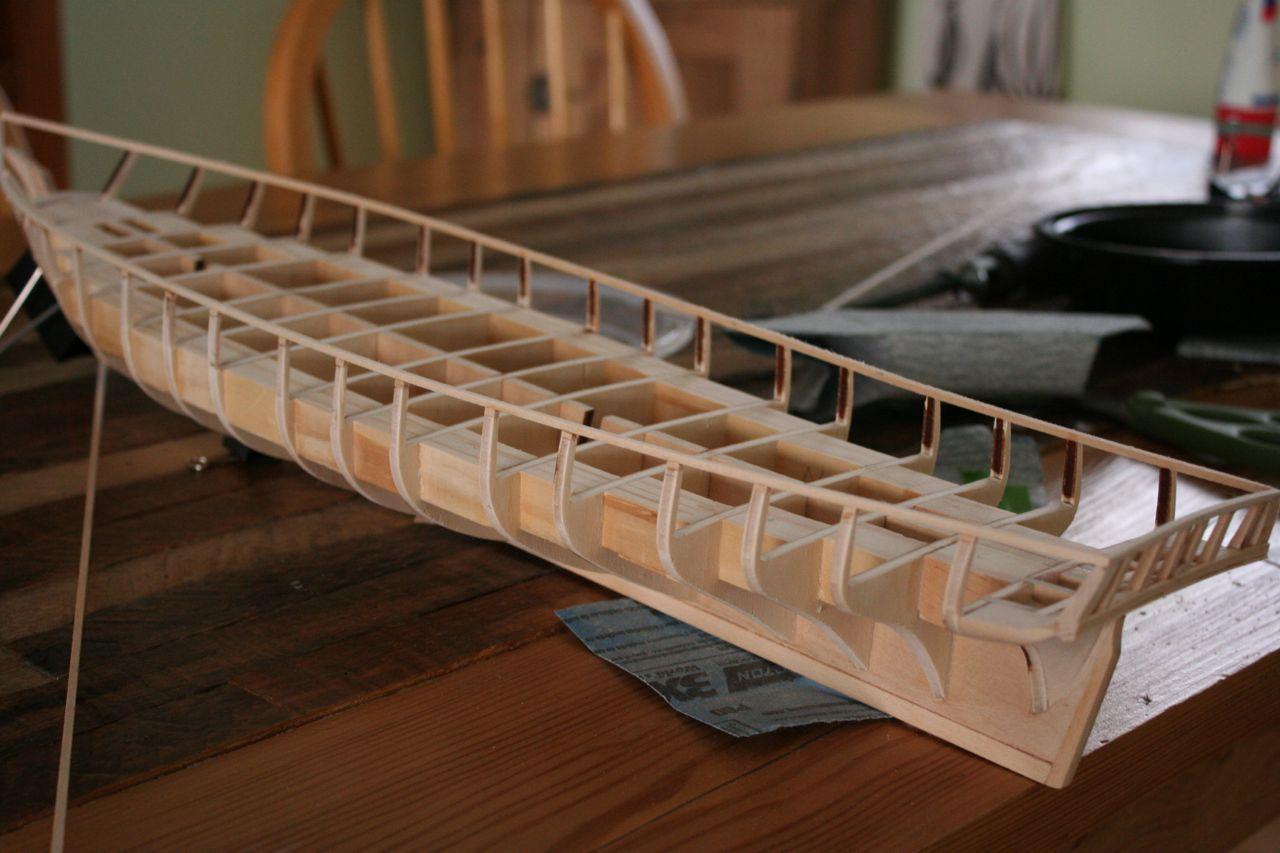
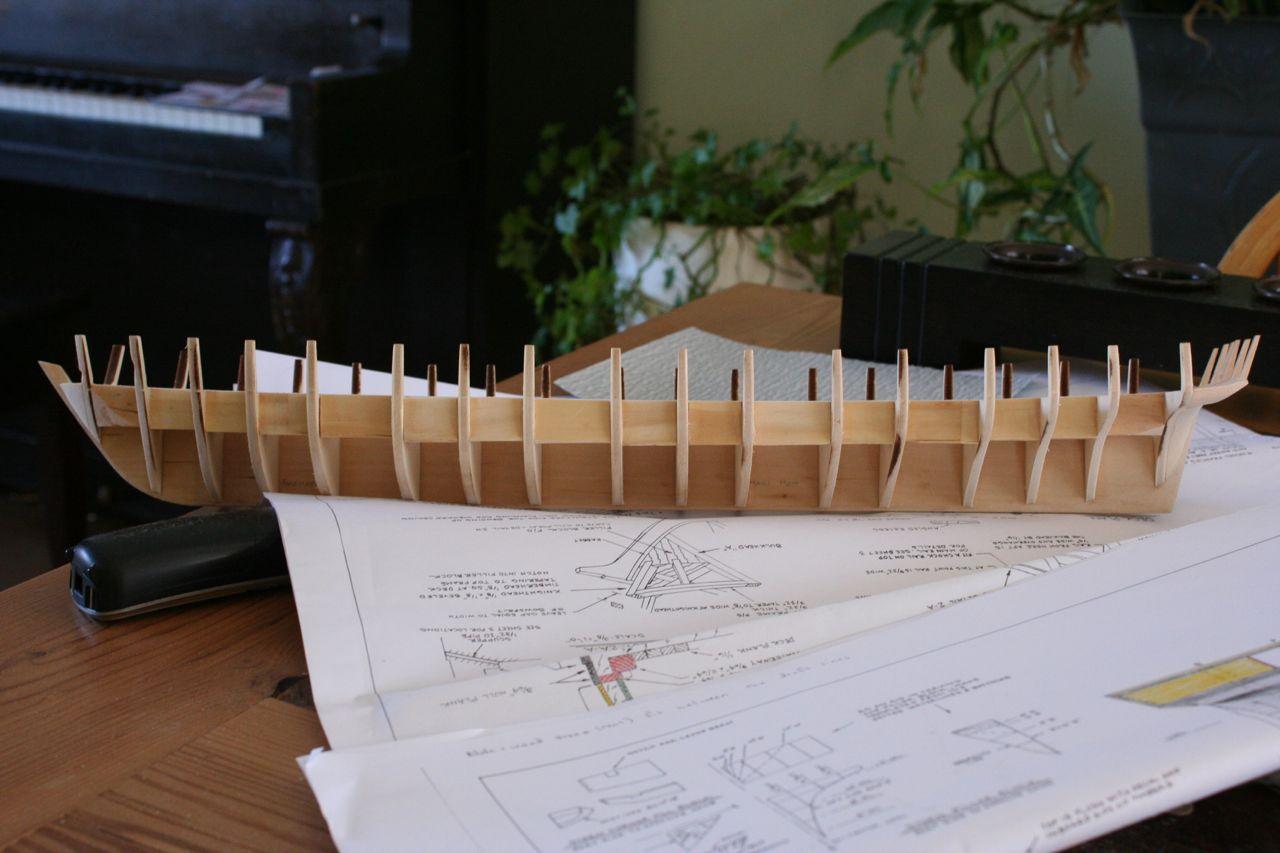
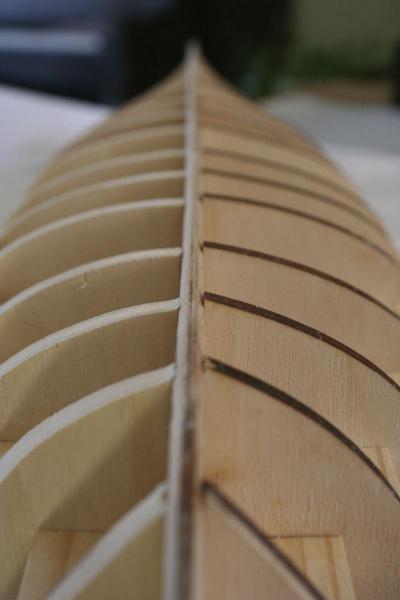
Over the past week or so I had decided that I might work on the blocking for the gun ports and the rails. I thought that I might take a bit of a different approach then what the kit prescribes. I thought that it might work well to forgo the blocking between the bulkheads, but to instead drop the post on each bulkhead and install one continuous rail along the top. I thought this would help give me a better idea as the the subtle curves the ship has and to save a bit of time. In end it causes me to loose a bit of extra wood from the kits stock but it may give me a better platform to work from. Also along the stern I installed the Arch board. To do this I roughly bent a longer piece of wood and cut out the portion that most resembled the arch in the plans. Next I glued a transom plank to it to at the angle indicated in the plans. Doing this gave me a great starting point to make measurements off of and to stiffen the horn timbers a little better. Cheers, Brian


-
Larry, hello and thanks for your welcome. I love that there are so many Niagara's being built at the moment. I am sure that I will follow and learn from everyone here including your build. And I know what you mean about those dreaded timber horns. The ship has some subtle curves to her, while keeping those line and every thing plumb and straight is a bit of a trick. Patrick wow, three years. What a journey! I mean your work is stunning and you can really tell that your ship has had a lot of heart put into it. I am a year and a half on my Bluenose which I am taking a little break from now, but when I look back on the pictures I realize how much I have learned and how much better my craft got. I wonder if you have given any consideration as to building another model? Brian
-
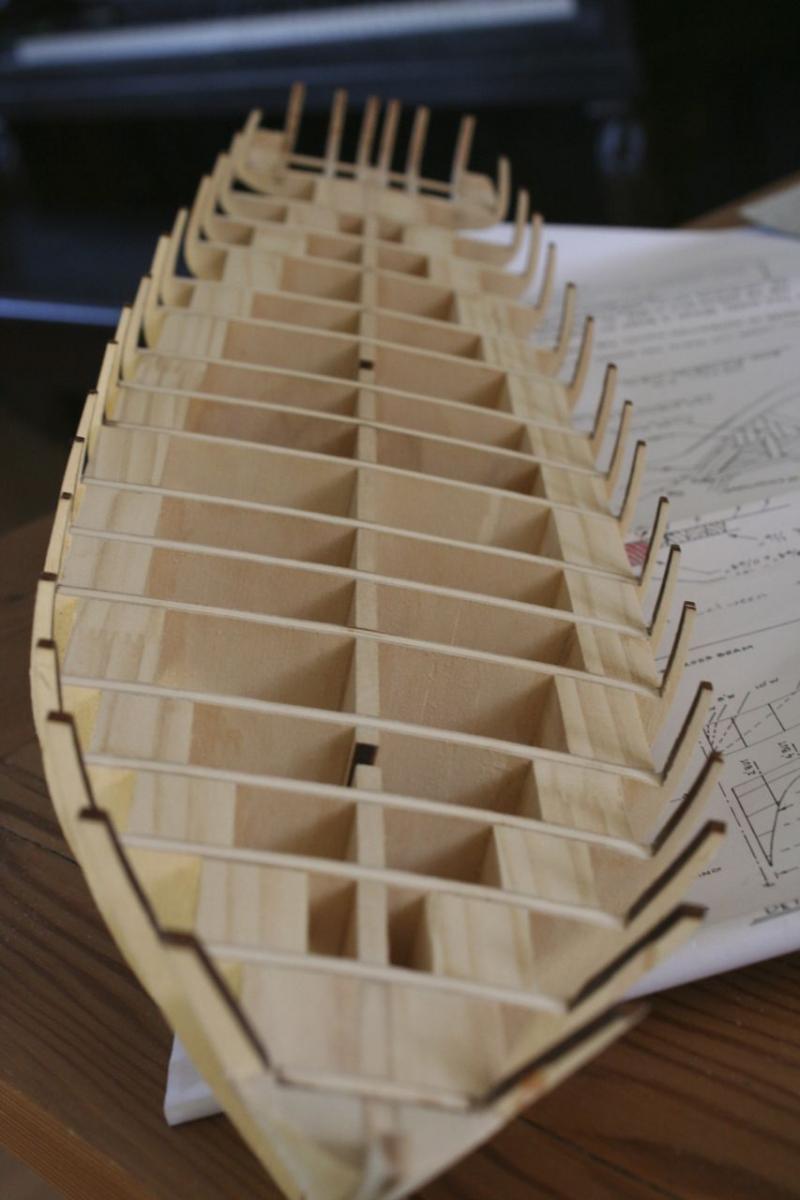
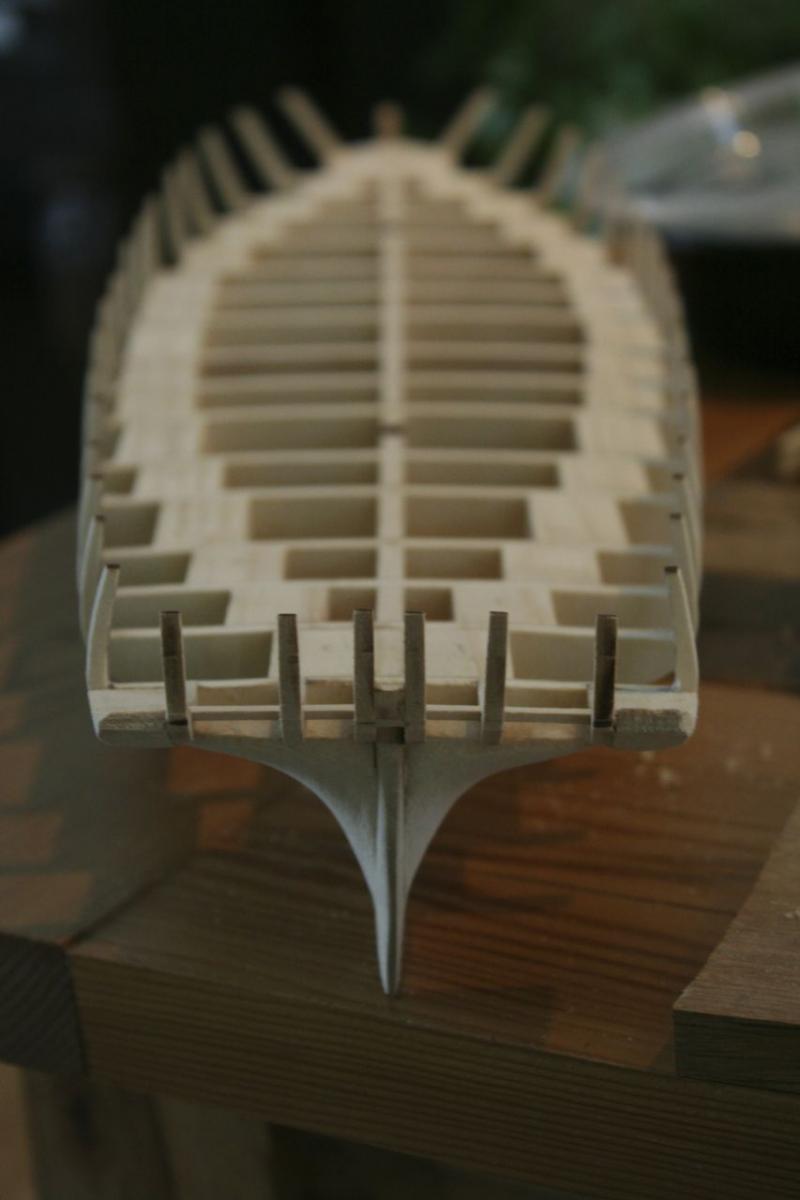
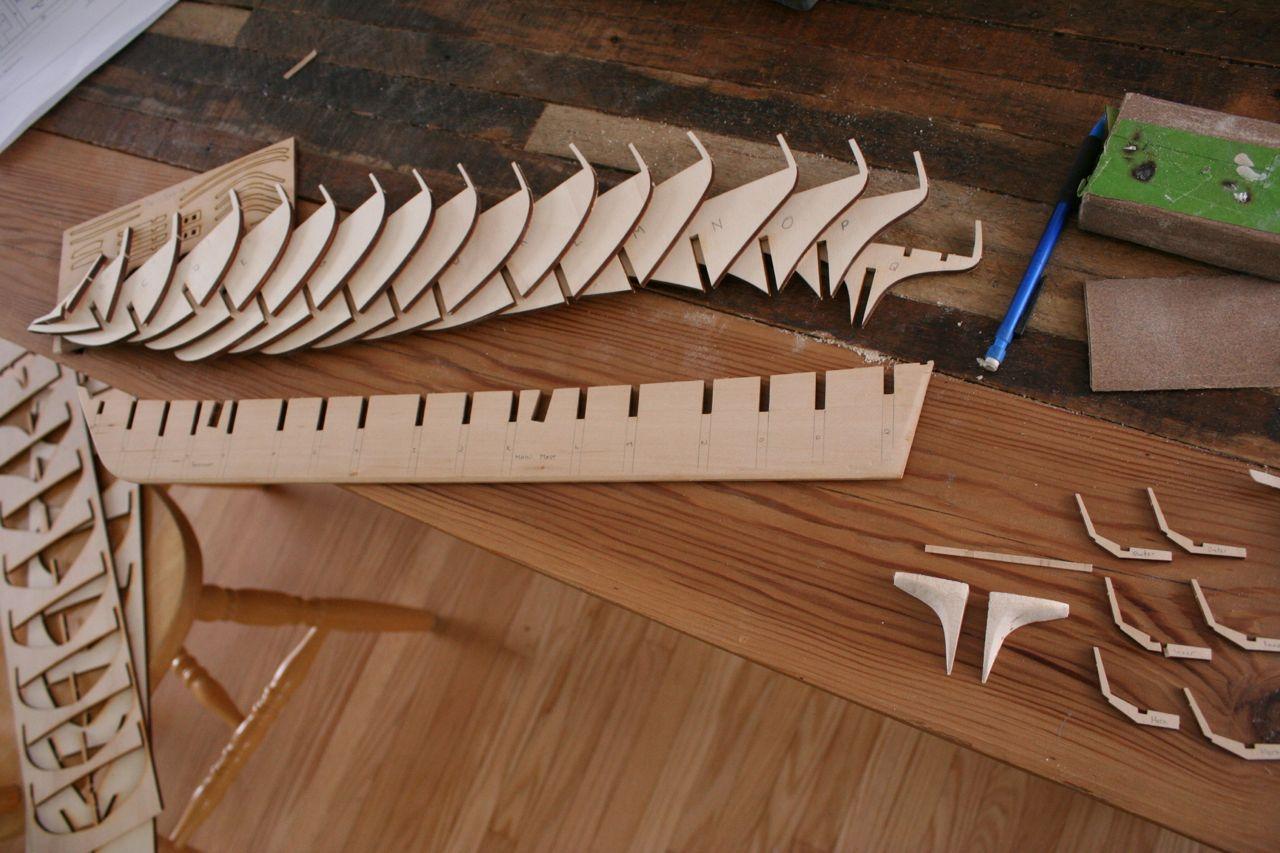
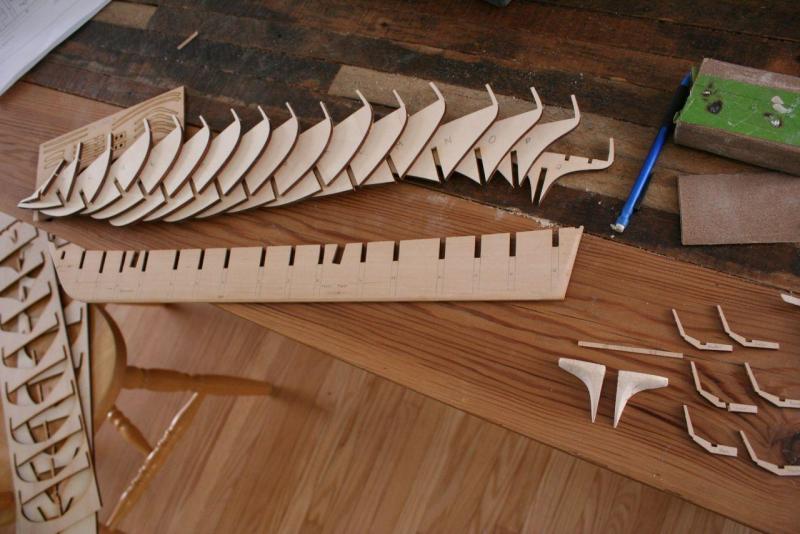
Hello Patrick I am glad to receive your welcome to the club. I have seen your build and would be very happy if mine came out even half as good as yours. I understand that you are basically on the final mile on your build... You have something truly to be proud of. Can I ask how long have you been working on it to date? Here is one more post to catch up to where I am at, at the moment.... Having dry fix all of the bulkhead members with the centre keel, I felt comfortable slowly glueing the basic skeleton frame together. I chose to leave the bottom piece of the keel off just to ensure that when I faired the hull I would do no damage to it. The last bulkhead at the stern was something that I tossed and turned on different ways to install do to the timber frames that project out (aft) of said piece. I thought that I might want to pre-assemble the whole unit and then mount it on to the keel, but in the end I chose to mount the last bulk head and then mount each timber individually. Having already finished that task I am still not sure which method would be better. Oh well. Mounting the bulkheads I took into account the deflection in the laser cut so that the slight pitch in the cut do to the lasers deflection through the wood would match the curvature of the centre keel. Keeping the bulkheads flush with the top of the keel I noticed that they sat a little low. But I took advantage of this so that when I faired the hull I would sand very slightly heavy in order to ensure that when the hulls planks are installed they will be tight. Once everything that I wanted was installed I ripped up some old door jam I had kicking around and used those pieces as blocking to stiffen up the whole unit. All-in-all, the ships first bit went well. There are a few flaws that I don't like but I hope to work them out in further stages. Brian


-
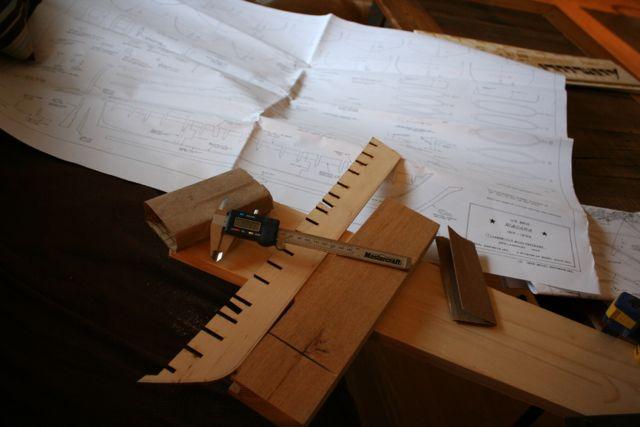
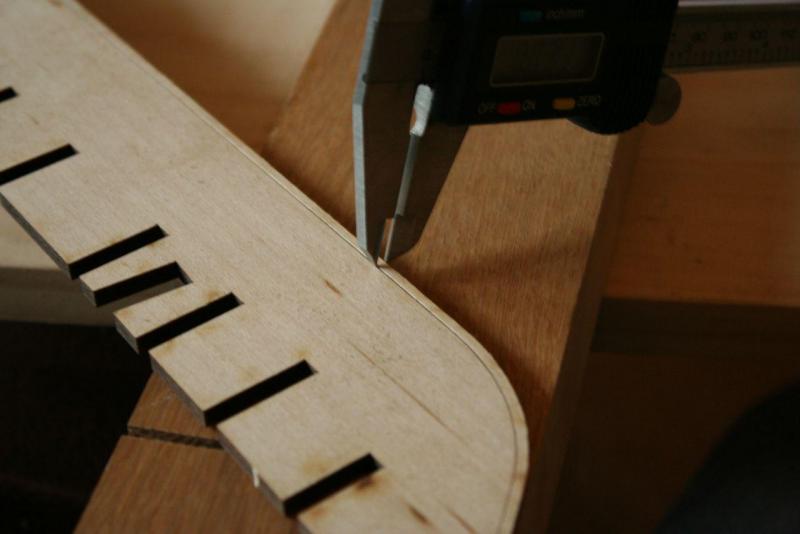
So I am just a little further then these posts, and am catching up a bit. Because the bottom of the keel with this kit is a separate piece I choose to take advantage of that by scribing 95% of the rabbit line with one of my favourite tools my calliper and then carved and sand the wood back being careful not to fold back too much wood with each pass of my chisel. Brian,

-
Hello, So seeing as the Brig Niagara club seems to be the popular club to be in these days I thought that I would jump in and start a log of my own. I first would like to introduce myself, by saying that I am a relatively new modeller. This kit will be my second wooden plank on bulkhead, and before that really nothing. My first kit, which I am almost at the rigging stage, is the Bluenose 1:64, also by MS, and has/ is been a joy to build. Her lines are fantastic and being a proud Canadian, she is simply a must to build. But I thought that I would do a little multi-tasking and work in chucks between old Blue and Brig's Niagara. Also to give a bit of context, I grew up in the Canadian side of the great lakes (in which the Niagara sailed). About two years ago I really had nothing to do with ships and their history, but after stumbling into this web site I fell in love. There are so many of you who post such stunning work and are so imaginative that I became inspired. I also have found the history of the birth of the United States to be a really interesting read especially through the eyes of the early Navy. Although, the battles between the British and the Americans on the Great Lakes were a small part of a bigger war, I think that the boats built in that area in that time were incredible. If any of you haven't read the book Six Frigates or the book Broadsides they are really interesting reads. Anywho, I will post a few pictures in the next day or so, depending on how busy work is, but I thought I would get the ball rolling and get this log on to it's feet. Cheers, Brian