HOLIDAY DONATION DRIVE - SUPPORT MSW - DO YOUR PART TO KEEP THIS GREAT FORUM GOING! (Only 53 donations so far out of 49,000 members - C'mon guys!)
×

j21896
-
Posts
287 -
Joined
-
Last visited
Content Type
Profiles
Forums
Gallery
Events
Everything posted by j21896
-
 Season's Greetings Augie! So here you are, closing out this year the same way you closed out last year -- that is, doing fine work on yet another beautiful model ship! May the pattern continue in the coming year(s) Merry Christmas, Robert
 -
Hi Jason, Your rope work is looking as nice as your wood work! No small task that! Per your reference to it, I've picked up the Darcy Lever book -- just in case I ever get to the rigging portion of the build Merry Christmas to you and Yours, Robert
- 800 replies
-
- 1
-

-
- snake
- caldercraft
- (and 1 more)
-
Hi Bob, You do some really nice stuff with a little bit of boxwood and holly! I especially love that first overall shot -- really shows her off beautifully. And that cabinetry below the stern windows is fantastic. I look forward to seeing more, but understanding you're busy for "The Season", I'll say it now -- Merry Christmas to you and your family. Cheers, Robert
-
Well Martin, I'll certainly look forward to seeing more pictures! Merry Christmas to you and your family. Robert
-
Hi Martin, I tracked your build down from your signature You're doing a fine job "bashing" Mamoli's offering! Looking very good. And to be all the way along to the rigging -- I'm envious! I see you started your log well into the build, but how long have you been working on this project in total? Cheers, Robert
-
That is a handsome ship model Elia! The crispness of the building is nicely complimented by the crispness of the paint job. Beautiful! Cheers, Robert
-
Thank you so much B.E.!!!! That is absolutely what I needed. I'm not at all familiar with the Training Tackle. I think I will omit those eyebolts. I hope that isn't a huge issue. One last question, as I will be making all of the eyes and rings from wire, are there rules for the diameter of the iron itself that was used in these fittings? Thanks, Robert
-
Hi Jim, I've been another silent follower and admirer of your Snake build log. I'm so sorry to hear about your disaster! As a fellow cat owner, I know all too well the dangers that lurk just one playful leap away -- a fact that earns bannishment from the shipyard most of the time. I'm very happy to hear that you're going to be able to regroup and continue, as you've done such a fine job on her! I'll also be less silent as I follow the rest of the way. Cheers, Robert
-
Thanks folks! Your encouragement and support is greatly appreciated!! Robert
-
Hey John -- very reminiscent of my last visit to Mystic Robert
- 2,250 replies
-
- 1
-
-
- model shipways
- Charles W Morgan
- (and 1 more)
-
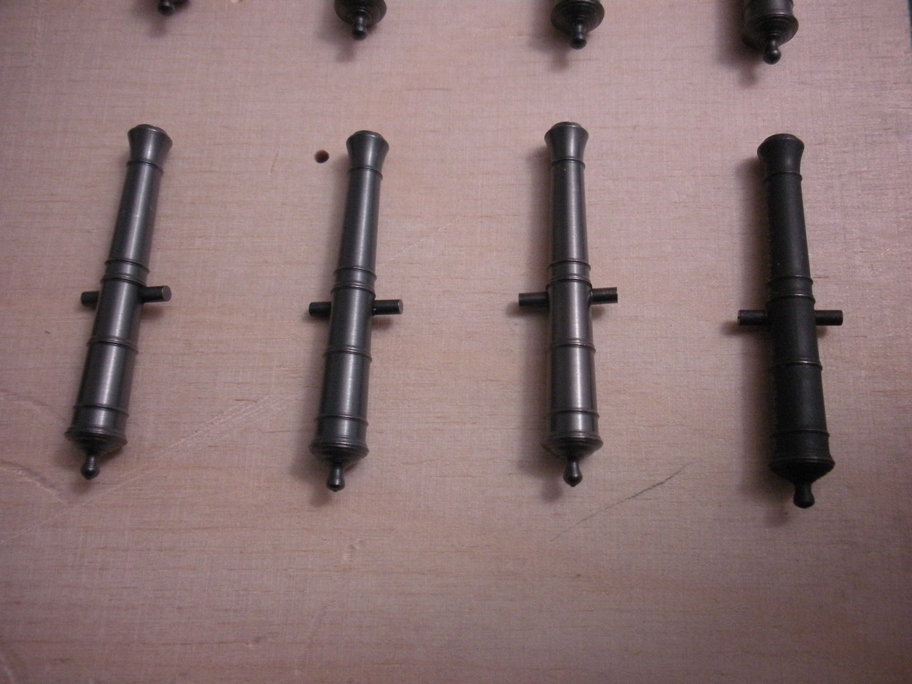
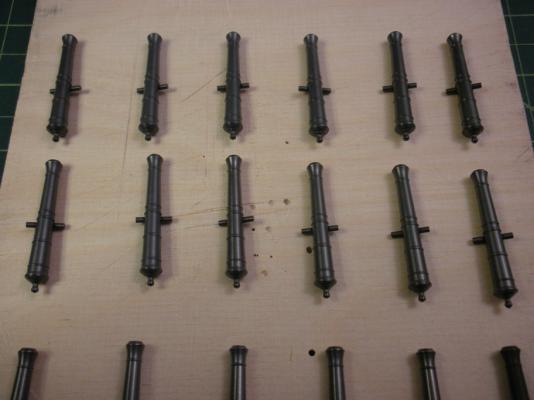
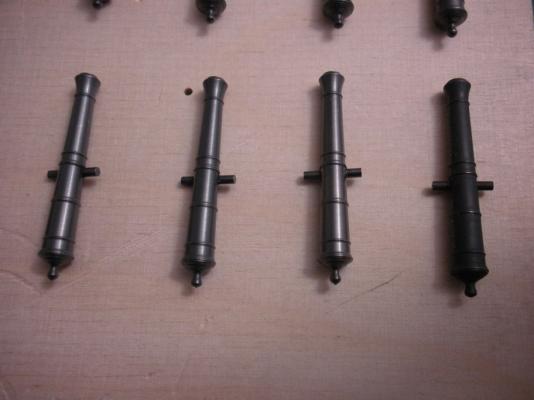
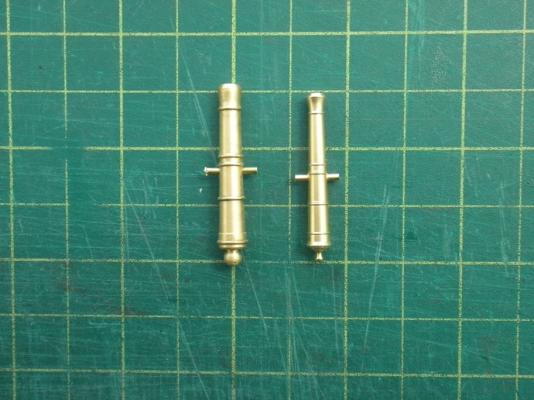
Cannons – Blackening Using the process outlined in many places on MSW, I chemically blackened the guns. Maybe some minor variations from what others use for mixture ratios or the duration of each step in the process, but pretty much the same drill: Silver solder trunnions in place Acetone bath for grease removal (15 – 20 Minutes) Muriatic acid bath for surface etching (15 – 20 Minutes) Thorough rinsing with cold water Blackening bath, 5 parts Birchwood Casey Brass Black, 1 part distilled water (approx. 2 – 4 minutes) Thorough rinsing in cold water Following a few minutes of air drying, buff with a soft cloth The end result, depending on the lighting, looks like a pretty attractive deep, gun metal gray. While I think they look kind of nice as is, the shine is a bit overwhelming for 1:64 scale. Therefore, the final step will be to seal them with a coat of clear, matte lacquer. The result of the matte finish treatment can be seen on the gun at the far right. With the reduced light reflection, it now looks more black. Onward to making some carriage bolts, eyebolts, and ringbolts... Robert

-
Thanks for that explanation Ron. Man, that boat looks great on deck! Robert
-
Those windows look great Bob!! Robert
-
That is just nicely done John! Really great work! Robert
- 2,250 replies
-
- 1
-
-
- model shipways
- Charles W Morgan
- (and 1 more)
-
Hi Ron, Looking good! Could you give a little more info on how you drew up your templates? Were the illustrations that you used at the same scale as your build? Thanks, Robert
-
Here's a link to the Naiad build by Ed Tosti (the "father of liver of sulphur" on MSW ) where, toward the bottom of the page, in post #446, Ed describes the ease of use of LOS and provides a link to Amazon where you can purchase it: http://modelshipworld.com/index.php?/topic/232-hms-naiad-by-edt-160-frigate-38-1797/page-30#entry85402
- 2,250 replies
-
- 1
-
-
- model shipways
- Charles W Morgan
- (and 1 more)
-
Great job on the tryworks John! It's amazing how much "stuff" was on the deck of a whaler. From the hurricane houses on forward, lots and lots of structures. By the way, I don't believe Blacken It works on copper. However, copper does blacken nicely with liver of sulphur. Robert
- 2,250 replies
-
- 1
-
-
- model shipways
- Charles W Morgan
- (and 1 more)
-
Hey John, I almost forget another consideration when it comes to using the draw plate -- the properties of the wood (or grass in the case of bamboo) that you’re reducing. Wood that hasn’t been sawn straight with the grain will present a big problem, as will overly dried-out or splintery wood. In my experience, good hard wood – sawn properly by Jeff at HobbyMill – like cherry or Swiss pear, works great, and can be drawn down through the smallest hole on the Byrnes. While I haven’t used it much, I’ve found that bamboo draws very smoothly and easily. I’ve never tried bass wood, but I’m wondering if it might be too soft to draw down to the smaller sizes. Hope this helps. Robert
- 2,250 replies
-
- 1
-
-
- model shipways
- Charles W Morgan
- (and 1 more)
-
Hi John, With regard to the draw plate, you can't remove huge amounts of material all at once. You have to start with a piece of wood that is at least relatively close in size to the hole you begin with. I think the largest hole is around 1/32", so you probably won't be able to initially pull a 1/16" toothpick through. I cut things down to size, or do some shaving with a knife blade or plane as necessary to get things close to my starting point on the draw plate. The numbered side of the plate is the back side. Meaning, you insert the wood on the side of the plate without the numbers, and pull it through from the numbered side. You'll want to draw through a hole a couple of times before moving to the next smallest hole. Also, check the numbering. Some of the increments between holes are bigger than others. For instance, on the smaller edge, the sequence is 36, 35, 33, 32, 31, 29, etc. You'll want to draw through 35 a few extra times before making the "double jump" of moving down to 33, and so on. Does any of this make sense? Robert
- 2,250 replies
-
- 1
-
-
- model shipways
- Charles W Morgan
- (and 1 more)
-
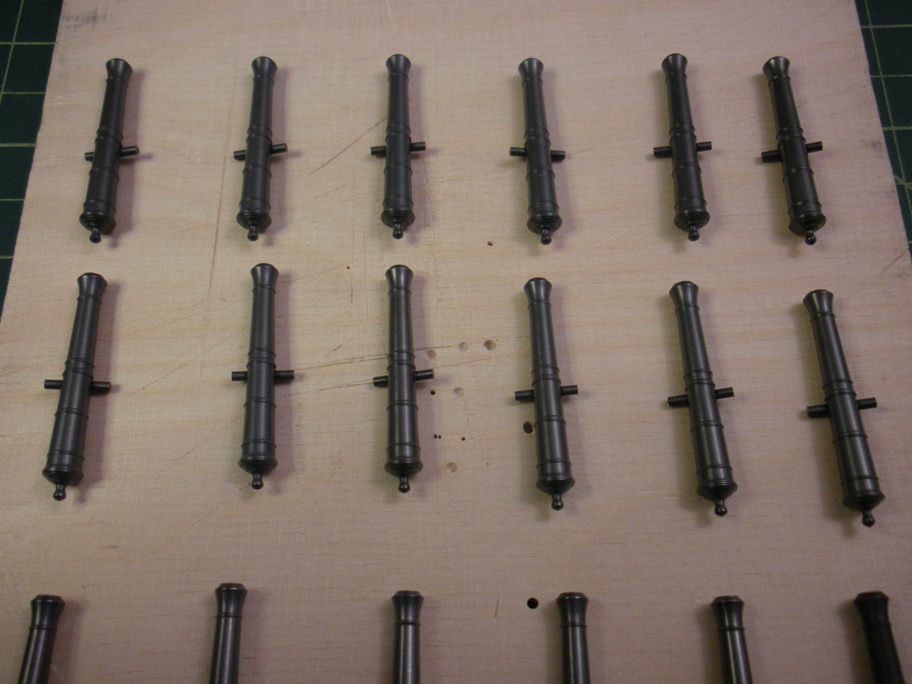
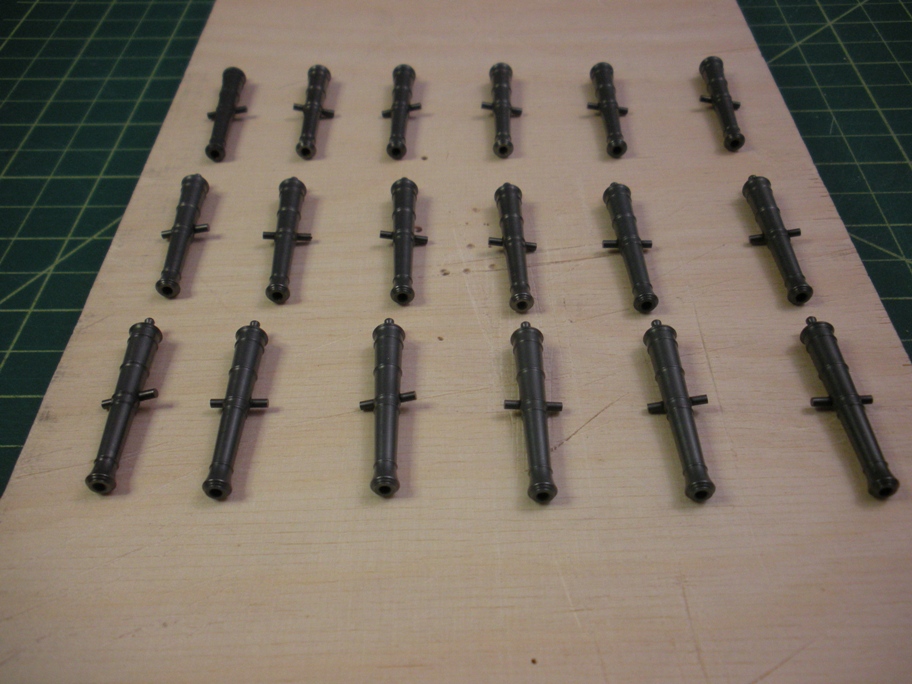
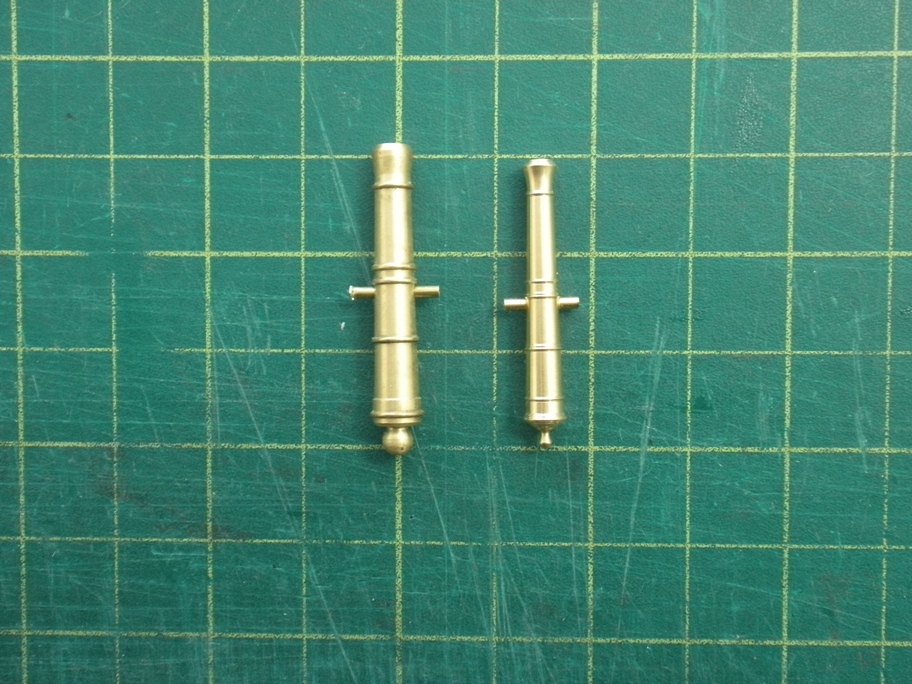
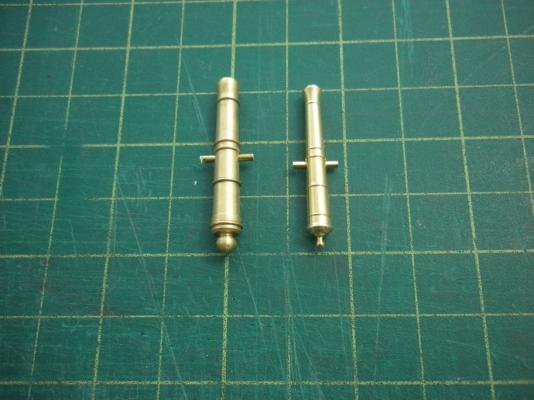
Cannons (replacement parts) All of the wooden parts for the carriages have been completed; they’ve been assembled, and given a coat of tung oil which needs some time to dry. I’m starting now to address the related ironwork – the most significant being the guns themselves. As previously mentioned, I didn’t care for the look of the kit-provided guns, as they seem out of scale – much too bulky and heavy – so I turned to Chuck’s Syren Ship Model Company for replacements. Side-by-side comparison with Kit-Provided on left and Syren Ship Model Co's on right. Needless to say, I’m very pleased with these replacements! On to the blackening process… Robert
-
Thanks Russ! I'll check their website. Robert
-
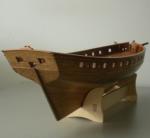
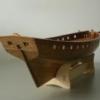
Well done Augie. That really is a LARGE model! Robert
- 2,191 replies
-
- 1
-
-
- confederacy
- Model Shipways
- (and 1 more)
-
I have the table, in Goodwin's book, with the sizes of the carriage eyebolts and ringbolts relative to the size of the shot. However, he mentions nothing about rope or block dimensions. Does anybody know if Lavery's book on the Arming and Fitting of British Ships might include this information? Thanks, Robert
-
Where's the best place to get specs for British gun tackle? Are there tables to determine dimensions of breeching rope, blocks, and tackle rope? Guidelines for when single blocks vs. single & double blocks should be used? Etc. Thanks, Robert