HOLIDAY DONATION DRIVE - SUPPORT MSW - DO YOUR PART TO KEEP THIS GREAT FORUM GOING! (Only 13 donations so far - C'mon guys!)
×


rcmdrvr
-
Posts
420 -
Joined
-
Last visited
Content Type
Profiles
Forums
Gallery
Events
Everything posted by rcmdrvr
-
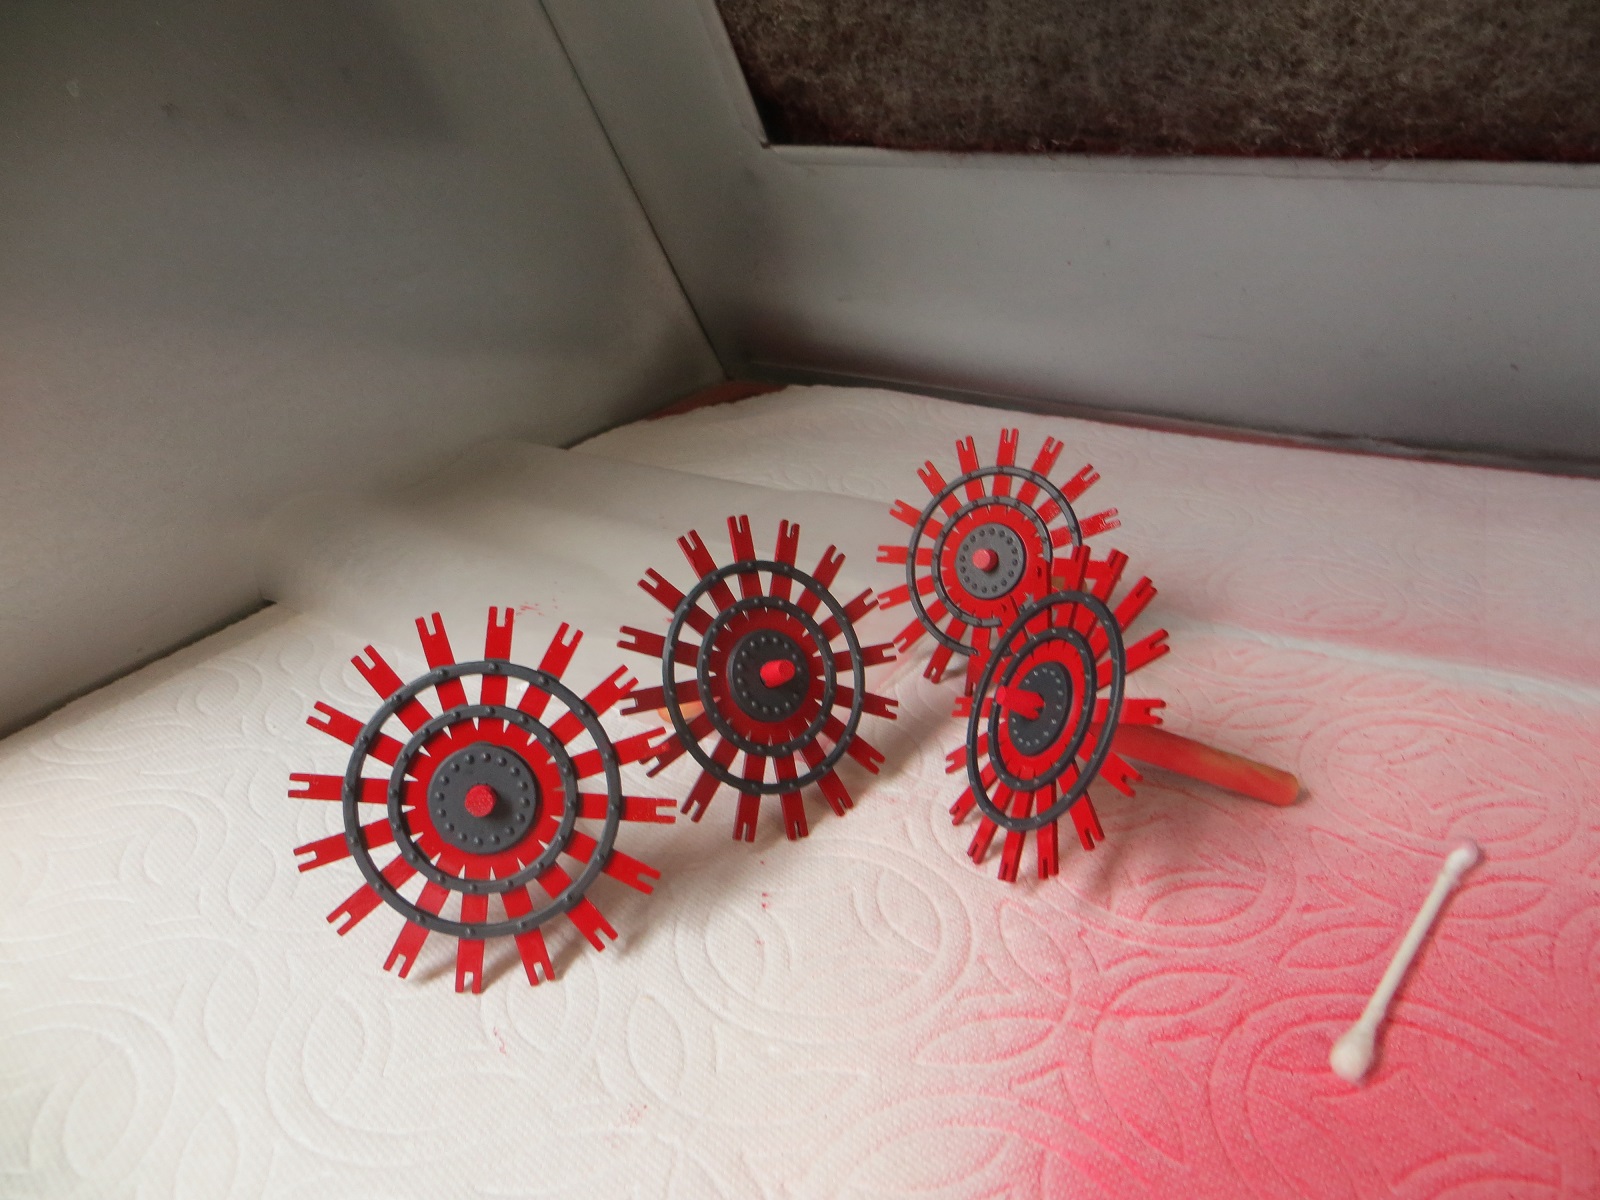
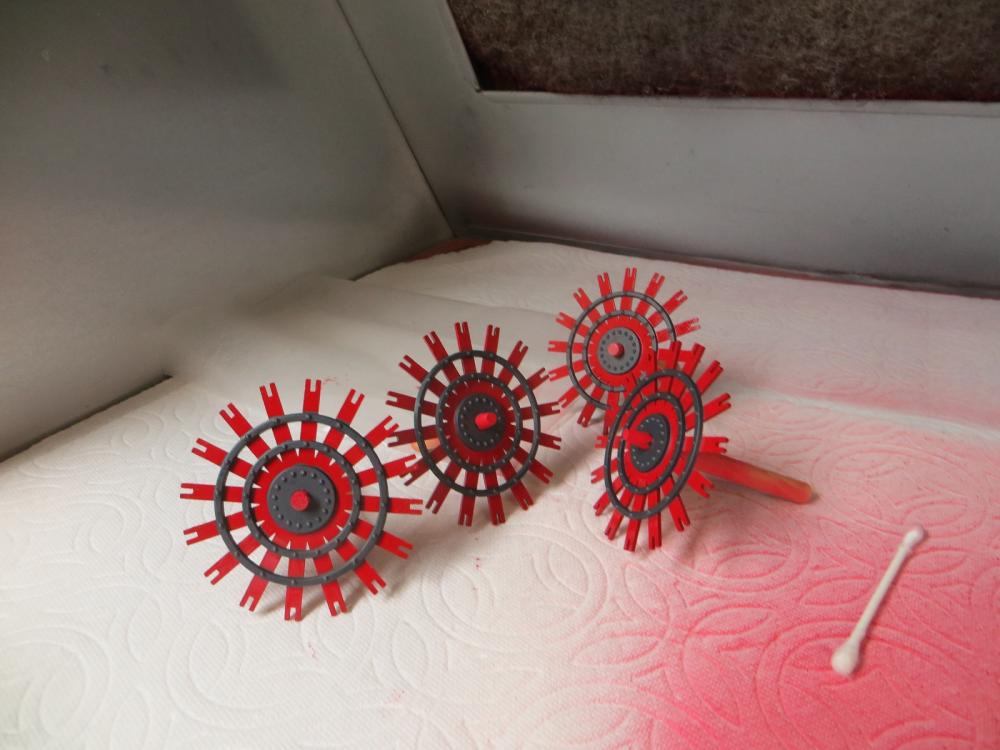
Started work on the paddlewheel. I airbrushed the red and hand brushed the dark grey. Next step will be to install the wooden paddles.
- 44 replies
-
- 3
-

-
- king of the mississippi
- artesania latina
- (and 1 more)
-
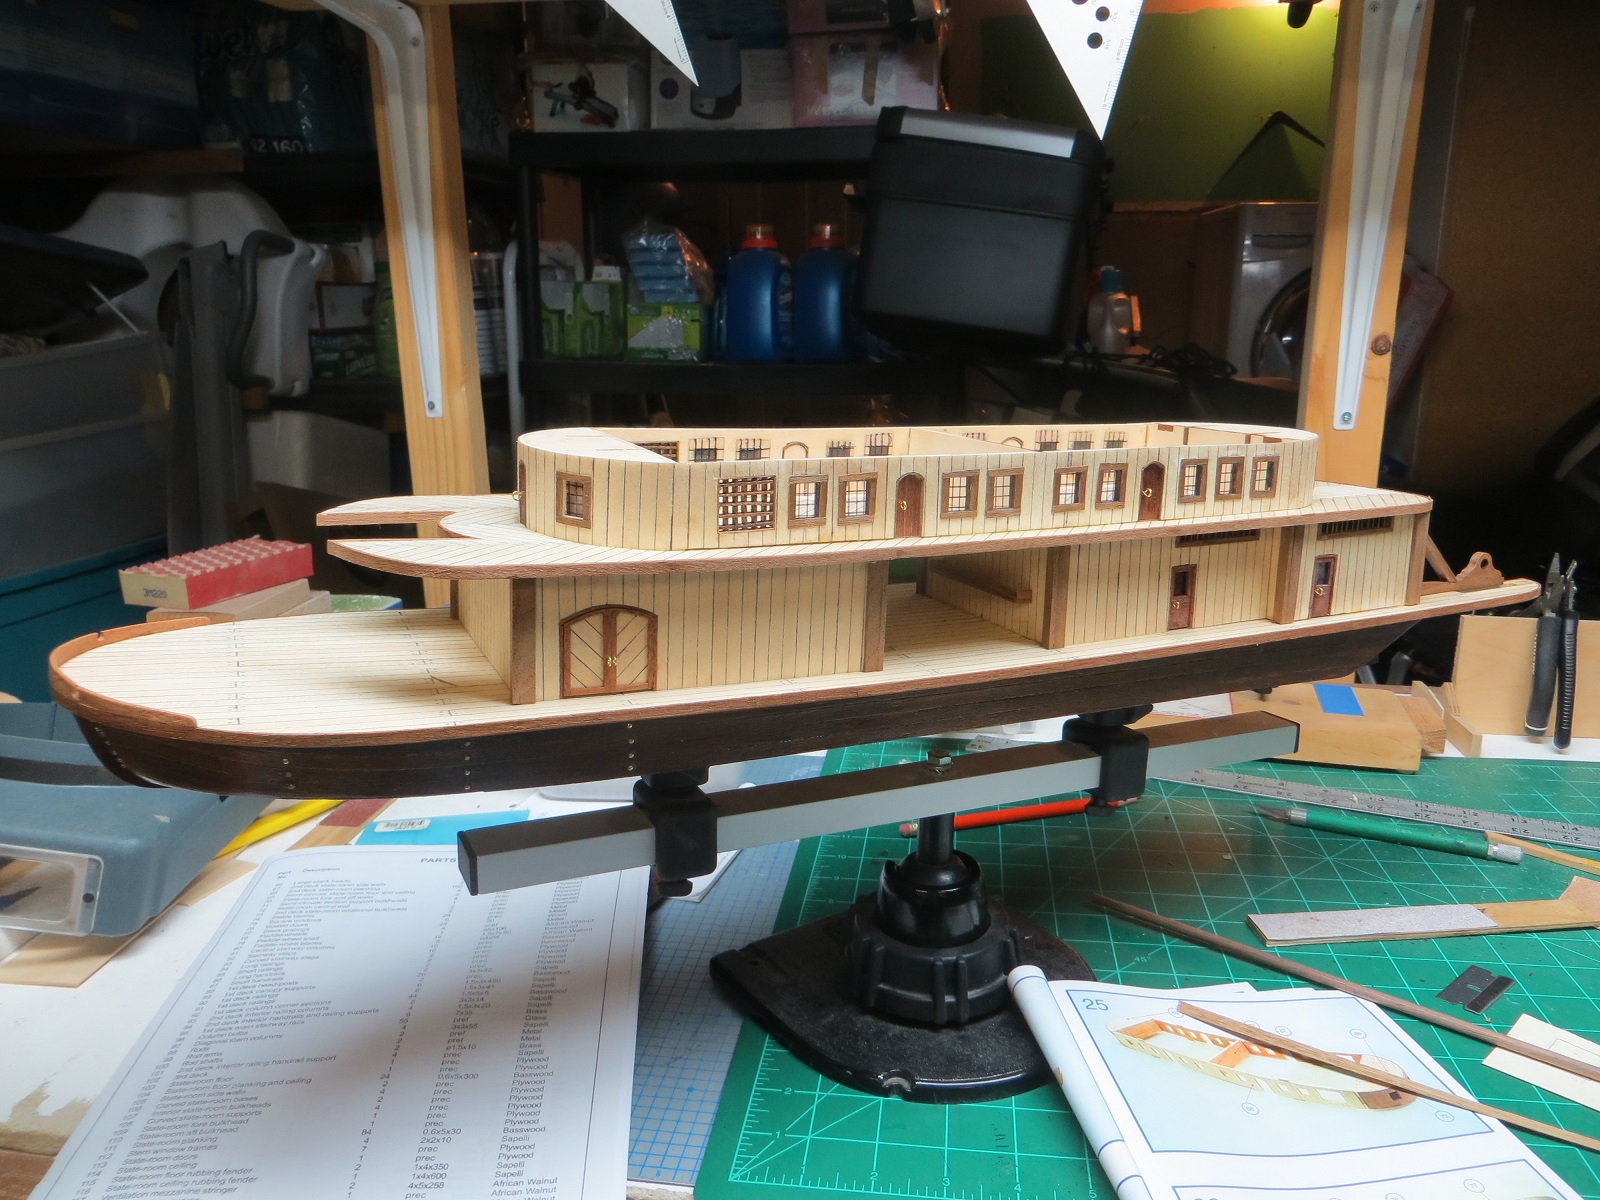
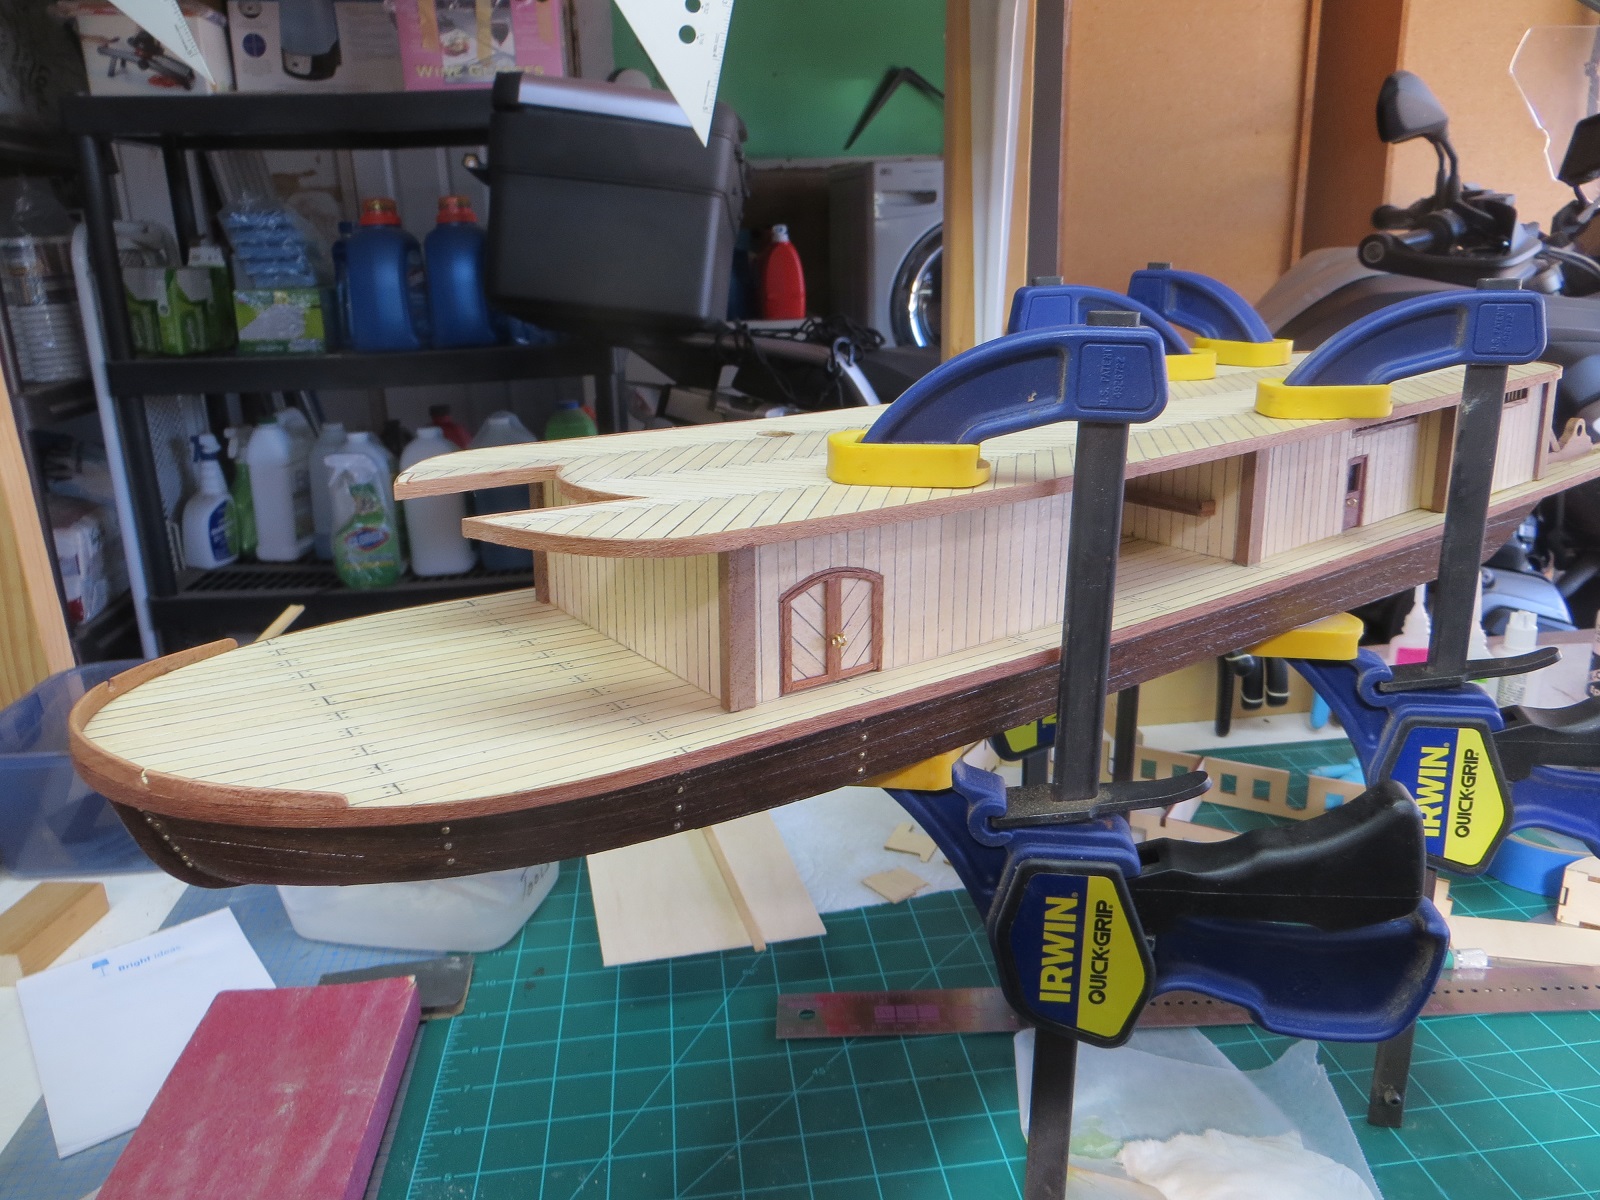
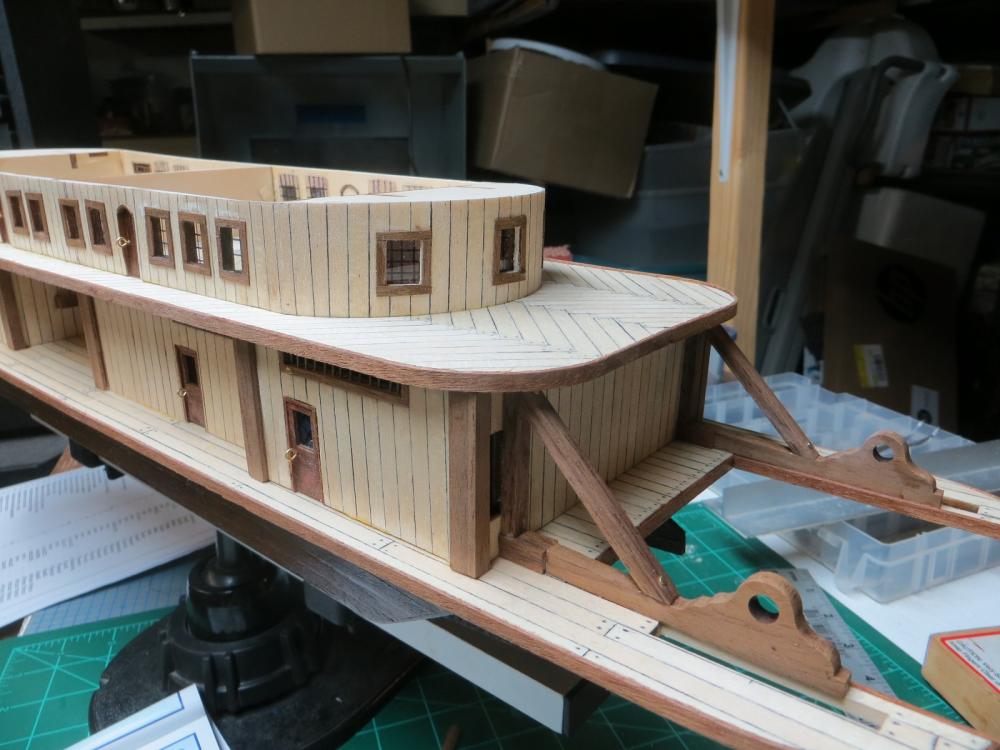
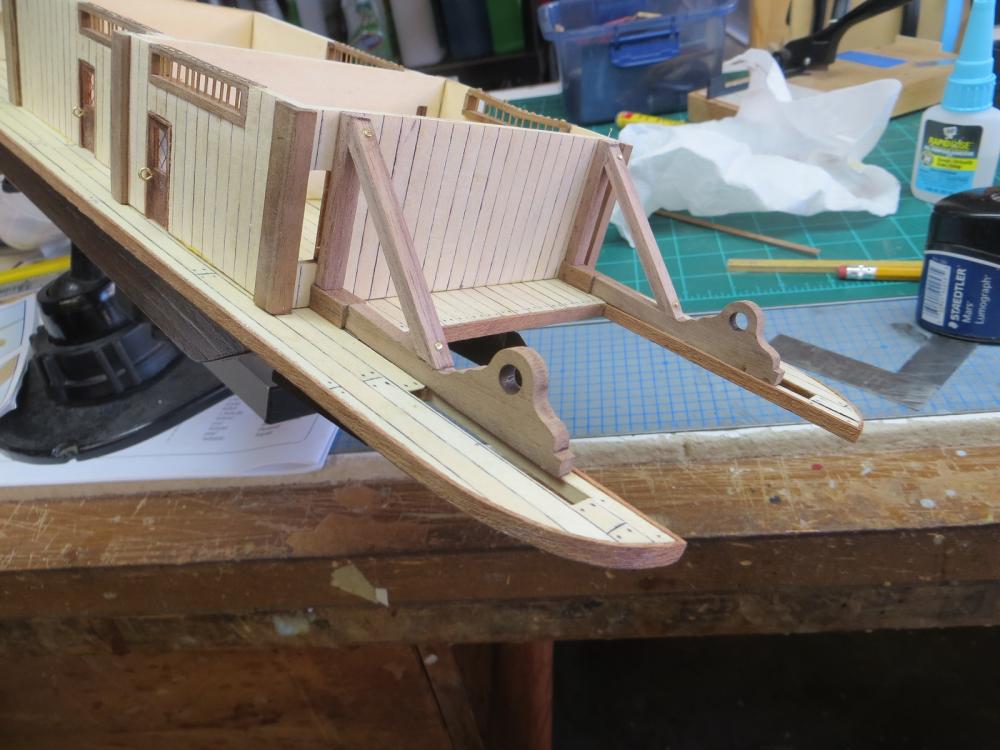
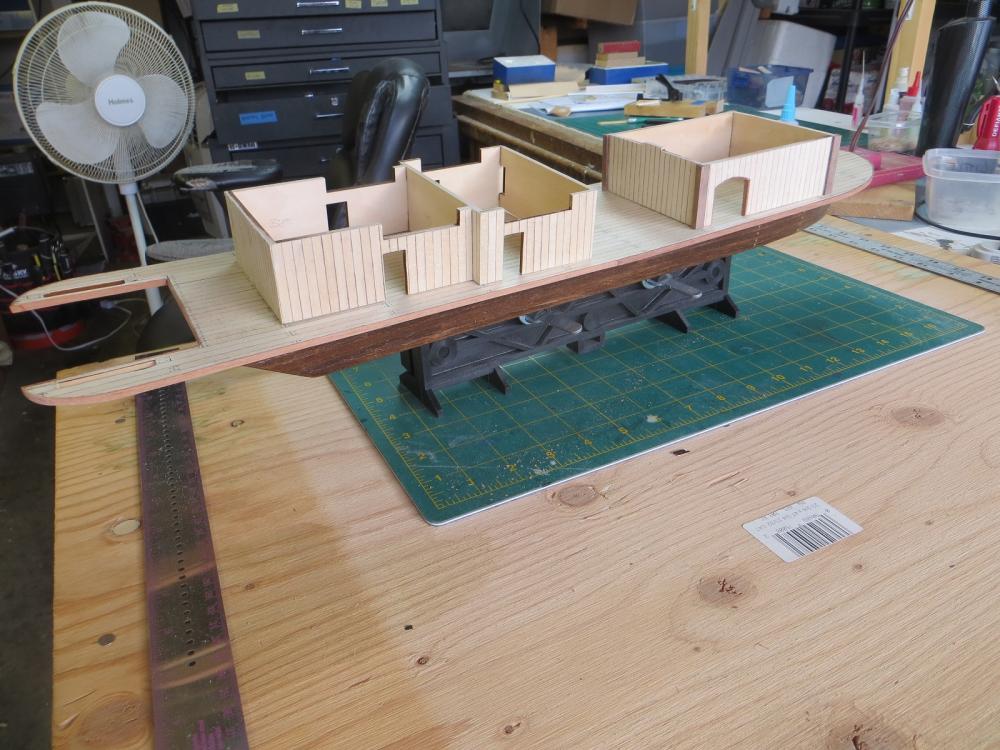
Next step was to epoxy the second deck structure into place. Took some heavy duty clamping to get the structure to conform to the decking.


- 44 replies
-
- 4
-
-
- king of the mississippi
- artesania latina
- (and 1 more)
-
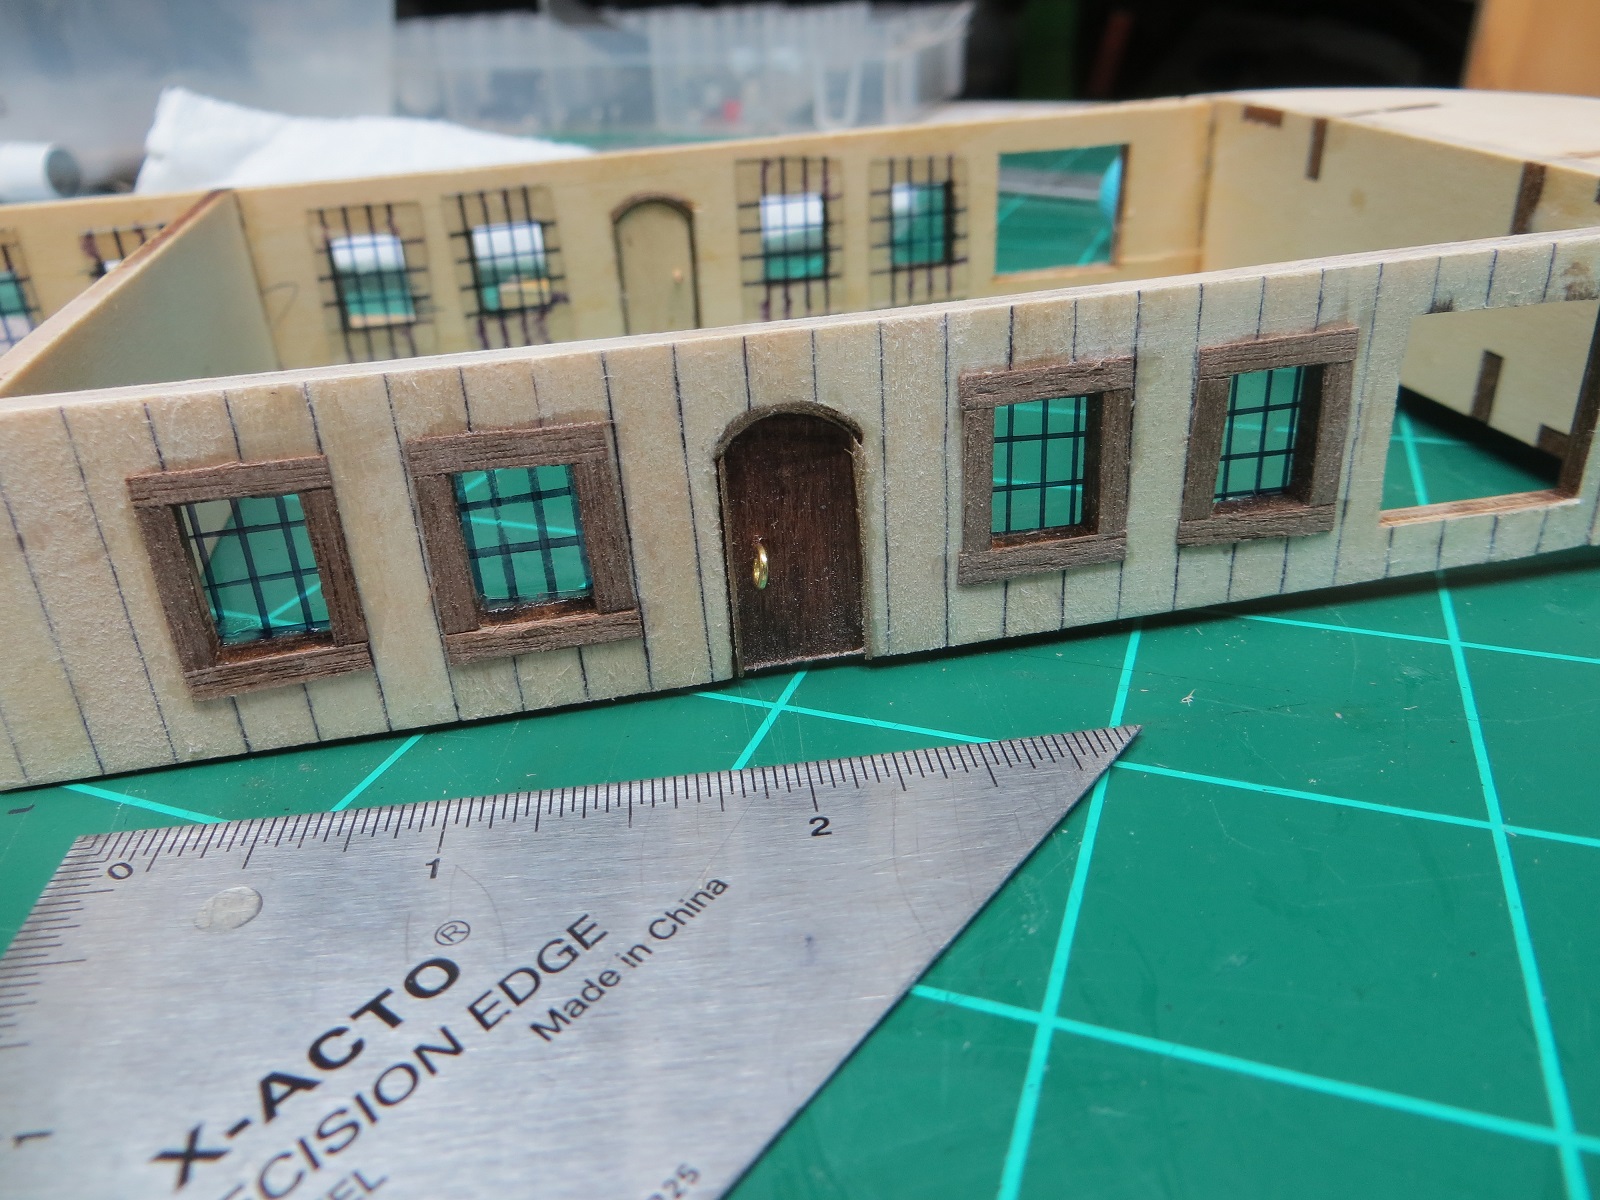
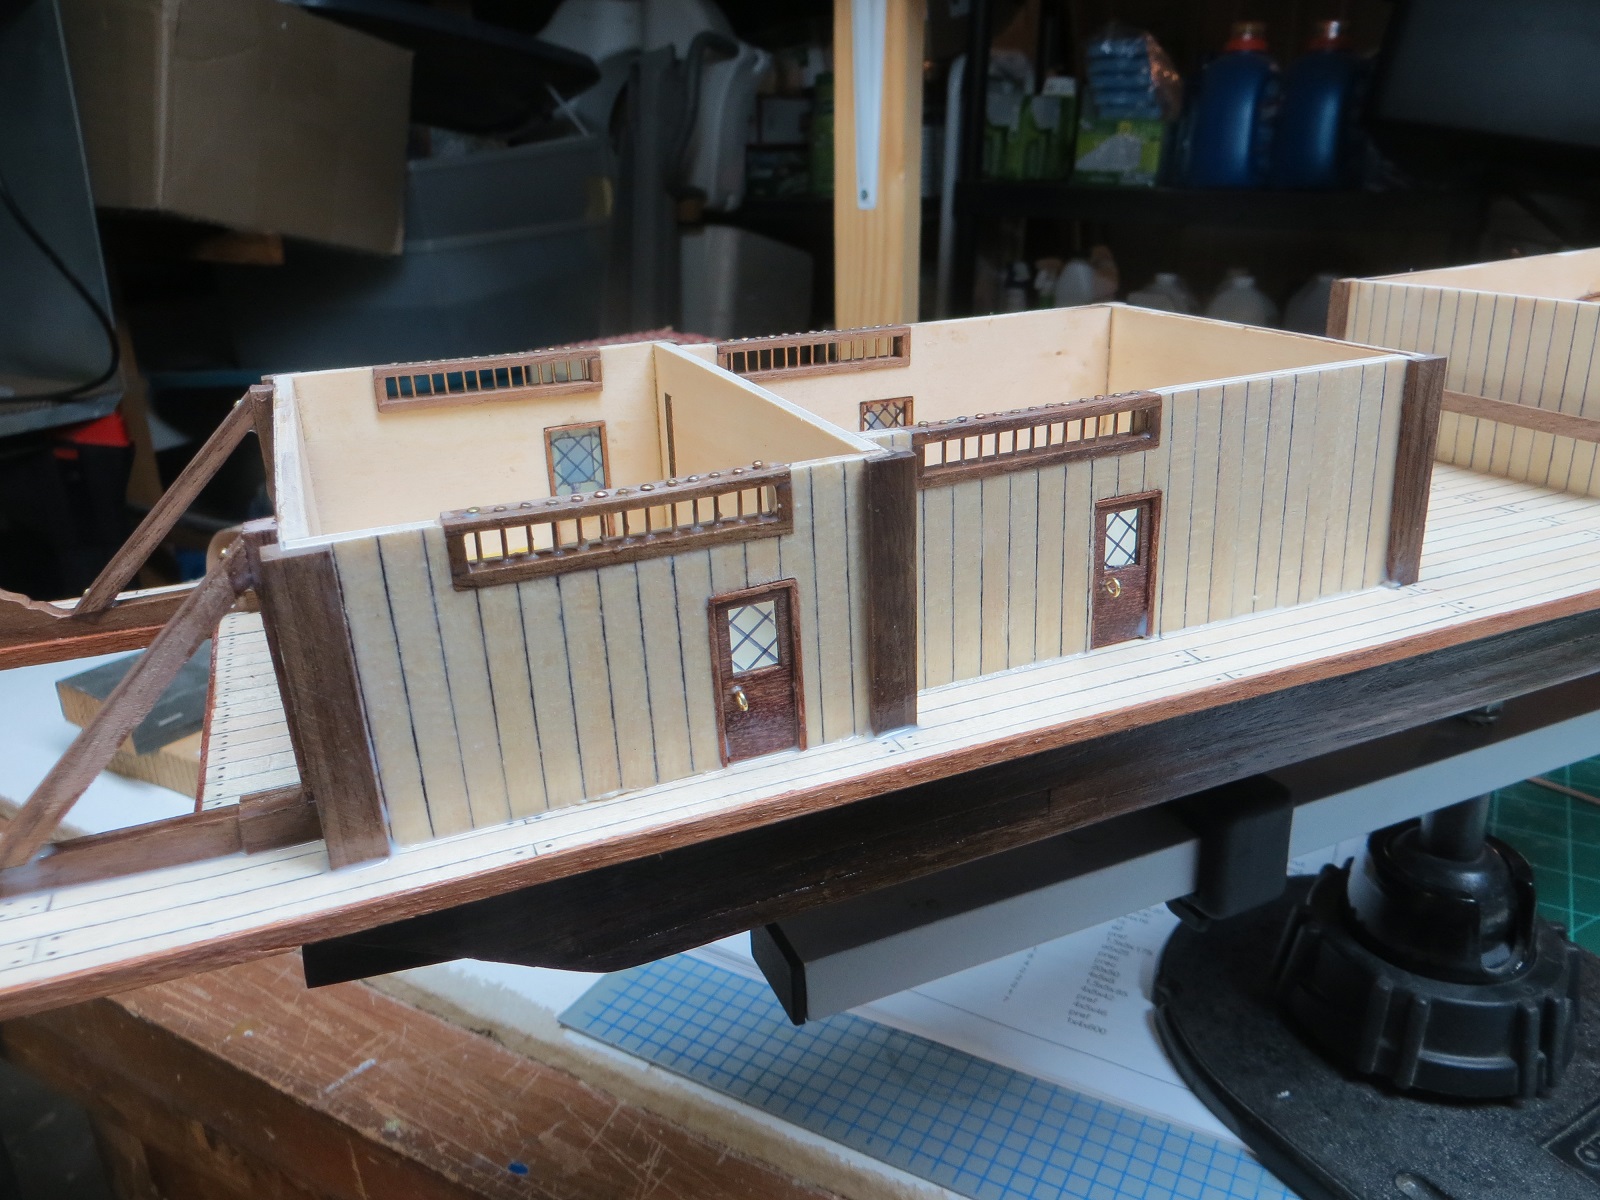
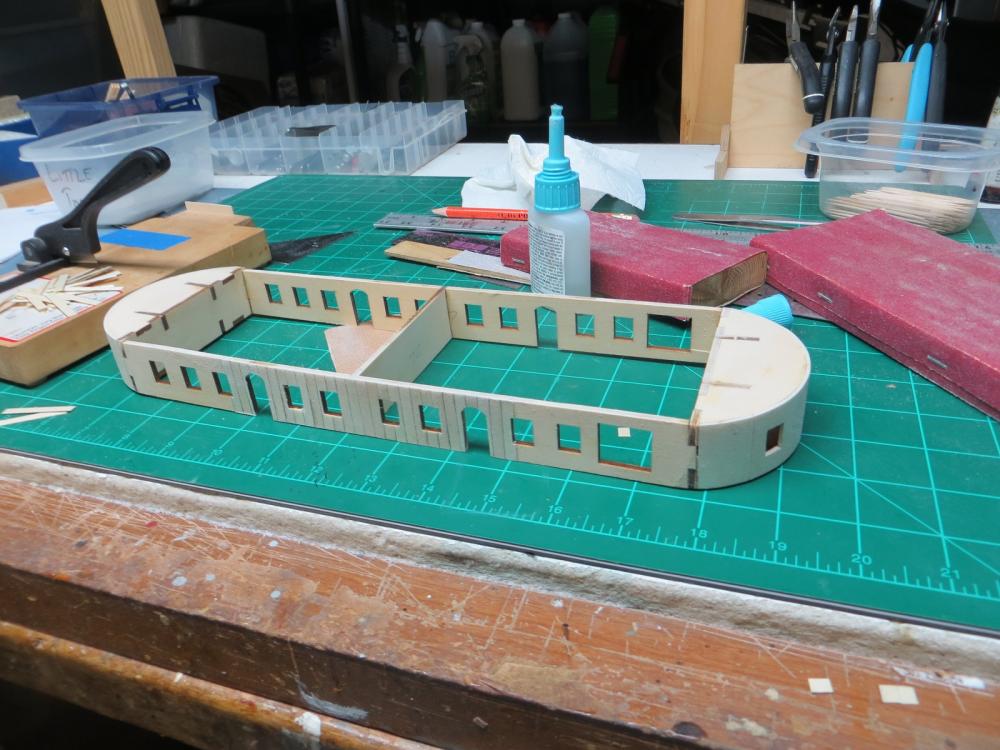
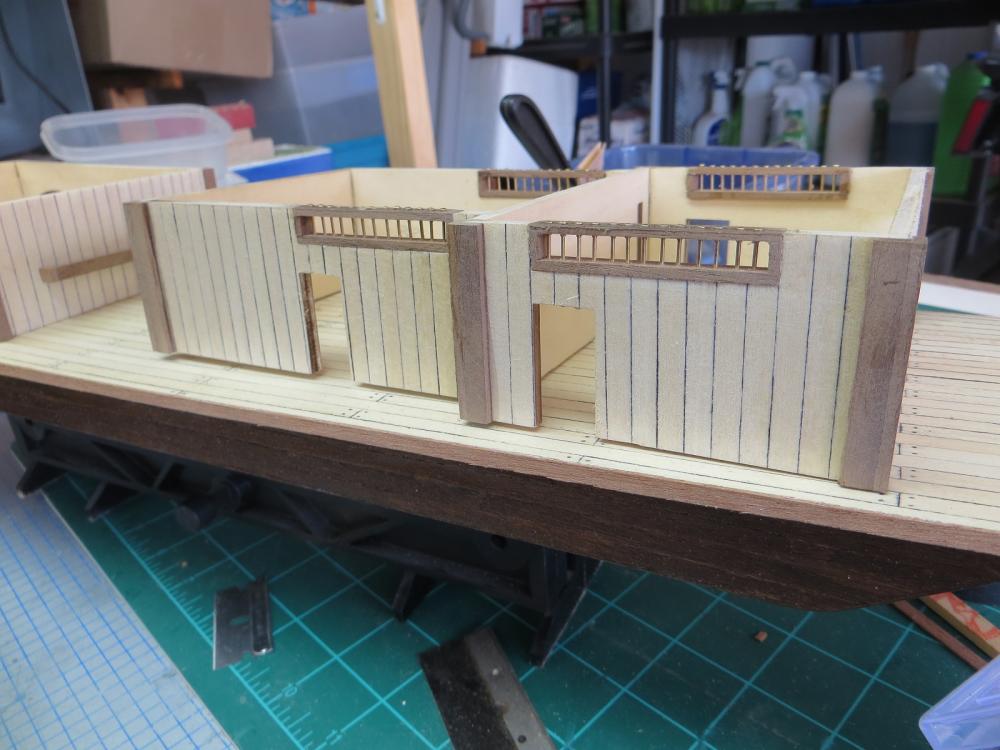
Beginning work on the structures for the second deck. The kit provides metal inserts for the windows and doors that you paint white to simulate glass and some other color for the frame. I did not like the look so I decided to put in my own windows and doors. A deviation from the kit that I think I like.

- 44 replies
-
- 4
-
-
- king of the mississippi
- artesania latina
- (and 1 more)
-
After planking, I attached the second deck to the main deck structures using epoxy and clamping. Clamping is necessary because the deck builds flat but must attached to curved structures.
- 44 replies
-
- 5
-
-
- king of the mississippi
- artesania latina
- (and 1 more)
-
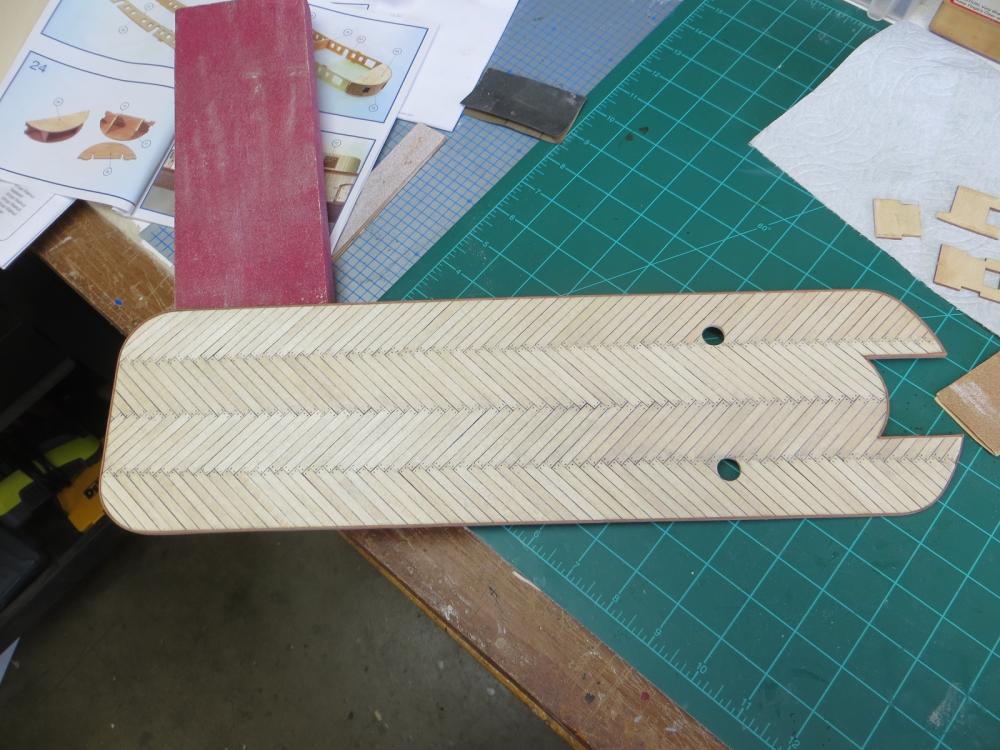
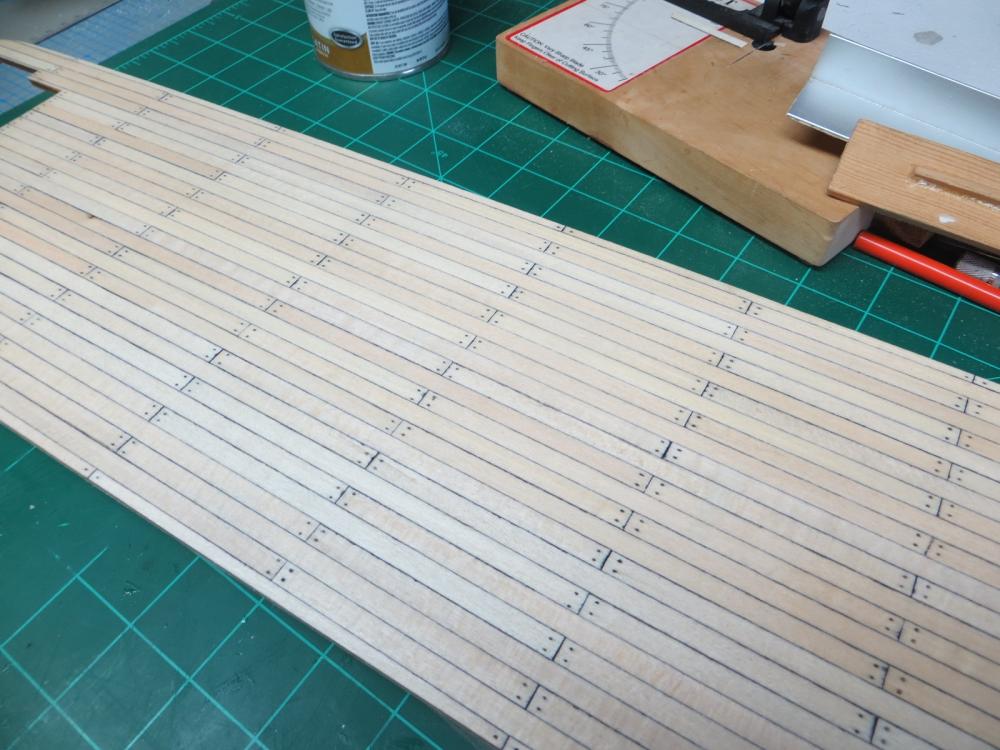
Realized that I have not updated this log in awhile. After completing the structures on the main deck I began planking the second deck in a herring-bone pattern. This turned out to be quite a project. I learned that you should not run the planning in rows the length of the deck. You lay the planning in rows of four planks and slowly work down the deck. I do believe that it turned out OK.
- 44 replies
-
- 4
-
-
- king of the mississippi
- artesania latina
- (and 1 more)
-
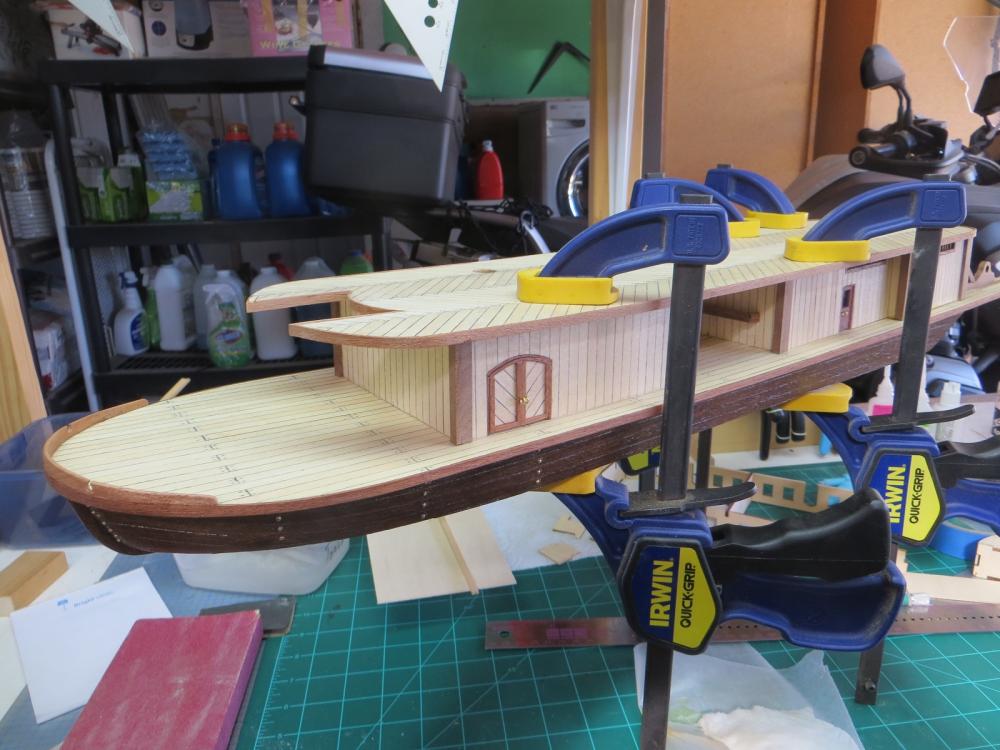
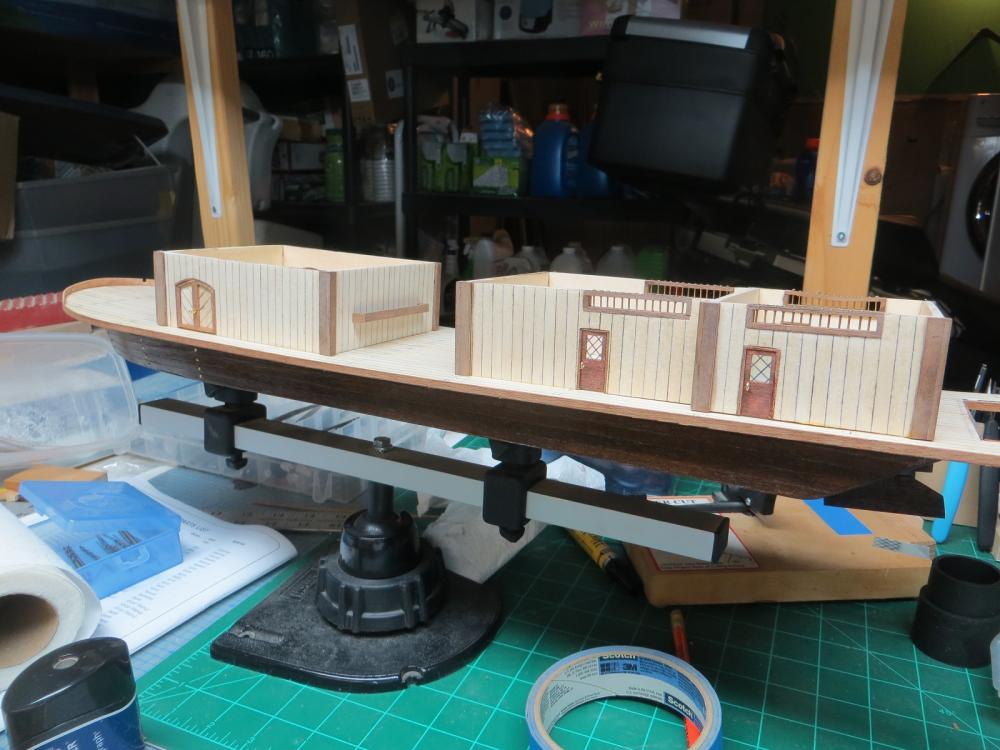
I finally have glued all the deck structures to the deck. I painted all the structures in a matt polyeurathane. Here is a picture. I am now starting on the 2nd deck.

- 44 replies
-
- 4
-
-
- king of the mississippi
- artesania latina
- (and 1 more)
-
Still working on the main deck structures.

- 44 replies
-
- 4
-
-
- king of the mississippi
- artesania latina
- (and 1 more)
-
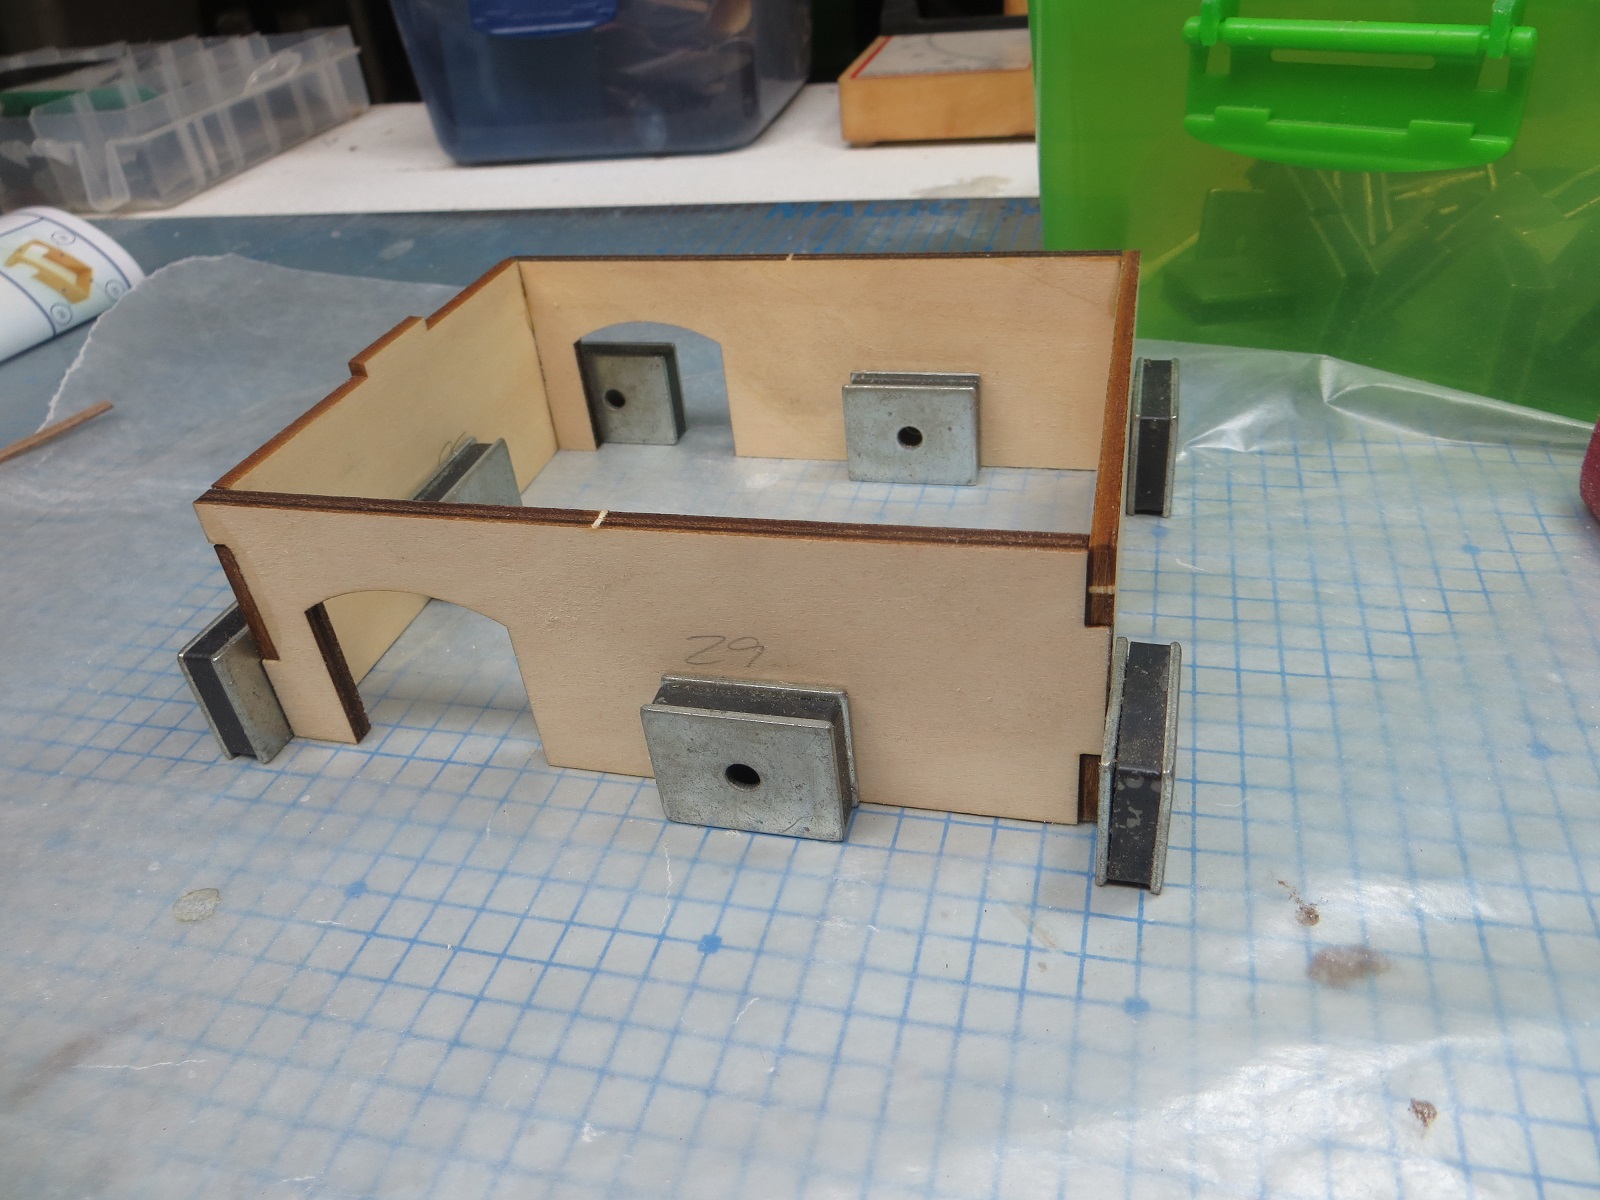
With the deck epoxied to the hull, the next step is construction of some of the main deck structures. These are essentially plywood boxes which are "planked" in the same basswood as is the deck.

- 44 replies
-
- 2
-
-
- king of the mississippi
- artesania latina
- (and 1 more)
-
Next step was to epoxy the main deck to the hull.

- 44 replies
-
- 2
-
-
- king of the mississippi
- artesania latina
- (and 1 more)
-
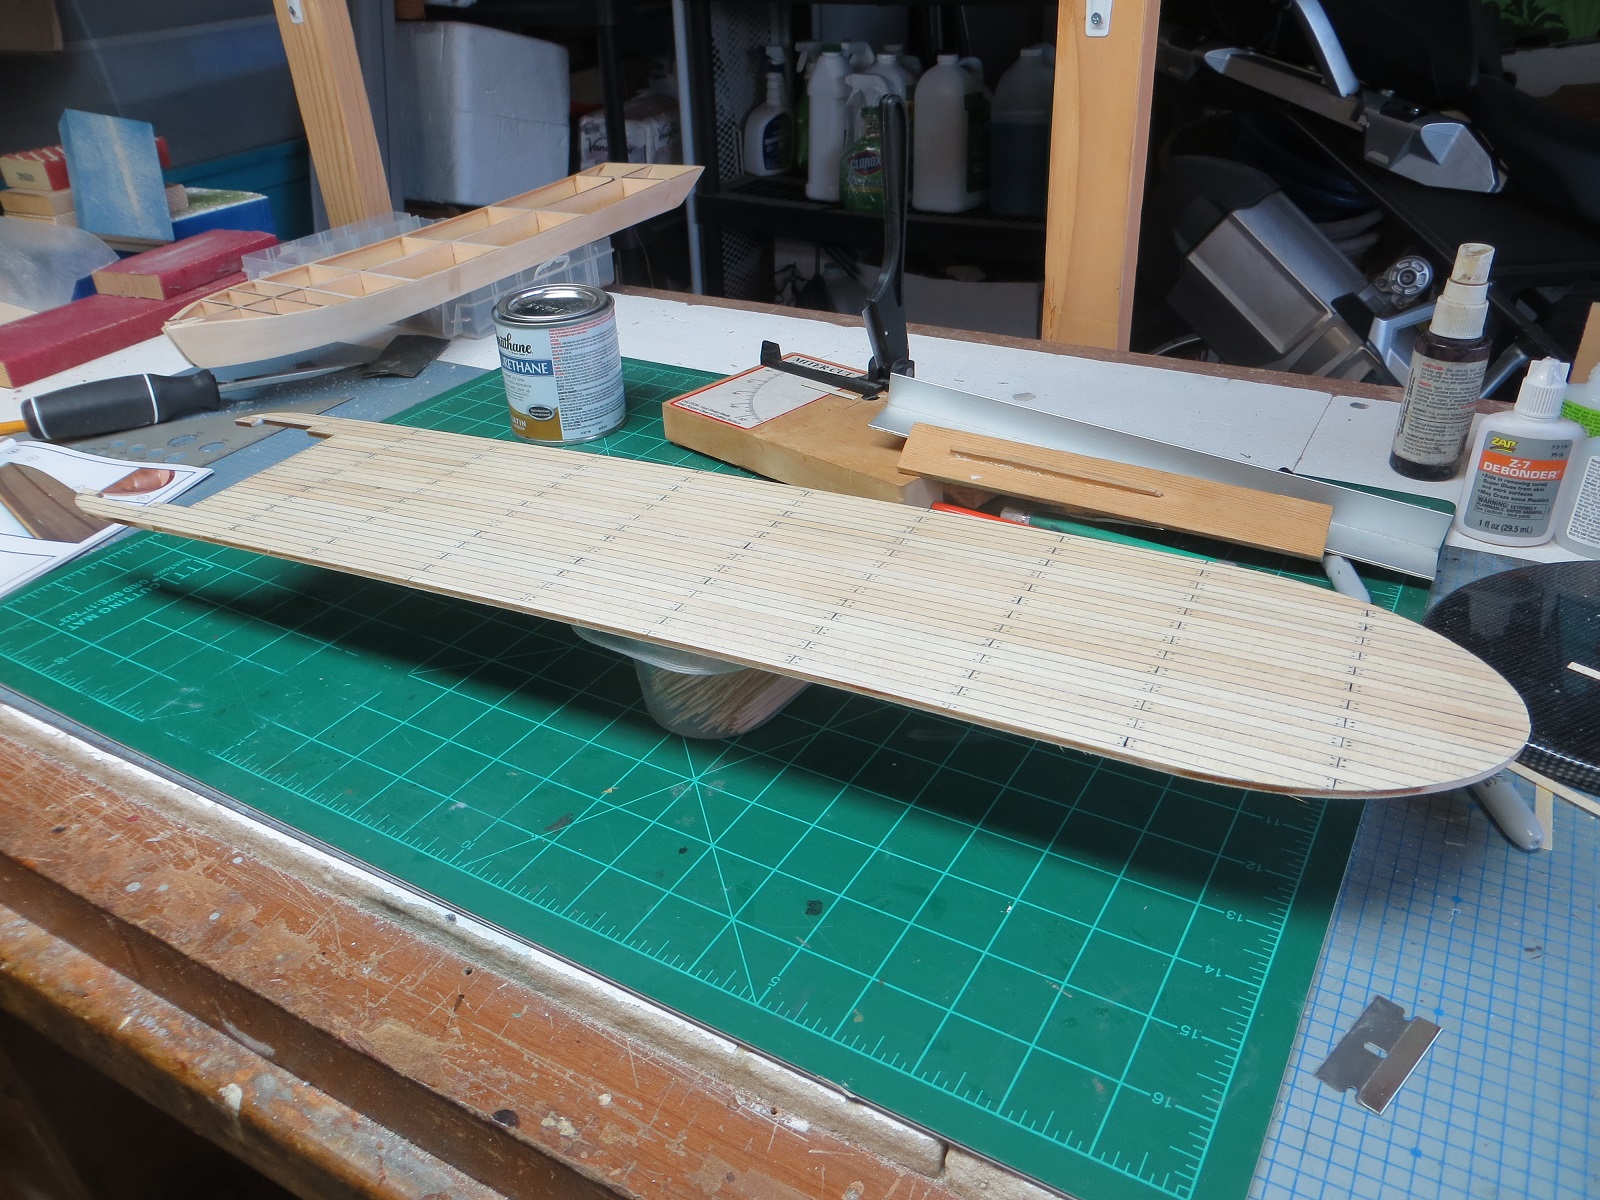
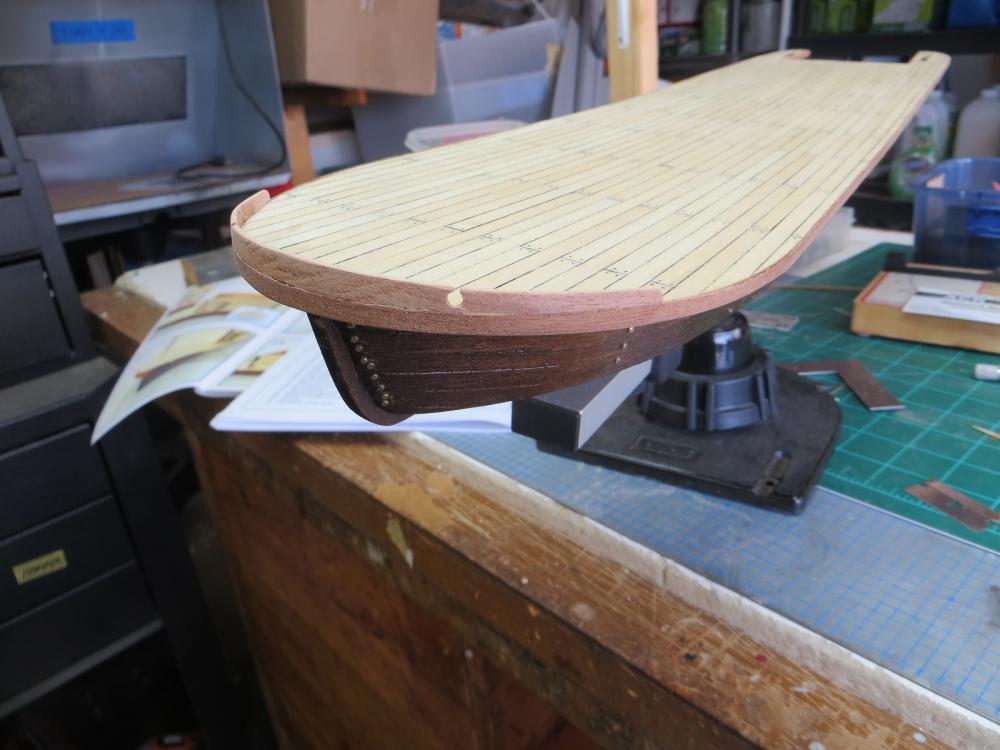
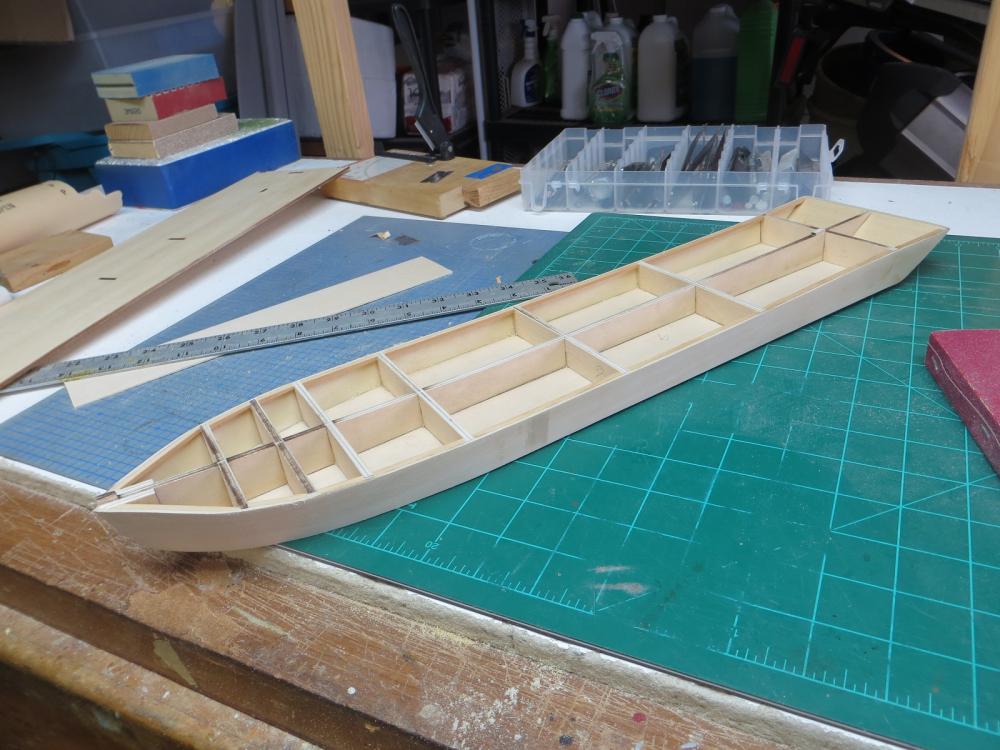
With the hull complete (for now) I started on planking the main deck. I use permanent marker down one edge of the plank to simulate caulking. When the deck is fully planked I used a #2 wooden pencil (well sharpened) to simulate the nails. Last step was to seal with polyurathane (in a matt finish).

- 44 replies
-
- 3
-
-
- king of the mississippi
- artesania latina
- (and 1 more)
-
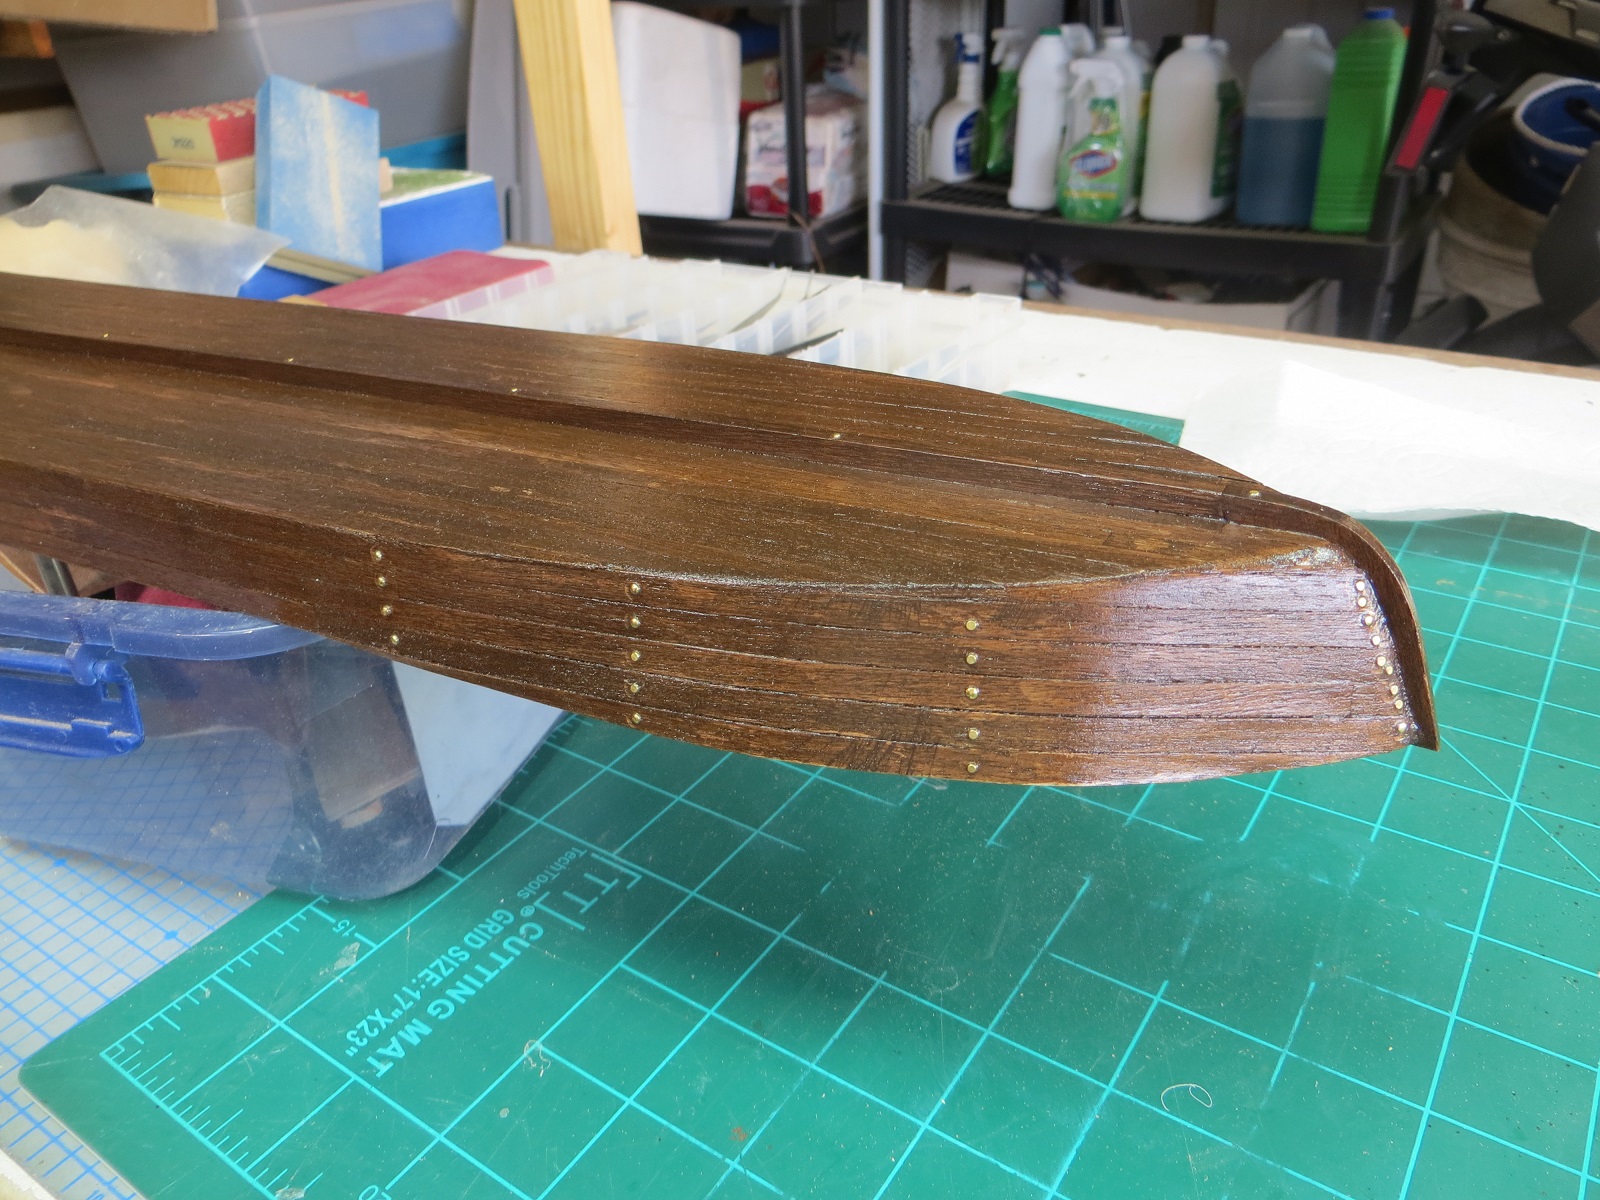
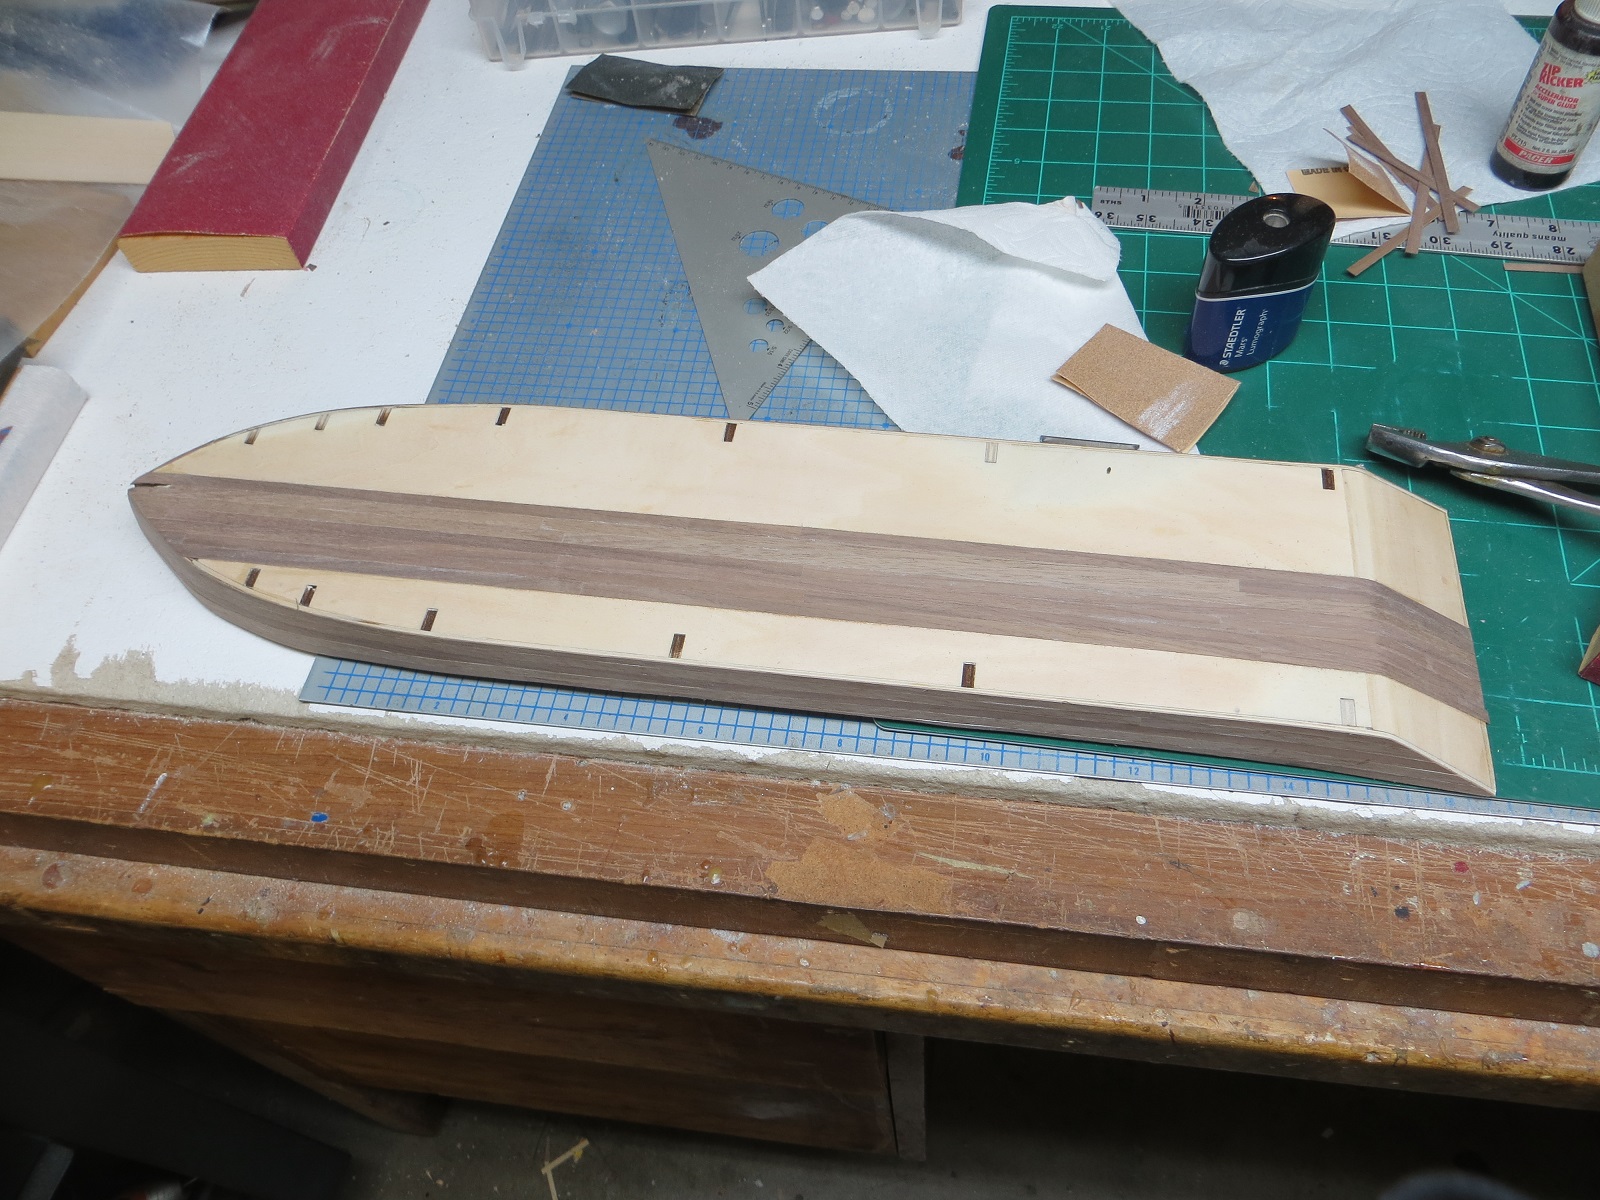
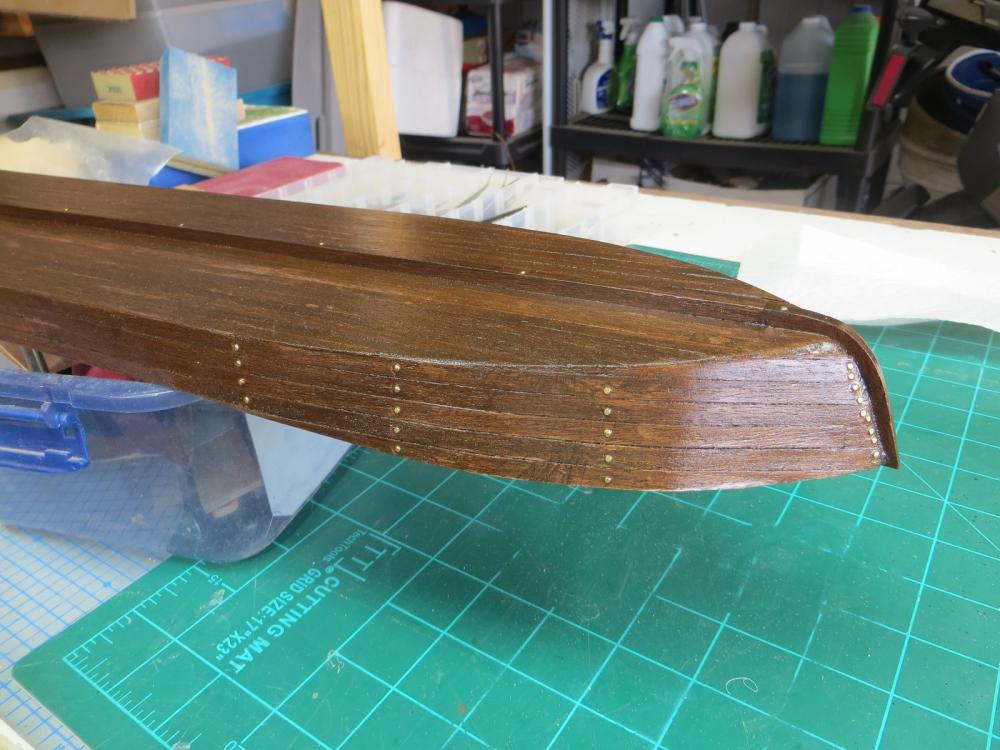
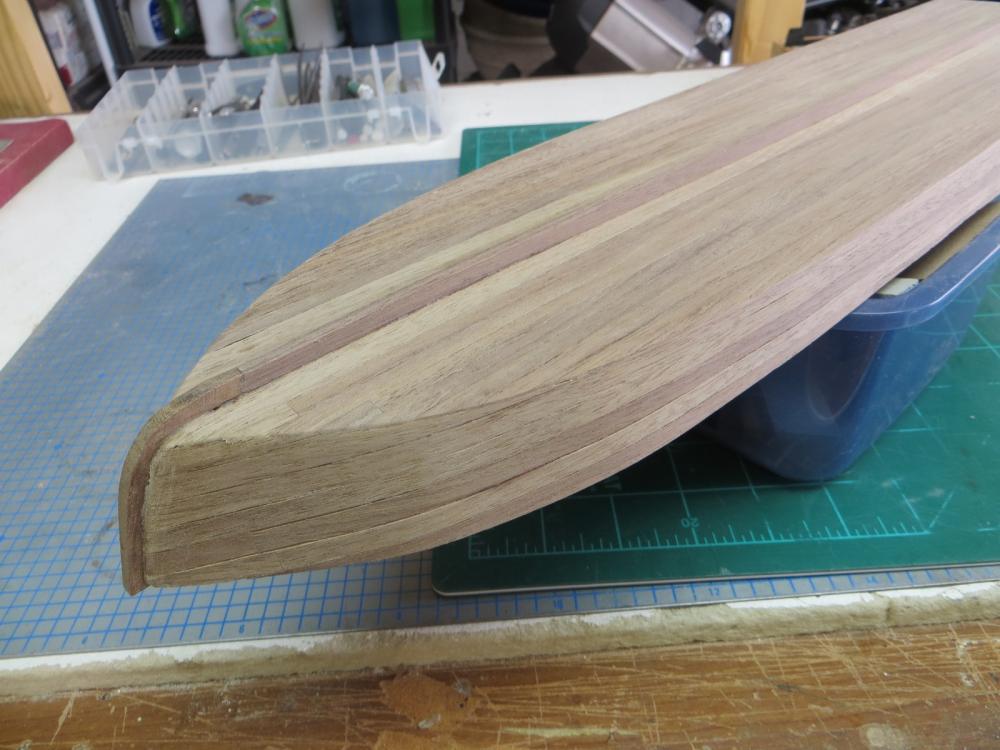
This model is not painted. When complete, most of the model will be natural wood. When I completed planking the hull with the thin walnut strips; I felt that the look of the unfinished planks was dull and not visually exciting. I decided to stain the planks darker and apply a glossy polyurethane finish. I used a dark walnut stain and it did come out a little darker than I anticipated but I still think it is better than the unfinished look. What do you think? I added the nails and deemed the hull complete enough to move onto the main deck.
- 44 replies
-
- 6
-
-
- king of the mississippi
- artesania latina
- (and 1 more)
-
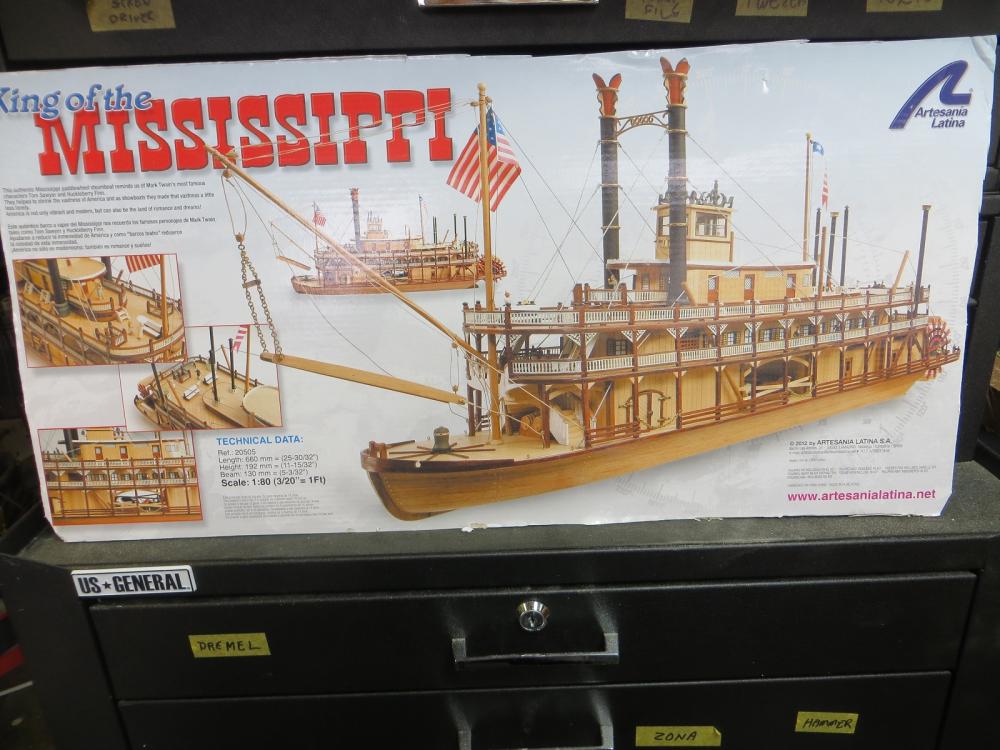
I have been away from the build logs for a while. Had to have some work done to the old ticker but I am back to the workshop. Decided to try a model of a ship that lacks sails. Spent a little time looking at kits and build logs on this site and decided that King of the Mississippi looked interesting and a fun build. So I invested a few bucks and purchased the kit. The first step, of course, is the hull. I was impressed with the fit of the die-cut pieces. This was one of the easiest hulls to build. First step was gluing the keel and formers to a flat bottom. Next came some thin plywood sides (which took a little care in bending) followed by planking with thin walnut strips.

- 44 replies
-
- 7
-
-
- king of the mississippi
- artesania latina
- (and 1 more)
-
Great topic. As I visit the many websites of kit manufacturers and distributors I see an abundance of model of ships with sails. I would like to see more kits of ships built after the golden age of sails. The early steam ship era represents a large population of ships that would be interesting as models. The first monitors, tugs, trawlers, riverboats, etc., would all be very interesting kits to build. I am not a ship historian, but I think that the early steam era would provide some great models.
- 117 replies
-
- 11
-
-
I think I have done all the standing rigging. When I post photos in the next day or so I am sure I will find out.
-
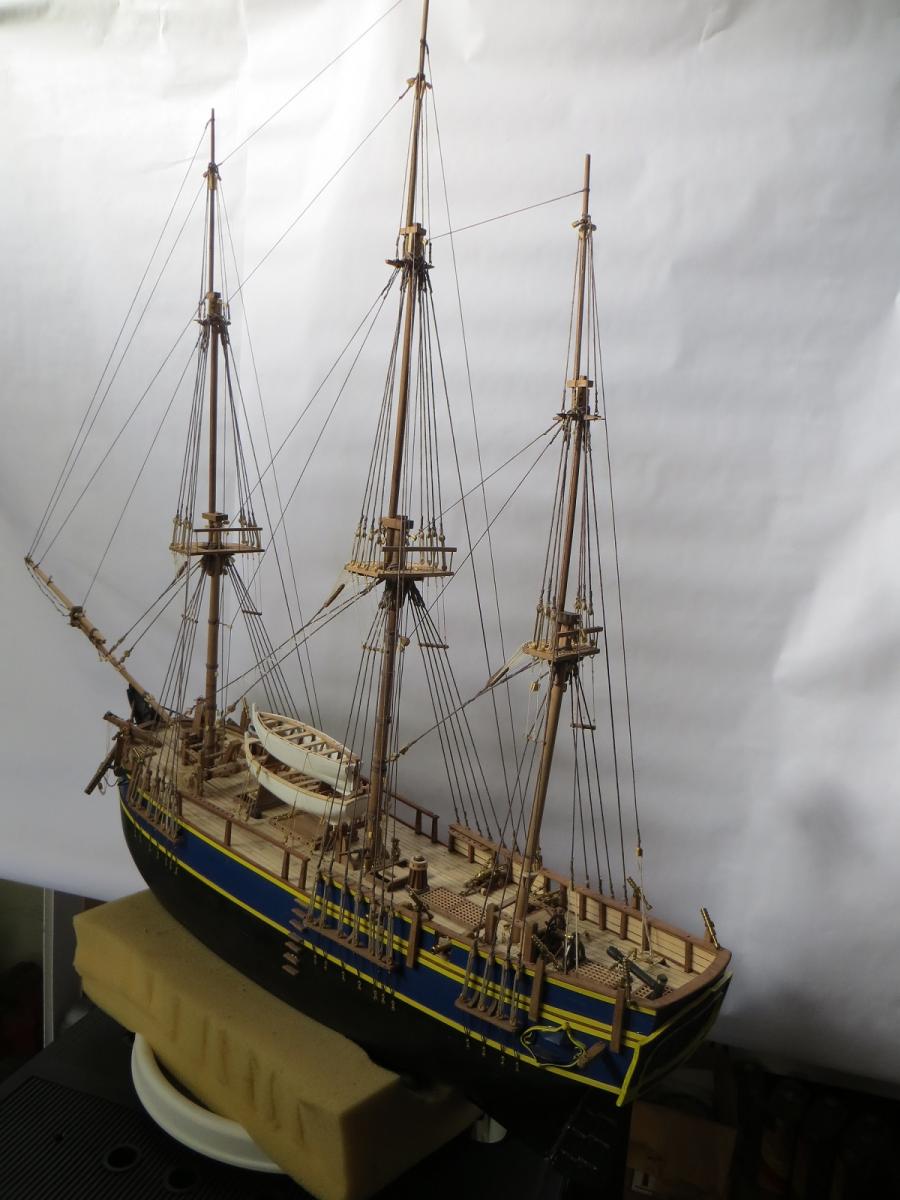
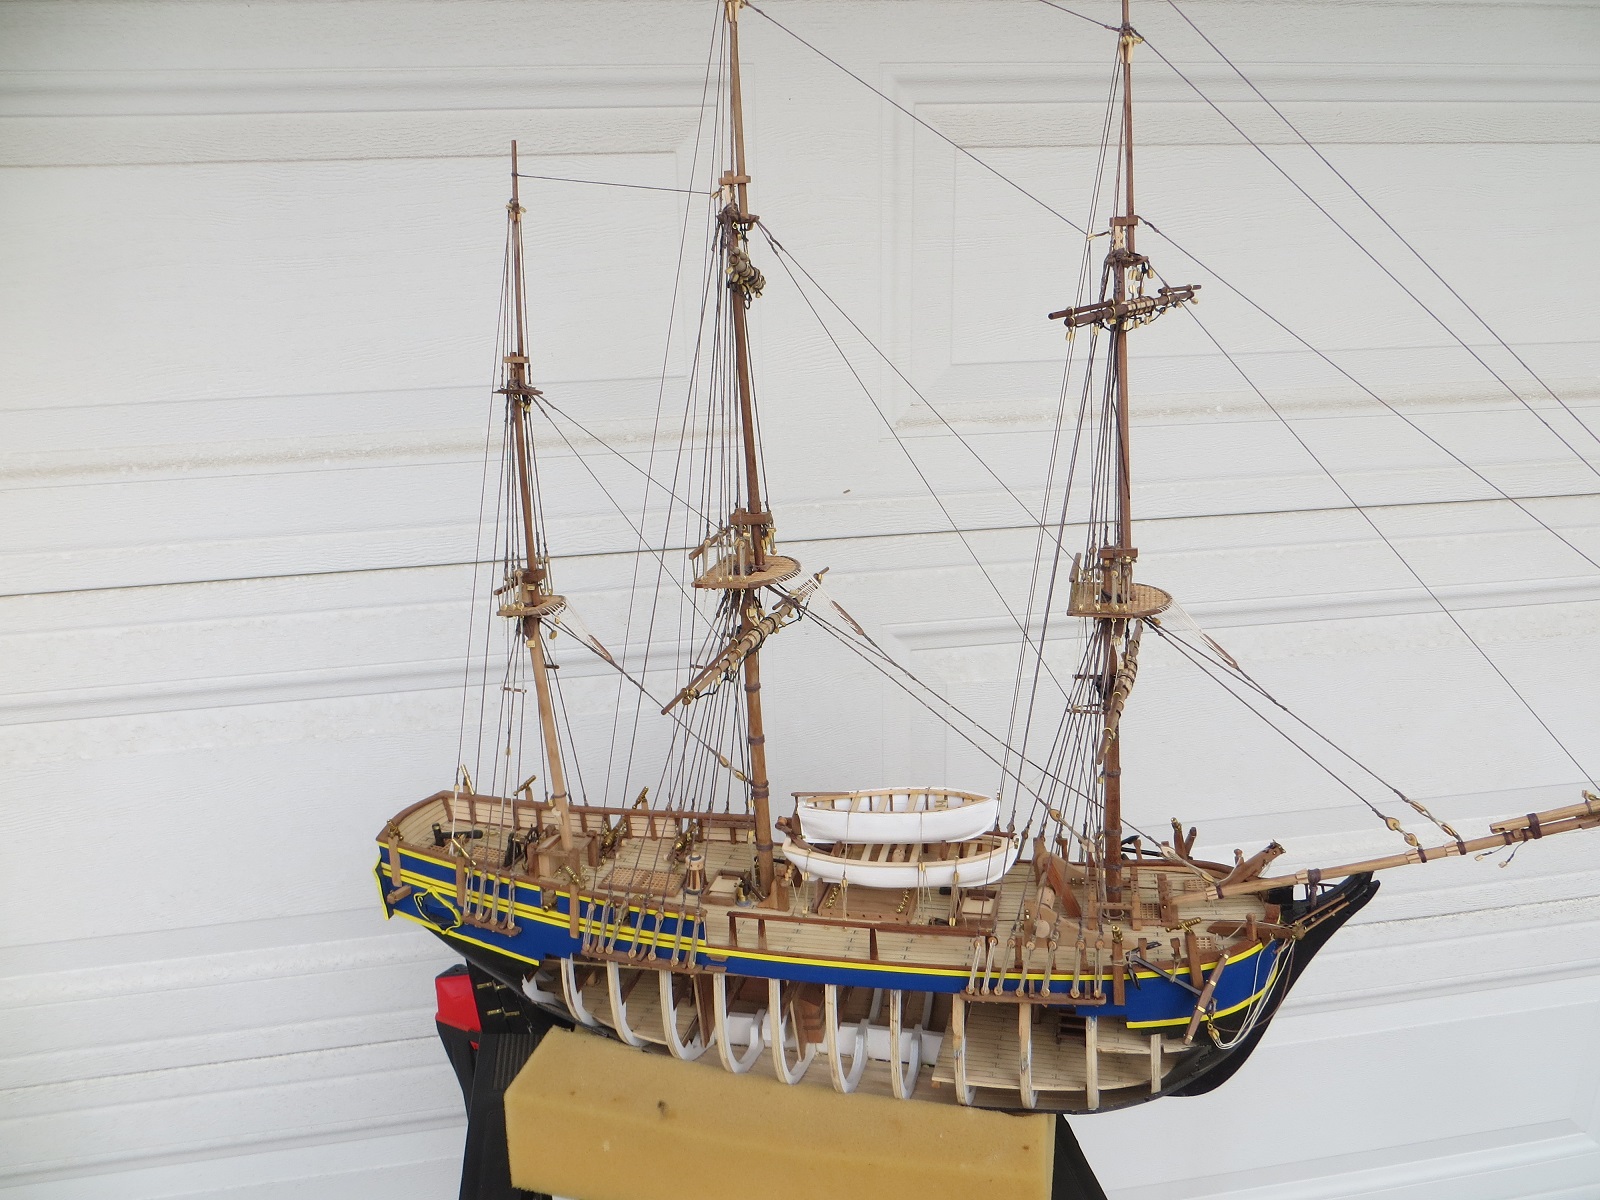
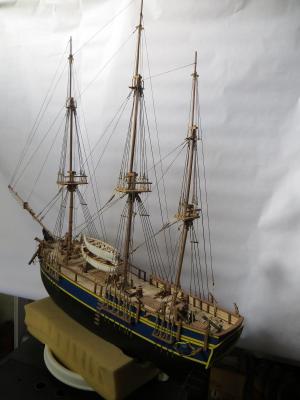
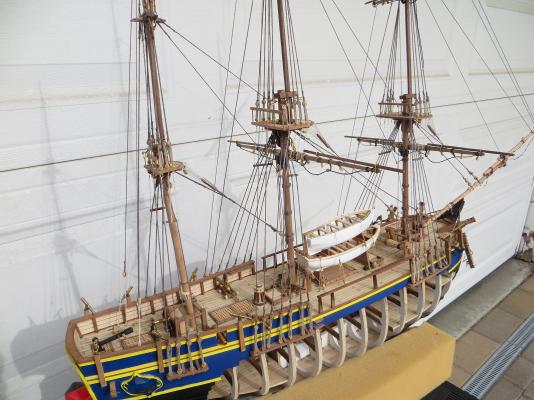
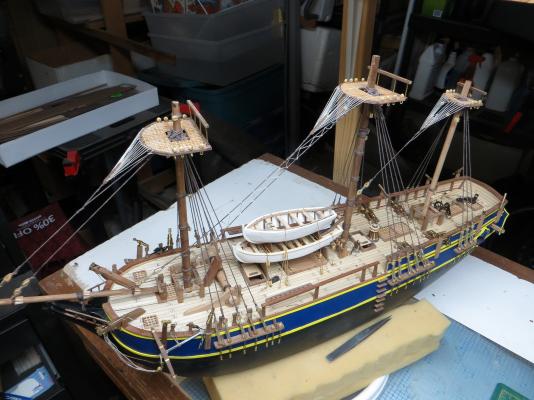
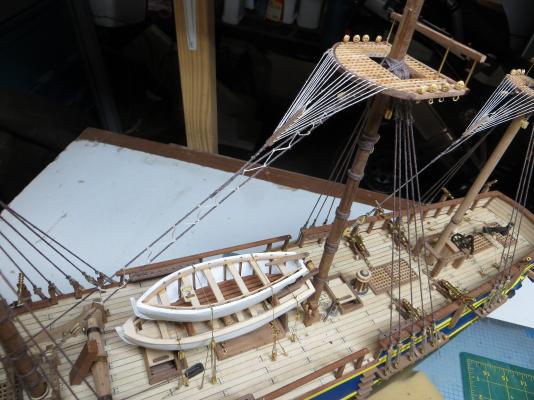
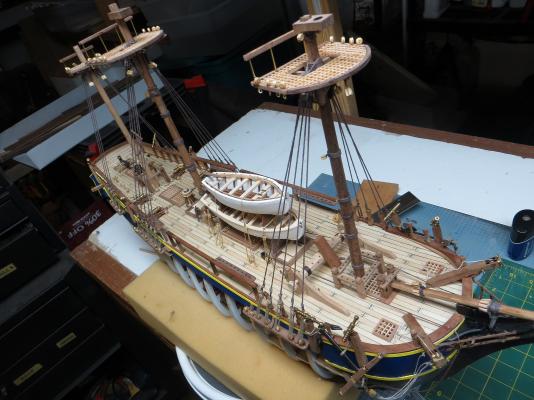
I am nearing completion of this model. I hope to update the photos soon. I elected not to add sails to the model. I have to be honest. I have been on this project since April and I am having problem maintaining my enthusiasm. This is without a doubt the most complicated hobby project I have ever attempted. It has been a huge learning experience.. I went back and read my first post. I had worried back then that I had overstepped my experience level....wow was I right. I am now beginning to think about my next project. I have three kits sitting on the shelf in my shop. The Santa Maria and Mississippi River King by AL and the Nordkap by Billings. Each are hugely different (all are gifts). Ah....choices
-
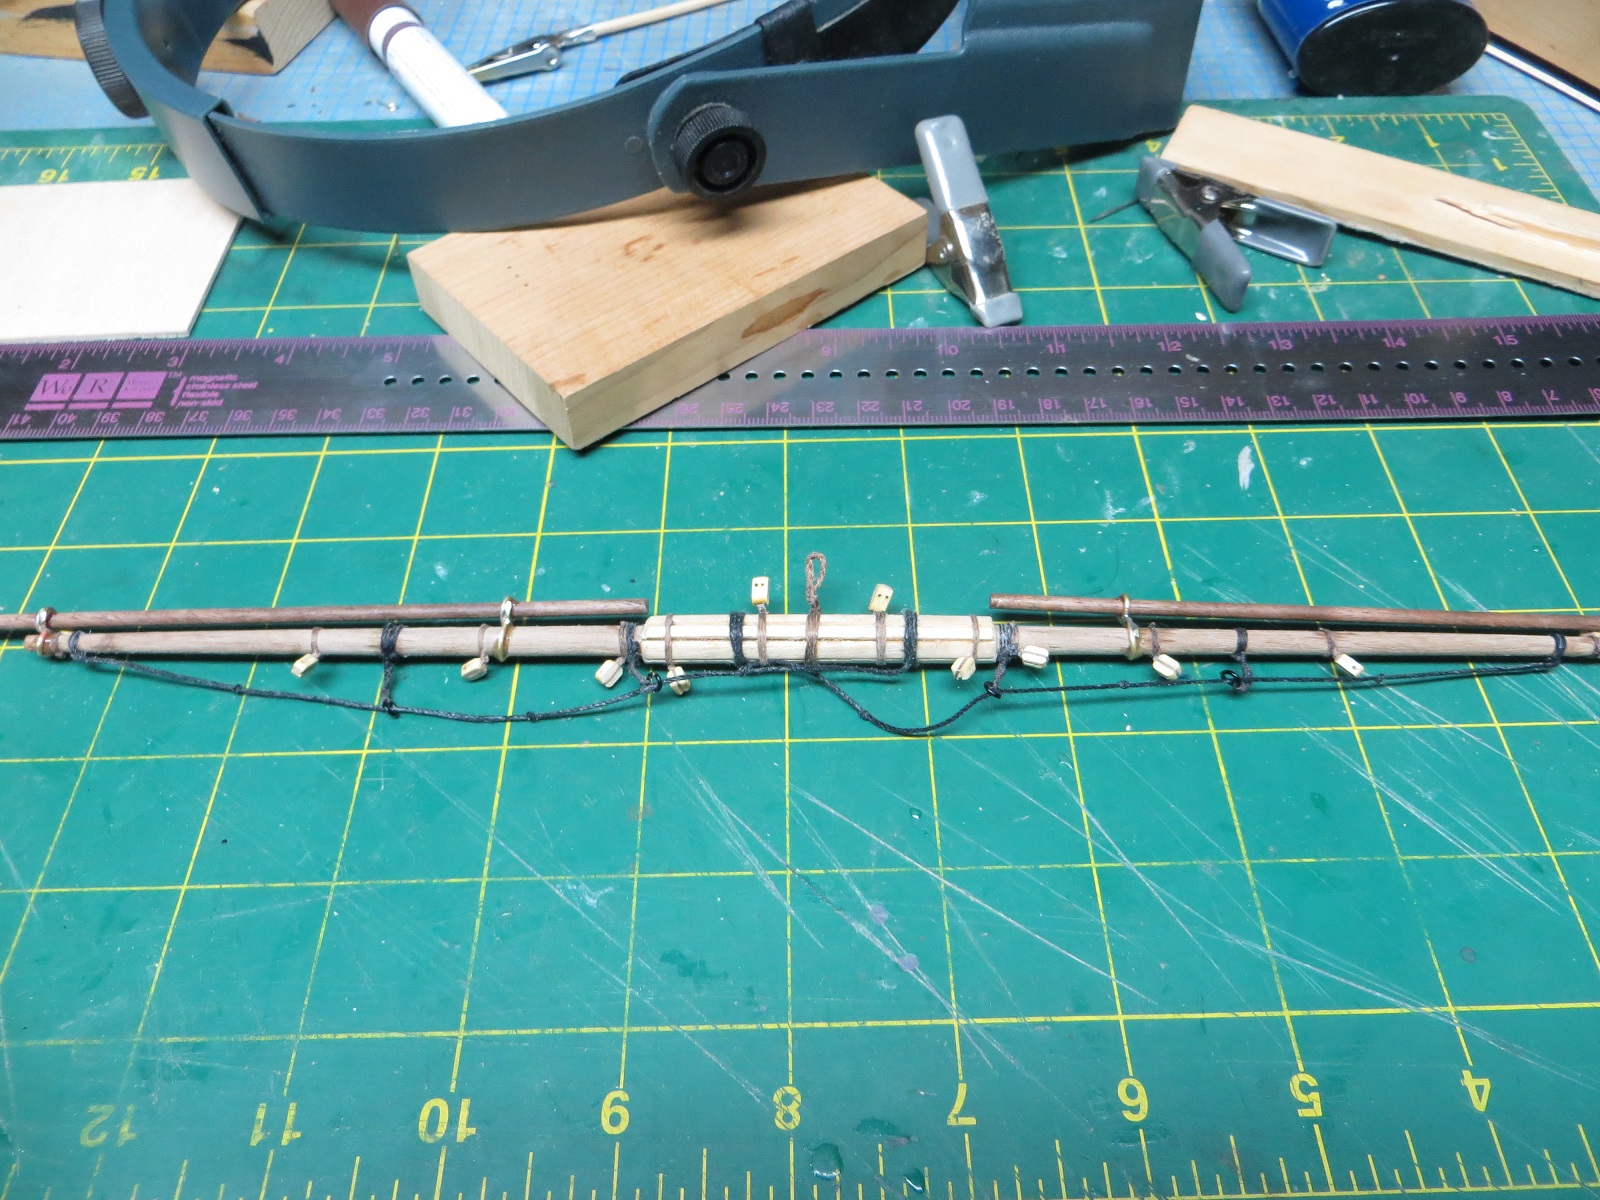
I have to be honest. When assembling the mast, I really didn't pay much attention to the rake. I was too absorbed in just getting the pieces right. I had quite a bit of problem following the directions as I assembled the masts. Tapering was a huge concern.
-
If you have to use CA, make an applicator. I take very small diameter length of music wire (get at local hobby shop). Then I bend tiny bit of the end, say 1/16", back on itself, say 180 degrees, to form a very small "spoon". I place a tiny drop of CA on wax paper and use this applicator to grab an even tinier drop. You can then just touch this applicator to the knot and the very tiny drop will wick into the knot. Even using cotton thread, the CA rarely wicks beyond the knot. If you are using the applicator in quick succession, tap it the wax paper between picking up CA. This will prevent dried CA from building on the music wire.
-
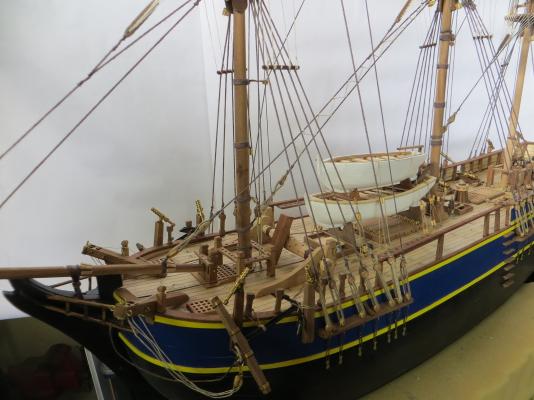
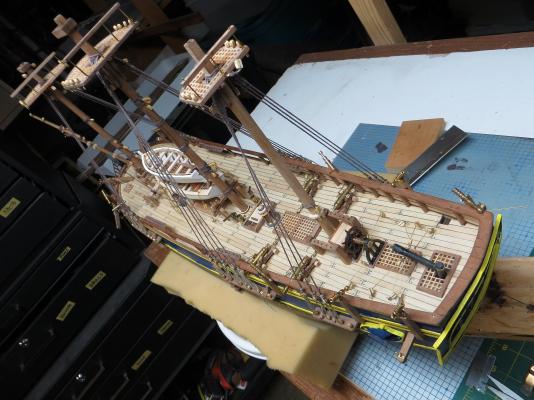
I guess that I am not the best build log producer. I have noticed that it has been quite a while since I last posted. I continue with the task of rigging. Wow! Rigging has turned out to be a much more difficult task than I ever imagined. You can spend several hours with cords, threads and tweezers; only to find you have built a single yard. One of the first tasks I had to play with was tapering yards. I tried multiple ideas that resulted in broken dowels all over the shop. Finally, I found if I put the dowel in my hand drill and then slowly passed the end of the yard over my belt sander (affixed to the work bench) I could carefully taper the ends. Not as exact as a lathe method but cheaper (I don't own a lathe). Only a few dollars in shattered dowels. The actual rigging is not difficult but tedious. One problem I have not solved is getting a very sore back as I lean over the model for hours carefully threading and tying knots. Looked on the internet for adjustable height tables but WOW are they ever costly. Any solutions out there. I have to admit to a mortal sin of ship building. I have resorted to using CA to set the knots. It does cause the ropes to become stiff, but it allows me to work on without knots unraveling. I can also use simpler knots. I certainly have not been able to re-create the work of some of the building artists on this site, but I am happy and proud with my result. Perhaps as my modeling skills develop I will be able to seize, tie and wrap with the best. I have also had photography issues. My shop is very small and now crowded with tools, work tables and now a model that is much larger than I anticipated. I now find it very hard to take photos of the model. I finally dragged it outside and photographed it against my white garage door. Not great but I think you can see my work. Here are the photos:


-
Where did you get the crates?
-
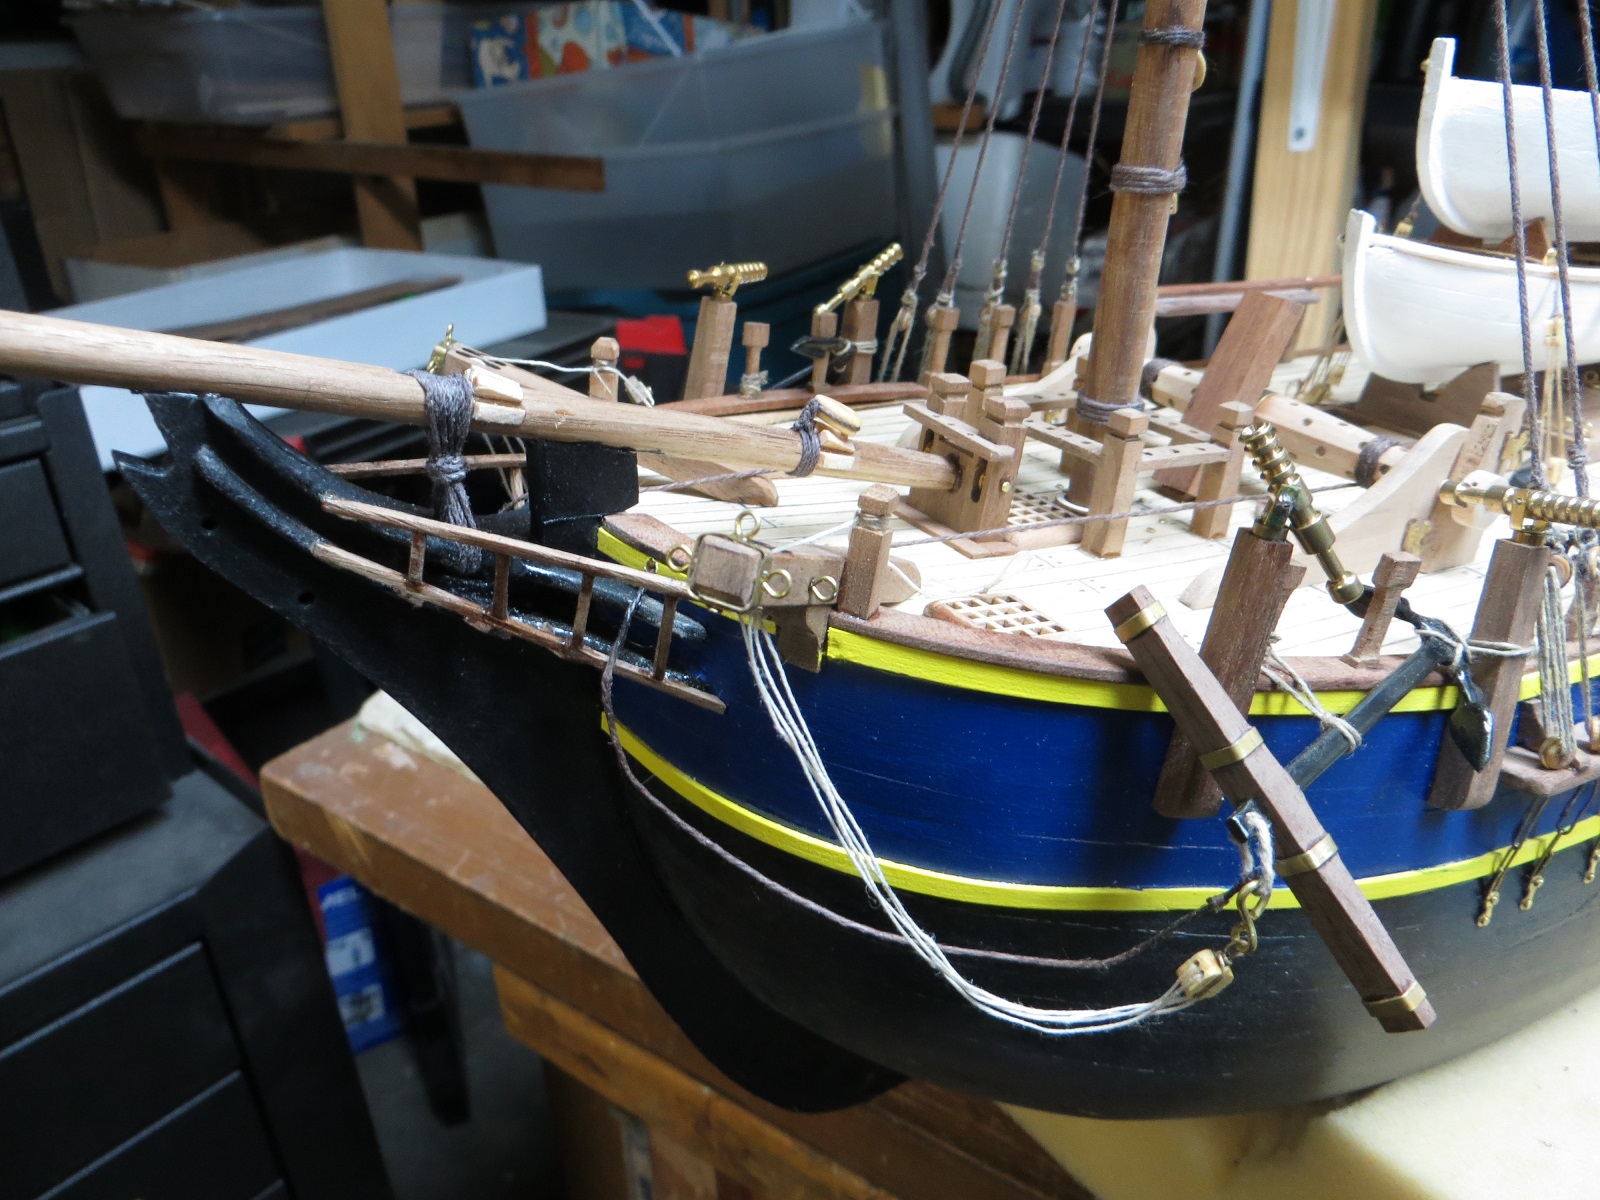
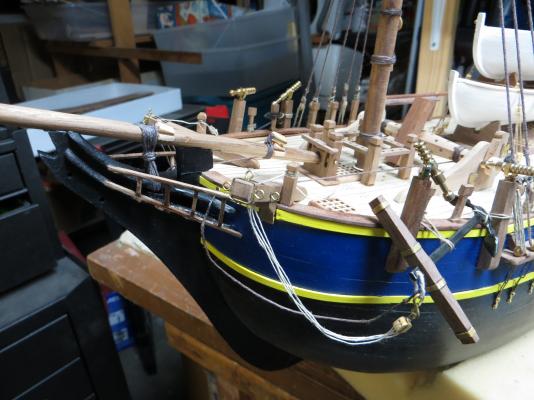
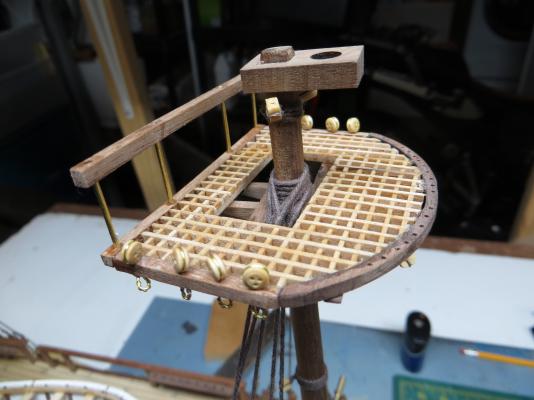
Sorry I have not posted for awhile. Work does continue. I will try to get some photos up soon. I wrapped my deadeyes with copper wire, slightly crimped the wires together and then twisted until I had a 1/2 "needle" extending down from the dead eye. I this drilled out the platforms with holes large enough to accept the twisted wires. The last step was to use rounded needle nose pliers to bend a loop under the platform to hold the deadeye in place. My execution of this last task was not the best. While this worked, I do believe there has to be a better way.
-
I painted the keel and bulkheads after assembly. I made sure that where any cross beams for decking were glued to bulkheads that the paint was sanded off to ensure good adhesion. I have had no problem with any of the hull coming apart.
-
Thanks for all the great photos of the rigging. I am in the process of rigging my Bounty from AL and your photos will be a huge help.
-
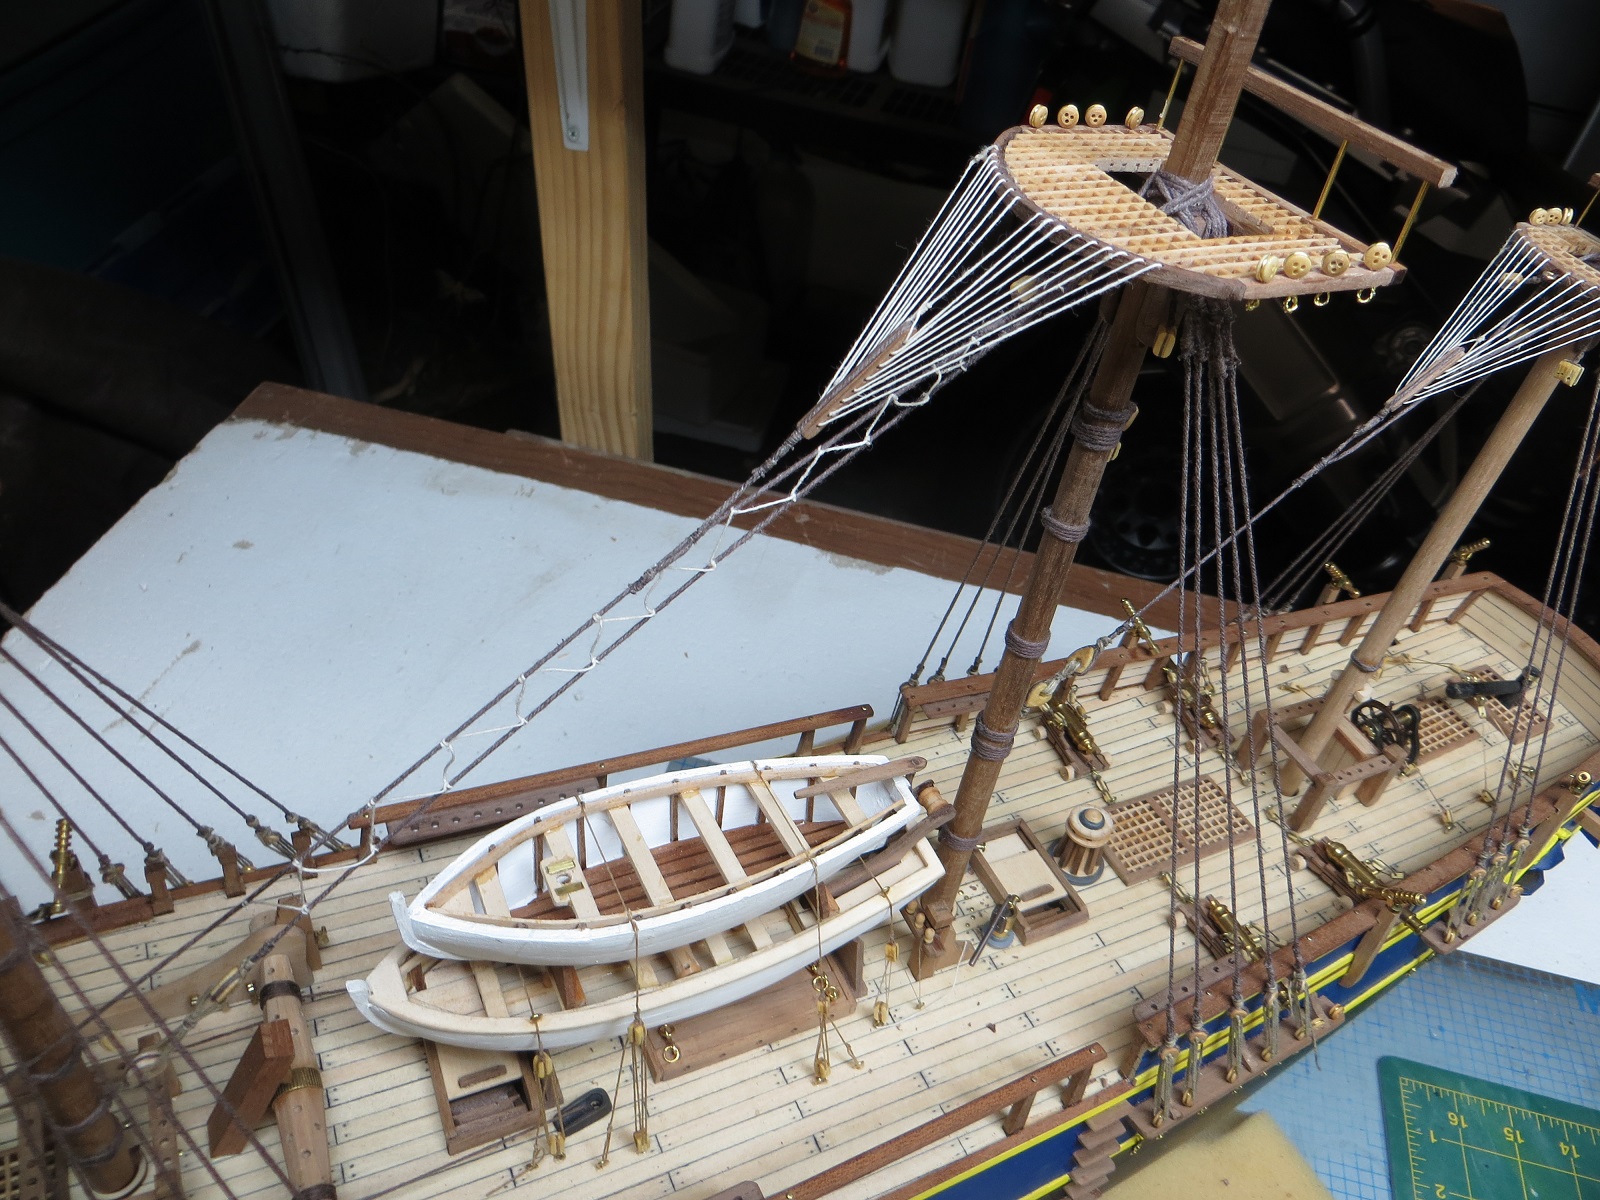
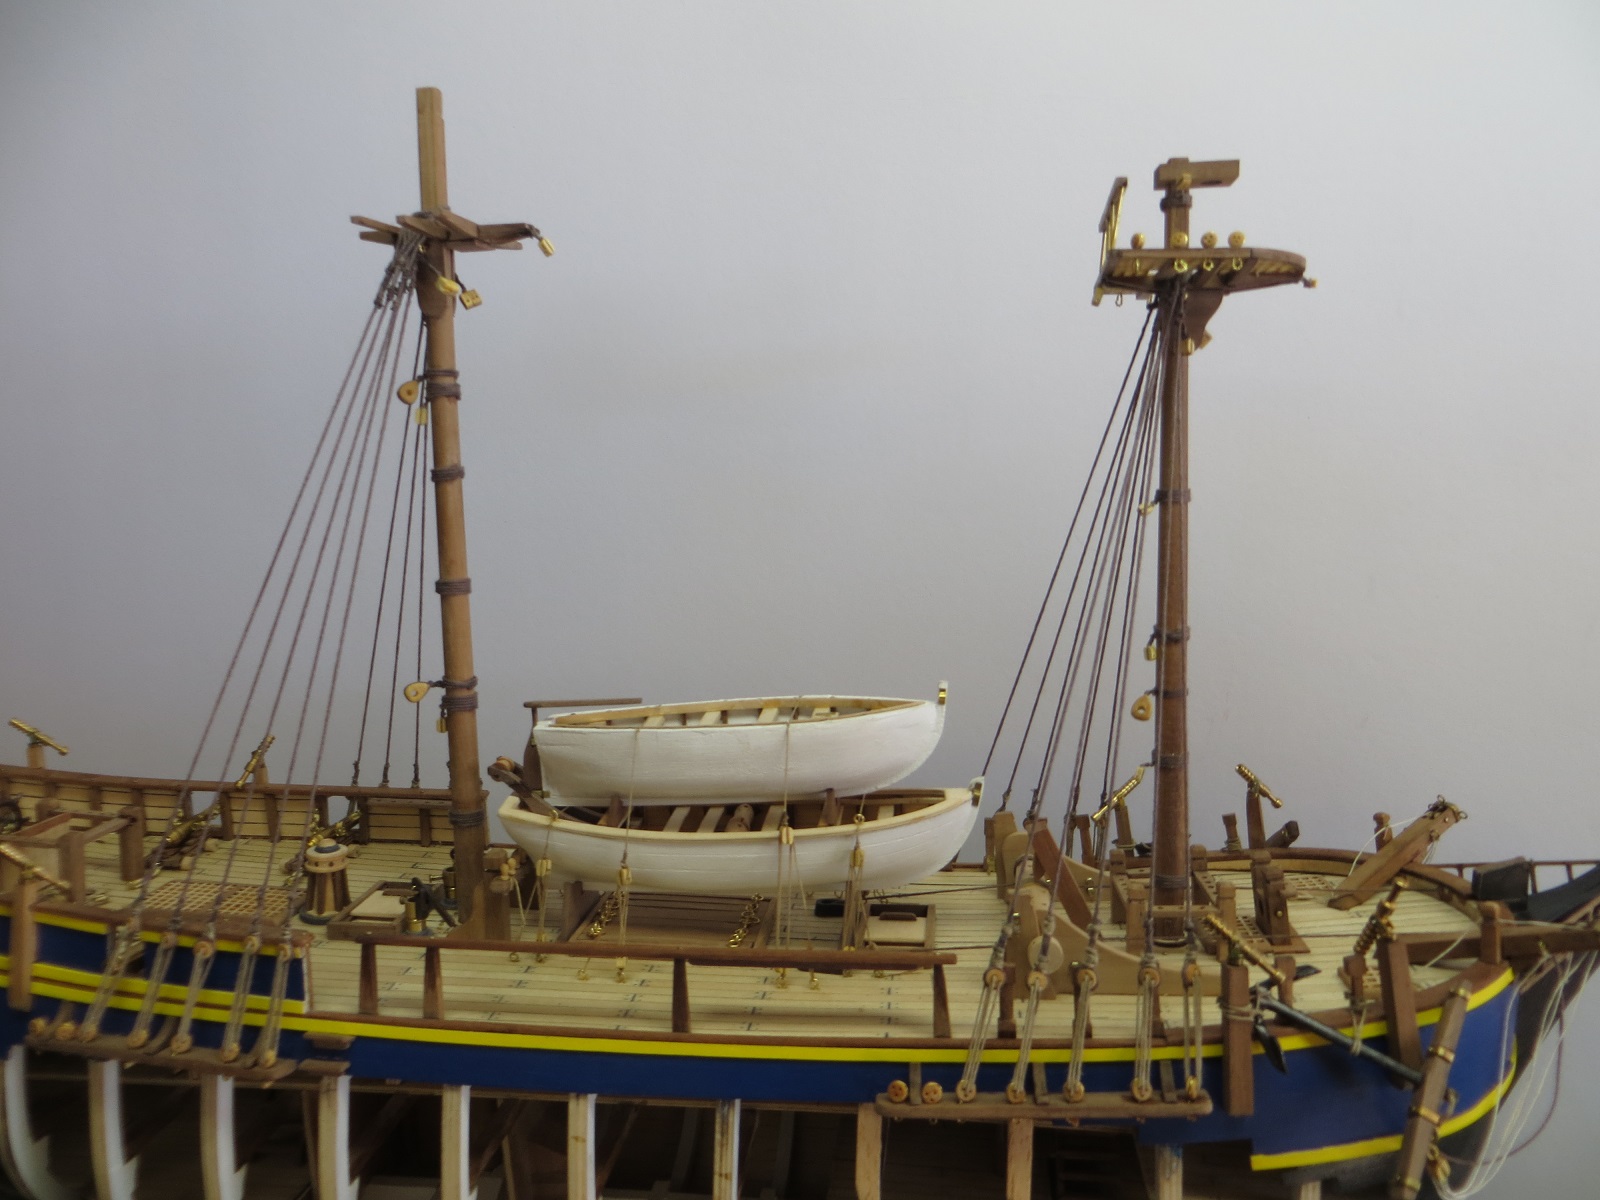
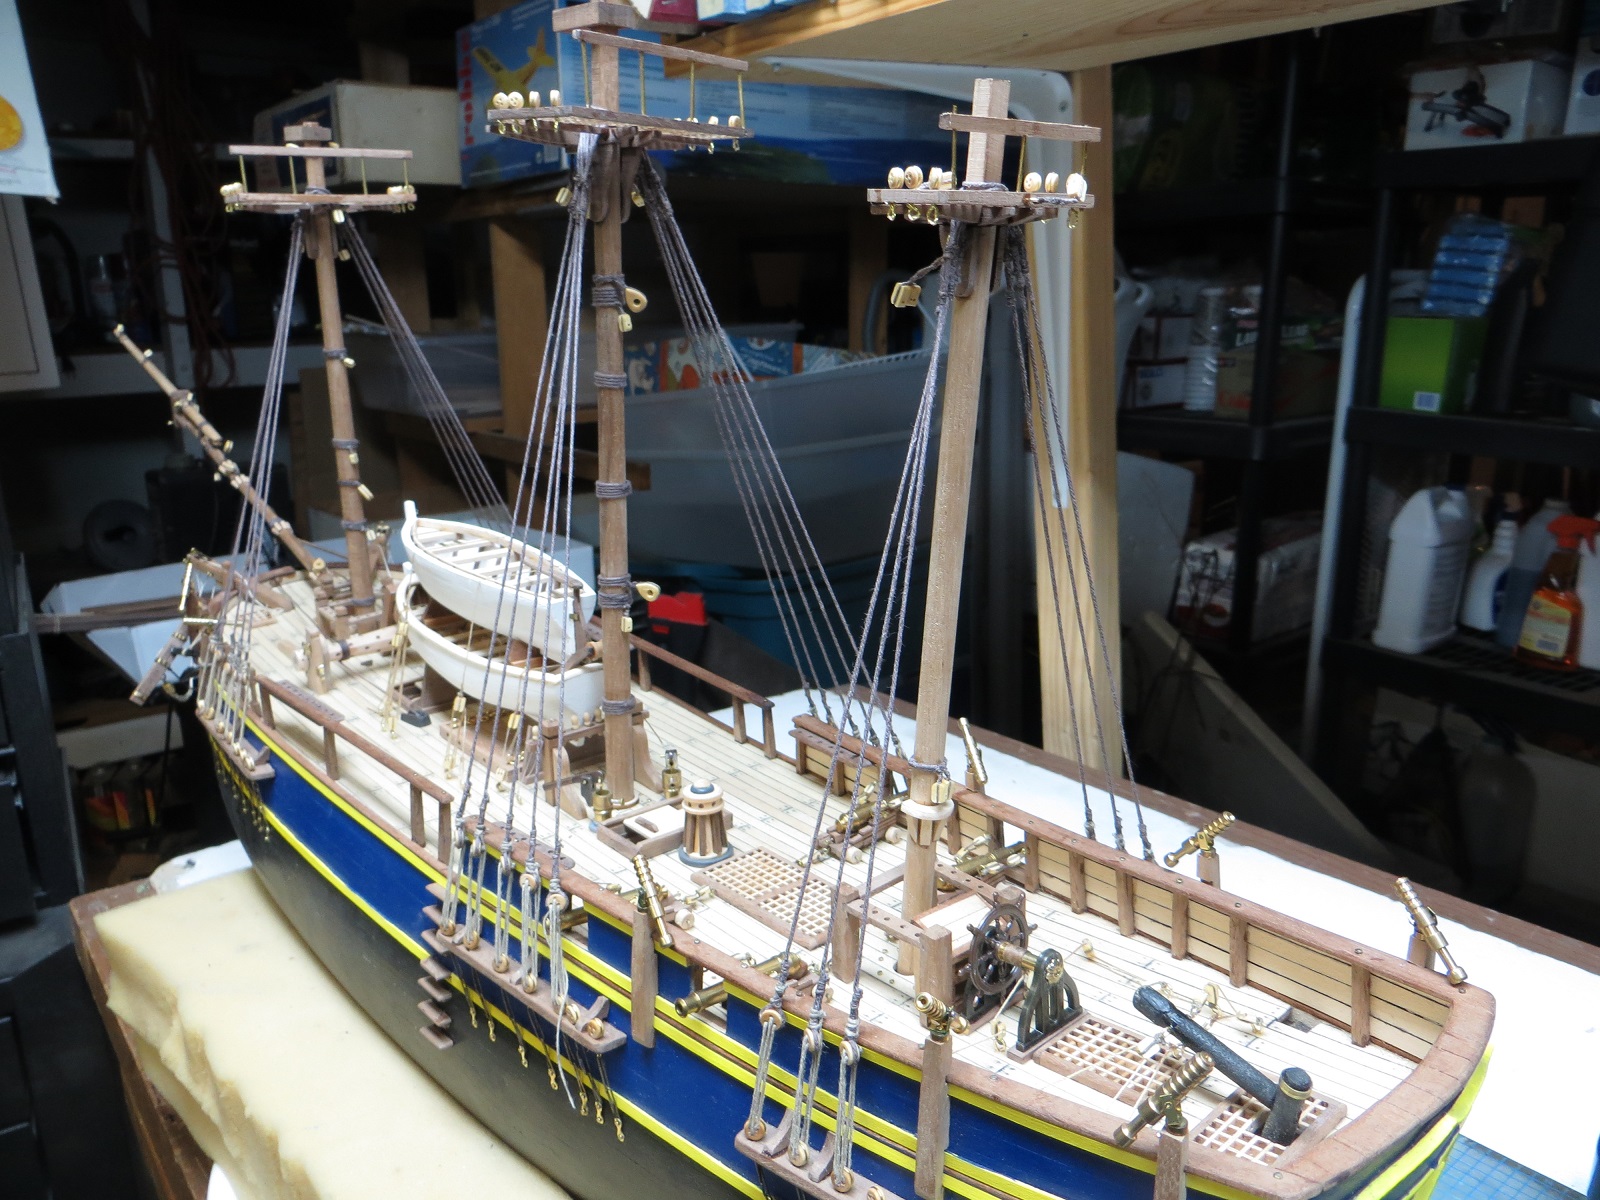
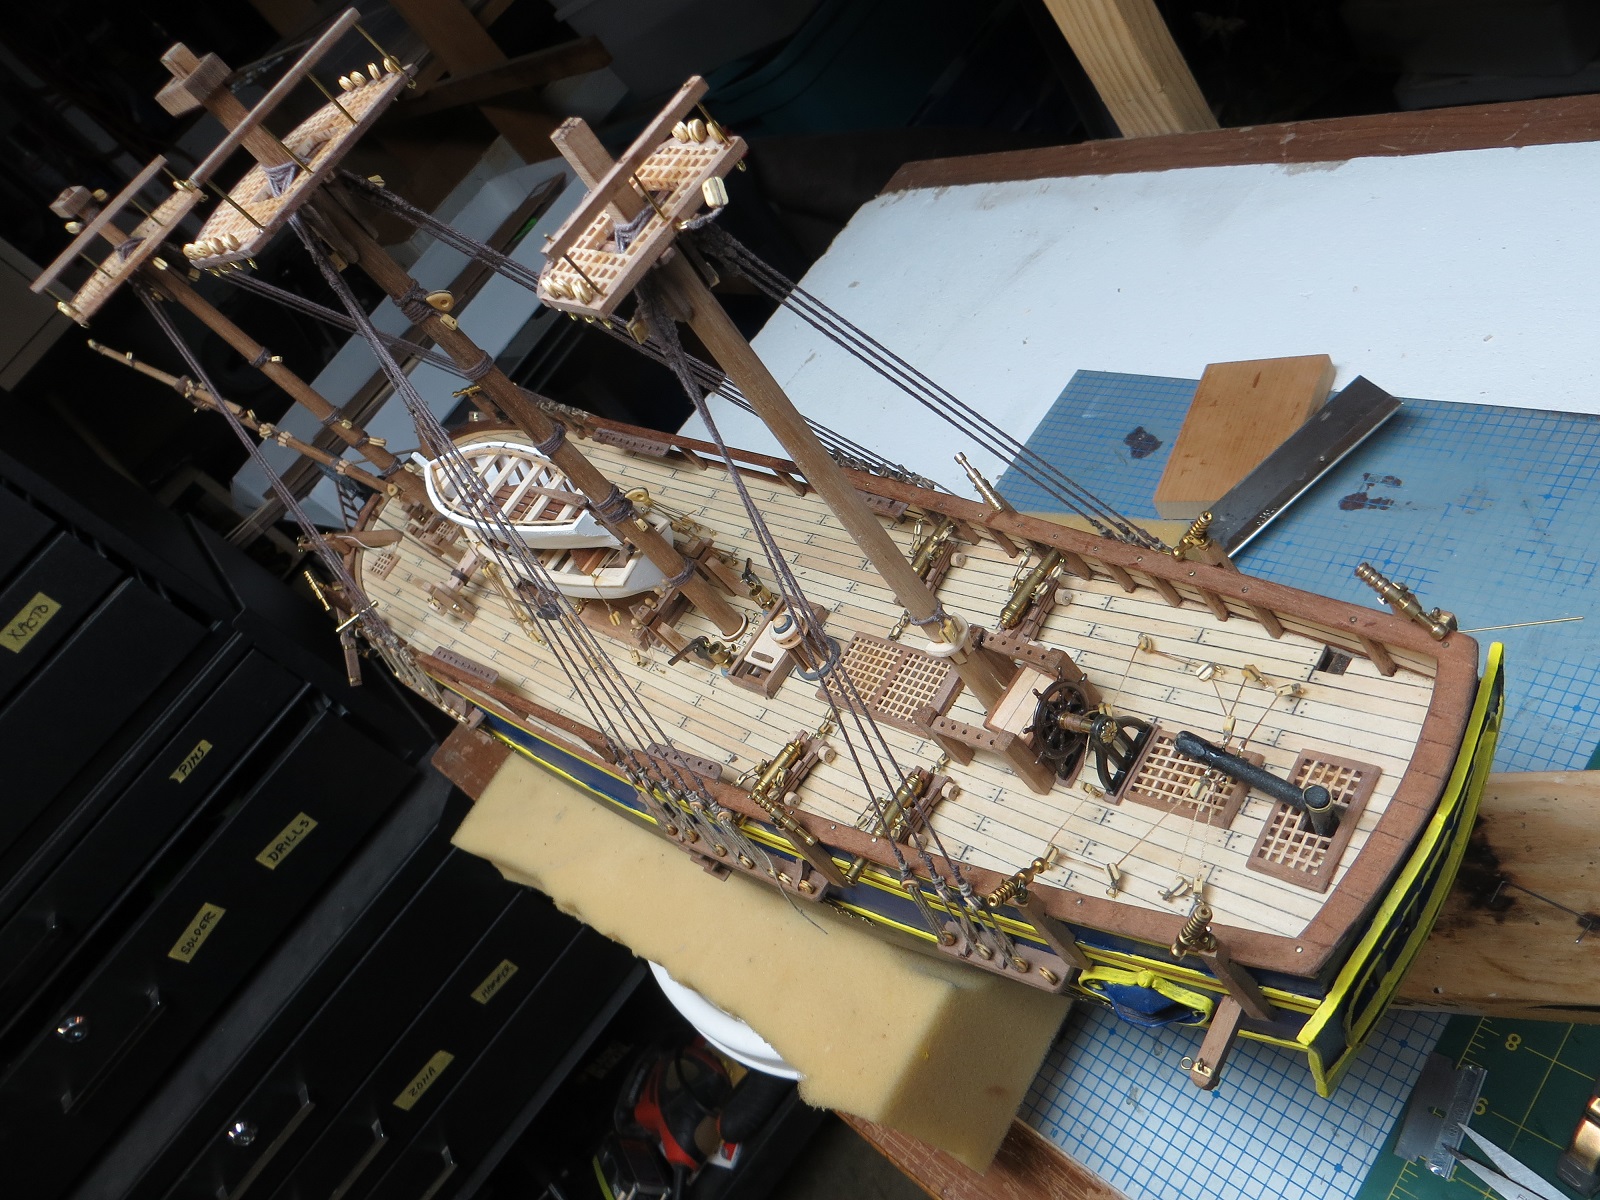
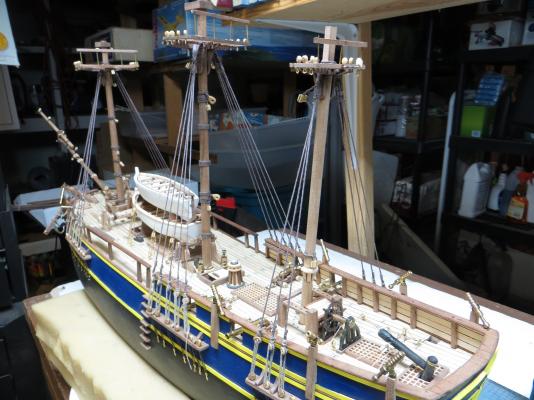
Well this was a productive weekend. Able to get the basic rigging on the lower portions of the fore, main and mizzen mast. As mentioned before, I am a bit lost, but forging forward.

-
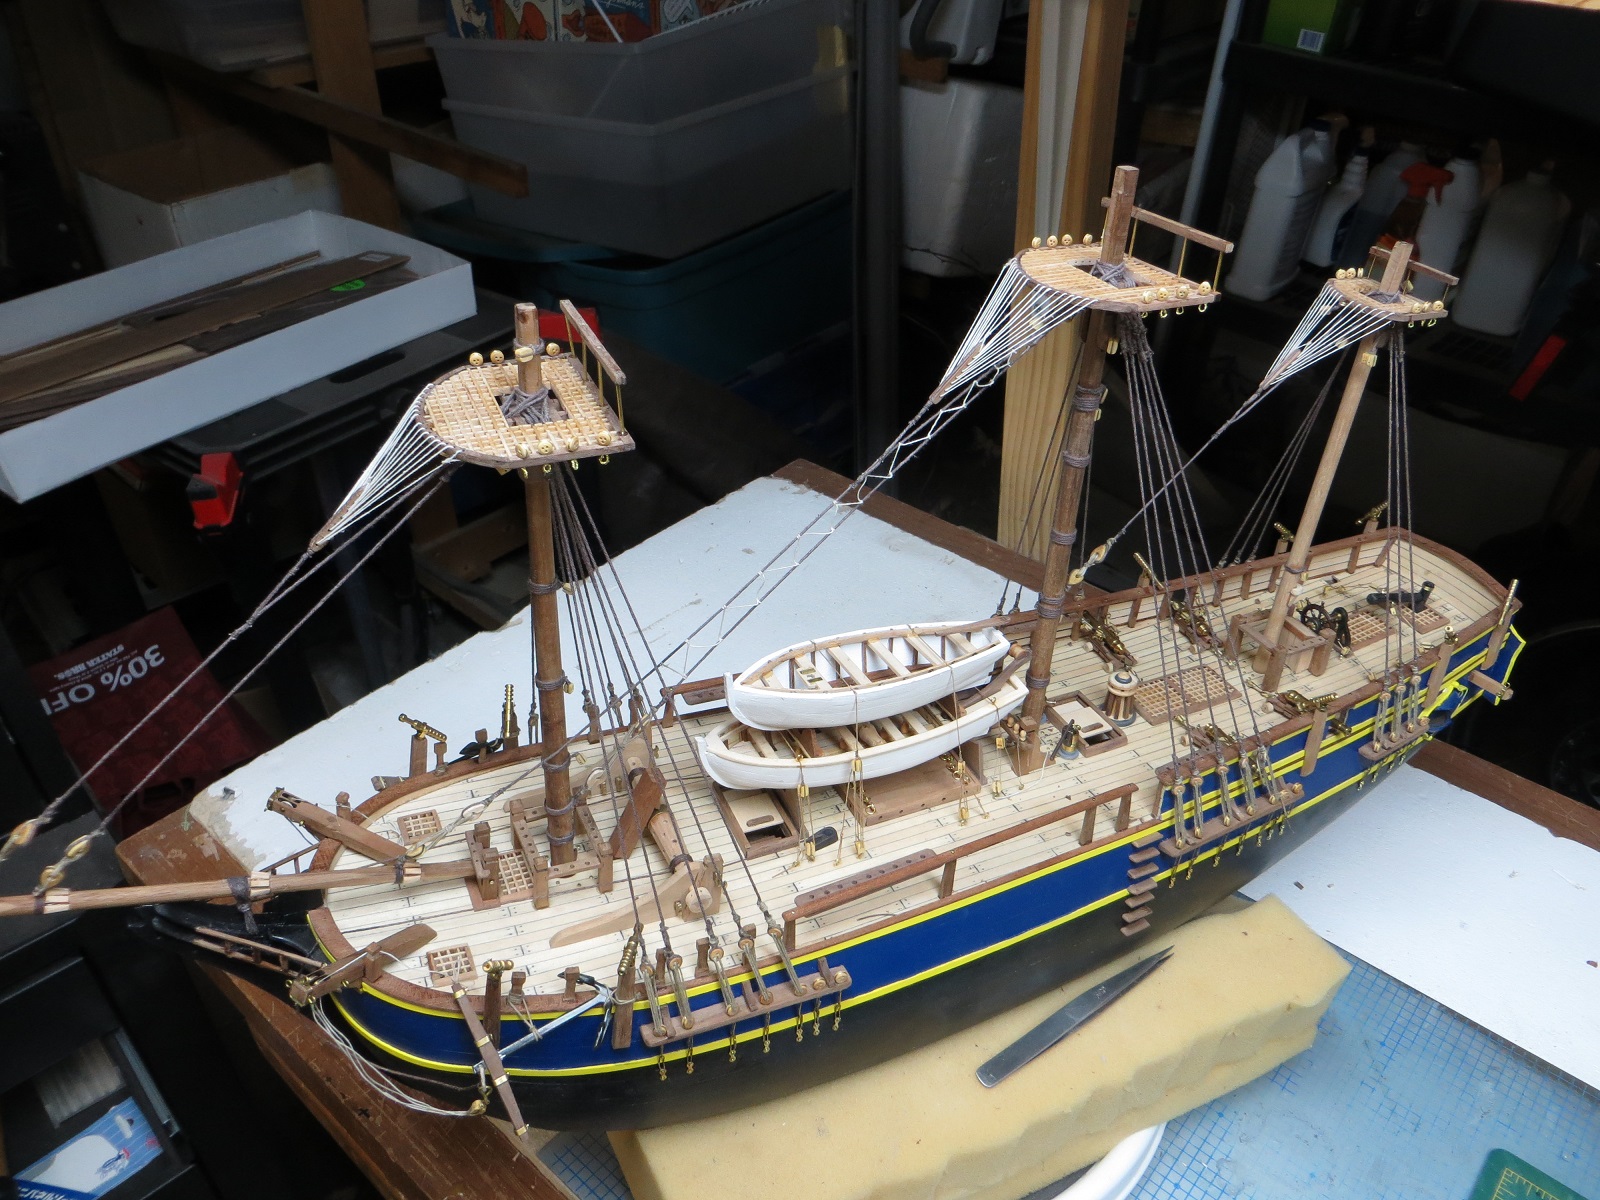
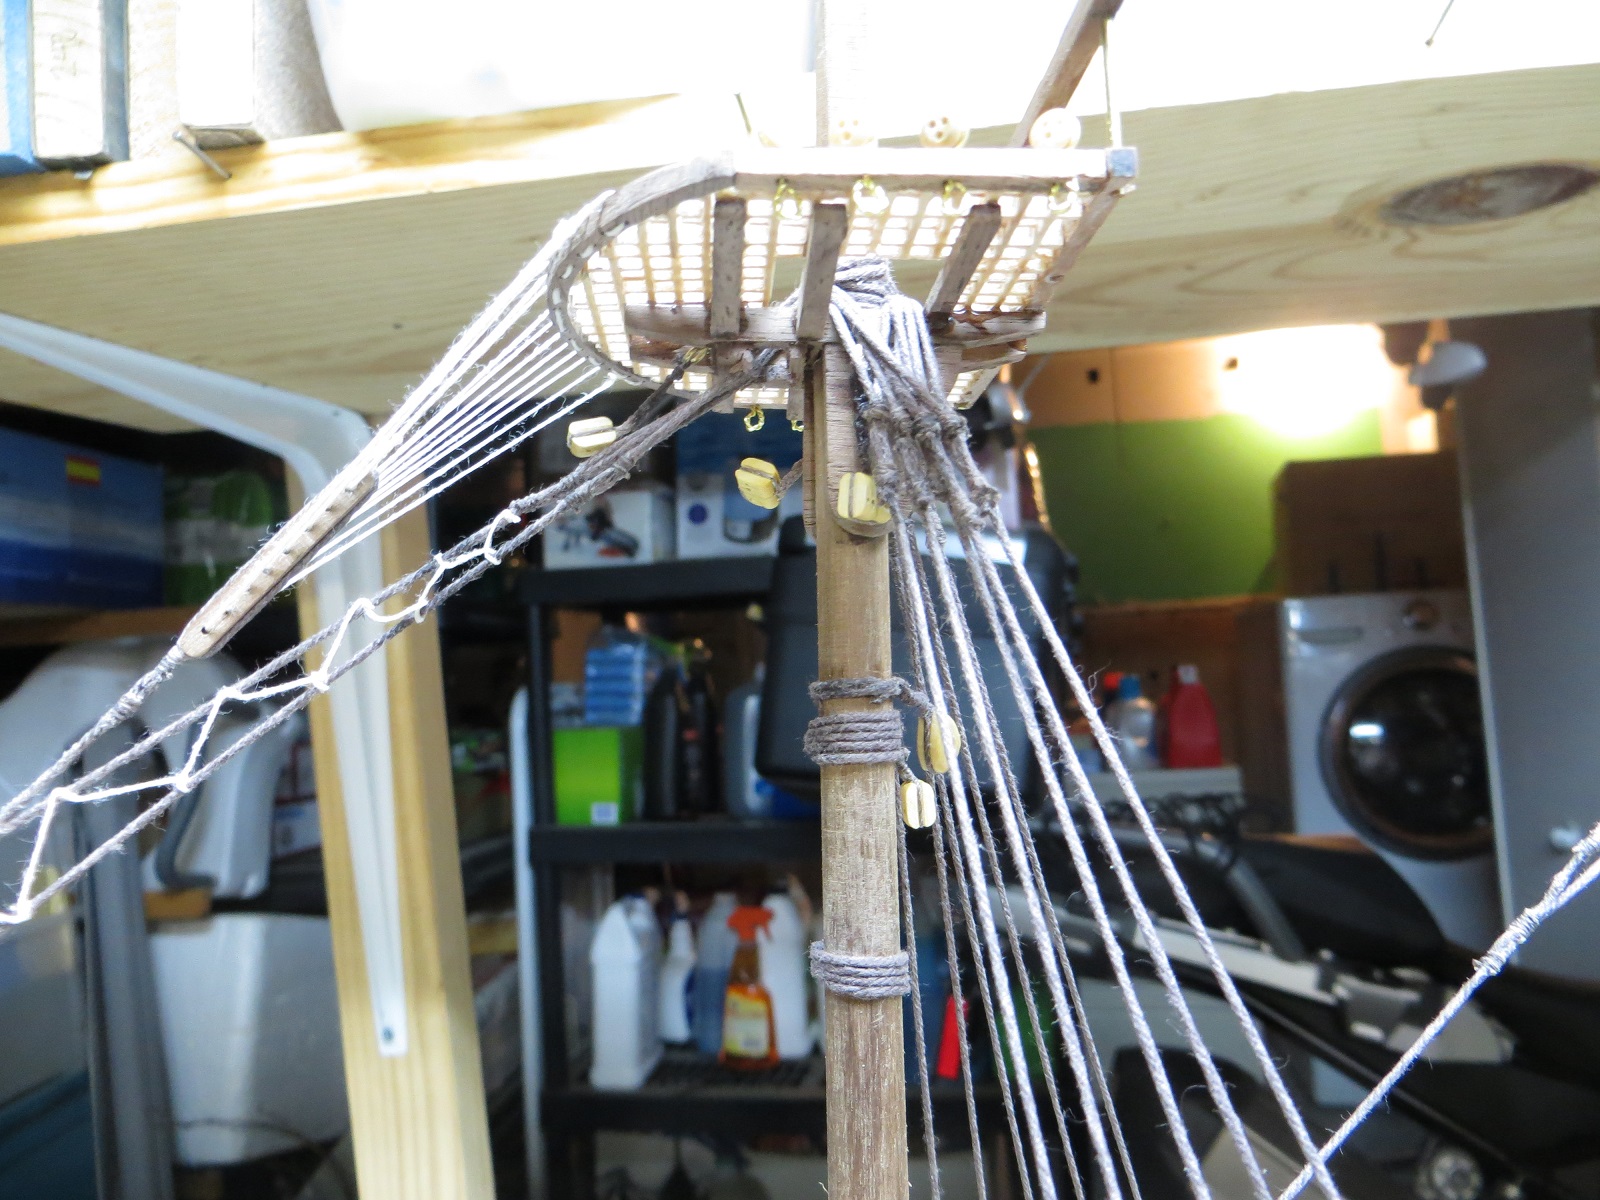
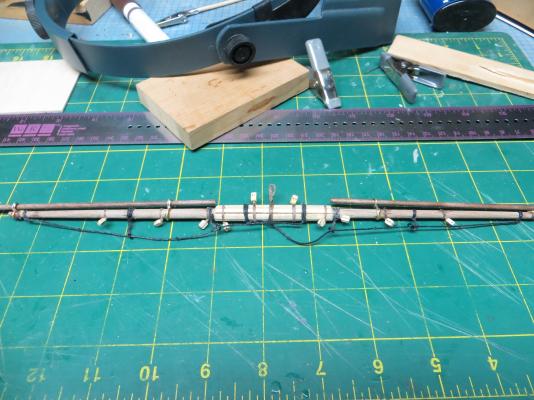
Looking at the date of my last posting, it has been awhile. I have continued work on the lower portion of the three masts and have got most of the shrouds installed. I have also constructed the three crow's nests. They have not been glued to anything yet. I am now following the rigging diagrams provided with the instructions. There are twelve "figures" showing the masts and rigging. The "figures" are not very explanatory and I have never felt as lost in building a model but I plow on. I have looked thru many a build log of Bounties and other build trying to get an idea of how to proceed. While you experts might find errors galore, I think to a building outsider, they will be impressed. I find rigging to be both frustration and rewarding. Well.....I press on.

-
Looks like this will be a fun build.