Piet
-
Posts
3,568 -
Joined
-
Last visited
Content Type
Profiles
Forums
Gallery
Events
Everything posted by Piet
-
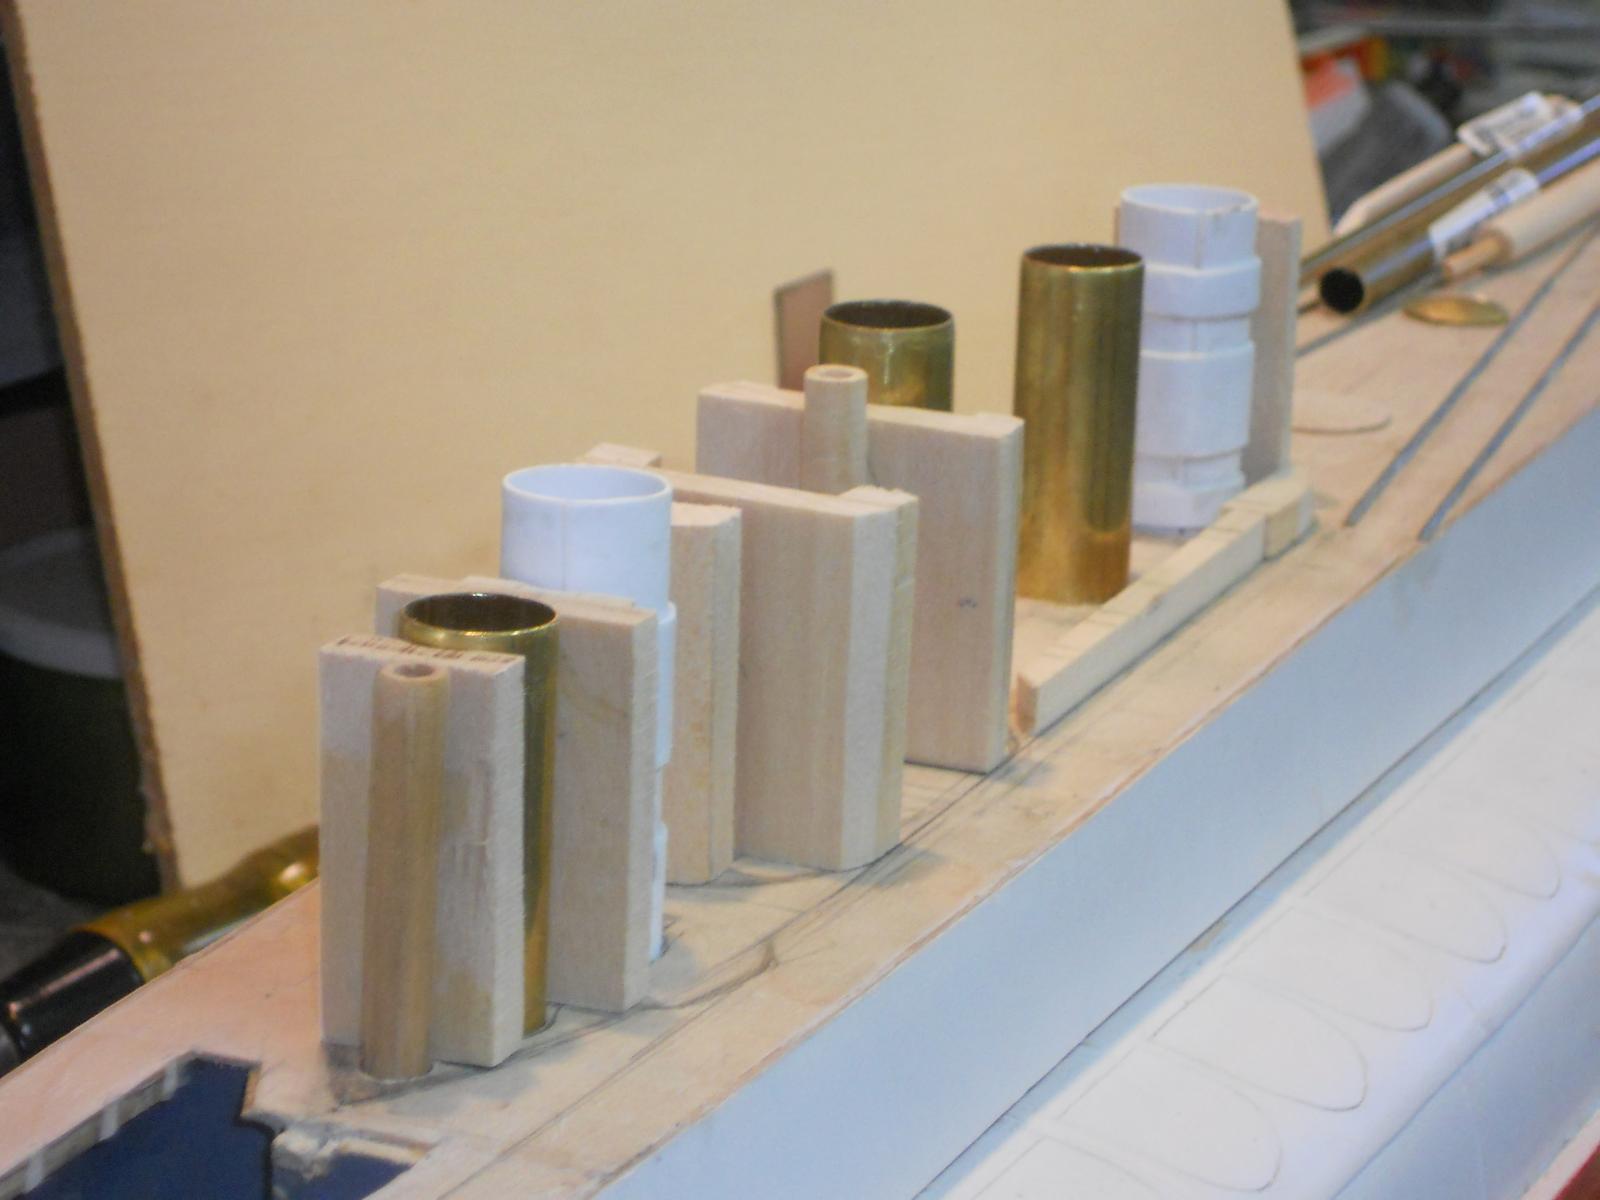
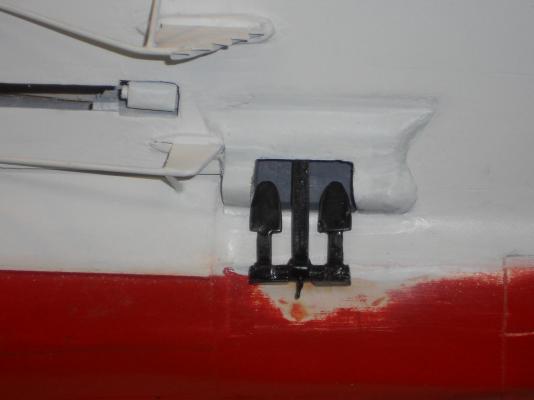
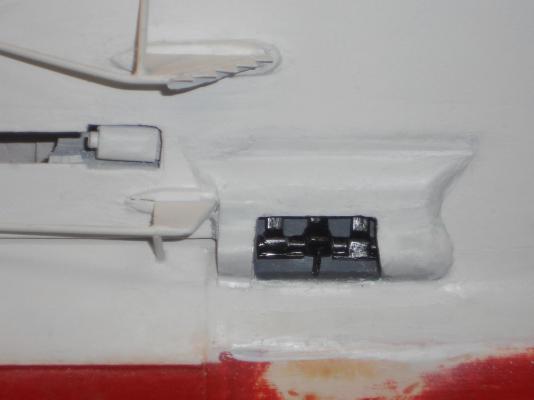
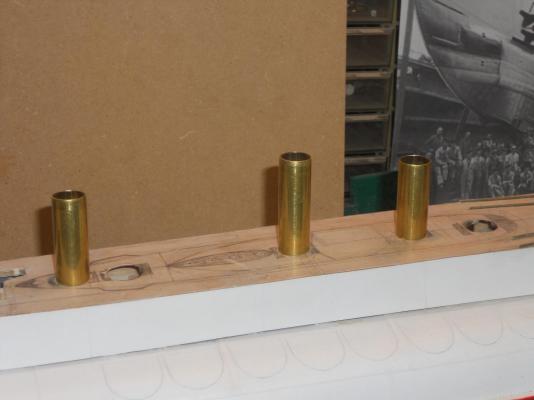
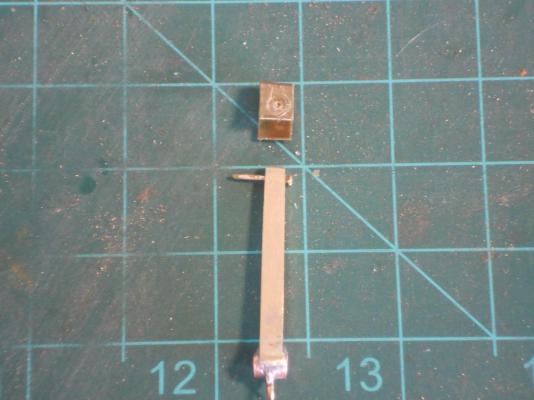
 Thank you all for visiting my dockyard and your "like" votes, it's most appreciated. Well, today was two steps forward and one back. This in itself was not a bad thing but I found necessary. I cemented the styrene wall plates to the aft and forward parts of the command center (inside the lower part of the con) and started with the framing for the forward and aft conning tower and AA gun decks. So now I was going to find out how long the AA lifting pistons have to be and for that I needed the guns. I copied them from the drawings I have of the O21, which are the same type, and cut them out of some scrap 1 mm ply. (See pic below). Well, I right away saw that my previously build styrene tubes are too short on the inside due to the extra reinforcing ring I cemented on the bottom part. I could make the guns a little shorter to make them fit - - - who would know - - - right? Hmmmmm, no - no - Piet - - - that'll be an absolute no-no! So - - - okay, I had to make two new styrene tubes and only cement reinforcing bands on them on the outside. Well, they are now shaped and taped on a brass tube of the right size. Tomorrow we'll cement the reinforcing bands to them so they'll remain round. The pedestal for the AA guns will most likely be made from a combination of wood and metal, brass. The gun barrels also from brass tubes and wood. I hope all this will work out and fit inside the tubes. At least I have the space now for them to fully retract inside. Doesn't look like a lot of progress but even though no one can see my second attempt of making styrene tubes I just could not use them with a clear conscience - - - my father is still looking over my shoulder so the third attempt should be acceptable to the quality control inspector I still need to go on the Internet to find some good illustrations of these 40 mm Bofors so I can at least make an attempt to make them look as close as I can make them. The deck gun will be a hole other issue and a worry / concern for later Here are the two Bofors hinged to a flat pedestal. As you see it here there is plenty of space for this assembly to fit inside my tubes. It's now a matter how far up I can go without the piston popping out of it's cylinder tube. Measure three or four times then cut once Cheers,
-
Hi John, That looks fantastic! With a little weathering it'll look real. On the draw plate, I suggest to use bamboo toothpicks or bamboo party sticks (they are longer). Depending on how thick your pins need to be I had to pre-shave a lot off first. Most of the time I just split the pics in three pieces and started with the largest hole it would take. And as is mentioned, you should draw it through a few times before moving to the next smaller hole. I use bamboo exclusively because it has a guaranteed straight grain and is very strong. Good luck and cheers,
- 2,250 replies
-
- 1
-

-
- model shipways
- Charles W Morgan
- (and 1 more)
-
Hello everyone and thank you all for visiting and thanks for your "like" votes. Not done much today, had to go to an holiday office party - - - free lunch! @ Daniel, there are no silly questions my friend. I know it was a bit confusing in describing all the "stuff" involved with the con. The reason for these pipes or tubes is to make whatever goes into it move up and down, i.e. make them retractable as was done on the actual boat. I'm making it a semi working model as much as I can. Yes, the styrene tubes are for the AA guns. They are mounted on a platform that is attached to a plate that is attached to a hydraulic cylinder that allows the gun to be lowered into the tube which is then closed from the outside before the crew goes inside through the crew hatch tube. The AA gun tube is also rated for maximum design depth and will thus remain dry. I have reposted one picture with letters to each tube with an explanation for each one and why. @ Popeye, yes, but the only part that has a lot of "stuff" inside is the actual control center where the periscopes can be used for attack and navigation. Oh, there is much more "stuff" inside that room but - - - . Below that control center is the central control station. Access to the control center above it is with a pull-down ladder. When on the surface access to the outside of the con, called "the bathtub," is through a hatch tube. @ Sailor, right you are, like I mentioned there is a lot of "stuff" in these boats. I remember the smell of the boat when my father came home from patrol or during his inspections of the boat and or work that was being done. No matter how often he bathed it always stayed with him. I guess it became part of him, like I used to smell like aircraft when I was working on them. @ John, thanks my friend for visiting and yes, things are getting exiting now. Okay, as I said above, not much work was done today but I managed to make provisions for the 2 X 3 stringers to tie all the bulkheads and frames together and to support the gun and "bathtub" decks. I hope to be able to cement the forward and aft half circular styrene command center walls to it. I am also making the frames for the forward section of the con but need to make the AA guns first to be able to determine how long I have to make the "piston rods" so they don't pop out of the "cylinders." I do not have photos of the AA guns and will have to go to the internet to find them. She had two 40 mm Bofors in pairs and one 12.7 mm gun for anti aircraft. This was all changed during the refit in 1943 but that was after my father's time. I'll have to search again through all my photos, also of the boats that were build and launched just before the Nazi army overran the Netherlands in May of 1940. Even so, these pics may not be enough to give me an good idea how these guns look like. The same goes for the deck gun. Tube A is the outer casing for the snorkel exhaust pipe. That thing is on the most aft part of the con and the exhaust pipe can be raised and lowered. Tube B is the crew hatch for access to the aft AA gun deck and is flush with the deck surface. Tube C is the water tight AA gun tube. The aft gun deck ends just forward of that tube where the Periscope sliding cylinders are housed. This tube stick out above the deck surface. Tube D is the shroud or cylinder for the snorkel intake. This is also a retractable pipe as the exhaust is. When "snorkeling" all you could see are the exhaust, intake, antenna mast and periscopes. For submerged sailing every thing was retracted as much as possible. Tube E is for access to the bridge or "bathtub" above it. I made this tube extra long to give it sufficient support. In the real boat it was rather short with the watertight lid/door at it's bottom, which is in the "ceiling of the command center. I could have made this tube short but wanted the extra support. Tube F is the forward gun deck crew hatch tube for access to the forward AA gun. Tube G is the forward watertight AA gun tube. Cheers,
-
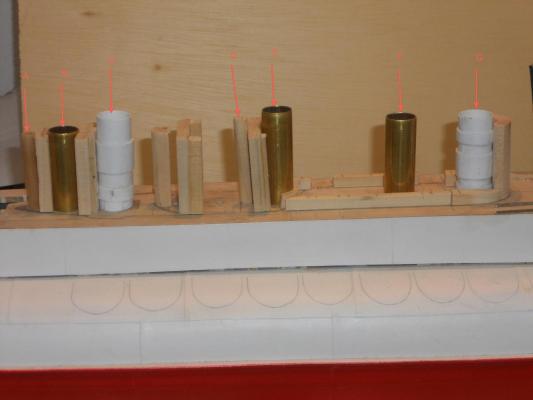
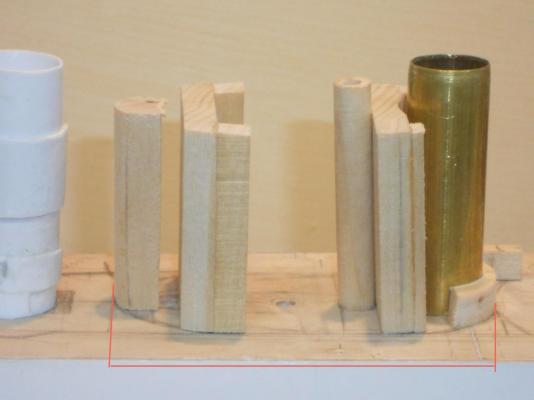
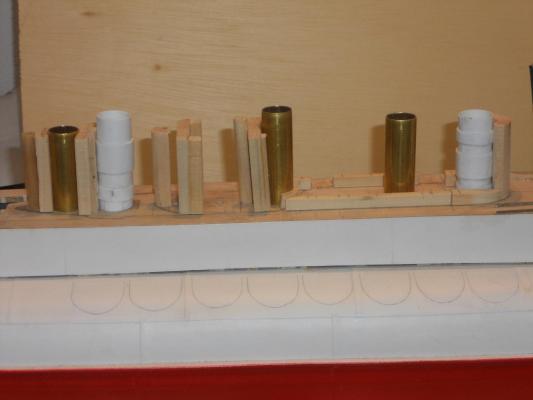
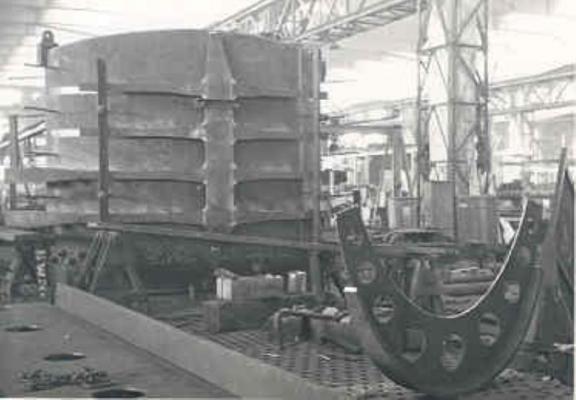
First of all, thanks to everyone who visited and your "like" votes. First thing this morning was finishing the *&%$*@ styrene tubes. I added a few more bands around them on the outside. After e remake of one I think they'll work for me. They are not the greatest things I have made so far but like I said, they are completely hidden anyhow.At this stage in the game I'm not going to wrap myself around the axle for something that'll never be seen. They are round and sturdy. I made a few bulkheads for the center and aft parts of the con. I also cut some 2 X 3 mm planks for the top bracing and 3 X 3 mm beams for the forward framing. I cemented the two wooden tubes in place for the snorkel exhaust and intake pipes and two of the aft frames. The sides of the 3 aft frames need to be faired yet because the aft end of the con runs into a point and is also tapered to the top. The rest of the con sides are perpendicular to the deck. I'll fair the aft end when they are braced at the top to give them rigidity. Before I can cement the styrene tubes into place I need to make the gun platforms, which means that I most likely have to make the gun pedestal already. Reason is that I need to know how far down they need to go to determine how long the "cylinder" tube has to be so that the "piston" rod won't pop out. This in turn will depend how long the gun barrels will be. Confusing - - - So, do I now have to make the entire gun assembly? Hmmmm, more details - - - - When can I put the con together????? Mutter - - - mutter - - -grumble - - - grumble. This is a close-up of the center part of the con, called the command center (I have indicated it with red lines). It's a heavy structure that can withstand the pressures to the design depth. This is where the commander and a few other crew members are during the attack phase. I am using this primarily for structural integrity of the entire con. Nothing inside will be seen but both ends can be visible on the outside through two doors on the port side. I'll use styrene for both ends. No, no, no - - - no lights! This is a photo of the command center during the actual construction of the O 19. The bands you see running on the outside are to fasten the side plates to. A pretty husky affair! This is an overall view of all the "stuff" that'll have to be installed yet. On this pic everything is just suck into the places where they belong. A view from the stern end. Cheers,
-
That's some nice planking Adriaan, regardless of a few tiny gaps. Is this a single or double plank project? Will the hull be painted or coppered and painted? Cheers,
-
My thanks to every one for clicking the "like" button, it's appreciated. Thank you Andy, Anthony, Remco, John and Mark for your comments and advice, wow, much appreciated. @ Andy, the OD is 18 mm for my scale. That sounds relatively easy, I can do that @ Anthony, I "heated" it up and wrapped it around a brass tube that gave my styrene tube the correct OD and found no warping. I also cemented reenforcing strips around three sections in the middle and one strip on the inside all the way on the bottom. @ Remco, I didn't have 0.3 mm sheet, that would have been ideal though. I just got the 0.7 sheets in for the deck slats and thought "hey, that would make nice tubes, let's I give it a try, seems nice and sturdy." Actually my first thought was some heavy drawing paper and thinned glue, like paper mâché , but wanted to try styrene. When I ordered the 0.7 mm styrene sheet for the deck slats the minimum order was 4 sheets so I could play with one. @ John, well it seems to have worked by using Andy's suggestion, for what I am using it for. I'll have to try first to move a dummy gun platform through it and see if it works okay. If not we'll make new ones. I want it to work for me, I'm not one to give up easy @ Mark, yes, that was my plan from the start and it would work just fine if the inside is smooth enough for the gun platform to ride against. But again, the styrene was something I wanted to try for it's smoothness, for the gun platform. I'll have both tubes completed by tomorrow afternoon and find out how they look like. None of it will be seen anyhow even the top part that sticks out above the gun deck. There is a low hexagonal box around it, fastened to the deck and I have to also cement the brass strip with the hinges to the top for the pressure lid. I'll use CA for that. As long as the gun platform can slide smoothly up and down the tube I'll be a happy camper. In between playing with the styrene I have been cutting some bulkheads for the lower portion of the conning tower. As mentioned in an earlier post, I want to keep the inside as free from structure as much as possible because there are three doors on the port side. I like to be able to look inside and see the "stuff" that may have been stored there, like a few cases of good Heineken beer For that reason I am kinda building the command center separately and the forward and aft ends are half circles. I'm thinking of using the styrene for that, it bends nice and is stiff enough. My 1 mm plywood is too stiff to bend around this tight curves. There will be vertical beams to support sides and the horizontal gun deck beams. More work not intended when I started this build but I thought it would add something extra in detail to look inside. Okay, enough of my banter. Thanks again to all for your input and help. Let's see what tomorrow brings. Cheers,
-
Thanks everyone for visiting and your like votes. @ John (Lad), thank you John and yes, that makes two of us, I am chomping at the bits to get going on the con but these tubes need to be made first though. Talking about tubes, I struggled all day making one lousy tube from styrene *%$@ ☜ mumbling under my breath. I can do wood, I can do metal, I can do fibreglass, I can do carbon fiber, I even do windows but I'm struggling with styrene. Can any styrene expert tell me how warm / hot the oven needs to be to soften this stuff so I can form a nice tube over a brass tube? I tried to make one cold but that obviously didn't work too well - - - duuuuuh
-
Hey Nenad, I kinda figured you meant beer. It could have been your Admiral, or cat or dog but thet wouldn't go with Grieg to the shipyard. I like beer and Grieg as well . I also enjoy your sense of humor and tenacity in your efforts to build a great model of a great ship. Keep plugging at it my friend. Cheers,
- 4,152 replies
-
- 1
-
-
- cutty sark
- tehnodidakta
- (and 1 more)
-
Moi? What ideas did I give your John - - - hmmmm oh yes, good Belgian beer - - - that's it isn't it John ? Your masonry looks splendid, now to paint it and weather it. Some soot maybe? You gonna have a wood pile too for the fires? Or did they use cole? Cheers,
- 2,250 replies
-
- 1
-
-
- model shipways
- Charles W Morgan
- (and 1 more)
-
WOW and a double WOW! She is a splendid ship Adriaan, well done my friend. Cheers,
-
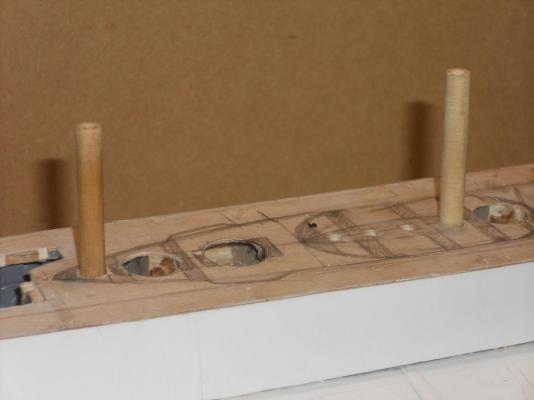
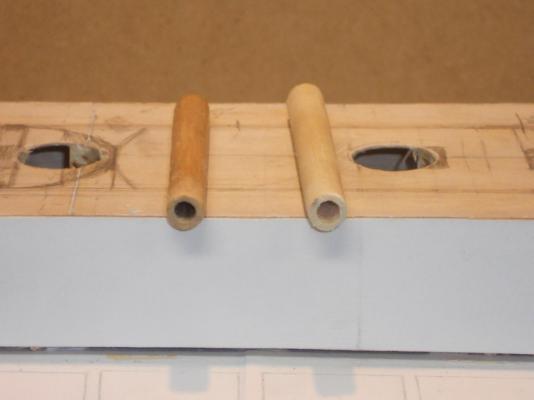
Thank you all for visiting and your "like" votes. @ Remco, I know you had a lot of fun doing this for me but without your help this build would have never even come close to how the O19 really looked like. It would have been a semi look alike of the O21 and they are two entirely different animals. I needed to give credit where credit is due. Thank you and Gino again. @ John (texnn5), yup, the "fun," as you call it, is beginning. I should say, with some frustration. @ Popeye, thanks my friend, yes, topside we go now! Today was spend with providing space for the retractable AA gun platform cylinders and rams and the periscopes. I'm still asking myself - - why are you doing all this extra detail stuff - - why not make it simple and show all this stuff static. Hmmmm - - - I guess I'm glutting for punishment Okay, so I calculated that I needed to make a few holes down into the vertical false keel for the AA gun platform lifts. Not as easy as I thought it would be, just set the drill on it and let her rip. Not so - - - even though I made sure that the drill bit was vertical both ways and started with a small drill bit there was enough of a difference in angle that I missed the center by a fraction. This just slowed me down a little but got things on track again. That was for the aft AA gun. Now I wised up a little and made a smaller hole for the front and inserted a smaller dowel into the larger one that acts as the hydraulic ram. Oh yeah, I had to "turn" those two dowels down a little to fit inside the brass tube that'll act as the cylinder. I used the drill press for this procedure using a sanding block and a back-up block. For the snorkel exhaust and intake pipes I needed a tube size I didn't have. So instead of driving 5 miles to Bunnell to the hardware store, with the chance they didn't have it, I made my own from a piece of wooden dowel. "Turned" it to size in the drill press as described above, then drilled a hole in the center using my DB 200 Unimat lathe. It's just for the guide for the actual pipes that slide inside them, no one will see them anyway. I had more luck with the periscope holes though, that made up for some of the frustration with the AA gun holes. Now to make the tubes for the AA guns. I guess I'll try the styrene first. That'll be the first time using this stuff. Andy says to use CA glue and Popeye says he uses regular plastic model cement. Okay, we'll experiment. I plan to use some styrene for inside the lower part of the con, where the command center is located. I like to keep this area as open as possible because there are three doors in the port side and we like to have a look-see inside without it all taken up by bulkhead wood. Well, that's it for today and thanks again for visiting. Cheers,
-
Hello Boris and welcome back from your trip to Poland - - - and congrats on your promotion! Wow and a double wow on the progress of your O16 model. You got the planking on and you did the propellers too - - - and that without the detailed drawings I send via post. Oh yes, I forgot, I send you the digital pics Remco got for me. They may need a little less pitch going towards the tips though. Check the drawings again. Cheers,
-
Popeye - - - that's the Dutch way and - - - - - his mom didn't raise a dummy Cheers,
- 1,873 replies
-
- 4
-
-
- occre
- san ildefonso
- (and 1 more)
-
Hey John, Oooooooooh - - - scratche-ing!!!! The dark side is calling, calling, calling calling. Hear the siren song John???? That looks really terrif! Cheers,
- 2,250 replies
-
- 3
-
-
- model shipways
- Charles W Morgan
- (and 1 more)
-
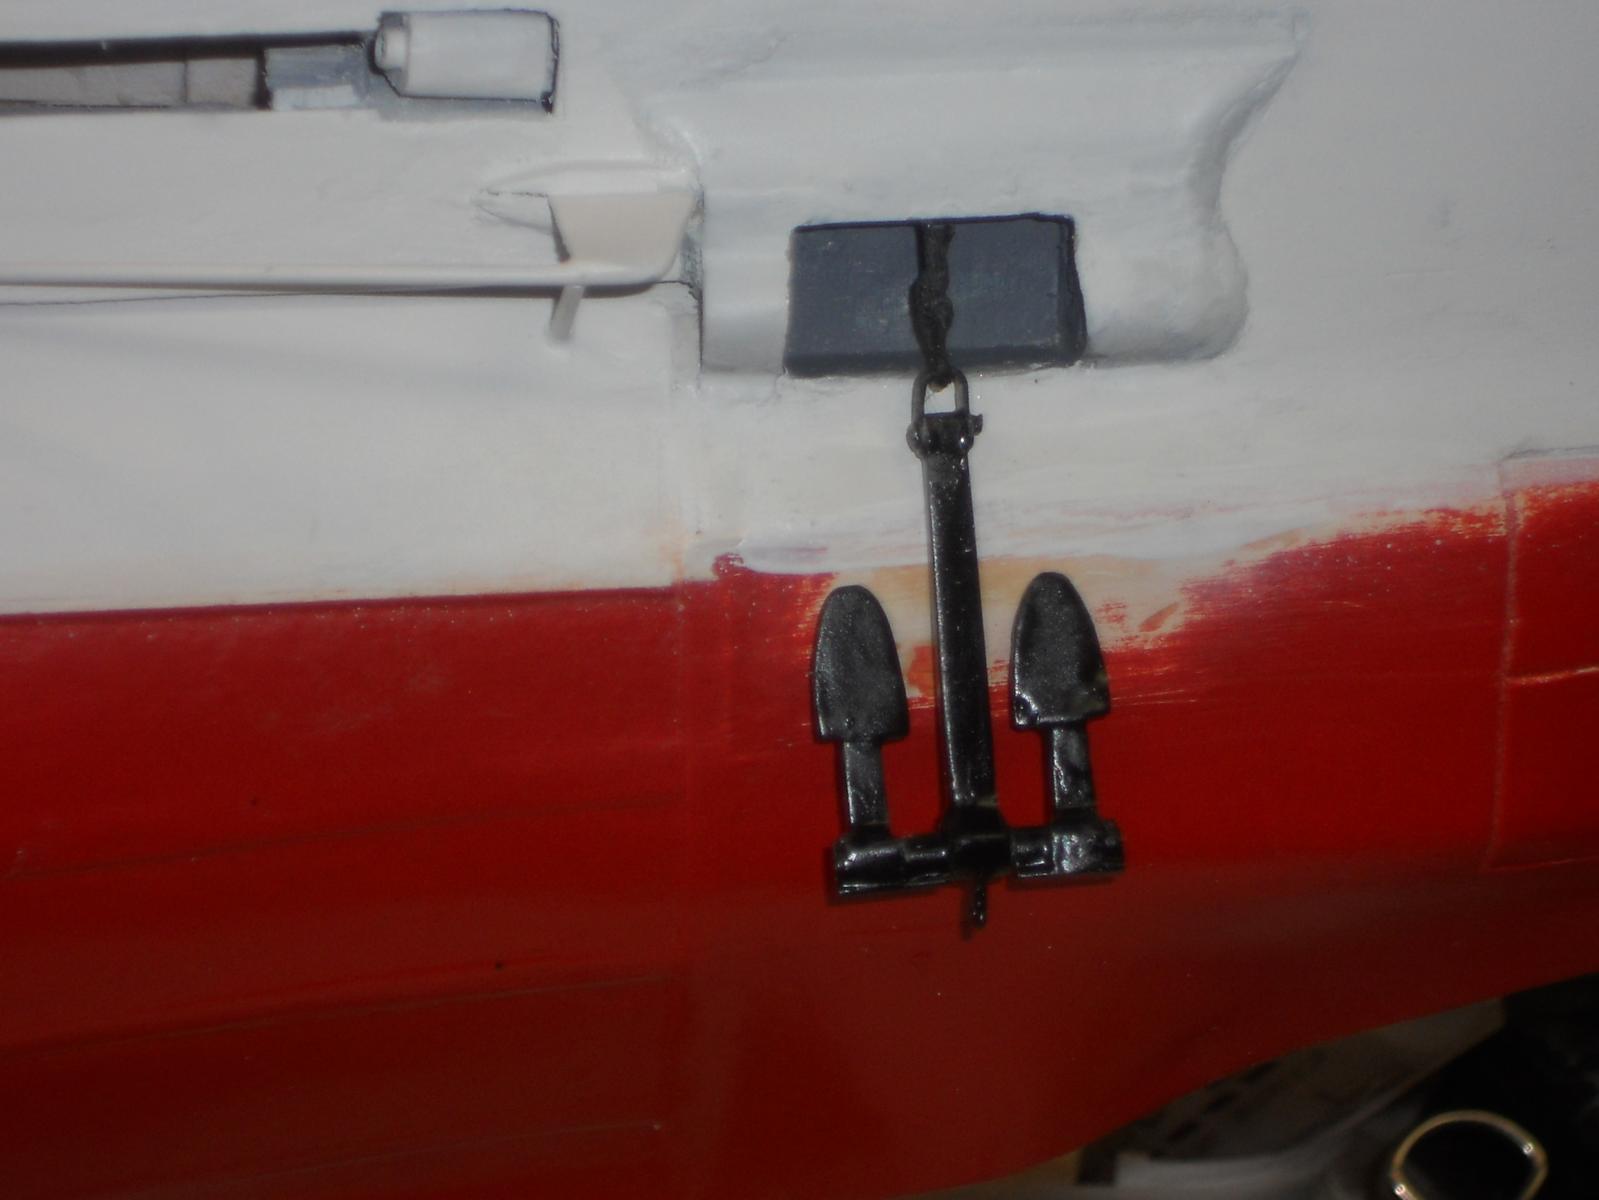
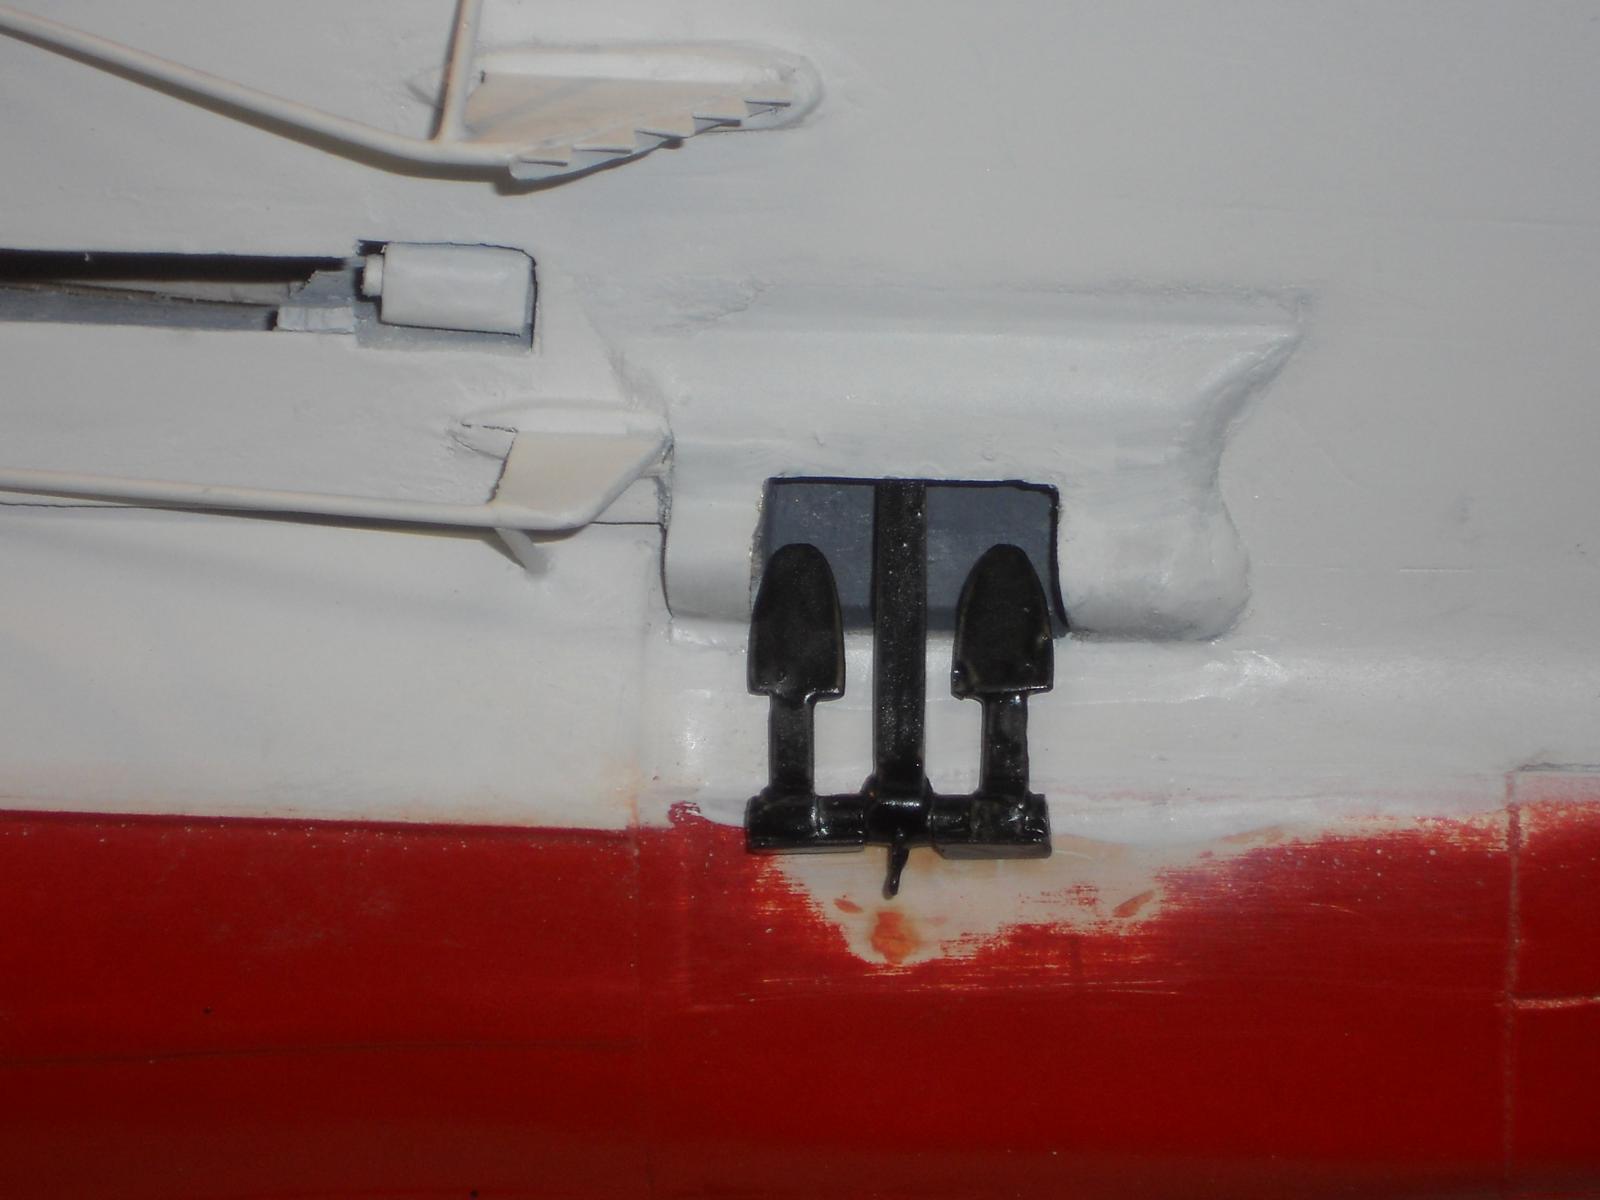
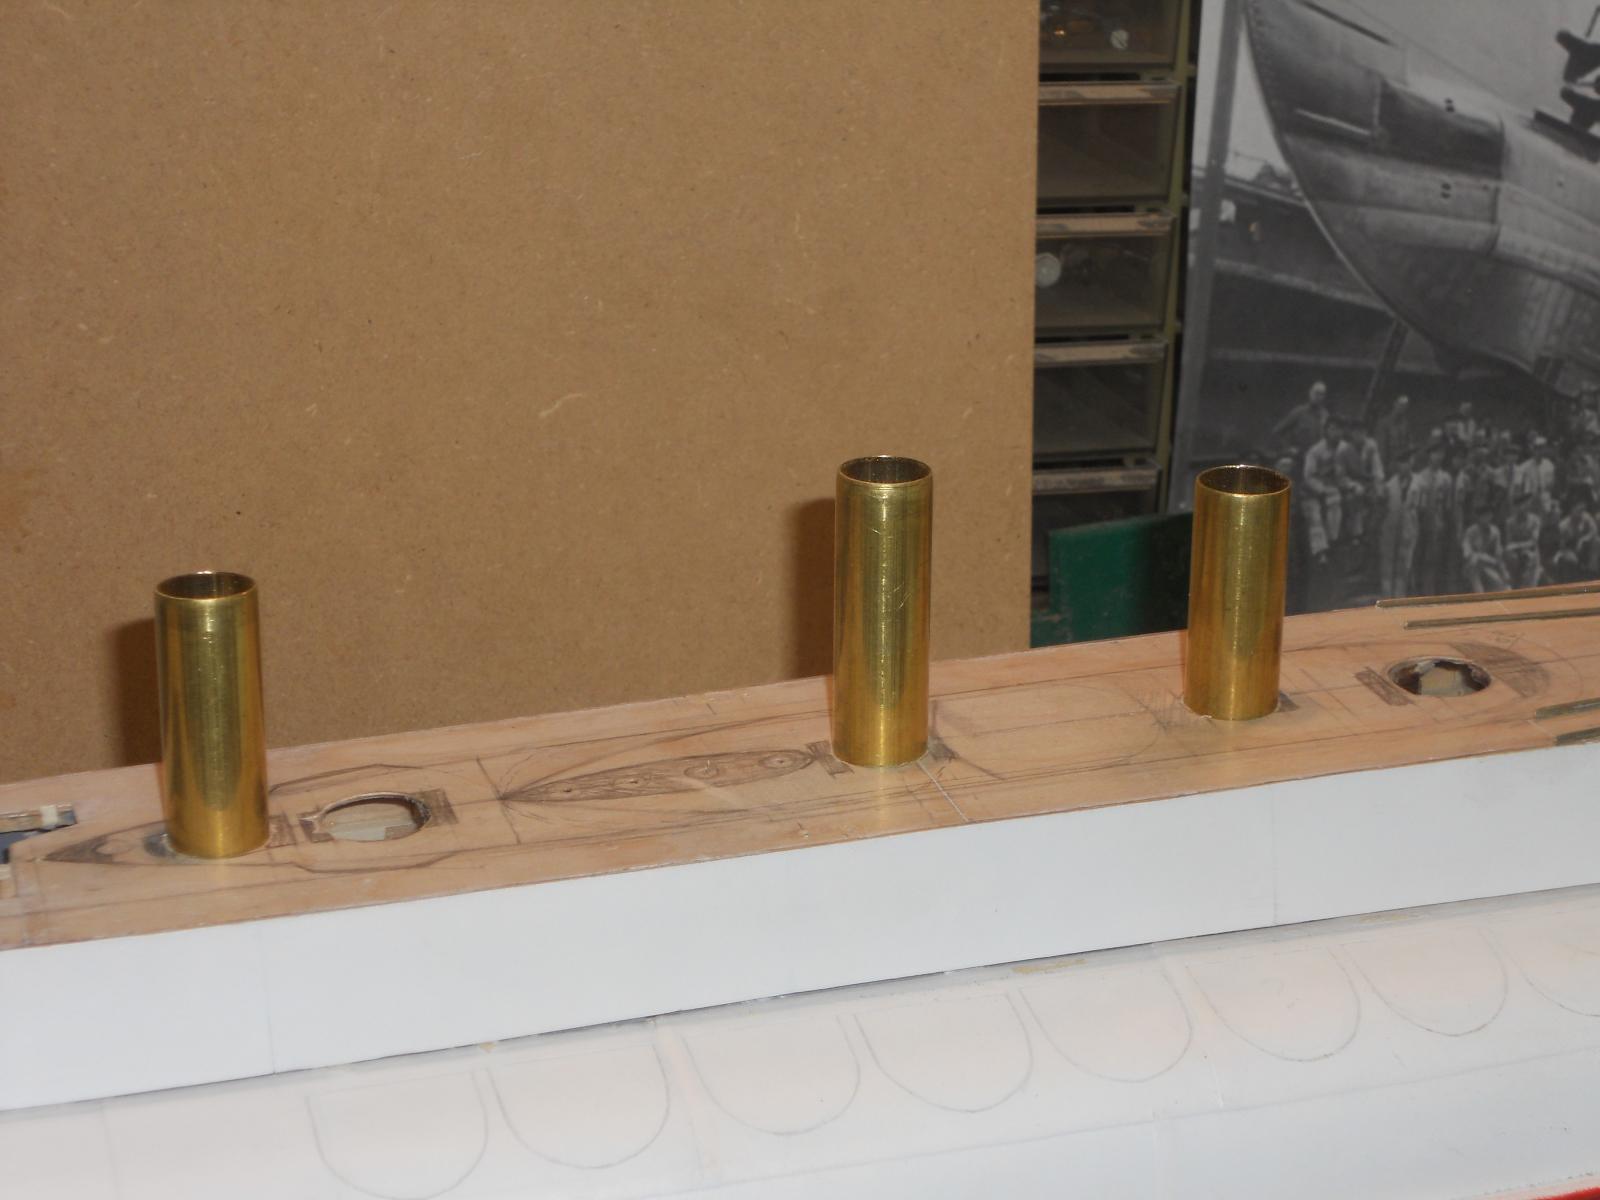
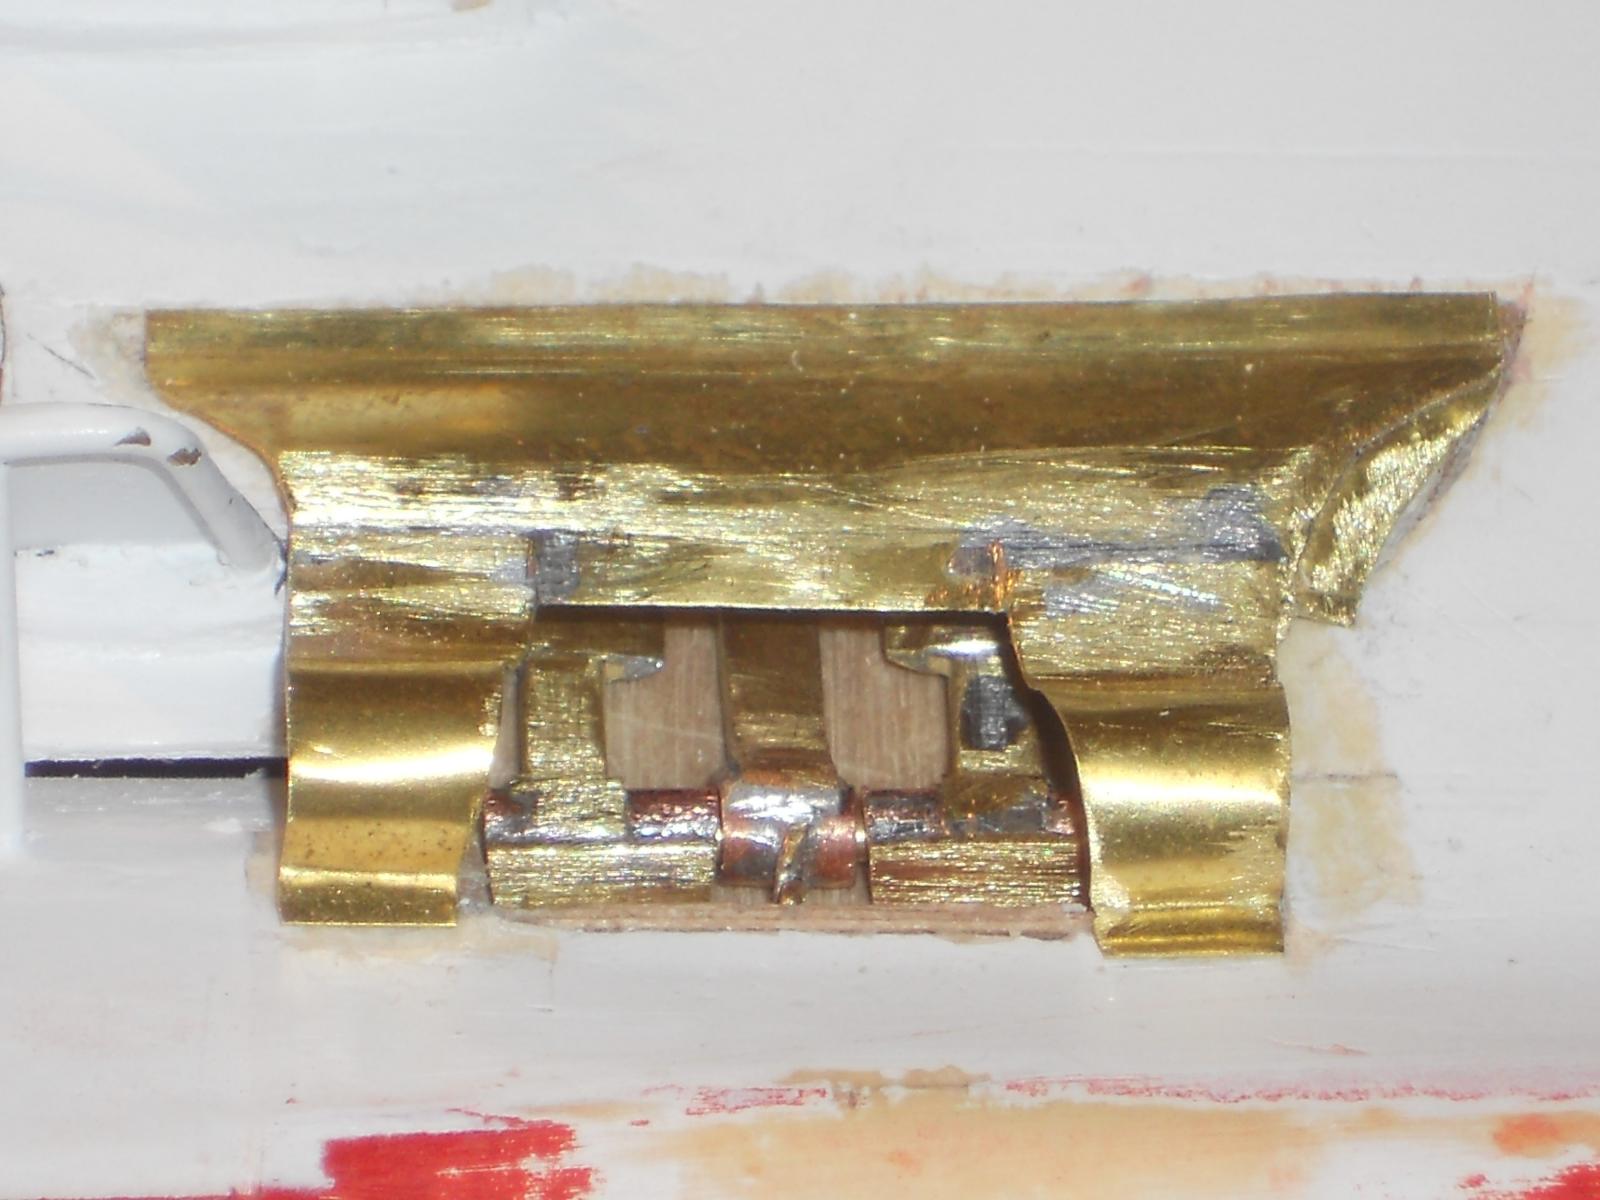
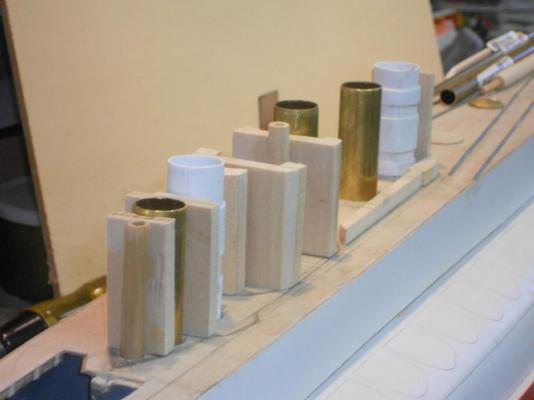
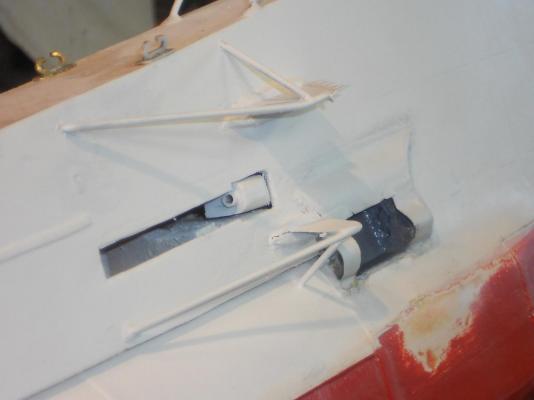
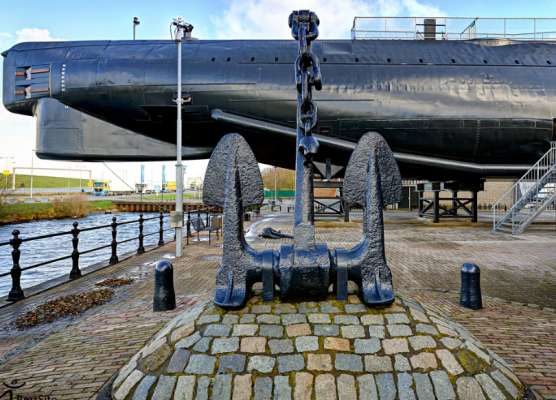
Hello again fellow shipwrights. Today I actually started with the conning tower, hurray I started with the crew hatch tubes, the AA gun tubes and the periscope tubes and the snorkel exhaust and intake tubes. At least I still have more access to the bottom part of the boat. In order to secure the crew hatch tubes I had to cut a hole in the deck structure to get to the pressure hull. This'll give me more meat" (wood) to cement them securely. For the AA gun mount tube I had to cut their holes also to the pressure hull but in the center of it I have to install a smaller diameter tube for the retractable gun mount. I went all the way down to the vertical false keel for this. This arrangement will act like a hydraulic lift. Instead of an other brass tube to slide inside I made a wooden dowel instead. This seemed easier to attach the gun mount platform to then using brass. I have to wait with completely finishing allthese tubes with the hinges, lids and ladders for the crew hatch tubes and the "hydraulic lift" with gun platform and gun mount, hinges and lid till the framing for the con is done to the point of being ready to receive the deck. That way I can know with certainty how long these tubes must be and gives me access for the epoxy cementing job. I'll use the same procedure for the snorkel system exhaust, intake and the periscopes. They all retract, at least that's the plan. There is also an antenna mast to consider. Now I'm coming to a lot of fiddly detail work. Well, at least it's a start and will be slow going. I used the detail drawings of the con that Remco send to make the drawings to my scale. That way I can just measure right from my drawings. I might as well go on record and tell y'all that I owe Remco and Gino den Ridder a ton of gratitude for their help. Remco being able and willing to go to the Navy Archive in the Hague and search for drawings I have a need of. Thank you both gentlemen. I also cemented a small strip of brass behind the anchor cowl. It was just too delicate end with playing with the anchor it buckled easily. I also painted the anchor flat black, the pics show some shine on it but in actuality it looks really nice. Y'all come and visit Well, here are a few pics of today's work. The completed and now painted anchor being hauled up. The anchor almost ready to slide into it's little "house." Here is the anchor safely stowed away. All three hatch tubes for the con are cut to some oversize and stuck into position. The tubes for the AA guns is another matter. They are of a larger diameter and I could try making them myself from some brass sheet or use the 0.7 mm styrene I just received. The dilemma is how to attach the hinge hardware. I could solder the hinges to a strip of 0.1 brass shim stock and then cement that to the outside of the styrene tube. I have to do some thinking about that. Cheers,

-
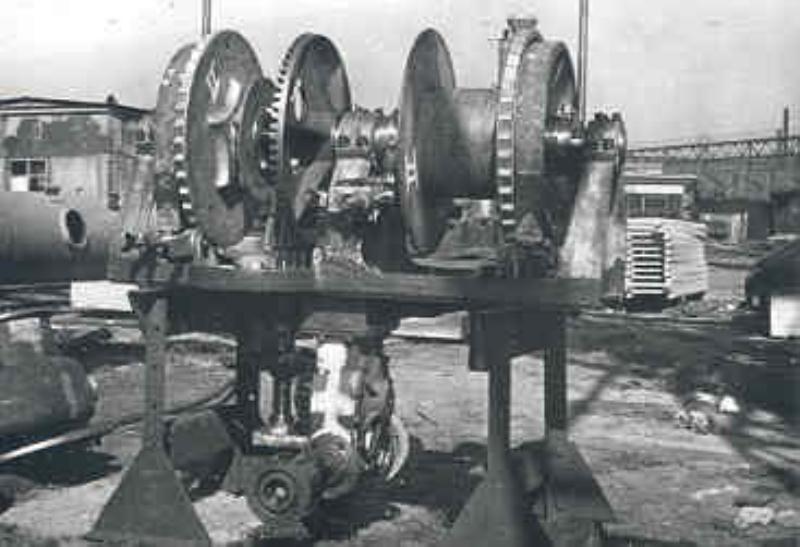
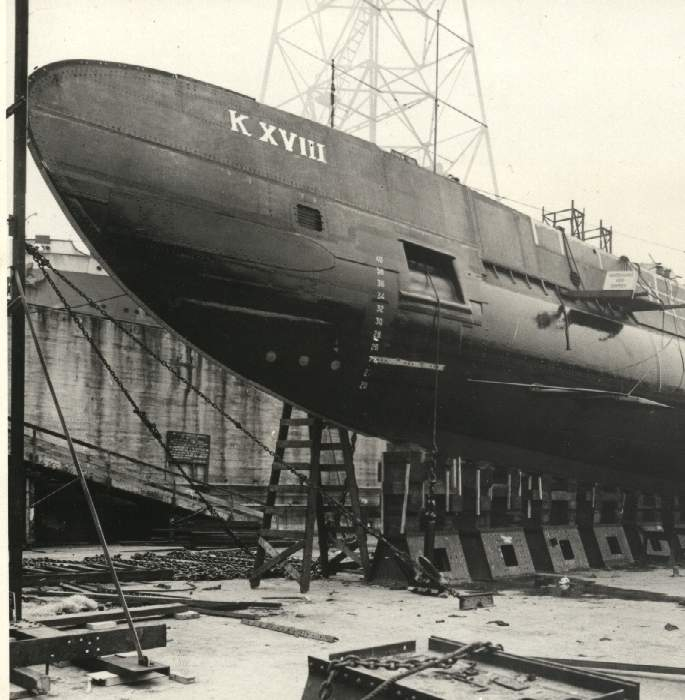
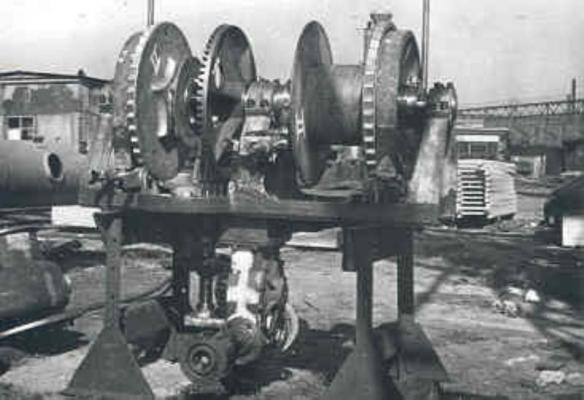
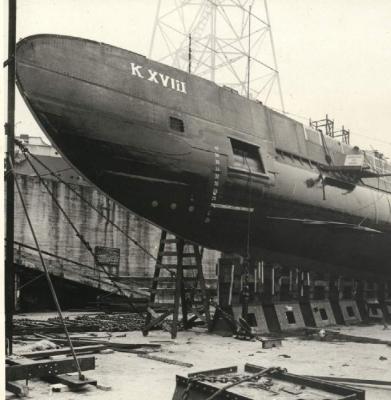
Thanks to the many who visited my shipyard and clicked on "like." @ John (texxn5), Thank you for your appreciation and kind words! I'm looking forward to seeing your harpoons. Looks like you are making the shafts from wood, good idea. yeah, it would be nice to live closer buy. I would also like to visit so many folks on MSW personally and see their work in reality. @ Remco, thanks my friend, it kinda worked okay after a few tries. That 0.1 mm brass shim stock is rather flimsy to work with. @ Daniel, Actually, it does have some heft to it. A chain for the anchor - - - well, actually that black rope is a very strong steel cable . This boat has a main anchor that drops down from the forward keel and that sucker is heavy and big, it's called a mushroom anchor. This side anchor is not meant to secure the boat in heavy weather. Both anchors had steel cables that wound around a drum under the forward deck structure. That's why these boats had an upturned forward deck to house the dual winch. There was really no space for a chain winch and storage for a chain. This is the anchor winch with two drums, one for the main anchor and one for the side anchor. This is a pic from the KXVIII Dutch sub in build dock. You can see the anchor on the ground with the cable attached to it. @ Popeye, thank you Popeye for your compliment. Not only chipping paint but also banging dents in the ballast tank plating. Yup, I had some very good examples to work with, thanks to Remco sending me some nice pics. @ John (Lad), thanks you John, it worked out okay. Cheers,
-
Hello Augie, Wow, thanks for the URL for small fasteners, awesome stuff. It's also saved to my "Model Stuff" file in favorites. Thanks for checking in and following along. Cheers
-
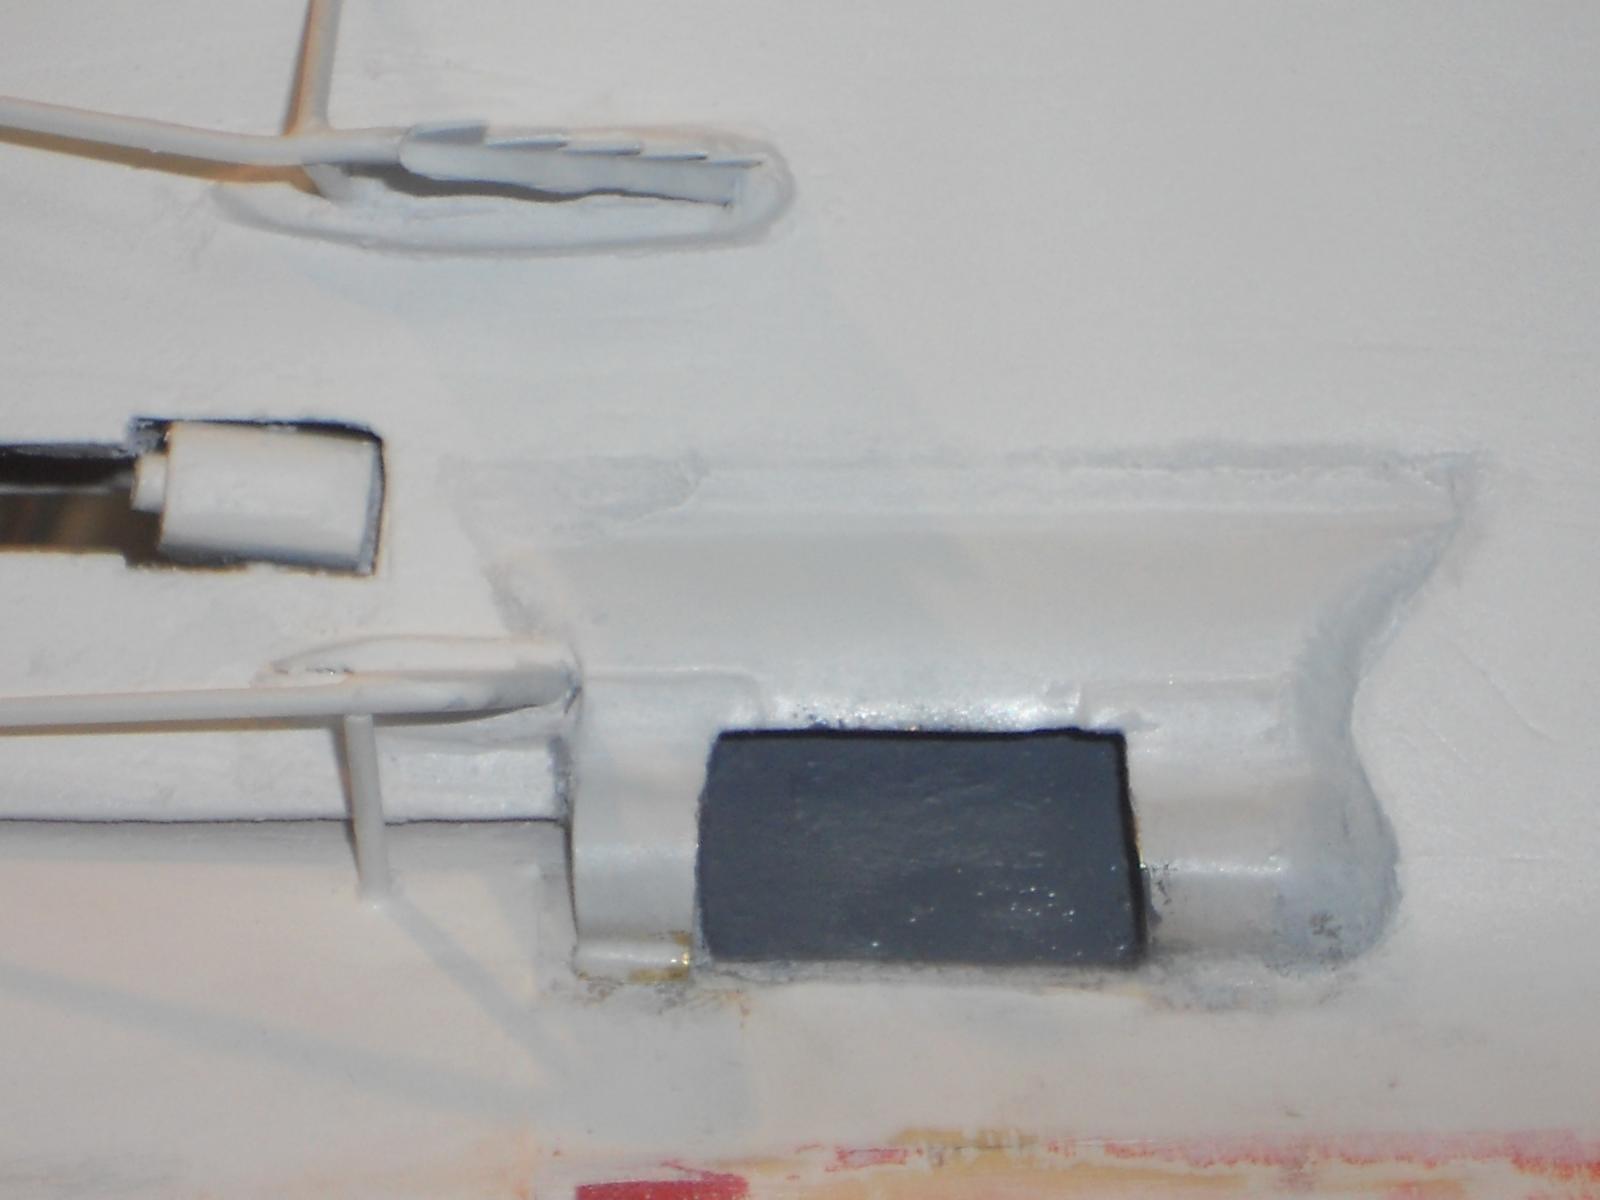
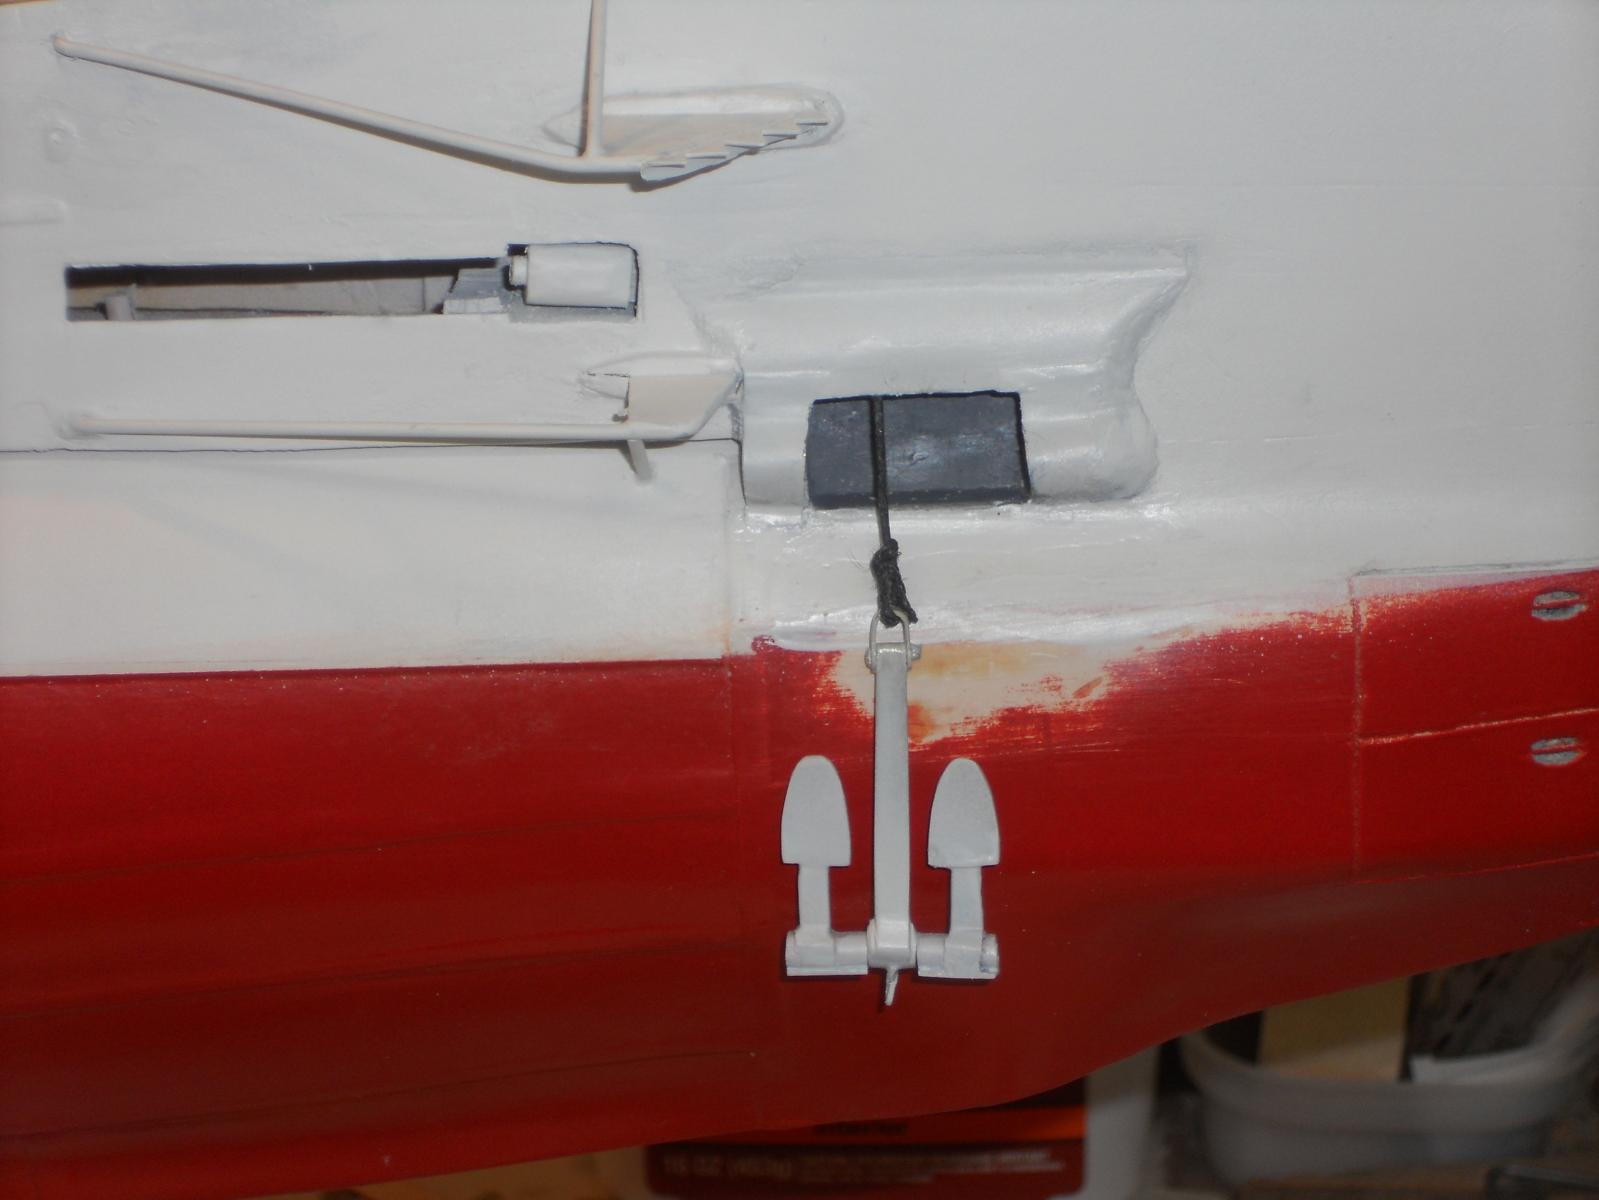
Thanks to all who came and visited my dockyard and your "like" votes. Today we reached a milestone of sorts. The anchor is finished and the cowling is cemented on and primed. I also painted the inside of the anchor "house" dark grey. It was getting late and to let the primer cure, and it was close to quitting time anyhow, 1700 hours. So I went inside and had a well deserved brew. I showed the anchor to the Admiral and she wants one on a necklace - - - hmmmm - - - not No, she really likes it and that's a good sign In trying to fit the anchor into it's little house I had to remove some more wood from the inside and in the process rubbed some of the paint off the hull. No matter how careful I was, well - - - stuff happens. This is no problem at all, it's just the paint and that area will be painted green anyhow. I finally got the anchor to slide in effortlessly, like it knew it knew it belonged there. That made me a happy camper. Can't wait to paint that little sucker flat black - - - tomorrow and stow it out of the way.. NOTE, The blank pic locations cannot be reinstalled because somehow I must have forgotten to [ut them into my photo file. I do have them in my Word doc but they cannot be transferred to this post. Edited 05/ to/2014. Now I'm close to painting the green on the topside, whoopee - - - The completed anchor, unprimed and painted. Well, okay, it has a little battle damage looks like The completed anchor, unprimed and painted., from another angle. file:///Users/PeterV/Desktop/Picture%20clipping.pictClipping Here we see the anchor stowed in its little "house." There is just enough room for it and it's deployment. I have cemented the anchor cowling on and applied some epoxy putty to the front for hydrodynamic flow. It's not metal but if yuns don't tell I won't either Looks okay from ten thousand feet we used to say in the airplane business I couldn't resist letting anchor, now primed, hanging down from it's cable. Ah yes, an unorthodox way but so what Cheers,


-
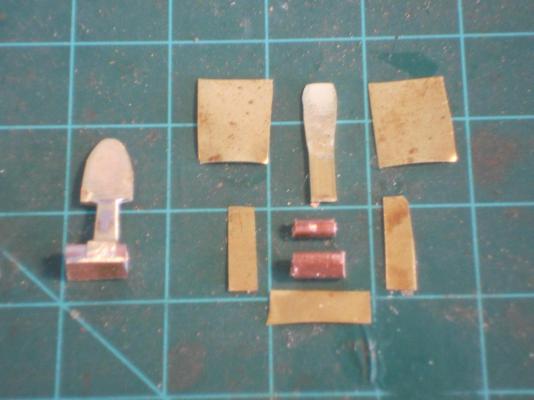
Hello and thanks Michael, Daniel and Marx for visiting. @ Michael, thanks for the URL, very helpful. @ Daniel, well yes, it seems overwhelming at first with 8 different pieces that makes just one of the two fluke posts. It took me some time just thinking how I would make them. The center post was easy, it has only 7 pieces Actually it was an easier solder job. I started out by cutting small pieces of copper tubing, one piece that would slide into the larger on. Clamped it in a wooden clothes pin, heated it up and let the solder flow inside through capillary action. Bingo, I now had a thick-walled piece of pipe. Next I filed a flat spot on it and clamped the shoe to it with a wooden clothes pin and soldered it to the pipe. Next I had to solder the two side braces to the copper pipe and had to use two wooden clothes pins, one to hold the shoe so it would not desolder itself and fall of and the other to clamp the side pieces to the pipe. Now I had to solder the center piece between the two side pieces. Here I had to use a "heat-sink." All that is is something to absorb the heat from what you are about to solder from what has already been soldered. I used a steel office clamp to hold the parts together and it could now soak up the heat from the previously soldered parts. A potato doesn't work here, the part is just too small. Oh, I could have carved a hole in it but elected to use a steel clamp. It also acted as a stabilizer for the part. I started away from the heat-sink to let the heat gradually travel toward the steel clamp. It took a little more time and heat for the solder to flow at that point. The two end plates for the flukes were done in similar fashion. Sorry for not taking any pics of all this, figuring everybody knows how to solder, my mistake and oversight If you like I can do a reenactment and post the pics @ Marc, thanks for plowing through my O 19 log and continuation of your visits. Yes, it has quite a history behind it because of my father's involvement with her. That's the main reason I elected to build her in the first place and the way he knew "his" boat. Later in the war years she was kinda overhauled and several major components were removed, it was no longer "his" boat. Cheers to everyone,
-
Hello Adriaan, Wow, what a difference! She's looking really great, realistic enough to expect smoke coming out of the stacks! Cheers,
-
Thanks Mark, will do. Cheers,
-
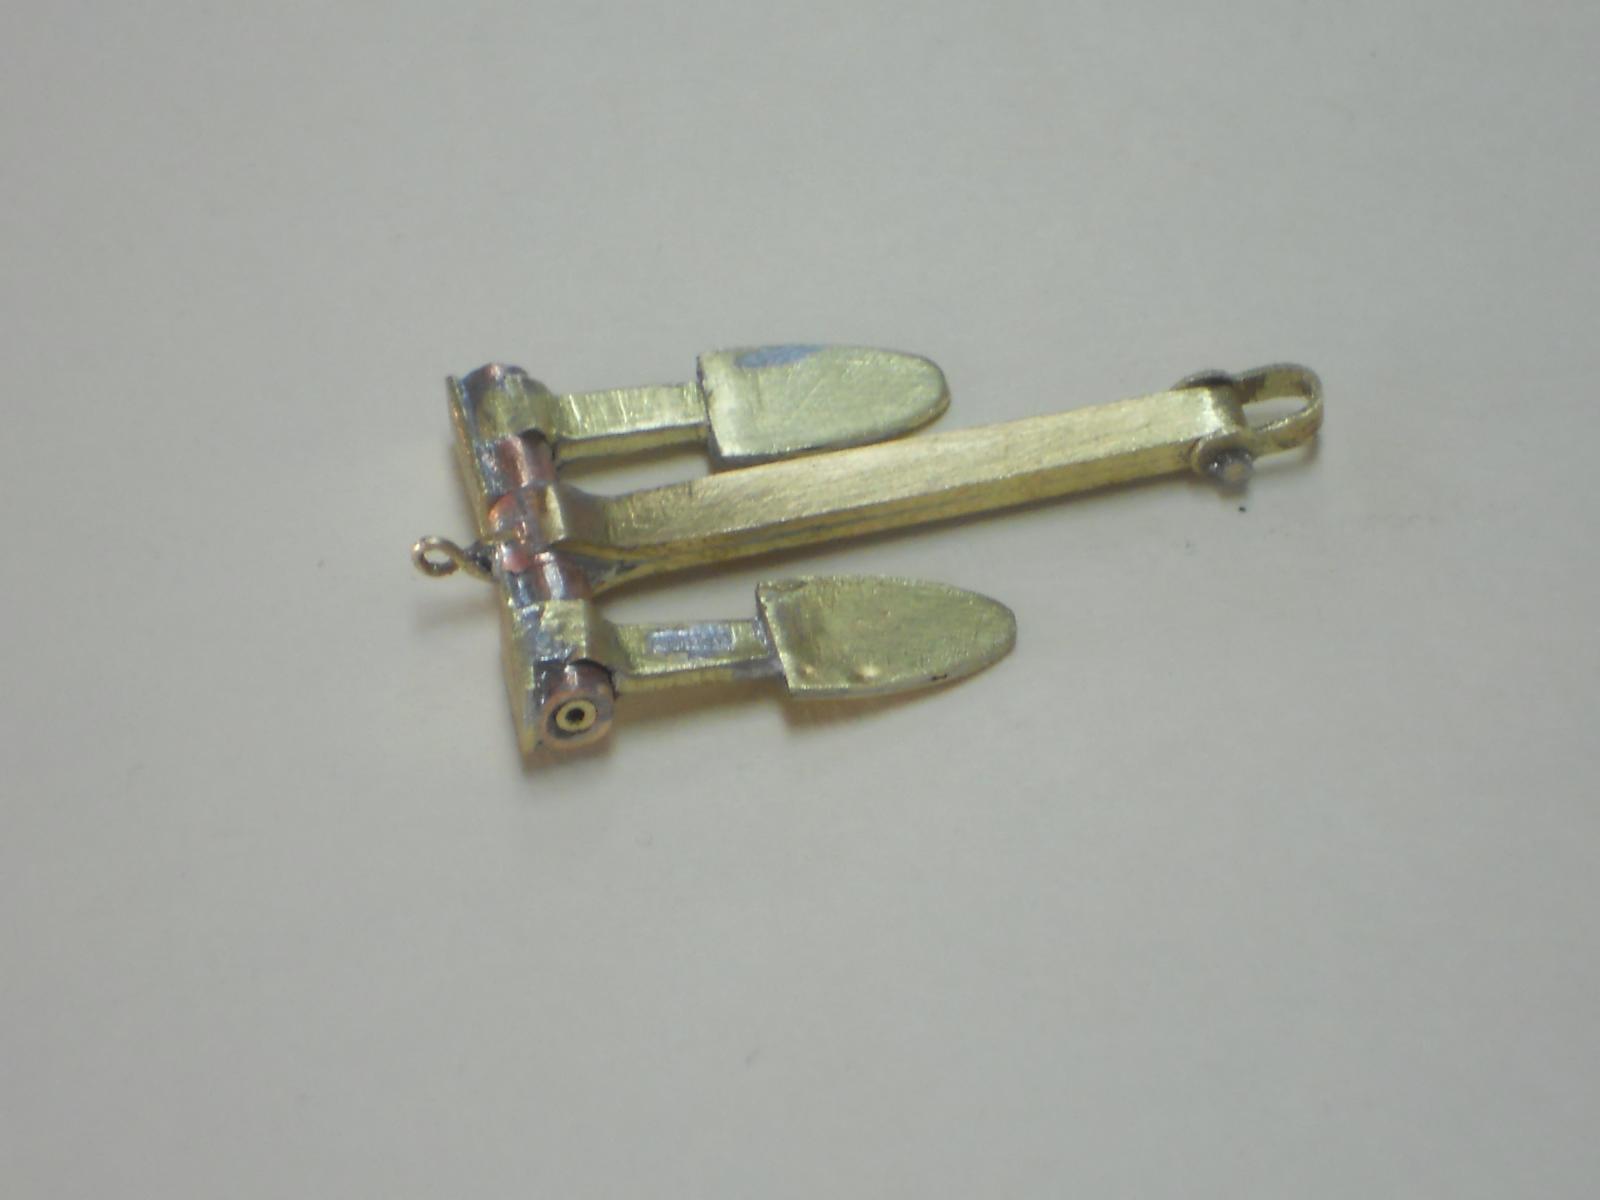
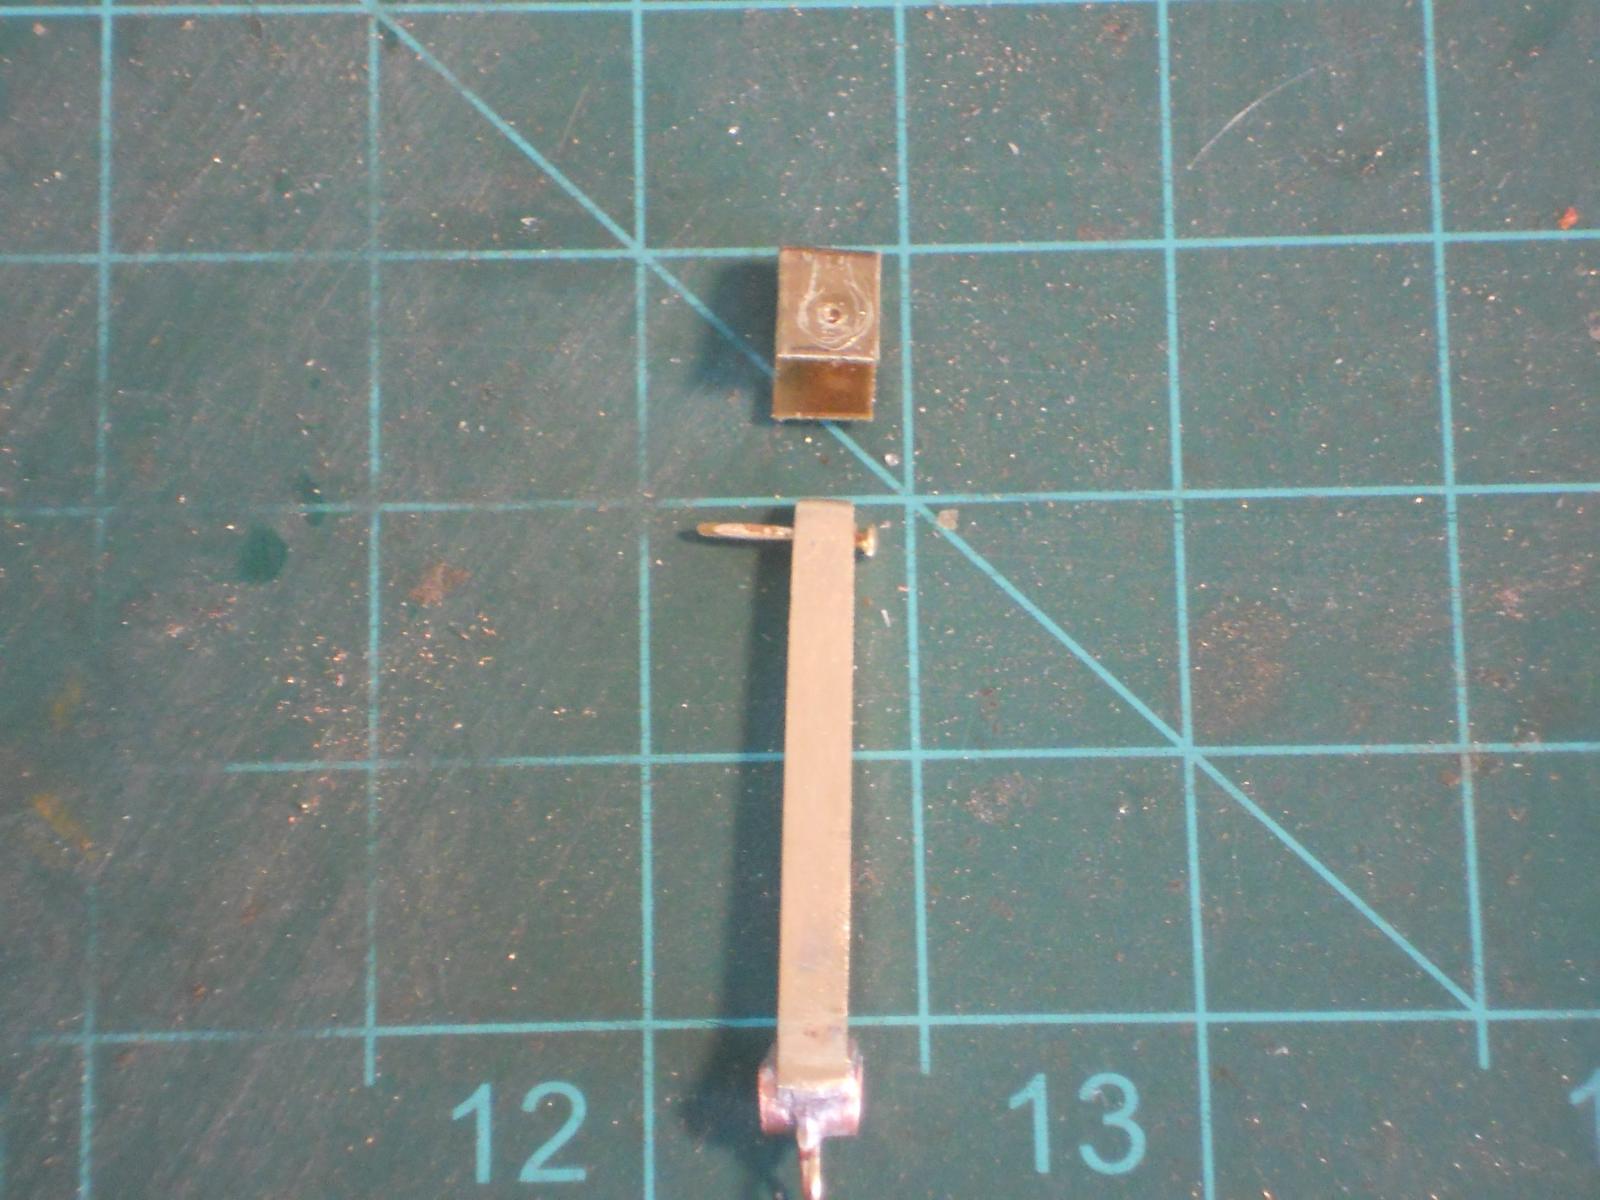
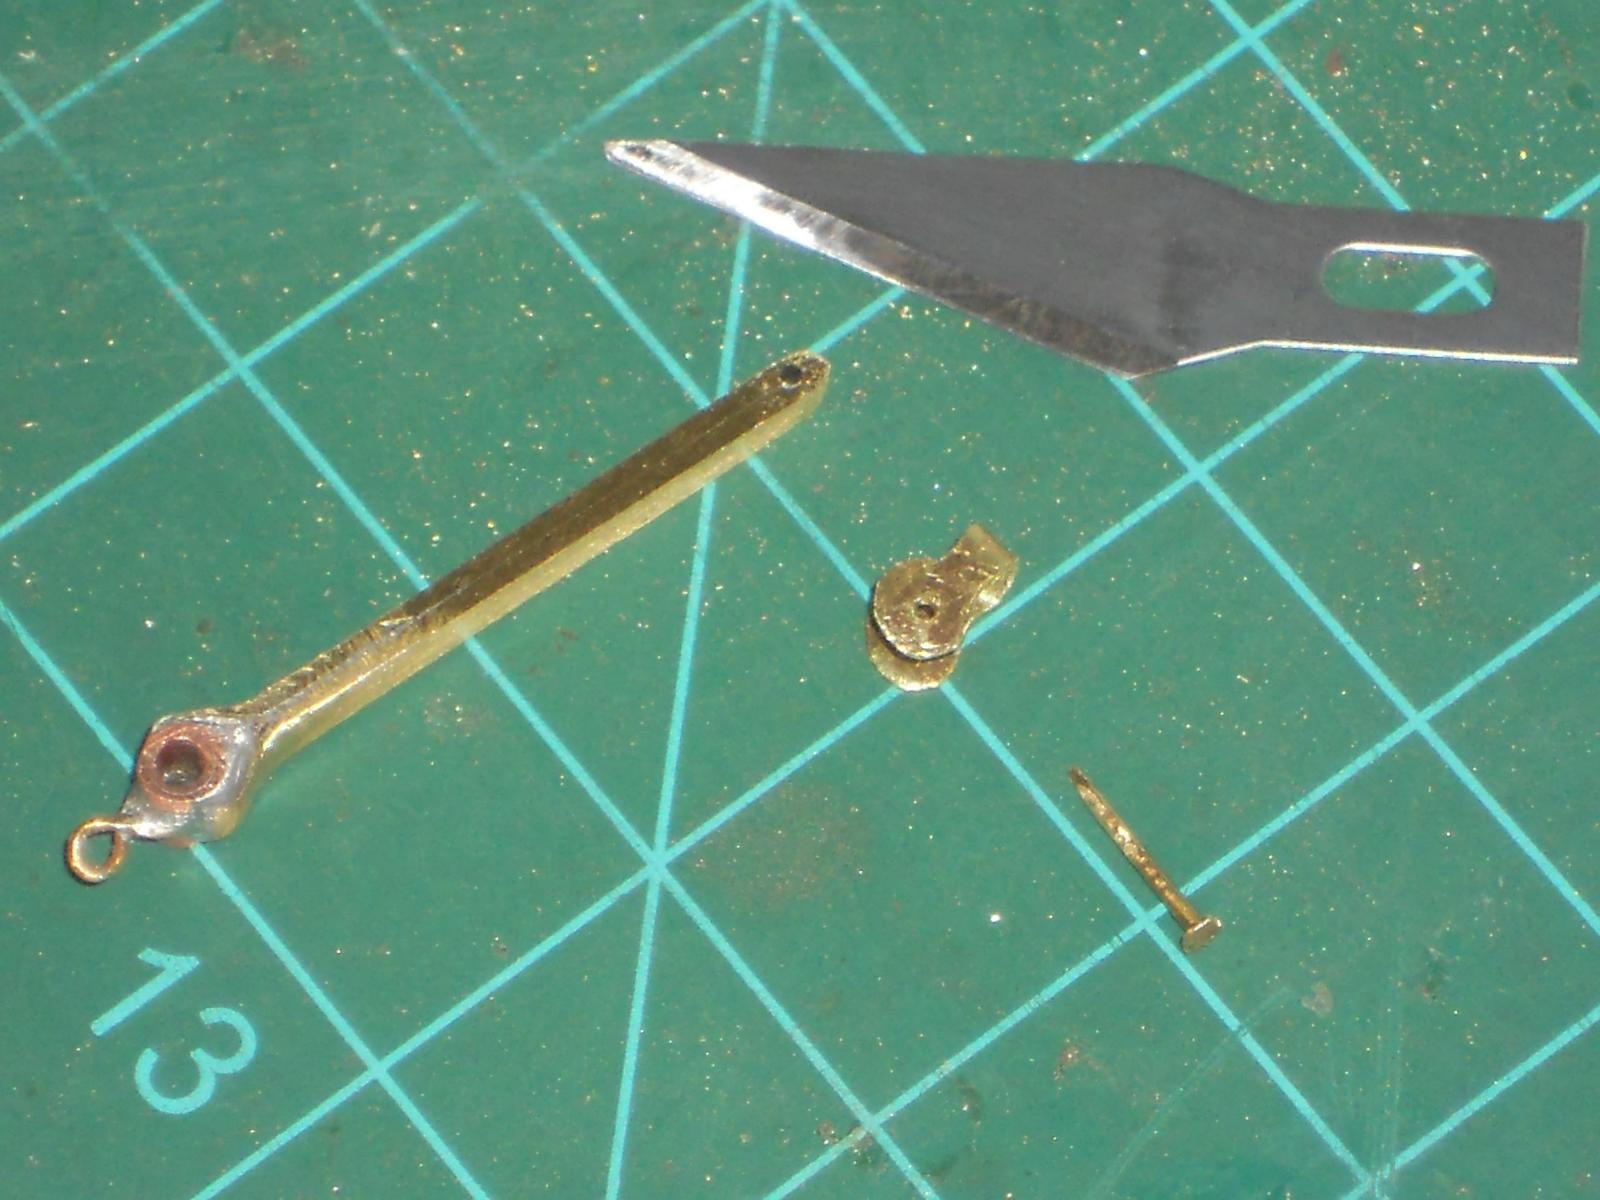
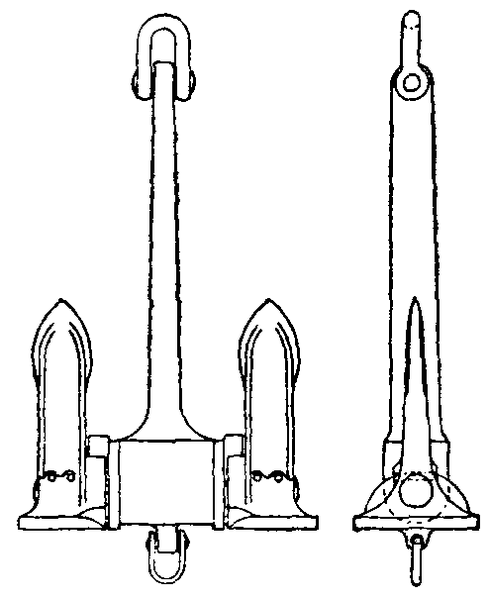
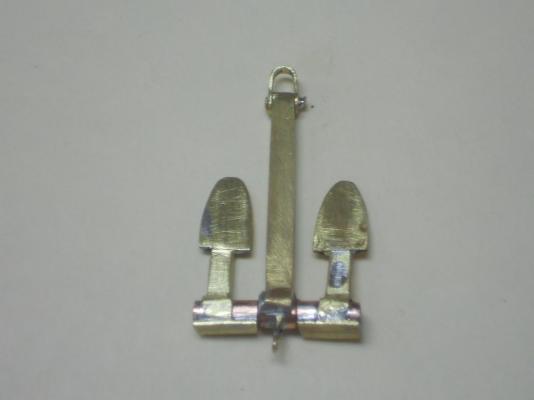
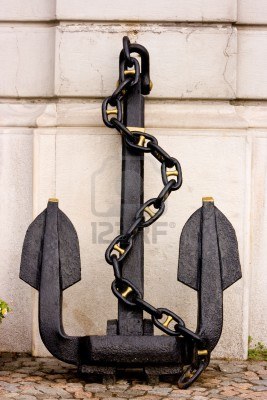
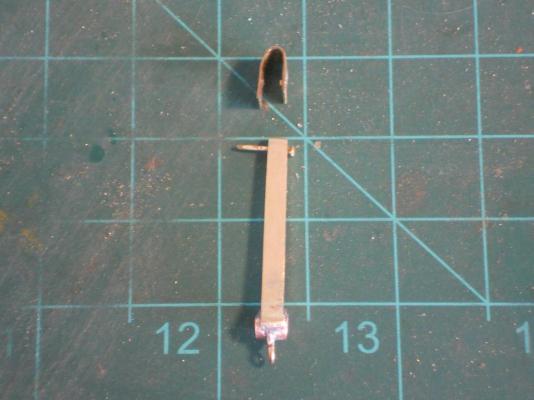
Hello again friends, Between a few domestic chores like getting on the roof of our house and cleaning the gutters and trimming a small tree from a few low branches, I did make some progress. I'm almost finished with the side anchor Yes, that's something to smile about, more tedious work behind me. Now I need to figure out how to fasten a cable to it AND stow it into a blind hole that's filled with foam and wood and is now also closed off. I may have to resort to an "unauthorized" trick butI really would like to lower and raise the anchor with a cable attached to it. Okay, I'll show a few pics of how I have made the anchor, except for the center post, that one I made yesterday. The total width of the anchor must not be more then 18 mm and the length including the shackle is 34 mm. I had to stick with the Wasteneys style anchor except for the shape of the flukes due to the width constraint and It's really looking good to me. There is still some final detailing and fine filing to dress it up nice before I can install it. So please judge the pics accordingly, it's still not the final piece, that'll be tomorrow when I have assembled the whole thing. This is a layout of the parts and pieces I needed to make the fluke arms. Each square on the cutting board is ½ inch, this gives you an idea how small I had to work with. The bottom piece is 0.2 mm thick brass sheet, the brass tubes are 3.1 mm and 2.1 mm which are soldered together to make one thick tube. The two side pieces are 0.1 mm by 3 X 9 mm. They form the attaching braces for the fluke center piece that's made from 1 mm thick 3.1 mm wide brass flat stock that I cut 20 mm long. I then peened one end flat and soldered two square pieces of 0.1 mm flat shim stock to make the fluke. I had to use two wooden clothes pins and a steel office clamp as a heat sink. Then it was a matter of filing till I had the desired shape I was after. If I recollect this whole operation took about 2 ½ hours. You can see the finished fluke arm to the left. I did not make a pic of the second one yet but it too is semi completed. Just a little tweaking and polishing like the rest of the anchor. The main hinge pin for the fluke arms to the central post will be a piece of 1.5 mm brass tubing. Both fluke arms will be spot soldered to this hinge pin and rotate on the center post. This shows the center post of the anchor with the raw shackle in process to be made. I had to solder two pieces of the 3.1 X 1 mm together with a length of 32 mm. I bend the ends of both pieces to form a V to be able to lay the copper tube assemblies in and soldered that all together. Then shape and clean everything up and drilled a 0.7 hole in in the other end for the shackle hinge pin. This pin is a small brass nail with a 0.7 mm diameter. The shackle is cut from a 0.3 mm piece of brass flat stock to be shaped into a shackle form. It also has a 0.7 mm hole drilled in both ends. This shows the raw shackle on its side. Here we see the semi finished shackle next to the center post and the hinge pin. As you can see there is still some tweaking to do to the shackle. Yes, it should have been a little longer but I am also hight constraint This shows the shackle pinned to the center post. A pic I got from the Internet of a Wasteneys Smiths anchor. A pic I got from the Internet of a Hall anchor. This is a pic I got from Remco. This is taken at the navy Museum in Den Helder, the Netherlands. I really like the shape of the flukes and tried to make mine kinda similar. This is another pic Remco send me from the same Navy museum. Also very nice but would not work for me. Cheers,


-
Thanks to all for visiting and your "like" votes !!!! @ Steve, thanks for mentioning the "Small Parts Inc," I was not aware of it mainly because I only got involved in ship modeling after my retirement of Federal Service a few years ago. I am a regular customer of Amazon and will log on with them tomorrow at lunch and see what they have to offer. Fortunately Ace Hardware in Bunnell, a town over from Palm Coast, had some small brass and copper tubes and shim stock I needed. It's stuff from K+S Engineering. The real small tubes and rods must be mail order. Small hardware like screws, bolts, nuts etc. I'll have to hunt for. In old MSW1 was a post with URL's for that stuff but I didn't make a note of it. The smallest screws and nuts I used in aircraft repair were 4x40's for instruments and radios. I guess watch and clock makers use some incredibly small hardware but I really don't think I have a use for it - - - yet. @ Kevin, thanks for stopping buy , it's good to hear from you again and your very kind words. I know you are busy with your magnificent Bismarck and don't have much time visiting other builds, so this is a treat. Yes, my father's O 19 is coming along real nice. Some slowdowns here and there due to detail work I did not anticipate, like this side anchor. I had no adea it had one. I started with a minimal amount of drawings and photos that were added piecemeal at later dates. And I thought I did enough research work - - - not Cheers,
-
As usual, I like to start by thanking everyone for visiting my build and your "like" votes, I do appreciate it a lot. @ Mark, thank you very much for your kind words. Now that I found a few pics in my archive with some detail how these shrouds kinda look like I have to try making them look as close as possible to the original. I may not need to make a third one. @ Daniel, the admiral also thinks it's looking okay. I fussed with it some more this morning and figured that it being shiny brass in contrast with the primer around it it throws the looks off somewhat. I think that when it's painted it'll look okay. Talking about the anchor, I have started with it I settled on a Wasteneys Smiths stockless anchor. It appears to be close to what they may have had. Remco send me a few pics he found at the Dutch Navy Museum, so I have a few good examples to work with Oh, I'll modify it some but who'll tell the difference at this time? I'm still going to wait with cementing the shroud / cowling to the hull till the anchor is completed.. It must fit in the opening and it's easier to adjust the opening of the cowl piece then having to make the anchor narrower. The center shaft is made except for the shackle on top. So far I'm happy with the way it looks. Sorry, no pics yet.
-
Papegojan 1627 by mati - FINISHED - 1/48
Piet replied to mati's topic in - Build logs for subjects built 1501 - 1750
Hello matt, Outstanding work! I love the detail. Cheers,