
MORE HANDBOOKS ARE ON THEIR WAY! We will let you know when they get here.
×


Perls
-
Posts
85 -
Joined
-
Last visited
Content Type
Profiles
Forums
Gallery
Events
Everything posted by Perls
-
Hi Alfons, There is something about your barrels that makes me smile when I see them or you mention them. I've finished all the hardware for the Bowsprit and Jibboom. I thought about you re the sheves in the Jibboom which I made from a thin slice of dowell, copper tape, and brass paint. I've been a bit of a veg. regarding pictures which I'll try to take and post tomorrow. The big question I need help with is whether or not there is any reason not to install the bowsprit and Jibboom at this point. Can you think of a reason why I shouldn't? Thanks, Steve
-
Hi All, I once had a kickback incident on a 10" 3hp saw. I became a bit pre-occupied and careless when cutting some 2" wide pieces of oak. In an instant a board kicked back, whizzed just past my face, and was thrown with enough force that it splintered, with part imbedded into the rafters on the ceiling (I was in the basement). Needless to say that it scarred the hell out of me. Mark is absolute right. One needs to pay attention at all times with ANY power tool. The force that can be generated by a Dremel spinning at 35,000 rpm would shock you. Be careful. Best, Steve
-
Hi All, I thought the comment from GM2SW interesting. I don't agree the the the larger the scale the easier the detail. While it may seem that a large scale provides the opportunity for greater detail, it also requires that the detail be more accurately rendered. At a smaller scale you can get by with a more impressionistic reproduction, larger scales allow for greater scrutiny. What you gain on one hand you lose on the the other. Best, Steve
-
Hi Alfons, For the nets, I was planning on using cheese cloth attached to a thin cotton string to act as rope. I was then going to fabricate cork floats out of Sculpy (a type of plastic clay which hardens in a low oven). Best, Steve
-
Hi Alfons, Its great to have you back. I like the barrels, you're crazy, crazy in a good way, but still crazy. I'm just as crazy, I have a couple of barrels I was planning on using and didn't like the ways the rings looked so I sanded them off. I have some copper tape I had left over from another project and sliced a thin sliver (it was a bit tricky to get the curve so it would lay flat)to make the rings. Instead of painting them black, I used a black Sharpie (Marker), so some of the copper red seems to show through so they look like iron with a tiny bit of rust. I'm traveling now, but when I get home I'll post a pic. Best, Steve
-
Hi Guys, I read this post and tried to replicate it with brass rods of various gauges using a Bernzomaticatic torch with out much success. Acetylene is way outside of my comfort level and budget. I'm a real neophyte when it comes to working metal at any scale. I was able to achieve a level of success using this technique. By far and away the biggest problem I faced was making the with flattened ends with overall lengths of equal size. My solution was to cut the rod to length first. I then annealed an end and put it in a vice grip to squeeze it flat. I annealed it again and then put it into a second vice grip set even tighter. I annealed it one more time and smacked it with a center punch with the end ground flat. I repeated on the other end, drilled the holes, annealed the piece one more time and bent to shape. I takes a lot of steps but it worked. Best, Steve
-
Hi, I have found that wooden coffee stirrers a lot more useful. The ones I have are about 7.5"x1/4"x1/16" and are made from birch. They have uniform straight grain and are quite flexible. You can get a box of 1000 for about 6 bucks at Staples, Office Depot, etc. If you look at my build log, I used them for the pump handles on my log pump. Best, Steve
-
Hi Elia, I can't believe it's taken until today to find this log. WOW! The overall level of craftsmanship is unbelievable and something to which I can only aspire. The "try, fail, ponder, adjust, try agin, fail, ponder,....." Is something I can completely relate to. I know some might find it amusing but today I spent 3 hours trying to fabricate an iron wye for the the bowsprit on the Smuggler. I think I could do one now in about 10 minutes. I wished I had found this log earlier since it was through trial and error I stumbled upon using different solders with different melting points. Anyway, thank you for sharing this terrific build, the things you've discovered and also for the encouragement you have shown me. Best, Steve ps. I've come to share your fondness for American fishing schooners. I spent a couple of hours last night going through Chapelle's AFS fantasizing about which one I would like to attempt as my first scratch build when my skills get there. S.
-
Hi Omega, I'm still on the "flat" part of the learning curve, but to make something so crisp and clean at that size amazes me. Are you going to fit sails? I usually wouldn't care but the profile earlier in the log showed a beautiful sail plan. Keep it up. You have found a new fan. Best, Steve
-
Thanks Pete, I appreciate the references and your kind offer. I will start looking up the reference materials. I also just picked up a copy of Chapelle's "The American Fishing Schnooners 1825-1935 ". It is truly amazing. I never realized the enormous volume of scholarship available and amount of research that model shipbuilders undertake if one is to take a serious approach to the craft (after what I've been learning I'm a bit hesitant to label it a hobby). I'm beginning to understand that while modeling skills are vital, it can be an avocation with an almost an unlimited depth of various skills and learning to which one can apply oneself. I'm still in the shallow end of the pool but, I've set my sights high. I'm sure I will need your help and support along the way. Thanks again. Best, Stephen
-
Hi Pete, I hope things are going well with your "real world modeling". I've been making some progress on my BlueJacket Smuggler and I've started a build log: http://modelshipworld.com/index.php/topic/7684-schooner-smuggler-by-perls-bluejacket-scale-148-gloucester-1877/#entry227443. Looking at your build logs has been a major inspiration for me. Actually, I've pretty much decided to follow in your footsteps and stick with 19th century schooners/commercial vessels. I had a chance to buy the Model Shipways Bluenose on sale and it will be my next build. I realize that many will consider it on par with the build difficulty of the Smuggler. However, the Smuggler is my first build and I thought that the Bluenose could help me learn POB and rigging with sails. At the same time, I would capitalize on the rigging experience for schooners I learned from the Smuggler. I'm probably getting way ahead of myself, but after the Bluenose, I'm thinking of either the Bluejacket Atlantic or, more like likely the Chas. Notman. All this is building up to my question for you. If I can get through these builds in some kind of reasonable time frame, I would like to follow you with the Eagle as a first scratch build. I'm hoping you might be able to give an idea of how I can start now with some research, plans, and preparations. Thank you in advance for any help/direction you might be able to give me. Best regards, Steve
-
What glue to use?
Perls replied to rshousha's topic in Painting, finishing and weathering products and techniques
Hi, I'm pretty confident you're OK. As I mentioned above, I have a lot of years experience reproducing antique furniture. This has obviously involved the use of lots of veneers and inlays. While not exactly the same, I have used a short cut for attaching the veneers and inlays. Depending on the specific circumstances I would use carpenters glue as opposed to the more traditional contact cement. Essentially it involved coating both the substrate and veneer/inlay with carpenters glue and letting both dry. Then I would use a hot iron and press the pieces together. It's sort of the opposite process of what you did with heat gun. I did some of this work 30 years ago and everything is as tight and smooth as the day I finished it. I've applied the veneers/inlays to both plywoods and hardwoods (mostly mahogany) with no problems. I hope this helps. Best, Steve- 18 replies
-
- 1
-

-
- CA glue
- cyanoacrylate
- (and 5 more)
-
What glue to use?
Perls replied to rshousha's topic in Painting, finishing and weathering products and techniques
Hi Rick, I'm a rookie at building ships. I had lost my job on Wall Street in the Financial Crisis and while I was on the beach, I started building BlueJacket's Smuggler. I put it down for about five years when I started working again but have recently picked it up again in no small part because I discovered MSW. I have also started a build log: http://modelshipworld.com/index.php/topic/7684-schooner-smuggler-by-perls-bluejacket-scale-148-gloucester-1877/#entry227443 (I don't know how to add an active link) Nevertheless, I have about 30 years experience in fine woodworking and have built a number of antique reproduction for our house. In the 90's, I took a brief sabbatical and that was where I was able to work with some excellent woodworkers. Which it where I learned this trick and a few others. Best, Steve -
What glue to use?
Perls replied to rshousha's topic in Painting, finishing and weathering products and techniques
Hi Rick, This is a trick i learned when I worked with some very expert finish carpenters. Take some Tite-Bond or Elmer's Wood glue and using your finger spread a very thin, but well coating, layer on one of the pieces to be glued. If it's end grain, let it soak in but make sure you have a complete thin layer on top. Let it dry until clear. Then take the other piece to be glued and again spread a very thin layer of glue on it. Let it get tacky for a moment or two and press the two pieces together. Using no more than finger pressure the two pieces will virtually instantly bond, in a manner very similar to contact cement. But unlike contact cement you still have a few moments to move and position the pieces perfectly. It truly is a great technique. Try it! Best, Steve -
Announcing the Model Ship World Ship Kit Database Project
Perls replied to SkerryAmp's topic in Wood ship model kits
Hi Adam, What you're doing is great! I certainly don't want to add to your huge backlog of work, but one thought came to mind after spending some time on your site. Would it be very difficult to add a link to build logs on MSW? That way potential builders could not only get an idea of the parameters you provide but gain an insight to the "guts" of the kits. Best, Steve ps. Though I love your site, I'm a bit less than keen on your avatar. Go JETS! S. -
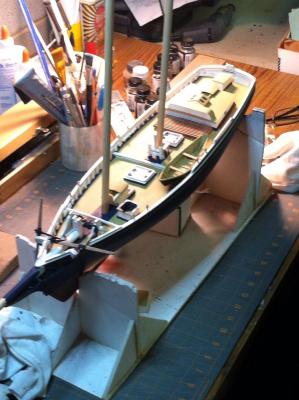
Hi Alfons, I want to take advantage of your offer to post a couple of pics. of my Smuggler. I don't think I can hold a candle to you or Nils, but it's my first build and I've given it my best best shot so far. You guys have really inspired me to take my craftsmanship up to the next level going forward. None of the deck furniture is attached. And, as I mentioned I'm reworking the color scheme. I'll use these photos as a starting point and put together my own build log in the very near future. Thanks again for your inspiration. Best, Steve

- 169 replies
-
- 7
-
-
- BlueJacket Shipcrafters
- Gloucester fishing schooner
- (and 1 more)
-
Hi Alfons, How did you make the sheves for the jib boom? I'm think I can cut a small section of dowelling and wrap the circumference with a sliver of copper tape, but your's are very cool. Best, Steve
-
Kevin, I only have one word - WOW!!!!!!!!!!. Best, Steve
- 1,319 replies
-
- 1
-
-
- caldercraft
- Victory
- (and 1 more)
-
Hi, I'm definitely a newbie and have been scouring every possible source of information on ship modeling. I'm about halfway through my fist build, BJ Smuggler and have been especially focused on building the masts, gaffs, booms etc., and rigging. I too was concerned about rat lines when I found and excellent YouTube video of doing them. The technique he uses for tying the ratlines using clove hitches was so fast and easy I wouldn't consider doing them any other way. Just Google " model ship ratlines you tube" and you"ll see the link.. Best, Steve
-
Hi Alphons, I have been working steadily to clean up my shop and move ahead with finishing the Smuggler. It has been uncovered in the basement for about 7 years and has gotten quite dirty. Any ideas other than water to clean it up? I've blown all the dust off with my compressor. I've been thinking of Naptha since it removes grease and dirt with out dissolving finishes. I'm also thinking about repainting the deck and the deck furniture. The deck and roofs I had previously painted a buff color which is pretty insipid. I figure nows the time to make changes if I want to. My plan is to finish the cleaning and painting, build the masts, spars, gaffs, and booms and then attach the desk furniture. If I've got the order wrong please tell me. I'm still working on figuring the camera and when I do post some pics. Best, Steve
-
Thanks Alfons, The pictures came through just great. I'll see what I can do about posting where I've gotten to so far. I'm not much of a photographer these days, but my wife has a nice digital camera and I'll see what I can do. It's probably a good idea for me to learn how take and post pictures. After having put down the build for about 5 years I'm extremely committed to finishing. Buy going through this site with a fine tooth comb, I'm beginning to see that what I saw as an insurmountable hurdle (masts & rigging) can be handled if you take a deep breath, plan ahead, and take one step at a time. Thanks again for your inspiration and I hope I'll be able to get some photos up this weekend. Best, Steve
-
Hi Alfons, I too am building the Smuggler as a first build and have read through this log several times. I'm about ready to build the masts and stays and the tackle the rigging (quite scared actually). For some reason, I am unable to see the photos you posted on Dec. 23, 2013 and I sense they would be quite helpful to me. Is there anyway you could repost them? If that would be difficult, I would be glad to send you my email address. I hope you can help and am looking forward to your future posts. Thanks. Best, Steve
-
Hi Pete, I completely agree with all the posts praising your build. I think it is an amazing and exquisite work of art. As a relative neophyte to model ship building, the fact that it was scratch built blows me away. I saw that this is a repost. How long did it take you? If you could break down the time between research and actual fabrication. I would appreciate it. Thanks. Best, Steve
-
PPS..... I was at Mystic Seaport a few weeks ago for the music festival and spent some time with one of the resident ship wrights. He was re-oiling a spar with an "authentic" finish made from 1/3 boiled linseed oil, 1/3 turpentine, and 1/3 pine tar. Talk about a sticky mess, he said it never quite hardened but got absorbed or wore off. I'm sticking with finishing waxes. Perls
-
Hi All, I'm new to the site and a relative neophyte to ship building, but I have 30 years experience with fine wood working. I totally agree with the comments regarding oils. There are many types and numerous variables regarding hardness and drying/curing times. Anything less than a perfect application could leave a sticky mess even after things appear to be completely dry. There are two basic and easy solutions. The first is to brush on a Minwax or other stain of your choice and quickly wipe off. The darkness you want can be achieved though multiple coats. Once the stain is dry, polish with Minwax Regular Finishing Wax. Thin coats of the wax dry quickly and hard. Any gloss can easily be buffed down with 00 steel wool. The other choice is to skip the staining and go with Briwax. It's available in 10 colors and depth of color can be achieved through multiple coats. Like the Mixwax it can be buffed to the desired gloss and makes a hard somewhat dust proof finish. Both are available in 1lb tins on the Internet and I think run about $15. 1lb is enough to last several lifetimes of ship finishing, but can earn you MANY wife dollars if you polish a piece of furniture or two (exchange rate around here is 1 Wife dollar = about $100 real dollars). I hope this helps, Perls PS. I've painted over the stain with Floquil before waxing and haven't had any problems. S.

