MORE HANDBOOKS ARE ON THEIR WAY! We will let you know when they get here.
×


Perls
-
Posts
85 -
Joined
-
Last visited
Content Type
Profiles
Forums
Gallery
Events
Everything posted by Perls
-
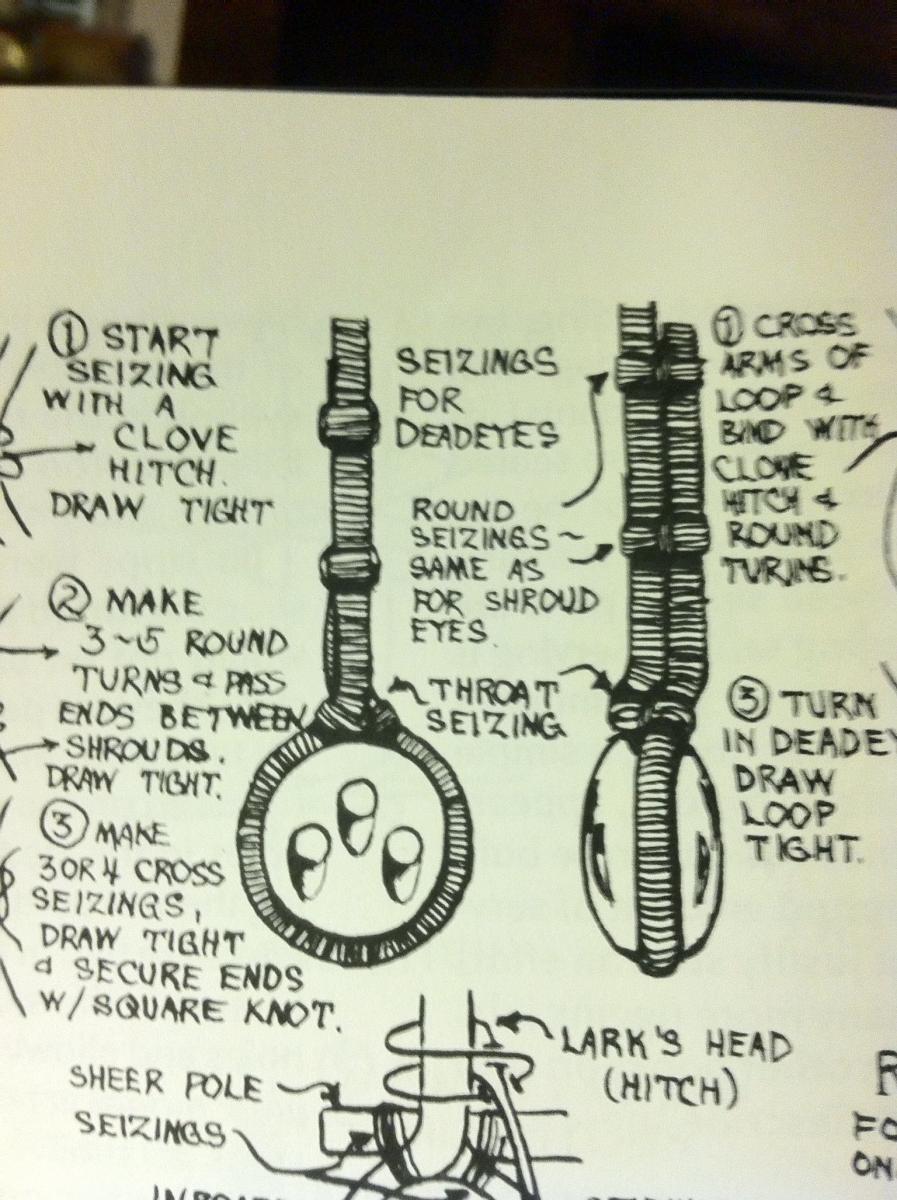
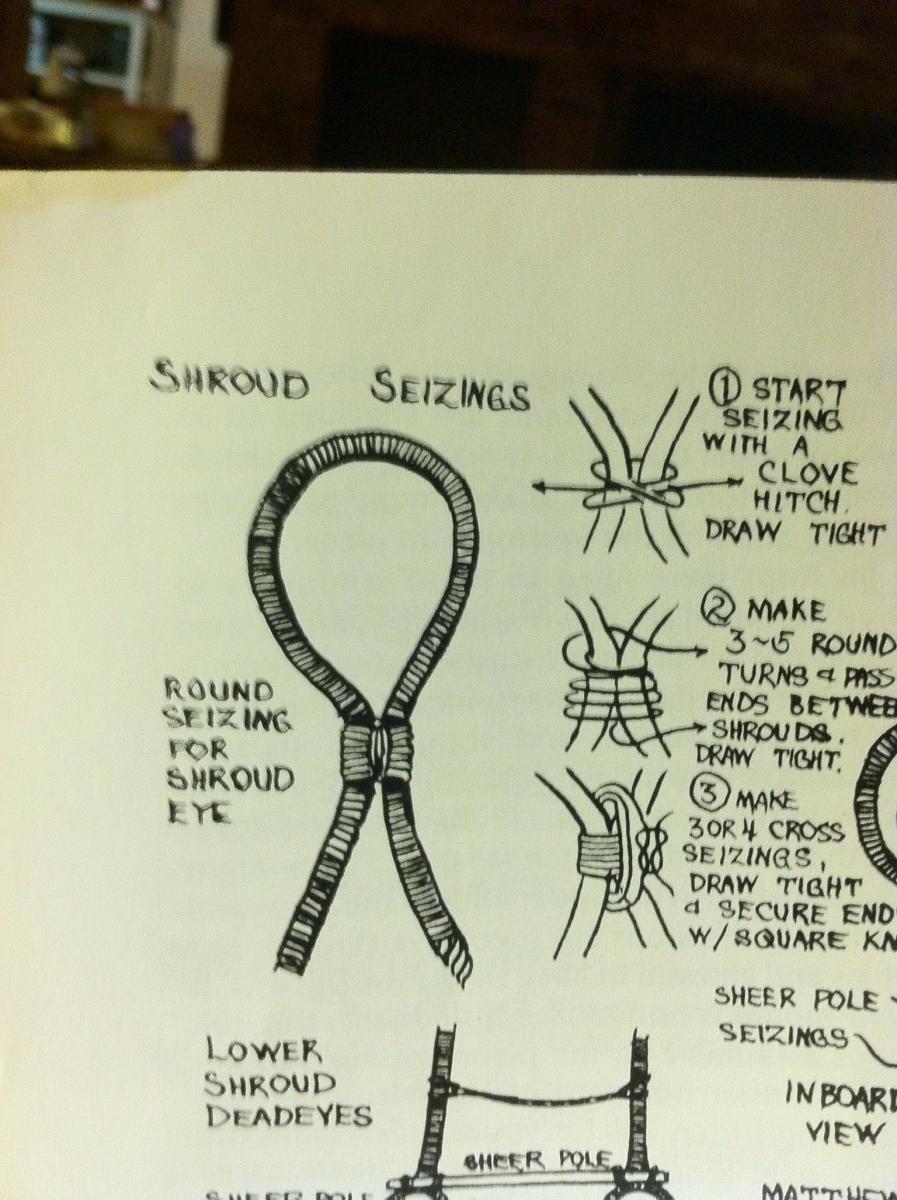
Thanks Again Mark, After I made the post, I realized that all the lines in the pictures were served first. Do I need to serve all the the shrouds/lines before I seize them to dead eyes, eye bolts, shackles, etc. ? If so, I'm really glad I have the machine! Thanks Again, Steve
-
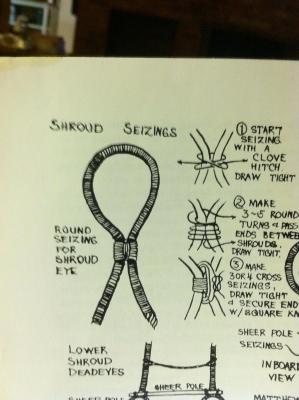
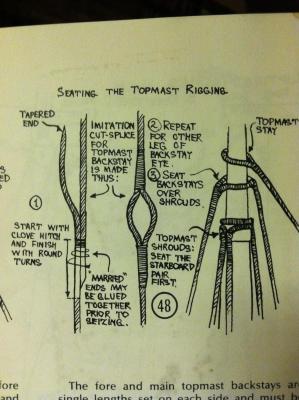
Hi Mark, Thanks. I looked at Gil's build log and the way it looked to me that the machine was basically used to simply serve a thead around larger cord. Below are some pictures of what I will be needing to do: Do you think this machine can help do these? Don't worry about looking for the instructions, the gizmo has a phone number on it I will call. Thanks, Steve
-
Hi Bob, She's coming along great! I especially like the "bright work". I think we Schnooner builders are a dedicated, somewhat motley, minority on MSW, but we build boats that are fast, beautiful, and (as Kate Hepburn would say) yar*. Best, Steve For those youngsters out there, see the Philadelphia Story. It means easy to handle, quick to the helm and ready.
-
Hi Dan, What did you do the second time around to make sure you hit the center? I'm right at the point in my build where I'll be drilling for sheves, staples, and eye bolts in both the bow sprit and jib boom of my build. I have a good drill press but I've been nervous about bringing drill bit to wood. Thanks, Steve
-
Hi Mark, A colleague of mine who knows I've gotten into shipbuilding, somehow had one of the serving machines you have and gave it to me. It didn't come with any kind of paperwork or instructions and I don't have the first idea of how the thing works. I based on the picture, I have all the parts. Is it difficult to use? Do you know how I might learn to use it? Thanks. Best, Steve
-
Hi All, I saw a post recently where someone was lamenting finding scale metal cannon balls. If you have a friend who is/was a hunter there's a good chance they have all kinds of mismatched shotgun shells. I probably have a hundred+ of different sizes. They are quite easy to open up and remove the shot. Be safe, use a little common sense and avoid going near the primer and you shouldn't have any problems. In most cases the shot is lead, sometimes copper covered. Newer shells can be steel. Tungsten, or bismuth. Below is a link with some scales. Best, Steve http://www.shotgunworld.com/amm.html
- 396 replies
-
- 1
-

-
- Idea
- Bright Idea
- (and 1 more)
-
Hi Kevin, Just out of curiosity, how much do you think she weighs? Thanks. Best, Steve
- 1,319 replies
-
- 1
-
-
- caldercraft
- Victory
- (and 1 more)
-
Hi Brian, I've been enjoying your build so far and I'm learning a lot about how to address shortcomings in the bulkheads. I think you've come up with good creative solutions. I especially like how you cut the crosses and injected the glue. I can think of a few times I could have used that technique. In some of your pics from the 25th, you are using some sort of steel blocks. What are they and where can one find them? Thanks. I'll be following you with interest. Keep up the good work. Best, Steve
-
Hi All, I've posted this idea a bunch of times on various forums. It's an old finish carpenters trick. Spread a thin layer of Titebond or Elmer's carpenter glue on one of the pieces to be glued and let dry. Spread another thin layer on the other piece and press together less than a minute.. You get a tight glue joint with finger pressure and it binds like contact cement but still gives you a little bit of work time to align the joint. It even works with end grain. Give it a try, experiment you'll be glad you did. Best, Steve
-
Hi Nick, The pictures you have shown really serve to prove the point which Michael was making. I don't see hardly any sapwood and the heartwood is beautiful. I hope you are able to creat many wonderful pieces with the wood you have sourced. I'm thinking of adding a new line to my signature....."Often wrong....but never in doubt"! Best, Steve
-
Michael, I think we can agree to disagree on this one. I also stand by remarks on how much I respect the work you do. While I mentioned you have a great shop, I failed to mention your incredable skills. They are something I can only aspire to. I'll continue to follow your work and hope you'll stop by my build log now and then. I would truly appreciate any advise and suggestions you can share. All the best, Steve
-
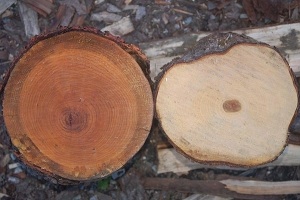
Michael, I just re-read my earlier post and I respectfully disagree with you. While I realize the overall tone was perhaps more discouraging than I was aiming for, I'm not pulling back from the gist of what I said. Yes, the satisfaction and enjoyment of using materials you source yourself is great but you're doing a disservice if you suggest someone expend time, effort and funds on an effort which is inherently fruitless. I do not know how fruit trees grow in Canada, or for that matter Australia, but I grew up in New England and had a business when I was in college pruning local orchards. I don't believe I EVER saw a three inch branch with more than an inch of heartwood. I think an inch of plain sawn heartwood, of questionable length, is not of much use. I just took down a miniature Crab Apple Tree in my yard, it was about 35 years old. The trunk was about ten inches in diameter, with about eight inches of heartwood. The clear length is about 4 feet and eventually I will harvest some pretty wood. Other than the branches which came directly off the main crotch there was not much useable heartwood. When I recommened HobbyMill I was not advocating "dead kiln dried" wood, but the fact that it was already milled (ps. If everyone shared your view on kiln dried hardwoods, good luck finding a nice piece of furniture). I admire everything you do, especially with metal work, but few have the machine/wood shop you have. I stand by my opinion that harvesting useable timber from a 3 inch log is, most likely, a waste of time, effort, and money. I agree with the member who suggested that the wood be chipped and used to smoke some Kangeroo on the Barbi. Below is a picture of how heart and sap wood can vary in a log. Best, Steve
-
Thanks Mark, I'm a complete tool junkie....I'll check out HF. Best, Steve
-
Railings? At this scale I would suggest hitting some spider webs with CA!! :) Best, Steve
-
Hi Louie, All hardwoods are comprised of heartwood and sapwood. Sapwood is pretty useless for modeling. In a 3" branch I doubt there is anything useful. My guess is that you would need a branch or trunk at least 8" in diameter before you could harvest anything worthwhile. If you were to get a hold of a piece with useable heartwood, you would want to bandsaw (either plain saw or quarter saw- google it) it into boards, paint the ends to prevent checking, stack them with spacers between the boards, and store them in a place with low humidity and a constant temperature for as much as a year. Then you would have to mill it into lumber, which in addition to the aforementioned bandsaw you would need a thickness sander and a hobbiest table saw (like the Byrnes saw). All in all, given the amount of time, skill, and effort it takes to build a successful model, why take a chance with questionable materials. You would be much better off buying your lumber from Jeff at HobbyMill. Best, Steve Ps here's a link about heartwood vs sapwood: http://northernwoodlands.org/articles/article/what_is_the_difference_between_sapwood_and_heartwood
-
Hi Mark, I just checked out the first post and then checked out Micro Mark. $92.65 for the micro sander? I guess we have different ideas on frugal. My idea is to glue some sandpaper to a Popsicle stick, drink about 5 cups of strong coffee, and become an "organic" sanding machine. :) Best, Steve
-
Hi Mark, I've just been going through this forum and my attention span isn't what it should be after a long intense day and a couple of adult beverages. I follow the info on the pads, but what are you using them on? Best, Steve
-
CA glue question
Perls replied to MikeB4's topic in Building, Framing, Planking and plating a ships hull and deck
Hi All, I've mentioned this before, but an old finish carpenter's trick is to spread a thin layer of Tite Bond on one piece to be glued and let it dry. Spread another thin layer on the piece to be glued and press together. It is almost always used on returns of complex mouldings. It's almost like contact cement, but with some working time. Finger pressure and a minute are all you need for good glue joint. I urge everyone to experiment with this technique. It can replace the need to use CA except in very specific circumstances. Best, Steve -
Hi Omega, I'm sure that however you work it out it will be spectacular. Now that I think about it, spectacular might be the wrong adjective when you're talking about an accurate representation of a boat that's seven inches long. Maybe it should be "min-tacular". Anyway I'm sure it will be awesome. Best, Steve
-
Thanks David and Brian, I guess I'll just give it a try. I had a dog with diabetes and still have a few syringes around. Best, Steve
-
Hi Omega, Herreshoff really designed some beautiful boats and yours certainly does him justice! So.......What's next? Best, Steve
-
Hi David, Before seeing this log I didn't even know that card kits existed. Your work is amazing, it looks to me that paper is a LOT less forgiving than wood. You mentioned above that you've only used white glue. Did you need to thin it out to use in the syringe? Do you think one could use CA in a syringe or would it harden in the needle. Anyway, keep up the good work. Best, Steve
-
Hi All, Here is a link to a US office supply store for the 7" coffee stir sticks. http://www.ontimesupplies.com/econtstc10c-wooden-stir-sticks-7in-birch-wood-light-wood-10000-per-carton.html Best, Steve
-
Hi Omega, I still love your boat. Somehow I find it amusing that looking at the scale of your build and Michael's Maria represent two ends of the spectrum . Best, Steve
-
Hi, I just read Queen Anne's post and in the absence of any direct experience I fail to see any contribution. Steve