
HOLIDAY DONATION DRIVE - SUPPORT MSW - DO YOUR PART TO KEEP THIS GREAT FORUM GOING!
×


David Lester
-
Posts
678 -
Joined
Content Type
Profiles
Forums
Gallery
Events
Everything posted by David Lester
-
 Thank you for dropping in, Gerald. It was in fact your build where I got the ideal of cutting the boats in half. I remembered the technique, but I'd forgotten where I'd seen it. I'm glad you reminded me. I also used your method for building the tryworks. I was tempted to just use acrylic paint, (which I can find easily here where I live), for the bricks. However, I took your advice and ordered some Humbrol enamel and it sounds as if I avoided a potential problem. Your build is nothing short of exquisite; I can only dream of producing such fine work. However I'm still having a lot fun. Thanks all for comments and likes. David
- 145 replies
-
- 2
-

-
- model shipways
- charles w. morgan
- (and 1 more)
-
Good Morning All I took a detour from working on the hull and have been spending the last month or so working on the seven boats. I have to say that they have driven me completely crazy. (Admittedly, it's an easy drive!) I don't recall which build log I saw it in, but there was a suggestion to glue up the boats, except for the bottom, then cut them in half lengthwise in order to make it easier to shape the interiors. I tried this and it works really well. After the interiors are shaped, just glue them back together and add the bottoms The plans show plenty of detail. On the one hand, the more the better, but on the other hand, if it can't be done half decently, better to leave it out. This took a bit of experimenting. It's a balancing act. For example, I simply couldn't manage to make the knees for the thwarts well enough, so I decided to let them go. It was a bit difficult to decipher what some of the detail shown in the plans was. I found it helpful to refer to download the instructions for the MS 1:16 whaleboat as well as John Fleming's build log for that model. Most of the finishing is wood, but I used styrene for the ribs, because 1/32 x 1/32 wood seemed just a bit over scale. Also I used card stock for the thwarts and lion's tongue. Working on the exteriors of the hulls is where it turned into a "Groundhog Day" type of experience for me and I thought I would never get out of the loop. It was a month long process of painting one component, waiting for it to dry, then painting the adjacent component, not being satisfied with the result, waiting for it to dry, repainting the first component, being reasonable satisfied, waiting for it to dry, touching the paint with glue on my finger, swearing, trying to scrap the glue off, ruining the paint job completely, swearing, using stripper to remove all the paint, then repeat and repeat and repeat. In the end I managed to get an acceptable result by cutting a piece of card stock to the size and shape of the coloured stripe along the hull and gluing it on. It gave a crisp edge along which to change paint colour. Thankfully, they are all now finished (apart from adding the rudders) and I can set them aside and return to the relative sanity of hull details. David
.JPG.2eb1a4d02775907b112aada2fe0f8917.JPG)
.JPG.fd343e0b10ab58ab72a0a1e76c40ff23.JPG)
.JPG.5d8d7632f6df1960cc44f6dbf0fe939f.JPG)
.JPG.1317b446d798c7cd8e7c4859d8db3648.JPG)
.JPG.2ec59b45141d650a91386c929839d563.JPG)
.JPG.21ea9f811c264c2185290036e0e79724.JPG)
.JPG.ba009ca103808003dbe0c93ad1a6fe06.JPG)
.JPG.3207b16c4f1377a97c4626a1afcf1424.JPG)
- 145 replies
-
- 13
-
-
- model shipways
- charles w. morgan
- (and 1 more)
-
Thank you very much guys! Very helpful, much appreciated. I'll check out the book The Whaleboat. It might be fun to build the MS whaleboat as a companion piece to the CWM. David
-
Good Morning, A couple of questions about whaleboats. I'm working on the boats for my Charles W. Morgan. I believe the best position for the rudders is the "stowed" position, which the plans indicate as an option and it appears to me that there is a small amount of rigging employed to hold them in place. The plans are a bit sketchy on this detail. Can anyone direct me to a reference to see how best to do this? I'm having trouble finding a clear indication. Build logs that I have found for the CWM are not particularly clear in this area and I have looked at the instructions on line for the MS whaleboat, but there are not overly clear either. (Perhaps the plans for this kit might be.) The scale of course is the 1:64 of the CWM, not the 1:16 of the whaleboat kit, so it probably can't be 100% accurate, but I would like it to at least be leaning toward the accurate side of things. The other question is one of the equipment for the whaleboats. How much of the equipment (oars, harpoons, hooks etc) would have been in the boats while they are mounted on the davits? Most build logs show plenty of equipment, as does the photo that MS provides, but in reality, would any of it actually have been there? Maybe it was, but it was tied down? I don't know. I realize from a modeling perspective, I can do whatever I want, but I'm just curious what opinions are on where that equipment might actually have been when the boats were suspended from the davits. Many thanks, David
-
Thanks for the kind comments everyone. Dave, I thought up the plumbers' tape idea for the hoops lying in bed one morning around 5 am. (I have a very exciting life😀.) Richvee - thank you very much for the idea of building up one whale boat before installing the davits. That's one thought that hadn't occurred to me lying in bed and I think it's a good one. See Hoss - You should keep the CWM on your wish list; it's a really great model kit. Scoot - Yeah, the plans are really pretty good; there's a ton of information on them, but it sure does take a great deal of scrutinizing to find it all. Thanks again, David
- 145 replies
-
- 2
-
-
- model shipways
- charles w. morgan
- (and 1 more)
-
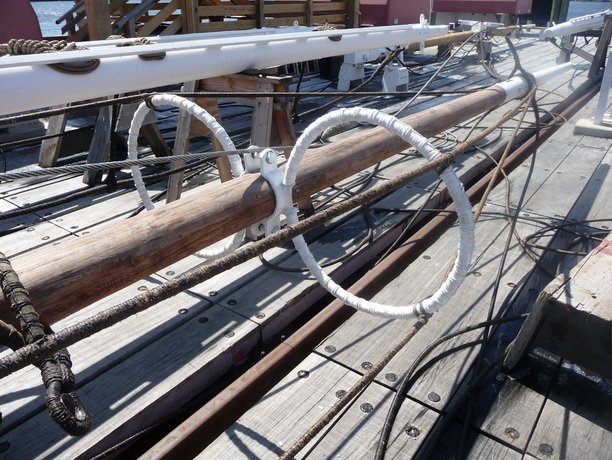
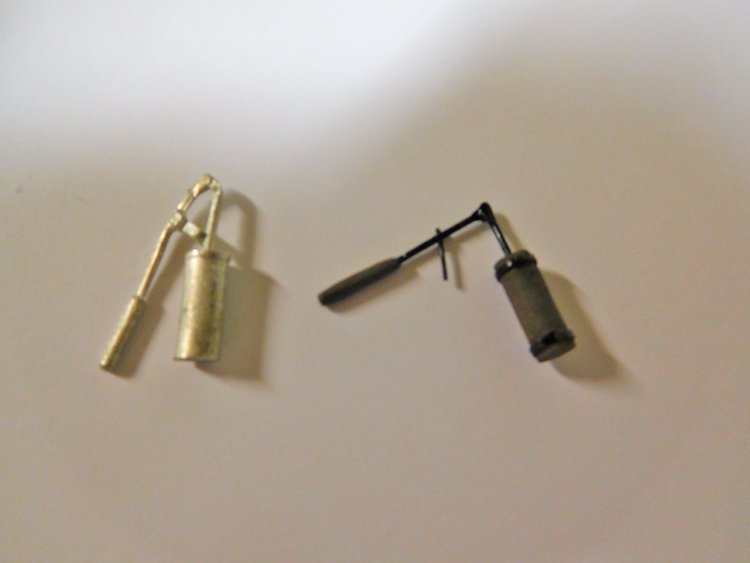
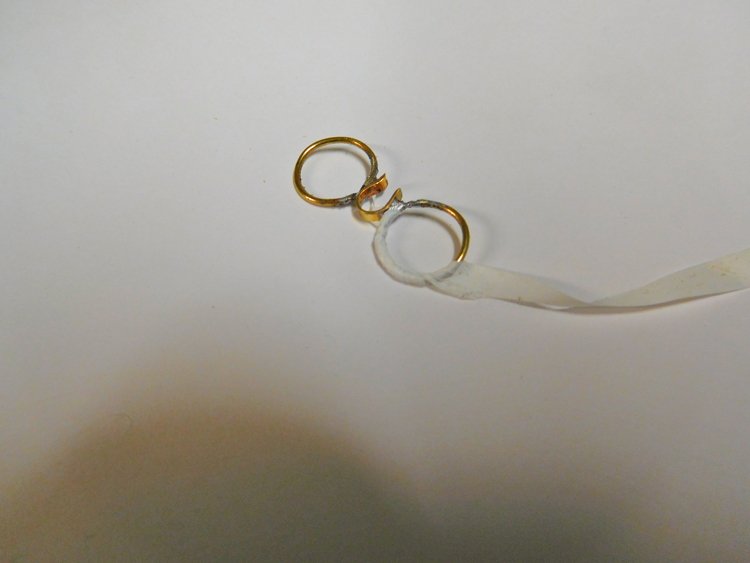
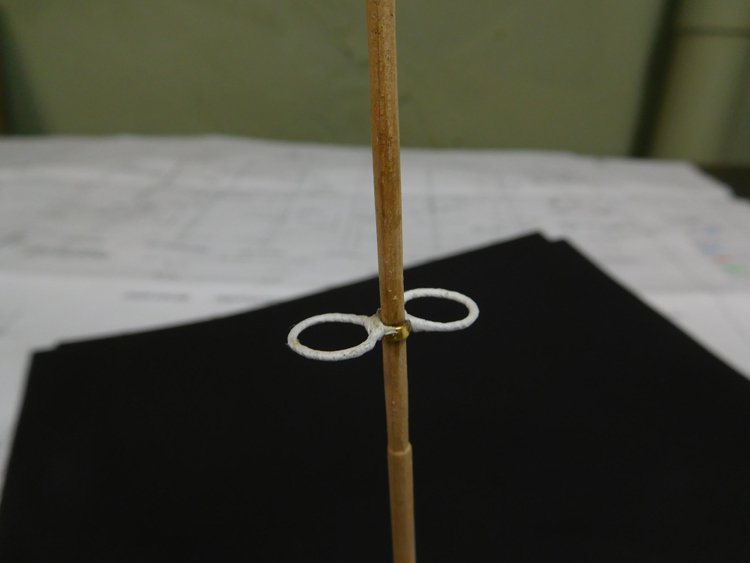
Hello All: I've been working on a couple of different things: I couldn't seem to make the cast metal bilge pumps fit properly. There is a bracket on the handle which is supposed to attach to the fife rail. I couldn't see how to bend the handle to make that work without breaking it and/or creating a strange shape. So I made new ones from scratch and will use an small eyebolt to attach it at the fife rail. The picture below shows the supplied cast one and one of my new ones: (sorry, it's poorly focused) I wanted a change of pace from deck and hull details so decided to jump ahead to something completely out of sequence and turn my attention to the life hoops on the fore and main masts. There is very little reference to them in the plans and I've been unsure about how best to deal with them. So today, I've been experimenting and think I've come up with an acceptable approach. I found this picture in John's (Texxn5) build log and I hope he doesn't mind if I share it with you here: It appears that the hoops are wrapped with canvas. I know I could simply paint the hoops white, but I was wondering how to replicate the covered look and came up with the idea of using plumbers' thread sealing tape. I made the rings by wrapping some brass wire around a 5/16" dowel and then soldered them to a piece of brass strip which will wrap around the mast. I then wrapped the rings with the tape and I think it gives a pretty good result. I'll glue the assembly to the mast at a later time and paint the brass strip white along with the mast. So that's my diversion for today. I've been stalling on the hull details because there are so many different elements (5 sets of davits, supports for the roof structure, channels, etc.) all to be fitted in with little wiggle room and no room for error. The location of each seems to rely on the placement of something else and I can't seem to settle on a starting point. However I will have to before much longer. Thanks again for checking in, comments and likes. David
- 145 replies
-
- 7
-
-
- model shipways
- charles w. morgan
- (and 1 more)
-
Good Morning, My wife Nancy is generally very supportive of my model building even though it's an interest she doesn't share. However she does not find the idea of whaling as an enterprise to be to her liking, so is a little dubious about the Charles W. Morgan. You may recall from one of my earlier posts that she refers to it as the "William H. Macy." (War ships on the other hand don't seem to bother her.) Last night she made a rare trip into my workshop to see how I was doing. Noticing that I had installed the belaying pins she asked "What are all those little clubs for? Whacking fish on the head I imagine!" Oh well. David
- 145 replies
-
- 6
-
-
- model shipways
- charles w. morgan
- (and 1 more)
-
Thanks for checking in Joe and Dave! Dave, I very much want to visit the Morgan too and I'm sure it won't be too long before we make the trip. It's not actually all that far from where we live - about a seven hour drive, so quite doable as a mini holiday. When we were in the UK last year we visited a number ships and it's quite a bit of fun. David
- 145 replies
-
- 1
-
-
- model shipways
- charles w. morgan
- (and 1 more)
-
Thanks Jim and Mike! This is one of the most enjoyable models I've built yet. The kit is well designed and there is plenty of detail to get your teeth into. David
- 145 replies
-
- 1
-
-
- model shipways
- charles w. morgan
- (and 1 more)
-
Thank you all for comments and likes!
-
Good Morning, A little update - I have finished the deck structures at the stern. I expected the skylight and the tryworks to be difficult, but they proved to be easier than I anticipated. These little "houses" on the other hand, took me by surprise and proved to be quite hard to do, and difficult to do any one aspect of them in isolation. Each step seemed to depend on something else being done first. The first step is installing the rudder- I tried making the pintles and gudgeons copper. I used styrene stips covered with copper tape. (the top one will be painted black.)It worked fairly well and it's certainly a little more forgiving than if they contrast sharply with the hull. Some components just dry-fitted, but the steering mechanism has to be installed before the cabins can be attached- Rigging the steering before final installation of the cabins- Cabins in place- More or less finished, just some details such as ladder and smoke stack to add as well as a couple of touch-ups- I'm currently working on the fife rail, which you can see in the above photo. It's just dry-fitted when the photo was taken and doesn't fit quite right yet. Once it's done, I will pretty much finished the deck details and will turn my attention to the details on the exterior of the hull. Many thanks for comments, likes and just looking in. I'm going out to get our Christmas tree later today. Every year I unsuccessfully lobby for an artificial tree as I never look forward to the effort and mess of cutting and setting up a real tree, but I have to admit when it's done, I'm always glad I made the effort! Happy holidays to all. David
.JPG.cff6580e990d0c610be0de3fb0d57fc8.JPG)
.JPG.75d81677f744c693f9fc9c62b6877274.JPG)
.JPG.408b67bef84a7b45690ef754842aafd1.JPG)
.JPG.469ebd25f9fd77ea69678fd37f54ddb8.JPG)
.JPG.385a033c93818362858b8d122a7aa45c.JPG)
.JPG.a02725dcc5f0dfb097c07eca562b7afd.JPG)
.JPG.826abf233bf158d91d884f1ea15a6e3a.JPG)
- 145 replies
-
- 12
-
-
- model shipways
- charles w. morgan
- (and 1 more)
-
Ronald, If you want to have the wheels gray, Tamiya xf-55 deck tan is a pretty good approximation. David
-
Hi Bob, Fishing line would probably have worked quite well, but it never occurred to me. The skylight is finished now and the thread worked fine, but the fishing line might have been easier to work with and would have given quite a clean result. Thanks, David
- 145 replies
-
- 1
-
-
- model shipways
- charles w. morgan
- (and 1 more)
-
Hi Mike, Thanks very much. The deck finish is a long story - it's basswood. Deck finishing is my nemesis. Basswood never takes a stain very nicely and usually comes out blotchy, sometimes even with only polyurethane. Also, I tend to like the grayed out look of decks on real ships. I'm fairly happy with how this one turned out, but it was a process that I would have a hard time duplicating exactly. I used artists' acrylic paint and mixed up a batch of a toupe colour using black, white, dark brown and yellow continually adjusting until I was reasonably satisfied. (It approximated Tamiya's 'deck tan'.) I applied it thinned down with water and after it dried I applied more over the "bad" areas that still showed through. Sometimes I would use the original taupe mixture, sometimes just brown, sometimes yellow etc. Sometimes I would apply it thinned down and sometimes full strength. Each application was an attempt to compensate for the poor results of the previous one. Before I knew it I had too much paint on it and it just looked like a painted deck. So I masked off the bulwarks and removed it all with paint stripper. It left the deck effectively stained and I was surprised to discover that it didn't look too bad, so I rubbed it down with fine steel wool and the result is what you see. I've built several models now and no two of my decks look similar, but I think this is my favourite one. I'm glad you like it too. Thanks again, David
- 145 replies
-
- 3
-
-
- model shipways
- charles w. morgan
- (and 1 more)
-
Thanks Bob! Much appreciated. Any thank you for the likes. D
-
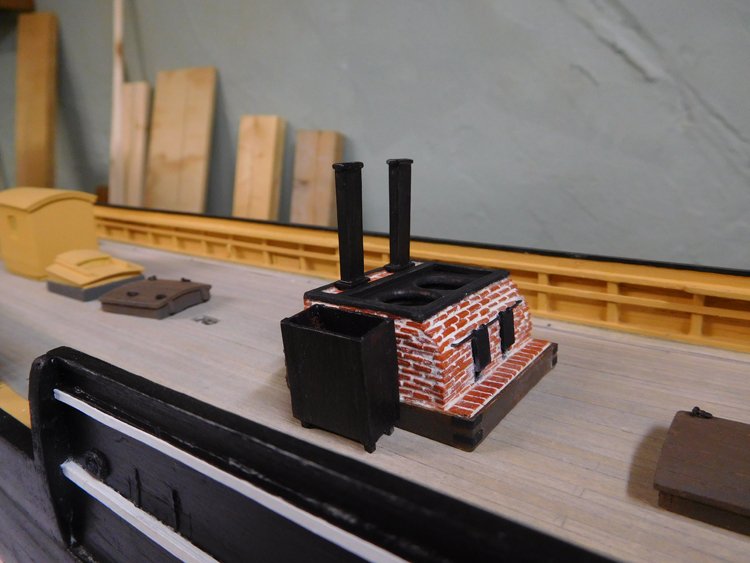
Good Morning, I've spent the last little while working on the tryworks and it's now finished. I used the method described by Gerald Spargo and which is available in the resources section on the NRG main site. It was a pretty straightforward endeavour. The only really difficult aspect is once you get to the top, it appears as though there will not be enough room for the pots, chimneys, trim etc. So it takes a bit of tweaking to get it all to fit. It's also a bit tricky to keep the walls plumb. Gerald advised strongly to use emamel paint for the bricks and not acrylic. (Perhaps it's difficult to wipe the joint filler off acrylic paint cleanly, I'm not sure.) So I used some Humbrol flat enamel. I understand that the top surface and chimneys are copper that has blackened over time. So I painted them with Humbrol copper enamel and then dry brushed flat black over top. I'm not sure how clearly it shows up in the pictures, but you can just see bits of copper showing through. I did the same thing for the cooling tank. So that's it for now. Many thanks for looking in. David
.JPG.06207f89129b8faab4111d696277318a.JPG)
.JPG.279e23762bfe43864ff867e5d1955c7a.JPG)
.JPG.9579d1f1eadaaf9894786f9d6b4f56d2.JPG)
.JPG.448b64546c9a55189b80851fff695298.JPG)
.JPG.0bd28f499e379af70f54c12e1f2ba84c.JPG)
.JPG.d624770110a619dffe969c05c0df2d49.JPG)
.JPG.33106f0c0e12b60b1e726c7c5a9034e3.JPG)
- 145 replies
-
- 19
-
-
- model shipways
- charles w. morgan
- (and 1 more)
-
Thank you for the comments and 'likes' I really appreciate it. David
-
Looks beautiful Dave - what a nice little project this one is.
-
Really enjoying this one - it's a whole different ball game than building a tall ship.
-
Good Morning, I have a bit of progress to report. I've finished up quite a few details on the hull including the coppering as well as a couple of more pieces of the deck details. (All are just sitting on the deck for the photos - none is actually installed yet.) There are a number of portholes etc that are not included in the kit, so I ordered a few different ones. It took a bit of research finding the right sizes but in the end I found some nice small ones - only 1.2mm - for the smallest openings and a couple of different bigger sizes for the others. The oblong mooring chocks are a bit of a mystery to me. The plans indicate four of them on the starboard side and none on the port size, but the kit comes with six. So that's more than needed for the outboard side of the openings, but not enough for both the outboard and inboard sides of the openings. So I used the four kit supplied ones on the outboard side and then used new brass portholes which I bent into an oblong shape for the inboard side and it seems to work well enough. You can see them clearly below. Stern details finished - I always find finishing the decking to be a challenge. The basswood takes the stain so poorly that it's hard to get a nice consistent finish. I also like to try to simulate the grayed out look that decks usually have on the real ship. I'm fairly happy with the result I got this time, but don't ask me to duplicate it! It was a lengthy series of experimental steps. This time I used acrylic artists' paint.I started with a thinned mixture of black, white, dark brown and yellow, mixed to achieve a sort of taupe colour. I brushed it on and rubbed it down. Then there was miserable series of steps - adding more brown because it was too gray; adding more black because it was too brown; adding more white because it was too dark; adding more yellow because - well because it was the only colour left to add and then going through the whole process over and over again. When I was finally reasonably happy, I rubbed the whole thing down with steel wool which resulted in a very nice finish and a colour that I think looks ok. (Also, while I'm on the topic of decking - this kit has no sub-decking. The decking planks are 1/16" thick and install directly on the bulkheads. If I was doing it again, I would buy 1/32" sheets and make a sub-deck and then install 1/32" planks over that. It would be much easier to get a good even surface and there would be no concerns about plank butts not lining up with the bulkheads.) The bigger challenge though, was getting a crisp line along the top edge of the upper white stripe. This is the outboard edge of the top rail and according to the pictures I've seen, the white should only be on the vertical surface, not the horizontal surface. After many failed attempts at painting, I realized I would never get a good clean line where the white and black meet. The upper edge of that white line is highly visible and the least deviation jumped out at me. I considered using a styrene strip which would give a good sharp line. I'm not opposed to using styrene in principal, but in this case it was just too front and centre so I abandoned that idea. In the end, I painted a piece of paper and applied that. I have some really nice black paper that I used to simulate small iron fittings etc. It's not as heavy as card stock, but heavier than regular paper. It painted beautifully, without any wrinkling. I cut narrow strips of it and glued it on and it solved the problem! The pump handles are another kit mystery. They provide a small centre fitting, but then you are supposed to attached extended handles to it. I couldn't see any way to do that easily or nicely, so I discarded it and fabricated the whole part as one from brass - So that's where I'm at so far. Next up is the tryworks, which looks like it will present some fresh challenges too. This is one of the most enjoyable builds I have done yet, and if anyone is considering this kit, I would definitely recommend it. Again, many thanks for comments and likes. David
.JPG.572fa21e3299ef3885b3fe910713d17f.JPG)
.JPG.9dd81bd823d9c26f875c26903778396d.JPG)
.JPG.edb80ea68b8b2e9a09c95721f87bbcd0.JPG)
.JPG.afe1b5ca8b09f4c9db3e0a8222186e9a.JPG)
.JPG.4700ed413b6fb921270d59bd57f4ad07.JPG)
.JPG.1b2d5c3d5a3b5890a09c2a2657a5d149.JPG)
.JPG.b00efd143be3da618831087cd7ac0105.JPG)
.JPG.23711be710b4c82f0958ce8bf7a7cc0e.JPG)
- 145 replies
-
- 17
-
-
- model shipways
- charles w. morgan
- (and 1 more)
-
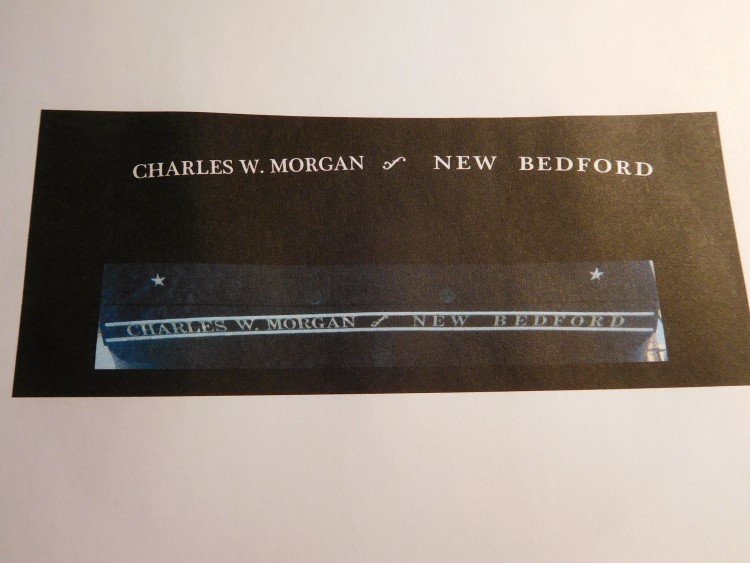
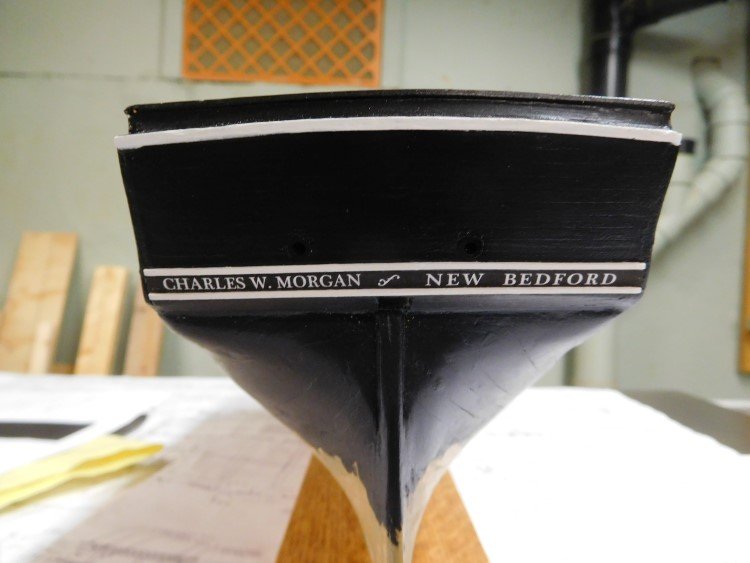
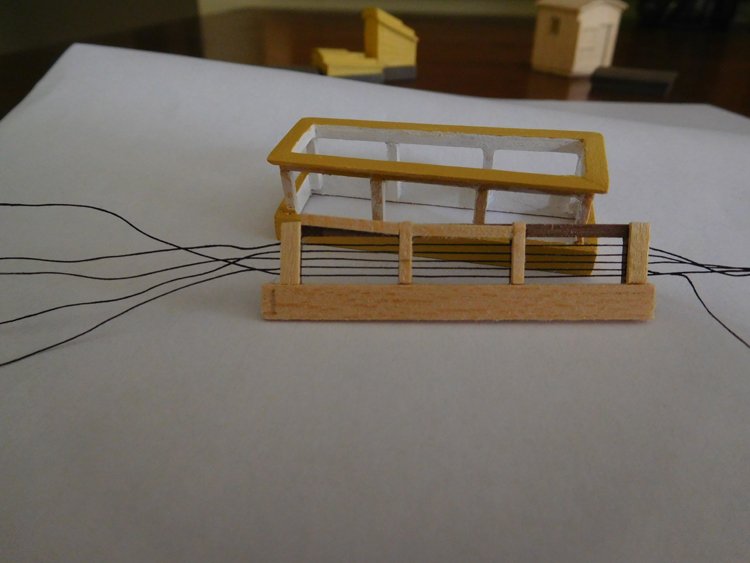
Good Morning, I've been working away at this and that. I spent a lot of time yesterday (raining all day, couldn't rake leaves) working on the lettering for the stern. I don't know what the decorative "f" in the centre is property called; whether it's simply a decoration or some old-fashioned contraction for "of". In any case it presented a bit of a challenge to duplicate. There is an elaborate "f" in the special characters section of Word, but it wasn't quite right. In the end I downloaded this image from Google: Then I doctored it with Photoshop and the result isn't too bad: The next photo shows my lettering above the lettering on the actual ship: And finally, on my model: I also finished the skylight: Using sewing thread for the rods worked quite well. Because it's so fine, I was able to get the same number of them in place as on the ship. For the bottom portion, I had stiffened the thread with CA glue, but for the upper portion, I tried it without adding the CA glue and it actually worked a little better. I am now working on a number of small details to the hull - portholes, etc before turning the hull upside down and staring on the copper plating. Again, thanks for likes and comments. David


- 145 replies
-
- 17
-
-
- model shipways
- charles w. morgan
- (and 1 more)
-
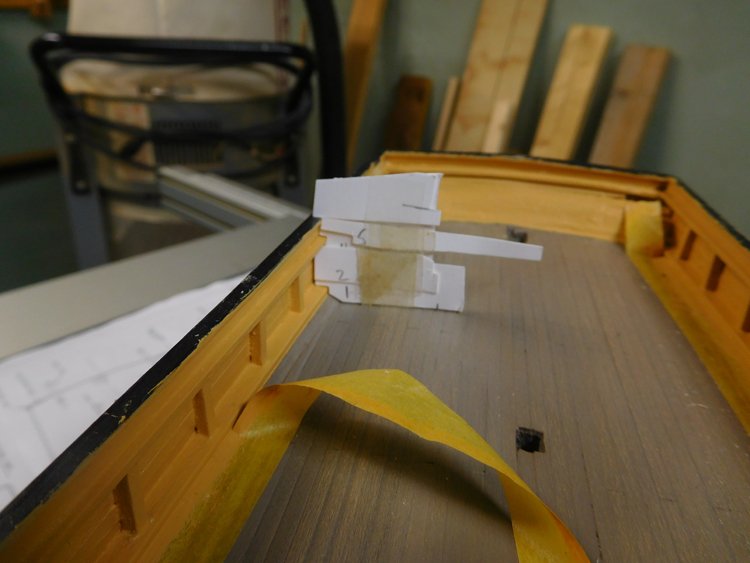
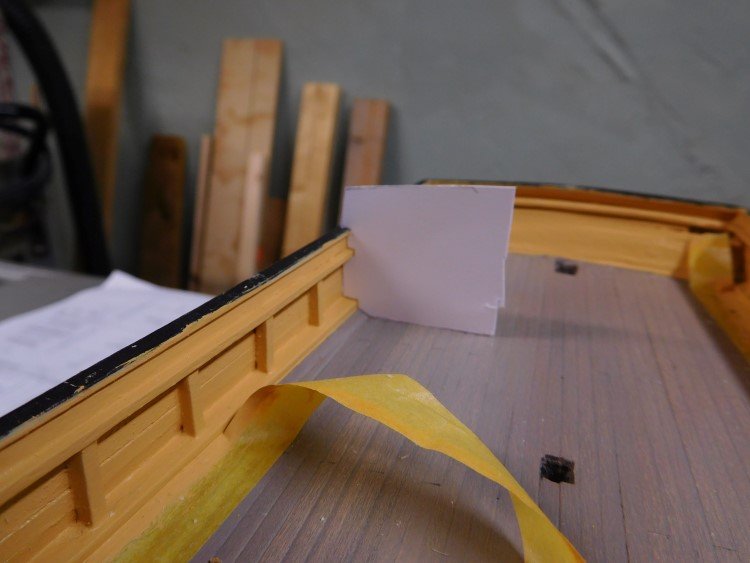
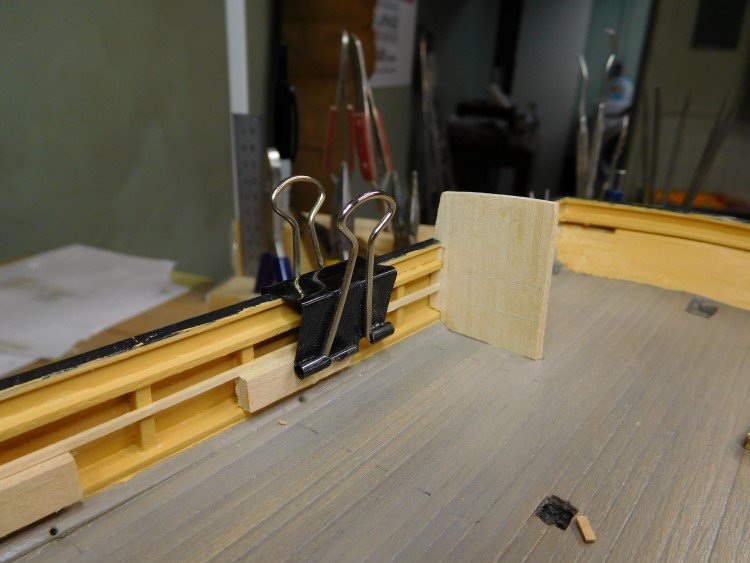
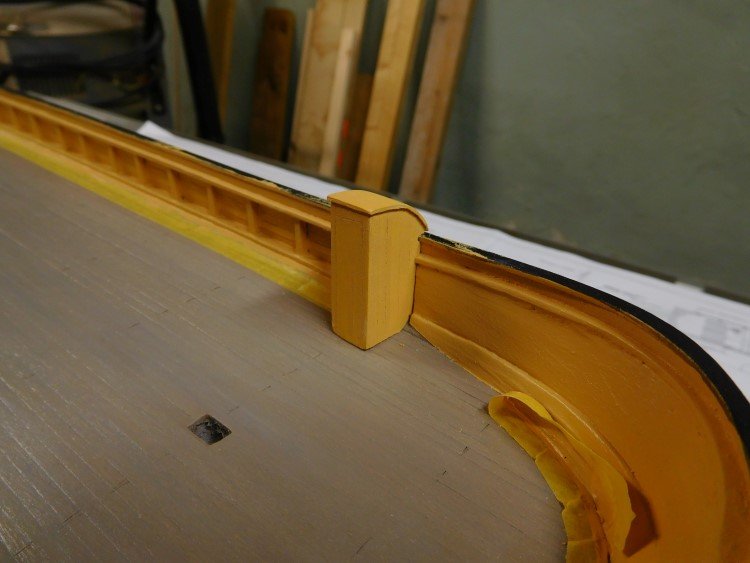
Good Morning, I've been working away at this and that. There are so many details to be added to this hull, that it's almost paralyzing figuring out what to do next. I've been playing around with some of the deck structures. The "houses" at the stern end and the "head" have to be let into the bulwarks and rail and this is a bit tricky. I knew I had to use templates, but even creating them seemed problematic, so I built the templates up from components with a new piece at each point where the profile changed and taped them together. I then made a decent one piece template. Then I fine tuned the one-piece template. And finally, the piece itself. I used a piece of 1/32" sheet material for the back and then faced it with 1/32" x 1/16" strips. (The blocks in the picture held in place by the clips are just spacers to help me locate the rail.) Here's the powder room ☺️ fitted to the bulwarks (just placed temporarily at this point. Many thanks for looking in, likes etc. David

- 145 replies
-
- 11
-
-
- model shipways
- charles w. morgan
- (and 1 more)
-
Richvee - Thanks, I think it's going to work just fine. A question though - what colour does everyone think the rods (thread) should be? The plans say all ochre. On the ship as it stands today, the rods on the base are painted ochre, but the ones on the roof panels are black. I'm tending to leaving all of it black as the contrast makes it stand out a little more, but I think I'll pick up some ochre coloured thread tomorrow and do a test run with it before deciding. Thanks again for comments and likes. David
- 145 replies
-
- 1
-
-
- model shipways
- charles w. morgan
- (and 1 more)
-
Hi Gary, Thanks for your comments. I am familiar with John's build log and photos, which I am referring to frequently. I think using the thread for the rods on the skylight is going to work just fine for me. It's not too difficult getting the lines to run even and parallel and I believe the scale is just about right if the plans are correct in suggesting the diameter should be .1mm. It is a bit frustrating knowing that the piece will be largely hidden, but that's often the case with much of the work on these models. Thanks again, David
- 145 replies
-
- 1
-
-
- model shipways
- charles w. morgan
- (and 1 more)
-
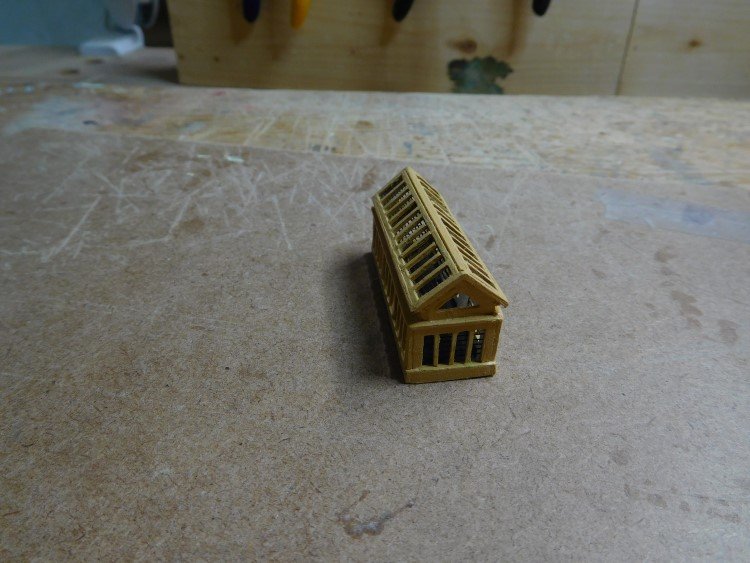
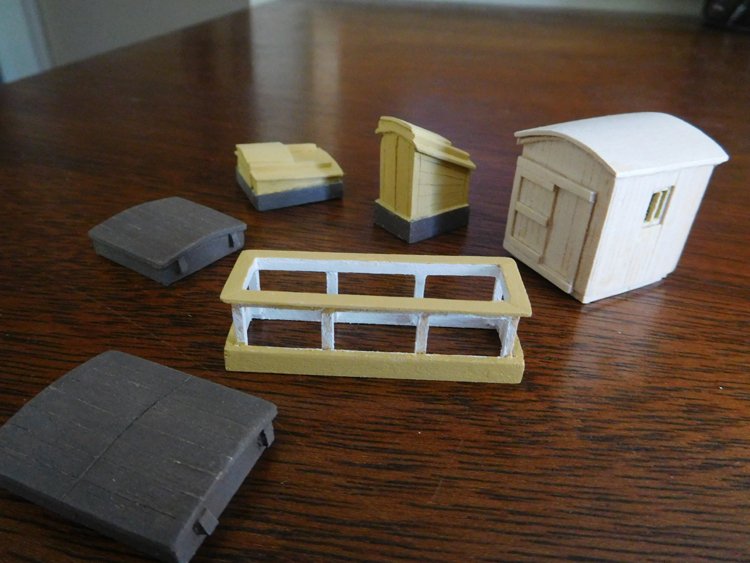
I've been working a bit on the deck furniture. Here's where I'm at so far. Here are the two companionways, two hatches, cabin and a start on the skylight. Still some painting, touchup and small details to do. Sanding basswood is always most successful when done between coats of paint. The skylight presents quite a challenge. It's very difficult to include all of the detail at this scale. I've made several prototypes, trying different means of making the rods on the windows, including different sizes of brass rod or wire. My biggest problem was getting the holes for the wire or rod to all line up evenly and even the smallest wire seems too big. The plans indicate that the diameter of the rods is just .1 mm which is very small. In the end I think I'm going to go with thread. What I'm showing in the picture is just sewing thread hardened with CA glue. I can glue it in place on top of the framework and then add a 1/32" piece of wood on top. When I apply it to the actual skylight, I think I will use one thread for each of the five rods and wrap it around the entire framework. I'll do something similar for the "roof" pieces, but I just haven't worked out yet how to construct the framework. Each of the three windows on each side should also have a small window frame around it, but I'm undecided as to whether to include it or not. The overall effect might be better if that tiny detail is omitted. I'm not sure yet. Again, thanks for comments and likes. David
- 145 replies
-
- 10
-
-
- model shipways
- charles w. morgan
- (and 1 more)