
HOLIDAY DONATION DRIVE - SUPPORT MSW - DO YOUR PART TO KEEP THIS GREAT FORUM GOING!
×


David Lester
-
Posts
678 -
Joined
Content Type
Profiles
Forums
Gallery
Events
Everything posted by David Lester
-
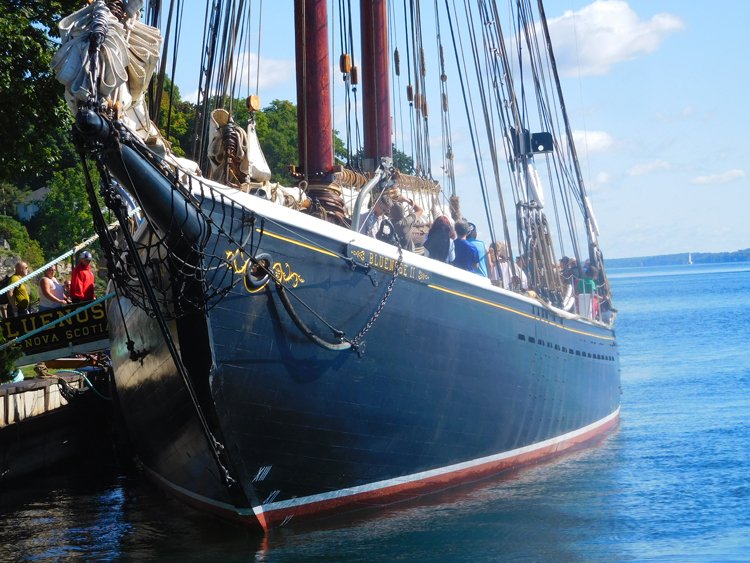
 Do these pictures help? Original Bluenose Bluenose II
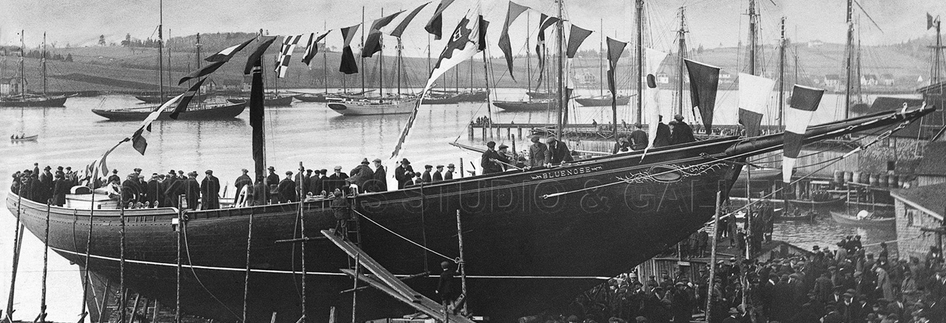
-
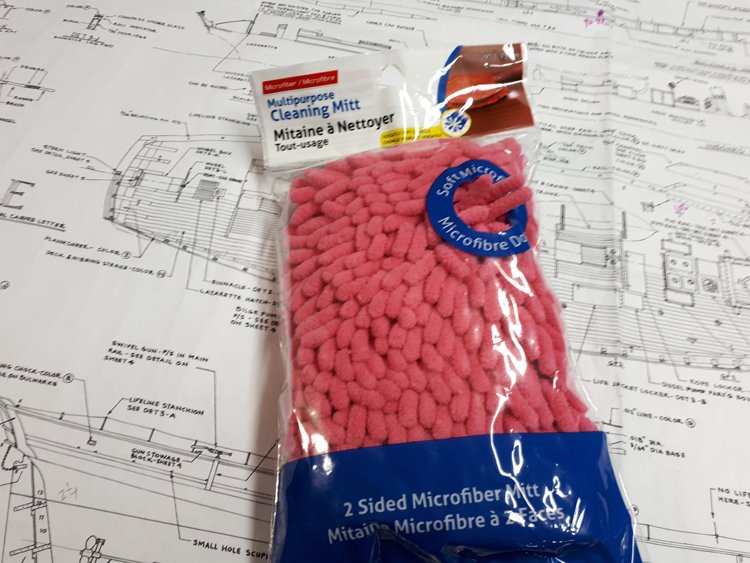
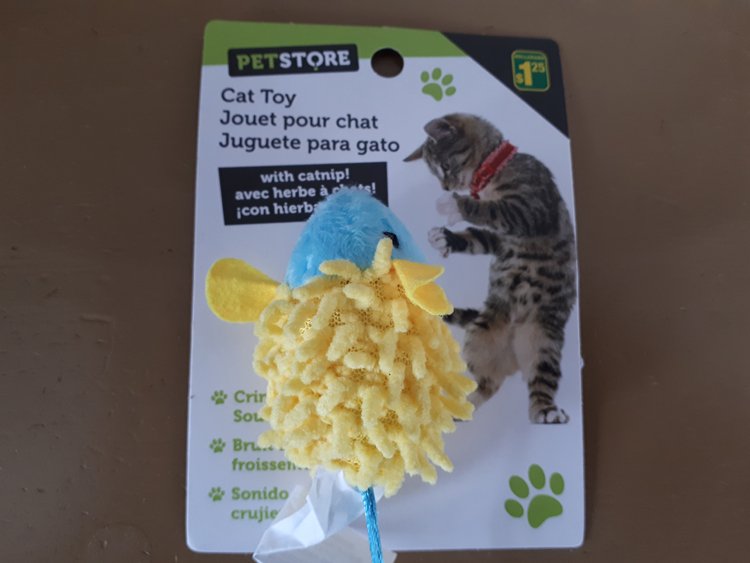
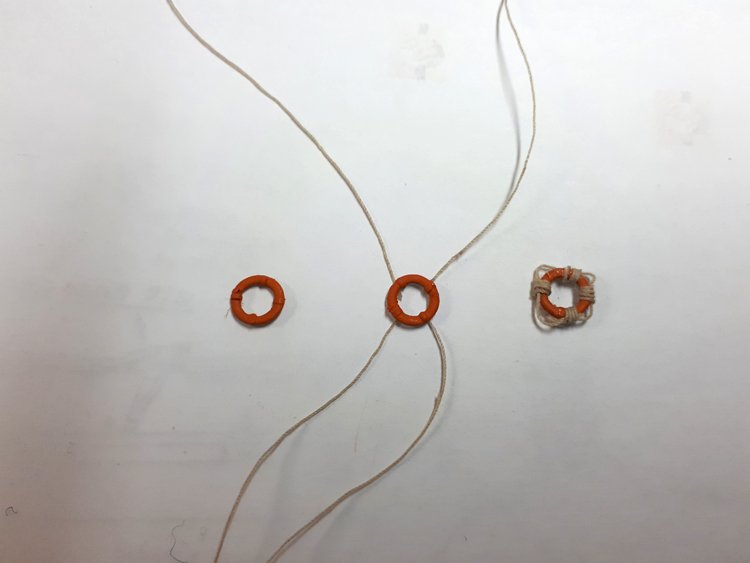
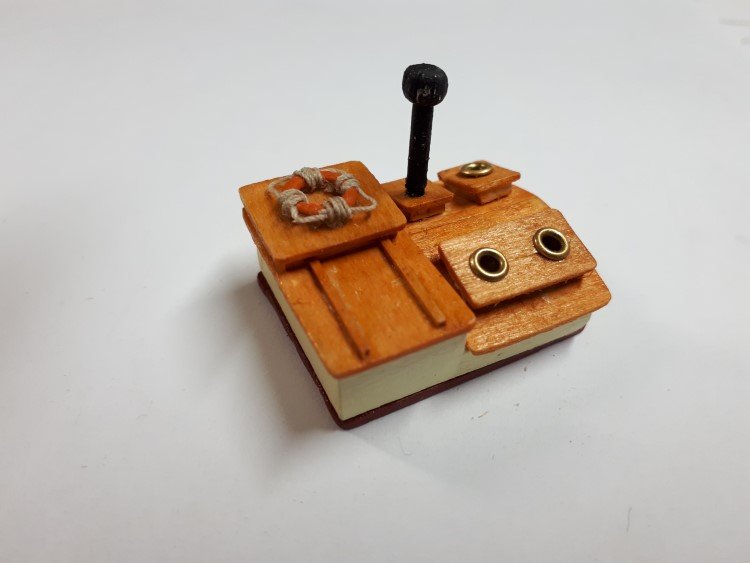
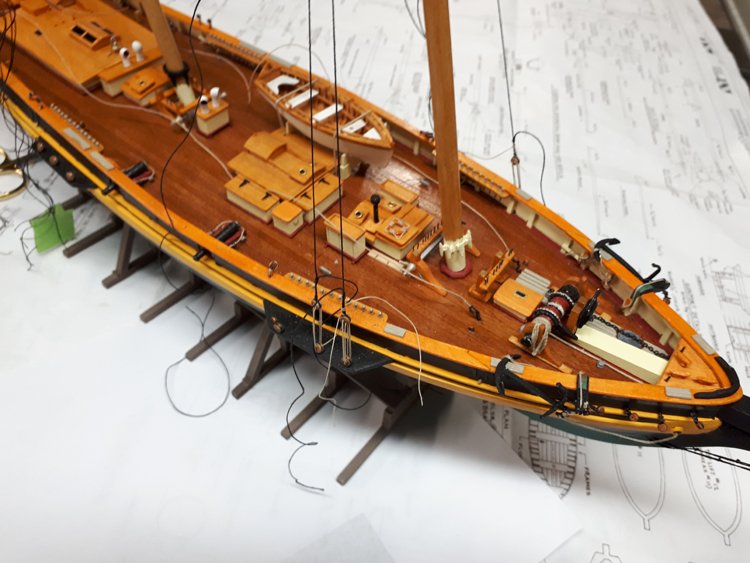
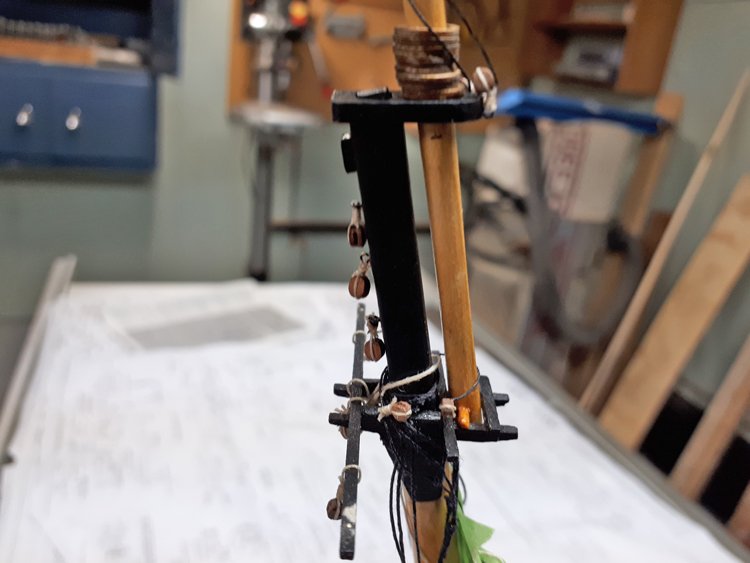
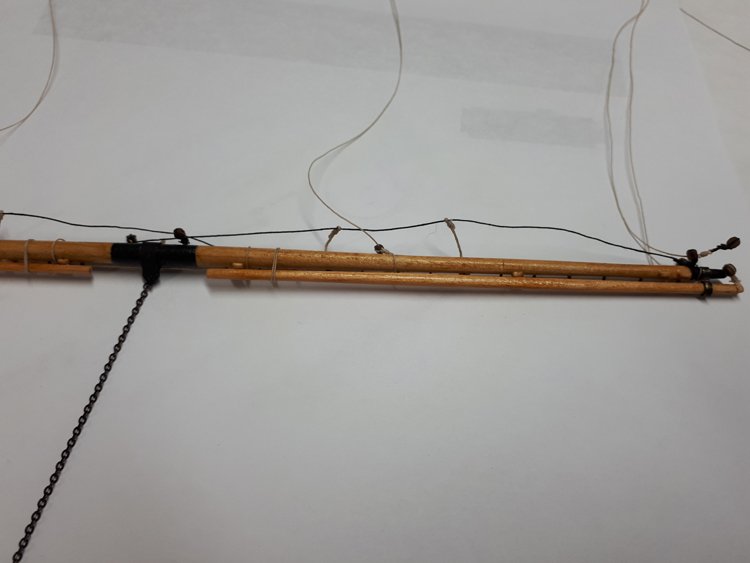
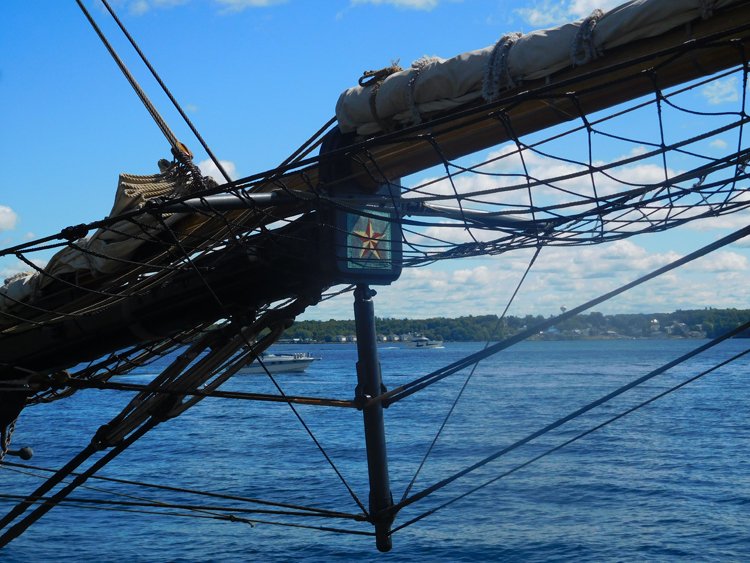
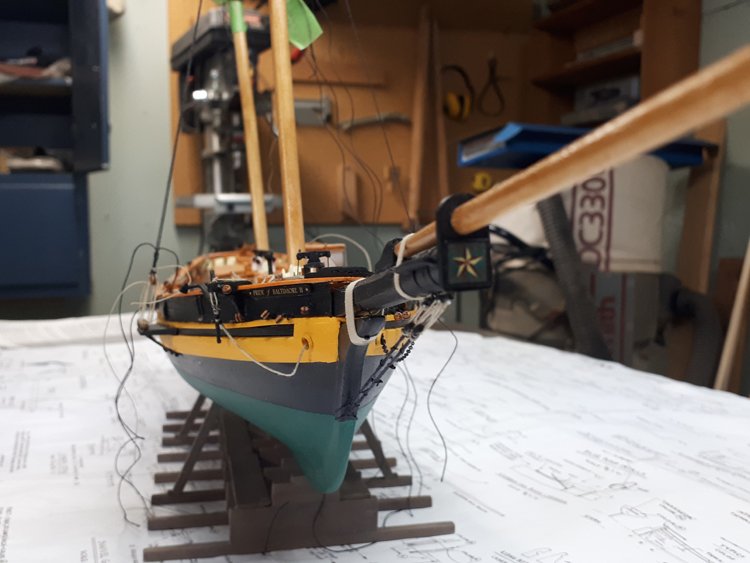
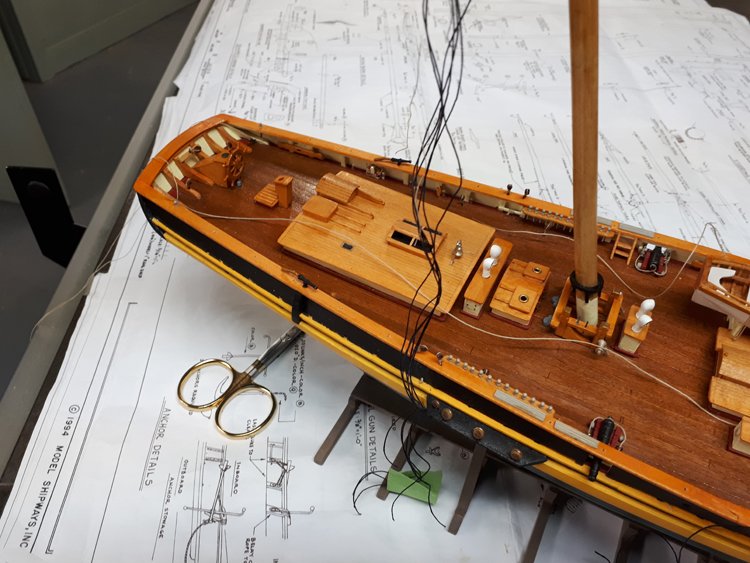
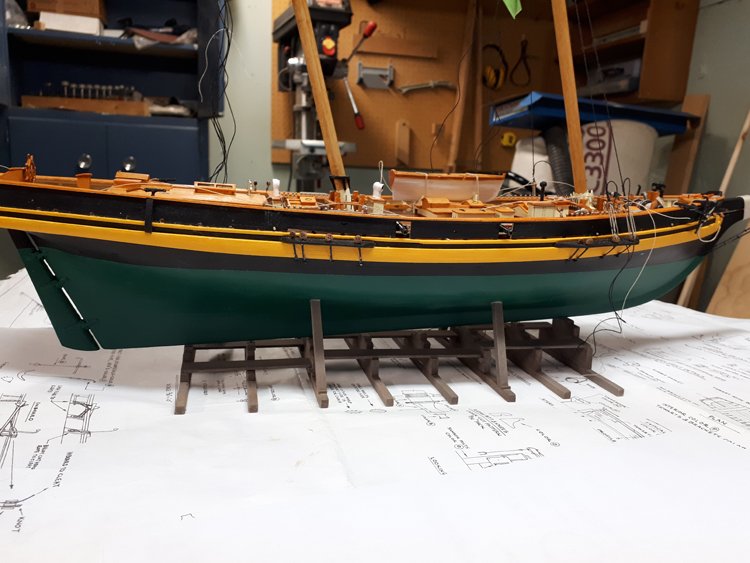
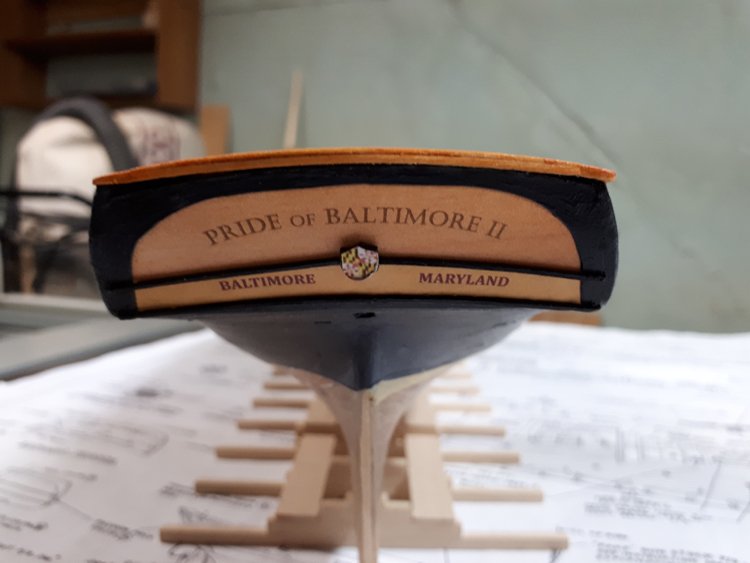
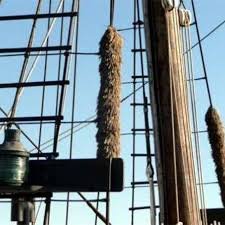
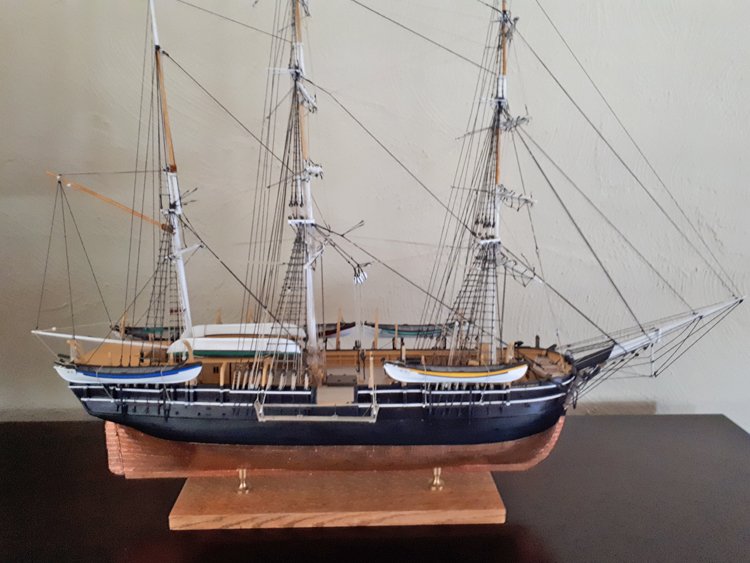
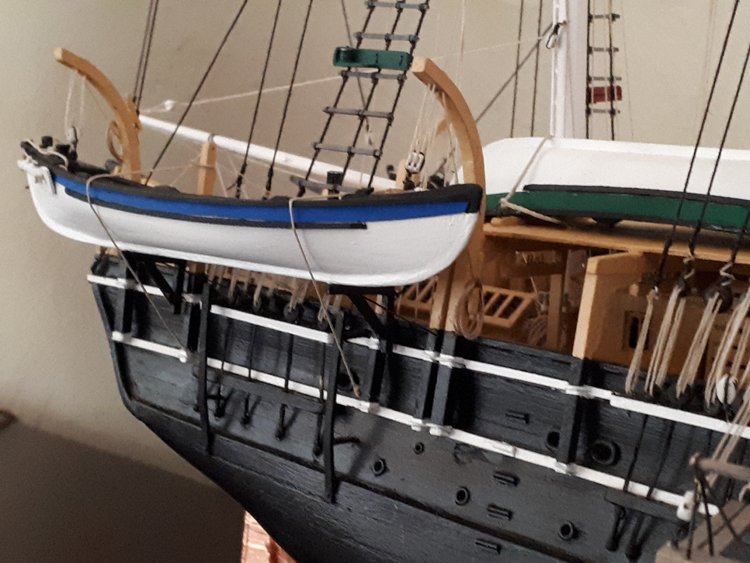
Hello All, In my last post I was experimenting with ways to make the baggywrinkles. I found this “cleaning mitt” which looked like an ideal solution. It would have been perfect, however the scale was way too big, and the pieces fell apart if I tried to cut them down. So I prowled the dollar store and found this cat toy. These little thingys would have been perfect, as they were about the right scale, but when I cut them off and attempted to thread them on the line, they just crumbled, so it’s back to the drawing board for the baggywrinkles. At this point, the deck and hull are pretty much finished; later I just have to add the stanchions and rope railing along the rail. I really hated the supplied life rings. They are cast, including the rope that surrounds them, which looked ridiculous to my eye, so I found these ones at Bluejacket without rope and then I added some rope myself. Not actually all that much fun to do, but the result is well worth it. You may notice that I have omitted the airports that run down both sides of the deck. The ones provided have a large rim that protrudes above the surface, and I just hated the look of it. I did use them on the cabins, but I hated the thought of them on the deck. I know I can buy flush ones, but they would have required very precise holes to be drilled and I doubted my ability to do that 14 times. One misstep and the whole deck would have been ruined. The supplied ones with the large rim would have been forgiving and the holes easy to drill, but I opted to omit them nevertheless. I was perplexed by the colour of the hull. It never appears the same twice in any of the pictures I find. It seems to change over the course of a season in the water. However, I found a picture of the hull being painted, so I used that one as my guide and managed to find a decent enough match. I’m now well into the rigging and it’s always the same – as I near the end of the woodworking part of the build, I can’t wait to start the rigging and then as soon as I’m into it I wonder why I was so anxious to begin. In any case, it’s going fine. I have been experimenting with upgraded blocks. On my CW Morgan I used Bluejacket cast blocks for the larger ones and Syren for the smaller ones. Both were great. For this model, I am trying Master Korabel which I bought from Vanguard Models. In addition to being good looking, these ones are also nice to use. They have very sharp grooves cut into each corner and the line really grabs. They never slip out of place. However, they are so finely made, that every hole has to be re-drilled to get the rigging line through. I recreated the star decoration on the bowsprit on the computer. So that’s it for now. Many thanks, David

- 23 replies
-
- 7
-

-
- pride of baltimore ii
- model shipways
- (and 1 more)
-
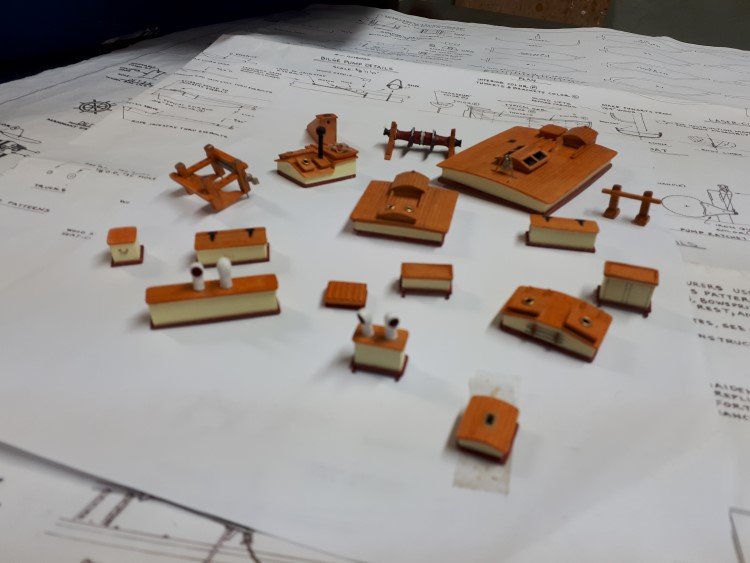
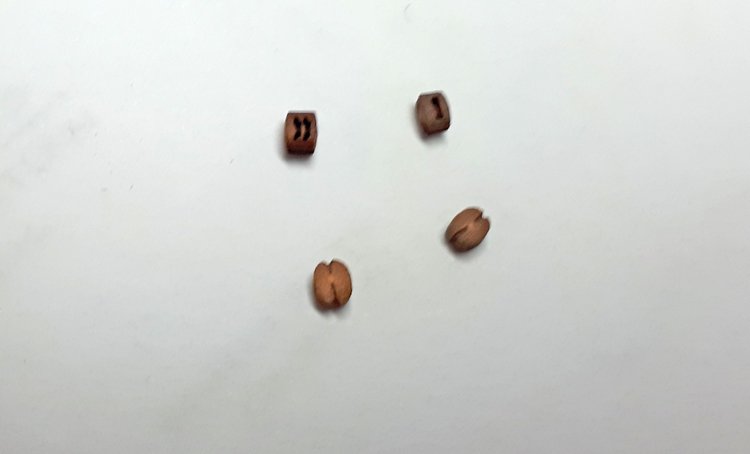
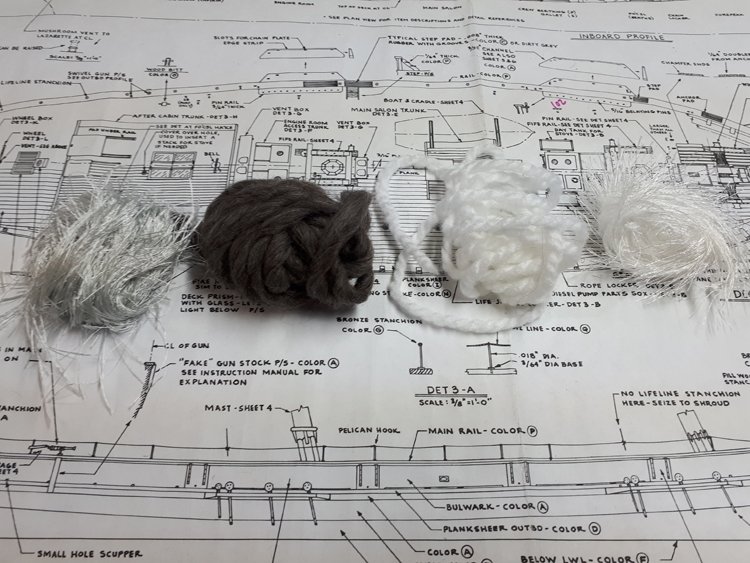
Happy New Year Everyone! I have been pretty derelict in my posting lately, so thought I better do something before the build gets too far along. The hull is pretty much finished, bulwarks installed and top rail in place. The upper hull and inner bulwarks are painted. I'm still debating on the shade of green I'm going to use on the lower hull. The stern caused me a bit of trouble. I never manage to get a perfectly symmetrical hull, which doesn't matter too much when you view the side of the model, but it's more noticeable when viewed from one end or the another. So, just as a carpenter has to do some fudging to get square factory made kitchen cabinets to fit into an out of square kitchen, I had to do quite a bit of tweaking to get the lettering and other details to fit an out of whack stern. This isn't the best stern I've produced, but after many tries, this is the one I'm going to live with. I've started in on the deck furniture. There is a ton of it on this ship and the tolerances are pretty small - very little space between components. I know from experience that if I simply start at one end and work to the other that I'll either have no space left or too much space left. I was particularly concerned about that on this ship because of the number of items. That's the reason that I didn't build the coamings in before I planked the deck, which is my preferred method. I opted to have all of the pieces finished and moveable before fixing any of them in place. My only exception is for the fife rails which I like to do first and get them positioned and then locate the other things working from the fife rails in both directions. This ship has a lot of natural honey coloured woodwork and I was concerned about duplicating the look with basswood which is notoriously difficult to finish. My solution seems to be ok. It's a light wash of orange acrylic paint, very watered down, then followed up with a couple of coats of orange shellac. One detail that this ship has that I haven't run across before is "baggywrinkles." I've been wondering how I'm going to recreate those. I asked a friend who is an avid knitter if she had any fuzzy wool, so she gave me these samples: I might be able to make one of them work, but then yesterday I spied this in the grocery store and bought it on spec: In many ways it looks less like a cleaning mitt than a baggywrinkle dispenser! If this proves to be my solution, it looks like I have a lifetime supply of baggywrinkles. That's where I'm at for now. Many thanks for looking int. David

- 23 replies
-
- 6
-
-
- pride of baltimore ii
- model shipways
- (and 1 more)
-
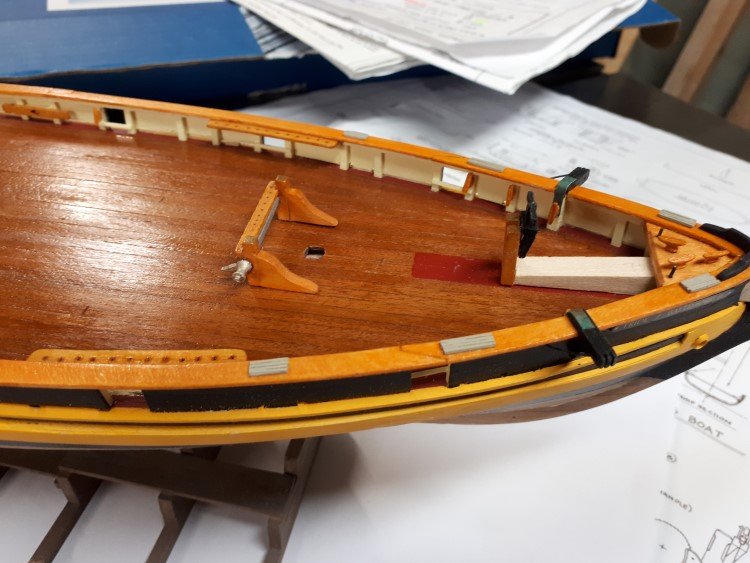
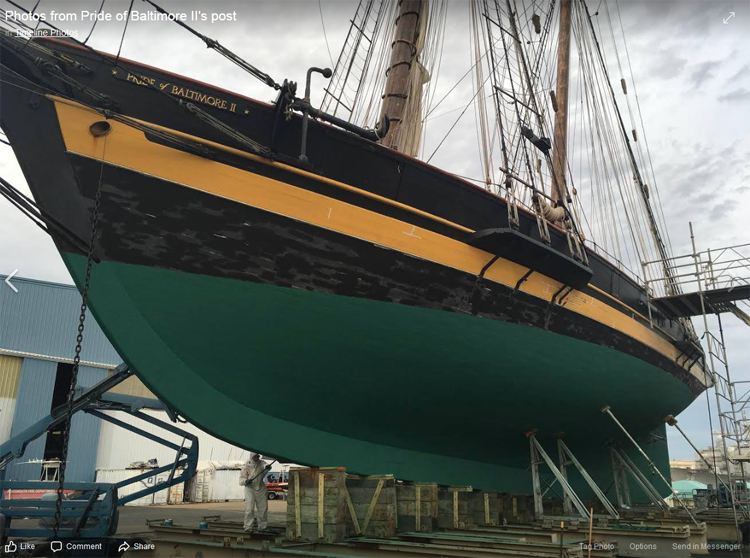
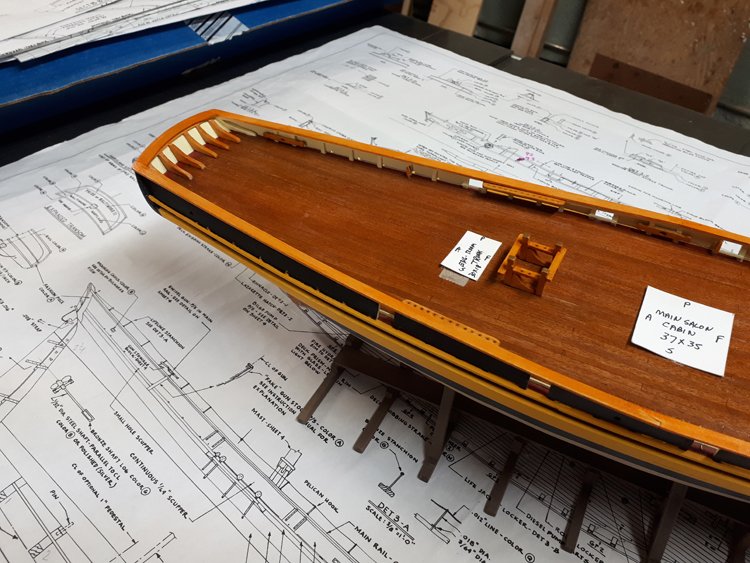
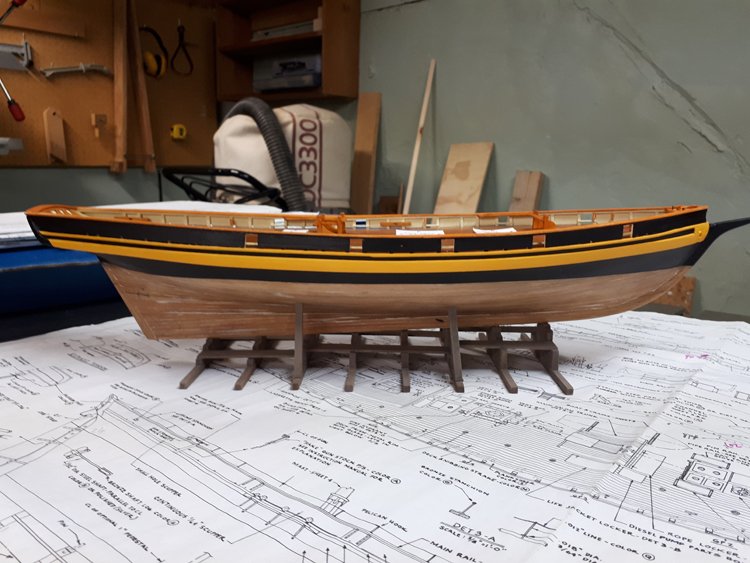
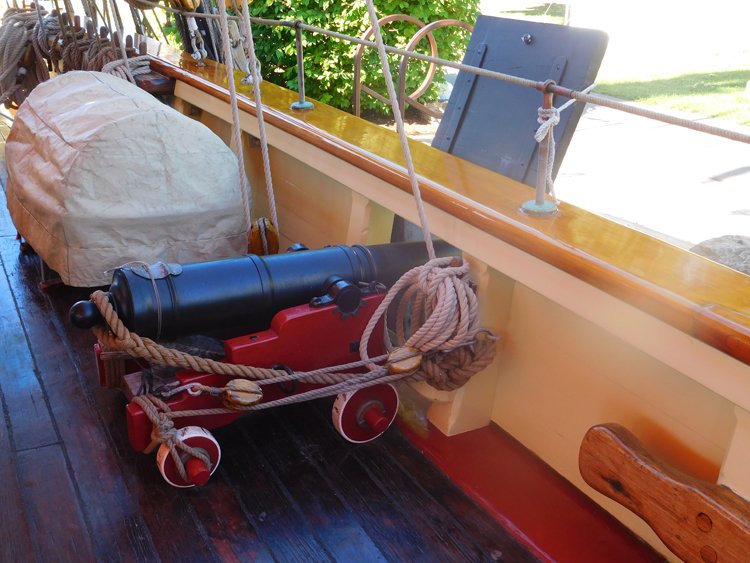
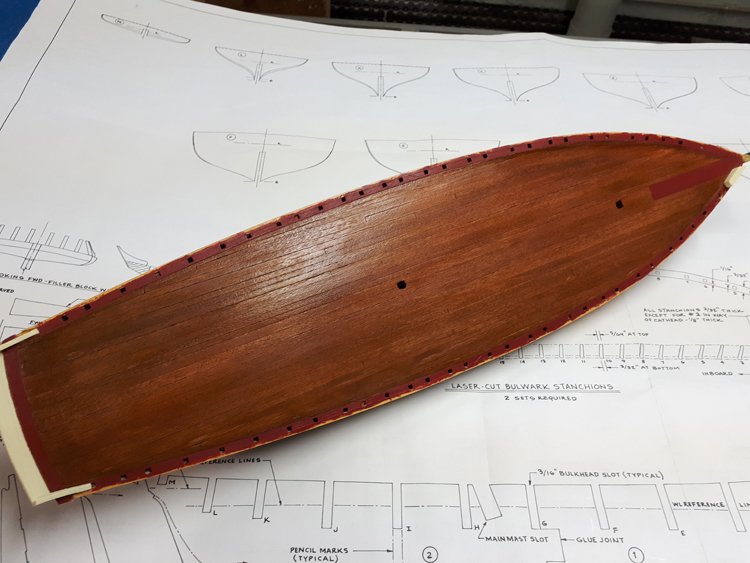
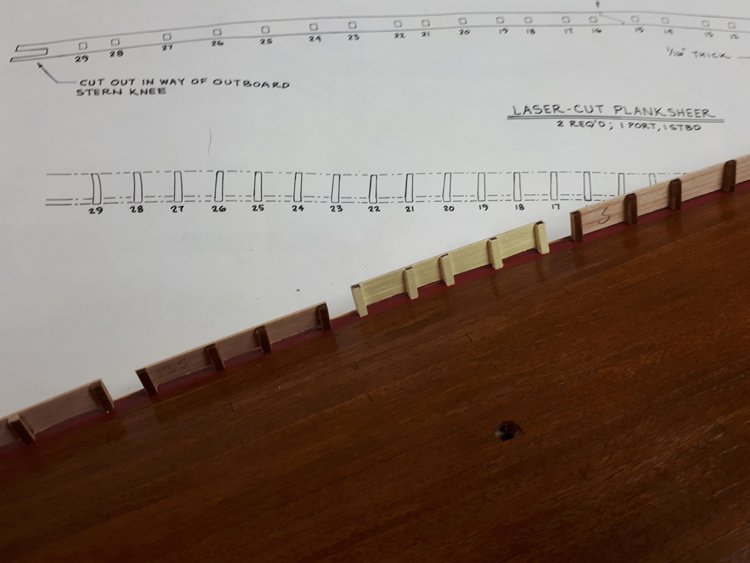
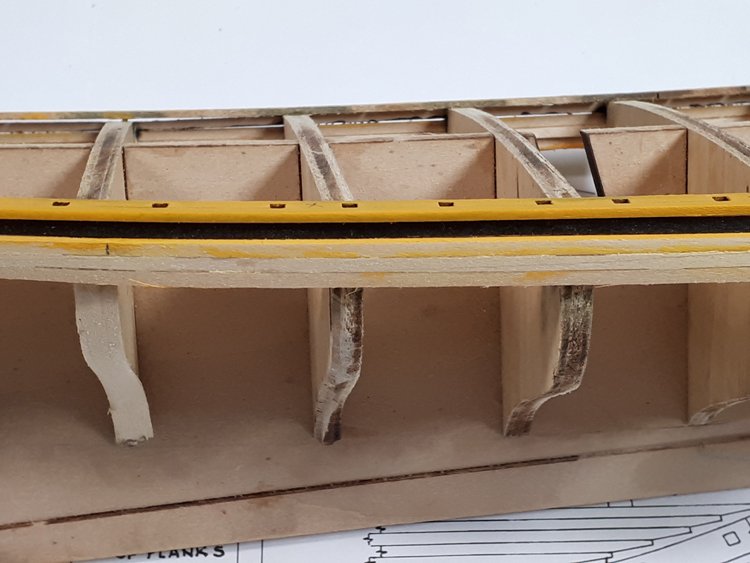
Good Morning, A little more progress on my POB. I took this picture at the Tall Ships Challenge this summer and have been working to try to replicate the colours on the deck. The deck on this ship is quite dark (and actually a bit rough looking.) I wanted to get a dark colour for my deck, but hopefully not quite as rough. I used a .5 mm veneer strip (I believe it's cherry) and then painted it with watered down acrylic paint, a mixture of brown and orange. It was so thin that it worked more like a stain than a paint. I then finished it with amber shellac. The result is pretty much the effect I was after. After a bit of experimentation, I found red and yellow colours that match the actual ship pretty well. (That's yellow masking tape on the outboard edge of the plankshear, not a really poor paint line.) Installing the stanchions looked like a daunting task to me. The instructions show installing them all first and then planking them afterward. I knew I would have trouble getting them all at the right angle. I have Bob Hunt's practicum for this kit, and while I haven't been following it, I did use the method that Bob suggested for this job. He suggested building each section of bulwarks between the gunports off the model, (spacing the stanchions correctly of course,) and then installing each as a sub assembly. This method is proving to work very well. In the photo below, the sections are just sitting in place for the picture, not glued in yet. I'm also painting each section before installing it. I can't imagine painting those stanchions successfully after they're installed. That's all for now. It looks like a really windy and rainy day shaping up, so a good one to spend in my workship. David
- 23 replies
-
- 10
-
-
- pride of baltimore ii
- model shipways
- (and 1 more)
-
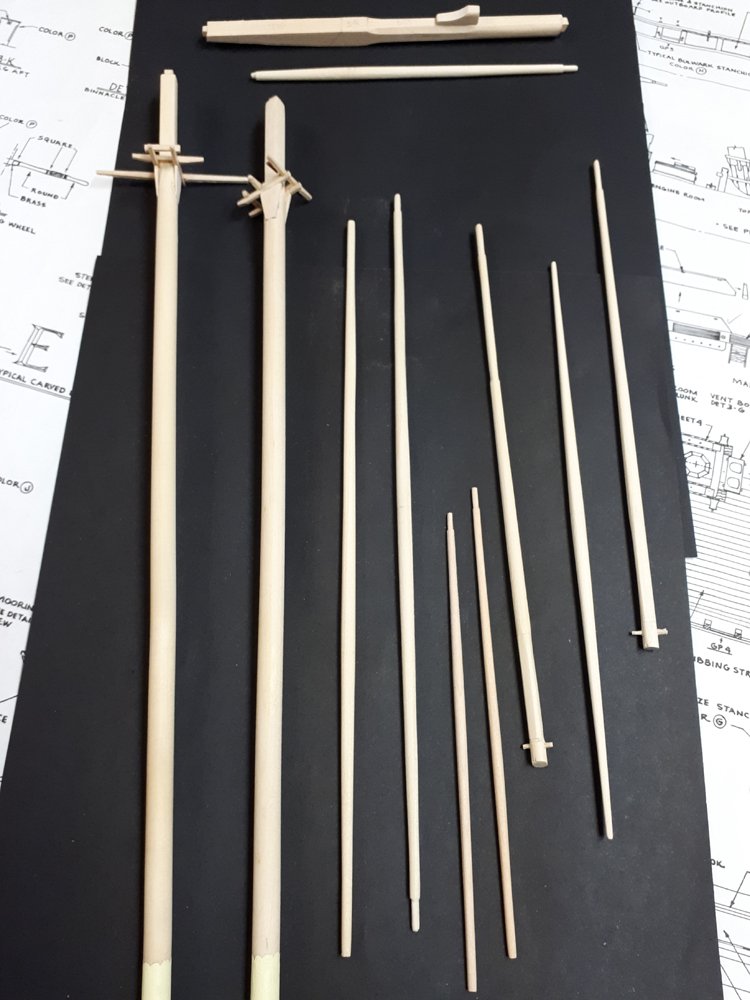
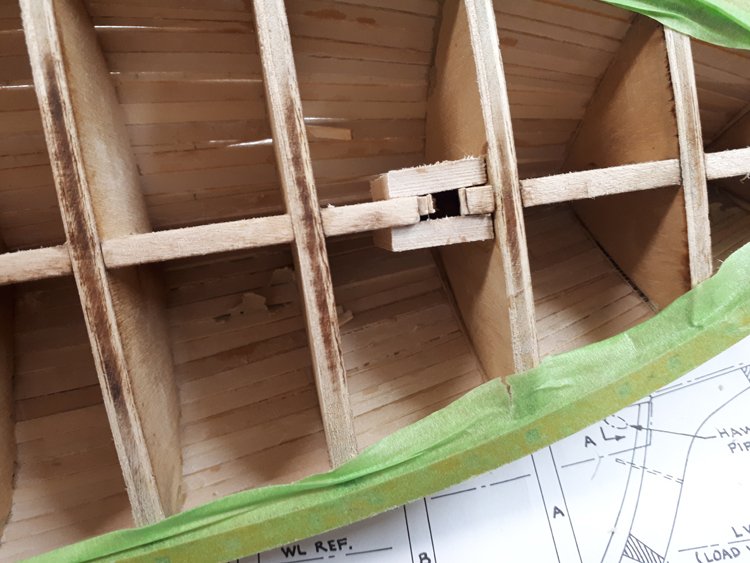
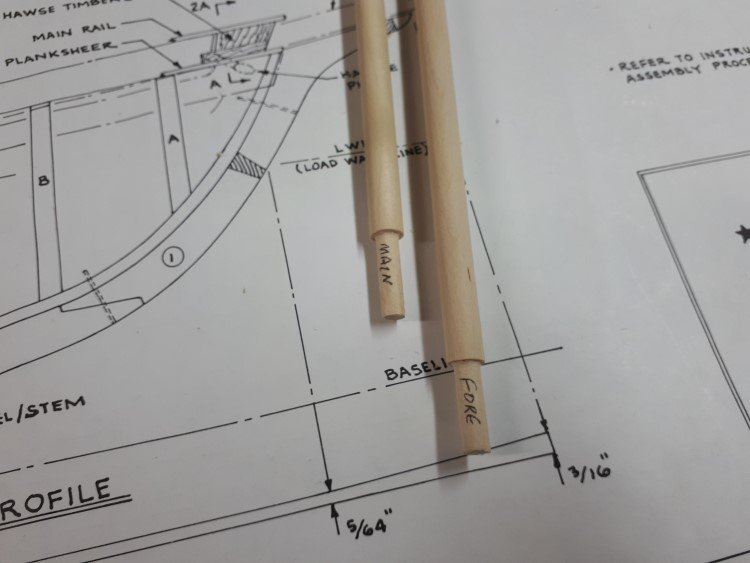
Good Morning, Brief update - One problem I often encounter is this: early on in the build, before planking the hull, I glue pieces of scrap the mast mortises and then cut a rectangular tenon on the ends of the masts and fit them snugly in the mortises. So far so good. However, much later, when I square up the top ends of the masts, I often have trouble getting the square exactly in the right plane. If I leave it like that, the mast top isn't properly aligned and it can't be left that way. In order to fix it, I end up trimming the lower tenon, so I can rotate the mast, but it results in a very loose and poor fit and I wonder why the heck I spent so much time getting the tenon to fit well in the first place. This time, I'm trying something different. I padded the mast mortises with scraps of wood, so that they are actually square rather than rectangular. Then I carved round tenons on the masts. They fit very snugly and at the right angles. Now my hope is that later I can simply rotate the masts to line up properly without losing the nice snug fit. Planking - I have to admit it - I am probably the world's worst hull planker. It's never my favourite part of the build and I never approach it with a good attitude. The POB is a single planked hull and I was not happy with the job I was doing. On top of that, the plans indicate planks 1/8" wide but the provided strips are 3/16" wide which doesn't look quite right to me. I was fretting about it all, but I think I have a solution. I had bought some cherry from Cornwall Model Boats that is .5mm x 3mm to upgrade the decking and I bought a ton of it. (Might as well get my money's worth out of the shipping fee, right?) 3mm is approximately 1/8" so I am going to double plank the hull with this material. It's so thin that it's really just a veneer, but I think it's going to address my problem. Once I made this decision, I was able to finish the first layer without more fretting, as I knew I would just sand the heck out of it and use a lot of wood filler. I've now got a good smooth solid base, (although ugly as sin,) and I'm ready for the veneer layer. Thanks again for your comments and likes. David
- 23 replies
-
- 7
-
-
- pride of baltimore ii
- model shipways
- (and 1 more)
-
Hi Jack, Your perseverance is better than mine. I've pretty much abandoned my build of this kit. I've identified so many problems with its design that it's defeating me. I'm not the best hull planker in the world to start with, and I'm finding this clinker style very difficult. It's almost impossible to tell how much taper to give each plank at the bow and stern and it's not clear from the instructions how high up the planking is supposed to go. Also the planking seems far too heavy for the light framework of the model and I found it almost impossible to bend. Then there is supposed to be a thin walnut plank on top of the planking, but it appears as though the bulkheads have run out by that time and it's just edge glued to the plank below which seems almost impossible to me. I hate to give up on this kit as it's a handsome little model, but I'm not sure I have the patience for it. Your clinker planking is much better than my attempts were, so it seems you're off to a decent start. I'll be watching with interest to see how you overcome the other various problems. With hope maybe I can gain some encouragement from your results. All the best. David
- 52 replies
-
- 6
-
-
- artesania latina
- titanic
- (and 1 more)
-
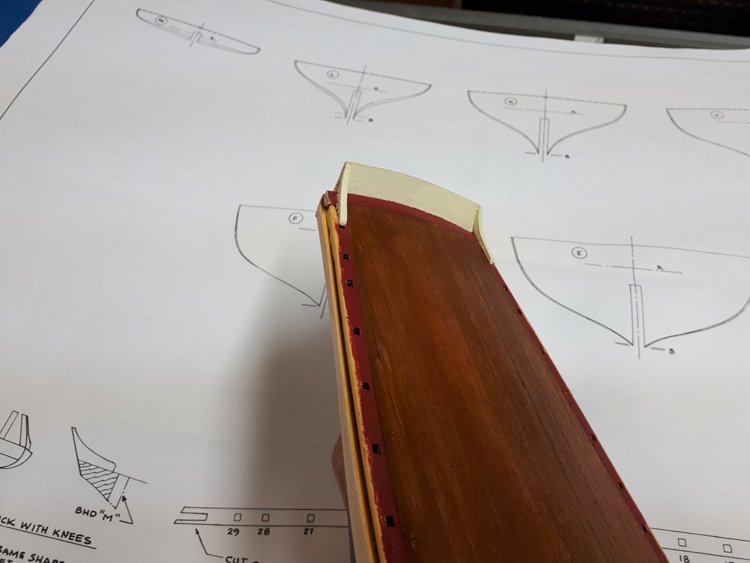
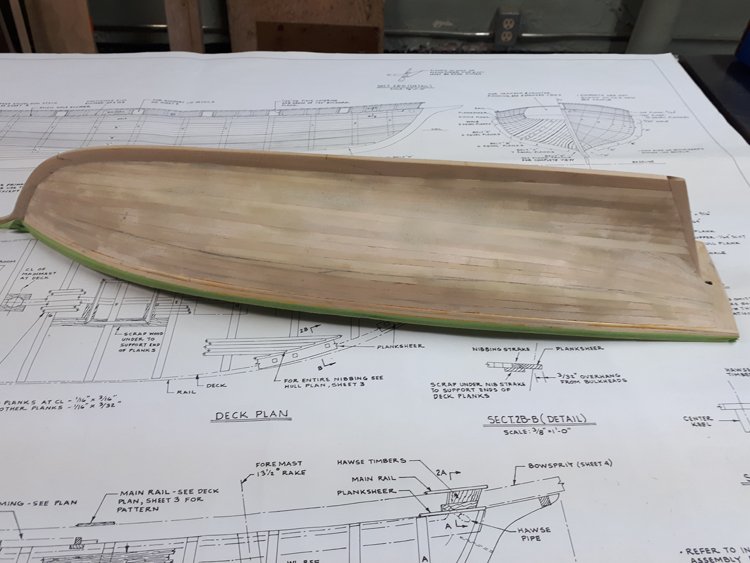
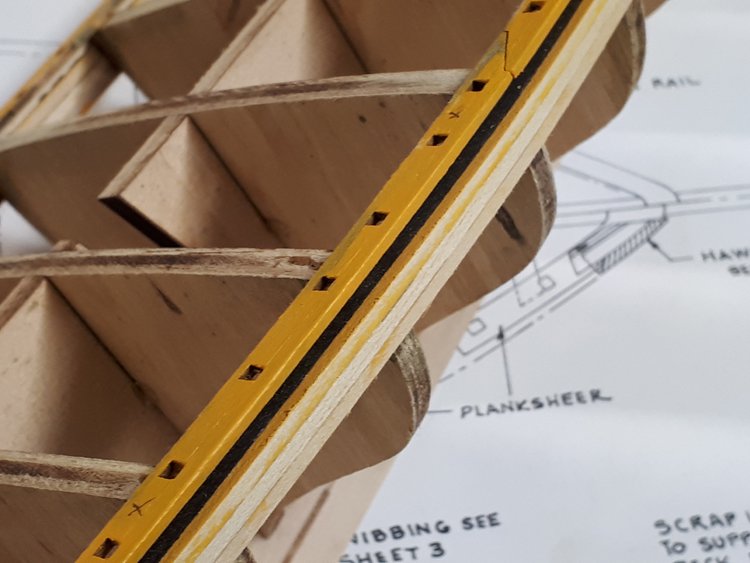
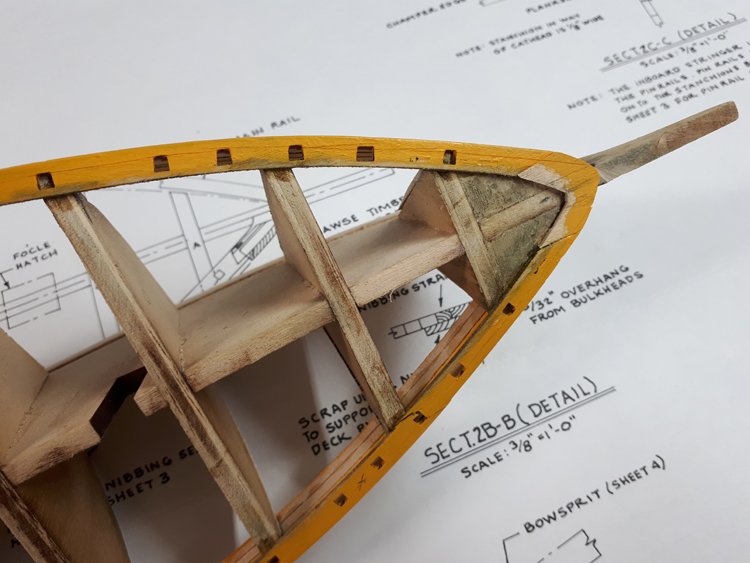
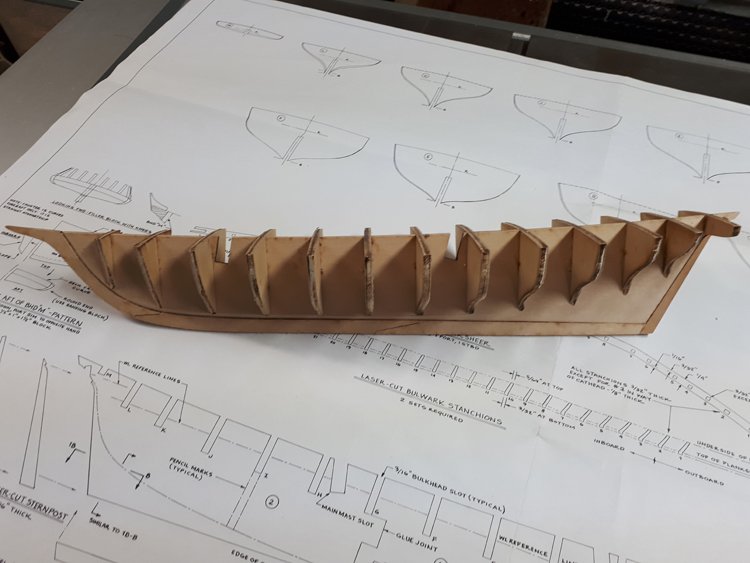
Good Morning, I have been progressing slowly on my POB; too many leaves to rake and too much painting at my daughter's house to do! I've attached the plankshear and wales. This plankshear is a tricky piece to position correctly. As is so often the case, the location of the gunports is key. I think I have it more or less in the right spot. I hate to add paint this early on in the process, but I couldn't think of another way to get a good crisp delineation between the yellow and the black where the plankshear and the wales meet the hull. I have now completely covered this area with masking tape to protect it while I proceed to other areas. The plankshear is yellow outboard and dark red inboard. I've scored it with a razor blade to help with the delineation when I add the red paint and the inboard side. The plankshear doesn't actually fit the hull very well. No matter what I did it came up about a half inch too short. This has to be a design flaw, because even allowing for minor differences in the way the hull is shaped or faired from one builder to another, a half inch is a lot. By getting the holes for the stanchions where it appears they ought to be according to the plan, the shortfall was at the bow. I ended up cutting off the mating ends of the plankshear and making a new piece to fill in the space at the bow. It looks a little rough at this stage, but there is much to add at this location which will virtually bury it. Parts of the framework appear discoloured because I wasn't happy with its location on my first attempt and decided to remove it and relocate it. Dissolving the glue spread the black paint around a little bit. So, that's all for the time being. I'm now about to start planking the counter and lower transom. David
- 23 replies
-
- 6
-
-
- pride of baltimore ii
- model shipways
- (and 1 more)
-
I haven't thrown it across the room, although many years ago I did throw a garden bench I was building across the room. The top and bottom rails for the back had dados in them and there was a series of slats that had to line up perfectly in order to get the top rail on. It did not go well. However I managed to salvage it and we used it for many years. I've decided to plank the hull conventionally and see how that looks. David
-
Jim, Maybe I'll just plank it normally and leave it at that. Thanks for the suggestion. It isn't too late; I haven't thrown it across the room yet. David
-
Well, I'm just about ready to throw this thing across the room. I have made four attempts to plank it, never getting more than three planks on and then dissolving the glue and starting over. I was hoping it would be a little in-between project bringing me nothing but joy😀, but it is the most aggravating difficult thing I've tried to do out of all the models I've built. There are many problems to solve: the bow and stern are identical, so if I try to use one plank for the whole length, it has to be cut and fitted perfectly at each end, rather than fitting it only at the bow and just cutting it off at the stern - the planks overlap, so it's very difficult to figure out how much to taper each one at the ends - I don't know what the planking wood is, but it's very hard, very thick and is too heavy and inflexible to work with against the weak and flimsy framework. If this hull was about 24" long with sold bulkheads it might be ok but as it is it's like framing a wall with 2x2's and trying to nail 2x4's on as the siding - and last, but far from least I simply cannot get this clinker planking to blend from the overlap into a flush fit at the bow and stern without looking like hell. As you have probably inferred by now, I am not having fun with this one, so it's going to have an indefinite time-out and I'm going to focus on my Pride of Baltimore. At least I didn't spend much money on it. David

-
You're coming along pretty well. I had quite a bit of trouble with the plankshear on my CWM too, not so much it breaking, but rather I couldn't seem to maintain a consistent projection from the hull for the length of the ship. If you're unhappy with the look of your plankshear, I would echo Landlubber Mike's suggestion to sand it smooth with the hull and then apply a new piece over top. That's what I did as well. It gave a very crisp look and it's a very easy fix. David
- 294 replies
-
- 1
-
-
- charles w morgan
- model shipways
- (and 1 more)
-
I thought it would be fun to build a simple model for a change (and avoid all that rigging.) This boat is very attractive and I think it will make a handsome little model. I located it at Cornwall Model boats and it was quite inexpensive. It would seem on the surface that such a kit should be considerably easier to build than a large intricate one, but already I'm not so sure. I know I would be up the creek already if this was my first "starter" kit. The instructions are weak and the illustrations are pretty poor too. There are a couple of ridiculous "stiffeners" as they call them to be installed at the bow and stern, but I soon discovered they are all but useless, so I cut them out and added filler blocks. I'm a little concerned about the planking. It's clinker, which I've never done before and the material provided is 1.5 mm thick which seems like it will be very heavy to bend over the short length of the model. I'm considering substituting 1mm planks, but I'm not sure if the scale would be noticeably off. I will do some experimentation. My fears may be premature, but I suspect I'm in for a bit more of a challenge that I anticipated when I bought this one. David
-
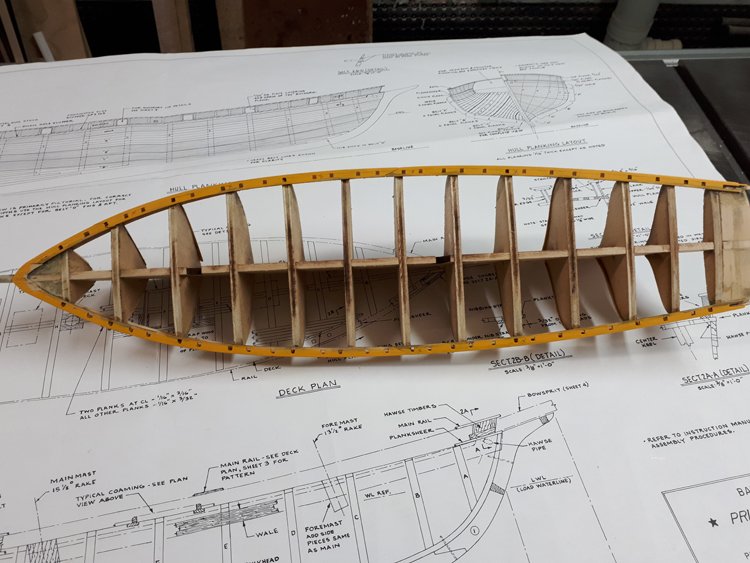
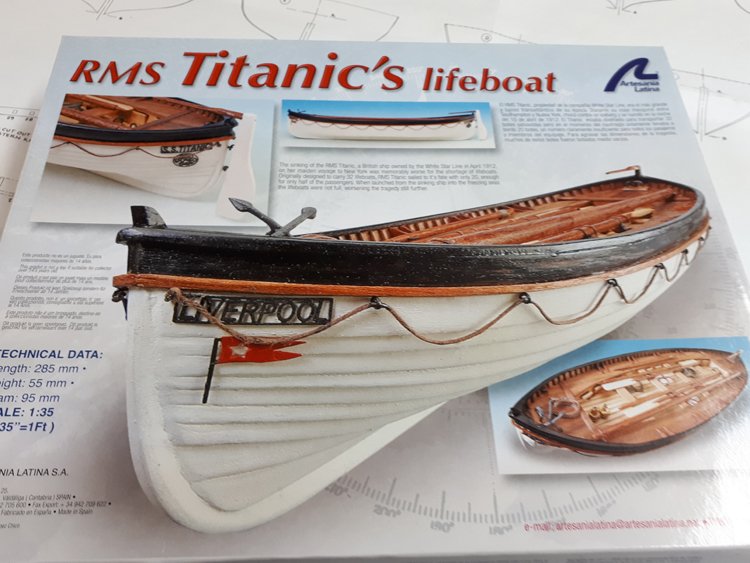
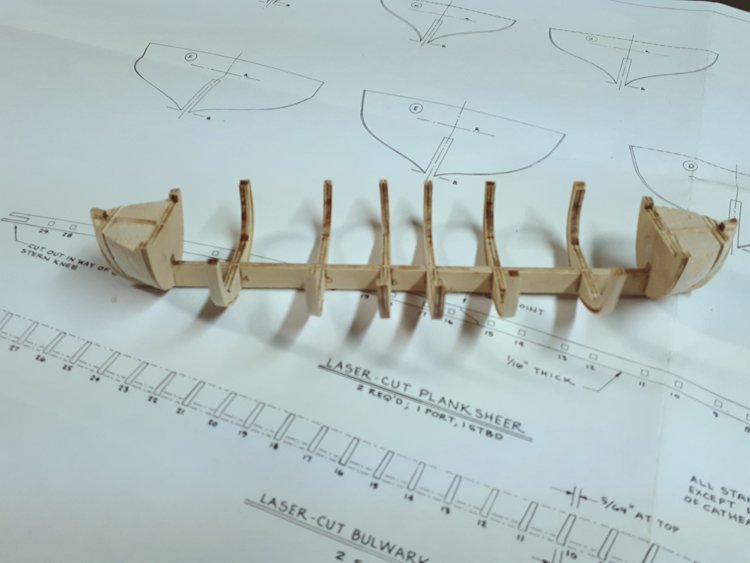
As there is no rest for the wicked, I am now launched into my next project - the Pobpob! - (plank on bulkhead Pride of Baltimore.) Actually two projects, as I'm doing something I've never done before and am building two kits at the same time, the other being the Artesania Latina Titanic lifeboat. On the POB, I have the bearding line cut and the bulkheads in place. These are the best fitting bulkheads I've run across yet; they lined up perfectly with the top of the keel and the bearding line/rabbet at the bottom. Not sure how they will all line up when I start fairing, but at a glance they look like they will be pretty good. This doesn't look like it will be too hard a planking job either. David
- 23 replies
-
- 7
-
-
- pride of baltimore ii
- model shipways
- (and 1 more)
-
Thank you for all the kind comments, everyone! D
-
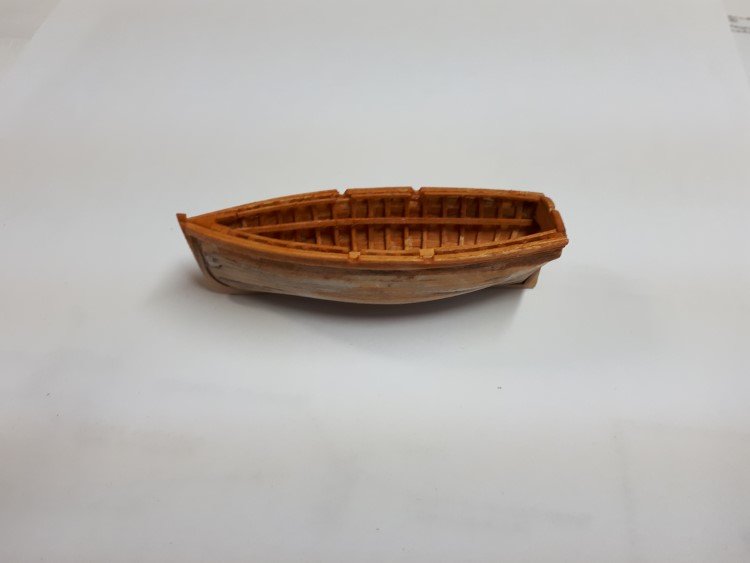
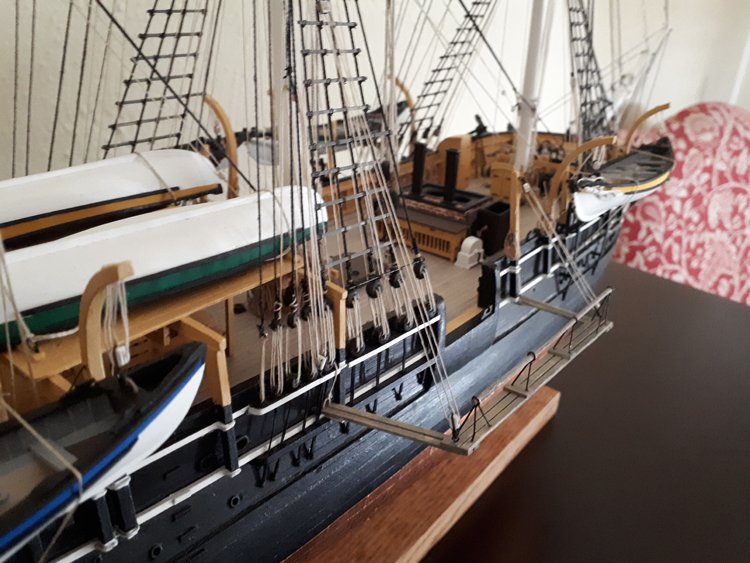
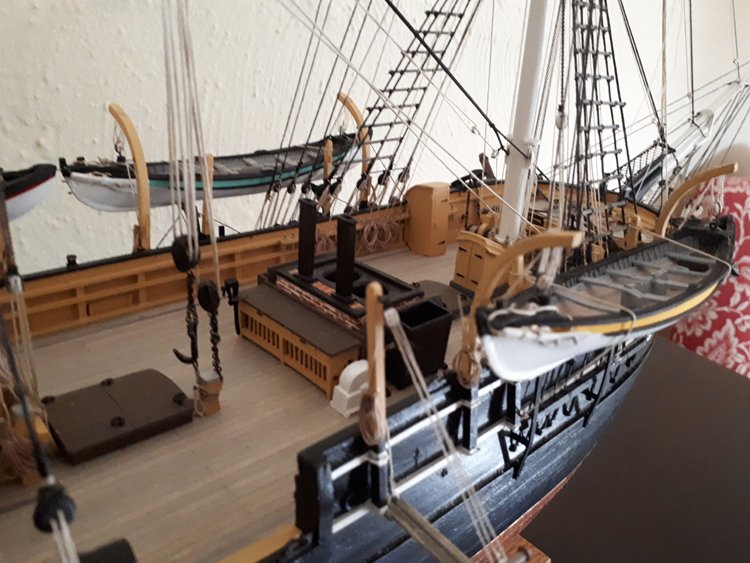
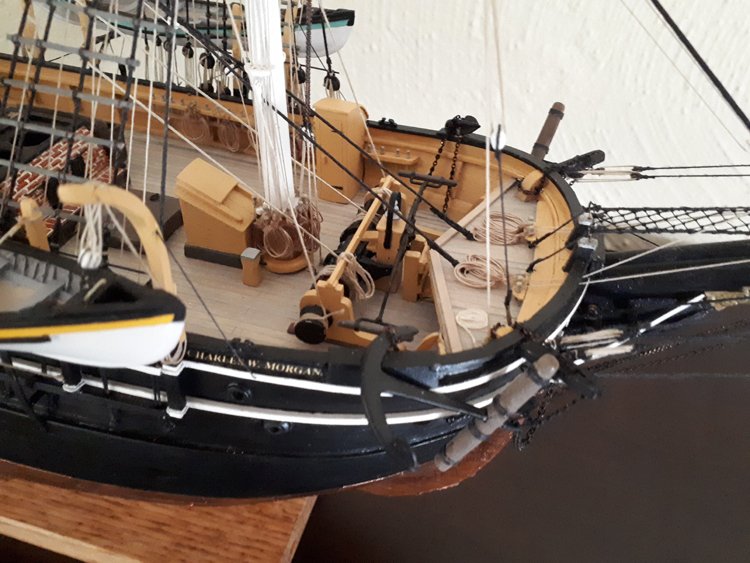
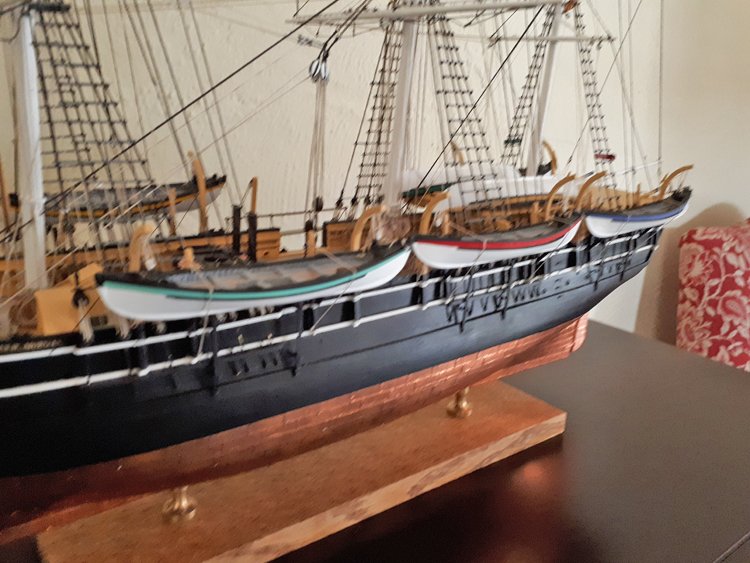
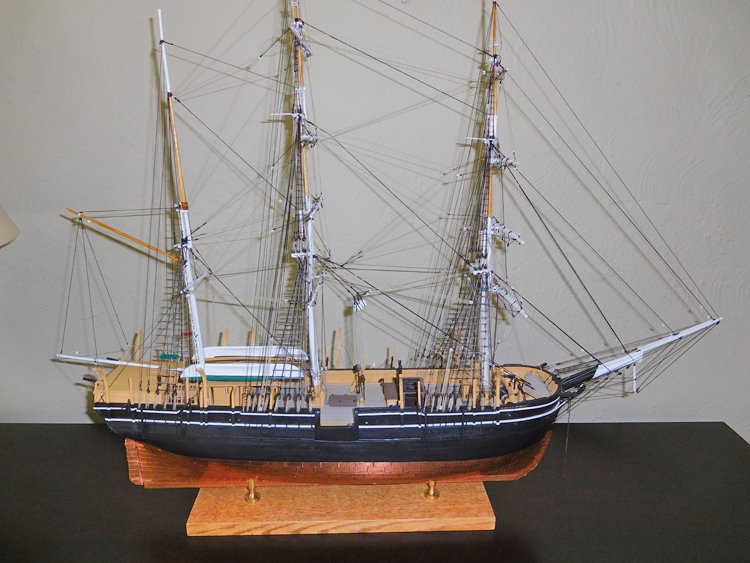
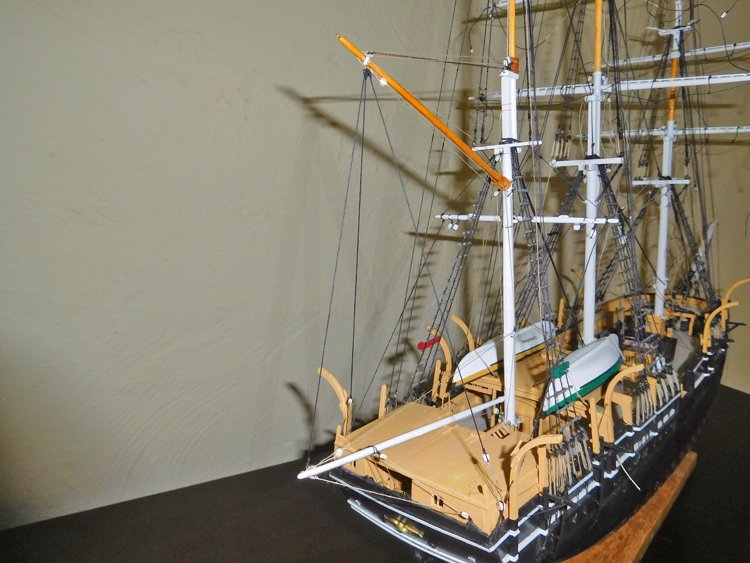
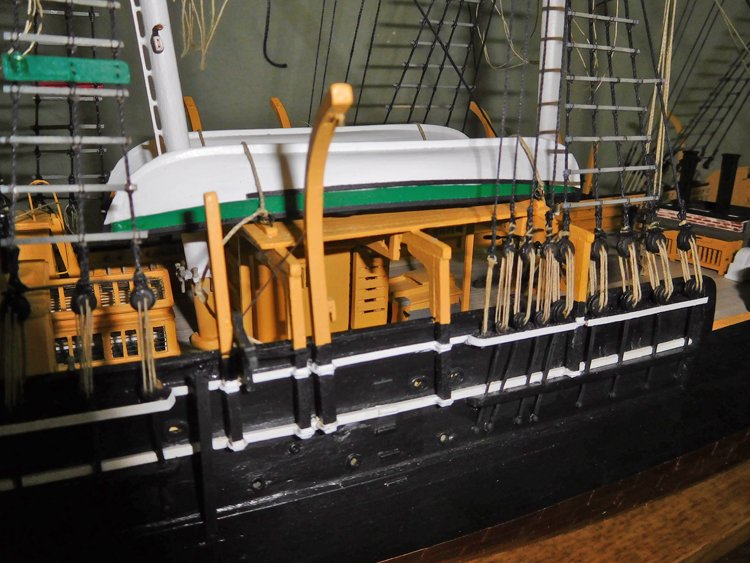
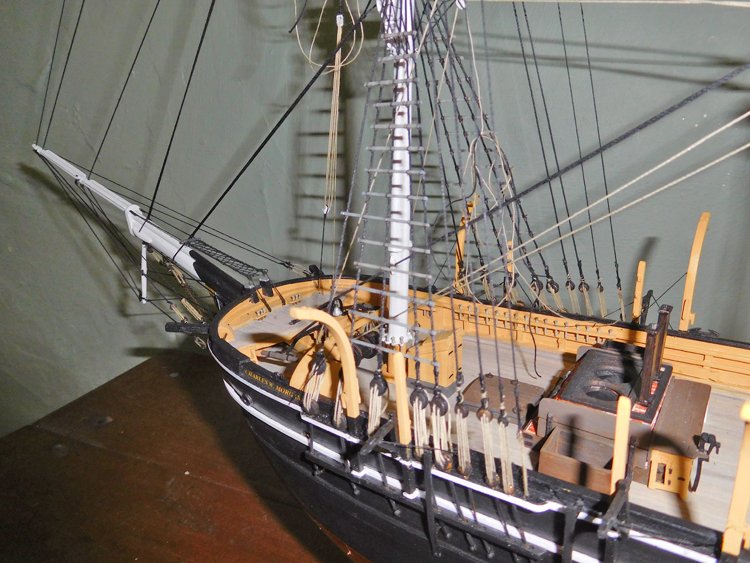
Good Morning All, Well, I have officially finished my Charles W. Morgan. (I would like to say that it's "done and dusted", but I know from experience that the dusting part has only just started.) Since my last post, the remaining undone bits were the rope coils for the belaying pins, the anchors, the cutting stage and the boats. I didn't post any updates as I was working through these, as they were very simple and straightforward. They didn't pose any problems, and there were no great insights that would benefit anyone from my sharing. Here are a couple of pictures showing the finished model - I think I've mentioned it before but it bears repeating how much I enjoyed this model. I think this has to be one of Model Shipways best kits. The plans are excellent with every detail very clearly covered, and the kit is well designed. While it's challenging, at no point do you find yourself fighting with the kit to get a decent result, which is not always the case. If you're looking for a break from naval vessels, this is a great option. I'm looking for a smaller project next time around and have purchased the Pride of Baltimore II which I'll be starting soon. Those clippers were very beautiful ships and I won't have to build an additional to the house to accommodate the model. Many thanks for your comments and "likes." David
- 145 replies
-
- 24
-
-
- model shipways
- charles w. morgan
- (and 1 more)
-
Thanks guys, much appreciated! Now on to making rope coils. David
- 145 replies
-
- 1
-
-
- model shipways
- charles w. morgan
- (and 1 more)
-
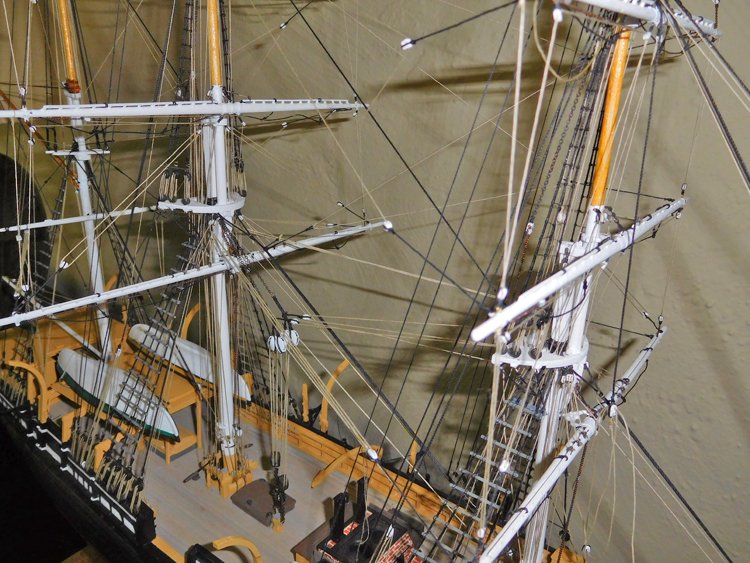
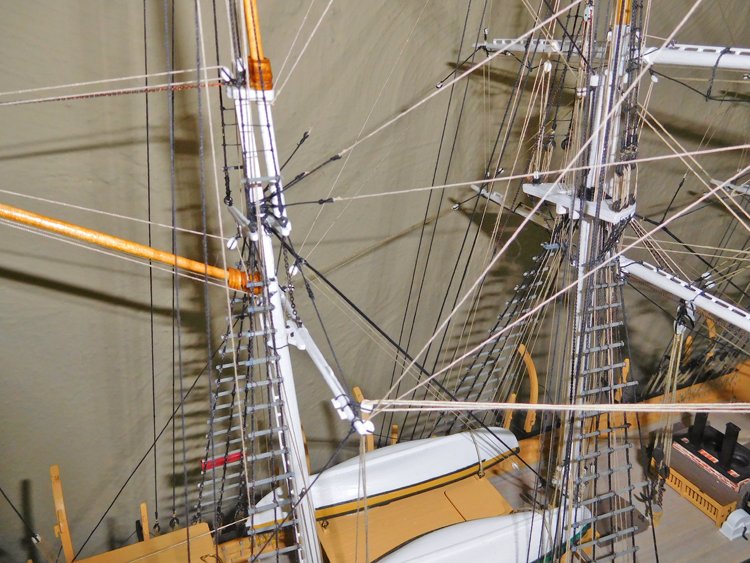
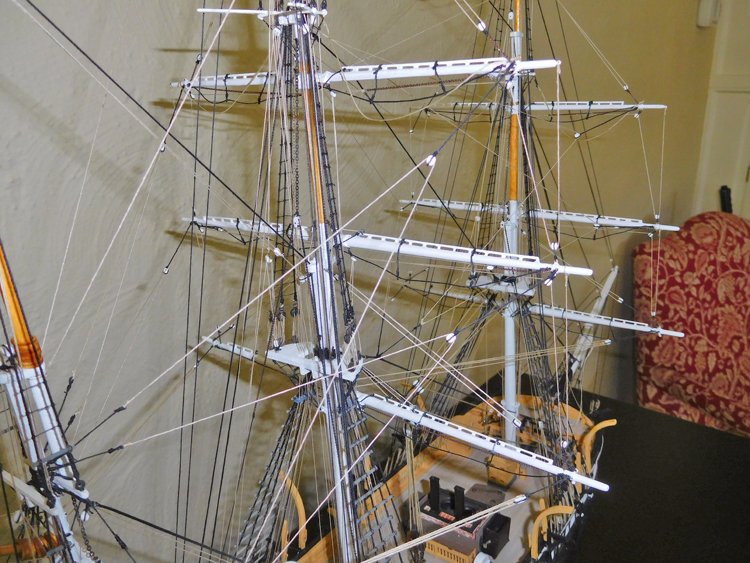
Hi All, I haven't posted lately, but that doesn't mean I haven't been working on my model. I have pretty much finished the running rigging and I just couldn't seem to get the model to a presentable state for photos and updates as I went along. For some reason I found this model very difficult to rig and I don't believe there isn't any aspect of the running rigging that I didn't do over at least once. About half of the belaying pins are completely inaccessible and I seemed compelled to run lines on the wrong sides of things, only to notice it much later! I had a tendency when snipping off the line at the belaying pin to snip on the wrong side of the pin! I was continually messing up the tension with each addition line! etc etc. and there's a fair bit of chain used for the rigging which is very frustrating to work with as it usually needs to be cut to an exact length without much wiggle room. Anyway, I got it done. I bought some internally stropped blocks from BlueJacket and used them where indicated. I think you can make them out below on the topsail halliards, which are chain. I also managed to snap off several davits. So, I'm closing in on the finish line. The remaining items to complete are the whaleboats, the anchors and the stage that attaches to the starboard side. I'm really pleased with my upgraded blocks on this model. The larger ones (3/16" anc 5/16") as well as the internally stropped blocks are from BlueJacket and the smaller ones (1/8" and 3/32") are from Syren. I don't know if any of you have ever the noticed the paradox in model building, but this last rigging job has really pointed it out to me. On the whole, this hobby is relaxing, challenging, rewarding, fun, contemplative, meditative, satisfying and any number of other positive things. However, at the same time and paradoxically it seems to comprise nothing but a series of jobs that individually are aggravating, tedious, repetitive, frustrating, and tending to make one bang one's head against the wall! How is this possible? I think we need a new word for this phenomenon. There's a word "synergy" which applies when the whole is greater than the sum of the parts. What would be the word when the whole is the opposite of the sum of the parts? Perhaps "frustifaction" or maybe "satistration" I don't know. David
- 145 replies
-
- 14
-
-
- model shipways
- charles w. morgan
- (and 1 more)
-
It appears you're off to a great start. I think you'll love building this model. It's a great kit. David
-
safety neting construction
David Lester replied to Thomas Staley's topic in Masting, rigging and sails
Hi Tom, I had to make some safety netting for my Morgan. I tried finding tulle in a fabric store, but the only stuff I could find was much too fine, so I resorted to making it. I essentially did what Bob suggest above - It was a little like tying ratlines, only the resulting squares needed to be diamond shape, so I made two rows of nails and strung lines between them so that they were a little bit like shrouds, only they ran parallel. I then ran two lines on an angle across them, which represented the outer edges of the shape I ultimately needed. Then I added "ratlines" securing them to the vertical "shrouds" and ending them at diagonal lines which defined the shape of the finished piece. I glued the knots and then cut out the piece. Admittedly, this is a much simpler shape than the safety netting on POB II, but perhaps the same technique might be made to work. The size of the "diamonds" can be adjusted to whatever is called for. These ones are fairly large, but they're exactly what the plans indicated. My next project is the POB II and I'm hoping I can make it work. I'm certainly going to try it at least. Just a thought. David.JPG.ee038586bdf6e70a00559e62c6104ee0.JPG)
.JPG.e108c16b4ef2bc0d21eaeecc80021630.JPG)
.JPG.bbf47562c13271d69803f755902d485f.JPG)
.JPG.871dd13074e3994e494d166eb5ef97e5.JPG)
-
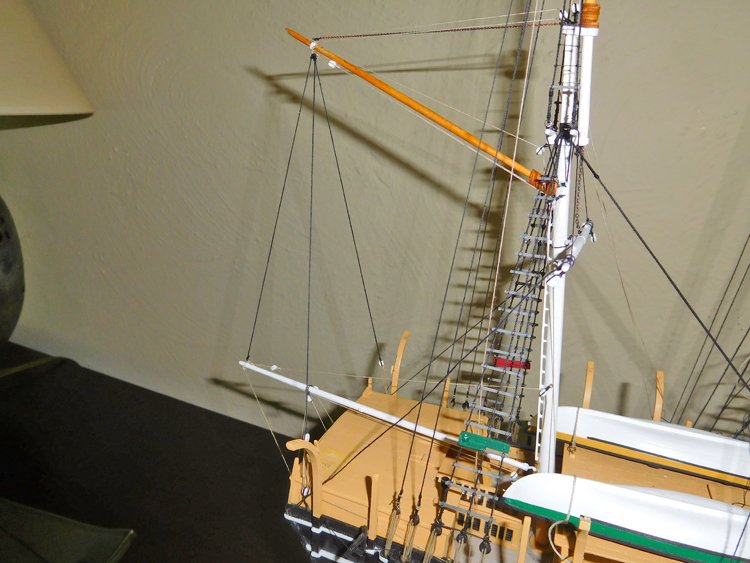
Not a lot of progress to report; I've been spending lots of time working outside on the house and yard. However I have accomplished a little bit on the CWM. I'm working from aft to fore and have now finished the mizzen mast rigging. A problem I didn't foresee is that most of the lines are seized to eyebolts, rather than seized directly around the spars, which is not a problem when there's only one line. However, some of these eyebolts have more than one line seized to them and at the aft end of the gaff there are four separate lines seized to one eyebolt. I used too small an eyebolt initially and wasn't able to cram all four seizings onto it and still have it look half decent, so I had to redo that bit using a bigger eyebolt. I always find it hard to belay lines to the pins and the ones surrounding the mizzen mast on this model are particularly hard to access, so here's a strange question. Has anyone ever considered doing much of the rigging backwards? By that I mean attaching and securing long lines to the belaying pins very early on, before almost any deck details have been added. Then run the lines in the opposite direction and seize them later to the masts and yards. I've never seen or read anything that suggests that as an alternative, and it probably isn't a viable alternative, but could it really be more difficult than belaying in a tidy manner to the almost inaccessible pins? It's just a thought that occurred to me this morning as I came close to "losing it"! Thanks again for checking in. David
- 145 replies
-
- 8
-
-
- model shipways
- charles w. morgan
- (and 1 more)
-
Have a extra $100.00 to spend......
David Lester replied to CPDDET's topic in Modeling tools and Workshop Equipment
Hi Dave, The tool that I went without for a long time and now can't imagine how I managed without it is a digital caliper. I use it all the time - when strips of wood need to be resorted by size, what size hole do I need to drill for this eyebolt, when I need to convert mm to inches, measuring wire thickness, when I stupidly have more than one container of drill bits open at the same time and mix them up, etc. etc. I seem to reach for it continually. It won't use up all of your $100 either. David -
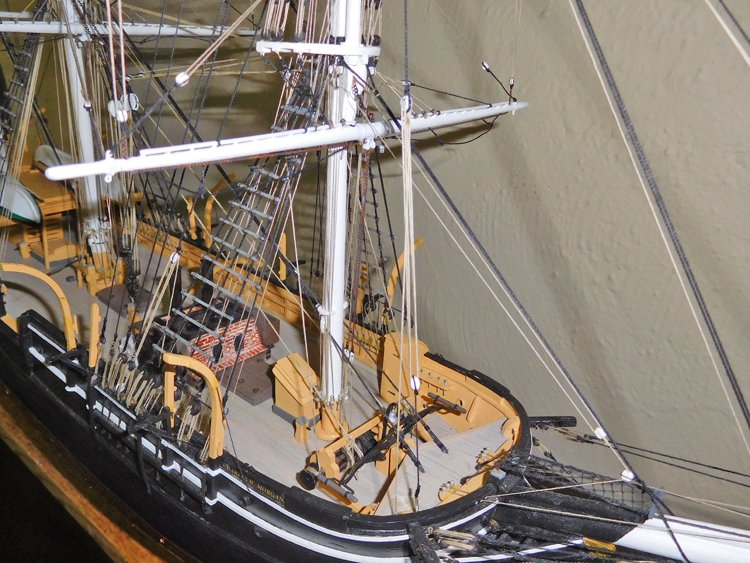
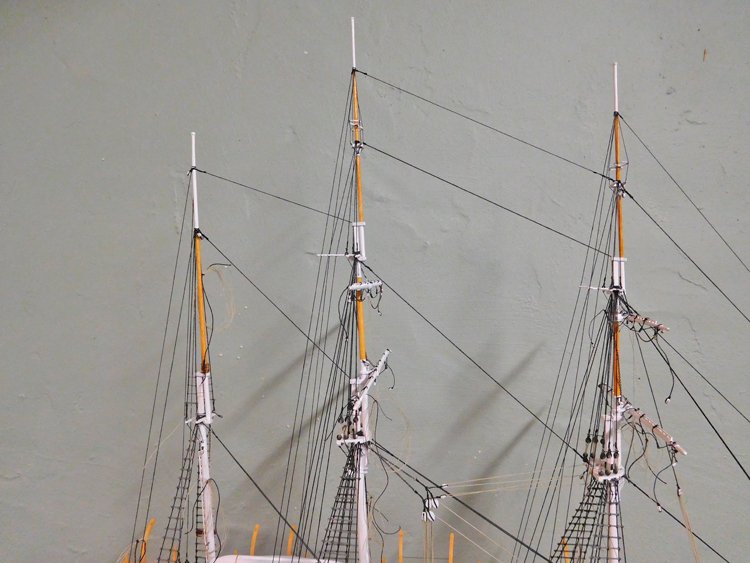
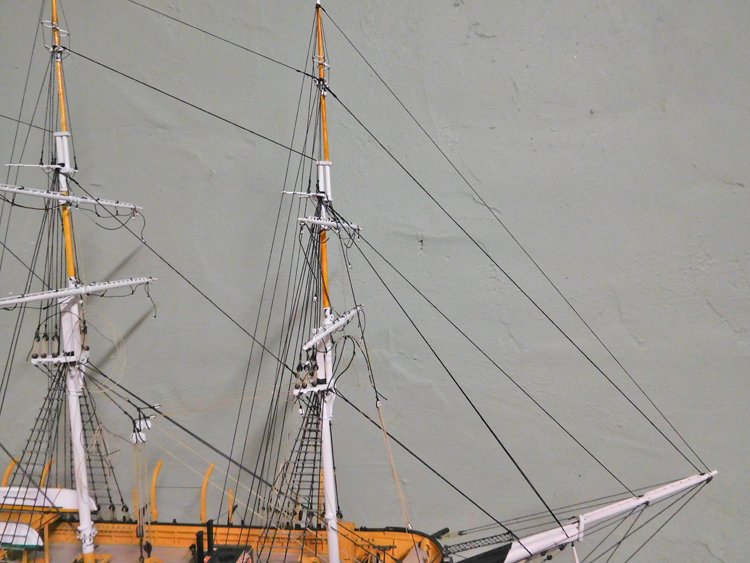
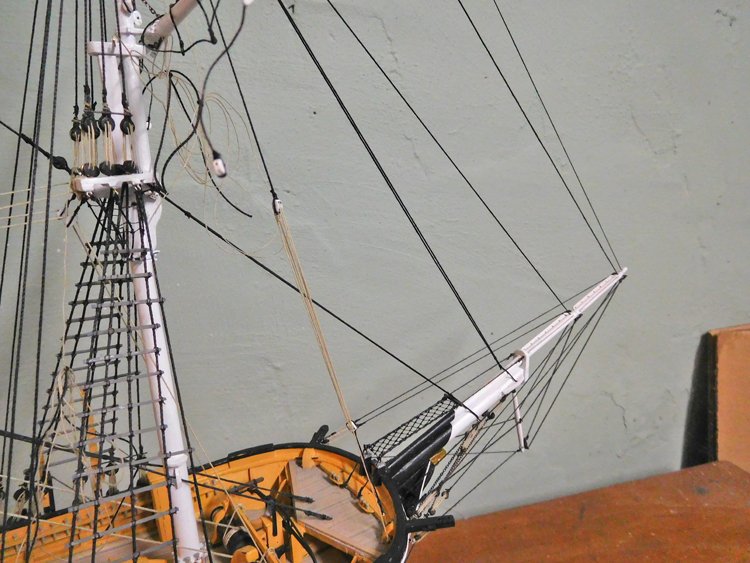
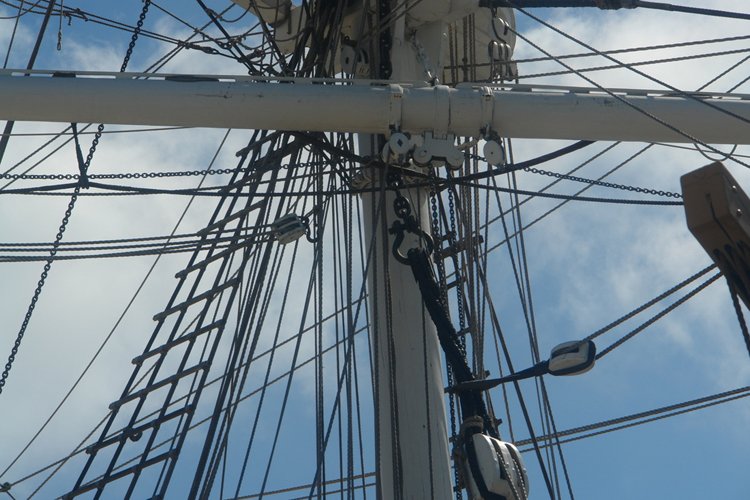
Hello All, A little more progress to report - I've finished the standing rigging! It's always a nightmare process for me as I can never seem to get the tension right among the three masts. As soon as I tension one line and it brings the mast into a more or less straight position, another line goes slack. And, I'm always too quick to get the seizings glued and trimmed, which of course makes later adjustments all but impossible. I never seem to learn from one model to the next; it's always like I'm doing it for the first time and like deja vu all over again I went down that rabbit hole this time too! But then I got control of myself and started over. I'm not sure what others like to do, but I've pretty much decided that the best way for me to do it is to get the lowest stay for each mast in place first before the lower shrouds go on, then move directly to the highest stay starting with the mizzen and moving forward. So my order was: 1. mizzen topgallant stay, then mizzen topgallant backstay, 2. main royal stay, then main royal backstay and 3. fore royal stay then fore royal backstay. And I even left the seizings all unglued and untrimmed until all were in place so I could adjust each as needed until the masts were all reasonably straight. Then it was just a matter of filling in the others. At this point it was easy to apply just enough tension to each line without it having an adverse effect on the others. Sorry if that all seems too elementary to even mention, but I'm feeling very happy about finding a system that works for me and with any luck I won't have to relearn it on my next model. I enjoyed Groundhog Day, but that doesn't mean I like living it! I've also attached the fish tackle. This is a piece of rigging that I'm not familiar with. I assumed it was related to whaling, but according to the MS instructions it was used to help hoist the anchor. Is that correct? Is it a feature of ships of this era (second half of the 19th century?) All the other models I've built are of much earlier ships. back stays secured also added the running lights mizzen topmast stay Up next is the upper ratlines. Many thanks for comments, likes etc. David
- 145 replies
-
- 11
-
-
- model shipways
- charles w. morgan
- (and 1 more)
-
Hi Rich, Thanks for drawing my attention to EdT's build log. That's one of the most impressive builds I've seen, not to mention one of the best build logs. David
- 145 replies
-
- 1
-
-
- model shipways
- charles w. morgan
- (and 1 more)
-
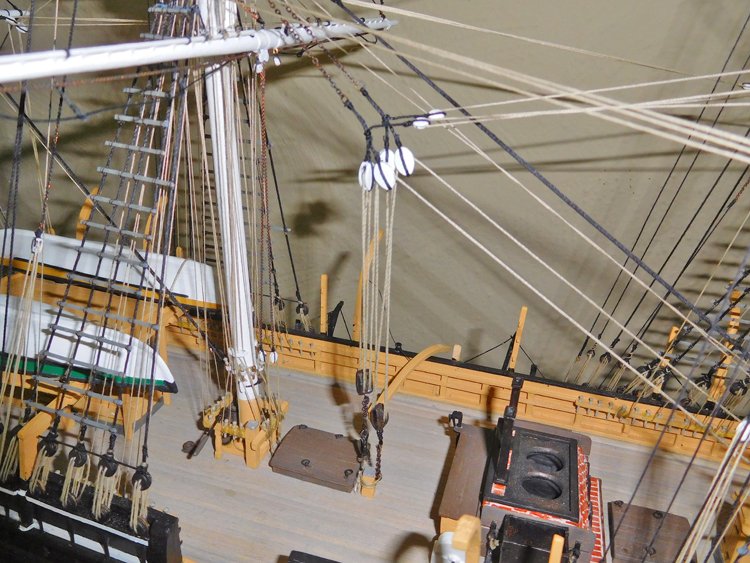
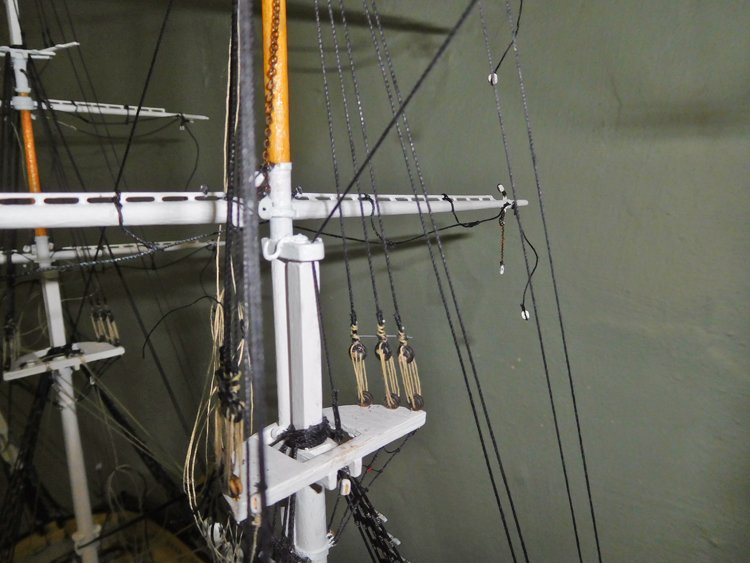
Hello All, It seems I have been working and working with very little to show for it! It's time to mount the top masts and then add their shrouds and stays, but a quirk of the Morgan is the lower and upper topsail yards on the fore and main masts are attached with metal brackets. That necessitates their being mounted to the masts before the masts can be mounted on the ship, which means a whole lot of rigging to add to the yards before anything can happen. There's a fair bit of chain rigging on this ship and it's had to deal with because you can't just snug it up by sliding the seizing; you pretty much have to get the length right from the beginning. You can see the metal brackets for the two yards in this photo: While there are many benefits to adding as much rigging to the yards before mounting them, it creates a great deal of chaos, especially with the long lines. I have a bad habit of inadvertently getting glue on them somewhere along their length which I never notice until much later when it won't pass through a block and I have to get up, leave the room and walk around the block before I settle down again. But, I'm getting ahead of myself; that's all lying in wait for me. 😯 One tricky bit on this model is this piece of rigging: It's a double iron block hanging below the two lower masts through which two chains pass. The piece included in the kit is almost laughable. It's a small piece of sold white metal with no holes in it. It needs to be drilled through on each side in order to accept the chains. I did not anticipate being able to use it successfully and have spent a lot of time considering how best to replicate this part from scratch. I decided to try drilling it nevertheless and couldn't believe it, but I managed to get it to work - two through holes in each of the two pieces! (Paint touch up is needed on the yard as a result of dirty fingers from handling the chain.) So now, on to the topmast shrouds and stays. Thanks again for looking in. David
.JPG.a123ece7ce36c0aae2219f973a43946a.JPG)
.JPG.c54c67b246a34eee16549850f97a6843.JPG)
.JPG.ec92880c890a7cc6ecbd1fad8086d1c6.JPG)
- 145 replies
-
- 8
-
-
- model shipways
- charles w. morgan
- (and 1 more)
-
Hi James, You're doing a great job! I too am a Bob Hunt alumnus and to be honest, I could never have grasped the process of building these models without him. I started with his Armed Virginia Sloop practicum and moved directly into the USS Consitution. After that I found I didn't need them any longer, as I was able to work on my own. Most of my models have been MS and I believe that you can basically throw the instruction book away. (Chuck Passaro's excepted.) Everything you need is on the plans, but they are absolutely dense with information and it takes a bit of experience to learn how to decipher them. You're off to a great start and it looks to me like you've have a fine Bluenose when you're done. David