Supplies of the Ship Modeler's Handbook are running out. Get your copy NOW before they are gone! Click on photo to order.
×


David Lester
-
Posts
676 -
Joined
Content Type
Profiles
Forums
Gallery
Events
Everything posted by David Lester
-
 Hi Paul, Many of the Model Shipways kits just call for putting the planks directly on the bulkheads. As I recall that never caused me too much trouble, but it can be a bit tricky keeping it smooth and level and it certainly can cause problems with your planking pattern as you don't necessarily want your planks always ending on a bulkhead. For my POB, I chose to use a solid subdeck first. It gives a really nice smooth flat surface to plank on and you can easily place the plank joints wherever your pattern calls for. However, as you mentioned, thickness is a concern on the POB. The planking is 1/16" thick and it you add a subdeck, you will probably be too high. I ordered a 1mm sheet to make the subdeck and .5mm strips to use for the planks which worked out about just right. Together they are just under 1/16". The .5mm planking from Cornwall Model Boats is quite inexpensive so I ordered a ton of it. I ordered both 3mm and 5mm widths. I bought both their cherry and tanganyka. I wasn't sure which colour I would prefer, but when it came the two were indistinguishable. It finished really nicely, but I had to be careful sanding, it's easy to go right through! I like the colour of your hull. David
 -
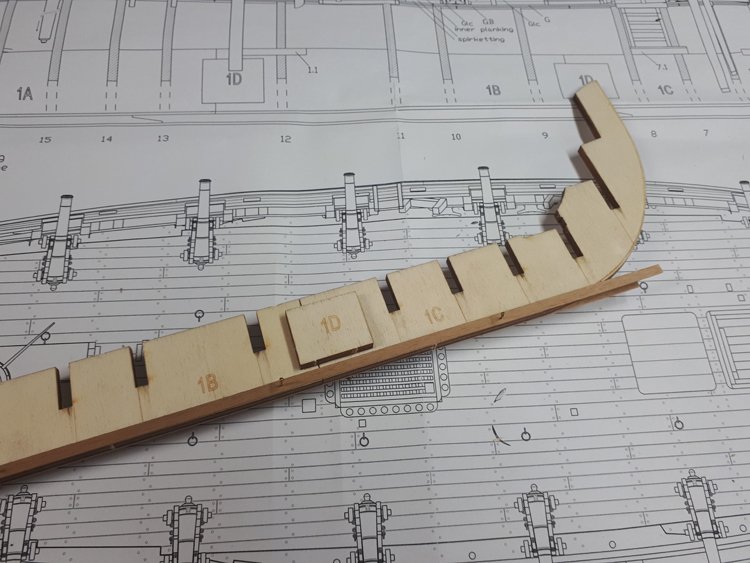
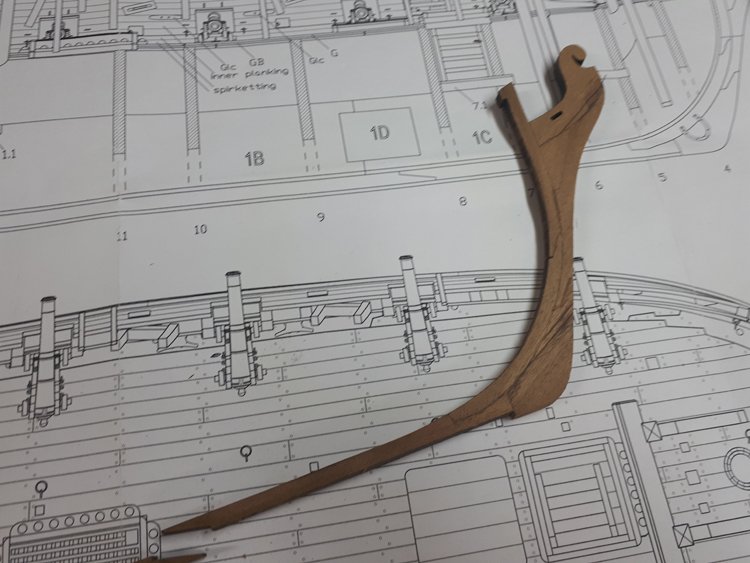
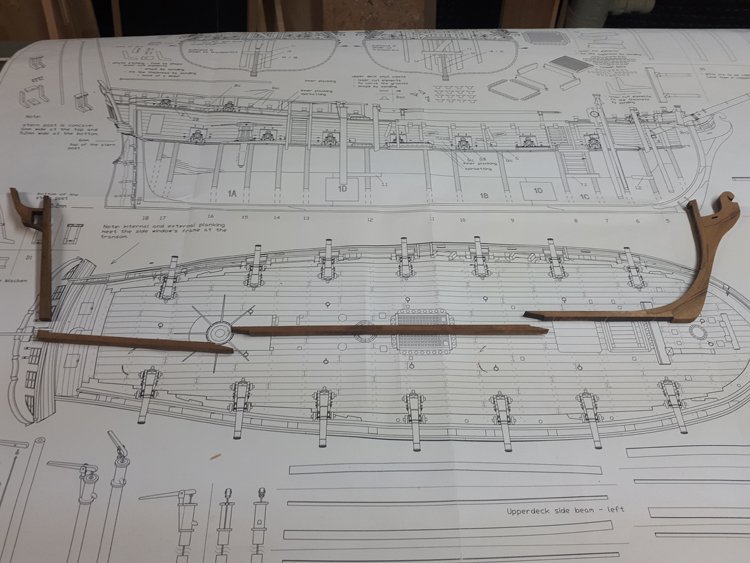
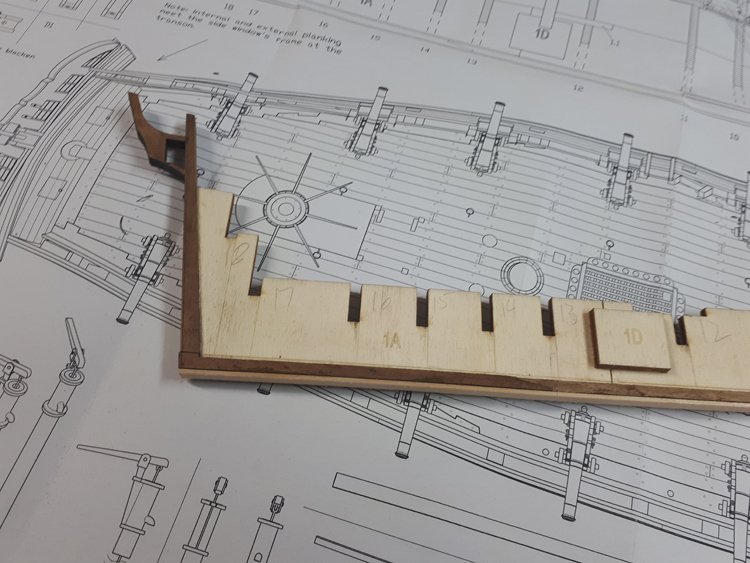
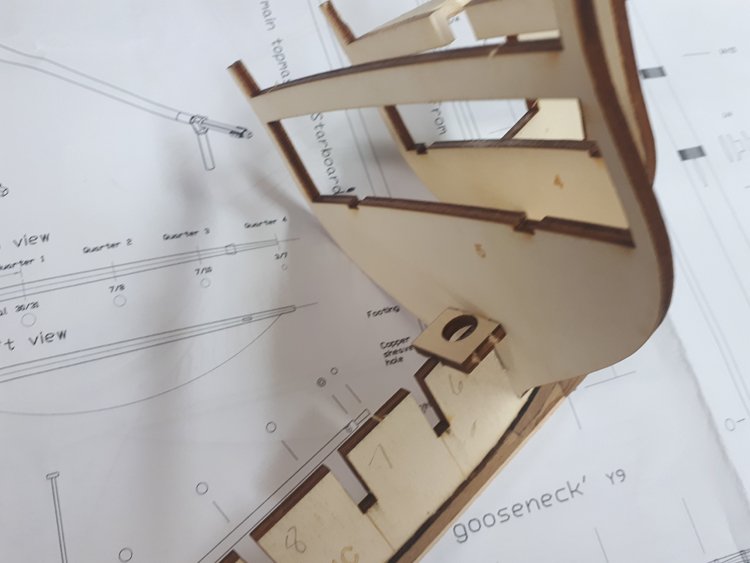
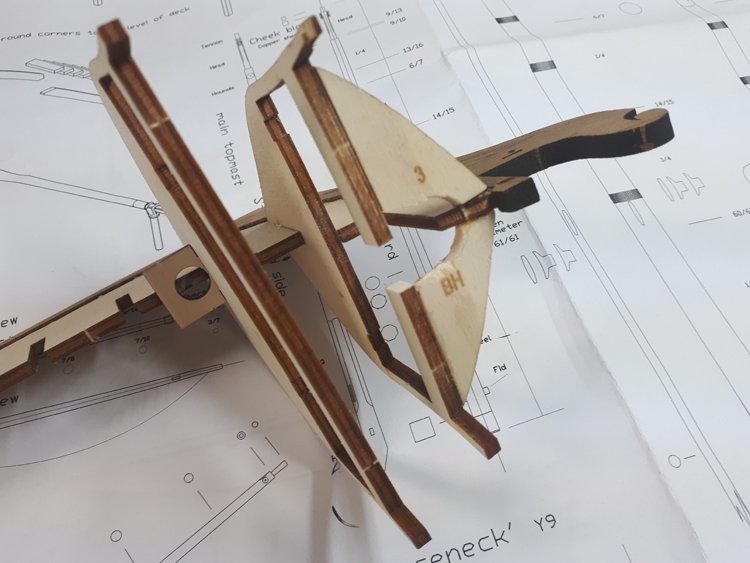
Thanks everyone for checking in - I've started in on this project and trying to get used to its idiosyncrasies. On the positive side, the pieces fit together with much more precision than I am used to on Model Shipways kits, but on the other hand already there have been some pitfalls which I have managed to catch, but I am worried about the ones further down the line that I miss until it's too late. The stem, keel and stern went together beautifully - They attach to the false keel and fit virtually perfectly. The false keel is 4mm thick and the keel/stem/stern assembly are 6mm thick. I tacked a 1mm strip down both sides of the false keel to help position it correctly - I would have expected the kit to include a thin walnut strip to fit along the bottom of the keel, but there was nothing even close in size. So I used a piece of basswood that I had that was the right thickness, but I had to sand it down to the right width. There are two pieces that are held in place by two of the bulkheads which receive the ends of the two masts. These are not mentioned in the instructions and it takes a bit work to even find them in the plans. They have to go in at the same time as the bulkheads or else it's too late. This one is for the fore mast This one is for the main mast, but look where it's located. Right in the middle of the bulkhead. That bulkhead will have to be cut out to accommodate the mast! Similarly, I discovered that some serious adjustments have to be made to accommodate the bowsprit - The part marked BH comes as one piece, but it needs to be cut in two and a large opening made it in. Also, the first bulkhead has to be cut, otherwise there is nowhere to put the bowsprit, which passes through the upper deck and rests on a bitt on the lower deck. Otherwise, it's progressing nicely. There are horizontal strips that tie the bulkheads together and they fit so precisely that it's amazing. Once I have all the bulkheads in place and the strips glued it, it should make for a quite rigid structure. The odd location of the bulkhead where the main mast goes caused me to look ahead at the gunports and how they're located vis-a-vis the bulkheads. I actually found a casual reference to it in the instructions, which suggested that it might be possible to find that a gunport opening was obstructed by a bulkhead (as if it was something that might or might not happen!) It looks from the plan that it is a certainty. Anyway, that's all for now. Thanks again, David
.jpg.fd80a2e06ddbef5c3d28480f281b2693.jpg)
.jpg.a7f3ad19ce863eba6b83eb324e454e26.jpg)
.jpg.936112765652c47f6e6c31c0b54e24bf.jpg)
-
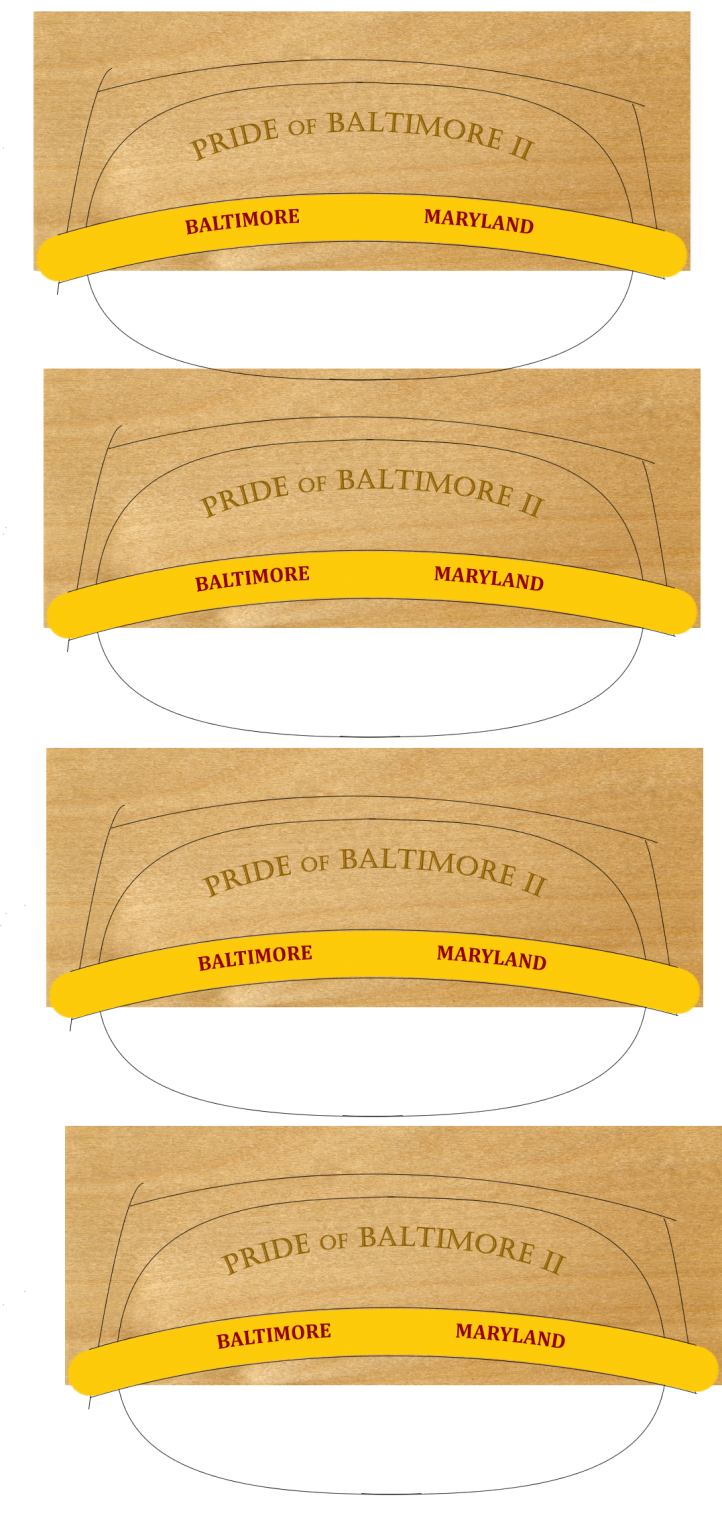
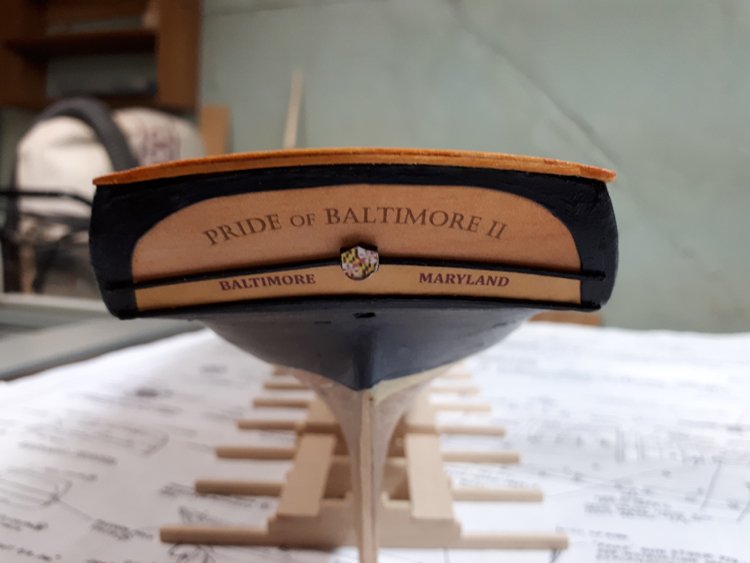
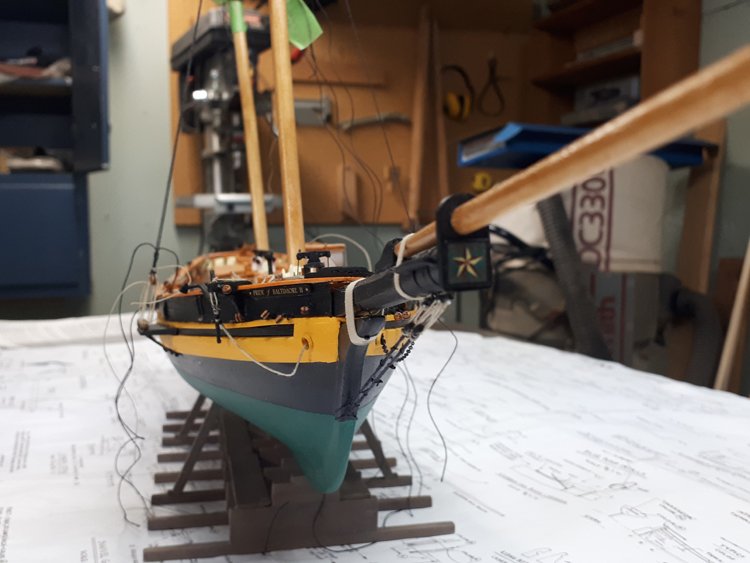
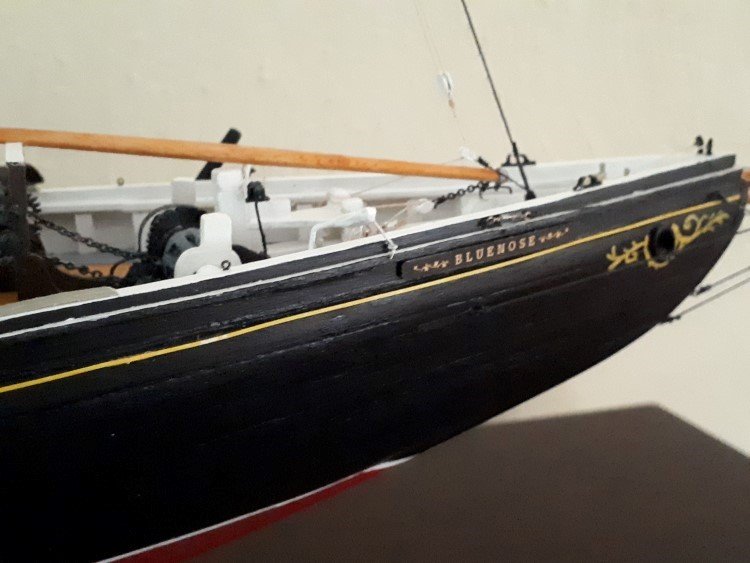
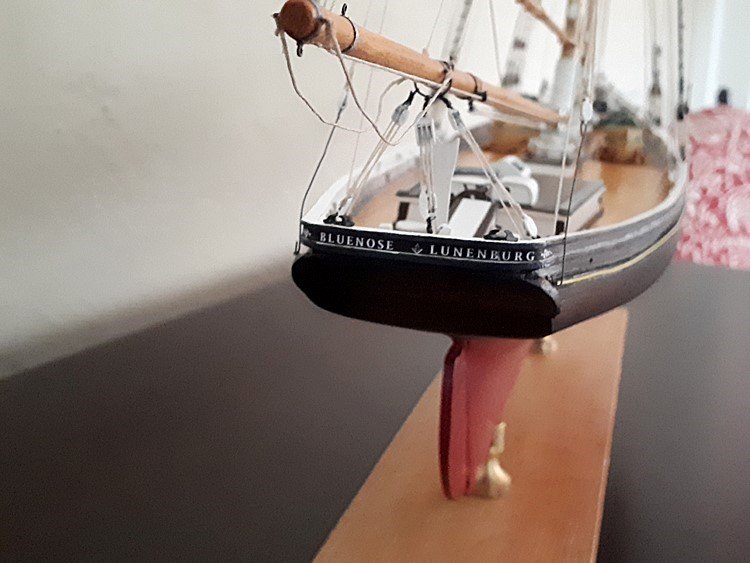
Here's what I did - I searched for images of wood grain, then printed gold lettering (I didn't worry about the carved aspect of the lettering). For the yellow, instead of painting the wood yellow, I printed yellow on a piece of paper and printed red lettering on it. Then I combined the two and glued them to the stern and coated them with some varnish. I did the same for the star on the bowsprit, this time searching for images of patinated copper and stars. I re-coloured the star and combined the two images It takes a little bit of trial and error on the computer getting the curve in the lettering, spacing etc. as close as possible to the real thing. That's one idea at least. David

.png.2489b9f385c4bf6480c78acb0c6ed3ef.png)


-
Hi Andy, Thanks for your input. I am aware that this is a snow brig. I'm just not sure how much that affects the rigging compared to a regular brig. The area of the kit's rigging instructions that is weakest, (apart from lack of belaying points shown) is in fact the lower main yard. I was looking at the on-line manual for Caldercraft's Badger, because it is a British brig of approximately the same period and it indicates that its lower main yard is rigged like a crossjack, so I'm really interested in seeing your input about this detail. The main question for me is the braces. There are none shown on the plans at all and I can't believe that there wouldn't have been any. I believe if the yard was rigged like a crossjack, then the braces would lead forward from the mast. If this is not how this yard should be rigged, then I assume they must lead aft, then through a sheave in the hull and belay to an inboard bulwarks cleat. Does that sound right I'm not sure if I'm ready to spring for a copy of TFFM just yet, they all appear to be pretty expensive. Anyway, this is all far in the future for me as I have much to do before getting to that point. David
-
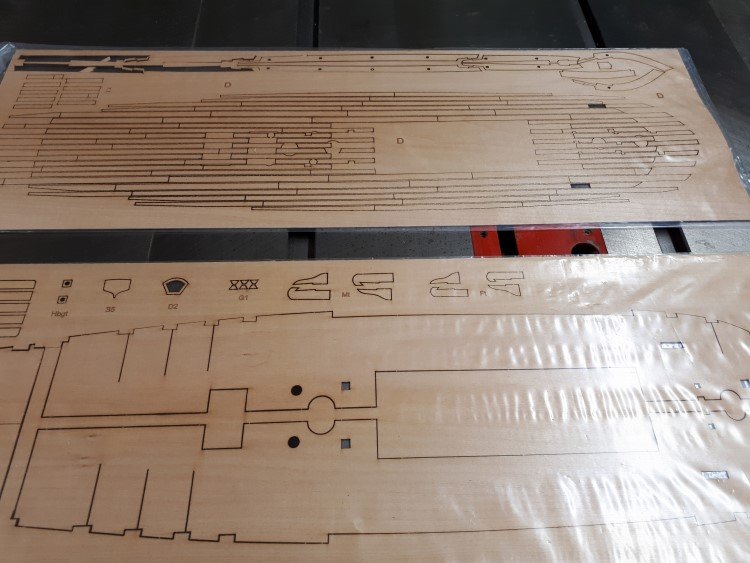
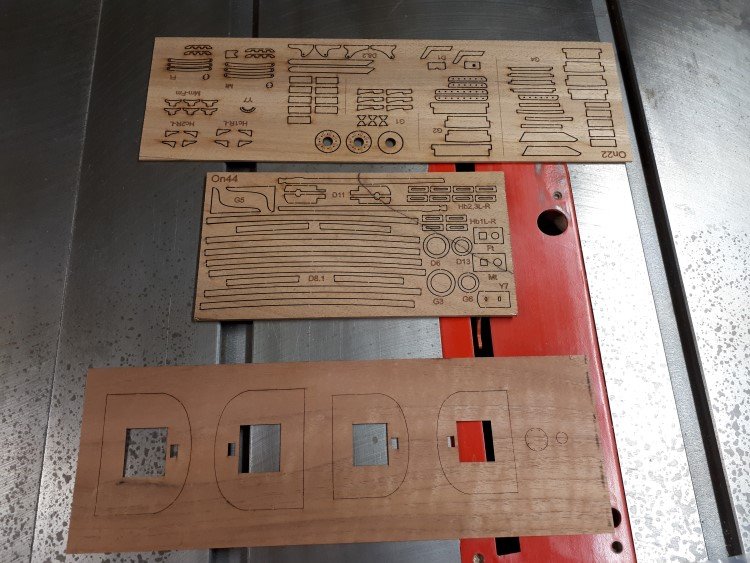
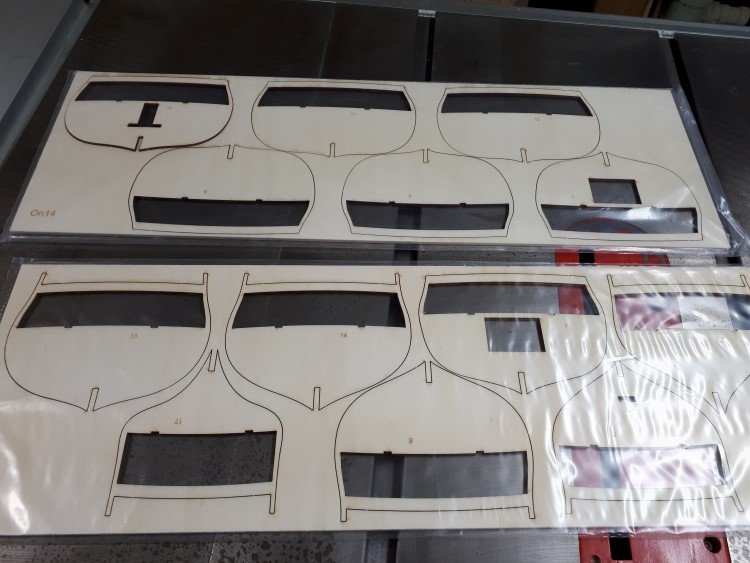
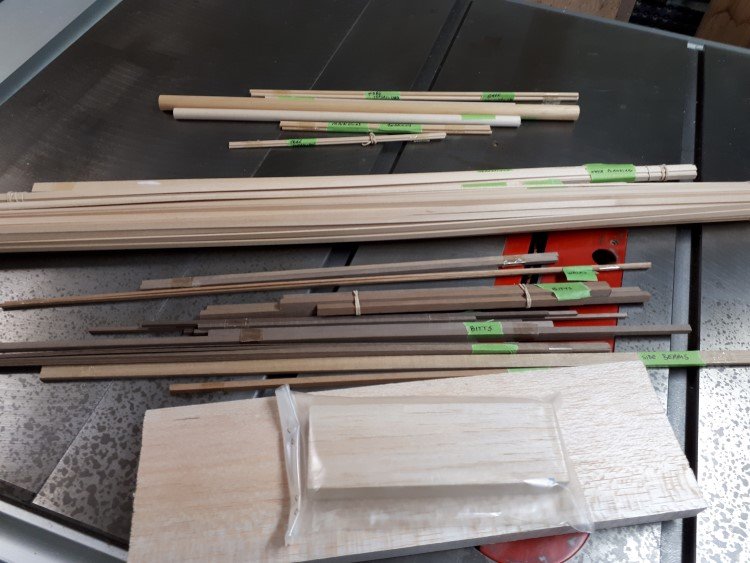
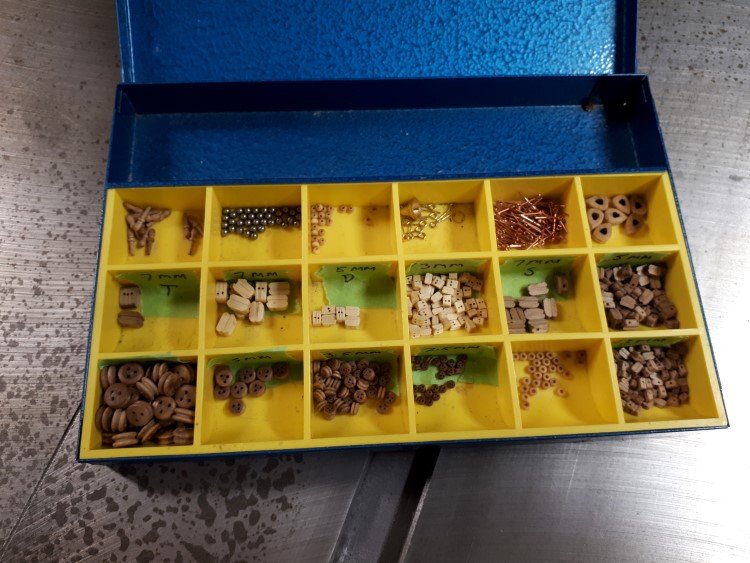
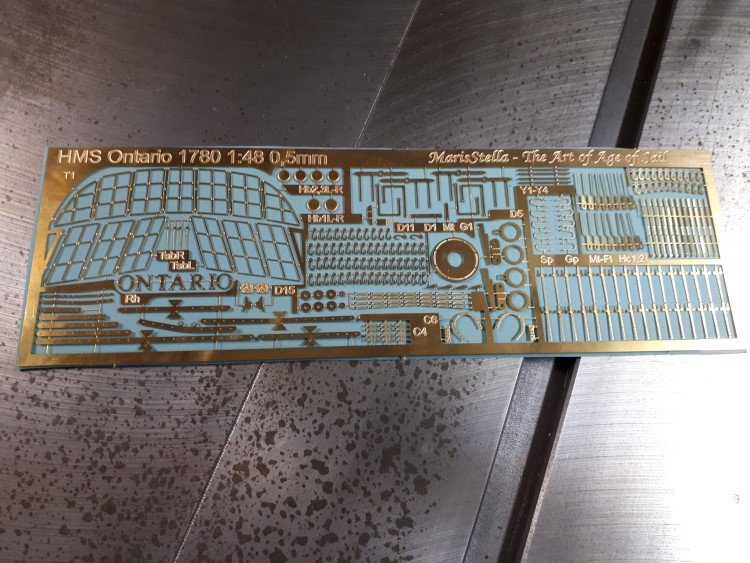
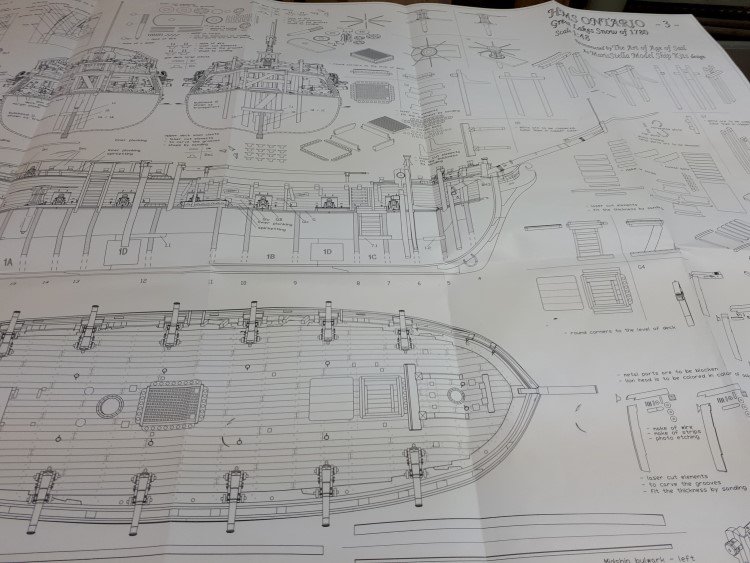
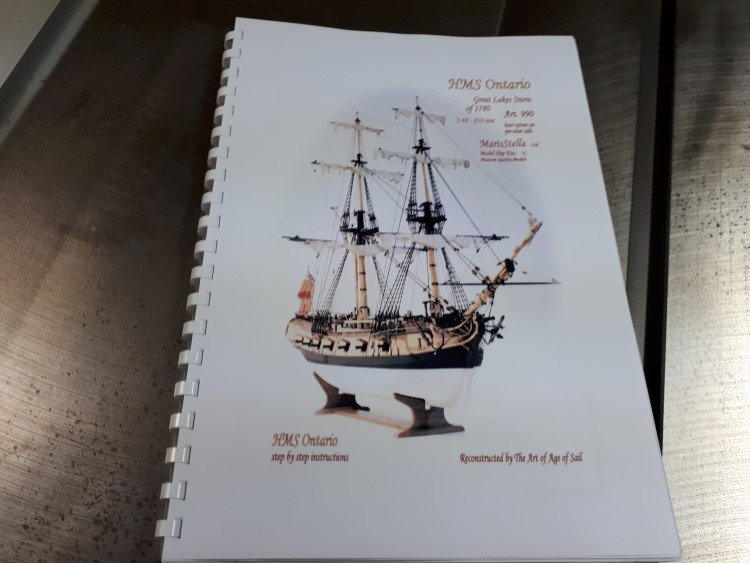
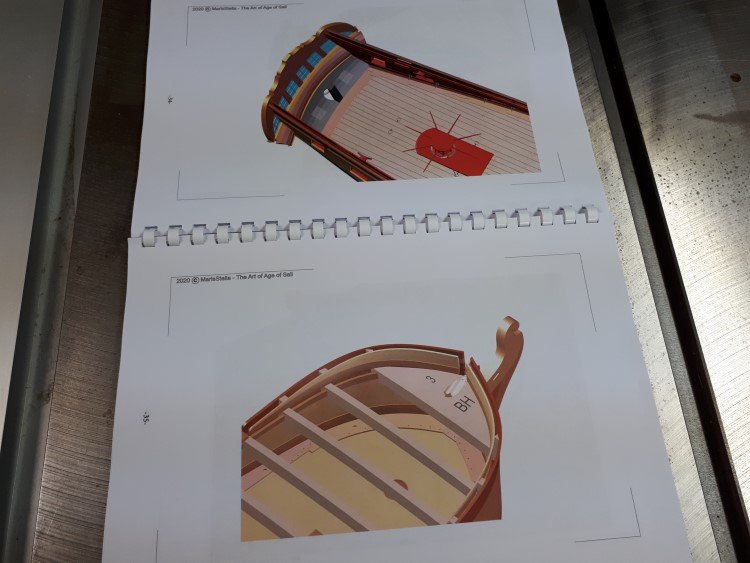
Good Morning All, So, I bit the bullet and ordered this kit from MarisStella. I couldn't believe how quickly it came. I ordered it on a Wednesday and it was on my doorstep the following Tuesday. It was shipped with DHL, which I had heard was the best courier for international shipping and I can see why they have a good reputation. This kit was expensive, especially when adding in shipping, duty, taxes and all in Canadian dollars. I have not looked at the VISA bill, so I don't know what the actual total was and my wife and I have tacitly agreed not to discuss it. I don't normally bother with showing the parts of the kits, but I thought it might be of interest this time, since this is such a new kit. There's a large manual - it has very little in the way of written instructions, but is mostly computer generated images that take you through the process. They will require a fair bit of scrutiny to follow, but appear to be quite comprehensive. Here is a sample page: There are four sheets of plans - two for the hull and masts and two for the rigging: Many sheets of laser cut parts. Here are just a couple of examples: This kit has an interesting and different (to me at Least) approach to the decks. I don't know if other MarisStella kits use this method or if it's unique to this kit. The two decks - gun deck and upper deck each comprise a thin sub deck over which is laid the actually decking. However, in this case all of the decking planks are pre-cut, tapered, joggled etc. You can see the decking planks in the top sheet in the picture below. I'm not sure yet how successful this will be, so I will find out. Strip wood, dowels and blocks: stripwood is walnut and lime, blocks are balsa. Appropriate set of fittings - the blocks are standard issue, but there some very nice parrel beads, cannon balls, hearts, bullseyes etc. There are many photo etched parts, which look very nice. And of course, the most interesting aspect of this kit - the 3d printed components. The cannon barrels, windlass, anchors all make a welcome change from cast metal and I expect will paint up really well. The more "controversial" parts are the stern components and the head rails, which you would normally expect to see made from wood. I have always hating making head rails, so I won't mind just having to paint these ones, but on the other hand it's going to require some precise modeling as I have to ensure that they will fit. When you scratch build them you can always alter them to fit the hull; I won't have that luxury this time, but on the other hand if they really don't fit at all, I can always make some new ones from wood. With the stern and galleries, the idea is that you plank the flat surfaces with thin planking, and only the painted trim work of the resin component will be exposed. This will be a bit of an experiment and we'll see how it goes. Again, if it's a complete and utter failure, I can always scratch build these parts. The kit provides for a fully finished gun deck and suggests using one of two options - either closing in the upper deck completely in which case none of the details of the gun deck would be visible or leaving a large portion of the upper deck out, exposing much of the gun deck. I am leaning towards fully closing the upper deck, but haven't decided yet. In any case, I will fully plank the gun deck as good practice for using the pre-cut decking planks when it comes to the upper deck. Until I start building, I won't know what all the pitfalls will be, but at this point, I can identify one huge problem and that is the very poor rigging plans. There is no mention of the rigging and no illustrations of it whatsoever in the manual and the rigging plans are very sketchy. I don't like to complain or find fault unnecessarily, but I can see that this is going to present me with a real challenge. I have become pretty good at following Model Shipways rigging plans, which I find to be quite comprehensive and easy to follow. But here, lines seem to begin and end at random, no line is labeled and not a single belaying point is indicated. The rigging plans are virtually incomprehensible and I'm not even sure of their accuracy - for example at a quick look, it appears to me that there are a least one too many stays on both masts, certainly more than are shown in the photographs of the finished model. So, I am going to have to be resourceful and round up other sources for details. I have never build a brig before, so I'm not too sure how much it differs from other ships. The original model was researched and built by a model maker named John Adela, whose business is called The Art of the Age of Sail. I was surprised to discover that he's located only about 30 miles from me. I have contacted him and he has offered to help me with any specific questions, but I can't be pestering him on a routine basis, so I'm going to have to discover some other sources. John suggested that British brigs of this period were rigged very much like British three-masted ships of the same period which is helpful to know. I know I can buy plan sets for American brigs from Model Shipways, which might be of some help, but I'm not sure how much they might differ from the British ones. Also belaying points look to be unique on the Ontario - there are only fife rails, no pin rails. Instead there are many cleats mounted to the bulwarks. Any suggestions that anyone has about where I should turn would be more than welcome. I spent the day yesterday "retooling" my shop by which I mean cleaning up all the detritus from my previous build, so I'm ready to get started. David


-
Thanks again all. Bob Hermann - it hadn't occurred to me to put the gaffs in the lower position until a friend sent me a video he took of Bluenose II motoring with no sails up and the gaffs were lowered. So I decided to show my model that way too. I think it's a good option for the Bluenose because it really shows off the rigging and the many large blocks of the peak halliards. Bob Garcia - lucky you for having made it to Lunenburg last year. We saw Bluenose in Ontario last September on the Tall Ships Challenge and we decided to make a trip to Lunenburg this year, but you know what occurred and we never made it. David
- 37 replies
-
- 1
-

-
- Finished
- model shipways
- (and 1 more)
-
Thanks guys!
-
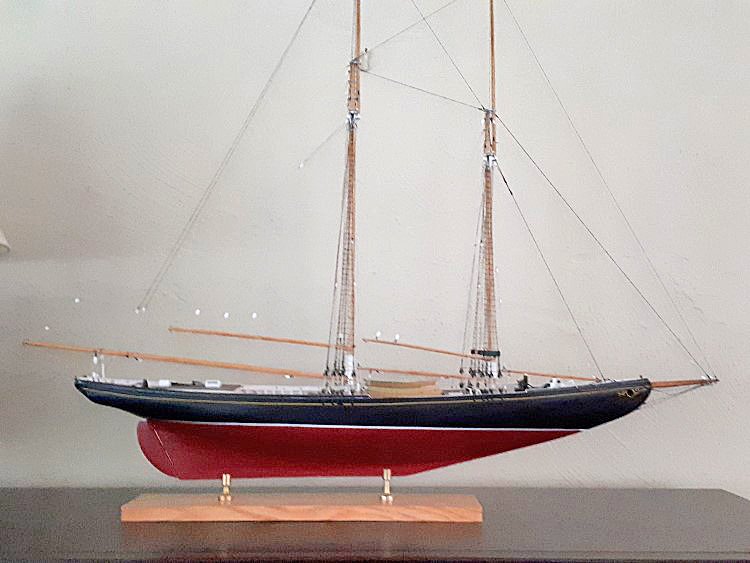
I am the world's worst maintainer of build logs. I forget to take pictures until I realize that I am quite a way along since my last update and then for some reason, the longer it goes, the harder it seems to be to do the update. So better late than never, here are some pictures of my completed Bluenose. To be honest you haven't missed much during the rigging as this is a pretty simple model and the rigging couldn't be more straight forward. There isn't too much of it, and there are no unique problems to overcome. The trickiest thing about this kit is deciding how to handle all of the metal work on the rigging. I've chosen to eliminate much of the metal work as I doubted my ability to recreate it well enough. I did use some around the mast tops and I made some turnbuckles. One detail that I did choose to include was the use of internally stropped blocks, which I purchased from BlueJacket and they seem to recreate the look of the original Bluenose quite nicely. I can see why the Bluenose is such a popular kit. Apart from being a very handsome model, it isn't too difficult to do, doesn't take too long to do, but at the same time is a very satisfying. So now that this one is done, I have decided to jump off the deep end and launch into a challenging new build - the HMS Ontario from Maris Stella. I had been unaware of this ship until reading about it on this site, and I find it to be of interest because it's so local to me. I live a five minute walk from the shore of Lake Ontario and it's only about 40 miles across the lake to the site of the wreck. So far, I have built Model Shipways kits almost exclusively and have gotten pretty comfortable with them. So I expect the Ontario will present some new challenges for me which I am looking forward to. David

- 37 replies
-
- 6
-
-
- Finished
- model shipways
- (and 1 more)
-
That should work Paul. Just be careful not to get the stanchions mixed up. It's very easy to do; the differences are minimal, but fairly crucial.
-
I always have an internal debate about attaching the deck furniture. I believe the better practice is to leave openings, adding supporting "beams" where necessary and install the items, all before planking the deck, planking around them. I have done that in the past, and it works really well, but this time I thought I'd try the simpler approach and I just glued them down on top of the planked deck. I think the result is not quite as good, but it's ok. It seems to work so long as you get a good tight fit accommodating the shape of the deck and you have to double check the height of the coamings, as they should be a shorter height when glued on top than when installed before the decking goes down.
-
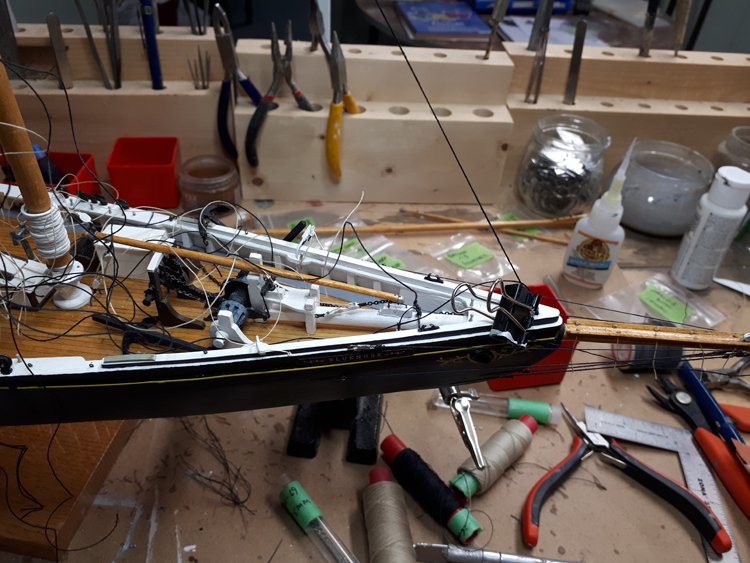
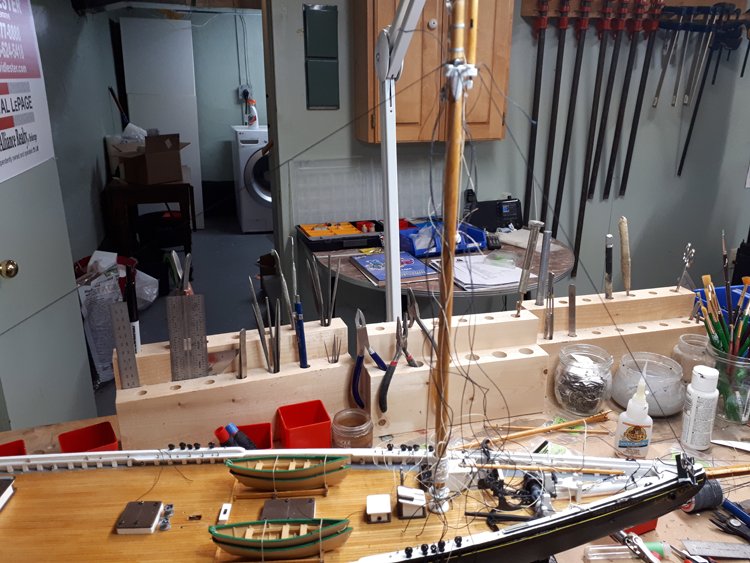
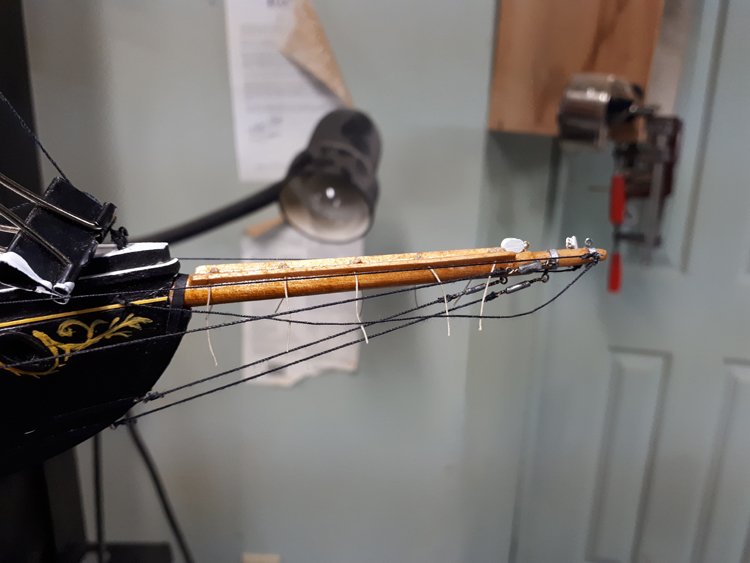
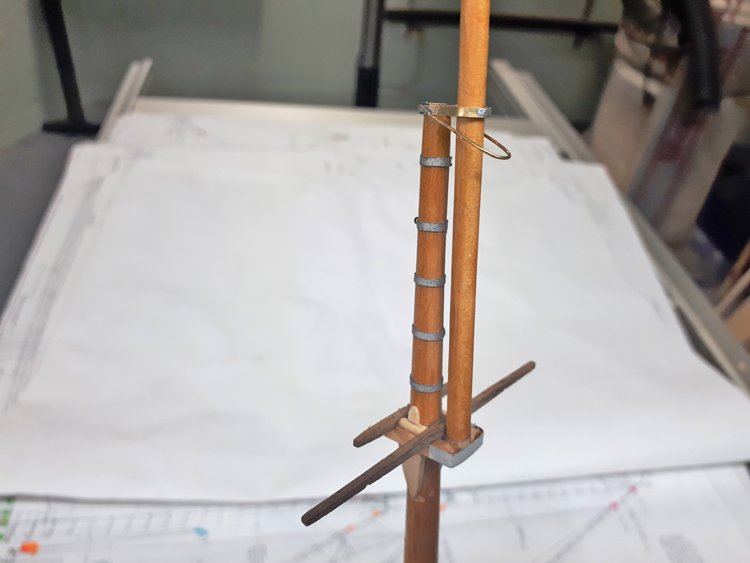
My masts, booms and gaffs are pretty much ready and it looks like I'm into the rigging now. All of the blocks on the Bluenose were internally stropped and it appears from old photos that they were all painted white. This is a detail that I wanted to include. There seem to be two options for internally stropped blocks: one is the wooden ones from Syren and the other is the cast metal ones from BlueJacket. I weighed the pros and cons of each and in the end settled on the BlueJacket ones for two reasons. The first is the Syren ones are not available in the smallest size that is called for on the Bluenose plus they are so exquisite that I didn't think I had the heart to paint them. On the other hand, the BlueJacket ones are available in all the specified sizes and they are intended to be painted, so they seemed the right choice for this project. Many of the blocks on the Bluenose were attached with shackles. I have no confidence in my ability to replicate them skillfully enough at this scale, so I have opted to seize the blocks to eyebolts which I know will look better in the end. The bowsprit is installed and rigged, including my fake turnbuckles - The foremast is held in place with temporary "stays" while I start in on the lower shrouds That's it for now. Thanks, David

- 37 replies
-
- 3
-
-
- Finished
- model shipways
- (and 1 more)
-
Paul, I think mine was the same as yours. You have to essentially scratch build everything on the deck. I just measure the plans, make a note and transfer the measurements to the wood. I have my own quirky little system. I measure everything in 32s of an inch and make a note, ie: width 12, height 14 which of course means 12/32 x 14/32. If something is over an inch, my note reads, for example, 1-15 which means 1" + 15/32". Just be careful with the detail insets on the plan. They are usually double the scale. I have been know to mistakenly build the odd very large hatch or two!
-
That forward wall fits nicely. I found that to be a particularly finicky thing to do on mine. Did you make a cardboard template? I must have gone through ream of cardboard until I had a template that fit. Looks great! David
-
Hi, They're kinda on a par, but I suppose the Bluenose is the easier build. I have found the MS plans for both kits to be very accurate. I visited the Pride of Baltimore last summer and took many photographs, and I found almost no discrepancies between the plans and the actual ship. For the Bluenose I am having to rely on the old photographs that I have found on line, but again, the plans seem to reflect reality very closely. Photos of the Bluenose II are not of any help, because the details are considerably different. So, to answer your question, it probably makes sense to begin with the Bluenose. It's an easy hull to plank and the rigging is relatively simple. In addition to the build logs on the forum, have you discovered this website: https://suburbanshipmodeler.com/ This guy has a pretty comprehensive build log of his Bluenose. Most old pictures of the Bluenose can be found at the Nova Scotia archives - https://novascotia.ca/archives/bluenose/ but the site is not much fun to navigate; you have to wade through page after page to find the pictures, but it's worth it. They can be quite helpful when something is not quite clear in the plans. Anyway, those are my thoughts for what they're worth. I hope they're of some help to you. David
- 37 replies
-
- 2
-
-
- Finished
- model shipways
- (and 1 more)
-
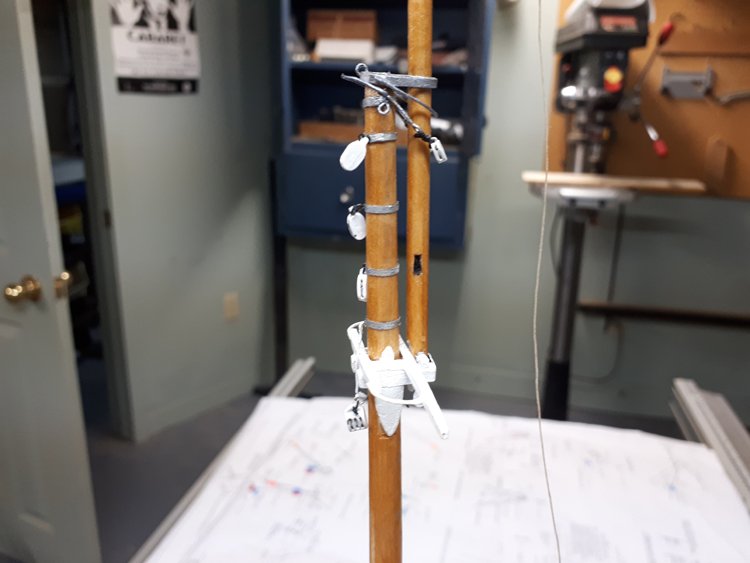
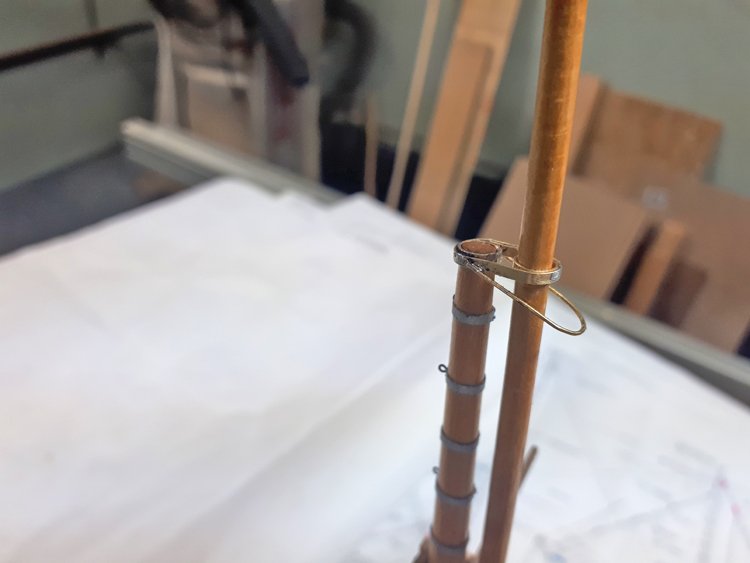
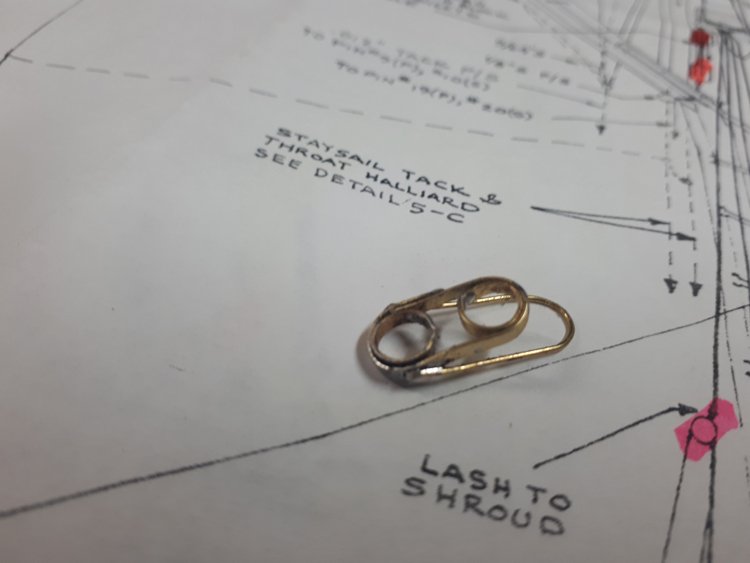
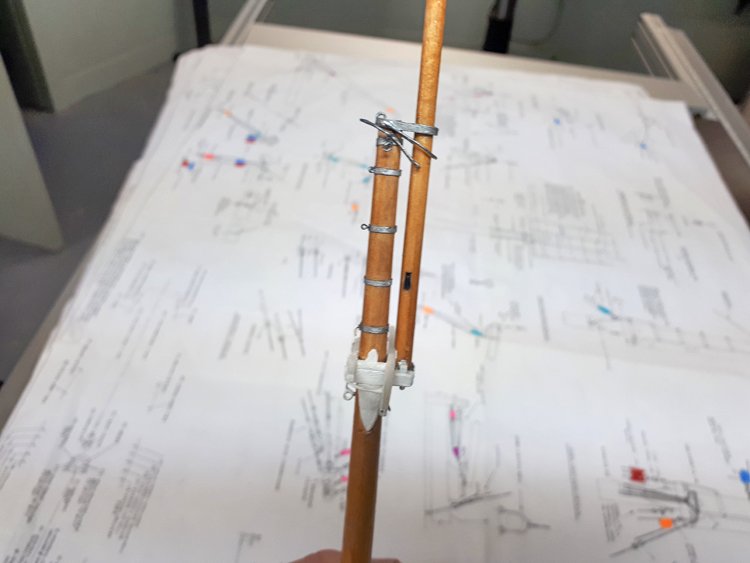
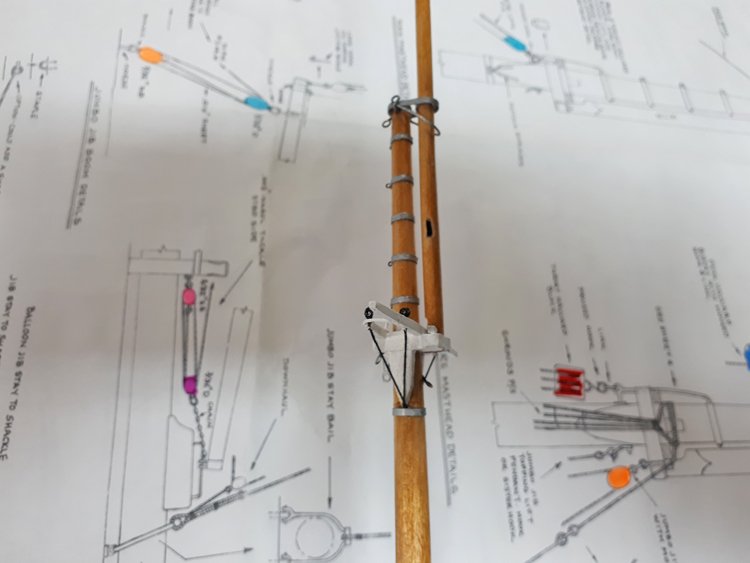
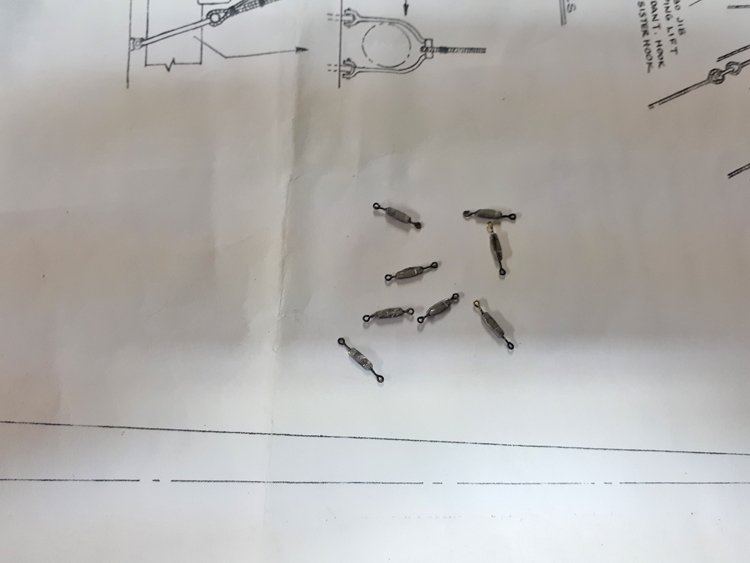
Continuing work on the masts. I'm simplifying much of the hardware on the masts by using paper strips and eyebolts, but at the same time not eliminating any of it. That will allow me attach all of the rigging yet stay within my comfort zone. Nevertheless it's not possible to avoid all of the metal work and I soldered brass strips for the mast caps. This is not my forte, nor of much interest me, but I thought the mast caps needed to be structural. I have also learned from experience not to use basswood for the crosstrees when they are quite long as they are on the Bluenose; they are quite likely to break during rigging and then of course, they're very difficult to repair or replace. Some walnut will work better. The fore mast in particular has a lot of points of attachment. I have always had trouble attaching futtock shrouds to the mast without making a big oversized mess, so I have developed my own, (not entirely authentic) method, that leaves a neater appearance. Instead of wire, I use rigging line. (I can never seem to get wire to stay straight or taut.) At the point of attachment, I drill a largish hole all the way through the mast. Once the lines are attached to the bullseyes or deadeyes on the crosstrees, I draw every line all the way through the one hole and out the other side. In this case, two lines passing through left to right and two lines passing through right to left. I glue them in place and then trim them flush. Another hardware feature on this model is a number of turnbuckles. If I had noticed them on the Bluejacket website sooner, I would have just bought them and added them to my last order. However, I didn't so I had to figure out how to represent them. I have seen a few builders making quite realistic ones out of brass and Tom Lauria has a video where he makes unbelievably detailed ones. This was out of the question for me, but nevertheless I wanted to represent them. The main objective for me is to get them small enough. If they are oversized, I think it ruins the look. Id' prefer to have them look a bit fake, rather than be oversized. I decided to use two small eyebolts attached to a central "cylinder" but I couldn't come up with what to use for a cylinder that was small enough yet still allowed me to drill holes for the eyebolts. The central part of the turnbuckle should be just 5/32" long. Here is what I came up with. The cylinder is a piece of solder. I drilled a hole in each end and glued in the eyebolts. I then gave the solder a squeeze with my pliers to slightly flatten them. I think when these are incorporated into the rigging they will be ok. They aren't perfect, but at least they are exactly the right size which I think is half the battle. That's it for now. Many thanks for checking in, "like" etc. David
- 37 replies
-
- 2
-
-
- Finished
- model shipways
- (and 1 more)
-
With respect to the "unidentified object" on the deck, I emailed the people at Bluenose II and received an answer this morning. They confirmed that the object is the lazarette hatch. You were right on the money, jamcdonel! This made me curious about the word lazarette which seems like an odd word. I was surprised to discover that it is a reference to Lazarus. If Wikipedia is to be believed, on old ships this area below deck was originally where bodies of "important" passengers and crew were stored rather than being buried at sea. More recently, it refers to the area where the steering mechanism is located.
- 37 replies
-
- 3
-
-
- Finished
- model shipways
- (and 1 more)
-
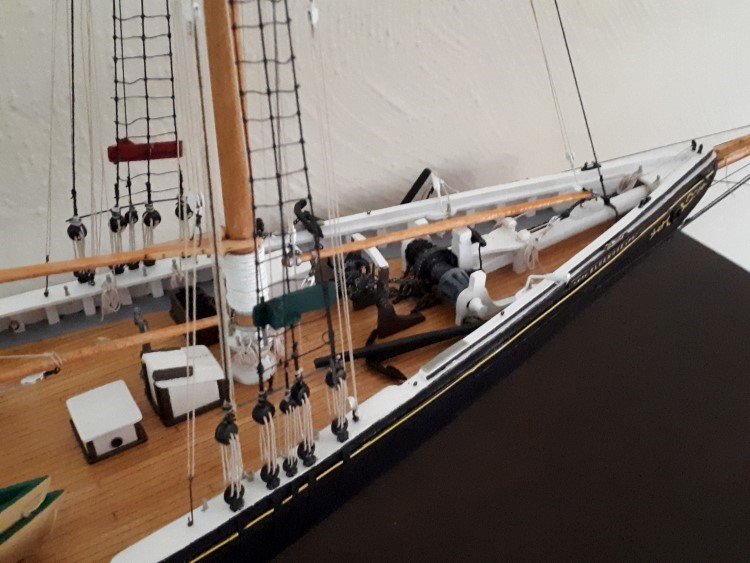
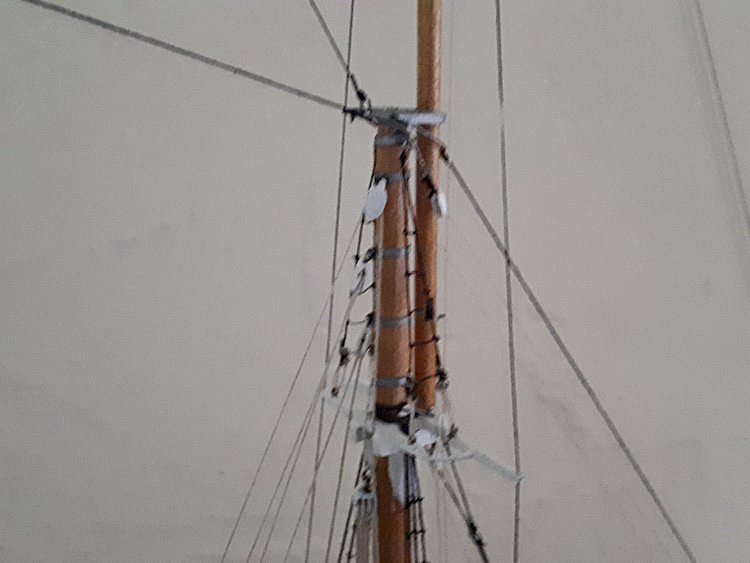
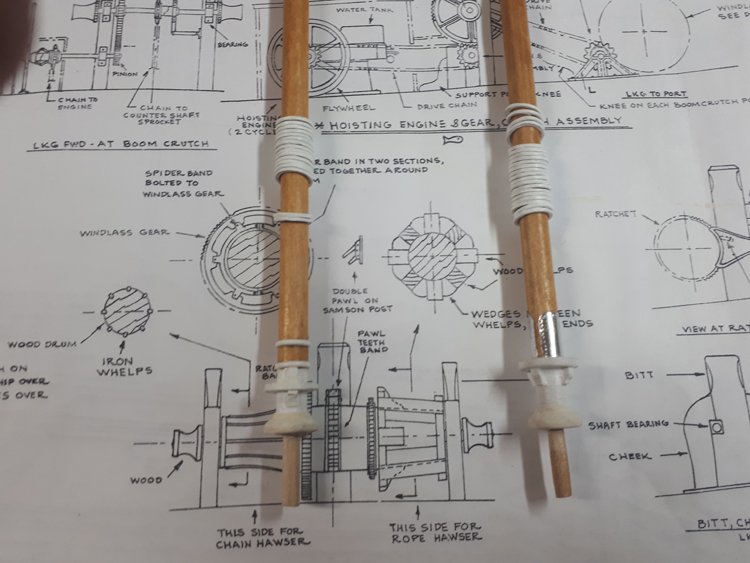
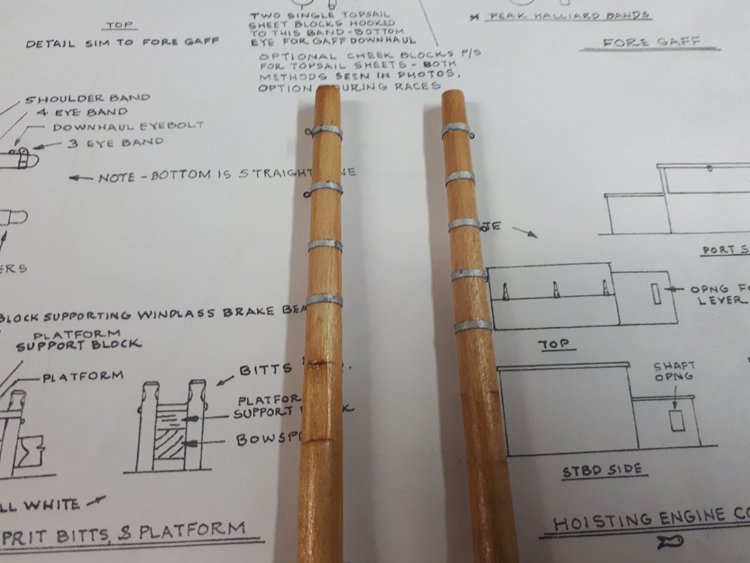
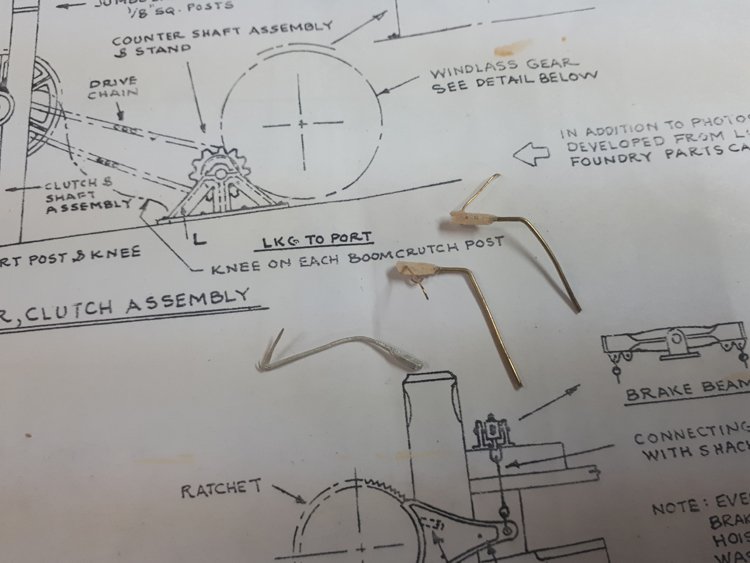
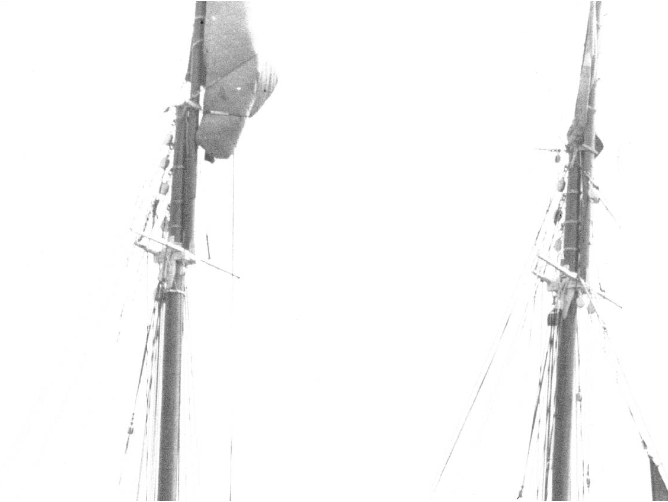
Good Morning All, A little progress to report: I've now finished all of the deck details and all have been added except the boom crutches and the catheads, for fear of breaking them. I'll add them at a later point. I built new catheads, because the included cast ones are too fragile and it's almost impossible to attach the various items to them. I'll paint these white and add them a little later. There is a lot of metal work on all the spars of the Bluenose, so I had to make a decision as to how best to replicate it. I know that many modelers have done very impressive brass work to recreate all the bands, shackles and the like. That is not a good option for me because I know I could not do a good enough job at the necessary scale. A lot of messy overscaled brass work would not be an asset, so I've chosen to simplify it considerably and represent the metal work with construction paper, eyebolts and in some cases, brass wire. While not completely accurate in every case, I know the overall effect will be better. My first inclination was to use black construction paper for the bands, but I noticed that the plans indicate that the bands are supposed to be all either galvanized or painted white. So I went searching for photos and while there are many of the hull and deck available, there are almost none of the masts and rigging that are clear enough to be an indication. However I did find this one: To my eye it looks like the bands are a little darker than the white spreaders but certainly not black. I took this as an indication that they are galvanized metal, so that's how I chose to represent them. I painted black construction paper with aluminum metallic paint. While looking at these pictures, it also appeared to me that the mast hoops are white, so I painted mine. (They are a nightmare to paint by the way.) I attempted one other detail with the mast coats. The plans indicate that they are covered with canvas, so I applied teflon plumbers' tape, then painted it off white. It doesn't show up in the picture, but I added a little texture to it by pressing it with sandpaper. The overall effect isn't especially great, but on the other hand, it's not terrible either. The shiny metal piece around the mast mast is a piece from a coffee can seal. It was just the right weight for the job. So that's it for now. It's nice and cool in my basement. The outside temperature is in the low 30's today, so it's too hot to do too much out there. David
- 37 replies
-
- 6
-
-
- Finished
- model shipways
- (and 1 more)
-
I think it might be a big cookie tin. To be honest I haven't really paid it too much attention, although I thought it was pretty odd for even the plans to call it "unidentified object." It reminds me of the time in public school when I assembled a rock collection for a science project and labeled most of the specimens "unknown rocks." The lazarette hatch idea seems feasible. It appears to be about the size of a manhole and seems to have a lid. Being elevated would prevent water from getting down. I think I'll email the people at Bluenose II and see if they can shed any light on it. They were very helpful when I was tracking down the Masonic and Odd Fellows connections. David
- 37 replies
-
- 2
-
-
- Finished
- model shipways
- (and 1 more)
-
Great pictures! I'm definitely going with "dory buff" for my dories. g
-
Thanks for the comments guys! Schooners - still one more bit to add to the machinery. There is a guard that goes over the big gear on the windlass. So I have that yet to do. Per - I like these deadeyes too. They're cast ones from BlueJacket and they're authentic in style to the ones on the Bluenose. I know many other builders have made this style themselves by bending wire in a loop on each side of the deadeye and attaching the chainplate directly to it with a pin, they even articulate when made this way. They're very cool, but I knew in my case "that way madness lies." So I opted for this alternative. But I have to be very careful with them. Too much bending and they can break off. Thanks again, David
- 37 replies
-
- 2
-
-
- Finished
- model shipways
- (and 1 more)
-
That's not a bad idea. I always struggle with whether a model should look "showroom" or weathered. I notice that railroad modelers always go for the weathered look, but ship modelers more often go for the pristine look. If you look at my previous post, maybe the effect you're talking about is more like the way I did the vent on the cabin. I painted it black and then applied a "watery" coat of aluminum paint. I did that because in the old black and white photos I have, the vent does not appear to have been black at all, but rather a metallic colour. I think I'll give that a try on these gears etc. Thanks for the idea! David
- 37 replies
-
- 3
-
-
- Finished
- model shipways
- (and 1 more)
-
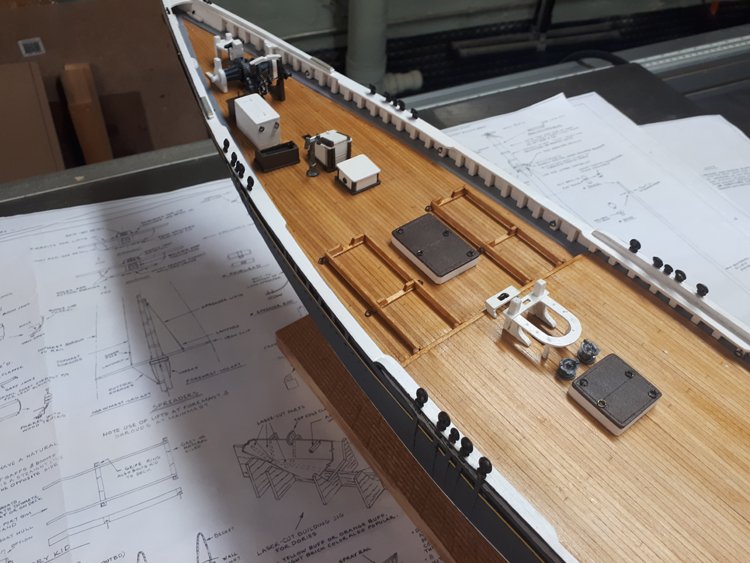
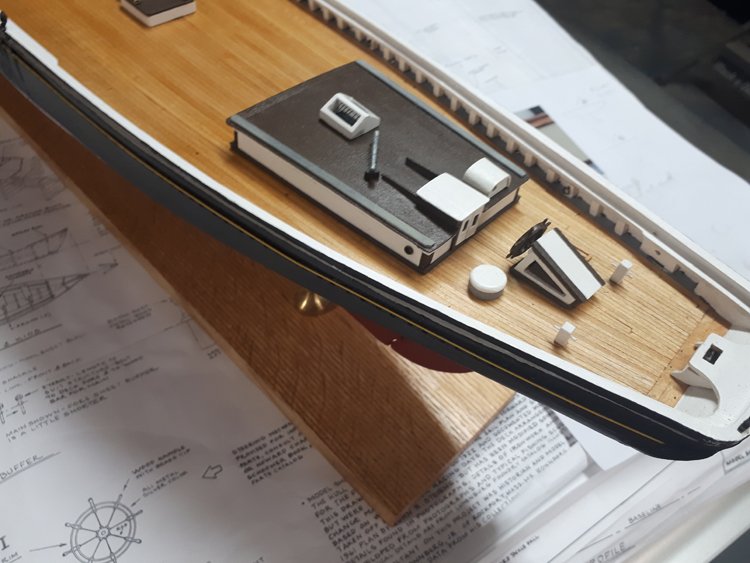
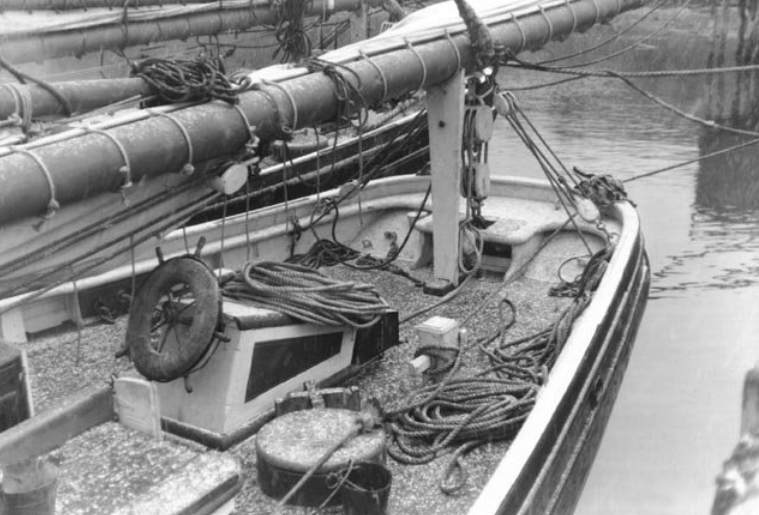
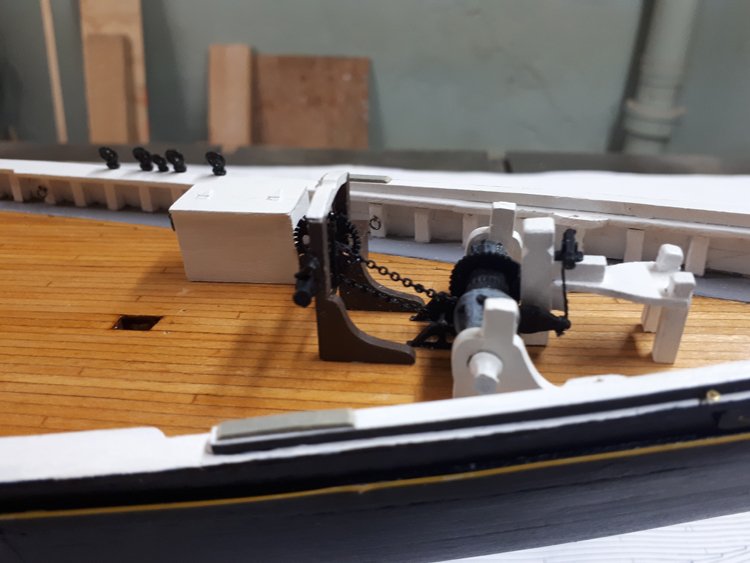
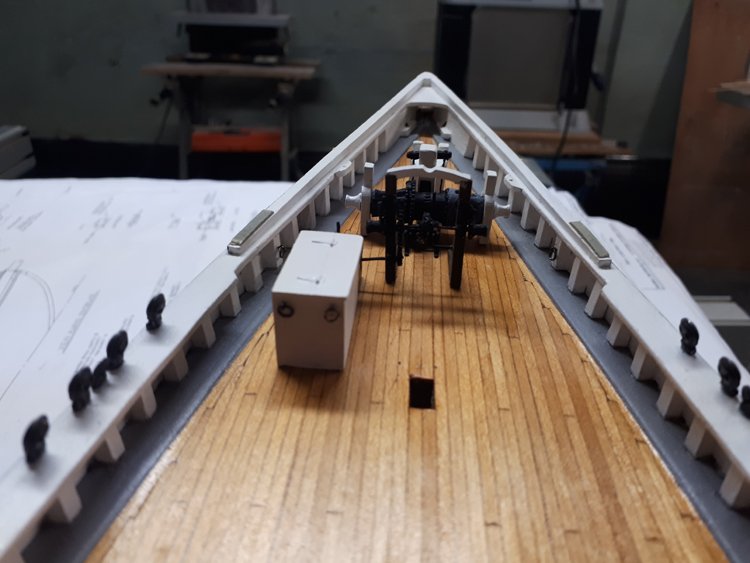
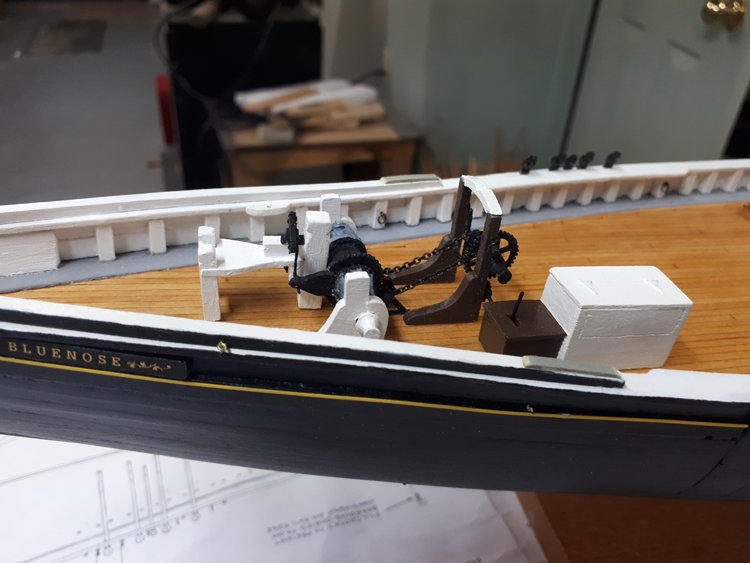
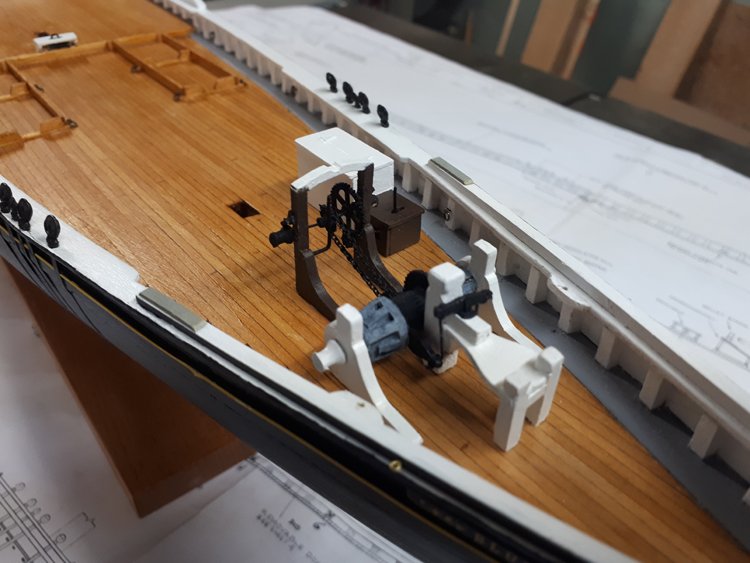
Hello All, I little more work on the deck details. Here is the mechanism that operates the windlass. This is a little bit tricky, mainly because the cast parts are so poorly done. I like MS kits on the whole, but I have to say that these parts are not really very good. It's odd to me that a number of the gears are all molded on the axle as one piece. This would be ok, except for the fact that one gear is molded separately but needs to be located on the axle between two of the already molded in place gears. So, the piece needs to be cut. Probably for the best anyway. The axle is so small and fragile that it's easy to break it in any case. I ended up cutting off all of the gears and drilling holes through them and using brass rod as the axle. I was worried about the placement of all the components, but the trick was to start with the bowsprit and get it and its post correctly located, then simply work backwards from there. I used a piece of fine copper chain that I had for the chain drive and I built up the starboard side of the windlass with wooden pieces and the port side with small styrene strips. David
- 37 replies
-
- 9
-
-
- Finished
- model shipways
- (and 1 more)
-
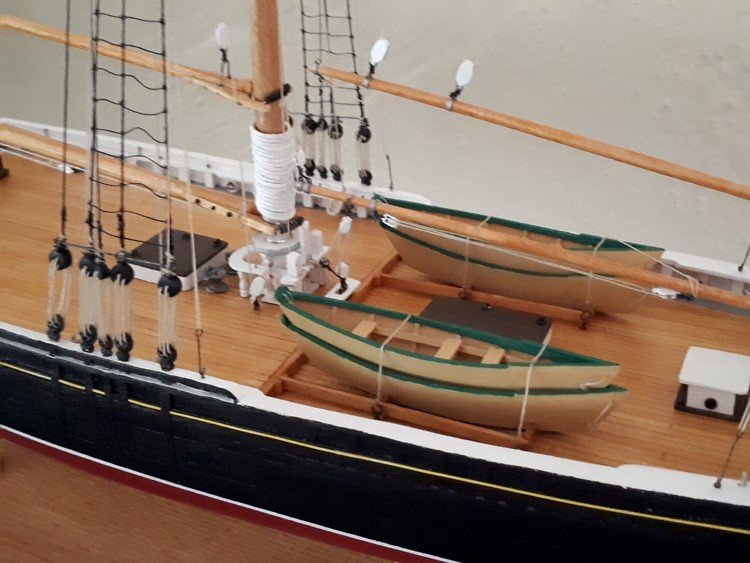
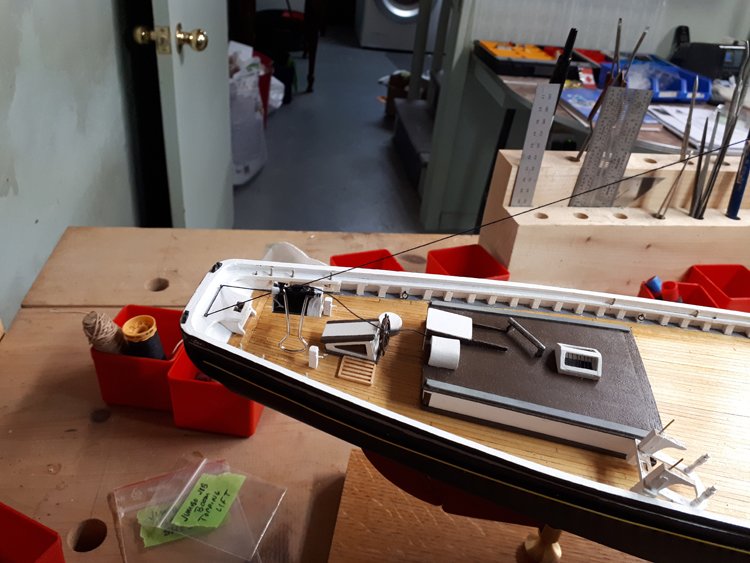
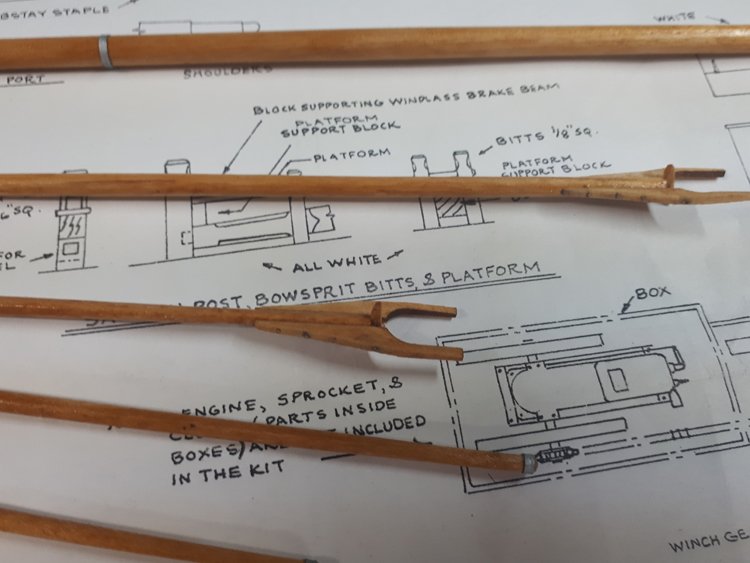
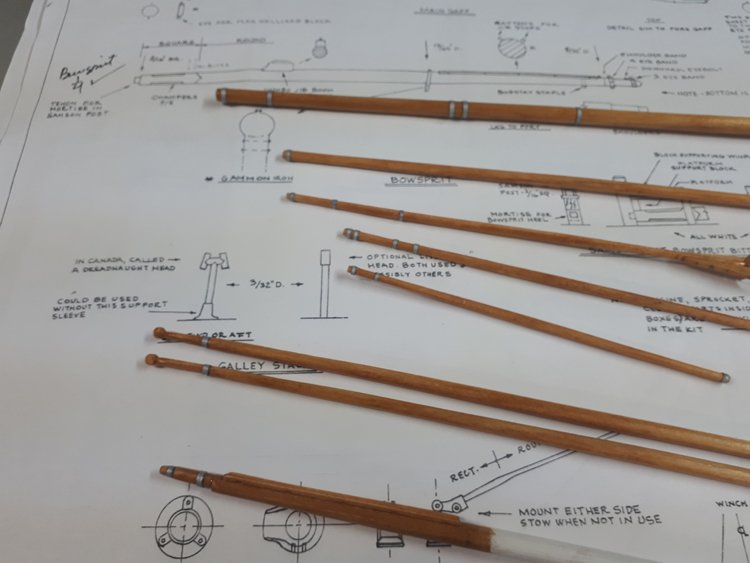
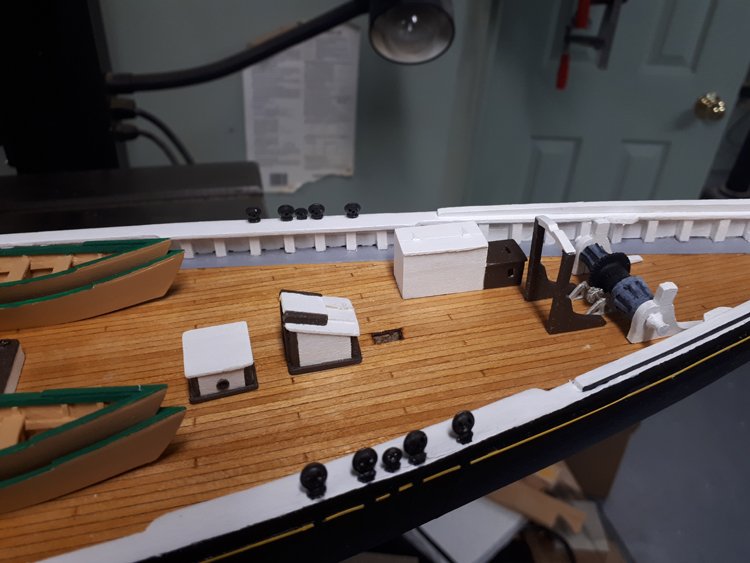
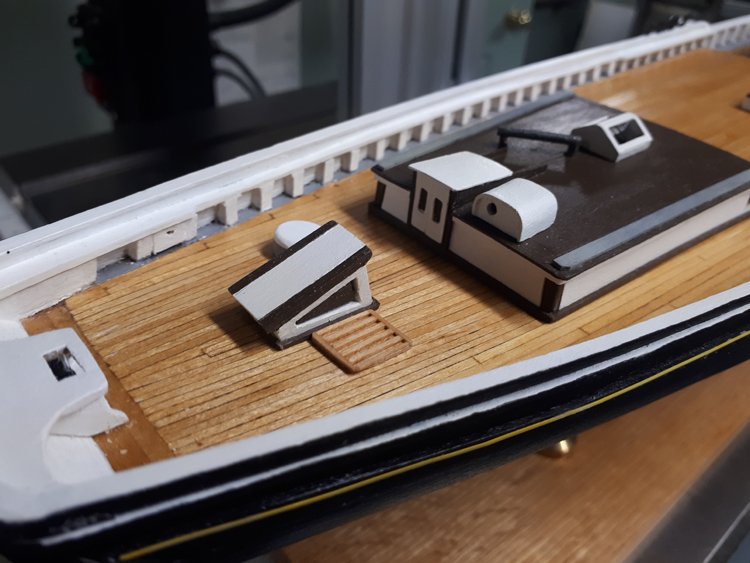
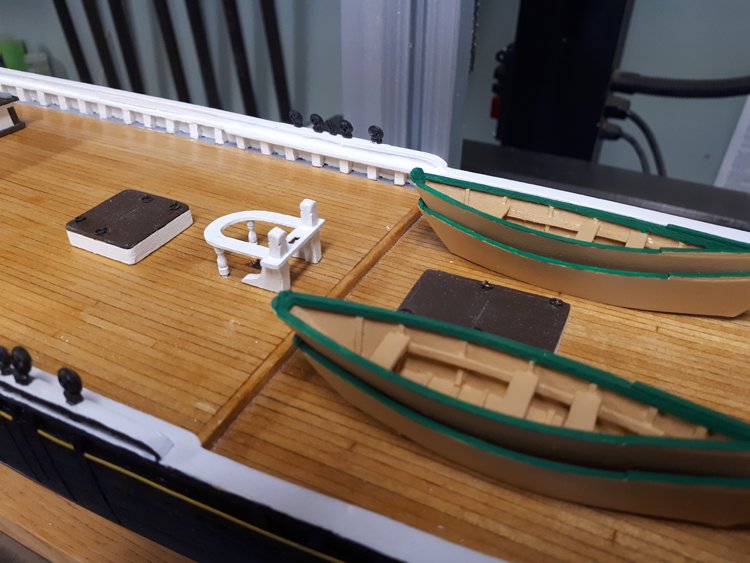
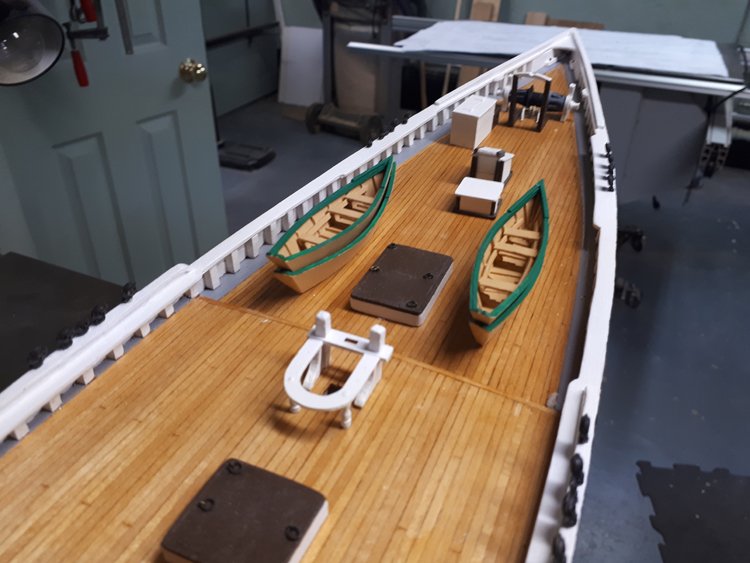
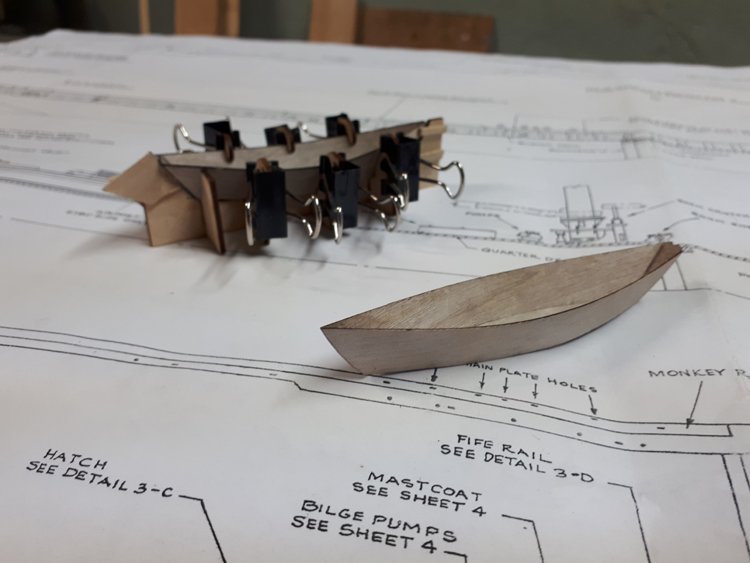
They say that in life there are only two certainties - death and taxes. Well, I think there are four - death, taxes, you will get an email today from Model Expo and your fife rail will crumble at even the lightest touch. Obviously, I've been working on the deck details and for some reason, even though there aren't all that many, it's been slow going. I've all but finished them now except for the complicated bit of machinery that connects the motor to the windlass that looks like it was designed by Rube Goldberg. It may be simpler than it seems; I haven't quite given it my undivided attention yet. Apart from having to build the fife rail from scratch, the components have all been straightforward to build. The skylight in the old pictures was quite different from the one in the plans. Mine more closely matches the photos rather than the plans and I've use black rigging line for the bars. So, here's how I arrived at my painting scheme for the parts. I rely on the notes in the plans to a large degree and everything is indicated as being either "white" or "burnt umber." Burnt umber is a paint colour, so I took it to mean that it's painted dark brown, rather than left a natural finish. I'm pretty sure that the plans would have said "natural mahogany" or "douglas fir" or something like that if it was meant to be a natural finish. I have gathered together a number of old photos of the Bluenose and for the most part the plans are very consistent with the photos. In a couple of cases where there are discrepancies, I've opted for the paint scheme in the photos. I don't think it means the plans are wrong but rather that the details were painted slightly differently at different times. The dories were not difficult to build. The little framing system that the kit provides works very well. There are eight dories provided, but I think I will only use four of them - two stacks of two. They looked a bit odd to me stacked four high. Of course, it's only the top two that need to be finished inside. So, that's it for now as I try to figure out the conglomeration of gears etc that go together at the bow. Thanks for looking in! David
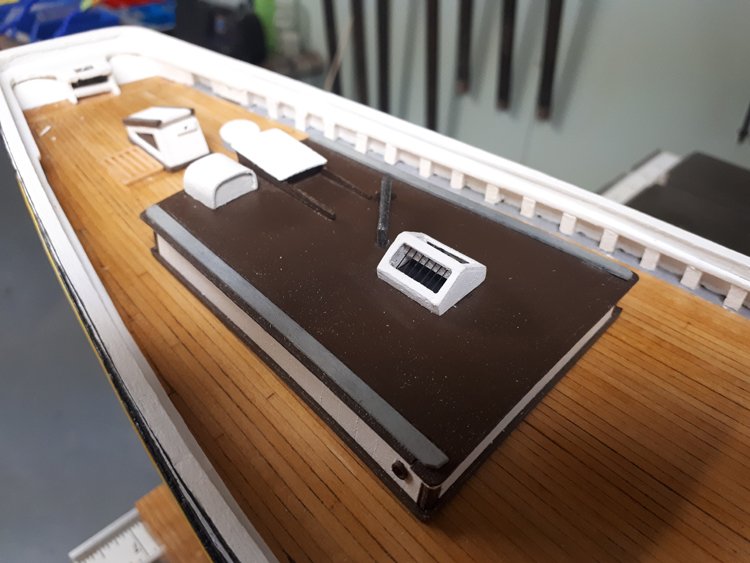
- 37 replies
-
- 8
-
-
- Finished
- model shipways
- (and 1 more)
-
Looks like a good start, Tim. It sounds like you're planning to plank the hull. I don't think you'll have too much trouble with that. On a "plank on bulkhead" model, I think the hard part is getting the hull faired correctly. Although I've never done one, I imagine on a solid hull model, getting the hull shape correct will also be the hard part. I also guess that planking a well shaped solid hull will be easier than planking a POB model. (Although a little harder to remove a plank, should that need arise.) If you look at Nic's Red Jacket build, you'll see that he uses quite a bit of filler when shaping the hull, so that's clearly part of the process. Does the kit come with wood to use as planking, or are you going to get some extra to do that. David
- 142 replies
-
- 2
-
-
- alfred
- solid hull
- (and 2 more)
-
John, have you found this website: www.charleswmorganmodel.com? It's primarily a build log, but what I found most helpful was the many excellent pictures of the actual ship. They're found under the "gallery" link. David